

Page 1

PROFESSIONAL KARAOKE JUKEBOX
Page 2

Contents ------------------------------------------------------------------------------------------- 1
Features ------------------------------------------------------------------------------------------- 2
Accessories ------------------------------------------------------------------------------------- 3
Panel ------------------------------------------------------------------------------------------------ 4
How To Connect ------------------------------------------------------------------------------ 5
Remote Controller --------------------------------------------------------------------------- 6
Double-Screen Play Mode --------------------------------------------------------- 7-10
Single-Screen Play Mode --------------------------------------------------------------- 11
Non-Karaoke Play Mode ---------------------------------------------------------- 12-13
How To Add Up Songs ------------------------------------------------------------- 14-16
How To Delete Songs --------------------------------------------------------------------- 17
Trouble Shooting ---------------------------------------------------------------------------- 18
Notes --------------------------------------------------------------------------------------------- 18
Specifications -------------------------------------------------------------------------------- 19
1
CONTENTS
Page 3

The KOD is a multi-function professional hard drive Karaoke-On-Demand jukebox.
This new model maintains ease of use but it is much more powerful than ever. The
following Key Powerful Features will really impress you and make you have never
experienced such easier and faster and humanized operation of the karaoke machine
on the market.
This KOD is perfect for Club, DJs, KJs, Pub, rentals, restaurants, other public
entertainment or if you simply want to have the ultimate karaoke system for any
occasion!
1 Supports High Capacity Of Hard Disk
Supports up to 1000GB hard disk for huge quantities of songs and movies.
2 Supports Multi-format Media
Supports MPEG1,MPEG2,MPEG4, MP3, JPEG formats etc.
3 Easy to add songs by yourself
1. Add songs from PC to hard disk through provided high-speed USB cable
2. Add songs from SD card through built-in card-reader
4 Fantastic effect to cheer up: Applause and flower effects
5 Easy To Change User's Operation Interface :
Provides 3 different styles of user's interface in monitor operation. (Multi-interface
available)
6 Supports Single-Screen operation mode and Double-Screen operation mode
7 Humanized operation for song search.
Easy and fast way to search songs by “Artists, Spell, Genres, Word Counts,
Language, Song No.” etc.
8 Supports SD card
Allow you to playback songs and pictures from SD card directly.
9 Supports mouse, remote controller, touch screen to operate the system
10 Full functions of karaoke such as: Key, Echo, Mic Vol, Music Vol etc
FEATURES
2
Introduction:
Page 4

Please make sure the following accessories are included in the box:
The Karaoke-On-Demand Jukebox (Hereinafter called “The KOD”),USB Cable,
Remote Controller, AV Cable, User's guide.
USB Cable Remote Controller
AV Cable
User's Guide
ACCESSORIES
3
Page 5
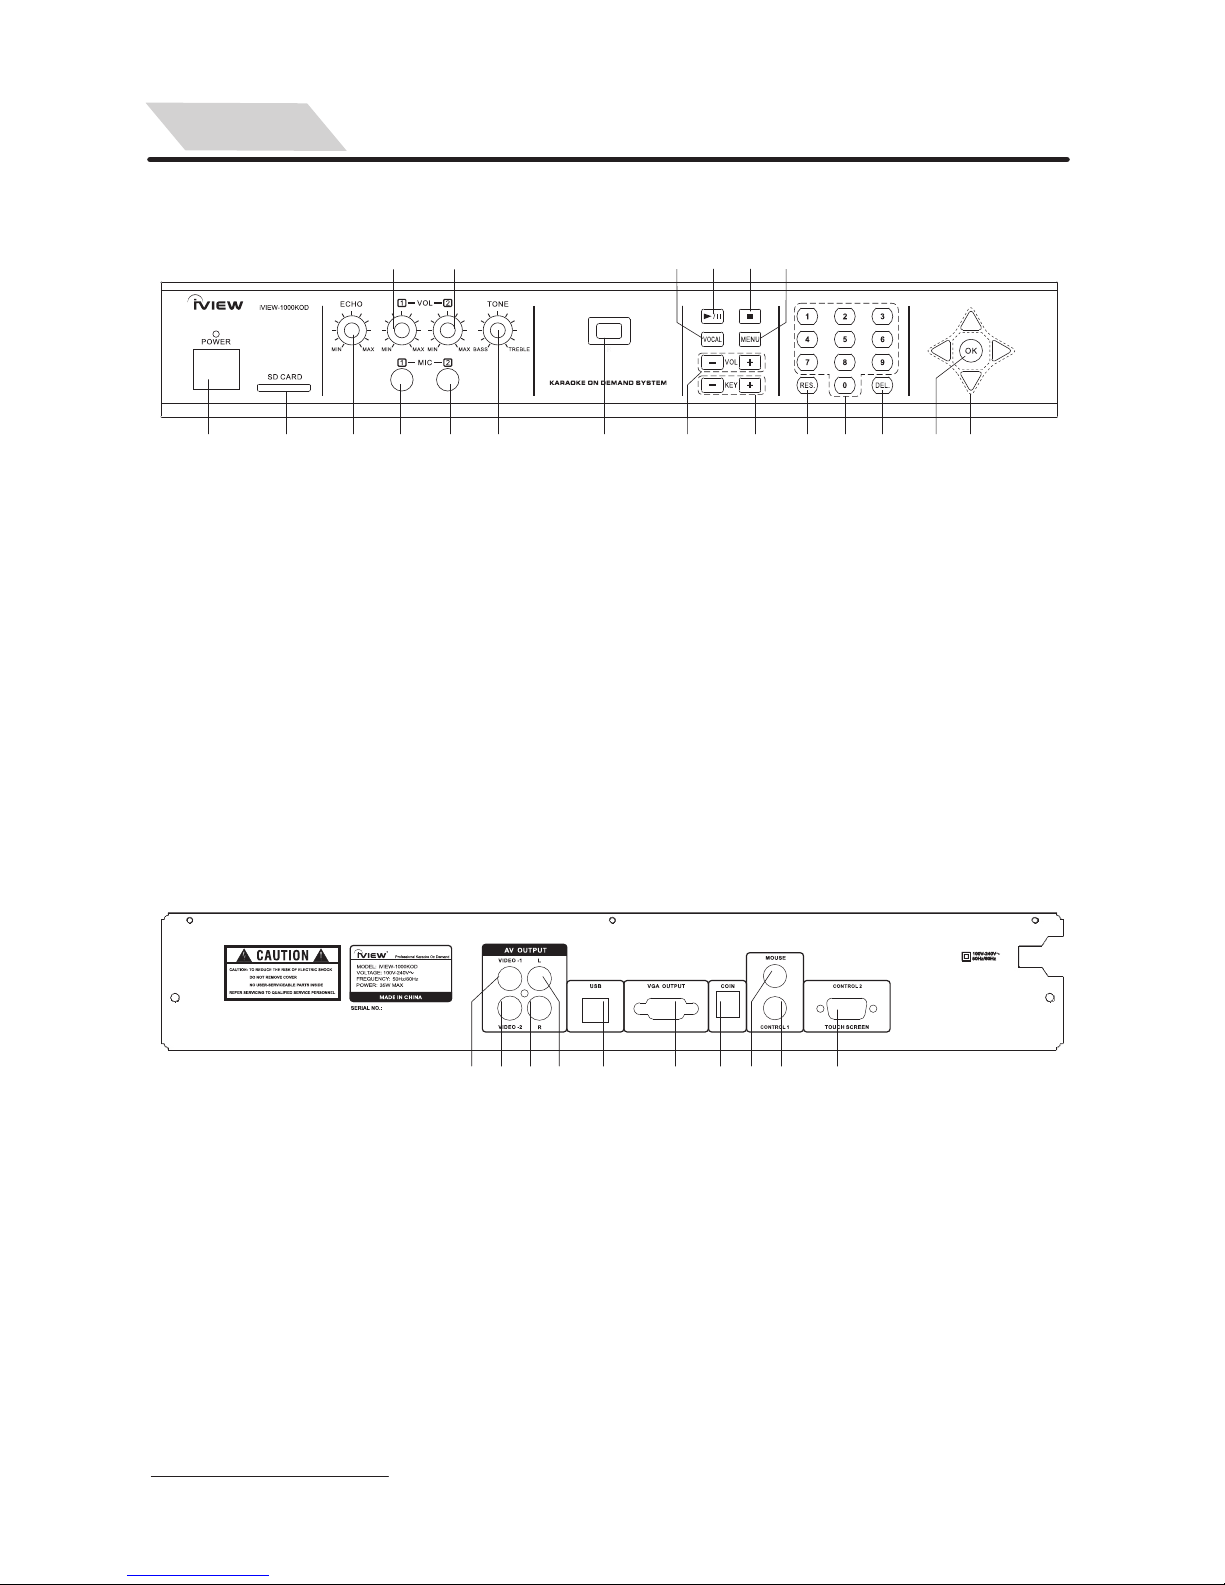
PANEL
FRONT PANEL VIEW
1. Video-1 Output
2. Video-2 Output
3. Right Channel Audio Output
4. Left Channel Audio Output
5. USB
6. VGA Output
REAL PANEL VIEW
4
1 3 162 4 5
6 7
8 9
10
13
11
12
14
1 2 3 4 5 6 7 8 9
Note: CONTROL1 and CONTROL2 can not support two touch screens at the
same time. Please select the right one for your touch screen according
to the shape of plug.
7. COIN Selector Input
8. MOUSE Input
9. CONTROL1 Input(For touch screen,
Extension Control Panel& MCU update)
10. CONTROL2 Input (For touch screen)
15
17 18 19 20
1. Power Button
2. SD Card Reader
3. ECHO Control Knob
4. MIC1 Jack
5. MIC2 Jack
6. MIC1 VOLUME Control Knob
7. MIC2 VOLUME Control Knob
8. TONE Control Knob
9. Remote Sensor
10.PLAY/PAUSE Button
11. VOCAL Button
12. STOP Button
13. MENU Button
14. VOL+/-Button
15. KEY Control Knob
16. Reserve Button
17. Number Buttons (0-9)
18. Delete Button
19. OK Button
20. UP / DOWN / LEFT / RIGHT Button
10
Page 6
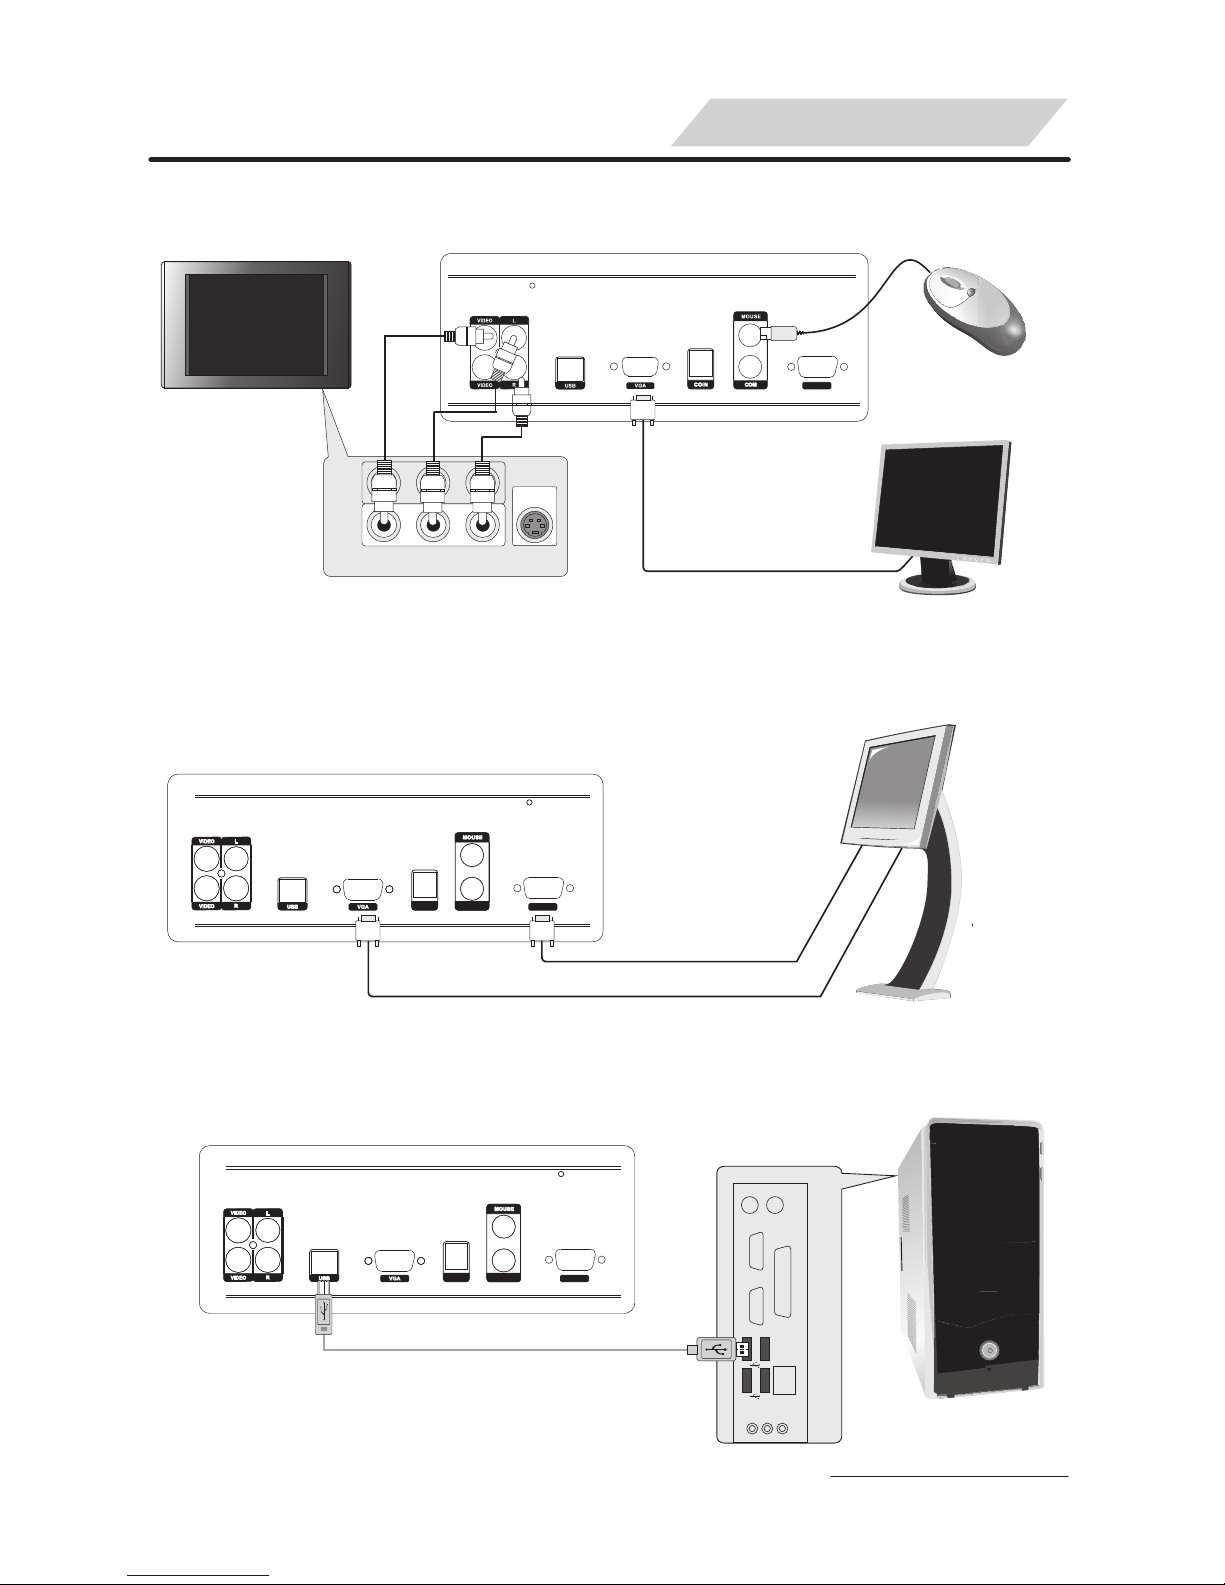
COIN C OM1
COM2
OUT
S-VIDEO
IN
Video
Audio-Left
Audio-Right
HOW TO CONNECT
1.TV ,MONITOR, MOUSE, AUDIO CONNECTION
2. TOUCH SCREEN CONNECTION:
3. USB Connection:
Component
VGA CABLE
Monitor
MOUSE
TV
Touch Screen
PC
Component
Rear Panel Of PC
Component
5
Components of TV
COIN C OM1
COM2
Touch Screen Cable
COM2
VGA CABLE
Page 7

REMOTE CONTROLLER
1
2
3
5
4
8
6
7
9
10
11
12
13
14
15
16
17
18
19
20
21
22
24
23
26
25
28
27
29
30
31
Note:
1. The ID of the Double and Single:
√ means the function is effective,
× means the function is not effective.
2. The remote controller is effective for
all functions shown on TV and monitor.
POWER
Power stand-by.
√ √
NAME
FUNCTION
DOUBIE
SCREEN
SINGLE
SCREEN
√ √
× √
√ √
√ √
√ √
√ √
NO.
1
√ √
√ √
√ √
√ √
APPLAUSE
2
Show flowers and applause effect.
3
THEME
(FACE)
Switch to different styles of operation interface
in monitor.
4
EXIT KARAOKE
Switch to non-karaoke mode.
KEY +, -
KEY +, -.
VOCAL
Vocal on/ off.
MUTE
Mute all music output.
NEXT
Stop the playing song and go to play next song
PLAY/
PAUSE
Switch between the function of “PLAY” and
“PAUSE”.
5
6
7
8
9
REPLAY
Repeat the current playing song.
10
ARTIST
(SINGER)
Search a song by artist .
SPELL
Search a song by initial letters of each word of
song title.
11
12
VOL+, -
Increase or decrease music volume.
WORD
COUNTS
Search a song by word counts of song title.
TOP HITS
Search a song by top hit list of songs.
MENU
Accesses main Step up Menu.
RETURN
Return to the previous Menu.
13
14
15
16
17
ENTER
18
Enter and confirm what you select.
TUNING
Open/close tuning menu.
RESERVED
LIST
List all reserved songs.
FWD
Access fast forward scanning while playing
Mp3, MTV (DAT, MPG, VOB) files in
Non-karaoke Mode.
ADVANCE
Advance a song in reserved list.
REV
Access backward scanning while playing Mp3,
MTV (DAT, MPG, VOB) files in Non-karaoke
Mode.
PAGE UP
Page up.
PAGE DOWN
Page down.
WORD
COUNT+
Search a song by word count +.
WORD
COUNT-
Search a song by word count -
0-9 (A-Z)
①Press number buttons to search a song
directly.
②Press number buttons accordingly to input
initial letter of title to search a song
③Press the corresponding number button to
enter sub-menu directly.
Delete the wrong input.
Reserve song while playing.
Move cursor by press
Press [ ] or [ ] button for page up /down
while listing song titles.
RESERVE
DELETE
19
20
21
22
23
24
25
26
27
28
29
30
31
√ ×
√ √
√ √
√ √
√ √
√ √
√ √
√ √
√ √
√ √
√ ×
√ √
√ √
√ √
√ √
√ √
√ √
√ √
√ √
√ √
6
Page 8

On-Screen-Display interface operation
Pic. 1
Touch or click the icon of “ ”
to ent e r main m enu. ( S ee Pic . 1)
1. ARTISTS
Search a song by initial letter in the
name of an artist.
DOUBLE-SCREEN PLAY MODE
7
1.1Touch or click “ ” then it will
enter submenu of “ARTISTS”.
(See Pic. 1-1)
Tips: You can press [ARTISTS] (or
“SINGER ” ) on the rem o t e
controller to enter submenu of
“ARTISTS” directly.
Pic. 1-1
1.2 Search by artists from countries,
areas and gender
1.3 Enter “ARTISTS LIST” (See Pic. 1-2)
to find an artist or you can touch or
click “SEARCH ARTIST” to make
you find your desired artist quickly
by input the first character(initial
letter) of each word of an artist's
name. (See Pic. 1-3).For example:
if you want to search an artist named
Baby Fa Honey, then you just need
to input the initial letters of her full
name as BFH then the photo of
Baby Fa Honey will be displayed
on screen.
Pic. 1-2
Pic. 1-3
Tips: ①Press “1-8” buttons accordingly
on Remote Controller directly
to enter the song list of the
selected artist , or you can
touch or click the photo of the
artist directly to enter his (her)
song list.
②Click to delete the wrong
input.
2. SPELL
Search a song by initial letter of
song title:
2.1Touch or click icon“ ”to enter
“SEARCH A SONG” interface,
(See Pic. 2-1):
Page 9

2.2 Input the first characters (initial letter)
of each word of the song title then
click or touch “Enter” to search.
8
Tips: ① You can click to delete
wrong input.
②This “SEARCH BY INITIAL
LETTER” function is only
effective for Chinese and
English song title or any other
song title consist of English
letters.
Pic .2-1
3. GENRES
Select a song by “GENRES”.
3.1 Touch or click icon “ ” to enter
“GENRES” menu to search a song,
(See Pic. 3-1):
Pic. 3-1
4. WORD COUNTS:
Search a song by word counts of song
title.
“WORD COUNTS” means the number
of words in a song title. For example:
“WORD COUNTS” of “MY LOVE” is 2
words.
4.1 touch or click icon of “ ” directly
on the screen to enter “WORD
COUNTS” menu. (See Pic. 4-1)
Tips: You can also press [4] on remote
controller directly to enter this
menu.
Pic. 4-1
5. LANGUAGE
Search a song by “LANGUAGE”.
5.1 Touch or click “ ”on the screen
direct l y or pres s [ 5] on rem o te
controller to enter the menu,
(See Pic. 5-1):
Pic. 5-1
6. TOP HITS:
Top hit 60 songs inside the KOD with
the most of times were ordered in the
past will be listed.
6.1 Touch or click icon of “ ” or
Press [6] on remote controller directly
to enter “SONG LIST” menu,
(See Pic. 6-1):
You can also press [TOPHITS] (or
“TOPLIST”) on remote controller to
enter “SONG LIST” menu directly too.
DOUBLE-SCREEN PLAY MODE
Page 10

9
Pic. 6-1
7. SONG NO.:
Search a song by number.
7.1 Touch or click “ ” to enter
“SEARCH BY NUMBER” menu,
(See Pic. 7-1):
7.2 S o n g num b e r mus t b e 5 dig i ts.
7.3 Song title will be displayed in the
window of “Song Title” after inputting
an effective song number, then touch
or click icon of [RES.] on screen or
press [ENTER] on Remote Controller
to play or reserve this song.
7.4 If you want to check all reserved
songs, please touch or click icon of
“RESERVED” on the screen.
(See Pic. 10-1)
Pic. 7-1
8. New:
Search the latest updated songs.
8.1Touch or click icon of “ ” on
screen or Pre s s [ 8 ] o n remote
con t r o ller to enter “SO N G LIST”
menu to see the l a t e s t u p d a t e d
songs list. (See Pic. 8-1):
Pic. 8-1
9. MOVIES:
Select a movie by different types.
9.1 Touch or click the icon of “ ”
on screen directly or Press [9] on
remote controller to enter “TYPE”
menu. (See Pic. 9-1):
Pic.9-1
0. THEMES:
You can change to different style of
display background on the screen.
The first 3-times click will change
bac k grou n d in En g lish v e rsio n ,
another second 3-times click will
change b a c kground i n C h inese
version, click continually then it will
change to English version aga in.
10. RESERVED LIST:
Display reserved songs list in this
menu. You can select a song in the
list then touch or click the icon of
“ADVANCE” to take priority to play
or touch the icon “Delete” to delete
the song from reserved list.
DOUBLE-SCREEN PLAY MODE
Page 11

10
10.1 Click “Reserved List” to see the reserved songs list, (See Pic. 10-1):
10.2 In “Reserved List”, You can select a song in the list then touch or click the icon
of “ADVANCE” to take priority to play or touch the icon “Delete” to delete the
song from reserved list .
10.3 In “Reserved List”, you can select a song then touch or click the icon of “Delete”
or press [DELETE] on remote controller directly to delete a song from reserved list.
Pic. 10-1
:Start to play a song.
:Pause the current playing.
Applause: Press [Applause], Effect of applause music and flowers will be effective.
VOCAL: Vocal on/off
NEXT: Stop current playing then go to play the next reserved song.
REPLAY: Repeat the current playing song.
MUTE: Mute all audio signal output.
VOL-: Music volume down.
VOL+: Music volume up.
MENU: Enter main menu.
BACK: Return to the previous menu.
Tips: 1. There is a number for each item in main menu, you can press the
number buttons on remote controller directly to select the item.
2. There are numbers [1] to [9] appear on the bottom of “SONG LIST”,
they are shortcut of corresponding “word counts”, [1] represents songs
with one word, [9] represents those songs with nine words and so on.
You can touch or click the icon of number directly to get corresponding
word counts of songs. (See Pic. 11)
Pic. 11-1
DOUBLE-SCREEN PLAY MODE
Page 12

In single-screen play mode you are allowed to use remote controller to access
all below functions only.
Press [MENU] on remote controller to enter main menu:
● There is a number for each item shown on TV screen. You can select the
corresponding number to enter an item or press [ ] directly on remote
controller to move cursor to the item you choose then press [ENTER] to access.
1. ARTIST:
Press [ , ] to select “ARTIST” then press [ENTER] or [1] directly to enter
“ARTIST” menu then you can select a song according to the artist's name.
2. SPELL:
2.1 Press [ , ] to select “SPELL” then press [ENTER] or [2] directly to enter
“SPELL” menu. Input the initial letter of each word of song title to search a song.
For example: song title is “Pretty Girl”, you can input initial letter of each word “PG”
then press [ENTER]to search.
3. GENRE:
Press [ , ] to select “GENRE” then press [ENTER] or [3] directly to enter.
4. WORD COUNT:
Press [ , ] to select “WORD COUNT” then press [ENTER] or [4] directly to enter
then search a song by word count of the song title.
5. LANGUAGE:
Press [ , ] to select “LANGUAGE” ,then press [ENTER] or [5] directly to enter
then search a song by language.
6. NEW:
Press [ , ] to select “NEW” then press [ENTER] or [8] directly to enter then
select a song from the latest updated songs list.
Tips: Press [RETURN] to return to the previous menu; press [MENU] again to
exit.
7. OPERATION OF OTHER BUTTONS:
7.1. Tuning:
Press [TUNING] to enter “tuning” menu then press [ , ] to select an item then
press [ , ] to adjust.
7.2. Reserved List:
Press [Reserved List] to enter reserved songs list.
Press [ , ]to select a song in reserved list then press [ADVANCE] to take
priority to play after the current playing song.
7.3. Replay:
Press [REPLAY] to repeat the current playing song.
7.4.NEXT:
Press [NEXT] to stop the current playing song and play the next reserved song.
7.5. WORD COUNTS+, WORD COUNTS -
Enter “WORD COUNT” menu then search a song by word counts accordingly.
SINGLE-SCREEN PLAY MODE
11
Page 13

NON-KARAOKE PLAY MODE
In non-karaoke play mode you are
allowed to use remote controller to
access all below functions only.
Press [EXIT KARAOKE] then press
[ENTER] to enter non-karaoke mode.
● Press item number directly or move
cursor to the item then press [ENTER]
to get into selected menu.
● Before you try to play back contents
from items of “1.PHOTO, 2.MUSIC,
3.VIDEO” please enter the menu
“4.FILE” first to select SD or HD you
want to play back from.
Tips: Enter “4.FILE”→press [ ] to
select HD or SD →press [ENTER]
to confirm→press[RETURN] to
exit then all contents in hard
disk or SD will be listed on TV
screen.
1. PHOTO: Play back photos from
hard disk or SD card.
1.1 Enter “1.PHOTO” then contents
inside this item will be displayed
automatically. Press [ , ] to
select then [ENTER] to play back.
1.2 Press [PLAY/PAUSE] to play or
pause playing; Press [RETURN] to exit.
Tips: If there are hard disk and SD
card inside the KOD but you
didn't select a target item before
browsing photos, the system
will play contents from hard disk
automatically first then SD card.
2. MUSIC: Play MP3 from HD or SD card
※ If there are MP3 songs in both of
subdirectory and root directory of HD
or SD card , system will list MP3 songs
from root directory first, then subdirectory.
2.1 Enter “MUSIC” menu, then MP3 songs
will be played back from the first one
automatically, press [ , ] to select
a song to play; press [ , ] to page
up or page down.
2.2 Press [NEXT] to stop current playing,
press [RETURN] or [0] to exit “MUSIC”
menu.
Note: “HD MUSIC LIBRARY” means
you are playing from hard disk,
If there is “SD MUSIC LIBRARY ”
shown on the screen then means
you are playing contents from
SD card.
3.VIDEO: You can play files in AVI,
DAT, MPEG VOB format
HD and SD card from
12
Page 14

Note: Because VOB is too big to be played back smoothly in SD card so please
do not put this kind of format into SD card.
3.1 Enter “VIDEO” menu then press [ , ] to select a file to play.
3.2 When a file is playing, press [NEXT] then all files will be listed on TV screen,
press [ , , , ] then [ENTER] to select and play.
3.3 Press [RETURN] to exit “VIDEO” menu.
4. FILE: Enter “4.FILE” to browse all contents in HD or SD card:
4.1 Press [ ] or [ ] to select HD or SD card then press [ENTER] to enter.
Hard disk is the system disk for karaoke mode, there are system files and folders
such as KARAOKVOB;LIST; MOVIE; Music Photo; PicPack.dat; TaiPack. dat
in root directory of hard disk, please do not rename or delete those files and
folders or the KOD will not work properly.
5. SETUP :
Press [ ],[ ]or [5] directly to move cursor to “5.SETUP” then press [ENTER] to
enter “Setup Menu”.
※You can press the item number directly to select an item.
“Coin” function is effective under Double-Screen operation mode only.
※Please input default password :88888888 if you want to exit from “Coin” operation
mode.
13
NON-KARAOKE PLAY MODE
Page 15

14
HOW TO ADD UP SONGS
You are allowed to use remote controller
to access all below operations only.
2) Press [5] to select “5. SETUP” then
press [ENTER] to get into “Setup
Menu”.(See Pic. 1.2-2)
4) Wait few second, If PC detects there
is USB connected then a USB Icon
will be displayed on the PC taskbar
I. Add songs from PC. (Please make
sure there is a hard disk inside the
KOD)
You should connect the KOD to PC
through USB cable properly then turn
on power of the K O D before the
following steps of operation.
1.1 Set up connection between KOD
and PC:
Connect the KOD to PC properly
through a provided USB cable then
turn on power.
1) Press [EXIT KARAOKE] to switch to
non-karaoke mode.(See Pic. 1.2-1)
Pic. 12-1
Pic. 12-2
3) Press [3] directly or [ , ] to select
“3. USB mode” then press [ENTER]
to set to “ON Mode”, (See Pic. 1.2-3)
Pic. 12-3
Tips:If there is no TV for above
operations to get into USB mode,
you can press [MENU] and hold
on a few seconds when you turn
on KOD then there is an USB icon
will be displayed on the PC taskbar
.If PC still can not
detect USB please turn off KOD
and try again.
1.2. Install and run the software of
“Createsonglist&photo” to add up
new songs (See Pic. 2)
Pic. 2
For the reason of different version for
different areas and countries, maybe
there is no Software tool of
“Createsonglist&photo” in hard disk
of the KOD, if you want to know more
about details of adding new songs
please contact your supplier.
Page 16

15
HOW TO ADD UP SONGS
II.Add up new songs from SD card to hard disk inside the KOD
1. Insert a SD card into PC and run software for add up new songs then click "On
SD Card Add" to add songs to the SD card accordingly.
1.1 Click "On SD card Add".
1.2 Add song or singer.
1.3 Click “Create song depot”.
1.4 Select SD card letter.
1.5 Finish.
2. After finishing to add up new songs into SD card, move the SD card from PC to
the KOD.
3. Enter “Setup Menu” and select “5.Add Song By SD Card” then press [ENTER]
on remote controller (See Pic. 3-1)
4. It will start to transfer data from SD to hard drive inside the KOD then there will
be “Upgrade finished” shown on the bottom of setup menu after finishing all data
transfer. (See Pic. 4-1)
Pic. 3-1
Pic. 4-1
5. Press [0] or [RETURN] on remote controller to exit Setup Menu. Done!
Note: Please don't make any operations while the system is processing or it
will lose all data of songs.
Page 17

III. Trouble shooting of adding new songs
16
Check whether the format of added songs is compatible with the KOD.
Before adding songs from SD card please check if there are duplicated song numbers
with hard drive inside the KOD, if it is then please change to use different number or it
will not be played back.
Make sure SD card is connected firmly and properly into KOD machine, Reinsert SD
card into KOD machine.
There are two ways to check whether SD card is connected firmly and properly: 1) in
non-karaoke mode, the picture of main menu will shake for a second while insert SD
card, that means the system can detect data from SD;2) Ente“4.FILE ”menu, if you see
there is HD and SD in device list, means the system has detected SD card successfully.
(HD:hard disk: SD: SD card)
Check label on SD card to make sure it is a standard SD card. If you see there is a mark
of “SDHC” on it, that means it is a SDHC card, but not a standard SD card, The KOD
supports standard SD Card only. Usually a SD card under 2GB will be compatible with
the KOD.
Make sure there are KARAOKVOB folder and LIST folder in root directory of SD card.
Make sure there are related files and folder in above mentioned folder.
Please check whether the channel of original song is normal or not, if it is not, please
add the song again through add-song-tools (Createsonglist&photo), and select different
item of vocal channel accordingly.
When you add up a new song with two artists or more please use “&” to divide the
name of artist in singer list
Can not find a
song with two
artists or more
in singer list
Phenomenon
Solution
Added songs
can't play
Display
“Upgrade fail
SD card not
present” when
adding songs
through SD
card
Display"Song
list Not found"
when adding
songs through
SD card.
There is no
vocal or the
function of vocal
on/off works
conversely
HOW TO ADD UP SONGS
Page 18

HOW TO DELETE SONGS
17
1.Setup connection between KOD and PC (see “1.2 How to set up connection
between KOD and PC”).
2.Run software tool of “Createsonglist&photo” then click “Connect HDD” and wait
until information of song tracks were listed on PC (See Pic. 2-1)
Pic. 2-1
Note: How long it will take to list all information of song tracks depends on
performance of PC and capacity of hard drive; usually it will take about
30 seconds.
3. Move cursor to the target you want to delete then right click by mouse (See Pic. 3-1)
4. Click “Delete” then click “Create Song Depot”;
5. Exit “Setup Menu”, Done!
Page 19

TROUBLE SHOOTING
No picture, no
color, the
picture is rolling
vertically
Remote
controller
doesn't work
Remove the obstacles in the path between remote controller and KOD.
Make sure the batteries are inserted correctly and still power.
Make sure connecting cables are not defective.
Make sure everything is connected firmly and properly.
Make sure all of your components are turned on.
Make sure all of the components (amplifier, TV,KOD machine etc) are setting right.
Make sure settings of the KOD match your TV system (PAL/NTSC/AUTO) .
Make sure audio cable is connected firmly and properly.
Make sure connecting cable is not defective.
Make sure all of your components (TV, amplifier, the KOD) are turned on and volume
setting is not in minimum.
Make sure all of the components (amplifier, TV, the KOD etc) are setting right.
No sound
Unable to enter
Karaoke Mode
(The screen
display: HARD
DISK SELECT
ON AND ENTER)
Make sure the name of folder in root directory of hard disk must be "karaokvob" Make
sure there are songs in "Karaokvob" folder.
Make sure there is a file "Syspack.sfl" in the root directory of HD. ("Syspack.sfl" is a file
of font, don't delete it )
Make sure there are songs in the right way of subfolders under "KARAOKVOB" in the
root directory of HD .
Make sure there is "list.dat" in "LIST" folder under the root directory of HD. ("list.dat" is a
index file of songs.)
Make sure there is a file “Picpack.dat” in the root directory of HD. (“Picpack.dat” is a data
file for pictures )
Song can't play
properly
No display
order songs
picture
Phenomenon
Solution
Notes
1 Please read this user's manual carefully before operation.
2 To reduce the risk of fire or electric shocks, do not expose the machine to rain or moisture. Do not
use it near water.
3 Please do not open the top cover. Leave all servicing to qualified maintenance personnel.
Please make sure all components are connected properly before turn on the KOD machine.
4 Do not shut down the machine when system is initializing. Press [POWER] button on remote
controller before switch off [POWER] button in front panel of KOD machine.
5 To keep proper aeration of the KOD when it is using for long time.
Trouble shooting
18
Page 20

SPECIFICATION
19
 Loading...