

Page 1
FAC – 500 FingerKey
Fingerprint Access Controller User Manual
Version: V1.1
Doc No.: 20061204
Page 2

Table of Contents
About this guide ................................................................................................................. 4
License Agreement..........................................................................................................4
Certifications and Approvers......................................................................................... 7
Chapter 1 Product Overview .............................................................................................. 8
1.1 Unpacking .................................................................................. 8
1.2 FingerKey Overview ................................................................... 8
1.3 Function and Feature ................................................................. 11
Chapter 2 Hardware Installation and Software Setting ....................................................13
2.1 Product Application: .................................................................. 13
2.2. FingerKey Hardware Installation: ............................................... 14
2.2.1. Power Supply Connection................................................ 14
2.2.2. Door Lock Connection.................................................... 15
2.2.3. Connect with Out-door Switch, Door Magnetism, Doorbell and
Warner
2.2.4. Connecting with Controller .............................................. 21
2.2.5. RS232 and Ethernet Connection ....................................... 22
2.2.6. RS485 Connection ......................................................... 23
2.2.7. Set up FingerKey System IP Address................................. 23
...................................................................... 19
2.3. Detecting FingerKey Device (EzFingerKey Software Setting) ...... 25
2.3.1. EzFingerKey Login Password Setting ................................ 25
2.3.2. Setting Up the Fingerprint Device ..................................... 27
Chapter 3 Basic Operation ...............................................................................................30
3.1. Properly Place The Finger .......................................................... 30
3.2. Enrolling The First Administrator............................................... 31
Page 3

3.3. Enrolling A User ....................................................................... 37
Chapter 4 FingerKey Device Menu Setup........................................................................ 43
4.1. FingerKey Menu Overview ........................................................ 43
4.2. User Manage............................................................................. 46
4.2.1. Enroll User ................................................................... 46
4.2.1.1. Enroll FP .................................................................... 46
4.2.1.2. Enroll Pwd .................................................................. 48
4.2.1.3. Enroll FP & Pwd ........................................................... 51
4.2.2. Enroll Admin ................................................................ 55
4.2.2.1. Enroll FP .................................................................... 55
4.2.2.2. Enroll Pwd .................................................................. 57
4.2.2.3. Enroll FP & Pwd ........................................................... 61
4.2.3. Delete.......................................................................... 65
4.3. Options 66
4.3.1. System Opt (System Option)............................................ 66
4.3.1.1 Date Time......................................................................... 66
4.3.1.2 Language .................................................................... 67
4.3.1.3 Fmt (Display Format)...................................................... 68
4.3.1.4 Adv Option (System Advanced Option)................................. 69
4.3.2. Power Mng (Power Manager)........................................... 70
4.3.3. Comm Opt (Communication Options)................................ 71
4.3.4. Log Opt (Log Options).................................................... 72
4.3.5. Access Options.............................................................. 73
4.3.5.1. Define TP.................................................................... 73
4.3.5.9. Auto Test .................................................................... 83
2
Page 4

4.4. Sys Info 84
Chapter 5 EzFingerKey Program Management................................................................85
5.1. Login and Password Setting ....................................................... 85
5.2. Fingerprint Device Setting ......................................................... 87
5.3. Group 89
5.4. User Management...................................................................... 90
5.5. Time Zone ................................................................................ 92
5.6. Backup Data ............................................................................. 93
Chapter 6 Functions with Witness DVR Program............................................................94
6.1. Setup I/O Port ........................................................................... 94
6.2. View Log.................................................................................. 97
6.3. POS Playback – EzPosPlayback ................................................. 98
Chapter 7 Trouble Shooting............................................................................................101
Specification................................................................................................................... 102
3
Page 5

About this guide
Conventions used in this guide
To make sure that you perform certain tasks properly, take note of the following symbols used
throughout this manual.
WARNING: Information to prevent injury to yourself when trying to complete a task.
CAUTION: Information to prevent damage to the components when trying to complete a
task.
IMPORTANT: Information that you must follow to complete a task.
NOTE: Tips and additional information to aid in completing a task.
License Agreement
Notice to end-user: please read the following legal agreement carefully. Use of the FAC-500
FingerKey or any of the software provided with this agreement constitutes your acceptance of
these terms. If you do not agree with the terms of this agreement, PROMPTLY RETURN the
FAC-500 FingerKey system, Witness pro, EzFingerKey software any related software and the
4
Page 6

included items (including the FAC-500 FingerKey access controller system, written materials and
containers) to the location where you purchased them for a full refund.
1. License Grant. I-View grants to you (either as an individual or an entity) a personal,
nonexclusive, nontransferable license to use one copy of the executable code of the I-View's
FAC-500 FingerKey, Witness Pro and EzFingerKey software on a single CPU residing on your
premises. The term of this Agreement will be for the duration of I-View’s copyright in the
FAC-500 FingerKey, Witness Pro and EzFingerKey software. You may assign your rights under
this Agreement to a third party who agrees in writing to be bound by this Agreement prior to the
assignment, and provided that you transfer all copies of the FAC-500 FingerKey, Witness Pro and
EzFingerKey software related documentation to the third party or destroy any copies not
transferred. Except as set forth above, you may not assign your rights under this Agreement, nor
shall you rent, lease, sell, sublicense or otherwise transfer the FAC-500 FingerKey, Witness Pro
and EzFingerKey software.
2. Reverse Engineering. You may not reverse engineer, decompile or otherwise disassemble the
FAC-500 FingerKey, Witness Pro and EzFingerKey software except to the extent that
applicable law expressly prohibits this restriction.
3. Copyright. Title and full ownership rights to the I-View's EzFingerKey software, Witness Pro
will remain the exclusive property of I-View or its suppliers, and you will not acquire any
rights to the I-View's Witness Pro and EzFingerKey software except as expressly set forth
above.
4. Maintenance. I-View is not obligated to provide maintenance or updates to you for the
Witness system and transport to Witness Pro and EzFingerKey software. However, any
maintenance or updates by I-View shall be covered by the Agreement.
5. Disclaimer of Warranty. I-View warrants that the FAC-500 FingerKey system, the Witness
Pro and EzFingerKey software related software will perform substantially in accordance with
5
Page 7

the accompanying documentation and that CD-ROM diskettes are free from any defects for a
period of 90 days from the date of purchase (limited warranty). Except for the foregoing
limited warranty, I-View expressly disclaims any and all other warranties, whether express or
implied, including without limitation, the implied warranties of merchantability, fitness for a
particular purpose, and non-infringement of third party rights. If law does not permit such
disclaimer of any implied warranty, the duration of any such implied warranties is limited to
90 days from the date of purchase. Some countries do not allow the disclaimer of implied
warranties, limitations on how long an implied warranty lasts, or the exclusion or limitation of
incidental or consequential damages, so such limitation as or exclusions may not apply to you.
This warranty gives you specific legal rights and you may also have other rights, which vary,
from state to state.
6. Customer Remedies. In the event the Witness system or related software does not meet or
conform to the Limited Warranty, I-View’s entire liability and your sole and exclusive remedy
shall be, at I-View's option, either to (a) correct the error, (b) help you work around or avoid
the error or (c) authorize a refund so long as the Witness system documentation and CD-ROM
diskettes are returned to I-View with a copy of your receipt. This Limited Warranty is void if
failure of the Witness system has resulted from accident, abuse, or application. Any
replacement Witness system will be warranted for the remainder of the original warranty
period.
7. No Liability for Consequential Damages. In no event shall its suppliers be liable to you for
any incidental, indirect, special or consequential damages of any kind rising out of or related
to this agreement or use or inability to use the related software, even if I-View has been
advised of the possibility of such damages.
8. Export. You acknowledge that the laws and regulations of the Taiwan R.O.C. restrict the
export and re-export of commodities and technical data of Taiwan R.O.C. origin. You may not
6
Page 8

download or otherwise export or re-export the Witness system or related software or any
underlying information or technology except in full compliance with all United States and
other applicable laws and regulations. You agree to indemnify and hold I-View harmless from
and against any and all liability arising from or relating to your breach of this Manual.
9. Governing Law; attorneys' fees. The laws of the Taiwan R.O.C will govern this agreement.
Without regard to conflict of law principles. The R.O.C. Convention on Contracts for the
International Sale of Goods is specifically disclaimed. The prevailing party shall be entitled to
recover its reasonable attorneys' fees in the event of a dispute arising out of or relating to this
Agreement.
10. Entire Agreement. This is the entire agreement between you and I-View with respect to the use
of the Witness Pro and EzFingerKey software, which supersedes any prior agreement, whether
written, or oral, and all other communications between the parties relating to the subject matter
of this Agreement. Should you have any questions concerning this Agreement, please contact
I-View directly at one of the numbers or addresses listed at the beginning of this manual.
Certifications and Approvers
The FAC-500 FingerKey has been tested and evaluated for compliance with all applicable
international standards and shall have the following approvals: FCC, CE. These approvals
shall be printed on the labeling located on the rear panel of the FAC-500 FingerKey.
7
Page 9

Chapter 1 Product Overview
1.1 Unpacking
1). One screwdriver
2). One FingerKey Access Control Machine
3). One CD (FingerKey software)
4). One FingerKey Manual
1.2 FingerKey Overview
FingerKey is an easy use but high secure terminal unit, fingerprint access control. FingerKey
Access controller series use the POE design, with the professional static electricity
prevention and anti-jamming design, all of the input or output interface are protected from
over-voltage and frequency, it has the function of dismantle alarm and professional alarm, as
well as the voltage and watchdog inspection, outstanding quality; also supports Mifare Card
or ID Card (Optional), support professional access control functions, most suitable for
controlling and administrating the large entrances and exits; The web server management
can be controlled by normal internet browse, operation and inquire form, there is no need to
use the specific program, simply realize remote information browse and management.
8
Page 10

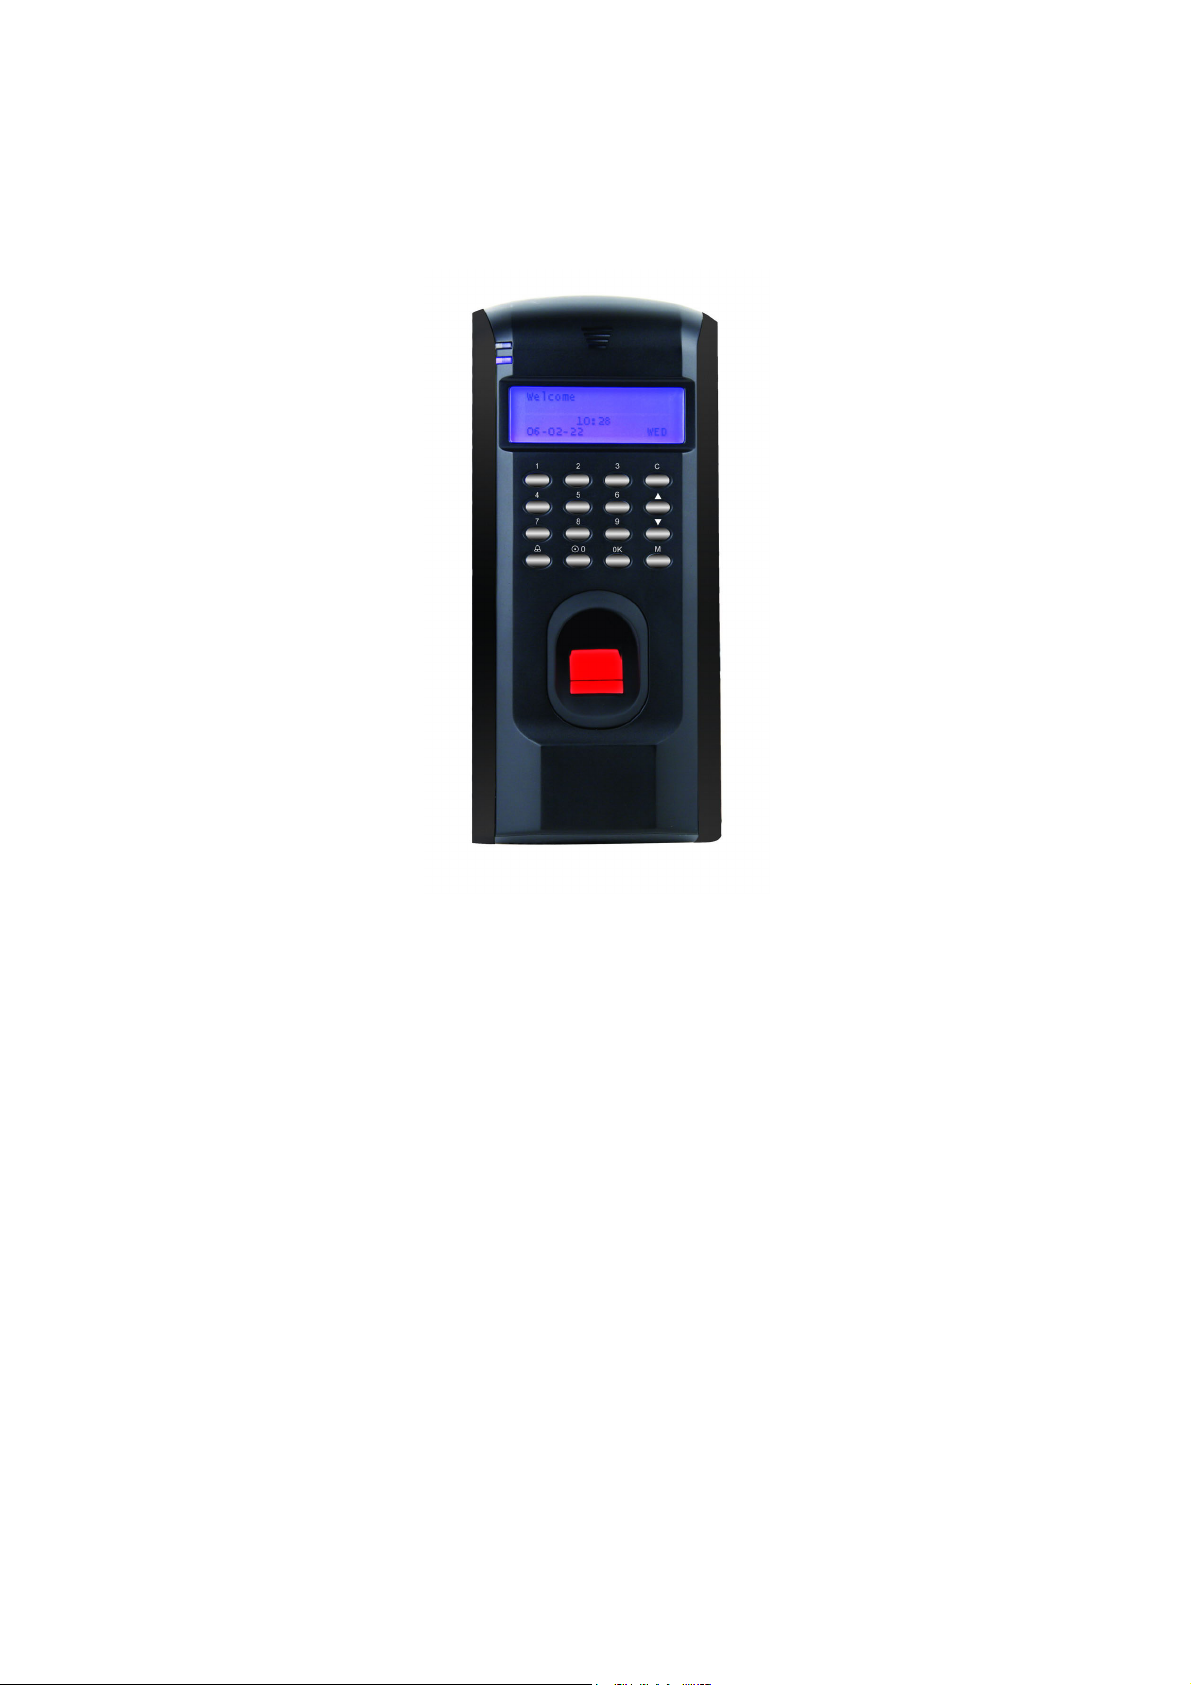
1). FingerKey:
122X32 LCD Display
Optical Fingerprint Sensor
Menu key: To open the main menu.
Confirm key: To confirm the present operation.
Cancel key: To cancel the present operation.
Power key: To control the power on and off. Press and hold for 3 seconds to
showdown the power.
Door bell key: To ring the door bell.
9
Page 11
Scrolling up key: To scroll the menu up.
Scrolling down key: To scroll the menu down.
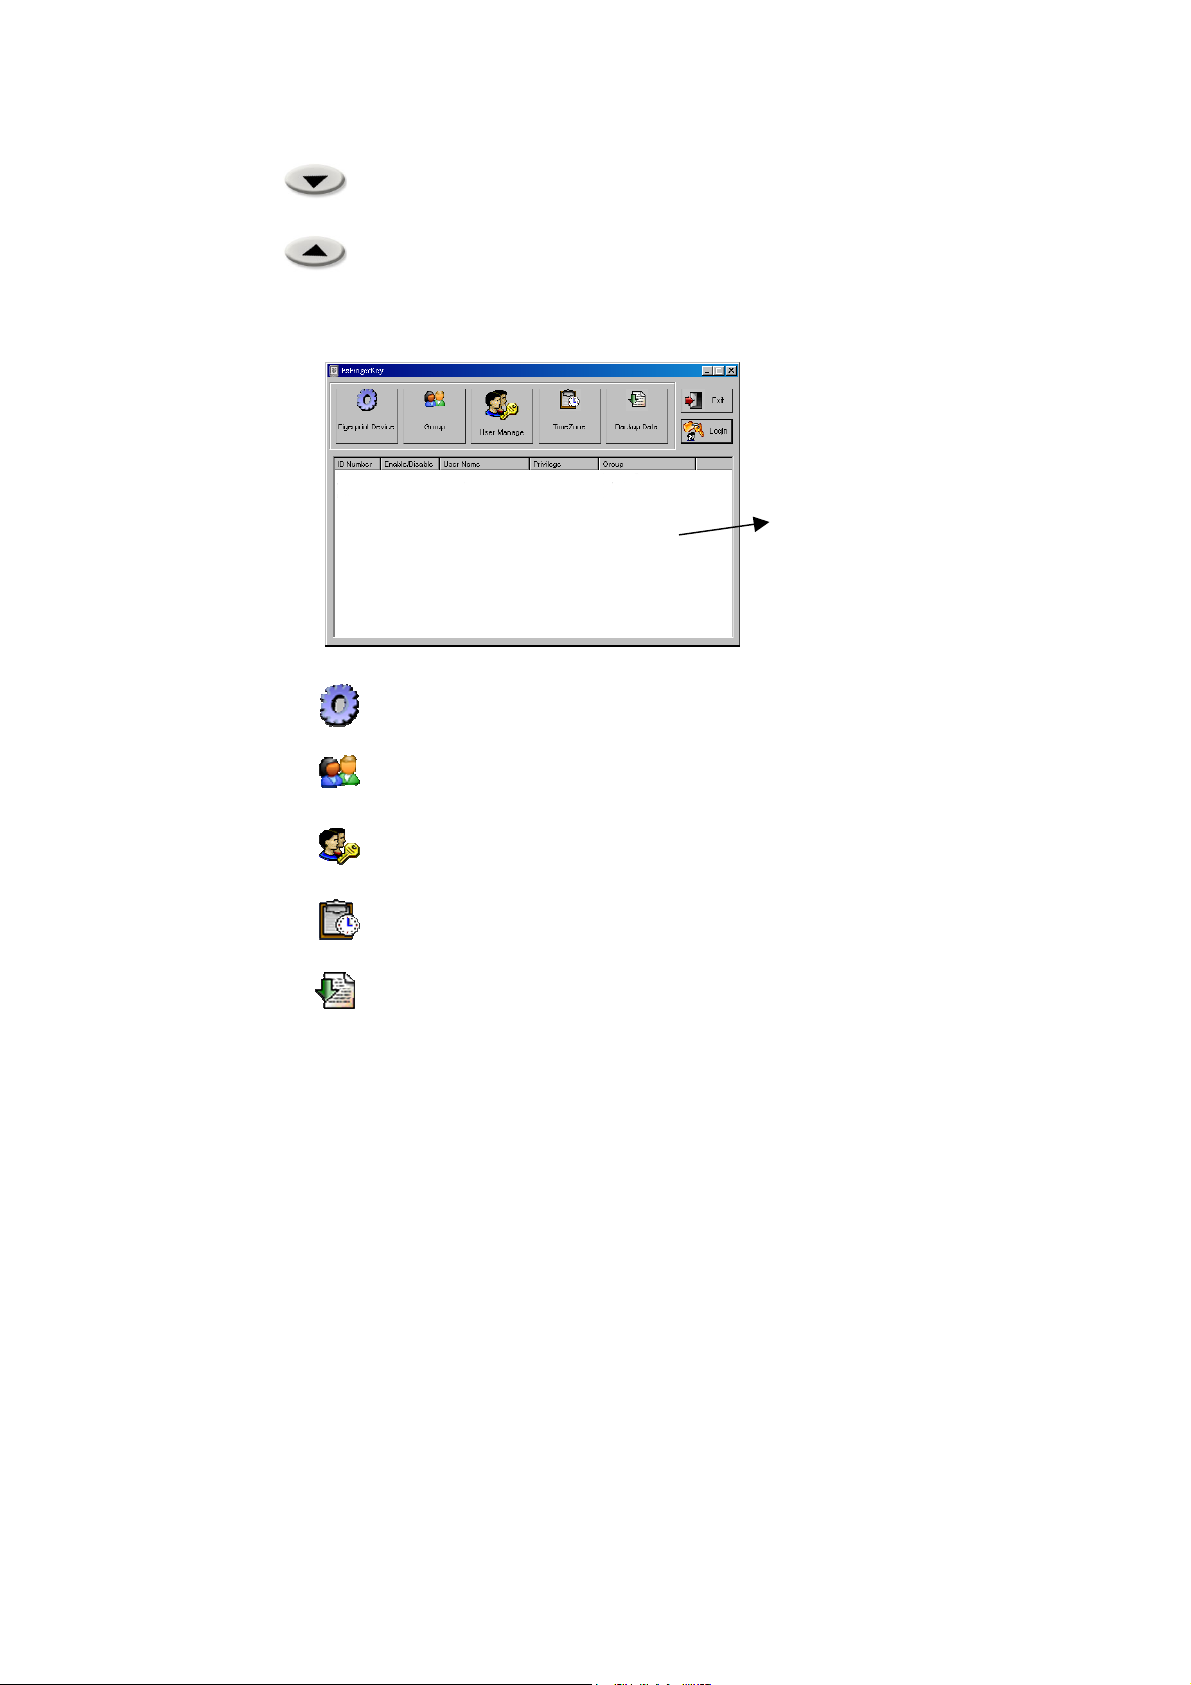
2). FingerKey Program (From the CD):
Display Window
Fingerprint Device: To detect and set up FingerKey device.
Group: To add group name for management.
User Manage: To confirm and manage user data.
Time Zone: To schedule users’ access time.
Backup Data: To Delete, Backup or Restore data from a connected FingerKey
device.
10
Page 12

Exit button: To exit FingerKey program.
Login button: To login FingerKey program for operation.
1.3 Function and Feature
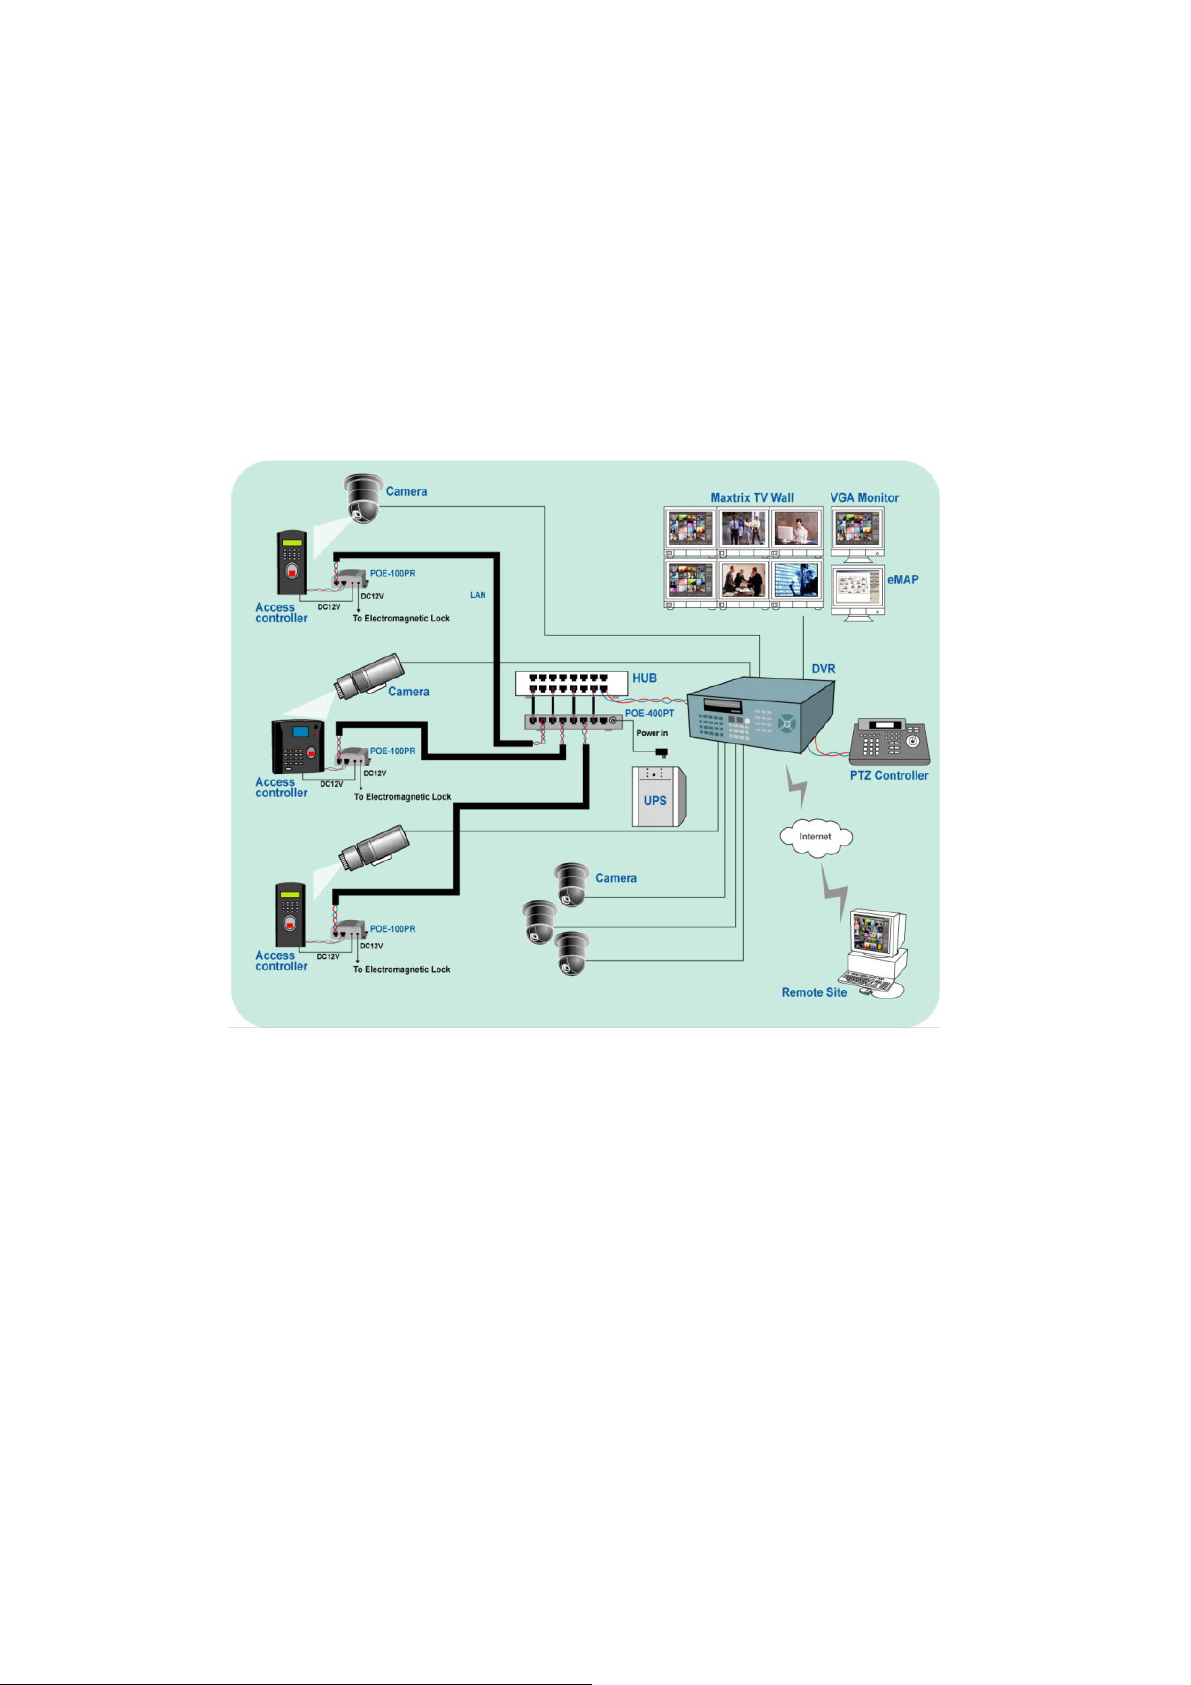
Text Overlay on Video: The text of Access controller can be superimposed on screen by
means of video clips and projects remote live video. The text can be displayed at different
sites by way of pre-setting and the font and color settings are individually adjustable.
Entry Record Search: Access the “Fingerprint” text records under View Log to search for
all the entry lists within specific time frames. Click on the relevant entry list of
“Fingerprint” text records, and the video will playback the selected time record of this entry
text in conjunction with the video clip.
General Search: Enter key words to search a field filter that will display the results in a
newly created View Log. Click on the newly created entry list and the video clip will be
playback automatically.
Save Cabling Costs: The entry text data and trigger signal of FingerKey can be transmitted
to the DVR via exist LAN (TCP/IP), thus bringing about a saving in cabling costs.
Integrate multi access controller: One DVR allows the connection of a maximum of 16
FingerKey access controllers via TCP/IP connectivity.
Trigger recording: The DVR system will start the video recording in the event when the
FingerKey system is being triggered, and it will be recorded in the View log.
e-Map: An e-map is a graphical overview of a site, indicating the locations of the cameras,
sensors and Fingerprint controller.
Real-time Notification: Pop up video, message and also flash icon on e-Map when Access
controller is triggered during normal or abnormal condition.
11
Page 13

Recording: Audio and video recordings can be activated automatically when access starts.
Surge Protection: Each video input builds in a 25KV surge protector to avoid the damage
of DVR from video-in voltage surges of nearby electrostatic strikes.
Web Browser/I.E.: Search & playback of archiving and/or downloading options via Web
Browser/I.E. can be remotely activated from anywhere, as also the monitoring of the video
and audio clips of the DVR.
Intelligent Search: Allow for narrowing the specific regions search of the recorded video.
The searching engine is able to search for video that has been changed only at that spot, so
the video that is retrieved will show exactly when the object disappeared.
Dynamic IP Solution: With no static IP, there is no problem. With our optional “ID
Codes” we connect them for you.
Remote Online Support: With our software, users can access the DVR remotely to change
local settings/configurations if and when necessary, without the need for a site visit.
POE-400PT Support (Option): 4 ports POE (Power Over Ethernet) transmitter.
POE-100PR Support (Option): DC 12V/1.5A POE (Power Over Ether) receiver.
12
Page 14
Chapter 2 Hardware Installation and Software Setting
2.1 Product Application:
◎ SMB Entry Door ◎ Warehouse ◎ Airport
◎ Accounting department ◎ R & D Department ◎ Hospital
◎ Manager Office ◎ Military ◎ School
◎ Government
13
Page 15

2.2. FingerKey Hardware Installation:
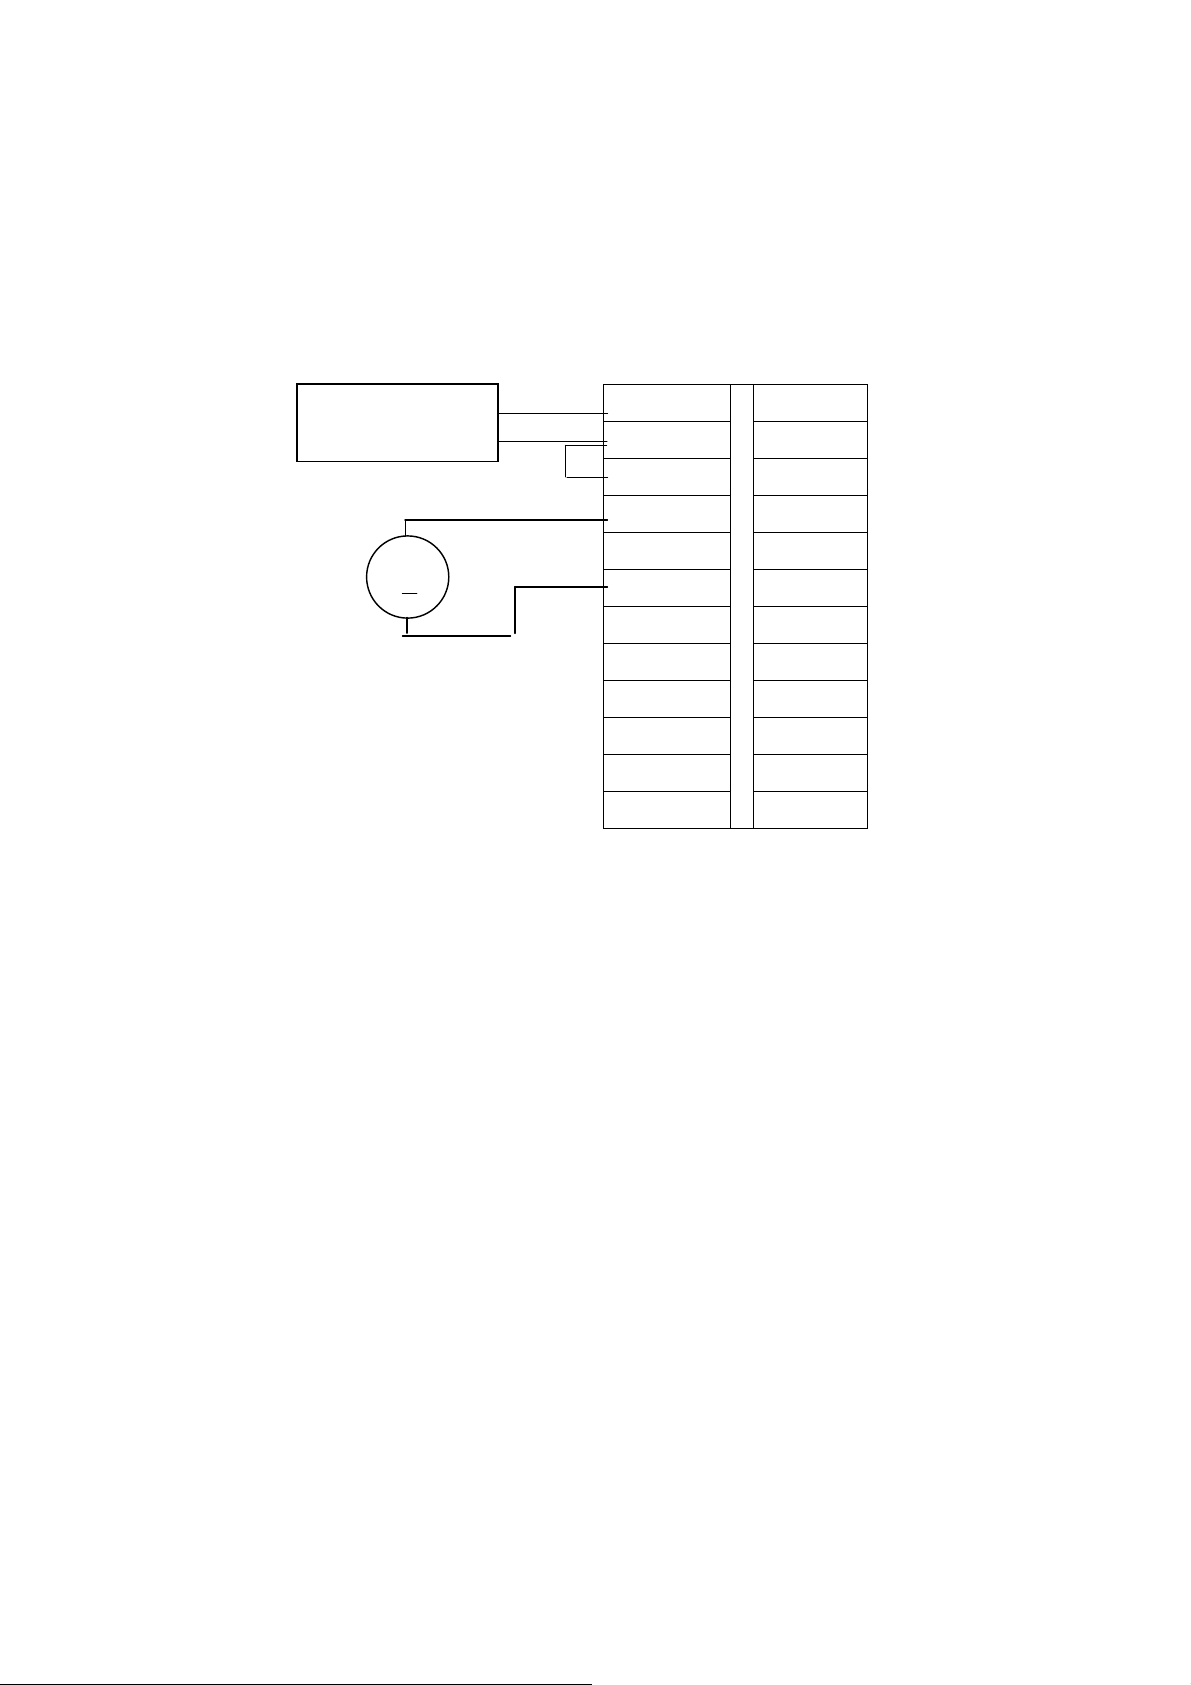
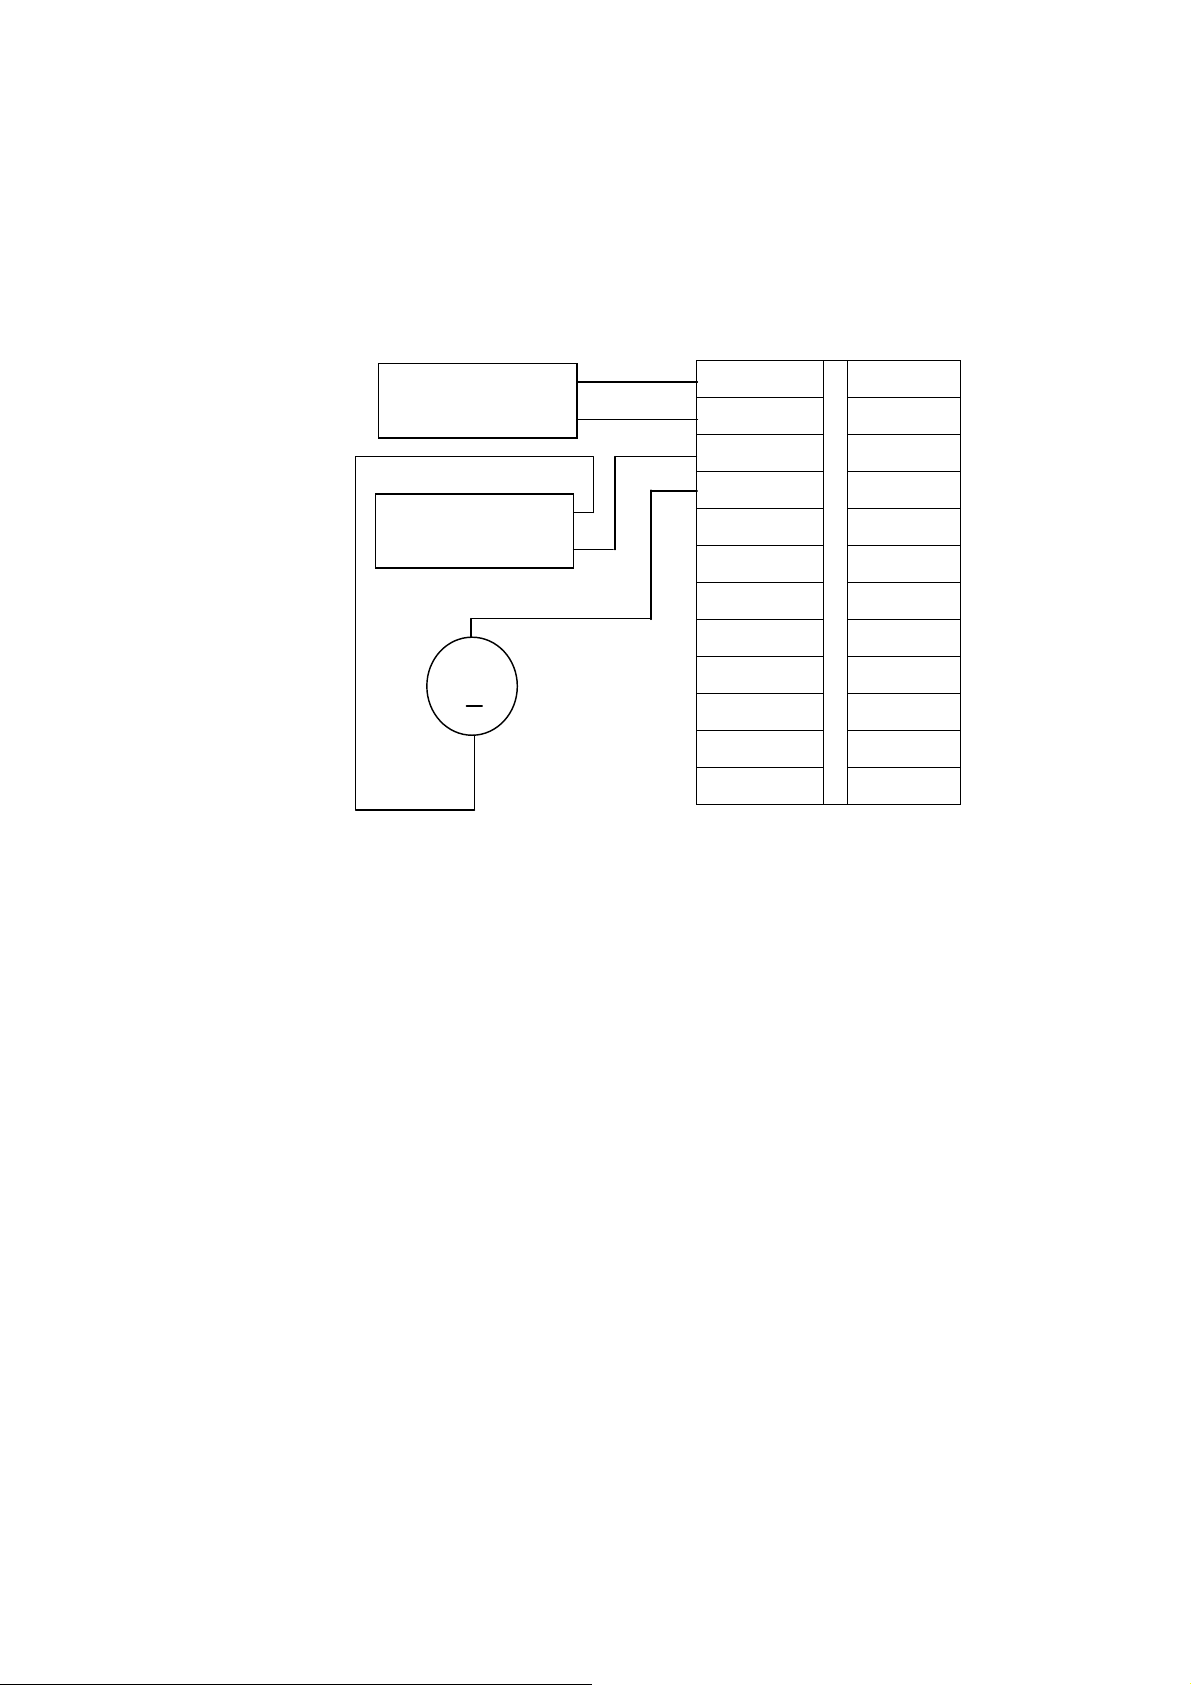
2.2.1. Power Supply Connection
FingerKey supports 9-15V DC power supply as input, and can work immediately through the
direct connection between GND and +12V . If lock-control uses the individual power supply,
the current of FingerKey power supply adapter applies matching current of 500mA or over; if
lock-control uses the same power supply with FingerKey, the nominal output current of the
power adapter will exceed the working current by over 1000mA
9—15V
Power supply adapter +
GND GND
+12V Power RS232 RXD
Lock COM RS232 TXD
Lock NO GND
Lock NC RS485 A
GND RS485 B
Alarm+
Alarm— DATA0
Button DATA1
GND +5V Output
Bell+
Bell— GND
GND
Door Sensor
.
14
Page 16

2.2.2. Door Lock Connection
FingerKey can support normal-open and normal-closed door lock simultaneously, as long as it
is connected with the different terminals respectively. Usually, Lock No terminal disconnects
with COM terminal, and they connect when FingerKey outputs the unlocking signal and
recover to disconnection when the signal ends. The connection and disconnection between
Lock NC terminal and COM terminal is opposite to above situation, they connect usually and
disconnect when the unlocking signal is output.
Due to the existence of varied electric-control door locks, the correct connection method must
be confirmed in accordance with the door lock specification: Lock NO terminal should be
used for the locks, which unlock when the power is on and lock when power is off; otherwise,
the Lock NC terminal should be used.
Take the electric-control lock, which locks usually when power is off, for example herein, to
show the connection method between FingerKey and locks. Use Lock NC terminal when
FingerKey is connected with the lock, which locks usually when power is on.
15
Page 17
1). Connecting method for power supply adapter serving for both FingerKey
and door lock contemporarily.
1. Matching voltage of lock must be 9 to 5V
2. Matching voltage of adapter must be accordant with that of lock.
3. Matching output current of adapter must exceed the working current by over
1000mA.
Power supply adapter -
12V +
+
Lock
GND GND
+12V Power RS232 RXD
Lock COM RS232 TXD
Lock NO GND
Lock NC RS485 A
GND RS485 B
Alarm+
Alarm— DATA0
Button DATA1
GND +5V Output
Bell+
Bell— GND
GND
Door Sensor
16
Page 18
2). Connecting method for power supply adapter serving for both FingerKey
and door lock contemporarily.
1). Matching voltage of lock is 12V or less
2). Matching voltage of lock’s power supply adapter must be accordant with the lock, and the
output current must exceed the working current of the lock.
3). 3Working current of the lock must less than 3000mA.
Power supply adapter -
12V +
Power supply adapter -
12V +
+
Lock
GND GND
+12V Power RS232 RXD
Lock COM RS232 TXD
Lock NO GND
Lock NC RS485 A
GND RS485 B
Alarm+
Alarm— DATA0
Button DATA1
GND +5V Output
Bell+
Bell— GND
GND
Door Sensor
17
Page 19
+
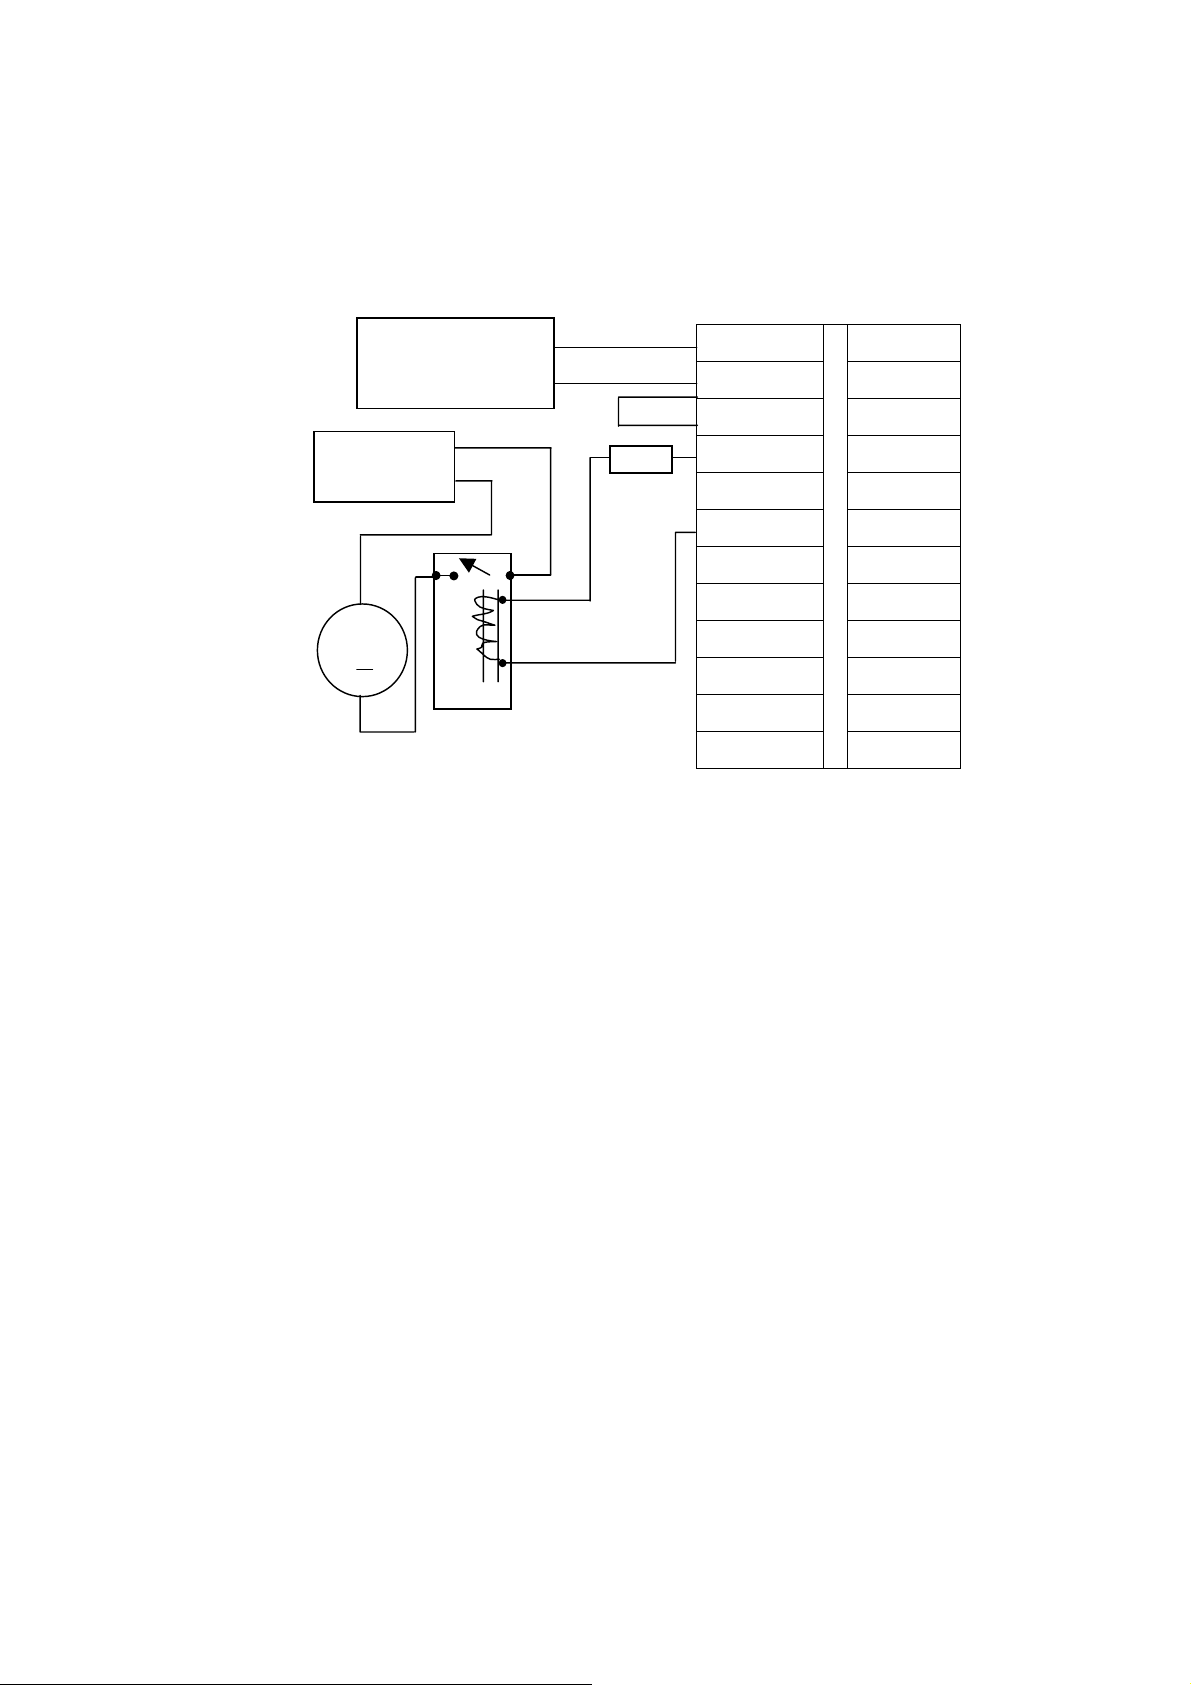
4). High current control of FingerKey and locks connection
1). Matching voltage of lock’s power supply adapter must be accordant with
that of lock, and the output current must exceed the working current of the
lock.
2). Matching voltage and current of relay must exceed those of the lock.
Power supply adapter -
GND GND
Lock Power -
+
Lock
12V +
Limit
Current
Resista
+12V Power RS232 RXD
Lock COM RS232 TXD
Lock NO GND
Lock NC RS485 A
GND RS485 B
Alarm+
Alarm— DATA0
Button DATA1
GND +5V Output
Bell+
Bell— GND
GND
Door Sensor
18
Page 20

2.2.3. Connect with Out-door Switch, Door Magnetism, Doorbell and Warner
Door switch is installed in the room, and you can open the door when the out-door
switch is closed. The door magnetism is used to induce the opening and closing state
of the door, and FingerKey can detect the state when the door is opened illegally and
hence output the alarming signal. Furthermore, FingerKey will also output the alert
signal if the door is not closed well within the specified time.
Alarming output of FingerKey is a switch signal, and can be connected in series into
the power loop of Warner. Of course it can be used as the trigger signal of advanced
alarming/monitoring system.
Doorbell terminal of FingerKey is connected directly with the doorbell button of
panel, so what you need to do is to connect the existing doorbell switch to these two
terminals.
19
Page 21
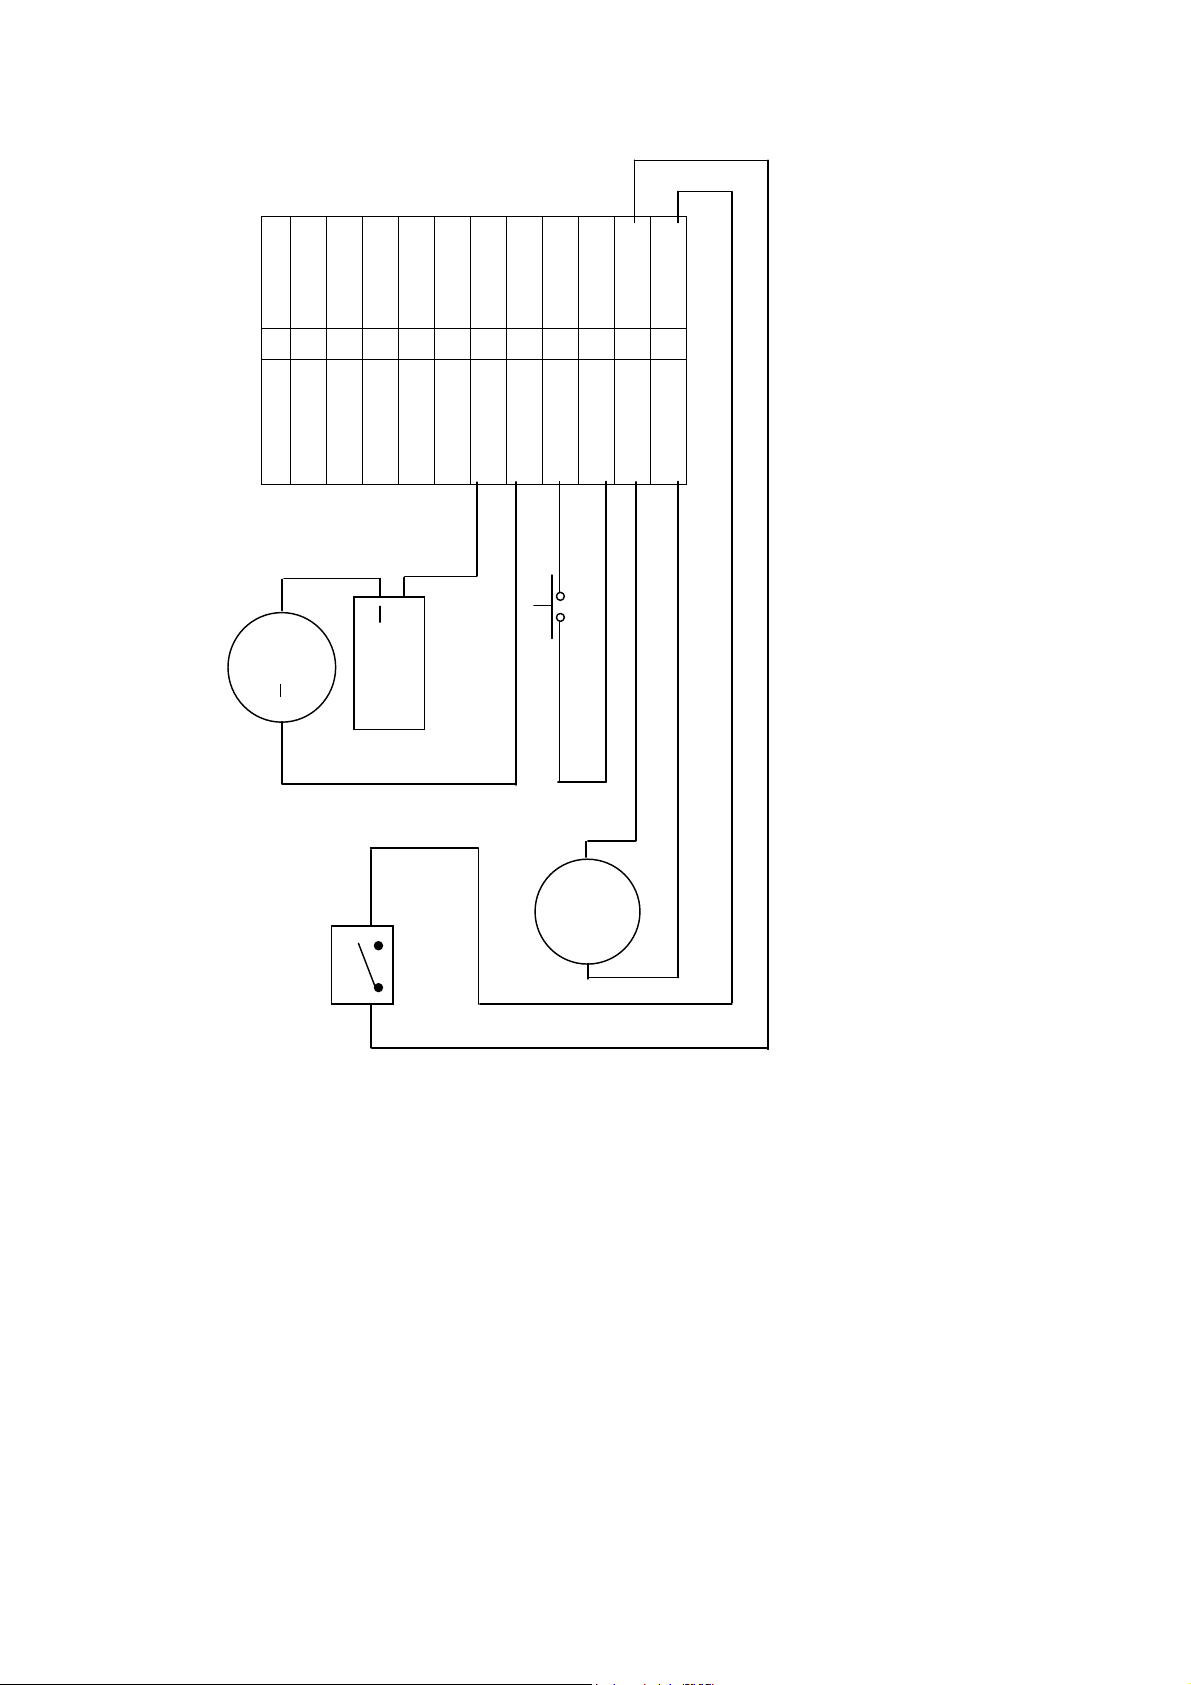
r
r
t
l
h
r
ND
ND
Warne
+
S232 R×D
S232 R×D
ock COM
12V Powe
ND
S485 A
S485 B
ock NO
Warner
ND
ock NC
Power supply +
ND
ATA 0
larm +
larm -
ATA 1
utton
-door switch
Ou
5V Output
ND
oor Senso
NG
ell +
ell -
Doorbel
Door magnetism switc
20
Page 22
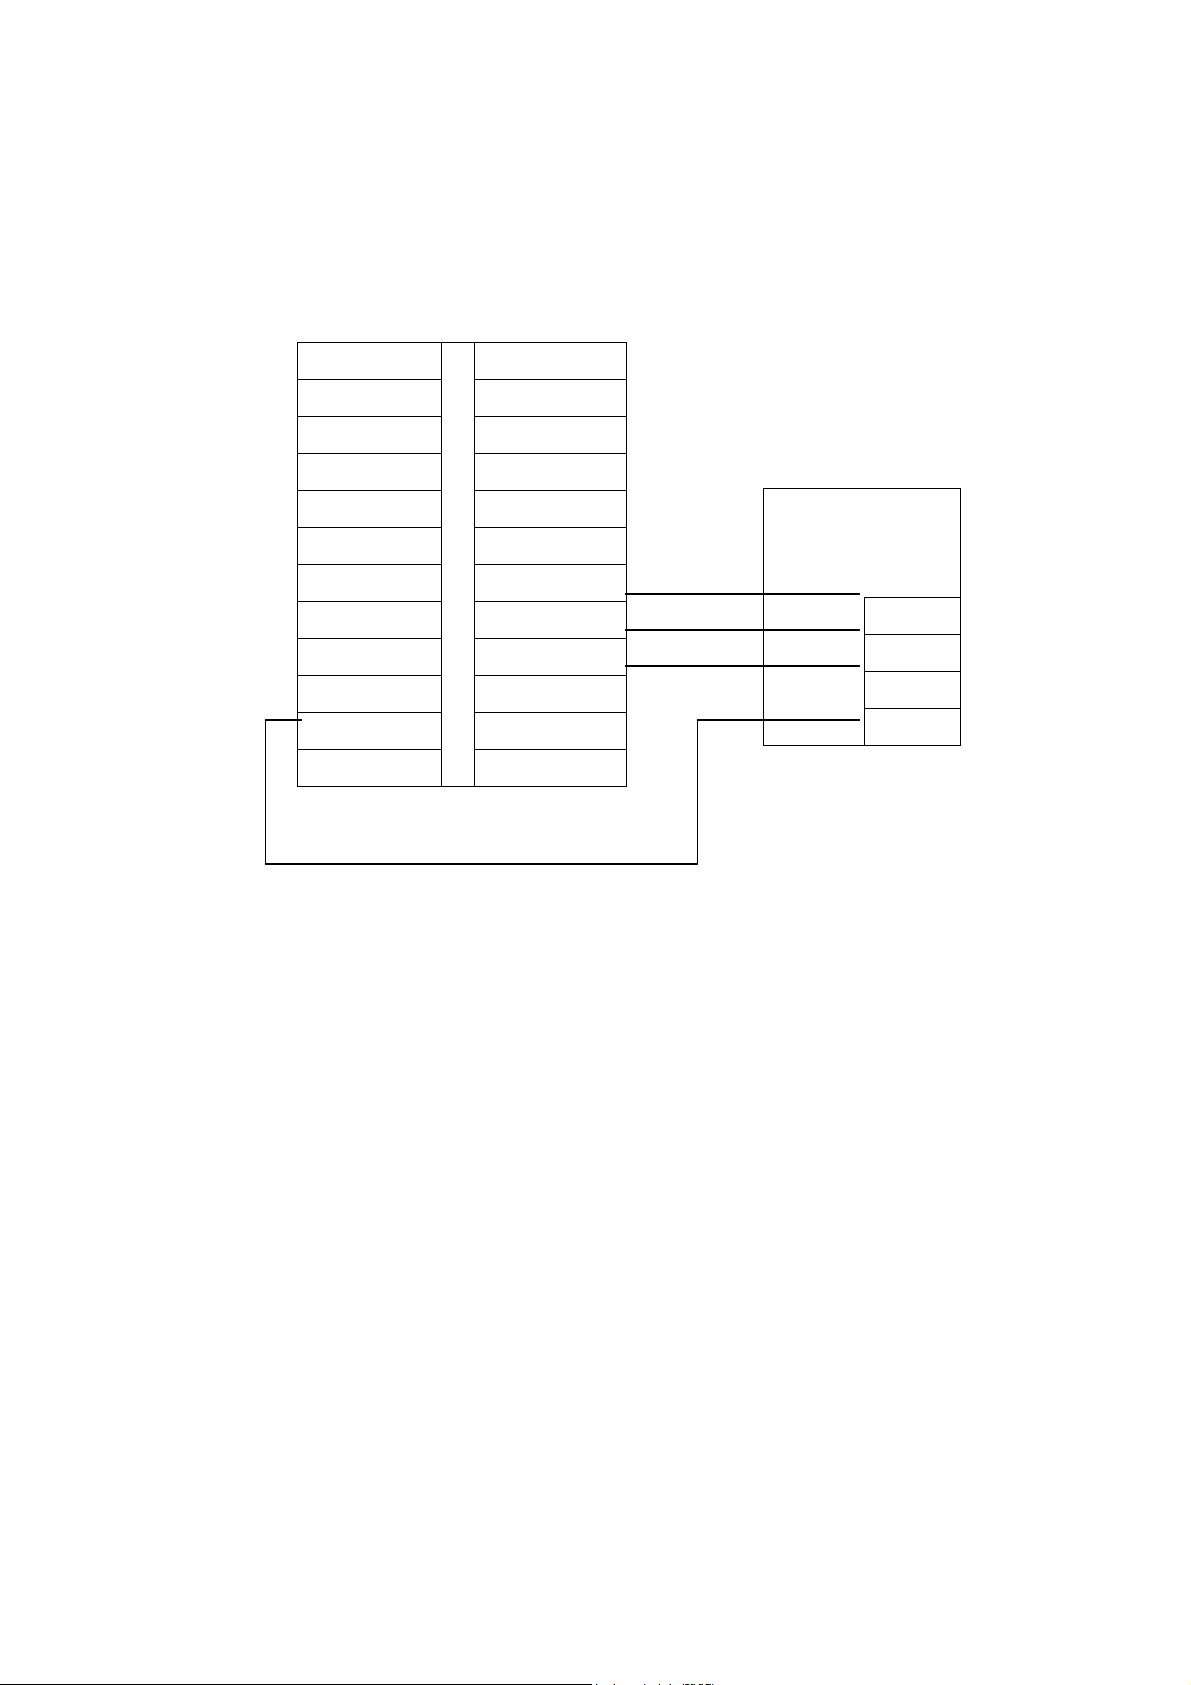
2.2.4. Connecting with Controller
FingerKey offers the standard Wiegand26 output, and can be connected with most
existing Access Controller as connection with an IC card reading head or password
keyboard.
GND GND
+12V Power RS232 RXD
Lock COM RS232 TXD
Lock NO GND
Lock NC RS485 A
GND RS485 B
Alarm+
Alarm— DATA0
Button DATA1
GND +5V Output
Bell+
Bell— GND
GND
Door Sensor
Access
Controller
GND
DATA0
DATA1
+12V
21
Page 23
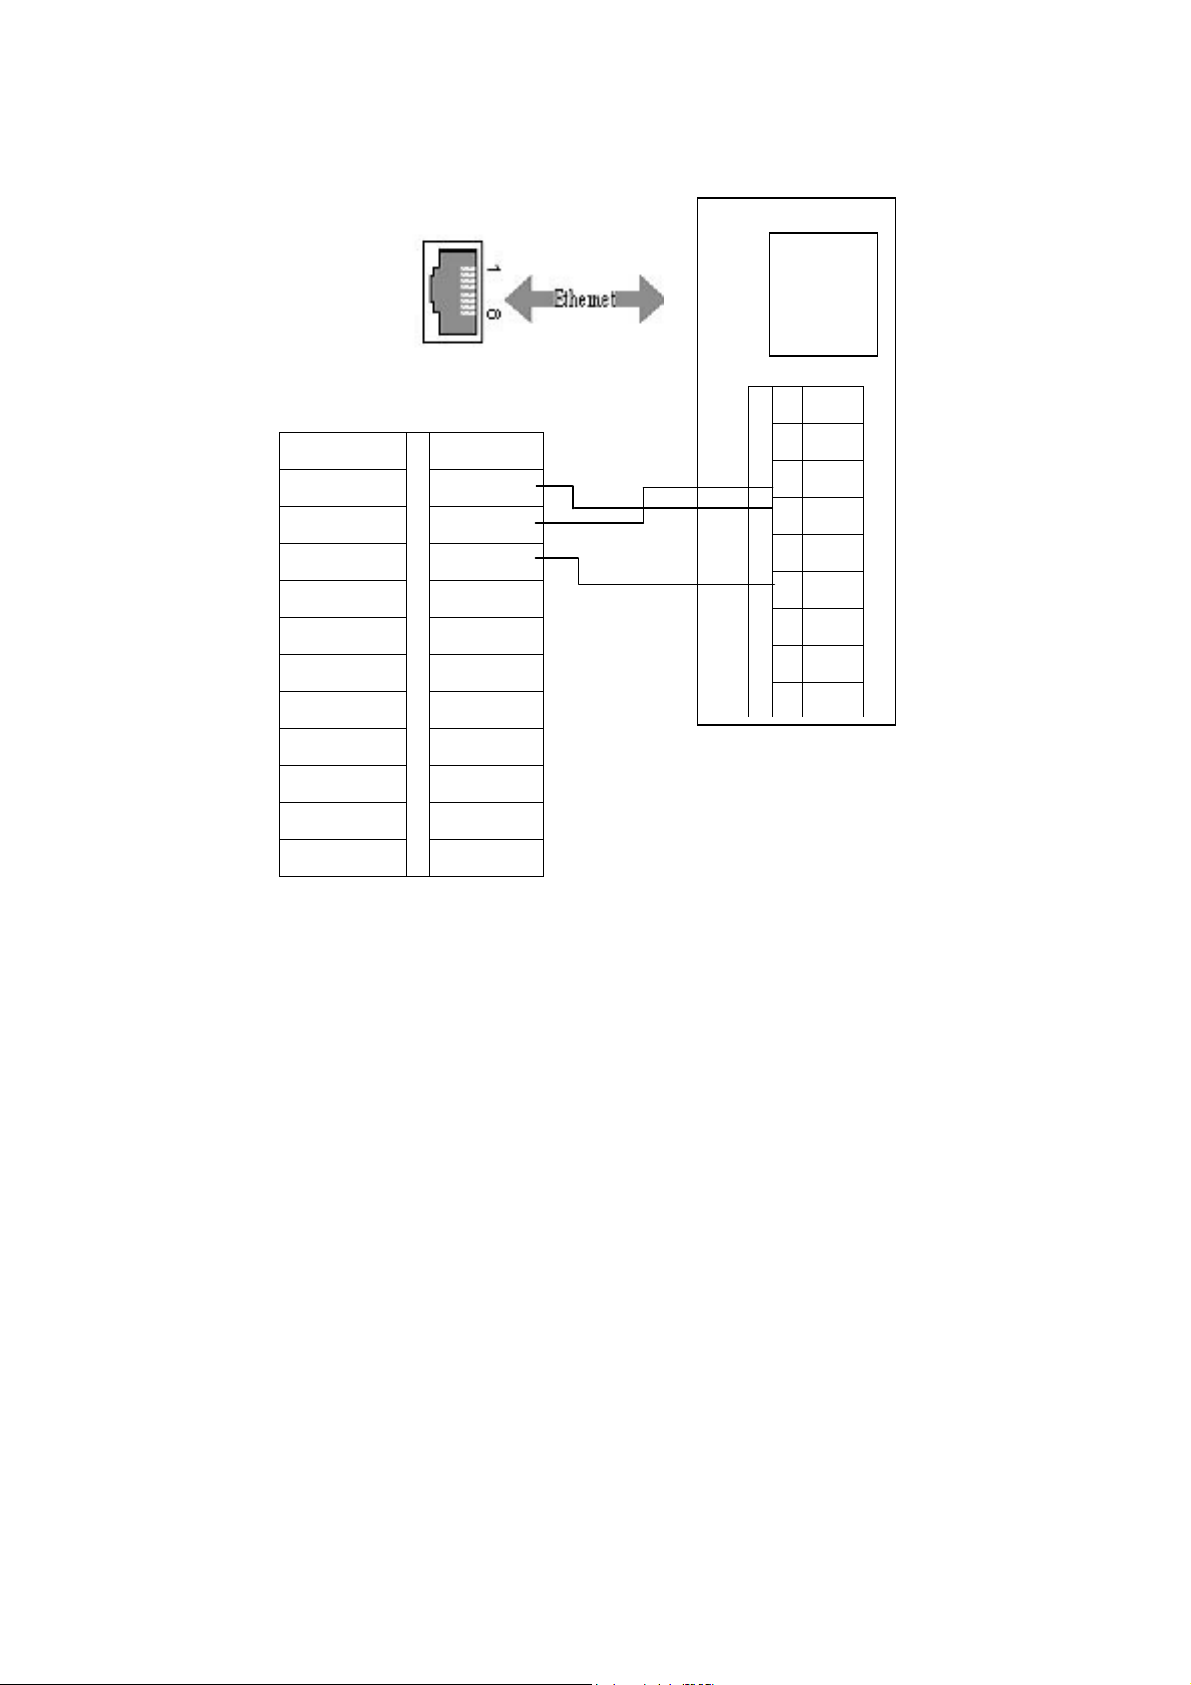
2.2.5. RS232 and Ethernet Connection
GND GND
+12V Power RS232 RXD
Lock COM RS232 TXD
Lock NO GND
Lock NC RS485 A
GND RS485 B
Alarm+
Alarm— DATA0
Button DATA1
GND +5V Output
Bell+
Bell— GND
GND
Door Sensor
NIC
1CD
2 RXD
3 TXD
4DTR
5 GND
6DSR
7RTS
8CTS
9RI
FingerKey can connect with PC through RS232 or Ethernet
22
Page 24

G
2.2.6. RS485 Connection
GND GND
+12V Power RS232 RXD
Lock COM RS232 TXD
Lock NO GND
Lock NC RS485 A
GND RS485 B
Alarm+
Alarm— DATA0
Button DATA1
GND +5V Output
Bell+
Bell— GND
GND
Door Sensor
2.2.7. Set up FingerKey System IP Address
User needs to set up different IP addresses in each different location of FingerKey
systems, therefore user can use only one computer to manage all connected FingerKey
GND A B
FingerKey is connected with
RS485 network
device by EzFingerKey PC program (FingerKey software from CD). To set the
FingerKey system IP address, please follow the steps bellow:
Step1: Please press button to enter the FingerKey menu system.
23
Page 25
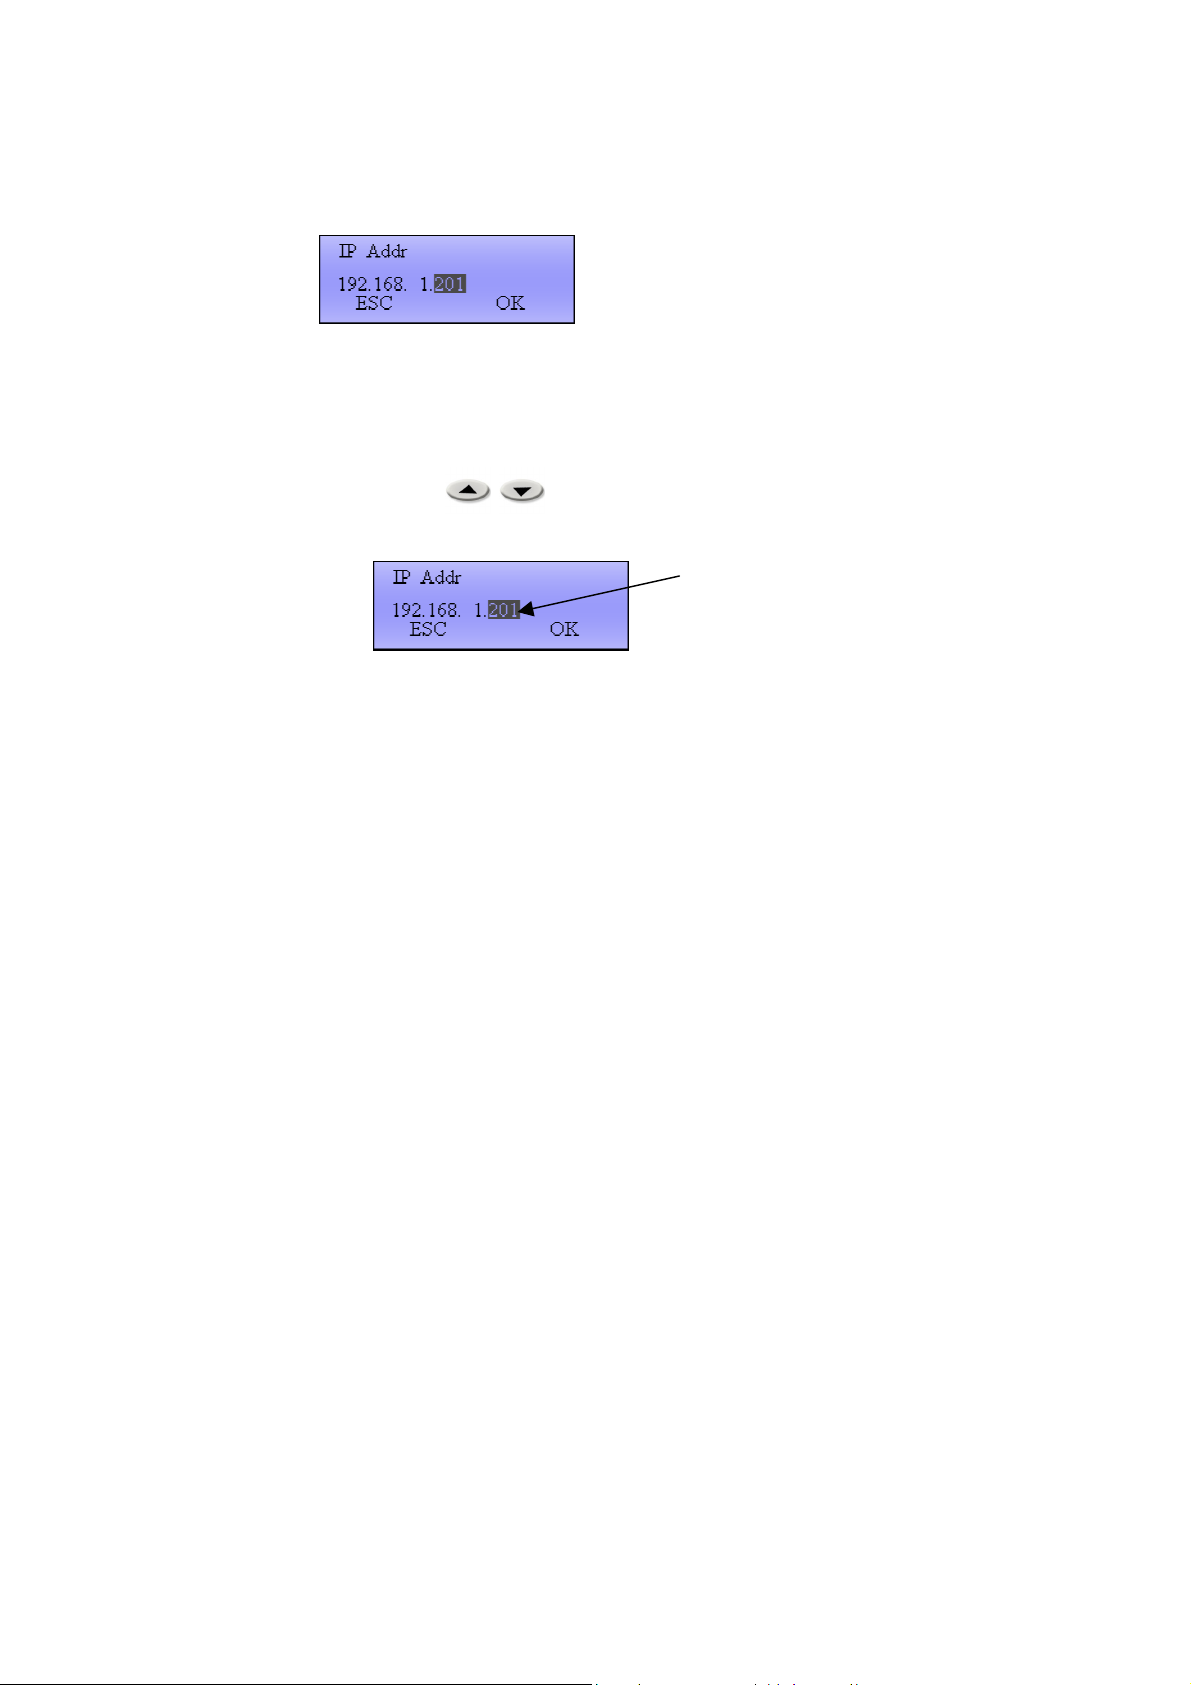
Step2: Please enter the menu path:
Option Comm Opt IP Addr
Finger 2.1.7 – 1: IP Address
NOTE: The first three digits of IP address are constant (Please do not change
192.168.1 these three digits or the EzFingerKey can not detect the device).
Step3: Please use buttons to select the fourth digit and use 0~9 number
buttons to type in the IP address.
Finger 2.1.7 – 2: The Forth Digit of the IP Address
NOTE: The range of fourth digit IP address is 1 to 253. For example: User can type IP
address as 192.168.1.201.
24
Please use number (0~9) buttons to
type the forth digit of IP address,
the range of the forth digit IP
address will be 1to 253.
Page 26
2.3. Detecting FingerKey Device (EzFingerKey Software Setting)
After all FingerKey devices have been installed and connected, user needs to set up
the EzFingerKey PC program and detect all connected FingerKey devices to manage
the whole system.
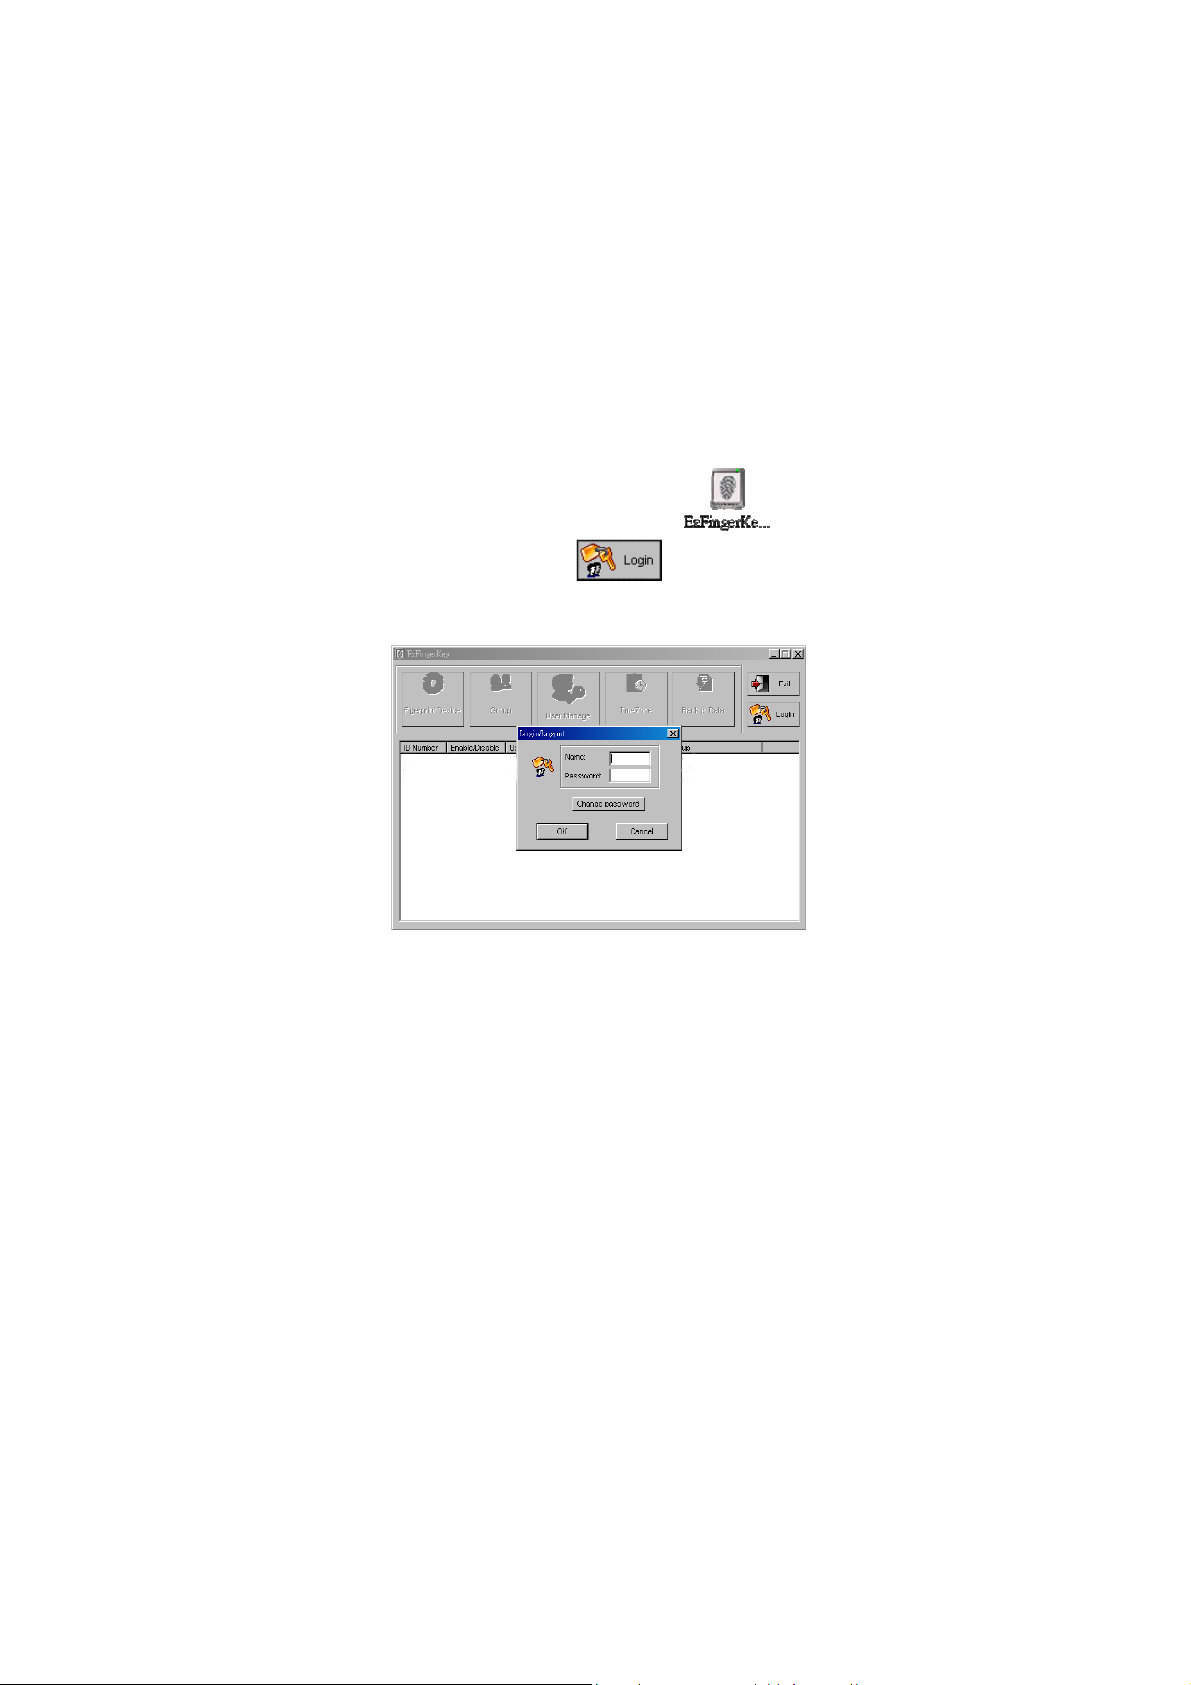
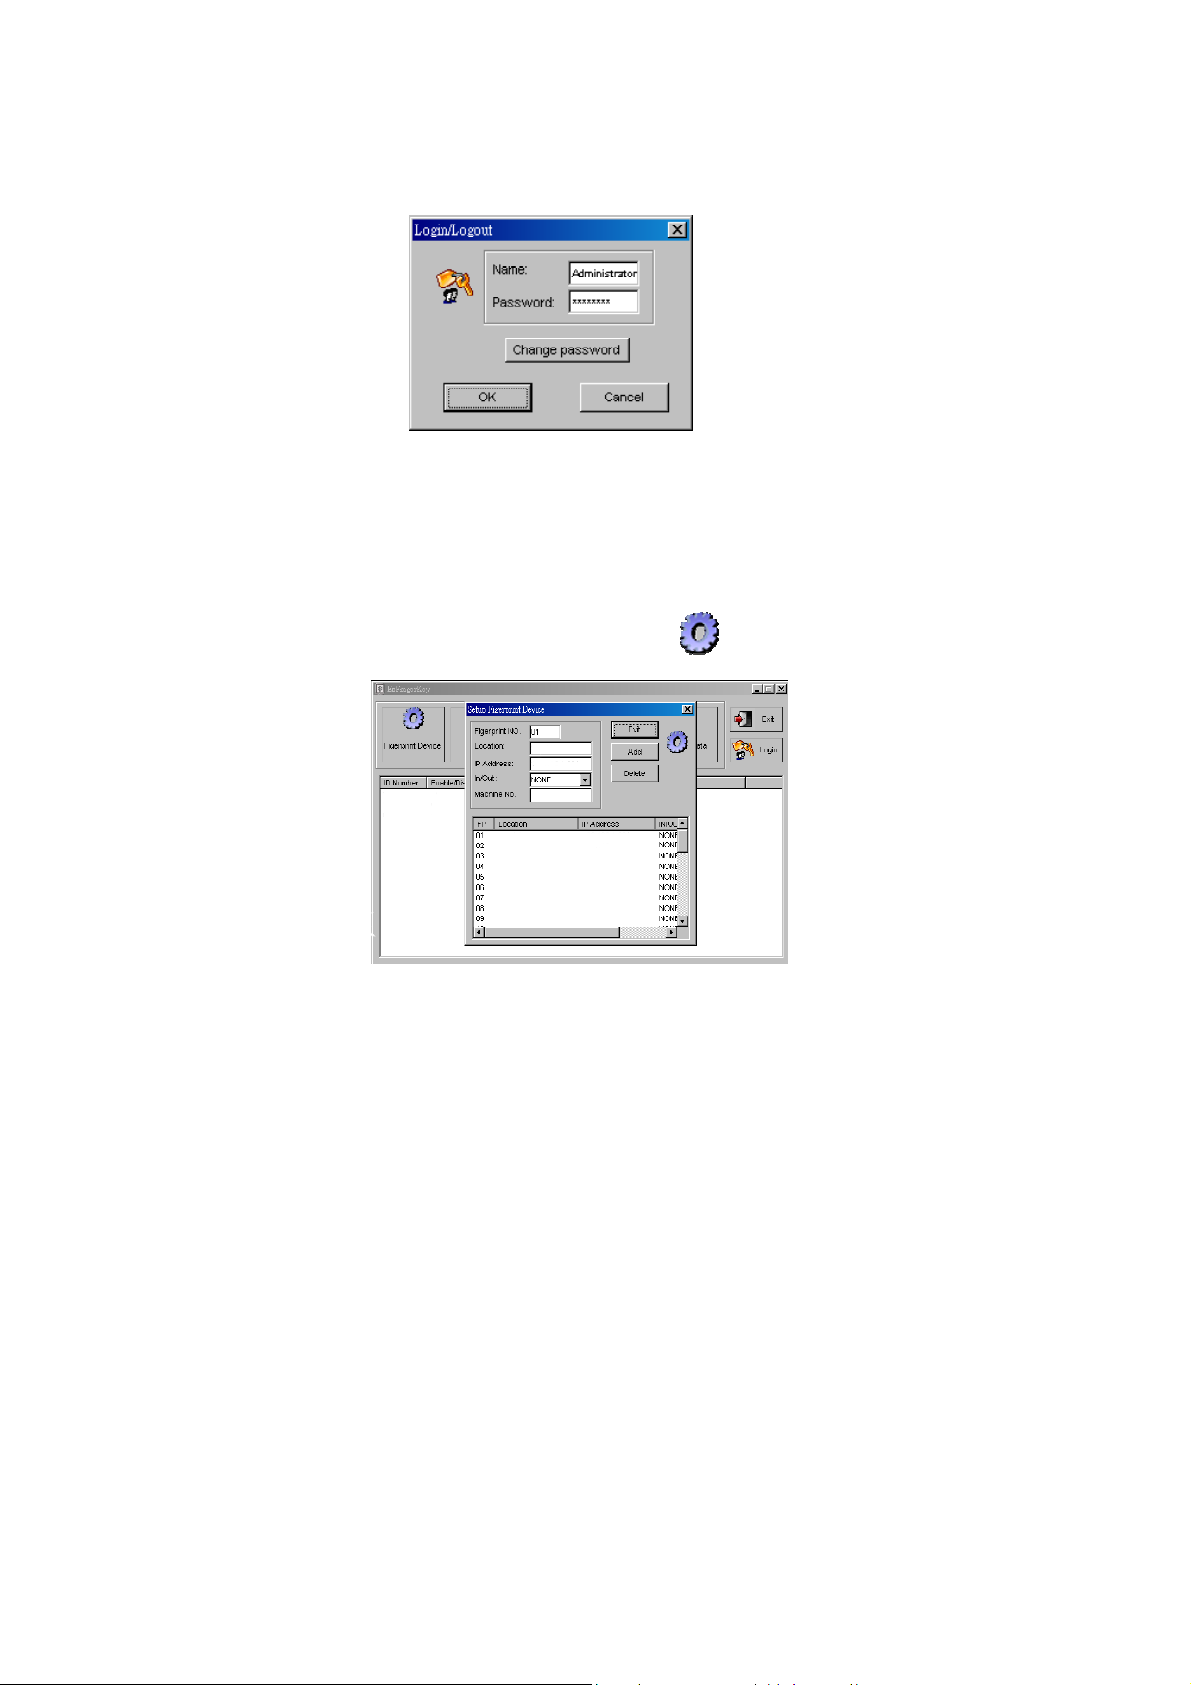
2.3.1. EzFingerKey Login Password Setting
Default setting of login name and password are null; therefore user can simply press
the “OK” button to access the system. However, for better secure management
consideration, we suggest administrator to set the login name and password. Please
follow the introduction below to complete the system login password setting.
Step1: Please double click the “EzFingerKey.exe” ( ) file from the PC to open
the program.
Step2: Please click the “Login” ( ) button to open the “Login/Logout”
dialog.
Finger 2.3.1 – 1: Login/Logout dialog
25
Page 27
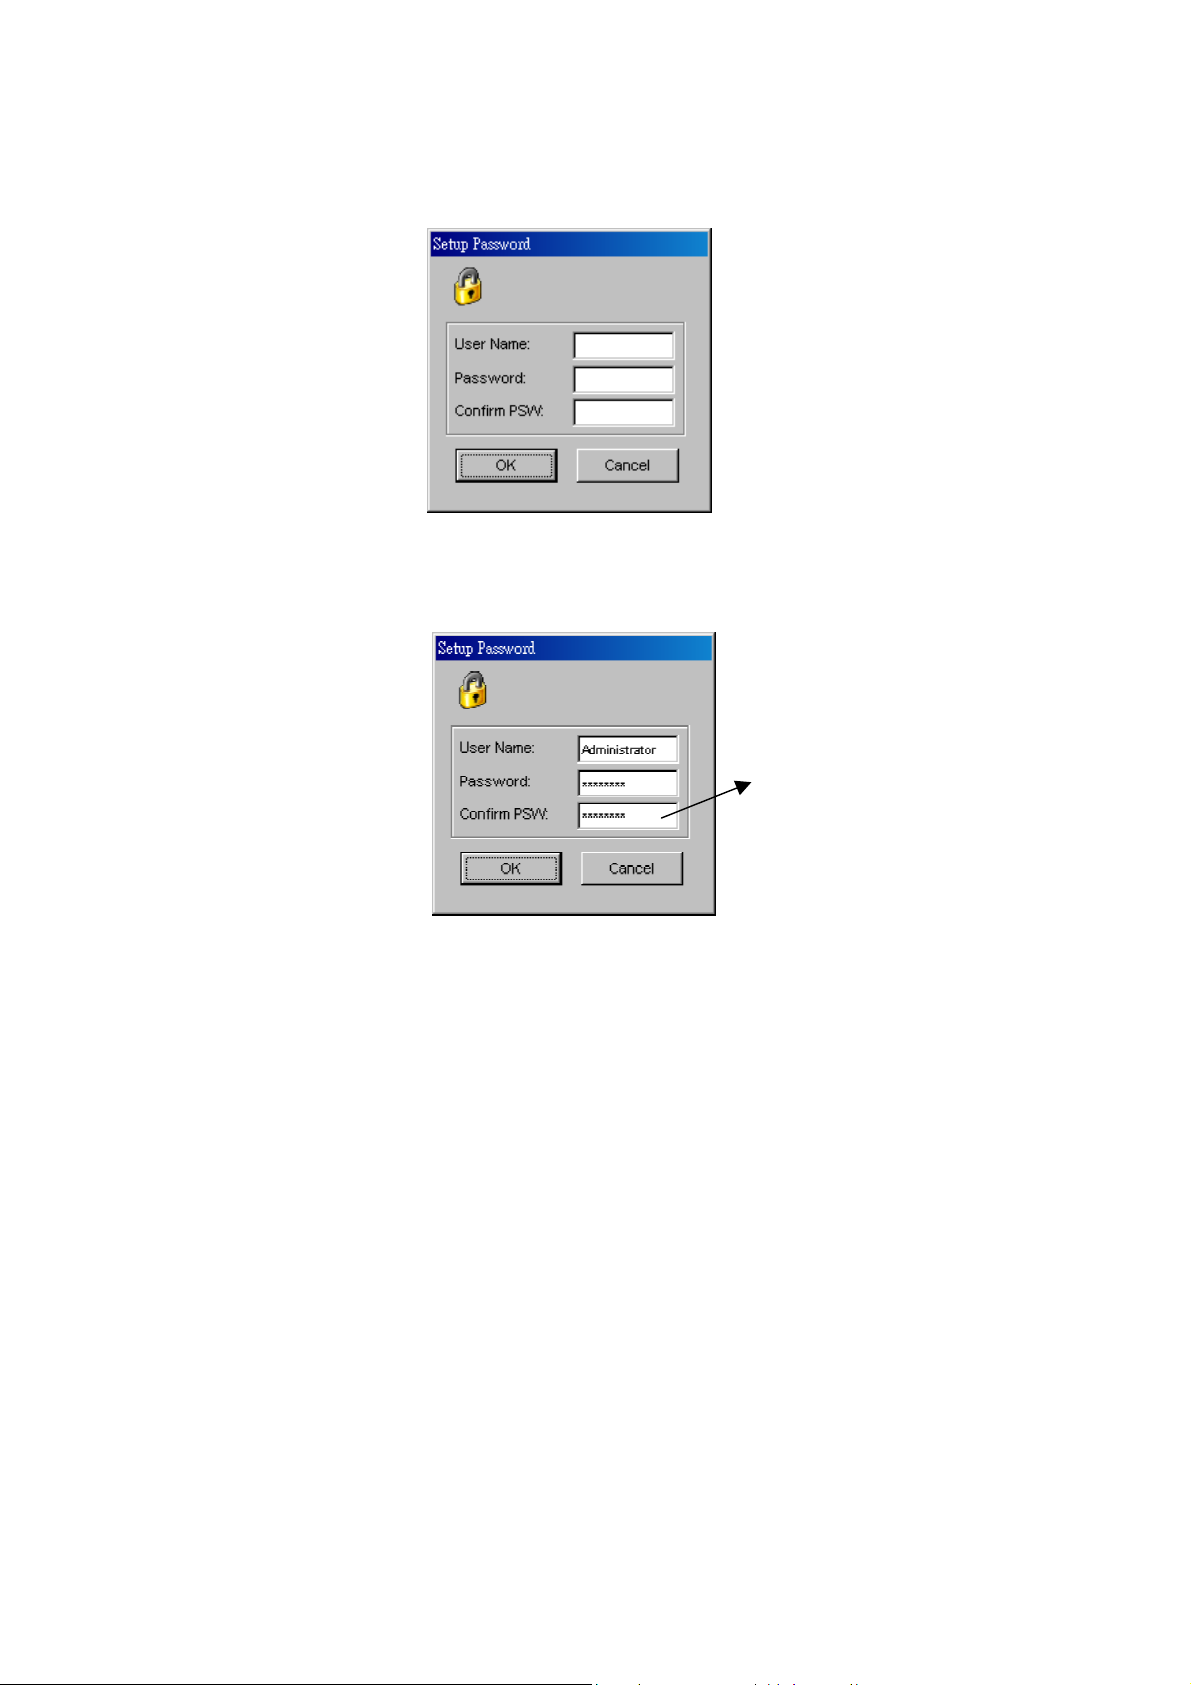
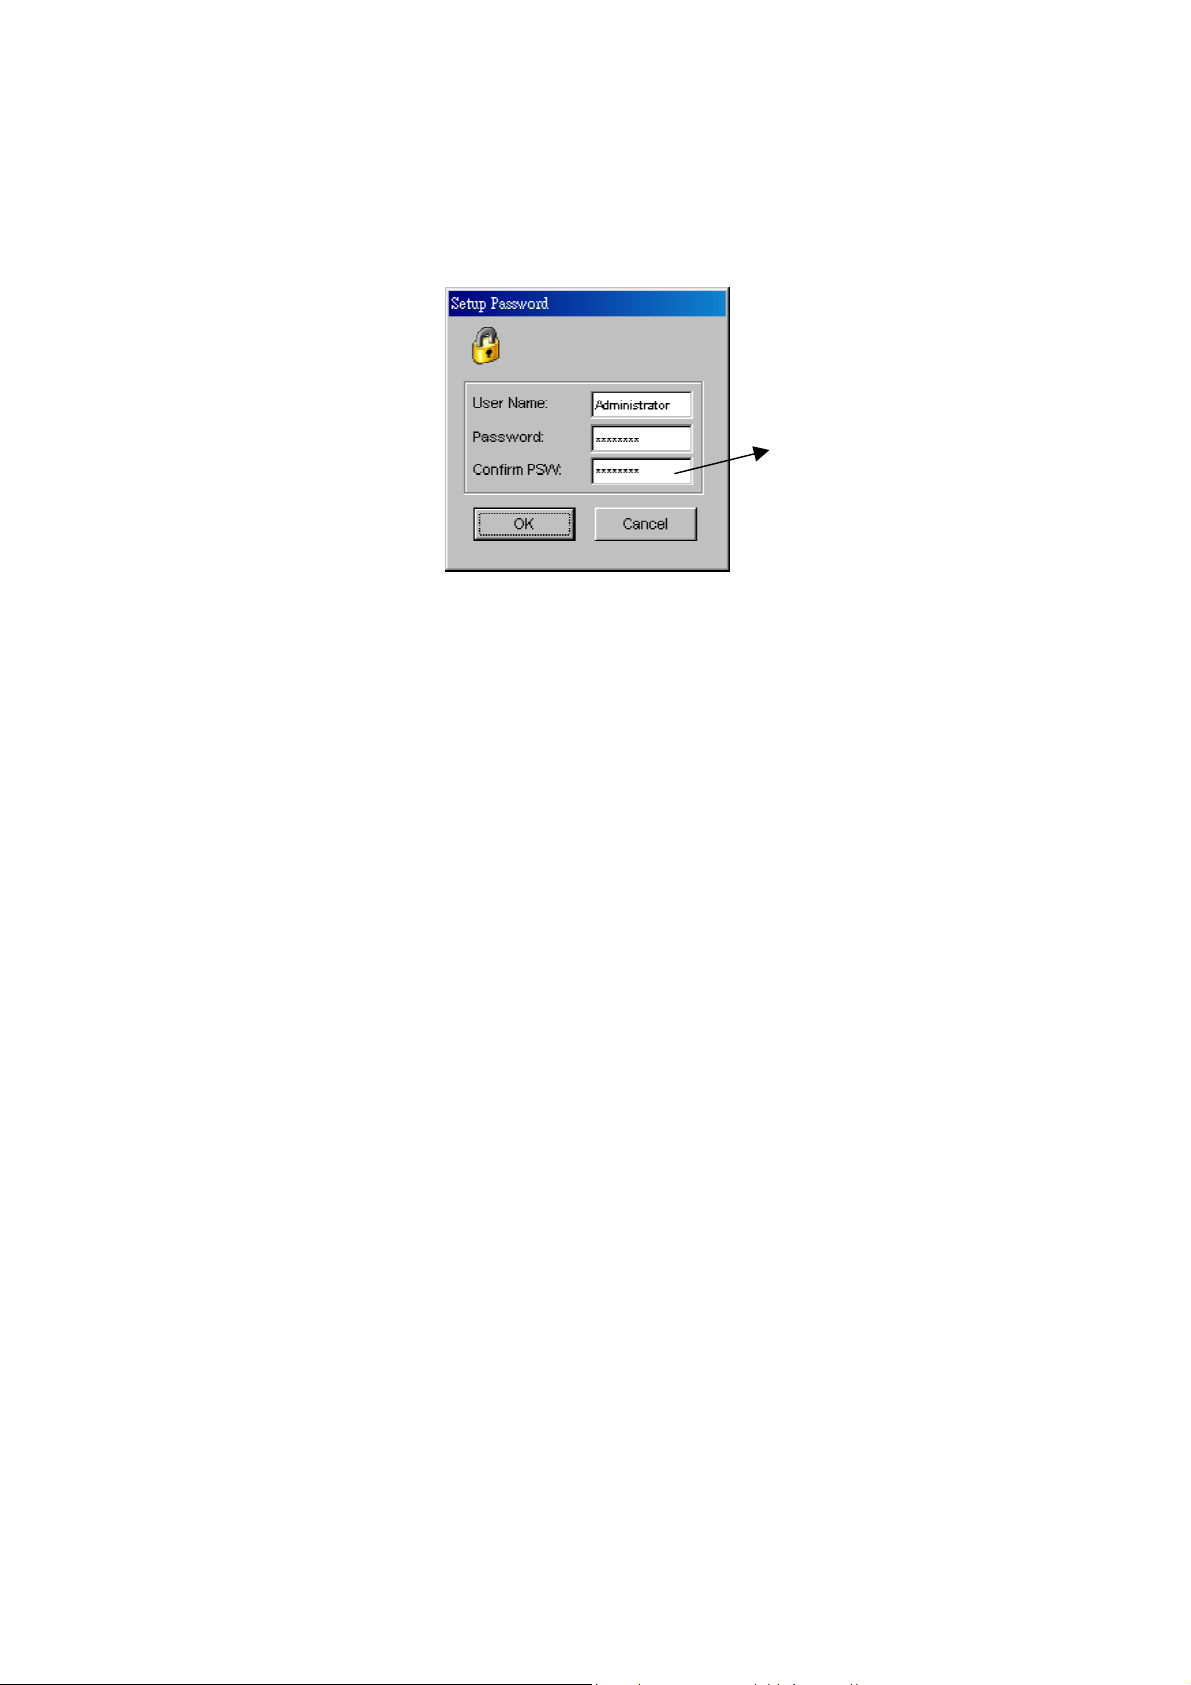
Step3: Please click the “Change Password” button to open the “Setup Password”
dialog.
Finger 2.3.1 – 2: Setup Password Dialog
Step4: Simply type the user name and password in each section and click the “OK”
button to complete the password setting.
Confirm the Password
Finger 2.3.1.- 3: Example of password setting
26
Page 28
Step5: After the login password has been set, user can simply type the user name and
password to login the system.
Finger 2.3.1 – 4: Login dialog
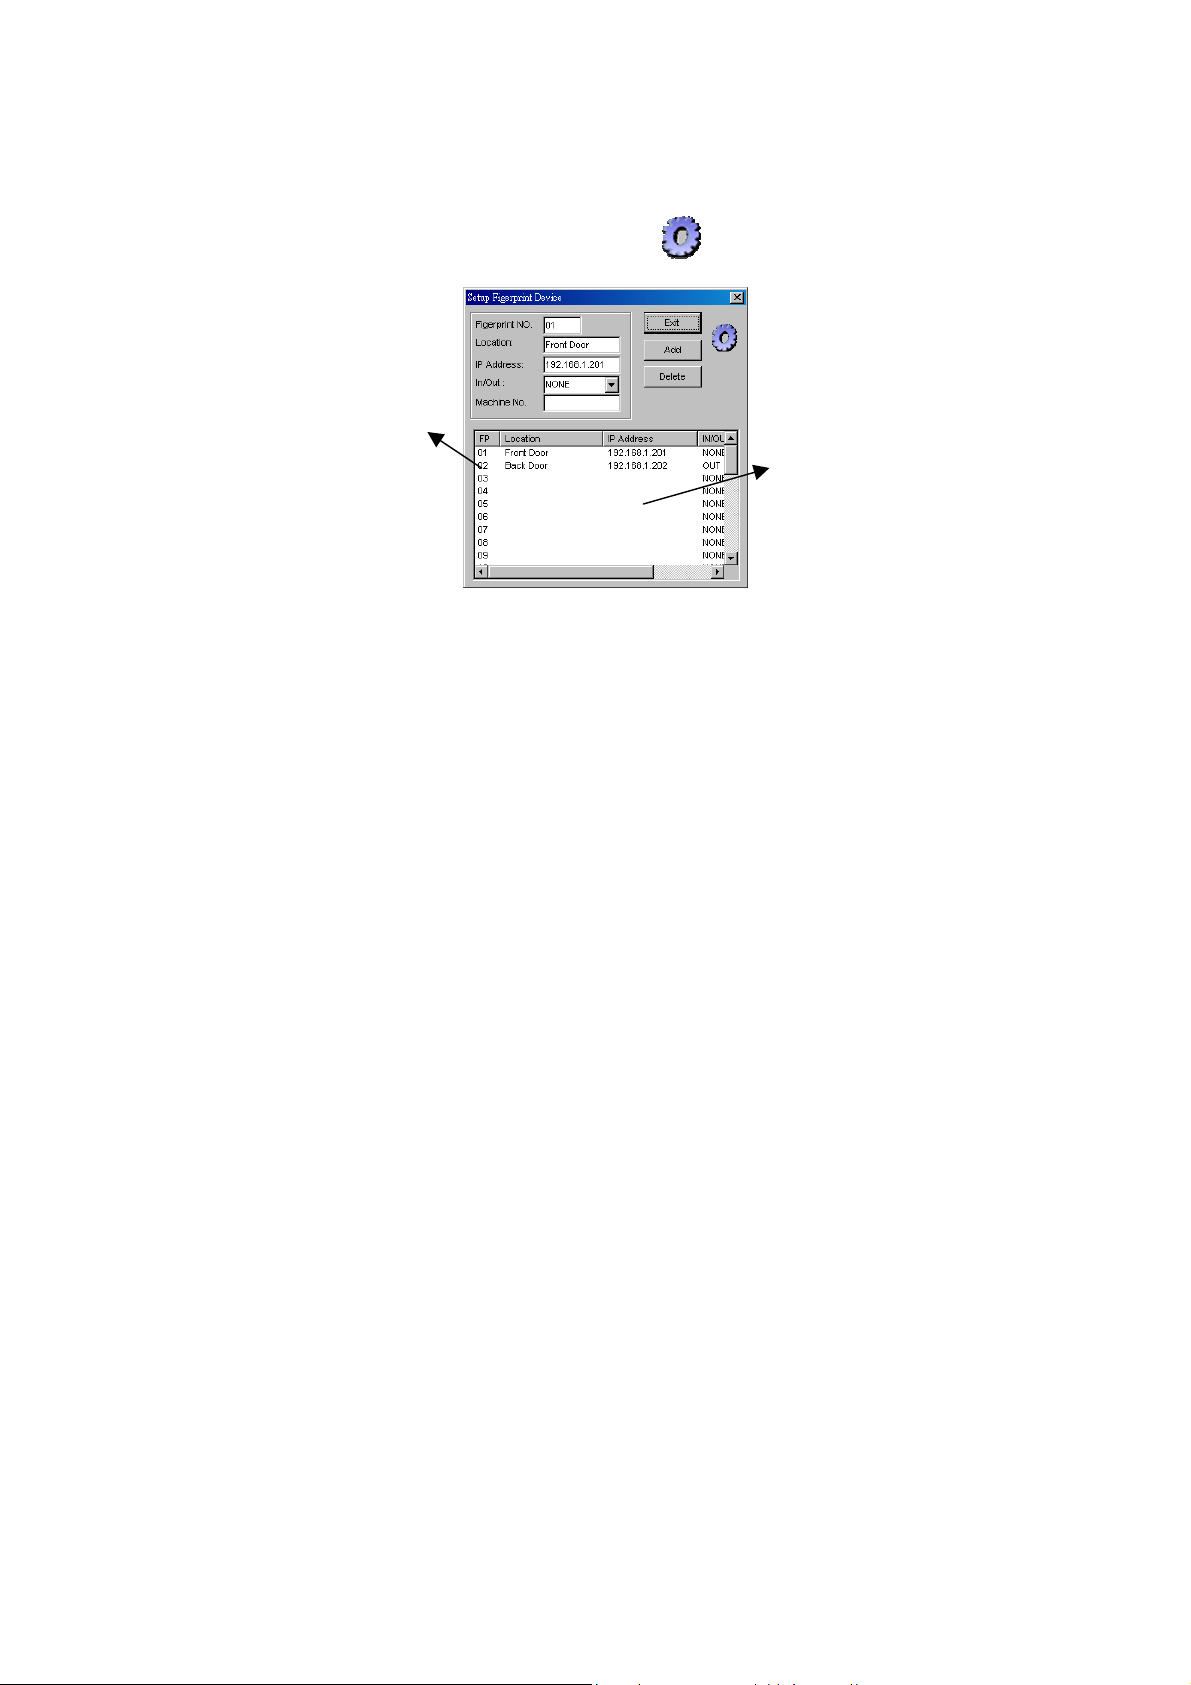
2.3.2. Setting Up the Fingerprint Device
User needs to set up the Fingerprint Device section to detect all connected FingerKey
devices before use the whole security management system. Please follow the
introduction below to complete the Fingerprint Device setting.
Step1: Please click the “Fingerprint Device” ( ) button to open the “Setup
Fingerprint Device” dialog.
Finger 2.3.2 – 1: FingerKey device dialog
27
Page 29
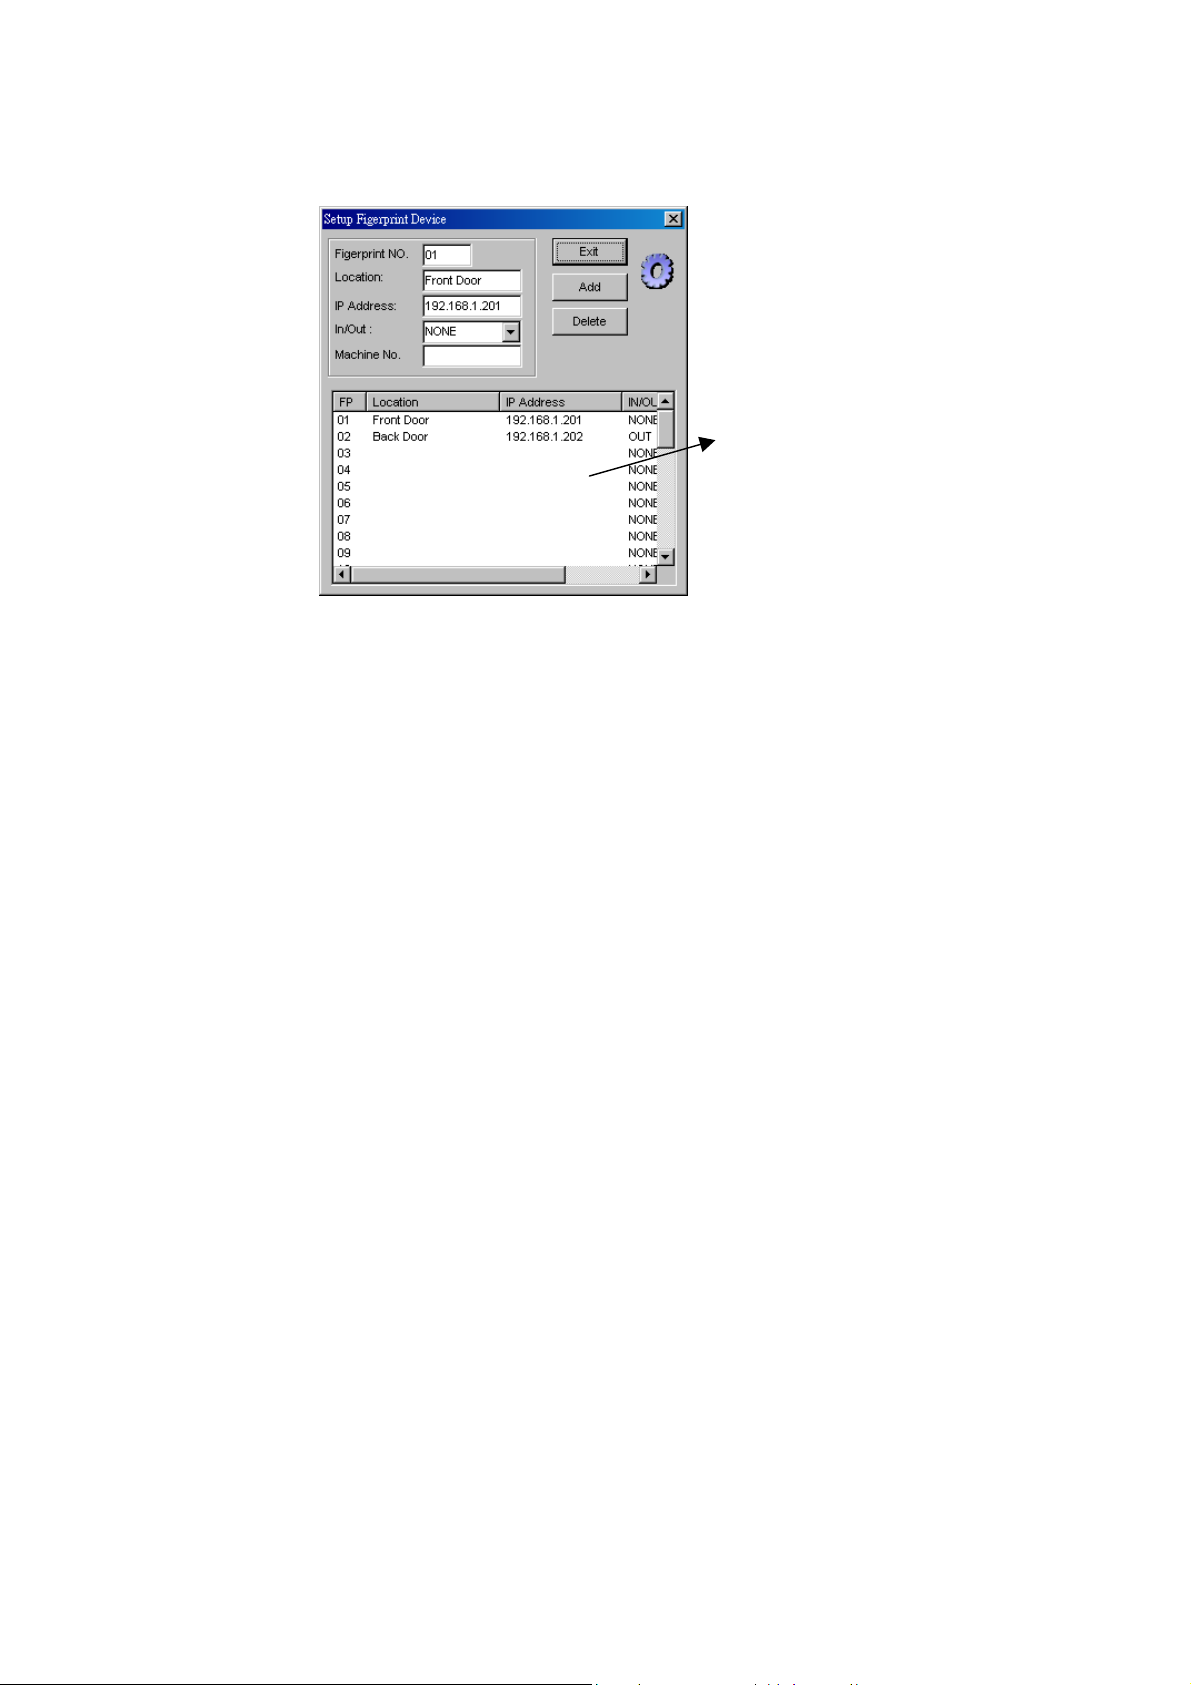
Step2: Please type a connected FingerKey device’s information in each column and
press “Add” button to add device in this management system.
Information of each connected
FingerKey devices which has
been set.
Finger 2.3.2 – 2: Fill out connected FingerKey device information
Section Description:
Fingerprint NO. : A number for each connected FingerKey device
Location: The connected FingerKey device location
IP Address: The connected FingerKey device’s IP address. The IP Address
need to be same as connected FingerKey device’s IP address. To check or set
up FingerKey device’s IP address, please refer to the section 2.2.7
FingerKey System IP Address on page 23.
In/Out: A mention of setting FingerKey for people entering of going out.
Machine No.: The FingerKey device’s machine number.
28
Set up
Page 30

Function Keys
To exit this section.
To add FingerKey device in this section.
To remove a FingerKey device from this management system.
29
Page 31

Chapter 3 Basic Operation
3.1. Properly Place The Finger
The correct way is:
Place a finger flatware on the sensor surface
Place it to the center of the sensor surface
The wrong way is:
Note: Please adopt the correct way to place the finger; Our Company is not responsible for the
malfunctioning results arising from improper pressing manners. Our company reserve ultimate the
interpreting and modifying right for this.
30
Page 32

3.2. Enrolling The First Administrator
Setting Outline:
1). Enroll the first administrator in FingerKey device
2). Enroll the first administrator in EzFingerKey program (FingerKey PC
software)
1). Enroll the first administrator in FingerKey device
The default enrollment setting of FingerKey is null, everyone can press M button to
enter and process the menu system. If the first enrolling person enrolls as a user who
will have the authority as administrator until the system has an administrator
enrollment; however, for better secure management consideration, we suggest that an
administrator enrolls as administrator in the system first while the system is brand new.
To enroll the first administrator in the FingerKey system, please follow the steps
bellow:
Step1: Please press button to enter the menu options.
Note: If there are already several enrolling users in the system, the first enrolling user
will has the temporary administrator authority to enroll other person in the system, then
this enrollment will need the first enrolling user’s fingerprint to enter the menu option
after pressing the “M” button. However, after an administrator has been enrolled as
administrator in this system, the first enrolling user will be auto-disabled the temporary
administrator authority and become a normal user.
Step2: Please follow the procedure below to complete the enrollment:
(1) Select “User Manage” and press button.
31
Page 33

(2) Select “Enroll Admin” and press button.
(3) Select “Enroll FP” and press button.
(4) Please press button to continue.
(5) Please press button to continue.
(6) Please use buttons to select UserID number, and press
button to continue.
32
Page 34

Step3: Until the screen displays the information as blow
Simply place finger 3 times and press
button to confirm this process.
Note: Please remember which finger has been enrolled for accessing the system next
time.
Function Keys:
Menu Function: Menu option button
Confirm Key: To confirm the present operation.
Cancel Key: To cancel the present operation.
Scrolling Up Key: To scroll the menu up.
Scrolling Down Key: To scroll the menu down.
2). Enroll the first administrator in EzFingerKey program (FingerKey PC software)
The administrator also needs to be set in EzFingerKey PC program after enrolling in
the FingerKey device. To enroll the first administrator in the EzFingerKey PC program
system, please follow the steps bellow:
Step1: Please open the EzFingerKey program from PC (Double click the EzfingerKey.exe
icon).
33
Page 35

Step2: Press button and type the login name and password to login the system.
Finger 3.2 – 1: Login password dialog
NOTE: To Set up or change the login name and password, please refer to the section 2.3.1
EzFingerKey Login Password Setting on page 25.
Step3: Please press the “Fingerprint Device” button ( ) to check and make sure the
FingerKey device has been add in the EzFingerKey system.
Finger 3.2 – 2: Please check the FingerKey device
which the administrator has been enrolled is on the list.
NOTE: For questions about how to add connected FingerKey devices in EzFingerKey
system, please refer to section 2.3.2 Setting Up the Fingerprint Device on page 27.
The display window lists the
connected FingerKey devices
information.
34
Page 36

Function Keys:
To exit this section.
To add FingerKey device in this section.
To remove a FingerKey device from this management system.
Step4: Please press “Group” ( ) button to add group name or department name for
enrolling Administrator.
Finger 3.2 – 3: Group adding
Section Description:
Group NO.: Select a group number from 01 to 10.
Description: Type a group name.
Function Keys:
To exit this section.
35
Page 37
To add a group name in the system.
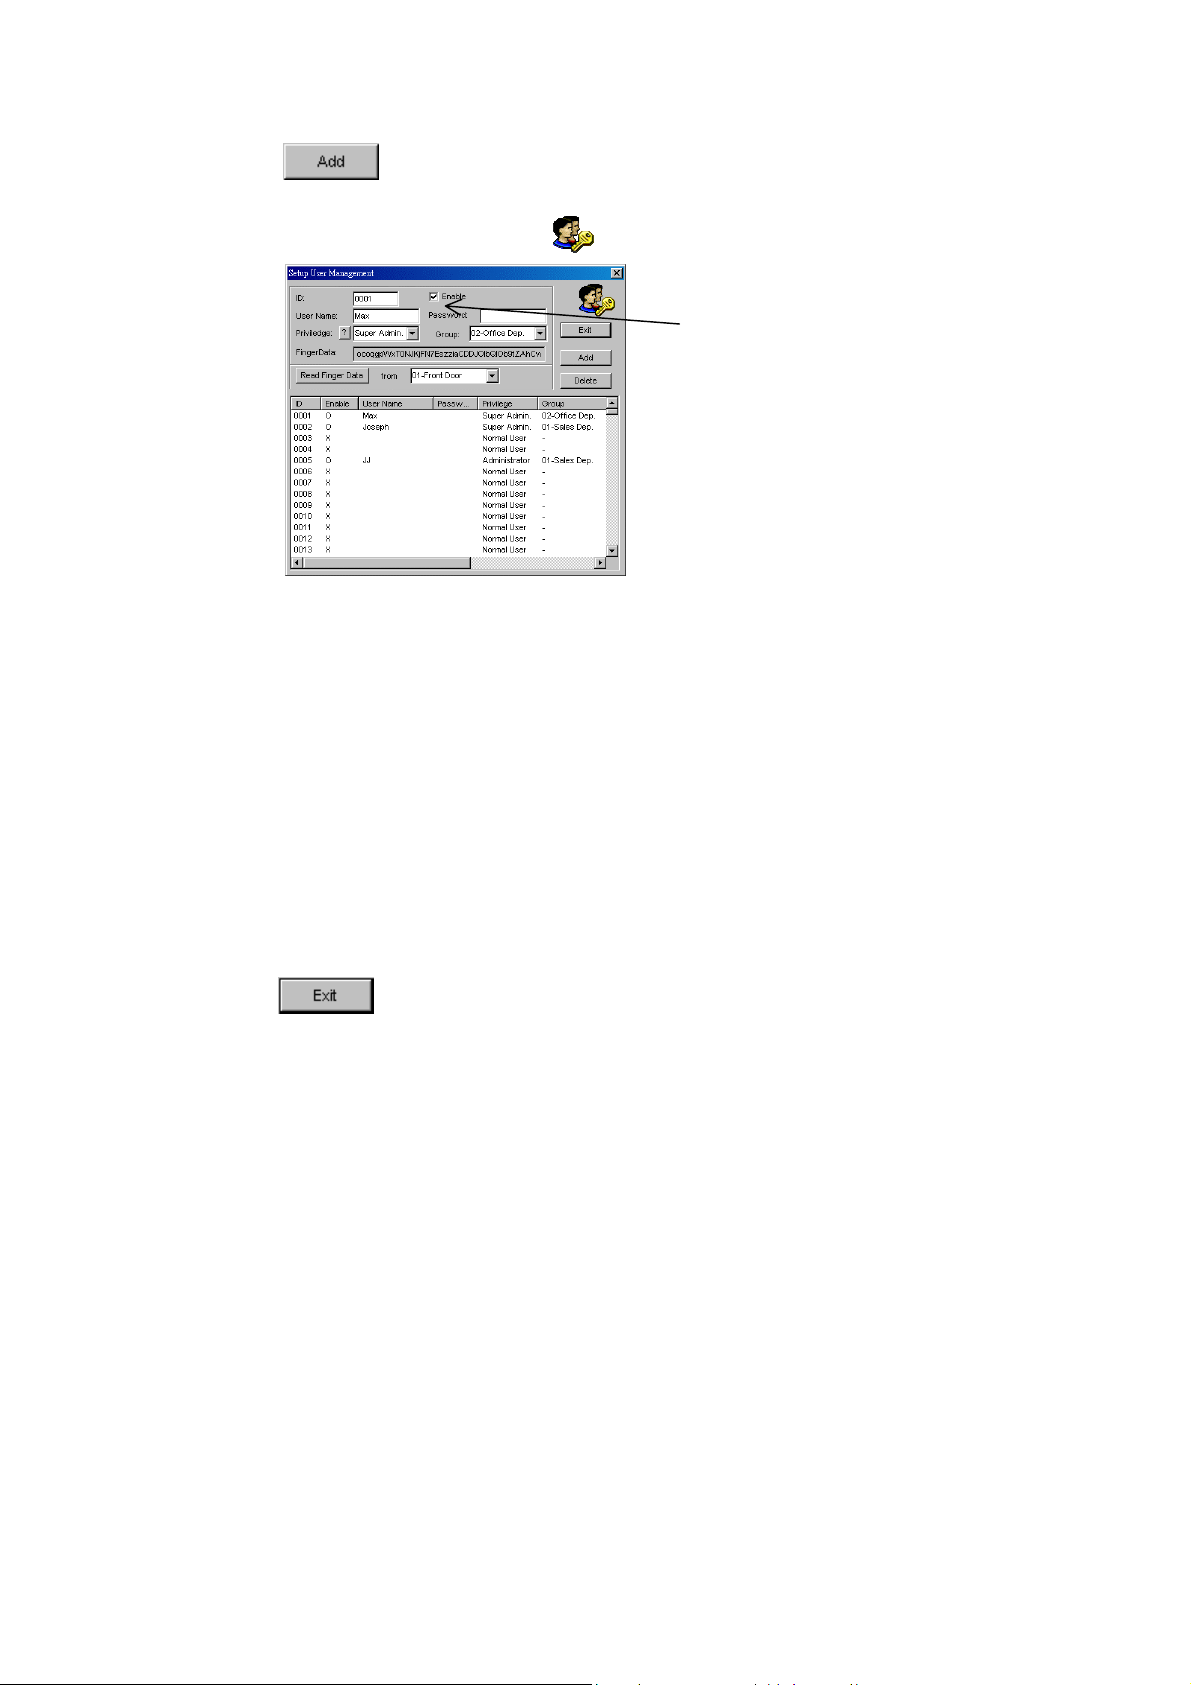
Step4: Please press “User Manage” ( ) button to set and add enrolling administrator.
Please check the Enable Box, or
enrolling user can not access the
FingerKey system.
Finger 3.2 – 4: Setup user management
Section Description:
ID: Select one ID number from 0001 to 0500 for an enrolling user.
Enable: To enable or disable access of the registered user.
User Name: Fill out the enrolling user’s name.
Password: Fill out the enrolling user’s password.
Privilege: Select an authority level from normal user to Super Admin for the enrolling user.
Group: Select a group name for the enrolling user.
From: Select the connected FingerKey Device’s location.
Read Finger Data: Press this button to receive the enrolling user’s fingerprint data from the
connected FingerKey device after fill out the information above.
FingerData: A reference for showing if the fingerprint data has been received.
Function Keys:
To exit this section.
36
Page 38
To add an enrolling user’s fingerprint data in the system.
To remove a user from this management system.
3.3. Enrolling A User
Setting Outline:
1). Enroll a user in FingerKey device
2). Enroll a user in EzFingerKey program (FingerKey PC software)
1). Enroll a user in FingerKey device
Step1: Please press button, and the system administrator place the finger on the
Optical Fingerprint Sensor to enter the menu option.
Step2: Please follow the procedure below to complete the enrollment:
(1) Select “User Manage” and press button.
(2) Select “Enroll User” and press button.
(3) Select “Enroll FP” and press button.
37
Page 39

(4) Please press button to continue.
(6) Please use buttons to select UserID number, and press
button to continue.
Step3: Until the screen displays the information as blow
Simply place finger 3 times and press button
to confirm this process.
Note: Please remember which finger has been enrolled for accessing the system next time.
Function Keys:
Menu Function: Menu option button
Confirm Key: To confirm the present operation.
Cancel Key: To cancel the present operation.
Scrolling Up Key: To scroll the menu up.
Scrolling Down Key: To scroll the menu down.
38
Page 40

2). Enroll the user in EzFingerKey program (FingerKey PC software)
Step1: Please open the EzFingerKey program from PC (Double click the EzfingerKey.exe
icon).
Step2: Press button and type the login name and password to login the system.
Finger 3.3 – 1: Login password dialog
NOTE: To Set up or change the login name and password, please refer to the section 2.3.1
EzFingerKey Login Password Setting on page 25.
Step3: Please press the “Fingerprint Device” button ( ) to check and make sure the
FingerKey device has been added in the EzFingerKey system.
Finger 3.3 – 2: Please check if the FingerKey device is on the list.
The display window lists the
connected FingerKey devices
information.
39
Page 41

NOTE: For questions about how to add connected FingerKey devices in EzFingerKey
system, please refer to section 2.3.2 Setting Up the Fingerprint Device on page 27.
Function Keys:
To exit this section.
To add FingerKey device in this section.
To remove a FingerKey device from this management system.
Step4: Please press “Group” ( ) button to add group name or department name for
enrolling users.
Finger 3.2 – 3: Group Adding
40
Page 42

Section Description:
Group NO.: Select a group number from 01 to 10.
Description: Type a group name.
Function Keys:
To exit this section.
To add a group name in the system.
Step5: Please press “User Manage” ( ) button to set and add enrolling user.
Finger 3.3 – 4: Setup User Management
Section Description:
ID: Select one ID number from 0001 to 0500 for an enrolling user.
User Name: Fill out the enrolling user’s name.
Password: Fill out the enrolling user’s password.
Privilege: Select normal user for the enrolling user.
Group: Select a group name for the enrolling user.
From: Select the connected FingerKey Device’s location.
41
Page 43

Read Finger Data: Press this button to receive the enrolling user’s fingerprint data from the
connected FingerKey device after fill out the information above.
FingerData: A reference for showing if the fingerprint data has been received.
Function Keys:
To exit this section.
To add an enrolling user’s fingerprint data in the system.
To remove a user from this management system.
42
Page 44

Chapter 4 FingerKey Device Menu Setup
4.1. FingerKey Menu Overview
FingerKey Menu Tree
User Manage Enroll User Enroll FP
Enroll Pwd
FP&Pwd
Enroll Admin Enroll FP
Enroll Pwd
FP&Pwd
Delete
Options System Opt Date Time
Language
Fmt
Adv Option Reset Opts.
Del AttLogs
Clear All Data
Clr Admin Pri
Show Score
Match Thr
Only 1 to 1
1:1 Thr
Power Mng Shutdown
Power On
Sleep
43
Page 45

Idle
Idle Min
Lock Power
Comm Opt BaudRate
Dev Num
IP Addr
Net Speed
Ethernet
RS232
RS485
COMM Key
Log Opt Alm SuperLog
Alm Attlog
ReCheck Min
Access Options Define TP
User Acc Opts
GRP TP Define
Access Comb
Lock
Dsen. Delay
Dsen. Mode
Duress Options Duress FP.
Help Key
1:1 Trig
1:N Trig
44
Page 46

Pwd Trig
Alarm Delay
Auto Test Run All Test
FLASH Test
LCD Test
FP Reader
Key Test
RTC Test
Sys Info User Cnt
FP Cnt
Att Log
Admin Cnt
Pwd Usr
S Logs
Free Space Info
Dev Info FPCnt
AttLog
S Logs
Manu Time
Serial Num
Vendor
Device Name
Alg Version
Firmware Ver
45
Page 47

4.2. User Manage
4.2.1. Enroll User
Enroll a user as user authority access.
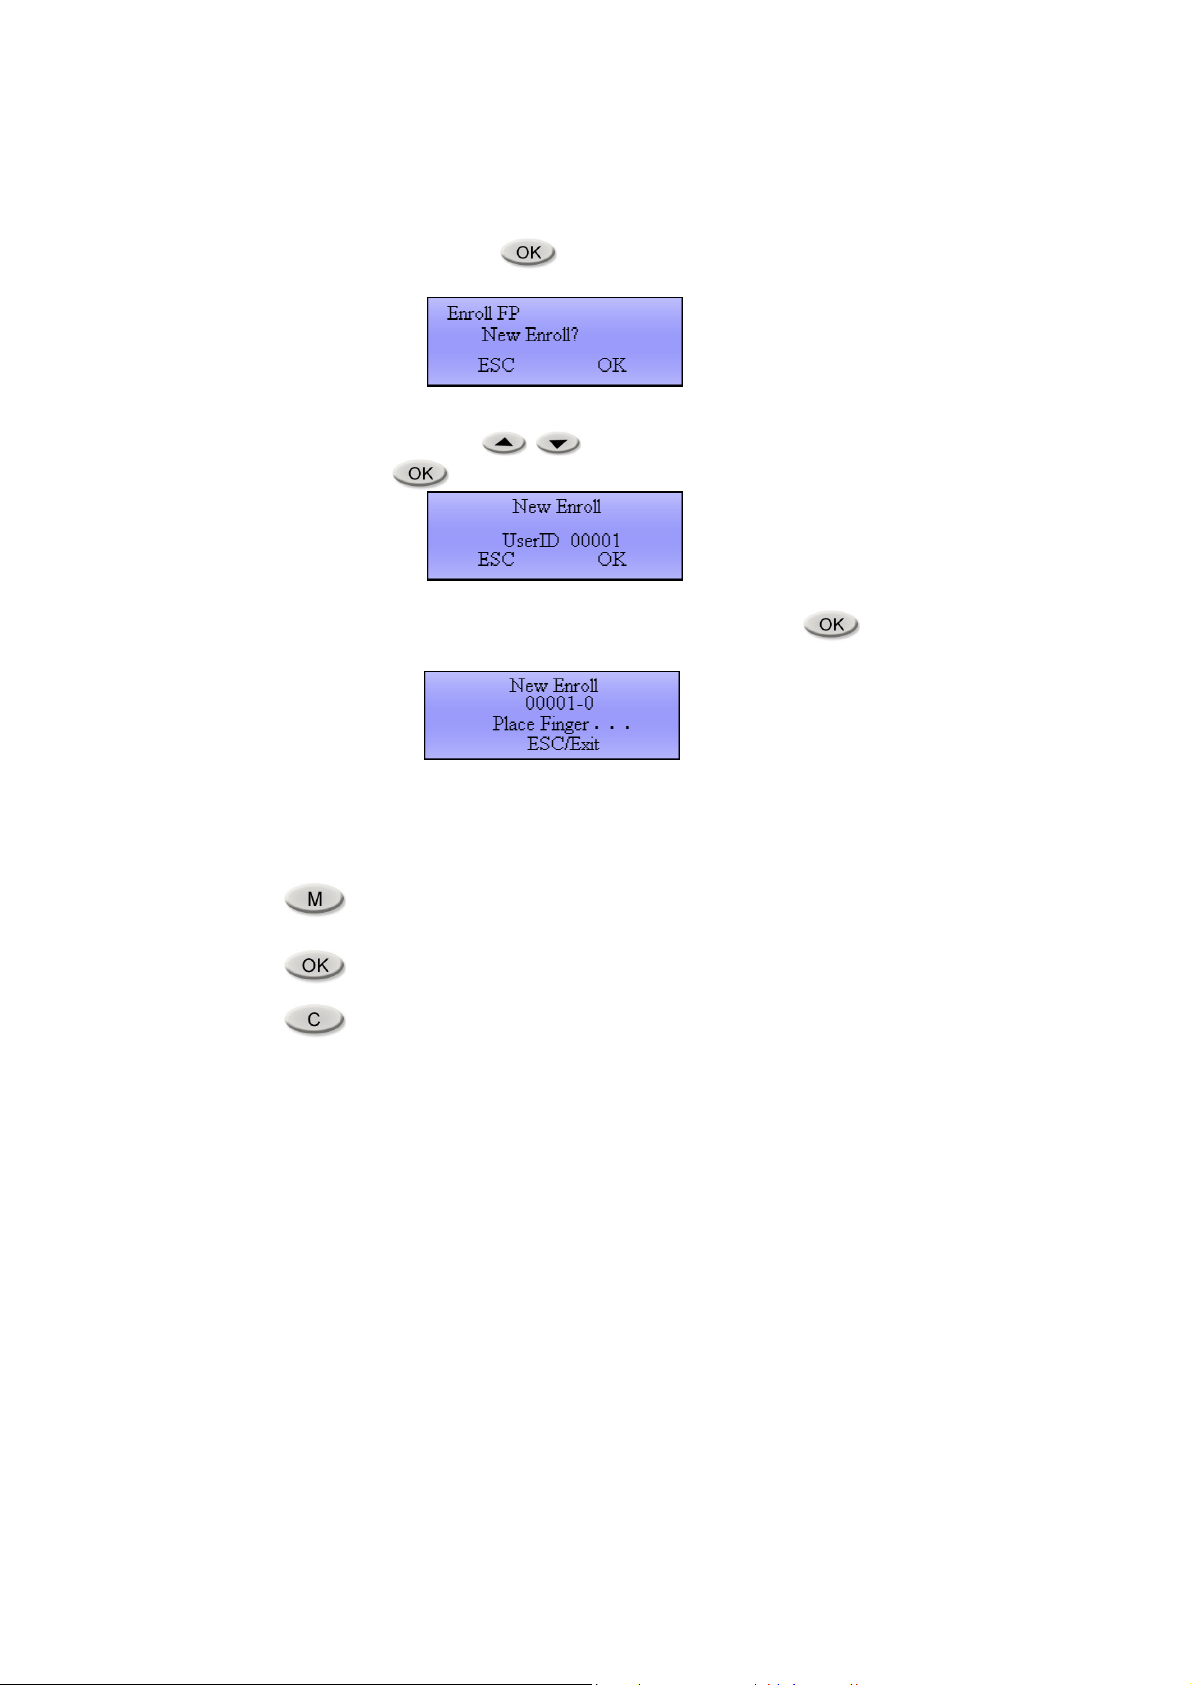
4.2.1.1. Enroll FP
Enroll user by fingerprint
Function path: Menu User Manage Enroll User Enroll FP
Example of Enroll FP:
(1) Please select the “Enroll FP” and press button.
(2) Please press button to continue.
(3) Please use buttons to select UserID number, and press
button to continue.
(4) Simply place a finger 3 times on the optical and press button to
confirm this process.
46
Page 48

Note: Please remember which finger has been enrolled for accessing the system next time.
Function Keys:
Menu Function: Menu option button.
Confirm Key: To confirm the present operation.
Cancel Key: To cancel the present operation.
Scrolling Up Key: To scroll the menu up.
Scrolling Down Key: To scroll the menu down.
User Verification:
User simply presses the enrolled finger on the optical sensor surface. If the
verification has been approved, the screen will display as below:
If the Verification is failed, the screen will display as below:
47
Page 49

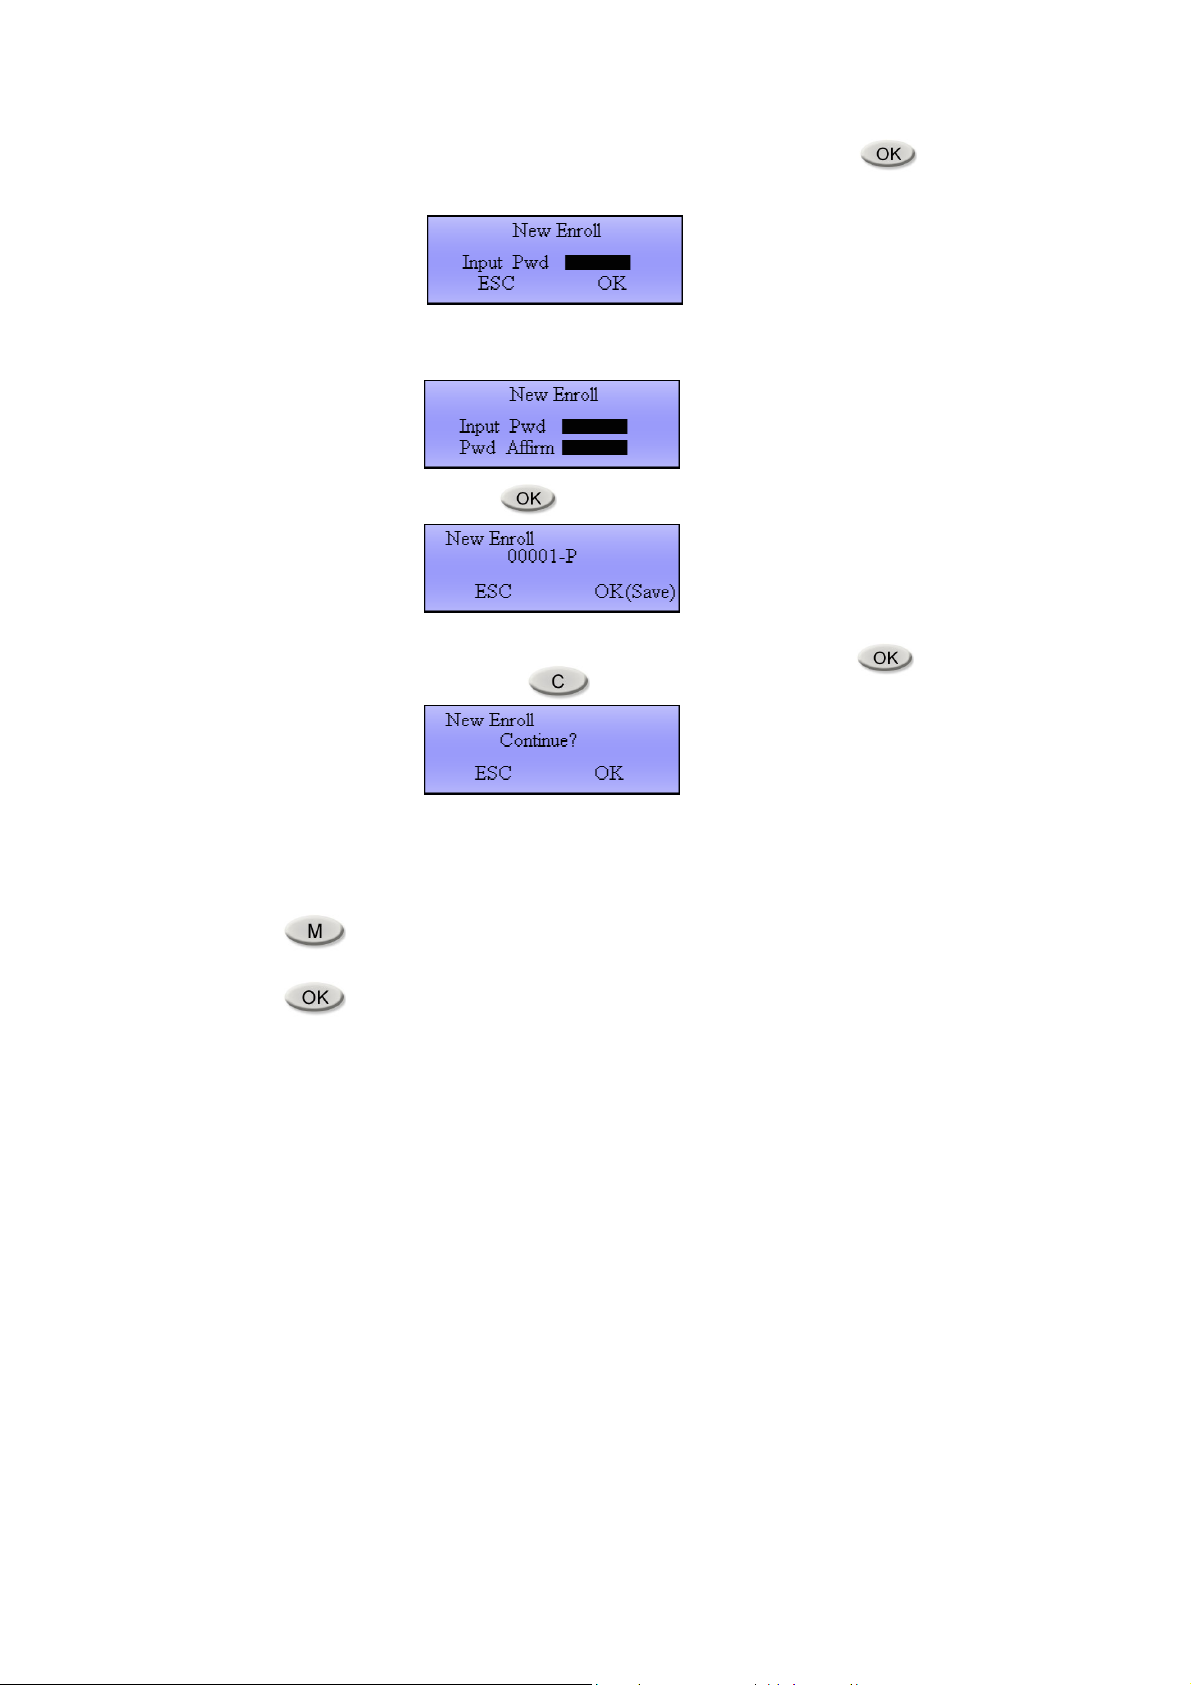
4.2.1.2. Enroll Pwd
Enroll user by password
Function path: Menu User Manage Enroll User Enroll Pwd
Example of Enroll Pwd:
(1) Please select the “Enroll Pwd” and press button.
(2) Please press button to continue.
(3) Please use 0 to 9 buttons to select UserID number, and press
button to continue.
Note: Please remember the enrolling UserID number for access the system
next time.
(4) Please use 0 to 9 buttons to type five digit password, and press
button to continue.
48
Page 50

Function Keys:
(5) Please type the password again to confirm the password.
(6) Please press button to complete this password enrollment.
(7) To continue enrolling another user by password, please press
button or press five times to exit.
Menu Function: Menu option button
Confirm Key: To confirm the present operation.
Cancel Key: To cancel the present operation.
Scrolling Up Key: To scroll the menu up.
Scrolling Down Key: To scroll the menu down.
49
Page 51

User Verification:
User simply uses 0 to 9 buttons to type the enrolled UserID number and press
the “OK” button to continue.
Please input the password by 0 to 9 number keys.
If the verification has been approved, the screen will display as below:
If the Verification is failed, the screen will display as below:
50
Page 52

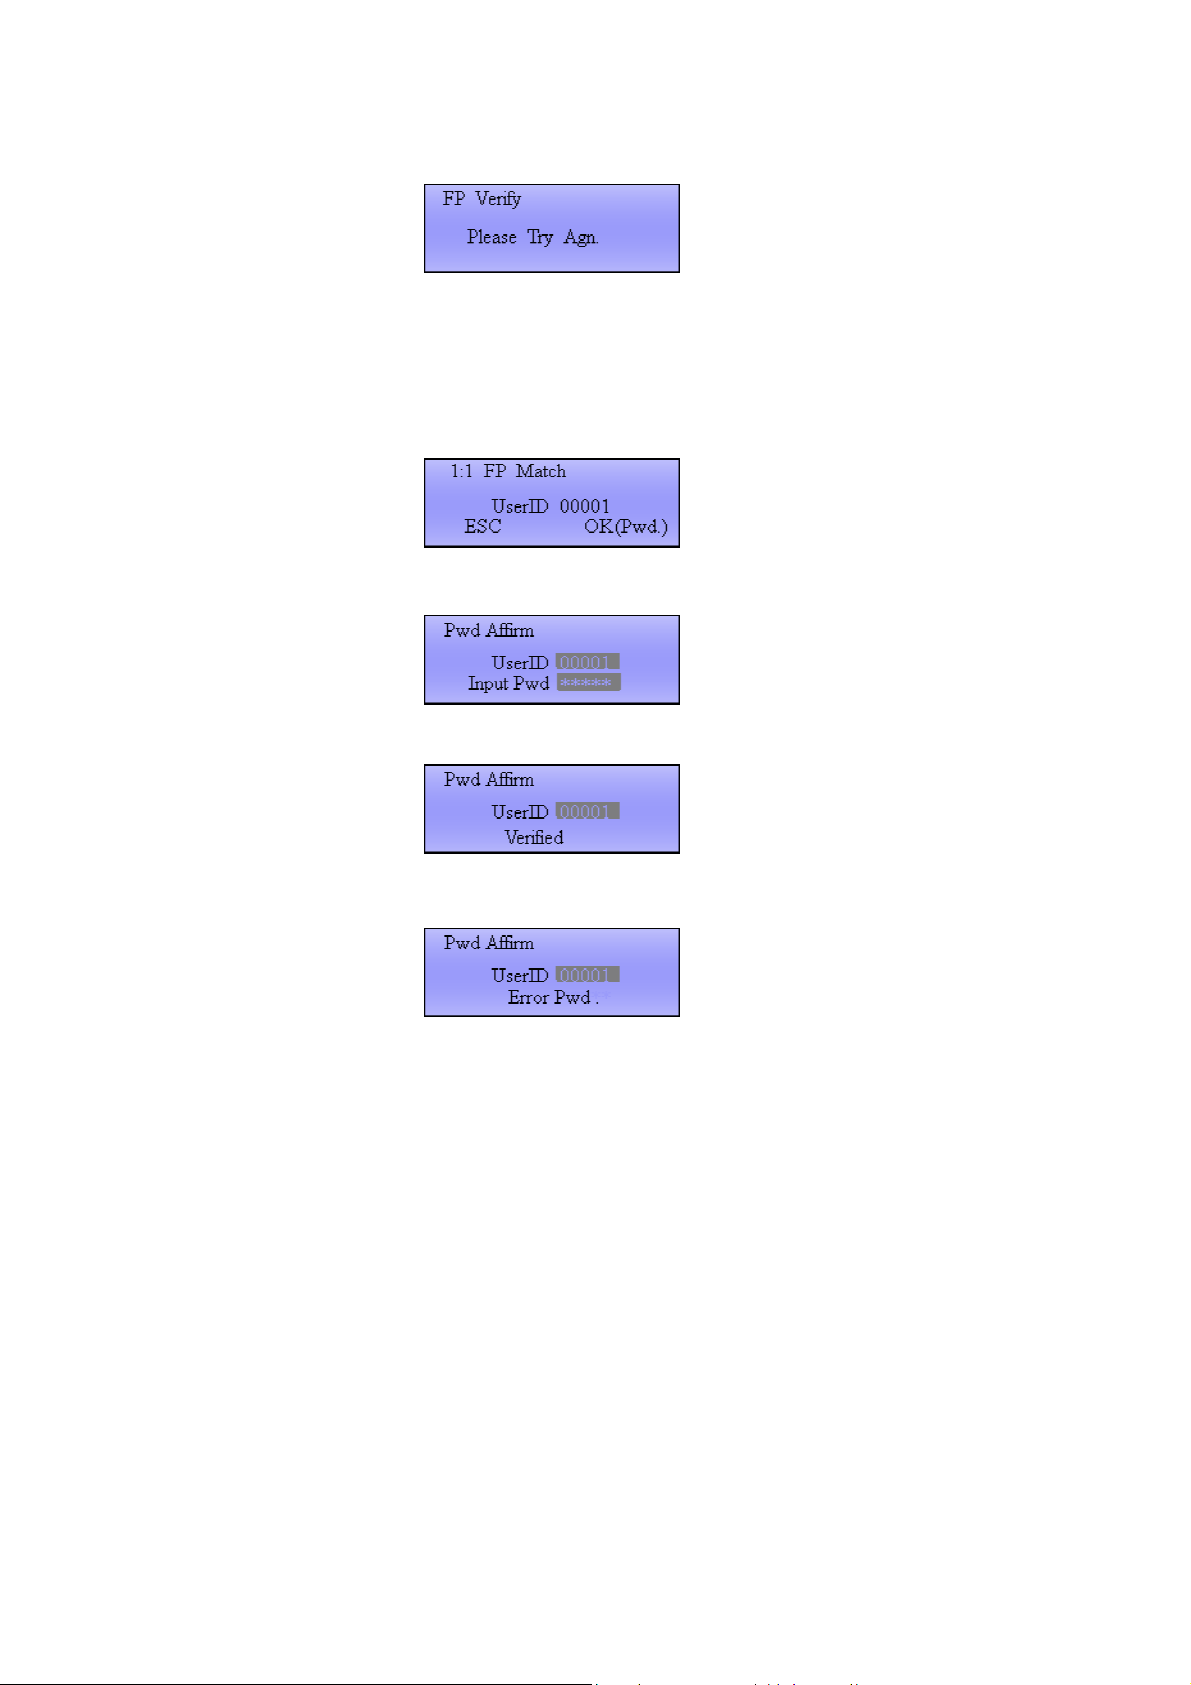
4.2.1.3. Enroll FP & Pwd
Enroll user by fingerprint and password, so user can either way use fingerprint or password
to access the system.
Function path: Menu User Manage Enroll User Enroll FP & Pwd
Example of Enroll FP & Pwd:
(1) Please select the “Enroll Pwd” and press button.
(2) Please press button to continue.
(3) Please use 0 to 9 buttons to select UserID number, and press
button to continue.
(4) Simply place a finger 3 times on the optical to continue.
Note: Please remember which finger has been enrolled for accessing the
system next time.
51
Page 53
(5) Please use 0 to 9 buttons to type five digit password, and press
button to continue.
(6) Please type the password again to confirm the password.
(7) Please press button to complete this password enrollment.
(8) To continue enrolling another user by password, please press
button or press five times to exit.
Note: Please remember which finger has been enrolled for accessing the system next time.
Function Keys:
Menu Function: Menu option button
Confirm Key: To confirm the present operation.
52
Page 54

User Verification:
Cancel Key: To cancel the present operation.
Scrolling Up Key: To scroll the menu up.
Scrolling Down Key: To scroll the menu down.
(1) Use Fingerprint to access the system:
User simply presses the enrolled finger on the optical sensor surface. If the
verification has been approved, the screen will display as below:
If the Verification is failed, the screen will display as below:
OR
(2) User password to access the system:
User simply uses 0 to 9 buttons to type the enrolled UserID number and press
the “OK” button to continue.
53
Page 55

Please input the password by 0 to 9 number keys.
If the verification has been approved, the screen will display as below:
If the Verification is failed, the screen will display as below:
54
Page 56

4.2.2. Enroll Admin
Enroll a user as administrator authority access.
4.2.2.1. Enroll FP
Enroll administrator by fingerprint
Function path: Menu User Manage Enroll Admin Enroll FP
Example of Enroll FP:
(1) Select “Enroll Admin” and press button.
(2) Select “Enroll FP” and press button.
(3) Please use buttons to select authority levels and press
button to confirm selection and continue.
FingerKey Authority Levels Description:
Supervisor: Top authority, supervisor can access all of management functions
in the system.
Administrator: Second authority, administrator can access most functions in
the system.
55
Page 57
Enroller: Enroller only can access system to enroll new normal user or check
system information.
(4) Please press button to continue.
(5) Please use buttons to select UserID number, and press
button to continue.
(4) Simply place a finger 3 times on the optical and press button to
confirm this process.
Note: Please remember which finger has been enrolled for accessing the system next
time.
Function Keys:
Menu Function: Menu option button
Confirm Key: To confirm the present operation.
Cancel Key: To cancel the present operation.
56
Page 58

Scrolling Up Key: To scroll the menu up.
Scrolling Down Key: To scroll the menu down.
User Verification:
User simply presses the enrolled finger on the optical sensor surface. If the
verification has been approved, the screen will display as below:
If the Verification is failed, the screen will display as below:
4.2.2.2. Enroll Pwd
Enroll administrator by password
Function path: Menu User Manage Enroll Administrator Enroll Pwd
Example of Enroll Pwd:
(1) Please select the “Enroll Pwd” and press button.
57
Page 59

(2) Please use buttons to select authority levels and press
button to confirm selection and continue.
FingerKey Authority Levels Description:
Supervisor: Top authority, supervisor can access all of management functions
in the system.
Administrator: Second authority, administrator can access most functions in
the system.
Enroller: Enroller only can access system to enroll new normal user or check
system information.
(3) Please press button to continue.
(4) Please use 0 to 9 buttons to select UserID number, and press
button to continue.
Note: Please remember the enrolling UserID number for access the system
next time.
58
Page 60

(5) Please use 0 to 9 buttons to type five digit password, and press
button to continue.
(6) Please type the password again to confirm the password.
(7) Please press button to complete this password enrollment.
(8) To continue enrolling another user by password, please press
button or press five times to exit.
Function Keys:
Menu Function: Menu option button
Confirm Key: To confirm the present operation.
Cancel Key: To cancel the present operation.
59
Page 61

User Verification:
Scrolling Up Key: To scroll the menu up.
Scrolling Down Key: To scroll the menu down.
User simply uses 0 to 9 buttons to type the enrolled UserID number and press
the “OK” button to continue.
Please input the password by 0 to 9 number keys.
If the verification has been approved, the screen will display as below:
If the Verification is failed, the screen will display as below:
60
Page 62

4.2.2.3. Enroll FP & Pwd
Enroll user by fingerprint and password, so user can either way use fingerprint or password
to access the system.
Function path: Menu User Manage Enroll User Enroll FP & Pwd
Example of Enroll FP & Pwd:
(1) Please select the “Enroll Pwd” and press button.
(2) Please use buttons to select authority levels and press
button to confirm selection and continue.
FingerKey Authority Levels Description:
Supervisor: The top authority, supervisor can access all of management
functions in the system.
Administrator: The second authority, administrator can access most
functions in the system.
Enroller: Enroller only can access system to enroll new normal user or check
system information.
(3) Please press button to continue.
61
Page 63

(4) Please use 0 to 9 buttons to select UserID number, and press
button to continue.
(5) Simply place a finger 3 times on the optical and press button to
confirm this process.
Note: Please remember which finger has been enrolled for accessing the
system next time.
(6) Please use 0 to 9 buttons to type five digit password, and press
button to continue.
(7) Please type the password again to confirm the password.
(8) Please press button to complete this password enrollment.
62
Page 64

(9) To continue enrolling another user by password, please press
button or press five times to exit.
Note: Please remember which finger has been enrolled for accessing the system next time.
Function Keys:
Menu Function: Menu option button
Confirm Key: To confirm the present operation.
Cancel Key: To cancel the present operation.
Scrolling Up Key: To scroll the menu up.
Scrolling Down Key: To scroll the menu down.
User Verification:
(1) Use Fingerprint to access the system:
User simply presses the enrolled finger on the optical sensor surface. If the
verification has been approved, the screen will display as below:
63
Page 65
If the Verification is failed, the screen will display as below:
OR
(2) User password to access the system:
User simply uses 0 to 9 buttons to type the enrolled UserID number and press
the “OK” button to continue.
Please input the password by 0 to 9 number keys.
If the verification has been approved, the screen will display as below:
If the Verification is failed, the screen will display as below:
64
Page 66

4.2.3. Delete
This selection is to delete an enrolled user from system.
Function path: Menu User Manage Delete
Example of Delete function:
(1) Please use 0 to 9 buttons to type the UserID number and press button
to continue.
(2) Please press to continue.
(3) Please press to continue.
(4) Please press to continue.
65
Page 67

4.3. Options
4.3.1. System Opt (System Option)
4.3.1.1 Date Time
This function is to setup FingerKey’s date and time.
Function Path: Menu Options System Opt Date Time
Example of Date Time Setting:
(1) Please select the “Date Time” and press button.
(2) Please use buttons to select each section, and use 0 to 9
buttons to set up date and time, then press button to complete this
setting.
Function Keys:
Confirm Key: To confirm the present operation.
Cancel Key: To cancel the present operation.
Selection Keys: To select the selections.
66
Page 68

4.3.1.2 Language
This function provides user to select different display languages.
Function Path: Menu Options System Opt Language
Example of Language Display:
(1) Please use buttons to select the Language section.
(2) Please press and buttons to setup different display
languages.
ENG: English Display.
SCH: Simplify Chinese Display.
TCH: Traditional Chinese Display.
Function Keys:
Confirm Key: To confirm the present operation.
Cancel Key: To cancel the present operation.
Selection Keys: To select the selections.
NOTE: To affect language display setting, please exit the menu after confirm the
language setting and restart the FingerKey system.
67
Page 69

4.3.1.3 Fmt (Display Format)
This function is to change the date and time’s display format.
Function Path: Menu Options System Opt Fmt
Example of Fmt Modify:
(1) Please use buttons to select the Fmt section.
(2) Please press and buttons to set different display
formats.
Function Keys:
Confirm Key: To confirm the present operation.
Cancel Key: To cancel the present operation.
Selection Keys: To select the selections.
68
Page 70

4.3.1.4 Adv Option (System Advanced Option)
Function Path: Menu Options System Opt Adv Option
Note: To access Adv Option functions, user needs to enroll supervisor authority
ID.
Functions Description:
Reset Opts.: To restore all setup information to default.
Del AttLogs: To delete all flash memory logs from system.
Clear All Data: To delete all enrolling fingerprints data and logs
Clr Admin Pri: To release all enrolling authorities, all enrolling users will be
normal users.
Show Score: To set if display enrolling user’s fingerprint quality value on the
screen.
Match Thr: Match Threshold Levels, this function is to adjust system
determination value of fingerprint exactitude. The value is from 0
to 50, if supervisor sets high value of Match Thr, the system will
easily reject fingerprints which are not so clean or difficult to
identify to decrease a rate of false acceptance. However, if
supervisor sets low value of Match Thr, the system will be easier
to accept enrolling user, but if the Match Thr is set too low, the
system might recognize A enrolling user to be B enrolling user.
Only 1 to 1: To set if user needs to input the ID number to verify the
fingerprint.
69
Page 71

1:1 Thr: 1:1 Threshold Levels, ID+ Fingerprint identification and degree of register
template matching.
Function Keys:
Confirm Key: To confirm the present operation.
Cancel Key: To cancel the present operation.
Selection Keys: To select the selections.
4.3.2. Power Mng (Power Manager)
Function Path: Menu Options Power Mng
Functions Description:
Shutdown: Schedule a time to turn off the FingerKey power.
Power On: Schedule a time to turn on the FingerKey power.
Sleep: Schedule a time to enter sleep mode. Press any key to active the system again.
Idle: Select a mode which will be triggered while no operation occurs within a specific
time.
Idle Min: Set a specific time (minute) to triggers the idle mode if no operation occurs.
Lock Power: To keep the system power on, the function of power key ( ) will
be disabled.
70
Page 72

Function Keys:
Confirm Key: To confirm the present operation.
Cancel Key: To cancel the present operation.
Selection Keys: To select the selections.
4.3.3. Comm Opt (Communication Options)
Function Path: Menu Options Comm Opt
Function Description:
BaudRate: Baud Rate is a measure of how fast data is moving between instruments
that use serial communication. In the FingerKey system, there are three selections
which is 9600, 38400 and 115200. Normally, for RS232 communication, the baud rate
has been recommended to set high (fast) baud rate; however, for RS485
communication, the baud rate has been recommended to set low (slow) baud rate.
Please according to the connecting device, use and buttons to
selection the baud rate properly.
Dev Num: Device Number, a machine number, setting range is from 0 to 255.
IP Address: Internet Protocol address, it is a unique number that devices use in order
to identify and communicate with each other on a computer network utilizing the
Internet Protocol standard (IP). The FingerKey default setting of IP address is
192.168.1.201. User may need to change this IP address according to practical
requirement. For more information about IP address setting please refer to the section
71
Page 73

Function Keys:
2.2.7 Set up FingerKey System IP Address on page 23.
Net Speed: Network speed, the default network speed is 10M-F.
Ethernet: To set if open Ethernet communication.
RS232: To set if open RS232 communication.
RS485: To set if open RS485 communication.
War ning: RS485 communication in the outdoor environment, the lightening
protection device is required.
COMM Key: the default system keyword is 0; user may need to define it.
Confirm Key: To confirm the present operation.
Cancel Key: To cancel the present operation.
Selection Keys: To select the selections.
4.3.4. Log Opt (Log Options)
Function Path: Menu Options Log Opt
Function Description:
Alm SuperLog: Supervisor Log Alarm, FingerKey will count the setting number of
supervisor logs, while the setting number has been reached, the system will trigger the
alarm. The number range of counting supervisor logs is from 0 to 99.
Alm AttLog: Attendance Log alarm, FingerKey will count the setting number of
72
Page 74

attendance logs, while the setting number has been reached, the system will trigger the
alarm. The number range of counting supervisor logs is from 0 to 99.
ReCheck Min: Rechecking time, this function is to set within specific minutes, no
matter how many times a user accesses the FingerKey system, the system will only
save the first access time in log.
Function Keys:
Confirm Key: To confirm the present operation.
Cancel Key: To cancel the present operation.
Selection Keys: To select the selections.
Access Options
4.3.5.
4.3.5.1. Define TP
Define Time Plan, this function is to schedule a time scale for registered users access the
FingerKey for a week.
user can be set with maximum three of time planes. If the End-time is set less than
start-time (23:57-23:56), the access will be forbad all day. However, setting as (00:00-23:59)
represents to access all day.
Note: System defaults that time plane of serial number 1 is all-day open (i.e. new
registered user default can unlock door).
Function Path: Menu Options Access Options Define TP
Example of Define TP setting:
(1). Please use number keys and buttons to set or selection the
Whole system can be set maximum 50 time plans. Each registered
Time Plan number, and press button to continue.
73
Page 75

Function Keys:
Setting Time Plane number
(2) Please select day and time to set up.
Setting number one time plan accessing schedule
Confirm Key: To confirm the present operation.
Cancel Key: To cancel the present operation.
Selection Keys: To select the selections.
4.3.5.2. User Acc Opts
User Access Options, this function is to process correlative setting according to
user’s requirement.
Function Path: Menu Options Access Options User ACC Opts
Example of User Access Options setting:
1). Please use buttons to select a UserID number to choose a user,
and press button to continue.
74
Page 76

Function Keys:
2). Select a function to set up user.
Function Descriptions:
Belong to GPR: To divide a registered user in a group.
Use GRP TPs: To set if use group time plans.
TP1: To set first time plan for a registered user.
TP2: To set second time plan for a registered user.
TP3: To set third time plan for a registered user.
Confirm Key: To confirm the present operation.
Cancel Key: To cancel the present operation.
Selection Keys: To select the selections.
75
Page 77

4.3.5.3. GRP TP Define
Define Group Time Plan, This function is to configure and group the setting
schedule.
Function Path: Menu Options Access Options GRP TP Define
Example of GRP TP Define setting:
1). Use number keys and buttons to select a group number, and
press button to continue.
2). Please use buttons to select a group number, and press
button to set.
Function Keys:
Confirm Key: To confirm the present operation.
Cancel Key: To cancel or exit the present operation.
Selection Keys: To select the selections.
76
Page 78

4.3.5.4. Access Comb
Note: System can simultaneously define maximum 10 access combinations,
Access combination is the direct representation of access controlling. For
example, if user wants that all registered users cannot unlock, then the user can
set all 10 access combinations to null.
Access combination definition is to define different unlocking combinations,
and each combination is composed of different groups. Access combination
directly uses group number and does not consider user verification sequence
between each group. For example, if setting is “Com 123” which represents
group 1, group 2, group 3 and at least one registered user in each group
congregation to pass verification together for unlocking the door. If setting is
“Com 4” which represents that everyone of group 4 registered users can access
the FingerKey system to unlock the door.
and access combination of system initial default setting is “1” (i.e. new
registered user default can unlock door).
Function Path: Menu Options Access Options Access Comb
Example of Access Comb setting:
Set a door needs one of each group 1, group 2 and group 3 reregistered users
verifying together to open. Please follow the setup procedure below:
1). Use buttons to select Comb 1, and press button to
set up Comb 1.
77
Page 79

Function Keys:
2). Use number keys to set groups number in Comb 1, and press button
to continue.
3). After all combs setting has been done, please press button to exit the
Access Comb section, and then press button to save changes.
Confirm Key: To confirm the present operation.
Cancel Key: To cancel or exit the present operation.
Selection Keys: To select the selections.
4.3.5.5. Lock
System requires setting fingerprint scanner to control the time of opening
electronic lock. Set the number to 0 is to close this lock control function. One
unit is 20ms; maximum value can be set to 254 (5.08 seconds).
Function Path: Menu Options Access Options Lock
Example of Lock setting:
78
Page 80

Use buttons to select Luck function and press button to
Function Keys:
Confirm Key: To confirm the present operation.
Cancel Key: To cancel or exit the present operation.
4.3.5.6. Dsen Delay
Door Sensor Delay, This function is to set seconds of triggering an alarm after
opening the door.
Function Path: Menu Options Access Options Dsen Delay
set up.
Selection Keys: To select the selections.
Example of Lock setting:
Please Use buttons to select Luck function and press
button to set up.
This setting represents that the alarm will be triggered if the door is not closed
over 10 sounds.
79
Page 81

4.3.5.7. DSen Mode
Door Sensor Mode, there are three selections of this section.
NO: Normally Open, the contacts of a switch or relay are normally open or not
NC: Normally Closed, the contacts of a switch or relay are closed or connected
None: Not using electromagnetic system or don’t care.
Function Path: Menu Options Access Options DSen Mode
Example of DSen Mode setting:
Please Use buttons to select DSen Mode function and press
connected. When activated, the contacts close or become connected.
when at rest. When activated, the contacts open or separated.
button to set up.
4.3.5.8. Duress Options:
This function is to trigger alarm system while a registered user uses duress
fingerprint to access FingerKey system.
Function Path: Menu Options Access Options Duress Options
80
Page 82

Function Keys:
Function Descriptions:
Duress FP: To enroll or disable existing registered fingerprints.
Help Key: To enable or disable the help key.
1:1 Trig: To set if registered users need to input the ID number to verify the
duress fingerprint and trigger alarm.
1:N Trig: To set if registered users verify duress fingerprint directly to trigger
alarm system.
Pwn Trig: To set if registered users can trigger alarm by password.
Alarm Delay: To set seconds to trigger an alarm after verify a duress
fingerprint.
Confirm Key: To confirm the present operation.
Cancel Key: To cancel or exit the present operation.
Selection Keys: To select the selections.
Duress FP Setting: To enroll a new duress fingerprint, please choose a fingerprint
which has not registered before or the system will skip the
process.
Function Path:
Menu Options Access Options Duress Options Duress FP
81
Page 83

New Enrollment: To enroll a new duress fingerprint for an existing
registered user.
1). Select an existing registered UserID by numeric buttons, and press
button to continue.
2). Please choose a finger which has not register in FingerKey system
before, and then please place the finger three times to be a duress
finger.
3). To confirm this duress fingerprint enrollment, please press
button to complete.
Def. DuressFP: To define a fingerprint to be a duress fingerprint by an
existing registered UserID.
82
Page 84

Function Keys:
Undef DuressFP: To disable a duress fingerprint from the system.
Undef All: To disable all of duress fingerprints from the system.
Confirm Key: To confirm the present operation.
Cancel Key: To cancel or exit the present operation.
Selection Keys: To select the selections.
4.3.5.9. Auto Test
This section is to test system devices to check if every components works properly.
There are six selections of the system test below:
1). Run All Tests: System will run all devices tests automatically.
2). Flash Test: Flash memory device test.
3). LCD Test: LCD display quality test.
4). FP Reader: Fingerprint sensor test.
5). Key Test: number keys and function keys tests.
6). RTC Test: System clock test.
83
Page 85

4.4. Sys Info
1). User Cnt: The amount of registered users.
2). FP Cnt: The amount of registered fingerprints.
3). Att Log: The amount of the user access logs.
4). Admin Cnt: The amount of the registered administrators.
5). Pwd Usr: The amount of the registered password.
6). S Logs: The amount of the management logs
7). Free Space Info: The amount of the free space.
8). Dev Info: Device Information
FP Cnt: The maximum system space of the fingerprints.
AttLog The maximum system space of the access logs
S Logs: The maximum system space of the management logs.
Manu Time: The date of production.
Serial Num: Product serial number.
Vendor: Manufacture Company.
Device Name: This product name.
Alg Version: Algorithm version for the system.
Firmware Ver: Firmware version for the system.
84
Page 86

Chapter 5 EzFingerKey Program Management
EzFingerKey is a PC program to easily manager registered user and enrollment data of a FingerKey
device.
Finger 5 -1: EzFingerKey program overview
5.1. Login and Password Setting
1). Login:
The default login name and password of EzFingerKey is null, user can
simply click the “Login” ( ) button to login.
Finger 5.1 -1: EzFingerKey login dialog
85
Page 87
2). User name and password setting:
Please click the “Change Password” button to open the “Setup Password”
dialog, and type the user name and password in each section, and then click the
“OK” button to complete the password setting
Confirm the password
Finger 5.1. - 2: EzFingerKey user name and password setting
86
Page 88
5.2. Fingerprint Device Setting
This function is to set up a FingerKey device information and connect with each
other. Please click the “Setup Fingerprint Device” ( ) to open the fingerprint
device setting dialog.
FP number section, if the
section is empty, simply
click to add a new
Finger 5.2. -1: Setup fingerprint device
To add a new FingerKey device, simply move the cursor to an empty FP number
section and click for adding. If user is going to switch Fingerprint NO.01 data to an
The connected FingerKey
device list window
empty section Fingerprint NO.03, simply click FP section number 01from the
FingerKey device list window, and modify the section Fingerprint NO. on the top
from “01” to be “03”, and then click the “Add” button to save in section Fingerprint
NO.03, then click FP section number 01 from the FingerKey device list window
again, press the “Delete” button to complete switching.
Section Description:
Fingerprint NO. : A number for each connected FingerKey device
Location: The connected FingerKey device location
87
Page 89

IP Address: The connected FingerKey device’s IP address. The IP Address
need to be same as connected FingerKey device’s IP address. To check or set
up FingerKey device’s IP address, please refer to the section 2.2.7
FingerKey System IP Address on page 23.
In/Out: A mention of setting FingerKey for people entering of going out.
Machine No.: The FingerKey device’s machine number.
Function Keys
To exit this section.
To add FingerKey device in this section.
To remove a FingerKey device from this management system.
Set up
88
Page 90

5.3. Group
This function is to set up group for easy management. Please press “Group” ( )
button to add group name or department name for enrolling users.
Finger 5.3. -1: Group setting dialog
Section Description:
Group NO.: Select a group number from 01 to 10.
Description: Type a group name.
Function Keys:
To exit this section.
To add a group name in the system.
89
Page 91

5.4. User Management
Please press “User Manage” ( ) button to set and add enrolling users.
ID number section, if
the section is empty;
simply click the
section to add a new
enrolling user.
Finger 5.4.-1: User Management setting
To add a new enrolling user, simply move the cursor to an empty ID number section
and click for adding. If user wants to switch enrolling user’s UserID from number 1
to an empty UserID number 3, simply click ID number section from the registered
user list window, and modify the section ID number on the top from “01” to be “03”,
and then click the “Add” button to save in UserID number 3, then click ID number
section number 01 from the registered user list window again, press the “Delete”
button to complete switching.
Section Description:
ID: Select one ID number from 0001 to 0500 for an enrolling user.
User Name: Fill out the enrolling user’s name.
Password: Fill out the enrolling user’s password.
Privilege: Select normal user for the enrolling user.
Group: Select a group name for the enrolling user.
From: Select the connected FingerKey Device’s location.
Read Finger Data: Press this button to receive the enrolling user’s fingerprint data
from the connected FingerKey device after fill out the information above.
FingerData: A reference for showing if the fingerprint data has been received.
The registered user list
window
90
Page 92

Function Keys:
To exit this section.
To add an enrolling user’s fingerprint data in the system.
To remove a user from this management system.
91
Page 93

5.5. Time Zone
This function is to schedule registered users’ FingerKey system access time. To start
this function, please simply click the “Time Zone” ( ) icon on the top to open
the time zone function dialog.
Finger 5.5. – 1: Schedule Time Zone
Section Description:
User: Select a registered user to be schedule an access time.
In Fingerprint: Select a FingerKey device.
Function Keys:
To exit this section.
To add an enrolling user’s access schedule in the system.
To remove a schedule from this management system.
Set up a registered user’s
access time schedule
everyday.
92
Page 94

5.6. Backup Data
This function provides user to backup all of the registered users’ data from this
EzFingerKey management system. To start this function, Please simply click “Backup
Data” ( ) icon on the top to open the backup data function dialog.
Finger 5.6 -1: EzFingerKey program overview
Section Description:
Fingerkey: Select a FingerKey device.
Open Door in Sec.: Set seconds for opening door while registered users access.
Function Keys:
To exit this section.
To open a backup dialog for saving the registered users’ data.
To select a backup file for restoring this EzFingerKey management
system.
To remove a schedule from this management system.
93
Page 95

Chapter 6 Functions with Witness DVR Program
Witness DVR program can support maximum 16 FingerKey devices. With Witness DVR
program support, user can identify entrance access person easily. Every success or fail
FingerKey verification will be listed on the Witness’s live, playback and log images.
6.1. Setup I/O Port
1). To start the FingerKey support setting in Witness program, please click “Set up
I/O port” ( ) icon on the bottom of Witness program to open the I/O
setting dialog.
Finger 6.1 -1: EzFingerKey program overview
94
Page 96

2).
Click the “Set up Access Controller” button to enter the Access Controller
setting dialog.
“Set up Access Controller” Function Description:
Fingerkey: To select a FingerKey device.
` Enable FingerKey: To enbable or disable a FingerKey.
Set up Schedule: To set up monitoring schedule of the FingerKey.
Event Selection:
1). Trigger: To set the actions of the Witness while the FingerKey has been
triggered.
2). Verify Fail: To set the actions of the Witness while the FingerKey verify
fail.
3). Verify OK: To set the actions of the Witness while the FingerKey verify
success.
4). Disconnect: To set the actions of the Witness while the FingerKey has been
disconnected.
5). Door Open: To set the actions of the Witness while the door is open.
Actions to take when triggered:
Pop up Video window: To enable about if the Witness will pop up video
window while the event has been triggered.
Enable Recording: To enable about if the Witness will start recording
with the “Selection camera” setting while the event has been triggered.
Enable Snapshot: To enable about if the Witness will implement a
snapshot with the “Selection camera” setting while the event has been
triggered.
95
Page 97

Enable sound alarm: To enable about if the Witness will start sounding
alarm with the “Select sound alarm” setting while the event has been
triggered.
Enable Notification: To enable about if the Witness will implemet the
“Set up notification” setting while the events has been triggered.
Trigger Speed Dome: To enable about if the Witness will trigger speed
dome with the “ Selection positions” setting while the event has been
triggered.
Enable TV Out: To enable about if the Witness will implemet the TV
out with the “Select TV out” setting while the evets has been triggered.
Trigger relay: To select which relay need to be triggered.
Post recording time: To set the recording time in seconds while the event has been
triggered.
96
Page 98

6.2. View Log
To see the FingerLog file, simply press “View Log” ( ) button on the
bottom of the Witness program to open the log display window, and select the last
clumlon
Select date for log
display
Finger 6.2. -1: Log display list
Function Keys:
Log Display
Window
Save Log: To save the log file of the selecting date.
Clear log: To clear the selecting date log list from the display window.
Exit: To exit this function.
97
Page 99

2345678
9
6.3. POS Playback – EzPosPlayback
EzPosPlayback provides users to easily search specific video file by time, preset
keywords and keywords searching.
1). Overview
Video Display
Window
Finger 6.3. – 1: EzPosPlayback Overview
2). Playback function description:
Searching by date
from the calendar
Timestamp Playback
File List Screen
Text Record List,
Witness Preset
Keyword and specific
keyword searching
functions.
1. Play button 2. Stop button 3. To the beginning of the video
4. Rewind 5. Fast forward 6. To the end of the video
10 11 12 13 14
98
Page 100

7. Repeat button 8. Zoon in 9. Zoon out
10. Fit to screen 11. Resize 12. Snapshot
13. Copy video clip 14. Display keyboard
3). Searching function description:
Text record list: User can select a list and press the play button to view the video.
Keyword selection: The Keywords which has been preset in Witness Pro program,
user can find the video file to play by selecting the preset keyword.
Searching function: User can type the specific word directly to search the video
file.
4). Example of searching video playback file:
Step1: Searching by selecting a folder, camera and date.
Select a
camera
Check to
use default
folder
Press mouse left button to
select date for playback
video file searching
99
To play playback file from
specific user saving
direction folder, uncheck
the use-default box and
click this open-file icon to
find the playback file.
 Loading...