

Page 1
Page 2

Notes ............................................................................................................................................ 3
1 A Brief Description of MID Series of Products ....................................................................4
1.1 MID Overall Drawing .....................................................................................................4
1.2 MID Accessories Introduction......................................................................................5
1.3 MID Use and Preparation.............................................................................................5
1.4 MID State and Information ...........................................................................................5
2 Quick Start ................................................................................................................................6
2.1 Power-On and Power-Off .............................................................................................6
2.2 Screen of Opening and Closing ..................................................................................7
2.3 The Use of Touch Screen ............................................................................................7
2.4 Page Interface................................................................................................................8
2.5 Access To The Application...........................................................................................9
2.6 USB Connection ..........................................................................................................10
2.7 Storage Card ................................................................................................................11
2.8 Input Text ......................................................................................................................12
2.9 Use Skills ......................................................................................................................13
3 Establish WIFI Connections .................................................................................................14
4 Communication ......................................................................................................................14
4.1 Email..............................................................................................................................14
4.2 Bluetooth Function...................................................................................................... 16
4.3 GPS Function.............................................................................................................. 16
5 Multimedia..............................................................................................................................17
5.1 Support The File Format............................................................................................17
5.2 Music ............................................................................................................................17
5.3 Camera.........................................................................................................................18
5.4 Gallery ..........................................................................................................................19
6 Internet....................................................................................................................................21
6.1 Browser ........................................................................................................................21
7 Other Applications.................................................................................................................23
7.1 Alarm Clock .................................................................................................................23
7.2 Calculator.....................................................................................................................23
7.3 File Manager................................................................................................................23
8 Basic Settings........................................................................................................................24
8.1 Sound and Display.....................................................................................................24
Content
Page 3

8.2 Location & Security ....................................................................................................25
8.3 Storage .........................................................................................................................26
8.4 Date & Time................................................................................................................. 26
8.5 Language & Keyboard ...............................................................................................27
8.6 About Device ...............................................................................................................27
9 The Apkinstaller and Control of Program .........................................................................28
9.1 Apkinstaller .................................................................................................................. 28
9.2 Managing and Unloading ..........................................................................................28
Specifications............................................................................................................................ 29
Page 4

Page 5
1.1 MID Overall Drawing
1
Page 6
Button function
Key functions illustration:
Power key l Long press this button for booting
l In booting condition, long press this button pop-up shutdown options.
l In booting condition, press this button to turn off the screen
Menu button l Press this button to open the interface menu
l Press this button to unlock in the lock screen condition
ESC button Press this button to back a previous operation procedure or previous
operation interface.
Home key l Press this button to return the function interface from arbitrary
interface.
l Long press this button to open recently application window.
1.2 MID Accessories Introduction
Packing List
Your MID packing box includes the following items
l MID unit
l Power adapter
l USB cable
l OTG Cable
l User manual
l Warranty
1.3 MID Use and Preparation
Battery charging:
Before using MID firstly, please charge for battery.
1. Use the AC Adapter to charge for MID.
2. In order to ensure that the battery is full, please charge for 4 hours or more.
2.4 MID State and Information
Notice Icon
Page 7
Please click column frame and slide on screen to open notice list when the message
appears notice panel. Click to requisite view options, check the detailed information. Later
you can click information box and slide to shut up information windows. The icon
illustration for status bar as follows:
New email
Mute
New instant messaging
No SD card
Use USB line to connect
computer with MID
Uploading/downloading
Matters to be handled
Download is completed
Alarm opening
General notice (such as:
synchronization error)
Music playing
More
Data synchronization
Charging
Insufficient SD
card space
Battery changing sign
WIFI service already
connected,network
available
Notice panel
Notice icon will display the new message, the setted alarm clock, schedule, and SD card
inserting etc. You can open inform panel to check specific information.
Open notice panel
When notice bar appears new notice icon here, please hold notice bar, then slide down fingers
then you can open notice panel.
2. Quick Start
2.1 Power-On and Power-Off
Power on
Page 8
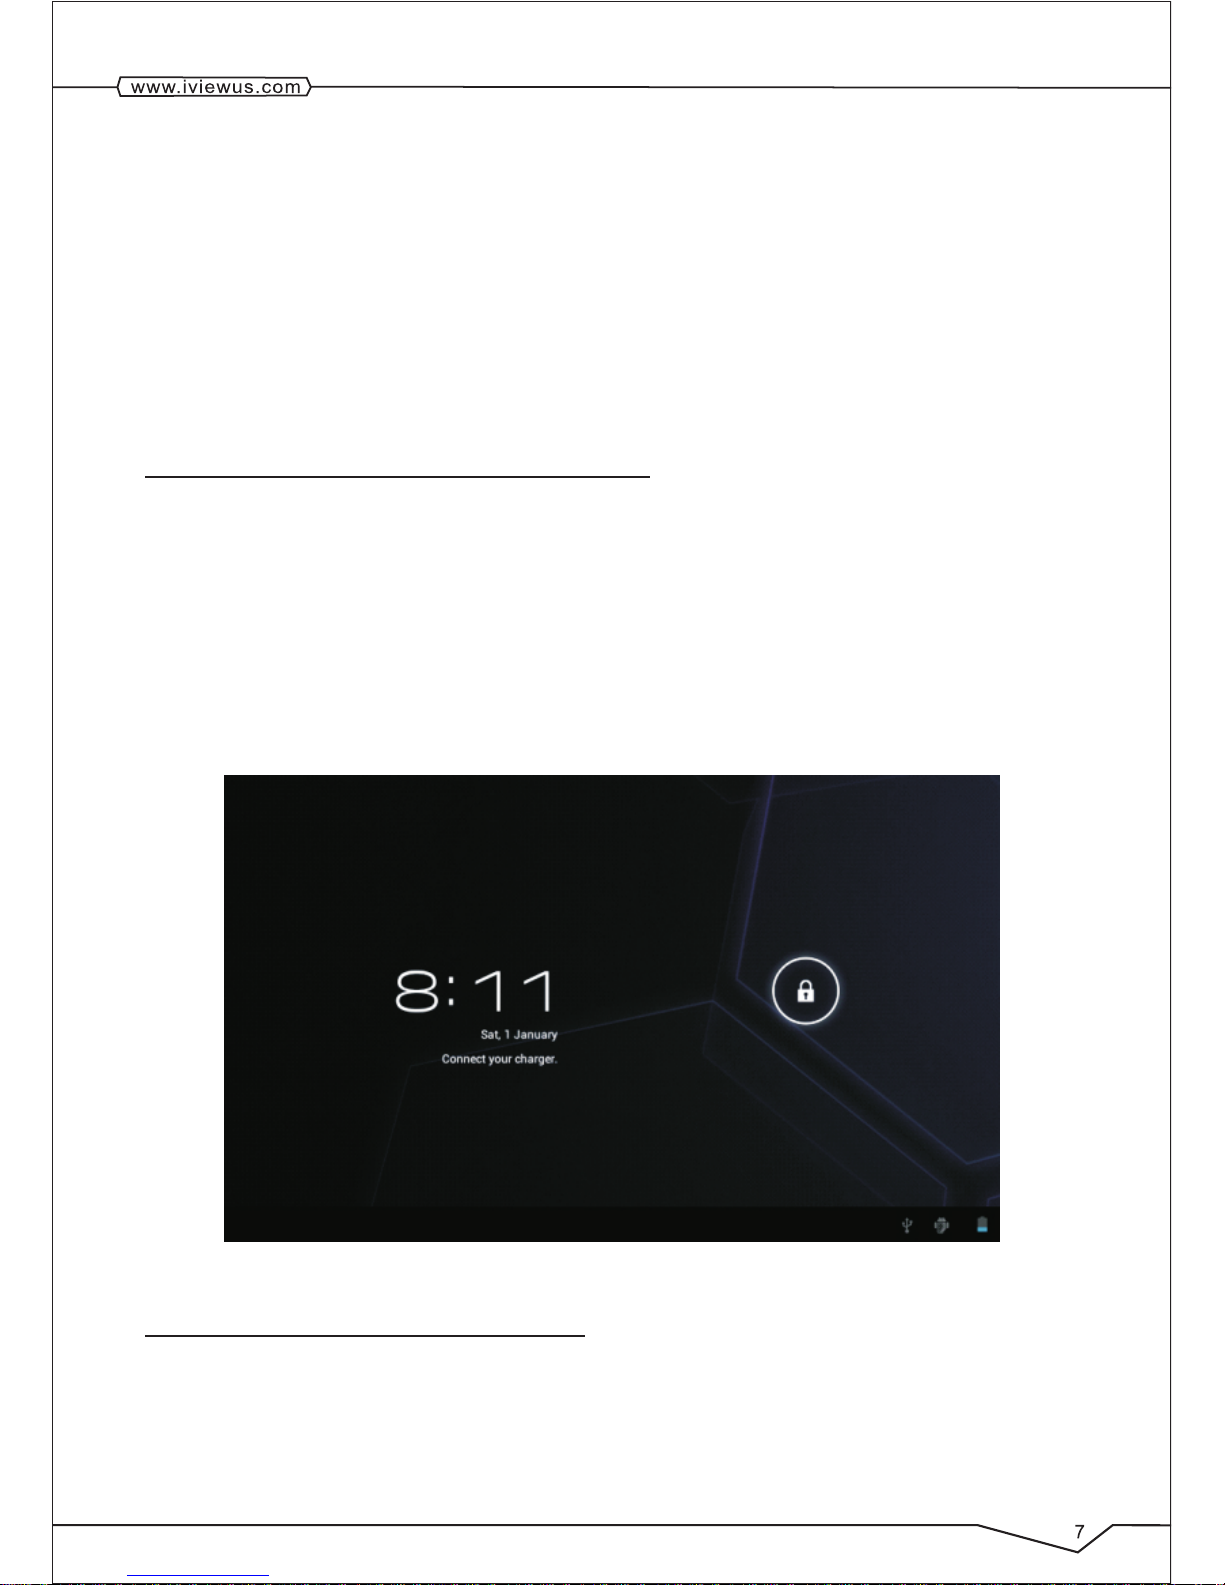
After long pressing 2 seconds for the power button, you can see the power on logo.
The system is access into screen locking status after opening, please press the Power
On/Off button to refresh., and slid up the Unlock Icon on the screen.
Power off
1. Long press the Power On/Off button, then the "Power off" options will pop up.
2. Device options have silent mode, Power off and Cancel.
3. Click the Power off.
2.2 Screen of Opening and Closing
It will be closed during the screen idling.
1. After idlinga period of time, screen will be automatically closed to save the battery.
2. In the screen opening condition, press the power button, the screen will immediately
shut down.
Tip: if you need to find out how to configure screen closing time please refer to chapter 9.1.
Opening in screen closed condition.
If screen is in the closed position, you can long press Power On/Off button to activate the
screen. Enter locked condition after opening it, press "lock "icon and slide up for unlocking,
and holding up " lock "icon and slide left for camera with finger.
2.3 The Use of Touch Screen
MID operation mode
There are several ways you can browse screen, menu and application, etc on the MID.
Click
When you want to use the screen keyboard to input and choose applications etc on the
Page 9
home page, as long as you click with finger.
Press
If you want to open a available options (such as the text box or web link) or move shortcut
and main program menu on the homepage as long as you press the items.
Fast sliding or sliding
Fast sliding or sliding with fingers making rapid vertical or horizontal drag action.
Drag
Before you start to drag, you must use a finger to press and put some pressure on until you
touch to the position which you want, then release your finger.
Rotating
For most pictures, you can only turn to MID then the screen will s witch from lateral to
straight direction.
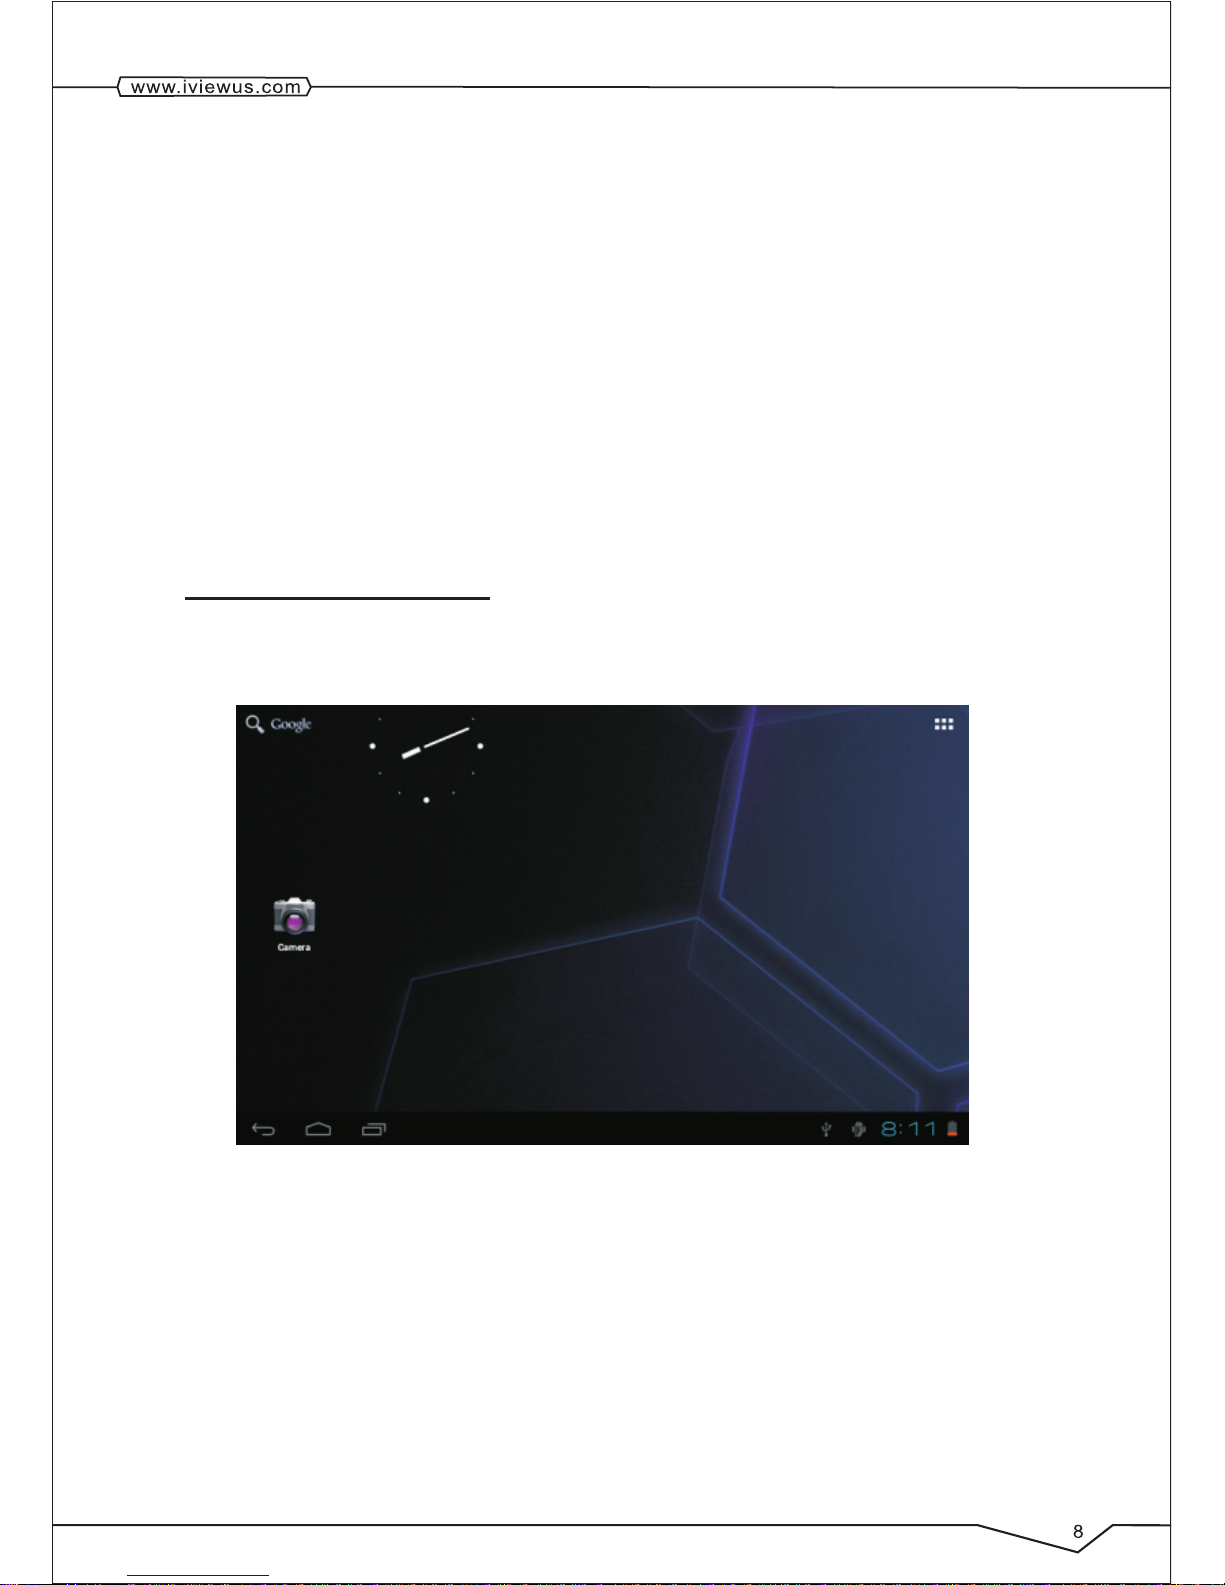
2.4 Page Interface
The main menu screen will show all application. You can use the application, shortcut, and
customize your homepage interface wallpaper, etc.
Tips: In any applications HOME key can be pressed to return to the home page.
The homepage interface may extend
Homepage interface can be extended to screen width to provide more space. It lets you put
new shortcut, small tools etc. Press blank place of homepage interface, then use finger to
rapidly and vertically slide. This enables you to skip to extend to the left or right of screen.
Homepage have above 2 extended interfaces.
Customize Homepage Interface
Page 10
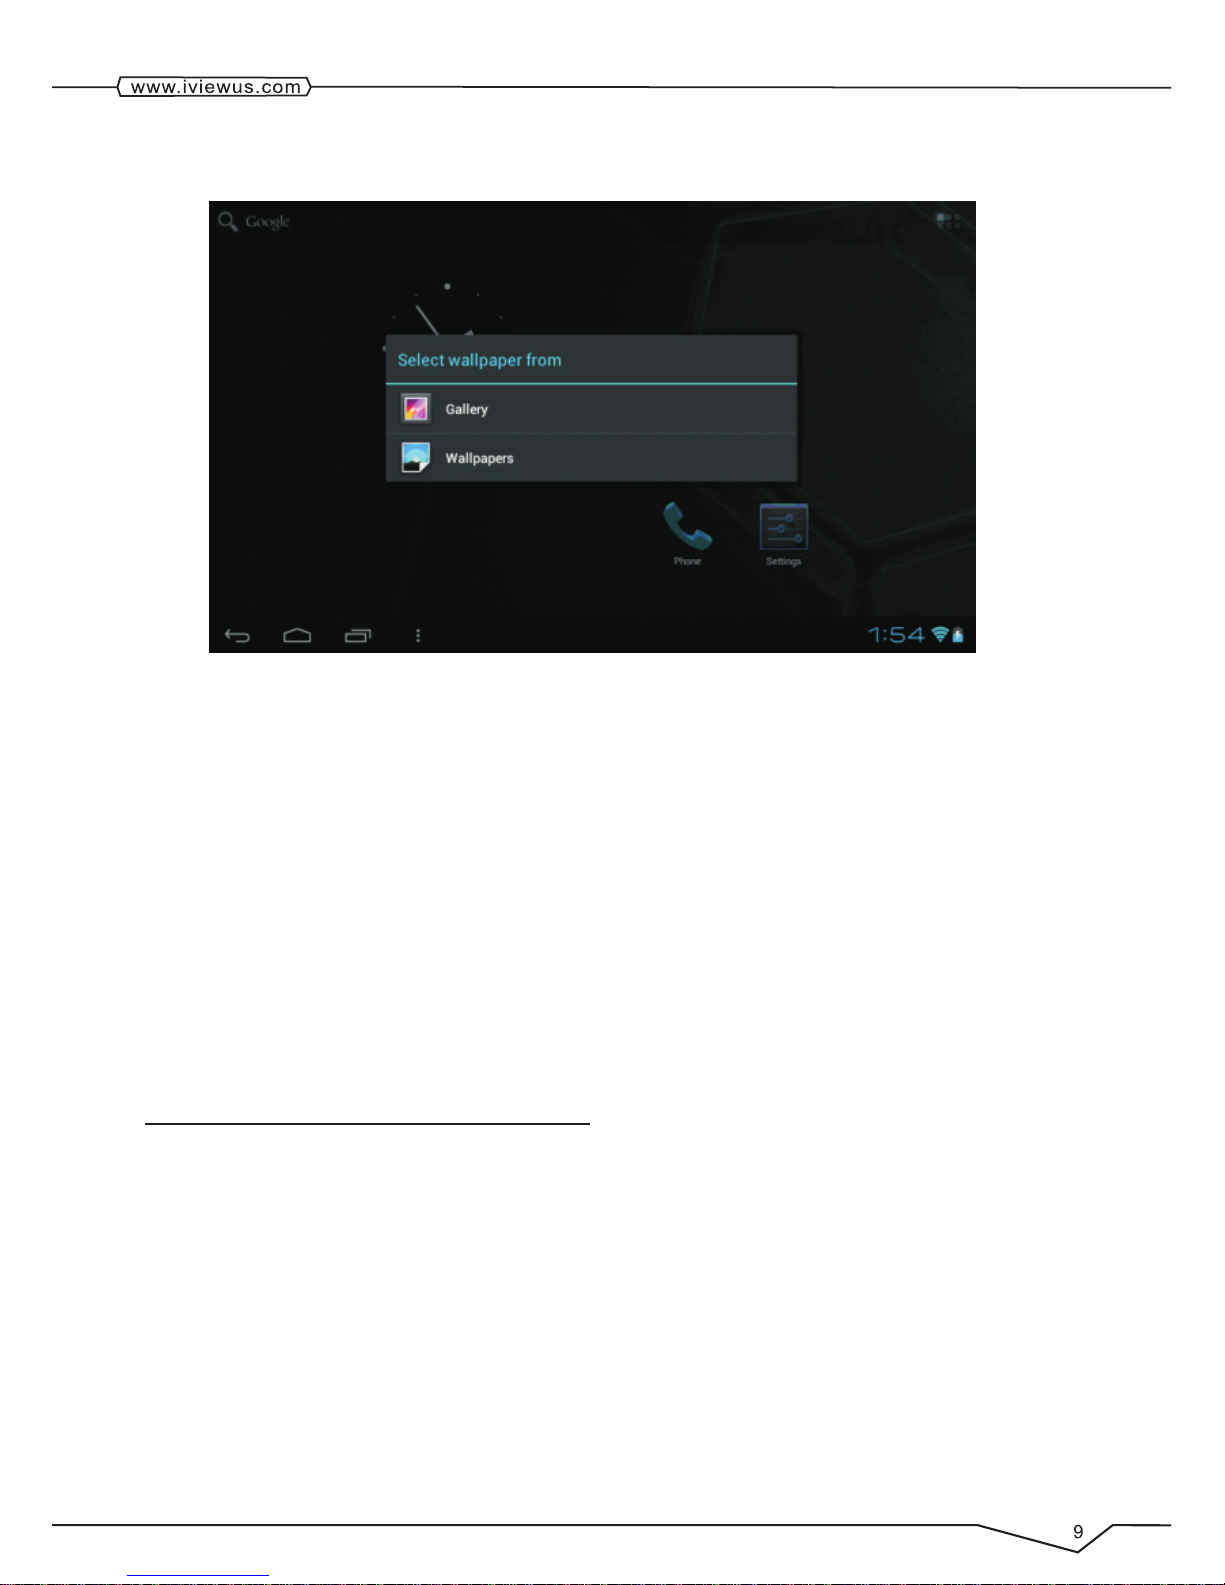
Change desktop wallpaper
1. In the homepage interface, press the menu button to display menu, then click the
wallpaper.
2. Click the picture or wallpaper to select pictures.
Establish folder
1. In the homepage interface, according to the menu button and click addition.
2. Click the folder, and new folder.
3. Click new folder of homepage interface to open it.
4. Click and hold the folder list of headlines to rename it.
5. Open the folder, click the application of marking, holding the application to drag folders,
then may put in the folder.
2.5 Access To The Application
How to access to MID application:
1. Please click program volume label. As shown in figure 3-5.
2. Choose to visit the application.
3. If you want to quit program interface, press the return key to a page or press homepage
key to directly returns home interface.
Page 11

2.6 USB Connection
1. Use USB cable to connect MID with computer. Notice bar will appear notice cue.
2. Drag down the Icon at the bottom-right side,
3. In the notification panel, click on the USB connected, then click Turn on USB storage.
4. Then the USB connection has been successfully established.
Page 12

Copy files to memory cards.
1. Use a USB cable to connect MID with computer.
2. After setting the store setting, then connect with computer successfully.
3. Open My Computer of your computer, then see "portable disk" content.
4. Find intended copy files to duplicate to the "portable disk".
5. After the completion of the copy, click on "safe deletion hardware" Icon of your
computer task bar to unload.
Content of MID Storage Device
1.iView-1000TPC has 8G NAND FLASH storage space for keeping files.
2.TF movable storage card.
3.The abovementioned two storage devices can be accessed using USB to connect to
your computer.
Note: When you connect the USB cable to MID, if you enable USB storage device, you
will not be able to access to Internal Memory; if you want to access to Internal Memory,
disconnect the USB device.
2.7 Storage Card
Copy files to storage card
You can transfer files between MID and computer such as music and pictures, etc. If you
want to see the file, provided that you click file browser, then you can browse the contents
of the SD card.
Delete the file on the MID memory card.
1. Find the file you want to delete.
2. Hold click the file which you need to delete, then the file menu will pop up.
Page 13

1. Click "delete"
Remove memory card in the MID opening condition.
If you need to remove memory card in the MID opening condition, you must firstly unload
memory card, lest memory card fault or damaged.
1. In the homepage interface, press the menu button and then click Settings.
2. Drag down setting menu, and then click the Storage.
3. Click the "Unload SD card"
2.8 Input Text
Use the screen keyboard
When you start programs or select text edit box which requires to input text or number, the
screen keyboard will appear.
Keyboard have optional input way as below:
1. Android keyboard
2. The third party input method(The user can install independently)
Select the input method which you want to use.
iView-1000TPC displays Android keyboard when you want to input word.
1. On the homepage interface, press menu button and then click "Settings".
2. Click the language and keyboard settings.
3. List all installed input method of MID in the text setup area.
4. Tick after the input method which you want.
Use and switch input method
1. On the text input interface, hold text edit box area until it "edit text menu " pops up. Then
click the input method.
2. Select the input method which you want to use.
Page 14

2.9 Use Skills
Open recently used applications
In any programming interface you can hold touch HOME keys, the screen will display
program windo w which displays recently used application.
Add small tools on the table
In the homepage interface, press the third button on the on the left corner of the screen as
you see in the above picture. A menu will pop up to display all previous viewed records such
as music, picture, and downloads, etc.
Quick close the program
Press the ESC button back to superior interface, or press HOME button back to the
homepage interface.
Restore to factory settings
When your MID has errors or when you forget unlocking passwords, etc, you can use
"Restore to Factory Settings" to restore them to the factory default status.
Methods:
1. At the homepage interface, press Menu key to display the Setting menu.
2. Click on Settings.
3. Click on Privacy.
4. Click on Factory data reset.
5. Wait for the system to restart.
Page 15

3. Establish WIFI Connections
You can connect MID to Wi-Fi network, operation for connection:
1. In the homepage interface, click the MENU button, then the settings menu will show up.
2. Click settings.
3. Click wireless and network settings.
4. Click Wi-Fi, then start Wi-Fi
5. Click Wi-Fi Settings, the MID will automatically scan available Wi-Fi wireless
networks.
6. Choose the Wi-Fi network which you want to connect. If it has requires password, it will
display an password input window. Then, input relevant password.
7. Click on Connect.
4. Communication
4.1 E-MAIL
E-mail Se ttings
E-mail applications accompany with email settings guide. It enables you to add the common Web
email service providers (e.g. Gmail, Yahoo, Hotmail and 163 etc manufacturers) external POP3 or
IMAP email account.
Page 16

Note: before the mail will be setted guide, please ensure that you already link the network.
Mailbox setting guide
1. Click the E-mail icon, then it will appear mailbox setup guide to help you to set.
2. Click the next step button.
3. Enter your email account address and password.
4. Click the next step button, and select your mailbox type: POP3 or IMAP.
5. Then click next step button to check whether email server is available.
6. Input account name and to display the name, then click completion.
7. If the mail is available, it will automatically enter your inbox.
Delete email accounts
You can delete setted POP3 or IMAP e mail account from your MID
Page 17

1. Click E-mail
2. Enter to your E-mail box
3. Press Menu key
4. Click accounts
5. Hold account which you want to delete.
6. The menu listing will pop up, and click “Remove account”
7. Click the" OK "can remove it.
Send E-mail messages
1. Click the E-mail, display your inbox.
2. Click the inbox to enter, automatically refresh the email, and click to read.
3. Press the Menu button, and the menu will pop up
4. Click "compose", enter to write a new mail interface
5. Input your E-mail address of the recipient in the recipient column.
6. Input the theme and information content.
7. If you want to add attachments, press the menu button, and then the menu options will
display.
8. Click "add attachment"
9. Select attachments which you want to send (such as video, images, etc.)
10. Click "send" and then sent email out.
Note: If you have more than one account, and hope to send an email in one account, click
that account title in advance before you click main menu key and write email.
4.2 Bluetooth Function
1. At the homepage interface, press Menu key to display the Setting menu.
2. Click on Setttings.
3. Click on Bluetooth.
4. Click "ON"
5. Then, the bluetooth devices nearby can be detected.
6. Click search Device, so that available device in the Search Device can find the matching
bluetooth.
7. Click the bluebooth name of counterpart, boothtooth send matching request ,click
macthing, then bluetooth matching is successful.
8. Choose the file you want to send, such as Picture/Music, and click bluetooth sending.
9. Bluetooth receiving: When receiving the request of counterpart bluetooth sending, click
matching, then bluetooth matching is successful.
10.when receiving counterpart who send file transmission, click accept, then you will
successfully receive the file.
4.3 GPS Function
1. Click on the GPS icon, click loaction service, choose GPS Satellite to allow orientate.
2. Click GPS moblie navigator .
Page 18

1. Click on the GPS icon, click loaction service, choose GPS Satellite to allow orientate.
2. Click GPS moblie navigator .
3. Choose navigator device (Function/search/common usage/surrounding/round)
4. According to your needs you can enter the function setting (For example, Address book,
electronic, eye, orbit, system, trip planning, 3D presentations, help, shut down the system)
5. To plan traveling, set your starting place and destination place.
6. Click search function, input the address you want to look for, such as city, regional,
destination, and so on.
7. For frequently used addresses the GPS software will automatically record and save in
the system.
8. You can use the navigator to search for the routes to your destination.
9. Use the navigator processing, can zoom or narrow the view of distances.
5. Multimedia
5.1 Support The File Format
Your MID can play in the following formats.
Music file format
u MP3
u AAC (AAC, AAC+ and AAC-LC)
u WAV
Video format
u AVI (H.264, and DivX, and XviD)
u RM/RMVB
u MKV
u MP4
u DAT
u VOB
u FLV
5.2 Music
Your music is divided into four categories: Artist, Album, Songs and Playlist. Choose a
classification to check list contents. If you enter a classification, always choose until you
have to play songs. For example, if you choose the artist category, you will see A to Z
sequence of a list of names of art. If you choose an artist, the list will be presented artist
album songs and lists.
Page 19

Visit and broadcast music
1. Click the music.
2. Click songs, also can click artist, album or song list.
3. Choose one song to play.
Add song to the new playlists
1. Click the music.
2. Click the songs.
3. Hold the song which you want to add to playlists.
4. Music setting menu will pop up, then, click add to playlist.
5. Click the New.
6. Input name of playlist.
7. Click to save.
Delete the playlist
1. Click the music.
2. Click the songs.
3. Hold the song which you want to delete in playlists.
4. Music setting menu will pop up, then, click "delete ".
5.3 Camera
Photo taking functions
1. Click on Camera.
2. The system enters the Camera interface.
3. Click on Shoot button to be able to have photos taken easily.
4. You can set sizes, storage locations, white balance and focusing adjustment and other
functions.
5. After photo taking, there will be preview of thumbnail display.
Page 20

Video recording functions
1. Drag up the switchover button to switch it into the video recording mode.
2. Click on red Video Record button to be able to perform video recording.
3. You can set color effect, white balance and video quality and other functions
4. Click on Video Record button again to end video recording, and you can see previewed
videos.
5.4 Gallery
Using the Gallery application program, you can automatically search all photos and video
files in MID and USB device(included TF card). Moreover, the Gallery will classify such
photos and video files by these folders. You can use the Gallery program to view and edit
photos and take the photos as the desktop and view videos.
Page 21

Check pictures
1. Click the folder you want to check including pictures.
2. Click pictures you want to see, the system will automatically check in full screen mode.
3. To see the next picture or previous picture, finger slide the picture towards left to go to
next picture and right to view previous picture.
4. Touch screen, zoom-panel will appear in pictures below; you can magnify and narrow
the pictures.
Skills: Gallery supports automatical rotating function. When you spin MID, the picture will
automatically adjust the direction of rotation.
Edit and set images
Press menu button to display select item in full screen mode, you can choose select item to
edit and setting up the picture according to your needs.
l Slide presentation
Open the pictures, then click slideshow. All the pictures will be start to slide to display.
l Sharing
1. Press the menu button to display menu option, and then click "share".
2. The picture will share with your friends via Twitter, Facebook, Me ssaging,
Bluetooth, G-mail or Email.
l Rotating
1. Press the menu button to display menu option, and then click "More".
2. Click the Rotate Left or Rotate Right.
l Crop
1. Press the menu button to display menu option, and then click “More”, and select
"Crop"
Page 22

2. Click on drag related region to adjust the size,
3. Adjust the size you want, click "Save".
4. If you want to abandon crop, click "Discard" back to the Gallery.
Video preview and play
After the Gallery is opened, you can scan all video files in the MID and the USB device
(Included TF card), and can preview playable video files. Click to select one of them to be
able to play the video file.
In the video preview interface, press Menu button to be able to appear the function window
editing video files as shown in below
6 Internet
6.1 Browser
Go to your home page
The Browser always opens to the last Web page you were viewing.
The first time you enter the Browser after powering on, your home page will display.
Change your home page
1. Touch Browser.
Press the Bookmark key in the Browser Bar. And change what you like.
Page 23

Visit Web pages
1. Touch Browser.
2. Press the Menu key.
3. Touch Address bar.
4.Type the Web address, touch Go. Need network connection
Page 24

7 Other Applications
7.1 Alarm Clock
1. Click the Clock program.
2. Enter into programming interface such as below
3. There were pictures, music, alarm clock and page buttons.
4. Press the Menu button, pop-up alarm setting menu.
7.2 Calculator
1. Click the calculator.
2. Enter into the basic calculator panel.
3. First, Click the Shortcut key, then click clear history.
7.3 File Manager
Browse the file
Sliding desktop, and find the File Manager.
You can use the file browser to manage editing and deleting files and folders, and can also
establish sharing FTP servers to realize resource sharing.
Page 25

Cut and copy files
1. On the Explorer, press operation documents with finger.
2. The operation menu will pop up including Copy, De lete, Move, Paste, and Rename.
Copy or Move the file
1. Use fingers to hold the file you want to delete in the file browser.
2. Click "copy" or " Move" .
3. Then select the file you want to copy or Move to, then click Paste.
Delete the file
1. Use fingers to hold the file you want to delete in the file browser.
2. Click "delete".
3. Click "delete " to delete files or click " cancel" to return.
8. Basic Settings
8.1 Sound and Display
Media volume Settings
1. On the homepage interface, press the menu button to display the setting menu.
2. Click Settings.
3. Click Sound.
4. Click on Volume to be able to control ring tones, volume of media, and alarm clock.
5. Open Volume Settings, then drag the progress bar to control.
Page 26

Notification ringtone Settings
1. On the homepage interface, press the menu button to display setting menu.
2. Click Settings.
3. Click Sound.
4. Click the Notification ringtone.
5. Ring menu will pop up, and select the bell ring you want to notice.
Screen button sound
You can set MID to release sound when you use the soft keyboards or tickle screen.
1. On the homepage interface, press the menu button to display setting menu.
2. Click Settings.
3. Click Sound.
4. There is selection such as Audible touch one, Audible selection or Screen Lock
sounds.
Display Settings
l Adjust screen brightness
1. On the homepage interface, press the menu button to display setting menu.
2. Click Settings.
3. Click Display.
4. Click the brightness.
5. Open the Brightness Settings, drag to bright slider to adjust the bright level
6. Click OK to save your selection.
l Adjust Slee p timeout
1. On the homepage interface, press the menu button to display setting menu.
2. Click Settings.
3. Click Display.
4. Scroll down the screen, then click Sleep timeout.
5. Open the Screen Standby Time Settings, choose standby time you want the
standby time.
8.2 Location & Security
Set up screen lock
You can set up their unlock pattern (equivalent to password) to protect your MID privacy.
1. On the homepage interface, press the menu button to display the setting menu.
2. Click Settings.
3. Click Location & security.
4. Click "Settings to unlock pattern".
5. Open unlock pattern plate, pattern has nine contacts with vertical and horizontal, or
diagonal directions to connect four points at least. Fingers left screen after completing.
The system will record your setting pattern.
6. Click "Next", then touch "Next" when you're ready to draw your own pattern.
7. See hints, draw a screen unlock pattern, and click continue, and then click Confirm
to save your setting.
Skills: If you don't want unlocked pattern to display on the screen in unlock, please
Page 27

remove using visible pattern checkbox.
8.3 Storage
Check SD card and device memory settings.
1. On the homepage interface, press the menu button to display the setting menu.
2. Click Settings.
3. Click the Storage.
4. Check the space available of SD card (TF card, Micro SD card).
5. Check NAND FLASH inner storage space.
Safely remove SD card
Secure removal of the SD card can effectively protect the SD card and increase the service
life of the SD card.
1. On the homepage interface, press the menu button to display the setting menu.
2. Click Settings.
3. Click the Storage.
4. Click the uninstall SD card.
5. Unplug the SD card.
8.4 Date & Time
According to the preset, the system will automatically use date, time zone and time provided
by network.
Note: If you automatically use time provided by the internet, you cannot manually adjust
Page 28

the date, time and time zone.
1. On the homepage interface, press the menu button to display setting menu.
2. Click Settings.
3. Scroll down the screen, then click the date & time setting.
4. Remove automatic checkbox.
5. Click the Select time zone, then select time zone of the list. Scroll down the list to see
more time zone.
6. Click Set date, then click upward or downward button to adjust the date and year,
month, click Set when completed.
7. Click Set time. Then click upward or downward button to adjust the hour and minute,
click AM or PM to change morning or afternoon, then, click Set when completed.
8. Select checkboxes which is use 24-hours format to switch system between 12-hour
and 24-hour. The selected format will also be applied to the time format of the clock.
9. Click to select date format, and then choose to display the date format on the MID.
8.5 Language & Keyboard
1. On the homepage interface, press the menu button to display the setting menu.
2. Click Settings.
3. Click on language & keyboard.
4. Click to select language area, then choose language of your need. Scroll down the
list to see more of the language.
8.6 About Device
Check MID status
1. On the homepage interface, press the menu button to display the setting menu.
2. Click Settings.
3. Click About Tablet
4. Click the status. You can see the battery status, battery level, IP address,WI-FI
MAC address, Bluetooth address and Up time.
Check system version
1. On the homepage interface, press the menu button to display the setting menu.
2. Click Settings.
3. Click About Tablet
4. Can check model number, Android version, Kernel version and Build number
Page 29

9. The Apk Installer and Control of Program
9.1 Apk Installer
Install the third-party applications
You can get the third party on the Internet for Android system, and install in MID
automatically. Copy applications into SD card, then insert into MID.
1. Click on File Manager, and search necessary installed application program in the SD
card.
2. Hold the application you needed to install.
3. The Install option will pop up, then, click install.
4. Follow the installation guide to complete, and then operate.
Note: Search files with the apk suffix for these third party programs which based on
system in the Internet
9.2 Managing and Unloading
Uninstall applications
1. On the homepage interface, press the menu button to display the setting menu.
2. Click Settings.
3. Click "application".
4. Click "manage applications", list all installed application list in the system.
5. Click the software you want to uninstall, and click "uninstall".
6. Click "OK" to finish uninstall.
Page 30

Skills: The Program manager in the systems can be uninstalled easily. Open the APK installer
and click the uninstalled option. It shows application list which have been installed.
• Screen: 10.1" Capacitive Touch Screen, 1024 x 600 Resolution
• Processor: Cortex A8, 1.2GHz
• OS: Android 4.0
• RAM: 1GB DDR3
• Memory: 8GB (Support up to 32GB)
• Wireless Connection: WIFI 802.11b/g
• Support 3G Module USB Dongle
• Support Flash 10.3
• Support Camera 0.3MP
• Build in Bluetooth
• Build in GPS
• Support G-SENSOR
• Mini USB port / Card Reader (Max: 32GB)
• Support 1080P HD video
• Audio Output: Stereo Speaker (8Ω1.0w) / 3.5MM Stereo
Headphone Jack
• King Kong Market, Internet Browser, Office, Calendar,
Calculator, E-mail
• Picture Viewing, Music / Video Playback, Games
• Battery: Built in 3000mAh / 7.4V
Page 31

6.
Page 32

 Loading...