

Page 1

Preface
Thank you very much for choosing our Smart TV Box. For your
convenience, and reference, please refer to the provided manual
for setup and operation instructions.
Statement & Disclaimer
We have made sure that all of the information on this device is
correct and as current as possible.
The information in this manual is strictly for the basic usage and
maintenance of the Iview Smart Box. We cannot guarantee the device
will work efficiently with more complex or advanced connections.
We reserve the right to make additional changes to the manual for
future convenience. If you feel that our manual may be out of
date, please check our website for the most updated version
Page 2

Contents
1 - System Introduction
1.1......................................................Features
2 - Remote Control
2.1................................................Remote Overview
2.2........................................................TV Mode
3 - System Setup
3.1 .................................................AV Connection
3.2............................................... HDMI Connection
4 – Main Menu
3.1 ......................................................Overview
3.2.................................................Shortcuts Menu
5 - Connecting to the Internet
5.1...........................................Connecting via Wi-Fi
5.2 .......................................Connecting via Ethernet
6 – Digital TV
6.1....................................................Quick Setup
6.2.................................................Cable-TV Setup
6.3 ......................................................DTV Menu
6.4 ........................................Scheduling a Recording
Page 3

7 – Favorites
7.1......................................Adding/Removing Favorites
8 - Media Players
8.1...................................................Music Player
8.2...................................................Movie Player
8.3........................................................Gallery
9 - Additional Features
9.1.........................................Online Video Streaming
9.2..................................................Google Chrome
9.3...................................................File Browser
9.4..................................................App Installer
9.5.......................................................Miracast
9.6....................................................IView iHome
10 - System Settings
10.1................................................Quick Settings
10.2................................................Droid Settings
10.3......................................................Settings
11 - Firmware Update
12 - Resetting Your Smartbox
13 - Troubleshooting
14 - System Specifications
Page 4

1 - System Introduction
1.1 Features
* Android 7.1 Nougat Operating system.
* Supports ATSC and QAM signals
* Supports LAN via R-J45 Ethernet cable and 802.11n (2.5 GHz & 5
GHz) WLAN.
* Supports online video streaming services.
* Supports three main HD formats: VC-1, H 265, MPEG-2 as well as
Standard Definition formants such as MPEG-1、MPEG-2、MPEG4、DNX、REALMEDIA.
* Video Player supports nearly all video formats, including AVI,
MPG, VOB, RM, MKV, and many others.
* Photo viewer supports JPEG, BMP, and PNG without size
limitations.
* Audio Player supports nearly all video formats, including
MP3、WMA、WAV、AAC and many others
* Two USB 2.0 ports for additional storage devices.
* Advanced Double-Sided remote control.
* PVR recording and playback.
* IVIEW Store App for additional promotions and savings on IVIEW
devices.
Page 5

2 - Remote Control
2.1 Remote Overview
POWER: Powers the device on and off.
Rewind/Fast-Forward: Rewinds or Fast
Forwards video or recording
Skip/Previous: Skips to the next/previous
Video or Recording
GOTO: Lets you skip to a specific time
during PVR Playback / *Opens search
engine
PLAY/PAUSE: Will play or pause current
media
HDMI: Changes HDMI resolution / *Zooms in
on a webpage.
TV/RADIO: Switches between TV and Radio
mode/ *Zooms out on a webpage
MENU: Enters the menu of the current
application
EXIT: Returns to the previous menu/ Exits
an App
HOME: Shortcut key to the main menu
Navigation buttons: Changes Volume and Channels / *Navigate
left/right up/down
OK: Confirms Selection
Page 6

MUTE: Disables and enables sound
MOUSE: *Enables/Disables wireless pointer functions on remote
USB: opens the file explorer / *Increases Volume
FAV: Opens Favorites Menu / *Decreases Volume
CC: Enables and disables closed captioning / *Scrolls up
EPG: Press to enter into programming guide when watching TV /
*Scrolls down
REPEAT: Sets repeat mode during PVR Playback / *Opens Media Player
Number keypad 0-9: Numeric input
TV: Enables/Disables TV Mode functions
AUDIO: Changes the audio output when playing movies or watching TV
/ *Opens the MY APPS Menu
ASPECT: Changes the Aspect Ratio / *Opens Email
RETURN: Returns to the previous menu or Exits DTV / *Opens Web
Browser
REC: Begins recording current TV channel
SCHD: Schedules a recording
INFO: Press to display program information, when watching TV
PVR: Enters PVR mode, displaying a list of recordings
* Functions are only available when TV mode is disabled.
Page 7

2.2 TV Mode
Your Cyberbox remote has buttons with alternate
functions, labeled next to the buttons themselves.
You can switch between these functions by pressing
the TV button on your remote.
While TV mode is Disabled, All buttons will change
to their alternate functions (All *-marked
Functions shown in Section 2.1). You are also able
to use the Mouse Button, as well as the keyboard on
the reverse side.
Press the TV Button again, to re-enable TV Mode, changing buttons
to their default functions.
Page 8

3 - System Setup
3. 1 AV Connection
A. Connect the AV Cable to the box and the other side to your TV.
B. Connect your Cable or Antenna to the IN port of the box.
C. Power on the SmartBox and set your TV’s input to Video/AV
3.2 HDMI Connection
A. Connect HDMI cable into the rear panel of the box, and the
other side into any HDMI ports on your TV
B. Connect your Cable or Antenna to the IN port of the box.
C. Power on the SmartBox and set your TV’s input to HDMI.
Connection diagram
Page 9

4 – Main Menu
4.1 Overview
Upon Startup, you’ll be taken to the main menu.
In the main menu various options will be displayed.
DTV: Opens the app to watch TV.
YOUTUBE: Opens Youtube App
GOOGLE PLAY: Opens Google Play Store
SETTINGS: Brings up a side menu listing basic settings.
APPS: Brings up a list of all apps installed on the SmartBox
MUSIC FAVORITES: Favorite Music App List (More on Section 7)
VIDEO FAVORITES: Favorite Video App List (More on Section 7).
FAVORITES: Favorite Apps List (More on Section 7).
Page 10

4.2 Shortcuts Menu
At the bottom of the main menu, you will see a small list of
icons. This is your Shortcut menu, which can be customized to your
personal preference.
To edit the Shortcut Menu, move the cursor to the (+) icon and
select it. You will be brought to a small list of all of your
installed apps.
Highlight an app and press OK on your remote to place a checkmark
the selected app. This will add the selected app to the shortcuts
menu. You can also press OK on a marked app to remove the
checkmark, removing the app from the shortcuts. When finished,
press the EXIT button on your remote.
You can shortcut up to 10 different apps.
Page 11

5 - Connecting to the Internet
You can connect to the Internet by selecting SETTINGS in the main
menu and selecting NETWORK.
5.1 Connecting via Wi-Fi
In the NETWORK settings, make sure Wifi is turned on. Select your
Wi-Fi network and press OK.
Page 12

Enter your network password. You can use either the navigation
buttons on the remote, or the keypad on the reverse side of the
remote.
The device will take some time to connect and authenticate your
connection. Once it says “Connected,” you’re able to access the
internet.
NOTE: There will be times where Wi-Fi may not be stable. When this
happens, disconnect the wi-fi and try reconnecting.
Page 13

5.2 Connecting via Ethernet
Make sure an active network cable is connected to the device. Your
IVIEW Smartbox will detect the connection and configure the
settings automatically.
Alternatively, you can manually change your network settings by
selecting PROXY SETTINGS and IP SETTINGS.
Page 14

6 – Digital TV
6.1 Quick Setup
When you first open the DTV App, you will be asked if you wish to
scan for channels. Select OK to enter the DTV Setup Menu.
In the Setup Menu, select INSTALLATION(ATSC) followed by AUTO
SEARCH.
Page 15
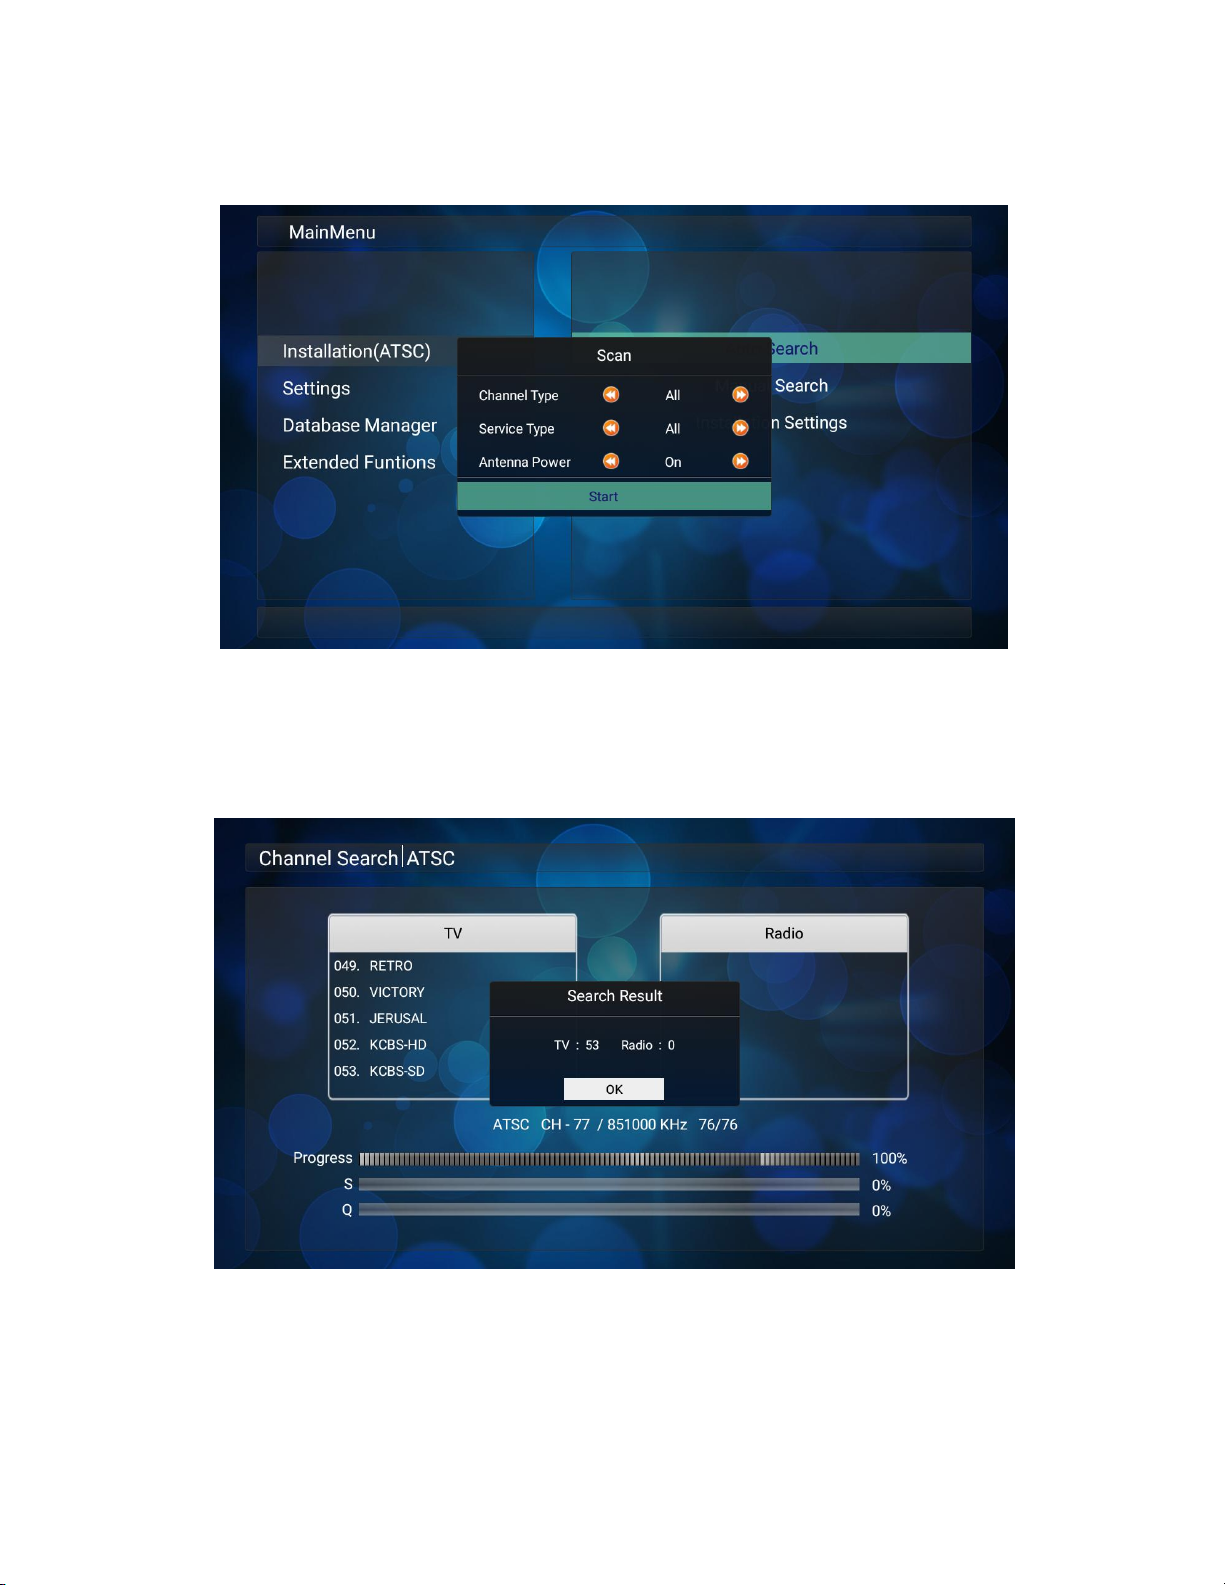
Once selected, a window will pop up with search settings.
Move the cursor and select START. The Smartbox will begin scanning
for channels. A channel scan using an antenna takes less than 10
minutes.
When scan is complete, you’ll be given a brief pop-up box with
the amount of TV (and Radio, if using cable) channels. And
congrats! You’ve successfully set up your DTV.
Page 16

6.2 Cable-TV Setup
If you’ve connected your IVIEW Smartbox to an active Cable
service, please follow these quick steps before scanning.
After selecting INSTALLATION(ASTC), move the cursor down to
INSTALLATION SETTINGS and press OK.
You will be given a pop-up window. Using the remote, change the
setting to CABLE, then move the cursor and select OK. From there,
follow the scan instructions provided in 6.1. A cable scan will
take roughly an hour to finish.
Page 17

6.3 DTV Menu Overview
Aside from the standard installation menu, here’s a basic
overview of the additional DTV options.
SETTINGS
GENERAL SETTINGS: Options for display, Closed Captions, and
Language.
PARENTAL CONTROL: General Parental control options that can be
used in the Database Manager. Requires a password (Default
Password is
PVR SETTINGS: General settings for recording.
FACTORY DATA RESET: Completely erases all TV data and settings
stored in the SmartBox.
0000
)
Page 18

DATABASE MANAGER
CHANNEL LIST EDIT: Brings up a list of all channels found by the
box. You’ll have the option of blocking, deleting, renaming and
creating lists of favorite channels
FAVORITE LIST EDIT: Lets you rename and edit up to 10 different
Favorite Channel lists.
DELETE ALL CHANNELS: Erases ALL channel data, without erasing
personal settings.
BACKUP USER DATA: Allows you to store DTV data onto an external
storage device.
RESTORE USER DATA: Loads DTV data from an external storage device.
Page 19

EXTENDED FUNCTIONS
EPG: Brings up the Electronic Program Guide for the current
channel.
PVR LIST: Brings up a list of all recorded programs. You can play,
rename or delete recorded programs.
BOOK LIST: Brings up your list of scheduled recordings. You can
add, edit, and delete schedule info. (To record a program, see
section 6.4)
Page 20

6.4 Scheduling a Recording
To record a TV program, a USB Storage Device is required.
NOTE: While the IVIEW Smartbox has up to 10GB of internal storage,
that storage is primarily reserved for Android-OS and cannot be
used to record programs.
SCHEDULING VIA EPG
You can access the EPG by pressing the EPG button on your Smartbox
Remote, or by accessing it via the DTV Menu.
To schedule a program to record, highlight a TV show on the EPG
and press OK. You will then be given a pop-up window asking if you
wish to PLAY or RECORD.
For this instance, select RECORD.
Page 21

Double-check the information. If everything is correct, select OK
at the bottom of the window.
MANUALLY SCHEDULING A RECORDING
You can access the Recording Schedule by pressing the SCHD button
on your Smartbox Remote, or by accessing the BOOK LIST via the DTV
Menu.
While in the Book List, press the REC button on your remote to add
an entry. You will be given the following menu shown above.
Page 22

Make sure TYPE is set to “Record.” Under MODE, you can choose to
record Daily (Sun-Sat), Weekly, Monthly, or just once.
Double-Check your channel and time information, and select OK on
the bottom of the window when finished.
The device will record and end at the times listed.
You can view all of your recorded programs by pressing the PVR
button on your remote, or by selecting PVR LIST via the DTV menu.
Page 23

7 - Favorites
The IVIEW Smartbox offers favorite Apps lists, organized into
three categories for your convenience.
7.1 Adding/Removing Favorites
Fist, select one of the three categories: MUSIC, VIDEO, or
FAVORITE.
For this example, we’ll be using VIDEO.
Just like with editing the Shortcut Menu, move the cursor to the
(+) icon and select it. You will soon see a menu drop down listing
all of your installed apps.
Page 24

Highlight an app and press OK on your remote to place a checkmark
the selected app. This will add the selected app to one of your
favorites lists. You can also press OK on a marked app to remove
the checkmark, removing the app from your favorites list. When
finished, press the EXIT button on your remote.
Unlike with the Shortcut Menu, you can favorite as many apps as
you like!
Page 25

8 - Media Players
By default, the IVIEW Smartbox has three basic media player apps.
Any additional apps must be downloaded from the Google Play Store
or the Internet.
8.1 Music Player
The Music Player supports many audio formats, including MP3, WMA,
WAV, and AAC.
The SmartBox will automatically scan and display all audio files
from both the internal storage and external storage.
In the music player menu, you can view your audio files, by
Artist, Album, and File Name.
You can even organize them into playlists.
NOTE: Music will STILL play, even after exiting the program.
Page 26

8.2 Movie Player
The Movie Player supports many video formats, including AVI, MPG,
MP4, VOB, RM, and MKV.
8.3 Gallery
The Gallery app supports JPEG, JPG, BMP, and PNG file formats.
The SmartBox will automatically scan and display all picture files
from both the internal storage and external storage and sort them
by folder.
Page 27

After selecting an Album, and selecting the Additional Options
icon on the Top-Right Corner of the screen, you can view the
entire album in a continuous slideshow.
Page 28

9 - Additional Features
9.1 Online Video Streaming
With an internet connection, you’ll be able to have access to
every internet streaming service for movies, shows, and even funny
videos (Service rates apply).
NOTE: Streaming video apps can ONLY be controlled using wireless
pointer.
9.2 Google Chrome
Many of Google Chrome’s features are included in the IVIEW
Smartbox.
Page 29

9.3 File Browser
Selecting APPS followed by FILEBROWSER, you can manage all of your
data.
9.4 App Installer
The IVIEW Smartbox is also equipped with an app installer that
will allow you to install additional .APK files that you’ve
downloaded from the internet.
NOTE: IVIEW is not responsible for any malfunctions due to corrupt
or virus-infected files.
Page 30

9.5 Miracast
Your IVIEW Smartbox also has the ability to Mira-cast from your
tablet or smartphone.
NOTE: Before casting, make sure both devices are connected to the
same network.
To miracast, select APPS from the main menu followed by MIRACAST.
Your IVIEW Smartbox will be sending a signal letting other devices
know that they can cast to it.
Page 31
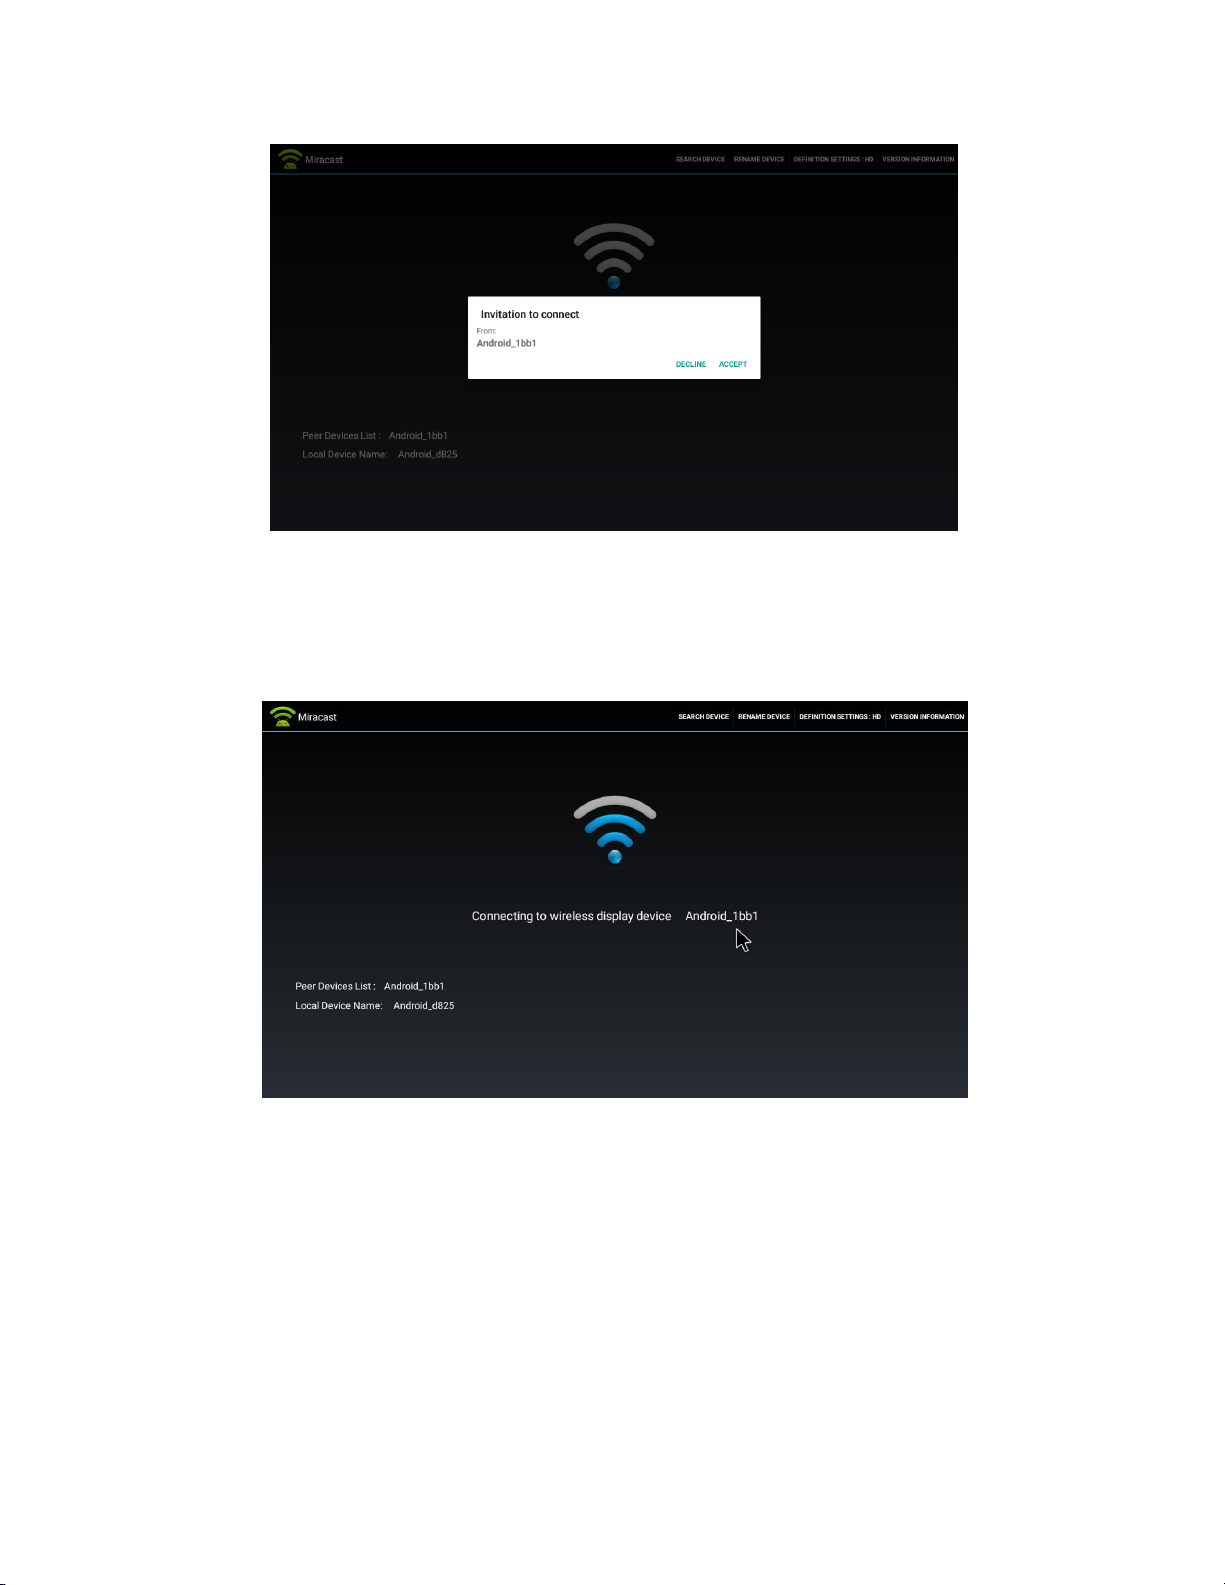
On your tablet or smartphone, select DISPLAY, followed by CAST.
The SmartBox will notify you of an incoming connection. Select
accept.
Both the Smartbox and your device will begin connecting. Process
will take several minutes.
When finished, the Smartbox will display what’s currently on your
tablet or smartphone.
Page 32

9.6 IView iHome
Your IVIEW Smartbox comes with the IVIEW iHome app preinstalled,
so you can connect it to your IVIEW Smart Home devices.
First, open the IVIEW iHome app, located under APPS, in the main
menu.
ACCOUNT SETUP
1. Open iView iHome and click Register.
Page 33

3. Register either your phone number or email address and click
NEXT.
4. You will receive a verification code via email or SMS. Enter
the verification code in the top box, and use the bottom text box
to create a password. Click Confirm and your account is ready.
DEVICE SETUP
** Before setting up, make sure your Smartbox is connected to your
desired wireless network.
1. Open your iView iHome app and select “ADD DEVICE” or the (+)
icon at the top-right corner of the screen
2. Connection instructions vary on the device. Please view the
manual of your IVIEW Smart Home device for additional information.
Page 34

3. Device will connect. Process will take less than a minute. When
the indicator reaches 100%, setup will be complete. You will also
be given the option to rename your device.
Page 35

10 - System Settings
The IVIEW Smartbox has 3 different types of settings, here’s a
basic overview of each and how to access them.
10.1 Quick Settings
You can access the Quick Settings from the Main Menu
Upon selecting the Quick Settings, you will be given the following
settings. Each will give you basic options for your box.
Page 36

NETWORK: General Network Settings
SOUND: Enable/Disable System Sounds and Surround Sound.
APPS: Lists all apps installed on the device.
SCREEN SAVER: Enables/Disables one of 4 screen savers that will
display when device is inactive.
STORAGE & RESET: Internal and External Storage Management and
Factory Reset Options (For information on resetting, see Section
12).
ABOUT: See Firmware information.
DATE & TIME: Change the Date/Time of your device.
LANGUAGE: General Language Settings
KEYBOARD: General Keyboard options.
ACCESSABILITY: General Accessibility settings.
REMOTE & ACCESSORIES: Connect your box to additional accessories
via Bluetooth.
LOCATION: Enable/Disable device location.
SECURITY & RESTRICTIONS: Set basic security settings.
ACCOUNTS: Connect the Smartbox to various email and social media
accounts.
Page 37

10.2 Droid Settings
You can access Droid Settings by selecting APPS from the main
menu.
Upon selecting the Droid Settings, you will be given the following
settings. Each will give you additional options for your box.
DISPLAY: Change resolution and zoom options for your box.
HDMI CEC: General Consumer Electronics Control settings for your
remote.
Page 38

PLAYBACK SETTINGS: Allows you to set the box to adjust to your
TV’s native frame rate.
POWERKEY DEFINITION: Changes what the power button does.
UPGRADE REMOTE: Upgrades your remote via Bluetooth.
MORE SETTINGS: Takes you to Android Settings.
10.3 Settings
You can access System Settings by selecting APPS from the main
menu.
These are the more advanced settings you would find in any android
device.
Page 39
11 - Firmware Update
Eventually, firmware updates will be released, which can add new
features and enhance performance. To update the box, download the
latest updates from Iviewus.com and place them onto a USB storage
device. From there, insert the USB Storage into the box.
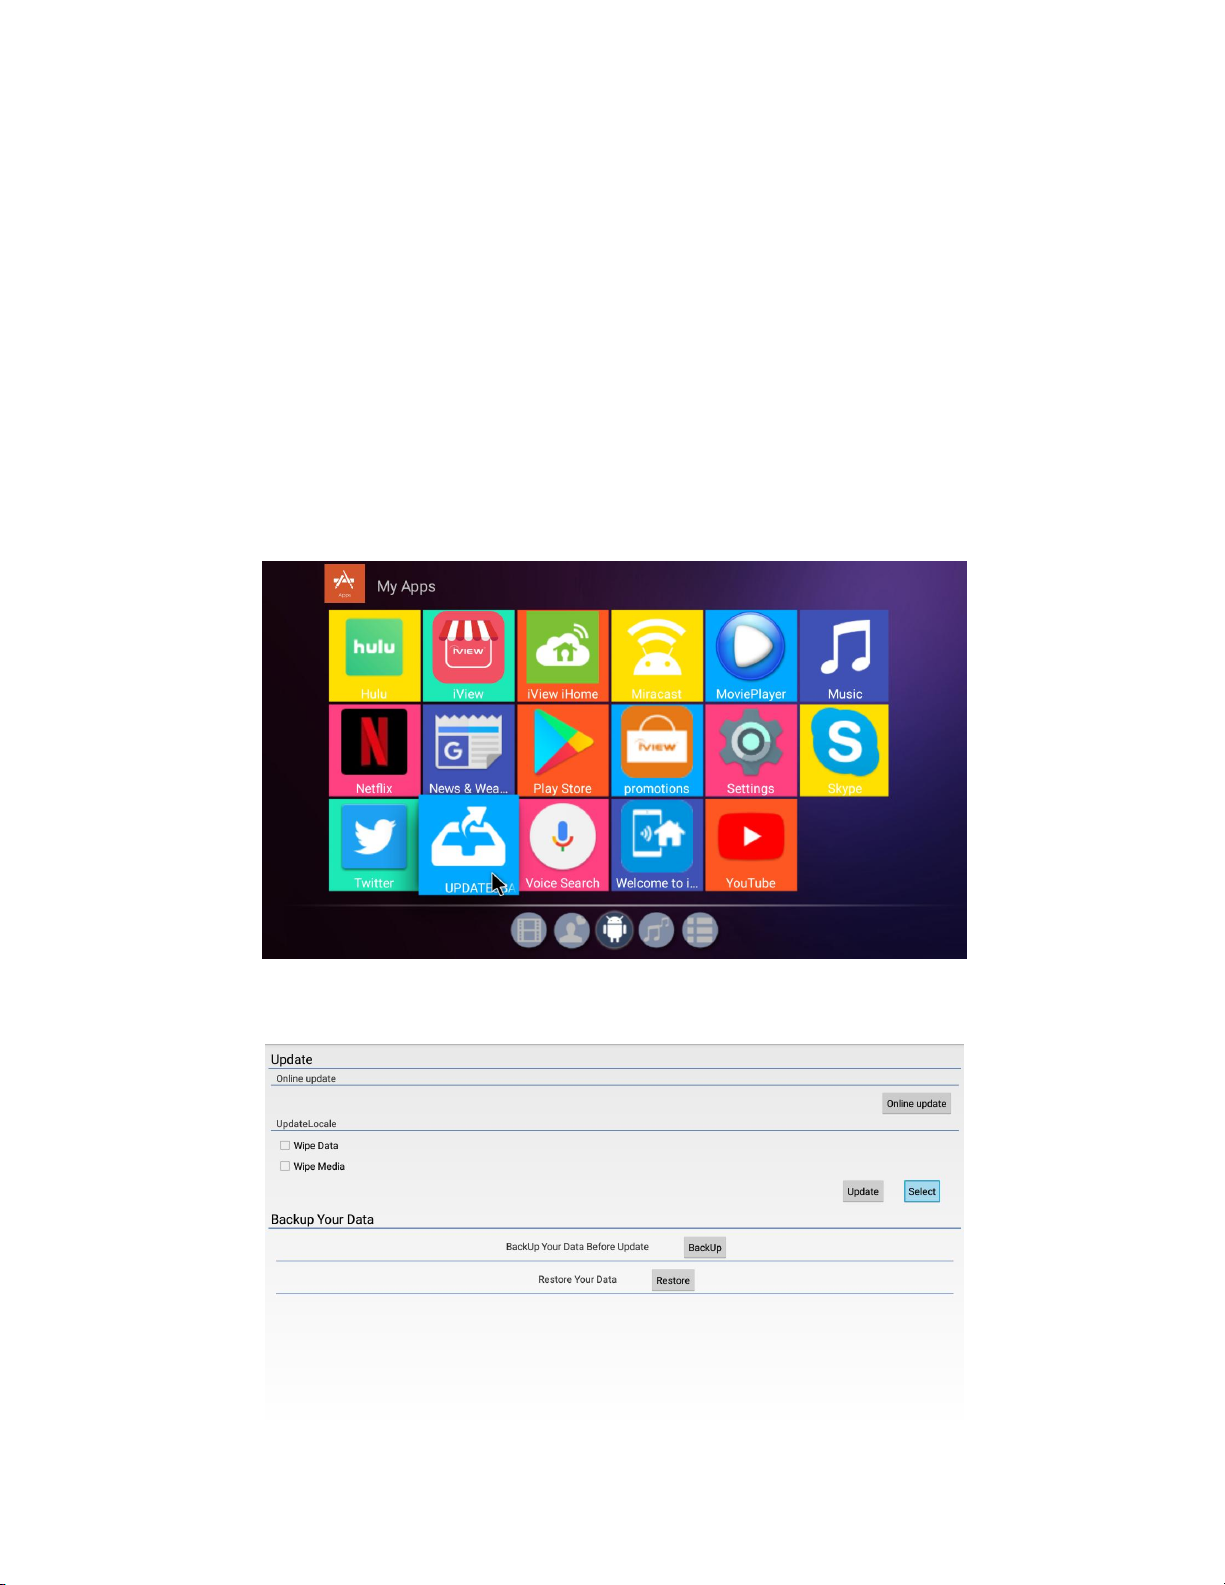
With the USB connected, you perform the update by selecting
UPDATE&BACKUP, which can be found by selecting APPS from the main
menu.
You will then be taken to the following menu.
Page 40

Click on SELECT and the box will automatically scan for update
files and display them on the screen.
Select the update file. It will be loaded onto the menu.
Make sure WIPE DATA and WIPE MEDIA are checked.
Select UPDATE and your device will begin updating. The process
will take several minutes.
Device will reboot when finished.
Page 41
12 - Resetting Your Smartbox
When your box is not performing well, you can perform a factory
reset on the box. There are two ways to perform a reset:
RESETTING VIA QUICK SETTINGS:
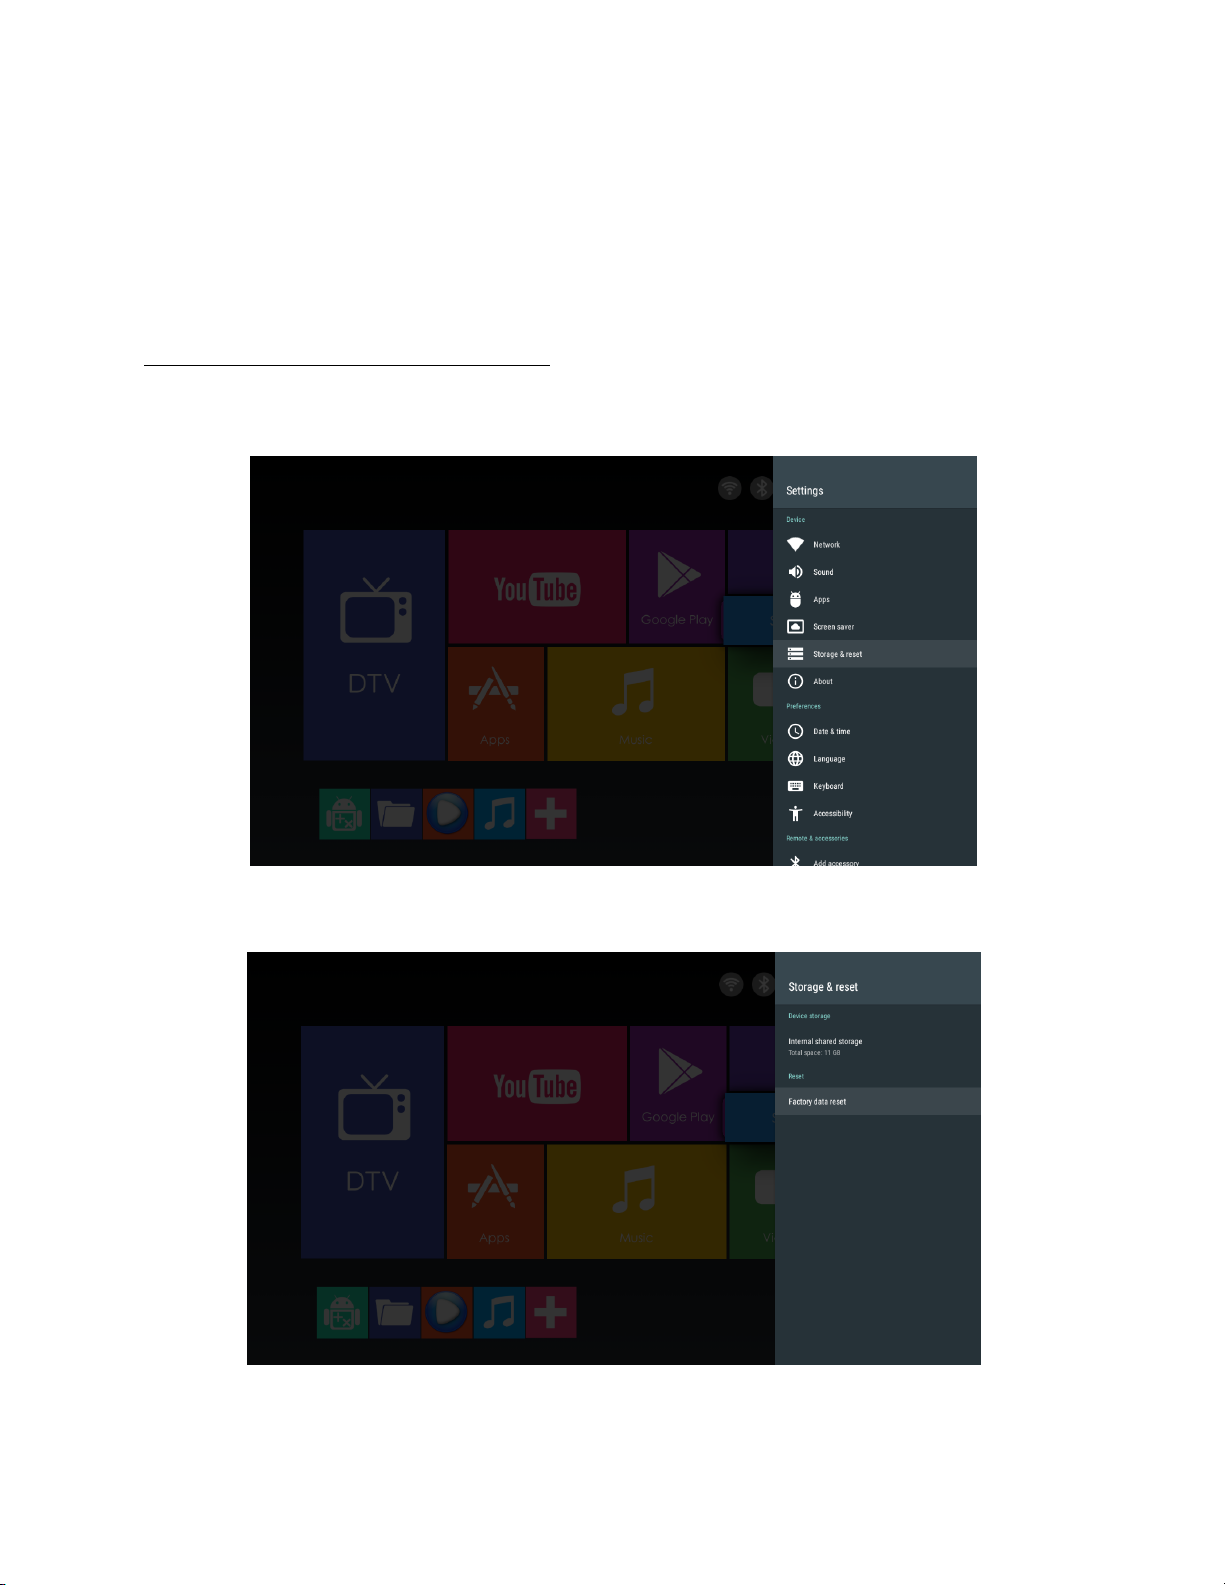
You can access the Quick Settings from the Main Menu.
In the Quick Settings menu, select STORAGE & RESET.
Select FACTORY DATA RESET.
Page 42

You will be prompted TWICE. First, select FACTORY DATA RESET.
Select ERASE EVERYTHING.
Your IVIEW Smartbox will reset to its original factory settings.
The process may take several minutes.
When finished, your smartbox will reboot.
Page 43
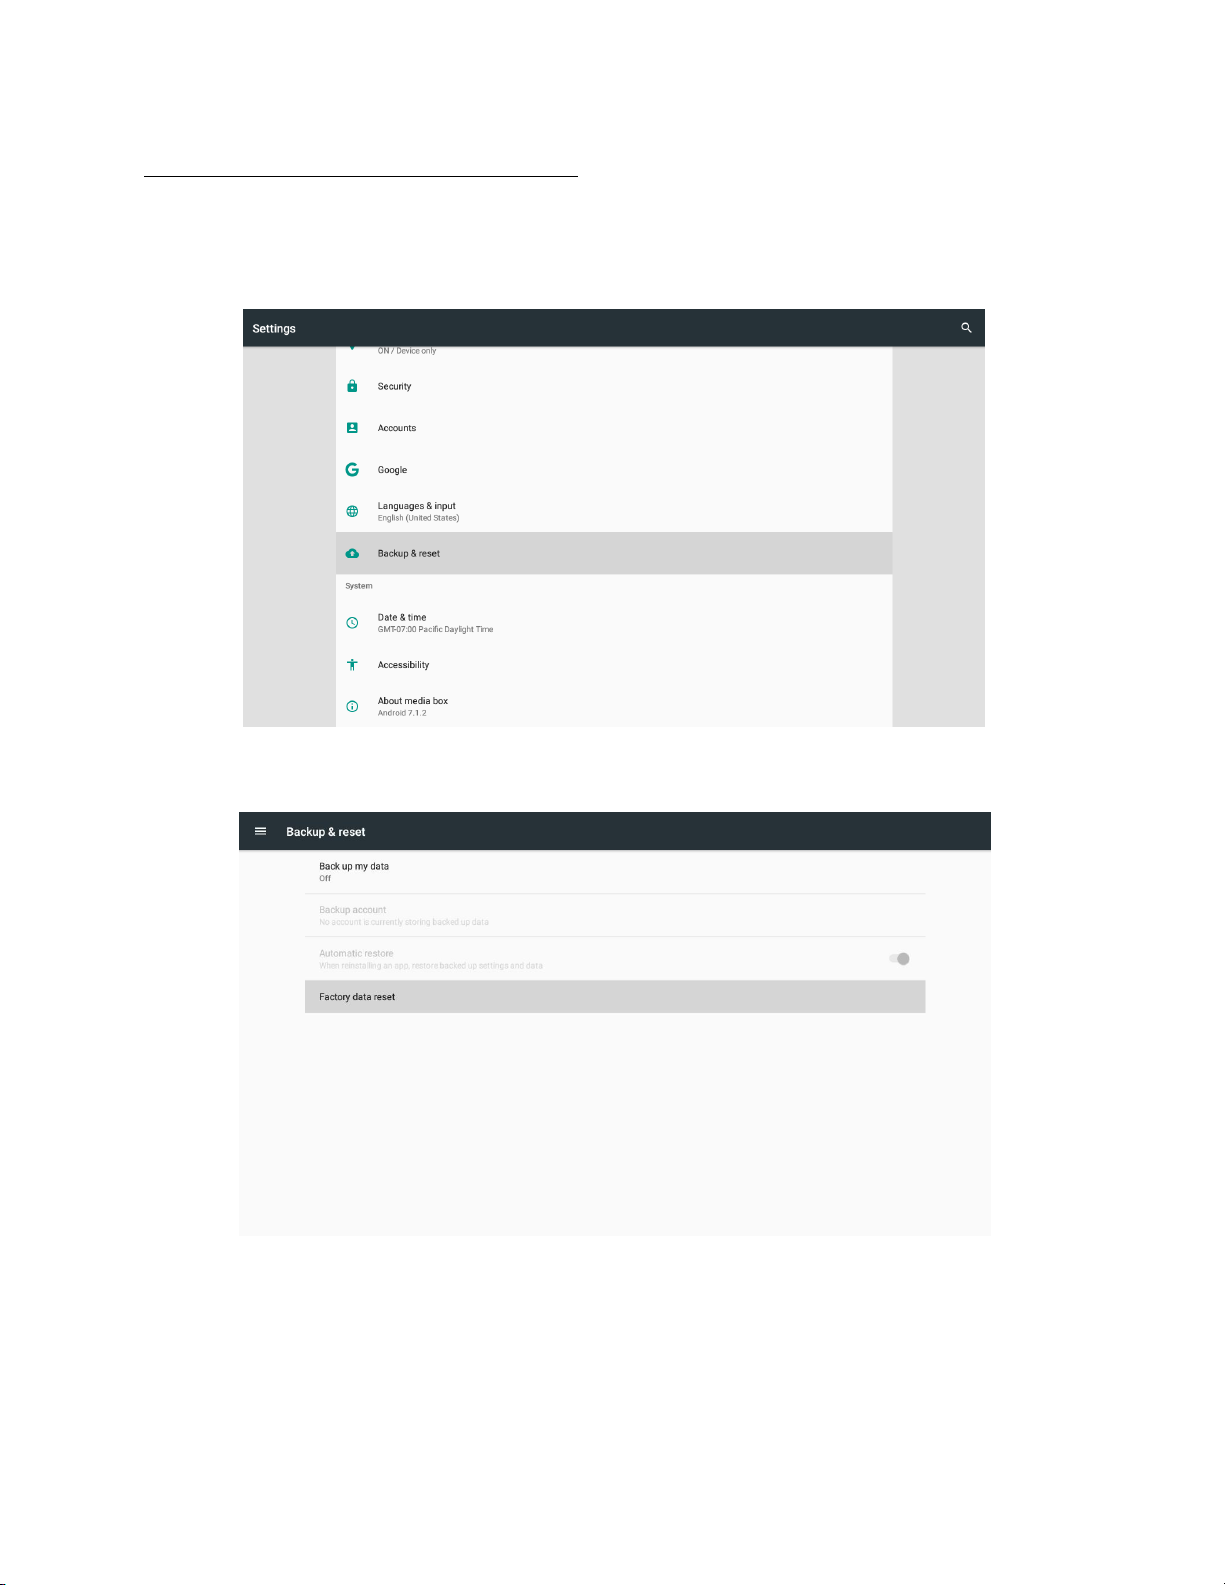
RESETTING VIA ANDROID SETTINGS:
You can access System Settings by selecting APPS from the main
menu.
Scroll down to the bottom of the menu. Select BACKUP & RESET.
Select FACTORY DATA RESET. You will then be prompted TWICE.
Page 44
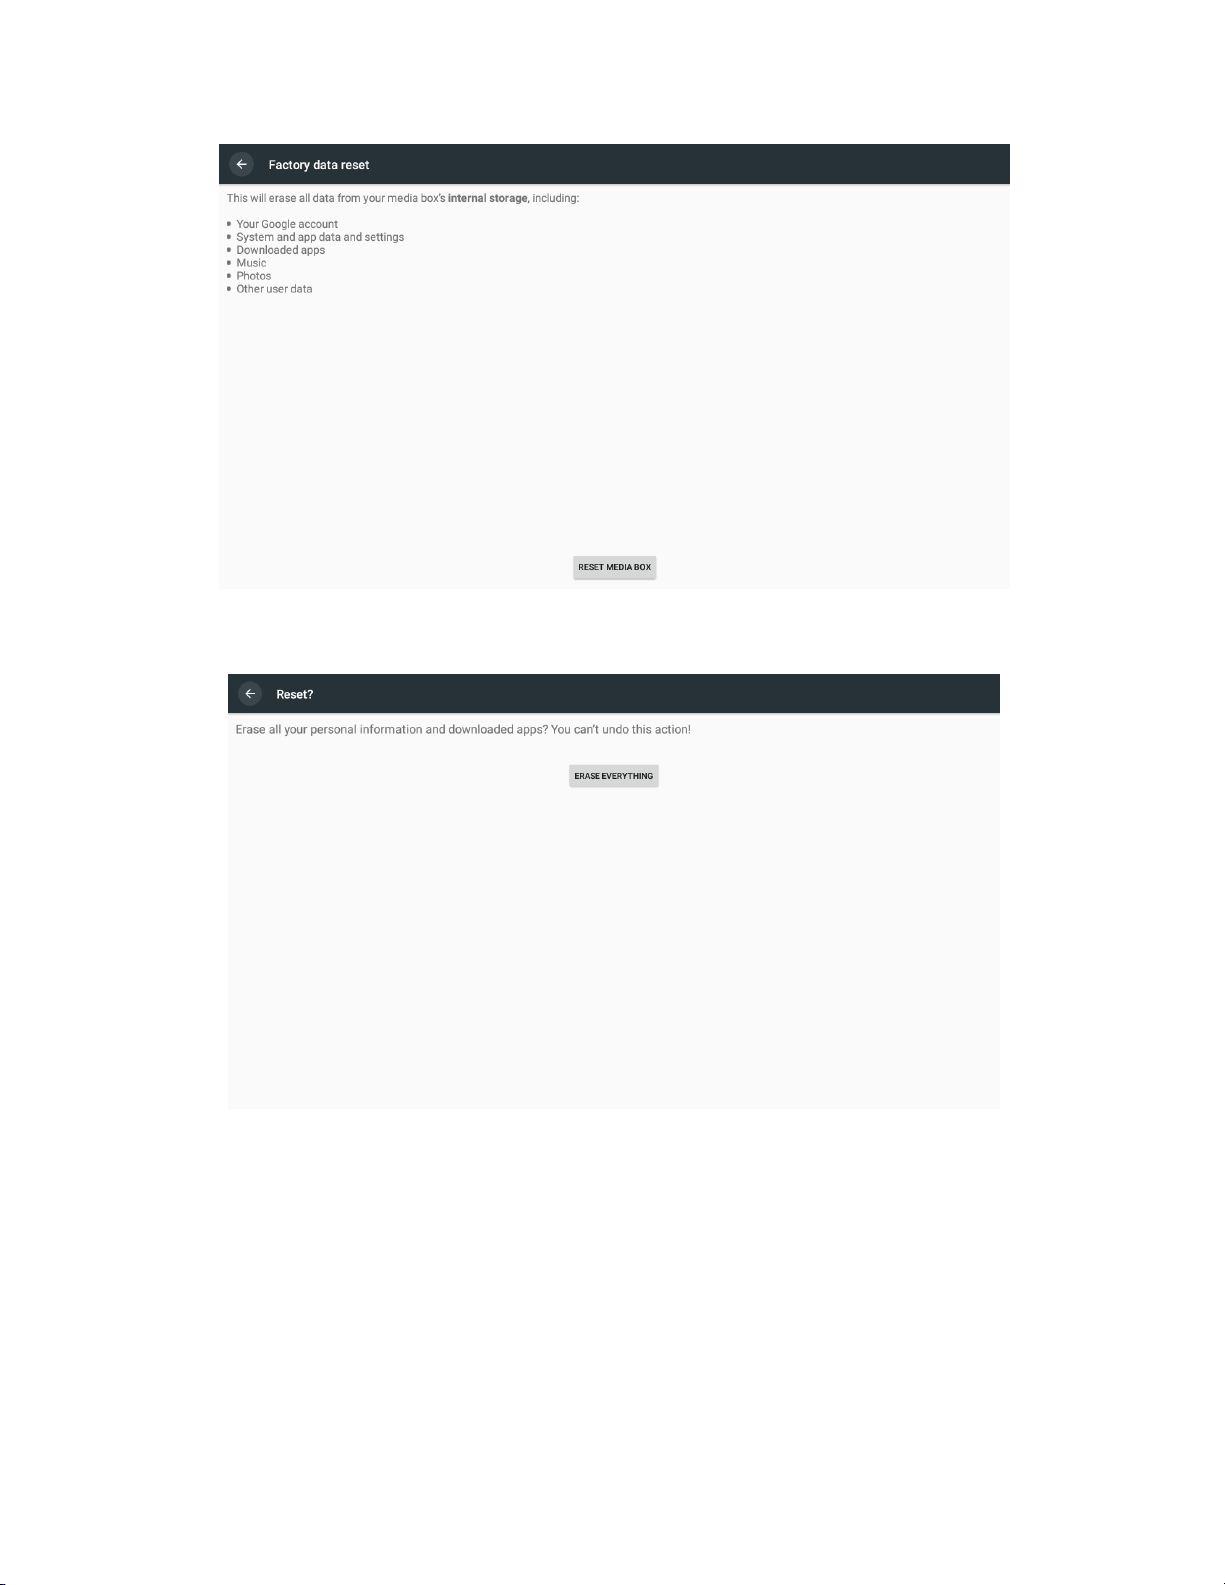
Select RESET MEDIABOX.
Select ERASE EVERYTHING.
Your IVIEW Smartbox will reset to its original factory settings.
The process may take several minutes.
When finished, your smartbox will reboot.
Page 45

13 - Troubleshooting
Issue
Solution
Not Powering on
- check if the power adapter is properly connected
to the power and the smart TV box
- Press the power on the remote controller to turn
on the power.
No picture
- Re-connect HDMI cable or AV cable.
- Check if the TV is switched on and on the correct
video input
Distorted or no sound
-Adjust the volume
No response from the
remote
-Aim the Remote Control at the sensor on the Smart
TV Box.
-Reduce the distance between the TV and Smart Box.
Certain remote commands
do not work during
video playback
-Some commands may not be available during playback.
Refer to the user manual.
-Possibility of system halted, re-insert with power
adapter
No sound during video
playback
-Audio codec may not be supported by the Smartbox.
You can change to the supported audio on player
menu.
-Check the volume.
Smartbox cannot read
USB
-The USB flash drive format is not compatible with
the box.
-If the USB can not be read, please turn off the
Smart TV Box for 30 seconds and reboot.
Box slows down when
running USB drive
-Large file sizes on the USB flash drive will take
longer to read and display on the TV screen.
No sound with HDMI
connection
-Check the HDMI connection between the TV and the
box.
-Check your TV system setup
Warning
Under no circumstances should you try to repair the Smart TV Box by yourself,
as this will void the warranty. Do not open the Smart TV Box due to risk of
electric shock. If an issue occurs, first see the chart below before taking
the Smart TV Box for repair. If you are unable to remedy a problem by
following hints, consult your dealer for help.
Page 46

Box LED is blinking and
no display on TV
-Turn off your Smart TV Box, wait 30 seconds, turn
it on again.
-If using HDMI, check if HDMI connection is correct
or change HDMI cable.
-Set the output resolution of this Smart TV Box into
720p.
Function
Device Specs
Primary
Operating
System
Android 7.1 Nougat
TV Tuner
ASTC and QAM Compatible
Hardware
CPU
Cortex A5 1.5GHz Quad Core Processor
Storage
16 GB Total internal storage
Memory
2GB DDR3 RAM
Network
Ethernet
RJ-45 Ethernet Port
Wireless
802.11n (2.5 GHz & 5GHz) wireless card
Audio/Video
Connection
Ports
Coaxial
Coaxial-IN port for Antenna or cable service
Coaxial-OUT for legacy TVs.
AV
Analog Video port, with stereo sound.
HDMI
HDMI port for 1080i high resolution video and
sound.
Additional
Ports
USB
2 USB 2.0 ports for devices and storage.
Supported
Video Formats
MPEG1/MPEG2/MPEG4, AVI, MPG, VOB, MKV, RM
Supported
Audio Formats
MP3, WMA, WAV, MIDI, OGG, AAC
Supported
Picture
Formats
JPG, JPEG, BMP, PNG
Power Supply
5V DC: Current:2A:
14 - System Specifications
 Loading...