

Page 1

&%-V(
OSD User's Guide
USER'S GUIDE
OSD User's GuideI
V0.1
&%9(
OSD User's Guide
2010/9/27
!
1
!
Page 2

Content
•
Interface Illustration!
3
•
OSD MENU!
5
•
LENS!
6
•
SHUTTER / AGC!
7
•
WHITE BAL!
9
•
BACKLIGHT!
12
•
PICT ADJUST!
13
•
ATR(WDR Function)!
14
•
MOTION DET!
17
•
PRIVACY!
19
•
DAY / NIGHT!
22
•
NR!
24
•
CAMERA ID!
25
•
LANGUAGE!
26
•
CAMERA RESET!
26
•
OSD TREE (FULL)!
27
•
Default Register Table!
29
USER'S GUIDE
V0.1
2010/9/27
2
!
&%9(
OSD User's Guide
Page 3

Interface Illustration
Control interface
USER'S GUIDE
V0.1
2010/9/27
3
!
&%9(
OSD User's Guide
Page 4

OSD Interface
(a) Item Name : Select Items by using UP & DOWN button
(b) Selection Function : Select Function by using LEFT & RIGHt button
(c) Adjustable Function : Functions with arrow sumbol, press ENTER button to enter
branch menu
(e) Next page : Press Enter to enter OSD menu page 2 (This OSD menu has total of 2
pages)
(f) Exit : Leave OSD Menu
(g)Save : Save all the settings
(h)Default : Reset all the OSD settings back to the factory default
(i) Back : Return to OSD Menu Page 1
(j) Adjustment Bar : Press LEFT or RIGHT button to adjust the values
(k)Return : Return to TOP OSD menu from branch OSD menu
USER'S GUIDE
V0.1
2010/9/27
4
!
&%9(
OSD User's Guide
Page 5

OSD MENU
LENS
Manual Lens & Auto Iris Lens Setting
SHUTTER / AGC
Shutter speed & AGC setting, it determines the
image brightness under low lux or bright condition
WHITE BAL
White balance mode setting, it determines the
way the color is produced
BACKLIGHT
Backlight setting
PICT ADJUST
Basic image adjustment such as hue, saturation,
contrast, sharpness
ATR
Adaptive tone reproduction, software WD setting
OSD
MOTION DET
Motion detect function, sense area, sensitivity
setting
OSD
PRIVACY
Privacy mask, color, transparency setting
OSD
DAY / NIGHT
Color / Mono / Auto Mode setting
OSD
NR
Noise Reduction setting
OSD
CAMERA ID
Camera ID Setting
OSD
LANGUAGE
OSD Language Setting, total of 8 languages
available
OSD
CAMERA RESET
Reset OSD setting
OSD
EXIT
Leave OSD Menu
USER'S GUIDE
V0.1
2010/9/27
5
!
&%9(
OSD User's Guide
Page 6

LENS
Basic setting for lens, it covers normal lens & auto iris lens.
1. MANUAL
This function is for normal lens or vari-focal lens.
2. AUTO
This function is for auto iris lens, system automatically adjusts the iris level to control the
brightness.
Option
Content
Description
TYPE
•
VIDEO
•
DC
VD circuit is not included in the module, it is
recommended to use DC
MODE
•
AUTO
•
OPEN
•
CLOSE
AUTO : Syster automatically determines the iris level-light
OPEN : Test function, iris will be opened to maximum
CLOSE : Test function, iris will be closed
SPEED
0-255
Speed for iris response , default is 80
0 : Slowest , 255 : Fastest
USER'S GUIDE
V0.1
2010/9/27
6
!
&%9(
OSD User's Guide
Page 7

SHUTTER / AGC
This function controls the shutter speed & AGC. AGC can automatic adjust the output
signal level during the low lux condition.
USER'S GUIDE
V0.1
2010/9/27
7
!
&%9(
OSD User's Guide
Page 8

1. AUTO
HIGH LUMINANCE
Option
Content
Description
MODE
•
SHUT(Note 1)
•
SHUT+ATUO IRIS (Note 1)
•
ATUO IRIS (Note 2)
•
Shutter Mode
•
Shutter + Auto Iris Mode
•
Auto Iris Mode
BRIGHTNESS
0-255
Brightness Adjustment , default 60
0 for dark , 255 for bright
Note 1: This function is appeared only when LENS : MANUAL is selected
Note 2: This function is appeared only when LENS : AUTO is selected , when using Auto
Iris Lens, it is recommended to set it to AUTO IRIS mode to avoid the color rolling issue.
LOW LUMINANCE
Option
Content
Description
MODE
•
AGC
•
OFF
Turn on AGC (so output signal
amplified during low lux)
Turn off AGC function
BRIGHTNESS
•
X0.25
•
X0.50
•
X0.75
•
X1.00
Brightness adjustment , default is x0.5 ,
x0.25 : Dark , x1.0 : Bright
2. MANUAL
Option
Content
Description
MODE
SHUT+AGC
Shutter + AGC
SHUTTER
•
1/60
•
1/100
•
1/250
•
1/500
•
1/1000
•
1/2000
•
1/4000
•
1/10000
Shutter Speed
AGC
•
6.00
•
12.00
•
18.00
•
24.00
•
30.00
•
36.00
•
42.00
•
44.80
AGC value
USER'S GUIDE
V0.1
2010/9/27
8
!
&%9(
OSD User's Guide
Page 9

WHITE BAL
White balance is the process of removing unrealistic color with according to the light
sources & temperature, so that objects appear white in person are rendered white on final
output to TV.
USER'S GUIDE
V0.1
2010/9/27
9
!
&%9(
OSD User's Guide
Page 10

1. ANTI CR
Color Rolling suppress
2. MANUAL
Manually adjust the white balance
Option
Content
Description
LEVEL
19-44
Manually adjust the white balance , default is 44 ,
19 for low temperature
44 for high temperature
LEVEL: 32
(Left)LEVEL: 19 (Right)LEVEL: 44
3. PUSH LOCK
Press OSD ENTER button to lock the current white balance, once it is locked, the white
balance will not operate even when light temperature is changed.
USER'S GUIDE
V0.1
2010/9/27
10
!
&%9(
OSD User's Guide
Page 11

4. ATW
Auto Trace White
Option
Content
Description
SPEED
0-255
Setting for ATW response time, default is 239,
0 for slowest delay & 255 for fastest
DELAY CNT
0-255
Setting for ATW delay time ,default is 16,
0 for shortest delay & 255 for longest
ATW FRAME
•
x1.00
•
x1.50
•
x2.00
•
x0.50
No effect, system already set it to full frame
ENVIRONMENT
•
INDOOR
•
OUTDOOR
No effect, system already set it to accomplish
for both indoor & outdoor
5. PUSH
Similar to ATW, but system will force to track white balance continuously
6. USER1
User define white balance
Option
Content
Description
B-GAIN
0-255
Adjust B-Gain value
R-GAIN
0-255
Adjust R-Gain value
7. USER2
User define white balance
Option
Content
Description
B-GAIN
0-255
Adjust B-Gain value
R-GAIN
0-255
Adjust R-Gain value
USER'S GUIDE
V0.1
2010/9/27
11
!
&%9(
OSD User's Guide
Page 12
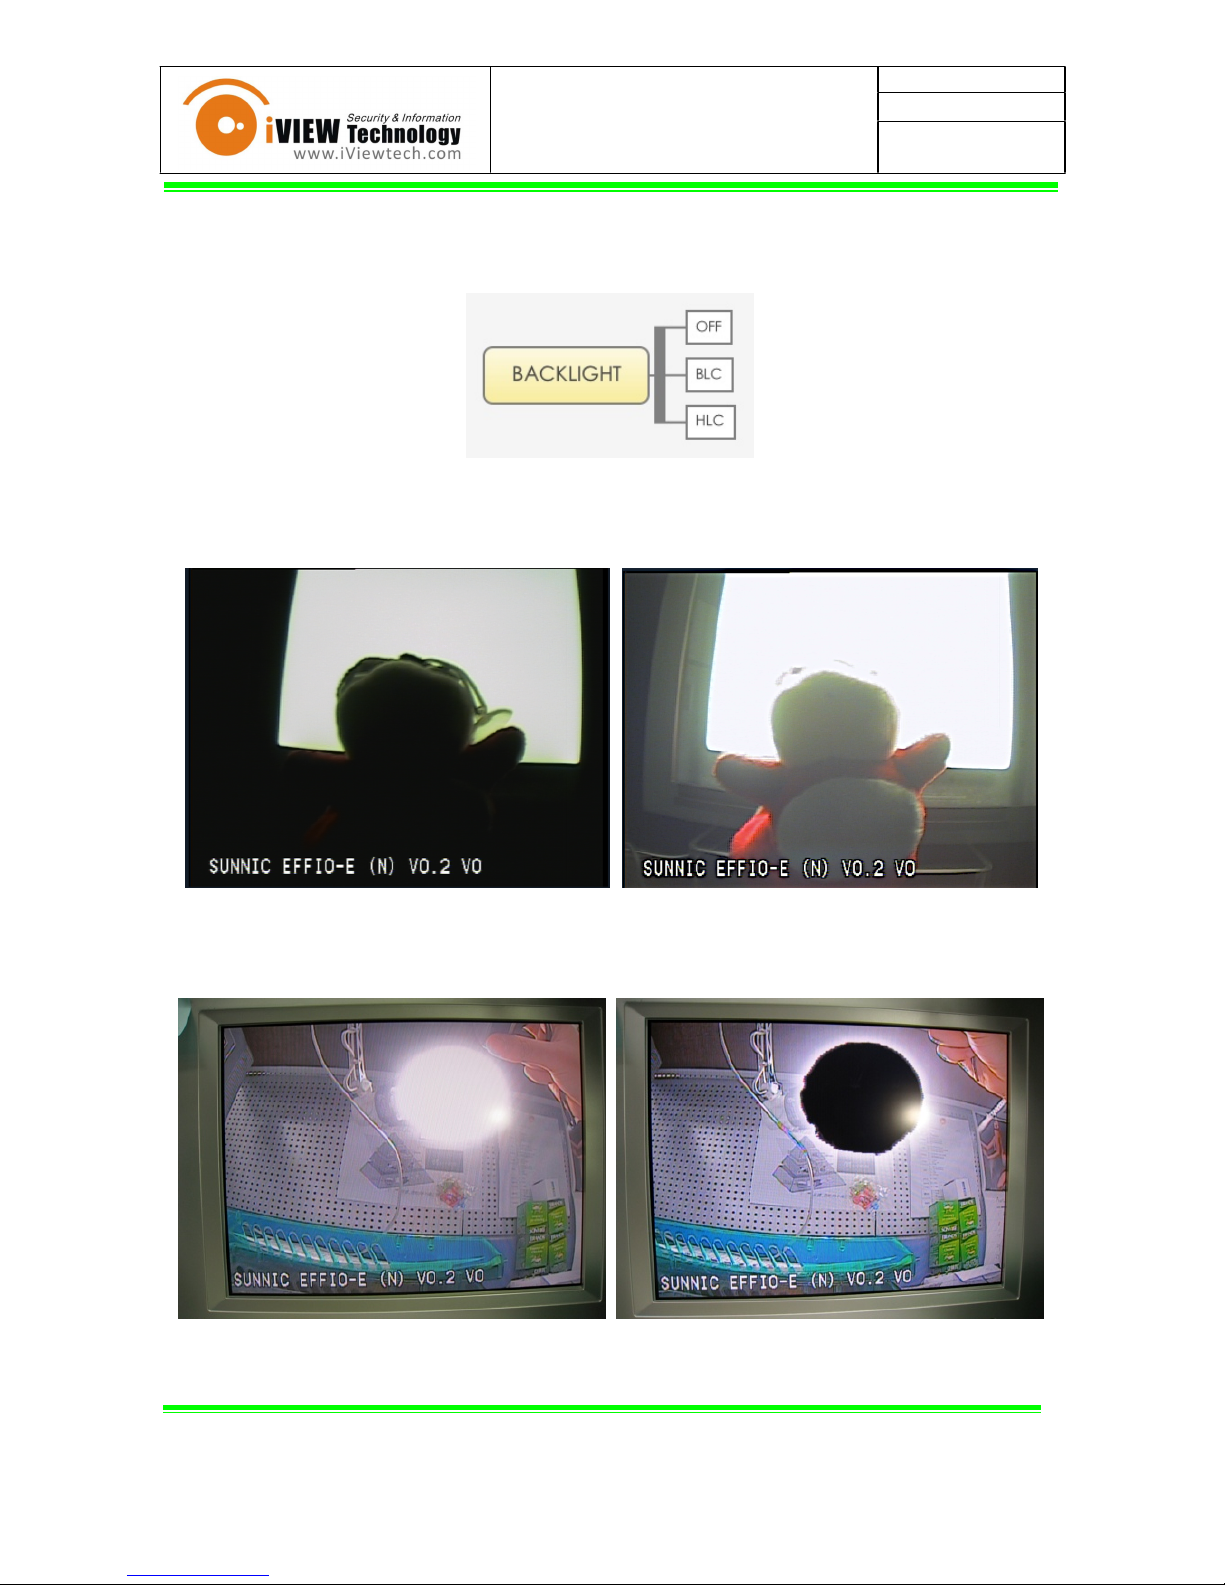
BACKLIGHT
This function is used when object is heavily influenced by the excessive front light or back
light source.
(1) OFF (DEFAULT)
(2) BLC : Back light compensation
(3) HLC : High light compensation
Turns the excessive white light into black, it is mainly used for recognization of the car
plate during the night.When excessive light source is behind the object.
LEFT : Normal Image RIGHT : Image with BLC ON
When excessive light source is presented
LEFT : Normal Image RIGHT : Image with HLC ON
USER'S GUIDE
V0.1
2010/9/27
12
!
&%9(
OSD User's Guide
Page 13

PICT ADJUST
Basic picture adjustment setting.
Option
Content
Description
MIRROR
•
OFF
•
ON
Flip image horizontally
BRIGHTNESS
0-255
brightness (default : 0)
CONTRAST
0-255
contrast ( default : 128)
SHARPNESS
0-255
Sharpness (default : 128)
HUE
0-255
Color Hue (default :
102 for NTSC , 108 for PAL)
GAIN
0-255
Color Saturation ( Default : 128)
USER'S GUIDE
V0.1
2010/9/27
13
!
&%9(
OSD User's Guide
Page 14

ATR(Adaptive tone Reproduction)--WDR Function
This function is to softwarely achieve Wide dynamic range, when this function is ON,
the brightness of the darker region will be slightly brighter, and same for the brighter
region, the brightness will be slightly darker
1. OFF
2. ON
Option
Content
Description
LUMINANCE
•
LOW
•
MID
•
HIGH
BRIGHTNESS
DEFAULT : LOW
CONTRAST
•
LOW
•
MID LOW
•
MID
•
MID HIGH
•
HIGH
CONTRAST
DEFAULT : LOW
USER'S GUIDE
V0.1
2010/9/27
!
14
!
&%9(
OSD User's Guide
Page 15

To:HISHARPELECTRONICSCO.,LTD.
!"#$ % & # ' ()* % + , - .' / & , % )0 ) 1 + + & , 2 1 3 ) 4 56/ " . )78 8 ( & # '/ & , % ) 9, / " 6 )2)
:"-;<; =;<) >'%? '-5) @A/$ B) @<C<)
[CONFIDENTIAL]
)
)
)
USER'S GUIDE
V0.1
2010/9/27
15
!
&%9(
OSD User's Guide
Page 16

Picture above : Normal Image
Picture below : Image with ATR ON
USER'S GUIDE
V0.1
2010/9/27
16
!
&%9(
OSD User's Guide
Page 17
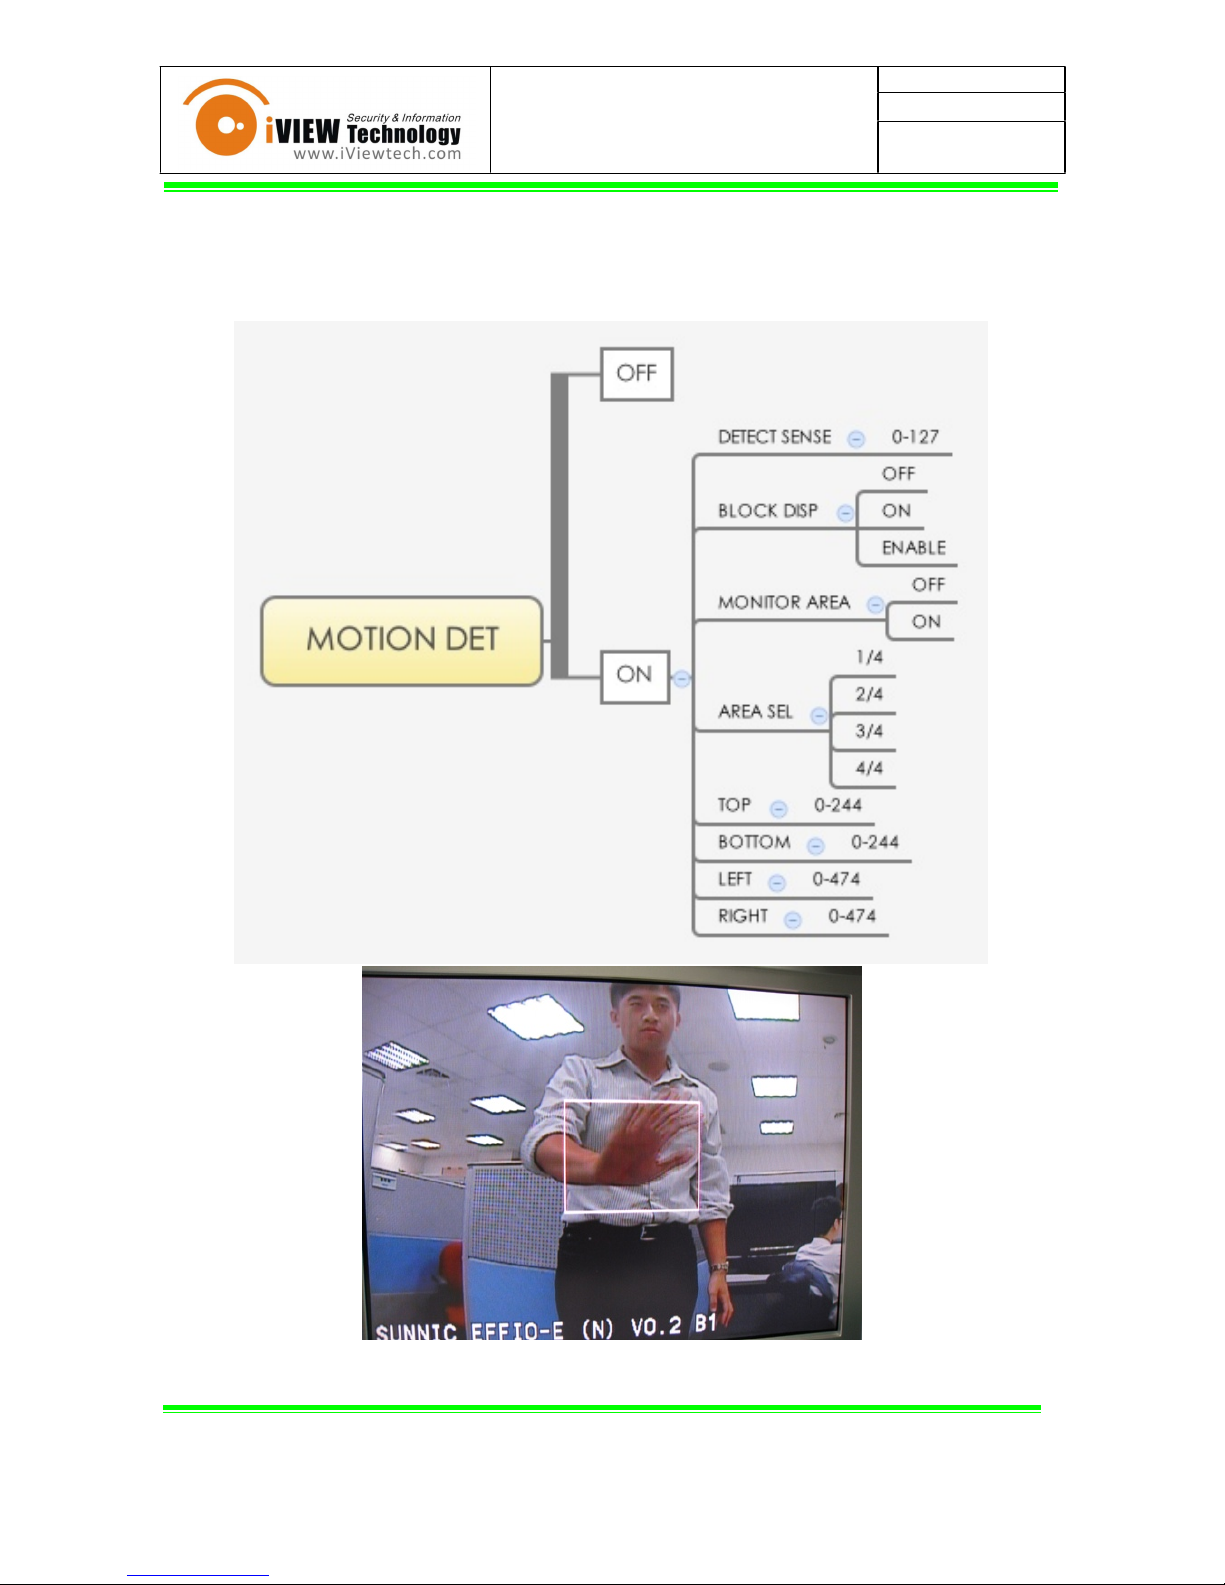
MOTION DET
This function detects the object movement (CCTV must be static). The detection frame
blinks when object movement is detected. GPIO 1 of the module will output alarm signal
(3.3V) when movement is detected. Normally it outputs 0V.
Motion Detect Frame : The frame blinks when any movement is detected within the frame.
USER'S GUIDE
V0.1
2010/9/27
17
!
&%9(
OSD User's Guide
Page 18

1. OFF
2. ON
Option
Content
Description
DETECT SENSE
0-255
Motion detection sensitivity , default : 115 ,
0 for lowest sensitivity,
255 for highest sensitivity.
BLOCK DISP
•
OFF
•
ON
•
ENABLE*
Display the motion detect grid,
default OFF
MONITOR AREA
•
ON
•
OFF
Display the motion detect frame when
movement detected , default ON
Option
Content
Description
AREA SEL
•
1/4
•
2/4
•
3/4
•
4/4
Frame location setting, total of 4 frames
available
TOP
0-244
Frame boundary (TOP)
BOTTOM
0-244
Frame boundary (BOTTOM)
LEFT
0-474
Frame boundary (LEFT)
RIGHT
0-474
Frame boundary (RIGHT)
USER'S GUIDE
V0.1
2010/9/27
18
!
&%9(
OSD User's Guide
Page 19

PRIVACY
Setting of the privacy mask and it's content (color & transparency)
USER'S GUIDE
V0.1
2010/9/27
19
!
&%9(
OSD User's Guide
Page 20

1. OFF
2. ON
Option
Content
Description
AREA SEL
•
1/4
•
2/4
•
3/4
•
4/4
Mask location setting, total
of 4 frames available
TOP
000-244 (NTSC)
000-288 (PAL)
Mask boundary (TOP)
BOTTOM
000-244 (NTSC)
000-288 (PAL)
Mask boundary (BOTTOM)
LEFT
000- 474(NTSC)
000- 468(PAL)
Mask boundary (LEFT)
RIGHT
000- 474(NTSC)
000- 468(PAL)
Mask boundary (RIGHT)
COLOR
1 ~ 8
Mask Color Setting
1. Red
2. Green
3. Purple
4. Yell ow
5. Cyan
6. Pink
7. White
8. Black
USER'S GUIDE
V0.1
2010/9/27
20
!
&%9(
OSD User's Guide
Page 21
Option
Content
Description
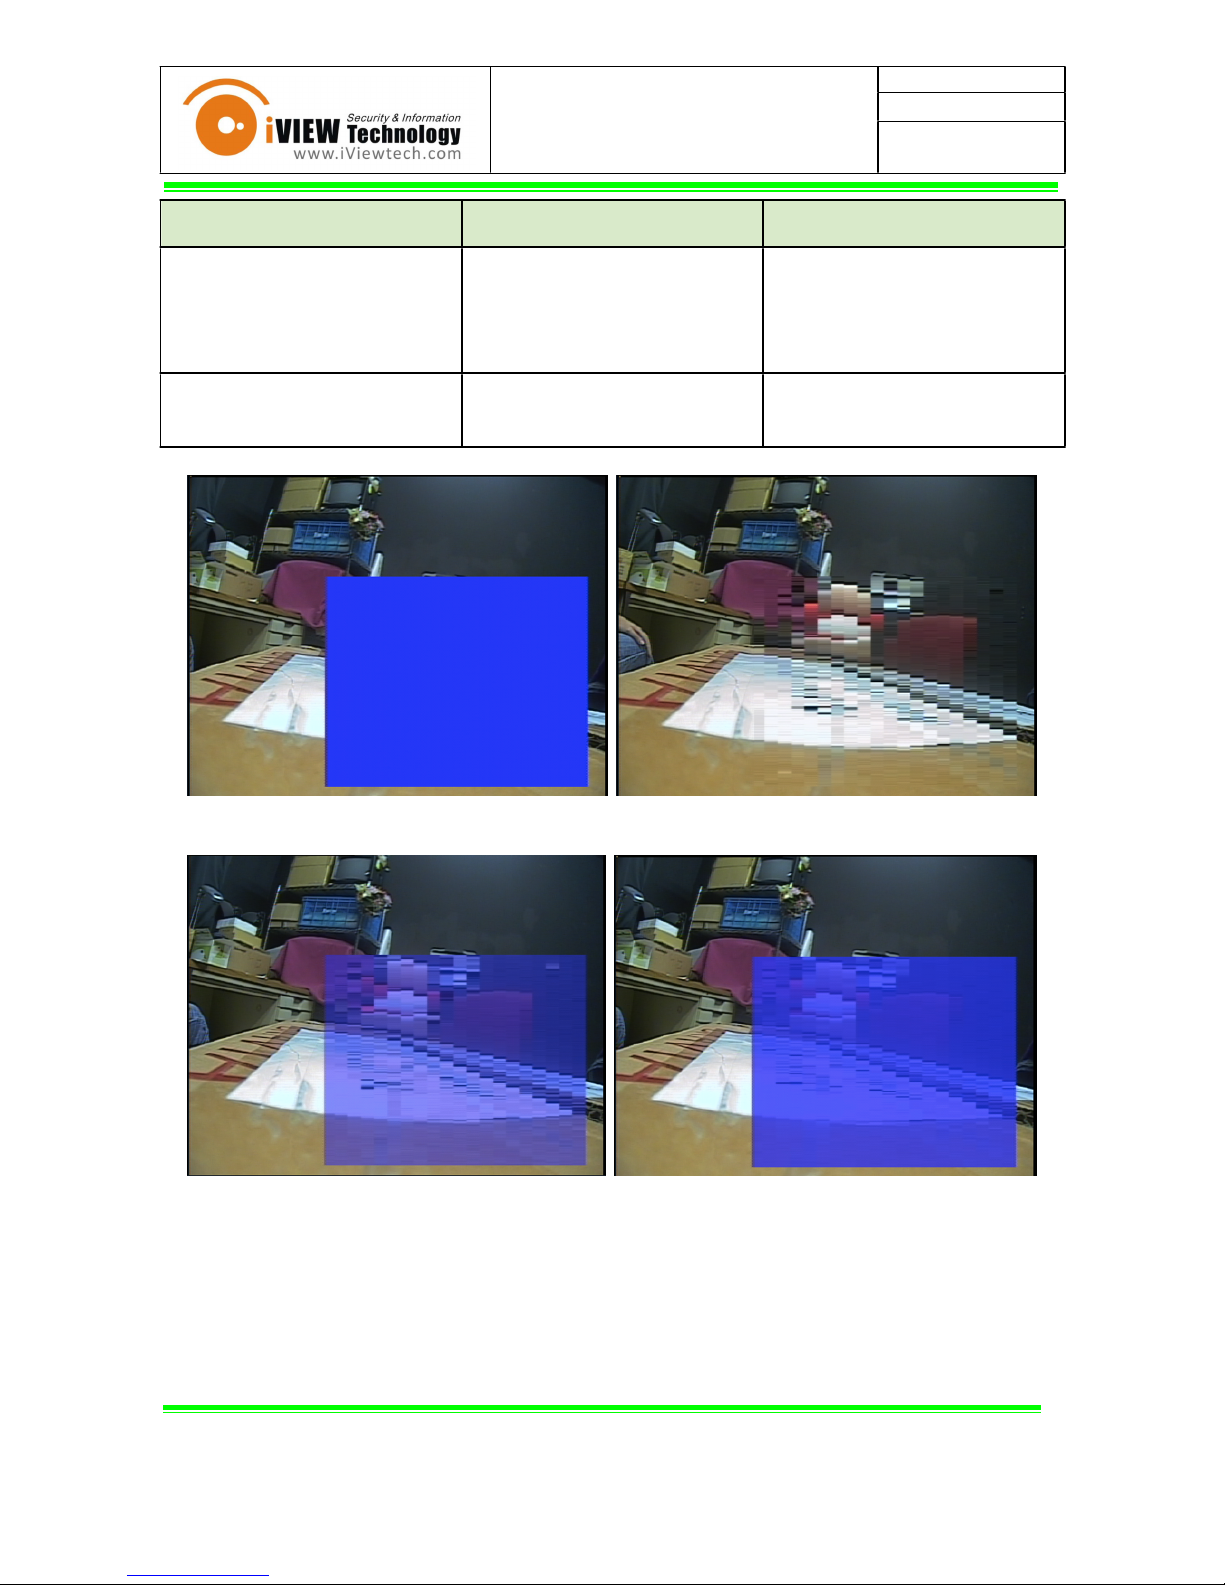
TRANSP
•
1.00
•
0.00
•
0.50
•
0.75
Mask transparency setting ,
1.0 = 0% Transparency ,
0.0 = 100% Transparence
MOSAIC
•
OFF
•
ON
Mosaic ON/OFF Setting
Transparency:1.00(Left) 0.00(Right)
Transparency:0.50(Left) 0.75(Right)
USER'S GUIDE
V0.1
2010/9/27
21
!
&%9(
OSD User's Guide
Page 22

DAY / NIGHT
Setting for the DAY/NIGHT or COLOR/BW mode.
When system switch to BW mode, GPIO 0 of the module will output a 3.3V signal.
Normally it outputs 0V.
1. AUTO
Option
Content
Description
BURST
•
OFF
•
ON
Burst ON/OFF during low lux mode, default : OFF
DELAY CNT
0-255
Mode switch delay time , default : 1,
0 for slowest delay , 1 for fastest delay
DAY→NIGHT
0-255
Color to B/W mode switch threshold , default : 3 ,
0 for lowest threshold , 255 for highest threshold
NIGHT→DAY
0-255
B/W to color mode switch threshold , default : 5 ,
0 for lowest threshold , 255 for highest threshold
USER'S GUIDE
V0.1
2010/9/27
22
!
&%9(
OSD User's Guide
Page 23

Switch threshold & Lux Table (Using 3.6mm, F2.0 lens)
DAY→NIGHT
NIGHT→DAY
Value
Lux
Value
Lux
5
0.97
5
2.43
10
2.20
10
6.31
15
3.32
15
10.89
20
4.86
20
14.18
25
9.16
25
17.47
30
12.94
30
22.67
35
18.50
35
28.62
40
20.76
40
32.36
45
25.61
45
36.07
50
27.03
50
45.62
2. COLOR
COLOR MODE
3. B/W
B/W MODE
Option
Content
Description
BURST
OFF
ON
Burst ON/OFF Setting
USER'S GUIDE
V0.1
2010/9/27
23
!
&%9(
OSD User's Guide
Page 24

NR
Noise reduction function minimises the level of noise. Noise refers to the random white or
color pixels.
Option
Content
Description
NR MODE
•
Y/C
•
OFF
•
Y
•
C
noise reduction mode adjustment
Y LEVEL
0-015
Luminance noise reduction , default : 4,
0 for minimum reduction,
15 for maximum reduction
C LEVEL
0-015
Color noise reduction , default : 4,
0 for minimum reduction,
15 for maximum reduction
USER'S GUIDE
V0.1
2010/9/27
24
!
&%9(
OSD User's Guide
Page 25

CAMERA ID
This function allows user to input their desired text and which will be shown on the screen
2 rows & 26 characters are availables, characters including 26 alphabets & numbers &
symbols
1. OFF
2. ON
Content
Description
CHR1
Default characters
CHR2
User define characters (maximum of 40), please contact to sales if
it is required
←→↑↓
Move the location of the cursors
CLR
Clear the highlight character & move to next character
POS
Use OSD UP/DOWN/LEFT/RIGHT button to adjust the ID locations
Press ENTER when it is finished
USER'S GUIDE
V0.1
2010/9/27
25
!
&%9(
OSD User's Guide
Page 26

LANGUAGE
8 OSD language are available
1. Japanese
2. German
3. French
4. Russian
5. Portuguese
6. Spanish
7. Simplified Chinese
8. English
CAMERA RESET
Return all the OSD settings to factory default
(SAVE ALL must be applied in order to keep the settings after power ON/OFF)
USER'S GUIDE
V0.1
2010/9/27
26
!
&%9(
OSD User's Guide
Page 27

OSD TREE (FULL)
USER'S GUIDE
V0.1
2010/9/27
27
!
&%9(
OSD User's Guide
Page 28

USER'S GUIDE
V0.1
2010/9/27
28
!
&%9(
OSD User's Guide
Page 29

Default Register Table
OSD Functions
OSD Functions
Default
NTSC
Default
PAL
MANUAL*
TYPE
DC
DC
LENS
AUTO
MODE
AUTO
AUTO
LENS
AUTO
SPEED
80
80
HIGH
MODE
SHUT
SHUT
HIGH
LUMINANCE
BRIGHTNESS
60
60
AUTO*
LOW
MODE
AGC
AGC
SHUTTER / AGC
AUTO*
LOW
LUMINANCE
BRIGHTNESS
X0.50
X0.50
SHUTTER / AGC
MODE
SHUT+AGC
SHUT+AGC
SHUTTER / AGC
MANUAL
SHUTTER
1/60
1/60
SHUTTER / AGC
MANUAL
AGC
66ANTI CR*
MANUAL
44
44
PUSH LOCK
SPEED
239
239
DELAY CNT
16
16
ATW
ATW FRAME
X1.00
X1.00
WHITE BAL
ATW
ENVIRONMENT
INDOOR
INDOOR
WHITE BAL
PUSH
WHITE BAL
B-GAIN
29
29
WHITE BAL
USER1
R-GAIN
34
34
WHITE BAL
B-GAIN
45
45
WHITE BAL
USER2
R-GAIN
2626OFF*
BACKLIGHT
BLC
BACKLIGHT
HLC
MIRROR
OFF
OFF
BRIGHTNESS
0
0
CONTRAST
128
128
PICT ADJUST
SHARPNESS
128
128
PICT ADJUST
HUE
102
108
PICT ADJUST
GAIN
128
128
OFF*
ATR
LUMINANCE
LOW
LOW
ATR
ON
CONTRAST
LOW
LOW
OFF*
DETECT SENSE
115
115
BLOCK DISP
OFF
OFF
MONITOR AREA
ON
ON
MOTION DET
AREA SEL
1/4
1/4
MOTION DET
ON
TOP 1
80
100
MOTION DET
ON
BOTTOM 1
150
170
MOTION DET
ON
LEFT 1
190
190
MOTION DET
ON
RIGHT 1
310
290
USER'S GUIDE
V0.1
2010/9/27
29
!
&%9(
OSD User's Guide
Page 30

OFF*
AREA SEL
1/4
1/4
TOP 1
160
190
BOTTOM 1
235
270
PRIVACY
LEFT 1
310
320
PRIVACY
ON
RIGHT 1
450
445
PRIVACY
ON
COLOR
8
8
PRIVACY
ON
TRANSP
0.75
0.75
PRIVACY
ON
MOSAIC
ONONBURST
OFF
OFF
DELAY CNT
1
1
AUTO*
DAY→NIGHT
3
3
DAY / NIGHT
AUTO*
NIGHT→DAY
5
5
DAY / NIGHT
COLOR
DAY / NIGHT
B/W
BURST
OFF
OFF
NR MODE
Y/C
Y/C
NR
Y LEVEL
4
4NRC LEVEL
4
4
* marks represent the factory default function
USER'S GUIDE
V0.1
2010/9/27
30
!
&%9(
OSD User's Guide
 Loading...