

Page 1

User Manual
NOTE: For Spanish users, please go to 'Settings", then go to “Language & Input” to change from
English to Spanish Language OSD.
17.3” All in One
To assure the product to work in best status please read the user’s manual carefully before
operation and keep it well for future use
Page 2

iVIEW introduces the new 1760AIO Portable PC! This All in One Portable PC has a beautiful
17.3 inch multi-cap & IPS Screen which allows you to watch movies or view your favorite photos
from any angle. The 1920x1080 High Resolution screen provides you with a crisp and bright
display, perfect for your entertainment, or work needs. The Windows 10 Operating System, Intel®
Celeron® Processor N3350 Dual Core CPU, and 4GB of RAM allow you to glide through your
experience with the iVIEW 1760AIO. Storing your favorite content is made easy with 32GB of
Internal Storage, or you can save up to 128GB more with the additional Micro SD card reader.
Video chat is made easy with the 2.0 MP front camera and built in microphone. The iVIEW
1760AIO features a built in 2600 mAh battery allowing you the freedom to take it with you
On-the-Go! If you are looking for a high performance 17.3" Portable PC, iVIEW-1760AIO is the
best All in One Portable PC you can't miss out.
Notes:
* This product is highly electric. Do not dismantle.
* Take necessary precautions to avoid dropping.
* Store in a cool environment: avoid extreme temperatures, humidity, and dust. Keep product away from
strong magnets and long-term exposure to the sun.
* Clean the device by gently wiping the product with a damp cloth; the use of chemical cleaners is
prohibited. Keep out of water.
* When using headphones for long periods of time, be advised that high volume may cause permanent
damage to hearing.
* When using headphones, be mindful of your surroundings while traveling.
* Only use permitted battery, charger and accessories. The use of any other type of product could damage
the device and may be dangerous.
* Please deal with waste machinery and accessories according to local environmental regulations.
* If you have any questions about the product, please contact the store of purchase or iVIEW’s customer
service center directly.
* Please follow the user's guide and backup your files. The company is not responsible for any data loss
that may occur due to product damage.
Page 3

1
Table of Contents
1. Product Overview ........................................................................................... 2
2. Keyboard & Mouse Setup............................................................................... 3
3. System Setup ................................................................ ................................ . 4
4. Desktop Functions .......................................................................................... 5
4.1 Windows Start Menu ............................................................................. 5
4.2 Basic Touch Screen Commands ........................................................... 5
4.3 Personalization ...................................................................................... 7
4.4 Action center ......................................................................................... 8
4.5 Task View .............................................................................................. 9
4.6 Split-Screen ........................................................................................... 9
5. Additional Functions ..................................................................................... 10
5.1 Sleep, restart and shut down ............................................................... 10
5.2 Recovery ............................................................................................. 10
5.3 Bluetooth ............................................................................................. 12
5.4 Account Management.......................................................................... 12
6. Storage Expansion ....................................................................................... 13
6.1 Micro SD Card ..................................................................................... 13
6.2 Internal HDD ....................................................................................... 13
7. Product Features .......................................................................................... 14
8. Accessories .................................................................................................. 14
Page 4
2
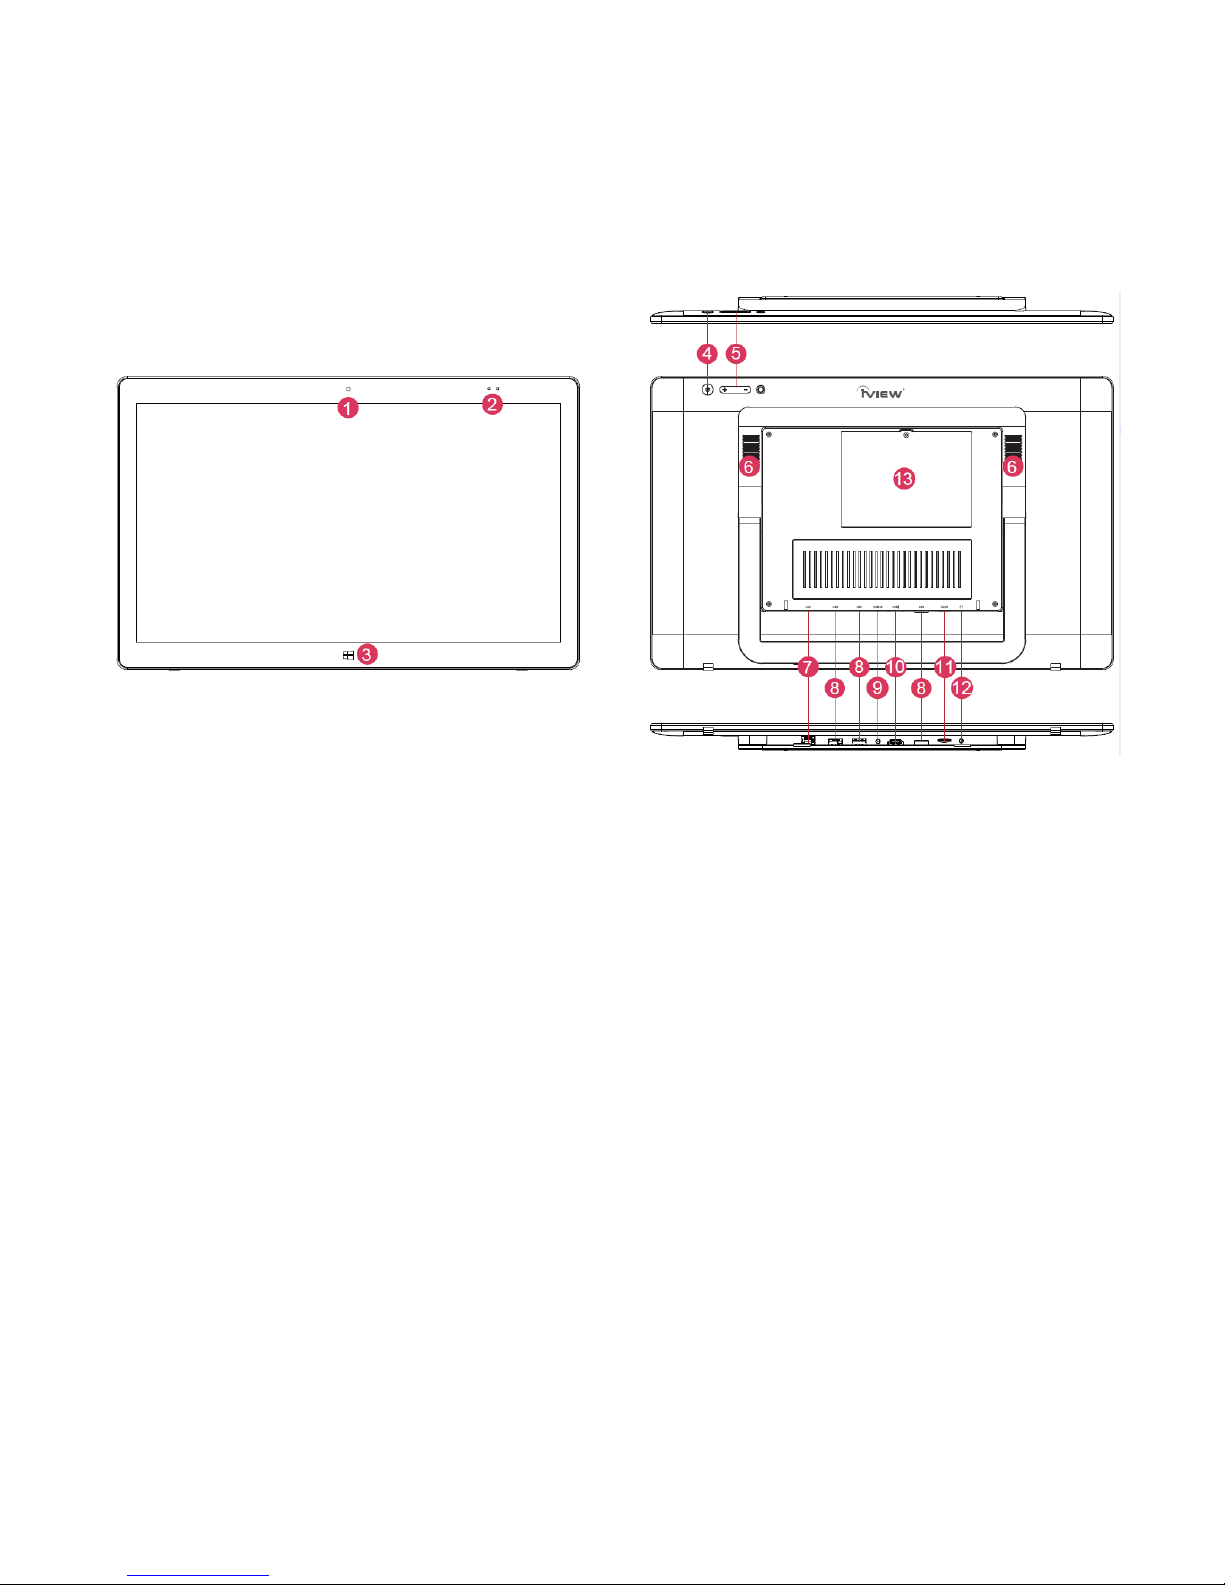
1. Product Overview
Iview PC:
1. Main Camera
2. Charging Indicator Light
3. Home Button
4. Power Button: Press and hold to power on/off. Tap it briefly to enter and wake from sleep
mode.
5. Volume- / Volume+: Lower / raise Volume.
6. Speakers
7. RJ-45 Port: For Ethernet LAN
8. USB 3.0 Port (3 in total)
9. 12V DC-in Charge Port:
10. HDMI: HDMI video output.
11. Micro SD Card Reader: Supports Micro SD and Micro SDHC format.
12. 3.5mm Headphone Jack
13. HDD Compartment: Supports 2.5” SATA or 2.5” SSD Internal Hard Drives.
Page 5
3
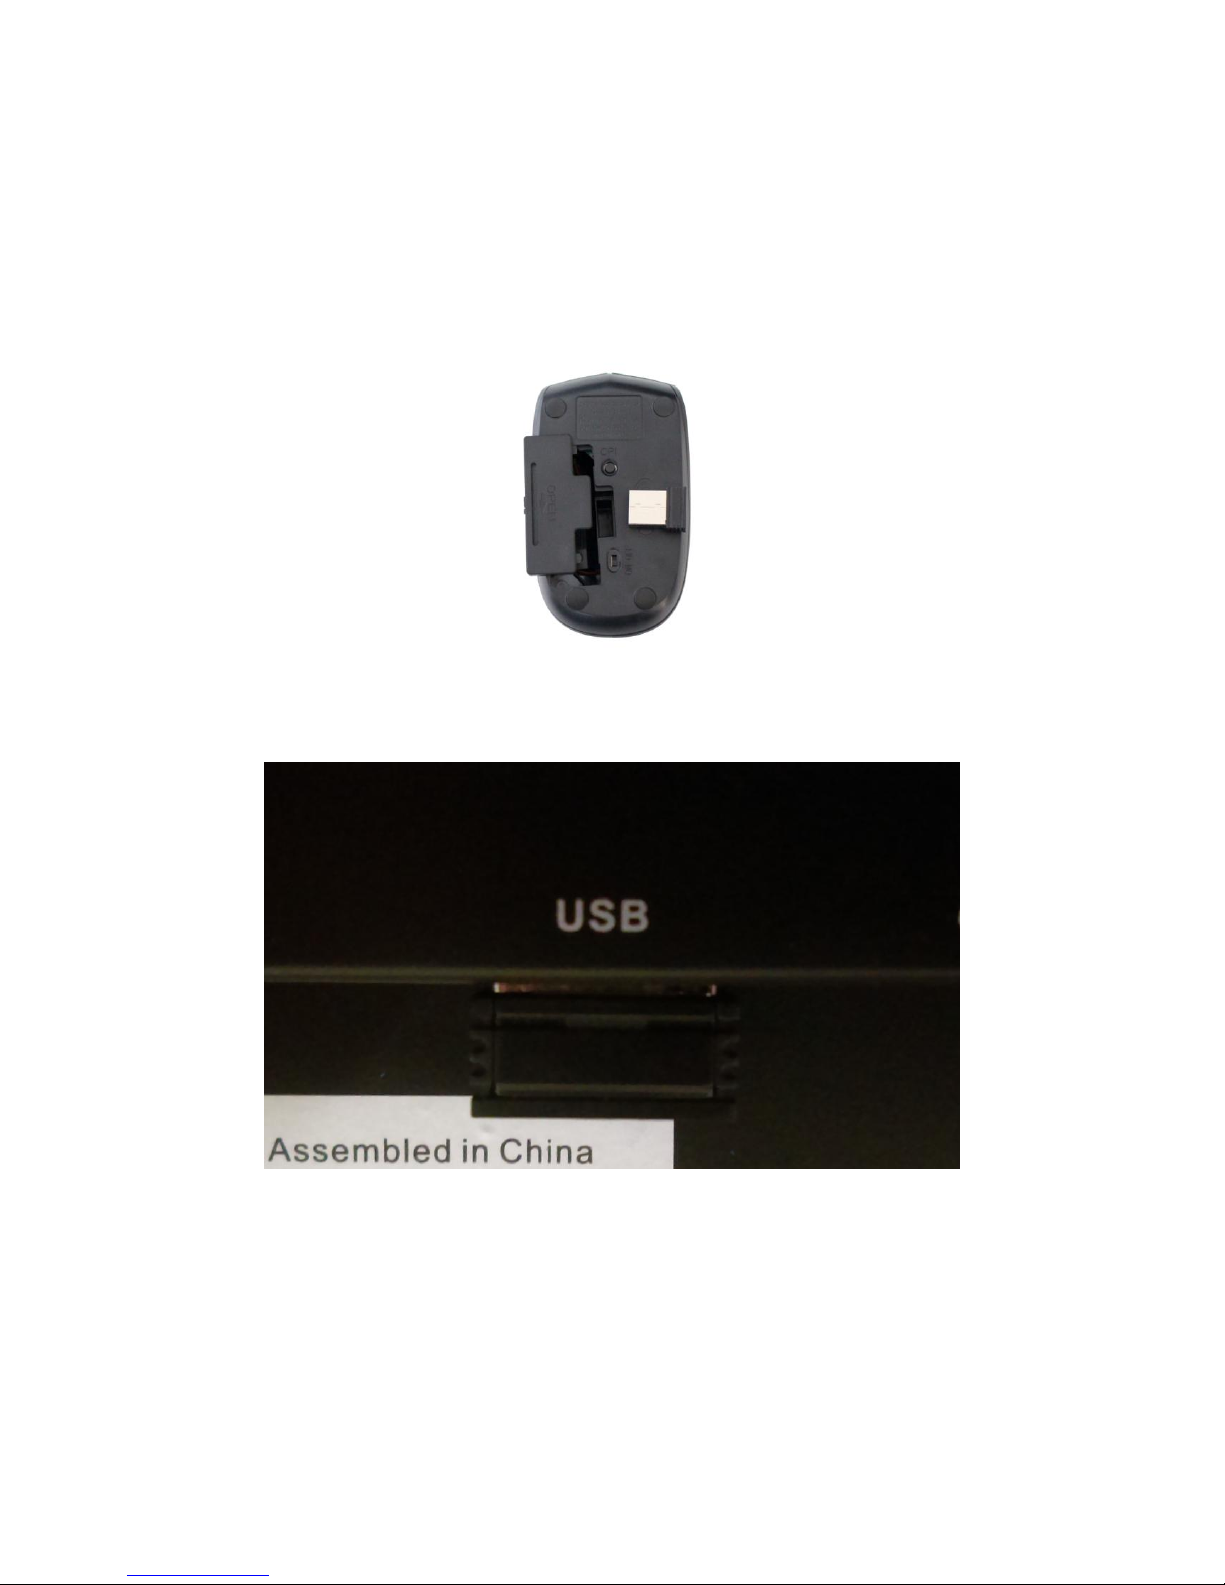
2. Keyboard & Mouse Setup
Before powering on your device, follow the instructions below to set up your wireless
keyboard and mouse.
First, open battery cover on the mouse and remove the wireless receiver. You can find it located
next to the battery compartment, shown in the picture below:
Insert the receiver in any of the device’s USB Ports (shown in Section 1).
Insert batteries into the mouse and keyboard respectively, and re-attach battery covers. Battery
sizes are as follows:
- Keyboard = 2 AAA Batteries
- Mouse = 1 AA Battery
Page 6
4
3. System Setup
Windows will automatically help you set up your internet connection and system preferences.
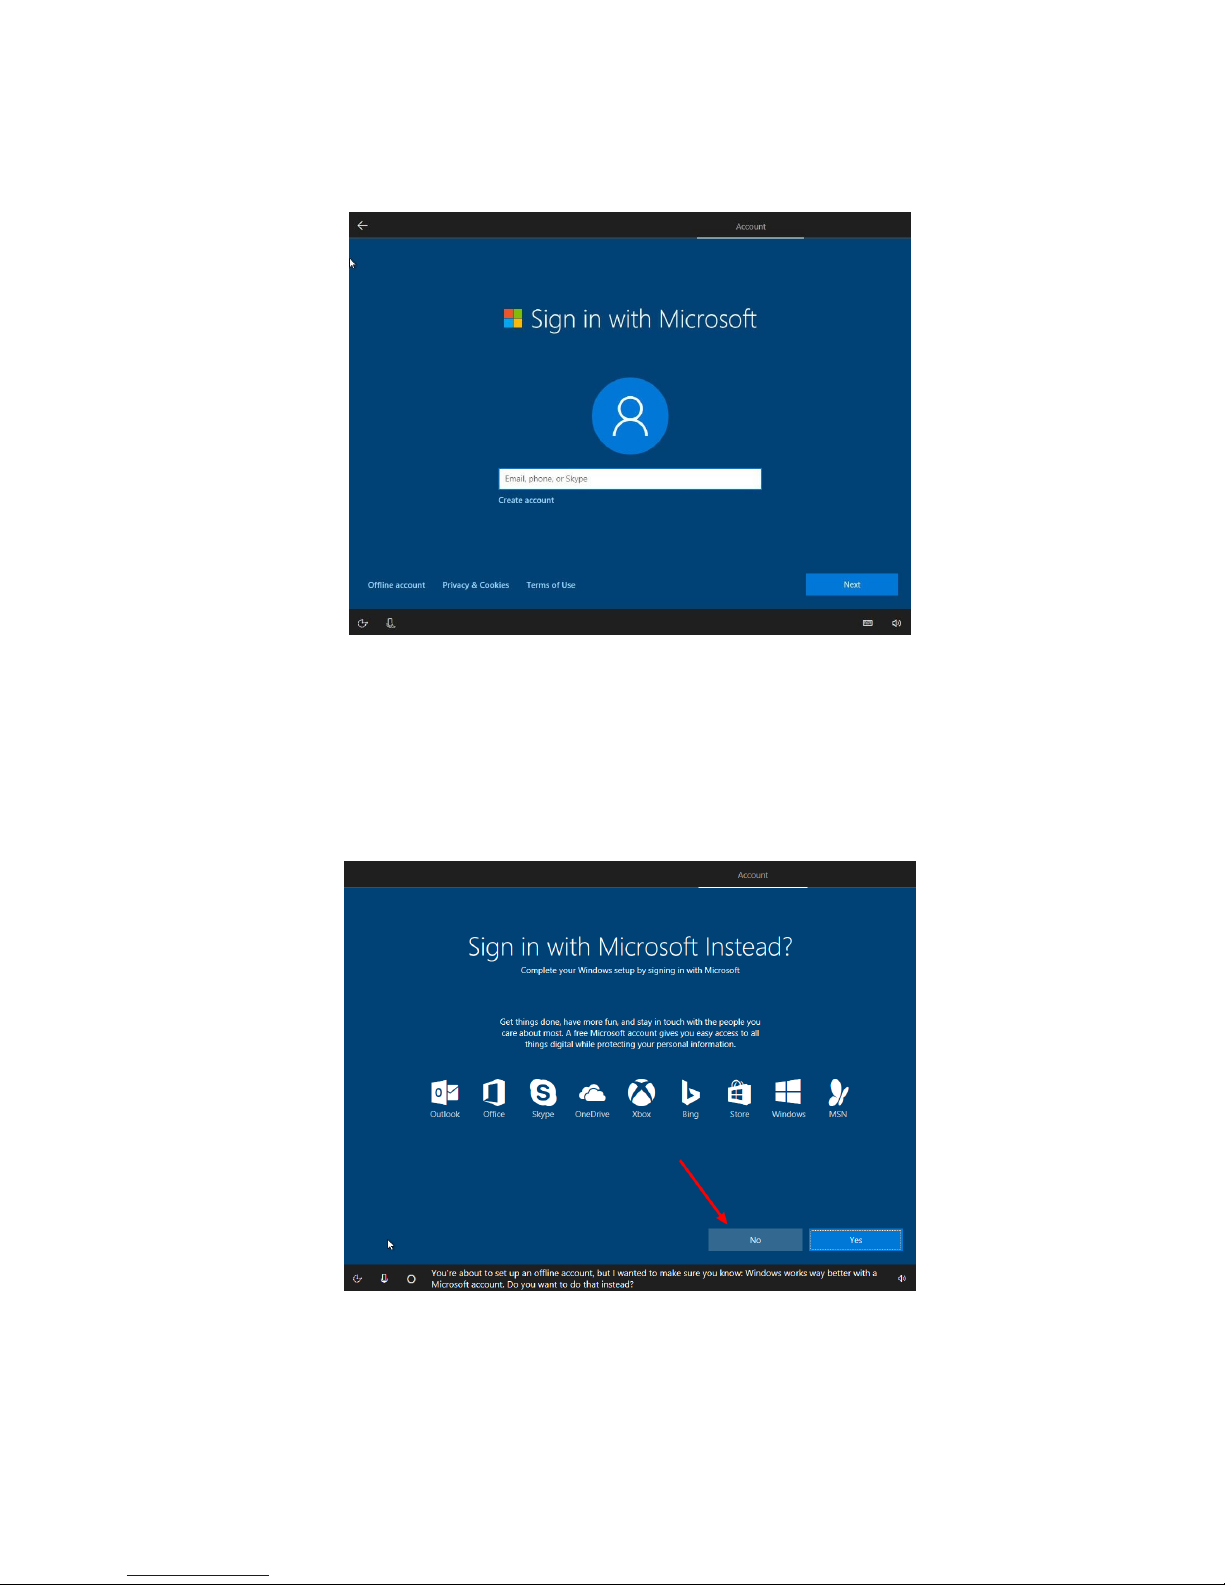
3.1 Account Setup
Once your network is set up, you’ll be asked to set up an account. You can add an existing
Microsoft account, or you can create one.
If you do not wish to create a Microsoft account at this time, you can select OFFLINE
ACCOUNT near the bottom left-hand corner.
(NOTE: Some features, like the Microsoft store, will only be available using a Microsoft
account.)
When creating an offline account, you’ll be prompted with the screen above. Just select NO,
and you’ll be able to set up an offline user name and password.
Page 7

5
4. Desktop Functions
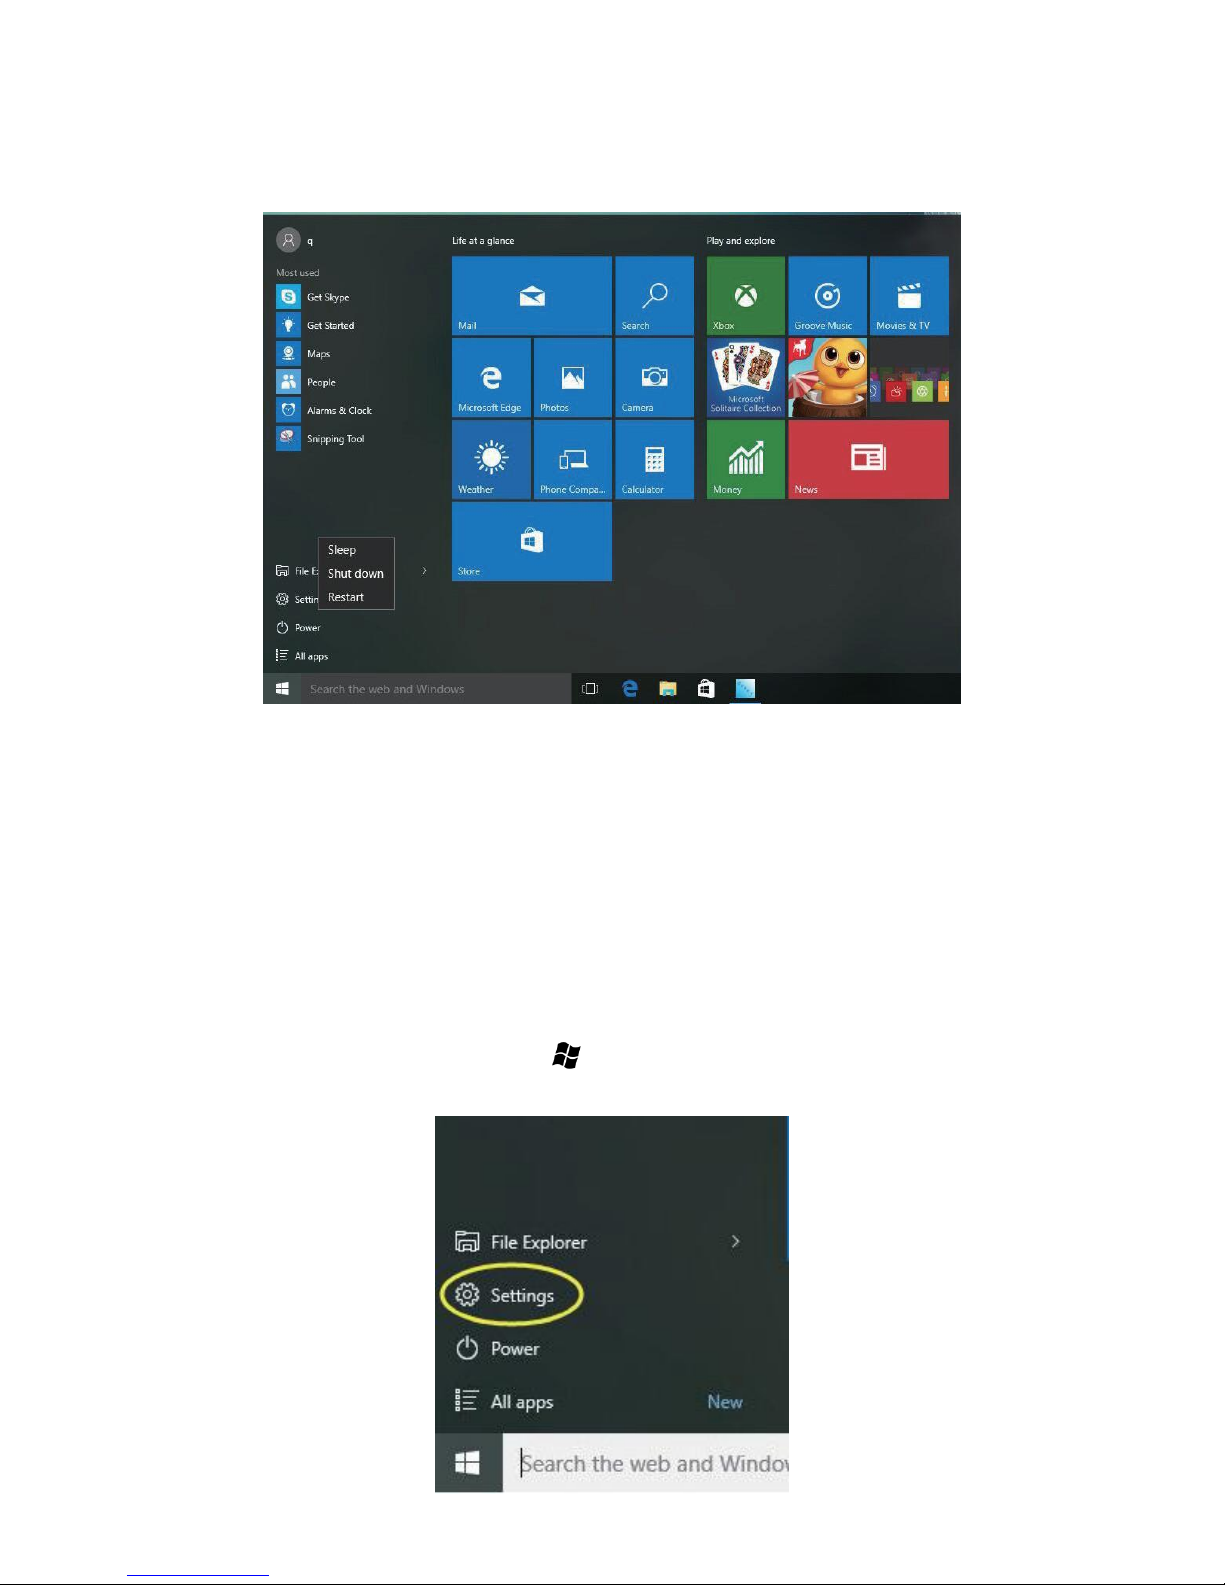
4.1 Windows Start Menu: You can access the Windows Start Menu by clicking on the Windows
Icon in the bottom-left corner of the screen, or by pressing the key on your keyboard.
Some apps and functions will only be available using a Microsoft Account.
4.2 Basic Touch Screen Commands
Task View
Action Center
Slide to the right from the left side of
the screen to open Task View.
Slide to the left from the right side of
the screen to open the action center.
Page 8

6
Zoom Out
Zoom In
To zoom out on an image or web page,
place two fingers on the screen and
pinch inwards.
To zoom in on an image or web page,
place two fingers on the screen and pinch
outwards.
Scroll up
Drag & Drop
In any menu or page, place finger and slide
downwards to scroll to the top of the menu
or page.
Tap on an App or File with your finger and
slide sideways to move that file. Remove
finger to place file in new location.
Scroll Down
Context Menu
.
In any menu or page, place finger and
slide upwards to scroll to the bottom the
menu or page.
Place your finger on an app or anywhere
on the screen and hold for 2 seconds,
then release. Just like a right-click on a
mouse, this will open a context menu.
Page 9

7
4.3 Personalization
Your device comes with an assortment of pre-installed applications. You can view them all in the
start menu, under “All Apps”. You can also pin your favorite applications to the start menu or the
taskbar for quick access.
If you would like to pin apps to the start menu, right-click, or tap & hold on an application until a menu pops up. From
there, you can select “Pin to Start” or select the “More” option if you would like to pin the application to the taskbar.
Page 10

8
You can also unpin apps that you don’t use, by right-clicking and selecting “Unpin”. If you’re
using the touch screen, tap and hold the pinned application for about one second, click to
unpin it from the Start Menu or Taskbar. You can also click for additional options.
4.4 Action center
From the right side of the screen, place and slide your finger to the left to open the Action Center.
Here, you are able to monitor your device’s status, access settings, connect to a Bluetooth
device, etc.
Page 11

9
4.5 Task View
From the left side of the screen, place and slide your finger to the right to open Task View. This
will display all applications currently running on your device. Click on an application to
close it.
4.6 Split-Screen
If you want to split-screen two applications at the same time, open the two apps you want to use,
making sure one of them is full screen. Tap and hold to drag an app to the left side of the screen
(Figure 1) to dock it. Select the second app to open on the right side. In (Figure 2), you can press
and slide the bar in the center to partition screen space between the two apps.
(Figure 1) (Figure 2)
Page 12
10
5. Additional Functions
5.1 Sleep, restart and shut down
● Forced Reset / Shutdown
If the tablet freezes, you can press and hold the Power button for 8~12 seconds. The tablet will
shutdown automatically.
5.2 Recovery
When your device is not performing well, you can perform a Windows Reset.
(NOTE: This WILL erase all your data and revert back to factory settings)
First, click on the start icon, or press the key on your keyboard. This will bring up the start
menu. Select SETTINGS.
Page 13

11
You’ll then be brought to the SETTINGS Window. At the bottom, select UPDATE AND
SECURITY, followed by RECOVERY.
Select the Get Started Button underneath RESET THIS PC.
You will be prompted TWICE. First, select, REMOVE EVERYTHING.
When Prompted again, select JUST REMOVE MY FILES.
Make sure your device is plugged in, and select RESET. The reset process will take roughly an
hour.
Page 14

12
5.3 Bluetooth
a) Turn on Bluetooth by opening the action center and tapping on the Bluetooth Icon. To pair a
device, tap and hold the Bluetooth icon until the option “Go to Settings” pops up. Select it. Your
1760AIO will automatically look for devices to pair.
b) Sending Files: To send files, click on the Bluetooth icon on the lower right corner of the
desktop. Click “Send a File” and follow the instructions provided by Windows.
c) Receiving Files: To receive files, click on the Bluetooth icon on the lower right corner of the
desktop. Click “Receive a File” and Windows will scan for Bluetooth connections.
5.4 Account management
Account Options:
Open the Start Menu by clicking on the Windows icon at the bottom-left corner of the screen.
Select “Settings” followed by “Accounts.” On the right side of the window, you can create an
offline account or set up a Microsoft Account for your device. Under “Sign-In Options”, you can
change your password or add additional verification methods (PIN number, picture, etc.)
You can also select “Family & Other Users” to add additional users to your device.
Page 15

13
6. Storage Expansion
The 1760AIO comes with 32GB of internal storage. However, you can use one or both of the
following methods to further expand the storage of your device.
6.1 MicroSD
You can expand your device’s storage space by inserting a Micro SD Card into the CARD slot of
your device. Make sure to firmly push the SD Card into the slot until it clicks. The 1760AIO
supports MicroSD cards up to 128GB.
6.1 Internal Hard Drive
Your 1760AIO comes with a hard drive port in the back of the device (shown in Section 1). Before
installing a hard drive, make sure your device is powered off and unscrew the cover, using a
Phillips screwdriver.
Once the screw is removed, the lid can pop open. Insert a 2.5 inch hard drive or SSD drive into
the compartment and slide it into the connector. Once connected, re-attach and screw-in lid.
Page 16

14
7. Product Features
* Screen: 17.3" Touch Screen, 1920 x 1080 IPS High Resolution
* Processor: Intel® Celeron® Processor N3350, Dual Core
* OS: Windows 10 Home
* Memory: 4GB
* Storage: 32GB
* Wireless Connection: WIFI 802.11 b/g/n
* Built in Bluetooth 4.0
* Camera: 2.0MP
* Support Skype Video Call
* Support 1080P Full HD Video
* I/O Port : USB 3.0 x 3 / HDD x 1 / RJ45 x 1 / HDMI x 1
* Card Slot: Micro SD Card (Max: 128GB)
* Audio Output: Stereo Speaker (4Ω 2.0W) x 2 / 3.5MM Stereo Headphone Jack
* Windows Store, Office Work, Internet Browser, Calendar, Calculator, E-mail, etc.
* Picture Viewing, Music / Video Playback, Games, etc.
* Supports Multi Languages
* Battery: Built in 2600 mAh / 7.4V Li-ion, Rechargeable
* Power Source: 12V 3A
8. Accessories
Below items are included in your tablet package:
* All-in-One PC
* Power adapter
* User manual
* Wireless Keyboard
* Wireless Mouse
* Handbag
Page 17

Basic Warranty Statement
This product is warranted to the original purchaser ONLY, to be free from defects in materials and
workmanship under normal use, for ninety (90) DAYS (parts and labor) and one (1) YEAR (parts only) from the
date of original purchase. We agree under the warranty period to replace product if it is determined to be
defective at 'No Charge" This limited warranty does not cover any loss or damages that occur as result of:
Cosmetic damage.
Shipping or improper installation or maintenance.
Misuse.
Neglect.
Any cause other than ordinary commercial or industrial
application.
Adjustment by non-authorized source or any of the
Product’s firmware or hardware that you or any third party have modified or altered
Improper environment
Excessive or inadequate heating or air conditioning or electrical power failures, surges, connection to
improper voltage supply or settings or other irregularities
Accidents, or acts of God
In the United States and Canada contact Customer Service at www.iviewus.com.
Please note that in order to have your merchandise repaired and replaced by warranty, you must
contact our customer service representatives by phone or email, and get RMA number.
To obtain factory service, the original purchaser MUST present the following:
1. A sales receipt/proof of purchase indicating date of purchase
2. Your name, place of purchase, address, unit model and description of problem.
3. Send the unit pre-paid to the address below in the original packaging or reasonable substitute to prevent
damage. No return will be shipped back to a PO BOX.
4. All of the accessories that came with the product package must be sent along with the main unit
5. Please include your check or money order in the amount of $30.00 to cover handling and return shipping
charges we will not be responsible for delays or unprocessed claims resulting from purchaser's failure to
provide any or all of the necessary information
6. There is Additional Shipping Charge for areas outside of United States. For shipping charge please consult
with our customer service.
Page 18

Please review your user
Guide carefully before
Using this product.
Additional troubleshooting information
can also be found on the web at:
www.iviewus.com and click on “Support”
or email us at support@iviewus.com
 Loading...