

Page 1
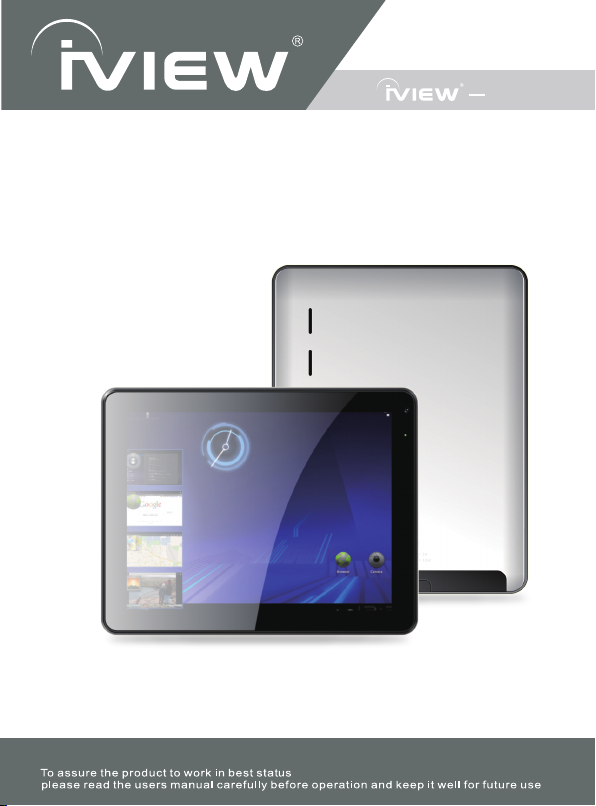
USER’S MANUA L
1030TPC
NOTE: For Spanish users, please go to "Settings", then go to "Language
& Input" to change from English to Spanish Language OSD.
10" Cyb erPad Table t PC
Page 2
Page 3
Page 4
iV I EW 's
mo b il e in t er net d ev ice , pr ovi din g ac ces s to the w eb , cu s to miz ati on
th r ou gh An d ro id Ap p s, an d vi ew ing of mu lti med ia co n te n t. You ar e a b le
to ac ce ss eas il y a nd dow nl o ad thou san ds of App s f ro m t he An dr oid Play
St o re a nd t he K in g Ko ng A pp s Ma r ke t to t ap y ou r ne e d, s uc h as n ew s ,
we a th er, or l oc al bu si nes s in fo, e nj oyi ng your fav ori te m ovi e cl ips ,
wa t ch ing s ome Yo uT ub e v id e os , p la y in g g am es, o r j us t k ic k in g b ac k a nd
li s te nin g to so m e musi c, w or kin g on th e ge t
so f tw are . Wi t h bu il t-i n DDR3 of 1 GB , CyberPad spe ed is faste r than
mo s t of t he ta ble t pc i n t he m ark et an d wi t h me m or y of 8G B, y o u ma y
st o re ple nt y of pi c tu res , mo vi e s, an d do cum ent s. Exp ans io n st ora ge i s
av a il abl e v ia Car d R ea d er s lot , u p t o 3 2GB . i VIE W- 1030 TPC is your a llin - on e tab let t ha t y ou c an't live without.
CyberPad 1030 TPC Tab le t PC i s th e ne xt g ene ra t io n o
new
10''
-g o wi th O ffi ce p ro d uc tiv ity
10''
f
Page 5

Content
1.Appearance and button................................................................... 2
2. First use .........................................................................................4
3.Equipment operation interface ........................................................9
4.Equipment basic set ......................................................................13
4.1 WIFI .........................................................................................13
4.2 Brightness................................................................................15
4.3 Install, uninstall,run the application............................................15
4.4 Backup & reset ........................................................................17
4.5Language & keyboard...............................................................18
4.6 Time/Date setting.....................................................................19
5. File Manager ................................................................................20
6 Network..........................................................................................22
7 Music playback ..............................................................................24
8 Video playback.............................................................................. 25
9 Photo browse.................................................................................26
10 Wallpaper ...................................................................................27
11 Record .........................................................................................28
12 Photograp ....................................................................................28
13 E-mail ..........................................................................................29
14 Keyboard and mouse ..................................................................30
Features............................................................................................31
1
Page 6
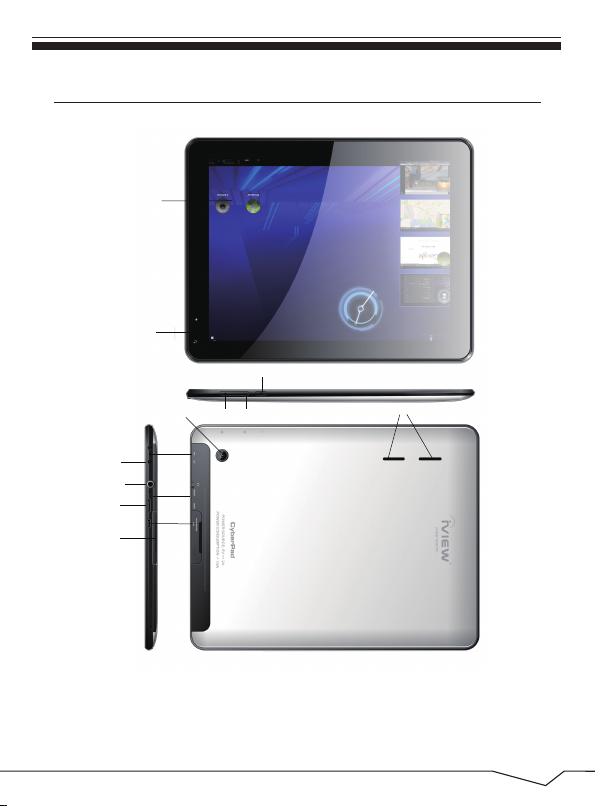
1. Appearance and button
Touch panel
Front Camera
Power
Speaker
DC IN
Headphone
HDMI
Card Reader
Back Camera
MIC
Reset
USB
VOL+
VOL-
1.1 Touch panel
10” Capacitive touch panel: During the operation, you can click and drag
items on the touch panel.
2
Page 7

1.2 POWER
To power on: Press and hold the power button, the system will enter the main
interface.
To power off: In the main menu interface, press the power button for about 5
seconds to power off, the system will appear "power off" option, click “ok’’ and
you can safely power off.
Lock screen: Press power button to lock screen or unlock screen.
Remark】: When the power ran out, the system will power off automatically.
1.3 Volume +, Volume-
The buttons Volume +/Volume located on the side of the tablet which allow to
adjust volume.
1.4 Earphone jack
3.5 mm standard earphone jack.
1.5 Card Reader
Video output interface.
1.6 Micro SD card
Card Reader Slot: External micro SD card.
1.7 USB
USB jack: you can use it to connect the computer for data transmission,
charging and external connection USB flash drive.
1.8 Reset
When the tablet fails to respond when buttons are pressed, using a thin small
object (such as a paperclip) to press RESET button, the tablet will force to reset.
3
3
Page 8
Remark : Unless it’
don’t use the reset option.
s unable to power o ff by normal procedure, otherwise
2. First use
2.1 Battery management and charge
.
Remark :
】
1. If you don’t use this tablet for a long time, in order to avo id power consumption
caused damage, pls charge the battery once a m onth.
2. When battery ran out, it will show “battery low ” after you connect adaptor and it
will take some time until the battery have eno ugh power to power on.
3. Battery charging should be in standby status for reach normal charging time.
2.2 Start-up and shut-down:
Startup: To press the power key and the system wil l enter the process of
Start-up, as shown below:
Startup Logo,in the process of startup
4
Page 9
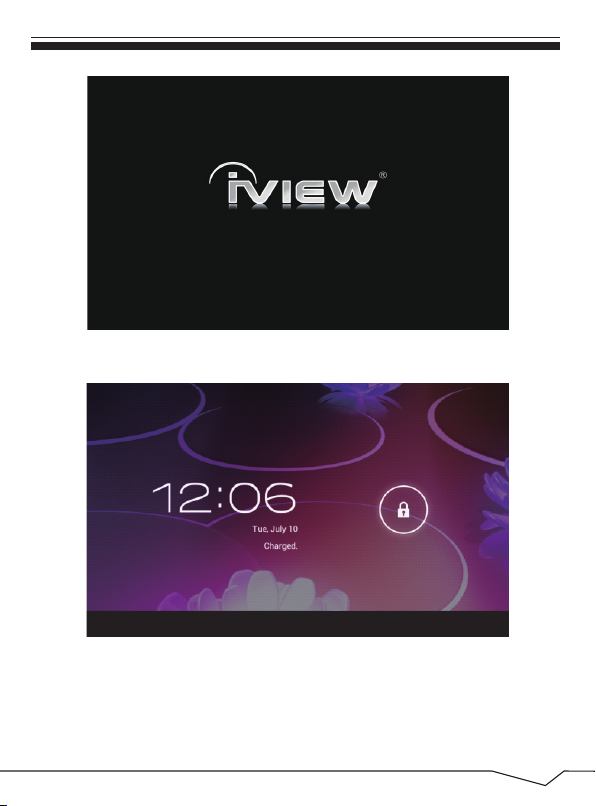
Then the system enters the default home interface.
Shutdown:Press the power key then pop-up options w ill be on the desktop,
choose the option of Power off as shown below.
5
Page 10
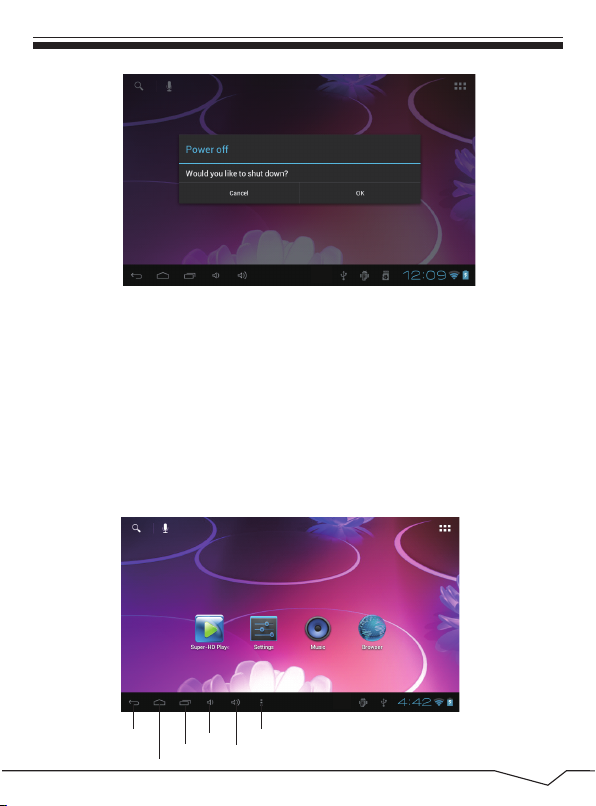
Click OK to shutdown
Sleep:In the normal state operation of the machine , press the power button,
enter a state of dorman cy, at this time,the screen will be closed. Another
short press on the power button will resume to nor mal mode.When CyberPad
is not in use you can start this function to reduc e power consumption.
2.3 Desktop
After the normal startup of the system is complete d, you can see the Android
4.0 desktop(below). The default desktop is consisted of quick search bar,
status bar,and menu label icon.
Return
Home Screen
View Records
volume-
volume+
Content
6
Page 11

The status bar is used to display the network stat us of current system,battery
power, time and other information.
Quick search box is used by the typing keywords to do the Internet search.
The main menu tag is in the right middle side of t he screen, click it and the
default menu bar can be expanded.
2.4 Buttons
Keys used in Android systems process:
The volume keys: Volume+,Volume-in the taskbar can be used for Volume change.
The power button: Press long time for switching mac hine. Press quickly to
enter or leave the state of dormancy.
Menu key: Return or select the main interface.
Return key: Return to the last interface .
2.5 Connection with PC
You use USB cable to connect device to PC, device w ill pop up the USB
connection windo w, click “Turn on USB storage to connect to PC, Into the
load mode, you can cop y, delete the file on the de vice and the file on the
memory card.
To view files on your MID, Please operate as bel ow:
1. Connect your MID to your computer using the USB cable.
2. On the home screen, Touch Notifications, touch USB connected .
3. Touch Turn on USB storage .
7
Page 12
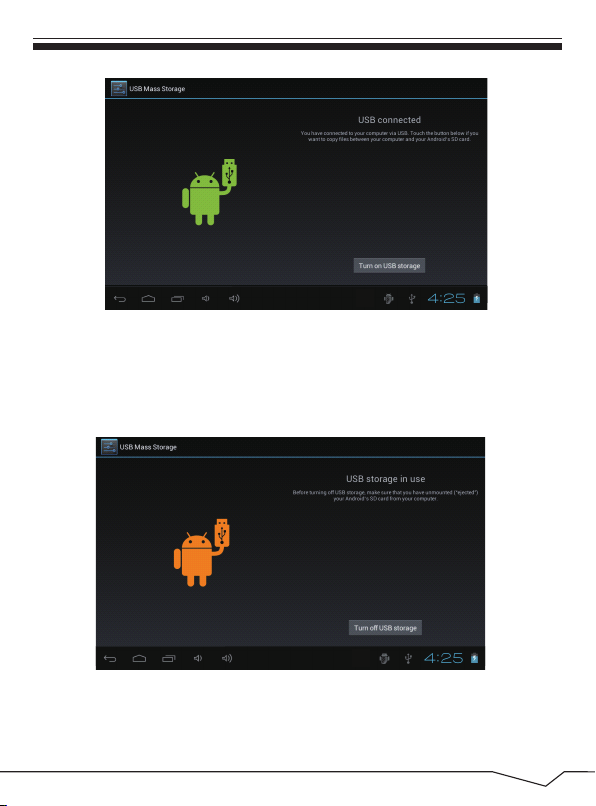
4. On your computer, go to the Removable Disk folder.
5. Locate the files on the computer that you w ant to copy to your MID.
6. Copy and paste files to the desired locatio n in the Removable Disk
folder.
7. Turn off USB Storage. As shown in the below picture.
8. Then touch SD, you will can see the copy c ontent from computer to
device, just like the information as below :
8
Page 13

3. Equipment operation interface
3.1 Main interface Description
After power on, you will enter the main interface.
9
Page 14

In the main interface, you can :
Management of main interface software ICONS:
Management of main
interface software ICONS: Press and hold the icons for 3 seconds, after the
icons become bigger, then you can drag anywhere in the interface.
Delete icons:
Press and hold the icons for 3 seconds, drag the icons
to the Recycle Bin icon, then release your finger from the screen.
Replace wallpaper:
the option “Choose wallpaper from” will appear as shown below.
Relpace and hold anywhere on the main screen,
10
Page 15

3.2 Status bar description
When you see a notification in the status bar, tap the bar and slide your
finger up the screen to open the list of notifications. As s shown below:
Icons of Status Bar:
Newe-mail message Downloading
Upcoming event Content downloaded
Song is playing Alarm is set
USB connected Wi-Fi service connected
Battery is charging
Volume reduction Volume increase
Warning
11
Page 16

3.3 Use touch panel
Device equipped with a 10“ touch screen. Following the main touch screen
area is described, and describes some of the tips for how to use the touch
screen.
No matter which interface you are on the screen, cyou an go back to main
screen through pressing the soft key on the bottom right corner of the
main screen.
Corner on the touch screen, you can return to its interface on the up level. In
different applications, by tapping the menu key on the upper right corner
of touch screen, the screen will appear the operation setting interface as
follows,
12
Page 17

In the main interface, you can touch the icon to open the APPs
In different browser(file, music, video, pictures), You shift and drag the scroll
bar, so that the file list can up or down to roll.
4. Equipment basic setting
Setting: Click setting icons , enter setting interface
4.1 Wi-Fi
Click on the "Settings"icon in the main menu, click on the "wireless and
network"into the " wireless and network"settings. Click on the "WIFI" column
and WIFI function can be started at once.Click"WIFI settings" column can
enter "WIFI se
tting interface", as shown below:
13
Page 18

In the WIFI" interface(Pictured above), by clicking on
the WIFI column you
can open and close the WIFI function. Click "network notification" to list the
wireless router that is searched by Cyberpad .Click the searched wireless
router and setup window will pop-up. follow the prompts to complete the
WIFI network links.
After you connecting WI-FI as shown above, the following image will appear:
14
Page 19

4.2 Brightness:
In the setting of the interface to select "display settings" into the display
settings interface,select "Brightness” in drop-down lists as appeared in
the following dialogue.
4.3 Install, uninstall, run the application
Android installation: There are a variety of ways to install applications, for
example, you can click on the Apk file directly and it will automatically be
installed. iIn case there are third party programs, the system may identify
it as unsafe and will need the following procedures for installation with the
assistance of the application.
15
Page 20

1. Enter “setting”>“Application”>“Manage application” And then
there will be installed program list
2. Click uninstall icon, then you can uninstall the application
16
Page 21

3. Press"Unknown sources" and then "OK" the following image will
appear.
4.4 Backup Reset
Factory data reset
17
Page 22

4.5 Language & keyboard
Setting: (Language), text input and automatic error correction options;
Select Language: 14 kinds of national languages are available.
Remark: Android system can support 54 kind of language, now manu
interface just suport 14 language.
Android keyboard: Android keyboard setting
Sound on Key-press
Auto-capitalisation
Show suggestions: Display suggested words while typing
Auto-complete: Specebar and punctuation automatically insert highlig.
18
Page 23

4.6 Date & time setting
In the interface of the setting, select "the time and date settings"to enter the
date and time settings interface:
You can choose the automatic mode by using the network time .
You also can choose to set the date, select time zone, set time, select date
format, set date and other information
For example,choose the set date , as shown below:
19
Page 24

Choose+: It means increase of 1 unit;
Select-: It means it reduces 1 unit;
You can also choose the number to enter the input pattern.Directly input the
number, and the n select the button done , a s shown below:
5.File Manager
Copy the APK software program that will be installed to Micro SD card or
NAND FLASH.
The first time to enter the program installation, the system defaults NAND
Flash as the search directory .
20
Page 25

If your APK setup application is on Micro SD card. The system will
automatically search the directory from Micro SD Card .
Install the searched application
21
Page 26

The user can do on-line installation through"market", or download and
install by the computer,or through a built-in browser download and install
online.
*Uninstall the application: You can use the third party software management
tools or use the built-in Android application management software.
Select"Settings"/"application"/"management application", and select the
corresponding installed applications to check the program.
6.Network
Webpage browsing:
When the network is connected ,open the webpage browser and enter the
URL, you can browse.
22
Page 27

Webpage can be free scaled by the scaling controller,as shown below:
Online video:
Users can use the "market"or other ways to download online video player
software, online TV player software, online music so
ftware, and then install in
the machine. To open the installed software, you ca n watch online video or
online TV,and listen to online radio.
23
Page 28

7.Music playback
Click on the "music"iconin the main menu,and thenenter the musicplayerinterface.
The default list system in the user data area for all audio files is shown as below:
You can use synchronous USB to input audio file, or by inserting a Mirco
SD card with audio file to input audio files. You can also use the network to
download the audio file.
Select the corresponding tag, and check the interface as "artists","album", and
"song" and so on to play the song.
24
Page 29

8.Video playback:
Click on the "Video player" in the main menu,to enter the "Super-HD player"
main interface. It lists all video files and image files as shown below:
Select the video file and enter the video playing interface,as shown below.
Select "play","stop","fast forward","rewind","progress" and other control keys
to control the payback schedule.
25
Page 30

9. Photo browse
Click on the main menu"Super-HD player"to enter the"Super-HD player"
interface.It lists all the picture files and video files as shown below:
Select a picture file; enter the picture play interface, as shown below.
Select"zoom","narrow" "set" and"delete" operation.
26
Page 31

10. Wallpaper
The system supports static wallpaper, and 3D wallpaper.
In the desktop interface, press down the Menu key for pop-up menu options,
select "wallpaper"and" choose the wallpaper source" selection box:
There are the following options:
Select " wallpaper" to customize wallpaper.
Select the "live wallpaper"to use the system-supplied 3D wallpaper.
Select the"super-HD player"to choose a picture supplied by the system as
the static wallpaper.
Or press on the screen and dialog box for the following to pop:
27
Page 32

11. Record
Click on the "sound recorder" icon in the main menu and enter the "sound
recorder" main interface as shown below:
Select the "recording" button to record and after recording is completed
press"stop" button . At this time you can select the "play" button to play the
recorded sound. Select"Use this recording"button to save the recording, so
that you can find the corresponding audio files in "NAND"; if you do not
need to save , you can select the "give up" button.
12. Photograph
Click on the "camera" icon in the main menu and enter the "camera" main
interface as shown below:
28
Page 33

Click on shutter in the camera.
13. E-mail
Click on the “e-mail” icon in the main menu to enter email client . Allocation
of account information will be required the first time. As shown below:
29
Page 34

1.Click the email icon,then it will appear in the mailbox setup guide to help
you to set.
2.Click the next step button.
3.Enter your email account address and password3.
4.Click the next step button, and select you mailbox type:POP3 or IMAP.
5.Then click next step button to check whether email server is available.
6.Input account name and to desplay the name,then click completion.
7.If the mail is available,it will automatically enter your inbox.
14. Keyboard and mouse
CyberPad supports plug and play USB mouse and keyboard device.
30
Page 35

Features
31
Page 36

6.
Page 37

 Loading...