

Page 1

Voice Mail System
User’s Guide
Personal Mailbox Management (PMM)
Utility Program
VERSION 2.0
MARCH, 2005
PROPRIETARY
Page 2

NOTICE
All rights reserved. No part of this document may be changed, reproduced or transmitted
in any form or by any means (electronic, photocopying, recording, or otherwise) without
the prior written permission of ITS Telecom.
The trademark and service marks ITS Telecom, including the ITS Telecom mark and
logo, are the exclusive pr operty of ITS Telecom, and may not be used without
permission. All other marks mentioned in this material are the property of their respective
owners.
Additional copies of this manual may be obtained from ITS Telecom.
ITS Telecom reserves the right to modify the hardware and software described in this
manual without prior notice. However, changes made to the hardware or software
described does not necessarily render this publication invalid.
WARRANTY
In the event that the product proves to be defective in workmanship or materials within a
period of one year from date of shipment, ITS Telecom shall repair or replace the
product at its discretion. Transportation will be the responsibility of the dealer/distributor.
Under no circumstances shall ITS Telecom be liable for consequential or special
damages, loss of revenue or user/dealer expenses arising out of or in connection
with the use or performance of the product, whether based on contract, tort, or
any other legal agreement.
The following shall void the ab ove warranty: malfunctions resulting from fire, accident,
neglect, abuse, or acts of God; use of improper electrical power; or repair of, tampering
with or alteration of the product by anyone other than ITS Telecom authorized personnel.
Page 3

Contents
1. Introduction....................................................................................1
2. Personal Mailbox Management (PMM) Utility Program........2
Setting Up the PMM Utility Program.........................................................................2
Installing the PMM Software................................................................................3
Starting the PMM Utility Program................................ .......................................5
Personal Mailbox Management Screen ...................................................................7
Mailbox Settings...................................................................................................7
Mailbox Notifications ........................................................................................11
Mailbox Statistics..............................................................................................14
Communication........................................................................................................15
3. Mailbox Owner Operations.......................................................16
User’s Main Menu .................................................................................................... 17
Retrieve Messages (1).....................................................................................18
Mailbox Settings (2)..........................................................................................18
List of Figures
Figure 1: PMM Installation Window: IP Address.............................................................3
Figure 2: PMM Installation Window: Mailbox Number....................................................4
Figure 3: MS Outlook window with Forward as Wave button........................................4
Figure 4: PMM Mailbox Settings Page............................................................................7
Figure 5: PMM Mailbox Notification Page................................ .................................... 11
Figure 6: Mailbox Statistics Page..................................................................................14
Figure 7: Mailbox Quick Reference Guide: User’s Main Menu..................................16
VMS User’s Guide: PMM Utility Program (v. 2)
Page 4

Page 5

1. Introduction
Congratulations on purchasing your new Voice Mail System!
This Voice Mail System User Gui de describes the different features of your new
Voice Mail System (VMS) and explains how to set up your personal VMS mailbox.
You should read this manual before installation and operation to take full advantage
of available options.
There are two methods you will use to set up your new VMS:
§ Personal Mailbox Management (PMM) Utility Program – a specially designed
graphic user interface (GUI) that lets you define your mailbox settings
(Chapter 2).
§ Directly from your telephone extension – which you must use to record your
outgoing messages and can be used to hear incoming messages (Chapter 3).
This manual assumes that the global VMS settings that you will choose from have
already been defined by your VMS Administrator.
VMS User’s Guide: PMM Utility Program (v. 2) 1
Page 6

2. Personal Mailbox
Management (PMM)
Utility Program
The Personal Mailbox Management (PMM) is a utility program that lets you setup
and maintain your personal mailbox. Via the Local Area Network (LAN)
connection, each mailbox owner can easily change the main voice mail parameters,
such as Password, Language and Mailbox type. The PMM also provides mailbox
owners with statistics on their own personal mailbox.
Setting Up the PMM Utility Program
This section describes how to install and start your PMM software on the PC that
you will use to set up and manage your personal VMS account.
,
If you are installing the software from the accompanying CD, begin at Step 1.
If you are installing the software from the network, skip to Step 3.
NOTES
The PMM software can be downloaded, installed and used for your Personal
Mailbox configuration.
The Mailbox owner’s PC must be connected to a TCP/IP protocol based
Local Area Network (LAN).
The system administrator provides the mailbox owners with access to the
external notification variable parameters.
During installation, the VMS’s IP address and Voice Mailbox number are
needed. Check this data with your local network administrator. The PMM
software will not run If this required data is not entered during installation,
The VMS’s IP address and Voice Mailbox number cannot be changed once
defined
VMS User’s Guide: PMM Utility Program (v. 2) 2
Page 7
Installing the PMM Software
1. Insert the PMM CD in the CD-ROM drive of your PC. The CD should run
automatically.
2. If the CD does not run automatically, select Start ð Run, then click the Browse
button to view the contents of the CD. Open the Software directory, then open
the PMM Installation directory and find the Setup.exe file (icon displayed on the
left) and open it.
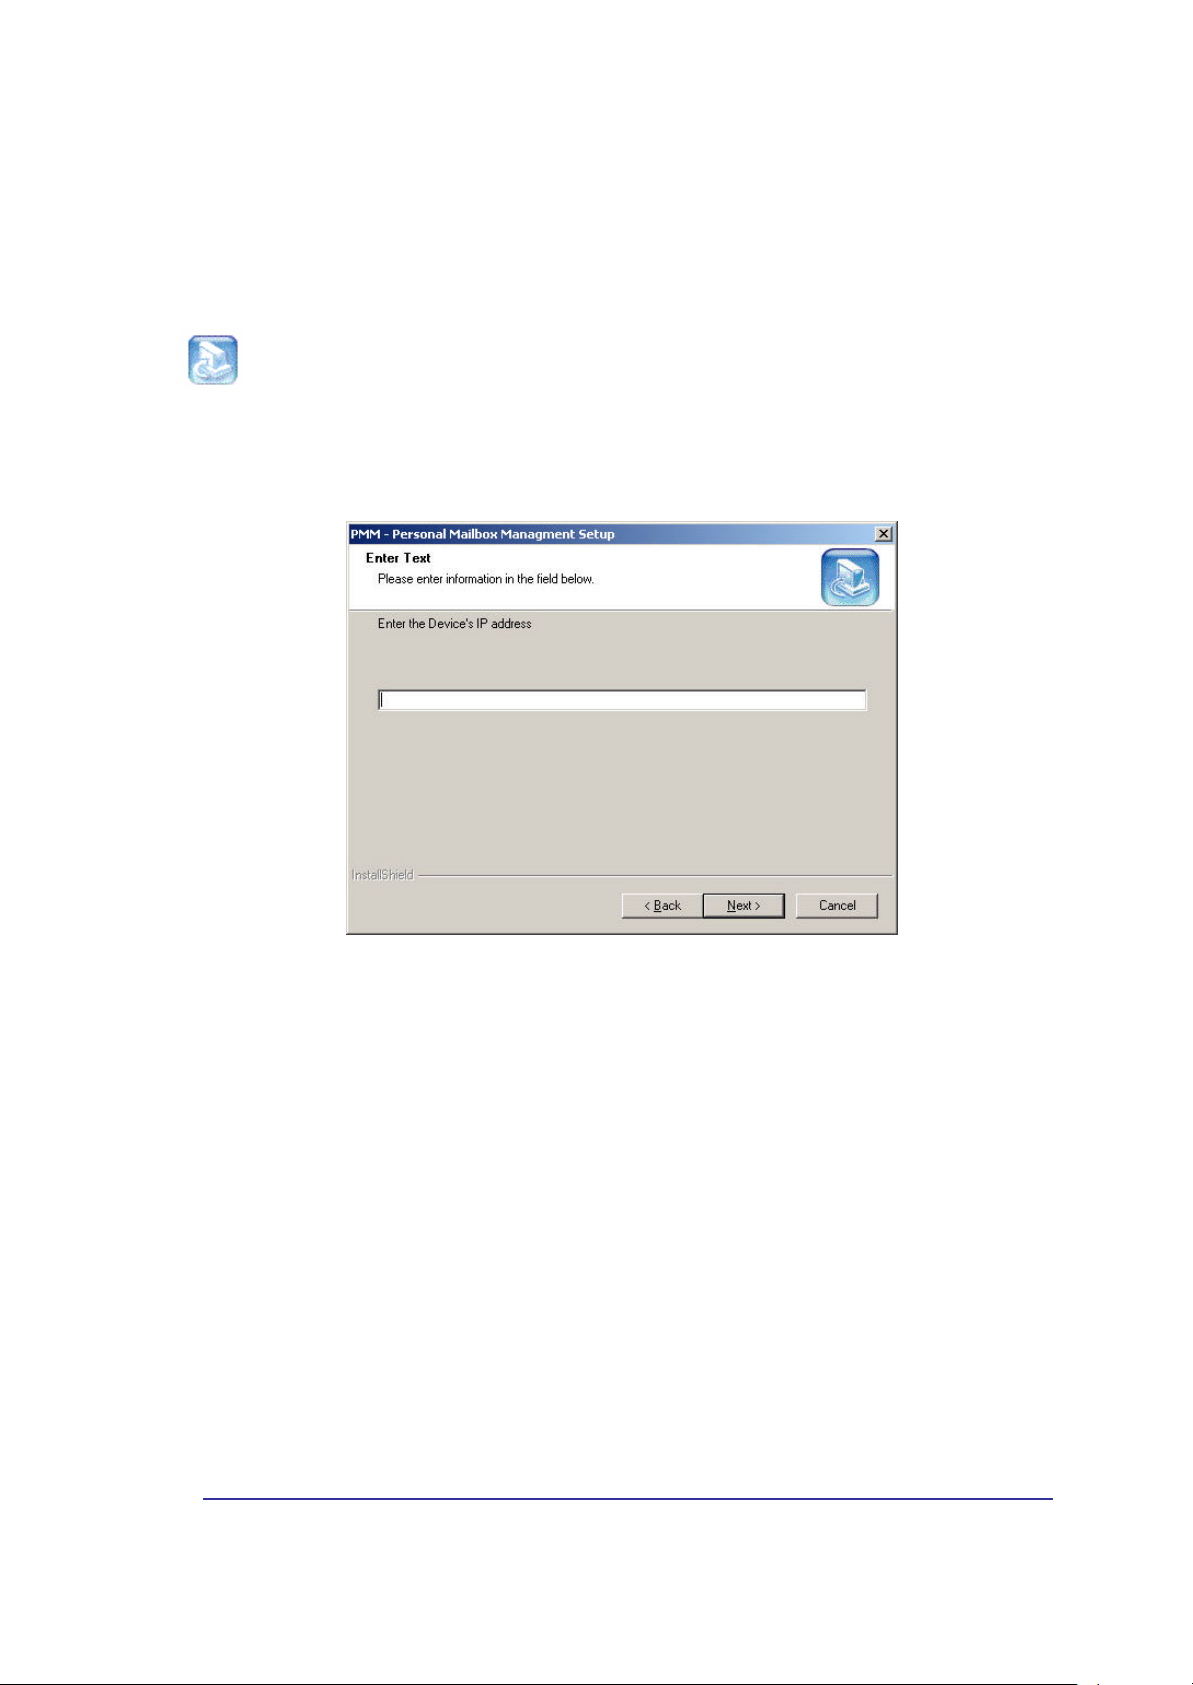
3. The following PMM Setup window appears to enter the IP Address.
Figure 1: PMM Installation Window: IP Address
Enter the Network IP Address of the VMS in this window. Contact your
Network Administrator if you do not know this address. When you are done,
click Next.
VMS User’s Guide: PMM Utility Program (v. 2) 3
Page 8
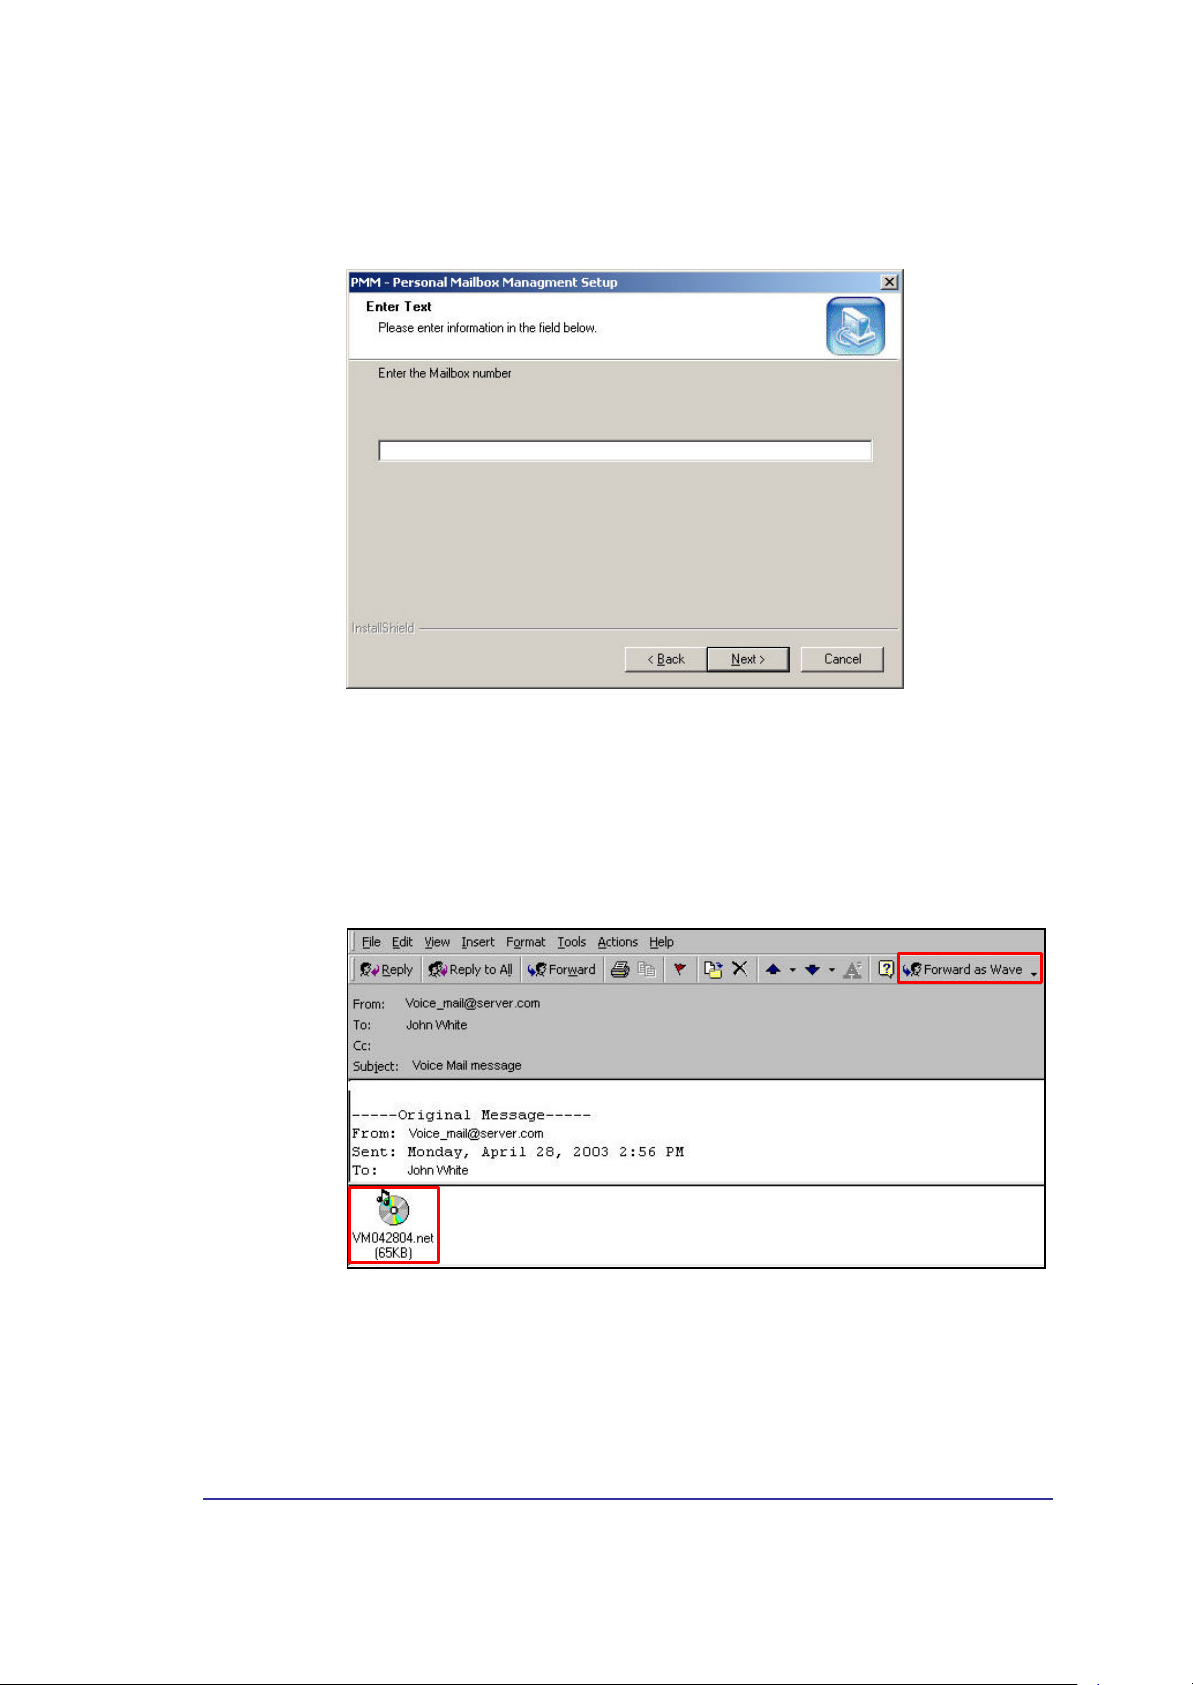
4. The following PM M Setup window appears to enter the Mailbox Number.
Figure 2: PMM Installation Window: Mailbox Number
Enter your Personal Mailbox number in this window.
5. Open your E-mail client application (e.g., MS Outlook/Express) and check if the
new Forward as Wave button has been added to your toolbar (see Figure 3).
You will click the Forward as Wave button to convert recorded messages that
the VMS send to your E-mail account in .NET format to .WAV format.
Figure 3: MS Outlook window with Forward as Wave button
VMS User’s Guide: PMM Utility Program (v. 2) 4
Page 9
,
Starting the PMM Utility Program
1. Do one of the following:
NOTES
During your VMS installation, a new driver is added to your PC that lets
the PMM software automatically convert an attached .NET file in an Email to a .WAV when you open it. Your Audio Player program (e.g.,
Windows Media Player) then plays this new .WAV file.
If you are not using MS Outlook/Express for E-mail, the Forward as
Wave button will not appear.
To forward an attached VMS message file, you must first open the
attached .NET file (it is converted to a .WAV) and then save it as the
new .WAV file. You can now attach this saved .WAV to your E-mail
message and forward it.
§ Select Start ð Run ð PMM – Personal Mailbox Management <version>
ð PMM.
Pmm.lnk
2. Click OK to view your mailbox settings.
3. Enter your password (default = 1234) and click on OK. The main PMM screen
,
§ Double-click on the PMM shortcut on your desktop (displayed to the left).
appears. If it does not, see Notes below. The mailbox owner can now change
the parameters.
NOTES
Every time the PMM program starts, the Read Parameters action is
automatically performed for the mailbox number that was defined
during the installation. You are not able to read parameters from a
different mailbox.
The telephone’s extension number is not relevant for a Virtual Mailbox.
VMS User’s Guide: PMM Utility Program (v. 2) 5
Page 10

NOTES
,
A message box may prompt you to “Work Off-Line” due to any of the
following 3 situations:
1. The defined mailbox does not exist.
What to Do: Contact the system administrator for help.
2. The incorrect password has been entered 3 times.
What to Do: Use the off-line state to check if your mailbox number is
correct. The system administrator can reset your mailbox password.
3. There is a communication failure and the PMM failed reading the data.
What to Do: Check with your system administrator if there is a
communication failure.
VMS User’s Guide: PMM Utility Program (v. 2) 6
Page 11
Personal Mailbox Management Screen
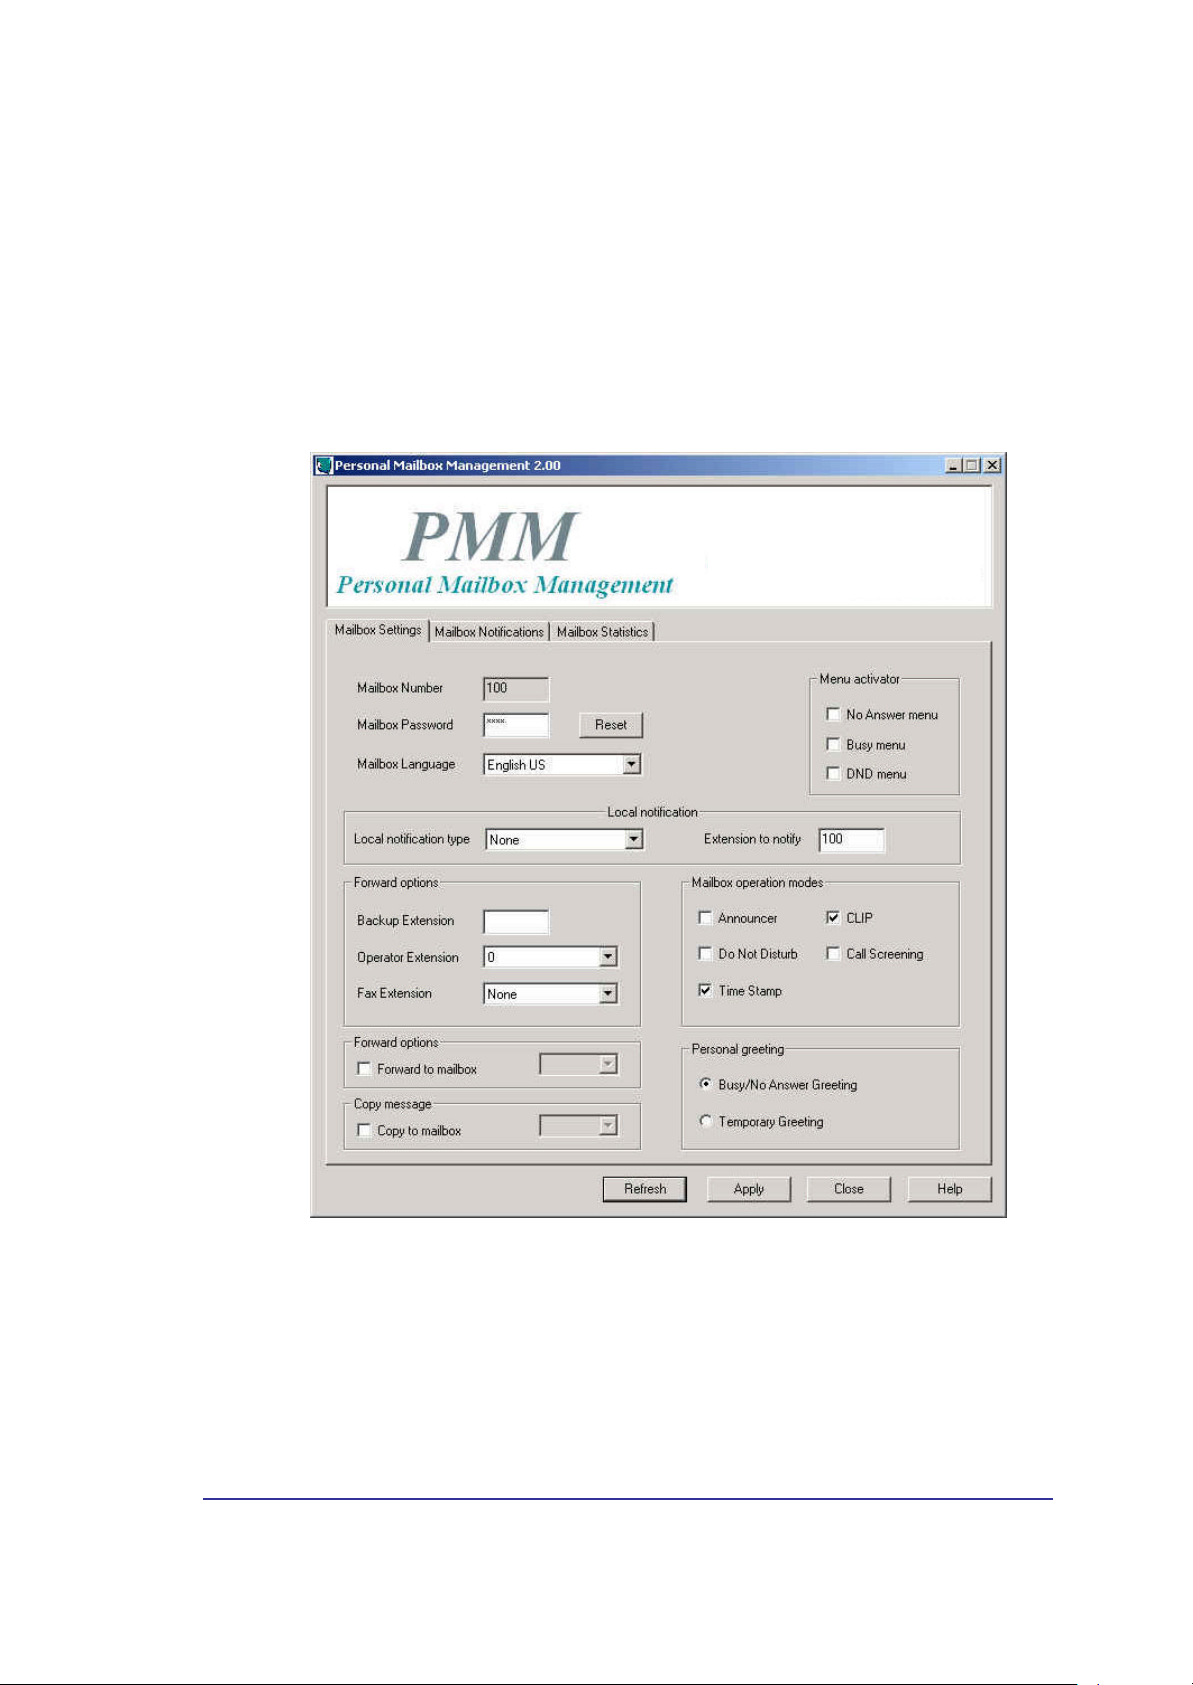
The main Personal Mailbox Management screen is divided into three pages: Mailbox
Settings, Mailbox Notifications, Mailbox Statistics.
Mailbox Settings
The Mailbox Settings page provides numerous settings for your personal mailbox.
Figure 4: PMM Mailbox Settings Page
VMS User’s Guide: PMM Utility Program (v. 2) 7
Page 12

The Mailbox Settings page displays the following user-defined parameters:
Parameter Usage
General
Mailbox Number Current Mailbox number (field is read- only).
Mailbox Password Access code to change Mailbox’s features. Press the
Reset button to change this password.
Mailbox Language Select the langua ge the mailbox should use to play system
messages.
Local Notification
Local Notification Type None
No notification is made.
MSG Light 1
Turns the telephone’s light on and changes the dial tone of
the extension, depending on the PBX. (This will work only if
the VMS Administrator has defined this code.)
MSG Light 2
Identical to Message Light 1, but for PBX units that support
more than one type of message notification code.
Sign Ring
System rings the extension number once, to inform the
mailbox owner of new messages.
Rings
System rings an internal or external number for a period of
time to inform the mailbox owner of new messages. When
the owner of the mailbox calls the mailbox, the unit plays a
menu for retrieving the messages.
The period of time that the system rings the number is
defined by the VMS Administrator.
Extension to Notify After a new message has been recorded, a local message
notification will be sent to this extension number.
Transfer Options Provides the possibility to transfer a call to another
destination while the Personal Opening Greeting is playing.
Note: These features are relevant only to incoming external
calls, not from extensions within the internal phone system
VMS User’s Guide: PMM Utility Program (v. 2) 8
Page 13
Parameter Usage
Backup Extension Transfers a call to this extension while the Person al
Greeting message is playing if the caller dials the specified
digit (i.e., Backup Extension ID code).
Note: The VMS Administrator must have specified the
Backup Extension ID code.
Operator Extension Transfers a call to one of eight local Operators whi le the
Personal Greeting message is playing if the caller dials the
specified digit (i.e., Backup Extension ID code).
Note: The VMS Administrator must have specified the
Operator ID code to transfer a call.
FAX Extension If fax data signal is detected during the Personal Greeting
message, automatically transfers the call to the specified
fax extension.
Personal Greeting Choice of Busy/No Answer or Temporary greetings.
Busy/No Answer
Activates the Busy/No Answer greeting for the mailbox.
Greeting
Temporary Greeting Activates the Temporary greeting for the mailbox
Mailbox Operation Special features that help you limit incoming calls.
Note: These features are relevant only to incoming external
calls, not from extensions within the internal phone system
Announcer Plays a pre -recorded personal greeting without allowing the
caller to leave a message.
Do Not Disturb (DND) Automatically plays the pre-recorded Do Not Disturb
message and prevents the phone from ringing. All calls are
automatically diverted to voicemail.
Note: No calls can be transferred from an Automated
Attendant to an extension in DND mode.
Time Stamp Plays the time and date that a message was recorded.
CLIP Activates the Calling Line Identification Presentation for
announcing Source ID (i.e., Caller’s ID) number.
Note: PBX must support for this feature to function properly.
VMS User’s Guide: PMM Utility Program (v. 2) 9
Page 14

Parameter Usage
Call Screening Activates the Call Screening function for the mailbox.
Note: Works only on condition that the call was routed via
an attached Automated Attendant system.
When activated, callers are first asked to record their
names, after which the extension rings. When the call is
answered, the recording with the person's name is played
and a choice is offered: Accept Call (the call is put through)
or Reject Call (the caller is directed to leave a message).
This feature must be enabled by the VMS Administrator.
Note: During screening, an incoming calls holds the
communication port until the cal is completed.
Menu Activator Note: These features are relevant only to incoming external
calls, not from extensions within the internal phone system
No Answer Menu Activates the pre-defined System No Answer menu.
Busy Menu Activates the pre-defined System Busy menu.
DND Menu Activates the pre-defined System Do Not Disturb menu.
VMS User’s Guide: PMM Utility Program (v. 2) 10
Page 15
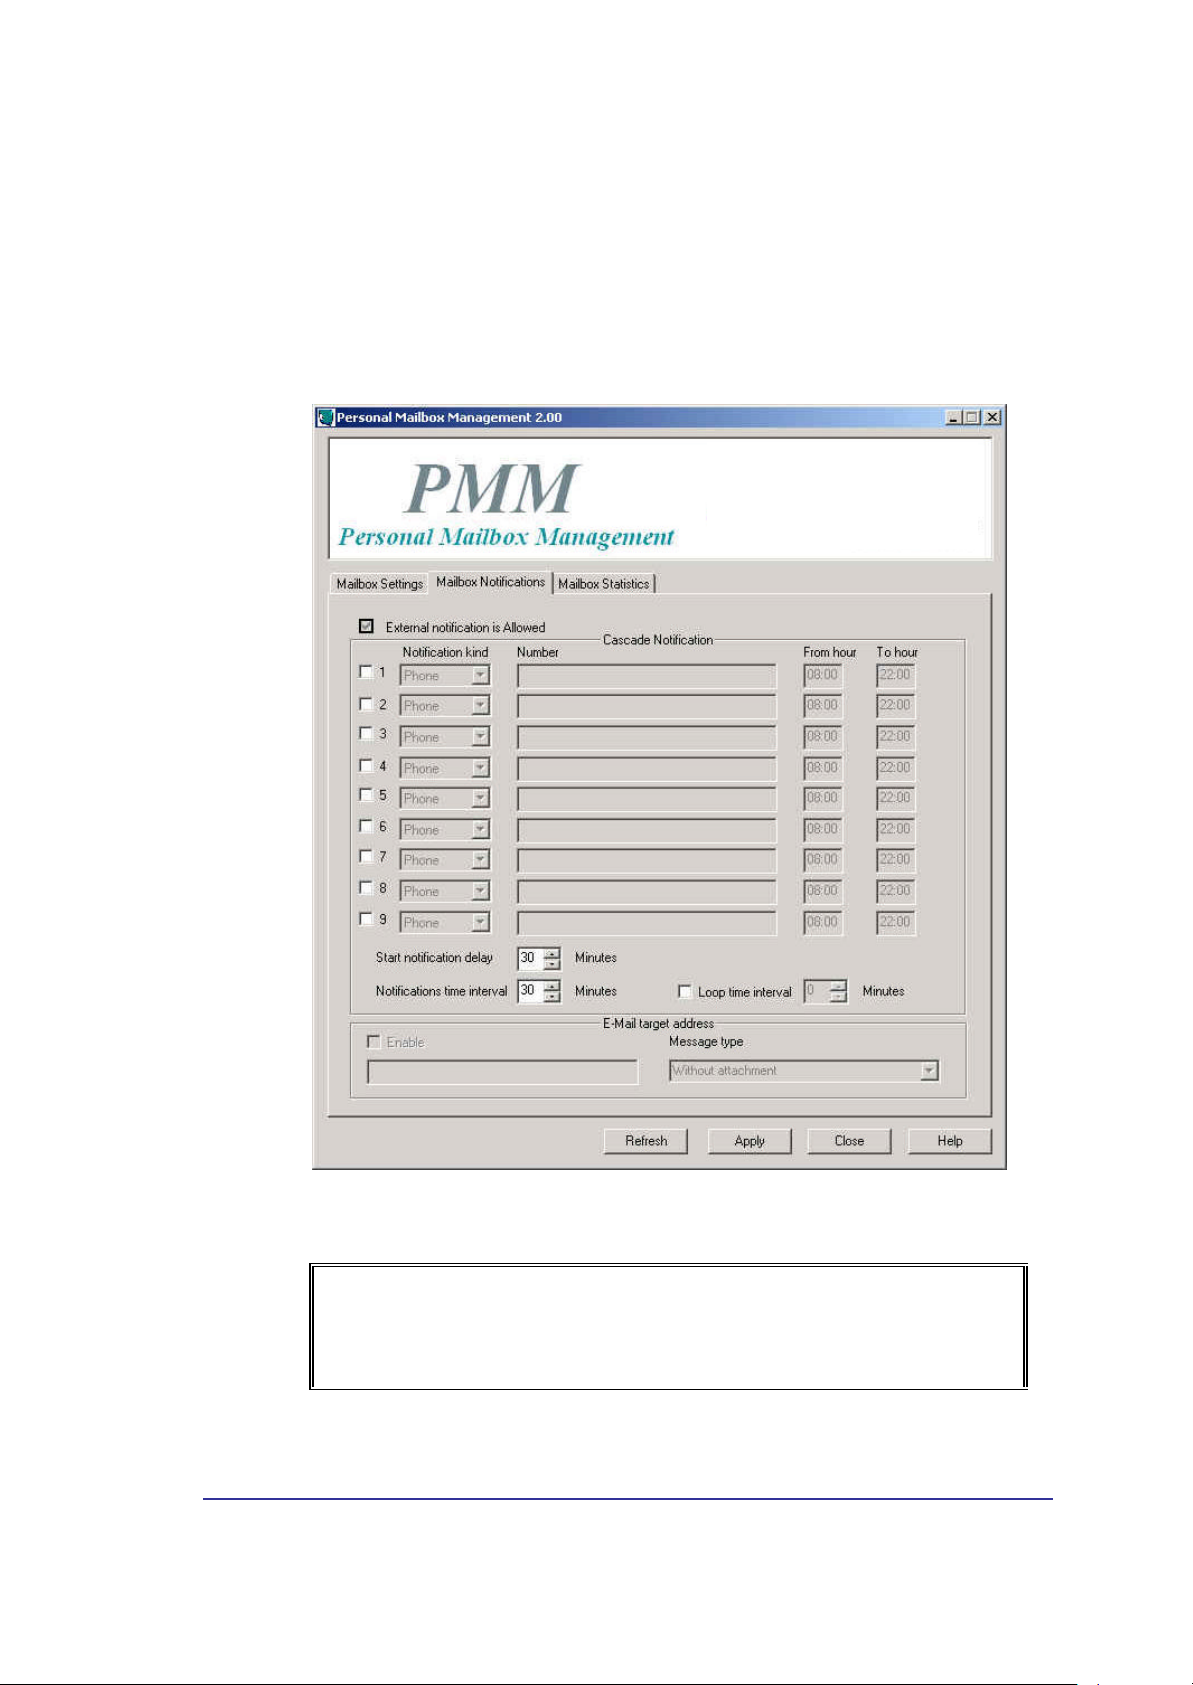
Mailbox Notifications
The Mailbox Notifications page provides several options for notifying different
external numbers that a message has been left.
Mailbox Notifications work on condition that the Local Notifications Type is not
None and an Extension to Notify has been entered.
Figure 5: PMM Mailbox Notification Page
NOTE
,
VMS User’s Guide: PMM Utility Program (v. 2) 11
The mailbox owner can only define the external notification options if the
VMS Administrator has provided the permission for this mailbox. The
“External notification is Allowed” checkbox always appears disabled.
Page 16

The Mailbox Notification page displays the following user -defined parameters:
Parameter Usage
Cascade Notification Lists 9 numbers to notify that a message was received.
Notifications are made in cascading order, based on the
From and To hour specified.
Checkbox Check to enable a notification to an external device by the
VMS that the mailbox owner has received a new message.
Notification Kind Select the type of device you want to notify:
Phone (External)
Enter the external telephone number for the VMS to call
when the mailbox receives a new message.
When this number is answered, the VMS announces that a
new call has been received.
To play the recorded message, enter the correct password.
Pager
Enter the following <numbers> in this order:
<pager number for the VMS to call><$><subscriber’s
ID><message code>.
The code combination/message helps the person identify
the reason for being paged. It can be up to 20 of the
following entries: 1234567890*#.
Note: A, B, C, D are also acceptable DTMF code options
that you can enter. But they will appear only if the pager
supports their display.
SMS
Enter a mobile phone number.
The VMS sends SMS text, defined by the VMS
administrator, alerting that a new message has been
recorded.
Note 1: This feature will work only when the SMS
Notification feature has been enabled by the VMS
Administrator.
Note 2: This feature will also send an SMS to other
communication devices, such as a Palm Pilot, if supported
by the device.
Number Enter the required number, as explained in Notification Kind
above.
From Hour Enter beginning range of time that a notification may be
sent to this number.
VMS User’s Guide: PMM Utility Program (v. 2) 12
Page 17

Parameter Usage
To Hour Enter ending range of time that a notification may be sent to
this number.
Note: If a call is received after this time, a notification will
only be sent the following day after the From hour and if the
message has not yet been heard and no message
notification has yet been sent to another number.
Start Notification Delay Amount of time after which the notification cascade will
start. Default is 30 minute.
Notifications Time
Interval
Loop Time Interval Check box to enable, then set the amount of minutes
E- mail Target Address Sets up E-mail notification and defines what to do with the
Enable Checkbox
Email Target Address
Amount of time after which the next notification kind is
started. Default is 30 minutes.
between cascade loops.
recorded incoming message.
Enables E-mail notification.
Relevant E-mail address to which the VMS will forward
messages.
Message Type Without attachment
The E-mail will be sent to the target E-mail address, with
information about a new recorded message, but without an
attachment.
With voice message attached
The E-mail with the attached media file, containing the
recorded message, will be sent to the target E-mail
address.
Voice message attached and saved
The E-mail with the attached media file, containing the
recorded message, will be sent to the target E-mail address
and the message will be marked as saved in the VMS.
Voice message attached and deleted
The E-mail with the attached media file, containing the
recorded message, will be sent to the target E-mail address
and the message will be marked as deleted in the VMS.
VMS User’s Guide: PMM Utility Program (v. 2) 13
Page 18
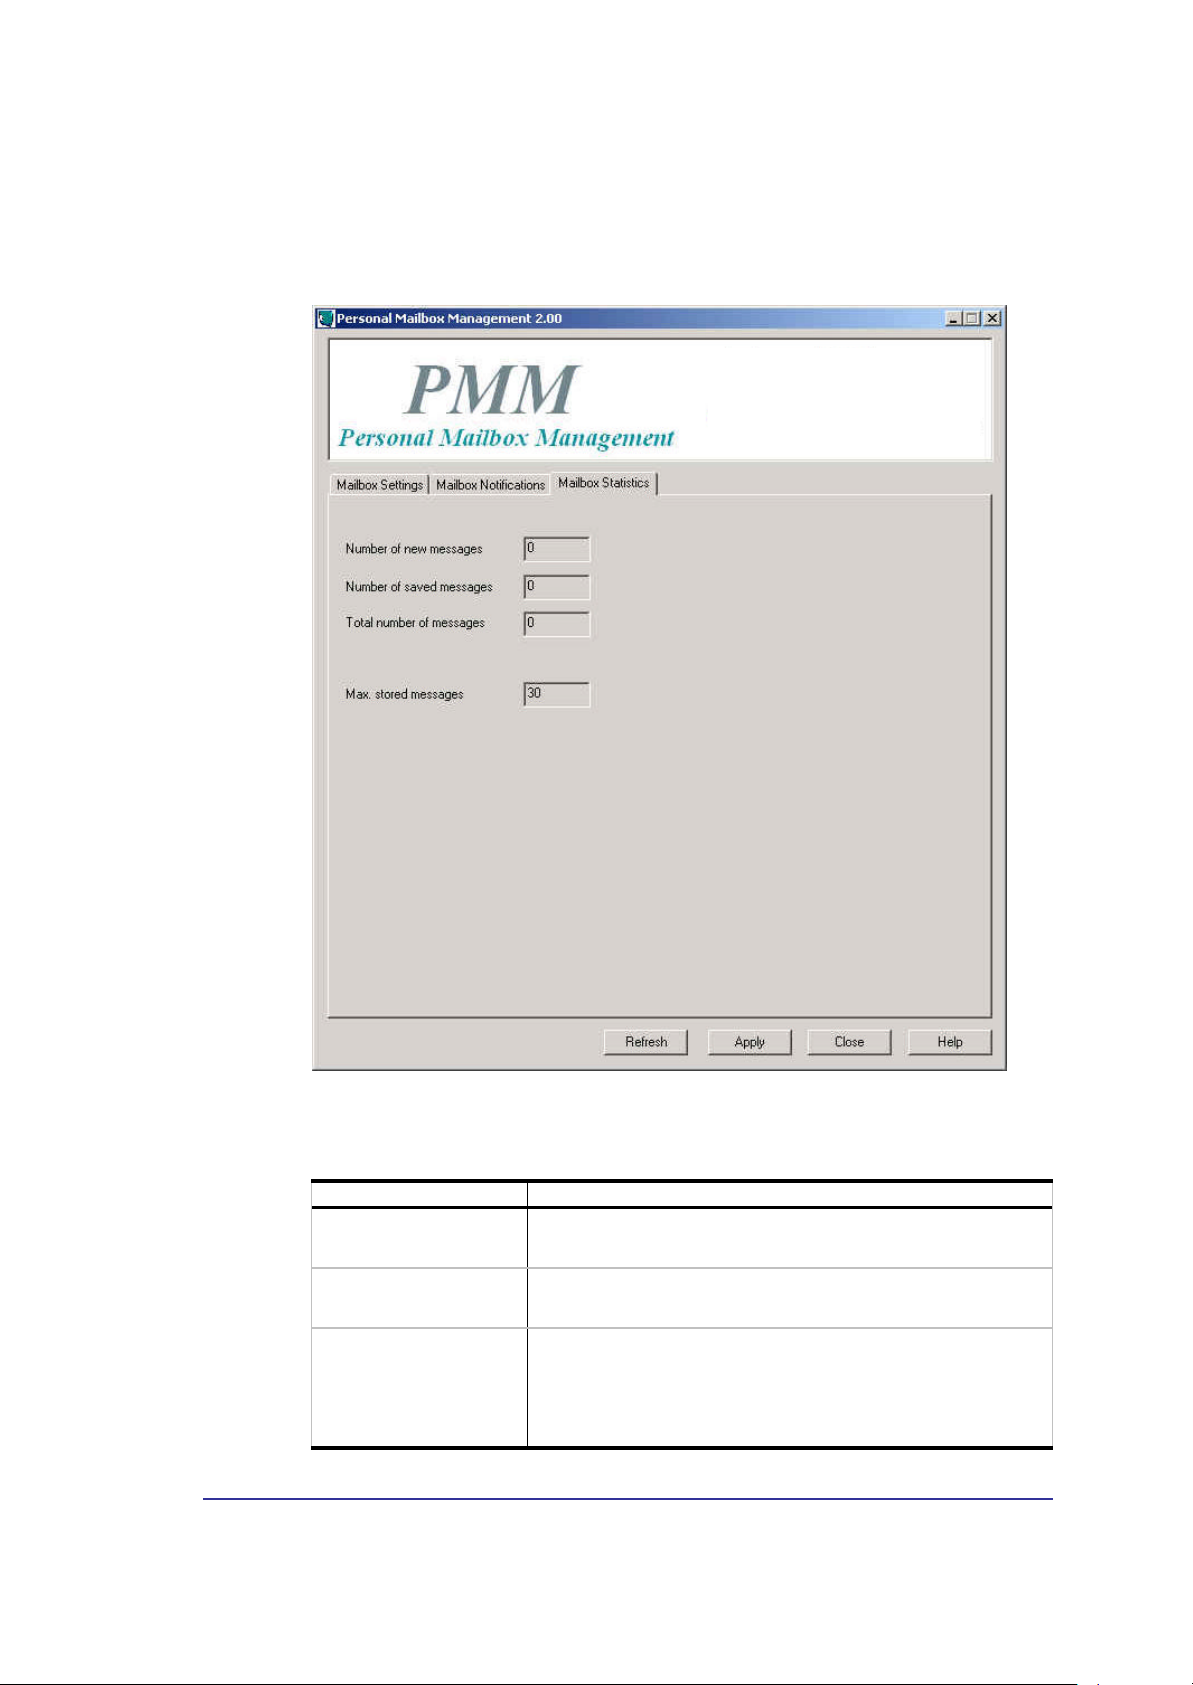
Mailbox Statistics
The Mailbox Statistics page displays figures on how your mailbox is being used.
Figure 6: Mailbox Statistics Page
The Mailbox Statistics page displays the following usage figures:
Parameter Usage
Number of new
messages
Number of saved
messages
Total number of
messages
Max. stored messages Shows the maximum number of messages that can be
VMS User’s Guide: PMM Utility Program (v. 2) 14
Shows the number of the new messages that have not been
heard.
Shows the number of the saved messages.
Shows the total number of recorded messages.
recorded in the mailbox.
Page 19

Communication
You are able to refresh your mailbox data and to send changes you make in your
personal mailbox settings to the VMS.
To refresh your mailbox data:
1. When inside the PMM program, click on Refresh.
2. Click on OK
To upload changes for your mailbox to the VMS:
1. Click on the Apply button in the PMM program
2. Click on OK
VMS User’s Guide: PMM Utility Program (v. 2) 15
Page 20
3. Mailbox Owner Operations
Each mailbox owner can execute the following operations:
§ Retrieve messages
§ Send messages
§ Set mailbox greetings
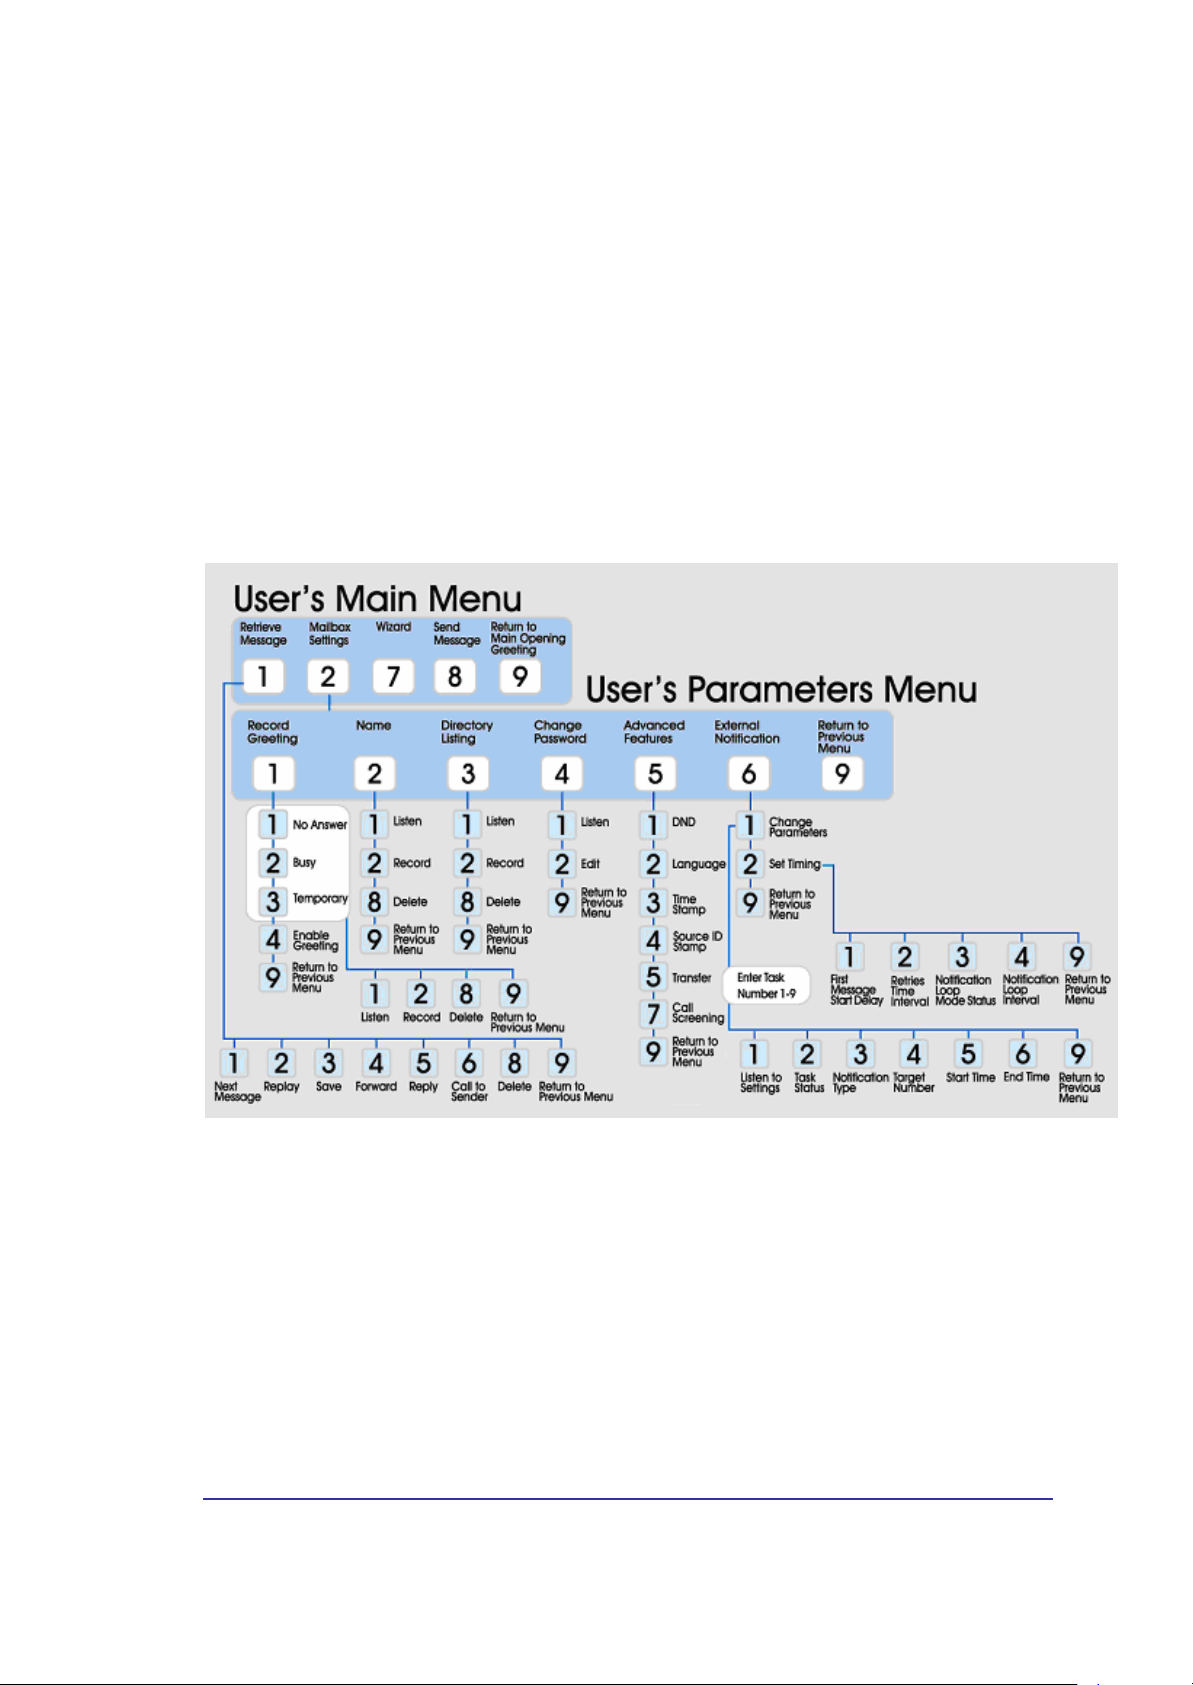
Use the outline in Figure 7 for a quick reference guide to mailbox menus, or continue
to the procedures below.
Figure 7: Mailbox Quick Reference Guide: User’s Main Menu
VMS User’s Guide: PMM Utility Program (v. 2) 16
Page 21
,
User’s Main Menu
To enter the user's main menu, use one of the following three methods:
§ Enter the Automated Attendant access digits for retrieving messages.
§ Press an access digit during the mailbox greeting.
§ Dial the voice mail extension and, if the PBX supp orts the in-band DTMF
protocol, enter the mailbox menu automatically.
NOTE
You can also enter the User's Main Menu by dialing the programmed “Key
to retrieve messages” while the mailbox greeting is played (Default=9).
When the VMS announces the number of received messages and plays the main
menu, press the digit corresponding to the required option.
,
NOTE
By entering #, an internal caller can reach the Opening Greeting. If the Automated
Attendant is programmed to offer a Retrieve Messages option, you can select it
and enter a different mailbox number in the VMS (if the Retrieve Messages feature
is configured in the Main Script).
Choose from the following Main Menu options:
Digit Usage
1 Retrieve messages. Automatically plays new messages, then ones that
have already been heard.
2 Set the mailbox parameters.
7 Run the Wizard to setup your mailbox.
8 Send a message to a specific mailbox or to a group of mailboxes.
9 Exit the main menu and return to the Automated Attendant.
VMS User’s Guide: PMM Utility Program (v. 2) 17
Page 22
Retrieve Messages (1)
After pressing 1 from the Main Menu, choose from the following options:
Digit Usage
1.1 Play the first/next message.
1.2 Replay the current message.
1.3 Save the current message.
1.4 Forward the current message to another mailbox.
1.5 Reply to the message
Note: This feature works only if the attached PBX supports Caller IDs or if
the message was left from an internal extension calling through the VMS.
1.6 Call to message sender
Note: This feature works only if the attached PBX supports Caller IDs or if
the message was left from an internal extension calling through the VMS.
1.8 Delete the current message.
1.9 Return to the User’s Main Menu.
,
NOTE
During playback of a message, pressing 0 will PAUSE the message.
Pressing any other key will continue playing the rest of the message. If no
key is pressed within 50 seconds after pausing, the call is terminated.
Note: You cannot use PAUSE during the time stamp message.
Mailbox Settings (2)
After pressing 2 from the Main Menu, choose from the following options:
Digit Usage
2.1 Record a Greeting Message for the mailbox.
2.2 Record your name.
2.3 Set the Directory Listing parameters.
2.4 Change the Mailbox Access Password.
2.5 Change advanced features.
2.6 Set the External Notification parameters (if allowed).
2.9 Return to the Main Menu.
VMS User’s Guide: PMM Utility Program (v. 2) 18
Page 23
Mailbox Settings (2) / Record Greeting (1)
Choose from the following options:
Digit Usage
2.1.1 Record the No Answer greeting.
2.1.2 Record the Busy greeting.
2.1.3 Record the Temporary greeting
2.1.4 Enable one of the Personal Greetings: Busy/No Answer or Temporary
2.1.9 Return to the Mailbox Settings Menu.
After recording your greeting, choose from the following options:
Digit Usage
1 Play the Current greeting message.
2 Record a new greeting message.
8 Delete the Current message.
9 Return to the Mailbox Settings Menu.
Mailbox Settings (2) / Name (2)
Choose from the following options:
Digit Usage
2.2.1 Play the current recording.
2.2.2 Record a new name.
2.2.8 Delete the current name.
2.2.9 Return to the Mailbox Settings Menu.
Mailbox Settings (2) / Directory Listing (3)
The Directory Listing code is how the mailbox owner’s name will be listed in an
attached Automated Attendant system. You must enter 3 DTMF codes
corresponding to the name (i.e., first or last) as defined by the VMS Administrator.
Choose from the following options:
Digit Usage
2.3.1 Play the current directory listing code.
2.3.2 Record the directory listing code.
2.3.8 Delete the directory listing code.
2.3.9 Return to the Mailbox Settings Menu.
VMS User’s Guide: PMM Utility Program (v. 2) 19
Page 24
Mailbox Settings (2) / Change Password (4)
Choose from the following options:
Digit Usage
2.4.1 Play the current 4-digit password.
2.4.2 Change the current password. Dial four digits (0 to 9) for the new password.
Notes: To disable the password, dial 0000. The VMS Administrator can also
reset the mailbox password to the default password.
2.4.9 Return to the Mailbox Settings Menu.
Mailbox Settings (2) / Advanced Features (5)
Choose from the following options:
Digit Usage
2.5.1 Activate Do Not Disturb (DND) (Enabled or Disabled).
2.5.2 Set the Mailbox Language.
2.5.3 Set the Time Stamp Playback Status.
2.5.4 Set the Caller Id Stamp Playback Status.
2.5.5 Set the Transfer options.
Press the digit of the selected Transfer Men u option:
1 Backup Extension
9 Go to the Main User’s menu
2.5.7 Activate the Call Screening feature.
2.5.9 Return to the Mailbox Settings Menu.
Mailbox Settings (2) / External Notification (6)
Before being activated by the end-user, the External Notification of a Mailbox
function must be enabled by the VMS Administrator.
Choose from the following options:
Digit Usage
2.6.1 Change the External Notification parameters.
See Change Parameters table below for options.
2.6.2 Set the External Notification Timing.
See Set Timing table below for options.
2.6.9 Return to the Mailbox Settings Menu.
VMS User’s Guide: PMM Utility Program (v. 2) 20
Page 25

Change Parameters
After you dial 1 from the External Notification menu, choose from the following
Change Parameters options for the external notification of a mailbox:
Digit Usage
1 Listen to Current Notification settings.
2 Change the Task Status. (Enable = 1, Disable= 2)
3 Change the Notification Type.
Note: The Notification Type field can support: None=0 (default), Phone=1,
Pager=2, or SMS=3.
4 Set Target Notification Number.
Note: The “Phone Number” field supports DTMFs 0-9, *, #.
Note: From the PMM screen, you can also add the following: A, B, C, D
5 Set Notification Task Start Time.
6 Set Notification Task Stop Time.
9 Return to the External Notificatio n Menu.
Set Timing
After you dial 2 from the External Notification menu, choose from the following Set
Timing options for the external notification of a mailbox:
Digit Usage
1 1st message start delay.
2 Retries time interval.
3 Notification loop mode status.
4 Notification loop time interval.
9 Return to the previous menu.
VMS User’s Guide: PMM Utility Program (v. 2) 21
Page 26

Page 27

www.its-tel.com
 Loading...