

Page 1

T
FC200
Getting Started Guide
D R A F T !
Page 2

Identification
FC200 Getting Sta rte d Guid e
TDC-0598-000d 9/16/04
Trademark Notice
Itron is a registered trademark of Itron, Inc.
All other produc t na m es an d logos in this document are us e d for ide nt i fic ation
purposes only and may be tradem arks or registered trademarks of their respective
companies.
Copyright Notice
Y our company has the right to reproduce this contract document provided that such
reproduction shall be subject to the same use and disclosure restrictions contained
in the Confidentiality and Non-Disclosure paragraphs in the Sales Contract.
© 2004 Itron, Inc. All rights reserved.
Use of This Device
This device is to be operated by properly trained personnel only.
Warning
It is important that only authorized Itron personnel attempt repairs on Itron
equipment, as this might void any maintenance contract with your company.
Unauthorized service personnel might be subject to shock hazard on some Itron
equipment if removal of protective covers is attempted.
Suggestions
If you have c omments or sugge stions o n how we m ay impro ve this d ocument , send
them to:
• Mail: Itron, Inc.; Attention: Customer Care; 2818 N. Sullivan Road;
Spokane, WA 99216
• E-mail: support@itron.com
• Phone: 1-800-635-8725
In Europe:
• Mail:
Itron BV.
Teleportboulevard 110
1043 EJ Amsterdam
The Netherlands
• Phone: +31-(0)206065220
• Fax +31-(0)206065299
• e-mail: support.emea@itron.com
In Australia:
• Mail: Itron; Level 533 Erskine Street; Sydney, NSW 2000; Australia
• Phone: 61 2 9299 5744
• Fax: 61 2 9299 5995
Page 3

page iii
Contents
Introduction. . . . . . . . . . . . . . . . . . . . . . . . . . . . . . . . . . . . . . . . . . . . . . . . . . . . . 1
Unpacking the FC200 Computer . . . . . . . . . . . . . . . . . . . . . . . . . . . . . . . . . . . . . 1
Getting Familiar with Your FC200 . . . . . . . . . . . . . . . . . . . . . . . . . . . . . . . . . . . . 2
LED Status Indicators . . . . . . . . . . . . . . . . . . . . . . . . . . . . . . . . . . . . . . 3
Communication Ports. . . . . . . . . . . . . . . . . . . . . . . . . . . . . . . . . . . . . . . 3
Installing the Battery Pack. . . . . . . . . . . . . . . . . . . . . . . . . . . . . . . . . . . 4
Controls. . . . . . . . . . . . . . . . . . . . . . . . . . . . . . . . . . . . . . . . . . . . . . . . . . . . . . . . 7
Turning the Handheld On and Off. . . . . . . . . . . . . . . . . . . . . . . . . . . . 10
Using the Stylus. . . . . . . . . . . . . . . . . . . . . . . . . . . . . . . . . . . . . . . . . . 10
Entering Data . . . . . . . . . . . . . . . . . . . . . . . . . . . . . . . . . . . . . . . . . . . . 11
Resetting Your Handheld. . . . . . . . . . . . . . . . . . . . . . . . . . . . . . . . . . . 13
Calibrating the Touch Screen. . . . . . . . . . . . . . . . . . . . . . . . . . . . . . . . 13
Recording Your Owner Information . . . . . . . . . . . . . . . . . . . . . . . . . . 15
Controlling the Screen Backlight. . . . . . . . . . . . . . . . . . . . . . . . . . . . . 17
Batteries . . . . . . . . . . . . . . . . . . . . . . . . . . . . . . . . . . . . . . . . . . . . . . . . . . . . . . 18
Checking the Batteries. . . . . . . . . . . . . . . . . . . . . . . . . . . . . . . . . . . . . 19
Main Battery Status . . . . . . . . . . . . . . . . . . . . . . . . . . . . . . . . . . . . . . . 19
Battery Conservation . . . . . . . . . . . . . . . . . . . . . . . . . . . . . . . . . . . . . . 20
Charging the Battery . . . . . . . . . . . . . . . . . . . . . . . . . . . . . . . . . . . . . . 20
Replacing the Battery Pack . . . . . . . . . . . . . . . . . . . . . . . . . . . . . . . . . 22
Battery Safety Instructions. . . . . . . . . . . . . . . . . . . . . . . . . . . . . . . . . . 23
Battery Storage. . . . . . . . . . . . . . . . . . . . . . . . . . . . . . . . . . . . . . . . . . . 23
Caring for Your FC200. . . . . . . . . . . . . . . . . . . . . . . . . . . . . . . . . . . . . . . . . . . . 24
Cleaning Your FC200 . . . . . . . . . . . . . . . . . . . . . . . . . . . . . . . . . . . . . 25
Storing Your FC200. . . . . . . . . . . . . . . . . . . . . . . . . . . . . . . . . . . . . . . 25
Using Your FC200 Safely. . . . . . . . . . . . . . . . . . . . . . . . . . . . . . . . . . . . . . . . . . 26
CompactFlash Cards . . . . . . . . . . . . . . . . . . . . . . . . . . . . . . . . . . . . . . . . . . . . . 26
Using CompactFlash Cards . . . . . . . . . . . . . . . . . . . . . . . . . . . . . . . . . 26
Installing a CompactFlash Card. . . . . . . . . . . . . . . . . . . . . . . . . . . . . . 27
Accessing Files on the CompactFlash Card. . . . . . . . . . . . . . . . . . . . . 28
Peripherals . . . . . . . . . . . . . . . . . . . . . . . . . . . . . . . . . . . . . . . . . . . . . . . . . . . . 28
Using iRescue . . . . . . . . . . . . . . . . . . . . . . . . . . . . . . . . . . . . . . . . . . . . . . . . . . 29
FC200 Backups . . . . . . . . . . . . . . . . . . . . . . . . . . . . . . . . . . . . . . . . . . 30
Backup Settings . . . . . . . . . . . . . . . . . . . . . . . . . . . . . . . . . . . . . . . . . . 30
Viewing and Deleting Backup Files . . . . . . . . . . . . . . . . . . . . . . . . . . 32
Restoring Handheld Data from a Backup . . . . . . . . . . . . . . . . . . . . . . 33
Installing Microsoft ActiveSync. . . . . . . . . . . . . . . . . . . . . . . . . . . . . . . . . . . . . 33
FC200 Best Practices . . . . . . . . . . . . . . . . . . . . . . . . . . . . . . . . . . . . . . . . . . . . 35
Daily Operation. . . . . . . . . . . . . . . . . . . . . . . . . . . . . . . . . . . . . . . 35
DRAFT FC200 Getting Started Guide - TDC-0598-000d 9/16/04
Page 4

page iv
Power Management . . . . . . . . . . . . . . . . . . . . . . . . . . . . . . . . . . . 36
File Management . . . . . . . . . . . . . . . . . . . . . . . . . . . . . . . . . . . . . 36
Charging. . . . . . . . . . . . . . . . . . . . . . . . . . . . . . . . . . . . . . . . . . . . 37
FC200R Best Practices . . . . . . . . . . . . . . . . . . . . . . . . . . . . . . . . . . . . . . . . . . . 37
Troubleshooting . . . . . . . . . . . . . . . . . . . . . . . . . . . . . . . . . . . . . . . . . . . . . . . . 38
Handheld will not turn on or stops running . . . . . . . . . . . . . . . . . 38
Battery does not charge . . . . . . . . . . . . . . . . . . . . . . . . . . . . . . . . 38
Battery does not last. . . . . . . . . . . . . . . . . . . . . . . . . . . . . . . . . . . 38
Lockups . . . . . . . . . . . . . . . . . . . . . . . . . . . . . . . . . . . . . . . . . . . . 39
RF communication. . . . . . . . . . . . . . . . . . . . . . . . . . . . . . . . . . . . 39
Infrared communication . . . . . . . . . . . . . . . . . . . . . . . . . . . . . . . . 39
ActiveSync communication. . . . . . . . . . . . . . . . . . . . . . . . . . . . . 39
AC Power Adapter. . . . . . . . . . . . . . . . . . . . . . . . . . . . . . . . . . . . . . . . . . . . . . . 40
Electromagnetic Compatibility . . . . . . . . . . . . . . . . . . . . . . . . . . . . . . . . . . . . . 41
FC200 Getting Started Guide - TDC-0598-000d 9/16/04 DRAFT
Page 5

Introduction
This document contains informat ion to help you get started using
your Itron FC200™ handheld computer.
For additional information, refer to the FC200’s online help.
To open online help:
• Select
You may also need to refer to some of the other documentation
available for your FC200. This includes:
• FC200 Desk Mount User’ s Guide, which co ntains instructions
• FC200 Vehicle Mount User’s Guide, which contains instruc-
Windows logo > Help > Handheld Computer Help.
for using and installing the FC200 Desk Mount, including
notes on how to use USB communications.
tions for using and maintaining the FC200 Vehicle Mount.
Unpacking the FC200 Computer
Make sure you have these items in your FC200 package:
• FC200 handhel d compu ter
• AC power adapter
• Power cord
• 2 styluses
• Stylus teth e r
• Lithium-ion battery pack
• USB client cable — 26-pin to USB client
• Serial cable — 26-pin to 9-pin
Optional items:
• Comm module cove rs
• Ethernet cable — 26-pin to RJ45
• USB host cable — 26-pin to USB host
page 1
DRAFT FC200 Getting Started Guide - TDC-0598-000d 9/16/04
Page 6
page 2
Styl
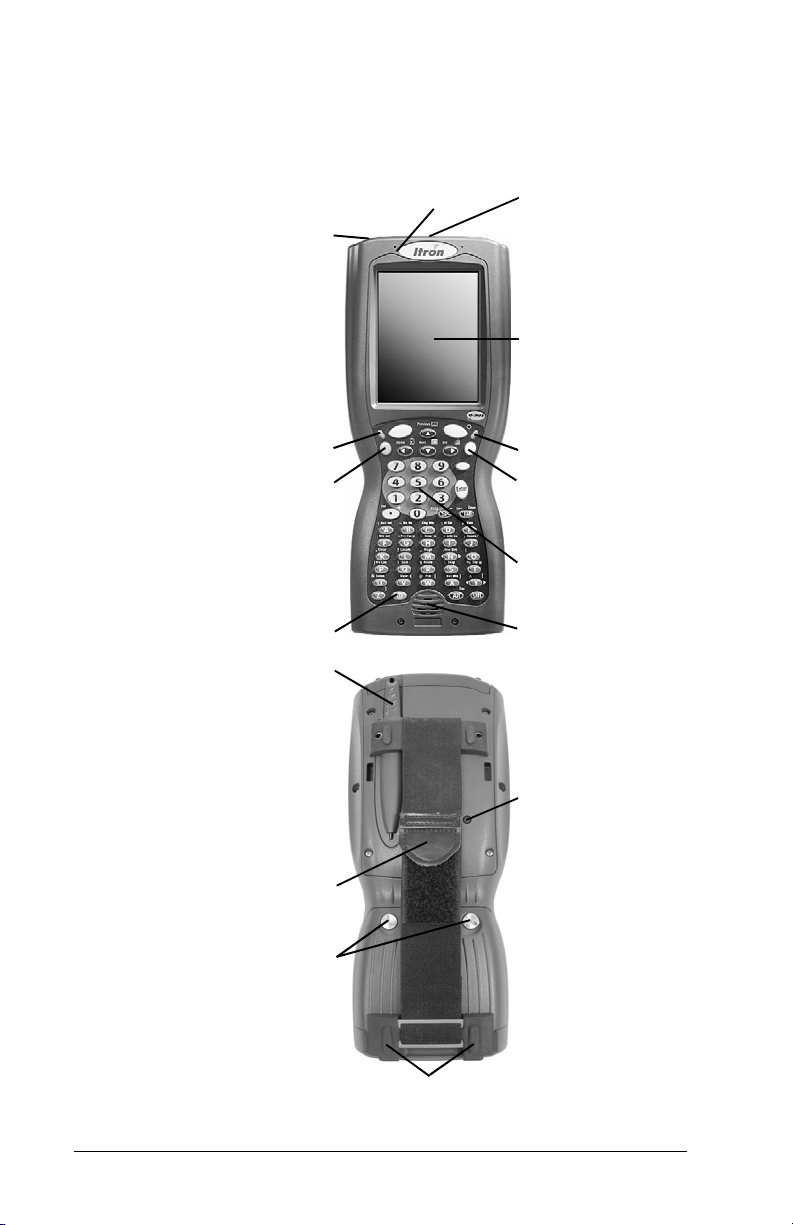
Getting Familiar with Your FC200
The following illustrations identify the main features of your
FC200.
Microphone
Audio in/out jack
Radio antenna connector
Touch screen/LCD
Charge status LED
Orange function key
Power key Speaker
us
Adjustable handstrap
Battery locking screws
Custom status LED
Blue function key
Keypad
External antenna
connector (optional)
Hand strap retaining clip
FC200 Getting Started Guide - TDC-0598-000d 9/16/04 DRAFT
Page 7

LED Status Indicators
The FC200 has two light-emitting diode (LED) status indicators
located at the upper corners of the keypad. The LEDs light up
when a particular function of the computer is active.
LED Light Description
page 3
Charge Status Regular blinking green
(one-second intervals)
Steady green Battery is fully charged.
Irregular blinking green
(irregular blink interval)
Custom Status Alternating red/green
blinks
Red, green, or amber May have customer-specific
Communication Ports
The FC200 has two communication ports on the bottom of the
computer (see picture below). Refer to documentation included
with individual devices for details on connecting th ese devices to
your computer.
Infrared
COM port
Battery is charging.
Charging error has occurred;
contact an Itron customer
service representative.
iRescue is performing a
backup.
See “Using iRescue” on
page 29.
functions.
COM4
COM1
DRAFT FC200 Getting Started Guide - TDC-0598-000d 9/16/04
Page 8
page 4
The following table lists the COM ports’ capabilities.
COM1 COM4 Infrared COM port
• Power in • Serial COM • Power in • Infrared
•USB •Ethernet •Serial COM
communications
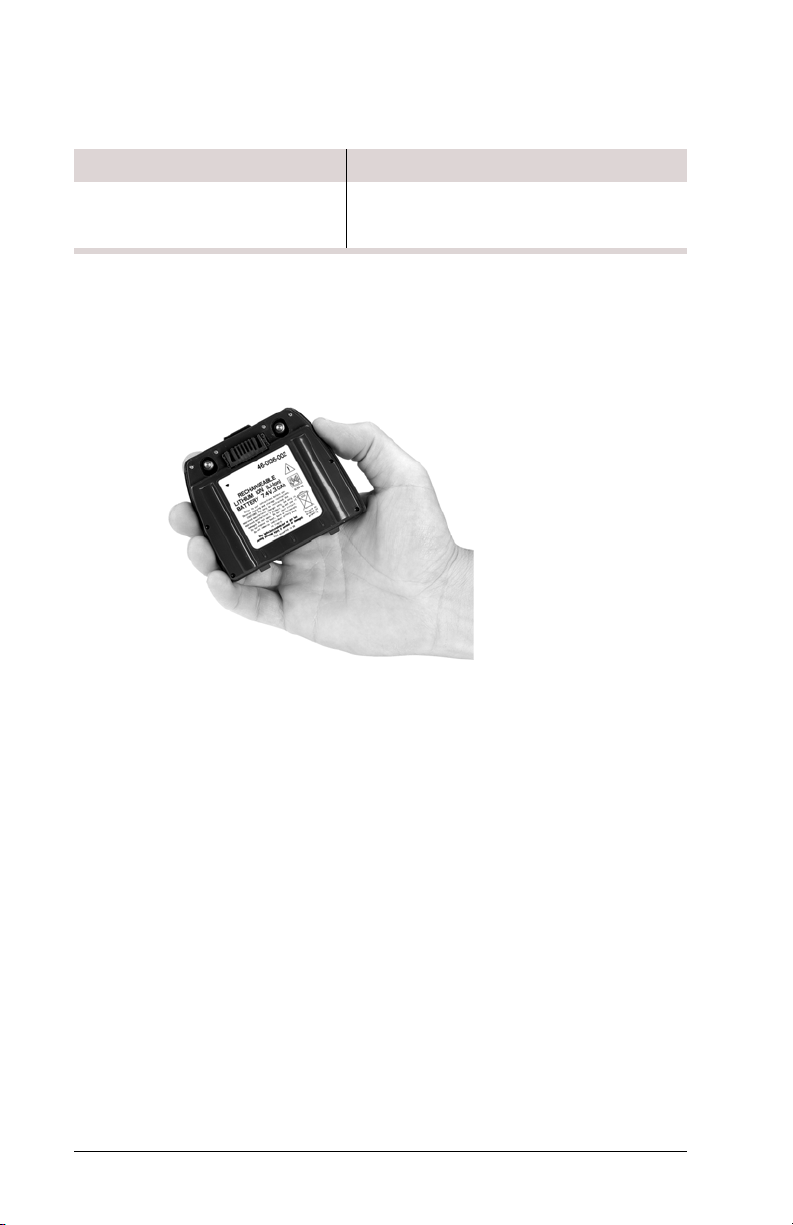
Installing the Battery Pack
The FC200’s lithium-ion (Li-Ion) battery is sealed in a separate
bag during shipping. Remove th e battery from i ts pack ing befo re
installation.
FC200 Getting Started Guide - TDC-0598-000d 9/16/04 DRAFT
Page 9
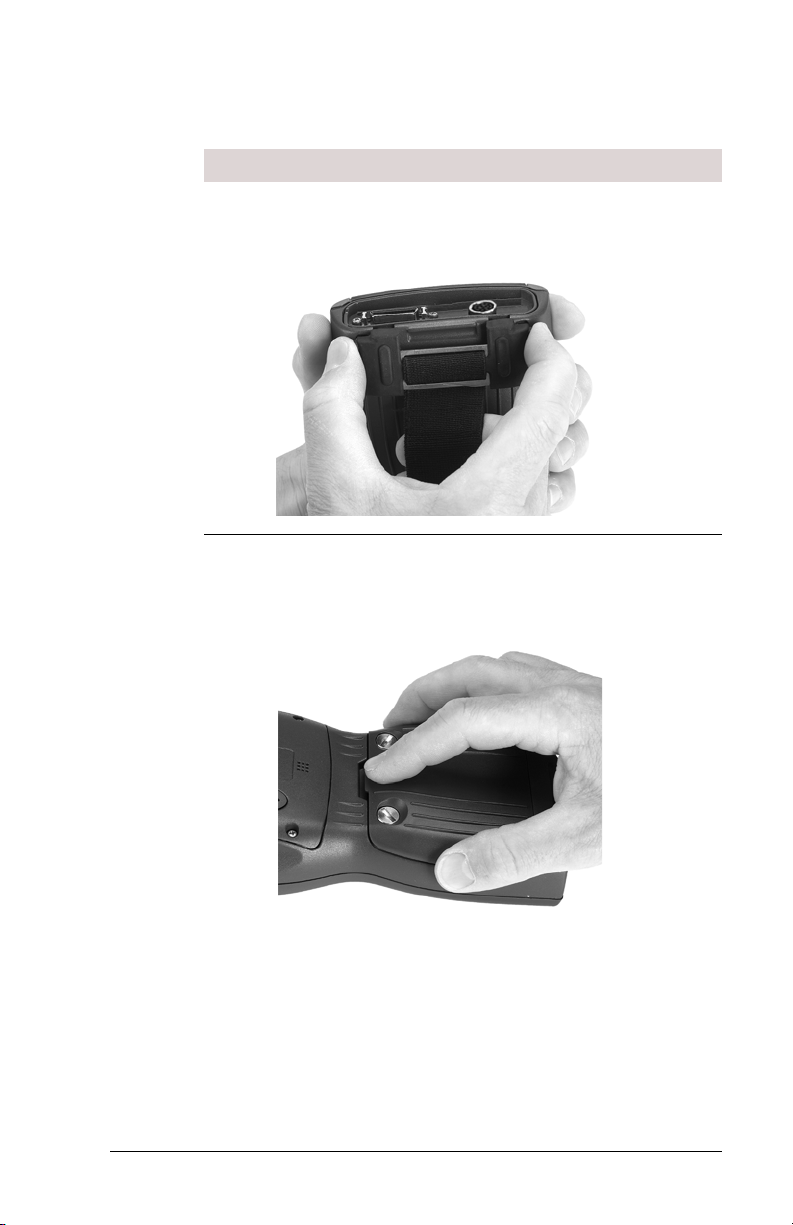
To install the battery pack, follow these steps.
Step Action
1 Remove the FC200’s hand strap by holding the
inverted handheld in one hand and gently pushing the
elastic strap upward and away from the bottom.
2 Place the FC200 face down on a clean surface and
insert the battery into the battery compartment. Press
the top edge of the battery pack firmly to ensure that the
power connector engages securely.
page 5
DRAFT FC200 Getting Started Guide - TDC-0598-000d 9/16/04
Page 10
page 6
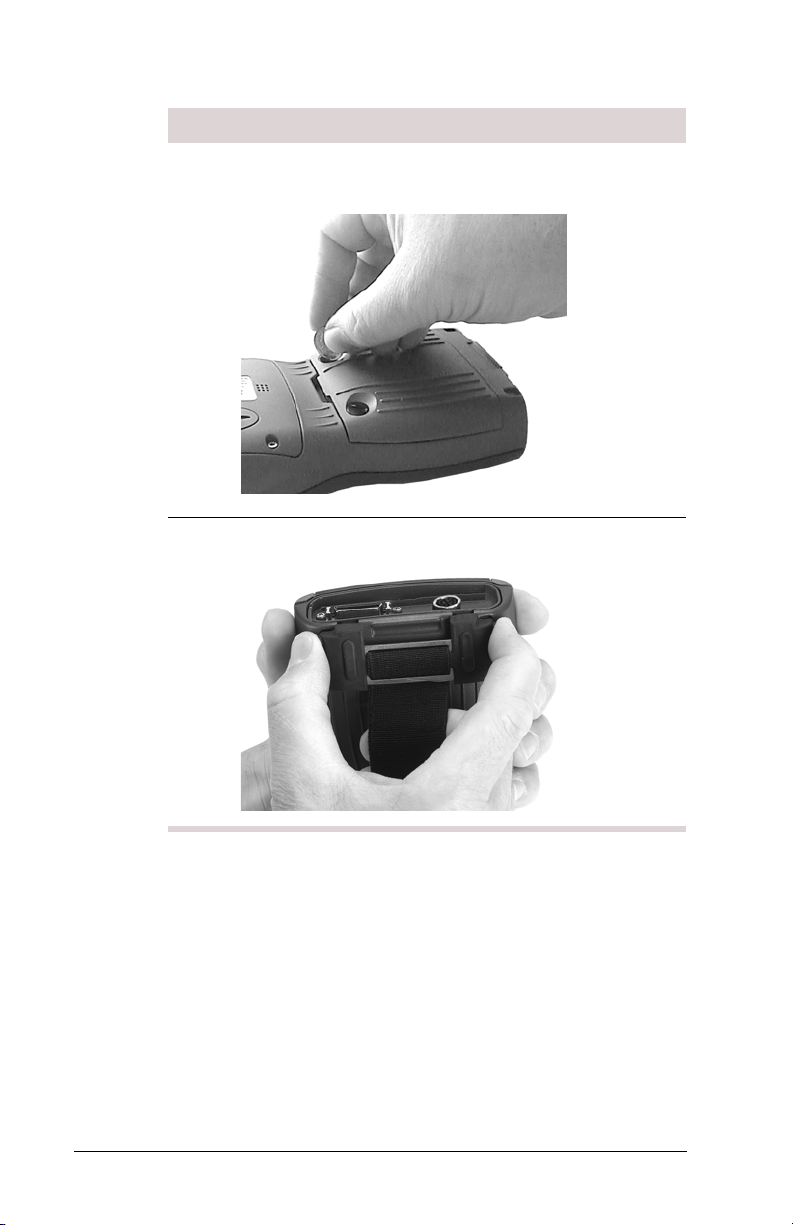
Step Action
3 Tighten the two locking screws clockwise with a flat-
bladed screwdriver or a coin.
4 Reattach the hand strap.
FC200 Getting Started Guide - TDC-0598-000d 9/16/04 DRAFT
Page 11
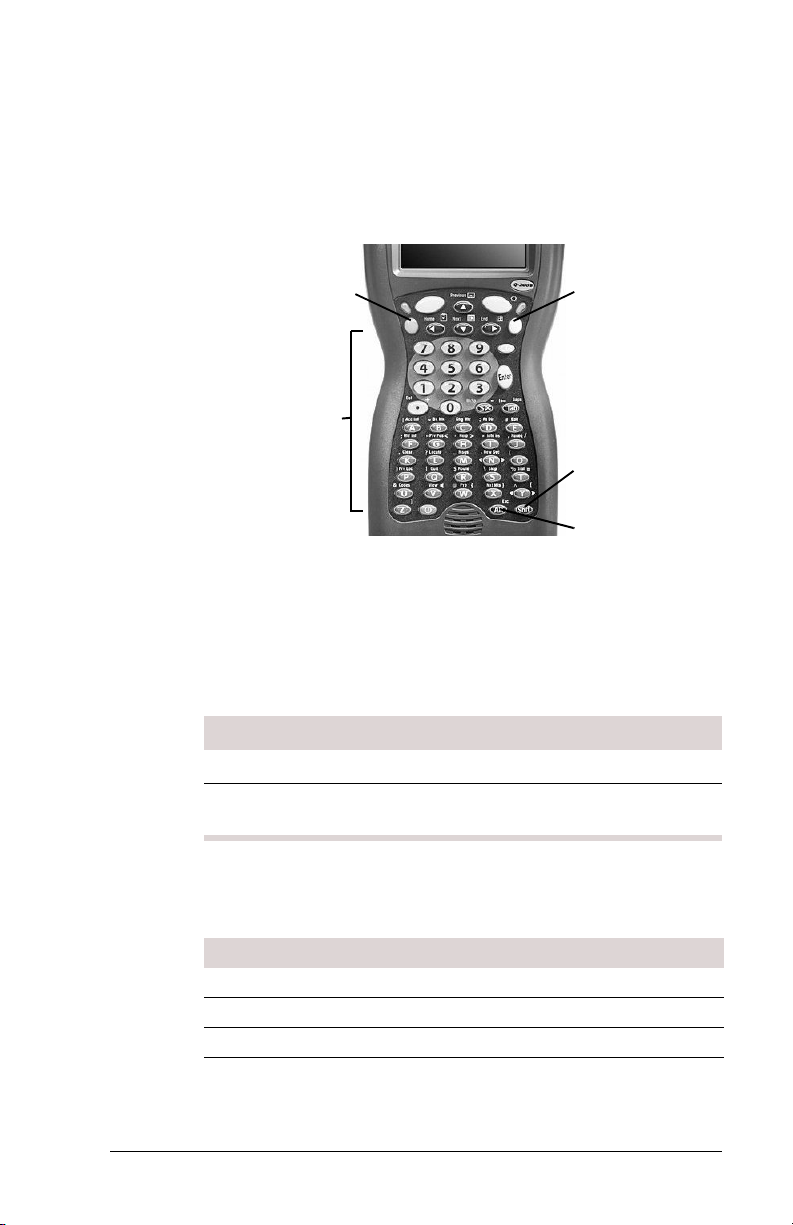
Controls
page 7
The FC200 is equipped with an alphanumeric keypad, cursor
control keys, and special function keys. Other functions are
available via the touch screen (see “Using the S tylus ” on page 10
and “Entering Data” on page 11).
Orange function key
Alphanumeric keys
The
Orange and Blue function (FN) keys are located at the upper-
Blue function key
Shift key
Alt/Esc key
left and upper-right corners of the keypad. These provide access
to the orange and blue characters and functions printed above
each alphanumeric and cursor key.
To access the character or function shown above a key, follow
these steps.
Step Action
1 Press and release the appropriate function key.
2 Press the alphanumeric or cursor key with the desired
character or function printed above it.
The following table summarizes the functions of the keypad’s
keys and key combinations:
Key Default Shft Orange FN Blue FN
A aA|
B bB~ Break
C cC
D dD:
DRAFT FC200 Getting Started Guide - TDC-0598-000d 9/16/04
Page 12

page 8
Key Default Shft Orange FN Blue FN
E eE#
F fF;
G gG“ <
H hH‘ >
I iI* Ins
J jJ, /
K kK.
L lL?
M mM
N nN‘
O oO(
P pP) Pause
Q qQ!
R r R $ Print
S sS\ Scroll
T tT%=
U uU&
V vV enter
W wW@ {
X xX }
Y yY^ [
Z zZ ]
1 1 ! F1 F11
2 2 @ F2 F12
3 3 # F3 F13
4 4 $ F4 F14
5 5 % F5 F15
6 6 ^ F6 F16
7 7 & F7 F17
8 8 * F8 F18
Screen
Lock
Volume
Control*
FC200 Getting Started Guide - TDC-0598-000d 9/16/04 DRAFT
Page 13

page 9
Key Default Shft Orange FN Blue FN
9 9 ( F9 F19
0 0)F10F20
. . (decimal) > Del +
Tab Tab Tab Back Tab Caps
Ctrl enter
Spc Space Space BkSp -
right
Yellow
left Yellow Left Scan Left Scan Left Scan
Enter Enter Enter Enter Enter
Control
Mode
Right Scan Right Scan Right Scan Backlight
enter
Control
Mode
enter
Control
Mode
Lock
enter
Control
Mode
S Up Arrow Up Arrow PgUp
T Down Arrow Down Arrow PgDn
X Right Arrow Right Arro w End Start
W Left Arrow L eft Arrow Home
Alt enter
Pwr Power/
Alt mode
Suspend
enter
Alt mode
Power/
Suspend
enter
Alt mode
Power/
Suspend
Esc
Power/
Suspend
*After entering volume control , press the up- and down-arrows to
change volume.
DRAFT FC200 Getting Started Guide - TDC-0598-000d 9/16/04
Page 14

page 10
Turning the Handheld On and Off
To turn the handheld on using external power, do one of the
following.
• Plug it into an AC electric outlet using the provided AC
adapter. Connect the adapter to the 26-pin COM port on the
bottom of the unit.
Note The AC adapter connector has spring-loaded clips that
keep the adapter attached when the unit is in use. Press in both
clip latches before attaching or removing the AC adapter to
prevent damage to the clips.
OR
• Insert the handheld into an optional cradle.
The unit automatically powers on when external power is applied.
To turn off the handheld, press the power key, or select
Windows logo > Suspend.
To turn the handheld on while using battery power, press the
power key.
Note During initial power-up and after a hard reset, it takes about
two minutes for the operating system to load. Then the software
version momentarily appears, followed by the touch screen calibration screen. If the calibration screen does not appear, see
“Troubleshooting” on page 38.
Using the Stylus
The FC200 stylus is designed to be lightweight, comfortable to
use, and gentle on the touch screen. It is s tored in a s leeve on the
back of the handheld.
To remove the stylus from the sleeve, do this.
FC200 Getting Started Guide - TDC-0598-000d 9/16/04 DRAFT
Page 15

page 11
• Press on the textu red part of the stylus, and push it up and out
of the sleeve.
Note Return the stylus to the sleeve when not in use. If you lose
the stylus, use your finger tip to operate the touch screen until you
can replace the stylus. Of course, a finger tip is less precise than
the stylus and does not work as well.
WARNING! Do not u se a ballpoint pen or ot her sharp-pointed o bject to
operate the touch screen, and do not use excessive f orce when u sing
the stylus—you could damage the screen’s surface.
Replace your stylus when the tip shows wear, when your screen
taps do not register easily , or when the stylus has been used daily
for six months.
Entering Data
You can enter data on the handheld in either of two ways:
• By pressing the appropriate keys on the keypad, using the
arrow keys to move the cursor around the screen.
• By using the input panel. This appears automatically at the
bottom of the screen in some applications when you tap a field
requiring text entry, or you can open it by tapping the keyboard icon in the taskbar.
DRAFT FC200 Getting Started Guide - TDC-0598-000d 9/16/04
Page 16

page 12
To enter data using the input panel, follow these steps.
Step Action
1 Display the input panel by:
• Tapping the field in which you want to enter data
OR
• Tapping the keyboard icon at the bottom of the
screen ( ).
2 Enter the desired data by tapping the appropriate keys
on the input panel.
• To correct a mistake, tap
Backspace ( ) to delete
incorrect characters.
• To display the shifted-character keyboard, tap
• To enter accented characters, tap
áü to display the
accented-character keyboard. Tap áü again to
return to the standard keyboard.
CAP.
3 If the input panel blocks the part of the t he window you
are working with, use the stylus to drag th e panel by its
menu bar out of the way.
4 When you’ve finished using the input panel to enter
data, tap the keyboard icon again to hide it, or your
application may hide it automatically.
FC200 Getting Started Guide - TDC-0598-000d 9/16/04 DRAFT
Page 17

Resetting Your Handheld
If your FC200 locks-up o r fail s to ope rate, yo u may need t o reset
it. You can do this in two ways:
•
Soft Reset A soft reset does not affect the operating system
and no data loss occurs.
•
Hard Reset A hard reset re turns the handheld to its original
configuration—any user-installed applications or data are
lost.
WARNING! When you perform a hard reset, you lose the settings
saved in the operating system, as well as all data stored in RAM.
When you restart, you may have to reenter the time, date, and personal data and recalibrate your touch screen. Because of the extreme
nature of a hard reset, you should consider it an emer gency procedure
only—use a soft reset instead, whenever possible.
To perform a soft reset, do this.
• Hold down the
together for five seconds. The screen dims while the FC200
carries out the soft reset.
To perform a hard reset, do this.
• Hold down the
key together for 10 seconds or until the boot-loader screen
appears.
You may be able to restore your FC200 following a soft or hard
rest using the iRescue program (see “Using iRescue” on page 29).
Orange funct ion key and the Power key
Orange and Blue function ke ys and the Power
page 13
Calibrating the Touch Screen
The first time you turn on the FC200, it automatically runs the
touch screen calibration program.
DRAFT FC200 Getting Started Guide - TDC-0598-000d 9/16/04
Page 18

page 14
To calibrate the touch screen, follow these steps.
Step Action
1 Remove the stylus from its sleeve at the rear of the unit
and follow the on-screen instructions.
Caution Do not use a ballpoint pen or other sharp-
tipped object instead of the stylus—you could damage
the touch screen.
2 When a cross-hairs icon ( ) appears on the screen,
use the tip of the stylus to lightly tap the center of the
cross-hairs.
Note Be careful to accurately locate the tip of the stylus
on the center of the cursor.
The target moves to a corner of the screen.
3 Tap the stylus on the center of the target.
The target moves to another corner.
Repeat this step at each corner.
When calibration is successful, the target vanishes.
4 Tap the screen once or press Enter to accept the cali-
bration settings. Press
FC200 Getting Started Guide - TDC-0598-000d 9/16/04 DRAFT
Esc to cancel the calibration.
Page 19

Note If you make a mistake calibrating the touch screen, you can
run the calibration program again by selecting Windows logo >
Settings > Control Panel > Stylus
Recalibrate
. Recalibration is only necessary to increase the
. Then select Calibration >
accuracy of a previously calibrated touch screen, or to adjust for
“calibration drift” that may occur over time.
Recording Your Owner Information
It is recommended that you finish setting up your FC200 by
setting your owner information, date, and time.
To set your owner information, follow these steps.
Step Action
1 Select Windows logo > Settings > Control Panel >
Owner Properties
.
page 15
2 Press Tab to cycle through the fields, or tap the de sired
field.
The input panel appears at the bottom of the screen (see
“Entering Data” on page 11).
3 Use the input panel or the keypad to enter the desired
information.
4 When you are finished, tap OK to save your owner
information and exit.
DRAFT FC200 Getting Started Guide - TDC-0598-000d 9/16/04
Page 20

page 16
To set the date and time, follow these steps.
Step Action
1 Select Windows logo > Settings > Control Panel >
Date/Time
2 To set the time, tap the parameter you wish to change,
.
such as the hour value, then use the nu meric keyp ad to
change the value.
3 To set the date, tap the month name and select the
desired month from the pop-up menu. Then tap the
desired day.
4 Select your time zone from the dro p-down menu and
Automatically adjust clock for daylight saving, if
check
appropriate.
5 When you are finished, tap OK to save your settings
and exit.
FC200 Getting Started Guide - TDC-0598-000d 9/16/04 DRAFT
Page 21

Controlling the Screen Backlight
y
Several keypad combinations let you turn the screen backlight on
and off and adjust backlight brightness. Control panel settings let
you set the backlight timeout — the length of time the backlight
remains turned on before it automatically goes off.
page 17
Yellow backlight ke
Orange function key
7 key
Blue function key
o key
• To toggle the screen backlight on and off, press and hold the
Blue function key while pressing the right Yellow (backlight)
key.
• To increase backlight brightness, press and hold the
Orange
function key while you press the lowercase o key.
• To decrease backlight brightness, press and hold the
function key while you push
7.
Orange
To set the backlight timeout, follow these steps.
Step Action
1 Select Windows logo > Settings > Control Panel >
Display > Backlight
Note The backlight timeout is enabled by default for
.
both battery power and external power.
2 Select the desired time period from the drop-down lists
for both battery power and external power.
3 Tap OK when finished.
DRAFT FC200 Getting Started Guide - TDC-0598-000d 9/16/04
Page 22

page 18
Batteries
The FC200 uses a rechargeable lithium-ion (Li-Ion) battery pack
as its main power source. The FC20 0 also has an internal b ackup
battery that maintains the unit for up to 24 hours if the main LiIon battery is removed or depleted.
WARNING! Do not try to use any other power source—it may damage
your handheld.
After you install a new Li-Ion battery pack, y ou should char ge the
new battery to 100 percent capacity before using it. This takes
about three and a half hours. This ensures that its power gauge
calculations will be correct. Frequent incomplete charges lead to
progressively larger errors that only a full charge will rectify.
The internal backup battery’s charge is automatically topped up
by the main battery whenever the FC200 is turned on. If the
backup battery is used due to a fully depleted or removed main
battery, you should charge the FC200 for a full eight hours to
ensure that the internal backup battery is fully charged.
To ensure data integrity, keep the main battery charged and save
important data in nonvolatile memory, such as on a CompactFlash
card.
Whenever you are working near an AC power outlet, use the
FC200 with its AC adapter to conserve the battery pack’s char ge.
The AC adapter keeps the battery pack topped-up and supplies a
maintenance charge to the backup battery.
If possible, charge your battery pack at the end of every working
day. Proper charging keeps both your main and backup batteries
in good condition.
If the backup battery becomes fully discharged, install a new
main battery or attach the AC adapter as soon as possible. The
backup battery typically rechar ges in eight hou rs, although it may
take longer if the surrounding temperature is extremely hot or
cold.
WARNING! If the main battery has been out of the handheld for an
extended period of time and becomes fully discharged or dead, the
backup battery will only last 24 hours. The unit will perform a hard
reset the next time power is supplied from either AC power or a new
battery. A hard reset results in loss of data and custom programs.
FC200 Getting Started Guide - TDC-0598-000d 9/16/04 DRAFT
Page 23

If you do not intend t o us e you r h andheld for an extended period
of time, back up all important data in nonvolatile memory, such
as on a CompactFlash card.
Checking the Batteries
To check the batteries, do this.
• Select
Windows logo > Settings > Control Panel > Power >
Battery
.
page 19
Main Battery Status
The battery level reading shows the current charge status of the
main battery . If the status is shown as critical, rechar ge or repl ace
the battery immediately. For best results, use external power
whenever available and charge your battery at the end of each
work day.
If you turn the handheld of f befor e replacing th e battery, you will
not lose its Windows registry or data held in memory.
The backup battery’s charge status is not displayed because it is
constantly charging.
DRAFT FC200 Getting Started Guide - TDC-0598-000d 9/16/04
Page 24

page 20
Battery Conservation
To conserve power when on battery power only, you can set the
FC200 to switch itself off (suspend) automatically when not in
use. You can also specify how long it waits before switching off.
The default setting is three minutes when the handheld is using
battery power and five minutes when it is using external power.
To change the suspend timeout, follow these steps.
Step Action
1 Select Windows logo > Settings > Control Panel >
Power
> Schemes.
2 Select the desired power scheme, then select a suspend
time.
Charging the Battery
Use only the AC adapter or vehicle charger supplied with your
FC200.
To charge the battery, follow these steps.
Step Action
1 Connect the AC adapter or vehicle charger to a suitable
power supply.
FC200 Getting Started Guide - TDC-0598-000d 9/16/04 DRAFT
Page 25

page 21
Step Action
2 Plug the FC200’ s char ging adapter in to the handheld’s
26-pin COM port.
26-pin
COM port
Note The AC adapter connector has spring-loaded
clips that keep the adapter attached when the unit is in
use. Press in both clip latches before attaching or
removing the AC adapter to prevent damage to the
clips.
The battery pack may take up to three hours to fully recharge.
Make sure the pack is fully recharged so the battery gauge calculations will be accurate.
Charging status is indicated by the regular flashing of the green
LED, located in the upper-left corner of the handheld’s numeric
keypad. When the battery pack is fully charged, the green LED
remains lit constantly.
Note If the LED flashes irregu larly, a charging error has occurred .
Contact an Itron technical support representative.
DRAFT FC200 Getting Started Guide - TDC-0598-000d 9/16/04
Page 26

page 22
Replacing the Battery Pack
WARNING! Do not try to open, puncture, or burn the battery pack. It
can burst or explode, releasing hazardous chemicals. Replace or
maintain your battery pack as described in this guide.
To replace the battery pack, follow these steps.
Step Action
1 Exit all programs and turn off the handheld.
Caution If you do not first turn off the computer, you
will lose all its data.
2 Remove the hand strap by pulling the lower clip down
and out of its recess.
3 Release the two battery retaining screws by turning
them counterclockwise.
4 Remove the old battery pack using a coin or fl at-bladed
screwdriver.
5 Place the new battery pack in position, and press down
firmly.
6 Lock the battery retaining screws by turning them
clockwise.
7 Refit the hand strap.
FC200 Getting Started Guide - TDC-0598-000d 9/16/04 DRAFT
Page 27

WARNING! Use only th e same brand of Li-Ion battery pac ks as the one
originally shipped wit h your FC200. The ha ndheld is not designed to
work with any other kind of battery. Use of non-approved batteries
can damage the handheld and may be hazardous.
Battery Safety Instructions
• Replace the battery pack only with another Itron-approved
battery pack.
• Follow the manufacturer’s recommendations and local regulations when disposing of or recycling used batteries.
• Do not subject the battery to abuse, piercing, or excessive
impact.
• Immediately discontinue use of the battery if it looks
abnormal in any way, and consult an Itron technical support
representative for advice.
• Do not immerse the battery pack in liquid.
• Do not subject the battery pack to temperatures higher than
140° F (60° C).
• Do not short-circuit the battery pack by connecting its terminals. Do not store the battery pack with metallic objects that
might accidentally cause a short circuit.
• Battery chemical leakage is harmful. In the unlikely event of
battery leakage, do not touch the leaked chemicals.
In case of accidental contact, wash the affected area immediately with running water and seek medical advice. In case of
accidental ingestion, seek immediate medical attention.
• Keep batteries out of the reach of children.
page 23
Battery Storage
Li-Ion battery packs gradually deteriorate, par ticularly if they are
not stored in ideal conditions.
When storing Li-Ion battery packs, keep these points in mind:
• Fully charged packs deteriorate faster than partly discharged
ones. For ideal storage, charge the packs to 100 percent
capacity, then discharge them to 50 percent before storing
them.
• Do not allow st ored b attery packs to dischar g e completely, as
this may permanently damage them. Follow a regular maintenance charge policy for stored packs.
DRAFT FC200 Getting Started Guide - TDC-0598-000d 9/16/04
Page 28

page 24
• Avoid storing packs at temperatures greater than 86° F
(30° C), as this hastens self-discharge and shortens battery
life.
• Storing packs at temperatures near 32° F (0° C) retards selfdischarge and b attery aging, so bat teries being stored f or long
periods are best kept near freezing.
• If you store battery packs at normal ambient temperatures,
follow these guidelines to help maintain battery pack condition:
– Charge installed packs every 21 days to maintain their
charge capacity.
– Charge uninstalled packs every six months.
• When you bri ng an FC200 out of s torage, charge i t for at least
eight hours so that both the main battery pack and the internal
backup battery are fully charged.
Caring for Your FC200
Your FC200 handheld is rugged and waterproof. However, you
should take the following precautions to ensure that it gives you
many years of reliable service.
• Avoid unnecessarily subjecting the handheld to extreme temperature, such as leaving it in a vehicle in bright sunlight.
• Avoid leaving it in damp or dusty places.
• Do not use hard or sharp objects on the touch screen. The
FC200 uses a plastic-over-glass LCD (display screen) to
provide the best display clarity. The screen is well-protected
against falls onto flat surfaces, but it can still be damaged if
struck directly or scratched by a sharp object.
• Avoid dropping your handheld or subjecting it to to severe
impacts.
• Do not apply excessive pressure to the touch screen, which
can cause it permanent damage.
• If you carry your handheld in a carrying case or with other
items, make sure the touch screen is protected against
scratching and other damage.
• Use only a soft, dry cloth to remove dust and dirt.
WARNING! Never use solvents of any kind on the case, keypad, or
display screen.
FC200 Getting Started Guide - TDC-0598-000d 9/16/04 DRAFT
Page 29

Cleaning Your FC200
When the screen of your FC200 gets dusty or mildly dirty, try
wiping it with a dry, clean cloth.
T o clean a very dirty comput er, when wipi ng with a dry clot h fails
to clean it, follow these steps.
Step Action
1 Make sure the battery is correctly installed and that the
battery compartment is sealed against moisture. If you
have dropped the handheld, make sure the case is
intact.
2 Wipe the handheld’ s case and s creen with a damp cloth.
3 Wipe the screen with a dry cloth.
4 To remove stubborn deposits, use a soft-bristle brush.
Treat the screen and keypad gently.
5 Blow any water out of the connectors, and then leave
the handheld to drain and air-dry.
Do not expose it to temperatures above 1 40° F (60° C).
page 25
WARNING! Never use solvents of any kind on the case, keypad, or
display screen.
Storing Your FC200
To store your FC200 (two weeks or less), follow these steps.
Step Action
1 Install the battery pack, connect the FC200 to external
power, and allow the battery pack to fully charge.
The Charge Status LED will flash at one-second
intervals when charging and will be on solid whe n
charging is complete.
2 Remove external power, exit all applications, turn off
the unit, and place it in storage.
Upon removal from storage, the battery pack will require a charge
(see “Charging the Battery” on page 20). Any programs and data
in SDRAM will be retained.
DRAFT FC200 Getting Started Guide - TDC-0598-000d 9/16/04
Page 30

page 26
To store the FC200 for longer than two weeks, first remove the
battery pack and store it separately (see “Battery Storag e” on
page 23).
Using Your FC200 Safely
Y our F C200 is er gonomically desi gned for safe, comfo rtable use.
However, as with all equipment, you should follow good working
practices while using it.
Some people experience discomfort while using computers. If
ignored, this discomfort can lead to Repetitive Stress Injury (RSI),
which is also known as cumulative trauma disorder or repetitive
motion injury.
Minimize the risk by following these guidelines:
• Maintain good posture while using the handheld. Keep your
fingers and body relaxed whenever possible.
• Avoid keeping your muscles tense for long periods. Change
tasks often to avoid prolonged muscle strain. Support the
handheld while using it.
• Reduce eyestrain by adjusting the backlight to suit your
working environment. Look away from the screen periodically and focus your eyes on distant objects. Have your eyes
checked regularly.
• Take frequent short breaks. Use these breaks to exercise the
muscles in your hands, arms, shoulders, neck, and back.
CompactFlash Cards
The FC200 has a user-accessible CompactFlash card slot. Files
stored on CompactFlash cards can be created, deleted, moved,
and modified in exactly the same way as files stored in the
handheld’s memory . However , unlike data in the memory, files on
CompactFlash cards are not lost when you reset the computer.
Using CompactFlash Cards
The FC200 can use Type 1 CompactFlash cards for secure data
storage. User-installed application programs and associated data
files on a CompactFlash card are not lost after a hard reset.
Note Do not operate the FC200 without its CompactFlash card.
FC200 Getting Started Guide - TDC-0598-000d 9/16/04 DRAFT
Page 31

The CompactFlash socket is located in a recess under the
handheld’ s battery . You must remove the battery to gain access to
the card. Because the battery compartment is waterproof and
secured by screws, it should not be opened where there is a risk
that moisture, dust, or dirt could get in.
Installing a CompactFlash Card
WARNING! The handh eld’ s o perating system resides on the C ompact-
Flash card provided with it. You will lose the OS if you remove the
card or replace it with a card that does not have the OS.
To install a CompactFlash card, follow these steps.
Step Action
1 Back up your data (see “Using iRescue” on page 29).
2 Remove AC power and turn off the handheld.
3 Remove the battery pack (see “Replacing the Battery
Pack” on page 22).
4 Remove the CompactFlash card stop, the small plastic
piece that holds the card in place.
page 27
5 Carefully insert the CompactFlash card into the socket,
label side up.
6 Replace the CompactFlash card stop.
7 Refit the battery pack and tighten the two retaining
screws.
DRAFT FC200 Getting Started Guide - TDC-0598-000d 9/16/04
Page 32

page 28
Step Action
8 Perform a soft reset (see “Resetting Your Handheld” on
page 13).
Accessing Files on the CompactFlash Card
To access files on the CompactFlash card, do this.
• From the Windows desktop, select
CompactFlash
.
My Computer > System >
Peripherals
The FC200 supports a range of peripherals, including TOU
probes, water probes, and external barcode scanners. Contact
your Itron customer service representative for a full list of supported peripherals.
WARNING! Connect only approved cables and peripherals to your
handheld.
T o connect a peripheral to one of the FC200’ s COM ports, follow
these steps.
Step Action
1 Connect the peripheral cable to the the peripheral (if
detached).
2 Connect the peripheral cable to the handheld.
3 Switch on both the handheld and the peripheral.
When using a peripheral with the FC200’s infrared (IR) COM
port, Make sure the handheld’s IR window at the bottom of the
unit is pointing at the peripheral’s IR port and that the units are
separated by at least 6 inches (15 cm).
FC200 Getting Started Guide - TDC-0598-000d 9/16/04 DRAFT
Page 33

Using iRescue
The iRescue program lets you back up and restore the contents of
the FC200's files and registry. Use iRescue to:
• Clone program settings and files from one device onto other
devices.
• Restore data if the FC200's battery is drained completely
before a recharge
• Restore data following a reset.
• Restore data if files or settings were unintentionally modified
or deleted, causing a device malfunction or data loss.
The program saves backup data onto the FC200's removable
storage media, such as a CompactFlash card.
To start iRescue, do this.
• Select the iRescue icon ( ) in the taskbar or select
Windows logo > Programs > iRescue.
page 29
Note To view version information, tap About.
DRAFT FC200 Getting Started Guide - TDC-0598-000d 9/16/04
Page 34

page 30
FC200 Backups
Use iRescue to perform full backups of all handheld files and
applications.
To perform a full backup of the FC200, follow these steps.
Step Action
1 Close all other pr ograms. If any prog rams ar e runni ng,
2 Select the iRescue icon ( ) in the taskbar or select
3 Select the Backup tab.
4 Tap Settings and choose a backup destination from the
5 Tap OK.
6 Tap Backup to begin the backup.
iRescue prompts you to close them.
Windows logo > Programs > iRescue.
Location drop-down list. This list shows all removable
storage media on the handheld.
Information about each completed file or error status
appears in the Backup status b ox and the Custom S tatus
LED flashes red and green altern ately duri ng th is oper ation.
Backup Settings
Y ou can change the s ettings iRescue uses to back up the handheld ,
including:
• The maximum number of backups iRescue saves
• Whether or n ot iRescue performs automatic backups when th e
handheld’s battery charge gets low
• Whether or not iRescue automatically deletes the oldest
backup to avoid exceeding the maximum number of backups
• The frequency of automatic backups
FC200 Getting Started Guide - TDC-0598-000d 9/16/04 DRAFT
Page 35

To change iRescue’s backup settings, follow these steps.
Step Action
1 From the iRescue Backup tab page, tap Settings.
2 From the Location drop-down list, select the backup
location.
page 31
3 In the Maximum Number of Stored Backups box, specify
how many backups the program is allowed to keep.
Note If the number of backups is exceeded, iRescue
prompts the user to delete one or more of the existing
backups before performing a new backup.
4 Y ou can set iRescue to automatically perfo rm a backup
when the battery charge level drops to 10 percent.
• Select
Automatic Backup on Battery Low Event to
enable this feature.
OR
• Clear the check box to disable it.
DRAFT FC200 Getting Started Guide - TDC-0598-000d 9/16/04
Page 36

page 32
Step Action
5 You can set iRescue to automatically delete the oldest
backup to free up space for the nex t backup if either of
the following is true:
– The maximum number of backups will be
exceeded by the next backup.
– The handheld does not have enough space for
the next backup.
Do one of the following:
• Select the
Auto-discard oldest backup… check box to
enable this feature.
• Clear the check box to disable it.
Note If this option is not checked, the automatic
backup on low battery only occurs if the maximum
number of backups is not exceeded and there is enough
space for the backup.
6 Tap Schedule . . and select a daily, weekly, or monthly
automatic backup schedule.
Note During an automatic backup, whether scheduled or battery-
level initiated, iRescue neither closes nor saves running applications. This does not appl y to user-initiated backups, for which
iRescue prompts you to close other running applications.
Viewing and Deleting Backup Files
The Manage dialog box lets you:
• View all available backups on all removable storage media
present on the device.
• Delete selected backups.
To display the Manage dialog box, follow these steps.
Step Action
1 From the iRescue Backup tab page, tap Manage.
The Manage dialog box appears, listing all available
backups.
2 To delete a backup file from the list, select it, then tap
Delete.
FC200 Getting Started Guide - TDC-0598-000d 9/16/04 DRAFT
Page 37

Restoring Handheld Data from a Backup
The Restore tab page lets you restore your FC200’s data from a
backup.
To restore handheld data from a backup, follow these steps.
Step Action
1 Open iRescue and select the Restore tab.
2 Select a backup file from the Select Date drop-down li st.
This displays all available backups from each of the
removable storage media. The tree view displays the
contents of the selected backup.
3 Double-tap the Files item to view a list of folders and
files contained in the backup.
4 By default, and each time a different backup is
selected, all files and folders are selected for restoration.
To restore only selected files, clear files that you do not
want to restore.
5 Tap the Restore button to restore the selected files and
registry settings.
page 33
Installing Microsoft ActiveSync
ActiveSync is a Microsoft utility that lets you share and update
information between your handheld and a desktop computer
running Microsoft Windows.
Four connection options are available on the FC200, to suit the
capabilities of your desktop computer:
• Serial (COM1)
•USB (COM1 only)
• Wireless infrared
• Ethernet (COM1 only—requires a partnership before use)
Note An Ethernet connection requires an optional RJ-45 dongle
or Desk Mount. These accessories are not supplied with your
FC200.
DRAFT FC200 Getting Started Guide - TDC-0598-000d 9/16/04
Page 38

page 34
To use Microsoft ActiveSync to connect the handheld to a
desktop computer, follow these steps.
Step Action
1 Download the latest version of the ActiveSync
software from the following Internet site:
http://www.itronix.com/Q-200ActiveSync
…and install it on your desktop computer.
Once ActiveSync is installed, its icon ( ) appears in
the Windows system tray.
2 Click the ActiveSync icon. Choose Connection Set-
, and make sure the connection method you want
tings
to use is enabled.
3 Attach the appropriate cable or line up the infrared
ports on both the FC200 and desktop computer.
Note When using a USB connection, connect the 26-
pin cable connector to COM1 on your handheld first,
then connect the USB connector to your desktop computer.
4 Turn on the handheld. ActiveSync should automati-
cally start connecting.
When a connection is established, the handheld
chimes, and the ActiveSync New Partnership window
appears on the desktop computer.
FC200 Getting Started Guide - TDC-0598-000d 9/16/04 DRAFT
Page 39

Step Action
5 Under Would you like to set up a partnership? select
No, then click Next.
6 Follow the instructions shown on your screen to com-
plete the installation.
FC200 Best Practices
The following recommendations are intended to help maximize
the service life of your FC200 and resolve problems you might
experience.
Daily Operation
Perform the following tasks each day of handheld operation.
• Inspect the handheld for broken, loose, or missing parts and
fasteners, taking corrective action as required.
• Make sure all application s are closed, and perfor m a soft reset
at the beginning of each work day (see “Resetting Your
Handheld” on page 13).
• Make sure the computer is o perated and stored within the recommended temperature range.
– Operating temperature: -4° F to 14 0° F (- 20° C to 60° C )
– Storage temperature -67° F to 167° F (-55° C to 75° C)
• Conserve battery pack ener gy when possib le to maximize
battery life during daily use.
– Select
– Shallow or partial discharge and charge cycles are pre-
• Avoid prolonged exposure to temperature extremes.
– Cold temperature extremes may result in reduced
– Exte nded expos u re to warm temperature extremes can
– Charging is disabled below 32° F (0° C) and abo ve 11 3° F
Windows logo > Settings > Contol Panel > Power >
Status
to view the battery level.
ferred, compared to draining the battery pack completely
and recharging it. Charging after a shallow or partial discharge will not degrade battery pack life or performance.
available energy from the battery pack. This energy is
recoverable as the battery pack warms to 68° F (20° C).
result in permanent reduction in available ener gy from the
battery pack.
(45° C) to protect the lithium-ion batteries in the pack.
page 35
DRAFT FC200 Getting Started Guide - TDC-0598-000d 9/16/04
Page 40

page 36
• Temperature and direct sunlight can affect the LCD.
– Cold temperature may cause the LCD refr esh rate to seem
sluggish and affect contrast. At about 40° F (4° C) the
LCD refresh rate change may be noticeable, depending on
the activity in process.
– Extended exposure to direct sunlight may cause the LCD
contrast to darken. Use the backlight adjustment keys to
optimize visibility.
• Exit all applications at the end of each work day.
– This ensures that all applications, and system resources
used by those applications, are reinitialized when the
program is started the next day.
– Unless an application is specifically designed for 24/7
operation, the daily practice of restarting (resetting) an
application can minimize the potential for a wide variety
of operational anomalies, which may be mistaken for
hardware failure.
Power Management
• Avoid changing battery suspend timeout settings. Extending
or disabling the timeout will increase power consumption and
reduce operational time on battery power.
• Avoid changing backlight timeout settings. Extending or dis-
abling the backlight timeout will increase power consumption
and reduce operational time on battery power.
• Power off manually when not using the computer for
extended periods to conserve battery power.
• RF devices can consume battery power unnecessarily when
not in use. Disable RF devices when not in use.
• A serially connected device may be powered by th e FC200. It
is best to exit the application pr ior to powering o ff. Rest arting
the application should reinitialize the device. Peripherals
using FC200 battery power may result in reduced FC200
operational run times.
File Management
• Data or files stored in volatile memory (SDRAM) are lost
during a hard reset. Back up essential data and files periodically.
• Periodically perform housekeeping of files:
– Uninstall unused drivers and applications.
FC200 Getting Started Guide - TDC-0598-000d 9/16/04 DRAFT
Page 41

– Delete unneeded files and clean up folders.
Charging
• Charge the handheld at room temperature (approximately
68° F/20° C) for best charge results.
• Charge the handheld at the end of each work day (see
“Charging the Battery” on page 20).
• At the beginning of each work day check the charge status
(see “LED Status Indicators” on page 3).
• During each work day, connect the handheld to external
power whenever possible.
FC200R Best Practices
• Hold the device 8 inches (20 cm) away from your body when
transmitting.
• Radio reads are best captured while you are walking during
radio communications.
• Hold the FC200R so the radio antenna is vertical (upright).
page 37
DRAFT FC200 Getting Started Guide - TDC-0598-000d 9/16/04
Page 42

page 38
Troubleshooting
If you have a problem with your FC200, review the appropriate
troubleshooting steps, as follows. After that, if you still have not
resolved the problem, contact an Itron customer service representative.
Handheld will not turn on or stops running
• Check the battery pack, try a different pack, or try operating
from the AC adapter.
• If you drop you r handheld and it stops operating, try swi tching
it off and on. Make sure the battery pack is connected correctly.
WARNING! The FC200 contains no user-serviceable parts, and high
voltages may be present. Do not try to open it. Opening its case will
void your warranty.
Battery does not charge
• Verify the connection and power to the charger.
• Check the char ger connection to th e handheld, and make sure
the handheld detects external power. The FC200 should
power on when connected to external power, and the Charge
Status LED should flash.
• Check the battery information in the Power Properties dialog
box (select
Power
). Make sure there are no errors or anomalies. If the
screen reports any failures, replace the battery pack.
Windows logo > Settings > Control Panel >
Battery does not last
• Ensure that the battery indicates a full charge following an
overnight charge (solid green Charge Status LED).
• Select
• If the battery does not last following a full charge, replace it
FC200 Getting Started Guide - TDC-0598-000d 9/16/04 DRAFT
Windows logo > Settings > Control Panel > Power >
Battery
number of cycles on the battery pack. T ypical useful life o f the
FC200 battery pack is betw een 300 and 50 0 charg e/dischar ge
cycles. When the battery has reached 70 percent of its original
capacity, it should be replaced.
with a new battery.
to view battery pack information, including the
Page 43

page 39
Lockups
1 Determine if touch screen or keypad inputs are recognized.
2 Try to recalibrate the touch screen. Select Windows logo >
Settings > Control Panel > Stylus > Calibration > Recalibrate
3 If touch screen recalibration does not resolve the issue, close
all applications. Then restart the applications and try the specific operation again.
4 If restarting applications does not resolve the issue, connect
external power. Perform a soft reset (see “Resetting Your
Handheld” on page 13).
5 If all else fails, perform a hard reset (see “Resetting Your
Handheld” on page 13).
RF communication
1 If coverage is historically good at this location, check the
signal strength. Reposition the computer slightly to increase
signal strength. Wait about five minutes. Determine if there is
RF activity.
2 If the problem is not resolved, exit all applications, restart the
applications, and try RF communications again.
3 If the problem is still not resolved, connect external power and
perform a soft reset. Restart applications and try RF communications again.
.
Infrared communication
• If the peripheral has a protective cap covering its IR port,
remove it.
• If necessary, switch the peripheral off, then on again, to initiate communications.
• Separate the two units by a slightly larger or smaller distance
and try again.
ActiveSync communication
• If you have trou ble con necting, make sure t he PC connecti on
setting on the handheld matches the setting on the desktop
computer.
T o chang e the set ting o n your handheld , select
> Settings > Control Panel > PC Connection
by default.
DRAFT FC200 Getting Started Guide - TDC-0598-000d 9/16/04
Windows logo
. It is set to USB
Page 44

page 40
• For detailed information about using Microsoft ActiveSync,
see the program’s online help, or the Microsoft ActiveSync
product website.
AC Power Adapter
Caution Read the following instructions before using the AC
power adapter.
WARNING! The adapter contains hazardous voltages. It contains no
user-serviceable parts. Do not try to open it.
• Use the adapter indoors only.
• Avoid spilling liquid on the adapter. Do not connect it if it is
damp.
• Ensure ventilation around the adapter is not restricted while it
is in use.
• Use only the specific AC adapter supplied. Do not substitute
an alternative or unapproved type—this may damage the
FC200 and void the warranty.
• Inspect the AC adapter before use. Do not use it if there are
any signs of damage or deterioration.
• Make sure all connectors are firmly connected.
• Avoid mechanical strain to cables and connectors.
• Make sure the green LED is illuminated while the adapter is
in use.
• In the event of overloading, the AC adapter is designed to be
fail-safe and may stop functioning.
• Do not try to use the AC adapter to power any other
equipment.
• Avoid use in dusty, damp, or contaminated environments.
FC200 Getting Started Guide - TDC-0598-000d 9/16/04 DRAFT
Page 45

Electromagnetic Compatibility
Only approved accessories may be used with this equipment. In general, all
cables must be high qua lity, shielded, correctly terminat e d , an d normally
restricted to two meters in length. FC200 AC adapters employ special provisions to avoid radio interference and should not be altered or substituted for.
Unapproved modifications or operations beyond or in conflict with these
instructions for use may void authorization to operate the equipment.
Europe
This product complies with the radio interference protection requirements of
the Council Directive 89/336/EC on the approximation of the laws of the
Member States of the European Union relating to electromagnetic compatibility. The product was tested in a typical configuration and found to conform
to the following test specifications:
EN55022: Radiated and conducted emissions, Class B.
EN55024: ESD and radiated and conducted immunity.
For further compliance details, refer to the specific CE Declaration Of Con-
formity. This is available on request. Please quote the exact and full model
number for the product(s) in question.
USA
RADIO INTERFERENCE, FCC Statement
NOTE: This equipment has been tested and found to comply with the limits
for a Class B digital device, pursuant to Part 15 of the FCC Rules. These limits
are designed to provide reasonable protection against harmful interference in
a residential installation. This equipment generates, uses, and can radiate radio
frequency energy and, if not installed and used in accordance with the instructions, may cause harmful interference to radio communications. However,
there is no guarantee that interference will not occur in a particular installation.
If this equipment does cause harmful interference to radio or television
reception, which can be determined by turning the equipment off and on, the
user is encouraged to try to correct the interference by one or more of the following measures:
• Reorient or relocate the receiving antenna.
• Increase the separation between the equipment and the receiver.
• Connect the equipment to an outlet on a circuit different from that to
which the receiver is connected.
• Consult the dealer or an experienced radio/TV technician for help.
To insure FCC regulatory compliance, only the antenna supplied by Itron for
the FC200/FC200R should be used with the device.
Changes or modifications not expressly approved by the party responsible for
compliance could void the user’s authority to operate the equipment.
Canada
English
This digital apparatus does not exceed class B limits for radio noise emissions
from digital apparatus set out in the Radio Interference Regulations of the
Canadian Department of Communications, standard ICES-003.
Français
Avis de conformité‚ aux normes du Ministère des Communications du
Canada.
Le présent appareil numérique n’émet pas de bruits radioélectriques dépassant
les limites applicable aux appareils numériques de classe B préscrites dans le
Règlement sur le brouillage radioélectrique édicté par le Ministère des Communications du Canada, NMB-003.
page 41
DRAFT FC200 Getting Started Guide - TDC-0598-000d 9/16/04
 Loading...