


C
5
HAPTER
Diaphragm Meter Installation
This chapter provides the instructions to install Remote 2.4GZ OpenWay Remote Mount
Gas Modules (Itron part number OWG-5001-501 and OWG-5002-501 with 2.5 foot cable
and encoder) on the diaphragm gas meters where a direct mount endpoint is not possible.
Reference the Itron Gas Endpoint Meter Compatibility List (PUB-0117-002 or the 2.4GZ
OpenWay Remote Mount Gas Module Meter Compatibility List on page 3 for compatible
diaphragm meters.
Tools and Materials Supplied By You
Note 2.4GZ OpenWay Remote Mount Gas Module installation to a diaphragm
meter may require additional tools and materials over those listed in Installation
Prerequisites on page 7.
The following user/installer-supplied tools and materials are required to install, program,
and check the 2.4GZ OpenWay Remote Mount Gas Module:
• Medium flat-blade screwdriver for band clamps.
• Medium flat-blade, torque-measuring screwdriver for screws to attach adapter plates
to pipe brackets and screws to attach endpoints to adapter plates. (Use torque
measured 9 to 12 inch-pounds.)
• Medium Philips screwdriver to attach endpoints to flat surfaces
• Pliers to secure cable ties.
• Side-cutting pliers or similar tool for removing excess cable tie ends.
• 1/4" nut driver or other blunt tool for seating endpoint tamper seals.
• FC200SR handheld with Endpoint-Link or Endpoint-Link Pro (version 5.3 or higher)
for programming and checking endpoints.
• 1" putty knife or similar tool to remove old gasket material from the meter and index
cover.
• Replacement temperature compensation (TEMP COMP) meter index stickers (if
required).
TDC-0838-000 2.4GZ OpenWay Gas Module Installation Guide - Remote Mount 53
Chapter 5 Diaphragm Meter Installation
Materials Available from Itron
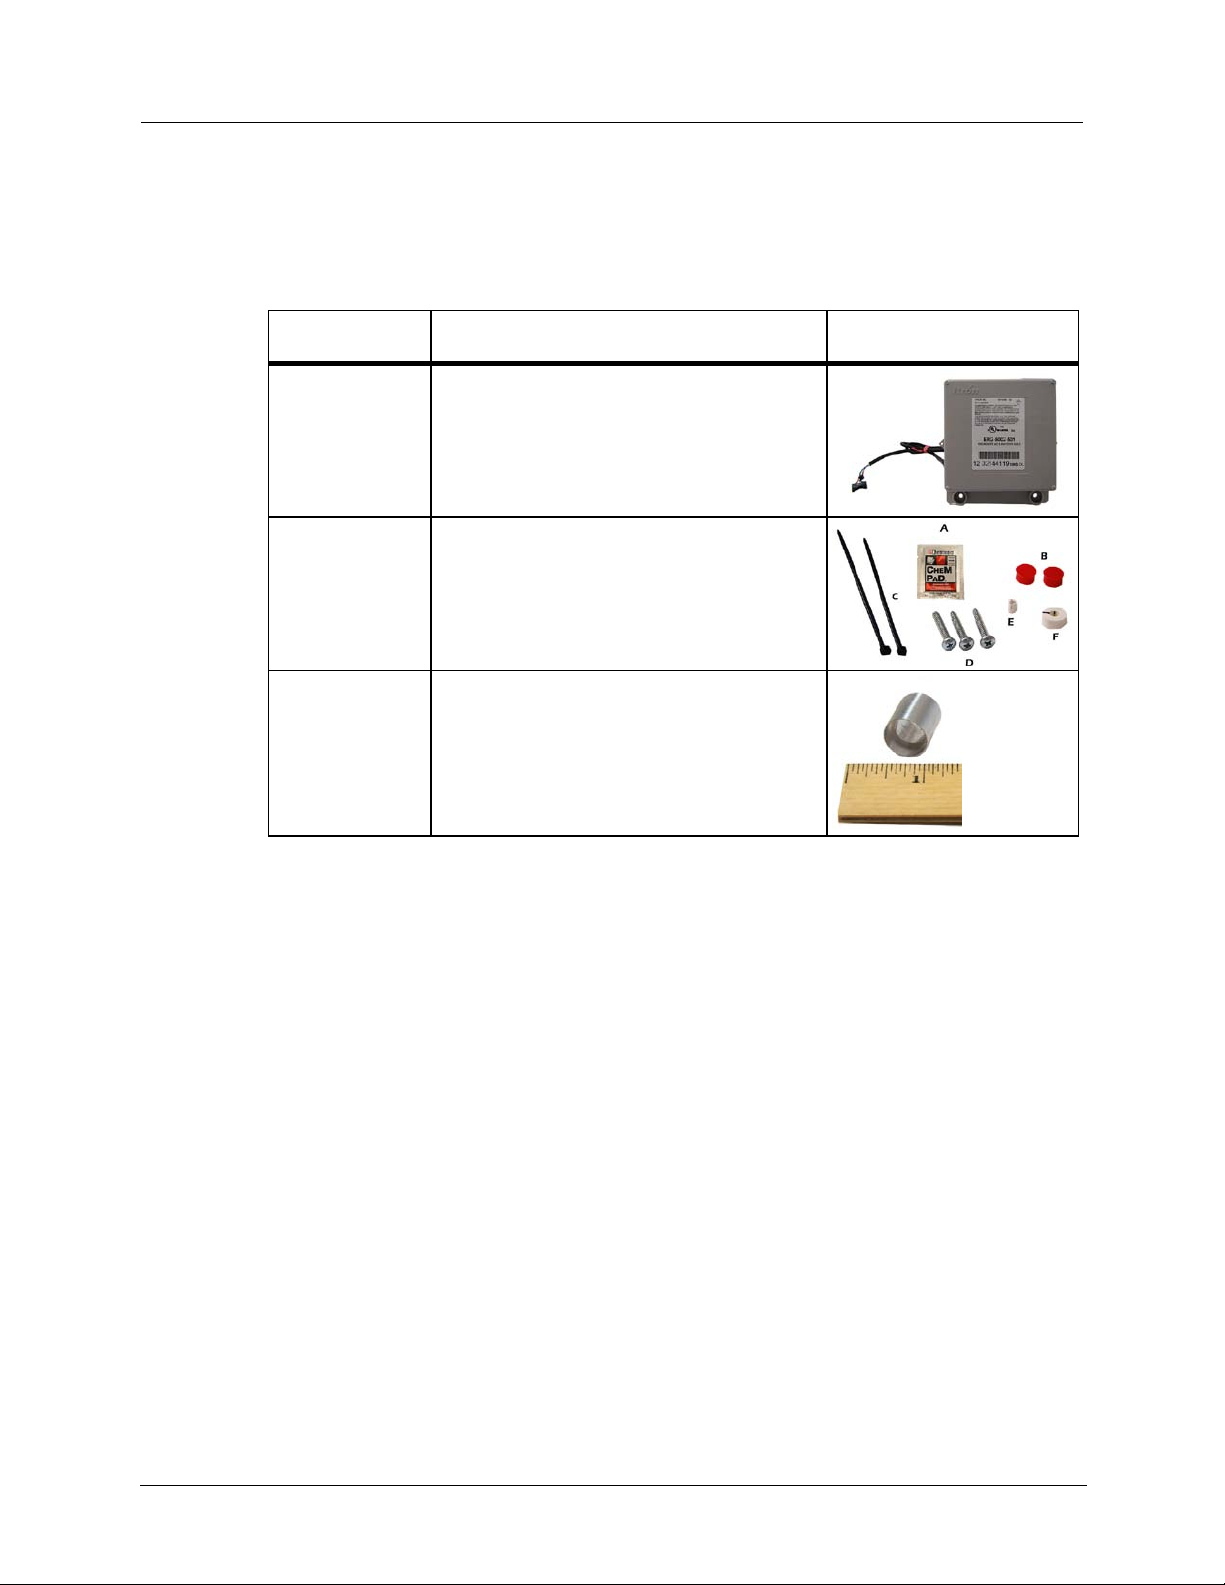
The following items are required for each 2.4GZ OpenWay Remote Mount Gas Module
installation to a diaphragm gas meter:
Itron Part
Number
OWG-5001-501
OWG-5002-501
CFG-0081-001 Remote Mount Encoder Kit
013-1723-112 Encoder Spacing Tool
Description
2.4GZ OpenWay Remote Mount Module - IPP
2.4GZ OpenWay Remote Mount Module - SEP
(Use the Encoder Spacing Tool to ensure the
encoder mounts the correct distance from the
magnet hub on the me t er index.)
54 TDC-0838-000 2.4GZ OpenWay Gas Module Installation Guide - Remote Mount
Materials Available from Itron
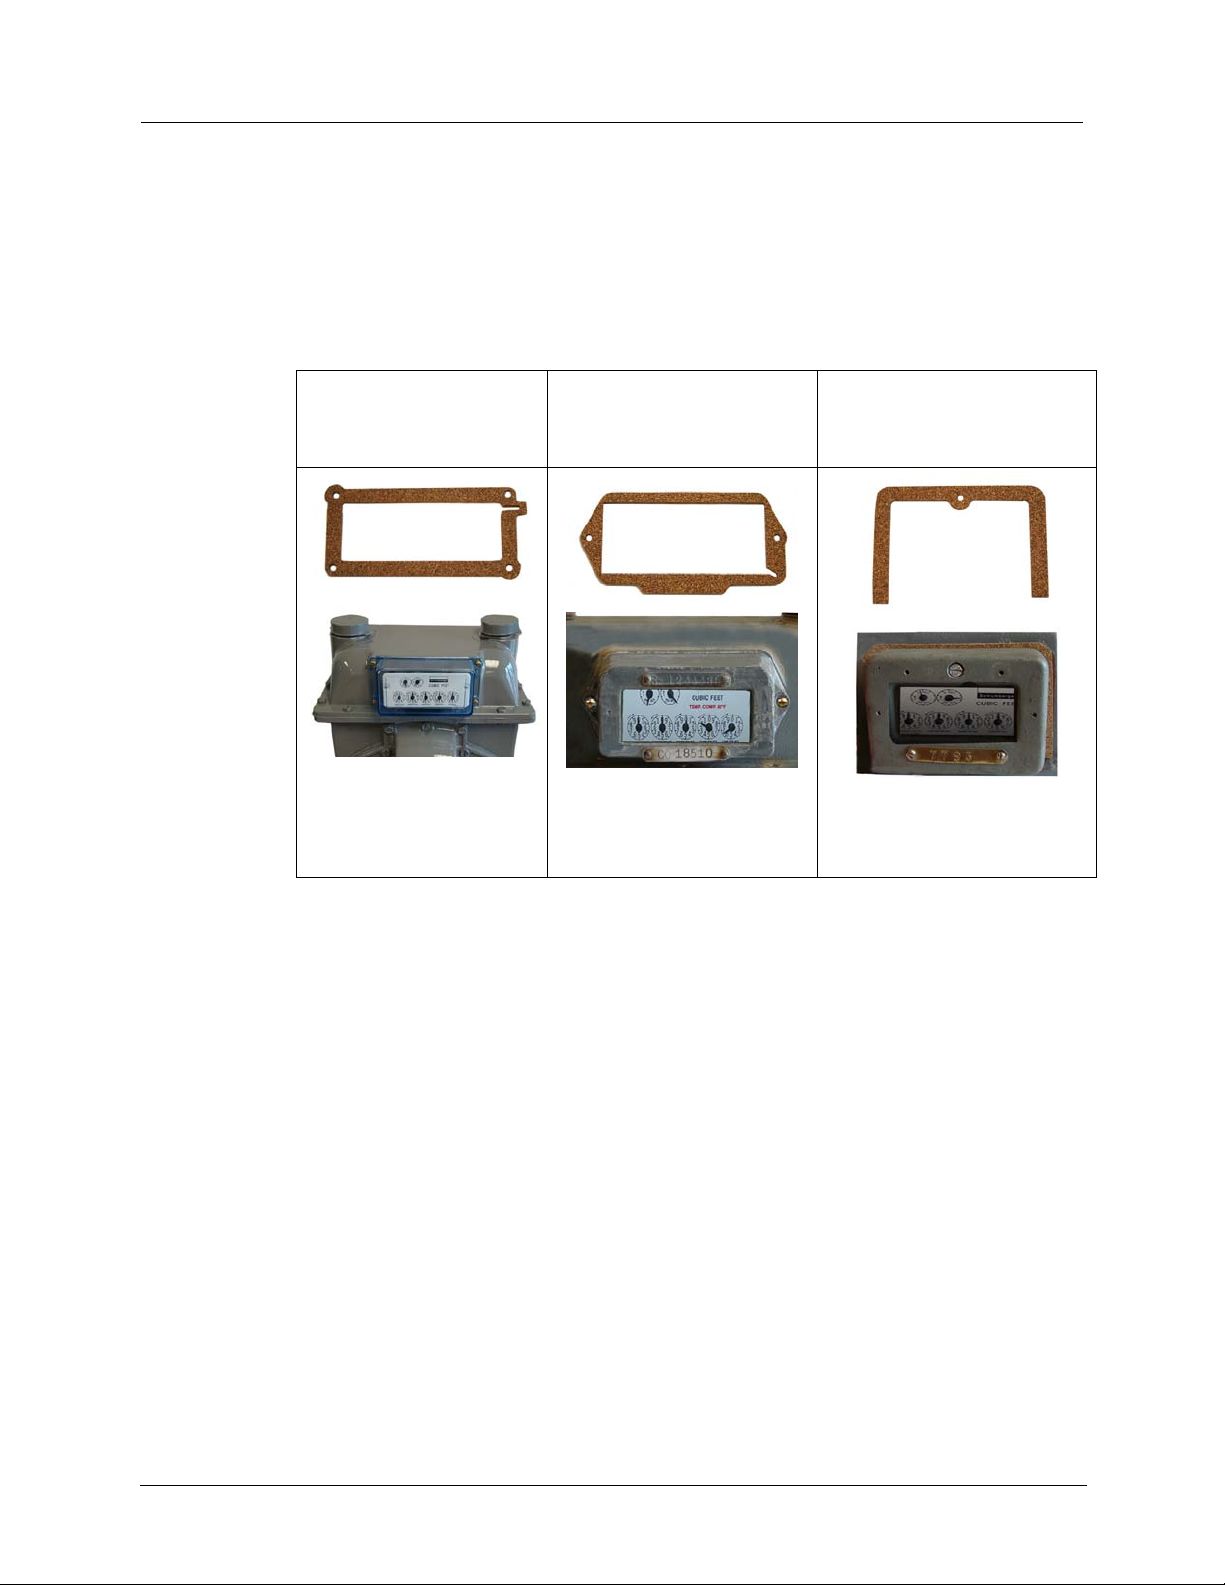
Replacement Gasket s
The Itron replacement index cover gaskets shown below are thicker than standard gaskets
and have a special slot to accommodate the encoder cable. Gaskets are specific to
Schlumberger/Sprague model 675 and 1000 commercial diaphragm meters
4-hole front cover
gasket:
Itron part number
2-hole front cover gasket:
Itron part number
FAB-0014-002
1-hole front cover gasket:
Itron part number
FAB-0014-001
FAB-0014-003
TDC-0838-000 2.4GZ OpenWay Gas Module Installation Guide - Remote Mount 55
Chapter 5 Diaphragm Meter Installation
Installing the 2.4GZ OpenWay Remote Mount Gas Module
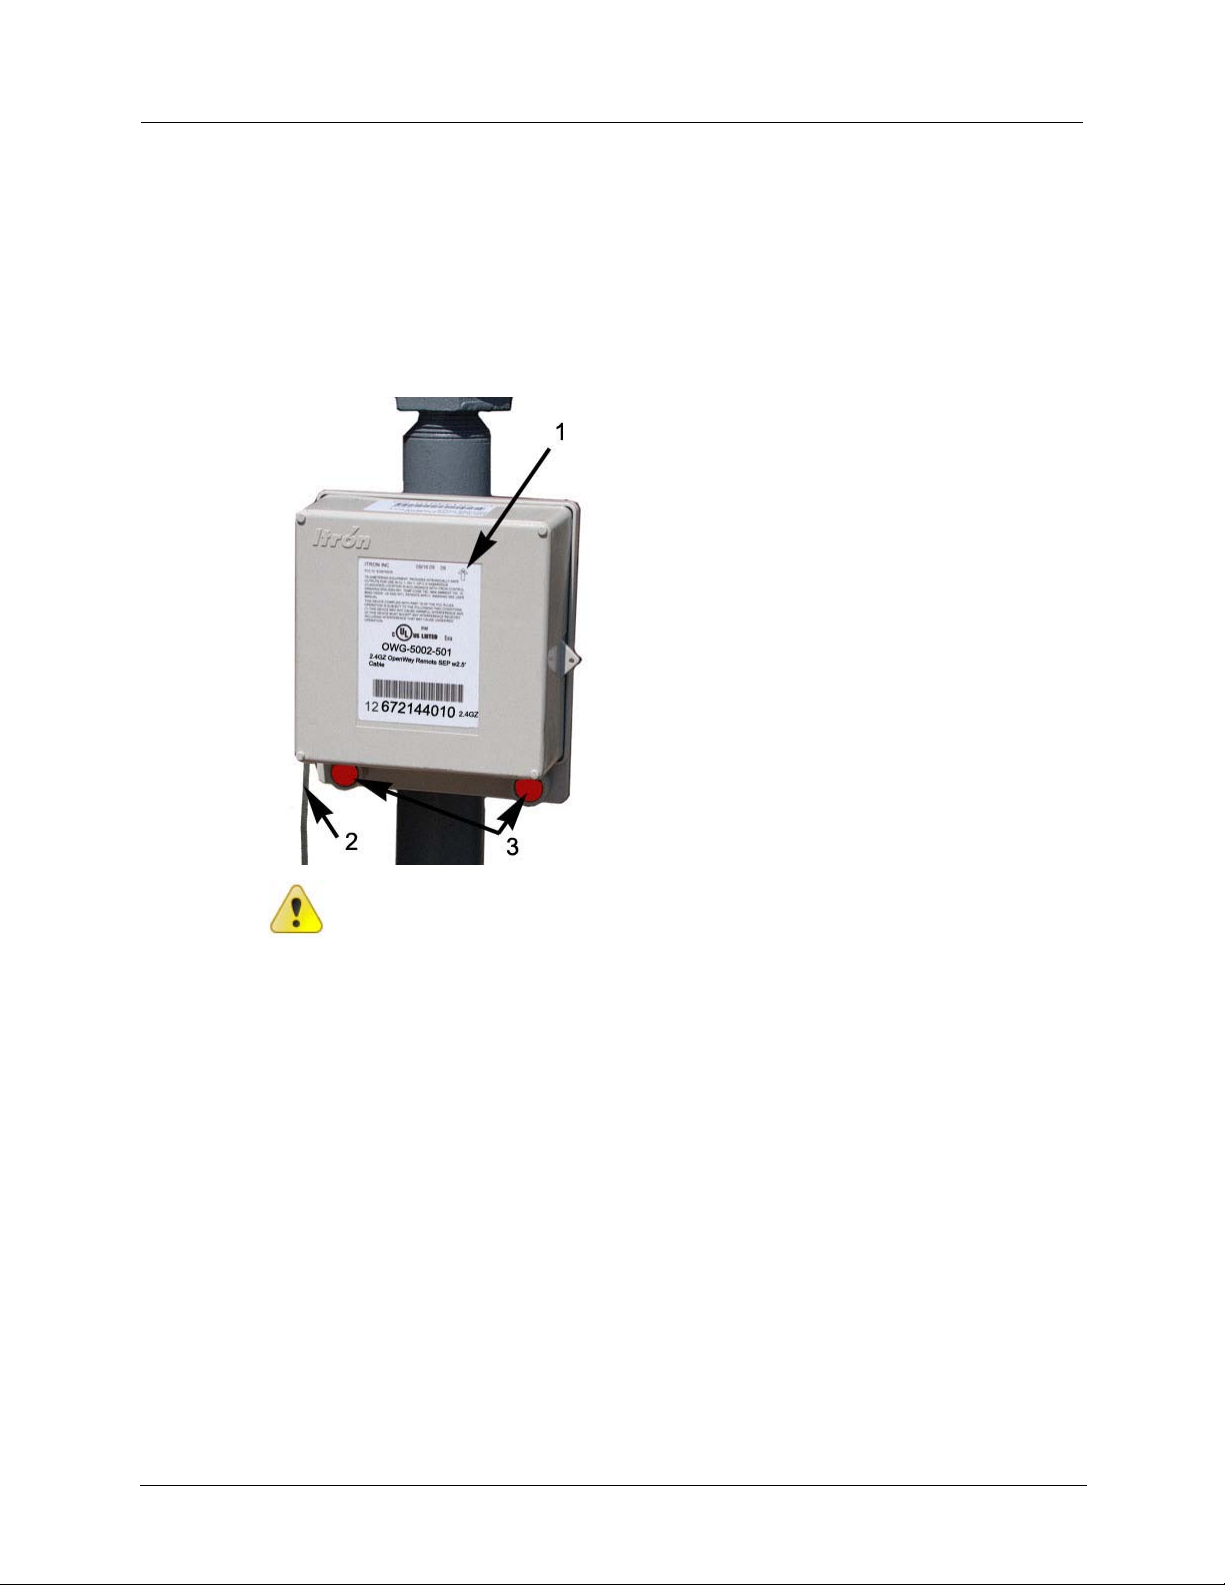
The 2.4GZ OpenWay Remote Mount Gas Module mounts on a pipe using the Remote
Mount Installation Kit (Itron part number CFG-0005-003) or a vertical flat (wall) surface.
Always mount the 2.4GZ OpenWay Remote Mount Gas Module with the printed label
right-side-up (arrow pointing up -1), and the encoder wires (2) and tamper seals (3) at the
bottom, as shown.
Caution Upright vertical positioning is ver y im portant becaus e:
• 2.4GZ OpenWay Remote Mount Gas Module are designed with the
antenna in a vertical direction so the antenna is parallel to the
reading device (which has a vertical antenna). Matching antenna
polarity can greatly affect RF performance and enable easy module
reading.
• 2.4GZ OpenWay Remote Mount Gas Module are designed so the
tilt tamper is vertical. It is important to maintain vertical positioning in
the field to enable tilt tamper stability.
56 TDC-0838-000 2.4GZ OpenWay Gas Module Installation Guide - Remote Mount
Installing 2.4GZ OpenWay Remote Mount Gas Module Encoders
Installing 2.4GZ OpenWay Remote Mount Gas Module
Encoders
Caution To insure proper adhesion, the 2.4GZ OpenWay Remote Mount Gas
Module encoder must be installed at temperatures between 40° to 95° Fahrenheit.
There are tasks when installing the 2.4GZ OpenWay Remote Mount Gas Module with an
encoder on a diaphragm meter:
• Remove the index cover and any gasket residue
• Install the 2.4GZ OpenWay Remote Mount Gas Module encoder on the index
• Program the 2.4GZ OpenWay Remote Mount Gas Module
• Attach the index cover to the meter.
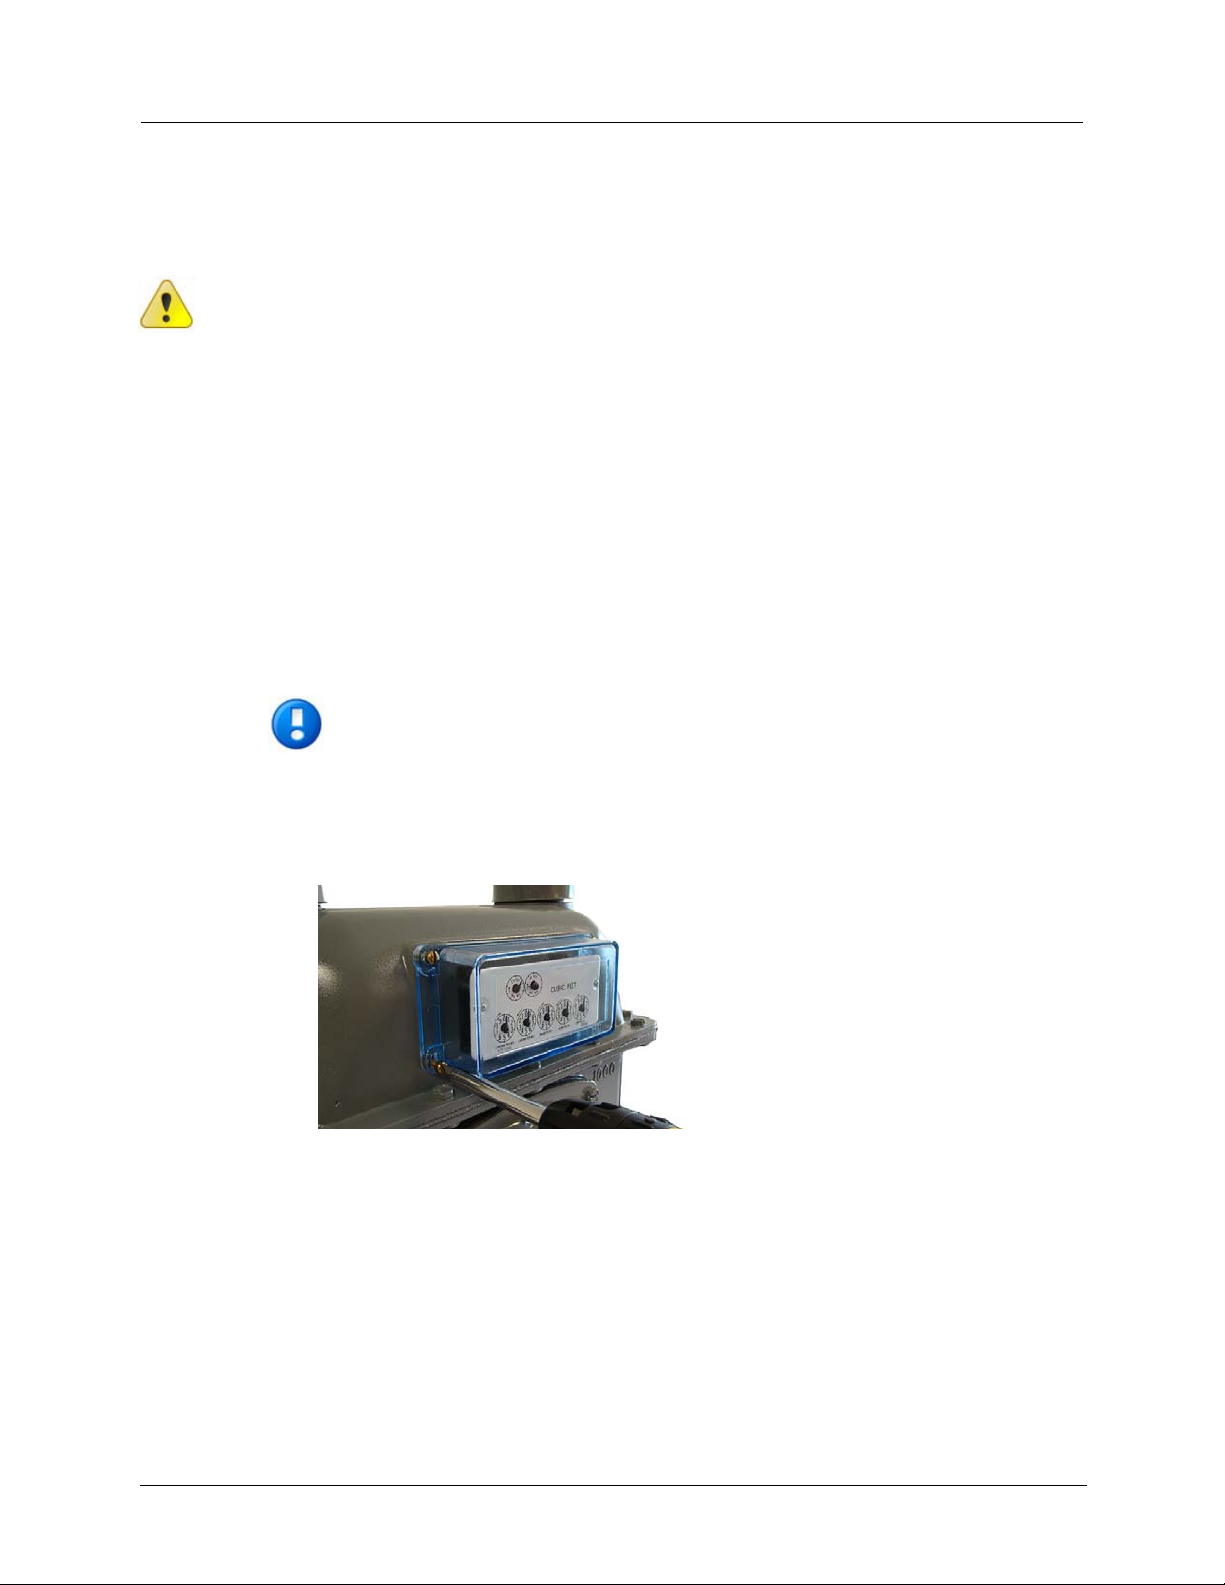
To remove the index
Note Properly dispose all unused screws, old index c ov ers, gaskets, tamper seals,
and other leftover materials. Do not leave materials on customer premises.
Replace any stripped, worn, or corroded mounting screws.
1. Cut and remove any wire seal routed through the index cover screws. Remove the
index cover and set aside. Remove the index mounting screws in an alternating
fashion.
TDC-0838-000 2.4GZ OpenWay Gas Module Installation Guide - Remote Mount 57

Chapter 5 Diaphragm Meter Installation
2. Remove the two index screws in an alternating fashion. Loosen the left index screw
two turns, loosen the index screw three to four turns. Hold the index while removing
the screws to keep the index from falling. Set the index aside where it will not be
damaged.
3. Remove old gasket and any gasket residue from the meter and index cover.
4. Use the FC200SR to read the 2.4GZ OpenWay Remote Mount Gas Module and
record the reading for comparison with progressive readings as installation is
completed.
To install the encoder
1. Take the magnet hub from the Encoder Installation kit (Itron part number CFG-0081-
001).
2. Verify there is only one magnet in the hub.
NOTE If there is no magnet or if there are two magnets in the magnet hub,
discard the magnet hub and use a hub with one magnet.
58 TDC-0838-000 2.4GZ OpenWay Gas Module Installation Guide - Remote Mount
Installing 2.4GZ OpenWay Remote Mount Gas Module Encoders
ng is not higher than the previous reading, the 2.4GZ OpenWay
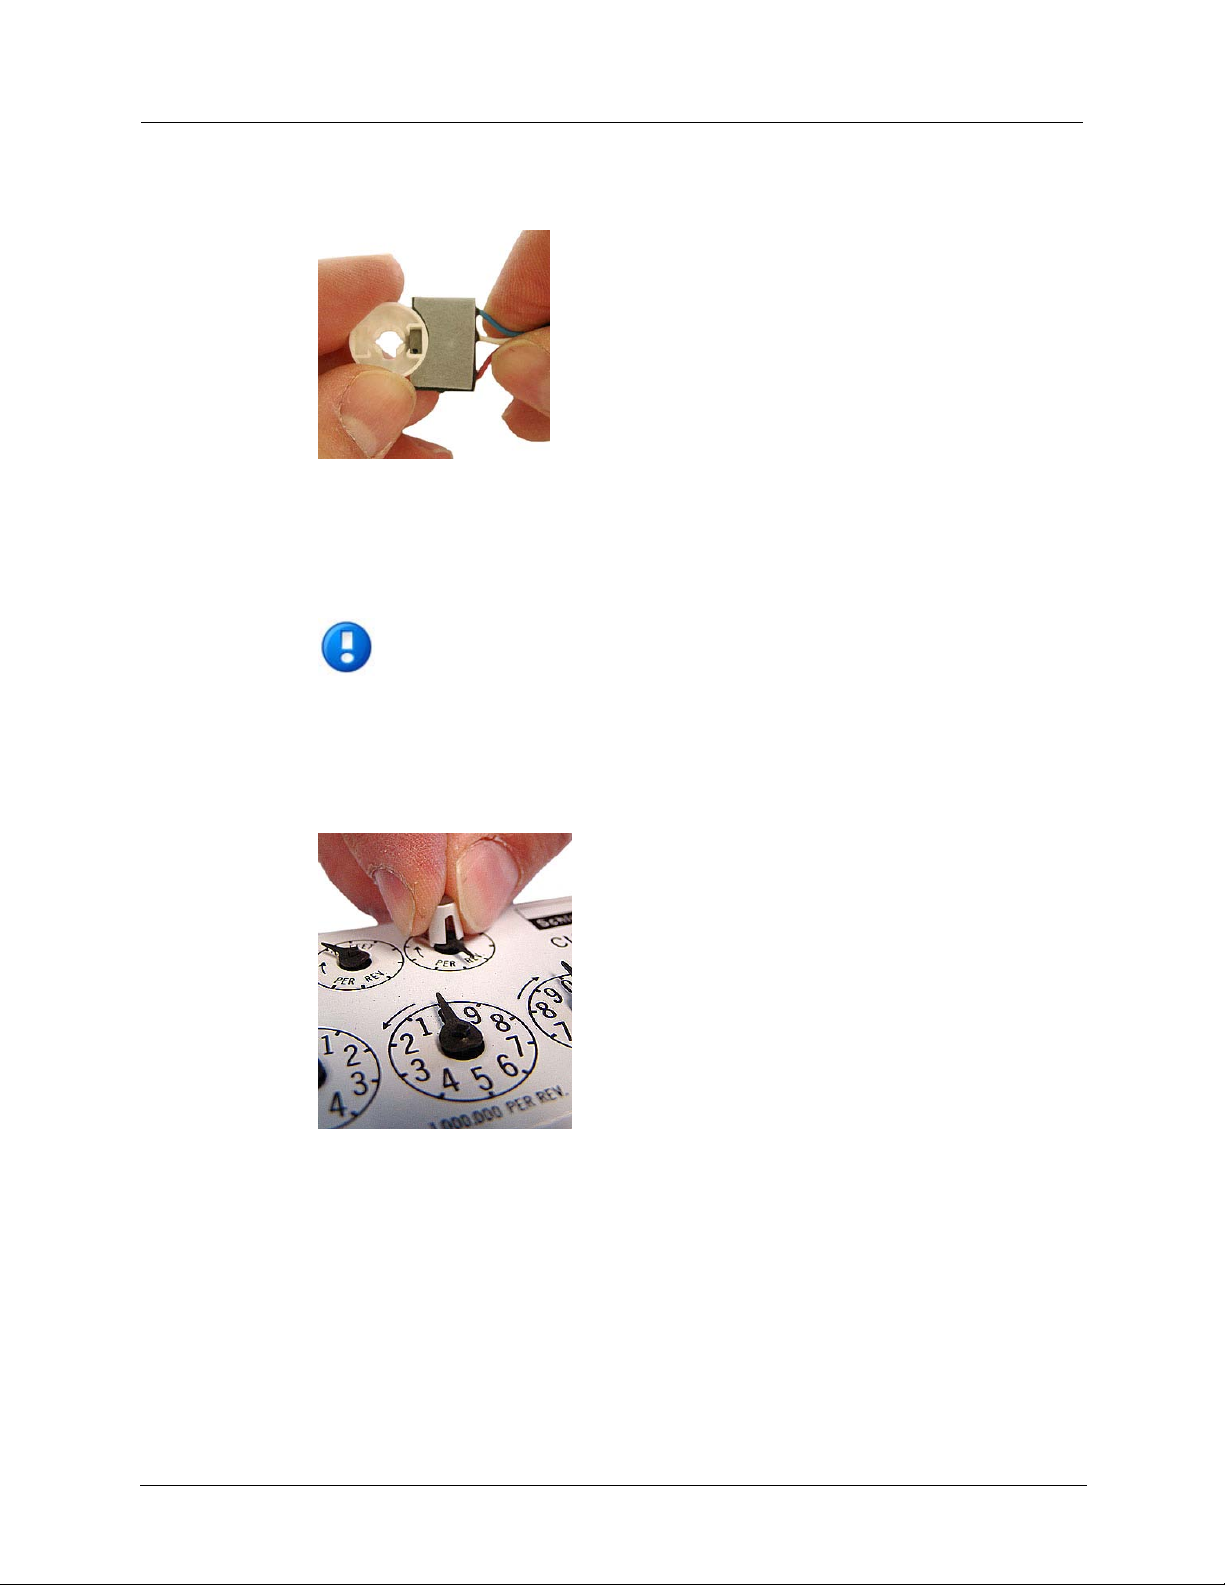
3. Briefly place the magnet side of the magnet hub into the curved indentation in the
encoder, as shown.
4. Take the magnet hub away from the encoder and set it at least one inch away from the
encoder.
5. Use the FC200SR to read the 2.4GZ OpenWay Remote Mount Gas Module. If this
reading is higher than the reading taken after removing the index, the 2.4GZ
OpenWay Remote Mount Gas Module is counting and working properly.
NOTE If the readi
Remote Mount Gas Module is not reading. Repeat steps 3, 4, and 5. If the 2.4GZ
OpenWay Remote Mount Gas Module is still not counting, replace the 2.4GZ
OpenWay Remote Mount Gas Module and perform steps 3, 4, and 5.
6. Align the large notch in the side of the magnet hub spacer with the needle of the meter
drive rate dial (1 foot or 2 foot for residential diaphragm meters; 5, 10, or 100-foot for
commercial diaphragm meters).
TDC-0838-000 2.4GZ OpenWay Gas Module Installation Guide - Remote Mount 59

Chapter 5 Diaphragm Meter Installation
7. Press the magnet hub spacer down over the dial needle as far as possible. The tip on
the bottom of the spacer may touch index face. Turn the dial after hub spacer
installation to verify the index dial functions with a smooth, easy rotation.
8. Align the pointer (1) on the top of the magnet hub and the notch (2) in the side of the
magnet hub with the needle (3) of the meter drive rate dial.
9. Press the magnet hub down over the hub spacer as far as possible. The bottom of the
hub spacer may touch the index face. Turn the dial after magnet hub installation to
verify the index dial functions with a smooth, easy rotation.
60 TDC-0838-000 2.4GZ OpenWay Gas Module Installation Guide - Remote Mount
Installing 2.4GZ OpenWay Remote Mount Gas Module Encoders
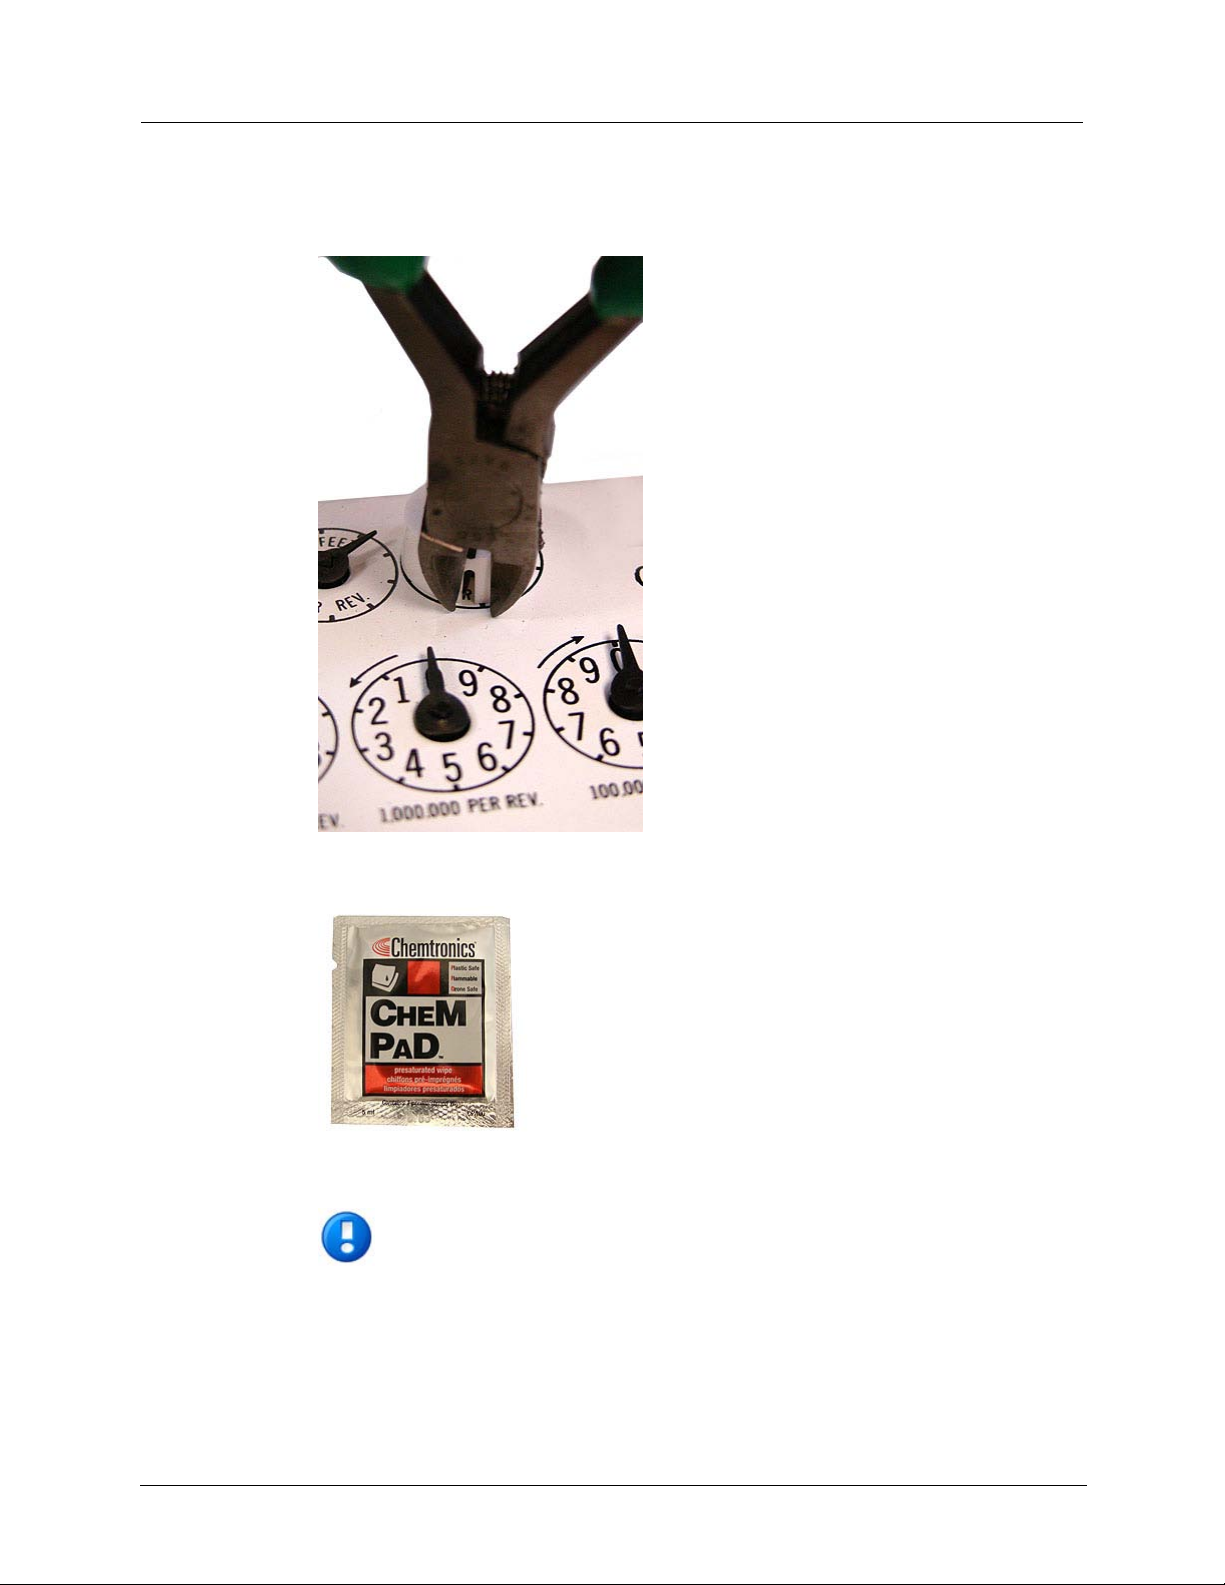
10. If the tip of the dial needle sticks out past the edge of the magnet hub, cut off the end
of the dial needle as close as possible to the magnet hub with a sharp, side-cutting
pliers.
11. Take the alcohol-saturated cleaning pad from the Remote Encoder Installation Kit
(Itron part number CFG-0081-001).
12. Select a location on the index face next to the magnet hub. After encoder installation,
the encoder cable must not interfere with the index dials.
Note If a TEMP COMP sticker is attached to the index where the encoder
cable will mount, remove it before priming. If the sticker (or replacement
sticker) must be put back on the register face, place it in a new location on
the index face after the encoder is attached.
TDC-0838-000 2.4GZ OpenWay Gas Module Installation Guide - Remote Mount 61

Chapter 5 Diaphragm Meter Installation
13. Wring out the excess alcohol from the cleaning pad before use. Thoroughly clean the
index face where the encoder will mount. Allow the alcohol to completely dry prior to
encoder application.
14. Thoroughly prime the area where the encoder will be installed. Do not touch the
primed area of the index face before the encoder is installed.
15. Slide the thin end of the encoder spacing tool down over the magnet hub.
16. Peel the strip of protective plastic off the adhesive side of the endpoint's encoder.
IMPORTANT Verify the alcohol is dry before completing installation. You
must do the next two steps exactly as described or the 2.4GZ OpenWay
Remote Mount Gas Module will not work properly.
17. Press the curved side of the encoder firmly against the side of the encoder spacing tool
as shown below, with the adhesive side down.
62 TDC-0838-000 2.4GZ OpenWay Gas Module Installation Guide - Remote Mount

Installing 2.4GZ OpenWay Remote Mount Gas
Module Encoders
18. Slide the encoder down along the side of the encoder spacing tool until it touches the
surface of the index (as shown below). Using moderate pressure, hold the encoder
firmly against the index, without moving, for 15 seconds to permanently apply the
encoder.
The photo below shows how the the encoder spacing tool and encoder will look after
the 15 second wait time.
19. Remove the encoder spacing tool, set it aside, and lay the index on a flat, horizontal
surface, to diminish strain on the encoder cable.
20. Program the index reading (with the encoder mounted) into the 2.4GZ OpenWay
Remote Mount Gas Module.
21. Read the 2.4GZ OpenWay Remote Mount Gas Module. If this reading is the same as
the reading programmed into the 2.4GZ OpenWay Remote Mount Gas Module, the
module is programmed correctly.
TDC-0838-000 2.4GZ OpenWay Gas Module Installation Guide - Remote Mount 63

Chapter 5 Diaphragm Meter Installation
To install the meter index covers over the 2.4GZ OpenWay Remote Mount
Gas Module encoder cable
Note Use the correct replacement index cover gasket for your index (see
Replacement Gaskets on page 55 for Itron 4-hole, 2-hole, or 1-hole gasket part
numbers).
1. Remove the gasket center and index cover hole plugs from the new gasket.
2. Insert the index/encoder assembly through the gasket center. Verify the gasket's
adhesive-backed side is facing the meter face.
3. Align the index wriggler with the meter's drive dog. Install the index on the meter
using the index mounting screws. Tighten in an alternating fashion.
4. Install a strain-relief cable tie about one 1/4" from the encoder cable's stripped end.
(The cable tie must be inside the index cover after the cover is installed on the meter.)
64 TDC-0838-000 2.4GZ OpenWay Gas Module Installation Guide - Remote Mount

Installing 2.4GZ OpenWay Remote Mount Gas Module Encoders
5. Remove the excess cable tie with a side-cutting pliers. Dispose excess cable tie
properly.
6. Remove the protective backing on the replacement gasket to expose the adhesive side
of the gasket. Align the gasket (1), encoder cable (2), and cable tie (for strain-relief)
(3) on the meter as shown.
Caution Route the encoder cable inside the index cover to provide strain
relief (minimize pulling or twisting on the encoder). Verify the strain-relief
cable tie on the encoder cable is inside the index cover when the cover is
installed on the meter. The gasket must align with the index cover screw
holes and adhere to the meter face to insure a proper seal after the index
cover is installed.
7. Install the four index cover screws and tighten them just enough to hold them in
place.
TDC-0838-000 2.4GZ OpenWay Gas Module Installation Guide - Remote Mount 65

Chapter 5 Diaphragm Meter Installation
8. Verify the encoder cable is in the cable slot of the gasket. Fully tighten the screws in
an alternating fashion. If required, install utility-approved security wire seals.
2.4GZ OpenWay Remote Mount Gas Module encoder/index installation is complete.
66 TDC-0838-000 2.4GZ OpenWay Gas Module Installation Guide - Remote Mount

C
6
HAPTER
Dattus Meter Installation
This section provides the instructions to install the 2.4GZ OpenWay Remote Mount Gas
Module with Itron Dattus fM2 and fM3 meters.
Dattus fM2 Dattus fM3
Installation Prerequisites
2.4GZ OpenWay Remote Mount Gas Module installation to a Dattus meter requires the
following materials:
• 2.4GZ OpenWay Remote Mount Gas Module compatible with the Dattus meter (see
the 2.4GZ OpenWay Remote Mount Gas Module Meter Compatibility List on page 3)
• Itron Dattus meter compatible with the 2.4GZ OpenWay Remote Mount Gas Module
• Tools and devices to complete installation and programming (see Installation
Prerequisites on page 7)
Programming the Dattus Meter
Program the Dattus fM2 or fM3 meter with the correct pulse width and weight. For all
Dattus type meters, the pulse width must be set to .050 seconds.
Dattus Meter Pulse Weight Settings
Meter type Pulse weight in cubic feet (CF)
or cubic meter (CM)
11M or smaller 10 (CF) or 1 CM
16M or greater 100 CF or 1 CM
TDC-0838-000 2.4GZ OpenWay Gas Module Installation Guide - Remote Mount 67

Chapter 6 Dattus Meter Installation
Installation Overview
Installing the 2.4GZ OpenWay Remote Mount Gas Module to an Dattus meter involves five
tasks:
1. Programming the meter (reference the Itron Dattus programming guide for more
information).
2. Installing any necessary Itron retrofit parts. Itron offers installation kits and brackets
for endpoint mounting options.
3. Mounting the 2.4GZ OpenWay Remote Mount Gas Module directly on the meter. If
direct-mounting is not an option for your installation, the 2.4GZ OpenWay Remote
Mount Gas Module may be mounted on a pipe, or flat surface (see Mounting the
2.4GZ OpenWay Remote Mount Gas Module on page 9).
4. Connecting the 2.4GZ OpenWay Remote Mount Gas Module to the Dattus meter.
5. Programming the 2.4GZ OpenWay Remote Mount Gas Module.
Installing the 2.4GZ OpenWay Remote Mount Gas Module to
Itron Dattus Meters
Dattus meters provide a an electronic pulse output compatible with the 2.4GZ OpenWay
Remote Mount Gas Module. The Dattus meter may be wired to the module using the pulse
output cable or the module can be directly mounted to the meter.
When ordering, customers can have the 2.4GZ OpenWay Remote Mount Gas Modules drop
shipped to Itron's Owenton, Kentucky meter factory to have a factory-installed connector
attached to the module's bare leads. The connector directly fits the pulse output on the
Dattus meter.
68 TDC-0838-000 2.4GZ OpenWay Gas Module Installation Guide - Remote Mount

Installing the 2.4GZ OpenWay Remote Mount Gas Module to Itron Dattus Meters
Direct Mounting the 2.4GZ OpenWay Remote Mount Gas Module to the
Dattus Meter
2.4GZ OpenWay Remote Mount Gas Modules can be direct mounted to Dattus fM2 and
fM3 meters with the Dattus Direct Mount Kit (Itron part number 442491-001). Dattus
meter registers can be rotated to accommodate vertical or horizontal meter. Customers may
have Itron, Owenton, Kentucky complete the cover modification and bracket attachment or
may order the kit to retrofit the Dattus meter. The external cover of the Dattus meter is
modified with three holes to mount the module bracket. The modification is dependent on
the orientation of the meter installation.
A Horizontally oriented meter module mounting hole modifications
B Vertic a lly oriented meter module mounting hole modifications
Caution The 2.4GZ OpenWay Remote Mount Gas Module must be mounted in
an upright position with the arrow on the label pointing upward.
After the meter cover and bracket are replaced on the meter, the 2.4GZ OpenWay Remote
Mount Gas Module is connected to the pulse output of the Dattus meter by the Binder
Connector. The module is seated into the bracket to create a secure assembly.
Vertical installation Horizontal installation
TDC-0838-000 2.4GZ OpenWay Gas Module Installation Guide - Remote Mount 69

Chapter 6 Dattus Meter Installation
Pulse Output Cable Pin Descriptions
Connecting the 2.4GZ OpenWay Remote Mount Gas Module
to a Dattus meter
The Dattus fM2 and fM3 meters have three configurable outputs usable as pulse outputs to
the 2.4GZ OpenWay Remote Mount Gas Module (Output channel 1 and Output channel 2).
Connecting the endpoint following the information in this section requires a pulse output
cable, installed at Itron, Owenton, Kentucky. Pulse output cables are available in 10 foot
and 20 foot lengths. Factory-installed cables have a Binder connector on one end and six
bare wires on the opposite end.
Dattus Meter Wiring Accessories (available from Itron, Owenton, Kentucky)
Accessory Itron Part Number
Pulse output cable - 10 ft. 442461-005
Pulse output cable - 20 ft. 442461-006
Pulse output cable
Pin Function Wire color
1 Output 2 (+) White
2 Output 4 (+) Black
3 Ground (-) Green
4 Output 3 (+) Orange
5 Output 1 (+) Red
6 Ground (-) Blue
70 TDC-0838-000 2.4GZ OpenWay Gas Module Installation Guide - Remote Mount

Mounting the 2.4GZ OpenWay Remote Mount Gas Module
white, and blue. The pulse output cable has six wires; the Binder connector has six
To wire the 2.4GZ OpenWay Remote Mount Gas Module to the Dattus meter
Note The 2.4GZ OpenWay Remote Mount Gas Module has three wires, red,
pins. You can connect the bare leads to a Binder connector (available from Itron,
see
Connecting the 2.4GZ OpenWay Remote Mount Gas Module to a Dattus
Meter on page 70) or you can directly wire to the connector.
1. For output 1, connect the red module wire to the red wire on the pulse output cable or
to pin 5 of the Binder connector if you are wiring directly to the connector.
2. For output 2, connect the red module wire to the white wire on the pulse output cable
or to pin 1 of the Binder connector if you are wiring directly to the connector.
3. Twist or solder the blue and white module wires together.
• To read from Output 1 on the Dattus meter: connect the blue and white module
wires to the red pulse output wire (Binder pin 5).
• To read from Output 2 on the Dattus meter: connect the blue and white module
wires to the white pulse output wire (Binder pin 1).
Mounting the 2.4GZ OpenWay Remote Mount Gas Module
The 2.4GZ OpenWay Remote Mount Gas Module can be mounted on a pipe or vertical flat
surface (wall). Mounting requires the Itron Remote Mount Kit (Itron part number CFG0005-003). See Mounting the 2.4GZ OpenWay Remote Mount Gas Module on page 9 for
mounting procedure instructions.
TDC-0838-000 2.4GZ OpenWay Gas Module Installation Guide - Remote Mount 71

Chapter 6 Dattus Meter Installation
Programming the 2.4GZ OpenWay Remote Mount Gas Module
Assembly
Program the 2.4GZ OpenWay Remote Mount Gas Module with a Bluetooth-enabled
FC200 handheld computer and ZigBee Belt Clip Radio loaded with Endpoint-Link
Endpoint-Link Pro
software version 5.3.1.26 or higher. See the Endpoint-Link
Endpoint Programming Guide (TDC-0744) for more complete programming
information. An Itron magnet is also required for programming.
or
FC200 Belt Clip Radio Itron Magnet
Caution The 2.4GZ Remote Mount Gas Module must be programmed
before use.
72 TDC-0838-000 2.4GZ OpenWay Gas Module Installation Guide - Remote Mount

Programming the 2.4GZ OpenWay Remote Mount Gas
Module Assembly
To program the 2.4GZ OpenWay Remote Mount Gas Module
1. Program the meter drive rate into the 2.4GZ Remote Mount Gas Module using the
FC200 and Belt Clip Radio. Programming parameters are based on the configuration
file loaded into the FC200.
During programming, the 2.4GZ Remote Mount Gas Module is set to the nearest 100
cubic feet with the last two digits (tens and units) programmed as zeros (0). After
programming is complete, the 2.4GZ Remote Mount Gas Module reads to the nearest
cubic foot.
2. The 2.4GZ Remote Mount Gas Module cover design includes two ridges (1) and a
stop (2) to ensure the magnet is placed in the correct location to wake-up the module.
3. Place the magnet under the index cover with magnet face (inked Itron logo and part
number) against the bottom of the module. The arrow on the magnet must point to the
back of the module. Slide the magnet back toward the 2.4GZ Remote Mount Gas
Module back plate until it touches the stop on the bottom of the index cover. Hold the
magnet in place for 5 seconds and remove it.
4. The LED will blink red three times. This signifies the 2.4GZ Remote Mount Gas
Module is searching for a programming device. Within a few seconds of locating the
FC200, the red LED will blink five more times. The FC200 will confirm
programming success or failure.
5. Read or Check the 2.4GZ Remote Mount Gas Module using the FC200 and Belt Clip
Radio.
• If the read result is higher than the number programmed in Step 1, the 2.4GZ
Remote Mount Gas Module is counting correctly.
• If the read result is not higher than the number programmed in Step 1, replace
the 2.4GZ Remote Mount Gas Module.
TDC-0838-000 2.4GZ OpenWay Gas Module Installation Guide - Remote Mount 73

Chapter 6 Dattus Meter Installation
74 TDC-0838-000 2.4GZ OpenWay Gas Module Installation Guide - Remote Mount

C
7
HAPTER
Sensus Sonix Meters
Sensus Sonix Meter
Programming the Sensus Sonix Meter
Program the Sensus Sonix meter following the Sensus programming guidelines.
Adjusting the Pulse Output for Sonix 600 and 880 Meters
The pulse output sent to the 2.4GZ OpenWay Remote Mount Gas Module may be set (using
the SonixCom software) as:
• 1 pulse per 10 cf
• 1 pulse per 100 cf
• 1 pulse per 1000 cf
Contact Sensus North American Gas Customer Service for more information.
Installing the 2.4GZ OpenWay Remote Mount Gas Module
with Sensus Sonix Meters
Sensus Sonix meters provide a standard Form A electronic pulse output compa tible with the
2.4GZ OpenWay Remote Mount Gas Module. The Sensus Sonix meter may be connected
to the module using the pulse output cable or the module can be directly mounted to the
meter.
TDC-0838-000 2.4GZ OpenWay Gas Module Installation Guide - Remote Mount 75

Chapter 7 Sensus Sonix Meters
Sensus Sonix2000 Pulse Output Wiring
Sensus Sonix2000 Pulse Output Options
Option (A) Pulse 1 (+) (B) Pulse 2 (+)
1 Uncorrected Corrected
2 LCD index vo lume Alarm
(C) Ground (-)
Direct Mounting the 2.4GZ OpenWay Remote Mount Gas
Module to the Sonix Meter
2.4GZ OpenWay Remote Mount Gas Modules can be direct mounted to Sensus Sonix
meters at the Sensus factory (contact Sensus North American Gas Customer Service for
mounting specifications and ordering information). This section includes the instructions for
customers to mount the moduleon the Sonix meter using the mounting materials available
from Sensus Metering Systems.
A Top anchor screw positions
B Bottom anchor position for the endpoint U-shaped mount
76 TDC-0838-000 2.4GZ OpenWay Gas Module Installation Guide - Remote Mount

Installing the 2.4GZ OpenWay Remote Mount Gas Module with Sensus Sonix Meters
Sensus Sonix Direct Mount Brackets and Mounting Hardware
Sensus Part Number Description
60025-063-00000 1 1/2" FTP, 45Lt, #3 Spg, 60Lt, #4 Spg
60025-063-01000 2" - 11BS, 2" FTP
60025-063-02000 30Lt, #1A Spg, 1 1/4" NPT, #2 Spg, 20Lt
903376 #8-32 x 3/4" SS Fillister-head screws (2 required)
011-14-286-00 Rubber mounting washer
Stabilizes bracket/2.4GZ OpenWay Remote Mount
Gas Module assembly
*Order the correct bracket for your installation requirements from Sensus North American
Gas Customer Service. Brackets and mounting hardware are ordered separately.
To direct-mount the 2.4GZ OpenWay Remote Mount Gas Module on the Sonix
meter
1. Place the module mounting bracket over the inlet or outlet pipe fitting on the Sonix
meter. (The default position is over the inlet connection - left side connection looking
at the meter front.)
2. Remove the four module backplate screws and turn the backplate so the module
mounting screw holes are to the top of the module (the arrow on the module label
must point up). Secure with the four module backplate screws previously removed.
3. Slide the mounting lug (now on the bottom of the module) over the bottom anchor.
Insert the two top module mounting screws and tighten in an alternating fashion.
TDC-0838-000 2.4GZ OpenWay Gas Module Installation Guide - Remote Mount 77

Chapter 7 Sensus Sonix Meters
Connecting the 2.4GZ OpenWay Remote Mount Gas Module
to a Sensus Sonix 600 or 880 Meter
The 2.4GZ OpenWay Remote Mount Gas Module provides RF-based data collection for the
Sonix 600 or 880 meter.
To wire the 2.4GZ OpenWay Remote Mount Gas Module to Sonix 600 and 880
meters
• Connect the Sonix 600 or 880 meter to the 2.4GZ OpenWay Remote Mount Gas
Module following the wiring diagram below.
78 TDC-0838-000 2.4GZ OpenWay Gas Module Installation Guide - Remote Mount

Programming the 2.4GZ OpenWay Remote Mount Gas Module Assembly
Programming the 2.4GZ OpenWay Remote Mount Gas Module
Assembly
Program the 2.4GZ OpenWay Remote Mount Gas Module with a Bluetooth-enabled
FC200 handheld computer and ZigBee Belt Clip Radio loaded with Endpoint-Link
Endpoint-Link Pro
software version 5.3.1.26 or higher. See the Endpoint-Link
Endpoint Programming Guide (TDC-0744) for more complete programming
information. An Itron magnet is also required for programming.
or
FC200 Belt Clip Radio Itron Magnet
Caution The 2.4GZ Remote Mount Gas Module must be programmed before
use.
TDC-0838-000 2.4GZ OpenWay Gas Module Installation Guide - Remote Mount 79

Chapter 7 Sensus Sonix Meters
To program the 2.4GZ OpenWay Remote Mount Gas Module
1. Program the meter drive rate into the 2.4GZ Remote Mount Gas Module using the
FC200 and Belt Clip Radio. Programming parameters are based on the configuration
file loaded into the FC200.
During programming, the 2.4GZ Remote Mount Gas Module is set to the nearest 100
cubic feet with the last two digits (tens and units) progr am med as zeros (0). After
programming is complete, the 2.4GZ Remote Mount Gas Module reads to the nearest
cubic foot.
2. The 2.4GZ Remote Mount Gas Module cover design includes two ridges (1) and a
stop (2) to ensure the magnet is placed in the correct location to wake-up the module.
3. Place the magnet under the index cover with magnet face (inked Itron logo and part
number) against the bottom of the module. The arrow on the magnet must point to the
back of the module. Slide the magnet back toward the 2.4GZ Remote Mount Gas
Module back plate until it touches the stop on the bottom of the index cover. Hold the
magnet in place for 5 seconds and remove it.
4. The LED will blink red three times. This signifies the 2.4GZ Remote Mount Gas
Module is searching for a programming device. Within a few seconds of locating the
FC200, the red LED will blink five more times. The FC200 will confirm
programming success or failure.
5. Read or Check the 2.4GZ Remote Mount Gas Module using the FC200 and Belt Clip
Radio.
• If the read result is higher than the number programmed in Step 1, the 2.4GZ
Remote Mount Gas Module is counting correctly.
• If the read result is not higher than the number programmed in Step 1, replace
the 2.4GZ Remote Mount Gas Module.
80 TDC-0838-000 2.4GZ OpenWay Gas Module Installation Guide - Remote Mount
 Loading...