

User’s Guide
100 MECO LANE | OAK RIDGE, TN 37830 | 865.483.2040 | ITOOLCO.COM
© 2018 PROPERTY OF ITOOLCO
ITOOLCO CANNON 12K USER’S GUIDE
1801C12KUG
Page | 2
BEFORE OPERATION OF THIS TOOL, READ AND
UNDERSTAND ALL OF THE INSTRUCTIONS AND
SAFETY INFORMATION IN THIS MANUAL
Contents
SAFETY FIRST ........................................................................................................................................... 3
SAFETY ALERT SYMBOLS .......................................................................................................................... 3
IMPORTANT SAFETY INFORMATION ........................................................................................................ 4
DESCRIPTION AND IDENTIFICATION ........................................................................................................ 8
SET UP AND OPERATION ....................................................................................................................... 15
Attaching Conduit Adapters............................................................................................................... 16
Underground Wire Pull ...................................................................................................................... 17
Overhead Wire Pull ........................................................................................................................... 18
Pulling Out Extra Wire ....................................................................................................................... 19
Receiver Hitch Wire Pulls ................................................................................................................... 20
Maintenance ..................................................................................................................................... 20
Specifications .................................................................................................................................... 20
LIMITED WARRANTY: ITOOLCO CANNON 12K ........................................................................................ 21

ITOOLCO CANNON 12K USER’S GUIDE
1801C12KUG
Page | 3
DANGER
Immediate hazards that, if not avoided, WILL result in severe
injury or death.
WARNING
Hazards that, if not avoided, COULD result in severe injury or
death.
CAUTION
Hazards or unsafe practices that, if not avoided, MAY result in
injury or property damage.
SAFETY FIRST
Safety is essential in the use and maintenance of this tool. This instruction manual and any
markings on the tool provide information for avoiding hazards an unsafe practices related to
the use of this tool. Observe all of the safety information provided.
SAFETY ALERT SYMBOLS
This symbol is used to call your attention to hazards or unsafe practices that could result in
injury or property damage. The three signal words, defined below, indicate the severity of the
hazard. The message after the signal word provides the information for preventing or avoiding
the hazard.
ITOOLCO CANNON 12K USER’S GUIDE
1801C12KUG
Page | 4
WARNING
Read and understand all instructions and safety information in
this manual before operating or servicing this tool.
Also read the instruction manual supplied with your drill.
FAILURE TO OBSERVE THESE WARNINGS CAN RESULT IN SEVERE
INJURY OR DEATH
WARNING – PERSONAL SAFETY HAZARDS
Only qualified persons should use iTOOLco Cannon 12K.
Wear eye protection and hard hat when using this tool.
Do not use this tool while tired or under the influence of drugs,
alcohol, or medication.
Keep body parts and loose clothing away from moving parts
and pinch points. Keep hands away from capstan.
Always follow operating procedures.
FAILURE TO OBSERVE THESE WARNINGS CAN RESULT IN SEVERE
INJURY OR DEATH.
WARNING – ELECTRICAL SHOCK HAZARDS
Do not expose power tools to rain or wet conditions. Water
entering a power tool can increase the risk of electric shock.
Plug into a (GFCI) ground fault interrupted circuit outlet only.
Use a 20 Amp 120 Volt extension cord no more than 100 feet in
length. Maintain proper care of power cords. Do not use the
cord to carry the tool or pull the plug from an outlet. Replace
damaged cords immediately. Damaged cords can increase the
risk of electrical shock. Do not use this tool near live circuits.
Shut off and lock out power when working near existing
circuits. FAILURE TO OBSERVE THESE WARNINGS CAN RESULT
IN SEVERE INJURY OR DEATH.
IMPORTANT SAFETY INFORMATION
ITOOLCO CANNON 12K USER’S GUIDE
1801C12KUG
Page | 5
WARNING – ENTANGLEMENT HAZARD
Do not operate this tool while wearing loose-fitting clothing.
Retain long hair.
Keep hands away from pullers capstan. Rope at capstan can pinch
or crush a hand or body part.
FAILURE TO OBSERVE THESE WARNINGS CAN RESULT IN SEVERE
INJURY OR DEATH.
WARNING – TIPPING HAZARD
Use the same size adapter with conduit. Disassemble when not in
use. FAILURE TO OBSERVE THESE WARNINGS CAN RESULT IN
SEVERE INJURY OR DEATH.
WARNING – TOOL USE HAZARDS
Use this tool for manufacturer’s intended purpose only. Use
other than that which is described in this manual can result in
injury or property damage.
Inspect all aspects of the wire pull to ensure safety, including the
cable puller, booms, sheaves, rope, swivels, pins, etc. and replace
any defective components.
Always inspect structural integrity of any supports, conduit,
anchoring system, etc. that will hold the cable puller during the
wire pull. These supports should be able to withstand the
maximum pulling force of the cable puller plus a safety factor of
3:1. A 12,000 lb. wire puller should be anchored to a support that
can withstand 36,000 lb. of pull.
Only qualified personnel should use pulling equipment.
Do not use the cable puller as a hoist or winch. The cable puller
cannot lower a load and may fall causing serious injury or death.
Do not exceed load rating of cable puller, rope, or accessories.
Always plug into a grounded receptacle with a 20 amp GCFI
protected circuit. Do not modify plug provided.
Always disconnect cable puller before servicing.
FAILURE TO OBSERVE THESE WARNINGS CAN RESULT IN SEVERE
INJURY OR DEATH. (CONTINUED)

ITOOLCO CANNON 12K USER’S GUIDE
1801C12KUG
Page | 6
WARNING – TOOL USE HAZARDS (continued)
Do not operate cable puller in wet or damp locations. Do not
expose to rain.
Do not operate in an explosive atmosphere.
Some components of the mobile cable pulling package exceed
50 lb. and will require more than one person to lift, transport, or
assemble.
Always inspect pins to be sure they are the correct part number
for the assembly and are fully inserted through holes and have
spring clips properly attached. Do not substitute any other object
for factory supplied pins.
When making a vertical pull, keep the area underneath the cable
puller clear of all personnel.
Use caution during assembly and disassembly of boom
components. Keep pins in place to avoid uncontrolled movement.
Have control of boom components before removing any pins.
Always ensure factory supplied boom tubes are fully inserted into
the receiver tubes and that the spring loaded boom pins are fully
engaged.
Do not switch between low and high speeds while the foot pedal
is depressed.
Always make sure the puller has completely stopped before
switching from low to high speed or high to low speed.
Do not alter this cable puller. Doing so will void the warranty.
Guards and safety features are provided for your protection.
Do not use an extension cord longer than 100’. Extension cord
should be a minimum of 12 gauge wire with ground.
FAILURE TO OBSERVE THESE WARNINGS CAN RESULT IN SEVERE
INJURY OR DEATH.

ITOOLCO CANNON 12K USER’S GUIDE
1801C12KUG
Page | 7
WARNING – ROPE HAZARDS
Do not use nylon or polypropylene rope, extreme force can be
stored when rope stretches. Inspect all aspects of the rope before
each use.
Only use 9/16” diameter or larger double braided composite
pulling rope with a minimum average breaking strength of
32,000 lb.
Pulling rope should be the only thing in contact with the capstan.
Never let swivels, grips, etc. come in contact with the capstan.
Keep as much rope confined in conduit as possible. This will help
prevent injury should the rope break.
Do not wrap rope around any body parts. Do not wrap rope
around wrists.
Always keep rope away from operator’s feet.
Rope must always be pulled over a rotating sheave. If a sheave
does not rotate, turn cable puller off immediately and determine
problem before continuing the pull.
Never allow rope to slip on a rotating capstan for more than a
couple of seconds. The rope will wear in that spot and could
break under pressure. If you need to stop the pull, turn the cable
puller off and tie the rope off to hold it in place until you restart
the pull.
Never allow rope to overlap on the capstan. If this condition
begins to occur, immediately release the tailing force on the
rope. To do this, stop the cable puller, switch to reverse gear,
unload capstan, stop puller again, place in forward gear, and
finish the pull.
The pulling rope must come in contact with all the sheaves used
in the boom system.
FAILURE TO OBSERVE THESE WARNINGS CAN RESULT IN SEVERE
INJURY OR DEATH.
ITOOLCO CANNON 12K USER’S GUIDE
1801C12KUG
Page | 8
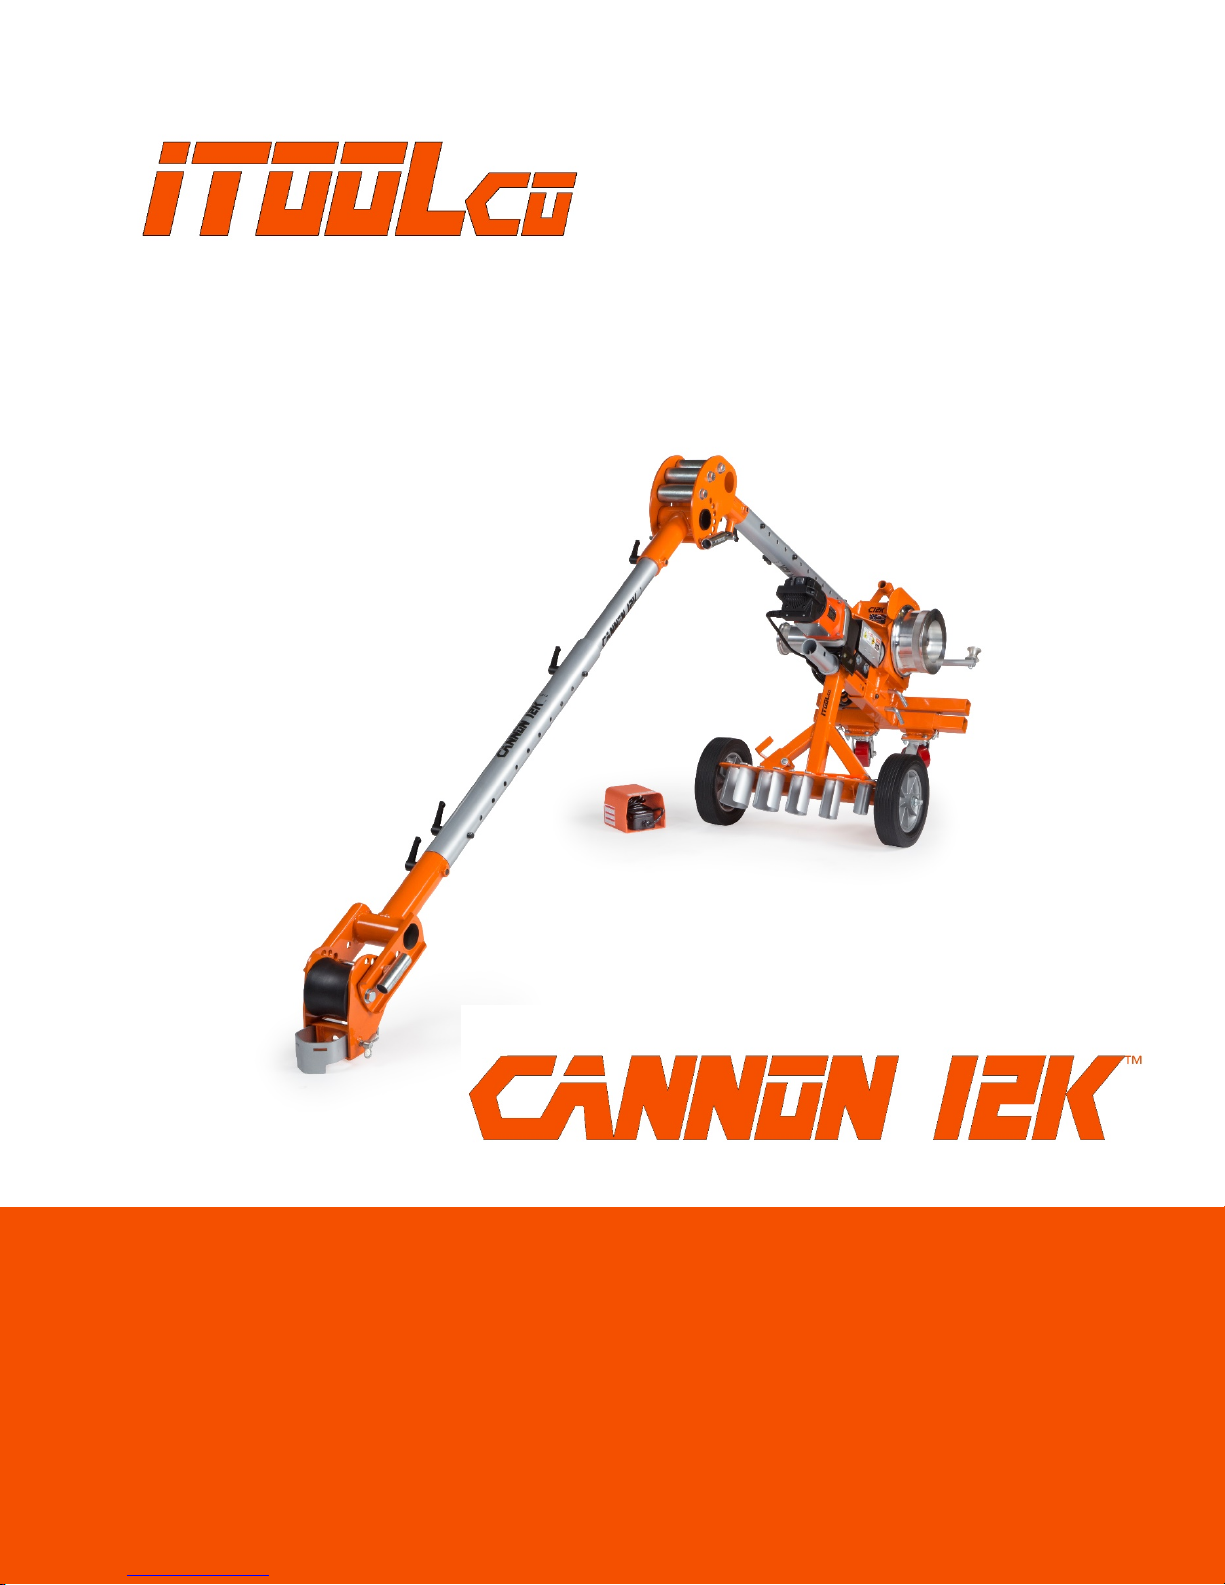
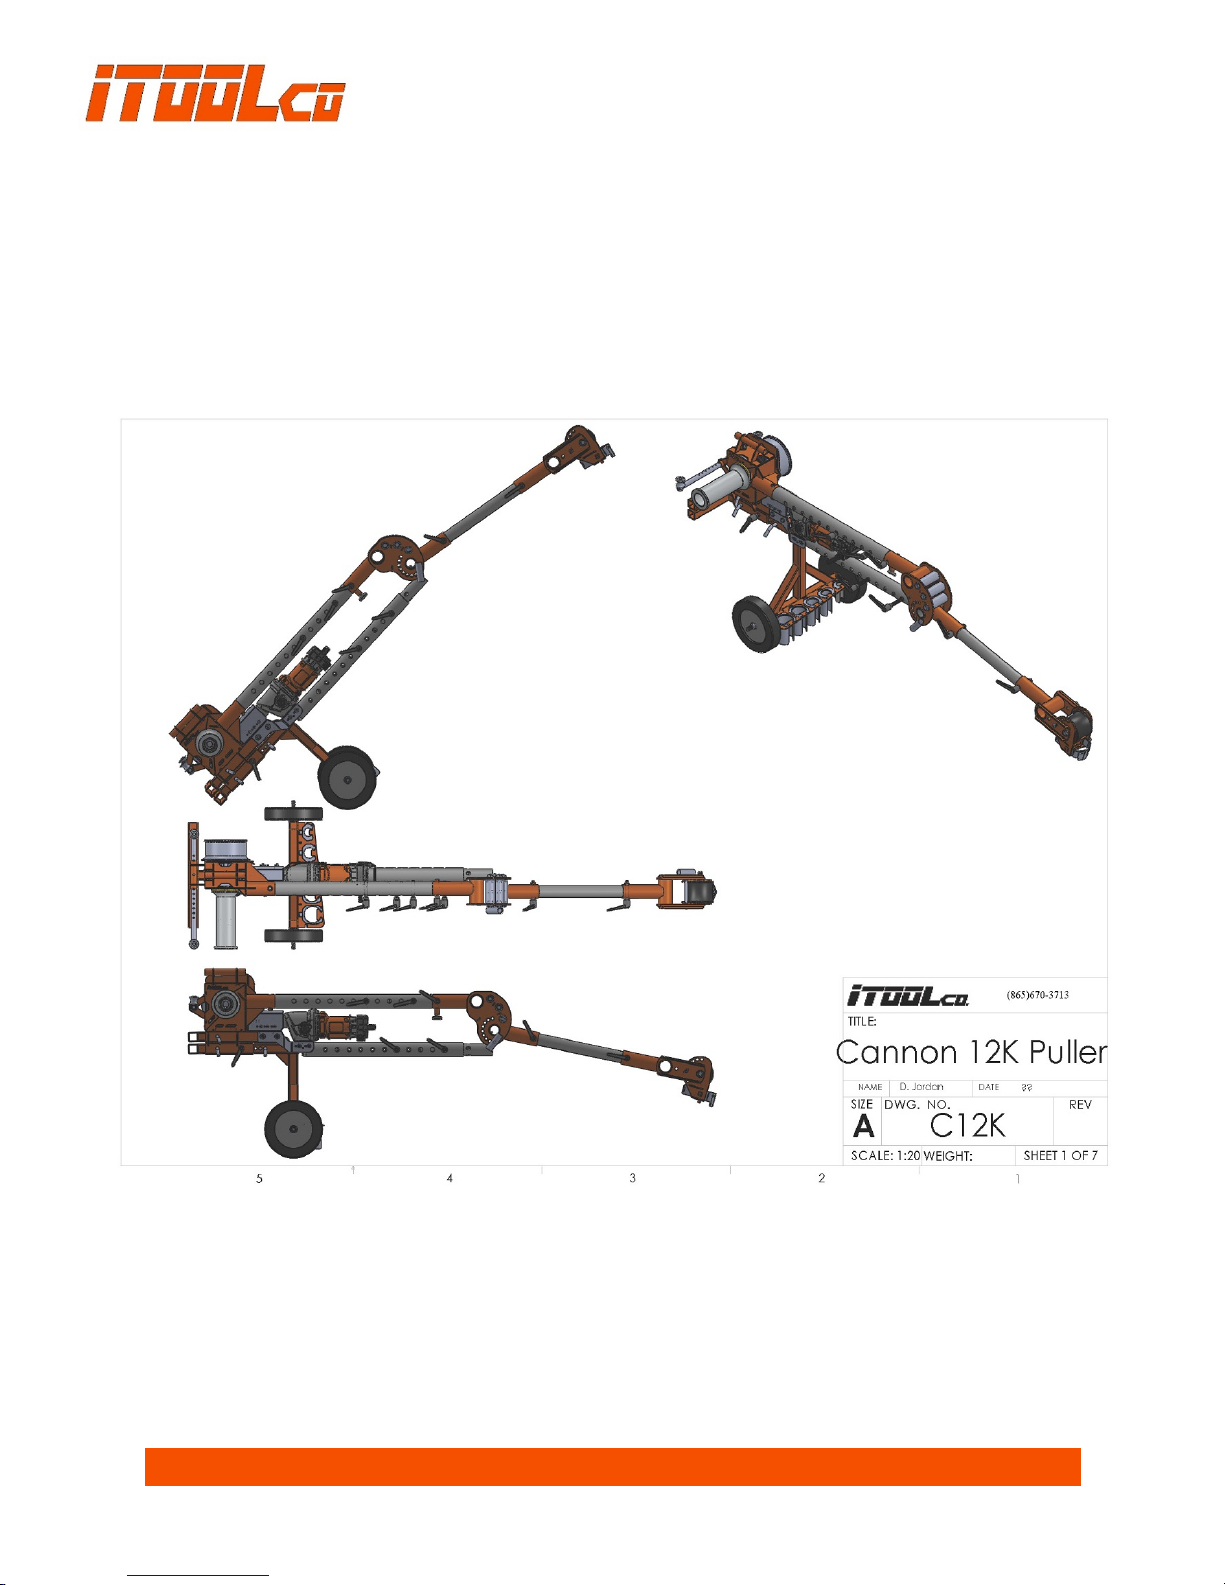
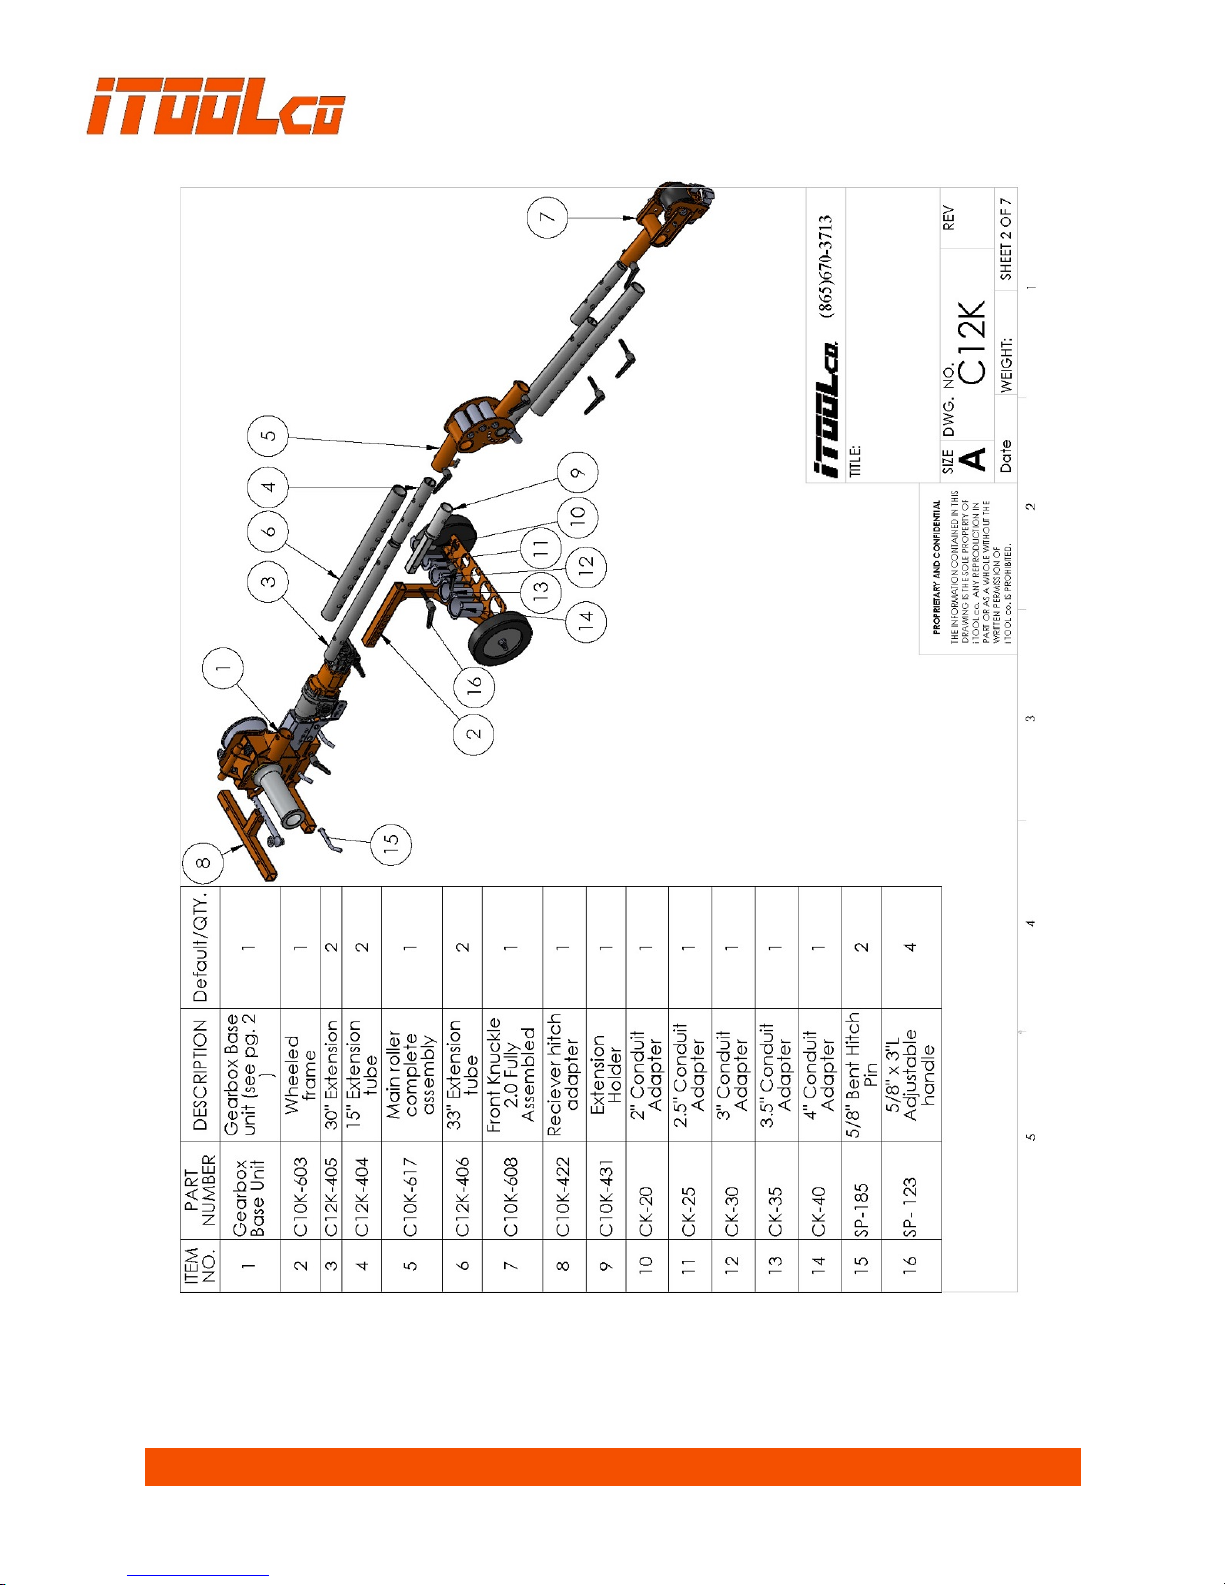
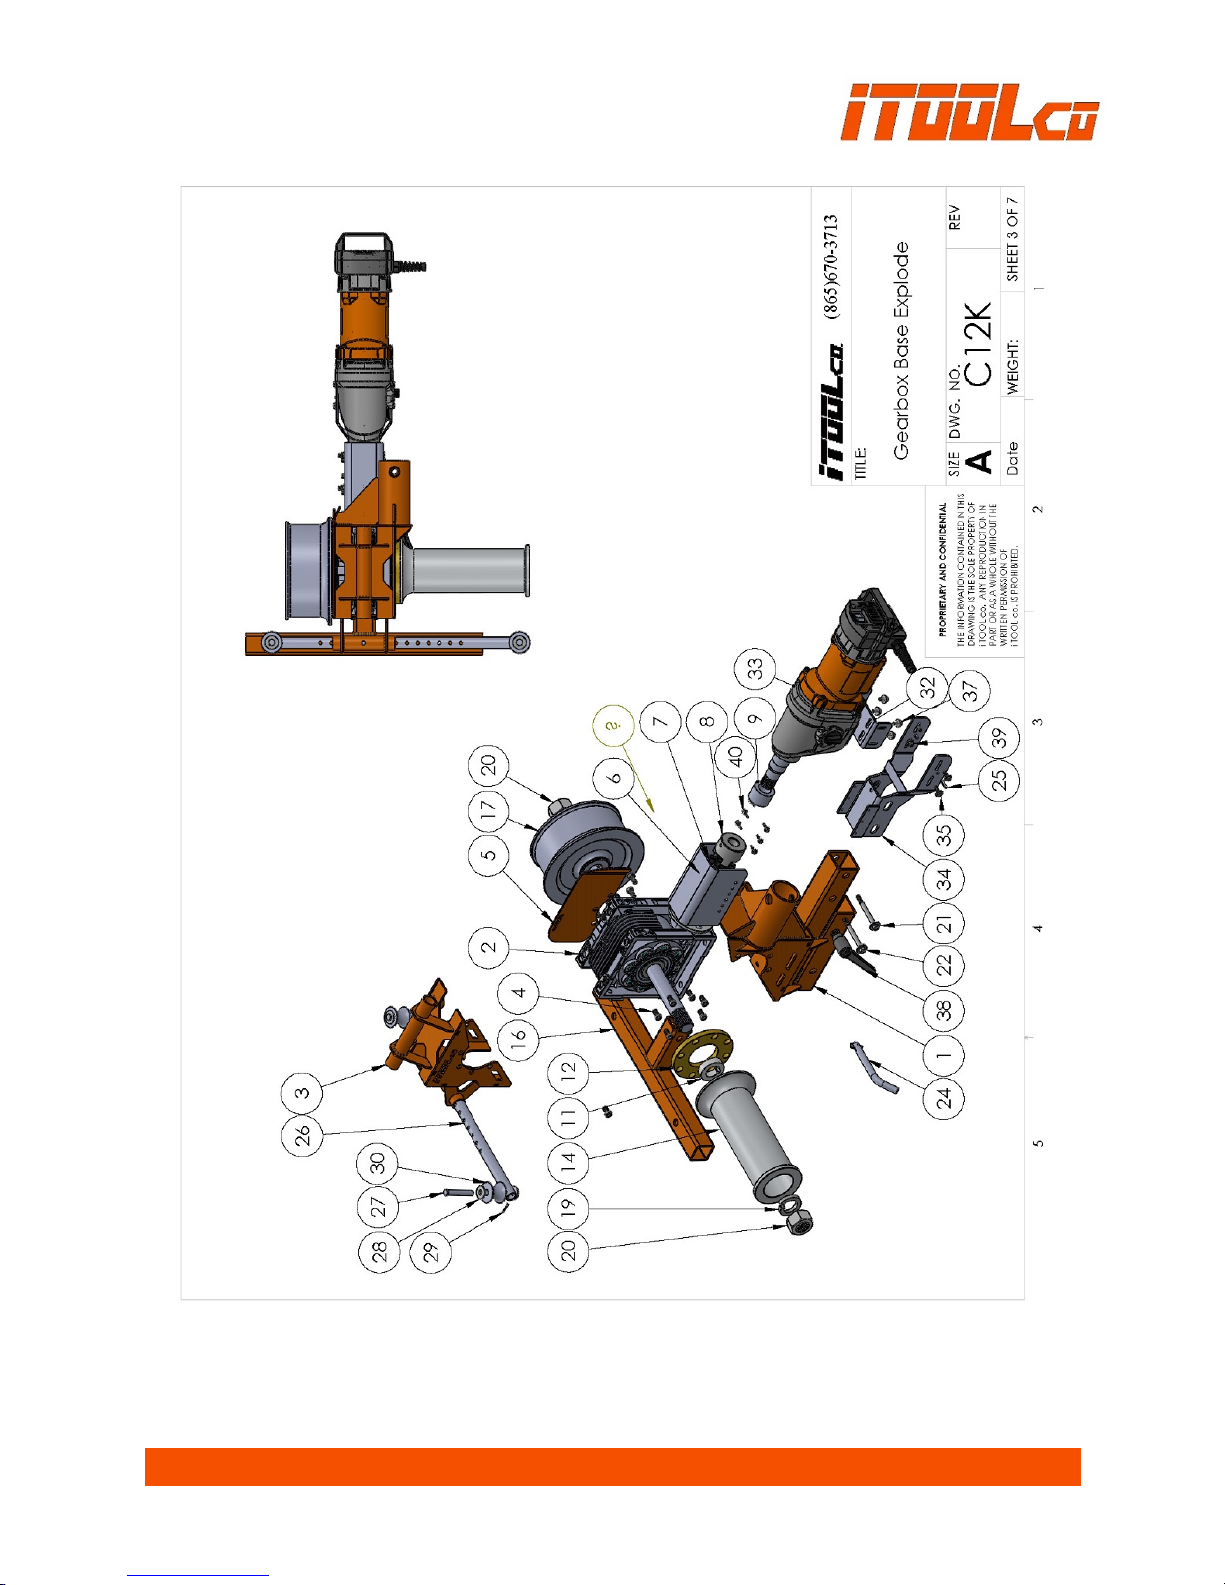
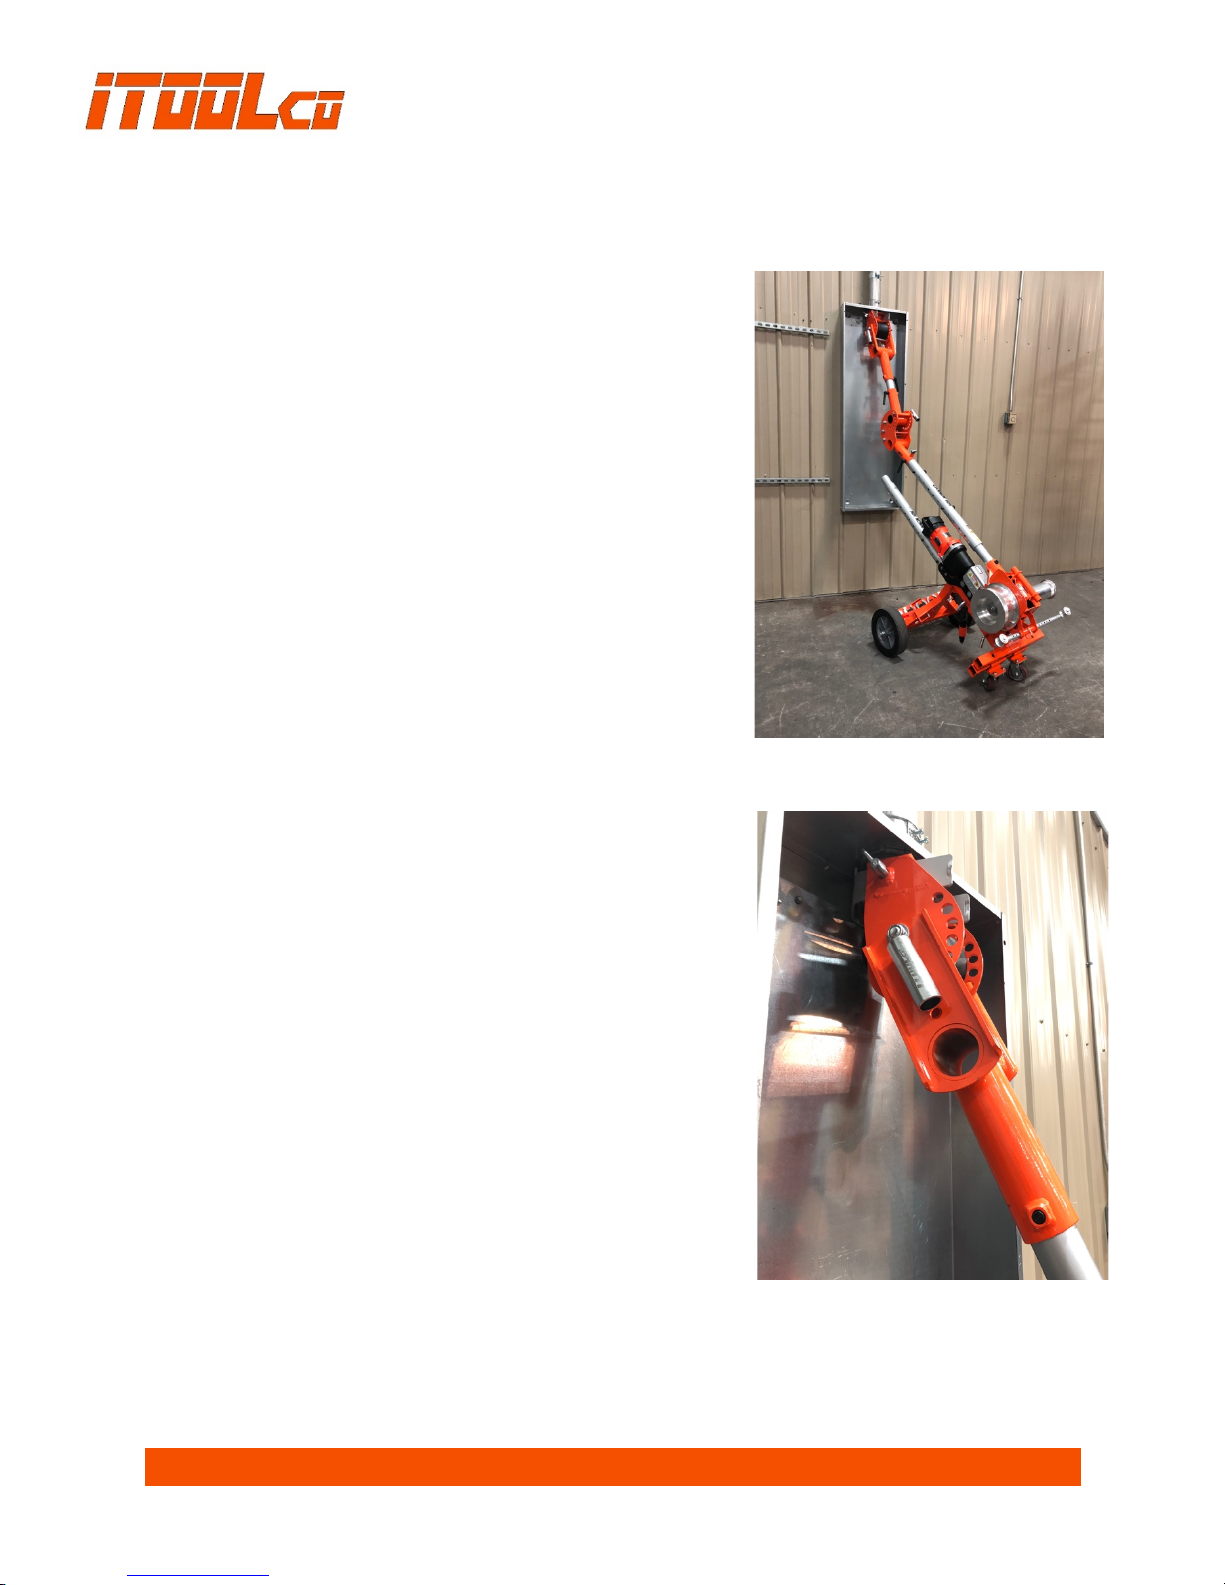
DESCRIPTION AND IDENTIFICATION
The ITOOLco Cannon 12K is a 12,000 lb. cable puller intended to pull medium to large wire through
conduit. It sets up in only minutes, and is a dual capstan, four-speed puller. The Cannon 12K can pull
at speeds up to 36 feet per minute. It does not need to be anchored to the ground, and is easy for
one person to set up, transport, and operate.

ITOOLCO CANNON 12K USER’S GUIDE
1801C12KUG
Page | 9
ITOOLCO CANNON 12K USER’S GUIDE
1801C12KUG
Page | 10
ITOOLCO CANNON 12K USER’S GUIDE
1801C12KUG
Page | 11

ITOOLCO CANNON 12K USER’S GUIDE
1801C12KUG
Page | 12

ITOOLCO CANNON 12K USER’S GUIDE
1801C12KUG
Page | 13

ITOOLCO CANNON 12K USER’S GUIDE
1801C12KUG
Page | 14
ITOOLCO CANNON 12K USER’S GUIDE
1801C12KUG
Page | 15
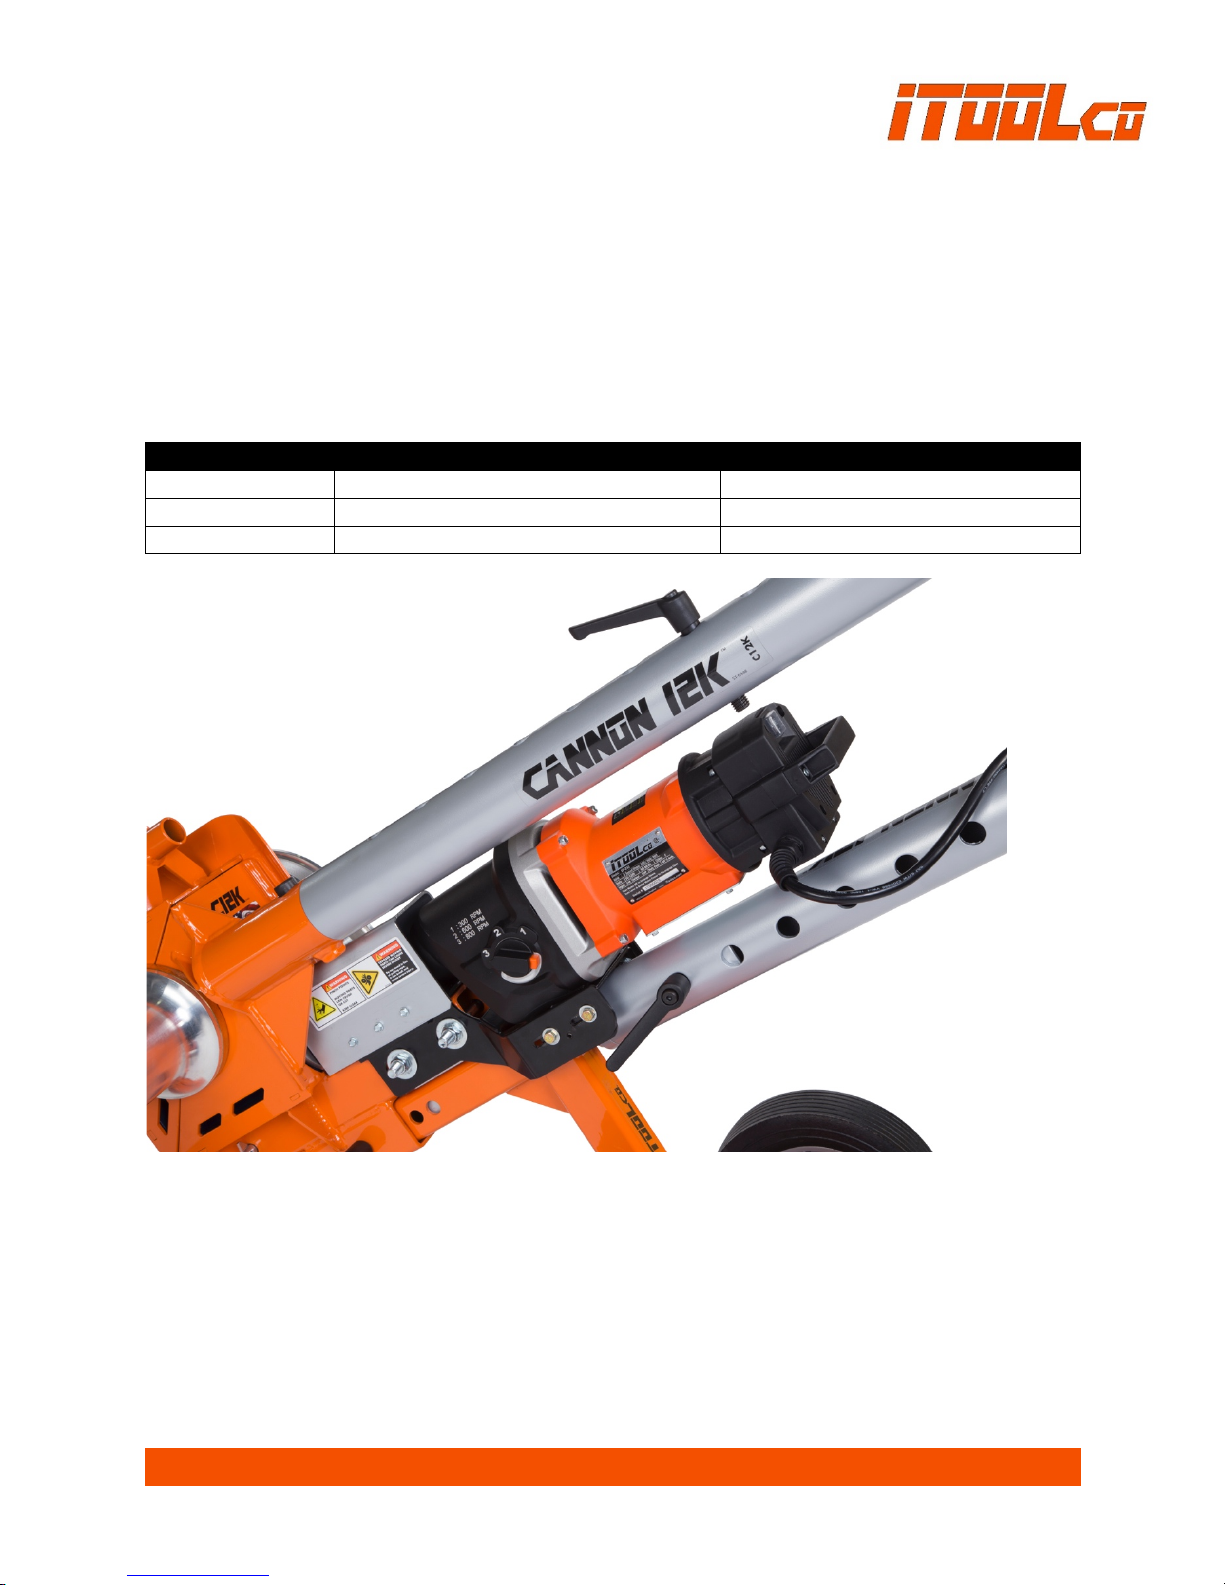
SET UP AND OPERATION
Gear Setting
Low Speed (small capstan)
High Speed (large capstan)
1
5 feet per minute
12 feet per minute
2
10 feet per minute
24 feet per minute
3
15 feet per minute
36 feet per minute
1. Always wear gloves, eye protection, and appropriate safety gear when working with pullers.
2. Remove iTOOLco Cannon 12K from shipping crate.
3. Insert 5 conduit adapters into base unit.
4. If necessary, install axle and wheels onto base.
5. iTOOLco Cannon 12K is designed to be used with a 20 amp, 6 speed coring motor.
6. Plug in the foot switch to the 100 volt power supply.
7. Set the desired speed.

ITOOLCO CANNON 12K USER’S GUIDE
1801C12KUG
Page | 16
Attaching Conduit Adapters
Option 1 - Using the universal adapter (Figure 1)
1. Loosen the 1/2” bolt on either side of the front head.
2. Slide the universal adapter in or out to accommodate the appropriate size of conduit, as
shown in Figure 3.
3. Make sure that the adapter engages the conduit, as shown in Figure 4.
Note: The universal adapter is to be used for pulling loads under 5,000 lbs. For loads over 5,000 lbs.,
the conduit adapters provided with your puller should always be utilized.
Option 2 - Using the appropriate 2” – 4” adapter (Figure 2)
1. Place the desired conduit adapter size into the top of the universal adapter. See Figures 5 and 6.
2. Slide the adapters toward the puller until the male pin on the adapter engages the female
opening and stops. Tighten the 1/2” bolt on the side of the head body. See Figure 7.
3. Remove the adjustment hitch pin. Slide the puller into position and place the conduit adapter
into the conduit. See Figure 8.
4. Replace all hitch pins.

ITOOLCO CANNON 12K USER’S GUIDE
1801C12KUG
Page | 17
Underground Wire Pull
1. Pivot front extension assembly as needed and reinsert pin.
2. Lift up front end and place conduit adapter into conduit. Always make sure conduit adapter sits
flush around the conduit you are pulling through.
3. Replace pin front assembly to lock all parts tight. (This must be pinned for the puller to operate
safely and properly.)
4. Make sure side set screw is tight on the universal adapter.
5. Do not stand in-line with the rope being pulled, (stand to the side of the puller) to avoid injury if
the rope breaks.
6. Use proper lubricant to make pulling jobs smoother.
7. Determine which capstan you will be using. For lighter loads at high speed, use the large
diameter capstan. For heavy loads, use the small diameter capstan. Note: To achieve the
optimum pulling speed when making a wire pull, listen to the sound of the motor. If it is
determined that the motor is straining, switch to the small diameter capstan.
8. Loosely wrap rope around the appropriate capstan. Start the capstan turning by stepping on the
included footswitch. Pull on the rope to produce some tension. The rope will begin to advance.
Note: If balling or backlashing occurs, reduce the number or wraps around the capstan.
9. Maintain tension on the rope. The rope will slip on the capstan during normal operation. Keep
the rope moving so that the capstan does not contact one spot on the rope for more than a few
seconds. If the rope stays in contact with the capstan for more than a few seconds, it will heat
up quickly and may break. Do not exceed about 45 N (10 lbs.) of tension on the rope. If the pull
becomes difficult, add another wrap or two of rope to the capstan. If excessive force becomes
necessary, stop the pull and inspect the set up.
ITOOLCO CANNON 12K USER’S GUIDE
1801C12KUG
Page | 18
Overhead Wire Pull
1. Convert the Cannon 12K to an overhead configuration by
removing the cinch pin at the main knuckle. Pull the snap
pin, and rotate the front end right or left to the desired
position.
2. To achieve optimum balance, slide base to adjust the
front knuckle weight.
3. Adjust front knuckle and main knuckle for proper
alignment of the adapter into and onto the conduit.
4. Use the universal adapter if the pull is under 5,000 lbs. If
the pull is over 5,000 lbs. attach the correct size adapter
and thread the rope through the adapter.
5. Install and tighten all pins.
6. Do not stand in-line with the rope being pulled, (stand to
the side of the puller) to avoid injury if the rope breaks.
Note: Use only low stretch rope designed for wire pulling,
5/8” to 7/8” sizes.
7. Use proper lubricant or no-lube wire to make pulling jobs
smoother.
8. Determine which capstan to use. For lighter loads at high
speed, use the large diameter capstan. For heavy loads,
use the small diameter capstan.
Note: To achieve optimum pulling speed, listen to the
sound of the motor. If the motor is straining, switch to
the small diameter capstan.
9. Loosely wrap rope around the appropriate capstan. Step
on the included foot switch to start the capstan turning.
Pull on the rope to produce some tension. The rope will
begin to advance. Note: If balling or backlashing occurs,
reduce the number of wraps around the capstan
10. Maintain tension on the rope. The rope will slip on the
capstan during normal operation. Keep the rope moving
so that it does not contact one area of the capstan for
more than a few seconds, or it may heat up and break.
Note: Do not exceed about 45 N (10 lb.) of tension on the
rope. If the pull becomes difficult, add another wrap or
two of rope to the capstan. If excessive force becomes
necessary, stop the pull and inspect the set up.

ITOOLCO CANNON 12K USER’S GUIDE
1801C12KUG
Page | 19
33” and 15” Extensions
Store Right on the
Cannon 12K
Pulling Out Extra Wire
1. If extra wire is needed, remove provided extensions from
carriage point.
2. Separate the front knuckle from the main knuckle.
3. Place extensions in line.
4. Then slide the extension over the extension tube.

ITOOLCO CANNON 12K USER’S GUIDE
1801C12KUG
Page | 20
Receiver Hitch Wire Pulls
Specifications
Length (fully extended)
188”
Width
30”
Weight/Mass
404 lb.
Pulling rope minimum average breaking strength
15,000 lbs.
Recommended pulling rope size
5/8” or
larger
Patented
1. Remove bottom pin from adjustable leg and remove front assembly from gear box section.
2. Remove wheel assembly.
3. Slide receiver hitch into trailer receiver hitch with the capstans horizontal.
4. Secure puller to receiver hitch with hitch pin.
Maintenance
Gear box is filled with high-temperature synthetic gear lubricant. No maintenance is required. Always
make sure that Cannon 12K is clean and in good working order before use. Replace any worn rollers or
rusty pins before use.

ITOOLCO CANNON 12K USER’S GUIDE
1801C12KUG
Page | 21
LIMITED WARRANTY: ITOOLCO CANNON 12K
iTOOLco warrants all new Cannon 12K covered by his agreement, when properly used, to be free from
defects in material and workmanship under normal use and service for which it is intended for a period
of one year from date of delivery by the dealer. Date of delivery shall be the date product is placed in
possession of the user. NORMAL WEAR FROM USE IS NOT PART OF THIS WARRANTY. This limited
warranty is extended to the original user only and is not transferrable to, nor enforceable by any other
person.
iTOOLco will replace free of charge any part(s) of the product found to be defective when such part(s) is
returned to iTOOLco at the address shown below, freight prepaid. If the part(s) if found to be defective,
iTOOLco will refund freight charges paid by you in retuning the defective part(s) and prepay
replacement part(s) freight charges. iTOOLco will not be responsible for more than replacement of any
defective part(s) and standard freight charges (parcel post or UPS ground rate) of any part(s) found to be
defective.
THIS IS THE EXCLUSIVE REMEDY. ITOOLCO SHALL NOT BE RESPONSIBLE OR LIABLE FOR ANY INCIDENTAL
OR CONSEUQNTIAL DAMAGES RESULTING FROM ANY DEFECTS COVERED BY THIS WARRANTY OR ANY
IMPLIED WARRANTY APPLICABLE TO THE PRODUCT INCLUDING, BUT NOT LIMITED TO, PROPERTY
DAMAGE, LOSS OF USE OF PRODUCT, LOSS OF TIME, LOSS OF PROFITS, INCONVENIENCE, COMMERCIAL
LOSS, LABOR COSTS, SERVICE TRIPS, AND MILEAGE.
Some states do not allow limitation on how long an implied warranty lasts, so the above limitation may
not apply to you.
Dealer/Distributor Warranty Claim Procedure
1. All warranty claims must be pre-approved by iTOOLco Warranty Department PRIOR to starting
any warranty work. Warranty work performed without prior approval will not be considered.
2. All claims must be handled through dealer/distributor.
3. Written approval must be received from iTOOLco before return of merchandise. A Return
Authorization is to be returned with the merchandise which is sent back.
4. All parts must be returned to iTOOLco at the address shown below, freight prepaid.
5. The serial number of the product and the date of delivery must accompany the part(s) being
returned.
6. If the part(s) is found to have failed because of a defect in material or workmanship,
replacement will be made on a no-charge basis, and the part(s) returned, freight prepaid.
Standard freight charges (parcel post or UPS ground rate) incurred in returning the part(s) will
be refunded.
7. For reasons of expediency, replacement and/or repair part(s) may be shipped as soon as
possible and billed to the dealer/distributor. When part(s) is returned, if it is covered under
warrant, credit will be issued for the part(s) and freight charges.
8. All parts found to be defective shall be retained by and shall become the property of iTOOLco.
This warranty gives you specific legal rights, and you may also have other rights which vary from
state to state.
Corporate Address: iTOOLco
100 Meco Lane
Oak Ridge, TN 37830

ITOOLCO CANNON 12K USER’S GUIDE
1801C12KUG
Page | 22
100 MECO LANE | OAK RIDGE, TN 37830 | 865.483.2040 | ITOOLCO.COM
© 2018 PROPERTY OF ITOOLCO
 Loading...