

Page 1

Wireless Bluetooth Keyboard User's Guide
Than ks for purch asing thi s Blue tooth Key board, it' s with stand ard 80 keys as we ll as 14 functi on keys.
This cr eative an d eas y-to-us e Blue tooth Key board wil l brin g you a who le new wirel ess life exp erience .
System Requirement
liPad , Mac OS .
lWindo ws OS(Wind ows XP, Windo ws Vist a, Win7 ).
Main Features
lBlue tooth Version : Bluetoo th V3.0, in BRO ADCOM 20730 chipset
l80ke ys design , with 1 4 mult i-funct ion keys
lScis sor-swi tch keypa d desi gn, comfo rtable and e rgonomic d esign
lBuil t-in inte lligent po wer manag e soft ware for pow er conser vation
lBuil t-in soft ware solut ions with Bl uetoot h human in terface de vice and com ply with the s tandard
versi on of the Blue tooth SIG Bl uetooth 3. 0
lPowe r by bui ld-in Li- ion rechar geable bat tery
lWorkin g ran ge: 10m
Specifications:
- Frequ ency band : 2.4 - 2.4 835GHz un license d ISM ba nd
- Recei ving sens itivity : -75bm (sta ndard)
- Batte ry Volumn : 310 mA
- Working Cu rrent:> 4mA
- Stan dby curr ent: 1mA
- Charg ing time: 3- 4 hour s
- RF outp ut power: up to 4b m as maximum , good for you r heal th with lowe st radiat es
- Opera tion dist ance: 0 - 10 m
- Dimen sion: 220 *120*7. 5(5.5) mm
- Net wei ght: 205g
<
0 1
Page 2
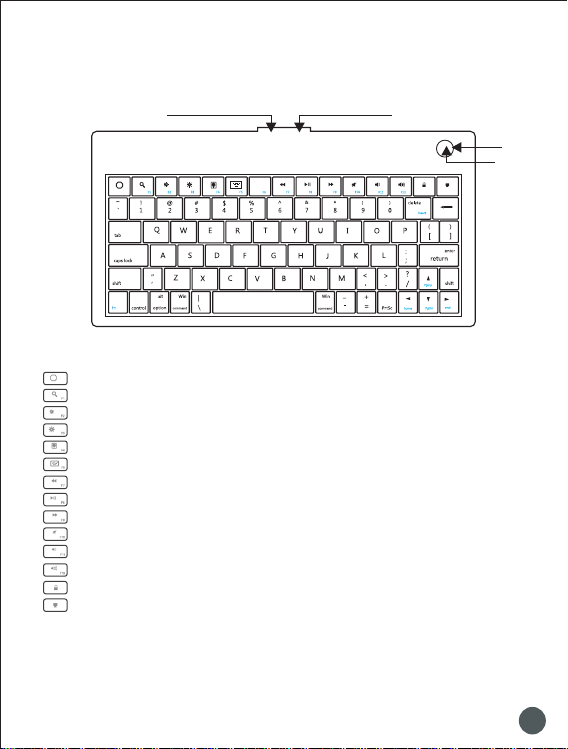
Multimedia F un ct io n With iPad
Powe r Butto n
Hom e
F1: S potli ght sea rch
F2: S creen l ight do wn
F3: S creen l ight up
F4: P ictur e frame m ode
F5: Vi rtu al ke ybo ard
F7: P revio us trac k
F8: P lay/P ause
F9: N ext tra ck
F10 : Mute
F11: Volu me down
F12 : Volum e up
Scr een loc k
Tur n off ba cklig ht
ON Off
USB Ch argin g Slot
LED
Pair ing But ton
0 2
Page 3

Installation Guide
Con nec t with iPad / iPhone4.0
1.Pu sh the power bu tton to “ON” , and press “PAIR ING” butt on. The blue li ght is flash ing,
now the ke yboard is in pa iring mod e.
2. On you r iPad / iP hone4.0 , select “se ttings ”---“Ge neral”.
3. Tur n “Blue tooth ” on, it wi ll star t searc hing bl uetoo th devi ces.
4. On ce your d evice f inds th e keybo ard, se lect “B lueto oth Key board ” from th e list.
5. Your de vice wi ll now gi ve you a 6 or 4 d igit pa sskey. E nter th is key on to the ke yboar d, and pr ess Ent er to
com plete t he pair ing(a lso on th e keybo ard).
Now t he keyb oard is c onnec t with yo ur iPad s ucc ess fully .
0 3
Page 4

Connect w it h co mputer
Bef ore you c onnec t the Blu etoot h Keybo ard, pl ease ma ke sure t here is b lueto oth fun ction i n your
com puter.
Sof tware a vaila ble lik e Widcom m(Rec ommen ded), I VT or the M icro soft bu ilt-i n softw are.. .
1.Tu rn the ke yboar d ON, and p ress th e pairi ng butt on. The b lue lig ht is fla shing , now the k eyboa rd is in pa iring m ode.
A: Matc h on Wi dco mm ( rec ommen ded)
1. Do uble cl ick the I con , the m ain Wind ow pops u p; sele ct Blue tooth - --Add
Blu etoot h facil ity. Cli ck Next b utton I n the Set up Guil d windo w.
0 4
Page 5

Blu etoot h
key board
2. Wh en the sy stem fi nds the K eyboa rd, sel ect it an d click N ext.
3. In put the s tocha stic Ma tch Cod e in blue tooth k eyboa rd, and p ress En ter.
0 5
Page 6

4.No w you can u se your k eyboa rd at eas e.
Tip s:
If no s ignal r eceiv ed afte r 10 minu tes, th e keybo ard wil l chang e to the po wer saf e model . If you wa nt to
mak e it into u se, jus t click t he Ent er key. Af ter the c onnec tion be tween t he keyb oard an d dongl e, if
you d rag off t he Dong le or tur n off the Co mpute r, the ke yboa rd will s hut dow n, clic k the En ter
the k eyboa rd will w ake it up .
B. Match on M ic rosoft bu il t- in software
1. Ma ke sure t hat the B lueto oth Fun ction h as been a ctiva ted. Do uble cl ick the B lueto oth Ico n on the
Task B ar or in th e Contr ol Pane l, open t he Blu etoot h Manag ement win dow, cli ck Add , ti ck off
aci lity is r eady fo r searc hing , cli ck Nex t
“
”
“
” ”
“
”
“ “
”
“ ”
key o f
0 6
0 7
Page 7

Page 8

2. Wait t ill the k eyboa rd is fou nd, sel ect key board a nd clic k Next ..
Blu etoot h keybo ard
“
”
0 8
Page 9

3. Se lect Ch oose a pa ss key fo r me, clic k Next.
4. In put the p ass key a nd pres s Enter i n bluet ooth ke yboar d, click N ext, the s ystem w ill fin ish the
ins talla tion of t he new fa cilit y autom atica lly.
0 9
Page 10

C. Ma tch on IV T Softw are
1. Ma ke sure t hat the B lueto oth fun ction i s activ e. Doub le clic k the Blu etoot h Icon, o pen the
Man ageme nt wind ow, sele ct S earch f or Blue tooth f acili ties or c lick th e Round B all in th e middl e of
.
the w indow
2. Cl ick the B lueto oth Key board f ound, c lick th e right b utton f or Refr esh Ser vice.
3. Se lect th e Bluet ooth Ke yboar d again , click t he righ t butto n for Con nect- Bluet ooth In put Ser vice,
inp ut the st ochas tic pas s key, the s ystem w ill aut o insta ll the HI D facil ity. After t hat you c an use yo ur
Blu etoot h Keybo ard at ea se.
1 0
Page 11

FAQ:
If un able to c onnec t the Blu etoot h Keybo ard to th e compu ter, or th e Keybo ard wor k uncon venti onall y,
ple ase try t he step s below :
1.Be fore yo u use you r Bluet ooth Ke yboar d, plea se make s ure you h ave don e the Blu etoot h Dongl e
ins talla tion pr ocedu re, and t he Blue tooth f acili ty is tur ned on.
2.Ma ke sure t hat the C omput er is con necte d to the Bl uetoo th Keyb oard. I f they ar e match ed to eac h
oth er befo re, the n under t he Stan dby Sta te, jus t click t he ent er key of t he keyb oard.
3.Ma ke sure t hat the k eyboa rd is wit hin the e ffect ive ran ge--- 10M.
4.Ma ke sure t hat the re's no c hange o f the Blu etoot h facil ity. If an ythin g chang ed, ple ase kin d remat ch.
5.If y our Blu etoot h facil ity is co nnect ed to oth er Blue tooth p roduc ts, ple ase kin dly con firm th at the
spe ed of the B lueto oth fac ility i s enoug h.
6.Pl ease ki ndly ch eck the b atter ies. If t hey are s hort of p ower, re place t hem for n ew ones .
“
”
1 1
Page 12

:
1.F ill in th e card ac cordi ng to the f acts.
2.T he card m us t be se aled wi th fr an chi ser s c ac het , or it s
ine ffici ent.
3.G uaran tee dat e:If an y fault f ound wi thin 1yea r, our f ac tor y
rep air it fr eely.
4.T he foll owing sit uat io ns ar e not w it hin g uar an tee r ange:
(1) Man-m ad e mis takes . eg: the dis rep ai r of sh ell o r botto n.
(2) Assem ble or di sassemb le it b y on ese lf.
(3) Opera te it bey on d tem perat ure , hu mid ity r at ing s.
(4) Beyon d the guara nte e da te.
(5) Other f au lts w hich ar e not m ad e by ou r fac to ry
5.I f need gu arant ee, ple ase conta ct th e franc his er w hom y ou
pur chase t he Mous e froma nd conf ixm it.
6.P lease kee p the g ua ran tee p ro per ly. We w on t su ppl y it
aga in if you l ose it.
Page 13

FCC STATEMENT
protection against harmfulinterference in a
nterference to radio or television
interference by one or more of
1. This device complies with Part 15 of the FCC Rules. Operation is subject to the following two
conditions:
(1) This device may not cause harmful interference.
(2) This device must accept any interferencereceived, including interference that may cause
undesired operation.
2. Changes or modifications not expressly approved by the party responsible for compliance could
void the user's authority to operate the equipment.
NOTE: This equipment has been tested and found to comply with the limits for a Class B digital
device, pursuant to Part 15 of the FCC Rules.These limits are designed to providereasonable
This equipment generates uses and can radiate radio frequency energy and, if not installed and
used in accordance with the instructions, may cause harmful interference to radio communications.
However,there is no guarantee that interference will not occur in a particular installation. If this
equipment does cause harmful i
determined by turning the equipment off and on, the user is encouraged to try to correct the
Reorient or relocate the receiving antenna.
Increase the separation between the equipment and receiver.
Connect the equipment into an outlet on a circuit different from that to which the receiver is
connected.
Consult the dealer or an experienced radio/TV technician for help.
RF warning statement:
The device has been evaluated to meet general RF exposure requirement. The device can be used
in portable exposure condition without restriction.
residential installation.
reception, which can be
the following measures:
This device complies with Part 15 of the FCC Rules.
Operation is subject to the following two conditions:
(1) this device may not cause harmful interference,
and (2) this device must accept any interference
received, including interference that may cause
undesired operation.
FCC ID:
VYVPA-BK07
 Loading...