

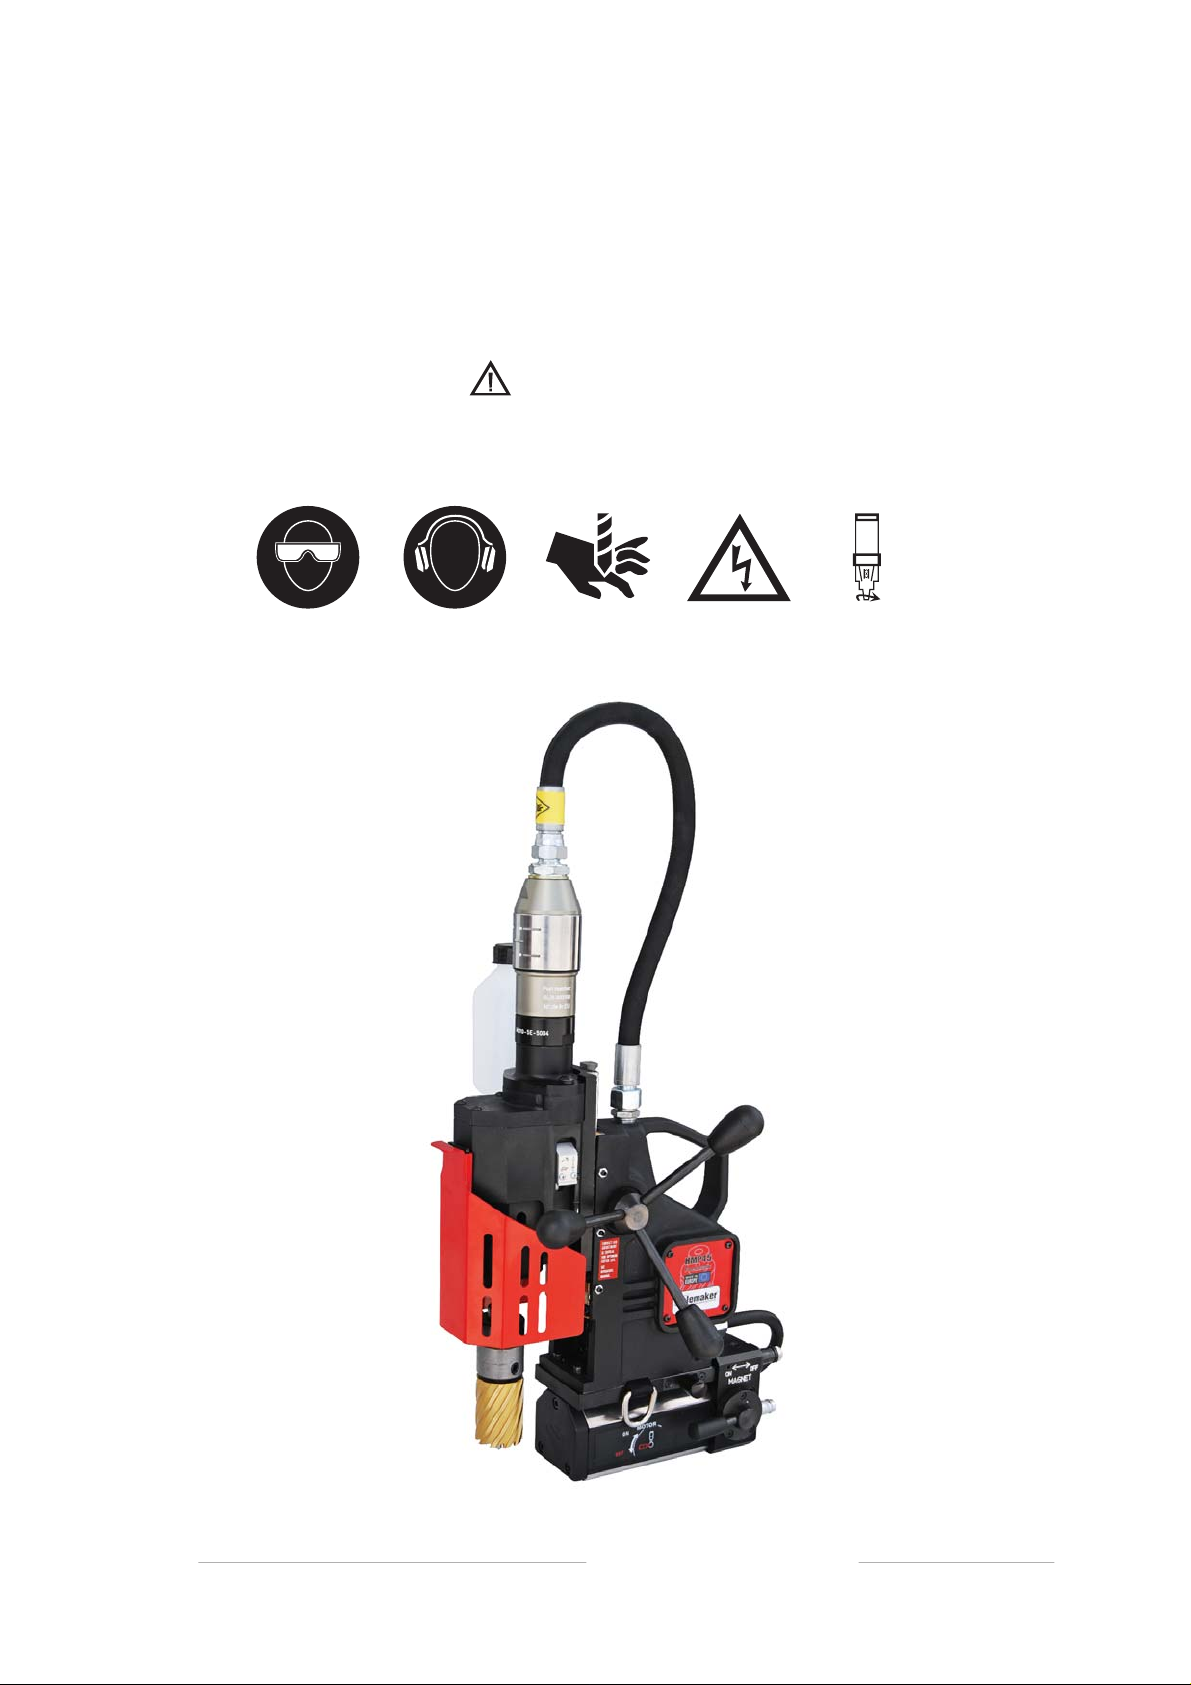
HOLEMAKER HMP45
Holemaker Portable Magnetic Drilling Machine
OPERATOR’S MANUAL
WARNING!
BEFORE USE, ENSURE EVERYONE USING THIS MACHINE READS AND UNDERSTANDS
ALL SAFETY AND OPERATING INSTRUCTIONS IN THIS MANUAL .
EYE PROTECTION
REQUIRED
HEARING PROTECTION
REQUIRED
NEVER PLACE
FINGERS NEAR
CUTTING AREA OR
MACHINE ARBOR
LINE VOLTAGE
PRESENT
BEWARE OF
ROTATING
MACHINE PARTS
Ver: 1.10 18/08/2015
esahcruP fo etaD # laireS

®
HMP45 OPERATOR’S MANUAL
LIMITED WARRANTY
Industrial Tool & Machinery Sales (hereinafter refered to as ITMS) will, within twelve (12)
months from the original date of purchase, repair or replace any goods found to be defective
in materials or workmanship.
This warranty is void if the item has been damaged by accident, neglect, improper service or
other causes not arising out of defects in materials or workmanship. This warranty does not
apply to machines and/or components which have been altered, changed, or modified in any
way, or subjected to overloading or use beyond recommended capacities and specifications.
Worn componentry due to normal wear and tear is not a warranty claim. Goods returned
defective shall be returned prepaid freight to ITMS or agreed repair agent, which shall be the
buyer’s sole and exclusive remedy for defective goods. ITMS accepts no additional liability
pursuant to this guarantee for the costs of travelling or transportation of the product or parts to
and from ITMS or the service agent or dealer, such costs are not included in this warranty.
Our goods come with guarantees which cannot be excluded under the Australian Consumer
Law. You are entitled to replacement or refund for a major failure and to compensation
for other reasonably foreseeable loss or damage. You are also entitled to have the goods
repaired or replaced if the goods fail to be of acceptable quality and the failure does not
amount to a major failure.
THE MANUFACTURER RESERVES THE RIGHT TO MAKE IMPROVEMENTS AND
MODIFICATIONS TO DESIGN WITHOUT PRIOR NOTICE.
PRODUCTS IMPORTED AND DISTRIBUTED NATIONALLY BY:
INDUSTRIAL TOOL & MACHINERY SALES
18 BUSINESS ST, YATALA QLD 4207
T: 07 3287 1114 E: sales@industrialtool.com.au
F: 07 3287 1115 W: www.industrialtool.com.au
2 www.holemaker.com

®
HMP45 OPERATOR’S MANUAL
CONTENTS
1. GENERAL SAFETY ADVICE..............................................................................4
2. START UP AND OPERATION............................................................................6
3. ADJUSTMENTS, MAINTENANCE & SERVICE................................................16
4. TECHNICAL DATA............................................................................................19
The Holemaker HMP45 Package consists of:
• metal box 1pc
• HMP45 drilling machine 1pc
• #2 Morse Taper arbor 1pc
• coolant system 1pc
• chip guard 1pc
• spoke handles 3pcs
• hex wrench s=4 1pc
• hex wrench s=5 1pc
• drill drift, MT2 1pc
• safety chain with snap hook 1pc
• operator’s manual 1pc
BEFORE YOU START WORK WITH THE MACHINE, PLEASE READ THESE
INSTRUCTIONS CAREFULLY AND USE ALL RECOMMENDATIONS.
www.holemaker.com 3

®
rawing 1.
xamples how safety chain should be fastened.
.
HMP45 OPERATOR’S MANUAL
1. GENERAL SAFETY ADVICE
Drilling machine must not be used when:
1. The operator has not read the Operator’s Manual.
2. The work to be done is not in agreement with the recommendations in this Manual.
3. Drilling machine is not complete or has been repaired with non-original parts.
4. Power supply parameters do not conform to those stated on the motor’s plate.
5. Machines operator has not checked condition of the drilling machine, condition of air hose,
control panel or cutting tool.
6. Machine is not secured with safety chain as a protection from falling down especially when
used at heights or in vertical or upside-down positions.
7. Bystanders are present in the immediate vicinity of machine.
Important rules of safe use of drilling machine
1. Before attempting to work with the machine check condition of air hose and coupling.
2. Make sure that the drill is supplied with purified air and oiled.
3. Machine can be used outdoors, but is not weatherproof. Do not expose to rain, snow or
frost.
4. Machine should not be used on: rusty surfaces, steel plates covered with paint, uneven
surfaces, or steel plate which is being welded on.
5. In all cases always use a safety chain/strap. See drawing 1. The safety chain must not be
loose!
6. Do not use the machine in explosion hazard zones.
7. Do not start work if the machine has excessive play on guide slides.
8. Always wear safety goggles and ear protection.
Drawing 1.
Examples how safety chain should be fastened.
4 www.holemaker.com

®
HMP45 OPERATOR’S MANUAL
9. Do not remove metal chips with bare hands, always use gloves.
10. Do not touch the spindle and cutting tool during work.
11. Cutting Tools must be fastened firmly.
12. Do not drill with blunt of damaged cutting tools.
13. Do not use annular cutters without a pilot pin, and arbors without an ejection spring.
Do not touch or replace the cutting tool with power source on
14. After use, always clean drilling machine from metal chips and cutting fluid.
15. Any maintenance and repair should be performed only when the machine is disconnected
from the air supply.
16. Before each use the machine should be checked for the presence of damage. Check
whether any of the parts are broken and all the that all parts are fasten properly.
17. In the case that the machine falls on a hard surface, from a height, is wet or is subjected
to other unfortunate events that could affect its technical state - work should be terminated
immediately and the machine should be sent to service for inspection as soon as possible.
This machine is not recommended to be used to drill on steel thinner than 10mm (3/8”).
On thin steel less than 10mm (3/8”) magnet’s adhesive power would be significantly
reduced which can cause machines failure or personal injury.
The pneumatic motor used in Holemaker HMP45 drilling machine is ATEX II2 G/D C IIC
T6;T4 certified, which is required for usage in explosion risk zones.
CAUTION: Never carry the drill by the motor’s air supply hose!
www.holemaker.com 5
®
D
D
HMP45 OPERATOR’S MANUAL
2. START UP AND OPERATION
Cutters and optional equipment features
The Holemaker HMP45 has a #2 Morse Taper spindle which can be used with twists drills,
annular cutters, tapping heads and reamers etc. that have a #2 Morse Taper shank.
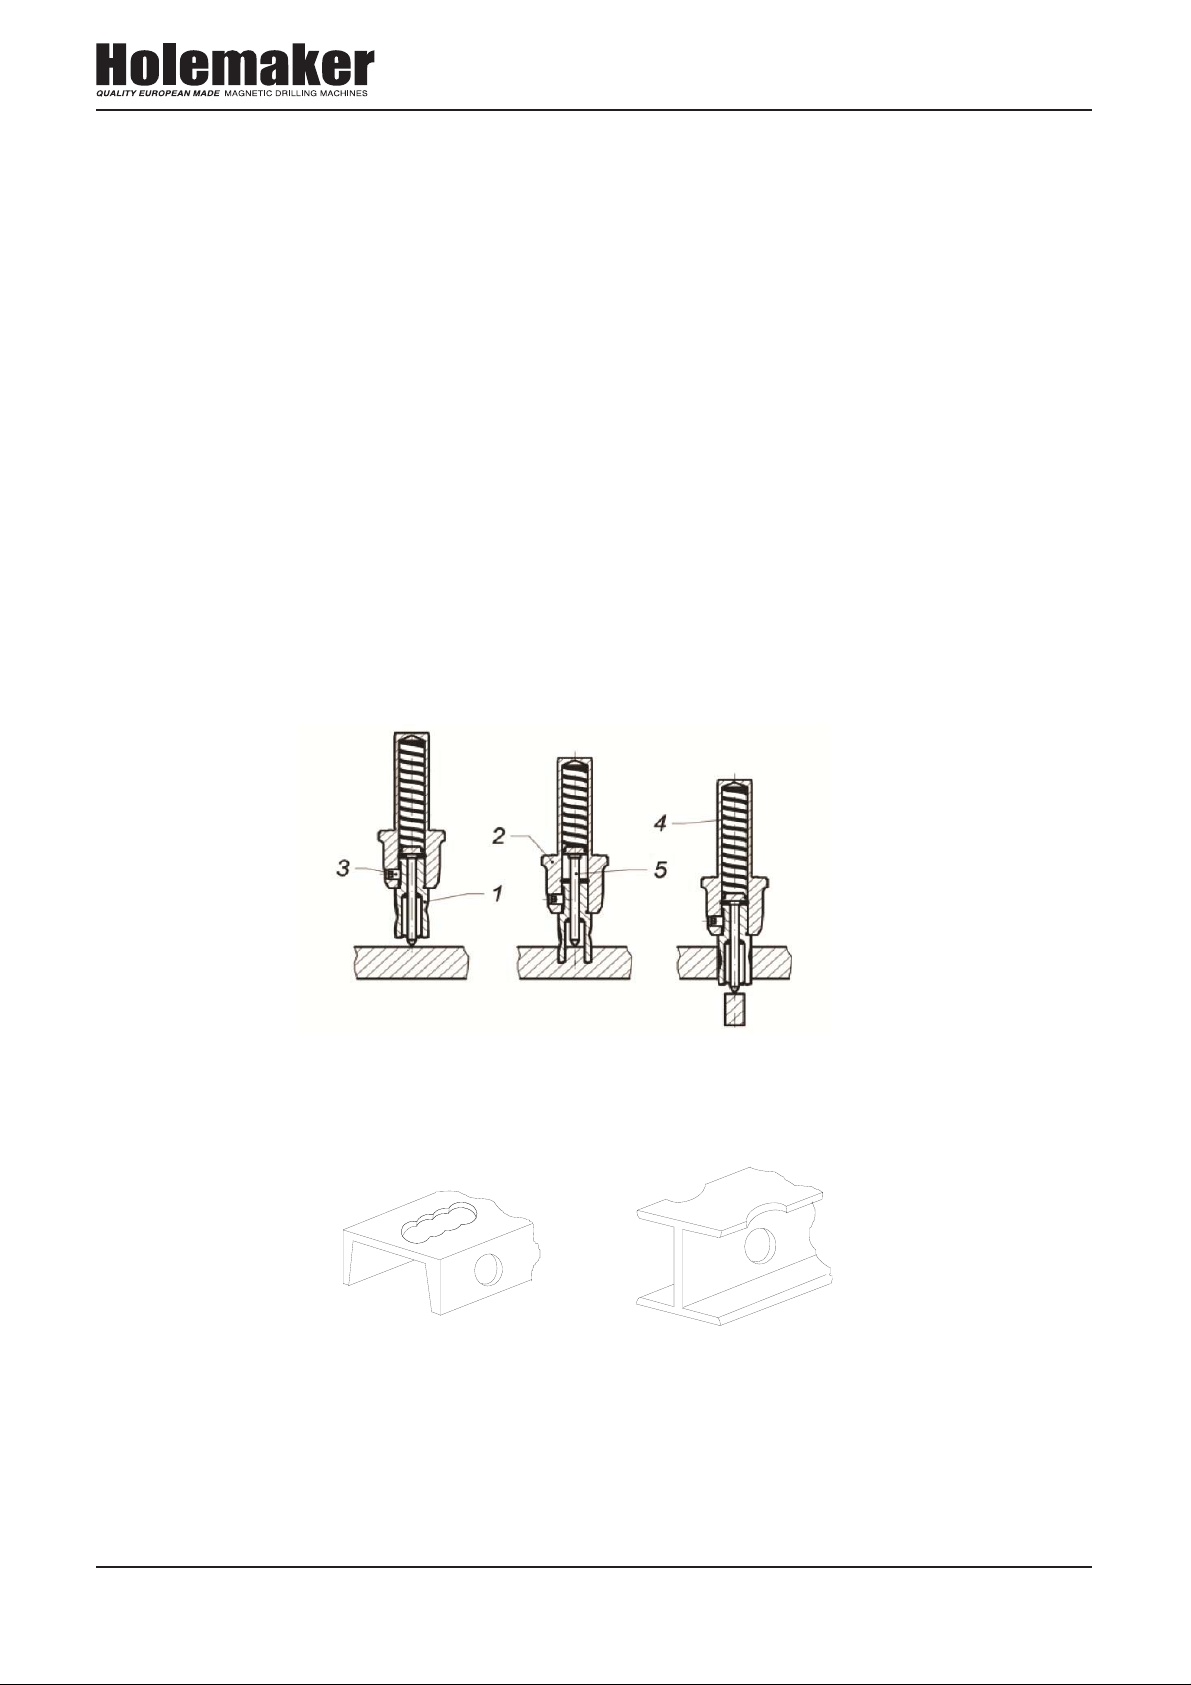
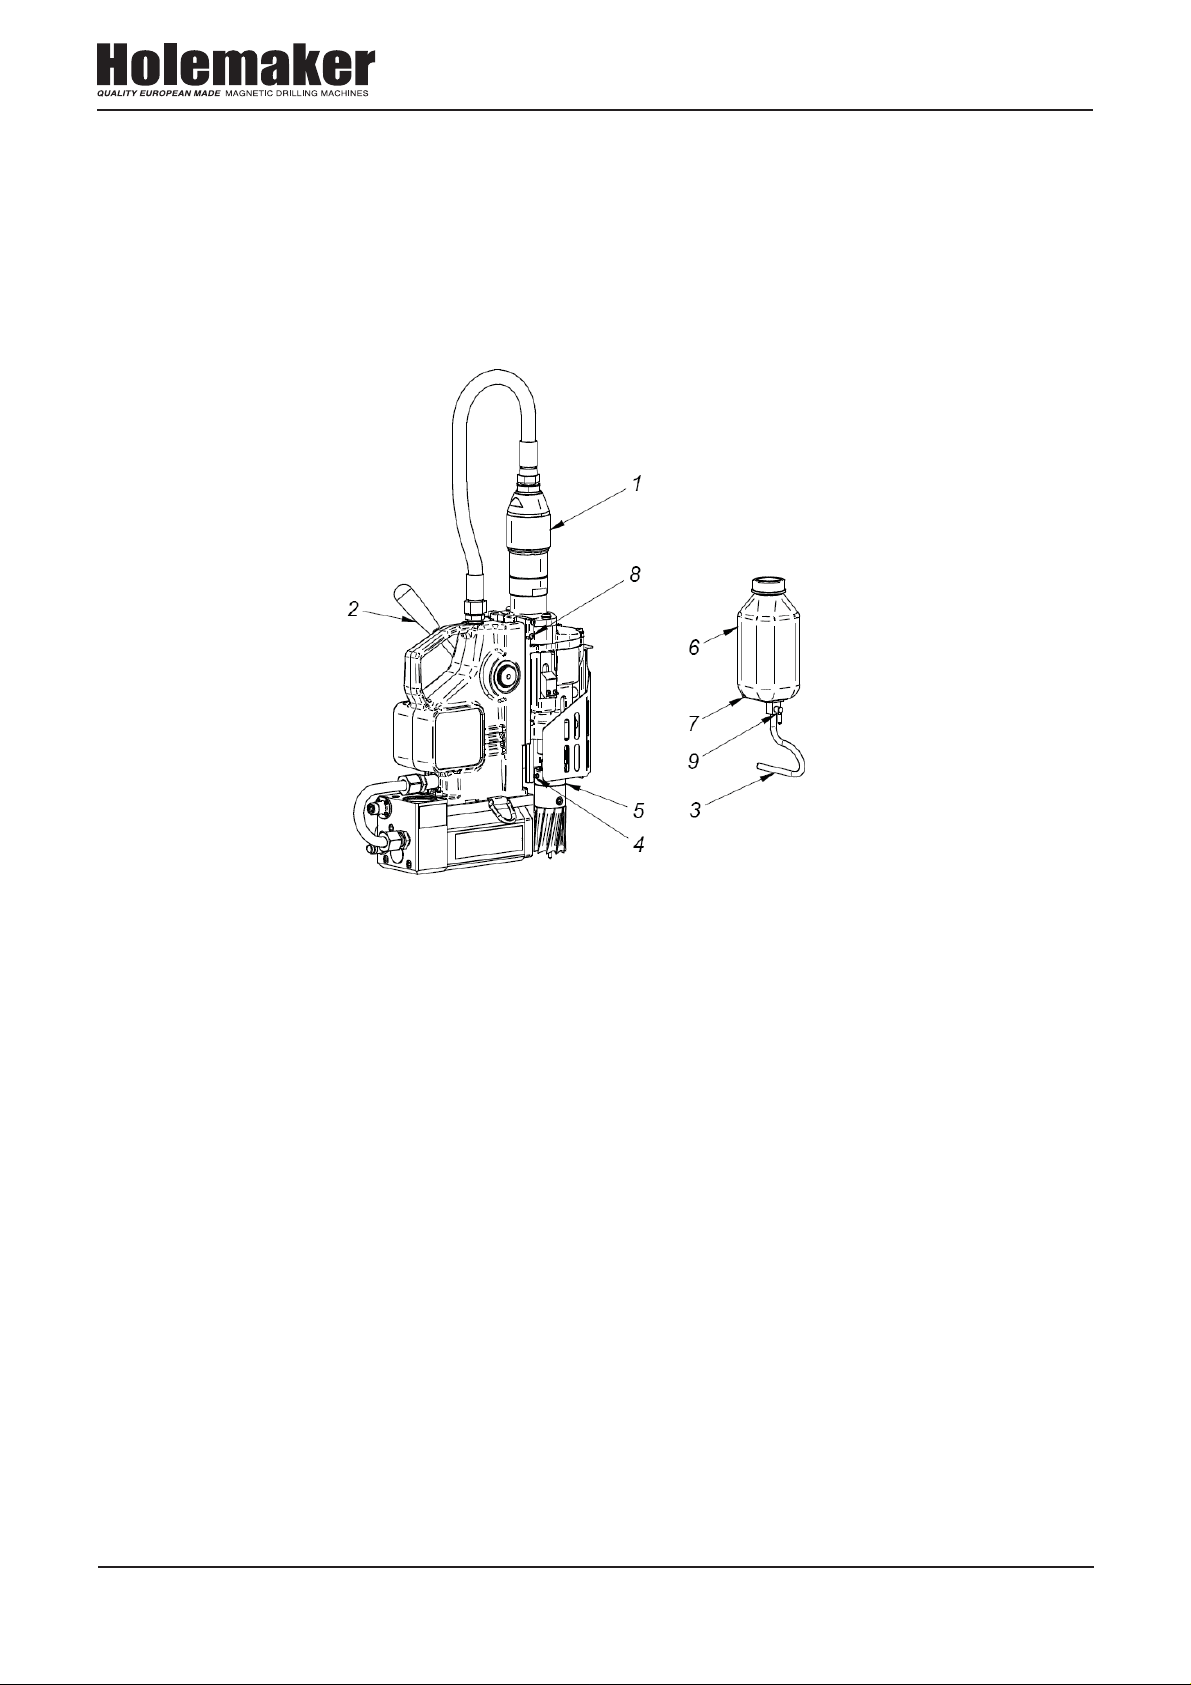
The Annular cutter (1) is located inside arbor body (2) and is fastened with grub screws (3).
When fastening the cutter in the arbour, ensure that the grub screws are firmly tightened to
avoid them coming loose during operation. It is important to position the cutter in relation to
the arbour in such a way that fixing flats on the cutter shank are positioned opposite to the
grub screws (3). Both grub screws(3) should be used to fasten the cutter. The Pilot Pin (5) is
located inside the cutter to easily position the annular cutter over centre of a planned hole.
During drilling as the cutter goes into the material, the pilot pin moves back into the arbour
body and pressurizes the discharge spring (4).That spring ejects the slug which is a byproduct of drilling the hole with a centre free cutter.
rawing 2. Principle of annular cutter’s work
rawing 3. A few types of holes that can be done with an annular cutter.
6 www.holemaker.com
®
HMP45 OPERATOR’S MANUAL
2.1 Installing and uninstalling the arbor
The arbor installation and uninstallation should be carried out when the machine is
turned off and disconnected from the air supply.
Installing the arbor:
a) Raise the cutter guard (2) to the maximum height
b) Clean the inside of the spindle using a cotton cloth,
c) Before mounting, clean off the lubricant from the new arbor (3),
d) Place the arbor with the tang on top, and place it in the spindle,
e) By turning the arbor, align the tang to the appropriate slot in the spindle,
f) Using a light impact from the bottom side, drive the arbor into the spindle.
1
2
3
Uninstalling the arbor:
a) Raise the guard, turn the spindle so that the opening in the spindle (1) is lined up with
the opening in the reducer body,
b) Place the drill drift (included as standard equipment) into the uncovered spindle
opening (1),
c) Hold down the arbor (3) with one hand,
d) Strike the drill drift with a hammer, taking care to not to damage the arbor,
e) Carefully remove the arbor from the socket in the spindle,
f) Remove the drill drift
www.holemaker.com 7
®
HMP45 OPERATOR’S MANUAL
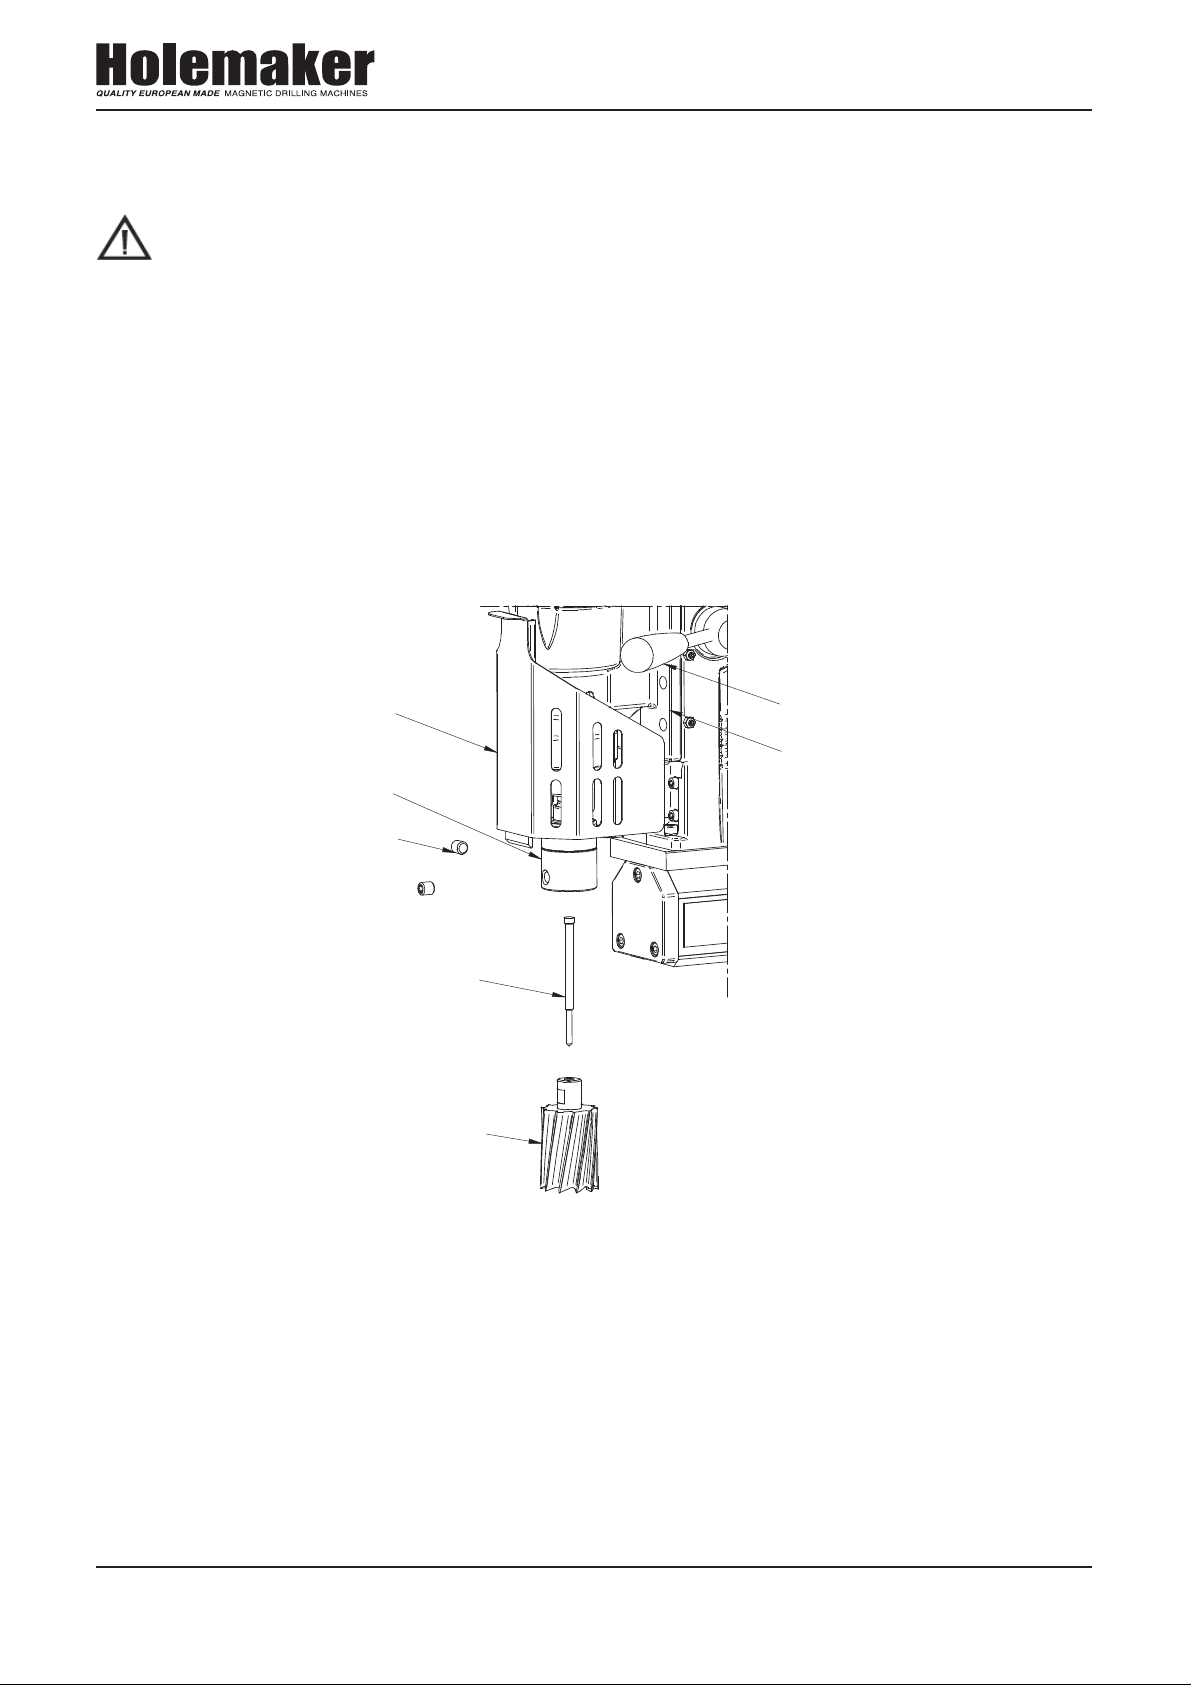
2.2 Installing and uninstalling an annular cutter
Annular cutter installation and uninstallation should be carried out when the machine is
turned off and disconnected from the air supply!
Installing the annular cutter:
1. Raise the drive and the slide (2) up using the feed handles (3);
2. Raise the guard (1) to the maximum height in order to attain access to the arbor (4) grub
screws (5);
3. Insert the appropriate type of pilot (6) into the annular cutter (7);
4. Position the annular cutter (7) with the cutter facing up, so that the flat sides of the milling
cutter are found facing the grub screws (5)
5. Put the annular cutter (7) into the arbor socket (4);
6. Tighten the grub screws securely (5), locking onto the flat sections of the annular cutter.
1
4
5
6
7
3
2
Uninstalling the annular cutter:
1. Raise the drive and the slide (2) up using the feed handles (3);
2. Raise the guard (1) to the maximum height in order to attain access to the arbor (4) grub
screws (5).
3. Loosen the grub screws (5);
4. Remove the annular cutter (7) and the pilot pin (6) from the arbor socket (4).
8 www.holemaker.com
®
HMP45 OPERATOR’S MANUAL
2.3 Installing and uninstalling the coolant system
1. Place the machine in the vertical position,
2. Slide the drive and the slider (1) up using feed handles (2),
3. Place coolant bracket (7) with cooling unit (6) onto screws (8)
4. Connect the cooling conduit ending (3) with the coupling (4) found in the cooling ring (5).
Before starting the machine:
• Remove the bottle’s cap,
• Fill it with soluble cutting fluid,
• Replace bottle cap.
After fulfilling the above actions and making sure, that the system has been appropriately
fixed, and the cooling conduit (3) is placed correctly on the coolant coupling (4), the bottle cap
should be loosened by 1/3 of a turn. Turn on the valve (9), so that liquid travels to the hose,
after which the machine can be started (see II pt. 3)
After finishing work, one must remember to tighten the bottle cap and turn off the valve (9) (to
prevent liquid from leaking during the time that the machine is not being used) and uninstall
the cooling system (6) before placing the machine in the box.
Uninstalling the cooling system:
1. Place the machine in the vertical position,
2. Slide the drive and the slider (1) up using feed handles (2),
3. Disconnect the cooling conduit ending (3) and the coolant coupling (4) found in the cooling
ring (5).
4. Remove the cooling system.
www.holemaker.com 9

®
HMP45 OPERATOR’S MANUAL
2.4 Before first use:
• Steel elements of the drilling machine are protected for transit and storing with grease film.
• Before first start up of the machine all grease should be removed before each use all
handles should be screwed into pinion.
2.5 Before you cut
Control elements include:
• MAGNET switch,
• MOTOR switch.
ON
MAGNET
OFF
ON
MOTOR
OFF
To start the machine, follow these steps:
• Make sure that both the motor and magnet ON/OFF switch are in the OFF position.
• Plug machine into air supply, and position drill
• Slide the magnet ON/OFF switch to the ON position.
• Toggle the motor switch to ON position, after pulling back the safety latch of the switch.
• Once cut has been completed, toggle the motor ON/OFF switch to the off position.
• To position the machine in a new drilling spot, the magnetic base switch has to be toggled
to OFF position.
READ THE WHOLE INSTRUCTIONS MANUAL BEFORE ATTEMPTING TO START UP
2.6 Before you cut
• Before positioning the machine on work piece always make sure that:
• Work piece is made of ferrous steel (some grades of stainless or acid resistant steel
do not conduct magnetic flux)
10 www.holemaker.com

®
HMP45 OPERATOR’S MANUAL
• thickness of work piece is at least 10mm (3/8”)
• surface of steel under the magnet is flat
• wipe, brush or sand down clean surface where you intended to place the drilling machine,
so that you remove rust, paint, dirt etc. which would reduce adhesive power of the
electromagnetic base.
• Install drill bit, annular cutter or other tooling such as tapping head or reamer into the
machine before plugging it air supply. Then plug into air supply (see paragraph 2) and
position where you wish to drill. Place the machine so that the tool is over the centre of the
hole you intend to make and turn the magnetic base ON.
Prior to use always make sure that the machine is secured from falling down with
original chain
2.7 Cutting
• Select the right speed for the tool you intend to use (see the speeds chart in this manual).
Do not use water as the cutting fluid.
The coolant system is an integral part of the machine and should always be used.
Warning: The coolant system can only be used when drilling machine is in vertical
position. In other positions additional external source of coolant should be used, for
example: a pressure feed coolant bottle.
• Check working of cooling system. Open coolant reservoir’s tap and apply pressure on the
pilot by turning the feed handles counter clockwise. As the pilot pin starts to retract up into
the annular cutter, cutting fluid should start to run down cutters inner wall and onto the
workpiece. If there is no cutting fluid flowing down check if the tap is fully opened. It may
take a few seconds for cutting fluid to fill the whole system.
• Connect air pressure hose with feeding air of appropriate parameters (6 bar / 90 PSI,
1400 l/min).
• Position an axis of the spindle precisely above drilling point
• Switch on magnetic action using the MAGNET switch.
• Turn the motor on.
• Making a hole with an annular cutter should ideally be done in one pass. It makes
the cutter work better and easier to eject the slug after the hole is completed. If you
experience slugs getting stuck inside a cutter after hole is complete try to reduce pressure
on the cutter. Do not allow excessive swarf build up around the annular cutter and arbor.
WARNING: when the annular cutter goes through the material, the slug can be pushed
out often with considerable strength. Pay attention to avoid injury.
www.holemaker.com 11

®
HMP45 OPERATOR’S MANUAL
• After a hole is made the cutter should be withdrawn back and both the motor and the
electromagnet should be switched OFF.
• When work with the machine is finished the air supply should be disconnected, the
machine should be cleaned up from swarf, coolant etc and the cutter should be removed
and cleaned.
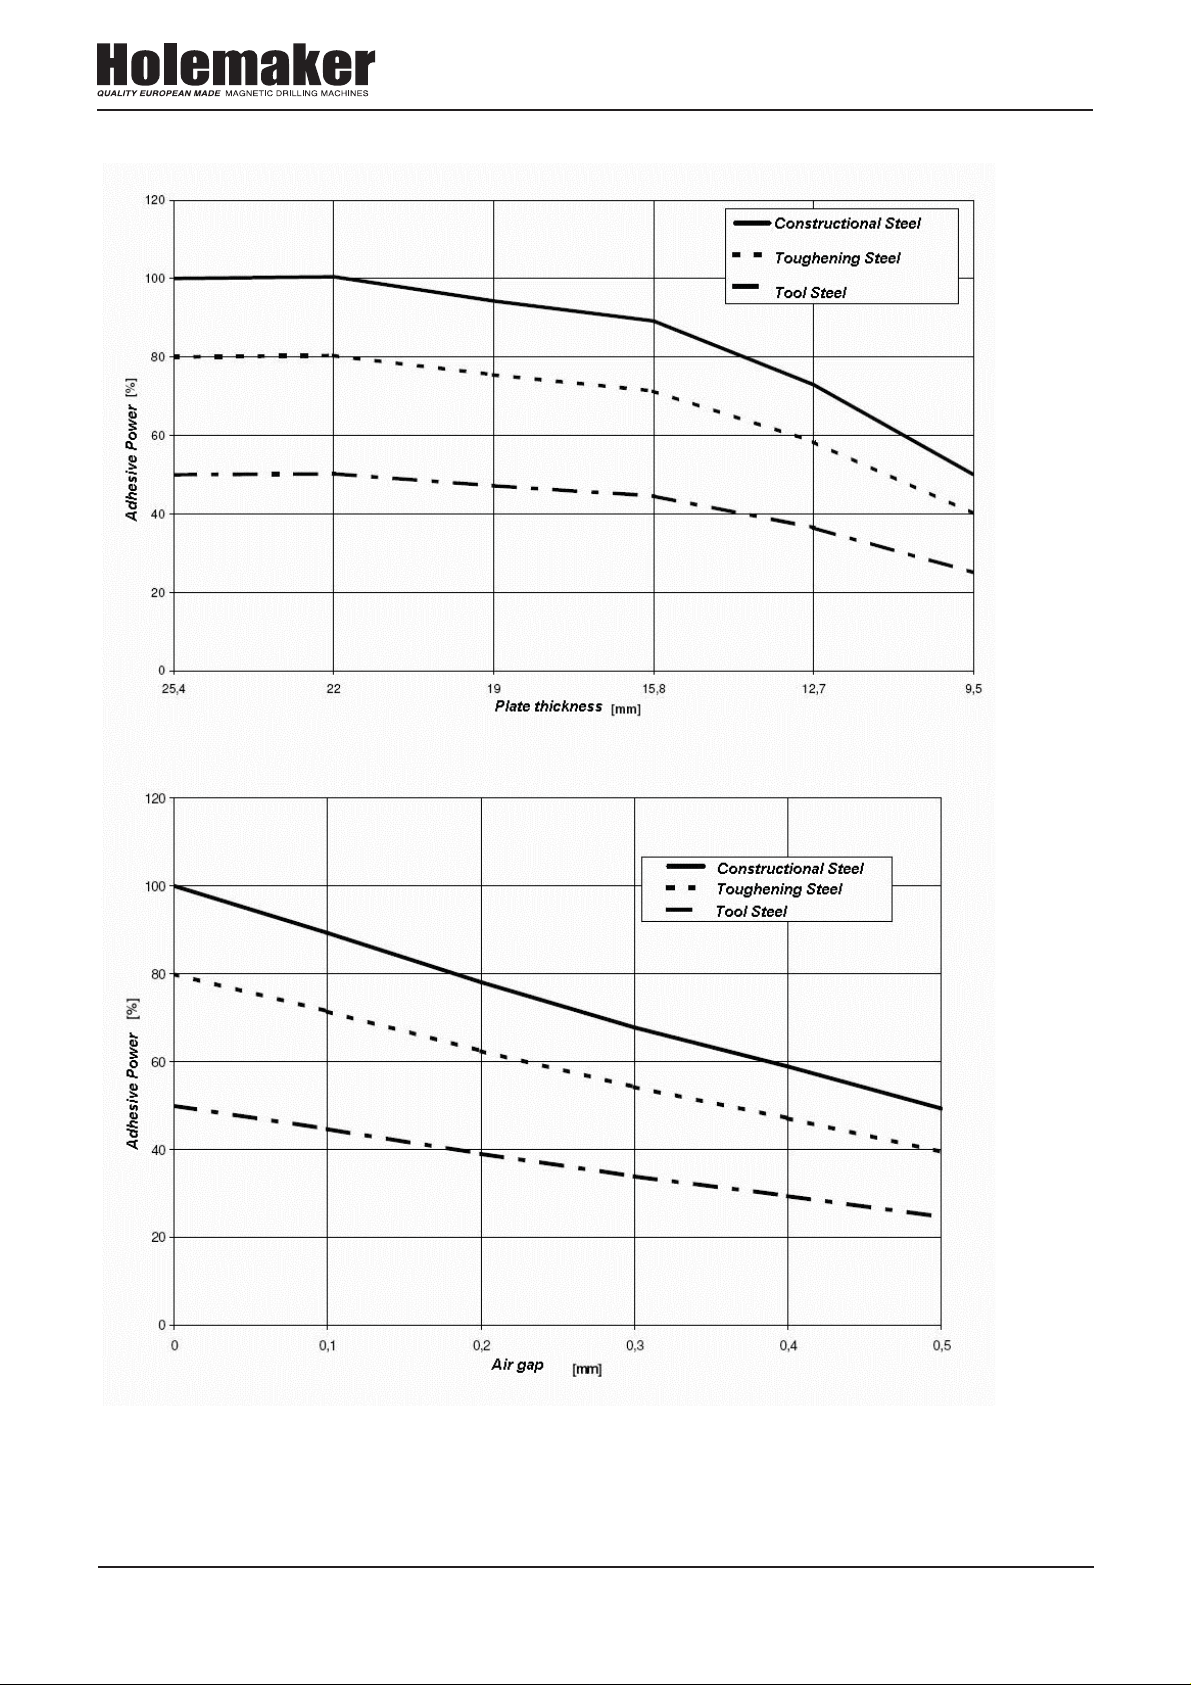
2.8 Workpiece Material
As shown on the graphs [Drawing 4] magnetic clamping force of the electromagnetic base
to the ferrous material depends on its magnetic properties. Steel with increased carbon
content and some other alloying ingredients have lower magnetic permeability, which causes
a decrease in the clamping force. Also the thickness of the work piece, on which the drill is
placed, is significant.
If material less than 10mm (3/8”) is to be drilled, a thick (10mm or more) piece of
material must be placed underneath the workpiece, directly below the machines
magnet, to ensure enough magnetic adhesion is present.
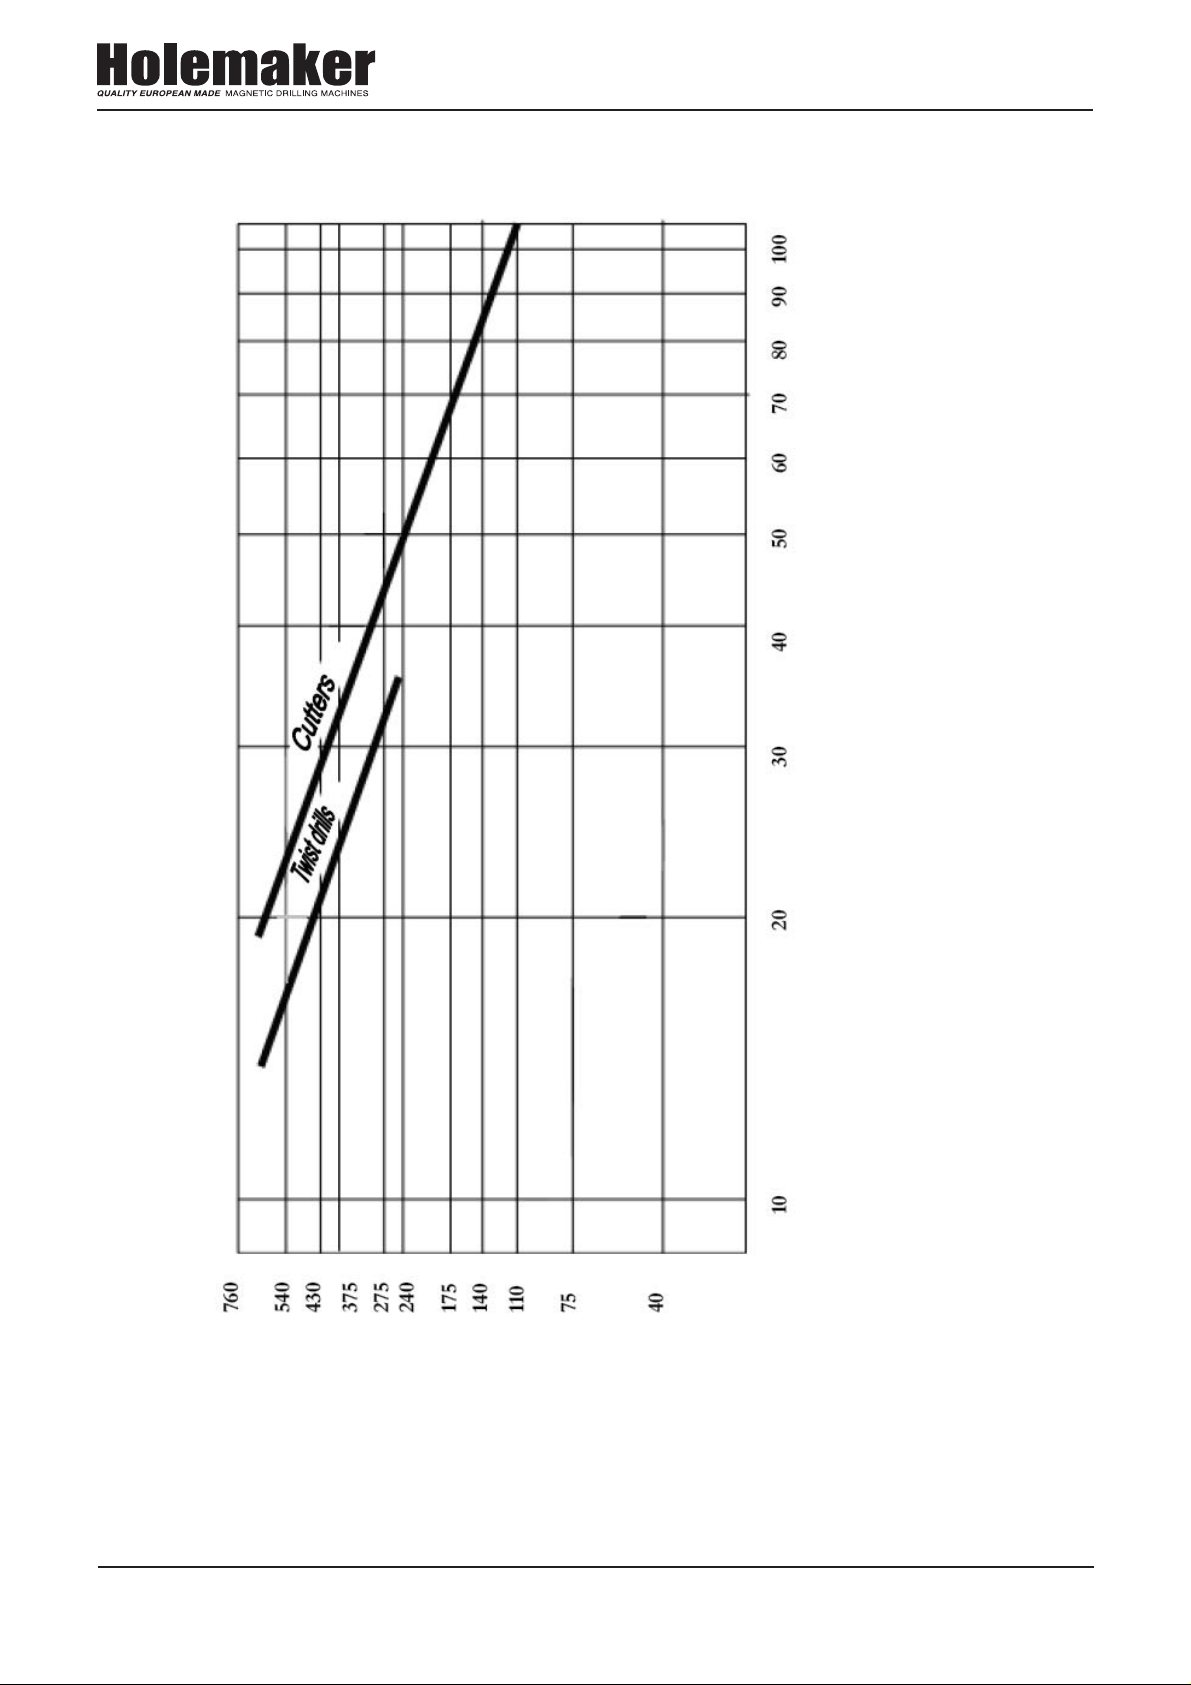
Appropriate rpm should be adjusted depending on if drilling would be carried out with a drill
bit, or annular cutter, and also the cutting tool’s diameter. The HMP45 is equipped with a
mechanical 2-step reducing gearbox. A general dependence between drilling diameter and
drilling speed is shown in graphs [Drawing 5]. Detailed guides should also be available from
the cutting tool manufacturer. The graph is just a general guide and applies to average mild
steel.
2.9 Working in difficult areas
The feed handles of the machine can be moved from one side to the other, by removing the
entire pinion shaft from the machine, and re-inserting into the opposite side of the drill.
Please keep all recommendations
12 www.holemaker.com
®
HMP45 OPERATOR’S MANUAL
Drawing 4. Clamping force depending on the thickness of the substrate and the value gap.
www.holemaker.com 13

®
HMP45 OPERATOR’S MANUAL
Relationship between machine speed and cutter diameter
The cutter diameter Rotary speed
(inch) (mm)
(rpm)
0.04 ÷ 0.43 3.5 ÷ 13 290
0.44 ÷ 0.78 14 ÷ 20 190
Relationship between machine speed and twist drill diameter
The twist drill diameter Rotary speed
(inch) (mm)
(rpm)
0.04 ÷ 0.43 3.5 ÷ 13 290
0.44 ÷ 0.78 14 ÷ 20 190
14 www.holemaker.com
®
HMP45 OPERATOR’S MANUAL
Diameter (mm)
Revolutions of spindle (rpm)
Drawing 5. Dependence of rotational speed on drilling diameter
www.holemaker.com 15

®
HMP45 OPERATOR’S MANUAL
3. ADJUSTMENT, MAINTENANCE AND SERVICE
• After every days work position of gear lever (used for selection of gearbox speed) should
be changed. For example if machine worked with 190 rpm speed, it should be switched to
290rpm.
• Regularly Lubricate brass slide guide inserts with grease as well as the rack and pinion.
• To prevent the machine from rusting (especially when used outdoors) all steel parts
should be covered with thin layer of grease film.
• When working with a pneumatic motor it is necessary to use an air lubrication unit.
• Damaged machine parts to be exchanged only to original parts.
• All repair work should be done only by authorized service points, appointed by distributor.
CAUTION: The warranty conditions for the pneumatic motor do not apply when
occurred damages and wear are caused by impurities from air supply, or an
appropriate lubrication wasn’t used.
Lubrication of the pneumatic motor.
• It is necessary to use the air lubrication unit in the air supply system.
• Inspections and maintenance of the air supply system should be carried out when needed
depending on level of air pollution; clean the filter and maintain the amount of oil in the
lubrication unit to ensure an oil drop every 2 to 5 seconds.
• The oil used in the air supply unit must have an ignition temperature higher than 260°C.
CAUTION: The HMP45 is designed to be supplied with an air of pressure 4 to 6 bar/60
to 90 PSI/. Maintaining the machine’s parameters and its condition strictly depend on
the air purity and its preparation level, and a proper servicing.
16 www.holemaker.com

®
HMP45 OPERATOR’S MANUAL
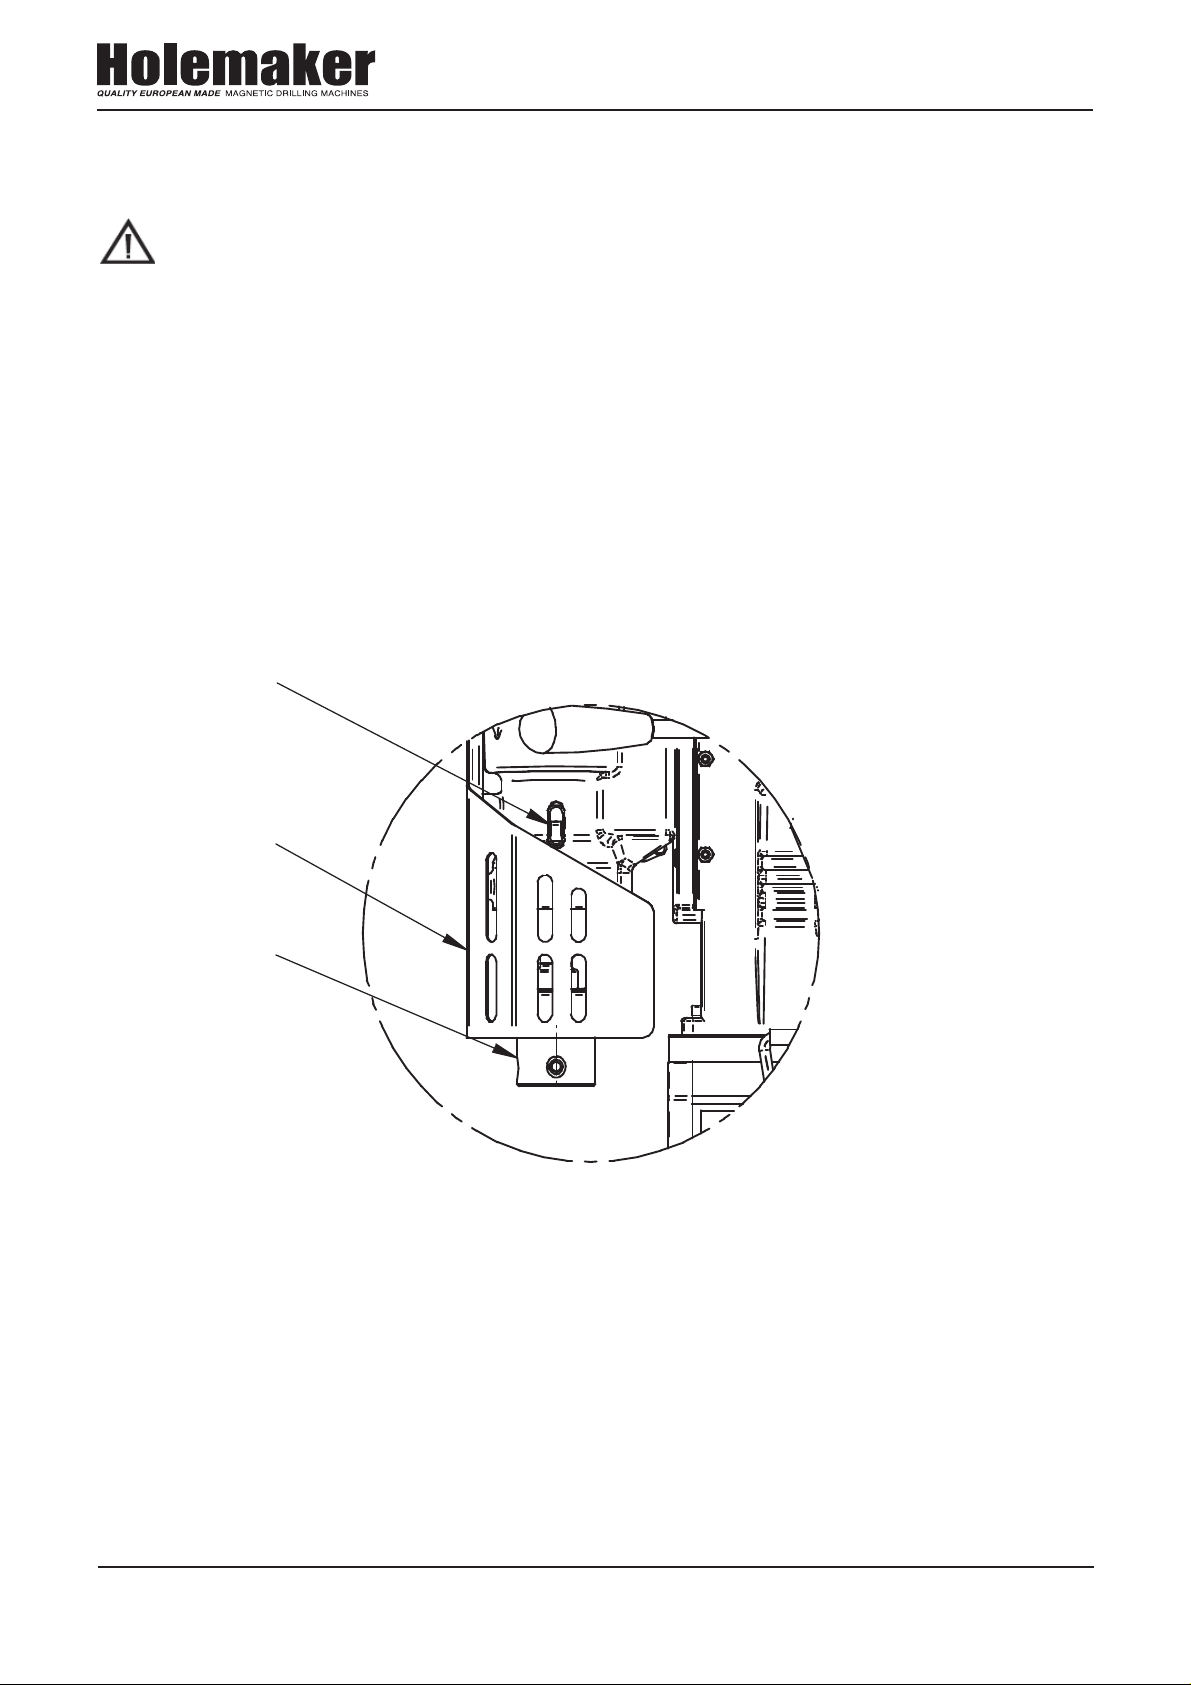
3.1 Slides Adjustment
Use the feed handles (1) to move the sliding section of the drill to a position where the screws
(2) align with the holes (5) in the sliding section. Loosen each of these screws slightly, and
then using the feed handles slide the sliding section up and down several times until any
clearance between the pressure strip and the slider is even and aligned.
Canceling clearance
1
5
2
3, 4
A
Once this has been completed, tighten screws (2) starting from the middle screw. The slider
should be located symmetrically relative to the middle screw. Next, tighten the neighboring
screws (2) moving the slider in the degree necessary for making them visible.
Then, tighten screws (3) until any noticeable resistance is felt. Tighten counter nut (4). The
screws (3) counteract the machining force and protect the pressure strip from shifting during
operation.
www.holemaker.com 17

®
HMP45 OPERATOR’S MANUAL
Then, tighten screws (3) until any noticeable resistance is felt. Tighten counter nut (4). The
screws (3) counteract the machining force and protect the pressure strip from shifting during
operation.
Caution: In the case that the machine falls on a hard surface, from a height, is wet or is
subjected to other unfortunate events that could affect its technical state - work should
be terminated immediately and the machine should be sent to service for inspection as
soon as possible.
18 www.holemaker.com
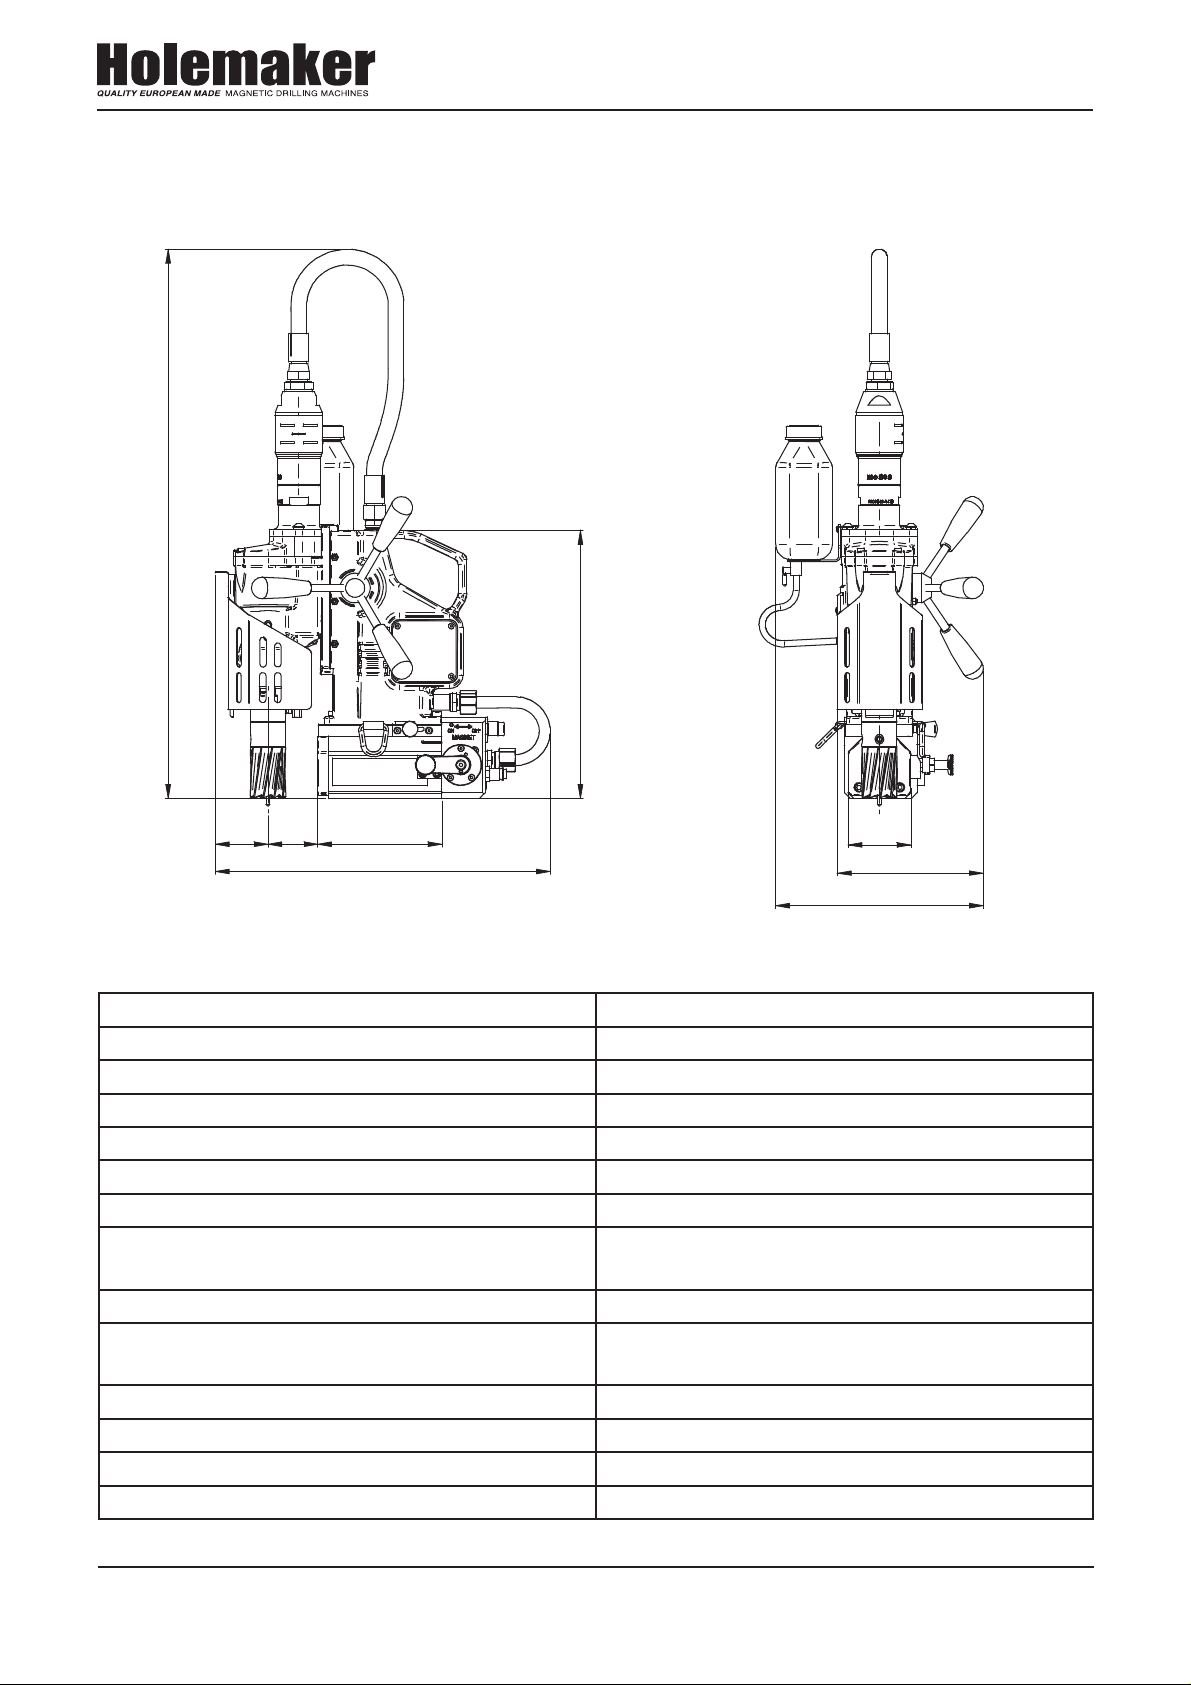
4. TECHNICAL DATA
690 / 750
®
HMP45 OPERATOR’S MANUAL
340
63 15766,5
424
Nominal pressure 6 bar
Air consumption 1400 l/min
Motor power 800 W
Tool holder 19 mm (3/4") Weldon
Max. twist drill diameter 20 mm
Max. annular drilling diameter 45 mm
Max. milling depth 51 mm (2”)
Standard adhesive force of electromagnet
7500 N
(for steel 7/8” (22 mm) thick and Ra < 1.25)
Slide stroke 150 mm
Machine speeds /under load/ I – 190 rpm
II – 290 rpm
Electromagnetic base 80 x 80 x 143mm
Total weight 19kg
Noice level 70 dB
Surrounding temperature -20°C ÷ +40°C
79
185
263
www.holemaker.com 19

PRODUCTS IMPORTED AND DISTRIBUTED NATIONALLY BY:
INDUSTRIAL TOOL & MACHINERY SALES
18 BUSINESS ST, YATALA QLD 4207
T: 07 3287 1114 E: sales@industrialtool.com.au
F: 07 3287 1115 W: www.industrialtool.com.au

HOLEMAKER HMP45
BREAKDOWN
HMP45 BREAKDOWN
1

Main Body Assembly
ITEM PART NUMBER DESCRIPTION Q-TY
2.1
2.2
2.3
2.4
2.5
2.6
2.7
2.8
2.9
2.1
2.11
2.12
2.13
2.14
2.15
SPP45201 MAIN FRAME BODY 1
SPP45202
SPP45203
SPP45204
SPP45205
SPP45206
SPP45207
SPP45208
SPP45209
SPP45210
SPP45211
SPP45212
SPP45213
SPP45214
SPP45215
PRESSURE PLATE
SLIDE INSERT -LEFT
SELF LUBRICATING SLEEVE
28,05H7x32x16,
SPRING, 1,6x8x14,5
HEX SOCKET BOLT-M5X20
ROUND WASHER 5,3
MAIN FRAME BODY PIPE I
MAIN FRAME BODY PIPE II
MAIN FRAME BODY BLOCK
SCR,SHCS M5 x 25 DIN 912
EXTERNAL RETAINING RING-20Z
SOCKET SET SCREW M5 x 10
NUT M5
SEAL WASHER 3/8 "
1
1
2
4
5
5
1
1
1
4
2
3
3
2
2.16
SPP45216
SPRING WASHER
4
2
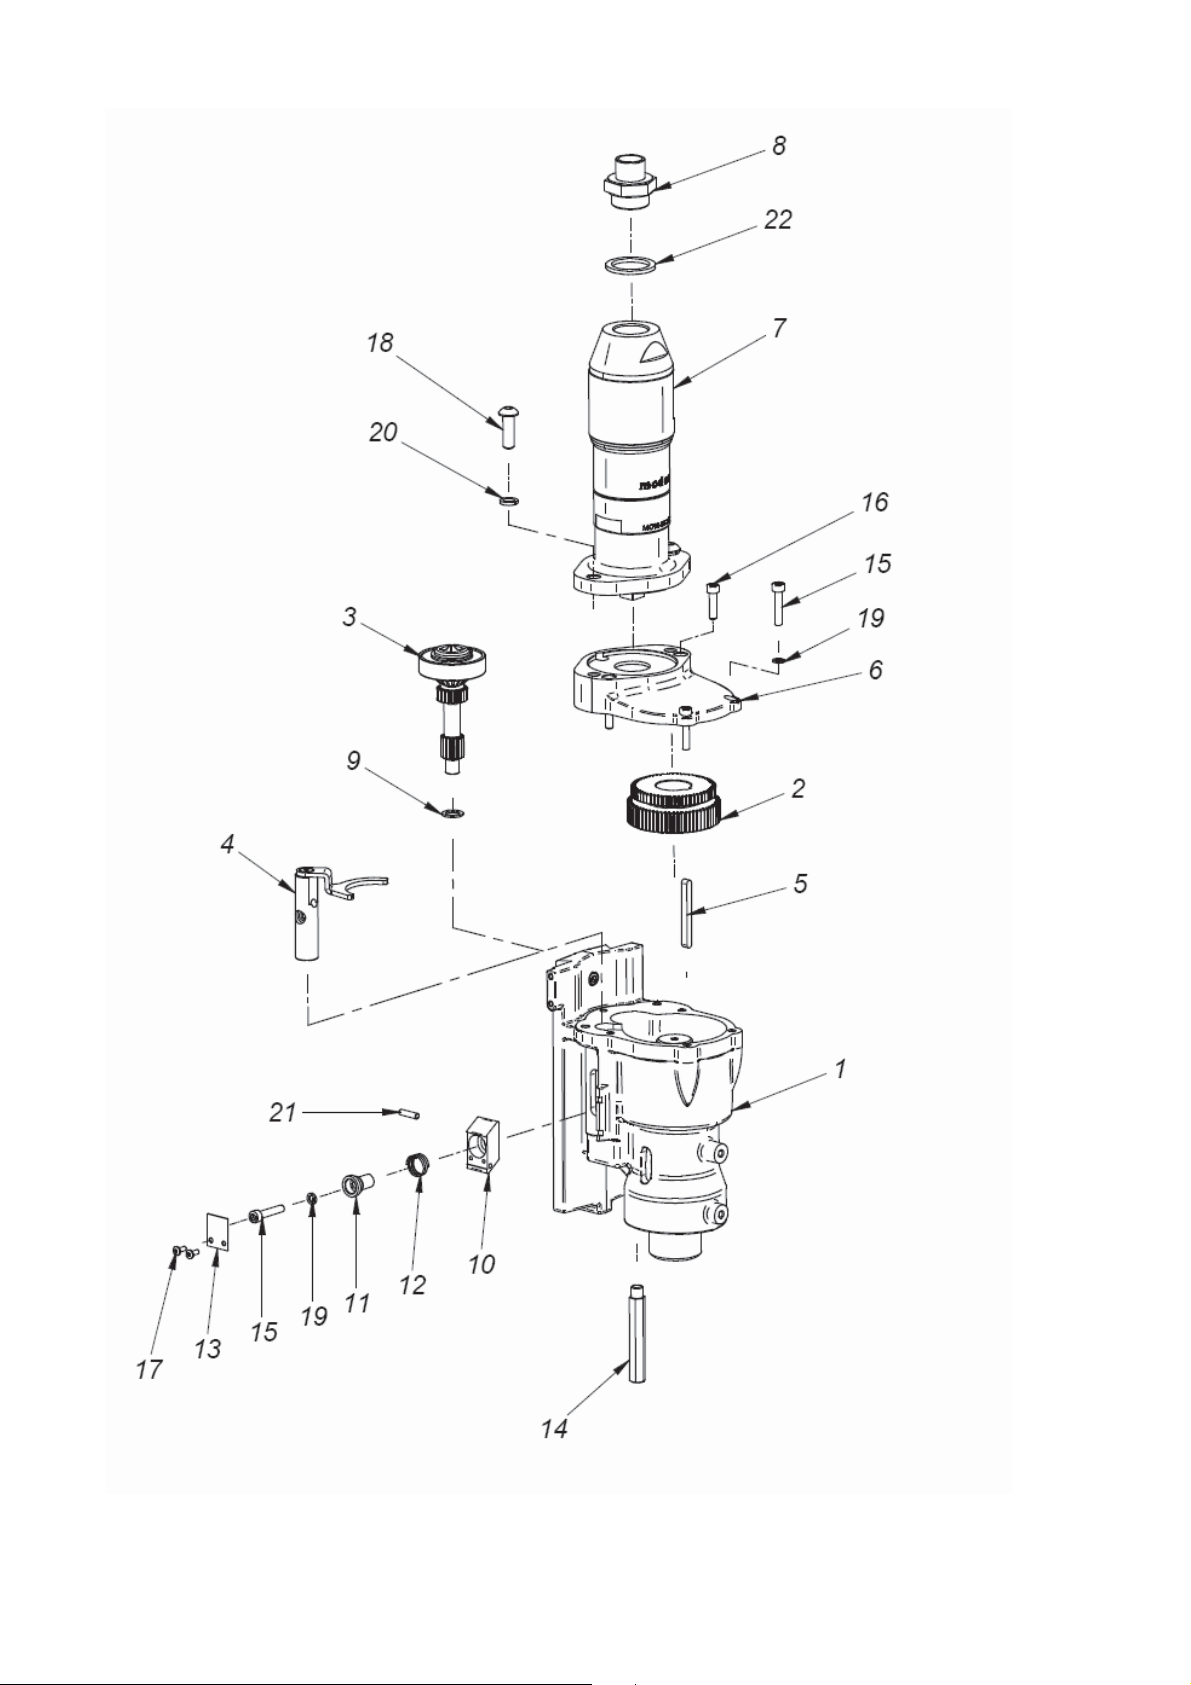
HMP45 BREAKDOWN

Drilling Machine HMP45
ITEM PART NUMBER DESCRIPTION Q-TY
1
2
3
4
5
6
7
8
9
10
11
12
13
14
SPP4501 MAGNET BASE ASSY 1
SPP4502
SPP4503
SPP4504
SPP4505
SPP4506
SPP4507
SPP4508
SPP4509
SPP4510
SPP4511
SPP4512
SPP4513
SPP4514
MAIN BODY ASSY
MOTOR ASSY
PINION SHAFT,
SPOKE HANDLE INCLUDING
KNOB (ASSY),
PANEL PLATE ASSY
GUARD'S SLIDE
D-RING STRAP
COOLANT SYSTEM
ARBOR SET -AMT2-C19/2-2
HEX. SOCKET BOLT M6x20
HEX SOCKET BOLT-M6X25
SPRING WASHER 6,1
SOCKET BUTTON HEAD CAP
SCREW M4x10
1
1
1
3
1
1
1
1
1
2
1
3
6
15
16
17
18
19
20
23*
SPP4515
SPP4516
SPP4517
SPP4518
SPP4519
SPP4520
SPP4523
SCR, M5 x 16 FHSCS
EXTERNAL RETAINING RING
28z
GUARD ASSEMBLY
MOTOR HOSE ASSY
VALVE HOSE ASSY
STRAIGHT COUPLING 1/2" -3/8"
METAL BOX
2
1
1
1
1
2
1
HMP45 BREAKDOWN
3

4
HMP45 BREAKDOWN

Magnet Base Assembly
ITEM PART NUMBER DESCRIPTION Q-TY
1.1
1.2
1.3
1.4
1.5
1.6
1.7
1.8
1.9
1.1
1.11
1.12
1.13
1.14
1.15
SPP45101 VALVE ASSEMBLY 1
SPP45102
SPP45103
SPP45104
SPP45105
SPP45106
SPP45107
SPP45108
SPP45109
SPP45110
SPP45111
SPP45112
SPP45113
SPP45114
SPP45115
MOUNTING PLATE
MOUNTING PLATE INSERT
MAGNET 1
TURN ON/OFF GEAR
GEAR PLUG
STRAIGHT COUPLING 1/2 -3/8" "
HEX. SOCKET BOLT M4x6
HEX. SOCKET BOLT M6X16
HEX. SOCKET BOLT M6x65
HEX. SOCKET BOLT M8x16
SCR, M4 x 06 FHSCS
HEX SET SCREW-M6 x 6
SPRING WASHER 6,1
SPRING WASHER 8.2
1
1
1
1
1
1
2
2
2
2
1
2
2
1.16
1.17
1.18
SPP45116
SPP45117
SPP45118
OVAL KNOB ASSY
HEX SOCKET BOLT-M5X16
STOP BLOCK
1
2
1
HMP45 BREAKDOWN
5

Valve Assembly
ITEM PART NUMBER DESCRIPTION Q-TY
1.1.1
1.1.2
1.1.3
1.1.4
1.1.5
1.1.6
1.1.7
1.1.8
1.1.9
1.1.10
1.1.11
1.1.12
1.1.13
1.1.14
1.1.15
1.1.16
1.1.17
1.1.18
1.1.19
1.1.20
1.1.21
1.1.22
1.1.23
1.1.24
1.1.25
1.1.26
1.1.27
1.1.28
1.1.29
1.1.30
1.1.31
1.1.32
1.1.33
1.1.34
1.1.35
1.1.36
1.1.37
1.1.38
SPP451101 VALVE HOUSING 1
SPP451102
SPP451103
SPP451104
SPP451105
SPP451106
SPP451107
SPP451108
SPP451109
SPP451110
SPP451111
SPP451112
SPP451113
SPP451114
SPP451115
SPP451116
SPP451117
SPP451118
SPP451119
SPP451120
SPP451121
SPP451122
SPP451123
SPP451124
SPP451125
SPP451126
SPP451127
SPP451128
SPP451129
SPP451130
SPP451131
SPP451132
SPP451133
SPP451134
SPP451135
SPP451136
SPP451137
SPP451138
PISTON ASSY
PISTON PLUG
STOP PLUG ASSY
LOCKING RING
SPRING 1
SOCKET BUTTON HEAD CAP SCREW WITH
FLANGE M6x10
EXTERNAL RING
HANDLE HOLDER
WASHER 1
HANDLE SHAFT
HANDLE 1
SEAL COVER
COVER 1
DIVIDING SHAFT
SLEEVE I
CENTER SLEEVE
SLEEVE II
SHAFT RING
COVER 1
SILENCER G1/4
SCR, M3 x 8 FHSCS
SCR, M4 x 16 FHSCS
HEX. INSERT SCREW M5x8
HEX. INSERT SCREW M12x8
PIN 4x8
BALL LOCK GN 614-8-NI
RETAINING RING INTERNAL 21w
RETAINING RING INTERNAL 24w
INTERNAL RETAINING RING-47W
PIN 4x10
O-RING 15,3x2,4
O-RING 17x2
O-RING 42x2
SEAL, 4x8,2x4
SEAL U2 012x18.4
MALE PLUG, G3/8 10mm "
INDEXING PLUNGER
1
1
1
1
1
1
1
1
1
1
1
2
1
1
1
8
3
1
4
1
1
1
1
1
1
1
2
1
1
4
1
1
6
HMP45 BREAKDOWN

HMP45 BREAKDOWN
7

Motor Assembly
ITEM PART NUMBER DESCRIPTION Q-TY
3.1
3.2
3.3
3.4
3.5
3.6
3.7
3.8
3.9
3.1
3.11
3.12
3.13
3.14
3.15
3.16
3.17
3.18
3.19
3.2
3.21
3.22
3.23
3.24*
SPP45301 GEARCASE ASSY 1
SPP45302
SPP45303
SPP45304
SPP45305
SPP45306
SPP45307
SPP45308
SPP45309
SPP45310
SPP45311
SPP45312
SPP45313
SPP45314
SPP45315
SPP45316
SPP45317
SPP45318
SPP45319
SPP45320
SPP45321
SPP45322
SPP45323
SPP45324
CLUSTER GEAR z64/z58
PINION SHAFT T=14, T=20 ASSY
SHIFT FORK ASSY
KEY 5X5X50
GEARBOX COVER
AIR MOTOR
COUPLING 3/4 -3/8" "
WASHER, THRUST 10x1 (2x2)
SHIFT LEVER
SHIFT DRIVE PIN (USA-5)
COMPRESSION SPRING (USA 5)
LABEL, SHIFT LEVER
STOP PIN L=70,
SCR,SHCS M5 x 25 DIN 912
HEX SOCKET BOLT-M5X20
SOCKET BUTTON HEAD CAP SCREW
M3x8,
SCREW M8x25
SPRING WASHER 5,1
SPRING WASHER 8.2
SPRING PIN 4x16
PIN 5x14
SEAL WASHER, 3/4 "
GREASE LUBRIPLATE BP1
1
1
1
1
1
1
1
1
1
1
1
1
1
3
3
2
2
3
2
1
2
1
0,2kg
8
HMP45 BREAKDOWN
HMP45 BREAKDOWN
9

Gear Case Assembly
ITEM PART NUMBER DESCRIPTION Q-TY
3.1.1
3.1.2
3.1.3
3.1.4
3.1.5
3.1.6
3.1.7
3.1.8
3.1.9
3.1.10
3.1.11
3.1.12
SPP453101 GEARCASE 1
SPP453102
SPP453103
SPP453104
SPP453105
SPP453106
SPP453107
SPP453108
SPP453109
SPP453110
SPP453111
SPP453112
SPINDLE 1
GEAR RACK,
HEX. SOCKET BOLT M5x14
HEX. SOCKET BOLT M5X20
SPRING WASHER 5,1
EXTERNAL RETAINING RING 30z
INTERNAL RETAINING RING 62W
UPPER SPINDLE BEARING 6005 25x47x12
LOWER SPINDLE BEARING 6206 2Z
30x62x16
BEARING, NEEDLE RHNA 10x16x10
EXTERNALE RETAINING RING 25z
1
1
1
3
1
1
1
1
1
1
10
HMP45 BREAKDOWN

HMP45 BREAKDOWN
11

Pinion Shaft T=14, T=20 Assembly
ITEM PART NUMBER DESCRIPTION Q-TY
3.3.1
3.3.2
3.3.3
SPP453301 PINION SHAFT T=14, T=20 1
SPP453302
SPP453303
BEARING BALL 6005 2RS
EXTERNALE RETAINING RING 25z
1
1
12
HMP45 BREAKDOWN

Coolant System
ITEM PART NUMBER DESCRIPTION Q-TY
9.1
9.2
9.3
9.4
9.5
SPP45901 COOLANT VALVE, 1
SPP45902
SPP45903
SPP45904
SPP45905
COOLANT BRACKET
BOTTLE, 1
NUT M8x1
PLASTIC HOSE 4MM
1
1
0,27
HMP45 BREAKDOWN
13

Arbor Set - AMT2-C19/2-2
ITEM PART NUMBER DESCRIPTION Q-TY
10.1
10.2
10.3
10.4
10.5
10.6
10.7
10.8
10.9
10.1
10.11
10.12
10.13
SPP451001 ARBOR BODY 1
SPP451002
SPP451003
SPP451004
SPP451005
SPP451006
SPP451007
SPP451008
SPP451009
SPP451010
SPP451011
SPP451012
SPP451013
PLUNGER 1
SPRING 2x2 MT2
COOLANT RING
WASHER II
BAR L=25,
WASHER 1
SEAL 1
CONNECTOR 4x11,5
HEX SET SCREW M10X10
INTERNAL RETAINING RING 19W
EXTERNALE RETAINING RING 25z
SEAL O-RING 25.2x3
1
1
2
1
1
2
1
1
2
14
HMP45 BREAKDOWN
 Loading...