

Square One
User’s Guide
This User’s Guide is needed for general use and installation.
Please keep it for your future reference.

Copyright
Copyright © 2007 ITian Corporation. All rights reserved. This user manual shall not be
copied, stored in a search system, applied or transmitted in whole or in part in any form or
method (electronically, mechanically, copy through photocopier, disk copy, or other
methods) without an expressed permission from ITian Corporation in a form of a
document. ITian Corporation and Square One are trademarks or registered trademarks of
ITian Corporation. Microsoft Windows 98, Windows ME, Windows 2000, Windows XP are
registered trademarks of Microsoft Corporation. Other product names are trademarks or
registered trademarks of their owners. One gigabyte, or GB, equals one billion bytes when
referring to hard drive capacity. Accessible capacity may vary. ITian Corporation reserves
the right to change product specifications without notice.
User’s Guide
2

Safety Instructions and Precautions
Please read the safety instructions and precautions below carefully before using Square
One.
Installation Safety Precautions
x Use grounded socket/outlet.
x Use rated voltage as indicated in the manual.
x Place Square One where there is good ventilation condition (At least 3.9
inches away from a wall).
x Do not place Square One where it could be exposed to high temperature or
direct sun light.
x Install where there is no electromagnetic interference.
x Do not put wet or heavy objects on Square One.
x Do not install or leave Square One, power cable, or LAN cables in pass
through areas.
x Do not install Square One where there is moisture (eg. bathroom, rain, or
splashes of water).
x Do not place Square One near any magnetic objects.
x Keep Square One out of reach from infants or children.
x Only use good quality standard cables.
x Install on a level and stable surface.
x Do not install where the product may fall.
User’s Guide
3

Hard Disk Drive Handling Precautions
x The Hard Disk Drive is a very sensitive device that may become faulty due
to external environments or impact during use.
x Any damages to or loss in data resulting from damages to Hard Disk Drive
caused by user negligence or external environment will be the sole
responsibility of the user and ITian Corporation will not be responsible for
any such damages or loss.
x Make sure to back up important data from Hard Disk Drive as ITian
Corporation will not be responsible for any damages or loss caused by data
loss.
Power Precautions
x Do not use multiple power plugs on a single socket and make sure that the
plugs are inserted fully so they may not move.
x Do not touch power plug with wet hands.
x Make sure power cable is not forcefully bent, pulled, or pressed by heavy
objects.
x Unplug the power cable and store it separately when not in use for a
prolonged period of time
x Unplug the power cable and disconnect the power during lightening and
thunder strikes.
x Do not use damaged power cable, plug, or worn out socket.
User’s Guide
4

Handling Precautions
x Do not insert foreign object through product vents and holes.
x Keep product packaging materials out of reach of children.
x Do not place containers of liquids such as water, juice, or coffee on the
product.
x Disconnect power plug before cleaning, and do not splash with water
directly, or wipe with benzene, thinner, or alcohol
x If you detect smoke or any abnormal smell from the product, immediately
disconnect and remove the power cable from the product and contact our
customer service center.
x Do not block the product’s vents.
x Keep product packaging materials out of reach from infants and children.
x Be careful in handling product packaging materials, there are sharp corners.
x Power off the product and disconnect power cable before moving the
product, and do not move the product during use.
x Do not drop product and do not apply any impact to the product.
x Do not disassemble, repair, or modify the product.
x Do not use within a vehicle.
User’s Guide
5

FCC Notice – Class B
This equipment has been tested and found to comply with the limits for a Class B digital
device, pursuant to Part 15 of the FCC Rules. These limits are designed to provide
reasonable protection against harmful interference in a residential installation. This
equipment generates, uses, and can radiate radio frequency energy and, if not installed
and used in accordance with the instruction manual, may cause harmful interference to
radio communications. However, there is no guarantee that interference will not occur in a
particular installation. If this equipment does cause harmful interference to radio or
television reception, which can be determined by turning the equipment off and on, the
user is encouraged to try to correct the interference by one or more of the following
measures:
x Reorient or relocate the receiving antenna.
x Increase the separation between the equipment and receiver.
x Connect the equipment into an outlet on a circuit different from that to which the
receiver is connected.
CAUTION
Changes or modifications not expressly approved by the party responsible for compliance
could void the user's authority to operate the equipment.
WARNING
While installing and operating this transmitter and antenna combination the radio frequency
exposure limit of 1mW/cm2 may be exceeded at distances close to the antennas installed.
Therefore, the user must maintain a minimum distance of 20 cm from the antenna.
x Consult the dealer or an experienced radio/TV technician for help.
User’s Guide
6

Table of Contents
1. SQUARE ONE PRODUCT OVERVIEW .................................................................... 8
1.1. I
1.2. F
1.3. S
1.4. P
1.5. P
NTRODUCTION ...................................................................................................... 8
EATURES............................................................................................................. 8
PECIFICATIONS .................................................................................................. 11
ACKAGE CONTENTS........................................................................................... 13
RODUCT EXTERIOR ........................................................................................... 14
2. PREPARING YOUR PCS ........................................................................................ 16
2.1. PC
2.2. PC
S RUNNING WINDOWS 95/98/ME .................................................................... 16
S RUNNING WINDOWS 2000/XP ..................................................................... 19
3. CONNECTING SQUARE ONE ................................................................................ 23
4. CONFIGURING SQUARE ONE .............................................................................. 24
4.1. U
SING THE SETUP WIZARD .................................................................................. 24
4.1.1. Connecting to the Square One Administrator Interface.................................. 25
4.1.2. Setting Up for DSL/Cable Internet .................................................................. 27
4.1.3. Setting Up for DSL with PPPoE ..................................................................... 33
4.1.4. Setting Up for Internet Connection with Static IP Address ............................. 39
4.1.5. Setting Up for a PPTP Connection ................................................................. 46
4.2. A
DMINISTRATOR INTERFACE ................................................................................ 53
5. USING SQUARE ONE ............................................................................................ 55
5.1. U
5.2. U
5.3. U
5.4. U
5.5. U
SING NETWORK STORAGE ................................................................................. 55
SING WEB SERVER............................................................................................ 59
SING PRINT SERVER ......................................................................................... 61
SING MEMORY CARD READER ........................................................................... 66
SING WIRELESS LAN ..................................................................................... 667
6. TECHNICAL INFORMATION .................................................................................. 73
User’s Guide
7

1. Square One Product Overview
1.1. Introduction
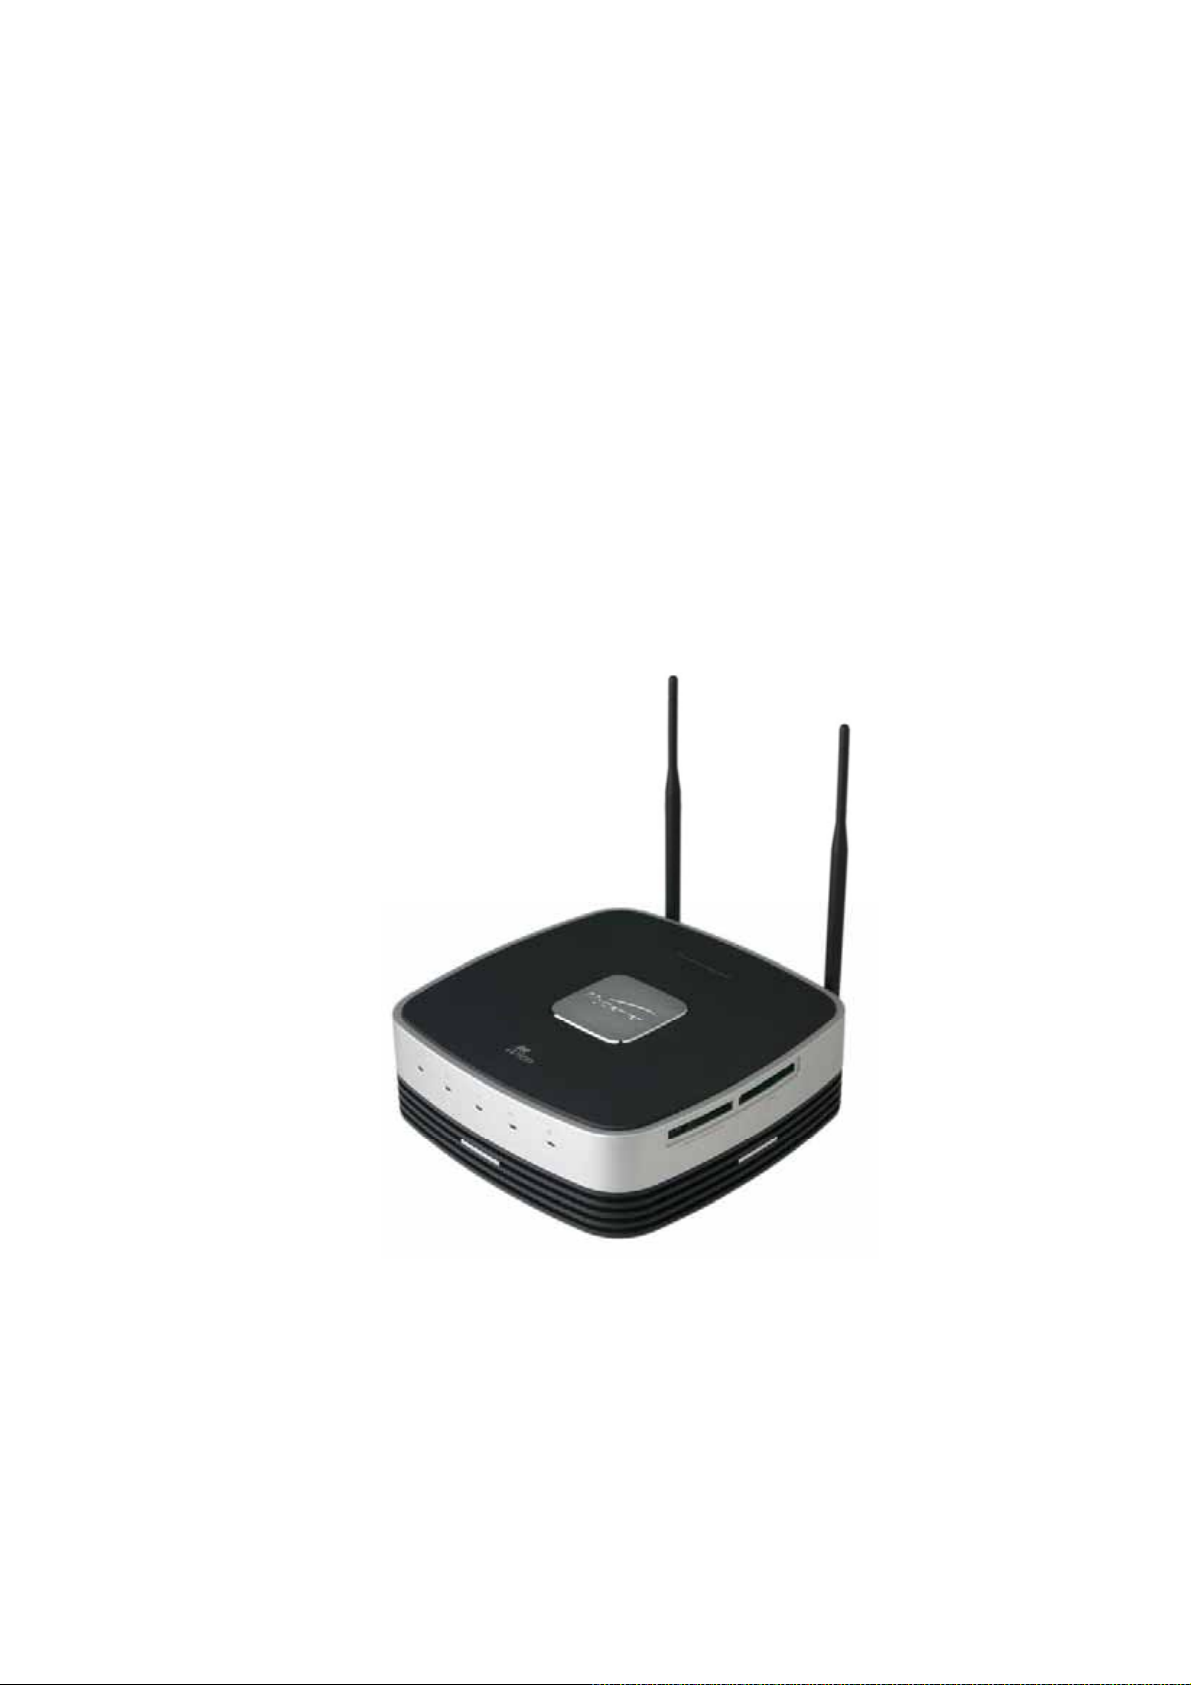
Square One Personal Internet Server is a revolutionary network appliance that
combines network storage, broadband router, hardware firewall, print server, and
Web server—all in one compact, easy-to-manage box. Square One gives you
everything you need to share an Internet connection among several computers,
backup and share files on the network, share a USB printer, access your files from
the Internet, and even host your own Web site or blog. Square One also features a
built-in memory card reader, and the included Memeo AutoBackup software backs
up your precious files to Square One continuously and transparently while you work.
1.2. Features
x High Capacity Network Drive
Square One’s internal large capacity hard drive provides convenient backup
and storage for Windows, Linux, and Mac OS clients through an industry-
standard Samba interface. Administrators can define folder access
permissions for individual users and groups. Award-winning Memeo software
is included for instant, automatic backup from Windows PCs.
x Broadband Router
Square One also acts as a Network Address Translation (NAT) router and
hardware firewall, allowing a single public IP address to provide secure
Internet connectivity for up to 250 computers. In addition to the integral 4-port
10/100 Mbps switch, a special DMZ port lets advanced users run public
servers behind the Stateful Packet Inspection (SPI) firewall without
compromising the security of the rest of the network.
x Printer Sharing
With its USB port and integral print server, Square One turns an inexpensive
USB printer into a shareable IP-based printer. Print from any computer on the
network as if the printer were directly attached to it.
User’s Guide
8

x Web Server
Despite its small size, Square One is a potent Web server. With Apache HTTP
Server, PHP, and MySQL all preinstalled, Square One is ready to serve up the
most advanced Web sites, right out of the box. And with Square One’s built-in
router directly connected to the Internet, there’s no need to set up port
forwarding to make your Web site visible to the world.
x Network Card Reader
Insert a memory card into Square One’s built-in card reader, and its contents
appear as a shared folder on the network drive. CompactFlash (Type I & II),
SD/MMC, xD, Memory Stick, MS Pro, and SmartMedia formats are all
supported.
Figure 1-1 Networking with Square One
User’s Guide
9

User’s Guide
10

1.3. Specifications
Table 1-1 Square One Specifications
User’s Guide
11

Your Square One’s performance may vary depending on the quality of your
Internet connection type, bandwidth, transmission length, line
characteristics, and other environmental characteristics.
User’s Guide
12
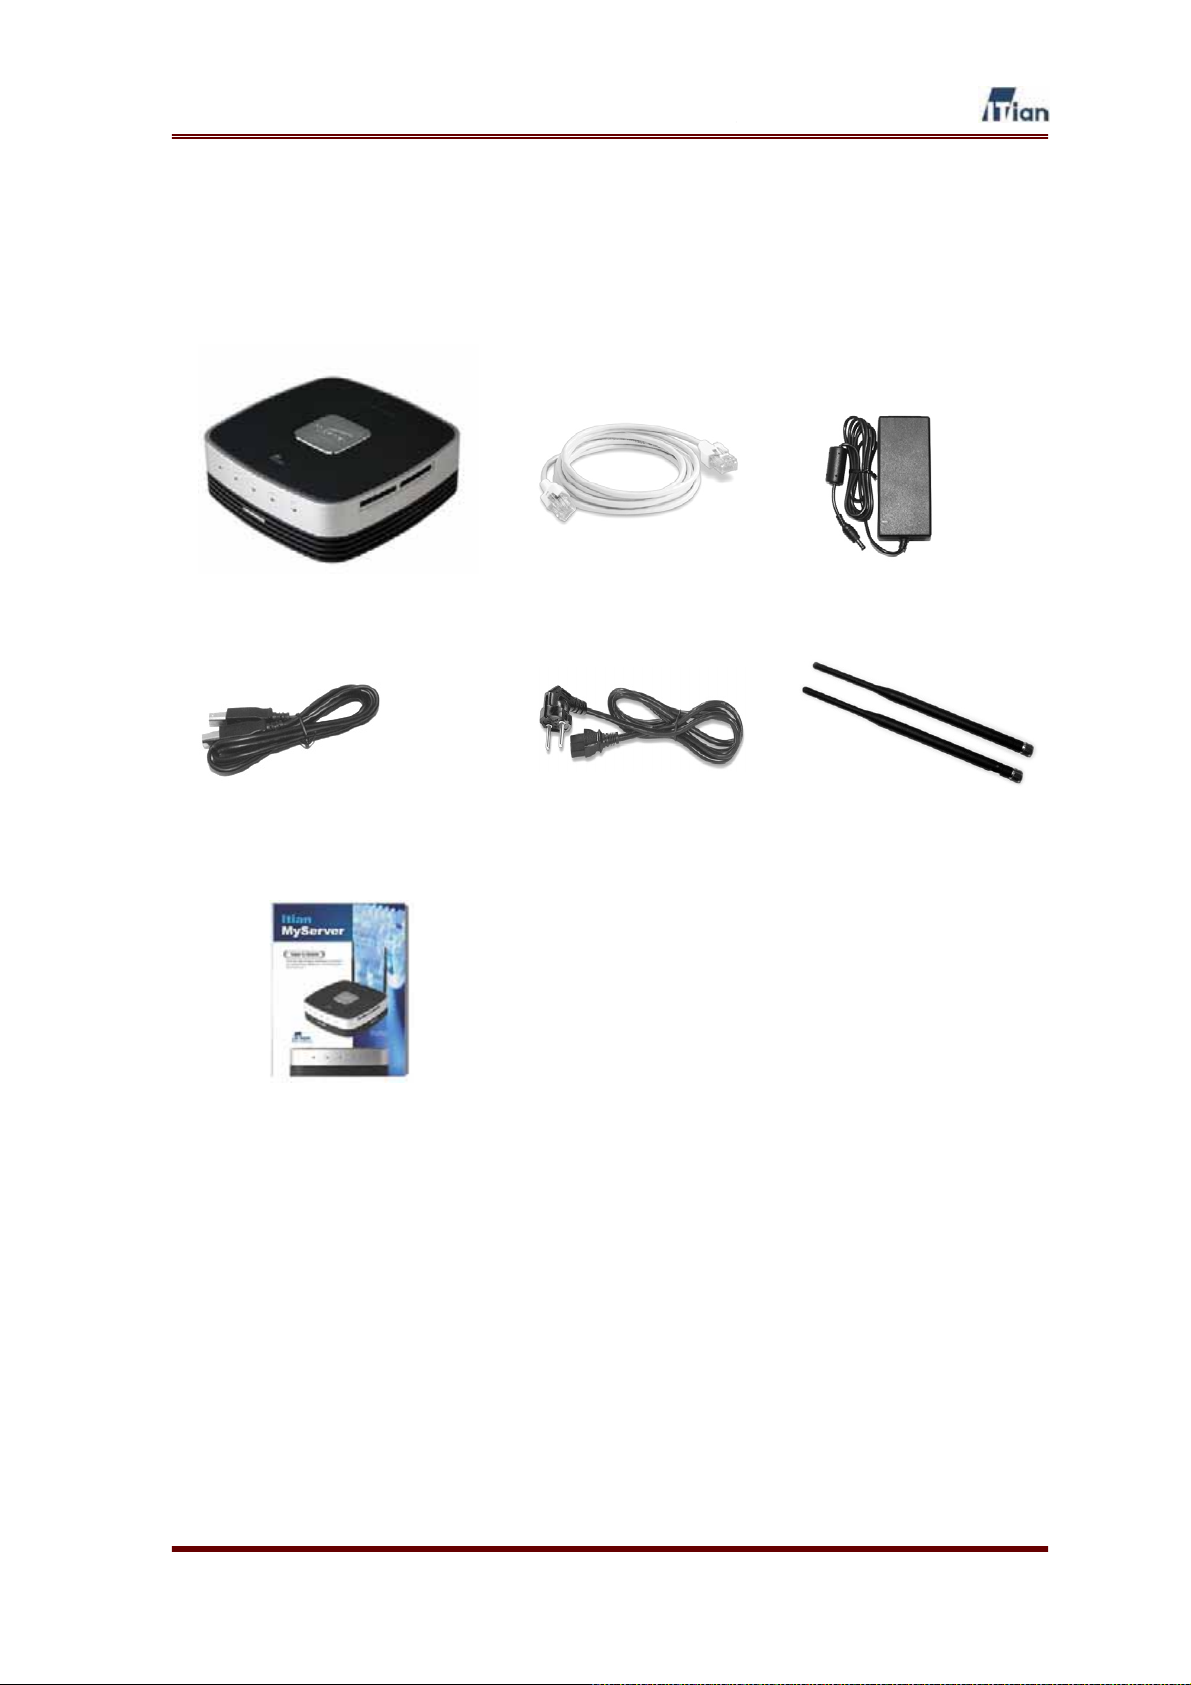
1.4. Package Contents
The Square One package contains the following. If any of the contents shown below are
missing, inquire at the place of purchase.
Square One Main Body – 1EA LAN Cable – 1EA Power Adapter – 1EA
USB Cable – 1EA Power Cable – 1EA Antenna – 2EA
(Wireless model only)
Square One User’s Guide - 1EA
User’s Guide
13
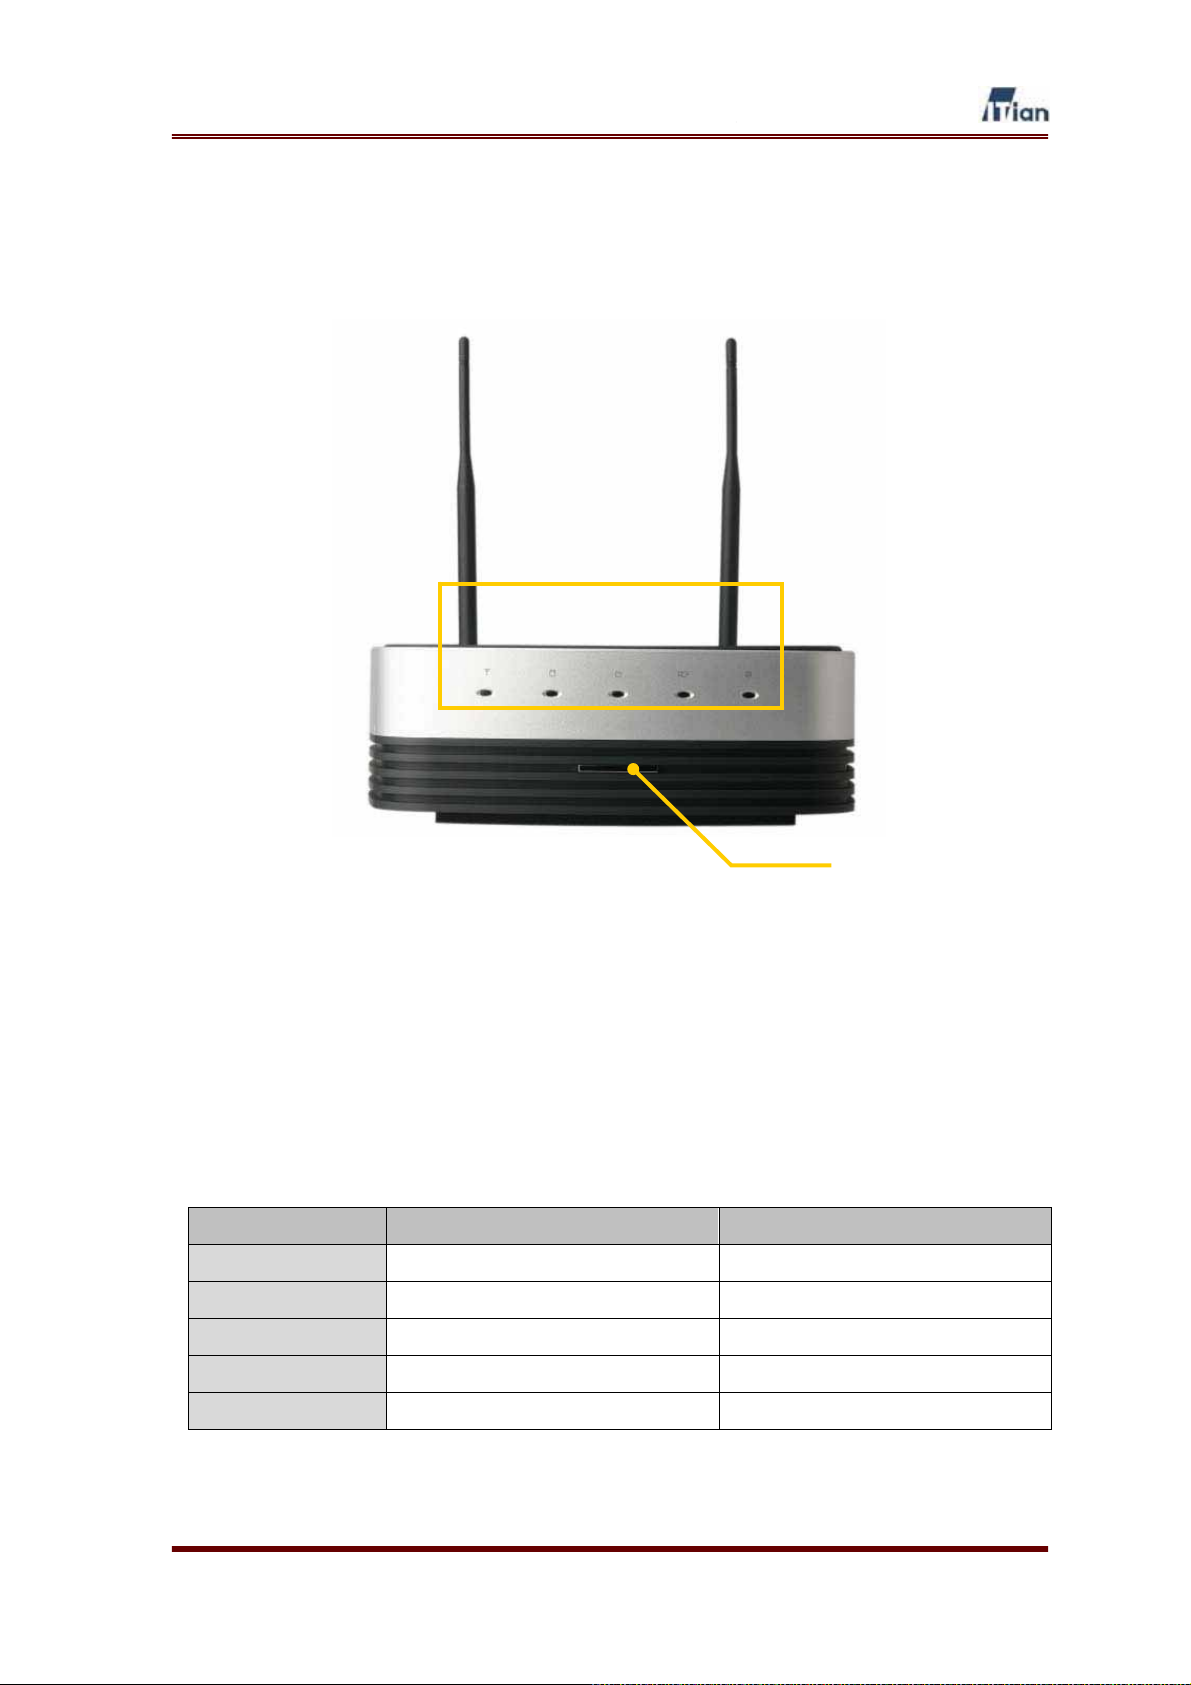
1.5. Product Exterior
Front View
1234
Figure 1-2 Front
ཛ Wireless LAN Activity Indicator (Used only in the wireless version)
ཛྷ Hard Disk Activity Indicator
ཝ Power Activity Indicator
ཞ Memory Card Indicator
ཟ Network Status Indicator
འ Power Button (Press to power on; hold down for 5 seconds and release to
power off.)
5
6
Indicator Solid Blinking
Wireless LAN
Hard Disk
Power
Memory Card
Network Status
User’s Guide
Wireless client(s) connected Wireless LAN transmitting data
- Accessing HDD
System is on -
Memory card inserted Memory card transmitting data
Connected to a network Connecting to network
Table 1-2 LED Indicator Meanings
14
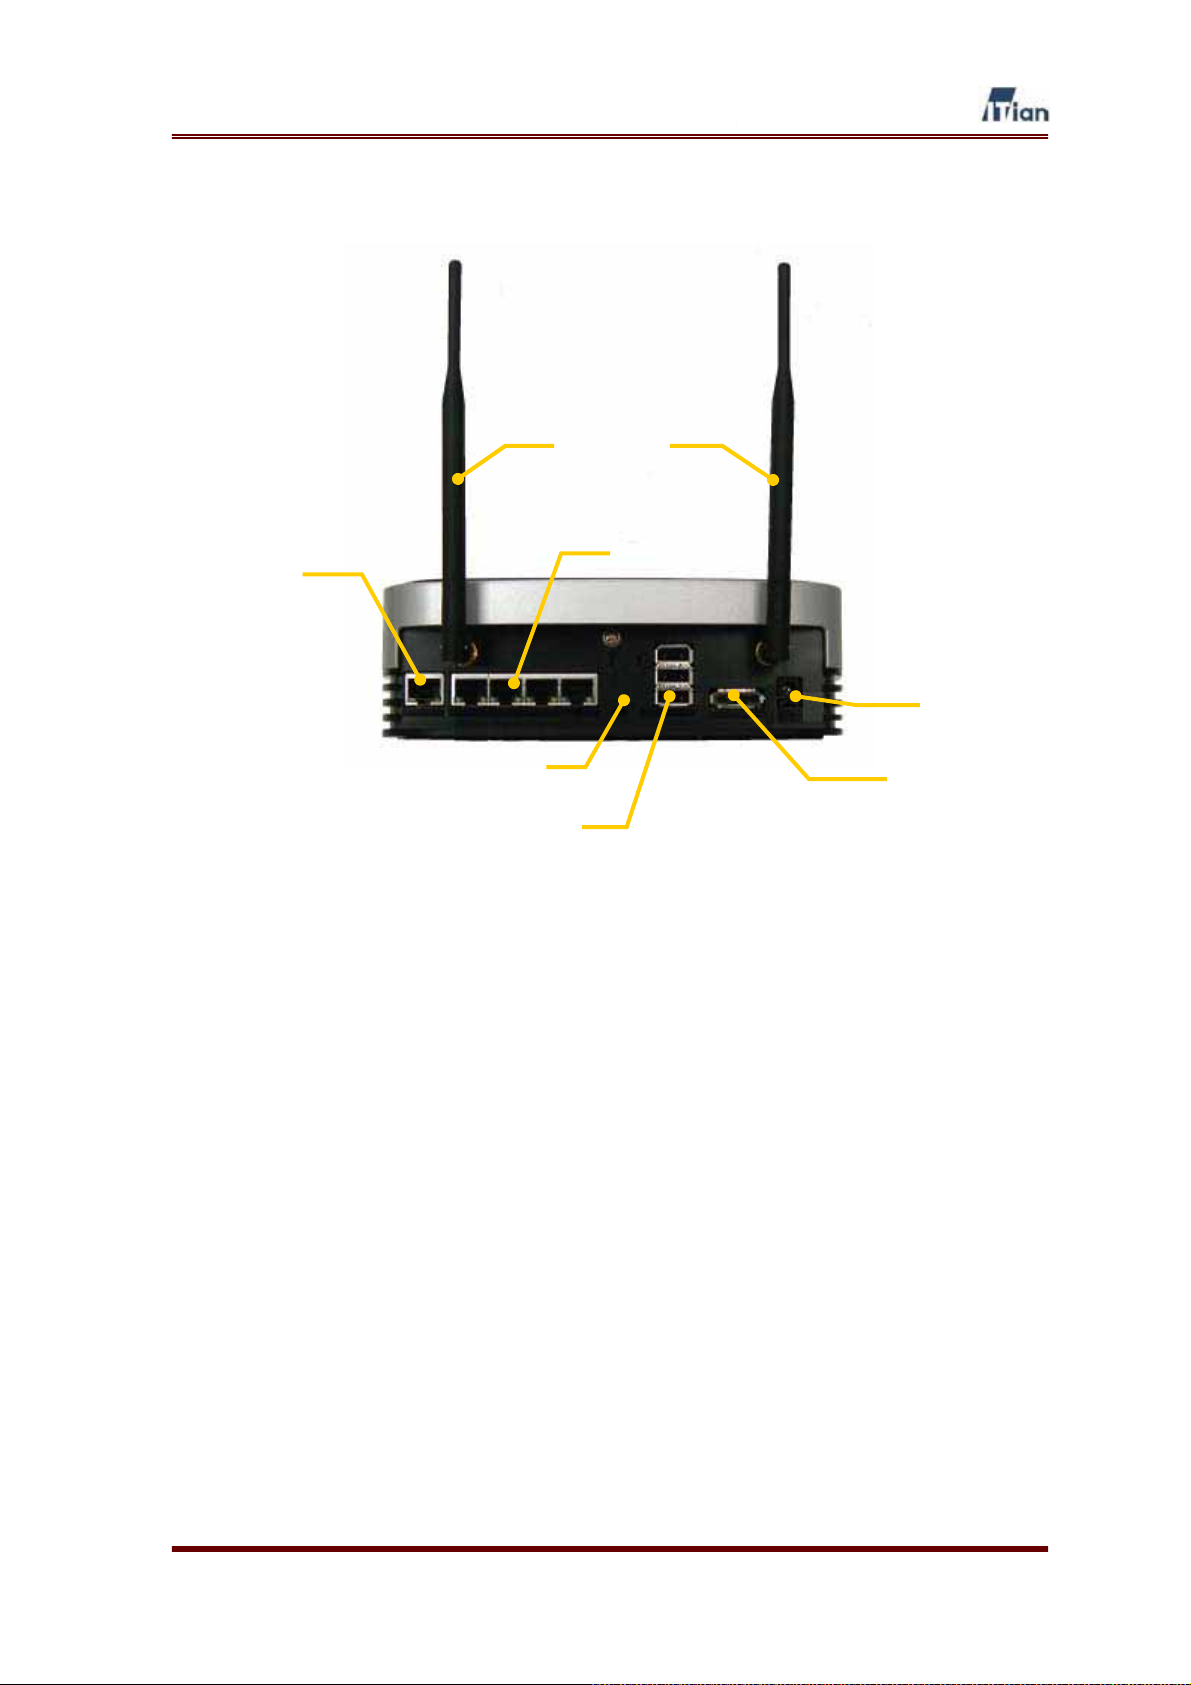
Rear View
ཛ
Gཡ
ཝ
འ
ྚ
ཟ
Figure 1-4 Rear
ཛ WAN port
ཛྷ System Reset Button
ཝ LAN port
ཞ E-SATA
ཟG USB Hub port
འG Power connector(12V/4A)
ཡG Wireless LAN Antenna GG
ཞ
User’s Guide
15
2. Preparing Your PCs
Before you can install Square One to your network, you should make sure that each
computer that will connect to Square One has an Ethernet network adapter. You may
choose to connect a Wi-Fi wireless access point to Square One and connect your
PCs to Square One wirelessly via the access point.
You should configure each computer that will connect to Square One to obtain an IP
address automatically from a DHCP server. The instructions below are for computers
running Microsoft Windows and networking with an Ethernet adapter. If your
computer runs Mac OS or Linux, or connects to the network wirelessly, please refer
to appropriate networking documentations.
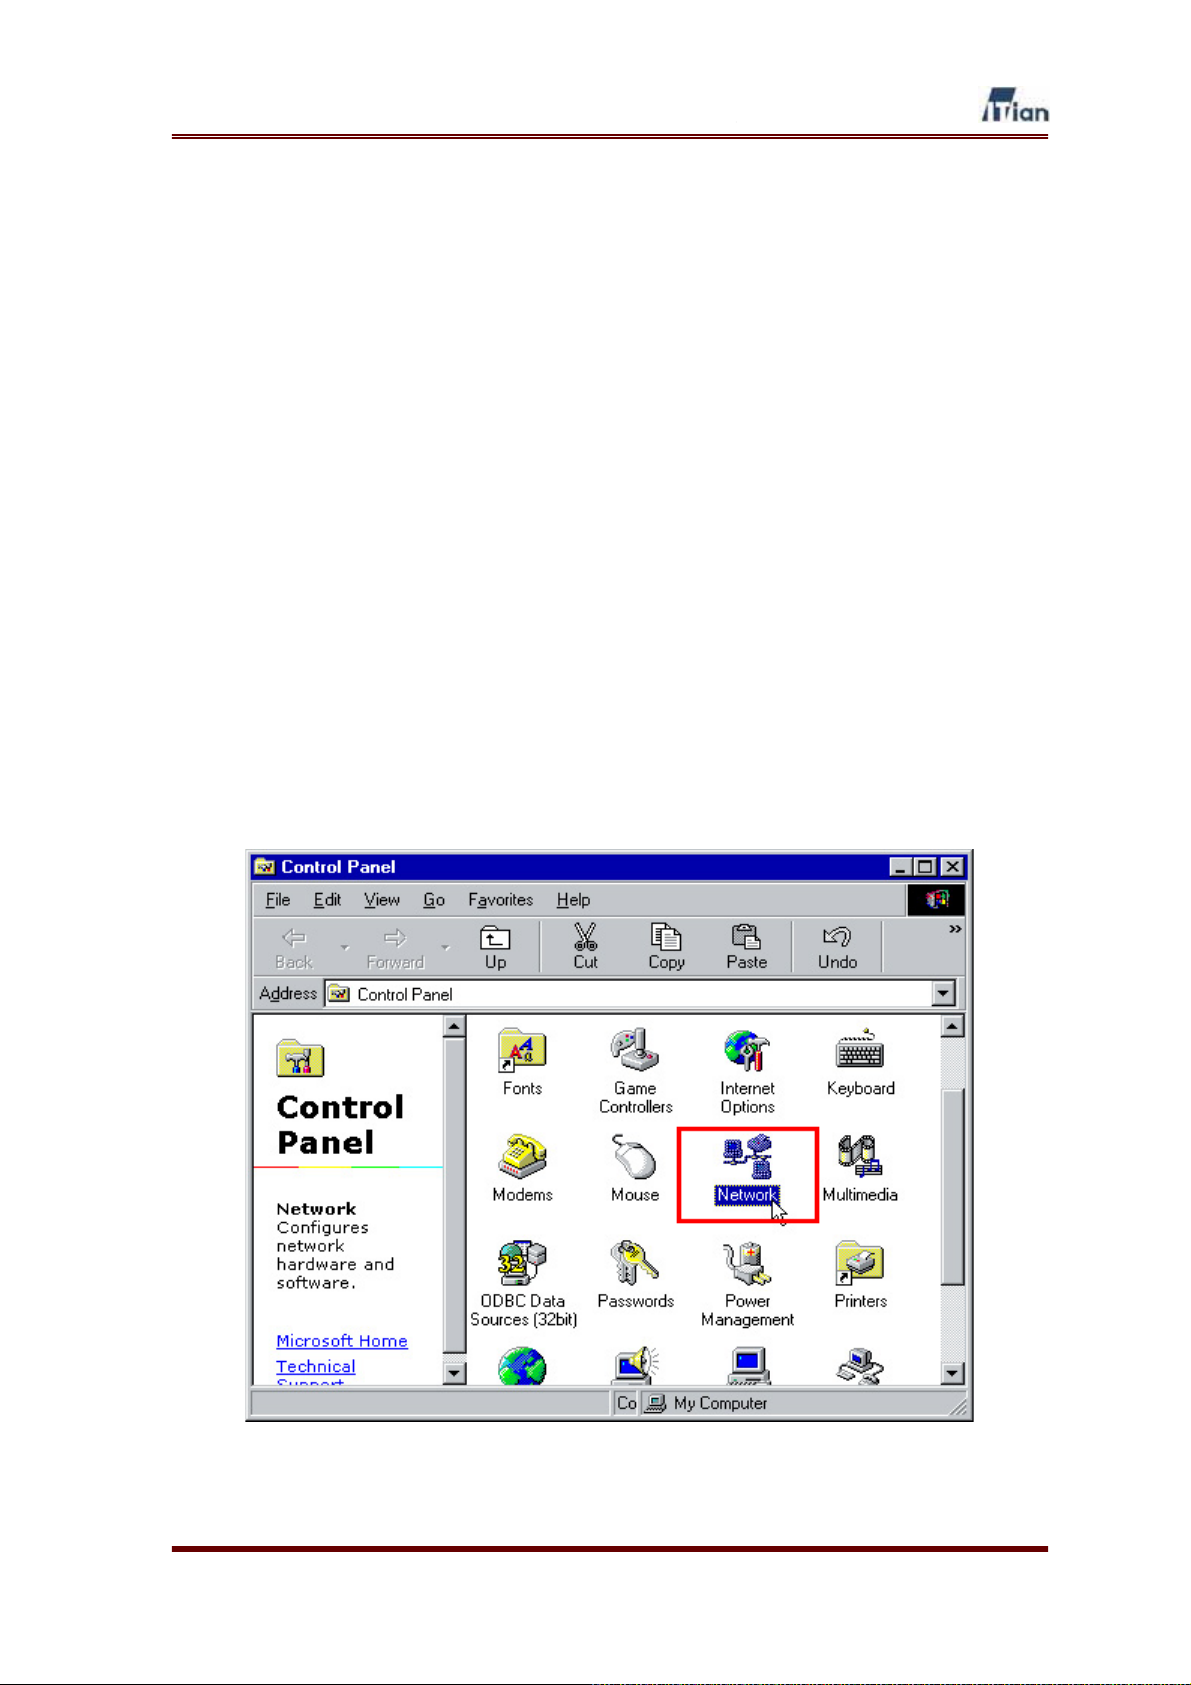
2.1. PCs Running Windows 95/98/Me
1. Click Start > Settings > Control Panel > Network.
User’s Guide
16
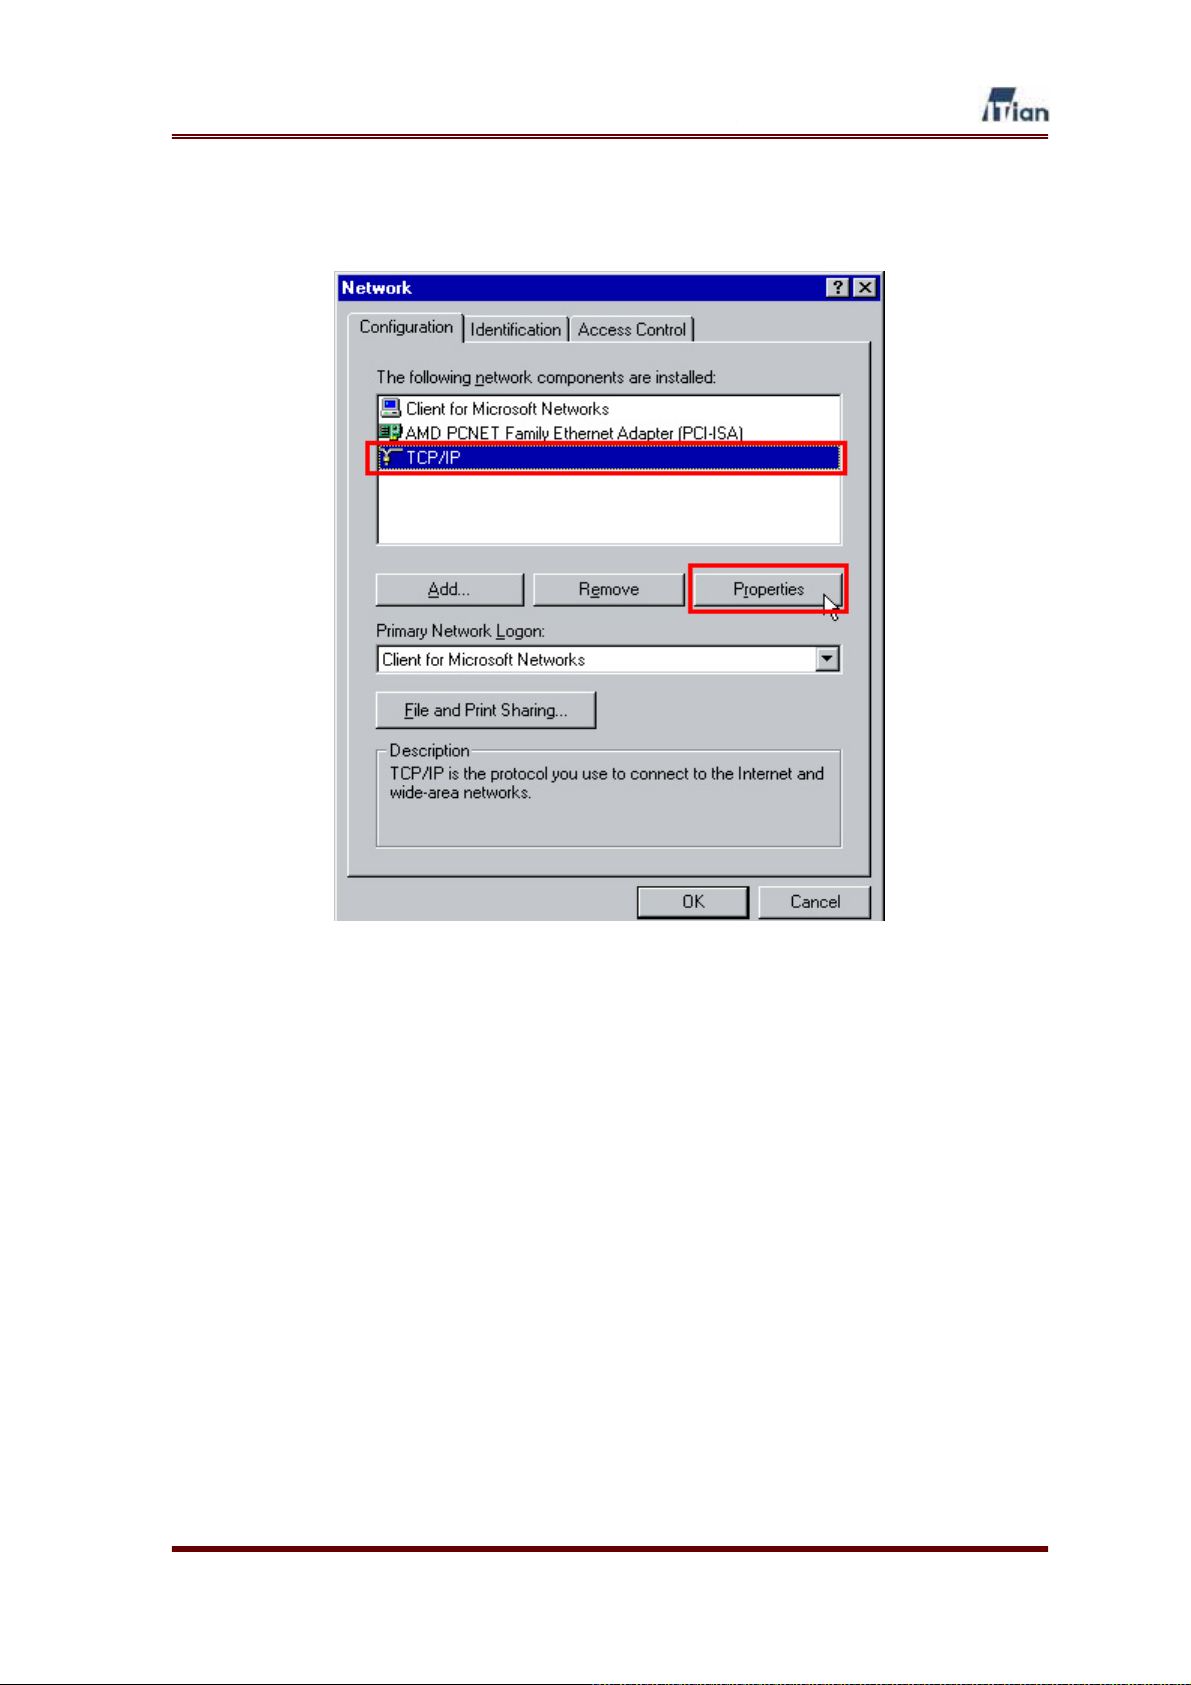
2. Select TCP/IP and click on the Properties button as shown below.
User’s Guide
17
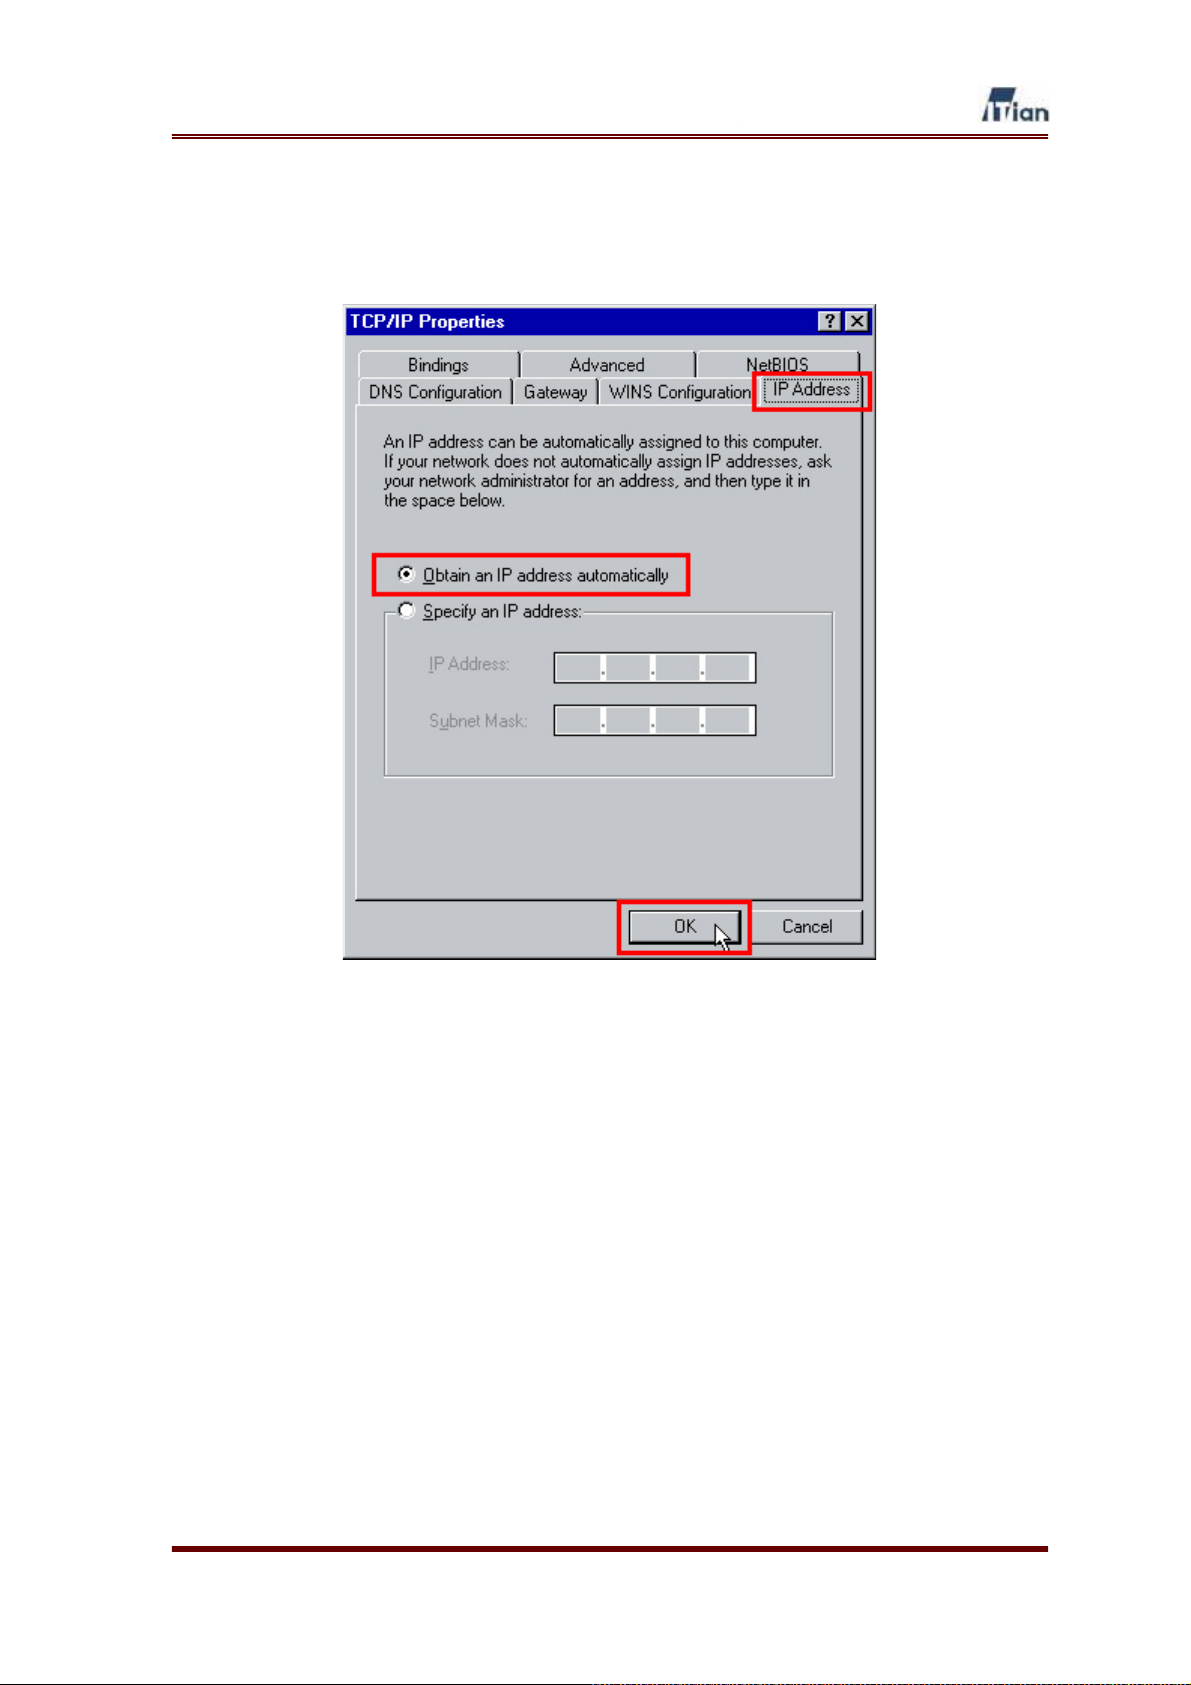
3. Select the IP Address tab and select Obtain an IP address
automatically, then click OK as shown below.
4. Restart the computer. Go to Section 3 to install Square One.
User’s Guide
18
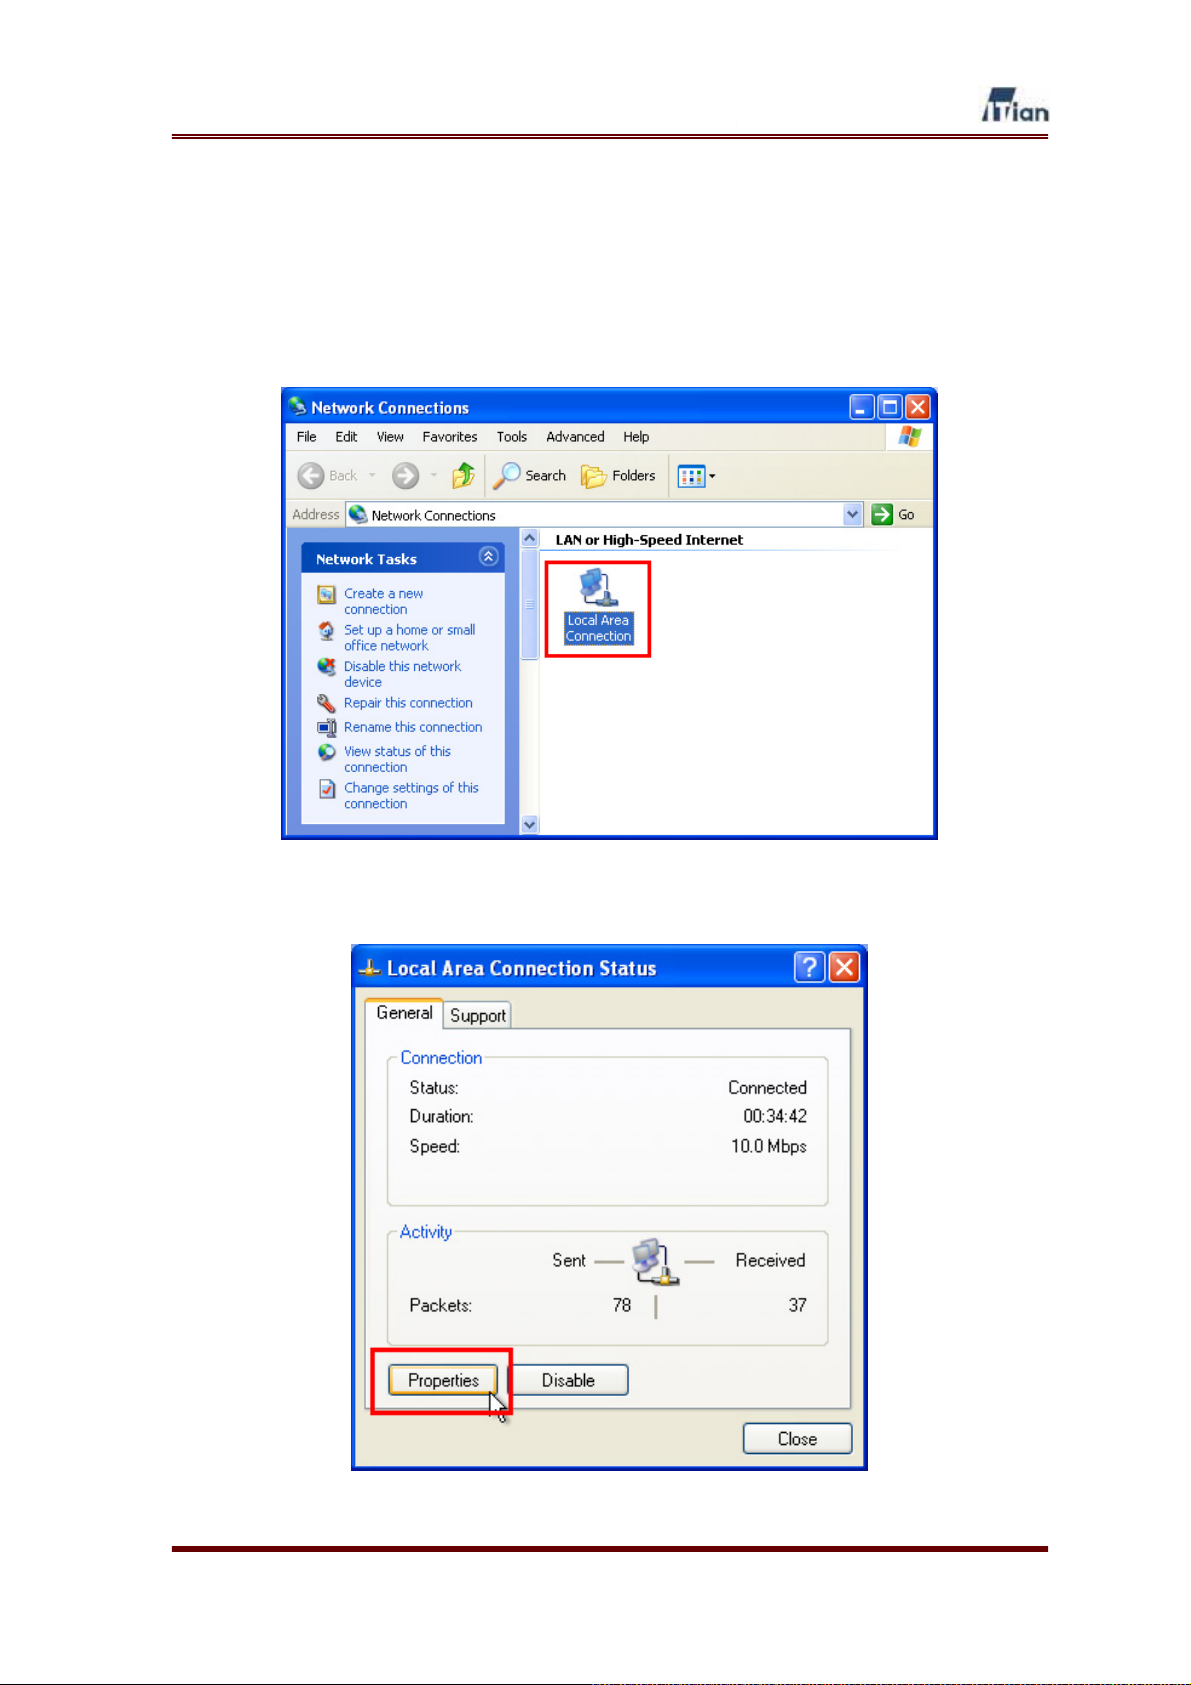
2.2. PCs Running Windows 2000/XP
1. Click Start > Control Panel > Network Connections.
2. Right-click Local Area Connection.
3. Click on the Properties button as shown below.
User’s Guide
19
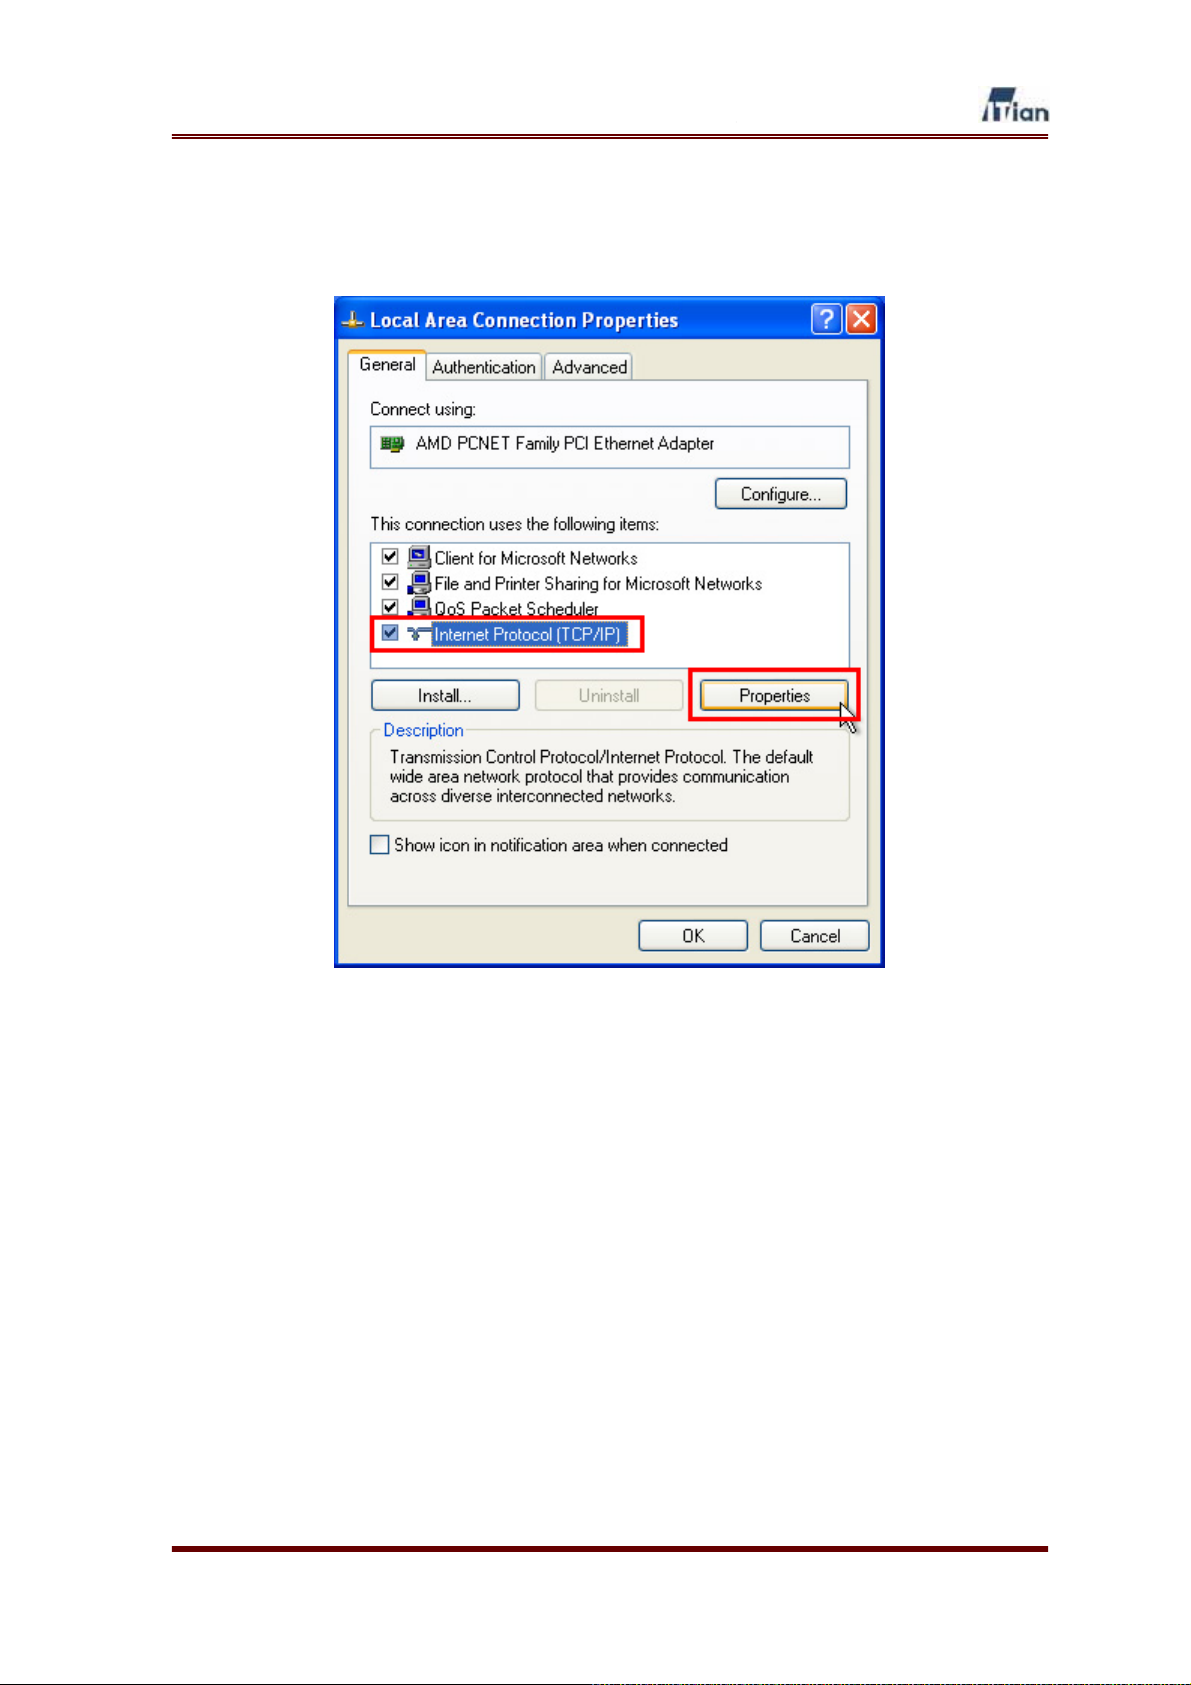
4. Select Internet Protocol (TCP/IP) and click on the Properties button as
shown below.
User’s Guide
20
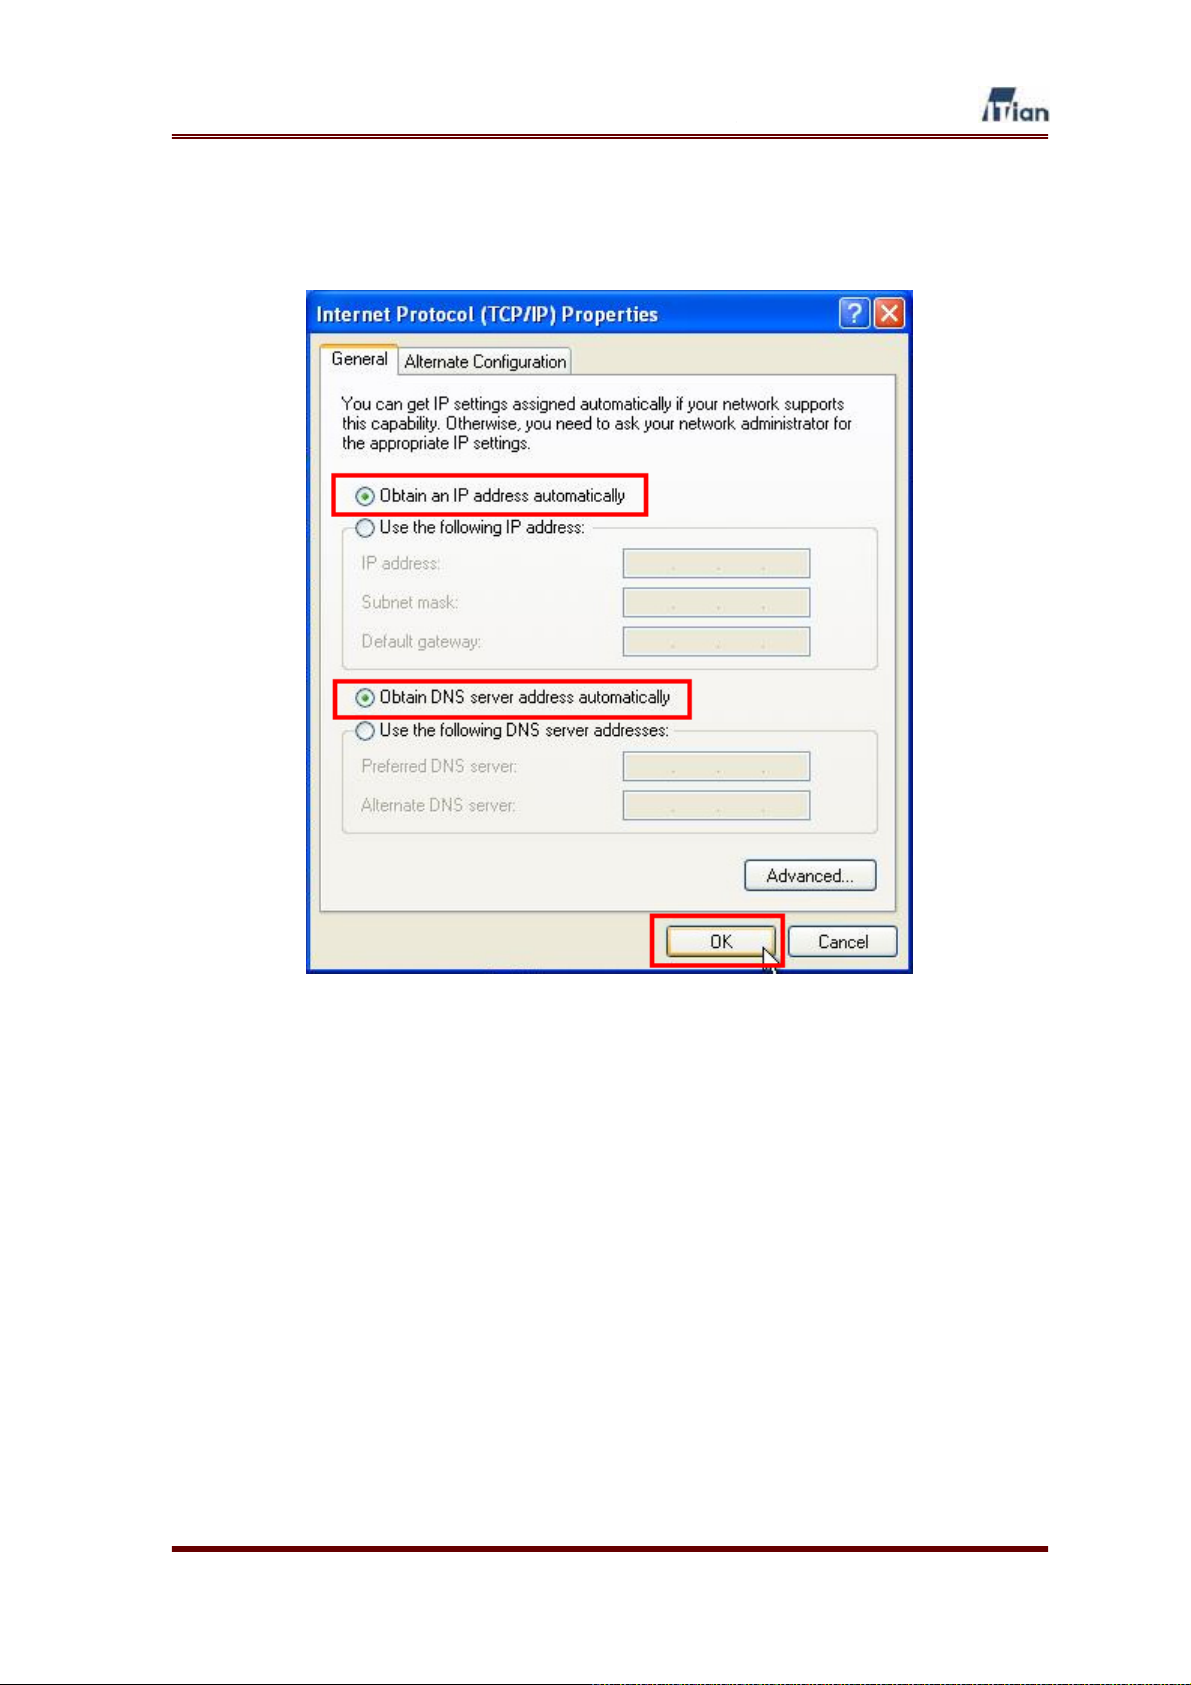
5. Select Obtain an IP address automatically and Obtain DNS Server
address automatically and click OK as shown below.
User’s Guide
21
6. Connection status can be checked by clicking Start > Settings > Control
Panel > Network Connections > Local Area Connection > Support Tab.
7. Go to Section 3 to install Square One.
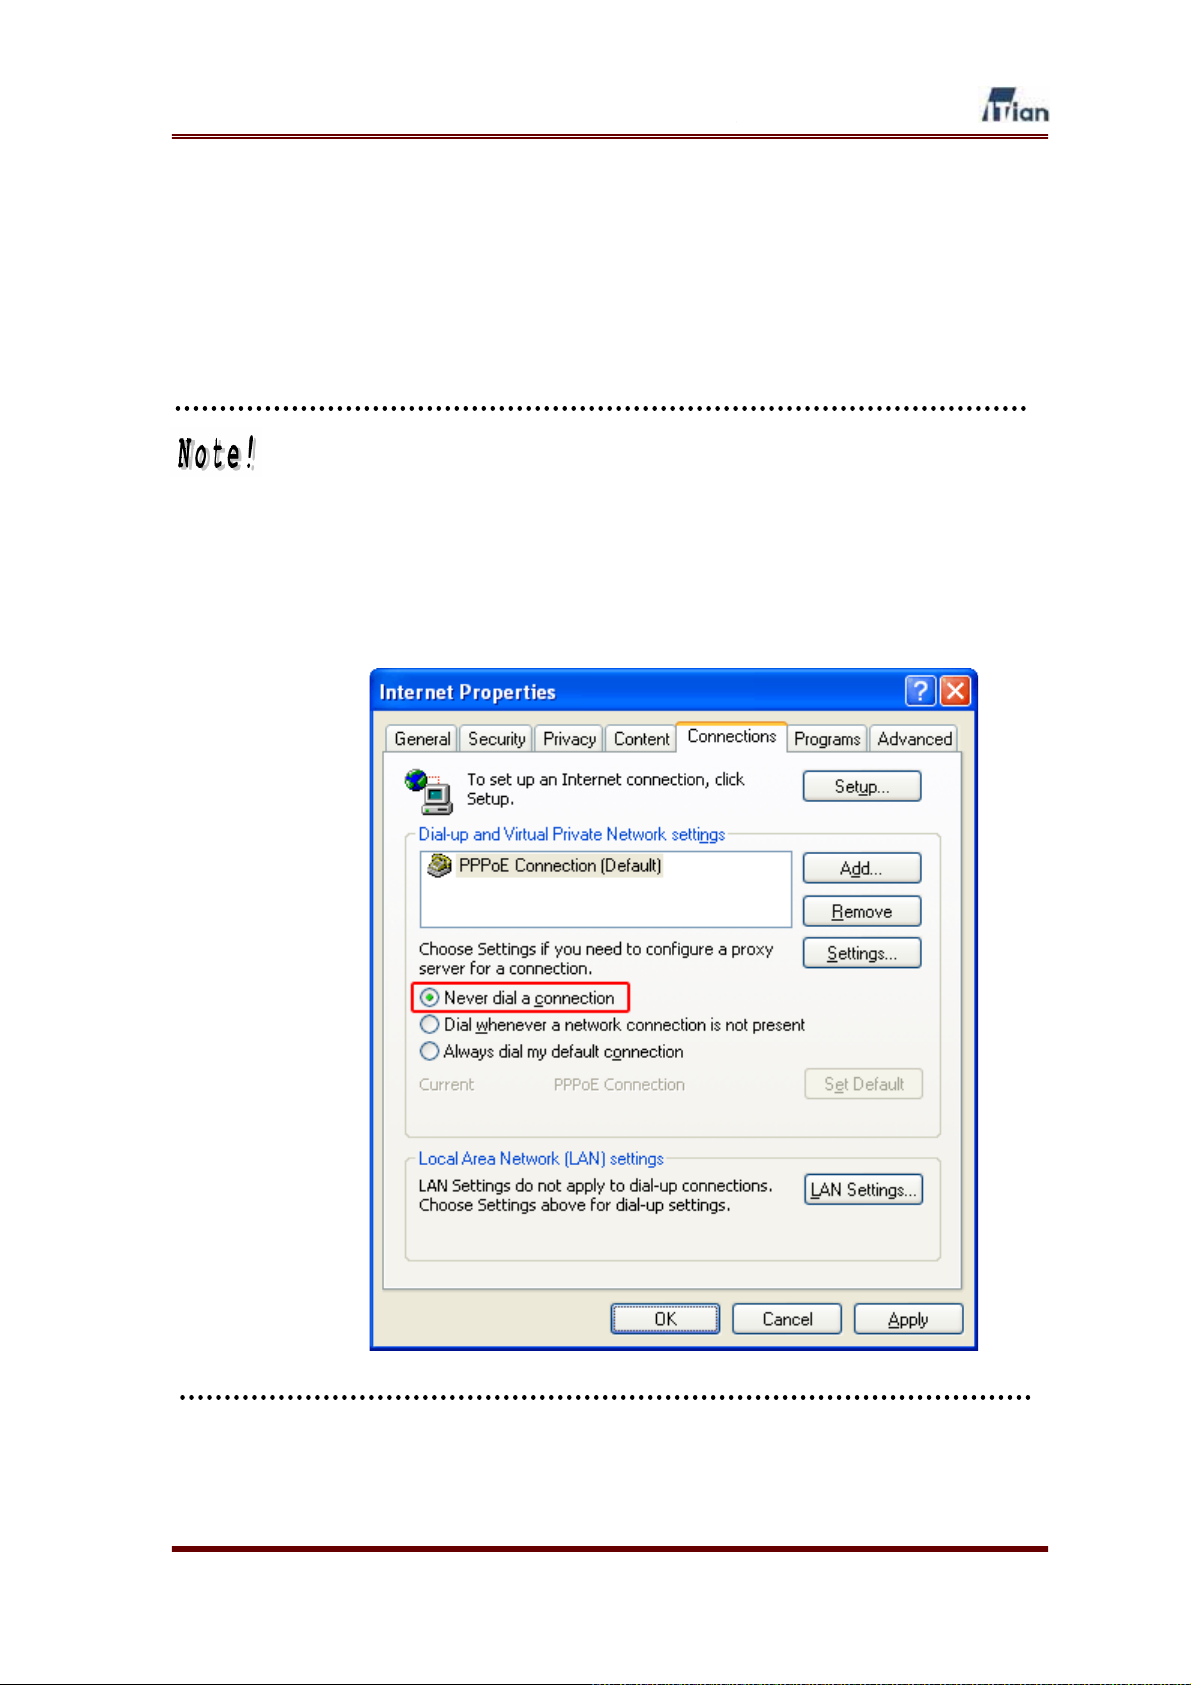
For PPPoE Users: If your Internet connection uses Point-to-Point Protocol
over Ethernet (PPPoE), you will need to disable the PPPoE login window,
since PPPoE login will be handled from now on by Square One.
1. On the Start menu, click Control Panel, and then double-click
Internet Options.
2. On the Connections tab, select Never dial a connection, and then
click OK.
User’s Guide
22
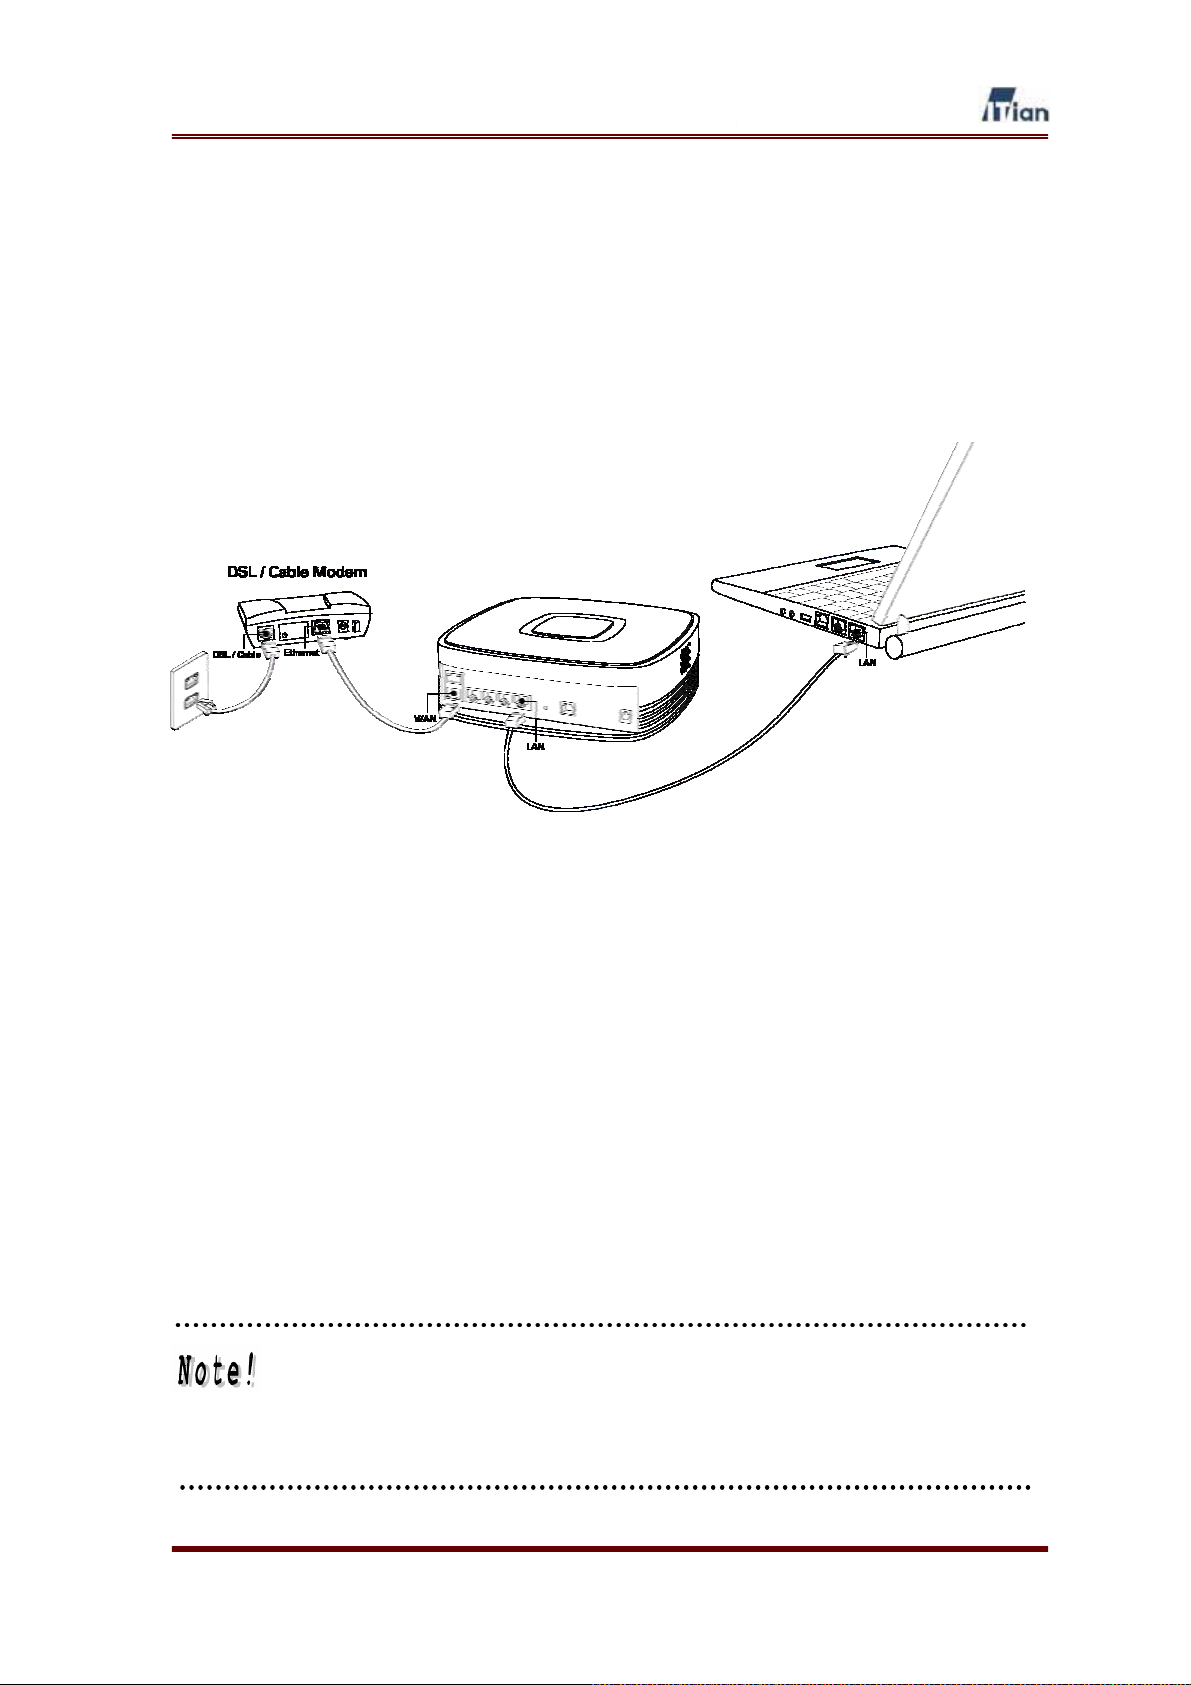
3. Connecting Square One
Once you have finished preparing your PCs, you are ready to connect Square One
to your network. Follow the instructions below.
Figure 2-1 Connecting Square One
1. Using the supplied Ethernet cable or another Ethernet cable (Cat 5 or
higher), connect your DSL/cable modem to the WAN port on the back of
Square One.
2. Connect Square One’s AC adaptor to the power port on Square One and
plug the adaptor into an electrical outlet.
3. Turn Square One on by pressing the chrome button on its front.
4. Plug one end of an Ethernet cable (Cat 5 or higher) into one of the four
LAN ports on the back of Square One, and plug the other end into your
computer’s LAN or Ethernet port.
If more than four PCs need to be connected to Square One, a hub or
switch may be connected to one of the four LAN ports and PCs can be
connected to the hub or switch. By adding hubs or switches, up to 253 PCs
can share the Internet connection through Square One.
User’s Guide
23

4. Configuring Square One
This section contains the instruction on configuring Square One. Before you
configure your Square One, determine the type of your Internet connection before
configuring Square One.
x If you have cable Internet service, no extra information is needed.
x If you have DSL Internet service with PPPoE, the user ID and the password
that were assigned to you by your Internet Service Provider (ISP) are required.
x If a static IP address is used to connect to the Internet, the IP address, subnet
mask, default gateway, and primary & secondary DNS server addresses
provided by your Internet Service Provider are required.
If a DSL service with PPPoE is being used for connecting to the Internet
and a connection program supplied by your ISP is used to connect to the
Internet, the connection program must be removed from your PC.
4.1. Using the Setup Wizard
Based on the type of your Internet connection, go to the appropriate sections listed
below to configure your Square One.
x DSL/cable broadband connection
ཛ 4-2-1. Connecting to Square One Administrator Interface
ཛྷ 4-2-2. Setting Up for DSL/Cable Broadband Internet
x DSL connection using PPPoE
ཛ 4-2-1. Connecting to Square One Administrator Interface
ཛ 4-2-3. Setting Up for DSL with PPPoE
x Static IP connection
ཛ 4-2-1. Connecting to Square One Administrator Interface
ཛྷ 4-2-4. Setting Up for Internet Connection with Static IP Address
x PPTP connection
ཛ 4-1-1. Connecting to Square One Administrator Interface
ཝG 4-1-5. Setting Up for PPTP
User’s Guide
24

4.1.1. Connecting to the Square One Administrator Interface
1. Open your web browser and enter the address below in the web browser’s
Address field as shown, and press Enter.
http://192.168.10.1:666
2. In the user authentication window, type in the following user name and
password and click OK.
x User name: admin
x Password: admin
User’s Guide
25
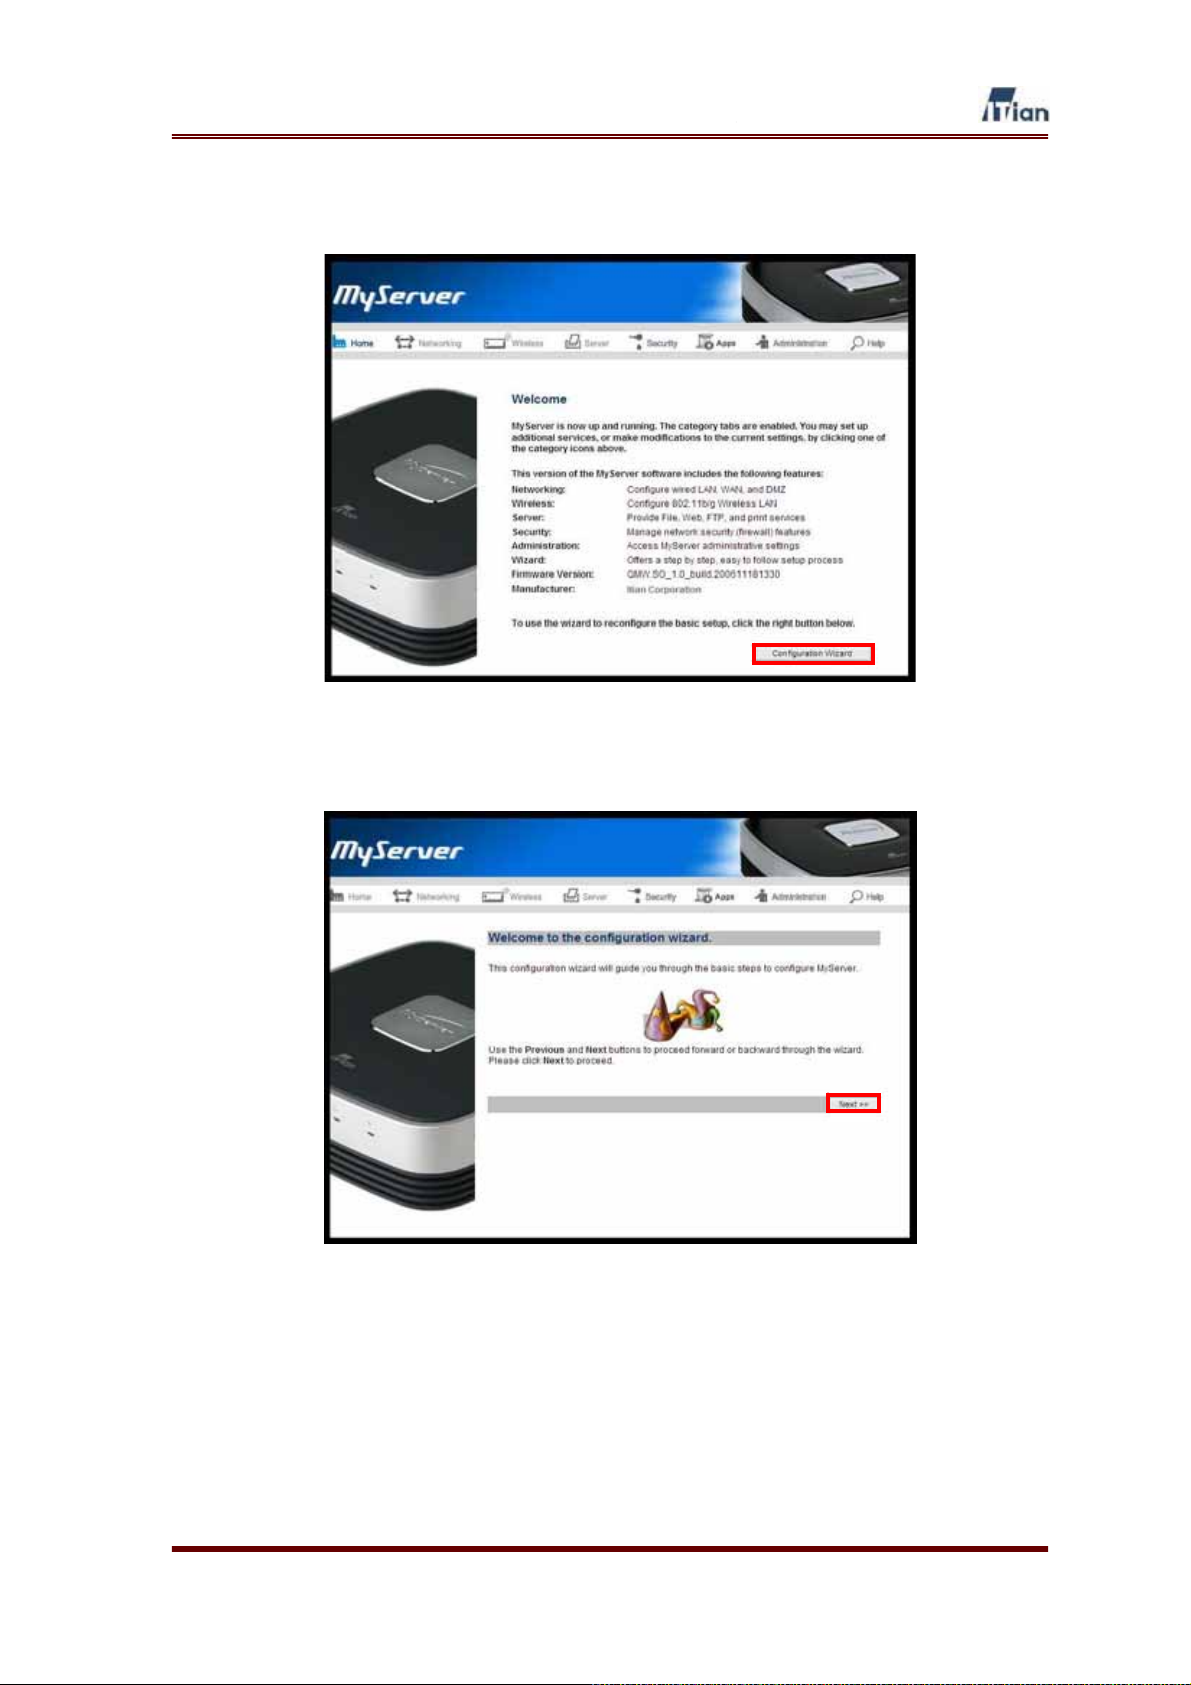
3. When the Welcome page opens, click the Configuration Wizard button.
4. When Configuration Wizard page opens, click Next.
User’s Guide
26
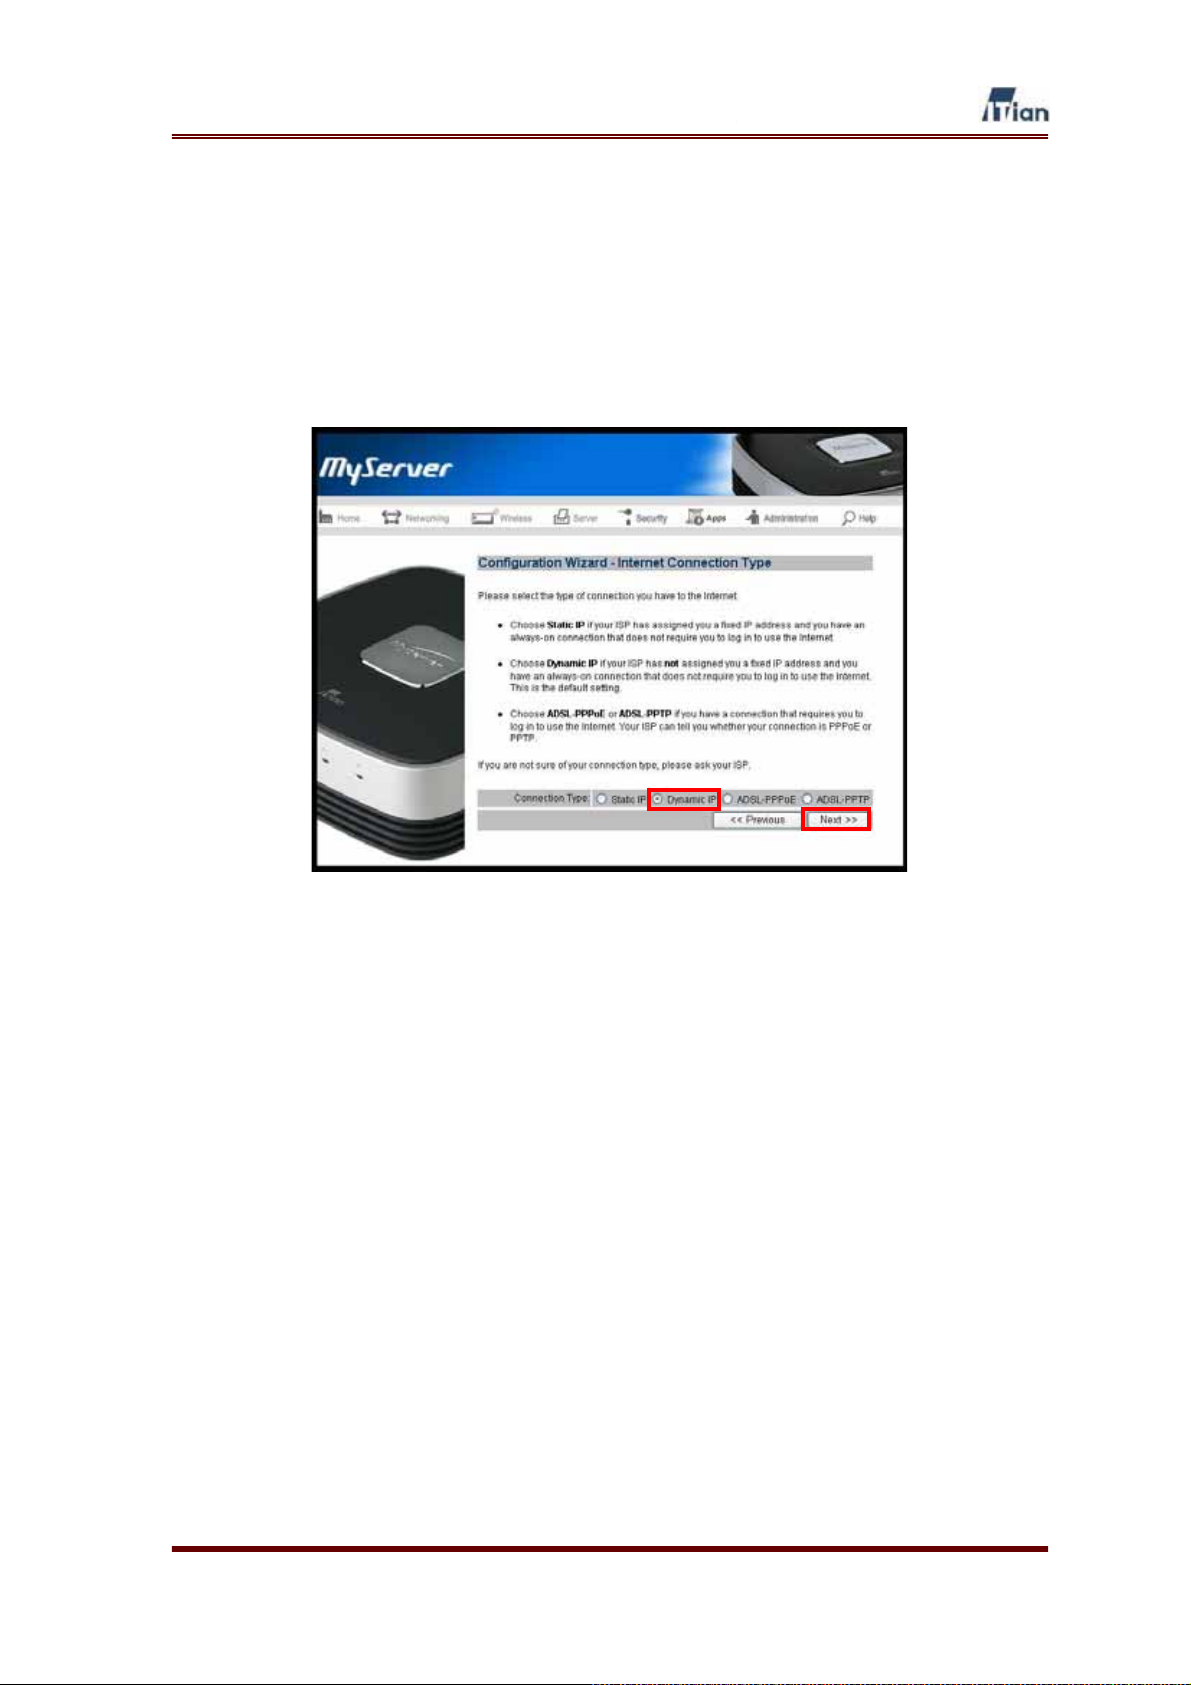
4.1.2. Setting Up for DSL/Cable Internet
If you connect to the Internet via DSL or cable without any user name or password,
follow the steps in this section.
1. Select Dynamic IP as the connection type, and then click Next.
User’s Guide
27

2. In most cases, you do not need to perform MAC cloning and just click
Next at this step. A MAC address is a physical address of a network card.
If your ISP requires you to connect to their network from one authorized
PC, you must “clone” the MAC address of that PC’s network card so that
Square One may assume the authorized MAC address. Fill in the Mac
Address field, If ISP authenticates using MAC address of LAN card that
was connected previous type in the MAC address of LAN card that was
connected. Then click the Next button.
User’s Guide
28
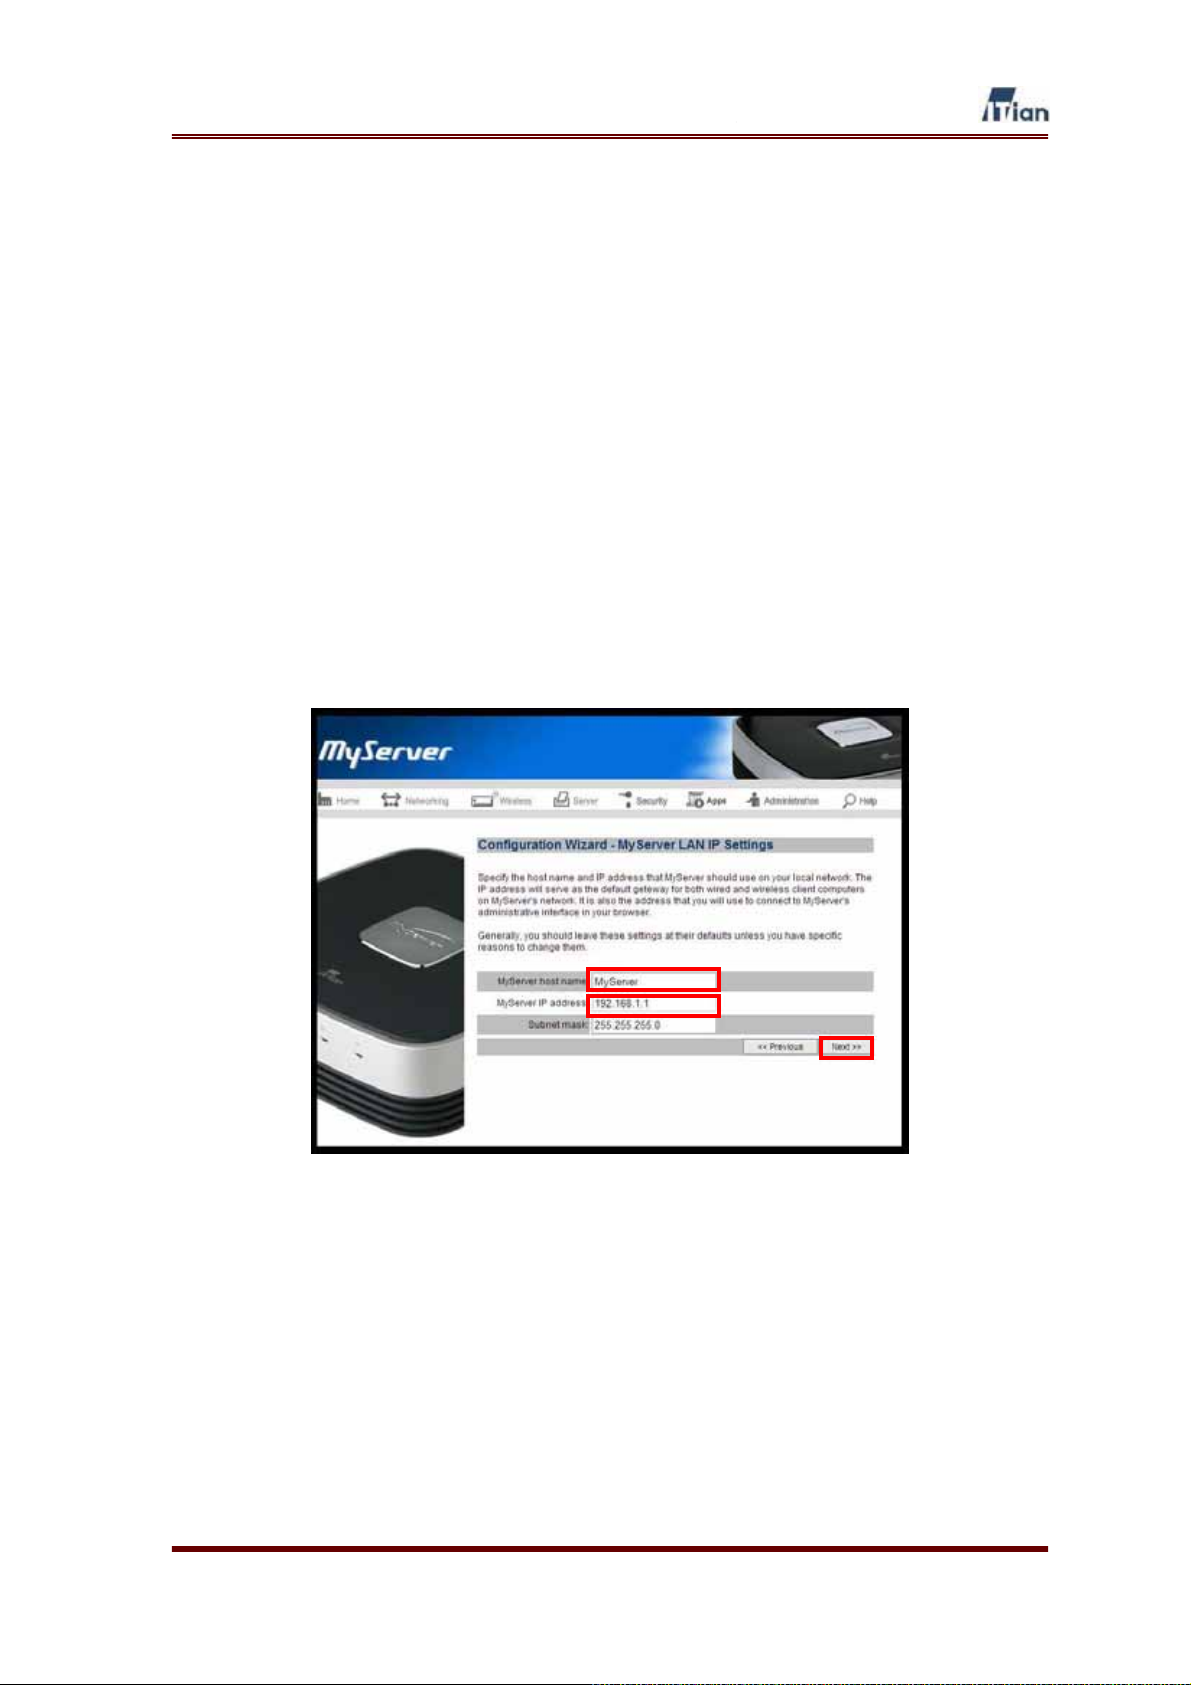
3. Type in the Host Name and IP address that you wish to assign to Square
One for identification within the local network, then click Next. You may
select any host name. (Examples: Home, Frank, or Smith). The IP address
should come from one of the ranges of IP addresses that are reserved for
private networks. By convention, private IP addresses are selected from
one of the following ranges:
x 192.168.0.1 through 192.168.255.255
x 172.16.0.1 through 172.31.255.255
x 10.0.0.1 through 10.255.255.255
For example, you could set the IP address to 192.168.12.1 or
172.16.29.100. The default value of 192.168.1.1 is suitable for most users.
User’s Guide
29

4. This screen allows you to configure the method of assigning IP addresses
to the PCs that connect to Square One and share the Internet connection.
If you wish to let Square One dynamically allocate IP addresses to the
PCs, answer Yes to the question: Enable DHCP? You may also specify
the range of IP addresses (from 0 to 255) that can be assigned
dynamically by Square One. Dynamically assigned IP addresses are valid
for the specified lease duration. After the lease duration, new addresses
are assigned. If you are not sure what settings you need here, we
recommend that you leave the settings as shown below. After configuring
DHCP, click Next.
If you do not enable DHCP, you will need to assign a static IP address to
each PC that connects to Square One.
User’s Guide
30
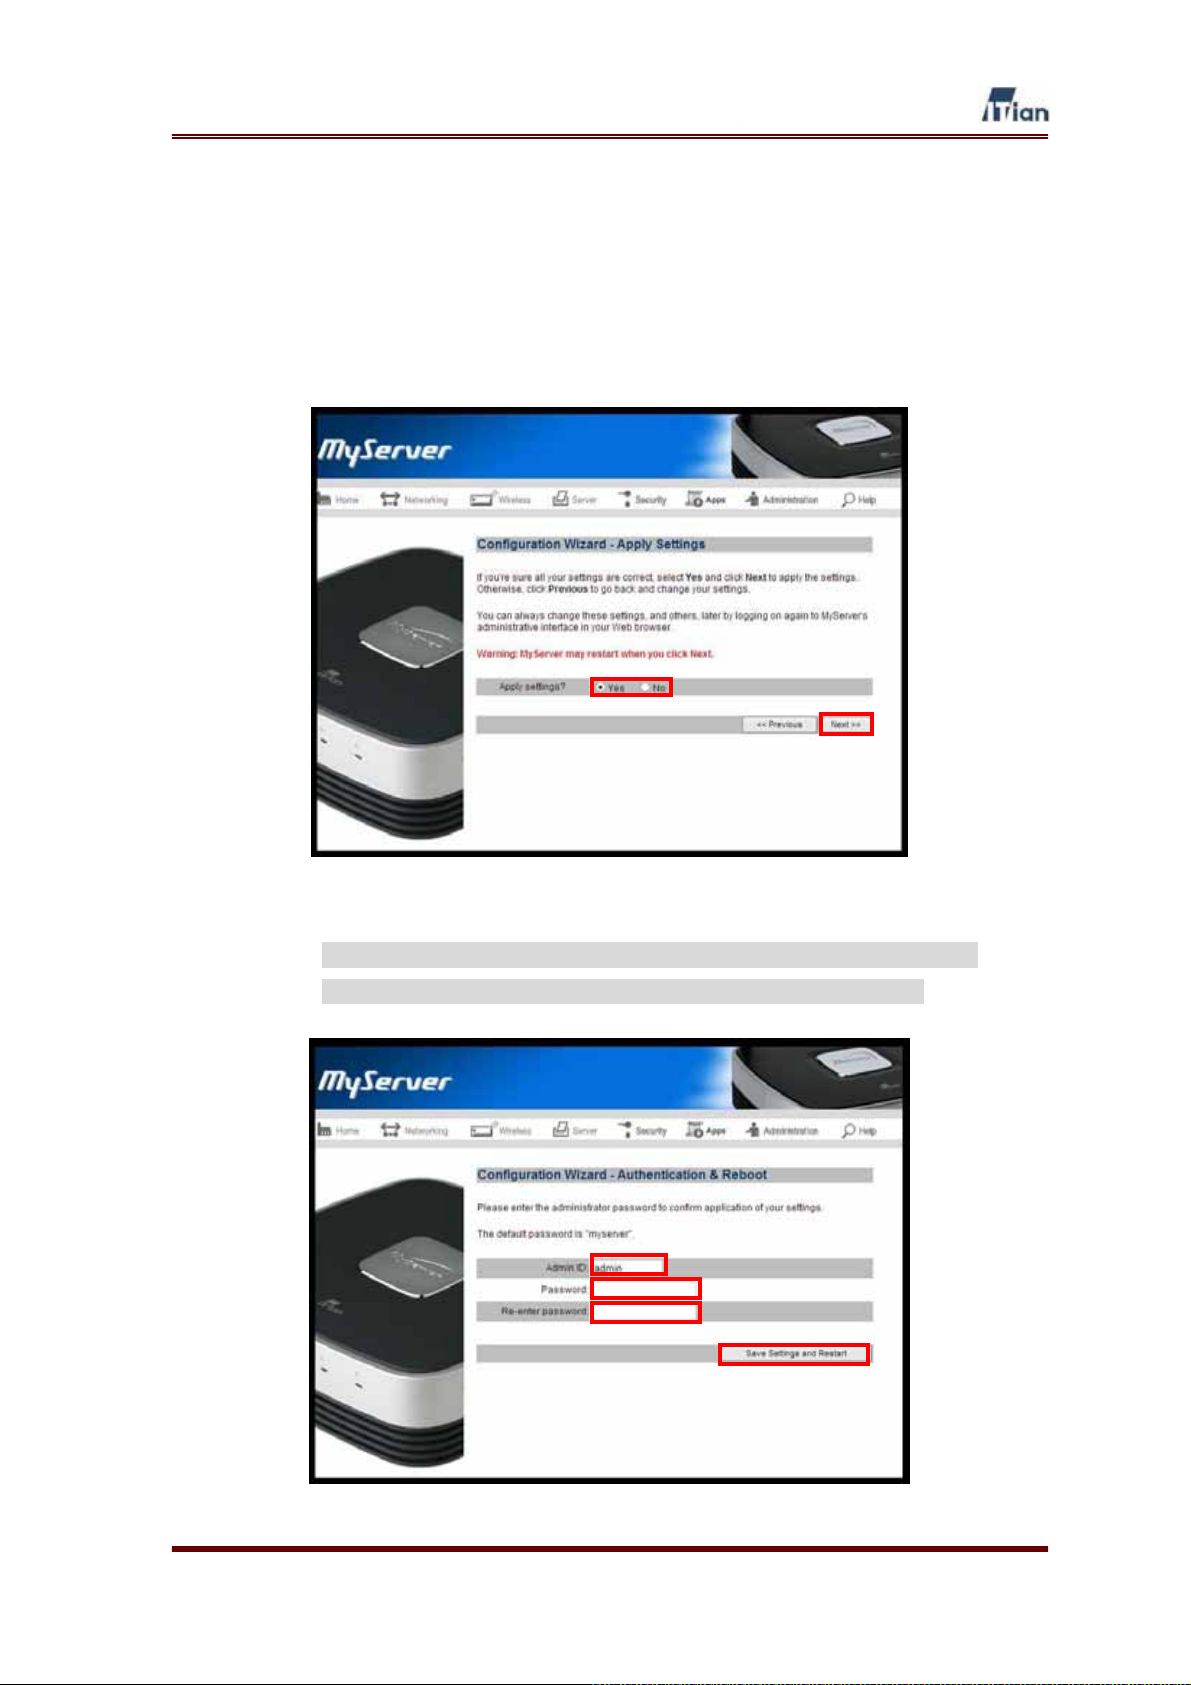
5. If you are satisfied with the choices you made in the configuration wizard,
select Yes to apply the settings and click Next. If you wish to go back to
previous screens to change any of your selections, click the Previous
button until you get to the screen that you wish to mo, click the Previous
button until you get to the section you wish to modify.
6. To make the new settings take effect, click the Yes button to restart
Square One. It may take a few minutes to restart Square One.
User’s Guide
31

7. After completing the configuration wizard once, you will see the following
screen when you go to the administrator’s interface at
http://192.168.1.1:8090 and log in. You can always run the configuration
wizard again by clicking the Configuration Wizard button at this screen.
User’s Guide
32

4.1.3. Setting Up for DSL with PPPoE
If you connect to the Internet using PPPoE with a user name and password
assigned by your ISP, follow the steps in this section.
1. Select ADSL-PPPoE as the Internet connection type and click Next.
2. Type in the user ID and password provided by your ISP. You may choose
to have Square One connect to the Internet always by selecting Always
on for Connection type, or specify the number of seconds after which
Square One disconnects from the Internet. Click Next when finished.
User’s Guide
33

3. In most cases, you do not need to perform MAC cloning and just click
Next at this step. A MAC address is a physical address of a network card.
If your ISP requires you to connect to their network from one authorized
PC, you must “clone” the MAC address of that PC’s network card so that
Square One may assume the authorized MAC address. Fill in the Mac
Address field, If ISP authenticates using MAC address of LAN card that
was connected previous type in the MAC address of LAN card that was
connected. Then click the Next button.
User’s Guide
34

4. Type in the Host Name and IP address that you wish to assign to Square
One for identification within the local network, then click Next. You may
select any host name. (Examples: Home, Frank, or Smith). The IP address
should come from one of the ranges of IP addresses that are reserved for
private networks. By convention, private IP addresses are selected from
one of the following ranges:
x 192.168.0.1 through 192.168.255.255
x 172.16.0.1 through 172.31.255.255
x 10.0.0.1 through 10.255.255.255
For example, you could set the IP address to 192.168.12.1 or
172.16.29.100. The default value of 192.168.1.1 is suitable for most users.
User’s Guide
35

5. This screen allows you to configure the method of assigning IP addresses
to the PCs that connect to Square One and share the Internet connection.
If you wish to let Square One dynamically allocate IP addresses to the
PCs, answer Yes to the question: Enable DHCP? You may also specify
the range of IP addresses (from 0 to 255) that can be assigned
dynamically by Square One. Dynamically assigned IP addresses are valid
for the specified lease duration. After the lease duration, new addresses
are assigned. If you are not sure what settings you need here, we
recommend that you leave the settings as shown below. After configuring
DHCP, click Next.
If you do not enable DHCP, you will need to assign a static IP address to
each PC that connects to Square One.
User’s Guide
36

6. If you are satisfied with the choices you made in the configuration wizard,
select Yes to apply the settings and click Next. If you wish to go back to
previous screens to change any of your selections, click the Previous
button until you get to the screen that you wish to mo, click the Previous
button until you get to the section you wish to modify.
7. To make the new settings take effect, click the Yes button to restart
Square One. It may take a few minutes to restart Square One.
User’s Guide
37

8. After completing the configuration wizard once, you will see the following
screen when you go to the administrator’s interface at
http://192.168.1.1:8090 and log in. You can always run the configuration
wizard again by clicking the Configuration Wizard button at this screen.
User’s Guide
38
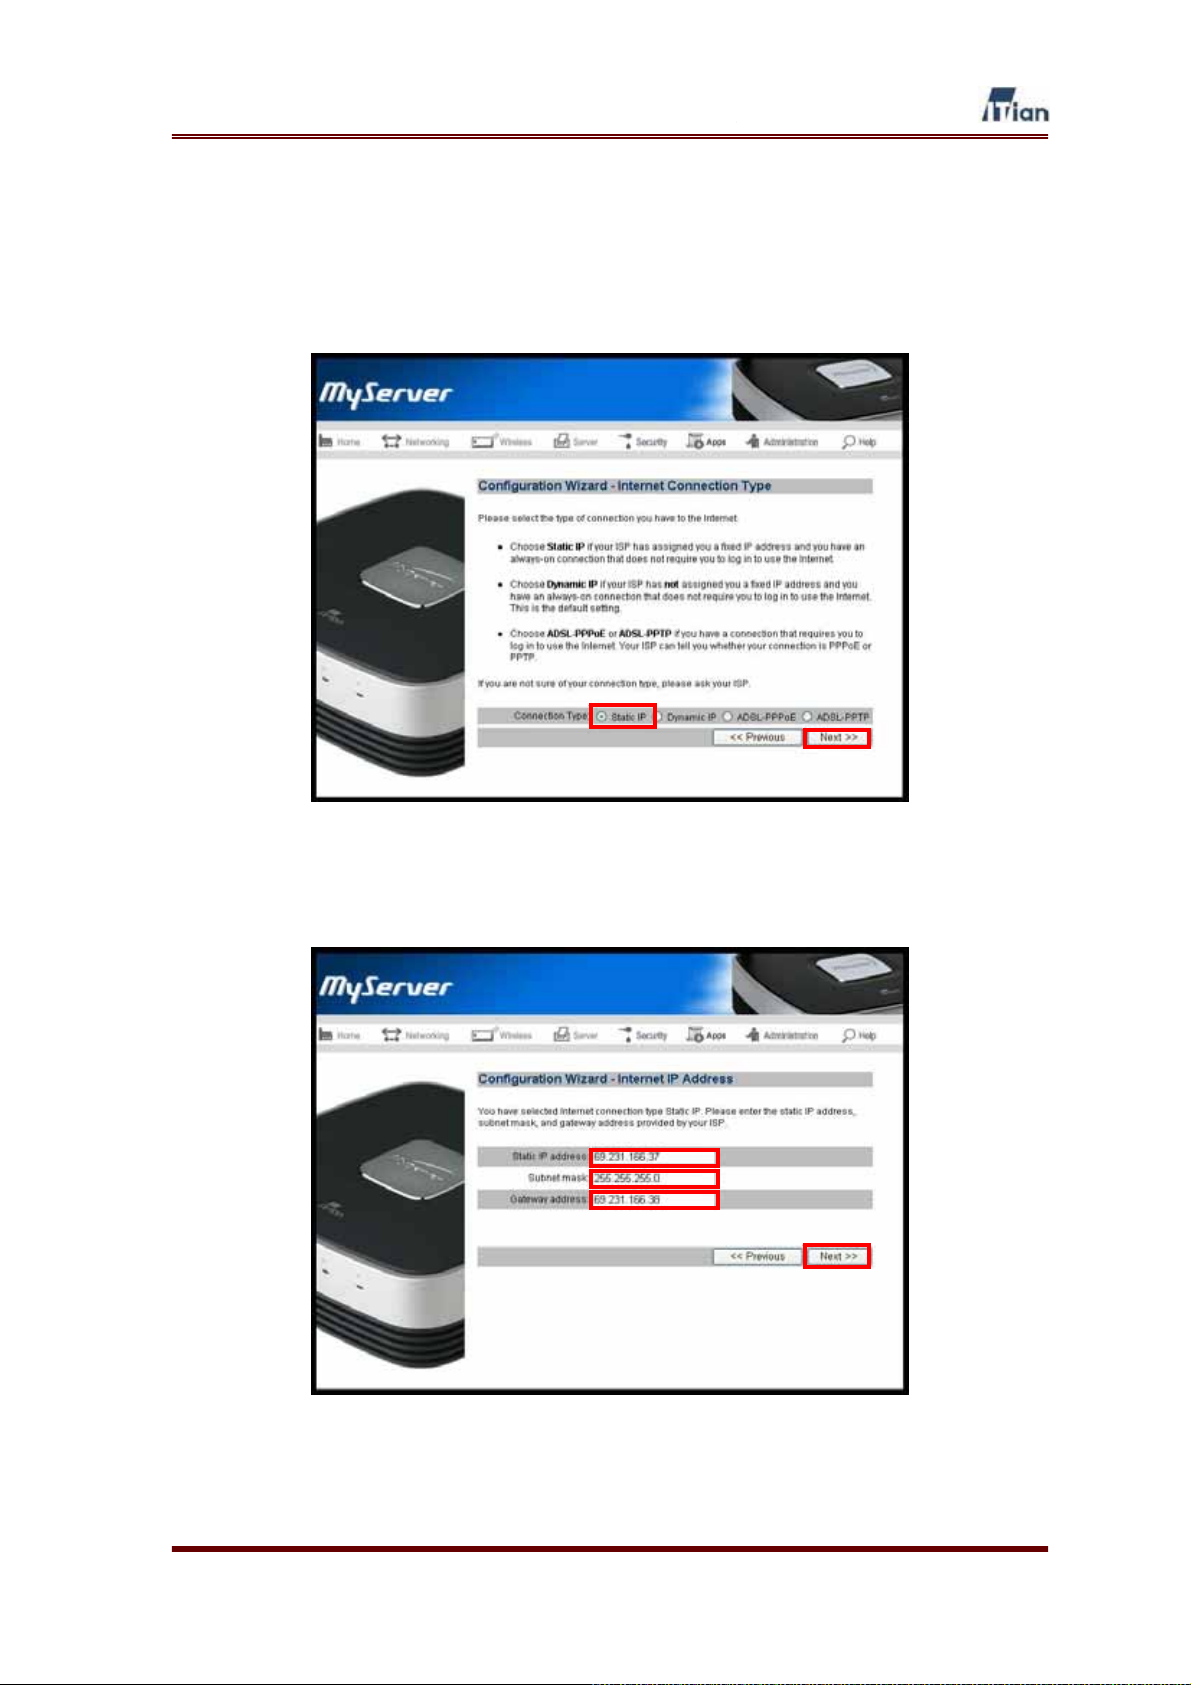
4.1.4. Setting Up for Internet Connection with Static IP Address
If you connect to the Internet with a fixed IP address, follow the steps in this section.
1. Select Static as your connection type and click the Next button.
2. Type in the IP address, subnet mask, and gateway address provided by
your ISP or network administrator and click Next.
User’s Guide
39

3. Type in the domain name server’s IP addresses (DNS Server IPs)
provided by your ISP or network administrator and click Next.
User’s Guide
40

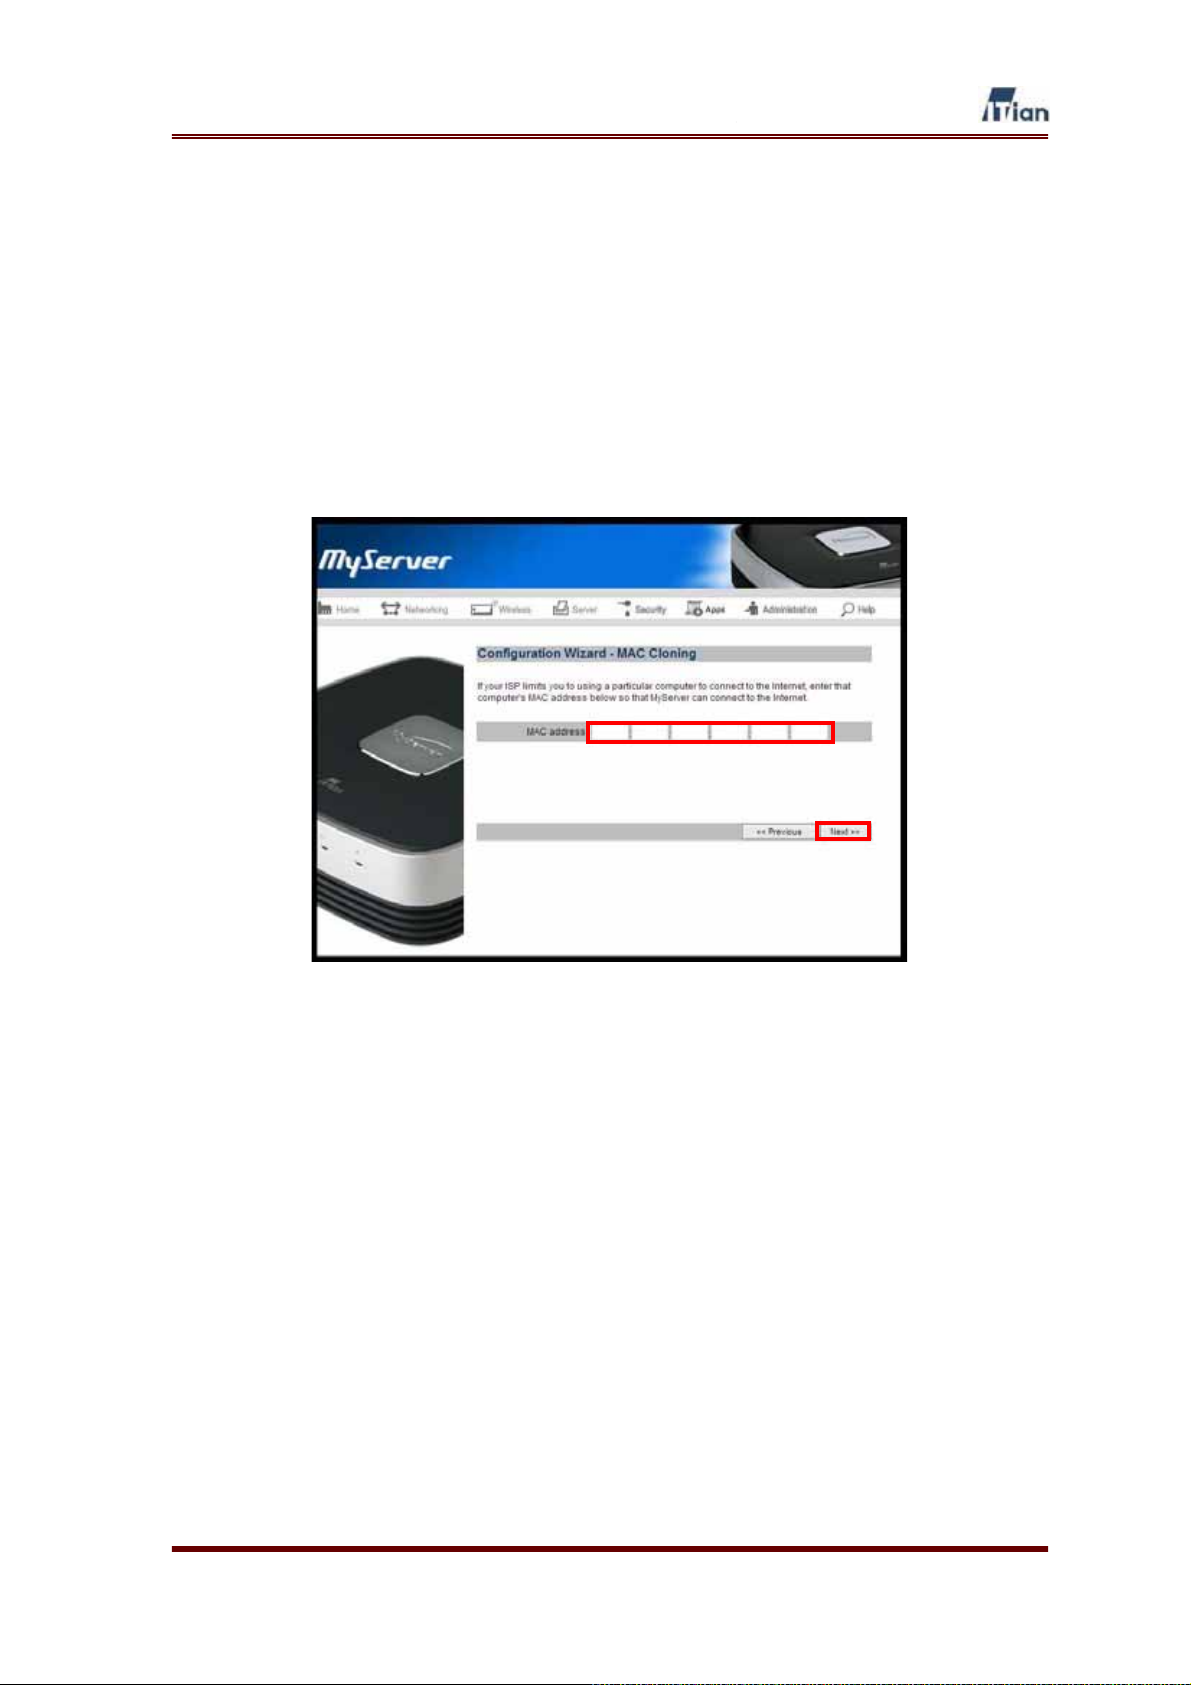
4. In most cases, you do not need to perform MAC cloning and just click
Next at this step. A MAC address is a physical address of a network card.
If your ISP requires you to connect to their network from one authorized
PC, you must “clone” the MAC address of that PC’s network card so that
Square One may assume the authorized MAC address. Fill in the Mac
Address field, If ISP authenticates using MAC address of LAN card that
was connected previous type in the MAC address of LAN card that was
connected. Then click the Next button.
User’s Guide
41

5. Type in the Host Name and IP address that you wish to assign to Square
One for identification within the local network, then click Next. You may
select any host name. (Examples: Home, Frank, or Smith). The IP address
should come from one of the ranges of IP addresses that are reserved for
private networks. By convention, private IP addresses are selected from
one of the following ranges:
x 192.168.0.1 through 192.168.255.255
x 172.16.0.1 through 172.31.255.255
x 10.0.0.1 through 10.255.255.255
For example, you could set the IP address to 192.168.12.1 or
172.16.29.100. The default value of 192.168.1.1 is suitable for most users.
User’s Guide
42

6. This screen allows you to configure the method of assigning IP addresses
to the PCs that connect to Square One and share the Internet connection.
If you wish to let Square One dynamically allocate IP addresses to the
PCs, answer Yes to the question: Enable DHCP? You may also specify
the range of IP addresses (from 0 to 255) that can be assigned
dynamically by Square One. Dynamically assigned IP addresses are valid
for the specified lease duration. After the lease duration, new addresses
are assigned. If you are not sure what settings you need here, we
recommend that you leave the settings as shown below. After configuring
DHCP, click Next.
If you do not enable DHCP, you will need to assign a static IP address to
each PC that connects to Square One.
User’s Guide
43

7. If you are satisfied with the choices you made in the configuration wizard,
select Yes to apply the settings and click Next. If you wish to go back to
previous screens to change any of your selections, click the Previous
button until you get to the screen that you wish to mo, click the Previous
button until you get to the section you wish to modify.
8. To make the new settings take effect, click the Yes button to restart
Square One. It may take a few minutes to restart Square One.
User’s Guide
44

9. After completing the configuration wizard once, you will see the following
screen when you go to the administrator’s interface at
http://192.168.1.1:8090 and log in. You can always run the configuration
wizard again by clicking the Configuration Wizard button at this screen.
User’s Guide
45

4.1.5. Setting Up for a PPTP Connection
Point to point Tunneling Protocol (PPTP) is typically used in Europe. If you connect
to the Internet using PPTP, follow the steps in this section.
1. Select ADSL-PPTP as your connection type and click Next.
User’s Guide
46

2. Type in the IP address, subnet mask, PPTP server’s IP address, PPTP
user name, and PPTP password assigned by your ISP and click Next.
User’s Guide
47
3. In most cases, you do not need to perform MAC cloning and just click
Next at this step. A MAC address is a physical address of a network card.
If your ISP requires you to connect to their network from one authorized
PC, you must “clone” the MAC address of that PC’s network card so that
Square One may assume the authorized MAC address. Fill in the Mac
Address field, If ISP authenticates using MAC address of LAN card that
was connected previous type in the MAC address of LAN card that was
connected. Then click the Next button.
User’s Guide
48

4. Type in the Host Name and IP address that you wish to assign to Square
One for identification within the local network, then click Next. You may
select any host name. (Examples: Home, Frank, or Smith). The IP address
should come from one of the ranges of IP addresses that are reserved for
private networks. By convention, private IP addresses are selected from
one of the following ranges:
x 192.168.0.1 through 192.168.255.255
x 172.16.0.1 through 172.31.255.255
x 10.0.0.1 through 10.255.255.255
For example, you could set the IP address to 192.168.12.1 or
172.16.29.100. The default value of 192.168.1.1 is suitable for most users.
User’s Guide
49

5. This screen allows you to configure the method of assigning IP addresses
to the PCs that connect to Square One and share the Internet connection.
If you wish to let Square One dynamically allocate IP addresses to the
PCs, answer Yes to the question: Enable DHCP? You may also specify
the range of IP addresses (from 0 to 255) that can be assigned
dynamically by Square One. Dynamically assigned IP addresses are valid
for the specified lease duration. After the lease duration, new addresses
are assigned. If you are not sure what settings you need here, we
recommend that you leave the settings as shown below. After configuring
DHCP, click Next.
If you do not enable DHCP, you will need to assign a static IP address to
each PC that connects to Square One.
User’s Guide
50

6. If you are satisfied with the choices you made in the configuration wizard,
select Yes to apply the settings and click Next. If you wish to go back to
previous screens to change any of your selections, click the Previous
button until you get to the screen that you wish to mo, click the Previous
button until you get to the section you wish to modify.
7. To make the new settings take effect, click the Yes button to restart
Square One. It may take a few minutes to restart Square One.
User’s Guide
51

8. After completing the configuration wizard once, you will see the following
screen when you go to the administrator’s interface at
http://192.168.1.1:8090 and log in. You can always run the configuration
wizard again by clicking the Configuration Wizard button at this screen.
User’s Guide
52

4.2. Administrator Interface
Whenever you need to configure Square One, you can open the administrator
interface by pointing your browser to http://[Square One’s LAN IP]:8090. For
example, if you did not change Square One’s LAN IP from the default one, you can
open the admin interface by going to http://192.168.1.1:8090.
The admin interface is divided into six sections as follows.
x Networking
The Networking section of the admin interface allows you to configure Square
One’s connection to the Internet and the settings that govern how PCs and
devices connect to Square One from external networks as well as internal.
x Wireless
The Wireless section allows you to configure the Wi-Fi access point
component of Square One. This section is only available in the wireless model.
x Server:
Square One can function as a file server, print server, and FTP server serving
multiple users. Square One’s built-in Web server and MySQL database allows
you to host your own Website or run PHP-based Web applications. The
Server section will help you take advantage of these powerful features in
Square One.
x Security:
As the gateway between your local network and the Internet, Square One’s
firewall monitors and filters incoming and outgoing network traffic. The
Security Section allows you to configure the firewall and network policies to
control the flow of various types of data packets in and out of your network.
x Apps:
The ability to run Web applications sets Square One apart from other network
hard drives. Square One does more than just store and serve files to users.
Square One can be programmed to run MySQL database-driven Web
applications written in PHP or Perl. At the Apps section, you can access and
configure the applications that are pre-installed in Square One.
User’s Guide
53

x Administration:
At the Administration section, you can manage the administrator’s account,
restart or shut down Square One, or update the system software.
x Help:
At any screen of the Square One admin interface, click on the Help button,
and the context-sensitive Help will guide you.
?
User’s Guide
54
5. Using Square One
Unlike other network appliances or network storage devices, Square One is not
merely a network-enabling device but a tool for facilitating enhanced productivity or
enjoyment in your home or office computing. There are many ways to implement and
use Square One. We introduce a few basic uses of Square One’s server
functionalities in the following sections.
5.1. Using Network Storage
Square One’s network storage can be accessed by computers and devices
connecting to Square One over the LAN. There are two ways to access the network
storage: 1) using the network address and 2) mapping a network drive. Using the
network address establishes temporary access that is valid until you log off from
your computer. Mapping a network drive creates a convenient “shortcut” by
assigning a drive letter to the network folder.
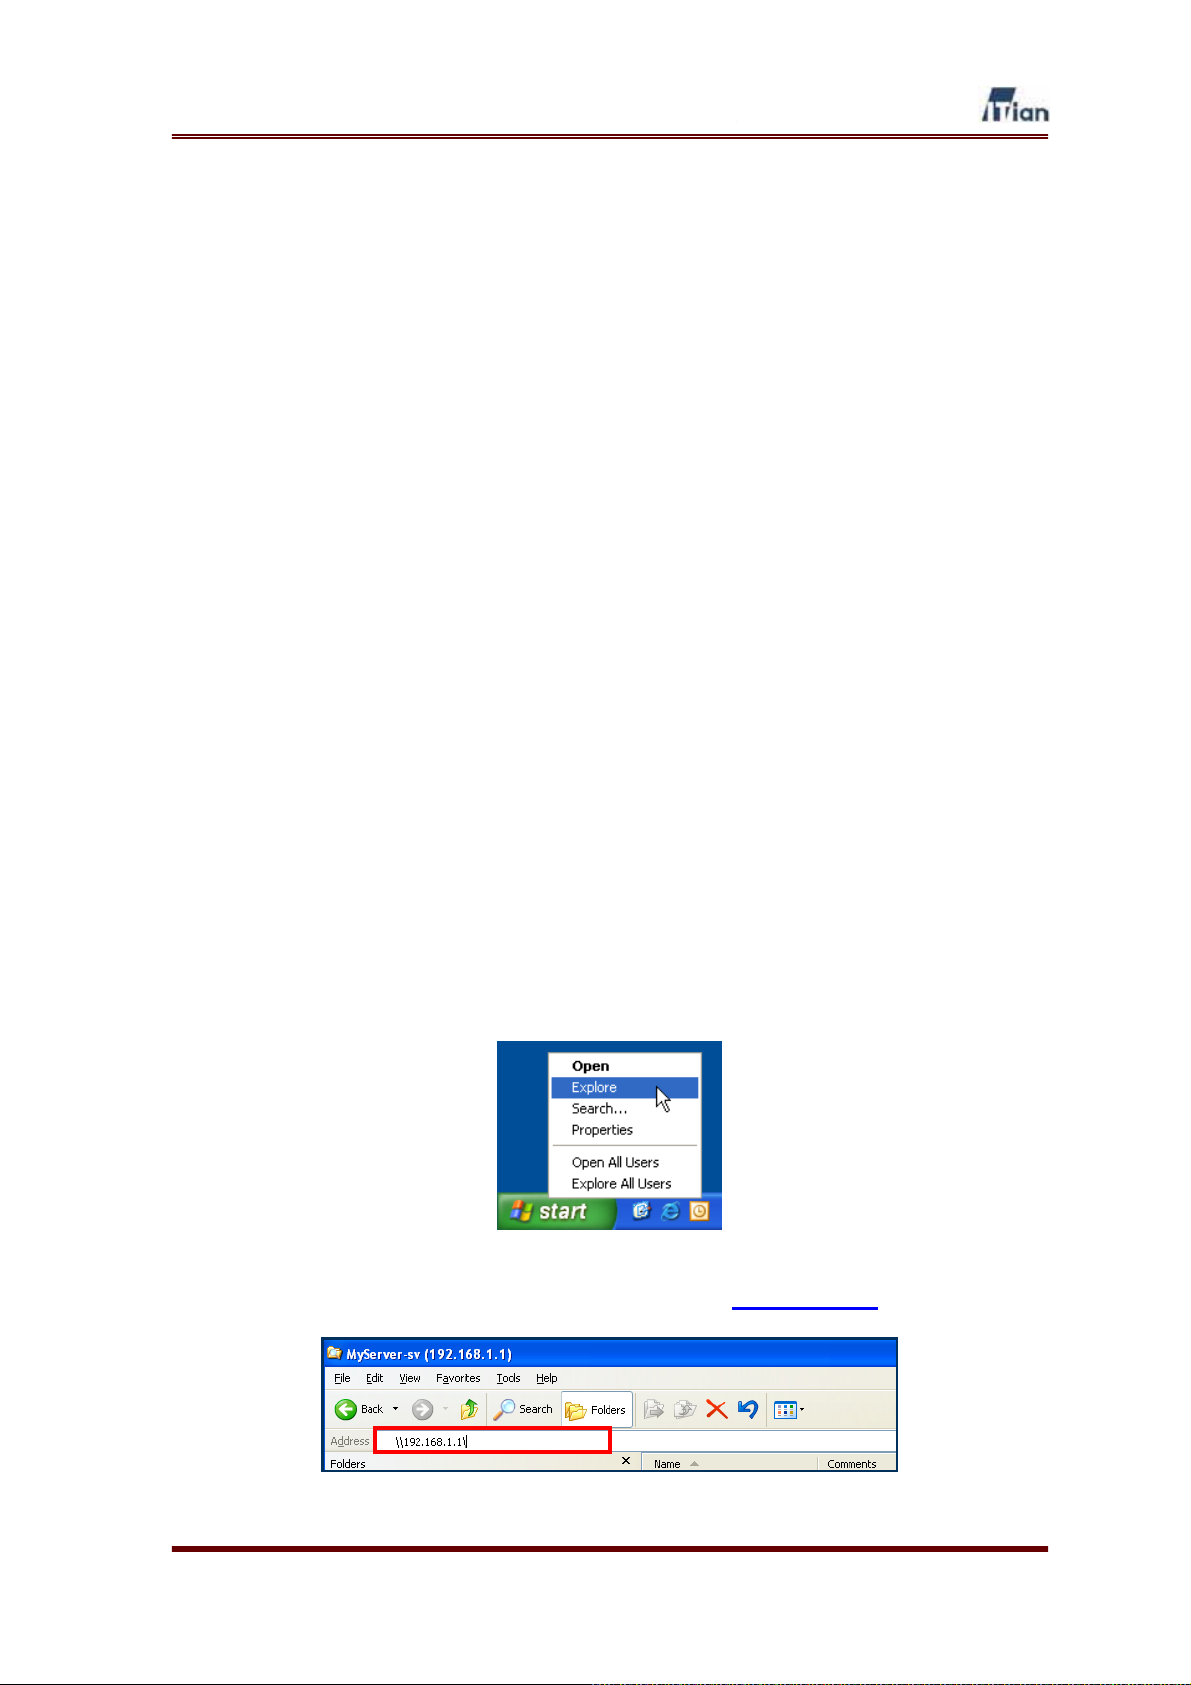
Using the Network Address
There are multiple ways to connect to a network folder. Here is one simple method:
1. Right-click the Start button and select Explore.
2. At the Windows Explorer screen, type in \\192.168.10.1\
and press enter.
User’s Guide
55

3. Enter your Square One User Name and Password.
4. If you have entered the correct user name and password, you will see the
network folders on Square One.
Network Drive connector can be downloaded from www.myITian
Corporation.com.
User’s Guide
56

Mapping a Network Drive
Instead of using the network address each time you wish to access the network
storage, you can map a Network Drive to establish a permanent shortcut. You can
then address the network drive as though it is one of the local drives on your
computer.
1. First, connect to Square One’s network storage using the network address.
2. At Windows Explorer, right-click the network folder you wish to map to a
drive letter, then select Map Network Drive.
User’s Guide
57

3. Select a drive letter. Check Reconnect at logon if you want a permanent
mapping of the drive letter. Click Finish when satisfied with your settings.
4. When the network drive is successfully mapped, you will see a new drive
letter under My Computer.
User’s Guide
58
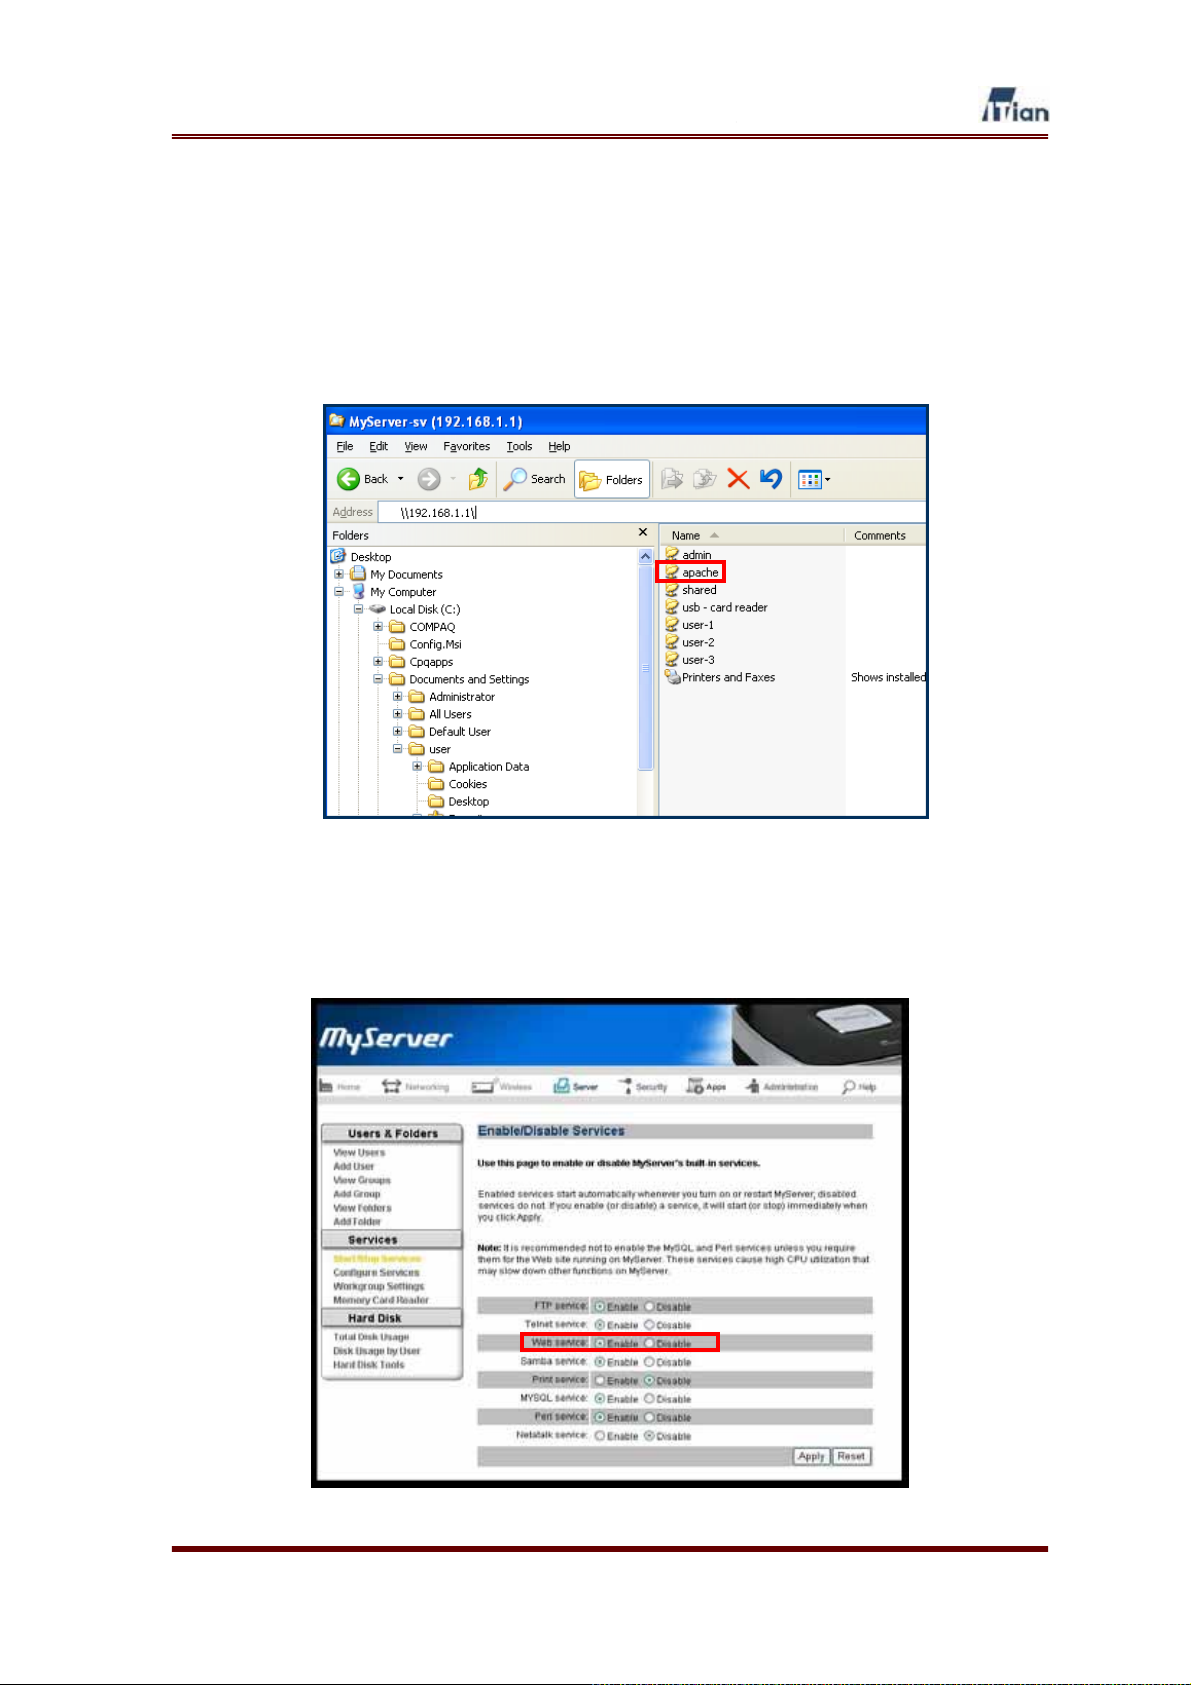
5.2. Using Web server
Square One is pre-installed with Apache Web server, Perl, PHP, and MySQL. Web
page file can be created and uploaded to Square One using Windows Explorer or an
FTP program. The Web files must be stored in /hdd/3/apache/htdocs/ folder.
sss
In order to publish your Website to the public, the Web service must be enabled at
the Start/Stop Services page under the Server section in the admin interface.
User’s Guide
59

Refer to the Apache administrator’s manual to configure your Web server.
By default, only the admin user may upload or modify Website content.
User’s Guide
60

5.3. Using Print Server
Square One allows the computers on your network to share a USB printer. In order
to take advantage of Square One’s print server functionality, follow the steps below
to configure the computers that need access to the USB printer connected to your
Square One’s USB port.
1. Select Start > Control Panel > Printers and Faxes > Add a printer.
2. Click the Next button when Add Printer Wizard comes up as shown
below.
User’s Guide
61

3. Select the Local printer attached to this computer then click the Next
button.
4. Select the Create a new port and then Standard TCP/IP Port then click
Next.
User’s Guide
62
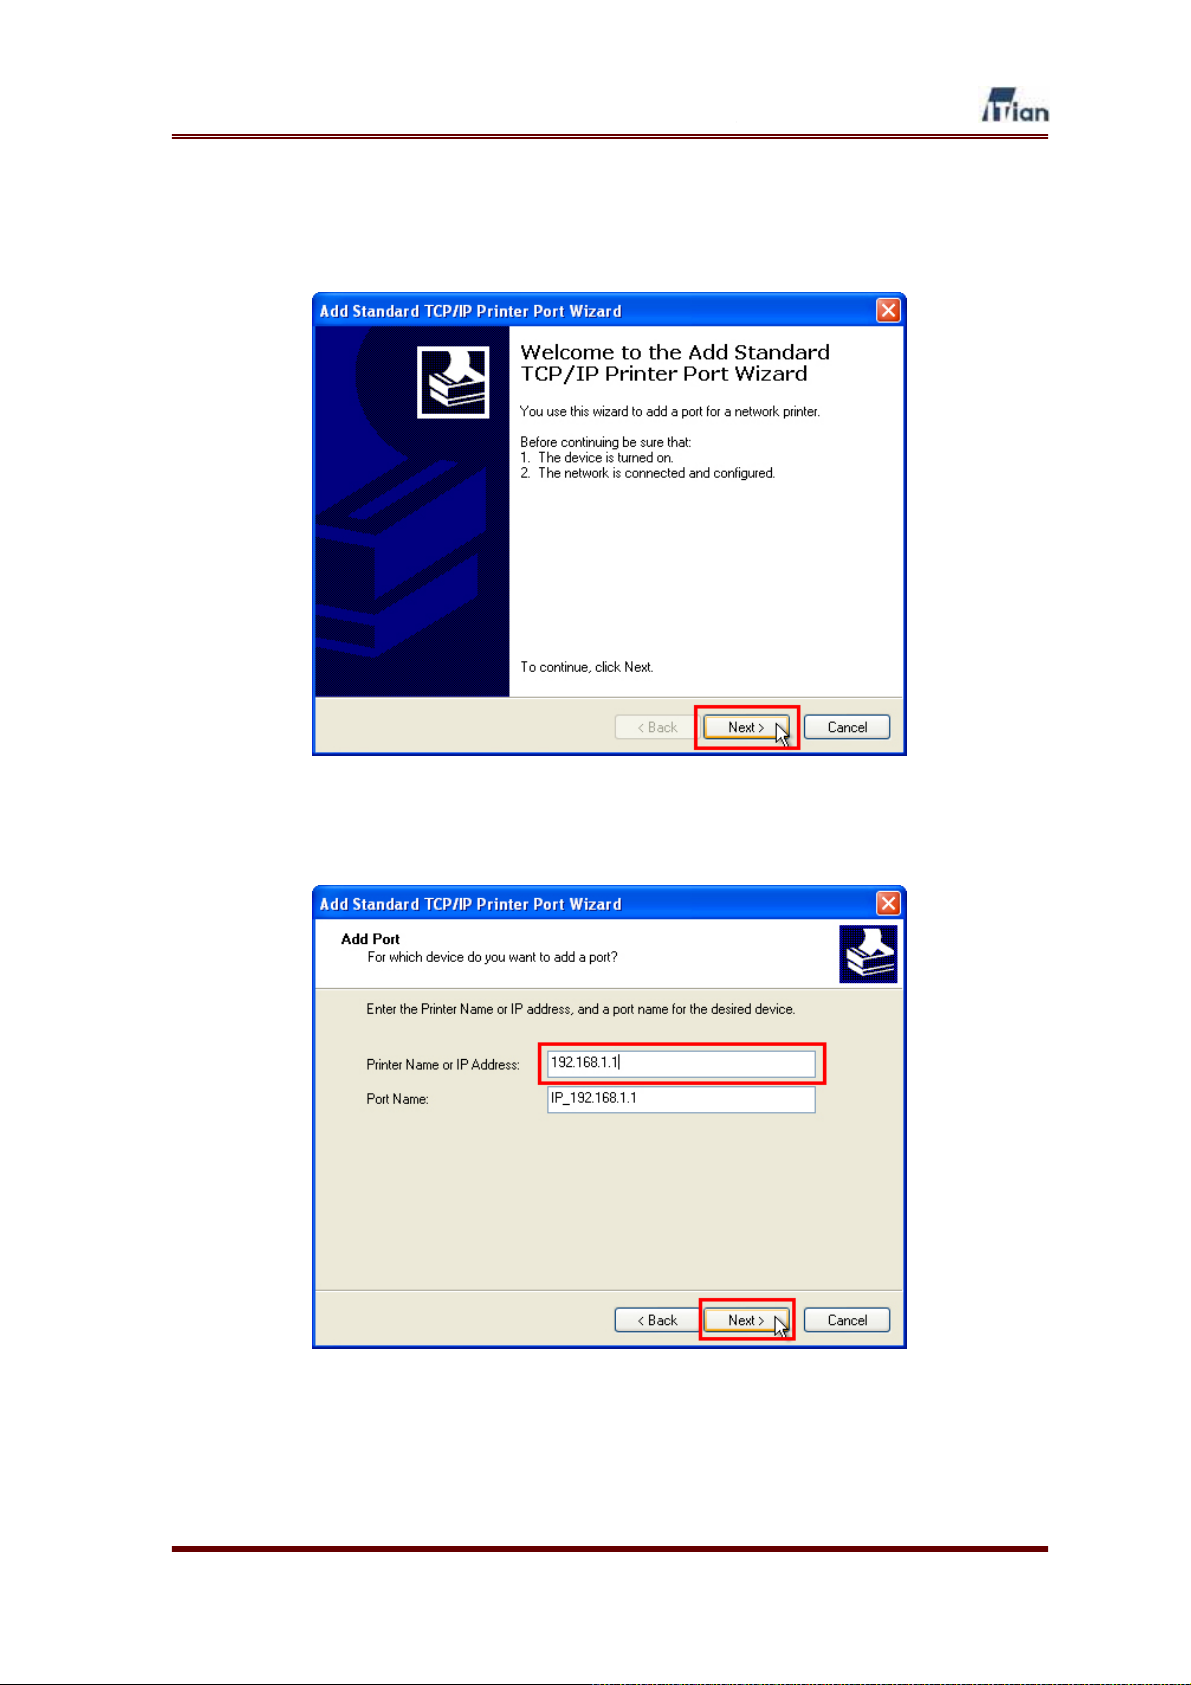
5. Click the Next button at the Add Standard TCP/IP Printer Port Wizard
screen.
6. Enter Square One’s IP address as shown below in the Printer Name or IP
address field and click Next.
User’s Guide
63

7. Select Custom for Device Type and click Settings.
8. Type in your Square One’s IP address. The Port Name will be IP_[Square
One’s IP address] by default. Set Protocol to Raw. Set Raw Settings port
number to 9100. Click OK.
User’s Guide
64

9. After confirming Custom setting, click the Next button.
10. Click the Finish button to close the Add printer port wizard, then configure
the printer driver for the printer that will be connected to Square One.
Refer to your printer’s manual for configuring the printer driver.
User’s Guide
65

5.4. Using Memory Card Reader
When a memory card is inserted into the memory card reader in Square One, the
memory card is mounted as a network folder.
In order to use the memory card reader, however, you must enable the service at the
Memory Card Reader page under the Server section in the admin interface. If you
wish to have the content of your memory card copied to Square One automatically,
enable the Auto backup feature as well.
Once you have enabled the memory card reader, access the network storage as
instructed in Section 5.1. The memory card’s content can be found in the folder
named usb-card reader.
User’s Guide
66

Upon entering the usb-card reader folder, you will see multiple folders, each
corresponding to a distinct type of memory card as follows.
Folders Memory Card Type
CF_MD Compact Flash and Micro Drive
XD_SM Extreme Digital and Smart Media
SD_MMC Secure Digital and Multimedia Card
MS_MSPRO Memory Stick and Memory Stick Pro
Table 5-1 Memory Card Folders
Do not insert multiple memory cards at once. Only insert one memory card
at a time.
Removing memory card while Square One is reading the card may cause
problems. Remove the card when operation is complete.
User’s Guide
67

5.5. Using Wireless LAN
This basic configuration required for Wireless LAN.
1. Select Wireless LAN mode.
Mixed This mode supports IEEE802.11b and IEEE802.11g.
B-only
G-only
ྙ Specify a SSID to be used as network ID in Wireless LAN environment.
Same SSID is used between AP and terminal equipment under wireless
LAN environment to provide access and network service. Since APs
provide SSID to all terminal equipments, it is recommended that
Wireless LAN security authentication such as MAC Filter is used.
ྚ Specify a Radio channel. IEEE802.11b and IEEE802.11g standards
specify a 2.4GHz frequency range to be subdivided into 14 channels.
From the 14 channels, it is recommended that a channel that is not being
used by other AP is selected.
This mode supports IEEE802.11b only.
Basic transmission speed : 1, 2, 5.5, 11Mbps
This mode supports IEEE802.11g only.
Basic transmission speed : 1, 2, 5.5, 11Mbps Extended
transmission speed : 9, 18, 36, 48, 54Mbps
Automatic channel selection feature that avoids channels currently being
used by other APs
User’s Guide
68

2. Wireless LAN Security
Authentication in a Wireless LAN environment is a step that takes place
when terminal equipments first make connection attempts to Square One and
gets registered to see if the end device will be allowed to communicate over
the network.
ྙ Open mode (NONE) registers end PCs to Square One without any
authentication.
ྚ Shared mode (WEP encryption) uses WEP Key password in all data
communications.
User’s Guide
69

Security mode (WEP encryption)
ྙ Select a Key number to be used.
ྚ Specify a WEP Key type to be used. (Hex or ASCII)
ྛ Specify a WEP Key length to be used. (64bit or 128bit)
64bit Hex:10 HEX characters (Key may consist of 0-9 and A-F)
64bit ASCII: 5 characters (All numbers and letters)
128bit Hex: 26 HEX characters (Key may consist of 0-9 and A-F)
128bit ASCII:13 characters (All numbers and letters)
ྜ Type in encryption Keys (Key 1-4) then, click the Apply button.
Example) 128bit Hex ASCII
Key 1 ABCDEF12345678901234567890 1234567890abc
Key 2 12345678901234567890ABCDEF jkl1234567890
Key 3 1234512345ABC6789067890DEF j123k456l7890
Key 4 123ABC456D78E901F23A45B678 123j456k7890l
User’s Guide
70

3. MAC Filter
In order to allow access only trusted end devices or PCs, trusted MAC
addresses can be registered to Square One and allowed only those registered
MAC addresses to access wireless LAN.
ྙ Select Do Not Use (Allow all) if you do not need to use MAC Filter feature.
ྚ Select Partial Permit to allow access specified MAC Address only.
ྛ Type in MAC Addresses, and then click the Apply button.
User’s Guide
71

4. Wireless LAN Advanced Setup
This page sets up detailed Wireless LAN environments.
ྙ Basic Rate specifies basic transmission rate. The default value of Basic
Rate is 4095.
ྚ Transmission Rate (Baud Rate) specifies the date transmitting bits per
second.
ᐯ Beacon Interval indicates a frequent interval value packet broadcasted by
the router to synchronize end devices within the wireless network. If Beacon
Interval is too big, synchronization will take too long. Basic unit of Beacon
Interval is in milliseconds (ms).
The default value of Beacon Interval is 100 ms and the range of Beacon
Interval is 1-65,535 ms.
User’s Guide
72

ྜ DTIM Interval is a packet sent as a part of beacon. It alerts to a client
device (PCs or Printers) from sleep mode (Power Save Mode). DTIM
packets are transmitted at an interval of DTIM interval multiplied by Beacon
interval. (Example, If Beacon interval is 100 and DTIM Interval is 3, DTIM
packets are transmitted every 100 * 3 = 300 ms)
ྜྷ Fragmentation threshold indicates maximum packet size before data gets
fragmented into smaller but multiplied packets. This is used when large
packets are fragmented into smaller packets according to network’s
physical requirement. Values between 256 and 2346 bytes are used and
the default value is 2346 bytes.
ྞ RTS threshold is used for data flow control during wireless data
communication by using RTS/CTS protocol. Square One sends Request to
Send (RTS) frames to a particular receiving station and negotiates the
sending of a data. After, Square One send an RTS, the wireless end device
(Client Device) responds with a Clear to Send (CTS) frame to let Square
One know when or how to begin data transmission. The range of RTS
threshold is values between 0 to 2347 bytes and the default value is 2347
bytes.
User’s Guide
73
6. Technical Information
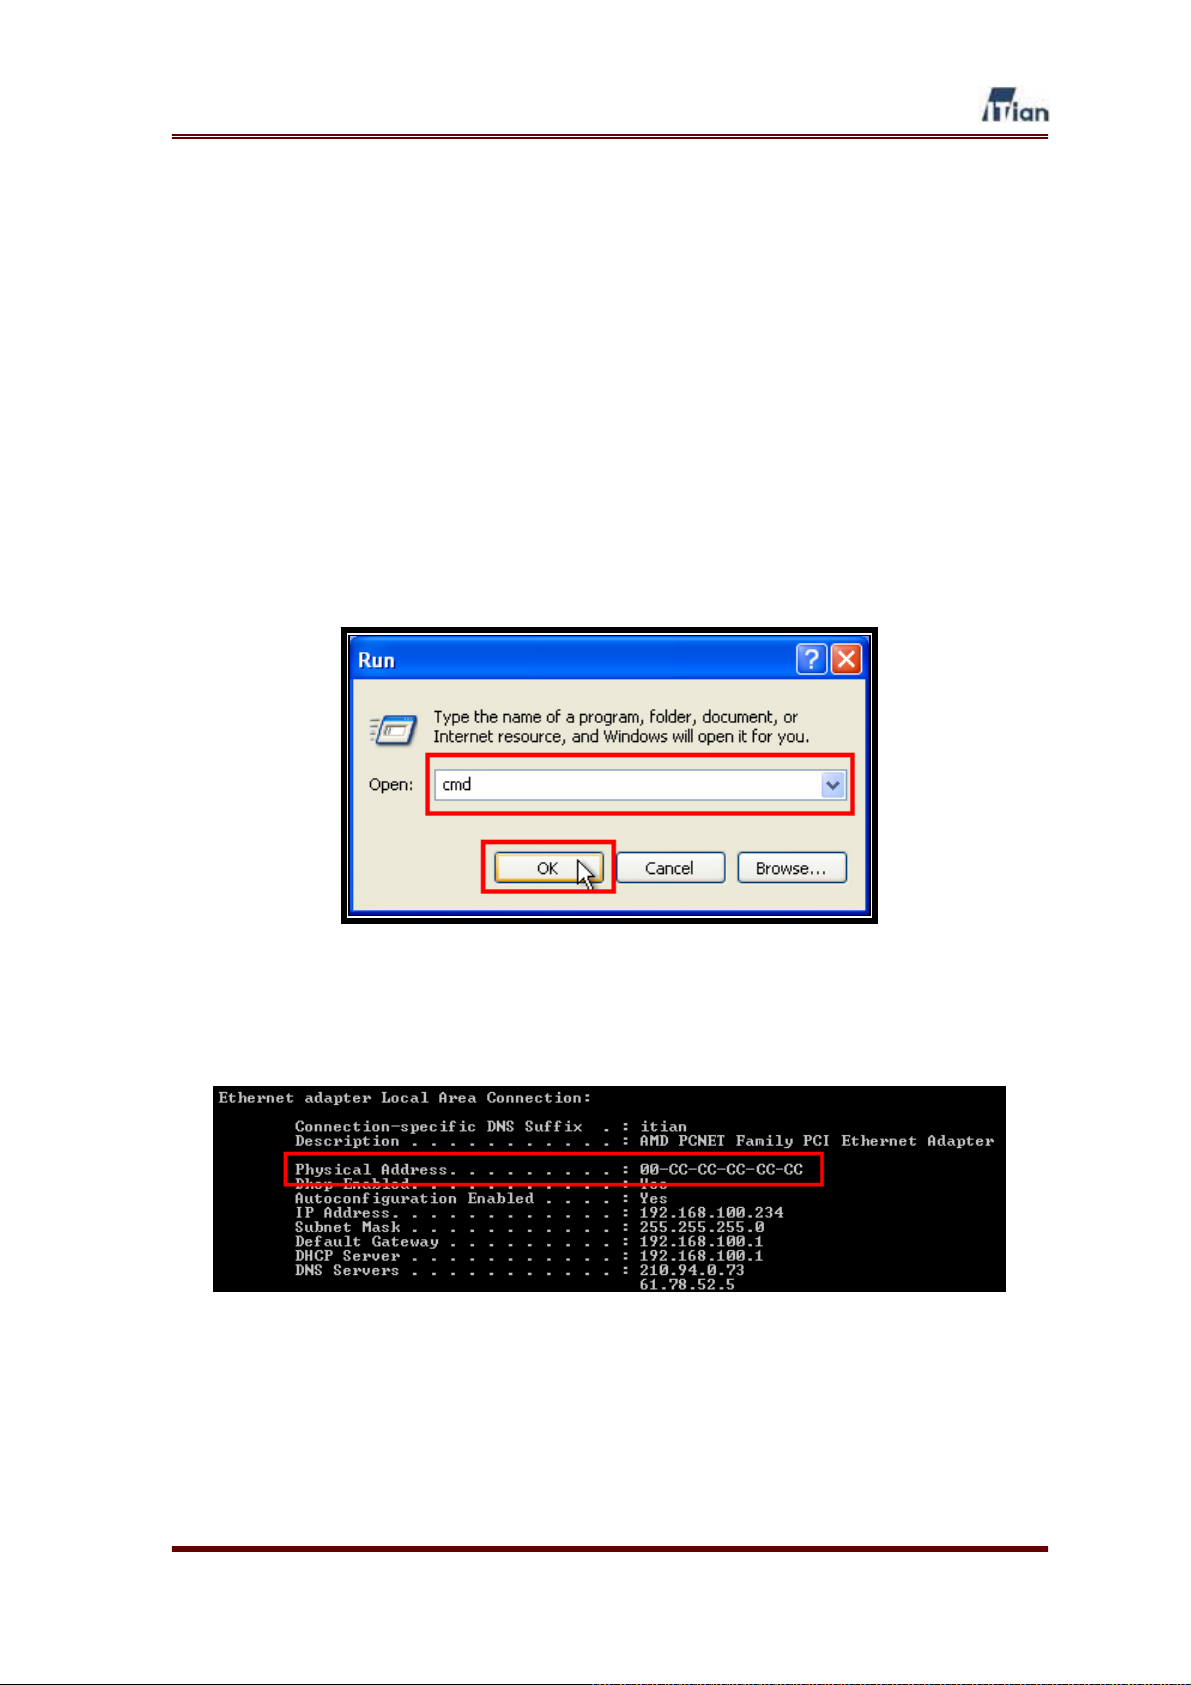
Verifying the MAC address
At times, you will need to verify the MAC address of the network adapter in your
computer in order to configure Square One’s security settings. Follow the steps
below to verify the MAC address.
11. Click Start > Run.
12. Type ‘cmd’ as shown below and click OK.
13. When the DOS window appears, type ipconfig /all at the prompt.
14. The MAC address is the hexadecimal numbers labeled Physical Address.
User’s Guide
74
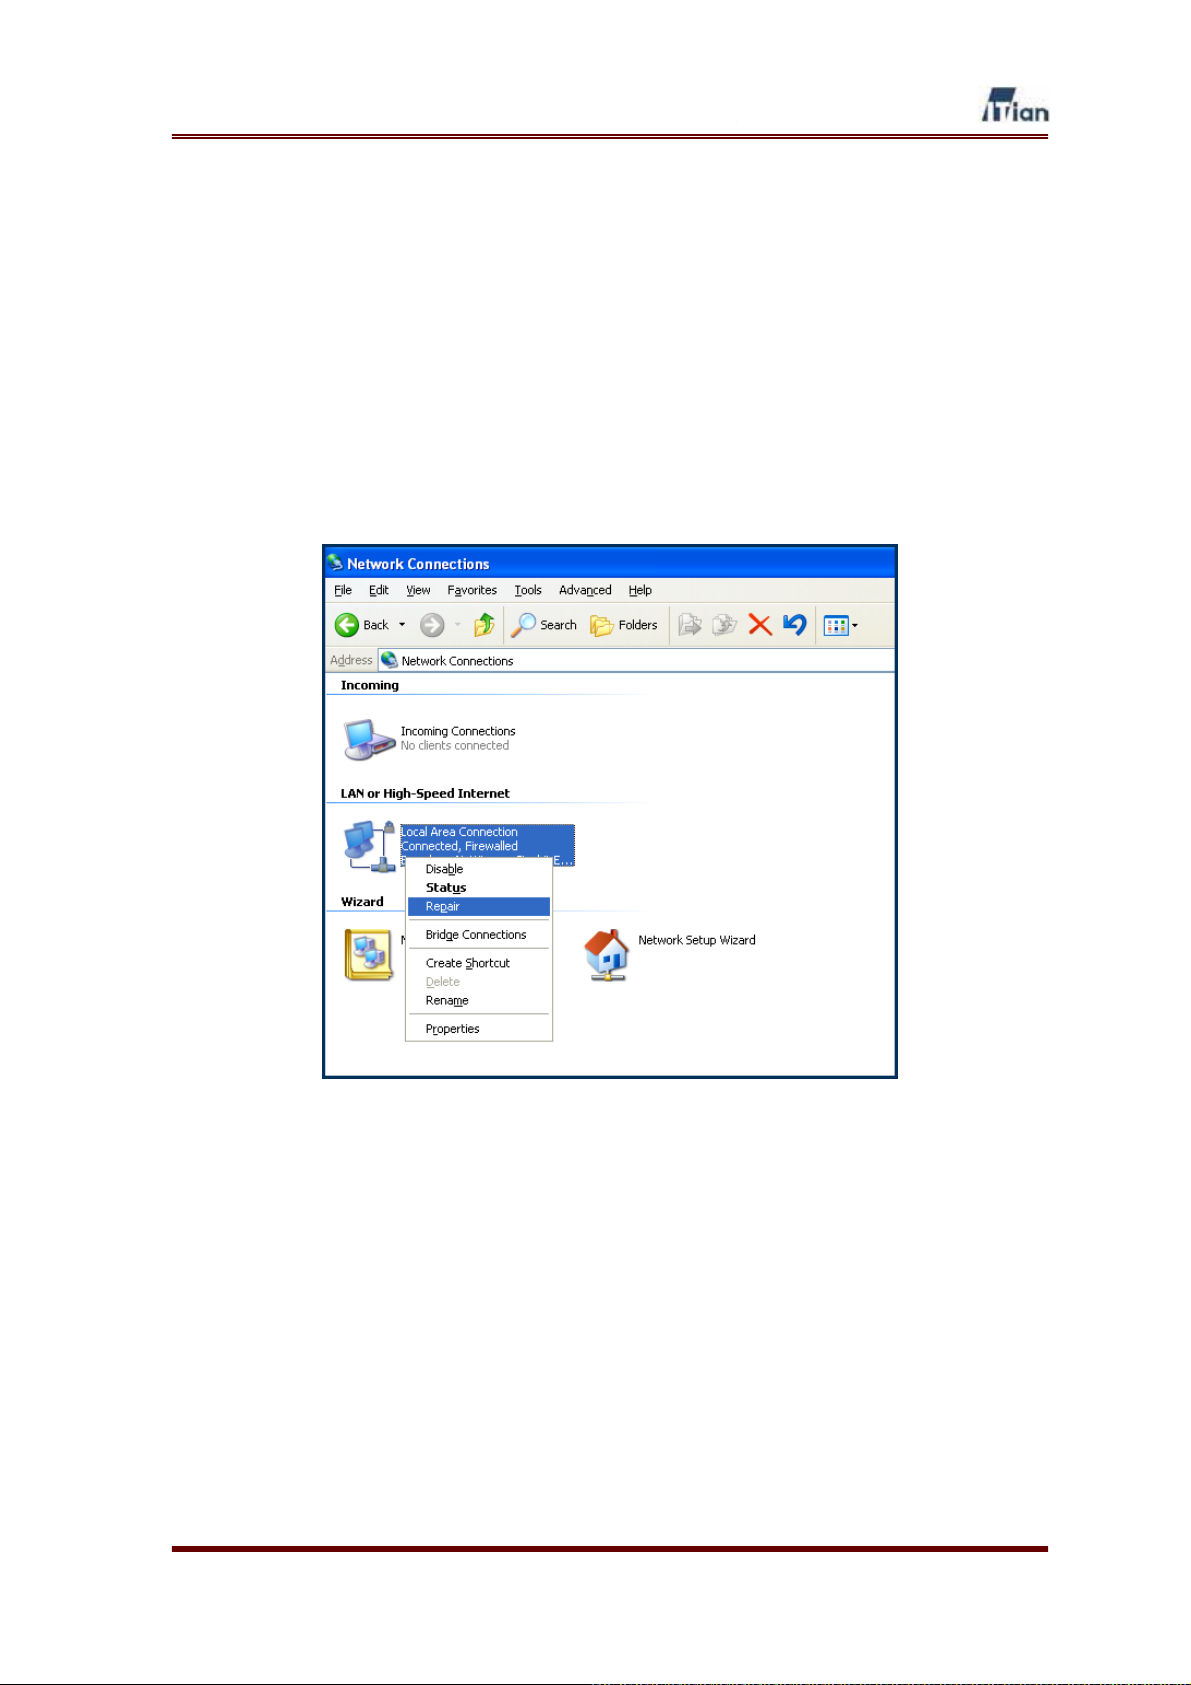
Re-establishing Network Connection
At times, you will need to re-establish the network connection between Square One
and your computer, because your computer failed to receive a new IP address from
Square One’s DHCP server. In order to re-establish the connection, follow the steps
below.
1. Click Start > Control Panel > Network Connections.
2. At the Network Connections window, right-click the icon that corresponds
to your network connection and select Repair as shown below.
3. The network adapter will be restarted and your computer’s network
connection with Square One will be re-established.
User’s Guide
75

Product Registration
Thank you for purchasing Square One.
Please visit our Website and register your Square One in order for us to serve you better.
We count on our customers’ feedback and suggestions in improving our products and
services. Your input would be much appreciated.
How to register your Square One:
1. Connect to Square One homepage--www.myitian.com
2. Click the Register Square One banner.
3. Fill out the product registration form online and submit.
Product registration is a good way to ensure you receive timely news about updates to
Square One and technical support. If desired, registered customers will receive news
about new products from ITian Corporation.
Product Warranty
Model Name Serial Number
Customer Name Customer Phone
No
Customer Address
Place of Purchase Place of Purchase
Place of Purchase
Address
Date of Purchase Year Date
Warranty Period - 1 Year
Warranty period without compensation is calculated from the date of purchase, so please
be sure to keep a statement indicating the date of purchase.
If purchase date cannot be confirmed, product warranty period is calculated from 3
months after the product manufacturing date.
User’s Guide
76
 Loading...