

Page 1

Security System
Owner’s Manual
®
®
Interactive Technologies Inc.
2266 North 2nd Street
North St. Paul, MN 55109
Page 2

FCC Notices
FCC Part 15 Information to the User
Changes or modifications no t expressly approved by Interactive Techno logies, Inc. can void the user’s
authority to operate the equipment.
FCC Part 15 Class B
This equipment has been tested and foun d to comply with th e li mits for a Class B digi ta l device, pursuant
to part 15 of the FCC Rules. These limits are designed to provide reasonable protection against harmful
interference in a residential installation.
This equipment generates, uses and can radiate ra dio frequency e nergy and, if no t installe d and us ed in
accordance with the inst ructions, may cause harmful interference to radio com munications. However,
there is no guarantee that interference will not occur in a particular installation.
If this equipment does cause harmful interference to radio or television reception, which can be determined by turning the equipm ent off and on, the user is encouraged to try to correct the interferenc e b y one
or more of the following mea s ures:
Reorient or relocate the receiving antenna.
Increase the separation between the equipment and receiver.
Connect the affected equipment and the Panel receiver to separate ou tlets, on different branch ci r-
cuits.
Consult the dealer or an experienced radio/TV technician for help.
Commander and ITI are registered trademarks of Interac tive Technologies, Inc.
Magic Key is a trademark of Interactive Technologies, Inc.
Energizer is a registered trademark of Eveready, Inc.
Ultralife is a registered trademark of Ultralife Batteri es, Inc.
X-10 is a registered trademark of X-10 (USA) Inc.
For reprints order: 46-585-01-ITI Rev. D
Cover 46-702-ITI
Text: 46-701-ITI Rev. B
Copyright ITI 1998
Page 3

TABLE OF CONTENTS
ECTION
S
NTRODUCTION
I
How the System Works . . . . . . . . . . . . . . . . . . . . . . . . . . . . . . . . . . . . . . . . . . . . . . . . . . . 5
Typical System Components . . . . . . . . . . . . . . . . . . . . . . . . . . . . . . . . . . . . . . . . . . . . . . . 5
ECTION
S
OW THE SYSTEM COMMUNICATES TO YOU
H
Panel Indicator Lights . . . . . . . . . . . . . . . . . . . . . . . . . . . . . . . . . . . . . . . . . . . . . . . . . . . 11
Alarm Sounds. . . . . . . . . . . . . . . . . . . . . . . . . . . . . . . . . . . . . . . . . . . . . . . . . . . . . . . . . . 12
System Status Beeps . . . . . . . . . . . . . . . . . . . . . . . . . . . . . . . . . . . . . . . . . . . . . . . . . . . . 13
Voice Messages . . . . . . . . . . . . . . . . . . . . . . . . . . . . . . . . . . . . . . . . . . . . . . . . . . . . . . . . 14
ECTION
S
ASIC SYSTEM OPERATIONS
B
Using Access Codes. . . . . . . . . . . . . . . . . . . . . . . . . . . . . . . . . . . . . . . . . . . . . . . . . . . . . 15
Entering and Exiting Premises . . . . . . . . . . . . . . . . . . . . . . . . . . . . . . . . . . . . . . . . . . . . . 17
Arming and Disarming Your System. . . . . . . . . . . . . . . . . . . . . . . . . . . . . . . . . . . . . . . . 18
Activating Emergency Alarms. . . . . . . . . . . . . . . . . . . . . . . . . . . . . . . . . . . . . . . . . . . . . 22
1–
. . . . . . . . . . . . . . . . . . . . . . . . . . . . . . . . . . . . . . . . .5
Panel . . . . . . . . . . . . . . . . . . . . . . . . . . . . . . . . . . . . . . . . . . . . . . . . . . . . . . . . . . . . . . 8
Wireless Sensors. . . . . . . . . . . . . . . . . . . . . . . . . . . . . . . . . . . . . . . . . . . . . . . . . . . . . 8
Wireless Touchpads . . . . . . . . . . . . . . . . . . . . . . . . . . . . . . . . . . . . . . . . . . . . . . . . . . 9
Sirens . . . . . . . . . . . . . . . . . . . . . . . . . . . . . . . . . . . . . . . . . . . . . . . . . . . . . . . . . . . . . 9
2–
. . . . . . . . . . . . . . . . . 11
3–
. . . . . . . . . . . . . . . . . . . . . . . . . . . . .15
Primary Access Code . . . . . . . . . . . . . . . . . . . . . . . . . . . . . . . . . . . . . . . . . . . . . . . . 15
Temporary Access Code. . . . . . . . . . . . . . . . . . . . . . . . . . . . . . . . . . . . . . . . . . . . . . 16
Secondary Access Codes . . . . . . . . . . . . . . . . . . . . . . . . . . . . . . . . . . . . . . . . . . . . . 16
Entering the Premises . . . . . . . . . . . . . . . . . . . . . . . . . . . . . . . . . . . . . . . . . . . . . . . . 17
Exiting the Premises . . . . . . . . . . . . . . . . . . . . . . . . . . . . . . . . . . . . . . . . . . . . . . . . . 17
Turning System Off . . . . . . . . . . . . . . . . . . . . . . . . . . . . . . . . . . . . . . . . . . . . . . . . . 18
Turning System On (STAY and AWAY). . . . . . . . . . . . . . . . . . . . . . . . . . . . . . . . . 20
Police, Fire, and Auxiliary/Medical Alarms. . . . . . . . . . . . . . . . . . . . . . . . . . . . . . . 23
Silent Duress Alarm . . . . . . . . . . . . . . . . . . . . . . . . . . . . . . . . . . . . . . . . . . . . . . . . . 25
iii
Page 4

ECTION
S
DVANCED SYSTEM OPERATIONS
A
Arming with No Alarm Delay (NO DELAY) . . . . . . . . . . . . . . . . . . . . . . . . . . . . . . . . . 27
Bypassing Normally Armed Sensors (BYPASS) . . . . . . . . . . . . . . . . . . . . . . . . . . . . . . 28
Using the Chime Feature (CHIME). . . . . . . . . . . . . . . . . . . . . . . . . . . . . . . . . . . . . . . . . 29
Controlling Lights (LIGHTS) . . . . . . . . . . . . . . . . . . . . . . . . . . . . . . . . . . . . . . . . . . . . . 30
Using and Programming the Magic Key . . . . . . . . . . . . . . . . . . . . . . . . . . . . . . . . . . . . . 31
Using the Keychain Touchpad. . . . . . . . . . . . . . . . . . . . . . . . . . . . . . . . . . . . . . . . . . . . . 32
Checking the System Status (STATUS) . . . . . . . . . . . . . . . . . . . . . . . . . . . . . . . . . . . . . 35
Checking for Alarms . . . . . . . . . . . . . . . . . . . . . . . . . . . . . . . . . . . . . . . . . . . . . . . . . . . . 36
Adjusting Panel Speaker Volume . . . . . . . . . . . . . . . . . . . . . . . . . . . . . . . . . . . . . . . . . . 37
ECTION
S
AINTAINING YOUR SYSTEM
M
Required System Tests. . . . . . . . . . . . . . . . . . . . . . . . . . . . . . . . . . . . . . . . . . . . . . . . . . . 39
Replacing Panel Backup Batteries. . . . . . . . . . . . . . . . . . . . . . . . . . . . . . . . . . . . . . . . . . 41
Replacing Smoke Sensor Batteries . . . . . . . . . . . . . . . . . . . . . . . . . . . . . . . . . . . . . . . . . 44
Replacing Other Sensor Batteries . . . . . . . . . . . . . . . . . . . . . . . . . . . . . . . . . . . . . . . . . . 44
4–
. . . . . . . . . . . . . . . . . . . . . . . . .27
Panel Light Control. . . . . . . . . . . . . . . . . . . . . . . . . . . . . . . . . . . . . . . . . . . . . . . . . . 30
User Light Control . . . . . . . . . . . . . . . . . . . . . . . . . . . . . . . . . . . . . . . . . . . . . . . . . . 30
Magic Key Voice Messages . . . . . . . . . . . . . . . . . . . . . . . . . . . . . . . . . . . . . . . . . . . 32
5–
. . . . . . . . . . . . . . . . . . . . . . . . . . . .39
ECTION
S
ROUBLESHOOTING YOUR SYSTEM
T
ECTION
S
LANNING FOR EMERGENCIES
P
Floor Plan. . . . . . . . . . . . . . . . . . . . . . . . . . . . . . . . . . . . . . . . . . . . . . . . . . . . . . . . . . . . . 51
PPENDIX
A
LARM SYSTEM NOTICE
A
LOSSARY
G
NDEX
I
6–
. . . . . . . . . . . . . . . . . . . . . . . .45
7–
. . . . . . . . . . . . . . . . . . . . . . . . . . . .49
A–
53
55
57
iv
Page 5

SECTION 1–
INTRODUCTION
Congratulations on your selection of the Commander 2000 security system! This system is
designed to provide you with years of dependable service.
This manual includes step-by-step instructions for the prop er use o f your secur ity system. Read this
manual before you begin using your system.
How the System Works
The Commander 2000 security system is a wireless, supervised system. Wireless means
that most sensors use radio waves instead of wires to communicate with the Control Panel
(panel). With a supervised system, the wireless sensors communicate with the panel on a
regular basis. There are three features that are unique to supervised security systems:
Automatic Sensor Communication Testing
The system receives a signal from each sensor every 64 minutes. This signal tracks
sensor communication.
User Friendly Arming
The system tracks the status of each sensor and sounds protest beeps if sensors are
open or have a trouble condition when yo u attempt to arm. If you ignor e these protest
beeps, the panel automatically bypasses the protesting sensor(s) and arms the system
to the desired level.
Sensor Battery Monitoring
The system notifies you of sensors with low batteries.
These three features help ensure that your Commander 2000 system handles alarm conditions in the appropriate manner.
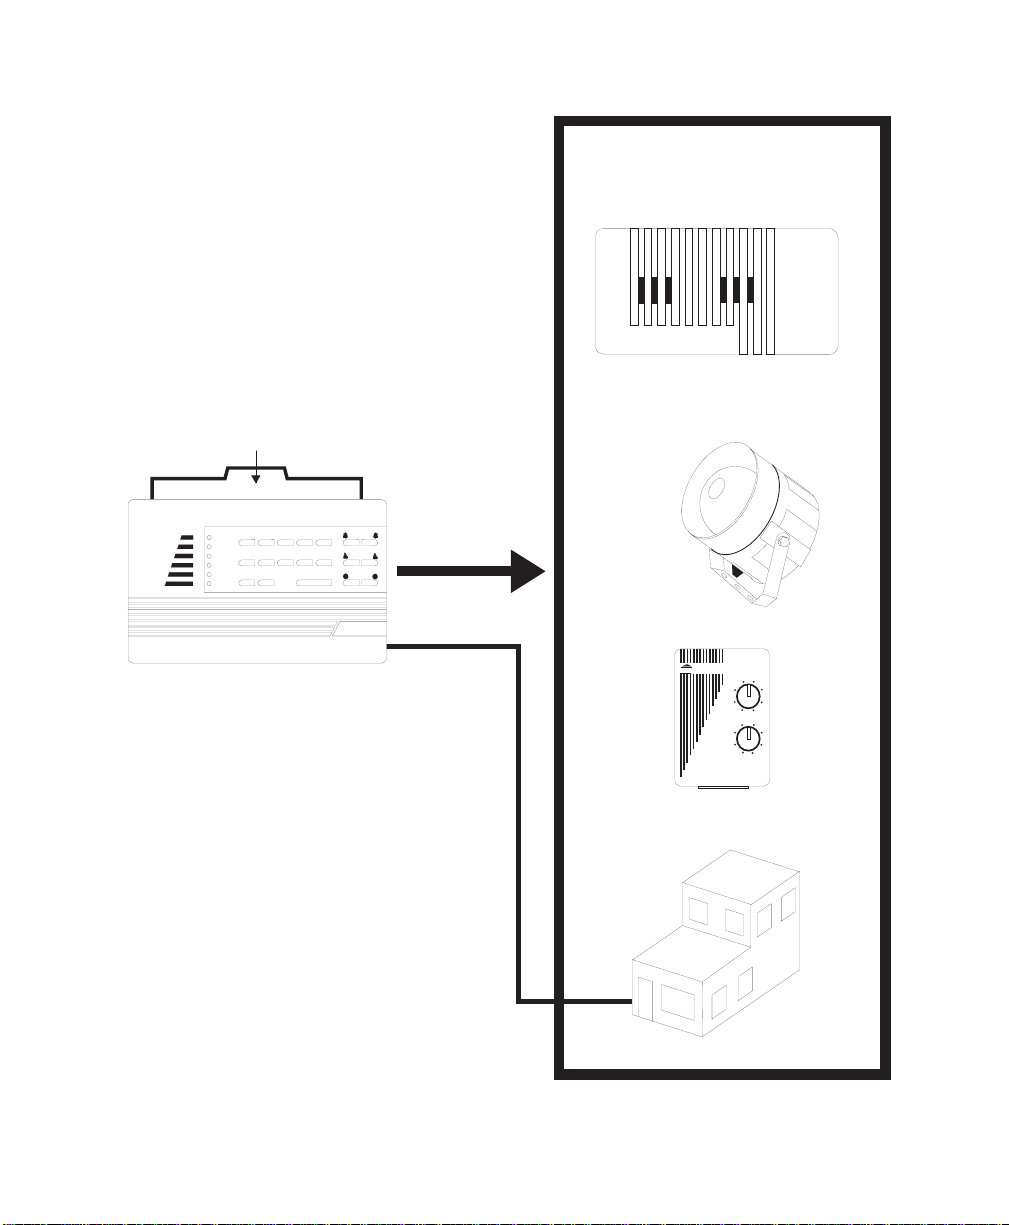
Typical System Components
Figure 1 shows a typical system configuration, highlighting the d evices that communicate
with the panel and the devices that the panel controls in response to system conditions.
A description of typical system components begins on page 8.
5
Page 6

THESE DEVICES R EPO RT TO THE PA NEL.
DOOR/W INDOW SENSO R
IT I P A R T N O . 6 0 -6 8 6 - 4 3
PIR M OTION DETECTO R
IT I P A R T N O . 6 0 - 6 3 9 -4 3
SM O KE SEN SO R
IT I P A R T N O . 6 0 - 6 6 8 -4 3
4-BUTTON KEYCHAIN TOUCHPAD
IT I P A R T N O . 6 0 -6 0 6
OFF
STAY AWAY
123
NO DELAY
4
5
6
CHIME
8
7
9
STATUS
BYPASS
BY
ST
0
COMMAND
Hi-TEC H HANDHELD TOUCHPAD
IT I P A R T N O . 6 0 - 6 8 7 -4 3
SHO CK SENSO R*
IT I P A R T N O . 6 0 - 7 0 6 -4 3
*NOT INVESTIGATED BY UL.
6
Figure 1
8333G 49B .D S F
. Typical System Components
Page 7
QUICK REFERENCE CARD
3
1
45
2
P
OWER
R
EADY
S
TAY
A
WAY
NO D
ELAY
STATUS
T
ROUBLE
67
BYPASS
8
90
COMMAND
POLICE
FIRE
AUXILIARY
THESE CO M PONEN TS RESPO ND TO
COM M ANDS FRO M THE PANEL.
SLIM LINE HARDW IRE
INTERIOR SIREN AND PIEZO
IT I P A R T N O . 6 0 - 4 8 3 -0 1
EXTERIO R SIREN
IT I P A R T N O . 1 3 - 0 4 6
CONTROL PANEL
IT I P A R T N O .
60-676-43-8Z
60-676-43-17Z
PRO CESSES IN FORM ATION REC EIVED FRO M
SOME SENSO RS AND CONTROLS OTHER
SENSO RS AND CO M PONEN TS IN RESPO NSE
TO INFORM ATION RECEIVED.
USER CONTROLS SYSTEM FROM HERE.
INSTALLER PROG RAMS PANEL FROM HERE.
TELEPHON E LIN E
X-10 POW ERHOUSE
X-10 LAMP MODULE
IT I P A R T N O . 1 3 - 2 0 4
Lamp Module
1
15
13
11
9
UNIT
A
O
M
I
HOUSE
CENTRAL STATIO N
3
5
7
C
E
GK
8333G 33B .D S F
7
Page 8
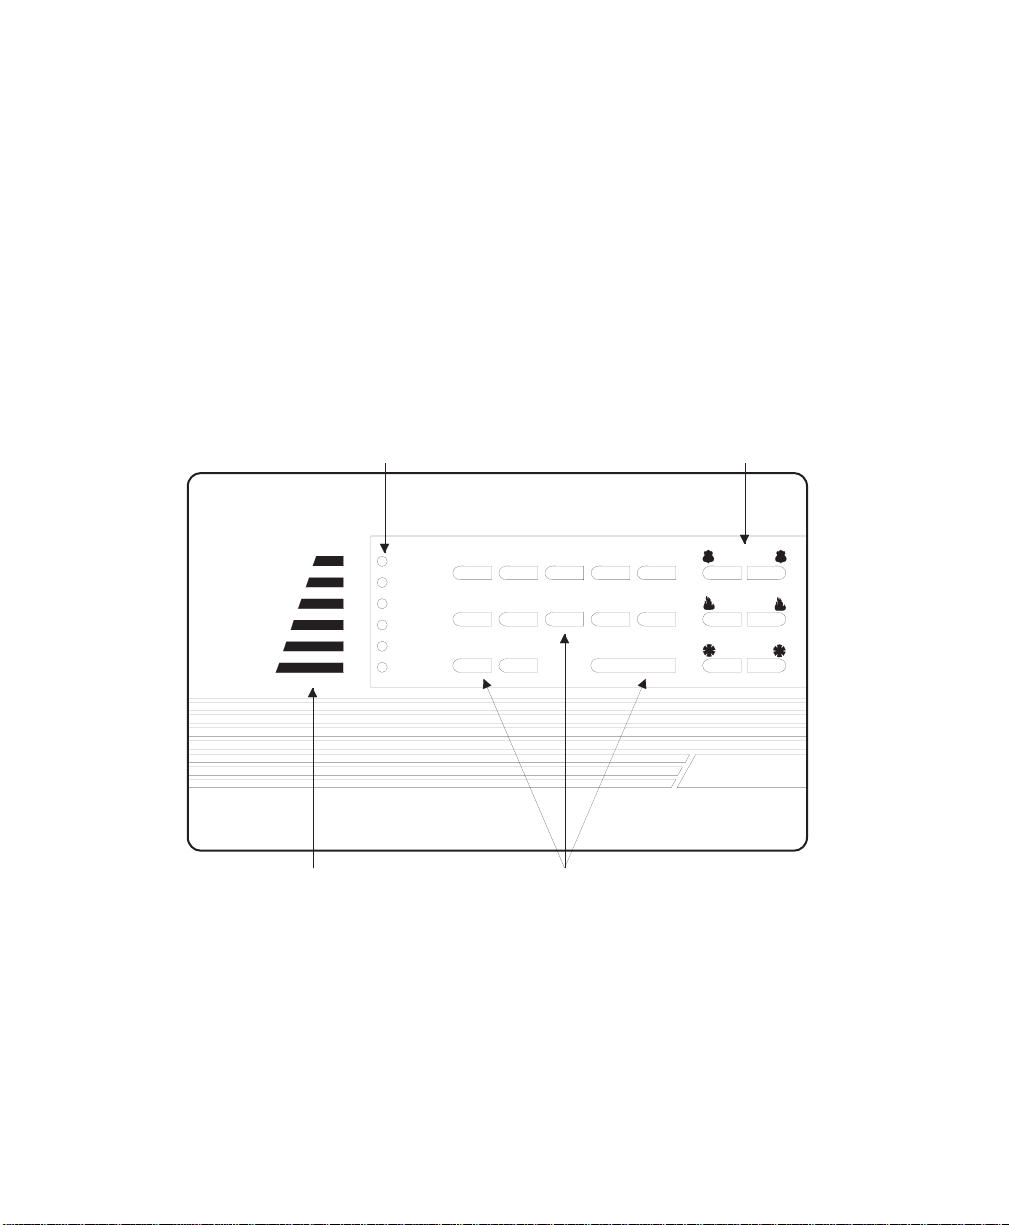
Panel
The panel is your security system’s most vital component (see Figure 2). It performs four main functions:
■ Lets you operate the system and set system options.
■ Provides you with feedback from the system through indicator lights, voice
messages, and status and alarm beeps.
■ Receives signals from wireless sensors and wireless touchpads throughout
the premises.
■ Responds to alarm and tr o uble conditions by reporting with voice and alarm
sounds; controlling output devices, including sirens and X-10
ules; and if necessary, contacting your monitoring service over the phone
line.
INDICATO R LIGHTS EMERGENCY BUTTONS
®
Lamp Mod-
P
OW ER
R
EADY
S
TAY
A
WAY
NO D
T
ROUBLE
ELAY
1
6
STATUS
OPERATION BUTTO NSBUILT-IN SPEAKER
2
7
BYPASS
3
8
5
4
90
COM MAND
POLIC E
FIR E
AUXILIARY
8333G 06A .D S F
Figure 2. Panel Lights, Buttons, and Speaker
Wireless Sensors
Wireless se nsors are yo ur s ecuri ty s yst em’s detection devices. They perform two
functions:
■ Notifies the panel if a change in the normal state of a sensor occurs. For
example, if the system is armed and you open a protected door, the sensor
reports to the panel and an intrusion siren sounds.
8
Page 9

■ Checks in with the panel approximately every hour to indicate proper opera-
tion. If a sensor fails to report to the panel within a specified time (programmed by your security consultant), a communication failure is reported
to the monitoring service and the system sounds trouble beeps (see Section
6, "Troubleshooting Your System").
Wireless Touchpads
Wireless touchpads let you operate the system inside or outside the premises. A
wireless touchpad’s range will vary, depending on the conditions of the premises
and the location of the panel relative to the wireless touchpad.
NOTE: The Energy Saver option, shown on button 5 of the Hand-
held and Wall-Mount Wireless Touchpads, is not available
with the Commander 2000.
Sirens
Sirens create two types of sounds, which alert you to the following:
■ Alarm conditions
■ System status
9
Page 10

10
Page 11

SECTION 2–
HOW THE SYSTEM COMMUNICATES
TO YOU
This section describes how your security system uses indicator lights, alarm sounds, status beeps,
and voice messages to communicate system information to you.
Panel Indicator Lights
The indicator lights on the panel provide system status information. Table 1 describes
what each light means.
Table 1
. Panel Indicator Lights
Indicator Light
POWER AC power is on,
READY System is ready
STAY System is armed
AWAY System is armed
NO DELAY Delay is off. Delay is on. ____
TROUBLE
† All lights scrolling indicates either a phone test or sensor test is on, or an armed sensor is activated.
STATUS
Press
‡ All lights on steady indicates that the panel has lost its memory. Contact your security consultant
immediately.
All lights blinking indicates that the system is in program mode. Contact your security consultant
∆
immediately.
†
and backup batteries are good.
to arm.
to level 2.
to level 3.
for a description of the condition.
ON
____
‡
OFF Blinking
AC power is OFF,
and backup batteries are okay.
Perimeter or interior sensors are
open, not ready to
arm.
____
____
System operating
normally.
AC power is on, and backup
batteries are bad.
Perimeter sensors are ready to
arm, but interior sensors are
open and system can only
arm to level 2.
System is armed to level 2,
with sensors bypassed.
System is armed to level 3,
with sensors bypassed.
System is not operating properly. Press
message of the problem.
STATUS
∆
for a voice
11
Page 12

Alarm Sounds
Exterior and interior sirens make three alarm sounds on the premises (see Table 2). Fire
alarms take precedence over auxiliary/medical alarms, which in tur n take precedence ov er
police alarms.
Table 2
. Siren Alarm Sounds
Siren Type Description of Siren Sounds
Fire Alarm Steady tone
Police Alarm Slow ON-OFF-ON-OFF
Auxiliary/Medical Alarm* Fast ON-OFF-ON-OFF
* Interior sirens only
12
Page 13

System Status Beeps
The panel speaker and interior sirens provide system feedback by sounding status beeps.
Table 3 describes the status beeps you may hear from your panel.
Table 3
. Understanding Status Beeps
Type Pattern Indicates
1 beep System disarmed to level 1.
Arm-
ing
Level
Entry
Delay
Chime
Protest
Trouble
2 beeps
3 beeps
2-beep continuous
sequence *
3-beep continuous
sequence *
2-beep (1 long, 1
short)
2-beep continuous
sequence (1 long,
1 short)
6-beep sequence,
once every minute
System armed to level 2, or armed to level 2 and exit delay
has expired.
System armed to level 3, or armed to level 3 and exit delay
has expired.
System armed to level 2 and entry delay is in progress.
System armed to level 3 and entry delay is in progress.
System disarmed to level 1 with chime feature on while an
exterior sensor opened.
1. System disarmed after an alarm from a wireless touchpad,
including Keychain Touchpad.
2. Attempt to arm to level 2 while the READY light is OFF,
indicating an exterior sensor is open.
3. Attempt to arm to level 3 while the READY light is OFF
(indicating an exterior sensor is open), or bli nkin g (indicat ing an interior sensor is open).
1. System has AC power failure.
2. System has low sensor battery.
3. System has failure to communicate.
4. System has sensor failure.
5. System has low battery.
6. System’s memory is clear.
STATUS
Press
6, "Troubleshooting Your System"), or contact your security
consultant.
for a voice message of the problem (see Section
* Entry delay beeps sound at a more rapid pace if an alarm has occurred. Exit the premises immediately
and call for emergency help from a neighbor’s phone.
13
Page 14

Voice Messages
The panel speaker announces voice messages of system and sensor information. These
messages are described as they are encountered throughout this manual.
14
Page 15

SECTION 3–
BASIC SYSTEM OPERATIONS
This section describes how to perform the basic system operations, including: using access codes,
entering and exiting the premises, turning the system on and off, and activating emergency alarms.
Using Access Codes
An access code is a four-digit number that lets you op erate the system and prevents unauthorized use of the system. An access code is required for most system commands (unless
you are using the Magic Key™).
WARNING: Select access codes you and other system users will
remember. If you forget your primary access code, contact your security consultant.
Primary Access Code
The primary access code allows you to perform all system commands. The system allows you to have one primary access code. The default primary access
code is 1234. You should change your primary access code from the default to a
number that you can remember.
To change your primary access code
■
1. Enter primary
The panel beeps once.
2. Enter the new primary
After five seconds, the panel announces,
indicating that the primary access code was changed.
NOTE: Because the first two digits of your duress code are the
NOTE: If your temporary access code is disabled, then changing
ACCESS CODE + STATUS + 8.
ACCESS CODE.
same as the first two digits of the primary access code,
when you change the primary access code, the duress
code also changes (see "Silent Duress Alarm" on page 25).
your primary access code will automatically make your
old primary access code
code. If you want the temporary acce ss code to remain
disabled, you must disable it again using your new primary
:
[new primary access code] OK
the new temporary access
,
15
Page 16

access code each time you change your primary access
code.
Temp orary Ac cess Code
The temporary access code allows you to perform all system commands except
changing access codes and bypassing sensors directly. The system allows you to
have one temporary access code. You might give the temporary access code to a
babysitter or other serv ice personnel.
■
To add or change the temporary access code:
1. Enter primary
The panel beeps once.
2. Enter the temporary
After five seconds, the panel announces, [temporary access code] OK,
indicating that the temporary access code was changed.
■
To disable the temporary access code:
1. Enter primary
The panel beeps once.
2. Enter the primary
After five seconds, the panel announces, [primary access code] OK, indi-
cating that the temporary access code was deleted.
NOTE: If your temporary access code is disabled, then changing
ACCESS CODE + STATUS + 7.
ACCESS CODE.
ACCESS CODE + STATUS + 7.
ACCESS CODE.
your primary access code will automatically make your
old primary access code the new temporary access
code. If you want the temporary acce ss code to remain
disabled, you must disable it again using your new primary
access code each time you change your primary access
code.
Secondary Access Codes
Secondary access codes allow you to perform all system commands, except
changing access codes and bypassing sensors directly. You can have up to four
secondary access codes. The secondary access codes can b e used in the same way
as the temporary access code, except the secondary access codes can only be set
and changed by your security consultant.
16
Page 17

Entering and Exiting Premises
While the system is armed, delay times let you enter or exit throu gh designated delay
doors without causing an alarm. A delay door is any door that is assigned a delay time. If
you activate any sensor before you open the delay door, an instant alarm sounds. When
entering the armed premises, you must disarm the system within the entry delay time.
After arming the system, you must exit the premises before the exit delay time expires.
There are two types of delays: standard and extended. Your security consultant will set up
and explain your system’s delays. Contact your security consultant to have your delay
times changed.
Entering the Premises
To prevent an alarm when entering the armed premises, you must:
■ Enter the extended delay door and disarm the system within the extended
delay time.
or– Enter the standard delay door and disarm the system within the standard
entry delay time.
or– Ente r the exte nded d elay door, then enter the standard delay doo r and d isar m
the system within the standard entry delay time or within the time remaining
for the extended delay, whichever is less.
Example: The extended delay is set to 4 minutes, and the standard entry delay is
set to 32 seconds. If you enter th e extended delay doo r and then open th e standard
delay door after 3 minutes and 50 seconds, you have 10 seconds to disarm the
system.
If you enter the extended delay door and open the standard delay door after 2
minutes, the extended delay is canceled and you have 32 seconds to disarm the
system.
Exiting the Premises
To prevent an alarm when exiting the armed premises, you must:
Exit the standard delay door within the standard exit delay time.
■
or– Exit the extended delay door within the standard exit delay and the remain-
ing extended delay.
Example: The standard exit delay is set to 32 seconds, and the extended delay is
set to 4 minutes. If you arm your system and exit the standard delay door in 22
seconds, then you must exit the extended delay do or withi n 4 minut es and 10 s econds.
17
Page 18

Arming and Disarming Your System
This section describes levels of security and how to arm and disarm the system.
Turning System Off
OFF
1
Use level 1 (
tem armed to level 2 or 3 and when canceling an accidental alarm. Level 1 disarms your perimeter and interior sensors. The 24-hour sensors (such as smoke,
heat, freeze, emergency buttons, and fire pull stations) always remain armed.
CAUTION: Do not enter the premises if you hear sirens. Call
To disarm the system from the panel or a Handheld
■
OFF
) to turn the system off when entering the premises with the sys-
for emergency help from a neighbor’s phone.
Touchpad:
1. Enter the premises through a delay door when the system is armed to leve l 2 or 3.
The panel and interior sirens sound entry delay beeps for the entire delay or
until you disarm the panel. You must disarm the system before the delay
time expires, or an alarm occurs.
CAUTION: Exit the premises immediately if the entry delay
beeps sound at a more rapid pace. This indicates
an alarm has occurred. Call for emergency help
from a neighbor’s phone.
2. Enter
3. Press
ACCESS CODE + 1.
The AWAY or STAY light turns off, and the panel and interior sirens sound
an arming level beep, and the panel announces,
disarmed from the panel.
CAUTION: If you disarm the system before entering the
premises, do not enter the premises if you hear
protest beeps. This indicates an alarm has
occurred. Call for emergency help from a
neighbor’s phone. For more information on this
feature, contact your security consultant.
STATUS
to learn if there are any system problems.
Alarm system is OFF, if you
18
Page 19

■ To disarm the system from a Keychain Touchpad:
1. Enter the premises through a delay door when the system is armed to leve l 2 or 3.
The panel and interior sirens sound entry delay beeps for the entire delay or
until you disarm the panel. You must disarm the system before the delay
time expires or an alarm occurs.
CAUTION: Exit the premises immediately if the two- or three-
beep sequence sounds at a more rapid pace.
This indicates an alarm has occurred. Call for
emergency help from a neighbor’s phone.
2. Press the D isarm button on the Keycha in Touchpad. The AWAY or STAY light turns off, and the panel and interior sirens sound
one short beep.
NOTE: Pressing the Disarm button will not disarm the system if an
alarm was generated by simultaneously pressing the arm
and disarm buttons.
CAUTION: If you disarm the system before entering the
premises, do not enter the premises if you hear a
two-beep continuous sequence (1 long, 1 short).
This indicates an alarm has occurred. Call for
emergency help from a neighbor’s phone. For
more information on this feature, contact your
security consultant.
3. Press the
STATUS
button to learn if there are any system problems.
To disarm the system using a Magic Key:
■
1. Enter the premises through a delay door when the system is armed to leve l 2 or 3.
The panel and interior sirens sound entry delay beeps for the entire delay or
until you disarm the panel. You must disarm the system before the delay
time expires or an alarm occurs.
CAUTION: Exit the premises immediately if the entry delay
beeps sound at a more rapid pace. This indicates
an alarm has occurred. Call for emergency help
from a neighbor’s phone.
2. Insert the Magic Key into the panel key slot (see Figure 3).
19
Page 20

Hold the Key steady in the slot until the panel and interior sirens sound an
arming level beep and the panel announces,
Alarm system is OFF. If any
alarms occurred, the panel announces the sensors that were activated.
MAG IC KEY
3
Figure 3
1
P
OWER
R
EADY
S
TAY
6
A
WAY
NO D
ELAY
STATUS
T
ROUBLE
. Inserting the Magic Ke y into the Slot
BYPASS
45
2
90
7
8
COMM AND
POLICE
FIR E
AUX
8333G 95A .DS4
3. Press the STATUS button to find out if there are any system problems.
■
To turn off an accidental alarm:
1. With the panel in alarm, enter ACCESS CODE + 1. The panel announces, Sensor [sensor #] [alarm type] alarm memory.
Alarm system is OFF .
Example: Sensor 16 intrusion alarm memory. Alarm system is OFF. Alarm
type may be intrusion, fire, or help.
If the panel is disarmed before a call is made to the monitoring s ervice (fro m
8 to 20 seconds), the panel announces,
alarm memory. Alarm system is OFF. Alarm bypassed.
Sensor [sensor #] [alarm type]
STAY
AWAY
20
2
3
Turning System On (STAY and AWAY)
Arming the system means you are turning on intrus ion detection. Depending on
the level you arm to, an alarm occurs if a perimeter or interior sensor is activated.
Use level 2 (
armed. Using level 2, you can also leave the premises through any delay door
during the delay time. Level 2 arms all perimeter sensors, including door/window, shock , and glass break senso rs, as well as all sensors that are active in level
1 (24-hour sensors).
Use level 3 (
armed. Level 3 arms all interior sensors, such as motion sensors, as well as all
sensors that are active in levels 1 and 2.
STAY
) when you want to stay in the premises with perimeter sensors
AWAY
) when you are leaving the premises and want all sensors
Page 21

■ To arm the system from the panel or a Handheld Touch-
pad:
1. Close all perimeter doors and windows.
2. Check to see that the panel’s READY light is on or blinking.
or– If the READY light is not on or blinking, press the
there are any system problems.
The system’s v oice message should p rovide y ou with the number of any sen-
sors that are open. After double-checking those sensors, if the READY light
is still not on or blinking, refer to "Bypassing Normally Armed Sen so rs
(BYPASS)" on page 28. You also should contact your security consultant to
resolve the problem.
3. From the panel or a touchpad, enter
3
to arm to level 2 or 3, respectively.
or– Enter
COMMAND + 2
COMMAND + 3
or
ACCESS CODE + 2
, if your system is set up for this
capability.
Depending on which level you arm to, the panel’s STAY or AWAY light
turns on, the panel and interior sirens sound arming level beeps at the beginning of the exit delay, and the panel announces,
or 3].
4. Exit the premises within the delay time, if you are leaving. When the delay time expires, the panel and interior sirens sound arming
level beeps again. If you are still in the premises and want to leave, disarm
and rearm the system, or you may cause an accidental alarm.
STATUS
Alarm system is ON [level 2
button to learn if
ACCESS CODE +
or
■
To arm the system from a Keychain Touchpad:
1. Close all perimeter doors and windows.
2. Check to see that the panel’s READY light is on or blinking.
or– If the READY light is not on or blinking, press the
STATUS
panel or a touchpad to learn if there are any system problems.
The system’s v oice message should p rovide y ou with the number of any sen-
sors that are open. After double-checking those sensors, if the READY light
is still not on or blinking, refer to “Bypassing Normally Armed Sen so rs
(BYPASS)” on page 28. You also should contact your security consultant to
resolve the problem.
3. Press the Arm button until the light blinks. The panel’s STAY or AWAY light turns on, and the panel and interior sirens
sound two or three beeps at the beginning of the exit delay.
button at the
21
Page 22

NOTE: Depending on programming, a Keychain Touchpad may
arm your system to the next higher arming level or directly
to level 3 NO DELAY.
4. Exit the premises within the delay time, if you are leaving. When the delay time expires, the panel and interior sirens sound two or three
more beeps. If you are still on the premises and want to leave, disarm and
rearm the system to prevent an accidental alarm.
■
To arm the system using a Magic Key:
1. Close all perimeter doors and windows.
2. Check to see that the panel’s READY light is on or blinking. If the READY light is still not on or blinking, check all perim eter doors and
windows again to make sure they are closed. If the READY light is still not
on or blinking, see “Bypassing Normally Armed Sensors (BYPASS)” on
page 28.
3. Insert the Magic Key into the panel key slot (see Figure 3).
NOTE: The Magic Key rearms the system to its previous arming
level (level 2 or 3). See "Using and Programming the Magic
Key" on page 31 for more information.
4. Hold the Magic Key steady in the slot until the panel and interior sirens
sound arming level beeps, and the panel announces,
[level 2 or 3].
5. Exit the premises within the delay time, if you are leaving. When the delay time expires, the panel and interior sirens sound arming
level beeps again. If you are still in the premises and want to leave, disarm
and rearm the system to prevent an accidental alarm.
Alarm system is ON
22
Activating Emergency Alarms
The emergency buttons on the panel or touchpads allow you to activate the appropriate
emergency alarm. Table 4 is a comparison of the alarms that indicates how you can use the
panel and touchpads to activate each alarm and how you can expect your security system
to respond to them.
Page 23

Table 4. A comparison of the alarm types
Alarm type
Where you can activate the
alarm
From
the
panel
From a
Handheld
Touchpad
From a
Keychain
Touchpad
What the alarm activates
Interior
sirens
Exterior
sirens
Monitoring
service
action
POLICE Yes Yes * Yes Yes Police alarm
FIRE Yes No * Yes Yes Fire alarm
AUXILIARY/
MEDICAL
SILENT
DURESS
* Must be programmed by your security consultant
Yes Yes * Yes No
Yes No * No No
Pre-specified
instructions
Police alarm
Police, Fire, and Auxiliary/Medical Alarms
POLICE
FIRE
Use the
POLICE, FIRE,
A police alarm activates interior and exterior sirens and sends a police alarm to
your monitoring service. The monitoring service should contact the police.
A fire alarm activates interior and exterior sirens and sends a fire alarm to your
monitoring service. The monitoring service should contact the fire department.
AUXILIARY
or
alarm buttons in an emergency.
AUXILIARY
An auxiliary/medical alarm activates interior sirens and sends an aux iliary/medical alarm to your monitoring service. The
AUXILIARY
button can be used to
request either auxiliary or medical service, if the monitoring se rvice k nows in
advance what service to contact in case of an alarm.
23
Page 24

The emergency buttons are active in all security levels. The system recognizes
the emergency buttons as sensors (see Table 5).
Table 5
. Emergency Button Sensor Numbers
Emergency
Button
Sensor Number
POLICE 81
FIRE 80
AUXILIARY 82
■ To activate a police, fire, or auxiliary/medical alarm
from the panel:
Press and hold both emergency buttons at the same time, for at least 3 seconds.
or– Press both emergency buttons twice within 3 seconds.
or– Press
COMMAND
, then immediately press both emergency buttons at the
same time.
The interior and exterior sirens and the panel sound the appropriate alarm. Exterior sirens do not sound for auxiliary/medical alarms.
■
To activate a police or auxiliary/medical alarm from a Handheld Touchpad:
Press and hold the appropriate emergency button for at least 3 seconds.
The interior and exterior sirens and the panel sound the appropriate alarm. Exte-
rior sirens do not sound for auxiliary/medical alarms.
24
NOTE: The Handheld Touchpad only has a POLICE emergency
button.
■ To activate an alarm from a Keychain Touchpad:
Simultaneously press the Arm and Disarm buttons until the light blinks to activate an alarm type set by your security consultant.
The interior and exterior sirens and the panel sound the appropriate alarm. Exterior sirens do not sound for auxiliary/medical alarms.
■
To cancel a police, fire, or auxiliary/medical alarm:
ACCESS CODE + 1
Enter
the panel announces,
system is OFF. See Table 5 for the appropriate sensor number.
from the panel or a touchpad. Sirens are silenced, and
Sensor [sensor #] [alarm type] Alarm memory, Alarm
Page 25

Silent Duress Alarm
If you are in a life-threatening situation (for example, if you enter the premises
and find an intruder inside), you can enter the duress code instead of an access
code while arming or disarming the system. The du ress code causes the panel to
send a silent duress alarm to the monitoring service. This notifies the monitoring
service of a potentially life-threatening situation, but no alarms sound at the premises.
NOTE: If you do not have a monitoring service for your system,
you cannot use the silent duress alarm feature.
The first two digits of your du ress code are th e same as th e first t wo digits of your
primary access code. The last two digits can only be changed by your security
consultant or monitoring service.
■
To activate a silent duress alarm:
DURESS CODE + [1, 2, OR 3].
Enter
The panel and interior sirens so und the approp riate number of arming level beeps
for the level you selected, and the p a nel an nou nces,
level #]
vice.
. The system immediately reports the duress alarm to the monitoring ser-
NOTE: Silent duress alarms cannot be canceled.
Alarm system is [OFF or ON
25
Page 26

26
Page 27

SECTION 4–
ADVANCED SYSTEM OPERATIONS
This section describes how to perform the more advanced system operations, including: arming
with no alarm delay, bypassing normally armed sensor s, u sing the ch ime feat ure, cont rol ling li ghts,
and using and programming the Magic Key.
Arming with No Alarm Delay (NO DELAY)
4
NO DELAY
The No Delay feature is used when you want an alarm to sound immediately when a sensor is activated, if the system is armed to level 2 or 3 and if the sensor is normally delayed
in that level. No Delay makes all normally delaye d sensors instant for that arming period.
You might choose to use No Delay in a home when all family members are in for the night
and you are ready to arm the system to level 2. If an intr uder op ens a delay door, an instant
alarm occurs. You can also use No Delay if you are outside the premises, have a touchpad ,
and are leaving.
■
To arm the system with no alarm delay time:
1. Close all perimeter doors and windows.
2. Check to see that the READY light is on or blinking at the panel.
3. Enter
or– Press
■ To arm the system with no alarm delay from a Keychain
ACCESS CODE + [2 OR 3] + 4.
COMMAND + [2 OR 3] + 4
The red STAY or AWAY light on the panel turns on, the panel and interior sirens
sound arming level beeps, and the panel announces,
or three]. The NO DELAY light on the panel turns on, and the panel announces, No
delay.
NOTE: Disarm the system before opening a perimeter door or window, or
an accidental alarm may occur.
, if your system is set up for this capability.
Alarm system is ON [level two
Touchpad:
1. Close all perimeter doors and windows.
2. Check to see that the READY light is on or blinking at the Panel.
27
Page 28

3. Press the Arm button, then press the Star button and hold until the light blinks. The Panel’s STAY or AWAY light turns on, and the Panel and interior sirens sound
arming level beeps. The NO DELAY light turns on, and the Panel and interior sirens
sound arming level beeps again.
NOTE: Disarm the system before opening a perimeter door or window, or
an accidental alarm may occur.
NOTE: Depending on programming, a Keychain Touchpad may arm
your system to the next higher arming level, or directly to level 3
NO DELAY.
Bypassing Normally Armed Sensors (BYPASS)
BYPASS
Use the Bypass feature to ignore selected sensors, so they can remain open or so they can
be opened and closed without sending an alarm. Bypassing a window sensor all ows you to
leave the window open while the system is armed. Bypass also allows you to ignore a sensor that is not working properly and is causing unwanted alarms. You can bypass all sensors for any security level in which they are active, except smoke, heat, and fire pull
sensors. Bypassed sensors remain bypassed until you change security levels.
You can bypass sensors indirectly or di rectl y. Indirect bypassing lets y ou b ypas s open sensors when the system will not arm. Direct Bypass lets you bypass sensors when the system
is armed and oper ating normally.
To bypass sensors indirectly:
■
1. Arm the system. If the panel announces, Sensor [sensor #] open and sounds prot es t
beeps, continue to step 2.
If the panel arms successfully, you do not have to bypass any sensors.
2. Press
To bypass sensors indirectly from a Keychain Touchpad:
■
BYPASS.
The panel announces, Alarm system is ON [level #]. Sensor [sensor #] bypassed.
NOTE: The indirect bypass procedure shall not be used in UL listed installa-
tions.
NOTE: The indirect bypass procedure does not work when you arm the
panel by pressing the COMMAND button rather than ent ering your
access code.
28
1. Press the Arm button. If the panel announces, Sensor [sensor #] open and sounds a
two-beep continuous sequence (1 long, 1 short), continue to step 2.
If the panel arms successfully, you do not have to bypass any sensors.
Page 29

2. Press the Arm button again. Depending on which level you arm to, the panel’s STAY or AWAY light turns on, the
panel and interior sirens sound two or three beeps, and the panel announces,
[sensor #] bypassed.
NOTE: The indirect bypass procedure cannot be used in UL listed installa-
tions.
■ To bypass sensors directly:
Sensor
1. Enter primary
2. Enter primary
01 to 18.
The panel announces,
3. Repeat step 2 to bypass another sensor.
NOTE: You cannot bypass fire sensors, which include smoke, heat, and
■ To remove all sensor bypasses:
Change the security level.
To remove a single sensor bypass:
■
1. Enter primary
The panel announces, Sensor [sensor #] ON.
If the panel announces, Invalid, try again, check that the sensor is closed, then repeat
step 1.
2. Repeat step 1 to remove another sensor bypass.
ACCESS CODE + [2 OR 3]
ACCESS CODE + BYPASS + [SENSOR #].
Sensor [sensor #] bypassed.
fire pull sensors. But you can bypass 24-hour police and auxiliary/
medical sensors, including sensors in level 1 (see Table 5 for sensor
numbers).
ACCESS CODE + BYPASS + [SENSOR #].
to arm the system to the desired level.
Sensor numbers range from
Using the Chime Feature (CHIME)
7
CHIME
The Chime feature causes the system to sound chime beeps whenever a monitored perimeter door or window is opened. Ch ime only work s in level 1, when t he system is disarm ed.
To turn Chime on or off:
■
1. Enter
2. Enter
or– Enter
ACCESS CODE + 1
ACCESS CODE + 7.
COMMAND + 7.
The panel announces, ON or OFF.
from the panel or a touchpad to disarm the system.
29
Page 30

0
LIGHTS
Controlling Lights (LIGHTS)
X-10 Lamp Modules a llow your system to turn l ight s on and off. X-10 Lamp Modules can
control any incandescent lights that plug into an outlet.
Panel Light Control
The Panel instructs the X-10 Lamp Module to control lights as follows:
■ During a fire alarm, lights turn on and remain on until the security level
changes or after 12 hours with no system status change.
■ During an intrusion alarm, lights blin k until the siren time-out ends, then
they remain on steady for up to 12 hours with no system status change.
■ During entry and exit delay time, ligh t s tu rn on and remain on for 5 minutes.
NOTE: If the system is disarmed during any of the above scenar-
ios, lights controlled by X-10 Lamp Modules turn on steady
and remain on for an additional 5 minutes.
User Light Control
Lights controlled by an X-10 Lamp Module can be turned on or off with the system in any security level.
To turn controlled lights on or off from the Panel or a
■
Handheld Touchpad:
30
ACCESS CODE
Enter
or– Enter
To turn contr oll ed lights on or off from a Keychain Touch-
■
COMMAND
The Panel announces,
+ 0, with the Panel in any security level.
+ 0 from the Panel or a touchpad.
On or Off.
pad:
Press and hold the Light button until the light blinks.
The Panel announces,
on the current setting.
On or Off. Cont ro ll ed lig ht s t urn on or off, depending
Page 31

Using and Programming the Magic Key
The Magic Key feature allows you to quickly change the arming level of your system
from the panel without entering an access code and arming level. If you insert the Key into
the panel’s key slot while the system is armed to level 2 or 3, the panel disarms to level 1.
If you insert the Key later, the panel rearms to level 2 or 3, respectively. Before you can
use the Magic Key, you must first program the Key with a primary or temporary access
code.
When you program a Magic Key with an access code, you can use the Key to disarm the
system, and then rearm it to the previous arming level (level 2 or 3). A Key programmed
for primary access works as long as your primary access code is not changed. A Key programmed for temporary access only works for a limited number of days (00-99). You can
reprogram a temporary access Key at any time to increase or decr ease the number of days,
or change it to a primary access Key.
MAG IC KEY
3
P
R
S
A
NO D
T
OWER
EADY
TAY
WAY
ROUBLE
1
6
ELAY
STATUS
BYPASS
45
2
7
8
90
COMM AND
POLICE
FIR E
AUX
8333G 95A .DS4
Figure 4
To program the Magic Key for primary access:
■
1. Enter primary
. Inserting the Magic Key into the Slot
ACCESS CODE + STATUS + 8 +
new primary
ACCESS CODE.
The panel announces, [new primary access code] OK.
NOTE: Y ou can enter your current primary access code in place of a new
primary access code if you do not want to change your code.
2. Insert the Key into the slot within 30 seconds of changing your primary access code
(see Figure 4).
3. Hold the Key in the slot until the panel anno unces,
Memory OK.
31
Page 32

NOTE: You must reprogram the Magic Key whenever you change your
primary access code.
■ To program Magic Key for temporary access:
1. Enter primary
The panel announces, [new temporary access code] OK.
NOTE: You can enter your current temporary access code in place of a
2. Enter the number of days (00-99) you want the Key to work. If you enter 00, the Key will work until midnight of the day th e K ey is programmed.
For numbers greater than 00, the Key will work until midnight o f the assigned day.
3. Insert the Key into the slot within 30 seconds of changing you r temporary access code
(see Figure 4).
4. Hold the Key in the slot until the panel anno unces,
NOTE: You must reprogram the Magic Key if you change the temporary
ACCESS CODE + STATUS + 7 +
new temporary access code if you do not want to change your
code.
access code.
new temporary
Memory OK.
ACCESS CODE.
Magic Key Voice Messages
Table 6 describes voice messages you may hear when programming or using a
Magic Key.
32
Table 6
. Magic Key Voice Messages
Message Definition
Memory OK
Invalid, try again.
Failure, good-bye.
Programming successfully completed.
Key not recognized. Repeat procedure.
Key’s programming prevents its use at this time.
Reprogram Key or revalidate the temporary
access code.
Using the Keychain Touchpad
This section summarizes all the fu nctions of the Keych ain Touchpad. You can perform the
following functions using the Keychain Touchp ad:
Arm the system
Arm the system with no alarm delay time
Disarm the system
Page 33

Activate an alarm
Turn system-con trolled light s on and off. (See also "Co ntrolling Lights (LIGHTS)" on
page 30.)
Bypass sensors indirectly. (See also “Bypassing Normally Armed Sensors
(BYPASS)” on page 28.)
To arm the system from a Keychain Touchpad:
■
1. Close all perimeter doors and windows.
2. Check to see that the panel’s READY light is on or blinking.
or– If the READY light is not on or blinking, press the
STATUS
touchpad to learn if there are any system problems.
The system’s voice message should provide you with the number of any sensors that
are open. After double-checking those sensors, if the READY light is still not on or
blinking, refer to "Bypassing Normally Armed Sensors (BYPASS)" on page 28. You
also should contact your security consultant to resolve the problem.
3. Press the Arm button until the light blinks. The panel’s STAY or AWAY light turns on, and the panel and interior sirens sound
two or three beeps at the beginning o f the exit delay.
NOTE: Depending on programming, a Keychain Touchpad may arm
your system to the next hig her arming level or dire ctly to level 3 NO
DELAY.
4. Exit the premises within the delay time, if you are leaving. When the delay time expires, the panel and interior sirens sound two or three more
beeps. If you are still on the premises and want to leave, disarm and rearm the system
to prevent an accidental alarm.
button at the panel or a
■
To arm the system with no alarm delay from a Keychain Touchpad:
1. Close all perimeter doors and windows.
2. Check to see that the READY light is on or blinking at the Panel.
3. Press the Arm button, then press the Star button and hold until the light blinks. The Panel’s STAY or AWAY light turns on, and the Panel and interior sirens sound
arming level beeps. The NO DELAY light turns on, and the Panel and interior sirens
sound arming level beeps again.
NOTE: Disarm the system before opening a perimeter door or window, or
an accidental alarm may occur.
NOTE: Depending on programming, a Keychain Touchpad may arm
your system to the next higher arming level, or directly to level 3
NO DELAY.
33
Page 34

■ To disarm the system from a Keychain Touchpad:
1. Enter the premises through a delay door wh en the system is armed to level 2 or 3. The panel and interior sirens sound a two- or three-beep sequence, with a one-secon d
pause between sequences. The beeping lasts for the entire delay or until you disarm
the panel. You must disarm the system before the delay time expires or an alarm will
occur.
CAUTION: Exit the premises immediately if the two- or three-beep
sequence sounds at a more rapid pace. This indicates an
alarm has occurred. Call for emergency help from a
neighbor’s phone.
2. Press the D isarm button on the Keycha in Touchpad. The AWAY or STAY light turns off, and the panel and interior sirens sound one short
beep.
NOTE: Pressing the Disarm button will not disar m the system if an alarm
was generated by simultaneously pressing the Arm and Disarm
buttons.
CAUTION: If you disarm the system before entering the premises, do
not enter the premises if you hear a two-beep continuous
sequence (1 long, 1 short). This indicates an alarm has
occurred. Call for emergency help from a neighbor’s
phone. For more information on this feature, contact your
security consultant.
3. Press the
STATUS
button to learn if there are any system problems.
To bypass sensors indirectly from a Keychain Touchpad:
■
1. Press the Arm button. If the panel announces, Sensor [sensor #] open and sounds a
two-beep continuous sequence (1 long, 1 short), continue to step 2.
If the panel arms successfully, you do not have to bypass any sensors.
2. Press the Arm button again. Depending on which level you arm to, the panel’s STAY or AWAY light turns on, the
panel and interior sirens sound two or three beeps, and the panel announces,
[sensor #] bypassed
NOTE: The indirect bypass procedure cannot be used in UL listed installa-
tions.
.
■ To activate an alarm from a Keychain Touchpad:
Simultaneously press the Arm and Disarm buttons until the light blinks to activate an
alarm type set by your security consultant.
The interior and exterior sirens and the panel sound the appropriate alarm. Exterior
sirens do not sound for auxiliary/medical alarms.
34
Sensor
Page 35

■ To turn controlled lights on or off from a Keychain Touchpad:
Press the Light button and hold until the light blinks.
The Panel announces,
current setting.
On or Off. Controlled lights turn on or off, depending on the
Checking the System Status (STATUS)
STATUS
Whenever you disarm the system or experience system problems, check the system’s status. The panel may notify you of the following conditions:
Sensors that are open or have covers off
Sensors with low batteries
Sensors that are bypassed
Condition of AC power
Condition of backup batteries
Sensor alarms that occurred during the arming period
Sensors experiencing communication failure
■
To check system status:
STATUS.
Press
The panel and interior sirens sound the appropriate number of arming level beeps for
the current security level, and the panel announces the status of the system.
NOTE: If a sensor is open , the system announces the open sensor number
instead of announcing the complete system status. The status of
the system battery and AC pow er are annou nced only if there is a
failure.
35
Page 36

Table 7 shows a few system status messages that may be announced.
Table 7
. Status Voice Messages and Their Meanings
Voice Message Meaning
Alarm system is OFF, system battery is OK,
AC power is OK.
Alarm system is OFF, sensor [sensor #]
open.
Alarm system is OFF, sensor [sensor #] low
battery.
Alarm system is ON level 3, sensor [sensor
#] bypassed.
Alarm system is OFF, sensor [sensor #] trouble.
Invalid, try again.
Alarm system is OFF, sensor [sensor #] failure.
Checking for Alarms
All sensors are closed, no system problems exist,
and system is in level 1.
A perimeter sensor is open. Close or bypass sensor to arm system.
A sensor has a low battery. Contact your security
consultant for sensor battery replacement.
All sensors are armed except for the announced
sensor.
Sensor cover is off. Put sensor cover on, then
activate the sensor. For ex ample, on a motion sensor, walk through its range of coverage.
An incorrect or incomplete command was entered
at the panel or from a touchpad.
A sensor isn’t working. Contact your security
consultant.
36
The panel saves a record of any alarms that occurred while the system was armed. Use the
following procedures to review any alarm messages stored in memor y an d clear the alar m
memory when you no longer need the alarm messages.
To hear alarms in panel memory:
■
COMMAND + STATUS.
Enter
The panel announces, Sensor [sensor #] [alarm type] Alarm Memory. If no alarms
occurred during the arming period, the panel announces,
To clear alarm memory:
■
1.
Enter any
ACCESS CODE + 9.
Alarm Memory is OK.
The panel and interior sirens sound one long beep and the panel announces, Sensor
test is ON.
2.
Enter any
The panel announces,
ACCESS CODE + 1
Alarm system is OFF. The alarm memory is now empty.
to exit out of sensor test.
Page 37

Adjusting Panel Speaker Volume
The panel has eight volume levels to choose from. Alarm sounds and alarm messages are
always at full volume.
To adjust panel speaker volume:
■
COMMAND
Press
The panel announces,
returns to full volume and starts decreasing volume again.
and hold until the desired volume is heard.
Hello... hello... hello... with a steadily decreasing volume, then
37
Page 38

38
Page 39

SECTION 5–
MAINTAINING YOUR SYSTEM
Follow these maintenance pr ocedures to help keep your system reliable and trouble-free.
Required System Tests
It is important that you check the system status and perform phone and sensor tests
weekly. These procedures ensure that your system is fully operational.
To check system status:
■
With all sensors in their normally secure position, press
The panel and interior sirens sound arming level beeps, corresponding to the current
arming level. The panel announces system status, as shown in Table 8.
NOTE: If a sensor is open, the system announces only the open sensor
number. The status of the backup battery and AC power are
announced only if there is a problem.
Table 8
. Voice Status Messages
Main Message Status Level
OFF —
Alarm System is
System Battery
AC Power
†
See "Replacing Panel Backup Batteries" on page 41.
‡
Check if the AC power transformer is plugged in. Check the cir-
cuit breaker or fuse cont roll ing the outlet. If you sti ll don’ t ha v e
AC power, contact your security consultant.
ON Level 2
ON Level 3
is OK. —
Failure
†
is OK. —
Failure
‡
STATUS.
—
—
■ To perform a phone test:
NOTE: Performing a phone test is only necessary if your security system is
monitored by a monitoring service.
39
Page 40

Enter ACCESS CODE + 8.
The panel and interior sirens sound one long beep, and the panel announces, Phone
test is ON.
The system returns to level 1 when the phone test is complete. The panel announces,
Phone test is OK, Alarm system is OFF.
If the panel announces, Phone test failur e, Ala rm system is OFF, make sure t he panel
is plugged into the phone jack. If a problem still exists, contact your security consultant immediately .
■
To perform a sensor test:
1. Enter ACCESS CODE + 9. The panel and interior sirens sound one long beep, and the panel announces, Sensor
test is ON. You have 15 minutes to complete the sensor test.
2. Activate each sensor, as described in Table 9. The panel and interior sirens sound several beeps, and the panel announces,
[sensor #] OK.
3. Press
STATUS when you think all sensors have been tested.
The panel announces,
All sensors test OK. If all sensors have not been tested, the
panel announces a list of all untested sensors. Test all untested sensors.
4. If you need more time to complete the sensor test, enter
ACCESS CODE + 9.
This gives you 15 minutes to comp lete the sensor test, and you don’t have to retest
any sensors.
5. Enter
ACCESS CODE + 1 to exit the sensor test at any time.
or– The panel goes to level 1 after 15 minutes in sensor test, if you do not exit first.
The panel announces,
Alarm system is OFF.
Sensor
40
NOTE: Performing a sensor test also clears the panel’s alarm history (see
“Checking for Alarms” on page 36).
Page 41

Table 9
. How to Activate Sensors During Sensor Test
Freeze
Shock
Smoke
Sensor
‡
Open the secured door or window, and reclose it
after it beeps.
Apply ice or freeze spray to the s ensor f or about 45
seconds. Do not let the sensor get wet.
†
Avoid sensor’s view for 5 minutes, then enter its
view.
Press and hold the appropriate emergency button(s) for at least 3 seconds. Test all three emergency buttons (
Rub your hands together until warm, then place
one hand on the sensor for 30 seconds.
†
Press and hold the test button until the system
sounds transmission beeps.
Press the button on the sensor.
Sensor
Door/Window
Glass Guard
Motion Sensor
Emergency But-
tons on T ouchpads
and Panel
Rate-of-Rise
Water-Resistant
Pendant Panic
†
You cannot test this sensor. Your security consultant should test the sensor
periodically.
‡
Your security consultant can explain how to test any additional sensors used
with your system.
Action
POLICE, FIRE, AUXILIARY
).
Replacing Panel Backup Batteries
Your panel uses six NiCd or alkaline backup batteries in case of an AC power failure. The
actual length of time the panel will operate on backup batteries depe nds on your backup
power time setting, the type of batteries used, and the condition of the batteries. The
default setting for backup power is 5 hours and may be changed by your security consultant.
Test your backup batteries weekly by checking the system status, as described in the section "Required System Tests" on page 39. If the panel announces,
when you check system status, replace your batteries.
System battery failure
41
Page 42

CAUTION: The panel may be damaged if the wrong batteries are
installed. Make sure the batteries are all the same type
and part number.
NOTE: Use only the following batteries:
Alkaline:
NiCd:
■
To replace the panel’s backup batteries:
Eveready E91, Duracell MN1500, Panasonic AM3X
Panasonic P-70 AAS or P-60AA, Sanyo N-600-AA
1. Enter ACCESS CODE + 1 to disarm the system to level 1. An alarm will occur if yo u
do not disarm the system.
2. Loosen the two screws on the bottom of the pa nel until you are able to slide the door
down and out (see Figure 5). Two full turns should be enough to allow you to remove
the battery door without removing the screws completely.
NICAD
12345
OWER
P
R
EADY
67890
TAY
S
WAY
A
ELAY
NO D
T
ROUBLE
ALKALINE
USE ONLY
BATTERY CAPACITY FOR
BATTERY DOOR SCREWS
Figure 5
. Loosen the two battery door screws
3. Check the battery type installed (NiCd or alkaline). You must use the same battery
type that is currently installed (see Figure 6).
42
Page 43

CAUTION: To avoid the risk of personal injury, equipment damage,
and battery failure, only install the battery type that the
tab indicates.
Figure 6
BYPASS
3
2
7
8
P
R
S
A
NO D
T
NiCd
ALKALINE
OWER
EADY
TAY
WAY
ELAY
ROUBLE
1
6
STATUS
. Tab Indicates Battery Type Installed
5
4
90
COM M AND
POLICE
FIR E
AUXILIARY
8333G48A.DS4
4. Remove the batteries from the battery bucket.
5. Insert appropriate new batteries in the order and direction shown in Figure 7.
3
+
+
2
1
+
4
5
Figure 7
6
. Battery Polarity and Order of Installation
8333G28C.DS4
6. Replace the battery door on the panel.
7. Wait 30 seconds, then press
STATUS.
The panel should announce, Alarm system is OFF, system battery is OK, AC power
is OK. If the panel announces, Alarm system is OFF , system battery failure, check the
43
Page 44

battery installation. If the batteries are installed correctly, contact your security consultant.
NOTE: If NiCd batteries are not fully charged, it may take up to 24 hours
for the system to fully recharge the batteries and clear the low
battery warning. During this time, the system is fully operational
unless an AC power failure occurs.
Replacing Smoke Sensor Batteries
The Smoke Sensor has two 9-volt batteries. Use only Eveready Alkaline Energizer® 522,
Duracell MN 1604, or Ultralife
Smoke Sensors once a year.
To replace the batteries in a Smoke Sensor:
■
1. Remove the sensor from its base by turning the s ensor co unterclo ckwise until t he line
on the sensor aligns with the line on the base. Then, pull the sensor off the base.
2. Pull the batteries out of their compartments, and disconnect the batteries fro m the battery clips.
3. Connect the new batteries to the battery clips, and push the batteries into their compartments.
4. To attach the sensor to the base, put the sensor on the base, then align the line on the
sensor with the line on the base. Turn the sensor clockwise until the sensor locks on
the base (about
5. Perform a sensor test on the Smoke Sensor to verify that the batteries are okay. See
"Required System Tests" on page 39 to perform a sensor test.
1
/4 turn).
®
U 9VL Lithium 9-volt batteries. Replace the batteries in
Replacing Other Sensor Batteries
Although you can replace the batteries in the panel and in the Smoke Sensor, you must
contact your security consultant to replace the batteries in all other sensors and touchpads.
These devices use lithium batteries not available in retail sto r es.
44
Page 45

SECTION 6–
TROUBLESHOOTING YOUR SYSTEM
Table 10 provides basic troubleshooting information.
Table 10
Access Code
Arming/Disarming
Batteries
Bypass
. Troubleshooting Your System
Problem Solution
Cannot remember access code.
System won’t arm. • If arming to level 2, make sure all monitored perimeter
Panel announces,
battery failure.
Panel announces, Sensor
[sensor #] low battery
System
.
Contact your security consultant.
doors and windows are closed.
• If arming to level 3, make sure all perimeter and interior sensors are closed.
ant.
STATUS
for a voice message of the problem.
•Press
• If system still won’t arm, contact your security consult-
Replace panel backup batteries as described in “Replacing Panel Backup Batteries” on page 41.
See “Replacing Smoke Sensor Batteries” on page 44 for
the procedure to replace your own smoke sensor batteries, or contact your secur ity con sultant to have yo ur other
sensor batteries replaced.
Panel announces,
when you attempt to
again
bypass a sensor.
System cancels sensor bypass
when you try to arm to le v el 2 or
3.
False Alarm
Alarm is being sent.
Invalid, try
You are trying to bypass a 24-hour sensor that cannot be
bypassed or a sensor that is not active in the current security level. You don’t need to bypass this sensor.
Arm to the desired level before you try bypassing a sensor.
ACCESS CODE + 1
Enter
mand bypasses the alarm if done within 8 to 20 seconds.
to cancel the alarm. This com-
45
Page 46

Table 10
Magic Key
. Troubleshooting Your System
Problem Solution
Temporary Access Magic Key
does not disarm system.
Lights
Light using X-10 Lam p Mod ule
doesn’t work.
Panel
All panel lights blink.
Trouble beeps sound.
All panel lights are on steady.
Trouble beeps sound.
Power
Panel announces,
Failure.
AC Power
Sensor
Panel announces,
[sensor #] Trouble.
Sensor
Use has expi red. Reprogram Magic Key.
Check light bulbs.
Check that light switch on lamp is turned ON.
Make sure lamp is plugged into an X-10 Lamp Module.
Make sure the lamp is plugged into a nonswitched outlet.
If light control still doesn’t work, contact your security
consultant.
The system is in programming mode.
Contact your security consultant.
The system’s memor y is clear. Contact your security consultant.
Check to see if AC transformer is plugged into an outlet.
If it is, check circuit breaker or fuse that controls that outlet. If there is still an AC power failure, contact your
security consultant.
Put the sensor’s cover on, if it is off. Activate the sensor.
Panel announces, Sensor
[sensor #] Failure.
Panel announces, Sensor
[sensor #] low battery
46
The sensor is not communicating with the panel. Contact
your security consultant .
See “Replacing Smoke Sensor Batteries” on page 44 for
.
the procedure to replace your own smoke sensor batteries, or contact your security consultant to have other sensor batteries replaced.
Page 47

Table 10
. Troubleshooting Your System
Smoke Sensor
Problem Solution
Beeps once every minute.
Telephone
Telephone doesn’t work.
Trouble Beeps (see also
Panel
Six beeps occur every minute.
Wireless Interior Siren (WIS)
Beeps once every minute
Batteries are low. Replace the smoke sensor batteries.
Disconnect panel from phone jack. If the telephone
works, contact your security consultant . If telep hone still
doesn’t work, the system is OK; contact your telephone
company.
)
STATUS
Press
for a voice message of the problem. This
disables the trouble beeps until the panel calls in its daily
report. Contact your security consultant.
Battery is low. Replace the WIS battery.
47
Page 48

48
Page 49

SECTION 7–
PLANNING FOR EMERGENCIES
To protect yourself and others on the premises, create a map of the premises. Develop a
plan for various emergencies, and practice your emergency plans. Figure 8 is an example
of a floor plan. Draw a floor plan of your premises in Figure 9. Include the location of all
system components. Be sure to show exits from each ro om (two ex its per ro om ar e reco mmended).
Periodically discuss emergency procedures that include the following points:
Understanding how to use the security system.
Knowing the normal state of the doors and windows of the premises, either open,
closed or locked.
Using alternate escape routes if closed doors feel hot to the touch.
Crawling and holding breath.
Escaping fast! (Do not stop to pack.)
Meeting at a designated outdoor location.
Conducting periodic rehearsals.
Emphasizing that no one should return to the premises if there is a fire.
Emphasizing that no one should enter the premises if they hear siren sounds.
CAUTION: If you arrive at the premises and hear sirens, DO NOT
ENTER the premises. Call for emergency assistance from a
neighbor’s phone.
49
Page 50

Bedroom
Bedroom
Hall
A smoke detector should
be located on each level.
Living
Room
Basement
Dining
Room
TV
Room
Bedroom
Kitchen
H
Living
Room
Dining
Room
Dining
Room
Living
Room
Bedroom
Kitchen
H
Hall
Bedroom
Bedroom
Bedroom
Bedroom
x
Recreation
Room
Basement
Bedroom
Living
Room
Smoke detectors should
be located between the
sleeping area and the rest
of the family living unit.
In family living units with more
than one sleeping area, locate a
smoke detector at each area.
Bedroom
Hall
NOTE: Ceiling-mounted smoke detectors should be located in the center of the room
or hall, or not less than 4 inches from the wall. When the detector is mounted
on the wall, the top of the detector should be 4 to 12 inches from the ceiling.
NOTE: Do not install smoke detectors where normal ambient temperatures are above
100°F or below 40°F. Also, do not locate detectors in front of AC/ Heat
registers or other locations where normal air circulation will keep smoke
from entering the detector.
NOTE: Additional information on household fire warning is available at nominal
cost from: The National Fire Protection Association, Batterymarch Park,
Quincy, MA 02269. Request Standard No. NFPA74.
Required smoke detector
H
Heat detector
x
Indicates smoke detector is optional if door is not provided between
basement and recreation rooms.
Figure 8
. Floor Plan Example
50
8557144a
Page 51

Floor Plan
Use the space provided (Figure 9) to draw your floor plan and indicate where all system
components and sensors are located.
Figure 9
. Draw a Floor Plan of the Premises
51
Page 52

52
Page 53

APPENDIX A–
ALARM SYSTEM NOTICE
Alarm System Limitations
Not
even the most advanced alarm system can guarantee protection against burglary, fire,
or environmental problems. All alarm systems are subject to possible compromise or failure-to-warn for a variety of reasons.
If sirens are not placed within hearing range of persons sleeping or in remote parts of
the premises, or if they are placed behind doors or other obstacles.
If intruders gain access through unprotected points of entry or areas where sensors
have been bypassed.
If intruders have the technical means of bypassing, jamming, or disconnecting all or
part of the system.
If power to sensors is disconnected or inadequate.
If freeze, flood, or any environmental sensors are not located in areas where the
appropriate condition can be detected.
If smoke does not reach a Smoke Sensor. For example, Smoke Sensors cannot detect
smoke in chimneys, walls, roofs, or sm oke blocked by a closed door . Sen sors may not
detect smoke on other levels of the buildi ng. Sensors may not warn in time when fires
are caused by smoking in bed, explosions, improper storage of flammables, overloaded electrical circuits, or other hazardous conditions.
If telephone lines are out of service. Telephone lines are also vulnerable to compromise by any of several means.
Inadequate maintenance is the most common cause of alarm failure. Therefore, test your
system at least once per week to be sure sensors, sirens, and phone communications are all
working correctly.
Although having an alarm system may make you eligible for reduced insurance premiums,
the system is no substitute for insurance.
Service
If you have any questions about your system or if you ever need service, please contact
your security consultant.
Company Name______________________________
Phone Number_______________________________
Address____________________________________
WARNING: Security devices cannot compensate you for loss of
life or property.
53
Page 54

54
Page 55

GLOSSARY
access code
A four-digit number that you must enter to control the security system.
alarm
A Panel condition that occurs when a sensor is tripped, if the sensor is active in the current
arming level that the system is set to.
arm
To turn on intrusion detection. When arming to level 2, perimeter sensors, such as door/
window sensors, are monitored. When arming to level 3, all sensors, including interior
sensors such as motion sensors, are monitored. See also disarm.
auxiliary/med ical alarm
Activated by pressing the AUXILIARY/MEDICAL buttons. Tu rns on interior sirens only and
sends an alarm to your monitoring service.
bypass
Have the system ignore selected sensors while the system is armed. For example, to open
a monitored door while the system is armed to level 2, bypass the door’s sensor. You cannot bypass 24-hour fire sensors.
central moni t oring station
See monitoring service.
delay
The time you have to enter the premises and disarm the system before an alarm occurs, or
the time you have to exit the premises after arming the system before an alarm occurs.
disarm
To turn off intrusion detection (level 1). Only the 24-hour sensors remain on.
fire alarm
Activated by a smoke, heat, or fire pull sensor or the FIRE buttons. Turns on interior and
exterior sirens and sends an alarm to your monitoring service.
interior sensors
Sensors that monitor the interior of the premises for intruders. Examples of interior sensors: sound sensors, motion sensors, and door/window sensors on interior doors.
intrusion alarm
An alarm that is caused by activating a perimeter or interior sensor. For example, if the
system is armed to level 3 and a motion sensor detects motion, an alarm occurs.
intrusion detection
Monitoring provided by perimeter and/or interior sensors. Intrusion detection does not
include 24-hour sensors.
55
Page 56

Keychain Touchpad
Miniature two- or four-button wireless touchpads that control basic system functions normally performed from the Panel or a wireless touchpad. The built-in light blinks when the
Keychain Touchpad has transmitted a signal.
Magic Key
A dime-sized programmable disk. You use the Panel to program the Magic Key for primary or temporary access privileges. Once prog rammed, you can control the system without entering codes or pressing buttons on the Panel.
monitoring service
The service your system calls to report various system conditions. The monitoring service
dispatches the appropriate authorities in an emergency and provides some system programming services.
perimeter sensors
The sensors that monito r ex terior d oor s and windo ws. Per ime ter sen sors i nclude door/win dow and shock sensors.
police alarm
Activated by perimeter or interior sensors or the POLICE button. Turns on interior and
exterior sirens and calls your monitoring service.
silent duress alarm
Activated by entering the duress code. No sirens are turned on , bu t th e mo nitoring service
is notified of the alarm.
silent duress code
A four-digit code that can be used to disarm the system in an emergency while it sends a
silent alarm to the monitoring service.
24-hour sensors
Sensors that monitor the interior of the premises for threats that are not caused by intruders. Examples of 24-hour sensors: heat sensors, freeze sensors, and smoke sensors.
56
Page 57

INDEX
A
AC power
see power
access code
– 15
defined
if you forget – 15, 45
primary – 15
secondary – 16
temporary – 16
troubleshooting – 45
accidental alarm
see alarm, turning off
alarm
activating
auxiliary/medical
checking for – 35
clearing memory – 36
fire
light response
police
preventing
sounds – 12
system limitations – 53
turning off – 20, 24, 45
arm
defined
security levels – 18
sensors active
troubleshooting – 45
unable to – 45
using COMMAND button – 21, 33
using Handheld Touchpad – 21
using Keychain Touchpad – 21, 33
using Magic Key – 22
using Panel – 21, 33
– 24
see auxiliary/medical alarm
see fire alarm
– 30
see police alarm
– 17, 27, 28
– 20
in level 1 (24-hr)
in level 2 – 18
in level 3 – 18
– 18
with No Delay – 27
with sensor bypass – 28 arming level beeps – 13 AUXILIARY button – 24 auxiliary/medical alarm
activating
using COMMAND button – 24
using Handheld Touchpad – 23
using Panel – 23, 24
description of – 22, 23
sound – 12
AWAY
– 20
button
indicator light – 11
B
battery
failure
– 39, 45
installing/replacing
backup batteries
in other sensors – 44
in smoke sensors – 44, 47
troubleshooting – 45
types
– 44
lithium
type indicator – 43
using the right type – 42
9-volt – 44
beeps – 13, 47 bypass
direct
defined – 28
performing – 29
indirect
– 28
defined
performing – 28
removing – 28
removing – 28
all – 29
single – 29
– 41
57
Page 58

troubleshooting – 45
BYPASS button – 28
C
changing
primary access code
see also battery, installing/replacing
temporary access code
checking
for alarms
see alarm, checking for
system status
chime – 13, 29 CHIME button – 29 code
see access code
see also silent duress alarm, activat ing
COMMAND
button
– 21, 24
COMMAND button
arming to level 2
arming to level 3 – 33
turning lights on/off – 30
Control Panel, see Panel
– 15
– 16
– 35, 39
– 33
D
delay – 17 direct bypass
see bypass, direct
disarm
defined
– 18
sensors active – 18
to level 1 – 18
troubleshooting – 45
using Handheld Touchpad – 18
using Keychain Touchpad – 19
using Magic Key – 19
using Panel – 18
duress alarm
see silent duress alarm
duress code
see silent duress alarm
E
emergency
alarm
see alarm
planning for
entering/exiting the premises – 17 entry delay beeps – 13 escape plan
see floor plan
extended delay
– 49, 50
– 17
F
failure
– 39
battery
power – 39
false alarm
turning off
fire alarm
activating
description of – 22, 23
placement – 50, 51, 53
sound – 12
FIRE button
description of
floor plan – 50, 51
– 45
using Panel – 23, 24
– 24
H
Handheld Touchpad – 24
I
indicator lights – 11, 46 indirect bypas s
see bypass, indirect
installing batteries
see battery, installing/replacing
K
key
see Magic Key
58
Page 59

Keychain Touchpad – 33
activating an alarm using – 24, 34
arming
with no alarm delay time
with No Delay – 27
arming using – 21
bypassing senso rs indirectly using – 28, 34
disarming using – 19, 34
list of functions – 32
turning lights on/off – 30, 35
– 33
voice messages
Failure, good- by e
Invalid, try again – 32
Memory OK – 32
when to reprogram – 32
maintaining system – 39 messages
see voice messages
monitoring service
– 8, 23, 25
– 32
L
lamp modules
see X-10 Lamp Module
level 1
– 18
defined
disarming to – 18, 19
sensors active in – 18
level 2
arming to
defined – 20
sensors active in – 18
level 3
arming to
defined – 20
sensors active in – 18
lights
see also indicator lights
table of
troubleshooting – 46
turning on/off
– 21, 33
– 21, 33
– 11
using Handheld Touchpad
using Keychain Touchpad – 30, 35
using Panel – 30
M
Magic Key
arming to level 2
arming to level 3 – 22
disarming using – 19
programming
for primary access
for temporary access – 32
troubleshooting – 46
– 22
– 31
– 30
N
No Delay
button
– 27
defined – 27
indicator light – 11
O
OFF button – 18
P
Panel
alarm sounds
beeps – 13
functions – 8
indicator lights – 11
operation – 15, 27
testing status – 39
troubleshootin g – 46
voice messages
volume control
phone
– 39
test
troubleshootin g – 47, 53
police alarm
activating
description of – 22, 23
sound – 12
– 12
description of
see also voice messages
using Handheld Touchpad – 23, 24
using Keychain Touchpad – 23, 24, 34
using Panel – 23, 24
– 14
– 37
59
Page 60

POLICE button
description of
power
failure
see also battery
troubleshooting
POWER indicator lights – 11 premises
entering/exiting
floor plan – 51
primary access
code
changing
if you forget – 15
defined – 15
using Magic Key – 31
problems
see troubleshooting
protest beeps
– 24
– 39
– 46
– 17
– 15
– 13
R
READY indicator light – 11 replacing batteries
see battery, installing/replacing
S
secondary access
code
adding – 16
changing – 16
defined – 16
sensor
alarm memory
batteries – 44
bypass – 28
bypassing – 35
cover off – 35
how to activate – 41
low battery – 35
number
AUXILIARY button
FIRE button – 24
POLICE button – 24
open – 35
– 36
– 24
status – 35
test – 40
troubleshootin g – 46, 47
wireless – 8
24-hour – 18, 20, 24
silent duress alarm
activating
using Handheld Touchpad – 25
using Panel – 23
defined – 25
description of – 22
turning off – 25
siren
description of
see also alarm
sounds
Wireless Interior Siren
troubleshooting
smoke sensor – 44 sounds
alarm
auxiliary/medical alarm – 12
fire alarm – 12
police alarm – 12
siren – 12
speaker vol ume – 37
see also voice messages
standard delay – 17 status
alarm memory
beeps – 13
checking – 35
checking after disarming – 18
checking system – 39
of alarm memory – 35
of backup batteries – 35
of sensor batter ies – 35
of system – 35, 39
voice messages – 36
STATUS button – 39 STAY
button
indicator light – 11
supervised – 5 system
beeps
communication – 11
– 9
– 12
– 12
– 36
– 20
– 13
– 47
60
Page 61

components – 5
maintaining – 39
status beeps – 13
testing status – 39
system battery
see battery
T
temporary access
code
– 16
defined
disabling – 16
using with Magic Key – 32
test
– 39
phone
sensor – 40
system status – 39
touchpad
handheld
see handheld Touchpad
touchpad, Keychain
see Keychain Touchpad
TROUBLE
indicator light
trouble beeps – 13
see also beeps
troubleshooting
access code
arming – 45
battery – 45
bypass – 45
disarming – 45
indicator lights – 11
Magic Key – 46
phone – 47
power – 11, 46
sensors – 46, 47
system – 45
turning off sensors
see bypass
– 45
– 11
defined – 14
for Magic Key – 32
for system status – 36, 39
volume control – 37
volume control – 37
W
wireless
defined
– 5
sensors, defined – 8
touchpad – 9
Wireless Interior Siren
see siren, Wireless Interior Siren
X
X-10 Lamp Module
– 30
defined
panel control – 30
see also lights
user contr ol
– 30
NUMERICS
24-hour sensors
see sensor, 24-hour
V
voice messages
alarm memory
– 36
61
 Loading...