

ITI Advent Navigator Owner's Manual

$GYHQW+RPH1DYLJDWRU
6\VWHP
Document Number: 466-1318-ITI Rev. B February 2001
Contents
ITI Part No. 60-562-02, 60-562-05
Welcome ........................................................................... 1
System Features ...............................................................1
System Information ..........................................................2
Using the Touchpad Buttons .....................................2
Using Hand-held Touchpads ..................................... 4
Using Keychain Touchpads ......................................4
General Operation .....................................................4
Adjusting the Touchpad Display Brightness .............5
Adjusting the Volume of Status Messages ................5
Global Settings .................................................................6
Global Access Code ..................................................6
Area Jumping ................................................. ...........6
Global Status and History .........................................6
Access Codes .................................................. .................6
Adding an Access Code ............................................6
Guidelines ............................................................6
Deleting an Access Code ..........................................7
Listing Codes ............................................................7
Changing an Access Code ........................................7
Changing an Access Code’s Limits ..........................8
Use Limit ............................................................. 8
Day Limit .............................................................8
Permanent User ....................................................8
Changing Access Code’s Authority ..........................8
User Text ................................................................... 9
Authority Levels .............................................................. 9
Authority Level Definitions ......................................9
Changing Authority Level Definitions ...................10
Using the Phone with the System ..................................11
Accessing the System Using a Home Phone ..........11
Accessing the System During a Phone Call........11
Accessing the System Away from Home ................11
Bypassing an Answering Machine or
Voice Mail ..........................................................11
Disengaging Local Phone Control ..........................12
Adjusting the Phone Volume ..................................12
Alarms ............................................................................ 12
Manually Activating Alarms ..................................12
Preventing Accidental Alarms ................................13
Tips for Avoiding Accidental Alarms ................13
Cancelling an Alarm ...............................................13
Manually Resetting Hardwired Smoke Detectors ..........13
System Tampering ..........................................................13
Touchpad Access Code Tampering .........................13
Remote Phone Access Code Tampering .................14
Phone Line Tampering ............................................14
Equipment/Sensor Tampering .................................14
Security Protection .........................................................14
Turning Security Protection On.............................. 14
Arming to Home ................................................14
Arming to Away .................................................14
Arming to Night................................................. 15
Arming to Silent .................................................15
Bypassing ...........................................................15
Automatically Bypassing ...............................15
Manually Bypassing .......................................15
Group Bypassing ............................................15
No Delay .................. ..... ...... ...... .........................16
Silent Arming .....................................................16
Turning Security Protection Off ..............................16
Using the No Activity Feature ................................16
Using Opening and Closing Reports .......................16
Open/Close Schedules .......................................17
Opening/Closing Exception Reports ..................17
Controlling Lights and Devices .....................................17
Lights ......................................................................17
Manually Turning All Lights On or Off
at Once ...............................................................17
Manually Turning One Light On or Off ............17
Brighten or Dim Lights ......................................17
Devices (Appliances) ..............................................18
Manually Turning a Single Device On and Off .18
Chime and Latchkey Features ........................................18
Chime Feature .........................................................18
Latchkey Feature .....................................................18
Automating The System Using Schedules .....................18
Schedule Types .......................................................18
Arming Schedules ...................................................19
Sunrise/Sunset Schedules ........................................19
Weekly Schedules ...................................................19
One-Time Schedules ...............................................20
Associating Lights, Devices and Access Codes
with Schedules ........................................................21
Lights and Devices .............................................21
Controlling Lights Automatically ..................21
Controlling Devices Automatically ................22
Access Code Schedules ......................................22
System Status .................................................................22
Checking the System Status .................................... 22
What the Status or Trouble Beeps Mean .................22
Checking the Alarm History ...................................24
Viewing the History Buffer .....................................24
Maintaining Your System ...............................................24
Testing ..................................................................... 24
Automatic T est Features .....................................24
T es ting the System Manually .............................24

Testing the Phone Connection to the
Monitoring Service..........................................24
Testing Sensors/Inputs (Zones) ......................24
Testing the Panel Backup Battery ...................24
Cleaning the System Components ..........................25
Checking and Changing Batteries ...........................25
Troubleshooting ..............................................................25
Appendix A: Planning for Emergencies .........................26
Guidelines ...............................................................26
Floor Plan Example 26
Your Floor Plan .......................................................26
Appendix B: System Menu Map ....................................28
Appendix C: Display Error Messages and Meanings .....29
Appendix D: System Planning Tables ............................31
Schedules .................................................................31
Holiday Schedules ...................................................31
Dealer Service Information
Dealer ____________________________________________
Representative ____________________________________________
Phone (______) ______–________
Fax (______) ______–________
Street Address ____________________________________________
____________________________________________
____________________
City
ZIP/Postal Code
_____________
State/Province
_________
E-mail ____________________________________________

Welcome
Welcome
Thank you for selecting the Advent Hom e Navig ato r secu rity system! This system is designed to detect and respon d
to various security related conditions such as door/window
sensor activation, smoke/heat detector activation, and others.
The system is simple and easy to use via touchpad displays and buttons (and telephone touchpads).
The system is designed to tell you what you need to know
(when you need to know) and to ask for what it needs by
way of simple menu displays and selections. This method
of communication simplifies your job as a us er and makes
the information in the manual complete and easy to follow.
Advent is a tremendous, user-friendly system designed to
simplify your life while providing the optimum in automated security protection.
System Features
Your security system provides several options for creating
the security and control environment you need in your
home. How you use the system is up to you. Regardle ss of
the features you choose, you will find that your security
system dramatically enhances your life style.
In addition to the standard intrusion and fire system features, here are just a few of the ways you can use the special features of your security system.
1RWH
Some features of this security system are optional and
are available from your security consultant.
Automatic Lighting Control
You can control lights inside and outside of your home by
plugging them into wireless devices called lamp modules.
These lights can then be turned on and off using either the
system touchpads or your home phones. In addition, the
system automatically turns selected lights on during an
intrusion or fire. The system automatically turns selected
lights on to scare off the intruder or to help you safely
enter/exit.
Automatic Device (Appliance) Control
You can control the appliances inside and outside of your
home by plugging them into wireless appliance modules.
For example, the system can be programmed to automatically turn your coffee pot or other appliance on and off
with a schedule.
Courtesy Features
The buttons on your hardwire touchpads light up when
you first push a button and stay on for 15 second s after the
last button is pushed. This makes it easy to operate your
system in a dimly lit entrance area. You can adjust the
brightness of the display and dim the l i ght to darken a
touchpad in a bedroom while someone is sleeping. You
can also operate your system silently. Using this method,
you can arm or disarm your system quietly and without
disturbing others.
Partitions
The system can be set up by your security consultant to
operate as a multi-partition system. This way the same sys-
tem can be used to protect separ ate areas such as duplex or
quad homes, with each area having its own touchpad, sen-
sors, sirens and so forth. Your home system can operate
with up to 4 or 8 (depending on model) separate partitions.
Areas
Choose whether or not to treat partitions as areas. If treated
as areas:
q Zones, touchpads, schedules, programming options,
etc., belong to areas instead of partitions.
q Users may “jump” from one area to another area using
an alphanumeric touchpad.
q The word “partition” will be changed to “area” wher-
ever it is spoken, displayed, or printed.
q Users can display status for all areas in one operation
(Global Status).
Zone/Sensor Types
The sensors in your system are made up of different
“types,” and various sensor types react d i f f erently. Certain
sensors automatically trigger a call to the central monitor-
ing station immediately after being set off, or “tripped.”
Other sensors trigger a call to the central monitoring sta-
tion only after being tripped twice within a certain time
period. Some sensors react silently while others allow you
to set entry and exit delays. There are “local-only” sensors
that sound sirens at your home but do not send a call for
help. The following are some of the useful ways you can
use various sensor types in your home.
q Monitor “Off-Limits” Areas of the Premises - Many
areas in your home can be hazardous to children.
Using local-only sensors, you can monitor certain
areas such as liquor, gun, and medicine cabinets and
even your swimming pool. If the pool gate or monitored cabinet door is opened, a siren beeps. The beeping stops when the gate or door is closed. You can also
use this sensor type to alert you to cars approaching
your home from the driveway, to monitor your mailbox so you know when the mail arrives, and as a wir eless doorbell.
q Protect Private Business Information - You can con-
trol accessibility to private documents or money
drawers. For example, sensors could be set to beep
any time the safe door is opened during business
hours. You can also assign up to 100 or 250 (depending on model) different system access codes to users.
Then, if you choose to receive opening and closing
reports from your central monitoring station, you can
check employee arming and disarming procedures. If
your system is not properly armed, you can be called.
If normal opening procedures aren’t followed, additional people can be notified.
If your home has a security gate covering the front
door and windows, yo u may cho ose to pu t a sen sor on
the gate to sound a local siren if someone shakes the
gate to scare them away but not to call the central station. If the intruder continues to break in, other sen-
Advent® Home Navigator System
1

System Information
sors protecting the front doo r and windows woul d call
the central monitoring station.
q Set Doors and Windows for Entry/Exit - Entry and
exit door sensors can be set to one of three delays,
depending on how accessible your doors are to your
system touchpad or Touch-Tone
®
telephone. The
delays are set to give you enough time to get in and
out of your house, but not allow an intruder to sneak
in behind you. You may want a short delay on the
door leading from the garage to the house and a little
longer delay on the overhead garage door. You can
have an even longer delay on the driveway gate.
What Happens in an Emergency?
Your security system touchpad has three panic alarms—
police, fire, and auxiliary or medical—that call for help
immediately. They are activated by pressing the appropriate touchpad buttons. Even very young children can learn
how to send for emergency help if needed. Police and fire
fighters will know the exact location and nature of the
emergency.
Your security system can also monitor the normal activity
in your home and call for help automatically if normal
activities are not detected. For example, if someone falls
and can’t move, the system notices that normal activities,
such as placing outgoing calls or opening doors and windows, have not occurred for a certain length of time. Your
system sounds a low-volume siren for 5 (programmable)
minutes to let you know there may be a problem. If all is
well, you can stop the siren by disarming your system. If
no one disarms the system during the 5 minutes, your system calls for help. Refer to Appendix A, “Planning for
Emergencies” for emergency planning details.
Using the System When You’re Away
Off-site operations using any T ouch-Tone telephone allow
you to control and monitor most of your system features
even while you are away from your home. If you are on
vacation, for example, you can turn lights and appliances
on and off, check for any trouble conditions, and even
bypass the sensor on a door to let in a neighbor, delivery
person, or service person.
System Information
You may have ins talled this security system simply to prevent break-ins and theft and t o detect f i res. H owever, your
new security system can alert you to many other emergencies. Plus, this security system lets you monitor and control conditions in your home or business even when you
are away.
To effectively use your security system, you need to develop a few simple habits:
q Check for open doors and windows before leaving.
q Remember to gather your things and then arm your
system and exit before the exit delay time expires.
q Remember to disarm your system within the entry
delay time when you return.
q Respond to beeps, light indicators, and voice
announcements from your system, which indicate the
status of your system.
You soon become aware of the benefits these few simple
habits bring you and help you incorporate your security
system seamlessly into your everyday life.
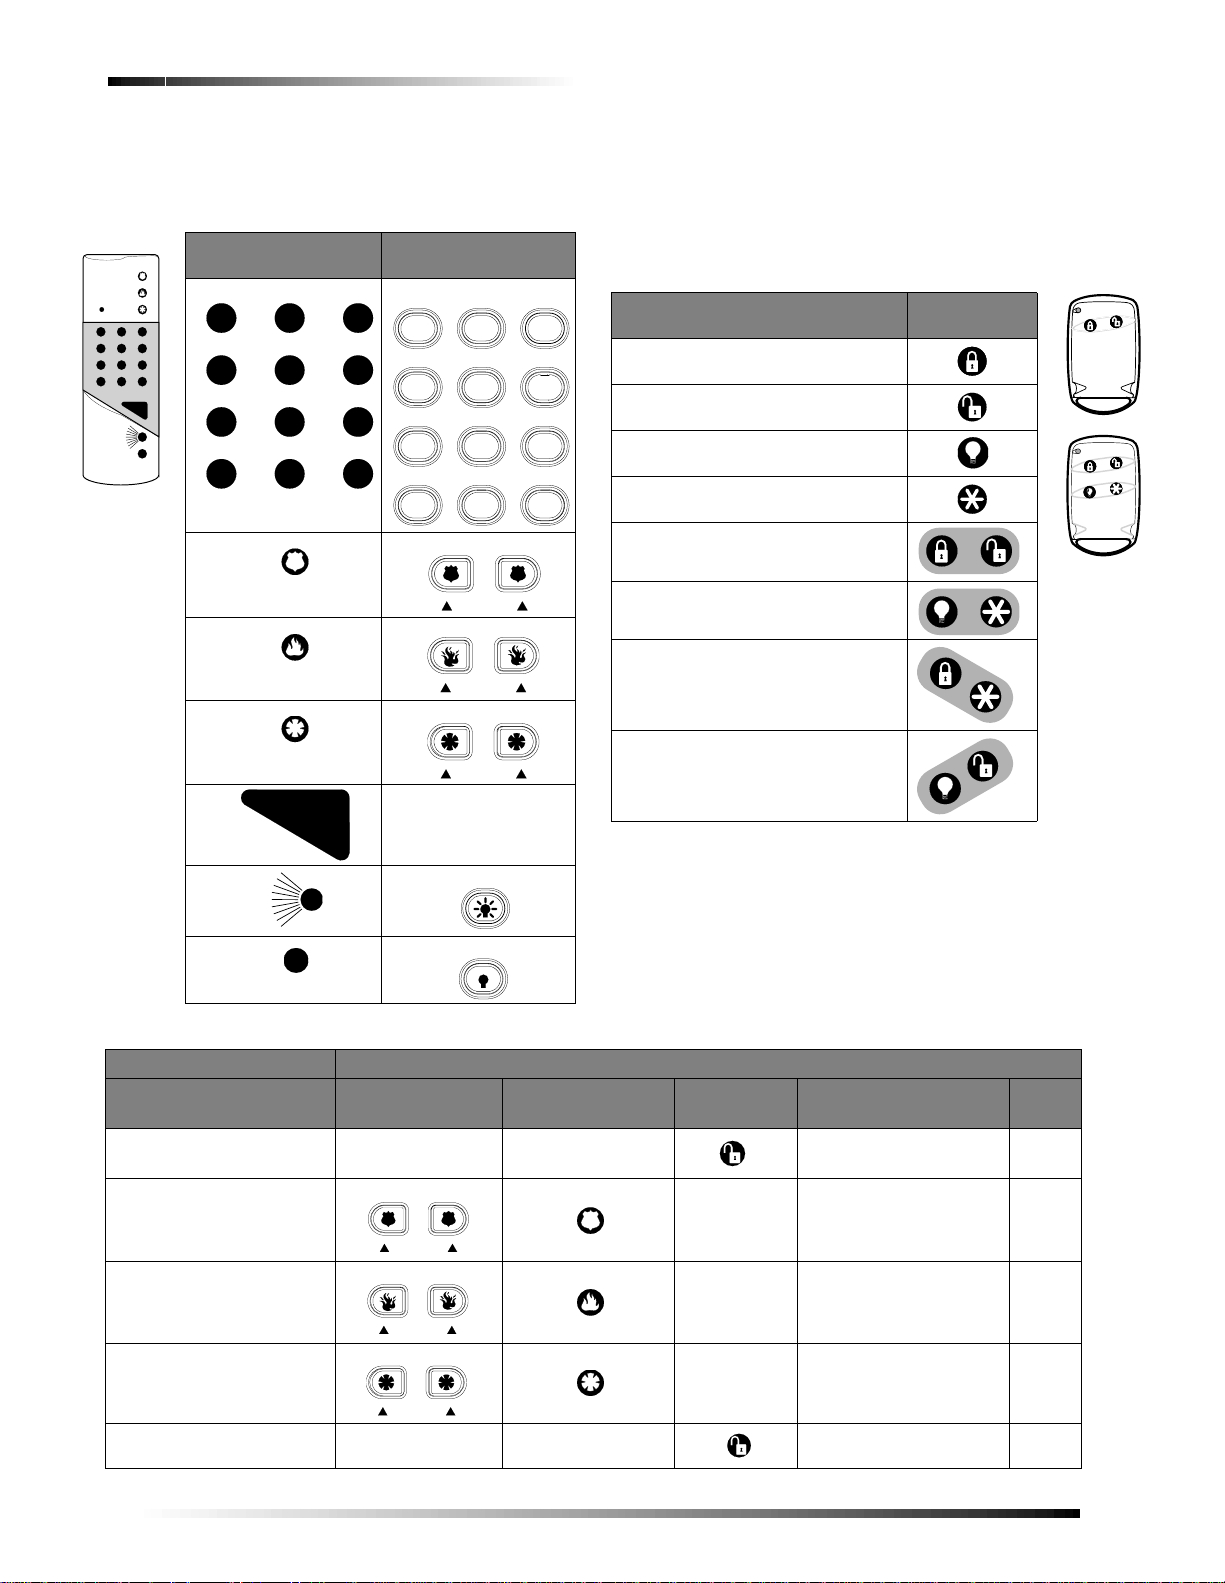
Using the Touchpad Buttons
The touchpad is the primary way to manually operate the
system or partition. Table 1 contains a list of the buttons
and what they do.
Security
Automation
Fire Protection
Access Control
A BD
POLICE
POLICE
PANIC BUTTONS -- PRESS AND HOLD BOTH BUTTONS TO ACTIVATE
C
AUXILIARY
AUX/MEDICAL
E
F
FIRE
FIRE
Figure 1. Touchpad Buttons
Security
1
Lights
4
Features
7
Undo
*
Advent System - Test Weekly
2
Devices
System
Phone
0
Access
ControlSilent Arm
3
Energy
65
Scripts
98
Enter
#
IHG
2
1 SECURITY MENU
2 SILENT ARM MENU
3 ACCESS CONTROL MENU (NOT USED)
4 LIGHTS MENU
5 DEVICES MENU
6 ENERGY MENU (NOT USED)
7 FEATURES MENU
8 SYSTEM MENU
9 SCRIPTS MENU (NOT USED)
0 PHONE MENU
MAIN MENU OR ACCEPT
PREVIOUS MENU OR QUIT
DISPLAY BRIGHTNESS
TURN ALL LIGHTS OFF
TURN ALL LIGHTS ON
8543g114b.dsf
Advent® Home Navigator System

T able 1: Touchpad Button Descriptions
POLICE
A
B
AUXILIARY
C
D
FIRE
F
E
Undo
*
Button Description
Causes police panic alarm when both buttons are pressed and held or pressed twice.
Causes auxiliary or medical panic alarm when both buttons are pressed and held or pressed twice.
Causes fire panic alarm when both buttons are pressed and held or pressed twice.
G
Turns all controlled lights on when held or pressed twice within 2 seconds.
H
Turns all controlled lights off when held or pressed twice within 2 seconds.
System Information
I
Controls display br igh t ness w he n pr esse d and he l d.
1 Security Displays Security menu. Allows you to do security functions such as arming/disarming, bypassing, and
checking system status and alarm memory.
2 Silent Arm Displays Silent Arming menu. Provides special security functions such as silent arming/disarming.
3 Access Control
(to be developed)
Displays Access Control menu. Offers building access control functions.
4 Lights Displays Lights menu. Allows you to turn controlled lights on and off individually and assign timed light
schedules. Lights can be turned on and off all at once by pressing the touchpad Lights On and Lights Off
buttons twice.
5 Devices Displays Devi ces menu. Allo ws you to turn no n-light controlled devices s uch as fans and others on and
off and assign timed device sch edules.
6Energy
(to be developed)
Displays Ener gy menu.
7 Features Displays Features menu. Allows you to turn features such as door chime on and off. Also allows you to
add, delete, or list lights and devices, change schedules, view the event log, and jump between areas (if
used).
8 System Displays System menu. Allows you to run various system tests and adjust the voice siren volume.
9 Scripts
(to be developed)
Displays Scripts menu. Allows you to record and run automatic button-press sequences (scripts). 0 Phone Displays Phone menu. Offers phone test and data communication (downloading) functions.
Cancels current operation, if any. Also returns to the previous or Main menu.
Enter
#
Advent® Home Navigator System
Displays Main menu if system is idle. The Main menu lists all other menus. Also enters or accepts
displayed data or selection and skips to the next selection (if any).
3
System Information
!
$
'
&
#
"
%
5 6
* ;
O F F
S T A Y A W A Y
N O D E L A Y
C H I M E
S T A T U S
B Y P A S S
POLICE
A
B
FIRE
F
E
AUXILIARY
C
D
POLICE
A
B
FIRE
F
E
AUXILIARY
C
D
Using Hand-held Touchpads
If you have a wireless hand-held touchpad (60-597-95),
you can use it as a remote control for the system.
These Hand-held
Touchp ad buttons…
O F F
S T A Y A W A Y
!
N O D E LA Y
"
#
$
C H IM E
&
%
'
S T A T U S
B Y PA S S
* ;
5 6
C O M M A N D
8543219A.DSF
Work like these
Touchpad buttons…
Security
1
Lights
2
Devices
4
Features
System
7
Undo
Phone
*
Access
ControlSilent Arm
3
Energy
65
Scripts
98
Enter
#0
Using Keychain Touchpads
If you have a two- or four-button Keychain Touchpad
(60-607-319.5, 60-606-319.5), your security consultant
has customized it to do designated system actions. You
may find i t useful to write down what the butt ons have
been set up to do.
Action Press this
button(s)…
Arm to Away (default)
_____________________________
Disarm (default) ______________
Press twice to cancel arming protests.
Turn All Lights On/Off (default)
_____________________________
Arm to next higher level (default)
_____________________________
Zone Trip (default)
_____________________________
Auxiliary Panic Alarm (default)
_____________________________
Programmable
_____________________________
8543164A.DSF
COMMAND
Action Touchpad Hand-held
Cancel an accidental alarm
Activate a police panic alarm
Activate a fire panic alarm
Programmable
_____________________________
Not Used
General Operation
G
H
Table 2: Basic System Commands
Touchpad
ACCESS CODE ACCESS CODE #, *, ACCESS CODE
In addition to automatic detection, the system also
responds to display touchpads, Touch-Tone telephones,
wireless touchpads, and other manual controls.
Table 2 shows some basic system commands and the most
common ways to perform them. F or a complet e discussi on
of these, go to the page number listed.
Press this on a…
Keychain
Home Phone See
Touchpad
__________
#, *, 8, 8, 8, 8, 8
optional
__________
#, *, 9, 9, 9, 9, 9
optional
Page
Activate an auxiliary panic
alarm
Disarm to OFF 1, 1,
4
__________
#, *, 7, 7, 7, 7, 7
optional
ACCESS CODE 1, 1, ACCESS CODE #, *, 1, 1, ACCESS CODE
Advent® Home Navigator System

Table 2: Basic System Commands
S
Action Touchpad Hand-held
Touchpad
Arm to HOME 1, 2, ACCESS CODE 1, 2, ACCESS CODE
1, 3,
Arm to AWAY
ACCESS CODE 1, 3, ACCESS CODE #, *, 1, 3, ACCESS CODE
Press this on a…
Keychain
Touchpad
__________
optional
System Information
Home Phone See
#, *, 1, 2,
ACCESS CODE
Page
Arm to AWAY with
Latchkey
Turn all lights ON
ACCESS CODE, 8 1, 3, ACCESS CODE, 8 _________
1, 3,
Press twice
or hold for 2
seconds.
G
4, 0, #, 1
optional
Hold
#, *, 1, 3, ACCESS CODE, 8
#, *, 4, 0, #, 1
Or press 4, 0, #, 1
H
4, 0, #, 2
Hold
#, *, 4, 0, #, 2
Turn all lights OFF
Press twice
or hold.
Or press 4, 0, #, 2
Manually reset smoke
ACCESS CODE 8, 9, ACCESS CODE #, *, 8, 9, ACCESS CODE
8, 9,
sensors
View main menus or cancel
a menu operati on
Enter data
Undo
*
Enter
#
S T A T U S
5 6
B Y P A S
* ;
#, *, *
Check system status 1, 9 1, 9 #, *, 1, 9
Silence trouble beeps
Undo
*
S T A T U S
5 6
#, *, *
Check alarm history 1, 0 1, 0 #, *, 1, 0
Check event history buffer 7, 5 7, 5 #, *, 7, 5
Adjusting the Touchpad Display Brightness
Both alphanumeric touchpad VFD (blue/green) display
character brightness and LCD (yellow) display back-lighting are adjustable.
To change the display character or back-lighting brightness press and hold the touchpad button
least two seconds and then release. Momentarily you will
see it at full brightness then it stays at the next brightness
level setting. Repeat this to the desired setting or to view
each of the five brightness levels from off to bright.
I (TARGET) for at
Adjusting the Volume of Status Messages
You can change the volume of the status voice messages
from the system. There are 9 volume lev els, from 0 (silent)
to 8 (maximum).
To change the status voic e m essage volume:
Steps Response
1. Press 8, 4 (from main menu).
SYSTEM MENU; VOLUME LEVEL IS X.
TO ACCEPT PRESS # OR ENTER A
NEW LEVEL FROM 0-8 THEN PRESS
#
1RWH
Any alarm condition or button press temporarily sets the
display to fu l l brightness.
Advent® Home Navigator System
2. Enter
0 through 8 for
desired loudness and
press #.
VOLUME LEVEL IS NOW SET TO X
5

Global Settings
1RWH
Police and Fire alarm voice messages are optionally at
full volume. Auxiliary and m edical alarms are affected
by status voice volume.
Global Settings
Global system settings specify how the entire system behaves.
Global Access Code
There are two types of codes regarding partitions/areas.
Global access codes can be used in all partitions/areas. All
other access codes belong to the partition/area in which
they were added and cannot be used to control other partitions/areas. When a touchpad is redirected to a new partition/area, any access code used must be valid in that
partition to work.
The partition/area of an access code cannot be changed.
However, the same cod e may be programmed in mo re than
one partition/area, with each instance of the code representing a unique user number. The panel does not allo w
the user to add a duplicate code within a partition/area,
globally, or a user code which is equal to the installer code.
Area Jumping
Normally, an Advent panel has partitions and no areas.
Y our security consultant can turn your partitions into areas
which then allows you to jump between areas using the
alphanumeric touchpad. Only users with global access
codes with primary or full authority can access this.
Every time a jump occurs, a 4-minute timer is started.
When this timer expires, the touchpad jumps back to its
original area automatically . Also, every time the touchpad
becomes inactive, (no menu changes) a shorter, programmable time, (default 10 seconds), starts. When this timer
expires, the touchpad jumps back to its original area automatically.
To jump between areas :
Steps Response
1. Press 7, 7 (from main
menu).
2. Enter your global ACCESS
CODE.
3. Enter the area to redirect the touchpad to.
Global Status and History
If partitions have been turned into areas, the user can also
check for global status and history. Selecting global status
allows the user to view the following:
q Arming status of all enabled areas.
q Whether any alarms are active in any enabled area.
q Whether a battery test, LED test, or download is in
progress.
FEATURES MENU; ENTER YOUR
CODE
ENTER AREA TO REDIRECT TO
THEN PRESS #; OR FOR GLOBAL
STATUS PRESS 19#; OR FOR
GLOBAL HISTORY PRESS 75#
System displays arming
status for that area.
q All current system or area troubles.
q Status of main power, main battery, and main phone
line.
To view global status:
Steps Response
1. Press 7, 7 (from main
menu).
2. Enter your global ACCESS
CODE.
FEATURES MENU; ENTER YOUR
CODE
ENTER AREA TO REDIRECT TO
THEN PRESS #; OR FOR GLOBAL
STATUS PRESS 19#; OR FOR
GLOBAL HISTORY PRESS 75#
3. Press 19, #. System displays the global
status then returns to the
main menu.
Selecting global history allows the user to view the complete contents of the event history buffer, i.e. system
events and events from all areas.
To view global history:
Steps Response
1. Press 7, 7 (from main
menu).
2. Enter your global ACCESS
CODE.
3. Press
75, #. System displays the global
FEATURES MENU; ENTER YOUR
CODE
ENTER AREA TO REDIRECT TO
THEN PRESS #; OR FOR GLOBAL
STATUS PRESS 19#; OR FOR
GLOBAL HISTORY PRESS 75#
history then returns to the
main menu.
Access Codes
The system access codes are used to limit certain system
operations to authorized personnel. Access codes are programmable and are from four to six digits long. The system will indicate if and when an access code is required to
perform any desired function. When
played, enter the access code using the touchpad buttons.
The system automatically has one access code for the primary user in each partition/area. It is the primary access
code. You can change the primary access code, but you
cannot delete it. In addition to this primary access code,
you can create secondary access codes for other users.
1RWH
If you enter access codes with a partition code, all
codes added will work for that partition. If a global code
is used, all codes added will aut om atically be global
codes.
Adding an Access Code
Add an access code to the system whenever you want
other authorized persons to have use of the system.
Guidelines
1. Do not use sequential numbers (1234, 5678, et c.) that
can be easily defeated by unauthorized users.
ENTER YOUR CODE is dis-
6
Advent® Home Navigator System

Access Codes
2. Do not use birthdate/year combinations which others may know.
3. Do not use phone number sequences which others may know.
4. Keep a separate log of all programmed user codes and their user names in a secure location.
To add an access code:
Steps Response
1. Press 1, 8 (from main
menu).
2. Enter your primary ACCESS
CODE.
SECURITY MENU; ENTER YOUR
CODE
ACCESS CODE MENU
3. Press 1. ENTER THE NEW CODE THEN
PRESS #
4. Enter new ACCESS CODE and press #.
5. Enter new
again and press
6. Press
1RWH
No two access co des can be alike. I f you are unsuccessful adding an access code, make sure th e new
access code doesn’t al re ady exist in the system. To
check the existing co des, from the main menu select 1,
8, your
access code
#.
* twice to exit. MAIN MENU
access code, 3.
ENTER THE CODE A SECOND
TIME THEN PRESS #
CODE OK
Deleting an Access Code
Delete an access code when you no longer want that code
to allow access to the system. To ensure maximum security, delete access codes as soon as they are no longer
needed.
1RWH
A partition code cannot view gl obal codes.
To list access codes:
Steps Response
1. Press 1, 8 (from
SECURITY MENU; ENTER YOUR CODE
main menu).
2. Enter your primary
ACCESS CODE.
ACCESS CODE MENU
3. Press 3. USER # CODE XXXX NO TEXT AUTH:X LIM:X
For LIM you can have the
following options:
P = Permanent, D = Day, and
U = Use.
For AUTH, you can have the
following options:
P = Partition, F = Full, or 1-8. If
there is a * the code is a global
code.
4. Press
* twice to exit. MAIN MENU
Changing an Access Code
All access codes are not alike. When you add an access
code, you can give each access code different options.
Using the Access Code menu, you can (and should)
change the options of each new access code to ensure
maximum security.
To ensure maximum security, access codes should be
changed on a regular (monthly) basis.You should also
change an access code if you suspect an unauthorized person knows a user’s access code or if/when a user is
replaced.
To delete an access code:
Steps Response
1. Press 1, 8 (from main menu). SECURITY MENU; ENTER YOUR
CODE
2. Enter your primary ACCESS
CODE.
ACCESS CODE MENU
3. Press 2. ENTER THE CODE TO DELETE
THEN PRESS #
4. Enter the
ACCESS CODE to
CODE DELETED
delete and press #.
5. Press * twice to exit. MAIN MENU
1RWH
If you are unsuccess fu l d elet i ng an access code, make
sure the access code exists in the system. To check the
existing codes, from th e m ai n m enu select 1, 8, your
access code, 3. Also, the system will not let you delete
the primary access code or codes with equal or higher
authorities.
Listing Codes
When listing codes, the panel displays the user number,
code, user text, limits, and authority level.
To change an access code:
Steps Response
1. Press 1, 8 (from main
menu).
2. Enter your primary ACCESS
CODE.
SECURITY MENU; ENTER YOUR
CODE
ACCESS CODE MENU
3. Press 4. ENTER THE CODE TO CHANGE
THEN PRESS #
4. Enter the
change and press #.
5. Enter the new
and press #.
6. Enter the new
ACCESS CODE to
ACCESS CODE
ACCESS CODE
ENTER THE NEW CODE THEN
PRESS #
ENTER THE CODE A SECOND
TIME THEN PRESS #
CODE OK
again and press #.
7. Press
* twice to exit. MAIN MENU
1RWH
No two access codes can be alike. If you are unsuccessful adding an access code, make sure that the new
access code doesn ’t al re ady exist in the system. To
check the existing co des, from the main menu select 1,
access code, and 3.
8, your
Advent® Home Navigator System
7
Access Codes
1RWH
1RWH
Changing an Access Code’s Limits
Use Limit
Select Use Limit when the user will only need to access
the system a limited number of times such as for testing or
service personnel.
To set a Use Limit for new access codes, first add the
access codes to the system, then follow the on-screen
menu.
To set a use limit for an exi st ing access code:
Steps Response
1. Press 1, 8 (from main menu). SECURITY MENU; ENTER YOUR
2. Enter your primary ACCESS
CODE.
3. Press
6. ENTER THE CODE TO CHANGE
4. Enter the ACCESS CODE to
change and press
5. Press
3. ENTER THE NUMBER OF USES
#.
6. Enter the desired number of
uses and press
#.
7. Press * twice to exit. MAIN MENU
When an access code wit h a U s e Li m it expires, it will
automatically be deleted.
Day Limit
Select Day Limit if a user will only need temporary access to the system, such as service personnel.
You can not set both a Day Limi t and a Use Limit for a
single access code.
To set a Day Limit for new access codes, first add the
access code to the system, then follow the touchpad onscreen menu.
To set a day limit for an existing access code:
Steps Response
1. Press 1, 8 (from main menu). SECURITY MENU; ENTER YOUR
2. Enter your primary ACCESS
CODE.
3. Press 6. ENTER THE CODE TO CHANGE
4. Enter the
ACCESS CODE to
change and press #.
5. Press
2. ENTER THE NUMBER OF DAYS
6. Enter the desired number of
days and press
#.
7. Press * twice to exit. MAIN MENU
CODE
ACCESS CODE MENU
THEN PRESS #
CODE IS SET TO XXXXXX
VALID THEN PRESS #
VALID FOR X USES
CODE
ACCESS CODE MENU
THEN PRESS #
CODE IS SET TO XXXXXX
VALID THEN PRESS #
VALID FOR X DAYS
1RWH
“Number of days” means the number of days starting
from today through the last day you want the access
code to work. The acces s code quits working and is
deleted at midnight of the l ast day.
Permanent User
All new access codes are automatically permanent unless
you set a Day/Use Limit. Select Permanent User when yo u
want the access code to work for an unlimited amount of
time or when you want to erase the Day Limit or Use
Limit of an access code.
To reset an access co de t o per m anent:
Steps Response
1. Press 1, 8 (fro m main menu). SECURITY MENU; ENTER
YOUR CODE
2. Enter your primary ACCESS
CODE.
3. Press
4. Enter the
6. ENTER THE CODE TO CHANGE
ACCESS CODE to
ACCESS CODE MENU.
THEN PRESS #
CODE IS SET TO XXXXXX
change and press #.
5. Press
1. CODE SET TO PERMANENT
6. Press * twice to exit. MAIN MENU
Changing Access Code’s Authority
Each access code can have an authority level from 0 (full)
to 8 (limited). A lower number allows the use of more features and gives the user more control. A higher number
prevents the user from using some features. See Authority
Levels for more detailed information.
To set an authority level for new access codes:
Steps Response
1. Press 1, 8 (from main
menu).
2. Enter your primary ACCESS
CODE.
3. Press
4. Enter the new
1. ENTER THE NEW CODE THEN
ACCESS CODE
and press #.
5. Enter the new
ACCESS CODE
again and press #.
6. Press 4. AUTHORITY 1. ENTER AN
7. Enter the desired authority
level and press
#.
8. Press * twice to exit. MAIN MENU
SECURITY MENU; ENTER YOUR
CODE
ACCESS CODE MENU
PRESS #
ENTER THE CODE A SECOND
TIME THEN PRESS #
CODE OK
AUTHORITY NUMBER THEN
PRESS #
CODE SET TO AUTHORITY X
8
Advent® Home Navigator System

Authority Levels
To set an authority level for an exis ting access code:
Steps Response
1. Press 1, 8 (from main menu). SECURITY MENU; ENTER
YOUR CODE
2. Enter your primary ACCESS CODE. ACCESS CODE MENU
3. Press
4. Enter the
5. Enter the desired authority level
7. ENTER CODE TO CHANGE
ACCESS CODE to change
and press
#.
number (0-8) and press #.
THEN PRESS #
AUTHORITY X; ENTER AN
AUTHORITY NUMBER THEN
PRESS #
CODE SET TO AUTHORITY
X
6. Press * twice to exit. MAIN MENU
User Text
Each access code can have up to 20 characters of user text
assigned to it. This text is used when listing codes and
when identifying a user during event printing. User text
uses the same display tokens as static display text (see
T able 3) except that special tokens, such as time, date, and
flashing *, are not allowed.
When using user text you need to enter the whole string before pressing #.
Table 3: Two-Digit Display Descriptors
No. Token Text No. Token Text
00 0 24 H
01 1 25 I
02 2 26 J
03 3 27 K
04 4 28 L
05 5 29 M
05 6 30 N
07 7 31 O
08 8 32 P
09 9 33 Q
10 (undefined) 34 R
11 (undefined) 35 S
12 # (pound) 36 T
13 : (colon) 37 U
14 / (slash) 38 V
15 ? (question mark) 39 W
16 . (period) 40 X
17 A 41 Y
18 B 42 Z
19 C 43 _ (space)
20 D 44 ‘ (apostrophe)
21 E 45 -- (dash)
Table 3: Two-Digit Display Descriptors
No. Token Tex t No. Tok en Text
22 F 46 __ (underline)
23 G 47 * (star)
To change user text:
Steps Response
1. Press 1, 8. SECURITY MENU; ENTER YOUR CODE
2. Enter your primary
ACCESS CODE.
ACCESS CODE MENU
3. Press 0. ENTER THE CODE TO CHANGE THEN
PRESS #
4. Enter the ACCESS CODE
ENTER USER TEXT NUMBERS
to change and press #.
5. Enter the user text
ACCESS CODE MENU
numbers (from Table
3) then press
6. To check that you
typed the correct text
#.
Touchpad displays all listed
codes and their authorities.
press 3 to list codes.
Authority Levels
Each access code has an authority level which determines
the authority the user has to execute certain actions. There
are three pre-defined authorities and eight configurable
authorities.
Installer Authority - Can enter program mode (if partitions/areas are disarmed), gain remote access, do phone
test, do installer zone test, initiate a downloader call,
review status and event his t ory, control lights and de vices,
change installer code, change arming level within one hour
of exiting program mode. Cannot change schedules or
access codes (except own), bypass zones, extend arming
levels, change arming levels except as stated above.
Installer code is permanent.
Primary Authority - Primary user for that partition/area.
There is exactly one primary code per partition/area. This
code is permanent and cannot be restricted. Can do everything except enter program mode, do installer zone test,
initiate a downloader call. Primary codes are permanent.
Full Authority -
except add/delete/change/list codes of equal or higher authority.
Authority 1 to 8 - Configurable authorities. In general,
authority 1 should be the highest of the configurable authorities and authority 8 the lowest.
Authority Level Definitions
The three pre-defined and eight configurable authorities
allow you to carry out a specific set of actions which
require an access code and deny others. Whenever one of
these actions is requested from a touchpad, the panel
prompts you for an access code and determines whether
the entered code has sufficient authority. If not, the panel
responds with
Can do everything the primary user can do
INVALID AUTHORITY.
Advent® Home Navigator System
9
 Loading...