

Page 1

$GYHQW&RPPHUFLDO
)LUH6\VWHP
Document Number: 466-1705 Rev. B
November 2001
ITI Part No. 60-562 -03
60-562-06
User’s Manual
System Information ............................................................3
Using the Touchpad Buttons .......................................3
General Operation .......................................................4
Using Systems with Keyswitches ...............................4
Global Settings ................................................ ...................4
Partitions ................................................................ 4
Areas ...................................................................... 4
Global Access Code ....................................... ...... .......5
Area Jumping ................................................. .............5
Global Status and History ...........................................5
Access Codes .................................. ..... ..............................5
Adding Access Codes .............................. ...................5
Access Code Guidelines ........................................5
Deleting an Access Code ............................................6
Listing Codes ..............................................................6
Changing an Access Code ..........................................6
Access Code Options ..................................................6
Permanent User ......................................................7
Day Limit ............................................ ...... .............7
Use Limit ...............................................................7
Authority Levels ....................................................7
Authority Level Definitions ........................................7
Alarms ................................................................................ 9
Manually Activating Alarms ......................................9
Acknowledging Alarms ..............................................9
Silencing Alarms .........................................................9
Preventing Accidental Alarms ....................................9
Tips for Avoiding Accidental Alarms ....................9
Manually Resetting Smoke Detectors ................................9
Adjusting the Volume of Voice Messages ..........................9
Testing the System ...........................................................10
Automatic T est Features ...........................................10
T es ting the System Manually ................................... .10
Testing the Phone Communication to the
Monitoring Service ..............................................10
Testing Devices ....................................................10
Equipment/Sensor Tampering ...................................10
Cleaning the System Components ...................................10
System Status ...................................................................10
Checking the System Status ......................................10
Silencing Trouble Beeps .......................................... .11
Checking the Alarm History .....................................11
Viewing the History Buffer ....................................... 11
Fire Drill ...........................................................................11
Appendix A: Planning for Emergencies ..........................12
Guidelines .................................................................12
Floor Plan Example ..................................................12
Your Floor Plan .........................................................12
Page 2

FCC Notices
FCC Part 15 Information to the User
Changes or modifications not expressly approved by Interlogix Inc. can void the user’s authority to operate the equipment.
FCC Part 15 Class A
This equipment has been tested and foun d to comp ly with the limits for a class A digi ta l devic e , pursua n t to pa rt 1 5 of the FCC rules. These
limits are designed to provide reas onable pro tection against harmful interference wh en the equipm ent is opera ted in a commercia l environment.
This equipment generates, uses, and can radiate radio frequency energy and, if not installed and used in accordance with the instruction manual, may cause harmful interference to radio communications. Operation of this equipment in a residential area is likely to cause harmful
interference in which case users will be requi r ed to correct the interference at their own expense.
FCC Part 68
This equipment complies with Part 68 of the FCC Rules. Located on this equipment is a label that contains, among other information, the
FCC registration number and the ringer equivalence number (REN) for this equipment. If requested, this information must be provided to the
telephone company.
The REN is used to determine the m aximu m num ber of devi ces that ma y b e conn ected to y our t eleph one l ine. In mo st areas, th e sum of all
device RENs should not exceed five (5.0).
If this equipment c auses harm to the teleph one networ k, the telep hone compa ny may tempor arily disconnect yo ur servic e. If possible, you
will be notified i n adva nce . Whe n ad va nce noti ce is no t p ract ical , y ou w ill be no tif ied as so on as possi ble . You will also be advised of your
right to file a complaint with the FCC.
Your t elepho ne compa ny may make ch anges in its facilitie s, equ ipment, operation s, or procedures that could a ffect the proper op eration of
your equipment. You will be given advanced notice in order to maintain uninterrupted service.
If you experience troub le with this equipment, pl ease contact t he company that instal led the equipm ent for servic e and repair information.
The telephone company may ask you to disconnect this equipment from the network until the problem has been corrected or you are sure
that the equipment is not malfunctioning.
This equipment may not be used on coin service provided by the telephone company. Connection to party lines is subject to state tariffs.
2266 Second Street North | North Saint Paul Mn | 55109 | 800-777-2624 | www.itii.com | www.interlogixsecurity.com
©2001 Interlogix,™ Inc. Interlogix is a trademark of Interlogi x, Inc. ITI and Advent a re registered trademark s of Interlogix, Inc.
Page 3
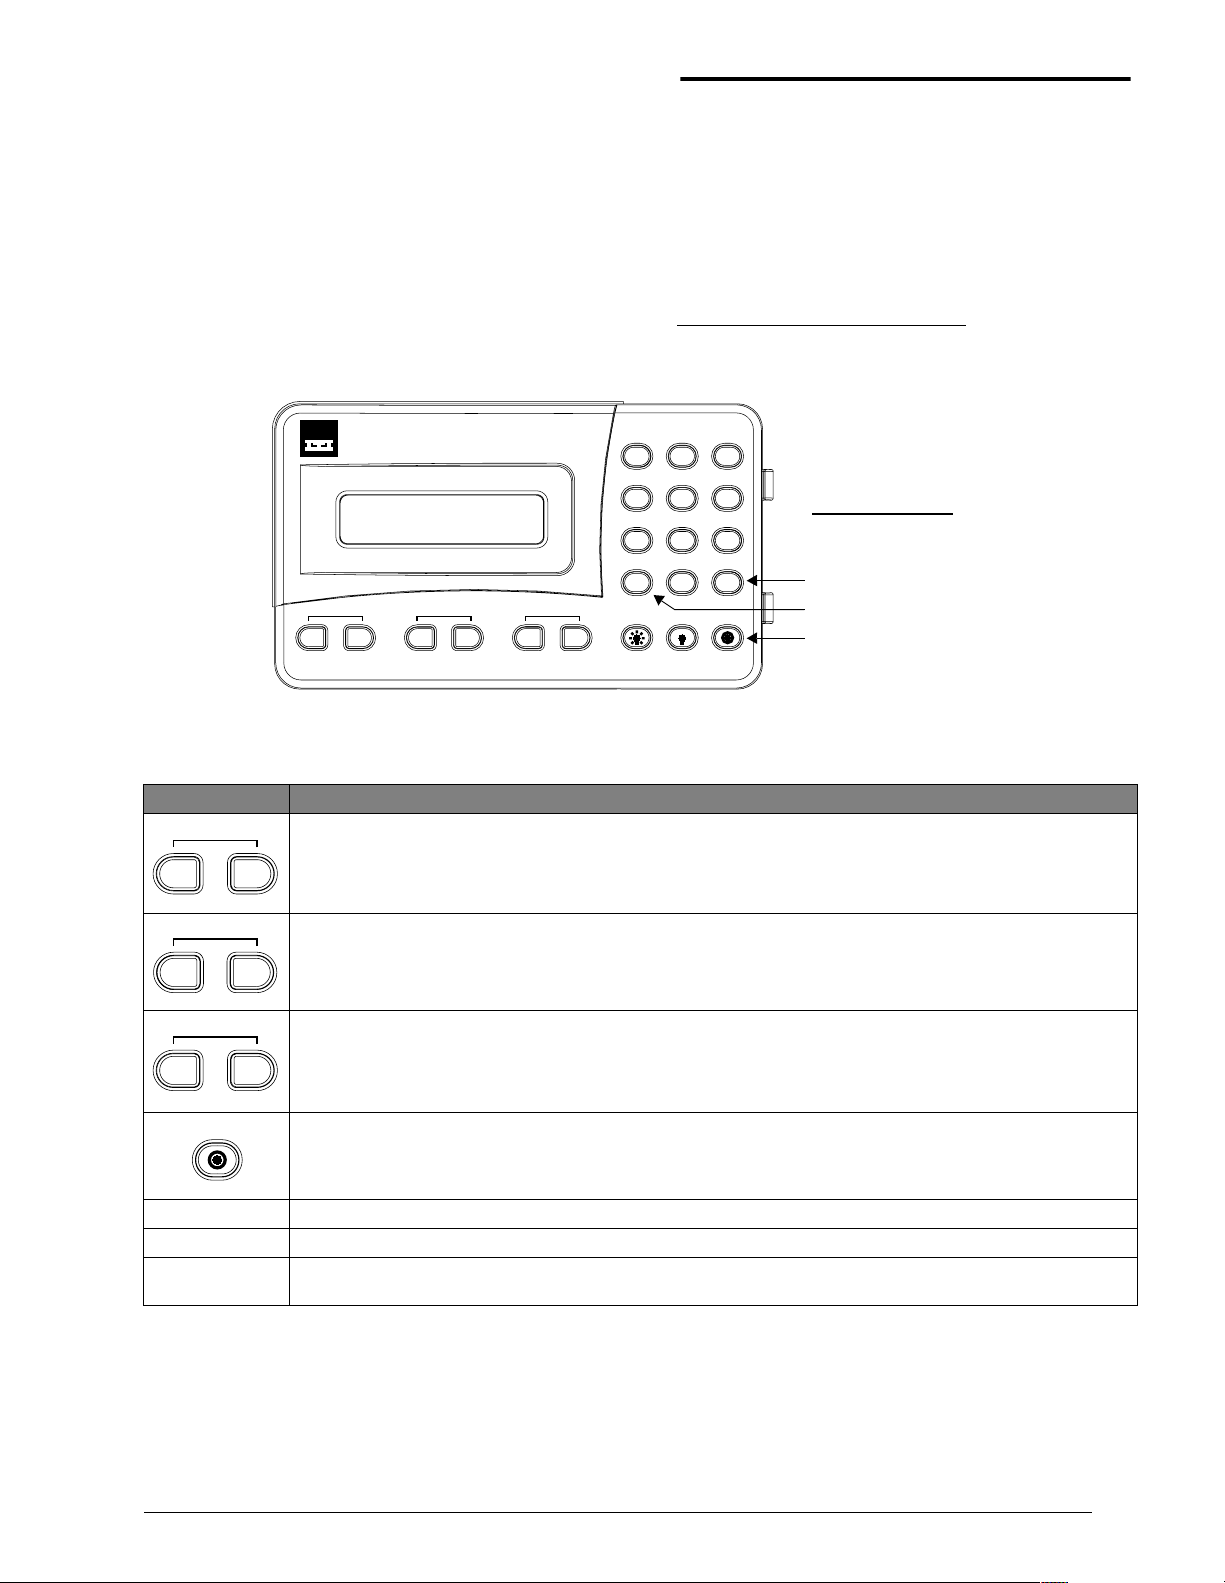
System Information
B
A
ACKNOWLEDGE
SILENCE
F
E
DRILL
Reset
I
Your system is typically made up of a main control p anel,
one or more display touchpads, and initiating and notification devices such as pull stations, smoke detectors, sirens,
horns, speakers, and strobe lights.
The system may optionally include security an d co ntro l features in addition to fire detection annunciation, if allowed
by the fire authorities in your area.
This manual covers only the fire detection and annunciation
features of your system. Please refer to the “Advent Com-
Security
Automation
Fire Protection
Access Control
System Information
*
mercial System” users manual
for information regarding
the security and control functions.
Using the Touchpad Buttons
The touchpad is the primary way to manually operate the
fire system. Below is a description of the touchpad buttons
and what they do.
*) Included with your system.
23
1
65
98
EnterUndo
#0
Reset
IH
ACKNOWLEDGE
A
Dual Buttons - Press both Buttons to Activate
C
B
DRILLSILENCE
ED
Hold 2 Seconds
F
4
7
*
G
Advent Fire System - Test Weekly
Figure 1. Touchpad Buttons
Table 1: Touchpad Button Descriptions
Button Description
Acknowledges/cancels an existing alarm and turns off all sirens, horns, strobes, etc. Sends “Alarm
Acknowledged” report to central monitoring station.
Silences all sounding horns and si rens. Strobe lights (if any) remain flash ing. Alarm is not ca nceled and alarm
reporting to central monitoring station continues. Sirens may restart after a pre-programmed delay (option).
Causes fire drill alarm when both buttons are pressed and held for 2 seconds. Sends “Fire Test” report to central
monitoring station.
Located Behind Door
Main Menu or Accept
Previous Menu or Quit
Reset Smoke Detectors
1 Security Displays Security menu. Lets you do access code functions and check alarm history.
7 Features Displays Features menu. Lets you view the event log.
8 System
Advent™ Commercial Fire System
Resets hardwired smoke detectors.
Displays System menu. Lets you run various system tests, adjust the status volume, and enter the program
mode of operation for setting up the system.
1
Page 4
Global Settings
Undo
Enter
#
Table 1: Touchpad Button Descriptions (Continued)
Button Description
0 Phone Displays Phone menu. Offers phone test and data communication functions.
Cancels current operation, if any. Also returns to the previous or Main menu.
Displays Main menu if system is idle. The Main menu lists all other menus. The # button also enters or accepts
displayed data or selection and skips to the next selection (if any).
General Operation
This system interface is menu-driven an d s elf-p rom pting. It
will automatically request access codes and data if required.
The two main buttons used for “moving around” the menus
Table 2: Basic System Commands
Action Steps
1. Turn the access keyswitch (if any) on.
Silence an Alarm
Acknowledge an Alarm
Manually Reset Smoke Detectors
View Main Menus or Exit a Menu Press the (
Enter Displayed Data or Menu Selection Press the (
Check System Status Press
Do Fire Drill
Silence Trouble Beeps Press the (
Check Alarm History Press
Check Event History Buffer Press
2. Press both
3. Enter your
4. Turn off access keyswitch (if any).
1. Turn the access keyswitch (if any) on.
2. Press both
3. Enter your
4. Turn off access keyswitch (if any).
1. Turn the access keyswitch (if any) on.
2. Press
3. Enter your
4. Turn off access keyswitch (if any).
1, 9 (from main menu). 6
1. Turn the access keyswitch (if any) on.
2. Press and hold both
3. Enter your
4. Turn off access keyswitch (if any).
1, 0 (from main menu ). 7
7, 5 (from main menu ). 7
are the # (Enter) and * (Undo) buttons. Table 2 shows some
basic system commands and the most common ways to perform them. For a complete description of these commands,
go to the page number listed.
SILENCE buttons.
ACCESS CODE, if prompted.
ACKNOWLEDGE buttons.
ACCESS CODE, if prompted.
RESET button.
ACCESS CODE, if prompted.
*) UNDO button. -
#) ENTER button. -
DRILL buttons for 2 seconds.
ACCESS CODE, if prompted.
*) UNDO button. 7
See
page
5
5
5
7
Using Systems with Keyswitches
If a keyswitch is installed with the fire touchpad(s), an
access code is not needed to utilize the touchpad
EDGE, SILENCE, DRILL, and RESET control buttons.
ACKNOWL-
Global Settings
Global system settings specify how the entire system
behaves.
Partitions
The system can be set up by your security consultant to
operate as a multi-partition system. This way the same sys-
2
tem can be used to protect separate areas such as multi-tenant office buildings, with each area having its own
touchpad, sensors, sirens and so forth. Your system can
operate with up to four or eight (depending on model) separate partitions.
Areas
Choose whether or not to treat partitions as areas. If treated
as areas:
❑ Zones, touchpads, programming options, etc., belong
to areas instead of partitions.
❑ Users may “jump” from one area to another area using
an alphanumeric touchpad.
Advent™ Commercial Fire System
Page 5

Access Codes
❑ The word “partition” will be changed to “area” wher-
ever it is spoken, displayed, or printed.
Global Access Code
There are two types of codes regarding partitions/areas.
Global access codes can be used in all partitions/areas. All
other access codes belong to the partition/area in which they
were added and cannot be used to control other partitions/
areas. When a touchpad is redirected to a new area, any
access code used must be valid in that area to work.
The partition/area of an access code cannot be changed.
However, the same c ode may be programmed in more than
one partition/area, with each instance of the code representing a unique user number . The panel does not allow the user
to add a duplicate code within a partition/area, globally, or a
user code which is equal to the installer code.
Note
If a partition access code is used t o ent er th e Access
Code Menu, all new code s ar e f or tha t partit ion. If a gl obal access code is used , all new codes will be global.
Area Jumping
Normally , an Advent panel h as parti tions and no ar eas. Your
security consultant can turn your partitions into areas which
then allows you to jump between areas using the alphanumeric touchpad. Only users with global access codes with
primary, or full authority can access this.
Every time a jump occurs, a 4-minute time is started . When
this timer expires, the touchpad jumps back to its original
area automatically. Also, every time the touchpad becomes
inactive, (no menu changes) a shorter, programmable time,
(default 10 seconds), starts. When this timer expires, the
touchpad jumps back to its original area automatically.
If the touchpad is redirected to its original area, no timers
are started because the touchpad is already where it belongs .
To jump between areas:
Steps Response
1. Press 7, 7 (from main
menu).
2. Enter your global
ACCESS CODE.
3. Enter the area to redirect the touchpad to.
FEATURES MENU; ENTER YOUR CODE
ENTER AREA TO REDIRECT TO THEN
PRESS #; OR FOR GLOBAL STATUS
PRESS 19#; OR FOR GLOBAL HISTORY
PRESS 75#
System displays arming status for
that area.
To view global status:
Steps Response
1. Press 7, 7 (from main
FEATURES MENU; ENTER YOUR CODE
menu).
2. Enter your global
ACCESS CODE.
ENTER AREA TO REDIRECT TO THEN
PRESS #; OR FOR GLOBAL STATUS
PRESS 19 #; OR FOR GLOBAL HISTORY
PRESS 75 #
3. Press 19, #. System displ ays the global status
then returns to the main menu.
Selecting global history allows the user to view the complete contents of the event history buffer, i.e. system events
and events from all areas.
To view global history:
Steps Response
1. Press 7, 7 (from main
FEATURES MENU; ENTER YOUR CODE
menu).
2. Enter your global
ACCESS CODE.
ENTER AREA TO REDIRECT TO THEN
PRESS #; OR FOR GLOBAL STATUS
PRESS 19 #; OR FOR GLOBAL HISTORY
PRESS 75 #
3. Press 75, #. System displays the global hi story
then returns to the main menu.
Access Codes
Access codes are numbers that you must enter from a touch pad to operate or make changes to the system. They are
used to limit certain system operations to authorized personnel. Access codes are programmable and can be from
four to six digits long. The system will indicate if and when
an access code is required to perform any desired function.
ENTER YOUR CODE is displayed, enter the access code
When
using the touchpad buttons located behind the touchpad
door.
The system automatically has one access code in each partition/area for the primary user. It is the primary access code.
You can change the primary access code, but you cannot
delete it. In addition to this primary access code you can
create secondary access codes for other users.
Adding Access Codes
Add an access code to the system whenever you want to
give other authorized personnel use of the system.
Global Status and History
If partitions have been turned into areas, the user can also
check for global status and history. Selecting global status
allows the user to view the following:
❑ Whether any alarms are active in any enabled area.
❑ Whether a battery test, LED test, or download is in
progress.
❑ All current system or area troubles.
❑ Status of main power and main battery.
Advent™ Commercial Fire System
Access Code Guidelines
❑ Do not use sequential numbers (1234, 5678, etc.) that
can be easily defeated by unauthorized users.
❑ Do not use birthdate/year combinations which others
may know.
❑ Do not use phone number s e quen ces which others may
know.
❑ Keep a separate log of all programmed user codes and
their user names in a secured location.
3
Page 6

Access Codes
To add an access code:
Steps Response
1. Press 1, 8 (from
SECURITY MENU; ENTER YOUR CODE
main menu).
2. Enter your prim a r y
ACCESS CODE.
ACCESS CODE MENU
3. Press 1. ENTER THE NEW CODE THEN PRESS #
4. Enter new
CODE and press #.
5. Enter new
CODE again, press #.
ACCESS
ACCESS
ENTER THE CODE A SECOND TIME THEN
PRESS #
CODE OK
6. Press * twice to exit.
Note
No two access codes can be alike. If you are unsuccessful adding an access code, m ake sure the new access
code doesn’t already ex is t in t he system. To check the
existing codes, from the ma in me nu select 1, 8, your
access code, and 3.
Deleting an Access Code
Delete an access code when you no longer want that code to
allow access to the system. To ensure maximum security,
delete access codes as soon as they are no longer needed.
To delete an access code:
Steps Response
1. Press 1, 8 (from main menu). SECURITY MENU; ENTER
YOUR CODE
2. Enter your primary ACCESS CODE. ACCESS CODE MENU
3. Press 2. ENTER THE CODE TO
DELETE THEN PRESS #
4. Enter the
and press
ACCESS CODE to delete
#.
CODE DELETED
5. Press * twice to exit.
Note
If you are unsuccessful del et ing an access code, make
sure the access code exi sts in the system. To check the
existing codes, from the main menu select 1, 8, your
access code, and 3. Also, the system will not let you
delete the primary access code.
Listing Codes
When listing codes, the panel displays the user number,
code, user text, limits, and authority level.
Note
A partition code cannot view glo bal codes.
To list access codes:
Steps Response
1. Press 1, 8 (from
SECURITY MENU; ENTER YOUR CODE
main menu).
2. Enter your pri-
ACCESS CODE MENU
mary ACCESS CODE.
3. Press 3. USER # CODE XXXX NO TEXT AUTH:X LIM:X
For LIM you can have the fol l o w ing
options:
P = Permanent, D = Day, and
U = Use.
For AUTH, you can have the following
options:
P = Partition, F = Full, or 1-8. If there
is a * the code is a global code.
4. Press
* twice to
MAIN MENU
exit.
Changing an Access Code
To ensure maximum security, access codes should be
changed on a regular (monthly) basis. You should also
change an access code if you suspect an unauthorized person knows a user’s access code or if/when a user
is replaced.
To change an access code:
Steps Response
1. Press
2. Enter your primary
3. Press 4. ENTER THE CODE TO CHANGE THEN
4. Enter the
5. Enter the new
6. Enter the new
7. Press * twice to exit.
1, 8 (from main
SECURITY MENU; ENTER YOUR CODE
menu).
ACCESS CODE.
ACCESS CODE
to change and press
ACCESS
CODE and press #.
ACCESS
CODE again and press
ACCESS CODE MENU
PRESS #
ENTER THE NEW CODE THEN PRESS #
#.
ENTER THE CODE A SECOND TIME
THEN PRESS #
CODE OK
#.
Note
No two access codes can be alike. If you are unsucc essful changing an access code, make sure the new access
code doesn’t already exist in the system. To check the
existing codes, from the main menu select 1, 8, your
access code, and 3.
Access Code Options
When you add an access code, you can give each access
code different options.
❑ Permanent User
❑ Day Limit
❑ Use Limit
❑ Authority Levels
4
Advent™ Commercial Fire System
Page 7

Access Codes
Permanent User
All new access codes are automatically permanent unless
you set a Day/Use Limit on it. Select Permanent User when
you want to erase the Day Limit or Use Limit of an access
code.
T o create a n ew perm anent u ser access co de, ad d the access
code to the system as described in “Addi ng Acc ess Codes .”
To reset an access code to permanent:
Steps Response
1. Press
2. Enter your prim a r y ACCESS
1, 8 (from main menu). SECURITY MENU; ENTER YOUR
CODE
ACCESS CODE MENU
CODE.
3. Press 6. ENTER THE CODE TO CHANGE
THEN PRESS #
4. Enter the
change and press
5. Press
ACCESS CODE to
#.
1. CODE SET TO PERMANENT
Day Limit
Select Day Limit if a user will only need temporary access
to the system, such as service personnel.
Note
You can not set both a Day Limit and a Use Limit for a
single access code.
T o set a Day L imit for new access codes, first add the access
code to the system, then follow the touchpad on-screen
menu.
To set a day limit for an existing ac cess code:
Steps Response
1. Press 1, 8 (from main menu). SECURITY MENU; ENTER YOUR
CODE
2. Enter your primary ACCESS
CODE.
ACCESS CODE MENU
3. Press 6. ENTER THE CODE TO CHANGE
THEN PRESS #
4. Enter the
ACCESS CODE to
change and press #.
5. Press
6. Enter the desi re d number of
2. ENTER THE NUMBER OF DAYS
VALID THEN PRESS #
days and press
Note
“Number of da ys” means the num ber of days st art ing wit h
today through the last day you want the access code to
work. The access code qui ts wor king at midnight of the
last day.
#.
VALID FOR X DAYS
Use Limit
Select Use Limit when the user will only need to access the
system a limited number of times, such as for testing the
system.
T o set a Use Limit for new access codes, first add the access
code to the system, then follow the on-screen menu.
To set a use limit for an existing ac cess code:
Steps Response
1. Press
2. Enter your pr imary ACCESS
1, 8 (from main menu). SECURITY MENU; ENTER
YOUR CODE
ACCESS CODE MENU
CODE.
3. Press 6. ENTER THE CODE TO
CHANGE THEN PRESS #
4. Enter the
change and press
ACCESS CODE to
#.
5. Press 3. ENTER THE NUMBER OF
USES THEN PRESS #
6. Enter the desired number of
uses and press
Note
When an access code wit h a U se Limit expires, it will
automatically be deleted.
#.
VALID FOR X USES
Authority Levels
Each access code has an authority level which determines
the authority the user has to execute certain actions. There
are three pre-defined authorities and eight configurable
authorities.
Installer Authority - Can enter program mode (if partitions/areas are disarmed), gain remote access, do phone test,
do installer zone test, initiate a downloader call, review status and event history, control lights and devices, change
installer code, change arming level within one hour of exiting program mode. Cannot change schedules or access
codes (except own), bypass zones, extend arming levels,
change arming levels except as stated above. Installer code
is permanent.
Primary Authority - Primary user for that partition/area.
There is exactly one primary code per partition/area. This
code is permanent and cannot be restricted. Can do everything except enter program mode, do installer zone test, initiate a downloader call. Primary codes are permanent.
Full Authority -
Can do everything the primary user can do
except add/delete/change/list codes of equal or higher authority.
Authority 1 to 8 - Configurable authorities. In general,
authority 1 should be the highest of the configurable authorities
and authority 8 the lowest.
Authority Level Definitions
The three pre-defined and eight configurable authorities
allow you to carry out a specific set of actions which require
an access code and deny others. Whenever one of these
actions is requested from a t ouchpad, the p anel prompts you
for an access code and determines whether the entered code
has sufficient authority. If not, the panel responds with
INVALID AUTHORITY.
When using a keyswitch to request an arming level change,
no access code is needed and the action is associated with a
zone, not a user.
Advent™ Commercial Fire System
5
Page 8

Access Codes
Table 3 list actions and whether they are allowed or disallowed for each of the eleven authorities.
Table 3: Authority Level Actions
Auth # Parameter
I P F 1 2 3 4 5 6 7 8
Authority Level
10Remote Phone Access Y Y Y CYCNCNCNCNCNCNCN
11Arm to Level 1* X Y Y CYCYCYCYCYCYCNCN
12 Arm to Level 2 X Y Y CY CY CY CY CY CY CN CN
13 Arm to Level 3 X Y Y CY CY CY CY CY CY CN CN
14 Arm to Level 4 X Y Y CY CY CY CY CY CY CN CN
15 Arm to Level 5 N Y Y CY CY CY CY CY CY CN CN
18 Bypass Zones N Y Y CY CY CY CN CN CN CN CN
19 Bypass Critical Zones N Y Y CN CN CN CN CN CN CN CN
20User Zone Test N Y Y CNCNCNCNCNCNCNCN
21Phone Test Y Y Y CNCNCNCNCNCNCNCN
22 Program Schedules N Y Y CY CN CN CN CN CN CN CN
Program Mode Y*NNNNNNNNNN
Installer Zone Test Y$NNNNNNNNNN
Initiate Downloader Call Y N N N N N N N N N N
Program Access Codes Y#Y#Y#NNNNNN NN
Reset Smoke Power YYYNNNNNNNN
Change Latchkey Time YYYNNNNNNNN
Initiate Fire Test Y Y Y N N N N N N N N
Initiate LED Test Y Y N N N N N N N N N
Jump Areas NY&Y&NNNNNNNN
Control Lights YYYYYYYYYYY
Control Devices YYYYYYYYYYY
(I = Installer, P = Primary, F = Full)
Y = Yes.
N = No.
X = Within one hour of exiting program mode.
CY = Configurable, defaulted to Yes.
CN = Configurable, defaulted to No.
* = All partitions/areas must be disarmed for installer to enter program mode.
$ = Partition/area must be disarmed for installer to enter installer zone test.
# = Allowed actions in access c ode menu depen d on authority of user.
& = Must be a global code.
6
Advent™ Commercial Fire System
Page 9

Alarms
To change an authority le ve l f or an existing access code:
Steps Response
1. Press
2. Enter your prim a r y ACCESS CODE. ACCESS CODE MENU
3. Press 7. ENTER THE CODE TO
4. Enter the
5. Enter the desired authority num-
1, 8 (from main menu). SECURITY MENU; ENTER
YOUR CODE
CHANGE #
and press
ber (0-8) and press #.
ACCESS CODE to change
#.
ENTER AN AUTHORITY
NUMBER THEN PRESS #
CODE SET TO AUTHORITY X
Alarms
Emergency alarms notify building occupants and the monitoring service in case of an em erg ency. Although alarms are
automatically activated by system sensors, you can also
manually activate alarms.
Manually Activating Alarms
Manually activate an alarm during a fire emergency. Activating a fire alarm triggers both indoor and outdoor sirens
and/or horns (and strobes, if any). The monitoring service
responds by dispatching t he fire depar tment.
To manually activate an al ar m :
You will hear this
Steps
Activate a manual pull station. - - - - - - - - -
Sirens and/or horns (and strobes if any) activate and a report
will be sent to the monitoring service.
Acknowledging Alarms
Acknowledging an alarm turns off the sirens and strobes. It
is used only after everything has been checked and cleared.
Smoke detectors are automatically reset when an alarm is
acknowledged. Acknowledging an alarm should only
done by an authorized person.
To acknowledge an alarm:
Steps Response
1. Turn the access keyswitch on, (if applicable).
2. Press both
3. Enter your
prompted.
4. Turn the access keyswitch off, (if applicable).
ACKNOWLEDGE buttons. Sirens/strobes stop
ACCESS CODE if
ON-OFF pattern
(From sirens)
be
or ENTER YOUR CODE.
Sirens/strobes stop.
Flashing strobes (if any) remain flashing. The alarm is not
canceled and alarm reporting continues
to the monitoring
service. The sirens may or may not automatically restart
depending on installation requirements.
To silence an alarm:
Steps Response
1. Turn the access keyswitch on, (if applicable).
2. Press both
3. Enter your ACCESS CODE if prompted.
4. Turn the access keyswitch off, (if applicable).
SILENCE buttons. Sirens/horns stop sounding
ENTER YOUR CODE.
or
Sirens/horns stop sounding.
Preventing Accidental Alarms
This section describes how to avoid the surprise and annoyance of accidental alarms.
Tips for Avoiding Accidental Alarms
❑ Become familiar with all system devices and how they
operate.
❑ Check the location of your smoke detectors. Keep in
mind that smoke detectors can be activated by some
steam, dust, and gases.
Manually Resetting Smoke Detectors
Manually resetting a smoke detector following a test or
alarm resets tripped detectors. This procedure is rarely
needed because smoke detectors are automatically reset
when an alarm is acknowledged. Do not reset smoke detectors until the location of the activated detector is determined
and the smoke source is eliminated.
To manually reset tripped smoke detec tors:
Steps Response
1. Turn the access keyswitch on, (if applicable).
2. Open the touchpad door
and press the
get) button.
3. Enter your
if prompted.
4. Turn the access keyswitch off, (if applicable).
RESET (tar-
ACCESS CODE
Tripped detectors are reset
(unless you are required to
enter your access code first).
Tripped detectors are reset.
Adjusting the Volume of Voice Messages
Silencing Alarms
Silencing an alarm turns off horns and sirens. This makes
voice or radio communication easier during an emergency.
Advent™ Commercial Fire System
You can change the volume of the voice status messages
from the system. There are 9 volume levels, from 0 (silent)
to 8 (maximum).
7
Page 10

Testing the System
To change voice status message volume:
Steps Response
1. Press 8, 4 (from
main menu).
2. Enter 0-8 for desired
SYSTEM MENU, VOLUME LEVEL IS X
(present level). TO ACCEPT PRESS #
OR ENTER A NEW LEVEL FROM 0-8
THEN PRESS #
VOLUME LEVEL IS NOW SET TO X
loudness and press #.
Note
Alarms are always at maximum volume.
Testing the System
Test your system weekly to verify that detected sensors,
sirens, and phone communications are all working correctly.
Automatic Test Features
The system automatically tests and reports any problems
with the following parts of the system:
❑ battery—The system automatically tests the backup
battery(s) voltage and notifies you if it is low.
❑ phone—Depending on your system configuration and
programming, the system may automatically test the
phone connection to the monitoring service once per
day.
❑ phone line—The system automatically tests the line
voltage.
Testing the System Manually
You may also test the system manually when desired.
Testing the Phone Communication to the Monitoring Service
T est the pho ne communication s after any phon e line/system
repairs or change in your service such as a change in area
code or prefix.
To test phone operation:
Steps Response
1. Press
2. Enter your pr imar y ACCESS CODE. PHONE TEST ON
3. Wait for acknowledgment indica-
0, 1 (from main menu). PHONE MENU; ENTER YOUR
CODE
The system should
tion.
report PHONE TEST OK
To test devices:
Steps Response
1. Press 8, 1 (from main
SYSTEM MENU; ENTER YOUR CODE
menu).
2. Enter your primary
ACCESS CODE.
3. Activate the desired device(s).
ZONE TEST ON
The system should report ZONE #
GOOD for each device actuated.
4. Press 8, 2. Shows zones tested.
5. Press
6. Press
8, 3. Shows zones not tested.
1,1 and (enter your
ACCESS CODE if needed)
(PARTITION NAME) SECURITY IS
OFF
to end zone t est.
Note
If not ended manually, zone test will automatically time
out after 30 minutes. If you need mo re tim e r epeat the
zone test.
Equipment/Sensor Tampering
Tampering with system equipment, sensors, etc. (for example, opening enclosures), results in a TAMPER TROUBLE indication and/or an alarm.
Replace any open system enclosures or sensor covers and
clear the tamper indication.
To clear a tamper/alarm indication:
Steps Response
To clear a trouble indication,
press *.
or
To clear an alarm, enter your
ACCESS CODE.
SECURITY MENU; SECURITY IS OFF
If any covers are still open, the trouble beeps will start again
in 4 hours. T he display conti nues displaying a flashing *
until the trouble is fixed.
Cleaning the System Components
You should clean your system at least once per year, or as
needed. Use a damp, warm rag and a mild, non-abrasive,
water-based cleaning solution to clean all touchpads, panels, sensors, and pull stations.
System Status
Testing Devices
A zone test allows you to activate any alarm triggering
device and verify its correct operation without
causing an
alarm.
Note
All fire protection is disabled du ring zone test.
8
Checking the System Status
Check the system status when yo u want to know the cur rent
status of the system and any current problems.
To check the system st at us:
Steps Response
1. Press
2. Press
1, 9 (from main menu). SECURITY MENU; SYSTEM
STATUS .........
UNDO (*) to quit. GOODBYE
Advent™ Commercial Fire System
Page 11

Fire Drill
Silencing Trouble Beeps
Silence trouble beeps if there is a system problem and you
have already notified your system consultant.
To silence trouble beeps:
Steps Response
Press the
indicated trouble to temporarily silence
UNDO (*) button once for each
Trouble beeps stop
temporarily.
trouble beeps.
Note
The trouble beeps stop temporarily, but the problem is
not fixed. Beeps restart every four hour s.
Checking the Alarm History
Checking the alarm history lets you know which and how
many alarms have been logged into memory. There can be a
maximum of 16 alarms stored in the alarm history. These
are listed from the newest alarm to the old est alarm with the
oldest being automatically deleted when a new alarm is
logged. A flashing * notifies you when there have been any
new alarms. The system reports the following information
about the last alarms:
❑ the alarm type
❑ which sensor activated the alarm
❑ the date and time the alarm happened
Note
Y ou may pr ess # whi le al arm s are ac tive t o scr oll throu gh
(view) all of them or you can ca ncel any active alarms
before checking the alarm history.
To check the alarm history:
Steps Response
1. Press
2. Press UNDO (*) to quit. GOODBYE
1, 0 (from main menu). SECURITY MENU; CHECK ALARM
HISTORY
❑ each sensor that was activated and at what time/date
❑ each time an access code was entered
❑ many others, including troubles
To view the history buffer:
Steps Response
1. Press
7, 5 (from main menu). FEATURES MENU; VIEW
HISTORY BUFFER
2. Press UNDO (*) to quit. GOODBYE
Fire Drill
Conducting a fire drill will trigger sirens and/or horns (and
strobes, if any), and a “Fire Test” report will be sent to the
monitoring service. Once you have completed the fire drill,
you must Acknowledge the alarm to turn off the sirens and
strobes (see page 5).
Note
Be sure to notify the monitoring service before and after
every fire drill.
To perform a fire drill:
Steps Response
1. Turn the access keyswitch on, (if applicable).
2. Press and hold both
DRILL buttons
for 2 seconds.
3. Enter your
ACCESS CODE if
prompted.
4. Turn the access keyswitch off, (if applicable).
Fire Test is indicated
or ENTER YOUR CODE.
Fire Test is indicated.
Viewing the History Buffer
Viewing the history buffer allows you to learn the systems
history of events. It gives a detailed report of every event
including:
Advent™ Commercial Fire System
9
Page 12

Appendix A: Planning for Emergencies
:$51,1*
!
Appendix A:
Planning for Emergencies
Develop a plan to prepare fo r emerge ncy situations. Discus s
and rehearse your plan with everyone by doing a fire drill
every few months.
Emphasize that no one should enter if they he ar
sirens.
Guidelines
❑ Understand how to use your fire system.
❑ Know the normal state of doors and windows: open,
closed, or locked.
❑ Escape fast! (Do not stop to pack.)
Office
Stairwell
Office
Lobby
Office
Hall
Office
Hall
❑ Use a different escape route if closed doors feel hot to
the touch.
❑ Crawl and hold your breath as much as possible to help
reduce smoke inhalation during your escape.
❑ Meet at a designated outdoor location.
❑ Emphasize that no one should return to the premises if
there is a fire.
❑ Notify fire department from a phone in another build-
ing.
Floor Plan Example
Below is an example of a floor plan. Use it as an example to
draw your floor plan on the next page and plan your escape
routes.
A smoke detector should
be located on each level.
H
Office
Office
Office
Stairwell
NOTE: Ceiling-mounted smoke detectors should be located in the center of the room
or hall, or not less than 4 inches from the wall. When the detector is mounted
on the wall, the top of the detector should be 4 to 12 inches from the ceiling.
NOTE: Do not install smoke detectors where normal ambient temperatures are above
100°F or below 40°F. Also, do not locate detectors in front of AC/ Heat
registers or other locations where normal air circulation will keep smoke
from entering the detector.
Required smoke detector
Mens
Ladies
Elevator
Closet
Your Floor Plan
When establishing your escape routes, consider the following guidelines:
❑ Have a drawing for each building level.
Office
Hall
Conference Room
Office
A smoke detector should
be located in each room.
❑ Show all exits (two exits per room are recommended).
❑ Show the location of stairwells and fire escapes.
❑ Show the location of all components of the fire system.
❑ Show the locations of all fire extinguishers, hoses, lad-
ders, etc.
10
Advent™ Commercial Fire System
Page 13

Draw your floor plan in this space.
Appendix A: Planning for Emergencies
Advent™ Commercial Fire System
11
 Loading...