

Page 1

iTero
®
Element
™
Intraoral Scanner Orthodontic
Training Guidebook with Invisalign
®
Page 2

Content
02 - 09 Hardware Overview (Touchscreen, Sleeves, Wand)
10 - 11 Make It Mine / Logging In
12 - 27 Home Page (Display, Icons, Help)
28 - 48 Invisalign®Scanning Basics
49 - 77 Resources
© 2016 Align Technology, Inc. All Rights Reserved.
1
Page 3

Hardware
System Configuration
© 2016 Align Technology, Inc. All Rights Reserved.
Touch Screen
Wheel Base
Scanner Sleeve
Wand / Touchpad
The on / off power butto n is located at
the b ot t o m right-hand corner of the
system under the power indicator light.
Optional counter stand may be
purchased separately
2
Page 4

Wheel Base
Hardware
Wheel Locks
© 2016 Align Technology, Inc. All Rights Reserved.
Power Cord
3
Page 5

System Components / Touch Screen
Hardware
• High definition multi-touch 19 inch display
• Works with all clinical glove types
• Refer to Operation Manual for
cleaning and disinfection instructions
© 2016 Align Technology, Inc. All Rights Reserved.
4
Page 6
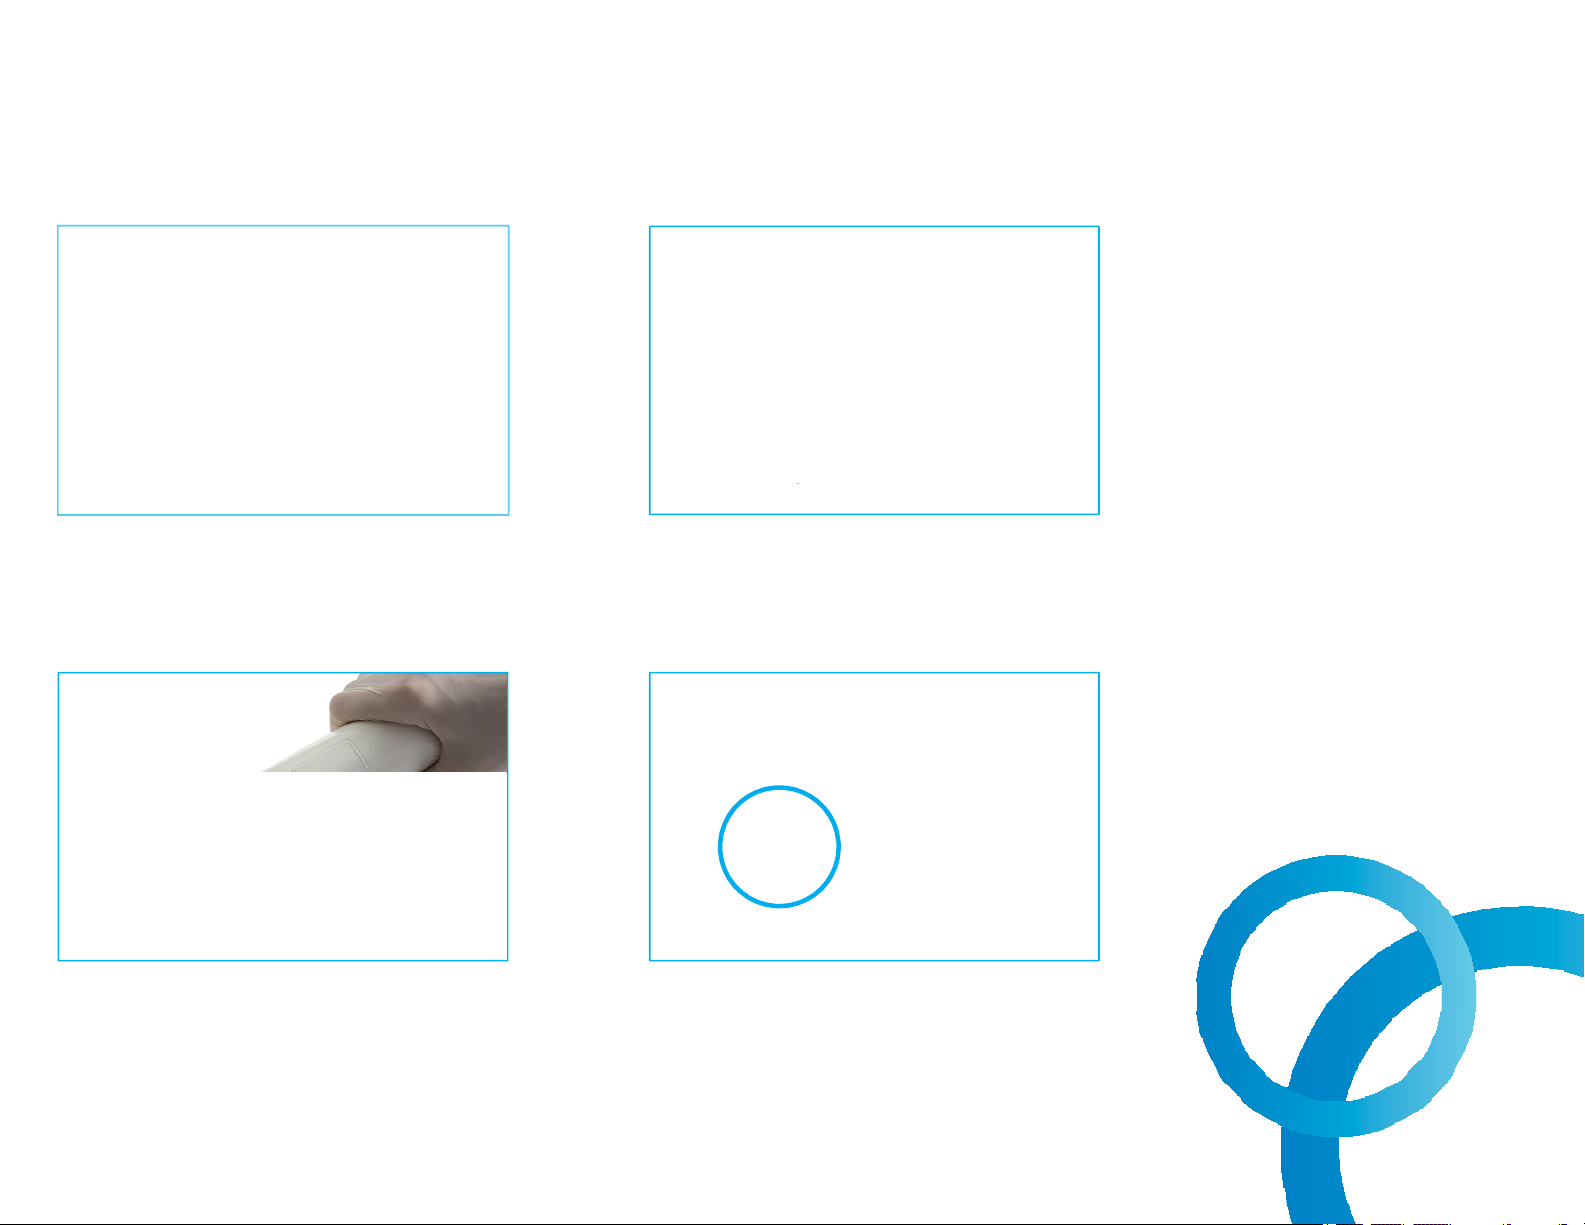
Scanner Sleeves
Hardware
Note: Please do not
touch the wand lens.
Blue protective sleeve protects
the lens when the wand is not in
use.
Confirm sleeve is completely
seated prior to scanning.
Disposable sleeve is made for
single use on patient scanning.
Discard sleeve after every patient.
To remove and place sleeve
use the side grips.
© 2016 Align Technology, Inc. All Rights Reserved.
5
Page 7

Wand Controls
To activate the wand touchpad, press and
release both side buttons simultaneously.
Hardware
To start and stop scanning, press and release
either of the side buttons.
© 2016 Align Technology, Inc. All Rights Reserved.
6
Page 8
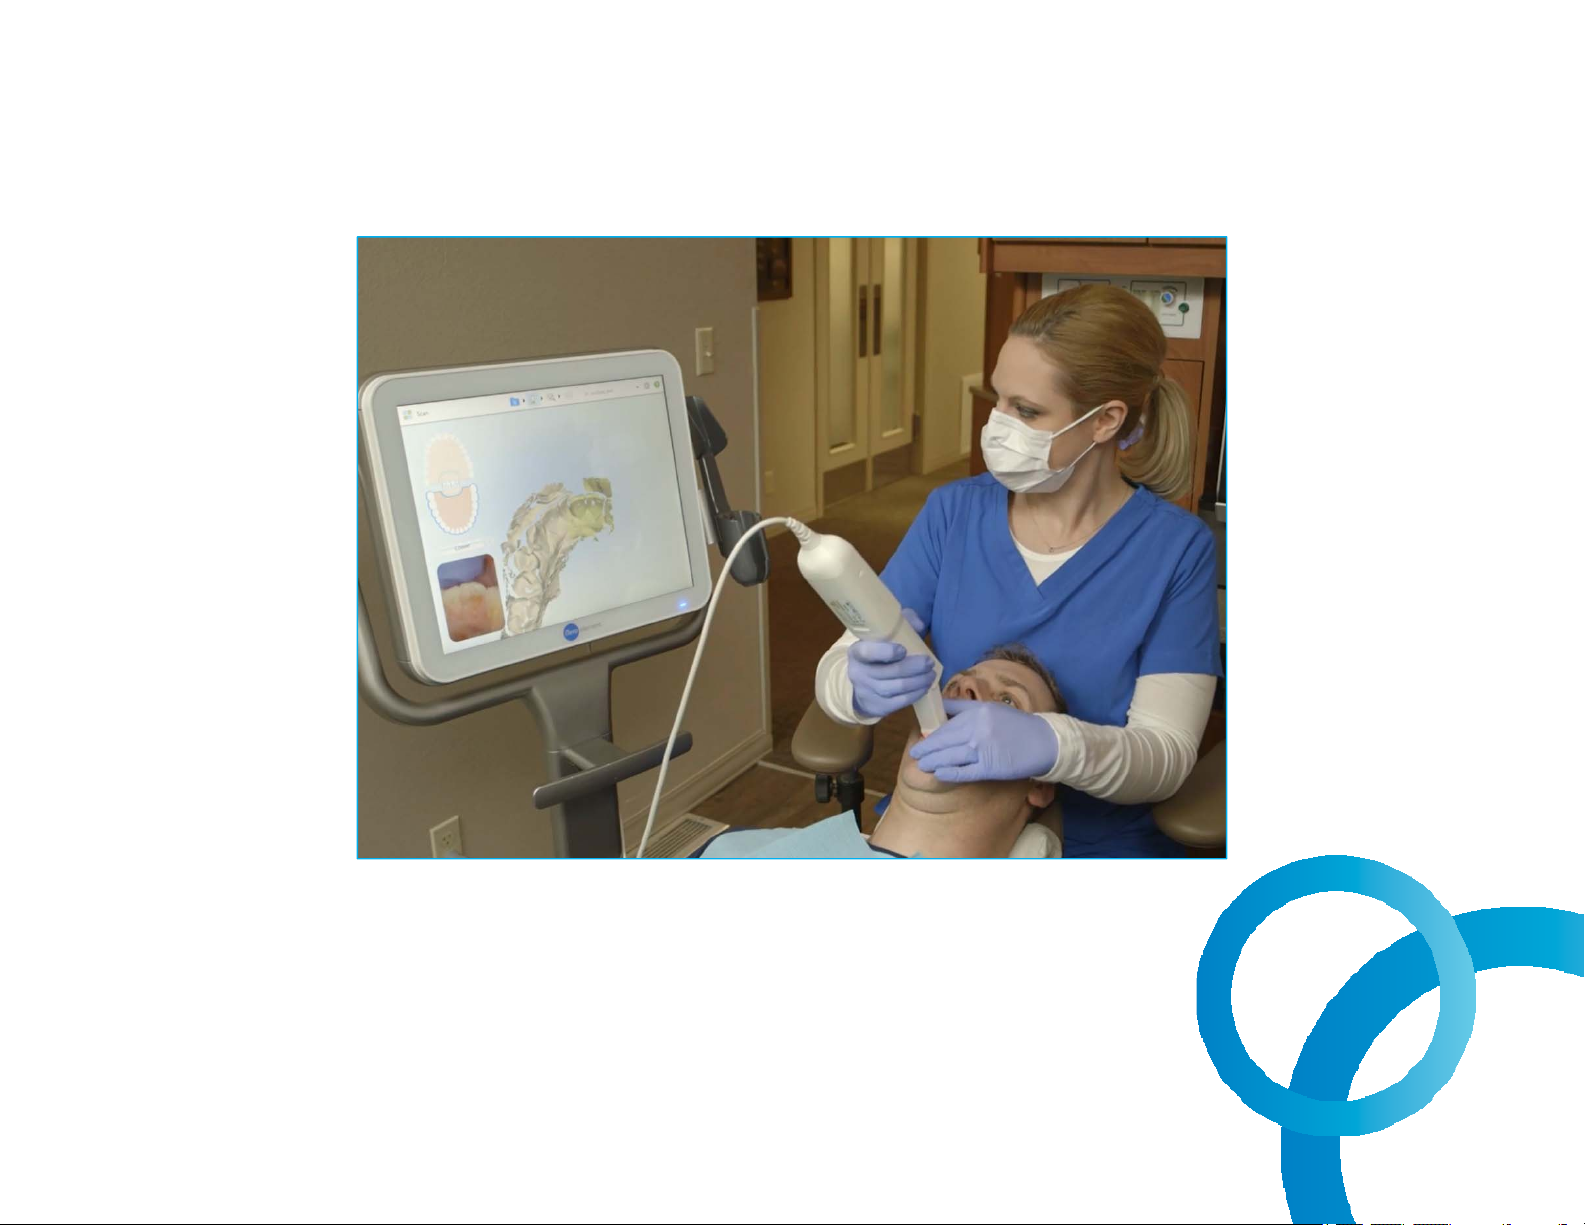
Holding the Wand
Hardware
For proper ergonomics and to avoid fatigue, make sure the
elbows are close to the body, holding the wand in the thin area
behind the wand sleeve.
Do not cover the air vents.
© 2016 Align Technology, Inc. All Rights Reserved.
7
Page 9

Wand Controls
Hardware
Pressing and releasing both the
buttons simultaneously will activate
the touchpad. Once activated
swiping the touchpad on the wand
will allow movements between
scan segments.
The current scanning segment is
© 2016 Align Technology, Inc. All Rights Reserved.
displayed in the indicator box
between the arrows.
To rotate the model on the screen
press and hold the wand touchpad.
8
Page 10
Care and Maintenance
Hardware
Recommended best practices for
cleaning and disinfecting the
Scanning Unit, Base Unit, Wheel
Stand, and / or Counter Stand in
between each patient use.
• Do not spray disinfectant
directly on scanner system
surfaces
• Spray the disinfectant on a
towel, or use disinfectant wipes
for the Scanning Unit and Base
Unit
• Follow the disinfectant
Description pH Manufacturer
Birex® Quat Wipes 7.6 Biotrol Intl.
CaviCide AF 12.7 Metrex
CaviCide 12.5 Metrex
CaviWipe
CaviCide 1 12.5 Metrex
CaviWipe 1
Clorox Healthcare®
Hydrogen Peroxide Cleaner
Disinfecting Liquid
Clorox Healthcare®
Hydrogen Peroxide Cleaner
Disinfectant Wipes
Opti-Cide 3® Liquid 7.6 Biotrol Intl.
Opti Cide 3® Wipes 7.6 Biotrol Intl.
OPTIM 33TB Liquid 2.5-3.5 SciCan Inc.
OPTIM 33TB Wipes 2.5-3.5 SciCan Inc.
ProSpray 10 Certol
ProSpray wipes
Webcol® Alcohol Prep Pads 7 Medtronic
2-3 Clorox® Healthcare™
2-3 Clorox® Healthcare™
manufacturers’ instructions for
appropriate contact time
• Remove residual liquid
disinfectant with a lint-free,
clean cloth
*Please refer to Operations Manual for further instructions.
© 2016 Align Technology, Inc. All Rights Reserved.
9
Page 11

Make It Mine / Registering the System
Logging In
To register the iTero®Element™system,
have the following information available*
• User Name
• User Password
• Company ID
* To retrieve User Name, User Password, and Company ID, please
contact iTero®Customer Advocacy at 1 800 577 8767.
© 2016 Align Technology, Inc. All Rights Reserved.
10
Page 12

Logging In
To log-in to the scanner,
Choose the doctor name
Enter user name and
password*
Check the ‘Remember Me'
* To retrieve User Name, User Password, and Company ID, please
®
contact iTero
Customer Advocacy at 1 800 577 8767.
© 2016 Align Technology, Inc. All Rights Reserved.
box to remain logged on to
the scanner for 9 hours
11
Page 13
Home Page
Home Screen Icons
Tap to set your preferences
Tap to lock the desktop
Tap to enter the Learning Center or start training
Double tap to connect to an iTero Customer
Advocacy agent for remote troubleshooting
(please call iTero Customer Advocacy first)
Tap anywhere on screen
to close this help overlay
Tap to check the status
of your orders
Tap to view notifications, updates, and
other messages from Align Technology
© 2016 Align Technology, Inc. All Rights Reserved.
12
Page 14

Small Icons – Learning Center
Home Page
The graduation cap is the link to the Learning Center.
Select this icon to access all training support materials
• Online training videos
• Training and reference documents
• Register and view webinars
© 2016 Align Technology, Inc. All Rights Reserved.
13
Page 15
Small Icons – Lock
Home Page
To further support HIPAA compliance, the Lock option secures the desktop and
returns screen to the login page.
Locking the system for cleaning is helpful to avoid unintended entries.
© 2016 Align Technology, Inc. All Rights Reserved.
14
Page 16
Small Icons – Settings
Home Page
Tapping on the Settings icon brings the screen which allows the
change of computer settings, scanner settings, time zone, language,
add the Doctor's signature, license number, and sync the system for
any new updates.
© 2016 Align Technology, Inc. All Rights Reserved.
15
Page 17
Settings – Scanner Settings
Home Page
Within the Scanner Settings, select the preference for the Gyro and Touchpad
orientation.
For example, in the above picture, the selections are for the wand tip toward the
screen for the gyro and the base toward the screen for the touchpad.
© 2016 Align Technology, Inc. All Rights Reserved.
16
Page 18
Settings – Scanner Settings
Change the Scan Order.
Home Page
Jaw Order Preparation Order
© 2016 Align Technology, Inc. All Rights Reserved.
17
Page 19
Settings – Scanner Settings
Home Page
• Enter doctor license number in the box provided
• Sign in the signature box
• Select preferred option
© 2016 Align Technology, Inc. All Rights Reserved.
18
Page 20
Help Overlay
Home Page
One tap on the question mark will enable a transparent overlay that will provide a
brief overview. Tap anywhere to close the Help screen and return to the relevant
screen.
© 2016 Align Technology, Inc. All Rights Reserved.
19
Page 21

Customer Advocacy
Home Page
Tapping on the headset will allow for remote assess for troubleshooting.
Contact Customer Advocacy first at 1 800 577 8767.
After contacting Customer Advocacy, an agent will review the specific steps
in order to connect remotely.
© 2016 Align Technology, Inc. All Rights Reserved.
20
Page 22
Large Icons / Orders in Progress and Past Orders
Home Page
Within the In Progress section, view an Rx, continue, view, or delete a scan.
Within the Past Orders section, view an Rx, open the order using the Viewer, or
open an Invisalign®scan using the viewer or the Invisalign Outcome Simulator.
© 2016 Align Technology, Inc. All Rights Reserved.
21
Page 23
Patients
Home Page
To search for a patient from the iTero®database, select the Patients icon on the home page.
The Patients order list will open.
Search by patient name or chart number to find the patient.
© 2016 Align Technology, Inc. All Rights Reserved.
22
Page 24
Patients
Home Page
The Patients icon can be used to start a new scan, open previous scans with Viewer
and / or Invisalign®Outcome Simulator.
© 2016 Align Technology, Inc. All Rights Reserved.
23
Page 25

Large Icons / Messages
Home Page
Dr. Test, Test
The Messages icon is a badged icon that notifies the user of important messages
from Align Technology such as product updates, upcoming educational sessions,
or internet connectivity issues.
© 2016 Align Technology, Inc. All Rights Reserved.
24
Page 26
Large Icons / Orders
Home Page
Within the Orders icon is the list of orders that are either In Process or Past Orders.
© 2016 Align Technology, Inc. All Rights Reserved.
25
Page 27

Ergonomics
Home Page
Ergonomics play a key role to comfort
while scanning. It’s recommended to
place the patient in the supine position.
Lower the patient's head and sit
comfortably with elbows on the side.
Place the display on dominant side to
see the screen without turning or
stretching.
The wand should fit comfortably in the
palm of the hand with a light grip. There
is no need to grip the wand tightly.
© 2016 Align Technology, Inc. All Rights Reserved.
26
Page 28

Large Icons / New Scan
Home Page
℞
New Scan
Opening the new scan icon will jump to the Rx page. The Rx is the section to enter
all the necessary patient information. The sections marked with a red asterisk (*)
are required information.
© 2016 Align Technology, Inc. All Rights Reserved.
27
Page 29

Scan in Color Feature
Invisalign®Scanning Basics
Clinicians will experience real-time scan in color in both scan and view mode to
make it easier to visually distinguish between gingival and tooth structure for a
more precise clinical evaluation while scanning. The color scan will provide
additional information to the laboratory technician when they attempt to imitate the
shading of the original dentition.
© 2016 Align Technology, Inc. All Rights Reserved.
28
Page 30

Invisalign®Scanning Protocol - Start New Prescription
Invisalign®Scanning Basics
There are several Case Types to choose from.
®
Any special instructions for Invisalign
treatment must be noted in the Invisalign
Doctor Site.
© 2016 Align Technology, Inc. All Rights Reserved.
29
Page 31

Invisalign®Scanning Protocol - Guidance Hints
Invisalign®Scanning Basics
The iTero®Element™ scanner
offers Guidance Hints that
helps recall the scanning
sequence.
Deactivate the Guidance Keys
by checking the box, ‘Don’t
show again’.
© 2016 Align Technology, Inc. All Rights Reserved.
Reactivate the Guidance Keys
in the Settings gear icon.
30
Page 32

Occlusal (Upper or Lower Arch First is Optional)
Invisalign®Scanning Basics
Scan the occlusal surface in a single
continuous motion.
When the wand reaches the cuspid,
continue by swiping across the anterior,
tilting slightly to the lingual until the
wand touches the contralateral cuspid.
Proceed by moving the tip straight back
to the terminal molar.
© 2016 Align Technology, Inc. All Rights Reserved.
31
Page 33

Lingual
Invisalign®Scanning Basics
Scan the lingual by rolling from the
occlusal. Bring the cable end of the
wand out to the side and maintain a
vertical 45 degree angle of the
wand tip to the lingual surface.
To capture the mesial and distal
interproximal anatomy, twist the
wand tip right and left as the wand
moves around the arch. Holding the
wand tip against the tooth will help
to retract the tongue.
© 2016 Align Technology, Inc. All Rights Reserved.
32
Page 34

Buccal
Invisalign®Scanning Basics
From the lingual, roll to the buccal at
a 45 degree horizontal angle and
use a rocking motion as the wand
moves towards the midline to
capture the interproximal anatomy.
After crossing the midline, begin on
the contralateral terminal tooth and
continue with the same rocking
motion to capture the buccal surface
from the posterior to the anterior.
Moving from posterior to anterior on
the buccal reduces the interference
from the cheek and provides a
smoother scanning experience.
Bring the cable end of the wand towards the arch to capture the mesial interproximal
anatomy and taking the cable end away from the arch will capture the distal
interproximal anatomy.
© 2016 Align Technology, Inc. All Rights Reserved.
33
Page 35

Anterior / Incisal
Place the wand with the cuspid and lateral centered in
the view finder and roll from the lingual surface over
the incisal edge to the facial.
Repeat this step on the contralateral side.
Invisalign®Scanning Basics
These scans help to ensure the lingual
segments and buccal segments are joined
with accurate incisal surfaces.
This step is critical for properly fitting
Invisalign®clear aligners.
© 2016 Align Technology, Inc. All Rights Reserved.
34
Page 36
Optimized Scanning
Invisalign®Scanning BasicsInvisalign®Scanning Basics
Additional Scan Feedback
Scan Color Toggle
When the Optimized Scanning Feature icon is activated, areas of missing anatomy
will be highlighted in red when scanning in monochromatic mode and purple when
scanning in color mode. This feature will alert you to areas that need additional
scans. The color icon allows you to toggle between color or monochromatic
modes. This applies to both scanning and viewing all case types.
35
Page 37
Switching to Opposing Arch
Invisalign®Scanning Basics
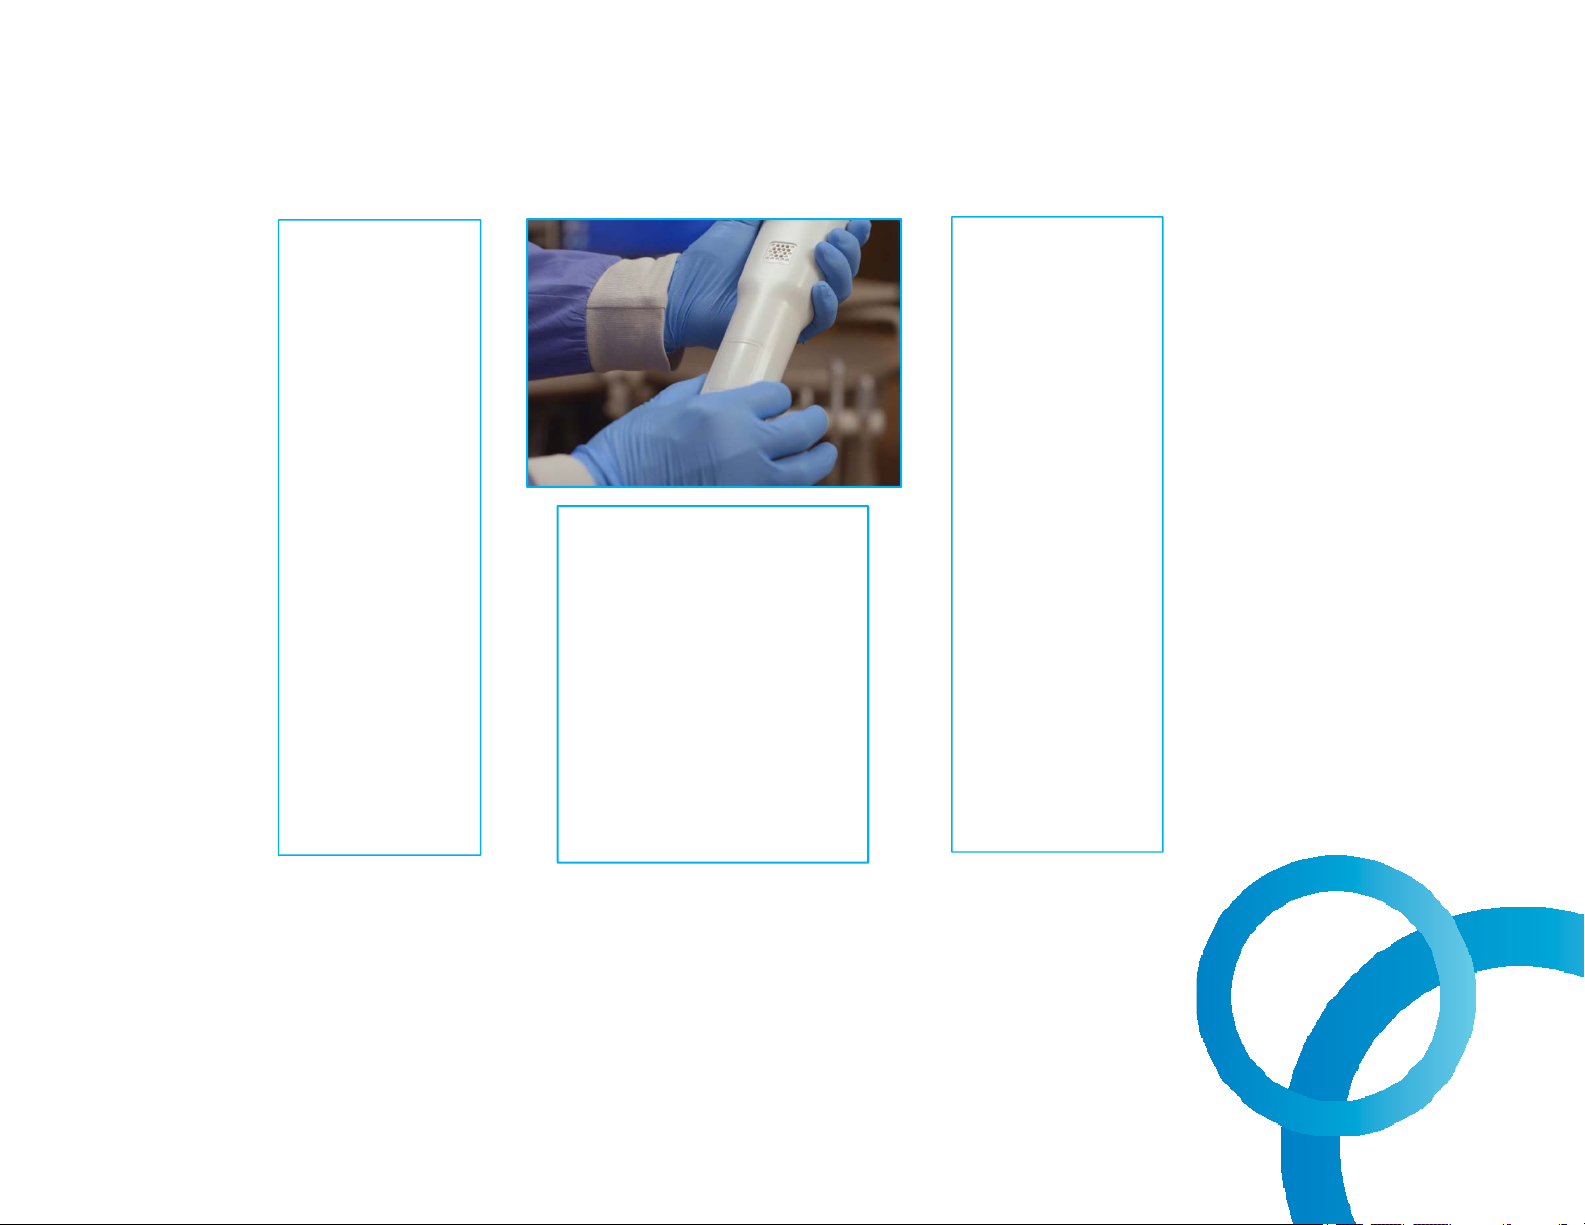
Switch to the opposing arch by pressing on the arch on the touchscreen or use the
touchpad on the wand.
Follow the same protocol for the upper as with the lower. occlusal, lingual / palatal,
buccal, and incisal edge.
© 2016 Align Technology, Inc. All Rights Reserved.
36
Page 38

Scanning the Palate
Invisalign®Scanning Basics
• For Invisalign®+ iRecord
or iRecord scans
• Once completed the
lingual tooth anatomy
• Begin at the midline
directly behind the central
incisors
• Scan in a straight line to
the soft palate
• Fill in the palate from the
midline to the teeth on
each side
®
© 2016 Align Technology, Inc. All Rights Reserved.
37
Page 39

Bite
The final segment is the bite. Prior to
scanning, confirm the patients bite.
Have the patient open, use the wand
to retract the cheek, and have patient
close in centric occlusion. Bring the
wand tip gently against the tooth
anatomy.
Invisalign®Scanning Basics
Moving forward in a small wave like
motion capture 3 – 4 teeth and then
move to the contralateral side using
the same technique.
© 2016 Align Technology, Inc. All Rights Reserved.
38
Page 40

Missing Scan Segments
Invisalign®Scanning Basics
Complete the following steps
if there are segments missing
in your scan:
• Go back to scan mode
• Complete the missing
segments that are
highlighted in red
• Repeat above steps if
© 2016 Align Technology, Inc. All Rights Reserved.
necessary
39
Page 41

Scan Timer
Invisalign®Scanning Basics
After you are done scanning, you can use the Scan Timer icon to view your
scanning time. The Elapsed Scan Time is the actual time the wand was actively
scanning. The Elapsed Total Time is the time while you were in scanning mode,
whether the wand was actively scanning or not.
© 2016 Align Technology, Inc. All Rights Reserved.
40
Page 42
Add Rx To An Existing Sent Scan – Allow Additional Workflows
Invisalign®Scanning Basics
Conditions for the Add Rx to be
enabled:
• Accessible from Orders and
Patient’s icons
• For cases except restorative
and chair side milling
• Enabled up to 21 days from
the case’s scanning date
© 2016 Align Technology, Inc. All Rights Reserved.
• The model has to be located
on the scanner’s base unit
41
Page 43

Add Rx To An Existing Sent Scan – Workflow
Invisalign®Scanning Basics
1. Select case type
2. Add scans as needed
3. Tap on view tool 4. Send the case
© 2016 Align Technology, Inc. All Rights Reserved.
42
Page 44

Evaluate Digital Models
Invisalign®Scanning Basics
For production of properly fitting aligners,
evaluate the digital model for the
following before submitting
• Capture 2 mm of gingival tissue
• Distal wall of the terminal teeth
• Mesial and distal interproximal anatomy
• The complete incisal / occlusal
surfaces of both mandible and maxilla
• Accurate bite with the patient in
centric occlusion
© 2016 Align Technology, Inc. All Rights Reserved.
43
Page 45

Invisalign®Scanning Basics
Evaluate Digital Models
Distal wall of upper terminal teeth. Distal wall of lower terminal teeth.
© 2016 Align Technology, Inc. All Rights Reserved.
44
Page 46
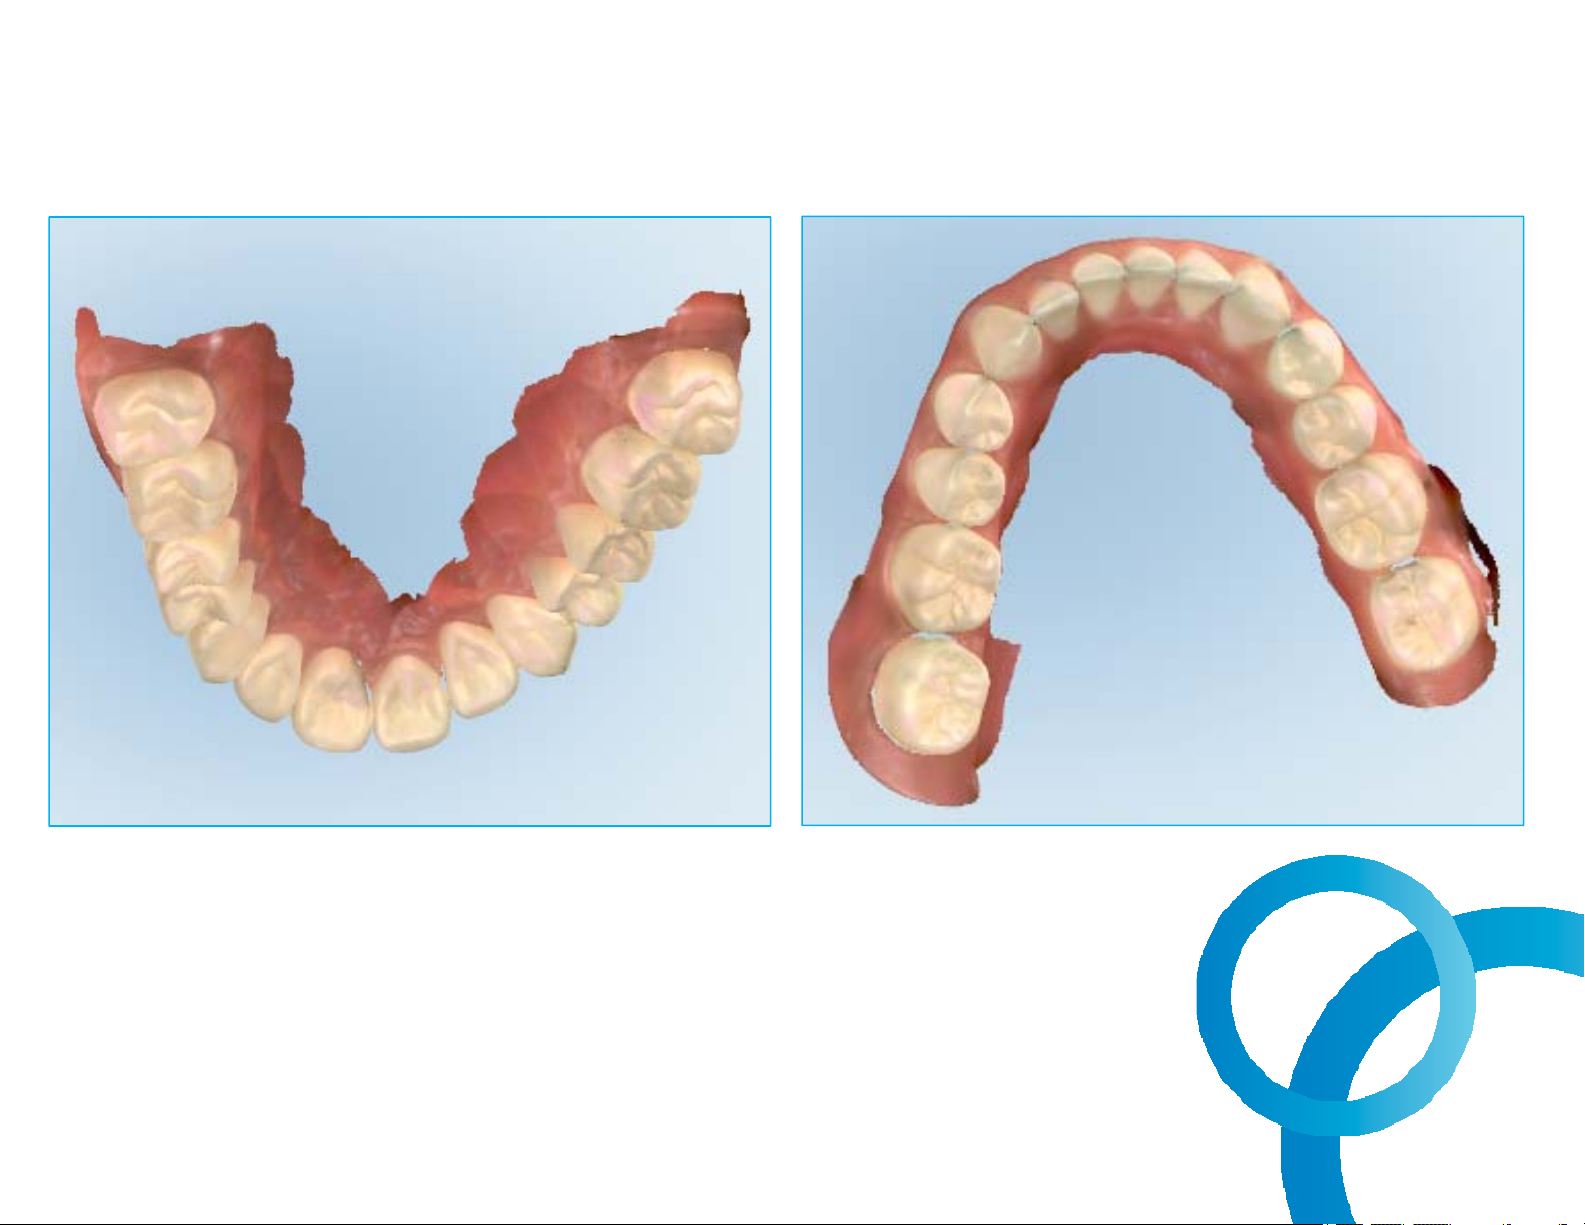
Evaluate Digital Models
Invisalign®Scanning Basics
The complete incisal / occlusal surfaces of both mandible and maxilla
© 2016 Align Technology, Inc. All Rights Reserved.
45
Page 47
Evaluating Digital Model / Occlusal Analysis
Invisalign®Scanning Basics
Utilize the Occlusal Clearance legend to determine
the distance between opposing teeth.
© 2016 Align Technology, Inc. All Rights Reserved.
46
Page 48
Submitting Case
Invisalign®Scanning Basics
To submit the case, simply tap on the envelope.
A prompt will appear stating that the scan will be
available for treatment submission through the
Invisalign®Doctor Site in approximately 15
minutes. Select OK.
Next, click yes to launch the Invisalign Outcome
Simulator.
© 2016 Align Technology, Inc. All Rights Reserved.
47
Page 49
Help / Display Screen Gestures
Invisalign®Scanning Basics
• Tap on the help icon for context
sensitive overlays with instructions
• Use fingers to rotate, move, or
© 2016 Align Technology, Inc. All Rights Reserved.
and tool descriptions
zoom in on the scanned model
for analyzing
48
Page 50
Using Eraser Tool
Resources
• Tap on the eraser icon
• Select the area to erase on the
screen
• Tap on the scanner sleeve icon
• Scan to fill area erased
• Tap on the view icon
• Confirm correction
© 2016 Align Technology, Inc. All Rights Reserved.
49
Page 51
Using Trim Tool
Resources
Use the Edge Trim tool if there is excessive
cheek or lip artifacts that should be removed
from the scan
• Tap on the scissors icon
• Circle the area to remove
• Verify the selected area
• Tap on the green check mark
• Tap on the view button to confirm area
has been trimmed as chosen
© 2016 Align Technology, Inc. All Rights Reserved.
50
Page 52
Tools – Deleting a Scan
Resources
• Available in scan mode
• Tap on the arch to be
deleted
• Press and hold on the
model
• Tap on the waste pail
Remove an artifact (soft tissue)
Wrong jaw scanned
Unstitched
Segment
Main model
Tooth anatomy not stitching
© 2016 Align Technology, Inc. All Rights Reserved.
segment or broom icon
• Confirm deletion
• Rescan area
51
Page 53
Resources
Tools – Deleting a Scan and Correcting the Bite
Clinical Scenario
The patient is able to close on maximum intercuspation and produce solid contacts on articulating paper.
During scanning, the patient was not able to bite properly.
Incorrect bite registration Occlusogram display
Poor contacts
© 2016 Align Technology, Inc. All Rights Reserved.
52
Page 54

Tools – Deleting a Scan and Correcting the Bite
Corrective Action
Erase and rescan bi-lateral bite
Resources
1. Tap on both bite segments to delete
2. Rescan
© 2016 Align Technology, Inc. All Rights Reserved.
53
Page 55

Tools – Deleting a Scan and Correcting the Bite
Resources
Verify new bite registration Occlusogram display
Adequate contacts
© 2016 Align Technology, Inc. All Rights Reserved.
54
Page 56
Viewer
Resources
Viewer is a tool that allows the
scanner to manipulate and display
the digital model for case
presentations.
The icons on the left of the screen
displays preset views of the
model.
© 2016 Align Technology, Inc. All Rights Reserved.
55
Page 57
Viewer
Hide / Display
Maxilla or
Mandible
Frontal View
Resources
Select the arch to be
displayed.
There are three layouts
on the Viewer.
• Occlusal View (single
jaw)
Occlusal View
Gallery View
Occlusogram
© 2016 Align Technology, Inc. All Rights Reserved.
• Occlusal View (upper
and lower)
• Gallery View
56
Page 58
Viewer / Occlusogram
Resources
The Occlusogram tool can be
shown in any view by tapping
the Occlusogram icon.
© 2016 Align Technology, Inc. All Rights Reserved.
57
Page 59
Viewer
Resources
In the Gallery View, the
models in each window can
be controlled separately for
© 2016 Align Technology, Inc. All Rights Reserved.
better evaluation.
58
Page 60
Resources
Viewer
Unchanged Margin Line and Ditch Changes on Margin Line and Ditch
Margin Line
Ditch Cut-Out
Clearance
When the case is in “iTero modeling” on the Orders tab, it’s in the early stages of
modeling and there are no edits and the margin and die tools are gray (inactive).
When the modeling process is completed, the die and margin line has been edited
and the changes will appear in color on the model and the icons are in color
indicating that they are active.
The occlusal clearance is also visible on viewer for reference.
© 2016 Align Technology, Inc. All Rights Reserved.
59
Page 61

Chairside Milling – Certified Connectivity
Resources
• Dedicated Rx case type
• Ship to lab is disabled
• Scanning protocol is the
same as restorative
Certified connectivity with:
E4D Planmeca Chairside Milling System
Glidewell IOS Technologies Fast Design System
© 2016 Align Technology, Inc. All Rights Reserved.
• Contact your Chairside
Milling provider for more
information on the integration
with the iTero® Element™
Intraoral Scanner
60
Page 62

Chairside Milling – Export Settings
Configure your network to download the files on the chairside milling software.
• Establishing connectivity between the milling unit and the scanner
• Customize the export settings: on the scanner, select the saving options
• Modify the number of days the file stays on the folder or manually delete all cases from the folder
Resources
Export Settings
icon is active
© 2016 Align Technology, Inc. All Rights Reserved.
61
Page 63
Chairside Milling – Default Folder Path
Resources
Files will be saved in a shared folder on the scanner, which are accessible from any computer or design
workstation. Configure the mapping for the default folder path on your network server.
In case you need assistance, please contact iTero® Customer Advocacy at 1 800 577 8767.
© 2016 Align Technology, Inc. All Rights Reserved.
62
Page 64
Resources
OrthoCAD
®
The OrthoCAD®software is the digital model
viewer for all your orthodontic cases.
After you send the cases on your iTero
®
Element scanner, it can be viewed, managed
and analyzed with this powerful tool from any
office computer or workstation
Some clinical applications for this software
are:
• Communicate between dental offices -
printing or emailing the 3D models
To export STL or view model, Install OrthoCAD®on a workstation.
®
Call iTero
Customer Advocacy at 1 800 577 8767 for instructions.
© 2016 Align Technology, Inc. All Rights Reserved.
• Perform diagnostic analysis of the 3D
orthodontic models
• Presenting cases to patients for discussion
of the treatment plan
63
Page 65

MYALIGNTECH
Resources
MyAligntech* is designed to effectively manage patient cases and the orthodontic models
produced by the iTero® scanner.
* To retrieve User Name, User Password, and Company ID,
please contact iTero
®
Customer Advocacy at 1 800 577 8767.
© 2016 Align Technology, Inc. All Rights Reserved.
64
Page 66
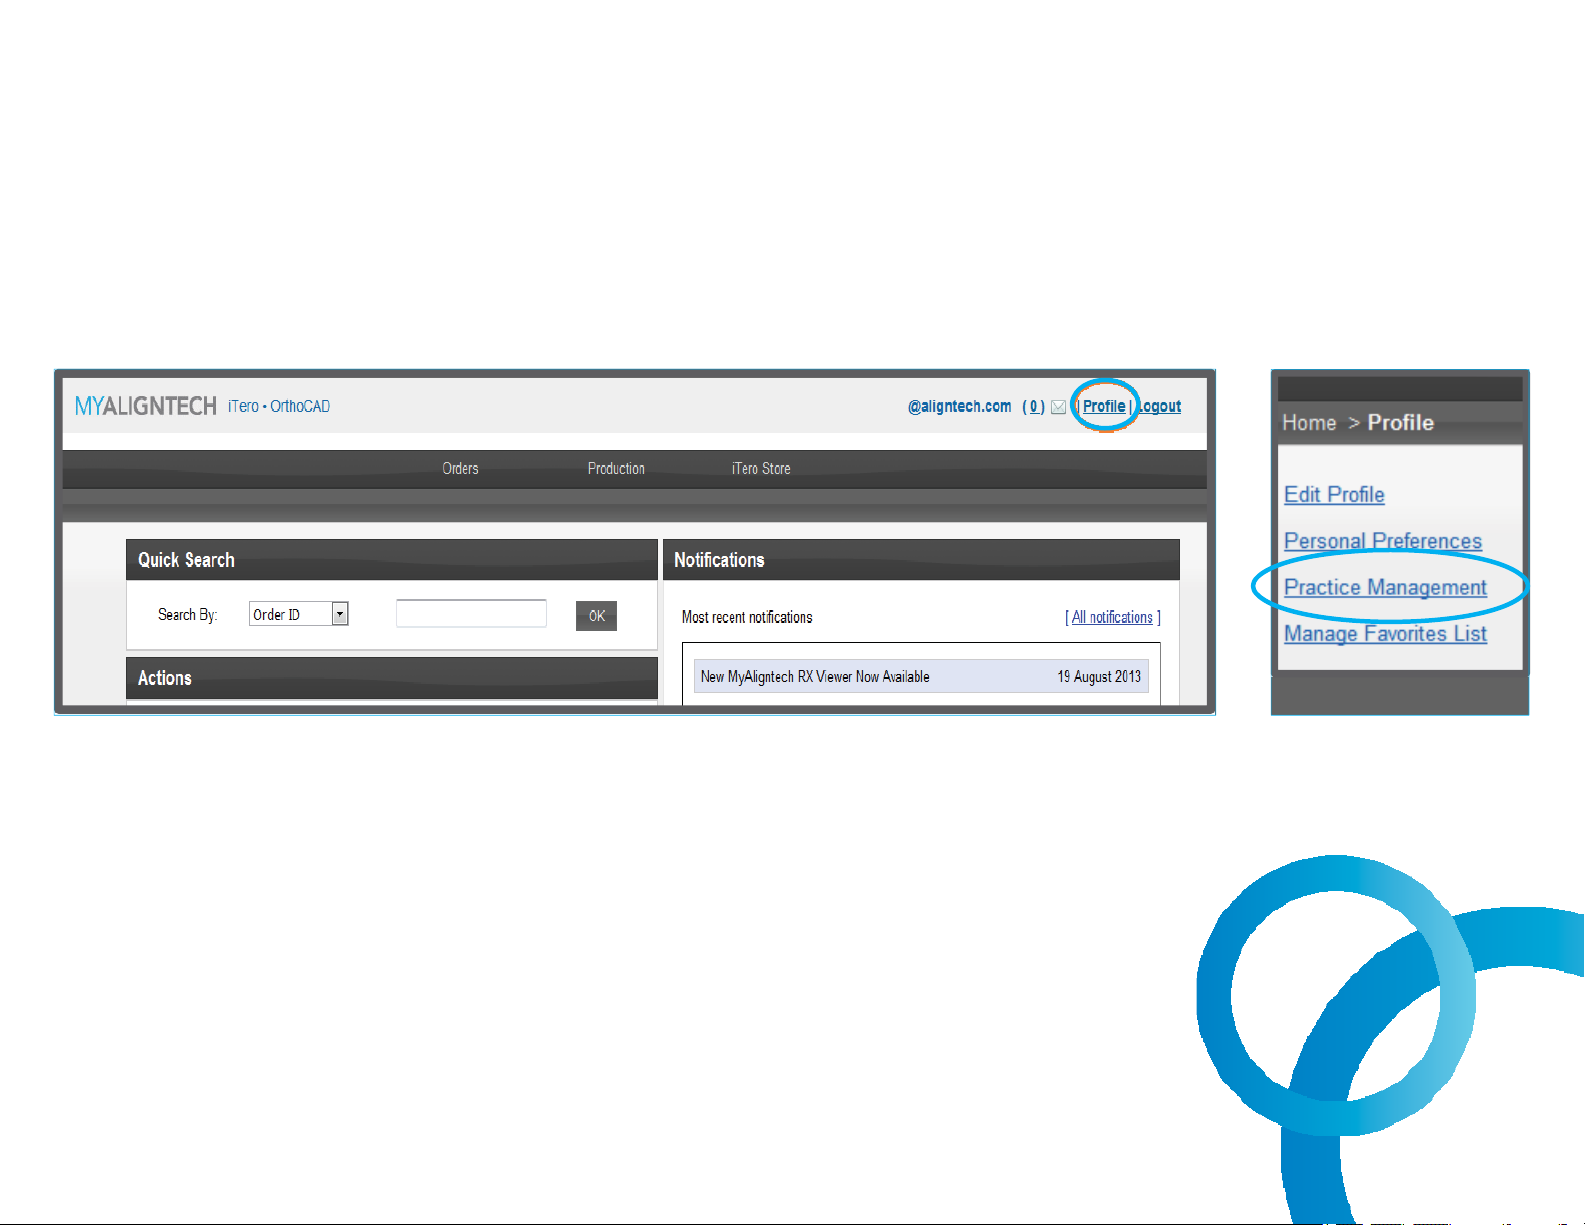
MYALIGNTECH Account Administrator
Resources
To log on as an Account Administrator
• Select Profile on the MyAligntech landing page
• Select Practice Management
© 2016 Align Technology, Inc. All Rights Reserved.
65
Page 67
MYALIGNTECH Account Administrator
MyAligntech landing page
will provide many options.
Click on the Orders link at
the top of the page to view
all orders.
Orders that require further
action are listed in the
Actions box.
Resources
On the right side, the
Notification section shows
alerts to communications
from Align Technology.
The Quick Search enables
the search for orders using
various parameters.
© 2016 Align Technology, Inc. All Rights Reserved.
66
Page 68

MYALIGNTECH Order Information Page
Resources
There are several options
in the Actions line
• Open File to view the
model
• Export the file to send
the file to 3rd parties*
• Change Lab to order
* Please contact iTero®Customer Advocacy at 1 800 577 8767 for software installations.
© 2016 Align Technology, Inc. All Rights Reserved.
a new milling model
and send it to the lab
67
Page 69
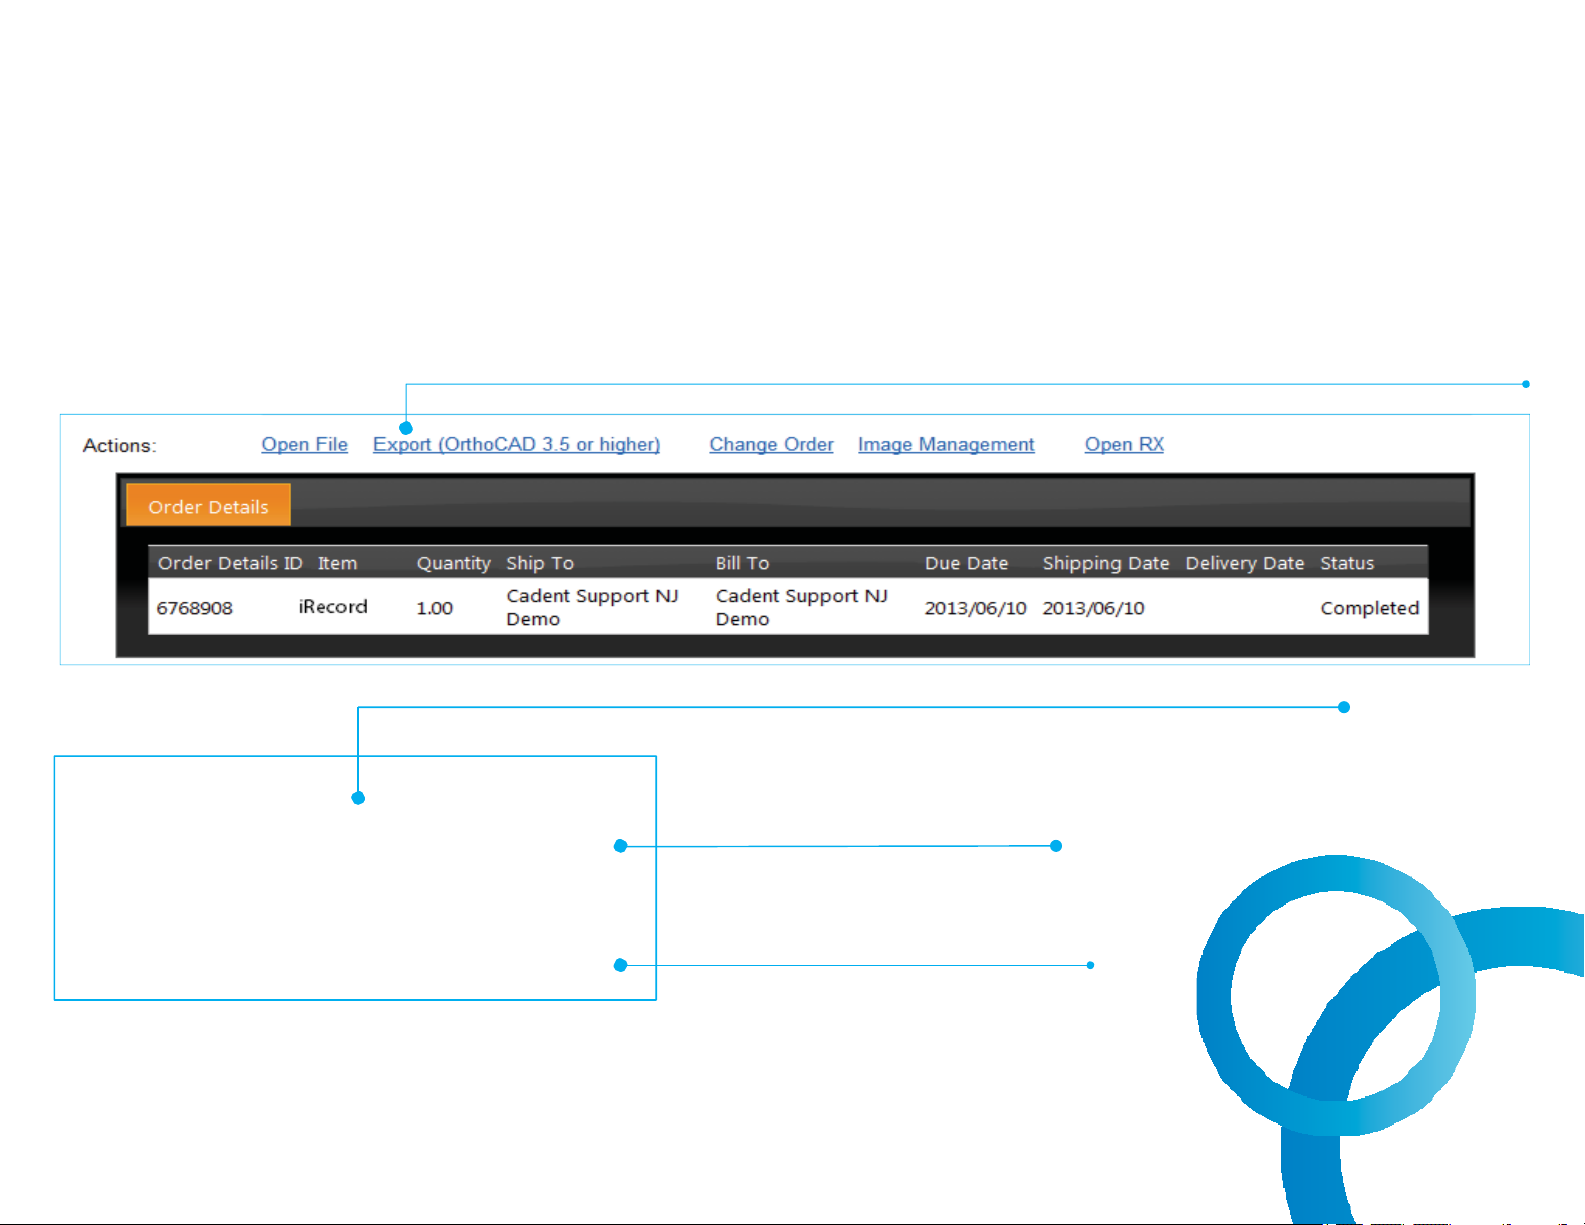
MYALIGNTECH Exporting STL Files
To export STL files from a workstation and send them external parties, follow these steps.
Resources
1. Click o n ex p o r t .
To export STL or view model, install OrthoCAD®on a workstation.
Call iTero
®
Customer Advocacy at 1 800 577 8767 for instructions.
© 2016 Align Technology, Inc. All Rights Reserved.
2.Export type.
3. Data Format.
4. Export.
68
Page 70

Invisalign® Doctor Site
Log into the Invisalign®Doctor Site
(IDS) through the link on the
MyAligntech website to access
patient case files.
After sending a digital impression
from the scanner, it may take up to
15 minutes for it to be available on
Resources
the IDS site for submission.
The digital scan may be associated
with a prescription in IDS prior to
submitting the Invisalign order.
© 2016 Align Technology, Inc. All Rights Reserved.
69
Page 71

Invisalign® Outcome Simulator
Resources
The Invisalign®Outcome Simulator
is a software tool that shows
patients the simulated outcome of
their Invisalign treatment.
To use the Invisalign Outcome
Simulator,
• Simply scan the patient under
the Invisalign or Invisalign +
© 2016 Align Technology, Inc. All Rights Reserved.
iRecord® case type
• Send the case
• Go to the Orders or Patients
page to open the case with
Invisalign Outcome Simulator
70
Page 72

Invisalign® Outcome Simulator
Resources
The clinician can make real time
adjustments to the simulated
outcome as the clinician is
showing the patient.
This tool will provide additional
information for the patient in their
decision to accept treatment.
The clinician will still be creating
a ClinCheck®treatment plan in
© 2016 Align Technology, Inc. All Rights Reserved.
the Invisalign®Doctor Site and
submitting the case for
production.
71
Page 73
Invisalign® Outcome Simulator
Access the Invisalign®Outcome Simulator
through these sites:
Resources
© 2016 Align Technology, Inc. All Rights Reserved.
Orders’pageview
MYALIGNTECH
72
Page 74
Progress Assessment
Resources
Open case from Orders or Patients
Correct Axis Lines (optional)
© 2016 Align Technology, Inc. All Rights Reserved.
73
Page 75
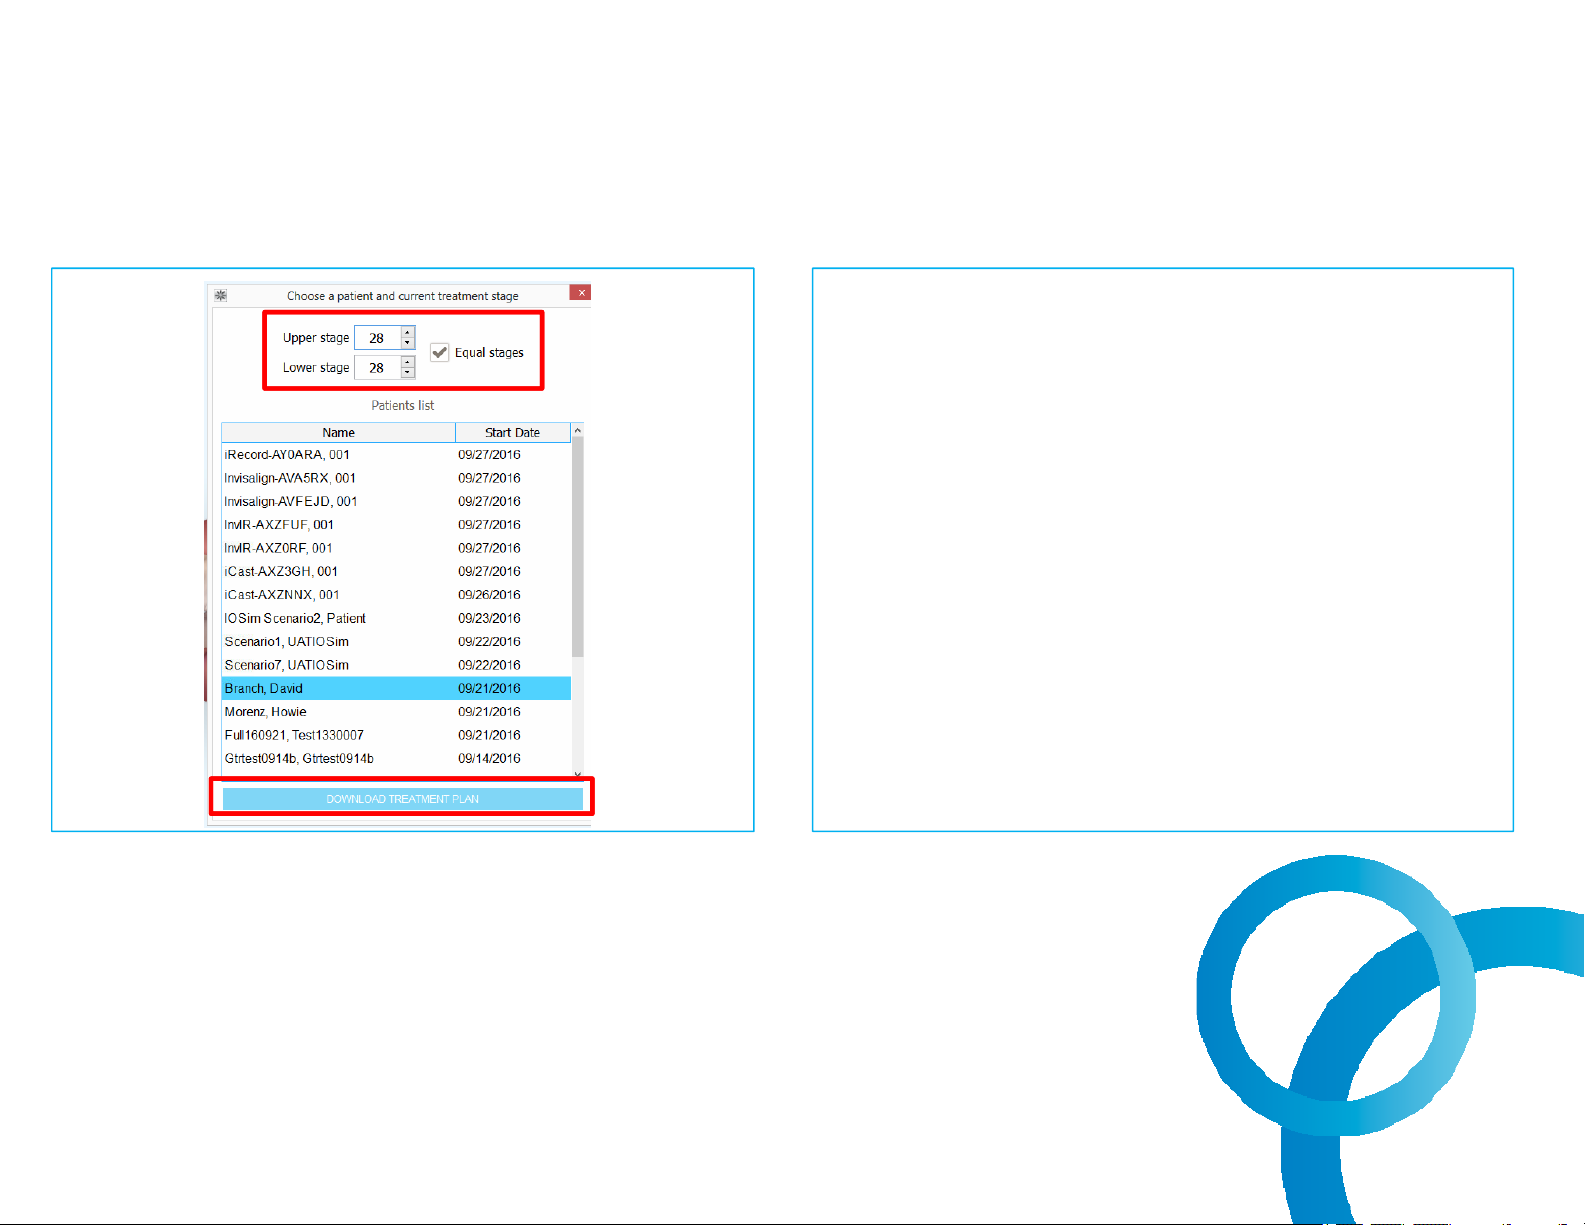
Progress Assessment
Resources
Access IDS Database
Analyzing progress assessment
© 2016 Align Technology, Inc. All Rights Reserved.
74
Page 76
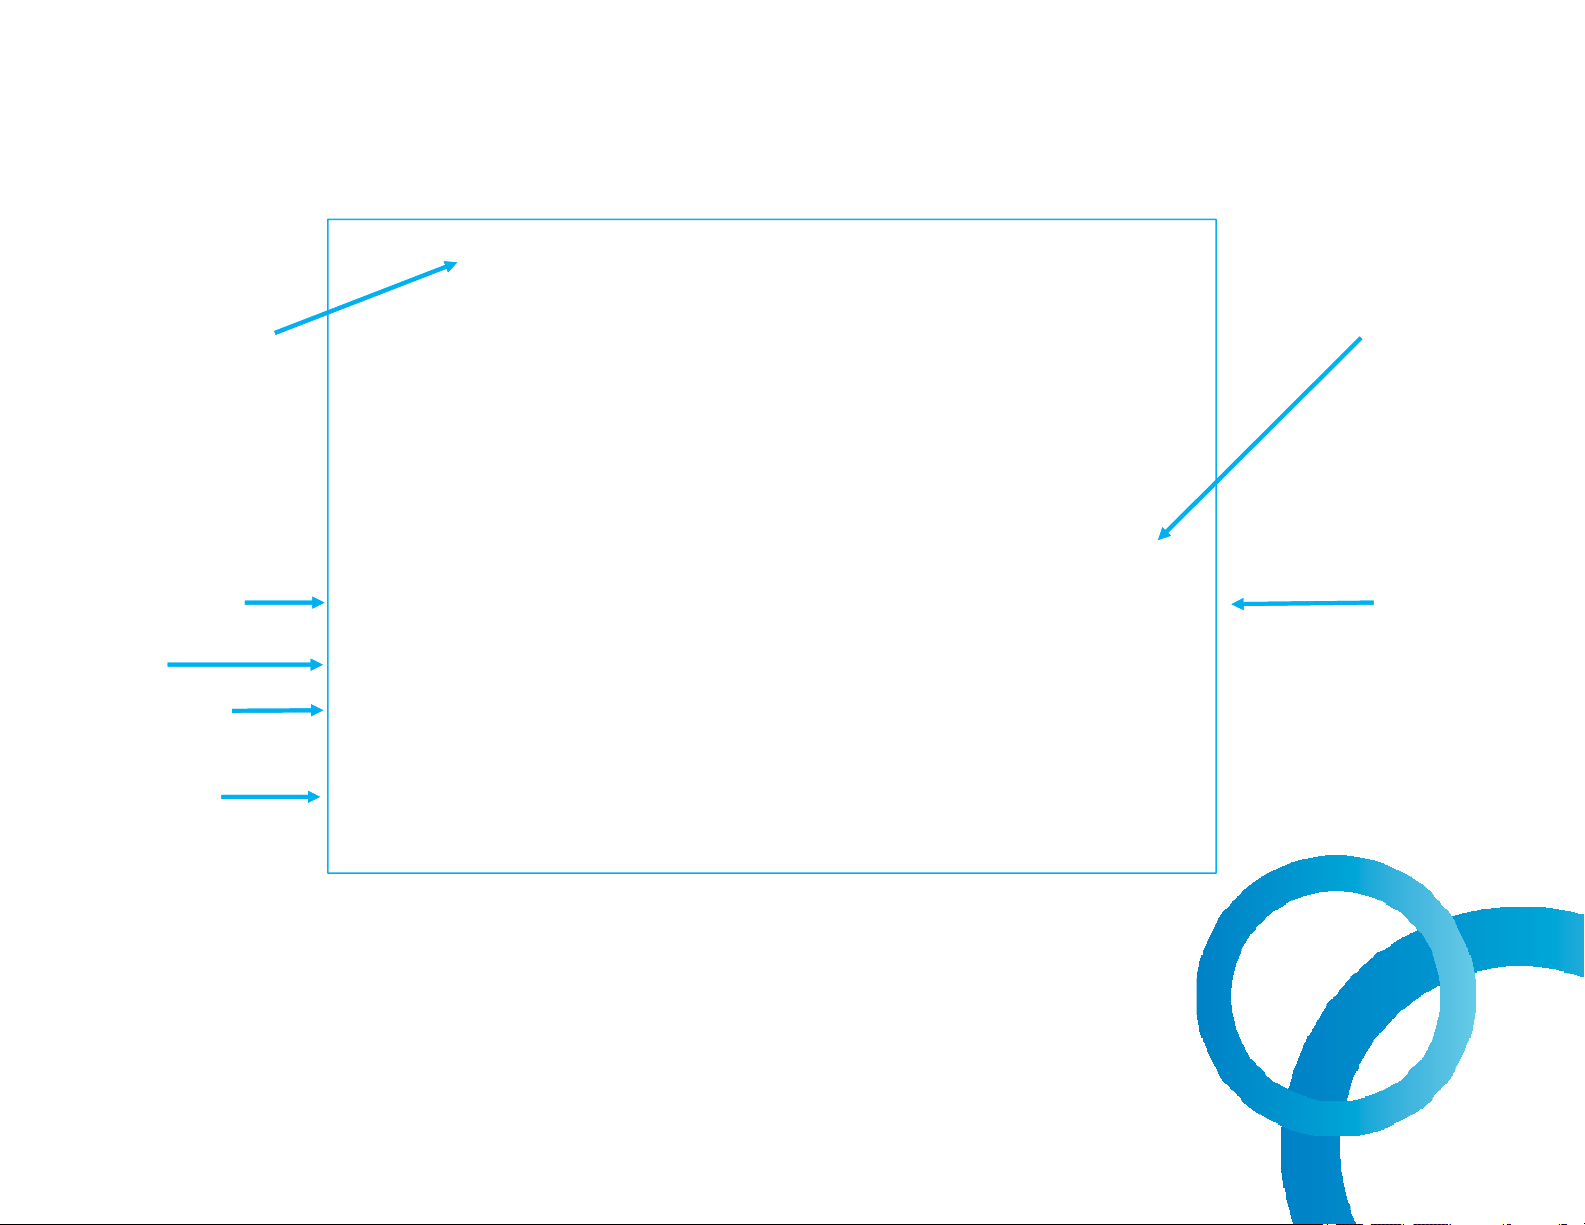
Progress Assessment
Resources
Assessment Tools
Stage Controls
Legend
Page Buttons
Report Panel
Stage Button
Stage Slider
The Progress Assessment tool includes a report that is a color-coded tooth
movement table to assist the doctor in making treatment decisions to track the
®
patient's progress to their ClinCheck
treatment plan.
© 2016 Align Technology, Inc. All Rights Reserved.
75
Page 77

Customer Advocacy
Resources
Contact iTero®Customer Advocacy at 1 800 577 8767.
Order disposable scanner sleeves, articulators, and patient
brochures online at the iTero Store (www.store.itero.com)or
click on the iTero Store tab in MyAligntech.
Check MyAligntech and Messages for upgrade notifications
and information on the monthly iTero Advanced Training
Webinars.
Align Technology, Inc.
2560 Orchard Parkway
San Jose, CA 95131
© 2016 Align Technology, Inc. All Rights Reserved.
76
Page 78

PDF Files
iTero®Element™Operation Manual
Invisalign®Outcome Simulator Quick Reference Guide
STL Export Instructions
iTero Element Video
Resources
© 2016 Align Technology, Inc. All Rights Reserved. | M20467 Rev A
77
 Loading...