

Page 1

Imaging system
instructions
for use
206721RevC_iTeroElement5D_IFU.indd 2 1/9/19 3:12 PM
Page 2

206721RevC_iTeroElement5D_IFU.indd 1 1/9/19 3:12 PM
Page 3
i
iTero Element 5D instructions for use English
Copyright
Copyright © by Align Technology, Inc. 2018. All rights reserved. The
information contained in this manual is subject to change without notice.
The hardware and software described in this manual are supplied under
a Sales and Services Agreement and may be used only in accordance
with the terms of that agreement.
No part of this document may be reproduced, photocopied, stored in a
retrieval system, or transmitted in any manner (electronic or mechanical)
for any purpose other than the customer’s normal usage, without the
prior written permission of Align Technology Inc.
This document describes the iTero® Element 5D Optical Impression
Device. English language version. Updated in November 2018.
Trademarks
The following are trademarks and/or service marks of Align Technology,
Inc. or one of its subsidiaries or aliated companies and may be
registered in the U.S. and/or other countries:
Align Technology Inc., iTero®
Any other trademarks or registered trademarks appearing in this
document are the property of their respective owners.
USA oce
Corporate Headquarters
Align Technology, Inc.
2820 Orchard Parkway
San Jose, California 95134
www.aligntech.com
Tel: +1 (408) 470-1000
Fax: +1 (408) 470-1010
Align Technology Ltd.
3 Ariel Sharon Boulevard
Or-Yehuda 6037606
Israel
Tel: +972 (3) 634-1441
Fax: +972 (3) 634-1440
Netherlands oce
International Headquarters
Align Technology B.V.
Arlandaweg 161
1043 HS Amsterdam
Tel: +31 (0) 20-586-3600
Fax: +31 (0) 20-586-3751
Customer support
Tel: +1 (800) 577-8767
E-mail:
iterosupport@aligntech.com
E-mail:
orthocadsupport@aligntech.com
Obelis s.a.
Boulevard Général Wahis 53
B - 1030 Brussels, Belgium
www.obelis.net
Tel: +32.2.732.59.54
Fax: +322.732.60.03
E-mail: zmail@obelis.net
206721RevC_iTeroElement5D_IFU.indd 1 1/9/19 3:12 PM
Page 4

206721RevC_iTeroElement5D_IFU.indd 2 1/9/19 3:12 PM
Page 5
1
iTero Element 5D instructions for use English
Table of contents
Introduction 2
Intended use 2
Chapter 1: System registration 3
Demo Mode 3
Make it Mine 3
Chapter 2: Logging in to the scanner application 6
Login 6
Create account 6
Forgot password 6
Chapter 3: iTero Element 5D main features 7
Home screen 7
Main desktop icons 7
Utility icons 8
Touch screen gestures 9
Wand controls 10
Demo Mode 10
Chapter 4: Messages 12
Chapter 5: Orders 13
Chapter 6: Scan 14
Start a new scan 14
Chapter 7: Element 5D screens 17
Review tool for iTero Element 5D imaging system 17
Using NIRI 18
Chapter 8: Patients 21
Chapter 9: iTero TimeLapse 22
Chapter 10: iTero Element 5D operational manual 24
Chapter 11: iTero Element 5D laptop configuration operational manual 24
206721RevC_iTeroElement5D_IFU.indd 1 1/9/19 3:12 PM
Page 6

2
iTero Element 5D instructions for use English
Introduction
The iTero Element 5D intra-oral scanner is Align Technology’s latest
generation integrated scanner and software system. It enables doctors
to take 3D digital scans of patients’ teeth and bite, make adjustments of
the scan in real time and transmit the results wirelessly.
This user guide provides general information and an overview of
the application.
Intended use
The iTero Element 5D is an intra-oral scanner with the following features
and intended/indicated for use:
1. The optical impression (CAD/CAM) feature of iTero Element 5D is
intended/indicated for use to record the topographical images of
teeth and oral tissue. Data generated from iTero may be used in
conjunction with the production of dental devices (e.g., aligners,
braces, appliances, etc.) and accessories.
2. iTero Element 5D software is used with the iTero Element 5D
scanner in capturing 3D digital impressions of teeth, oral soft
tissue and structures, and bite relationship. iTero software controls
the processing of the data, facilitating the integration of data, and
exporting of the data for CAD/CAM fabrication of dental restorations,
orthodontic devices, abutments, and accessories. In addition to scan
data, various patient and case information can be imported/exported
or used for simulation purposes. Other functions are available for
verification and service of the system and to serve as an order
management tool.
3. The iTero Element 5D NIRI functionality, is a diagnostic aid for the
detection of interproximal caries lesions above the gingiva and for
monitoring the progress of such lesions.
This all-in-one system is available on a monitor with a fully interactive,
touch screen display and an easy-to-use scanner. The topography of a
patient’s teeth can be viewed on the screen as they are being scanned,
and determining the degree of occlusion of the bite can be analyzed as
the scan is completed.
In conjunction with the scanner, the application facilitates the following
tasks by:
• Capturing 3D digital impressions of teeth, oral soft tissue and
structures as they are being scanned.
• Enabling real-time viewing of the visual bite relationship once the
scan is completed.
• Managing the processing of the data.
• Sending the data wirelessly to designated providers for the
fabrication of dental restorations, orthodontic devices, abutments,
and accessories, etc.
• Using the data for simulation purposes.
The application also includes administrative capabilities which enable
the user to:
• Start a new scan.
• Place a new order for an existing patient or new patient.
• View orders in progress.
Review and/or track past orders.
206721RevC_iTeroElement5D_IFU.indd 2 1/9/19 3:12 PM
Page 7
3
iTero Element 5D instructions for use English
Chapter 1:
System registration
Demo Mode
Press Demo Mode to familiarize yourself with the scanner’s features
and perform practice scans without submitting the scans. Demo Mode
is designed for training new sta members and practice. Demo Mode
is available anytime for dental practices to train on an iTero Element
5D device, for scanning techniques, how-to guidelines for prescription
forms, case types, and to familiarize with the iTero interface. Demo
Mode will feature all the aspects of the scanning process and include a
wide variety of cases. Sample cases oered will include clinical cases,
Invisalign cases, and restorative cases for your convenience.
When Demo Mode is in use for practice scanning, a lightly striped
background and red tag in the upper left-hand corner will indicate Demo
Mode. Any scans captured in Demo Mode cannot be saved or submitted
for patient treatment. Demo Mode is available to access on the Welcome
screen or at any point by pressing the iTero Element logo button on the
home screen.
Make it Mine
Press Make It Mine to register your scanner. Please have your
User Name, User Password, and Company ID ready to complete
the registration process. You will receive an email from an iTero
representative with login credentials and detailed information on the how
to Make it Mine procedure.
Demo Mode
Make it Mine
1
1
2
2
206721RevC_iTeroElement5D_IFU.indd 3 1/9/19 3:12 PM
Page 8
4
iTero Element 5D instructions for use English
1. Select the appropriate Network Connection
2. Network connection verification
3. Register the system
4. System is registered
206721RevC_iTeroElement5D_IFU.indd 4 1/9/19 3:12 PM
Page 9

5
iTero Element 5D instructions for use English
5. Accept the License Agreement 7. System is now ready
6. Updating SW to the latest version
206721RevC_iTeroElement5D_IFU.indd 5 1/9/19 3:12 PM
Page 10
6
iTero Element 5D instructions for use English
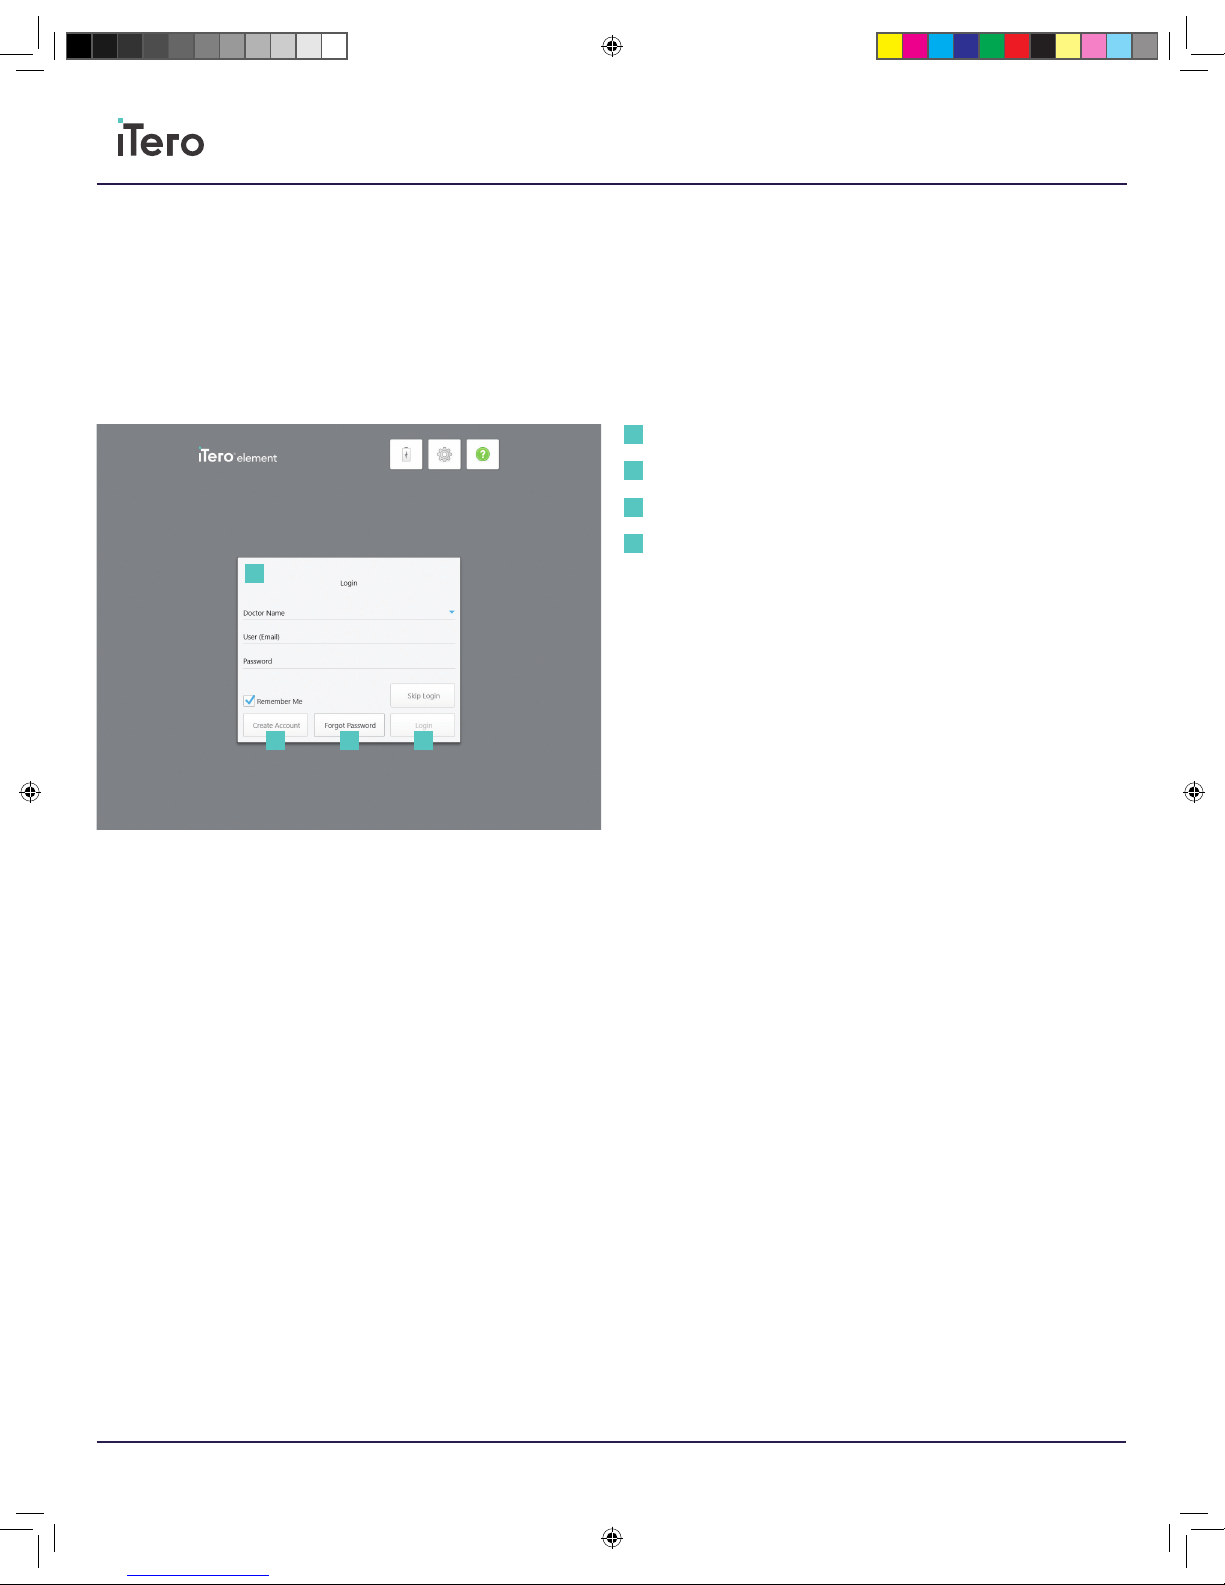
Login
When the scanner is powered on, the login screen for the iTero Element
5D will appear.
Please have your MyiTero account information ready when logging
in to the iTero Scanner. You will need your name, account email, and
password. Fill out all the necessary fields and click the Login button.
Create account
To create an account, please press the bottom button labeled Create
Account. Enter an email and create an account to use on the iTero
Scanner and MyiTero.com.
Forgot password
If you forgot your password, press the lower button labeled Forgot
Password. Enter your registered account email and a temporary
password will be sent to your email. Alternatively, answer your
predetermined security question and gain access to the account from
the scanner.
Chapter 2:
Logging in to the scanner application
User information
Create Account
Forgot Password
Login
1
1
2
2
3
3
4
4
206721RevC_iTeroElement5D_IFU.indd 6 1/9/19 3:12 PM
Page 11

7
iTero Element 5D instructions for use English
Home screen
The iTero Element 5D home screen provides access to all the main
features of the iTero software.
Below is an image of the iTero Element 5D application’s home screen.
Main desktop icons
There are four main home screen icons for the iTero Element
5D software.
New Scan: To begin a new scan for a patient, select the New Scan
icon. This home screen icon navigates to the iTero Rx form to fill out the
prescription form for a patient and begin scanning.
Patients: To look up any patient on your system, select the Patients
icon. This home screen icon navigates to the Patients page. Search for a
specific patient, scroll through recently scanned patients, review scans,
access iTero TimeLapse, view patient history, add new scans, or add a
treatment plan.
Orders: To view the status of your orders, select the Orders icon. This
home screen icon navigates to a list of orders in progress or past orders.
Messages: To read messages, select the Messages icon. This home
screen icon navigates to the message inbox, where you may read on the
latest notifications from the Align team regarding new updates, improved
features, enhanced tools, and latest developments.
Chapter 3:
iTero Element 5D main features
Main home screen icons
Utility icons
1
1
2
2
206721RevC_iTeroElement5D_IFU.indd 7 1/9/19 3:12 PM
Page 12
8
iTero Element 5D instructions for use English
Utility icons
Battery: To view the charge on the iTero external battery, press the
Battery icon. A battery indicator will appear and specify how long the
battery has until the iTero Element 5D may need to be charged again.
When the battery icon displays a lightning bolt symbol, the battery is
charging. Note: this feature only appears in supported iTero Element
5D scanners.
Learning Center: To access training materials and educational videos for
your iTero Element 5D, press the Learning Center icon.
Lock: To log out of an account whenever the iTero Element 5D is not in
use, press the Lock icon. This will help ensure that the dental practice is
HIPAA compliant and that all medical information is secure.
Settings: To adjust preferences for your iTero Element 5D like
wand configuration, localization, user settings, and more, press the
Settings icon.
Help: To navigate icons for home screen and helpful hints, press the
Help icon. A transparent Help overlay appears over the screen to aid
in navigation of features and tools. At any time, tap the Help icon for
assistance. Tap anywhere to close the Help screen and return to the
relevant screen. Customer support is available on every Help overlay.
206721RevC_iTeroElement5D_IFU.indd 8 1/9/19 3:12 PM
Page 13
9
iTero Element 5D instructions for use English
x1
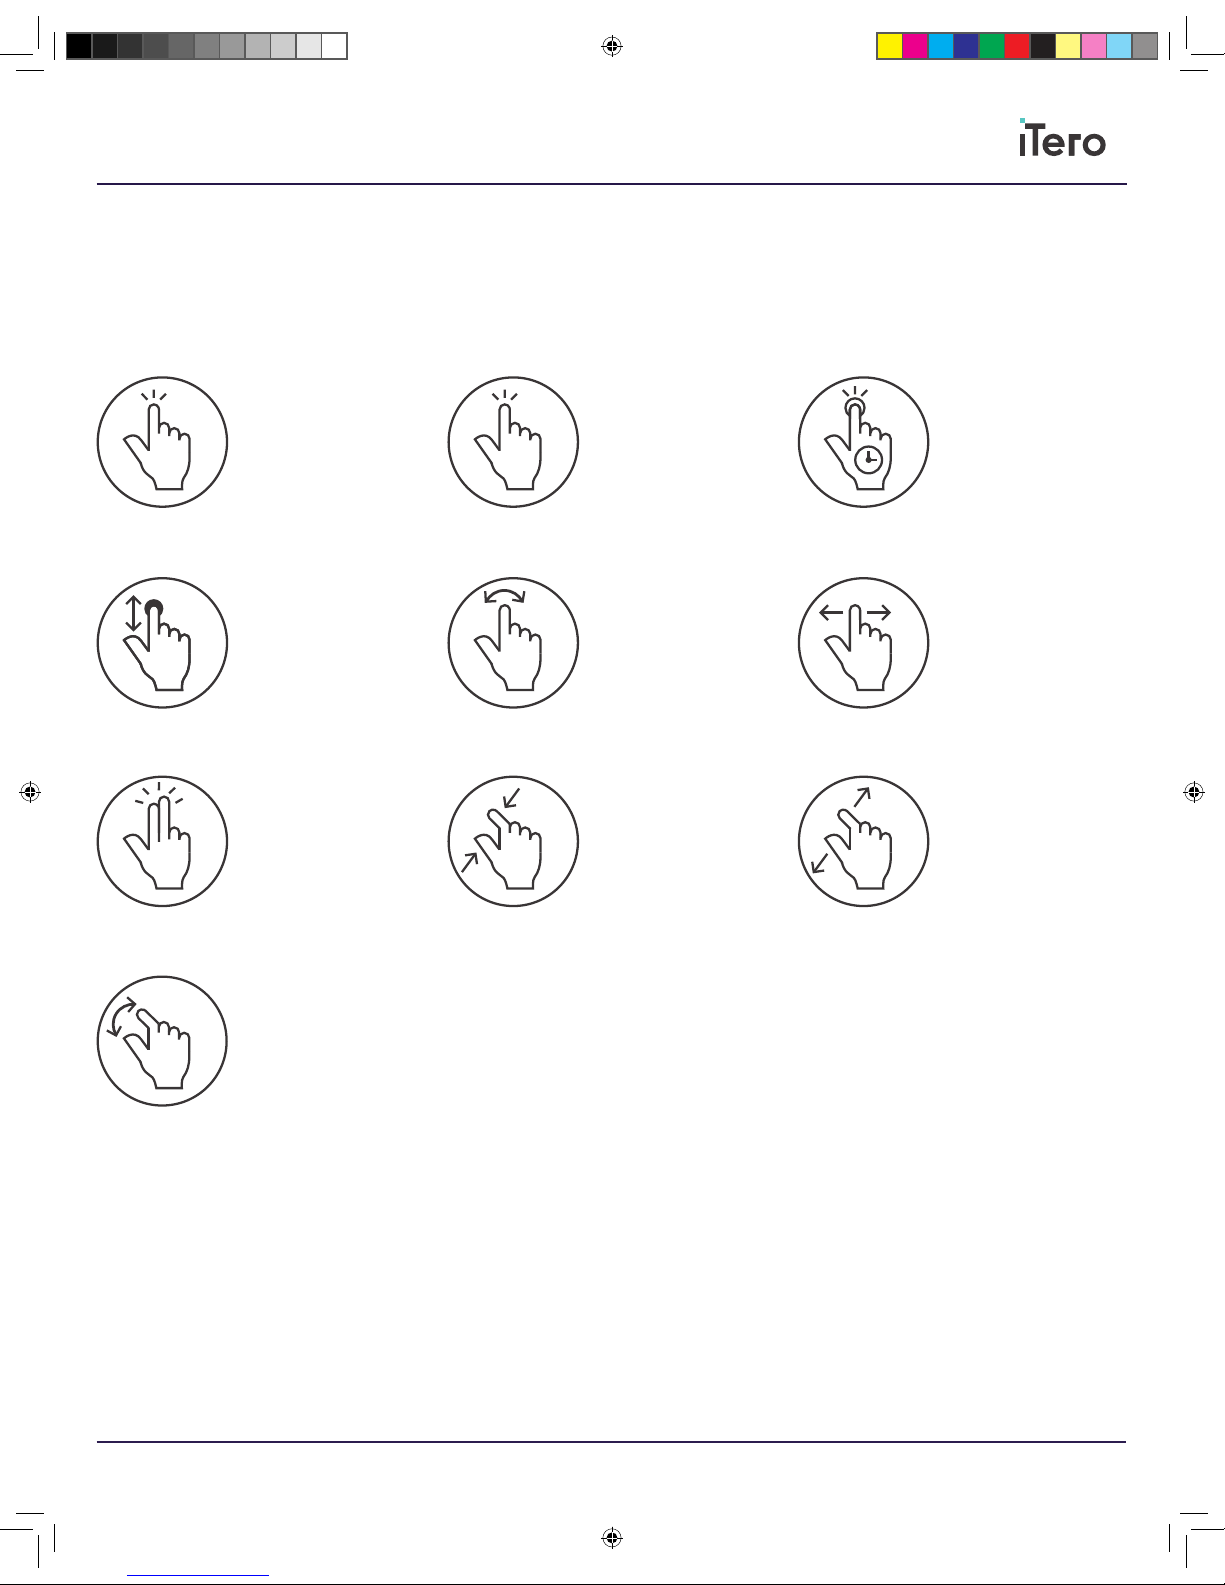
Touch screen gestures
iTero Element 5D application supports touch screen (also known as
multi-touch) gestures. These gestures are predefined motions used to
interact with multi-touch devices.
Examples of common touch screen gestures:
Tap
Scroll
2 finger tap
Pan
Double tap
Rotate
Zoom in/pinch
Long press
Swipe
Zoom out
x2
206721RevC_iTeroElement5D_IFU.indd 9 1/9/19 3:12 PM
Page 14

10
iTero Element 5D instructions for use English
Wand controls
Side buttons: Press and release either of the side buttons on the wand to
start or stop the scanning process. Press the buttons simultaneously to
activate the touchpad.
Touchpad: Once activated, swipe left or right on the touchpad to
navigate between scan segments. Press and hold the touchpad will
enable the gyro function to rotate the model on the screen.
Demo Mode
To access demo mode, press the iTero Element logo on the upper left
side of the home screen. A menu will appear to press Demo Mode or to
cancel and return to the home screen. Demo Mode will appear with all
the same functionality as when taking a normal scan. No data will be
permanently saved.
Side buttons
Touchpad
1
1
2
2
Demo Mode
Exit to Windows
Cancel
1
2
3
1
2
3
206721RevC_iTeroElement5D_IFU.indd 10 1/9/19 3:12 PM
Page 15

11
iTero Element 5D instructions for use English
Demo Mode: Initiate Demo Mode for practice without saving any data.
Exit to Windows: To Exit the iTero interface and return to Windows. Note:
Only available on iTero laptop configuration devices.
Cancel: To exit from the screen and return to normal use.
Demo Mode tag: The red tag indicator when using Demo Mode.
Striped background: A striped background will appear while scanning. It
is designed to prevent scanning real patients in Demo Mode.
Practice any portion of the patient experience. Any scans taken during
Demo Mode cannot be submitted for treatment. To exit Demo Mode,
please go back to the home screen and press the iTero Element logo.
The menu for Demo Mode will appear in order to exit Demo Mode.
1
Demo Mode tag
Striped background
1
2
2
206721RevC_iTeroElement5D_IFU.indd 11 1/9/19 3:12 PM
Page 16

12
iTero Element 5D instructions for use English
Press the Messages icon from the home screen to view notifications,
updates and other messages from Align Technology. On the left side of
the page, search for specific messages by subject title quickly or, press
on the right side of the screen and scroll down the page to search and
find a specific message. To mark any message as unread, press Mark
as Unread.
Chapter 4:
Messages
Inbox
Mark as Unread
1
1
2
2
206721RevC_iTeroElement5D_IFU.indd 12 1/9/19 3:12 PM
Page 17
13
iTero Element 5D instructions for use English
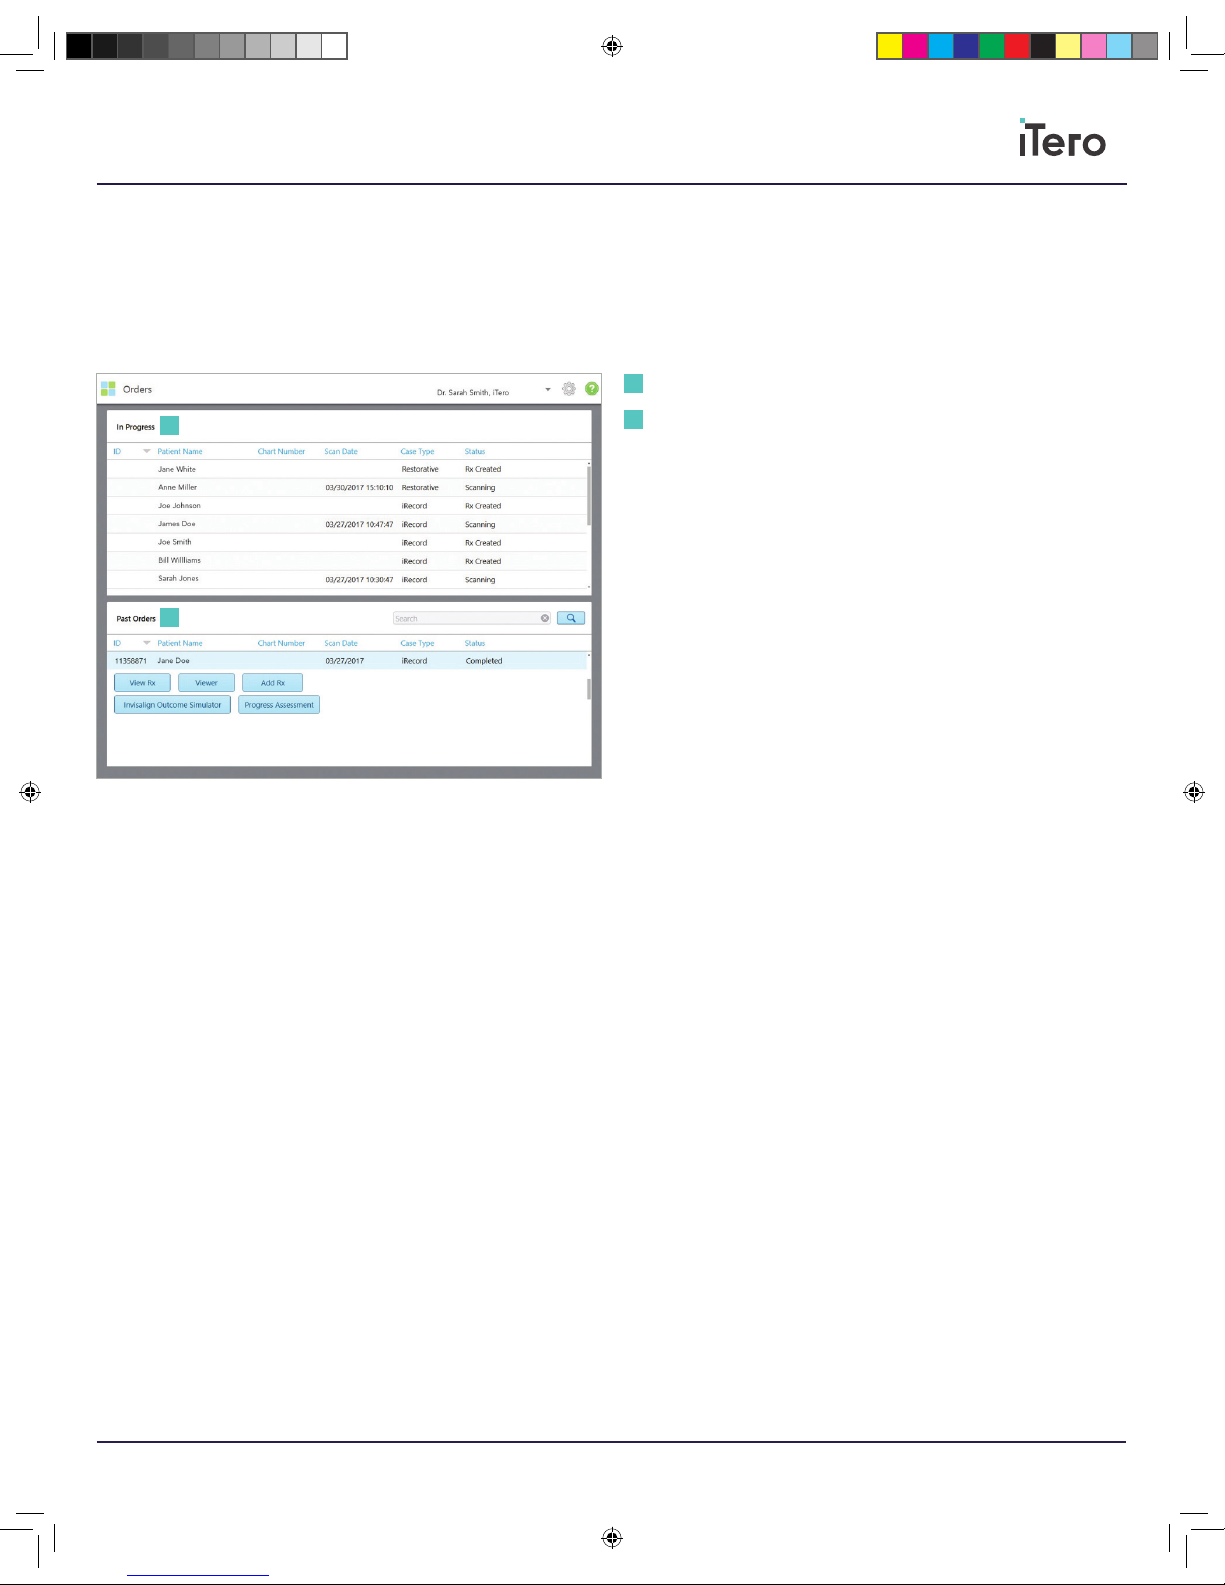
Tap on the Orders icon to view or review In Progress or Past Orders.
In Progress: Scans that have not been submitted.
Past Orders: Orders that have been submitted. Press on any order to
check the status of the scan.
Clicking on a past order shows the following options, depending on the
case type.
View Rx: View the prescription for this order.
Viewer: View the scans for this order.
Add Rx: Add a prescription for this order (only applicable for Orthodontic
orders and available up to 21 days after a scan).
Invisalign doctors may also select Invisalign features such as Invisalign
Outcome Simulator.
Chapter 5:
Orders
In Progress
Past Orders
1
1
2
2
206721RevC_iTeroElement5D_IFU.indd 13 1/9/19 3:12 PM
Page 18

14
iTero Element 5D instructions for use English
Start a new scan
To start a new scan, press the New Scan icon from the home screen or
press the new scan button from the Patient page.
Prescription icon: The first step in the New Scan workflow. Fill out the
prescription form with patient information, case type, and any notes
to include.
Scan icon: The second step in the New Scan workflow. Scan the patient
for a new scan to be captured.
View and Review icon: The third step in the New Scan workflow. Inspect
the scan and examine that all adequate data has been captured.
Send Case icon: The final step in the New Scan workflow. Sign the
confirmation form and send the case to its destination for storage or
additional work needed.
For Restorative cases, select the case type and restoration needs for
the appropriate indication. For Orthodontic cases, such as Invisalign or
iRecord, select the case type and enter in patient information.
Chapter 6:
Scan
Patient information
Case Type
Notes
1
1
2
2
3
3
206721RevC_iTeroElement5D_IFU.indd 14 1/9/19 3:12 PM
Page 19

15
iTero Element 5D instructions for use English
After selecting the case type for a patient, please begin scanning.
To start a scan, tap the scan icon.
Scan feedback: To view any missing tooth, soft tissue, or oral structure
during the scan.
Color: To switch from scan to color view.
View finder: View the wand’s current positioning.
Toggle View: Toggle between displaying a color image or a NIRI image in
the viewfinder
Enlarge View: Switch to a large viewfinder in the middle of the screen
1
Select a lab to send the case
Select the restoration type
from the dropdown
1
2
Real time modeling
View finder
Color
Scan feedback
Toggle view
Enlarge view
1
1
2
2
2
3
3
4
4
5
6
5
6
206721RevC_iTeroElement5D_IFU.indd 15 1/9/19 3:12 PM
Page 20

16
iTero Element 5D instructions for use English
After reviewing the scan, sign the Rx form and send the scan to complete
the case.
Signature box: Sign your signature here with a finger. Check “Save
Signature” to store a signature away for future ease and use. Check
“Don’t show again” to eliminate this step.
Clear: To clear a signature from the signature box.
Confirm & Send: Confirm scan has been reviewed and send the scan to
a lab or iTero storage.
Signature box
Clear
Confirm & Send
1
1
2
2
3
3
206721RevC_iTeroElement5D_IFU.indd 16 1/9/19 3:12 PM
Page 21

17
iTero Element 5D instructions for use English
Chapter 7:
iTero Element 5D screens
In addition to scanning, the iTero Element 5D scanner provides a Near
Infra-Red Imaging (NIRI) mode. The NIRI and ViewFinder color images
are captured during the scan, and can be reviewed, once scanning
has completed.
Review tool for iTero Element 5D imaging systems
After scan is completed, go to View and Review icon, inspect the scan
and examine that all adequate data has been captured, including NIRI
and color images, on specific locations in the mouth.
Review tool: Displays the Color and NIRI images captured during scan
Loupe: When loupe is dragged to the scan, the Color and NIRI images
are displayed according to the specific location of the loupe on the scan
Review tool
Loupe
1
2
1
2
206721RevC_iTeroElement5D_IFU.indd 17 1/9/19 3:12 PM
Page 22

18
iTero Element 5D instructions for use English
Zoom in button: Viewfinder window will be enlarged and only the specific
image will be displayed in the viewfinder.
Brightness and contrast toolbar: Opens the brightness and contrast
adjustment toolbar.
After review and confirmation that the scan has been captured with
sucient data, the following features can be used to view the scan in
color or monochrome, edit the scan, remove any extra scanned artifacts,
and erase additional scanned materials.
Using NIRI
NIRI provides imaging of the internal tooth structure.
Structure translucency translates in the NIRI image to brightness level;
the darker the object the higher is its translucency and vice versa.
Healthy enamel appears dark, translucent, while dentin or caries are less
translucent and appear brighter.
Proximal lesion will appear as bright stripe/wedge-like features as in the
image above, in this case proximal lesion reaching all the way to
the dentin.
Zoom in button
Brightness and contrast toolbar
1
2
1
2
206721RevC_iTeroElement5D_IFU.indd 18 1/9/19 3:12 PM
Page 23

19
iTero Element 5D instructions for use English
Changing viewing angle around such area may provide more information
regarding its depth, while using the color image may help dierentiate the
diagnosis as well as the lesions severity.
In addition to the NIRI, the color images are also provided to give more
information regarding the tooth’s health, and help with the diagnosis.
The NIRI above demonstrates two proximal lesions circled in red,
reaching all the way to the dentin, while the color image helps determine
that the lesions are proximal and not occlusal, as no white/brown spots
appear in the correlating areas of the occlusal surface in the color image.
The dark lines marked by the blue arrows indicate occlusal fissures.
Note: Highly opaque teeth will have low translucency of the enamel
making it appear brighter, this may cause diculty in understanding
internal tooth’s structures, and dierentiating between enamel and
dentin, thus aecting the ability to detect proximal caries. In addition,
several dental restorations such as amalgam fillings are not translucent
for the NIRI, meaning they may mask lesions underneath them.
NIRI along with the color images can assist in the detection of
proximal caries.
206721RevC_iTeroElement5D_IFU.indd 19 1/9/19 3:12 PM
Page 24

20
iTero Element 5D instructions for use English
Proximal caries
Scoring provided according to ICDAS-II standard
• Sound enamel, will appear without any noticeable bright spots,
meaning it will resemble a dark ring circling a bright inner circle
representing the dentin.
• Enamel caries appear as a bright spot, which is not reaching the dentin.
• Caries reaching EDJ will appear as bright spot in the enamel dark ring,
which connects, to the bright dentin.
• Bright spot in the enamel which is connecting significantly to the
bright dentin, may indicate a dentinal/cavitated caries.
206721RevC_iTeroElement5D_IFU.indd 20 1/9/19 3:12 PM
Page 25

21
iTero Element 5D instructions for use English
On the home screen, press the icon labeled Patients to locate a
patient and their scans. Press on a patient to add a new scan or view
previous scans.
Patient page: View any patients, see historical scans associated with the
patient, access iTero TimeLapse, or add a new scan.
Search bar: Search for specific patients using their names or
chart numbers.
Chapter 8:
Patients
Patient page
Search bar
1
1
2
2
206721RevC_iTeroElement5D_IFU.indd 21 1/9/19 3:12 PM
Page 26

22
iTero Element 5D instructions for use English
iTero TimeLapse compares previously captured patient’s 3D scans to
allow a clinician to visualize changes of a patient’s teeth, tooth structures,
and oral soft tissues.
Patients scanned on a regular basis can be analyzed using the iTero
TimeLapse tool.
In the patient’s profile, select two scans from the timeline at the bottom
of the screen. Once two scans are selected, press the Compare
Selected button to analyze the scans.
Timeline: Scans taken over time of the patient.
Scan selection checkboxes: Selected scans to compare and visualize in
iTero TimeLapse.
Compare selected: Analyze scans using iTero TimeLapse.
Chapter 9:
iTero TimeLapse
Timeline
Scan selection checkboxes
Compare selected
1
1
2
2
3
3
206721RevC_iTeroElement5D_IFU.indd 22 1/9/19 3:12 PM
Page 27

23
iTero Element 5D instructions for use English
Color Legend: Highlighted areas with the most changes between scans
with rich color. Scale measurements are in millimeters.
Loupe: To view areas in detail and visualize points on interest in the
Animation Window. Drag the loupe from the animation window to the area
of interest in order to magnify potential treatment spots. The areas in
which appear in the loupe will be magnified within the animation window.
Animation window: Visualize fine details of changes for the
scans selected.
Color visibility: Toggle between monochrome and color in the
Animation Window.
Play/pause: To play or pause the Animation Window.
1
2
Color Legend
Loupe
Animation window
Color visibility
Play/pause
1
2
3
3
4
4
5
5
206721RevC_iTeroElement5D_IFU.indd 23 1/9/19 3:12 PM
Page 28
24
iTero Element 5D instructions for use English
Chapter 10:
iTero Element 5D
Operational manual
The iTero Element 5D system is delivered as a proprietary, PC-based
workstation for performing intra-oral scans in the doctor’s oce. This
document describes how to start and shut down the system, how to
correctly handle the Scanning Unit/Wand and cable, and how to clean
the Scanning Unit and replace its sleeves between patients.
This section is referenced from the iTero Element 5D operational
manual 206519
Chapter 11:
iTero Element 5D laptop
configuration
Operational manual
The iTero Element 5D laptop configuration system is delivered as a
proprietary, laptop based workstation for performing intra-oral scans in
the doctor’s oce. This document describes how to start and shut down
the system, how to correctly handle the Scanning Unit/Wand and cable,
and how to clean the Scanning Unit and replace its sleeves
between patients.
This section is referenced from the iTero Element 5D laptop configuration
operational manual 206520
206721RevC_iTeroElement5D_IFU.indd 24 1/9/19 3:12 PM
Page 29

25
iTero Element 5D instructions for use English
Notes:
206721RevC_iTeroElement5D_IFU.indd 25 1/9/19 3:12 PM
Page 30

206721RevC_iTeroElement5D_IFU.indd 26 1/9/19 3:12 PM
Page 31

206721RevC_iTeroElement5D_IFU.indd 27 1/9/19 3:12 PM
Page 32
Align, Invisalign, iTero, iTero Element, and iTero Element 5D among others, are
trademarks and/or service marks of Align Technology, Inc. or one of its subsidiaries
or a liated companies and may be registered in the U.S. and/or other countries.
© 2018 Align Technology, Inc. All Rights Reserved. 206721 Rev C
Align Technology, Inc.
2820 Orchard Parkway
San Jose, CA 95134
USA
Align Technology B.V.
Arlandaweg 161
1043HS Amsterdam
The Netherlands
206721RevC_iTeroElement5D_IFU.indd 1 1/9/19 3:12 PM
 Loading...