

Page 1
K
wxyz
wxyz
CCaalllleerrIIDDSSyysstteemmOOppeerraattiioon
n
EEddiittiinnggaaNNaammeeaannddNNuummbbeerriinntthheePPHHOONNEEBBOOOOK
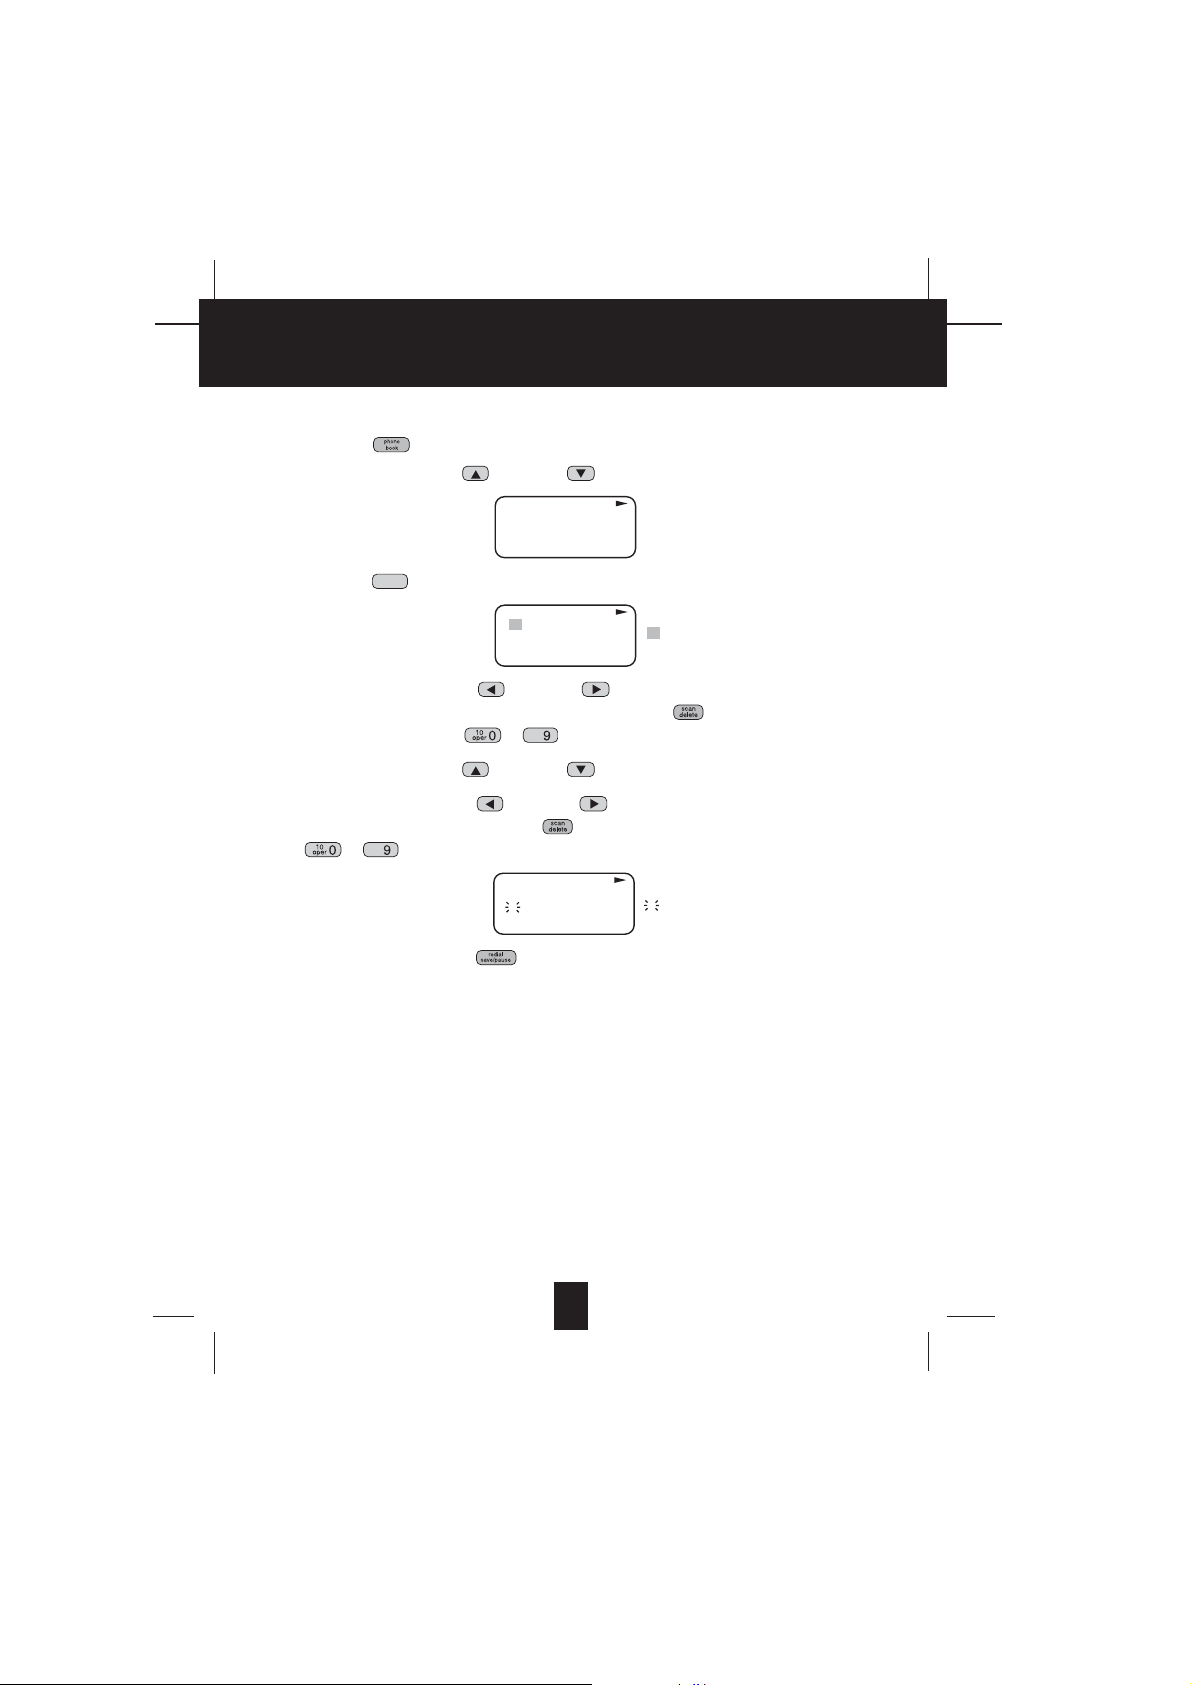
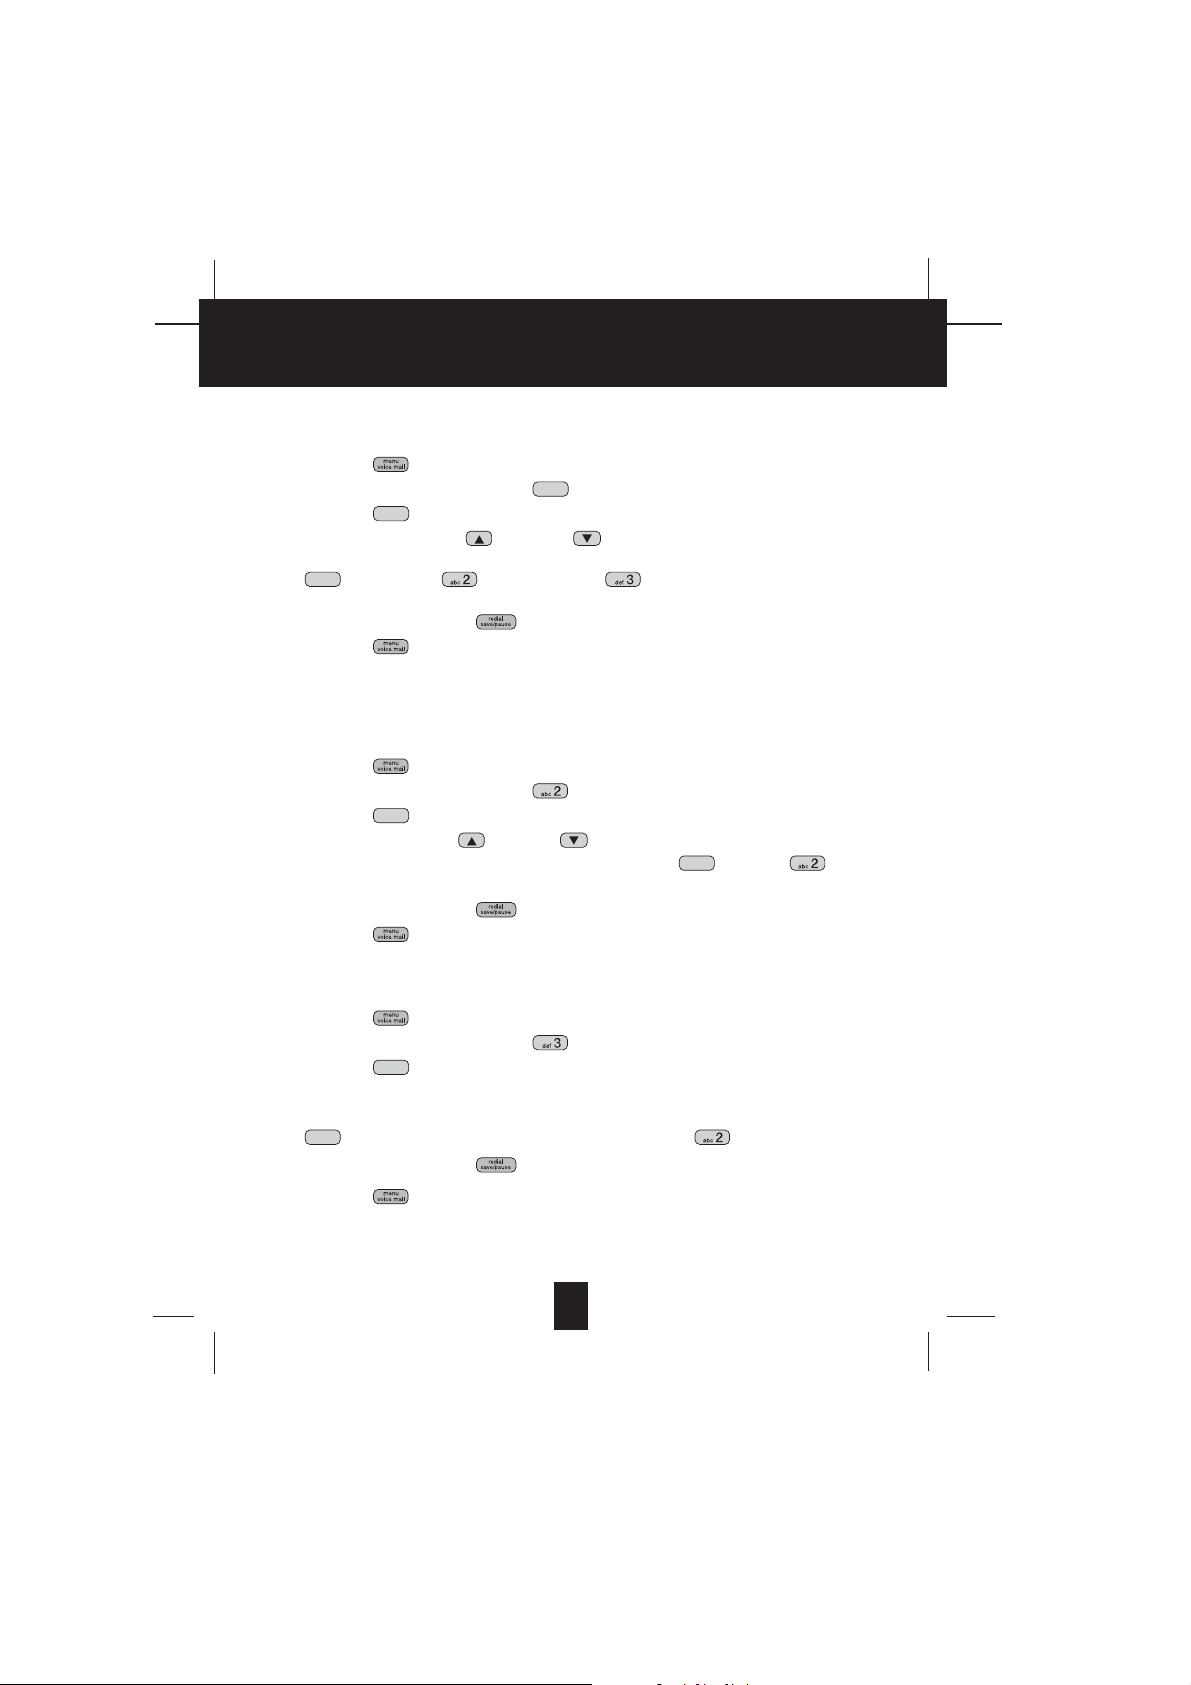
1. Press the button. The LCD Screen will display “DIRECTORY”.
2. Press the SCROLL UP or DOWN button to find the record you want to edit.
MICHAEL BROW
604-555-1212
3. Press the button to edit the name, and the cursor will blink over the first character.
edit
MICHAEL BROW
604 555 1212
DIR
#
TOTAL
8
12
DIR
cursor is blinking
#
TOTAL
8
12
4. Press the SCROLL LEFT or RIGHT button to move the cursor to the letter or
number you want to change. To erase, press the button. To add, use the
TELEPHONE KEYPAD ~ buttons. (See page 27 for details.)
5. Press the SCROLL UP or DOWN button to edit the number.
6. Press the SCROLL LEFT or RIGHT button to move the cursor to the digit you
want to change. To erase, press the button. To add, use the TELEPHONE KEYPAD
~ buttons. (See page 27 for details.)
MICHAEL BROW
604 555 1212
DIR
#
8
6 cursor is blinking
TOTAL
12
7. Press and hold down the button to confirm.
IMPORTANT: It is not advisable to save a telephone number without the corresponding
name in the PHONEBOOK. This will lead to improper displays on PRIVATE
and OUT OF AREA calls.
NOTE: When no active buttons are pressed for 20 seconds, the LCD Screen will
automatically return to STANDBY mode.
19
Page 2
g
wxyz
CCaalllleerrIIDDSSyysstteemmOOppeerraattiioon
n
EEddiittiinnggaaNNuummbbeerriinntthheePPHHOONNEEBBOOOOKKbbeeffoorreeDDiiaalliinng
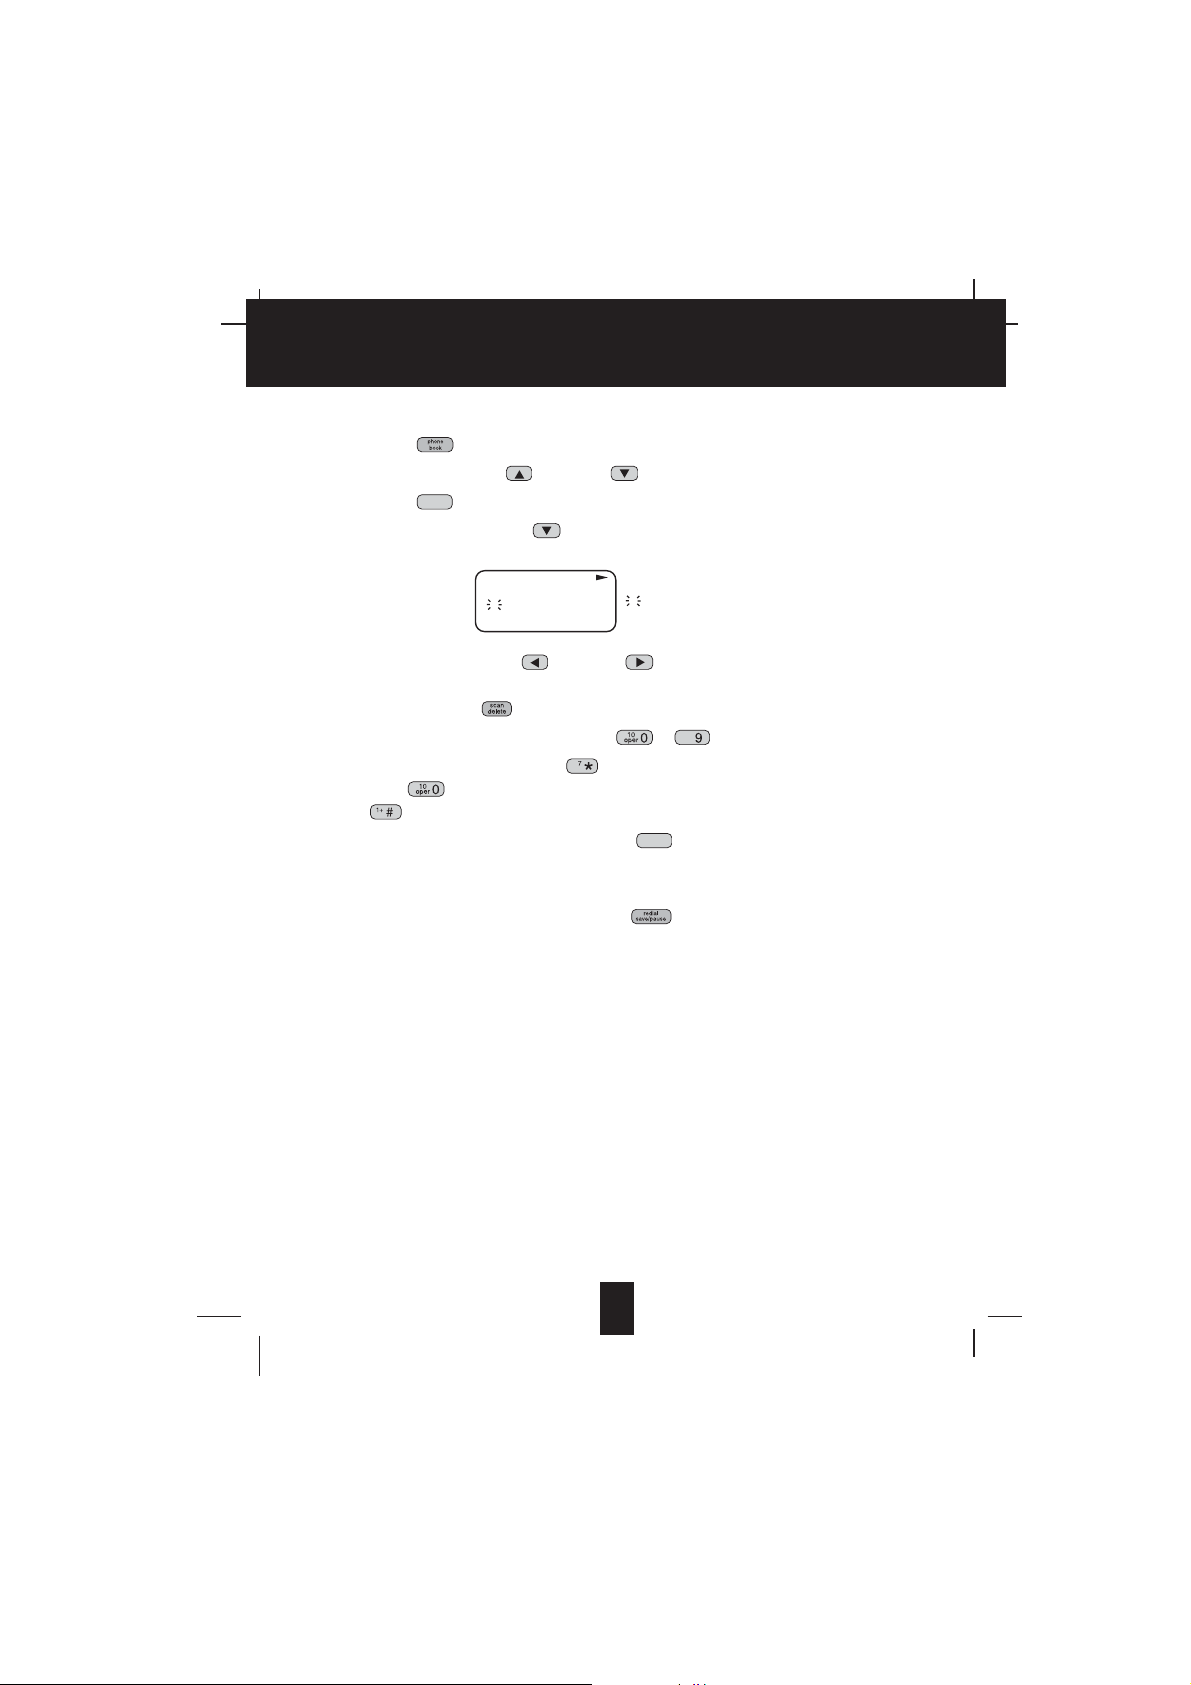
1. Press the button. The LCD Screen will display “DIRECTORY”.
2. Press the SCROLL UP or DOWN button to find the caller.
3. Press the button to edit the name.
edit
4. Press the SCROLL DOWN button.
e.g.:
MICHAEL BROW
604 555 1212
DIR
#
1
6 cursor is blinking
TOTAL
12
5. Press the SCROLL LEFT or RIGHT button to move the cursor to the number
you want to change.
To erase, press the button.
To add, use the TELEPHONE KEYPAD ~ buttons.
6. Press and hold down the DIAL 7 button for a local call, or press and hold down the
DIAL 10 button for a local call with area code, or press and hold down the DIAL
1+ button for a long distance call.
7. To end your conversation, either press the button or place the HANDSET on the
talk
BASE UNIT.
NOTE: If you want to save the edited number in the PHONEBOOK, follow steps 1 through
5 and then press and hold down the button.
20
Page 3
K
K
K
CCaalllleerrIIDDSSyysstteemmOOppeerraattiioon
n
PPllaacciinnggCCaallllssffrroommtthheePPHHOONNEEBBOOOOK
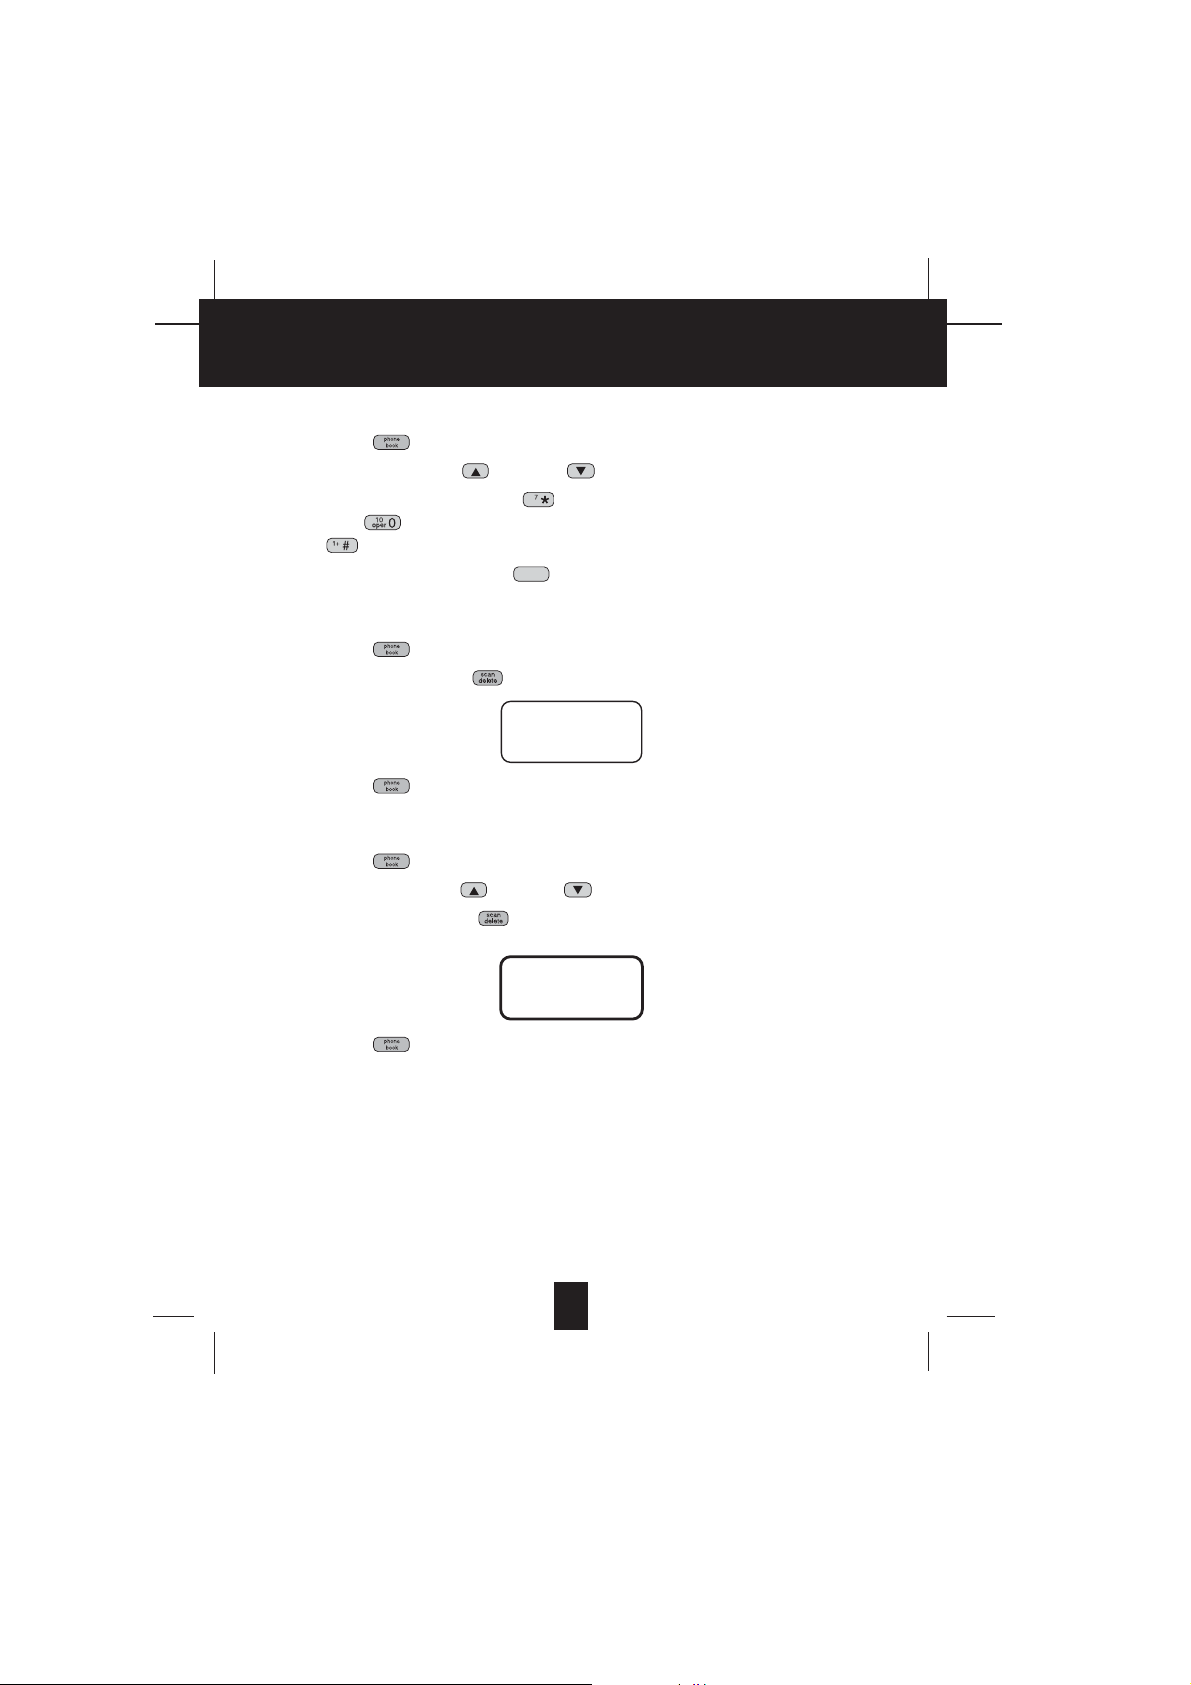
1. Press the button. The LCD Screen will display “DIRECTORY”.
2. Press the SCROLL UP or DOWN button to find the record you want to call.
3. Press and hold down the DIAL 7 button for a local call, or press and hold down the
DIAL 10 button for a local call with area code, or press and hold down the DIAL
1+ button for a long distance call.
4. To end the call, either press the button or place the HANDSET on the BASE UNIT.
DDeelleettiinnggAAllllRReeccoorrddssiinntthheePPHHOONNEEBBOOOOK
1. Press the button. The LCD Screen will display “DIRECTORY”.
2. Press and hold down the button for at least 3 seconds while in DIRECTORY mode.
3. Press the button to return to STANDBY mode.
SSeelleeccttiivveeDDeelleettiinnggiinntthheePPHHOONNEEBBOOOOK
1. Press the button. The LCD Screen will display “DIRECTORY”.
2. Press the SCROLL UP or DOWN button to find the record you want to delete.
3. Press and hold down the button for at least 3 seconds, then the LCD Screen will
display the next record in the PHONEBOOK.
talk
ALL DELETE
10:00AM8/24
DELETE
TOTAL
0
#
TOTAL
5
12
4. Press the button to return to STANDBY mode.
21
Page 4
n
wxyz
CCaalllleerrIIDDSSyysstteemmOOppeerraattiioon
n
wxyz
FFuunnccttiioonnOOppeerraattiioon
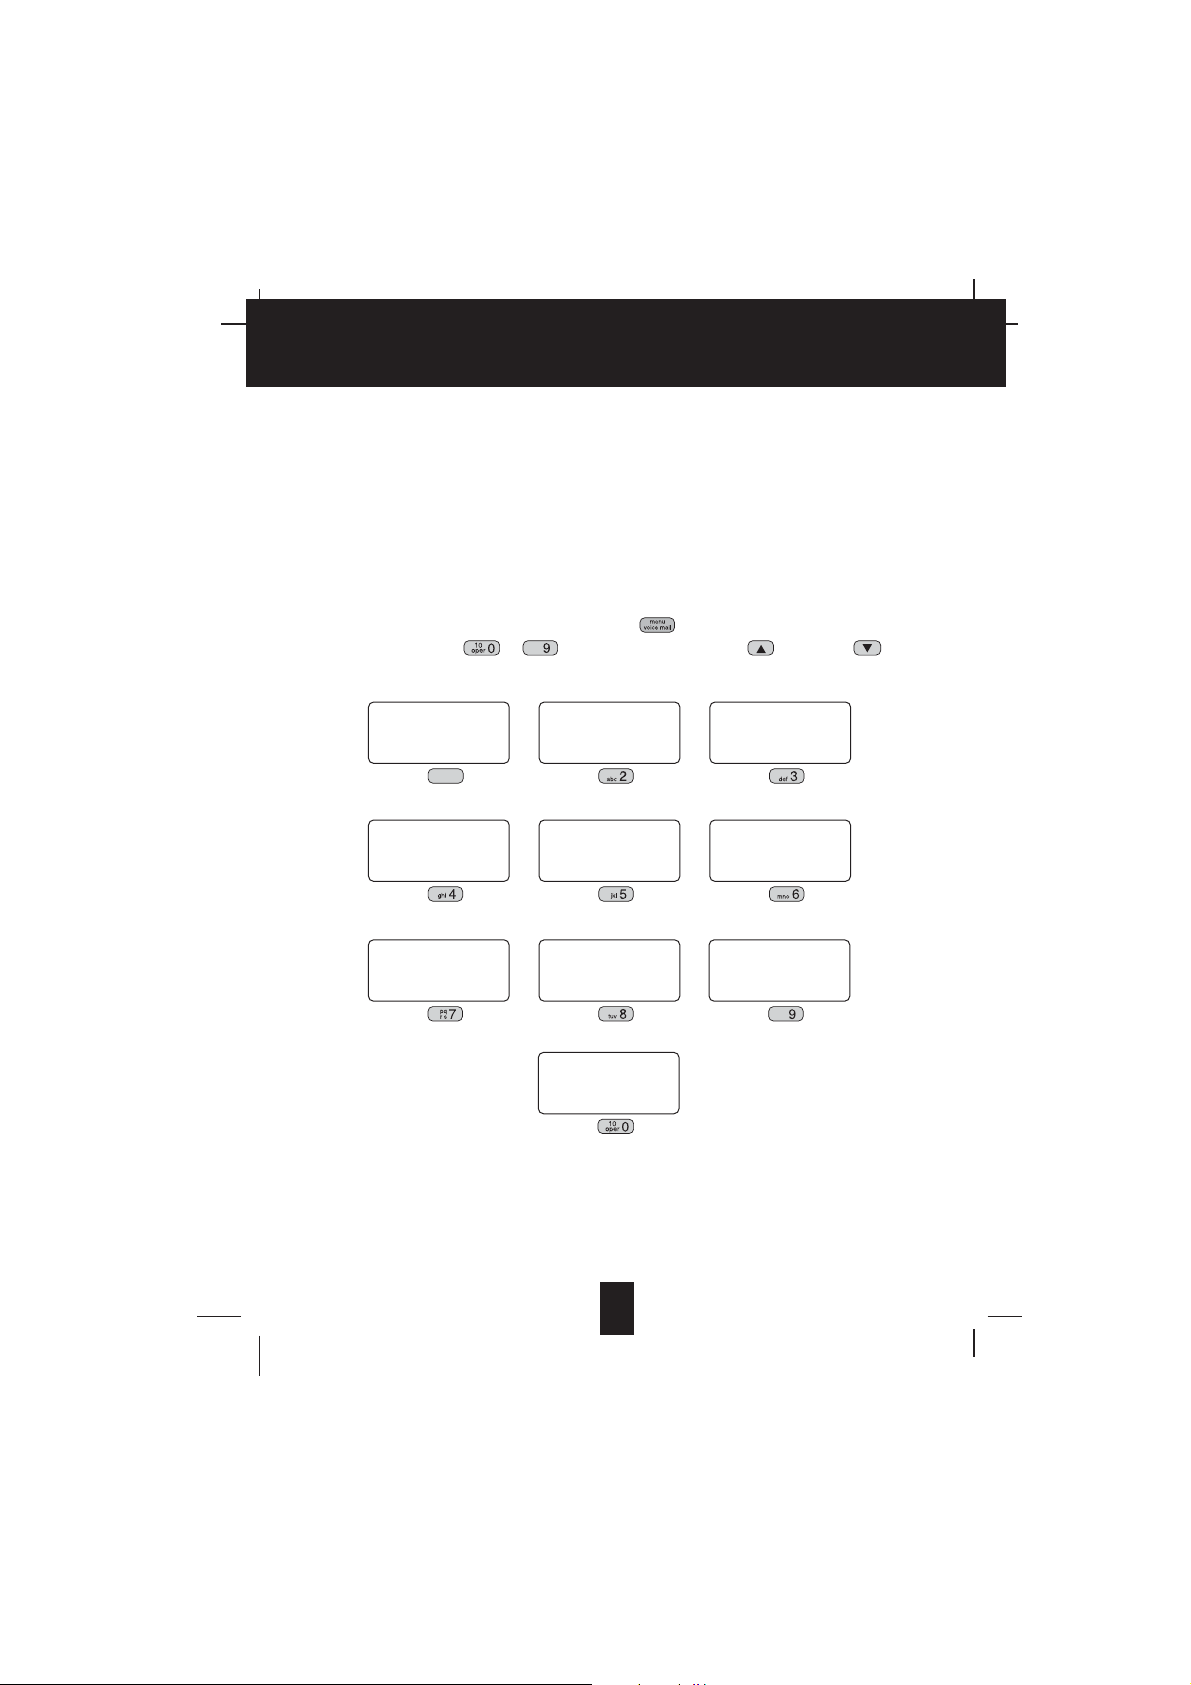
You can change the settings on the HANDSET through the functions menu.
This unit contains the following special functions:
A. LANGUAGE F. PBX NUMBER
B. SILENT ON/OFF G. FLASH TIME
C. TIME SET H. PAUSE TIME
D. RINGER VOLUME I. VOICE MAIL
E. (LCD) CONTRAST J. MSG WAITING
With the HANDSET in STANDBY mode, press the button. Then press the corresponding
TELEPHONE KEYPAD ~ button or the SCROLL UP or DOWN button
to access the desired setting.
ENGLISH
#
TOTAL
1
KEYPAD Button
1
RING: HI
#
TOTAL
4
KEYPAD Button
FLASH TIME
600
#
TOTAL
7
KEYPAD Button
SILENT
10
KEYPAD Button
CONTRAST
10
KEYPAD Button
PAUSE TIME
10
KEYPAD Button
10
TIME SET
10:00AM8/24#3
TOTAL
10
#
OFF
2
TOTAL
KEYPAD Button
10
PBX NO.
OFF
#
6
TOTAL
10
1
#
TOTAL
5
KEYPAD Button
10
VOICE MAIL
#
TOTAL
9
10
4
#
TOTAL
8
KEYPAD Button
MSG WAITING
OFF
#
TOTAL
10
10
KEYPAD Button
22
Page 5
e
f
t
CCaalllleerrIIDDSSyysstteemmOOppeerraattiioon
n
AA..LLaanngguuaagge
This telephone offers English, Spanish, and French languages for your convenience.
1. Press the button.
2. Press the TELEPHONE KEYPAD button.
3. Press the button.
4. Press the SCROLL UP or DOWN button to select the language you desire.
5. Press and hold down the button.
6. Press the button to return to STANDBY mode.
BB..FFIIRRSSTTRRIINNGG//SSiilleennttOOnnoorrOOfff
This telephone will generate the first ring sound even in the BLOCKED CALL mode to
indicate that you have an incoming call. To keep the ringer silent in BLOCKED CALL mode,
you can turn off the first ring sound.
1. Press the button.
2. Press the TELEPHONE KEYPAD button.
3. Press the button.
4. Press the SCROLL UP or DOWN button to select the SILENT ON/OFF setting.
5. Press and hold down the button.
6. Press the button to return to STANDBY mode.
CC..TTiimmeeSSeet
Set the date and time.
1. Press the button.
2. Press the TELEPHONE KEYPAD button.
3. Press the button.
4. Use the TELEPHONE KEYPAD button to enter the month, date, hour, and minute. The
5. Press and hold down the button.
6. Press the button to return to STANDBY mode.
1
edit
You can also set the language by pressing the following TELEPHONE KEYPAD buttons;
1
for English, for Spanish, or for French. English is the preset
language.
edit
You can also press the TELEPHONE KEYPAD buttons; for ON or for OFF.
SILENT OFF is the preset mode.
1
edit
cursor moves automatically after entering each item. Press the TELEPHONE KEYPAD
1
for AM setting, or press the TELEPHONE KEYPAD for PM setting.
NOTE: If you have subscribed to the Caller ID service from your local telephone company,
the date and time will automatically be set with the first incoming call.
23
Page 6

e
t
r
CCaalllleerrIIDDSSyysstteemmOOppeerraattiioon
n
DD..RRiinnggeerrVVoolluumme
This function enables you to adjust the ringer volume to HI, LOW
1. Press the button.
2. Press the TELEPHONE KEYPAD button.
3. Press the button.
4. Press the SCROLL UP or DOWN button to adjust the ringer volume as
needed. You can also adjust the ringer volume by pressing the following TELEPHONE
KEYPAD buttons; for HI, for LOW, or for OFF. HI is the preset ringer
volume.
5. Press and hold down the button.
6. Press the button to go back to STANDBY mode.
EE..LLCCDDCCoonnttrraasst
This unit enables you to select 8 brightness levels for the Large LCD Screen.
1. Press the button.
2. Press the TELEPHONE KEYPAD button.
3. Press the button.
4. Press the SCROLL UP or DOWN button to adjust the brightness of the LCD
Screen. Level 1 is the preset brightness.
5. Press and hold down the button.
6. Press the button to go back to STANDBY mode.
FF..PPBBXXNNuummbbeer
This unit enables you to preset the PBX number (such as an 8 or 9) while you are using a
switchboard system.
1. Press the button.
2. Press the TELEPHONE KEYPAD button.
3. Press the button.
4. Press the SCROLL UP or DOWN button. (OFF is the preset PBX number.)
PBX MODE OFF - set for direct line access.
5. Press and hold down the button.
6. Press the button to go back to STANDBY mode.
, or OFF as desired.
edit
1
edit
edit
NOTE: When placing a call by using the DIAL 7 , or the DIAL 10 , or the DIAL
1+ button, this telephone will automatically add the PBX number and a pause
time before the dialed telephone numbers.
24
Page 7

e
e
l
wxyz
wxyz
wxyz
CCaalllleerrIIDDSSyysstteemmOOppeerraattiioon
n
GG..FFllaasshhTTiimme
This unit enables you to select the standard FLASH TIME applicable to your calling area. If
you are not sure of the FLASH TIME you are using, call your local telephone company.
1. Press the button.
2. Press the TELEPHONE KEYPAD button.
Press the button.
3.
4. Press the SCROLL UP or DOWN button to select the FLASH TIME. You can
also set the FLASH TIME by entering the FLASH TIME number using the TELEPHONE
KEYPAD ~ buttons. The preset FLASH TIME is 600 milliseconds.
5. Press and hold down the button.
6. Press the button to go back to STANDBY mode.
HH..PPaauusseeTTiimme
This unit enables you to adjust the PAUSE TIME when placing a call using a switchboard
system or dialing long distance calls.
1. Press the button.
2. Press the TELEPHONE KEYPAD button.
3. Press the button.
4. Press the SCROLL UP or DOWN button to adjust the PAUSE TIME. The
preset PAUSE TIME is 4 seconds.
5. Press and hold down the button.
6. Press the button to return to STANDBY mode.
edit
edit
II..VVooiicceeMMaaiil
This telephone enables you to store the Voice Mail Access Code number in your area. This
will automatically connect you to the Voice Mail service provider with one-touch dialing.
1. Press the button.
2. Press the TELEPHONE KEYPAD button.
3. Press the button.
4. Enter the Voice Mail Post Code number by using the TELEPHONE KEYPAD ~
5. Press and hold down the button.
6. Press the button to go back to STANDBY mode.
edit
buttons.
25
Page 8

)
CCaalllleerrIIDDSSyysstteemmOOppeerraattiioon
n
JJ..MMSSGGWWaaiittiinngg((MMeessssaaggeeWWaaiittiinngg)
To turn off the Message Waiting LCD Screen indicator.
1. Press the button.
2. Press the TELEPHONE KEYPAD button.
3. Press the button.
4. Press the SCROLL UP or DOWN button.
5. Press and hold down the button.
6. Press the button to go back to STANDBY mode.
IMPORTANT: The Message Waiting LCD indicator will automatically turn ON, if you have
edit
subscribed to Voice Mail message service and if you have Visual Message
Indication from your local telephone company.
IMPORTANT
In order to utilize the Caller ID feature, you must
subscribe to Caller ID service from your local
telephone company.
26
Page 9
s
wxyz
CCaalllleerrIIDDSSyysstteemmOOppeerraattiioon
n
TTeelleepphhoonneeKKeeyyppaaddCChhaarraacctteerrs
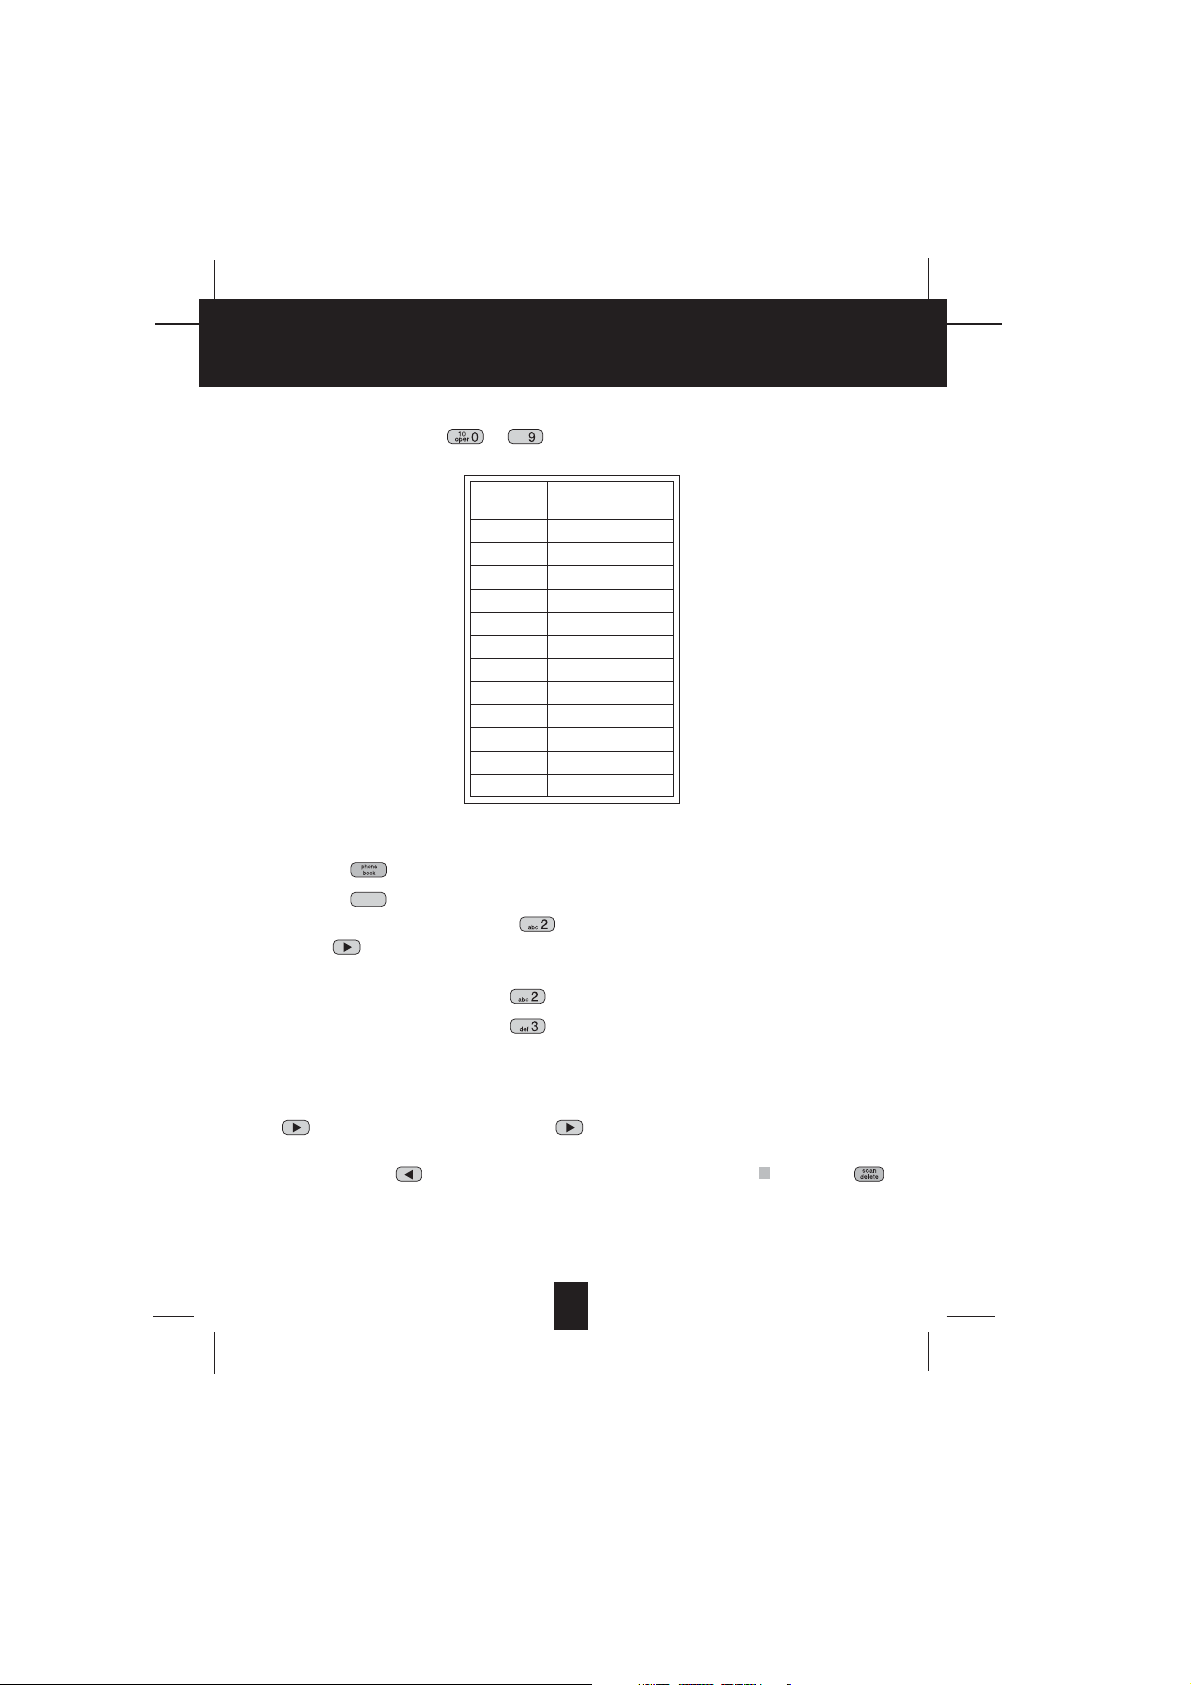
The TELEPHONE KEYPAD ~ buttons are used to enter characters when entering
names. Press the appropriate TELEPHONE KEYPAD button to get the following characters.
KEYPAD
BUTTONS
1
2
3
4
5
6
7
8
9
*
0
#
CHARACTERS
SPACE&’()*.1
ABC2
DEF3
GHI4
JKL5
MNO6
PQRS7
TUV8
WXYZ9
*
0
#
EXAMPLE:
If you want to enter the characters “ACE” on the HANDSET LCD Screen.
1. Press the button. The LCD Screen will display “DIRECTORY”.
2. Press the button.
edit
3. Press the TELEPHONE KEYPAD button, “A” will be displayed. Press the SHIFT
RIGHT button to move the cursor to the right to enter the next character (See NOTES
below.).
4. Press the TELEPHONE KEYPAD button three times to display “C”.
5. Press the TELEPHONE KEYPAD button two times to display “E”.
NOTES:
1. To enter the next character, press the appropriate button. If, however, the next character is
on the same button as the previous character, you will first need to press the SHIFT RIGHT
button. Pressing the SHIFT RIGHT button a second time will produce a space.
2. If you want to change any character, you can go back to the incorrect character by pressing
the SHIFT LEFT button. To delete the character inside the cursor “ ”, press the
button.
3. You can store a maximum of 15 characters on the letter icon.
4. You can store a maximum of 16 digits on the number icon.
27
Page 10

m
e
n
s
SSeeccuurriitty
y
SSeeccuurriittyySSyysstteem
Your cordless telephone uses a digital coding security system to prevent unauthorized use of
your telephone line by another nearby cordless telephone. The system has its own identifying
signal created by microcomputers in both the BASE UNIT and the HANDSET.
SSeeccuurriittyyCCoodde
This telephone has an internal security code with 65,536 possible combinations.
RReesseettttiinnggSSeeccuurriittyyCCooddeeaannddCChhaannnneellIInnffoorrmmaattiioon
Communication between the HANDSET and the BASE UNIT may not be possible in any of the
following situations:
1. After a power failure.
2. After relocating the BASE UNIT by disconnecting the AC ADAPTER.
3. After replacing the HANDSET BATTERY PACK.
To reset, place the HANDSET on the BASE UNIT for 2 to 5 seconds.
MMuullttii--CChhaannnneellAAcccceesss
Your cordless telephone lets you select a channel from the 40 frequencies available to transmit
signals between the BASE UNIT and HANDSET. When you notice interference from other
cordless telephones, change to another channel by pressing the button on the HANDSET.
28
Page 11

e
k
RReecchhaarrggiinnggtthheeBBAATTTTEERRYYPPAACCK
K
BBaatttteerryyTTyyppe
Use the following type and size of BATTERY PACK:
NOTES: 1. During a power interruption, the BASE UNIT does not operate, and a phone
RReecchhaarrggiinnggtthheeBBaatttteerryyPPaacck
The nickel metal hydride (Ni-MH) BATTERY PACK in the HANDSET can be recharged many
times using the built-in charger in the BASE UNIT.
When the BATT LOW symbol appears on the LCD Screen, a “beep” sound will be heard every
10 seconds. This indicates that the BATTERY PACK needs to be recharged.
Charge the BATTERY PACK at least once every 90 days of non-use to avoid battery failure.
When the BATTERY PACK can no longer be charged, replacement of the BATTERY PACK will
be necessary.
The BATTERY PACK used in your telephone may develop a condition known as “MEMORY”.
Once subjected to a regular short discharging routine, the BATTERY PACK assumes the
discharging pattern it was subjected to. This is known as a “MEMORY” condition which causes
rapid discharging thereby shortening the BATTERY PACK charge span. If you believe your
BATTERY PACK has developed a “MEMORY” condition, do not charge the HANDSET until the
BATT LOW symbol appears on the LCD Screen. When the BATT LOW symbol appears on the
LCD Screen, charge the HANDSET fully for 12 hours.
Cordless Telephone BATTERY PACK
3.6V, 600mAh
U.S. Electronics Inc.
Ni-MH Battery Pack: Model B655
This BATTERY PACK is available through:
U.S. Electronics Service Center
105 Madison Avenue
New York, NY 10016
1-800-825-5208
conversation cannot be made on the HANDSET.
2. A “beep” will be heard when the HANDSET is properly positioned in the
BASE UNIT CHARGE CRADLE and charging. Securely positioning the
HANDSET, KEYPAD face up, in the BASE UNIT will also prevent the
HANDSET from falling.
IMPORTANT
When you hear interference, press the
scan
button to change the operating
delete
channel.
29
Page 12
k
:
:
CChhaannggiinnggtthheeBBAATTTTEERRYYPPAACCK
K
CChhaannggiinnggtthheeBBaatttteerryyPPaacck
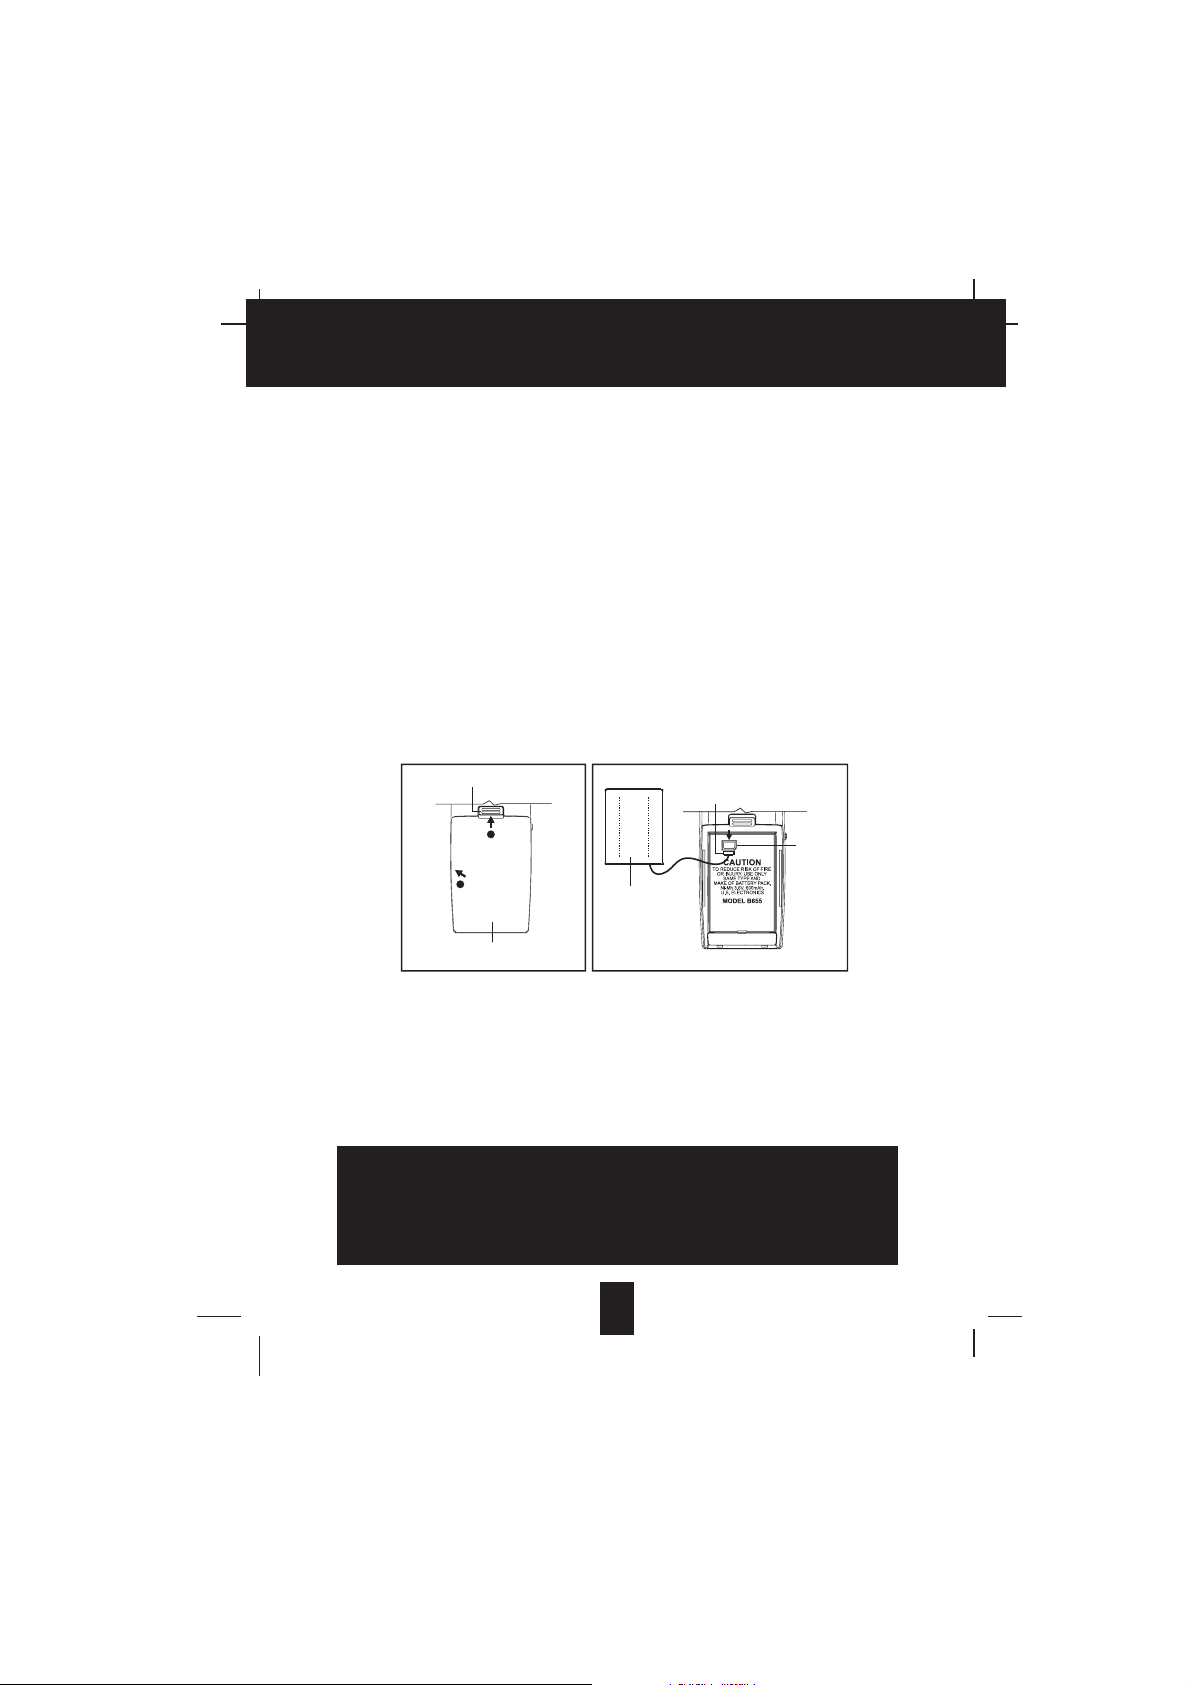
The BATTERY PACK provides power for the HANDSET of your cordless telephone.
TTooRReeppllaacceeBBAATTTTEERRYYPPAACCKK:
1. Push the KNOB TAB up, then remove the HANDSET BATTERY COMPARTMENT COVER.
2. Pull out the BATTERY PACK PLUG and remove the BATTERY PACK.
3. Plug the new BATTERY PACK into the BATTERY CONNECTOR.
4. Adjust the BATTERY COMPARTMENT COVER, Press down the BATTERY COMPARTMENT
COVER gently, a clatter sound will be heard when the BATTER Y COMPARTMENT COVER is
properly closed.
5. Before use, charge the new BATTERY PACK for 12 hours.
AATTTTEENNTTIIOONN:
The telephone that you have purchased contains a rechargeable BATTERY PACK. The
BATTERY PACK is recyclable. At the end of its useful life, under various state and local laws, it
may be illegal to dispose of this BATTERY PACK into the municipal waste stream. Check with
your local solid waste officials for details in your area for recycling options or proper disposal.
Push the KNOB TAB up, then remove the
HANDSET BATTERY COMPARTMENT
COVER.
KNOB TAB
1
2
BATTERY COMPARTMENT
COVER
BATTERY PACK
BATTERY PACK
PLUG
BATTERY
CONNECTOR
IMPORTANT
In order to get maximum life from the HANDSET
BATTERY PACK, be sure to charge the HANDSET for 12
hours before initial use.
30
Page 13

n
:
:
:
:
:
e
C
k
:
:
e
e
s
k
:
PPrroobblleemmSSoollvviinng
g
PPrroobblleemmSSoollvviinnggSSeeccttiioon
For your assistance, we have listed below a few common problems.
PPhhoonneeddooeessnnoottwwoorrkk,,cchheecckktthheeffoolllloowwiinngg:
1. BASE UNIT is plugged into a power source.
2. HANDSET is charged.
3. TONE/PULSE Select switch is in the right position.
4. TELEPHONE LINE CORD is plugged into the TELEPHONE JACK.
RRaannggeeooffpphhoonneelliimmiitteedd,,cchheecckktthheeffoolllloowwiinngg:
1. BASE UNIT is centrally located in your residence.
2. BASE UNIT is not located near appliances.
NNooddiiaallttoonnee,,cchheecckktthheeffoolllloowwiinngg:
1. TELEPHONE LINE CORD plugs are connected to the TELEPHONE JACK and
TELEPHONE LINE CONNECTION JACK.
2. BASE UNIT is plugged into a power source.
3. If you had a power failure or had unplugged the BASE UNIT , replace the HANDSET on the
BASE UNIT for 2 to 5 seconds to reset the system.
RReecceeiivveeddssiiggnnaallfflluutttteerrssoorrffaaddeess,,cchheecckktthheeffoolllloowwiinngg:
1. BATTERY PACK in the HANDSET is fully charged.
2. HANDSET is not too far from the BASE UNIT.
IInntteerrffeerreenncceeoonnrreecceeppttiioonn,,cchheecckktthheeffoolllloowwiinngg:
1. Noise may be picked up from electrical products in the home or electrical storms. Generally,
this noise is a minor annoyance and should not be interpreted as a defect in your system.
(See Technical Information on page 32.)
2. Choose an alternate channel using the button on the HANDSET.
3. Do not use this telephone within 20 ft. of a microwave oven while it is working, as you may
experience interference. This is a normal occurrence with 5.8 GHz phones and should not
be interpreted as a defect in the product.
LLoonnggDDiissttaanncce
tthheeffoolllloowwiinngg:
1. Your local telephone company can provide the Area Code on an incoming long distance call.
EExxcceessssssttaattiicc,,cchheecckktthheeffoolllloowwiinngg:
1. Check to see that the ANTENNA is not touching another metal object.
IIffaafftteerrpprreessssiinnggtthhe
tthheeffoolllloowwiinngg:
1. BASE UNIT is plugged into a power source.
2. If you had a power failure or had unplugged the BASE UNIT , replace the HANDSET on the
BASE UNIT for 2 to 5 seconds to reset the system.
“
LL--DD--C
iinnddiiccaattoorriissnnoottOONNwwhheennrreecceeiivviinnggaalloonnggddiissttaanncceeccaallll,,cchheecck
”
talk
bbuuttttoonn,,yyoouurreecceeiivveetthhrreee
bbeeeepps
“
aannddnnooddiiaallttoonnee,,cchheecck
”
NOTE: If none of telephonew in the house are working, disconnect one set at a time to verify
that none of the phones are causing the problem. If you still have a problem after doing
this, and your telephone still does not work, please contact your local phone company.
31
Page 14

n
e
e
e
:
TTeecchhmmiiccaallIInnffoorrmmaattiioon
n
TTeecchhnniiccaallIInnffoorrmmaattiioon
This cordless telephone uses radio frequencies to allow mobility. There are certain difficulties in
using radio frequencies with a cordless telephone. While these are normal, the following could
affect the operation of your system.
NNooiisse
Electrical pulse noise is present in most homes at one time or another. This noise is most
intense during electrical storms. Certain kinds of electrical equipment such as light dimmers,
fluorescent bulbs, motors, and fans also generate noise pulses. Because radio frequencies are
susceptible to these noise pulses, you may occasionally hear them in your HANDSET.
Generally they are a minor annoyance and should not be interpreted as a defect in your system.
RRaanngge
Because radio frequency is used, the location of the BASE UNIT can affect the operating range.
Try several locations in your home or office and pick the one that gives you the clearest signal
to the HANDSET.
IInntteerrffeerreenncce
Electronic circuits activate a relay to connect the cordless telephone to your telephone line.
These electronic circuits operate in the radio frequency spectrum. While several protection
circuits are used to prevent unwanted signals, there may be periods when these unwanted
signals enter the BASE UNIT. You may hear clicks or hear the relay activate while you are not
using the HANDSET. If the interference occurs frequently, it can be minimized or eliminated by
relocating the BASE UNIT. You can check for interference before selecting the final BASE UNIT
location by plugging in the telephone.
NNOOTTIICCEE:
This cordless telephone uses radio communication between the HANDSET and the BASE
UNIT and may not ensure privacy of communication. Other devices, including another cordless
telephone, may interfere with the operation of this cordless telephone or cause noise during
operation. Units not containing coded access may be accessed by other radio communication
systems. Cordless telephones must not cause interference to any licensed radio service.
IMPORTANT
When you hear interference, press the
button to change the operating
channel.
32
Page 15

s
FFCCCCRReeqquuiirreemmeenntts
s
FFeeddeerraallCCoommmmuunniiccaattiioonnssCCoommmmiissssiioonnRReeqquuiirreemmeenntts
This equipment complies with Part 68 of the FCC rules. A label on the BASE UNIT of the
equipment contains, among other information, the ACTA Product Number and the Ringer
Equivalence Number (REN) for this equipment. You must, upon request, provide this
information to your telephone company.
The REN is also useful in determining the number of devices that you may connect to your
telephone line and still allow all of these devices to ring when your telephone number is called.
In most, but not all areas, the sum of the RENs of all devices connected to one line should not
exceed five (5.0). To be certain of the number of devices that you may connect to your line,
contact your local telephone company.
If your equipment should cause harm to the telephone network, the telephone company may
temporarily disconnect your service. If possible, they will notify you in advance that temporary
discontinuance of service may be required.
However, when advance written notice is not possible, the telephone company may temporarily
discontinue service without notice if such action is necessary under the circumstances. The
telephone company may make changes in its communication facilities, equipment, operations,
or procedures where such action is reasonably required in the operation of its business and is
not inconsistent with the rules and regulations of the Federal Communications Commission.
Do not attempt to repair or modify this equipment.
Warning: Changes or modifications not expressly approved by the party responsible for its
compliance could void the user’s authority to operate the equipment.
Some cordless telephones operate at frequencies that may cause interference to nearby TV’s
and VCR’s. To minimize or prevent such interference, the BASE UNIT of the cordless telephone
should not be placed on or near a TV or VCR. If interference is experienced, moving the
cordless telephone farther away from the TV or VCR will often reduce or eliminate the
interference.
This equipment should not be used on coin telephone lines. Connection to party line service is
subject to state tariffs. If trouble is experienced, disconnect this equipment from the telephone
line to determine if it is causing the malfunction. If the equipment is determined to be
malfunctioning, its use should be discontinued until the problem has been corrected.
IMPORTANT
Placing your BASE UNIT near appliances such as
televisions, refrigerators, radios, or microwave ovens
may cause interference.
33
Page 16

)
FFCCCCRReeqquuiirreemmeenntts
s
FFeeddeerraallCCoommmmuunniiccaattiioonnssCCoommmmiissssiioonnRReeqquuiirreemmeennttss((ccoonnttiinnuueedd)
NOTE: This equipment has been tested and found to comply with the limits for a Class B digital
device, pursuant to Part 15 of the FCC Rules. These limits are designed to provide reasonable
protection against harmful interference in a residential installation. This equipment generates,
uses, and can radiate radio frequency energy and, if not installed and used in accordance with
the instructions, may cause harmful interference to radio communications.
However, there is no guarantee that interference will not occur in a particular installation. If the
equipment does cause harmful interference to radio or television reception, which can be
determined by turning the equipment off and on, the user is encouraged to try to correct the
interference by one or more of the following measures:
- Reorient or relocate the receiving ANTENNA.
- Increase the distance between the equipment and the receiver.
- Connect the equipment into an outlet on a circuit different from that to which the receiver is
connected.
- Consult the dealer or an experienced radio/TV technician for help.
This device complies with Part 15 of the FCC Rules. Operation is subjected to the following two
conditions:
(1) this device may not cause harmful interference, and
(2) this device must accept any interference received, including interference that may cause
undesired operation.
34
Page 17

n
d
d
WWaarrrraanntty
y
WWaarrrraannttyyIInnffoorrmmaattiioon
BellSouth Products
One-Year Limited Warranty
This limited warranty sets forth all BellSouth Products responsibilities regarding your
telephone. There are no other expressed or implied warranties from BellSouth Products.
WWaarrrraannttyySSeerrvviicceePPrroovviiddeed
If you purchased the telephone new from a retail vendor, BellSouth Products warrants the
telephone against defects in material and workmanship for a period of one (1) year from the
original date of purchase. This warranty is in lieu of all other express warranties. This warranty
begins when you purchase the telephone and continues for one (1) year unless you sell or rent
the telephone, in which case the warranty stops.
BellSouth Products disclaims any implied warranty, including the warranty of merchantability
and the warranty of fitness for a particular purpose, as of the date of 90 days from your original
purchase of the telephone. BellSouth Products assumes no responsibility for any special,
incidental, or consequential damages.
This warranty gives you specific legal rights and you may have other rights which vary from
state to state. Some states do not allow the exclusion or limitations of special, incidental or
consequential damages, or limitations on how long a warranty lasts, so the above exclusion and
limitation may not apply to you.
WWaarrrraannttyySSeerrvviicceeNNoottPPrroovviiddeed
This warranty does not cover damage resulting from accident, misuse, abuse, improper
installation or operation, lack of reasonable care, unauthorized modification, or the affixing of
any attachment not provided by BellSouth Products with the telephone, and/or loss of parts.
This warranty is voided in the event any unauthorized person opens, alters or repairs the
telephone.
All BellSouth Products equipment being returned for repair must be suitably packaged.
Telephone companies use different types of equipment and offer various types of services to
customers. BellSouth Products does not warrant that this telephone is compatible with the
type of equipment of any particular telephone company or the services provided by it.
35
Page 18

e
e
WWaarrrraanntty
y
WWhhaattTTooDDooffoorrWWaarrrraannttyySSeerrvviicce
During the first thirty (30) days, a defective product is eligible for over-the-counter exchange at
the retailer from whom it was purchased. After thirty (30) days, the defective product should be
returned to the authorized service center. Please allow 2-3 weeks for the return of your
telephone product. The shipping address of the authorized service center is:
U.S. Electronics Consumer Center
C/O Southern Bonded Warehouse
7137 Southlake Parkway
Morrow, GA 30260
NOTE: A telephone product received which was not made for BellSouth Products or which is
not defective as determined by our test procedures will not be repaired and will be returned to
you C.O.D., freight collect.
TTooOObbttaaiinnWWaarrrraannttyySSeerrvviicce
• Provide proof of the date of purchase within the package.
• Prepay all shipping costs to the authorized service center.
• Include a return shipping address within the package.
Please retain your sales receipt, the carton, the packing materials, and the printed material. The
original carton is the best shipping container for the telephone should you have to return it.
For your reference:
Serial Number
Date of Purchase
Name of Dealer
Customer Service Telephone Number:
U.S.A. & Canada: 1-800-210-8950
OUTSIDE THE U.S.A. & Canada Call: 1-212-242-6978
Visit Us on the Web:
www.uselectronics.info
36
Page 19
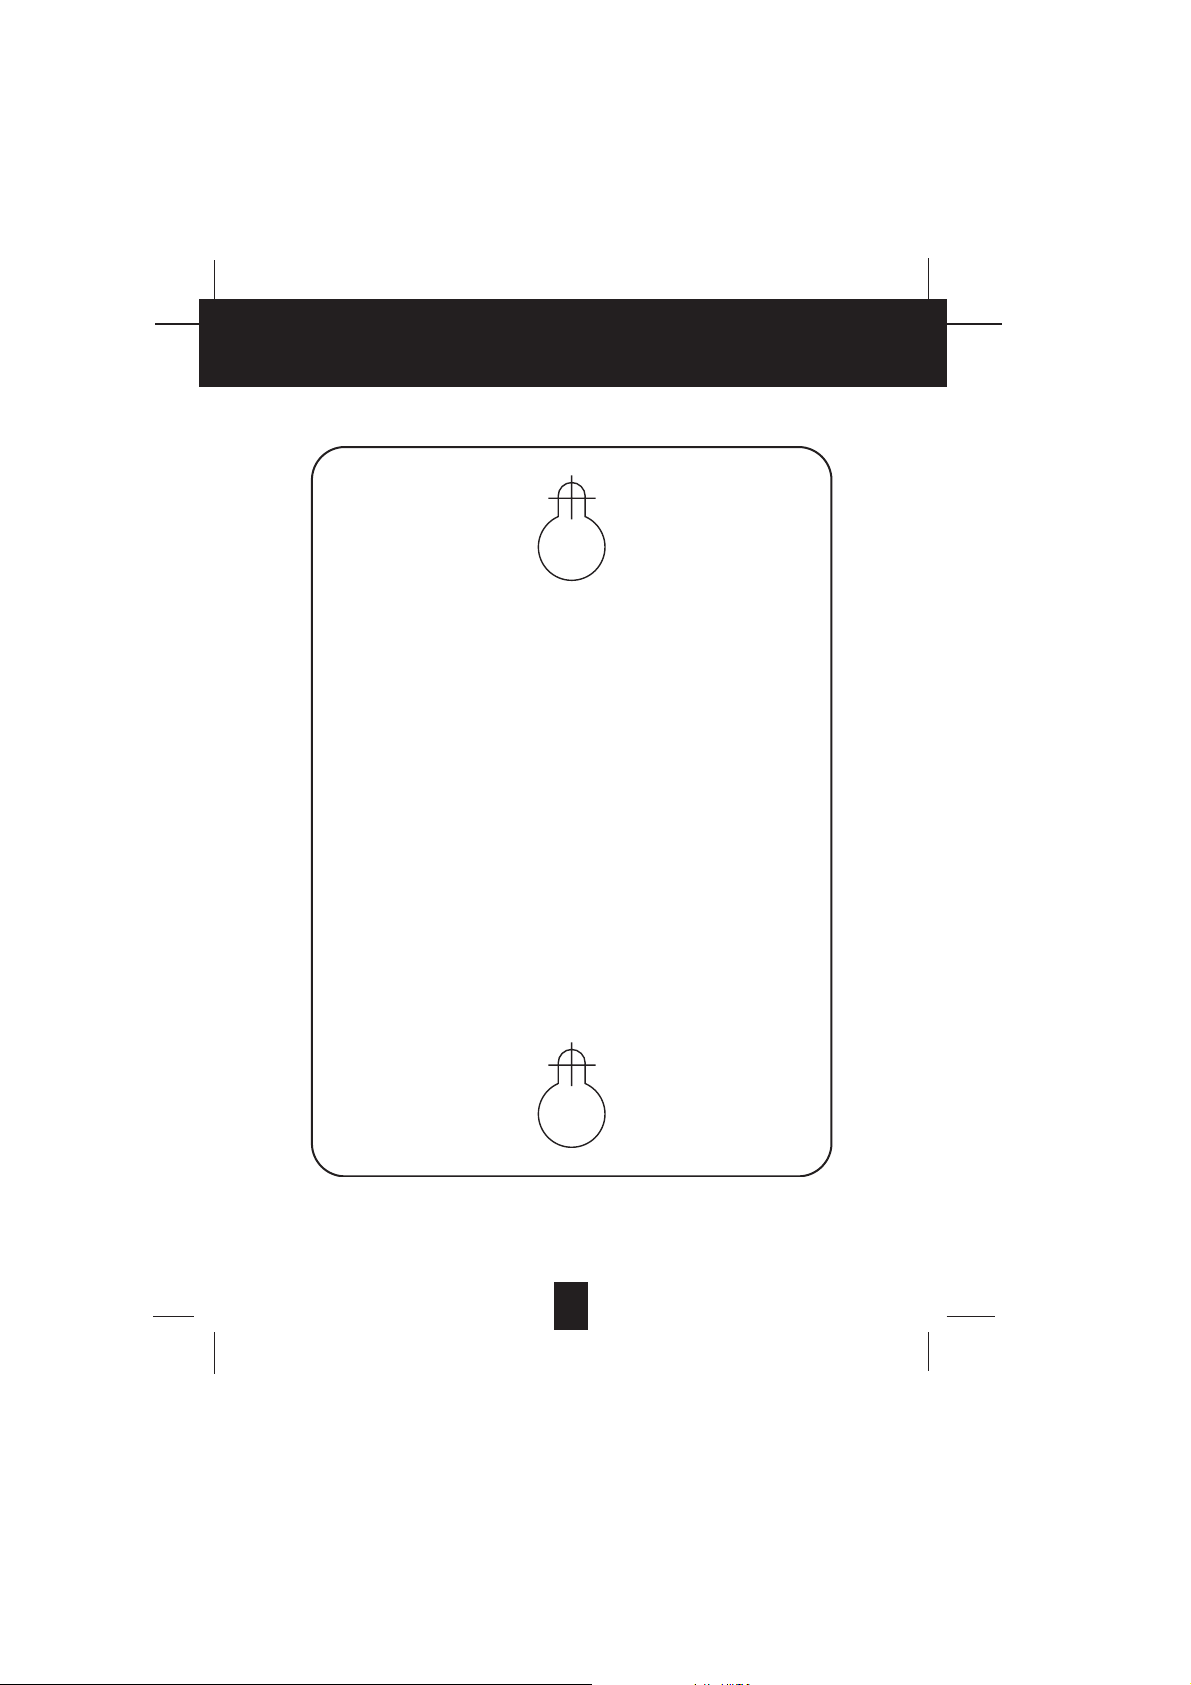
WWaallllMMoouunnttiinnggTTeemmppllaatte
e
This page serves as a template for attachment of screws to the wall
when mounting this telephone on the wall.
1. Cut out this page.
2. Use this template to determine the distance between screws
when mounting this phone on the wall. The two cross hairs
identify where to attach the screws.
37
Page 20

IMPORTANT
In order to get maximum life from the HANDSET
BATTERY PACK, be sure to charge the HANDSET for 12
hours before initial use.
IMPORTANT
Placing your BASE UNIT near appliances such as
televisions, refrigerators, radios, or microwave ovens
may cause interference.
IMPORTANT
When you hear interference, press the
button to change the operating
channel.
IMPORTANT
The AC ADAPTER must always be plugged into an
electrical outlet.
IMPORTANT
If you live in an area which gets frequent
thunderstorms, we strongly recommend plugging your
AC ADAPTER into a surge protector.
IMPORTANT
In order to utilize the Caller ID feature, you must
subscribe to Caller ID service from your local
telephone company.
38
Page 21

STOP
Make certain you receive the best
performance from your telephone.
Read this manual first.
Visit Us on the Web:
www.uselectronics.info
Made in China
 Loading...