

Page 1
Designed and Manufactured by
ITEC Tontechnik und
Industrieelektronik GesmbH
8200 Laßnitzthal 300
Austria / Europe
TWIN-BOX
INSTRUCTION MANUAL
Page 2

ITEC TWIN-BOX
2 www .itec-audio.com
TWIN-BOX
Dear Customer!
ITEC TWIN-BOX – yet another product in our wide range of mobile, mains independent
loudspeaker systems.
The TWIN-BOX offers two possibilities of sound distribution:
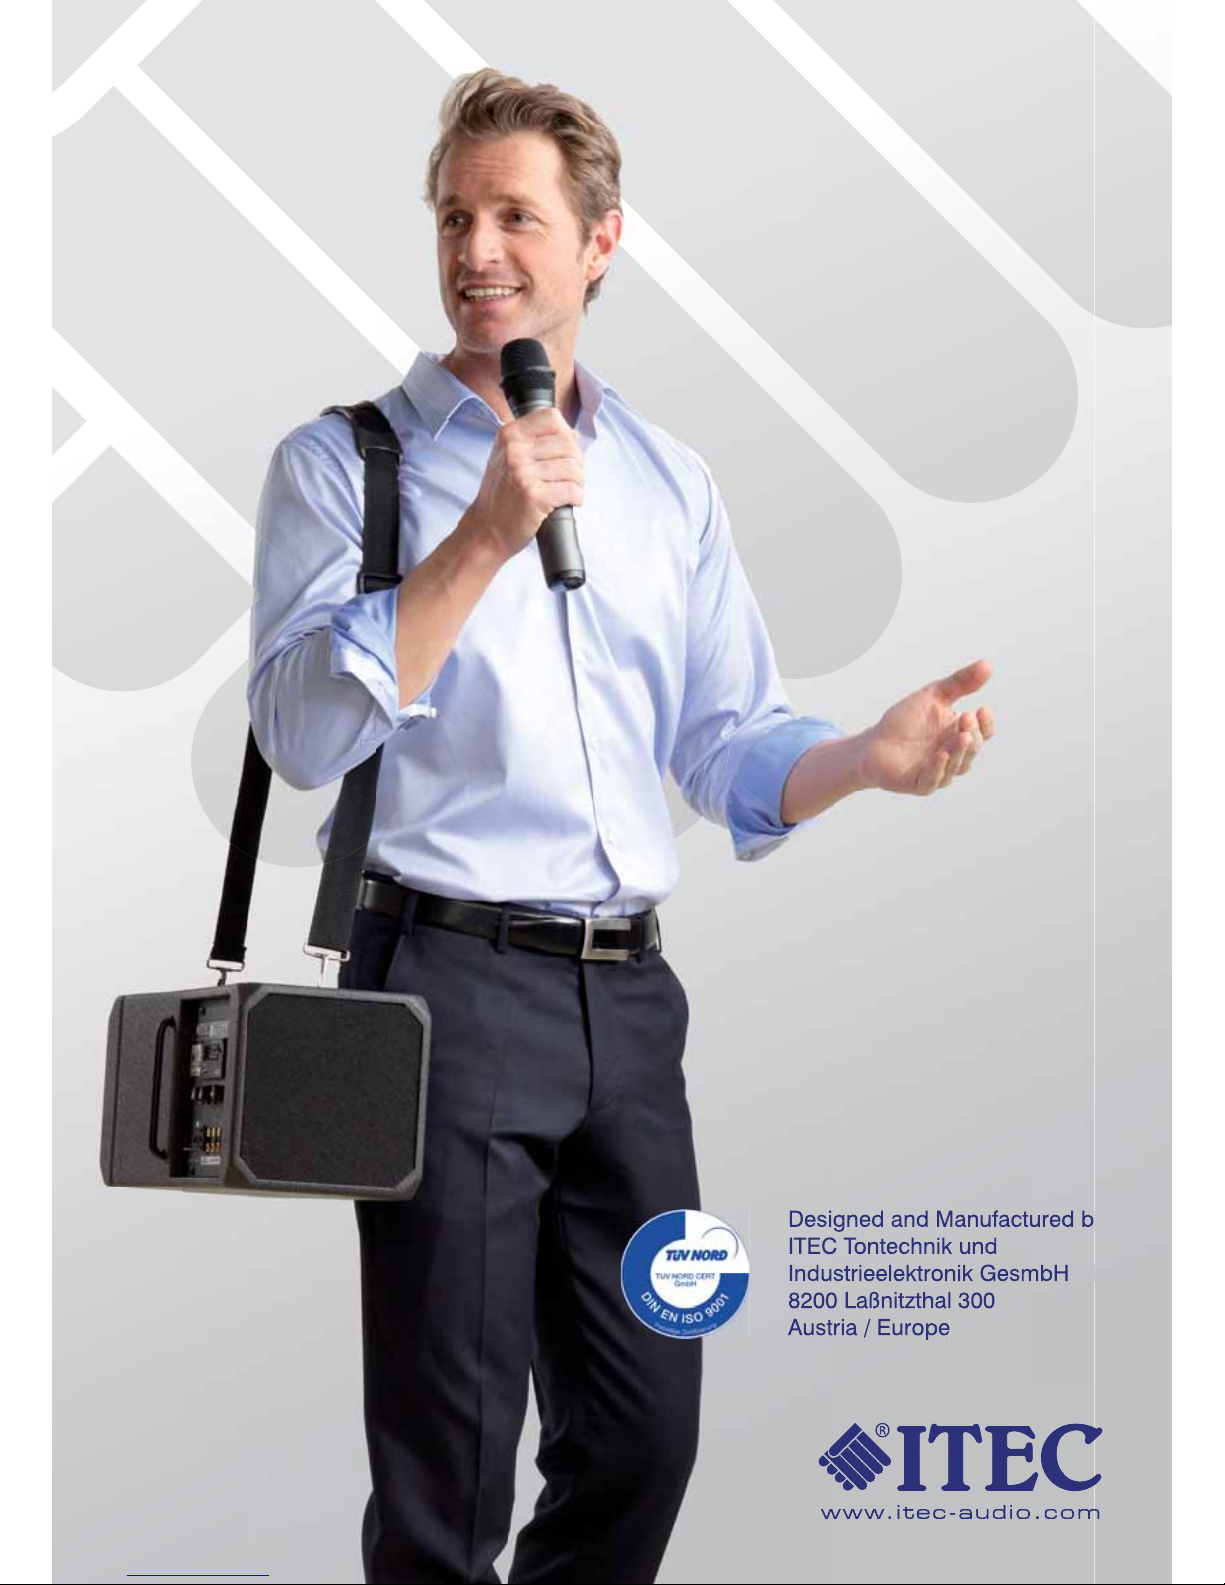
In two directions - to the front and to the rear: carry the TWIN-BOX with the shoulder strap
and use it to expose a group of people to sound.
In one direction - using it for sound reinforcements in rooms, halls or outdoors by placing
the TWIN-BOX onto the tripod. Simply do the unique „twist“ to change from two-sided to
one-sided sound distribution; the two speaker casings will engage automatically in their
appropriate positions.
Use the TWINBOX with cable or radio microphones.
Use the TWINBOX to create playbacks from the tape recorder or CD player.
However you are going to use the versatile TWIN-BOX, you will certainly add the perfect sound to
many successful events with this compact, high performance tool so easy to handle.
Sincerely,
your ITEC acoustic team
1.
2.
Page 3

ITEC TWIN-BOX
www.itec-audio.com 3
TWIN-BOX
INHALTSVERZEICHNIS
1. the twist 4
2. how to wear the TWIN-BOX 4
3. how to stand the TWIN-BOX 4
4. how to start 5
5. using a cable microphone 5
6. playback 5
7. using a radio microphone 6
8. music attenuation - optional 6
9. recording 7
10. connecting an external amplifier 7
11. connecting a passive speaker - optional 7
12. recharging the TWIN-BOX 7
13. general advice 8
14. advice on radio microphones 8
15. Controls 8
16. changing batteries of radio microphones 9
14. The integrated USB-Player - optional 10
Page 4

ITEC TWIN-BOX
4 www .itec-audio.com
TWIN-BOX
1. the unique twist
With a simple 180° rotation of the two speaker casings you can change the sound distribution from two
directions into one direction.
Attention: an integrated blocking system prevents a full circle. Twist only as indicated above!
sound in both directions sound focussed in one direction
2. how to wear the TWIN-BOX
simply click the carrying strap shut in the 2 strap eyes on the top side of the TWIN-BOX. Wear it over your
shoulder, one speaker facing the front, the other one the rear. Make sure the controls point outward for your
easy and quick access.
3. how to stand the TWIN-BOX
loosen the lower adjusting screw of the aluminium light-weight tripod and open the legs of the tripod
(as amply as space allows). Once you have found a solid stand, tighten lower adjusting screw.
mount the TWIN-BOX on the tripod, loosen upper adjusting screw, position the pull-out tube at the height
requested and tighten the upper adjusting screw again.
Attention: make sure the TWIN-BOX does not collapse, particularly when it is windy!
Page 5

ITEC TWIN-BOX
www.itec-audio.com 5
4. how to start
general:
turn on the TWIN-BOX by turning the ON/OFF switch (1) to the right (position ON); the ON/OFF indicator
light (2) will show.
battery mode:
in case the power supply is not plugged in, the TWIN-BOX will be supplied by an integrated rechargeable
battery. The average operating time with a fully charged battery will be 6 to 8 hours.
mains supply:
in case the TWIN-BOX is connected (socket 10) to the mains supply (220V), the red mains indicator (3)
will show in addition to the indicator light (2). As soon as you switch off the TWIN-BOX the battery will start
recharging immediately with the mains indicator light (3) staying on and the indicator light (2) disappearing
(see 12. recharging the TWIN-BOX).
5. using a cable microphone
plug in the cable microphone in the microphone socket (4) and adjust its volume at the volume control for
the cable microphone (6). See 13. general advice.
technical information:
the multi-jack microphone socket (3) lets you plug in microphones with XLR or ¼” jack.
use either dynamic microphones or electret condenser microphones.
connecting balanced microphones: by means of a XLR plug or a stereo ¼” jack.
connecting balanced microphones with phantom supply: by means of a XLR plug.
connecting unbalanced microphones: by means of a mono ¼” jack.
in case you have a long microphone cable, an interference free operation can only be guaranteed when you use
both balanced microphones and a balanced microphone cable.
TWIN-BOX
no phantom voltage
signal
12
3
1 earth (US = ground)
2 signal +
3 signal -
signal
earth (US = ground)
earth (US = ground)
¼” stereo jack, balanced
phantom voltage 12V
XLR plug, balanced
no phantom voltage
¼” stereo jack, unbalanced
signal
6. playback
the cinch sockets (5A) will accept any tape recorder, CD player, radio, etc. The volume can be adjusted at
the corresponding control (7).
Page 6

ITEC TWIN-BOX
6 www .itec-audio.com
TWIN-BOX
7. using a radio microphone
switch on the radio microphone and adjust the volume at the corresponding control (8). See 13. general
advice.
when using a radio microphone make sure the batteries are alright:
Using WM-702, WM-802 or TOA: this is the case when the green LED light shows; when the red LED light
shows the batteries should be replaced.
see 12. recharging the TWIN-BOX
8. music attenuation (optional)
should your device have an automatic music attenuation the volume of the music playback will be turned
down while somebody is speaking. You determine the volume of the attenuated playback by means of the
appropriate control (9).
Control position left: while speaking, the music is turned off completely
Control position middle: while speaking, the music volume is halved
control position right: even while speaking, the music volume remains the same, i.e. no attenuation at all.
attenuation adjustment:
while speaking into the microphone adjust the playback volume you want during your announcement.
attenuation will be started when using a radio microphone or cable microphone and takes effect on music
playbacks via the line-in socket (external equipment)
Page 7

ITEC TWIN-BOX
www.itec-audio.com 7
TWIN-BOX
9. recording
Connect a tape recorder, MD player or speech mike recording system to the ‘PRE OUT’ cinch socket (5B).
You can record cable microphone, radio microphone and music playback. The output level will depend on
how you have adjusted the controls.
10. connecting an external amplifier
the adjusted signal of the ‘PRE OUT’ cinch socket (5B) may be connected to an external amplifi er (see 9.
recording). however, in most cases, the integrated radio receiver will be needed. In this case, please plug in
the ‘HF LINE OUT’ (5C) socket. As for volume, be aware that now the signal of the radio receiver/s overrides
your volume adjustments.
11. connecting a passive speaker (optional)
socket 11 (optional) can take another passive speaker. It is then connected in series to the integrated
speakers and should consequently have an impedance of 4 ohms. We recommend the original ITEC
PASSIVE-BOX.
12. recharging the TWIN-BOX
simply connect the TWIN-BOX (socket 10) to the mains (110/220V) and leave the TWIN-BOX switched off.
The power indicator light (3) is on, the ON/OFF indicator light (2) is not. After approximately 10 hours the
battery will be fully recharged. The power indicator light will remain on! The TWIN-BOX can remain plugged
in without causing any damage.
maintenance of the battery
the integrated lead battery is rechargeable and maintenance free; however, a few basic rules ought to be
heeded:
do not store below a temperature of 5°C
recharge after use
not having used the TWIN-BOX for months we recommend you switch it on for several hours and then recharge it.
Page 8

ITEC TWIN-BOX
8 www .itec-audio.com
TWIN-BOX
13. general advice
do not place microphones and speakers close to each other in order to avoid acoustic feedback; too
great a distance, on the other hand, between microphone and speaker has an unnatural effect on the
audience (the sound, bear in mind, does not come from the person speaking) and makes speaking
more difficult (sonic speed, as we now know, is not all that fast). we recommend a distance between
mike and speaker of between 5 and 15 metres.
furthermore, make sure the speaker does not face the mike directly.
perfect as the loudspeaker system may be, the person speaking ought to annunciate loudly and clearly .
An audience of 10 should be able to understand him perfectly well without any technical support.
the distance between the mouth and the microphone should be between 5 and 10 cms.
it is advisable always to have an attendant near the loudspeaker controls, e.g. should the person
speaking suddenly come too close to the speaker with his mike the resulting feedback could be
remedied.
•
•
•
•
•
1 ON/OFF switch
2 ON/OFF indicator light
3 mains indicator light
4 socket for microphone (¼ “ stereo jack, XLR)
5A LINE IN cinch sockets (for external audio supply)
5B PRE OUT cinch sockets
(for external recording device)
5C HF LINE OUT cinch sockets
(Radio reception, not controlled)
6 volume control for cable microphone
7 volume control for external audio source
8 volume control for radio microphone
9 AUTO MUTE for music attenuation (optional)
10 battery recharge socket
11 socket for passive loudspeaker (optional)
12 volume control for 2nd radio microphone (optional)
14. advice on radio microphones
make sure the batteries of the radio microphones are in good condition
high voltage cables, iron gates, metal roofs, etc. can cause interference
do not place the receiver or the microphone/s anywhere near potential interference sources
(Computers, mobile phone etc.)
•
•
•
15. Controls
Page 9

ITEC TWIN-BOX
www.itec-audio.com 9
TWIN-BOX
16. Changing batteries of radio microphones
Attention: old batteries are hazardous waste; dispose of properly!
ITEC WM-716 - hand held microphone
(also WM 816 and WM 702)
Slide battery lid open, remove top battery and then pull the white plastic
strip to remove the other two batteries from the battery compartment.
Insert 3 new batteries!
Mind the poles (+ is at the bottom)!
Battery type: 3 pcs Mignon „AA“ 1.5 V
Batteries are okay: green LED is on
Batteries are low: red LED is on
ITEC WT-716 - button microphone
(also WT 816 and WT 702)
Open lid at the bottom of the casing and exchange all three batteries.
Mind the poles !
Battery type: 3 pcs Mignon „AA“ 1.5 V
Batteries are okay: red LED blinking
Batterie are low: red LED permanently on
ITEC WM-5100 - hand held microphone
Unscrew lid at the bottom end of the microphone and insert two new
batteries.
Mind the poles (+ is at the bottom)!
Battery type: 2 pcs Mignon „AA“ 1.5V
Batteries are okay: red LED blinking
Batterie are low: red LED permanently on
The status of the battery is also shown on the LCD-display.
ITEC WT-5100 - button microphone
Open lid at the bottom of the casing and exchange both batteries.
Mind the poles!
Battery type: 2 pcs Mignon „AA“ 1.5V
Batteries are okay: red LED blinking
Batterie are low: red LED permanently on
The status of the battery is also shown on the LCD-display.
ITEC WM-5300 Handheld Microphone
Unscrew cap on lower end of microphone and insert two new batteries.
Note the poles (- pole at spring contact, once at top, once at bottom)!
Battery type: 2 „AA“ 1.5V Mignon
When you switch on, red LED briefly illuminates.
Battery status on display.
ITEC WT-5300 Pocket Transmitter
Open pocket transmitter cover by pressing left and right snapper
simultaneously. Insert two new batteries.
Note the poles (- pole at spring contact, left)!
Battery type: 2 „AA“ 1.5V Mignon
Battery status on display.
Page 10

ITEC TWIN-BOX
10 www.itec-audio.com
TWIN-BOX
17. The integrated USB-Player (optional)
The integrated USB-data link enables the connection to a USB-storage media (USB-Stick) werden.
With the “Play”-Button you can start the replay. The volume is set with the controller 7 (Cass/CD).
If your device decreeds a voice triggered music attenuation then consider also the in chapter 6 described
mode of operations of this practical feature.
The function of the buttons on the device:
Start of the replay; new push: Pause
1 x push = next track, hold pushed longer = fast forward motion
1 x push = start of track or previous track, hold pushed longer = fast return motion
next folder
previous folder
Mode playback mode
Repeat function (only with remote control):
Push the “Mode”-button. The display appears „RANDOM“:
The tracks are played in a random order.
A new push of the “Mode”-button. The display appears „SINGLE“:
The current track is continually repeated.
Push the “Mode”-button again. The display appears „FOLDER“:
The songs of the current folder are played repeatedly.
If you push the “Mode”-button once again, the display appears „ALL“:
The stick is played in the normal order and starts over again and again..
elapsed time
of the title
Display A=ALL
R=RANDOM
S=SINGLE
F=FOLDER
Total duration
of the title
previous title
Play/Pause
next title
Name of Title
(Lied2.mp3)
Currently selected title
Total number of tracks
on the stick
(in all folders)
previous folder next folder
playback mode
Page 11

ITEC TWIN-BOX
www.itec-audio.com 11
TWIN-BOX
stop
direct selection
play/pause
previous title
next title
playback mode
EQ (sound adjustment)
volume
Page 12

ITEC TWIN-BOX
12 www.itec-audio.com
GENERAL
Portable, active speaker system with built-in amplifier, rechargeable battery,
3-channel mixer, power supply unit with automatic charging module and a
high-performance speaker system.
Amplifier Output Power 75 W / RMS
2 full-range cone speakers 6 ½ inch
SPL max: 113 dB (Powerful enough for an audience of approx. 500 listeners)
3-channel pre-amplifier Microphone/Wireless/Auxiliary
High-capacity lead-gel rechargeable battery 3.5 Ah / 12 V
Tripod flange for use with box tripod
Dimensions 450 x 190 x 185 mm (W x H x D)
Weight 5.6 kg
Colour black, shock-resistant polyurethane coating
OPTIONS AND ACCESSORIES
Up to 2 wireless microphone receiver modules (UHF or VHF)
with separate volume adjustment may be built-in
Cable microphones
Tripod, quiver, transport bag, shoulder strap
CONNECTIVITY
Microphone connector, symmetrical, combinational XLR/jack plug,
12 V phantom power
Line-Input Stereo-cinch socket
Line-Output Stereo-cinch socket for recording devices
TWIN-BOX - SPECIFICATIONS
ITEC- Tontechnik und Industrieelektronik GesmbH, A-8200 Lassnitzthal 300 / Austria / Europe
Tel.: +43 (0)3133 / 3780-0, office@itec-audio.com, www.itec-audio.com
450 mm
190 mm
185 mm
All information without guarantee. Subject to technical changes.
 Loading...