

Page 1
Contents
Product Specifications
SolarCharger Overview
Charge Your SolarCharger
Using Your SolarCharger
In Car Usage
Q&A
Safety Information
Care and Maintenance
Declaration of Conformity
3
4
5-7
8-10
11-12
12-13
13-14
15-16
16
SolarCharger 906
User Guide
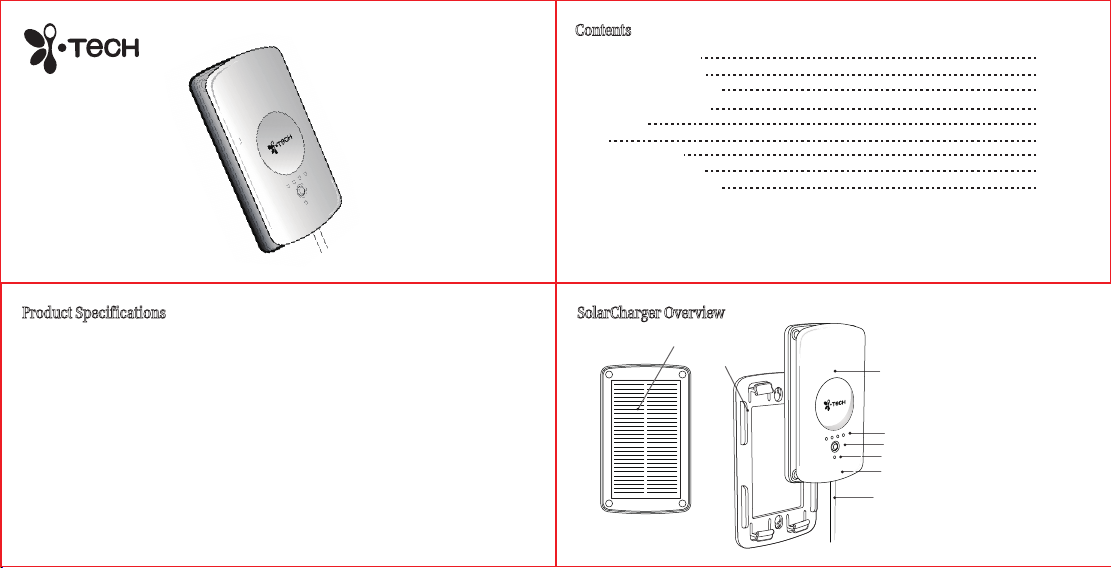
Product Specifications
Solar Panel: Mono Crystalline 0.5V, 1A
d.c Input: 5V, 500mA (max)
d.c Output: 5V, 500mA (max)
Rechargeable Lithium Battery: 3.75V, 1260mAH
D.C Charging Time: Within 4 hours
Solar Charging Time: 22 hours (Charging hours may vary due to intensity
D.C Charging Operation Temperature: 0 to 53 C / 32 to 127 F
Solar Charging Operation Temperature: 0 to 70 C / 32 to 158 F
Dimensions (without Holder): 105 (L) x 64 (W) x 15 (T) mm /
4.13 (L) x 2.52 (W) x 0.59 (T) inches
Dimensions (with Holder): 130 (L) x 71 (W) x 17.5 (T) mm /
5.12 (L) x 2.80 (W) x 0.69 (L) inches
Weight: 100 grams / 3.53 ounces
of sunlight and ambient temperature)
SolarCharger Overview
1
8
(fig.1)
3 4
7
1. Solar Panel
2. Check Battery Button
3. Battery Indicator
4. Charging Indicator
5. Mini USB Charging Socket for
3
2
4
5
6
Power In
6. Mini USB Cable for Power Out
7. Built-in Rechargeable Battery
8. Detachable Holder
2
Page 2
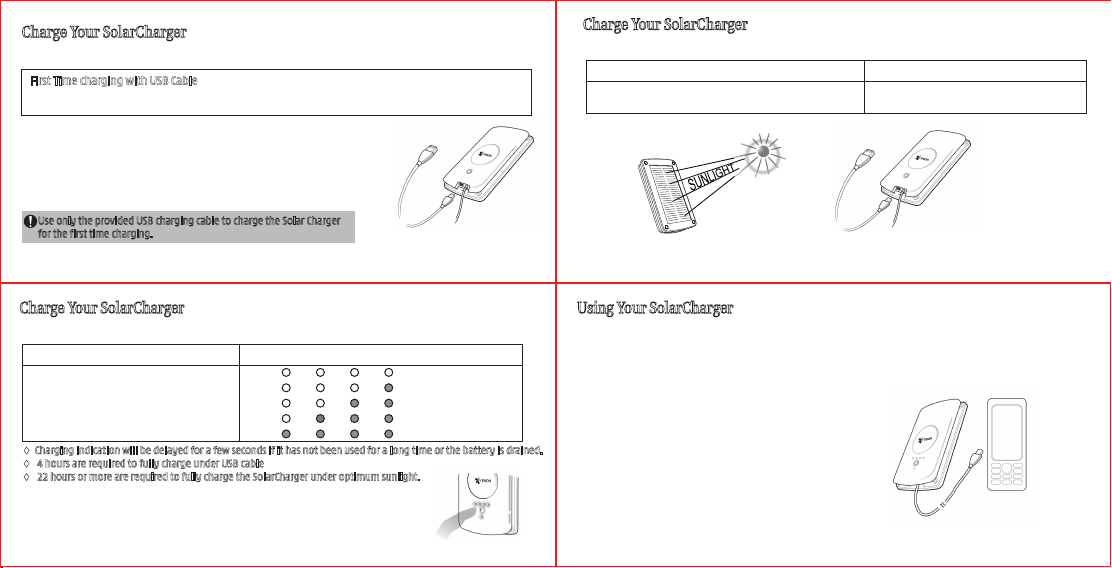
Charge Your SolarCharger
The SolarCharger comes with a built-in rechargeable battery.
First Time charging with USB Cable
Prior to using the device for the first time, it is recommended to fully charge the battery with the USB Cable for
4 hours.
Insert the USB cable plug into the SolarCharger’s USB charging socket and plug
the other end into the PC, notebook or other suitable device. The charging
indicator will turn solid red and the battery indicator will show the battery level
on blue color. Once the battery is fully charged, the charging indicator will turn
off and the battery indicator will show 4 LED light up in solid blue. The operation
temperature for USB Cable charging is 0 ºC (32 ºF) to 53 ºC (127 ºF). For the safety
reason, the charging will be cut off once exceeding this temperature range.
Use only the provided USB charging cable to charge the Solar Charger
for the first time charging.
* If you do not use the SolarCharger frequently, please ensure that the charger is being recharged once
every three months to provide the best performance
DC Power
Via USB socket
Mini USB
Charging Socket
Charge Your SolarCharger
Charging Indictor LED
Charging Status Charging Indictor LED
• Solar Charging (Solar panel must face upward to the sun)
• USB Cable Charging
* Light off after fully charged
The operation temperature for the solar charging is 0 ºC (32 ºF) to 70 ºC (158 ºF), for safety reason the charging
will be cut off once exceeding this temperature range.
5
• Flash Red*
• Solid Red*
DC Power
Via USB socket
Mini USB
Charging Socket
6
Charge Your SolarCharger
Battery Indictor LED
Battery Status
• No battery
• Low Battery (Need to Recharge)
• At least remain 40% battery
• At least remain 65% battery
• At least remain 80% battery
♦ Charging indication will be delayed for a few seconds if it has not been used for a long time or the battery is drained.
♦ 4 hours are required to fully charge under USB cable
♦ 22 hours or more are required to fully charge the SolarCharger under optimum sunlight.
Note: The battery needs to have some charge before the solar panel can charge it.
Please ensure the SolarCharger should have at least 40% battery level (2 LED light on
by pressing the battery indicator). This is the minimum level for charging up a mobile
device and the solar charger itself. If the battery is totally empty, the solar panel does
not work, you need to use the USB charging cable to charge the SolarCharger first.
Battery Indictor LED
•
•
•
•
•
Check Battery Level
Using Your SolarCharger
Charge Hand Held Devices
To charge the hand held electronic device, first to check the battery status and make sure the battery indicator always have
at least 40% battery (2 LED) to provide emergency back up charging. Second, select the suitable adapter tip, plug the tips into
the mini USB cable and connect to your device. The hand held device will be powered by the solarCharger automatically.
Note: 1) When SolarCharger is fully charged, it will completely charge
your device, depending on device’s charge capacity and current fuel
level.
2) The SolarCharger support dual charging at the same time, you
can charge your hand held device while the SolarCharger is charged by
the USB cable or sunlight.
3) In order to protect the battery of the SolarCharger and the
hand held device; the charging function may cut off automatically
when the temperature of the SolarCharger was over 53 C / 127 F. It will
auto resume when the SolarCharger detect the temperature was below
53 C / 127 F. The SolarCharger can still charging its built-in battery if the
temperature is not goes beyond 70 C / 158 F.
4) If the device battery is totally drained, it will take longer time
to shore the power first.
7 8
Page 3

Using Your SolarCharger
The adapter tips contain:
i.Tech d.c. jack adapter (iTech DC)
i.Tech 8 pins adapter (iTech USB)
Female USB adapter (USB) – for iPhone* and iPod* series
LG adapter (LG) – for Chocolate series
Micro USB adapter (Micro USB)** – for Motorola, Blackberry
Nokia 2 mm jack adapter (NK)
Nintendo DS Lite adapter (ND)
Samsung adapter (SA) – for D800 series
Sony Ericsson adapter (SE) – for K750i series
Sony PSP adapter (PSP)
*For iPhone and iPod series, charge the device via your Apple Sync & charging cable
**Some of the portable devices may contain the Mini USB / Micro USB port. Pleas note that some of the Mini USB / Micro
USB port may only support data transfer function. If your portable devices contain a Mini USB / Micro USB port, please
read the user guide of your portable device carefully and make sure I support the charging function.
Using Your SolarCharger
The adapter tips contain:
i.Tech d.c
jack adapter
Nokia 2 mm jack
adapter (NK)
9
iTech USB
i.Tech 8
pins adapter
ND
Nintendo DS
Lite adapter (ND)
USB
Female USB
adapter (USB)
SA
Samsung
adapter (SA)
LG
LG adapter (LG) Micro USB adapter
SE
Sony Ericsson
adapter (SE)
Micro USB
(Micro USB)
Sony PSP
adapter (PSP)
10
In Car Usage
Recommended Installation Position
To use the SolarCharger inside the car, a detachable holder is included in the package. You can select to use the
provided sticker to stick the holder on the windscreen, or use the window mount with the protective pad to put
up the holder on the windscreen.
Make sure that the SolarCharger is not in the
operating area of any side impact airbags or
any of the other safety or operating equipment
in your car. In addition, check that product is
securely fastened and does not interfere with
you being able to operate the vehicle.
* Please make sure the Solar Panel is facing
to the sun
Please stick to a clear and without UV
coating windscreen
i.Carkit 305
Protective Pad
In Car Usage
Charging i.Tech i.Carkit 305
When the solarcharger use with i.Tech i.Carkit, it can provide the longest talk time solution:
1. Provided overall 32 hours talk time*
2. Provided overall 3200 hours standby time*
3. Provided infinity standby time under optimum sunlight
* Assume both SolarCharger and i.Carkit 305 are fully charged
Q&A
Can I charge the SolarCharger while it is powering i.Carkit at the same time?
Yes, you can charge the SolarCharger with either solar charging or USB d.c charger when it is powering i.Carkit
305.
Can I leave the SolarCharger out in rain?
No, we do not recommend getting the SolarCharger wet. However, should this happen accidentally, please dry
the solarcharger in a dry airy position away from children and food stuffs. The solar cell should be fine; however,
the battery may be drained.
11
12
Page 4

Q&A
Why the SolarCharger cannot charge my devices?
Please check the SolarCharger is fully charged by pressing the check battery button. If not please charge the
SolarCharger first.
Can I use the SolarCharger to charge my device if is not fully charged?
SolarCharger can deliver power even it is in charging mode except if the battery is lower than 40% battery level.
Safety Information
• Never leave the device above any air bag deployment area inside your car as serious injury may result when
an air bag deploys.
• Never allow children to play with the device – small parts may be of choking hazard.
• Do not attempt to modify the device.
• Do not use or store the device in dusty, dirty areas
• Do not store the device in hot area. High temperatures can shorten the life of electronic devices, damage
batteries, and warp or melt certain plastics
Safety Information
• Do not keep the device near a wash basin or other wet places.
• Do not use the device outdoors in the rain.
• Do not use the device in stormy weather.
• Do not clean the device while it is being charged. Always disconnect the charger from the device before
cleaning.
• Do not attempt to force open the built-in battery.
• Only charge the device’s built-in battery in accordance with the instructions described in this user guide.
FCC RF Radiation Exposure Statement:
This equipment complies with FCC radiation exposure limits set forth for an uncontrolled environment. End users
must follow the specific operating instructions for satisfying RF exposure compliance. This transmitter must not
be co-located or operating in conjunction with any other antenna or transmitter.
13
14
Care and Maintenance
• Do not expose the device to liquid, moisture or humidity, or rain as it is not waterproof.
• Do not use abrasive cleaners to clean the device.
• Do not expose the device to extremely high or low temperatures.
• Do not leave the device near open flames such as cooking burners.
• Do not dispose of the device in a fire as it will result in explosion.
• Do not bring the device into contact with any sharp objects as this will cause scratches and damages.
• Do not stick anything inside the device as this may damage internal components.
• Do not attempt to disassemble the device as it does not contain serviceable components.
• If you do not plan to use the device for a long period, please store it in a dry place that is free from extreme
temperatures and dust.
• Avoid charging the device in extremely high or low temperatures.
• Dispose of the battery and the device according to local regulations. Do not dispose of them as household
waste.
Built-in Battery
• Do not attempt to replace the device’s battery as it is in-built and is not changeable.
• Dispose of the battery according to local regulations. Do not dispose of the battery as household waste.
Care and Maintenance
• Charge the battery in accordance with the instructions supplied with this user guide.
• Use only the USB charging cable supplied by the device’s original manufacturer to charge the device. Other
USB charging cable may look similar but using them could be dangerous and could damage the device.
• Rechargeable battery will be eventually wear out after charged and discharged few hundreds of times
depending on the use and usage conditions.
Declaration of Conformity
We, i.Tech Dynamic Limited, declare that the following product:
Product Name: i.Tech SolarCharger 906
Model No.: C51-B906-XX
is in conformity with the following essential requirements of Council Directive 1999/5/EC (referred to as R&TTE
Directive): Article 3.1a, 3.1.b and 3.2. and the product is manufactured in accordance with Annex II of the above
directive.
A copy of the Declaration of Conformity can be found at http://www.itechdynamic.com.
15
16
Page 5

Notes on Environmental Protection
After the implementation of the European Directive 2002/96/EU in the national legal system, the following applies:
Electrical and electronic devices must not be disposed of with domestic waste. Consumers are obliged by law to
return electrical and electronic devices at the end of their service lives to the public collection points that are set up
for this purpose or designated points of sale. However, such details are defined by the national law of the
respective country. This symbol on the product, the instruction manual or the packaging indicates that the product
is subject to these regulations. By recycling, reusing the materials, or other forms of utilizing old devices, you are
making an important contribution in protecting our environment.
Federal Communications Commission (FCC) Statement
This device complies with Part 15 of the FCC Rules. Operation is subject to the following two conditions: (1) this
device may not cause harmful interference, and (2) this device must accept any interference received, including
interference that may cause undesired operation.
Changes or modifications not expressly approved by the party responsible for compliance could void the user’s
authority to operate the equipment.
©2009 Hutchison Harbour Ring Enterprises Limited
All rights in this publication are reserved and no part may be reproduced without the prior written permission of
the publisher. The contents of this publication are believed to be correct at the time of going to press, but any
information, specifications, products or services mentioned, and product I.D. shown may be modified,
supplemented or withdrawn without further notice. The Stylized i.Tech logos are trademarks owned by Hutchison
Harbour Ring Enterprises Limited or its affiliates. All other trademarks or registered trademarks belong to their
respective owners.
Dispose of the packaging and this product in accordance
with the latest provisions.
08/2009
Federal Communications Commission (FCC) Statement
15.21
You are cautioned that changes or modifications not expressly approved by the part responsible for compliance
could void the user’s authority to operate the equipment.
15.105(b)
This equipment has been tested and found to comply with the limits for a Class B digital device, pursuant to part 15
of the FCC rules. These limits are designed to provide reasonable protection against harmful interference in a
residential installation. This equipment generates, uses and can radiate radio frequency energy and, if not installed
and used in accordance with the instructions, may cause harmful interference to radio communications. However,
there is no guarantee that interference will not occur in a particular installation. If this equipment does cause
harmful interference to radio or television reception, which can be determined by turning the equipment off and
on, the user is encouraged to try to correct the interference by one or more of the following measures:
- Reorient or relocate the receiving antenna.
- Increase the separation between the equipment and receiver.
- Connect the equipment into an outlet on a circuit different from that to which the receiver is connected.
- Consult the dealer or an experienced radio/TV technician for help.
17 18
S3J-A906US-01C-F
19
 Loading...