

Page 1
SLED
User’s Manual
(v3.1.5)
Document Version 1.1
i-Tech Company LLC
TOLL FREE: (888) 483-2418 • EMAIL: info@iTechLCD.com • WEB: www.iTechLCD.com
Page 2

SLED Full Color LED Signage User’s
Manual
© 2013 i-Tech Company LLC. All rights reserved.
Under copyright law, this manual may not be reproduced in any form, in whole or in part,
without the prior written consent of I-Tech Company LLC.
Disclaimer
I-Tech Company LLC. has reviewed this manual and provides it only as a guide to
operation. All statements, technical information, and recommendations in this manual and in
any guides or related documents are believed reliable, but the accuracy and completeness
thereof are not guaranteed or warranted, and they are not intended to be, nor should they be
understood to be, representations or warranties concerning the products described.
Specifications are subject to change without notice.
Trademarks:
SLED is a trademark of i-Tech Company LLC.
I-Tech Company LLC.
41758 Christy Street
Fremont, CA 94538
Page 3

Important Safety Instructions
■ Read and follow these instructions. And ke ep all in struct ions .
■ Heed all warnings.
■ Do not use this product ne ar wa ter. C lea n only w ith a d ry cloth.
■ Install in accordance with the manufacturer's instructions.
■ Do not install near any heat sources such as radiators, heat registers, stoves, or other
apparatuses that produce heat.
■ Protect the power cord from being walked on or pinched, particularly at plugs,
convenience receptacles, and the point where they exit from the apparatus.
■ Only use attachments/accessories specified by the manufacturer.
■ Unplug this product during lightning storms or when unused for long periods of time.
■ Refer all servicing to qualified service personnel. Servicing is required when the
apparatus has been damaged in any way, such as when the power supply cord or plug is
damaged, liquid has been spilled or objects have fallen into the apparatus, the apparatus
has been exposed to rain or moisture, the apparatus does not operate normally, or the
apparatus has been dropped.
■ To reduce the risk of fire or electric shock, do not expose this ap pliance to rain or
moisture.
■ Do not expose apparatus to dripping or splashing and do not place objects filled with
liquid on the apparatus.
Page 4
Product Cautions
TO PREVENT POSSIBLE DANGER, ELECTRIC SHOCK, AND OTHER
INJURIES WHEN HANDLING YOUR SIGNAGE, PLEASE BE AWARE OF
OF ALL WARNINGS AND SAFETY PRECAUTIONS LISTED BELOW.
Note: Read all safety and operating instructions before operating your new SLED LED
display.
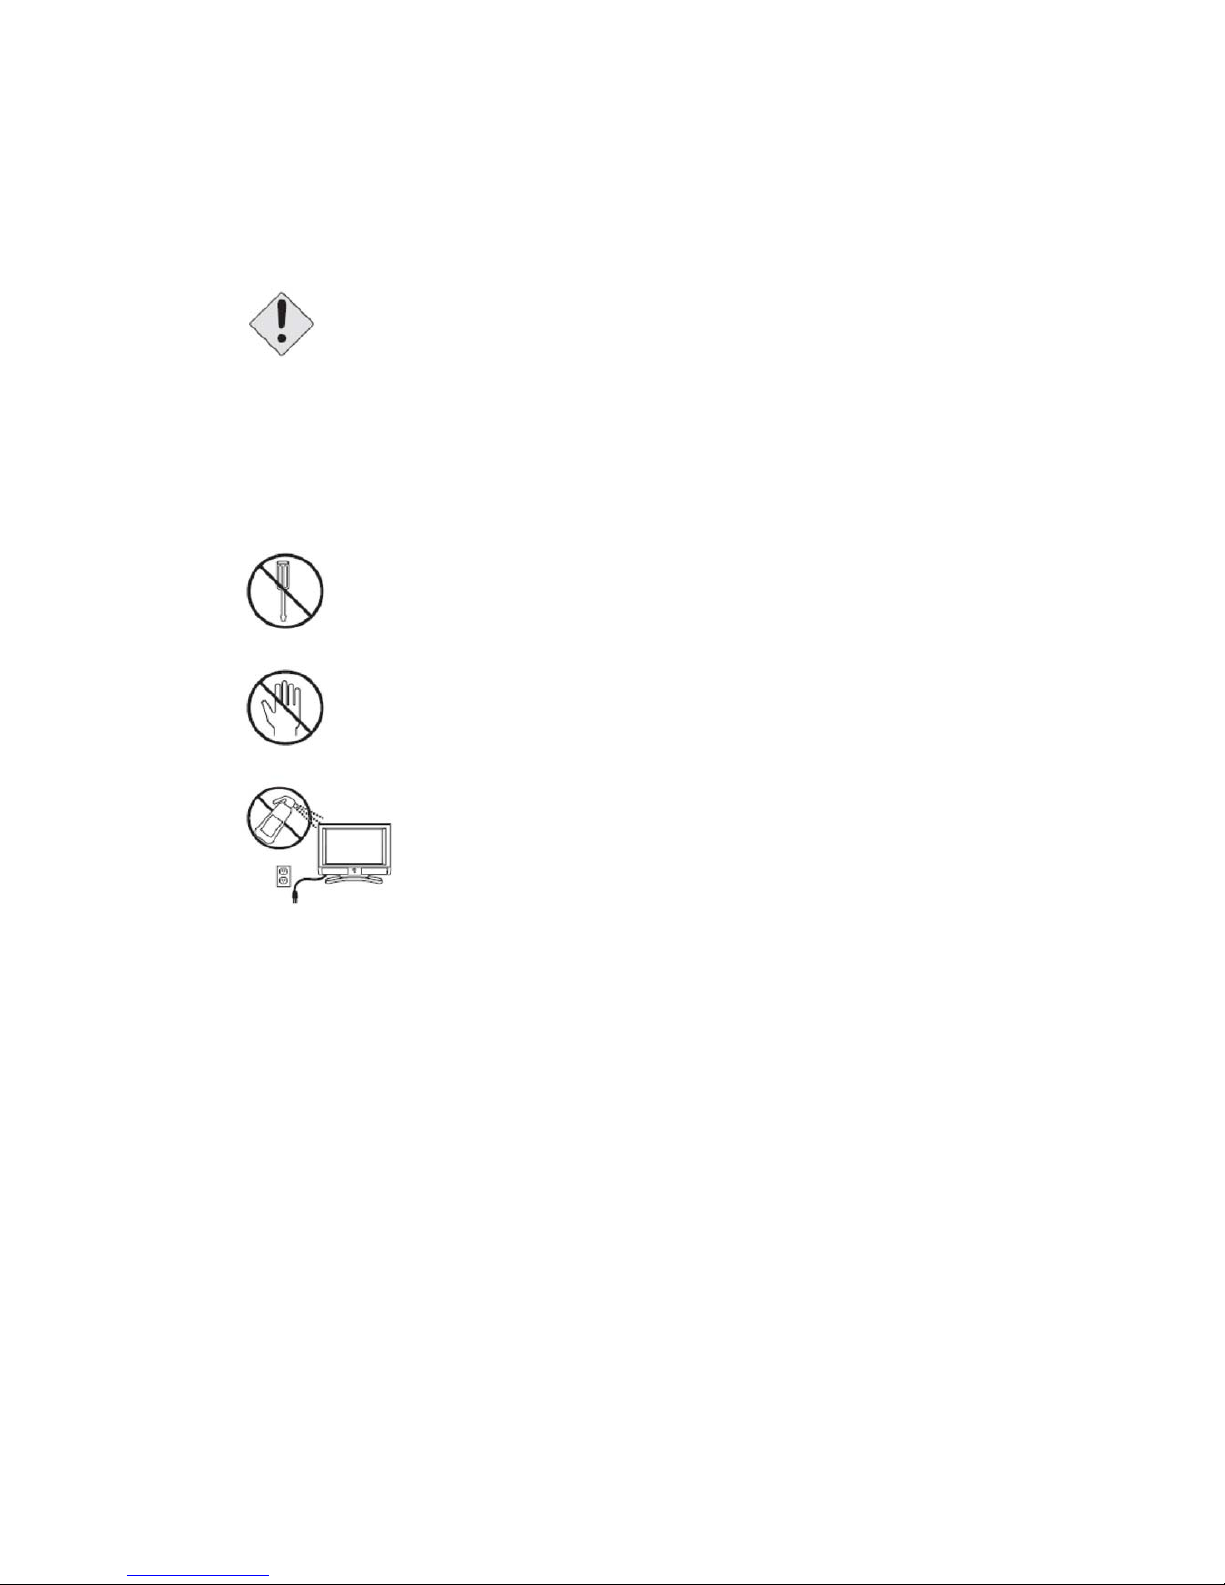
3.
Never insert anything into the LED signage, where objects can come
into contact with high voltage nodes or damage internal components.
Do not attempt to service the signage yourself. Opening or
removing covers exposes high voltage nodes and other hazards.
Refer all servicing to qualified service personnel.
Do not touch the LED signage during thunderstorms.
Unplug the signage during thunderstorms, or if it will not be us
ed for extended periods.
Failure to do so may result in electric shock or fire.
Before cleaning the LED signage, unplug it from the wall. Do not use
a damp cloth for cleaning. Never use liquid or aerosol cleaners.
To prevent overheating and ensure reliable operation, place the LED
signage only in a well indoor and ventilated location.
Page 5

Contents
Important Safety Instruction
Product Cautions
Introduction
2 Application and Feature
3 Unpacking Your SLED
4 SLED Dimension
5 Hardware & Software Installation
6 Software Operation
7 Turning the Signage On and Off
8 Brightness adjustment
1
2
5
6
7
8
13
38
70
71
9
Video Playing Controlling
72
10 File Format Supported
73
11 Specification of SLED
74
4.
1
Page 6

1. Introduction
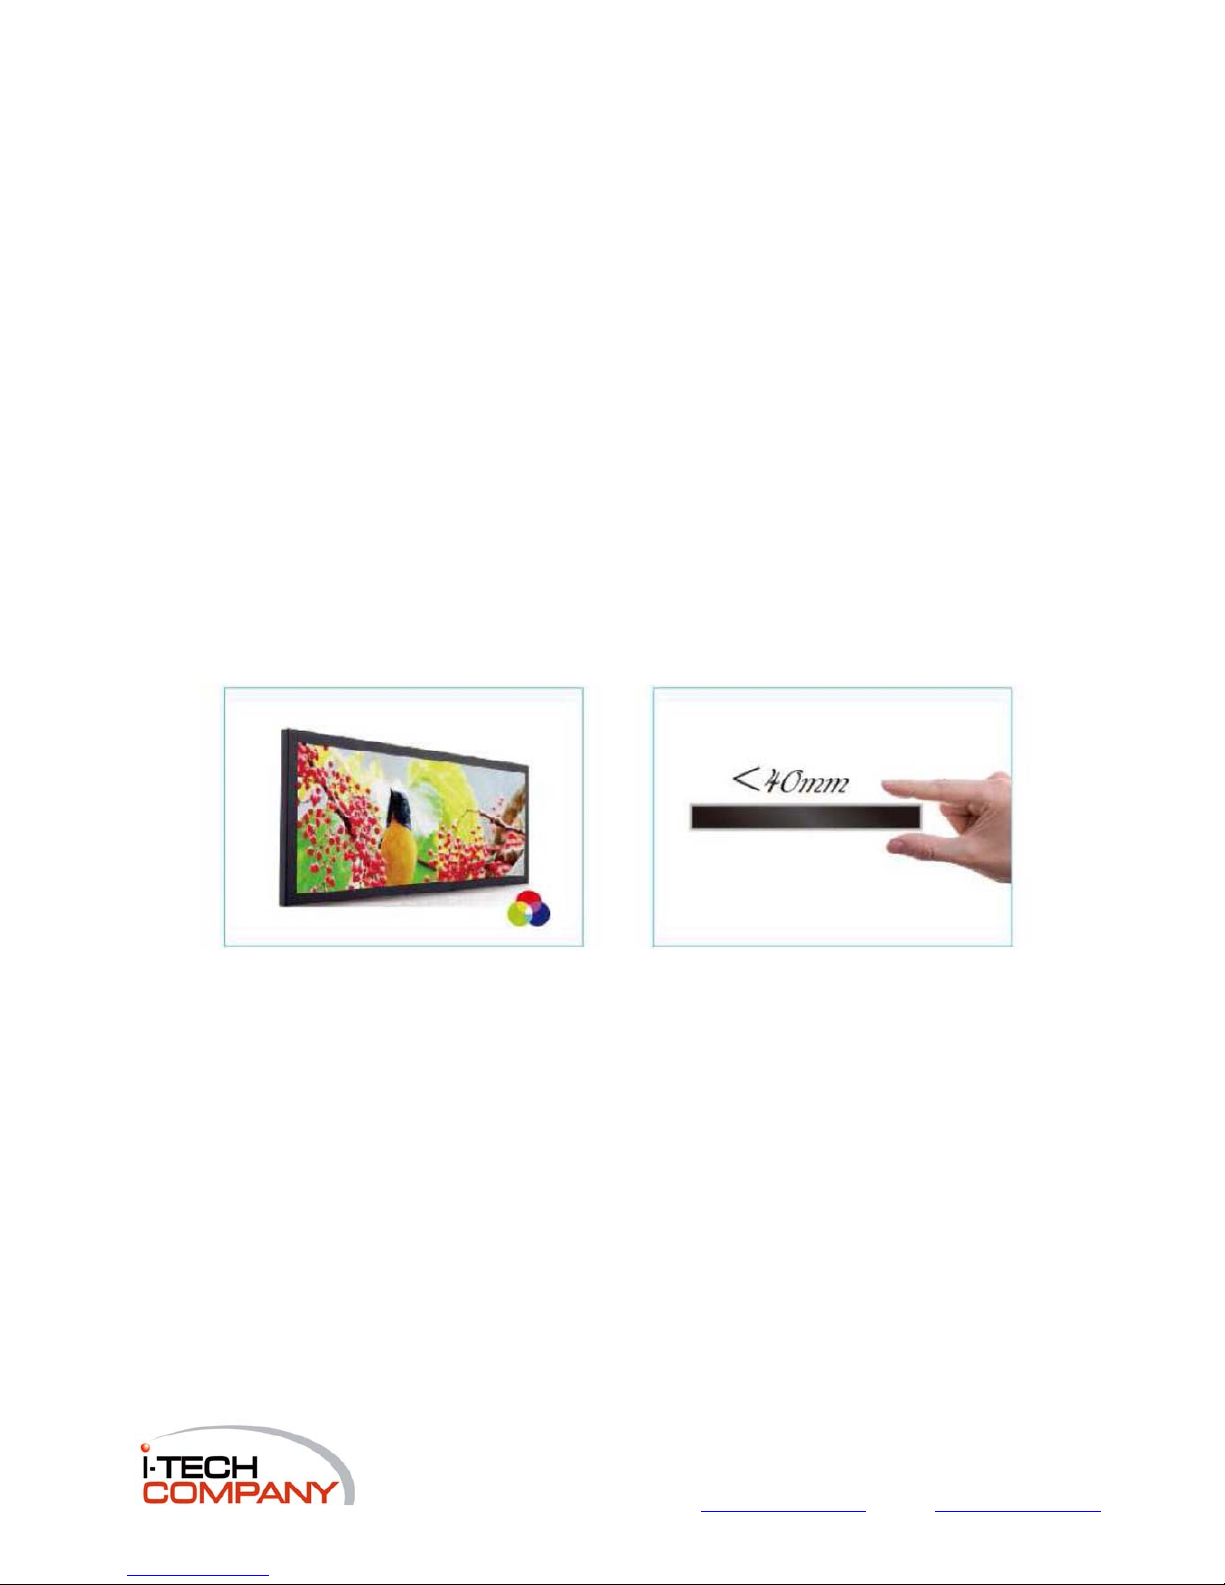
SLED series models are innovated electronic LED signage, which is ch aracterized by low
power consumption and ultra-thin & lightweight for easy carry and installation. Differed from
traditional type, SLED series models, with weighs from 3~ 18kgs and thickness from 28 ~
40mm, is integrated with 8x8 full color LED modules that are constitutes by 3-in-1 RGB LED
with dot pitch 6mm, a memory card and a control system. All the SLED are activated by the
point-to-point (static) driving technology; each color shows 1,024 grayscale levels controlled
by the 10-bit PWM. Thus, SLED model can reach full color performance with natural color
blending, excellent smoothness and consistency, which is superior to any scan-driving LED
signage.
SLED is also a remarkable eco-solution tool for your business marketing. Under normal
video display, power consumption of the SLED (Model No.: LM19296F-6) is below 250W
while maximum is no more than 500W under full-power operation (RGB 256x256x256).
SLED promises you the best advertising platform for your business marketing and enables
users to utilize their creativities to the fullest in an economical way. It saves both your bills as
well as the globe.
In brief, easy installation & operation of SLED allows users to advertise their products /
brands / services wherever they prefer. Whether you mount it on the wall, hang from the
ceiling, place on a tripod, SLED can be easily managed. Sbravo’s SLED provides you a new
marketing medium for your advertising planning. Marketing yourselves wherever you go!
5.
Page 7

2.1 Application
□ Indoor (semi-indoor) LED display;
□ LED message signboards
□ Advertising signage
□ Installation art or media art
2.2 Feature
□ 3-in-1 SMD LED
□ 6 mm pixel pitch
□ 10-bit (1024) grayscale PWM control for each single LED
□ Point-to-Point (static) driving mode
□ Embedded Control System
□ Thickness < 40 mm, weight 3kgs ~18kgs
Ultra-thin & lightweight for easy-mounted
□ Full color performance (more than one billion colors, 1024*1024*1024 colors),
□ Natural color-blending, consistency and smoothness
□ Low power-consumption for power saving
□ No thermal issue, cooler system needless
□ Temperature range of operation: -10 to 40°C
□ Meet RoHS compliant (lead free)
□ User Friendly Operation Interface
□ Module design for easy maintenance
□ Metal frame, thin, firm & durable
6.
Page 8

3 Unpacking Your SLED
Before using your new signage, you should unpack the contents of the box and check to
make sure everything is present and undamaged.
To unpack the signage:
A. Set the box upright near the intended signage location.
B. Open the top of the box.
C. Remove the accessories box from behind the signage and set it aside.
D. Lift the LED signage out of the box.
E. Remove the pads and set the signage aside.
The accessories box should contain the items indicated below. If any items are
missing or damaged, please contact the seller immediately.
The accessories including:
A. CD x 1 (includes User’s Manual)
B. Power Adaptor x 1
C. USB Cable x 1
7.
Page 9

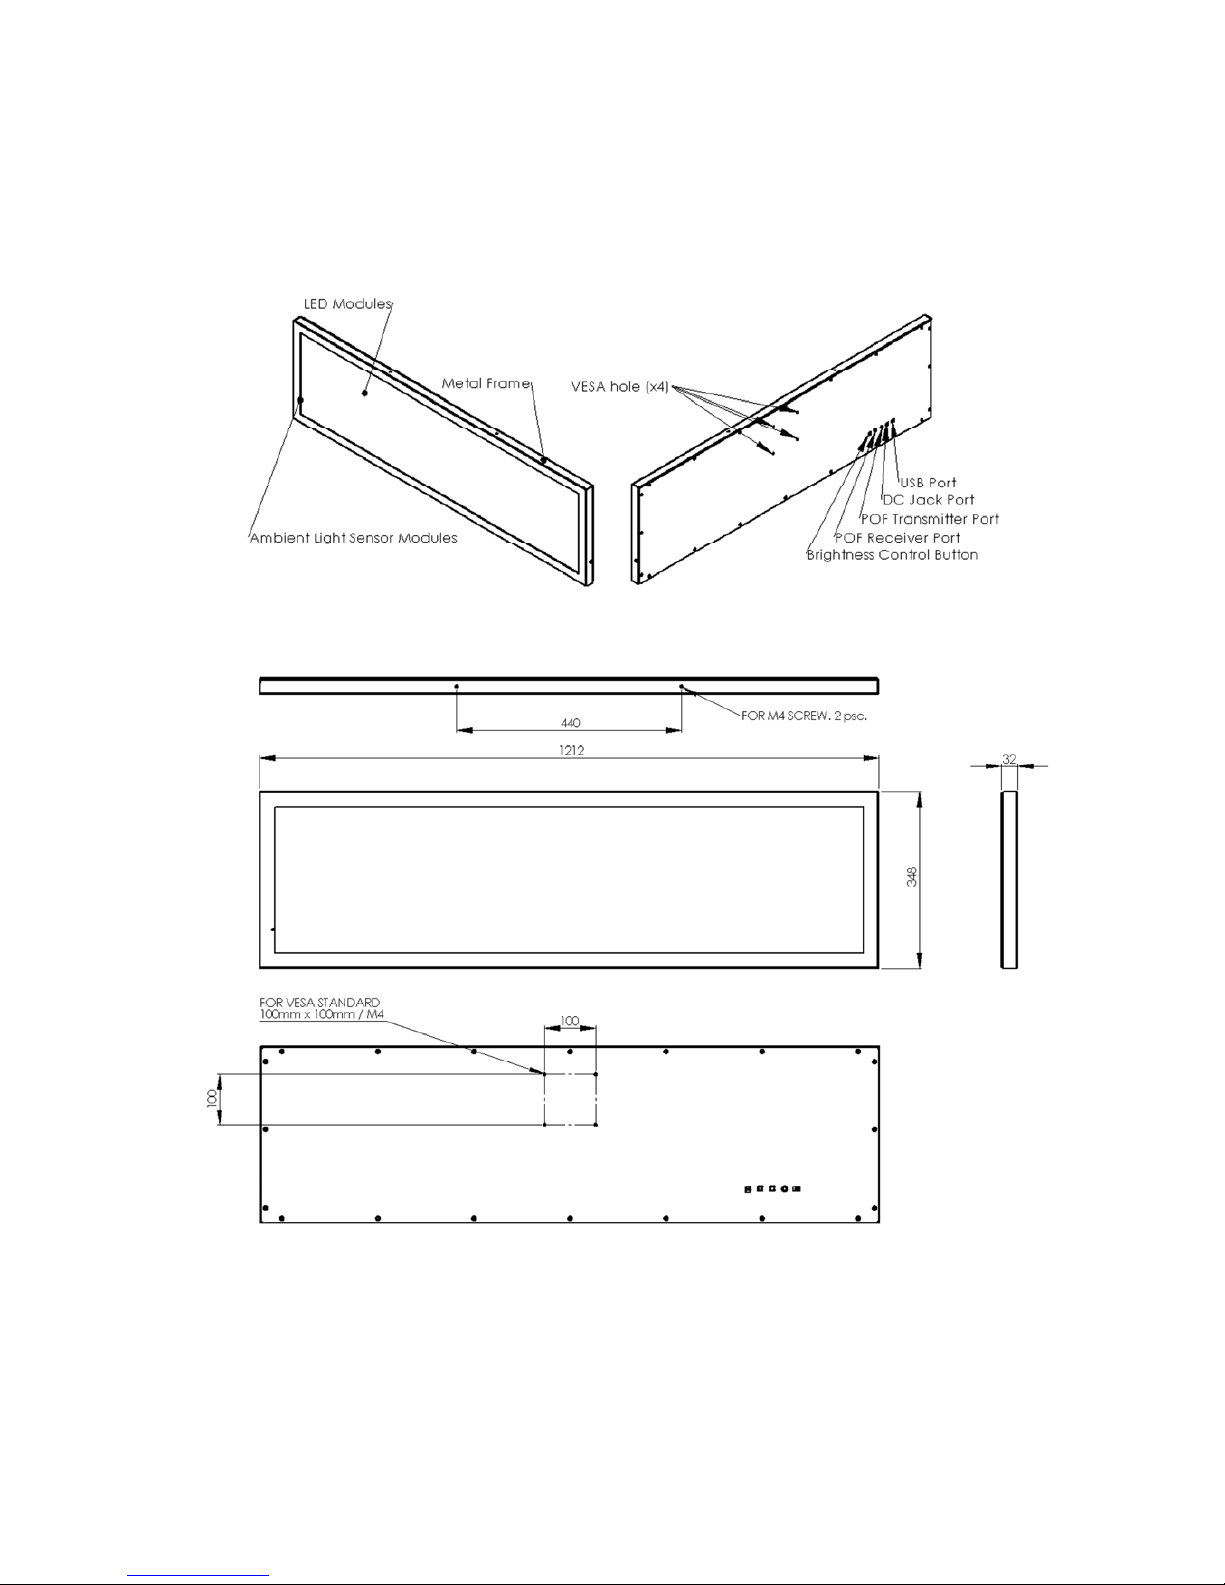
4. SLED Dimension 4-1.
Model: SLED6448F-6
Figure 1
8.
Page 10

4-2. Model: SLED12848F-6
9.
Page 11
4-3. Model: SLED19248F-6
Figure 3
10.
Page 12

4-4. Model: SLED25648F-6
Figure 4
11.
Page 13

4-5. Model: SLED12896F-6
Figure 5
12.
Page 14

5. Hardware & Software Installation
5.1. If you are going to connect several SLED to show one video file, please be make sure to
connect the SLED by Plastic optical fiber cable by Figure 6 list.
(p.s. 5.1 is unnecessary if connection is only one unit SLED).
13.
Page 15
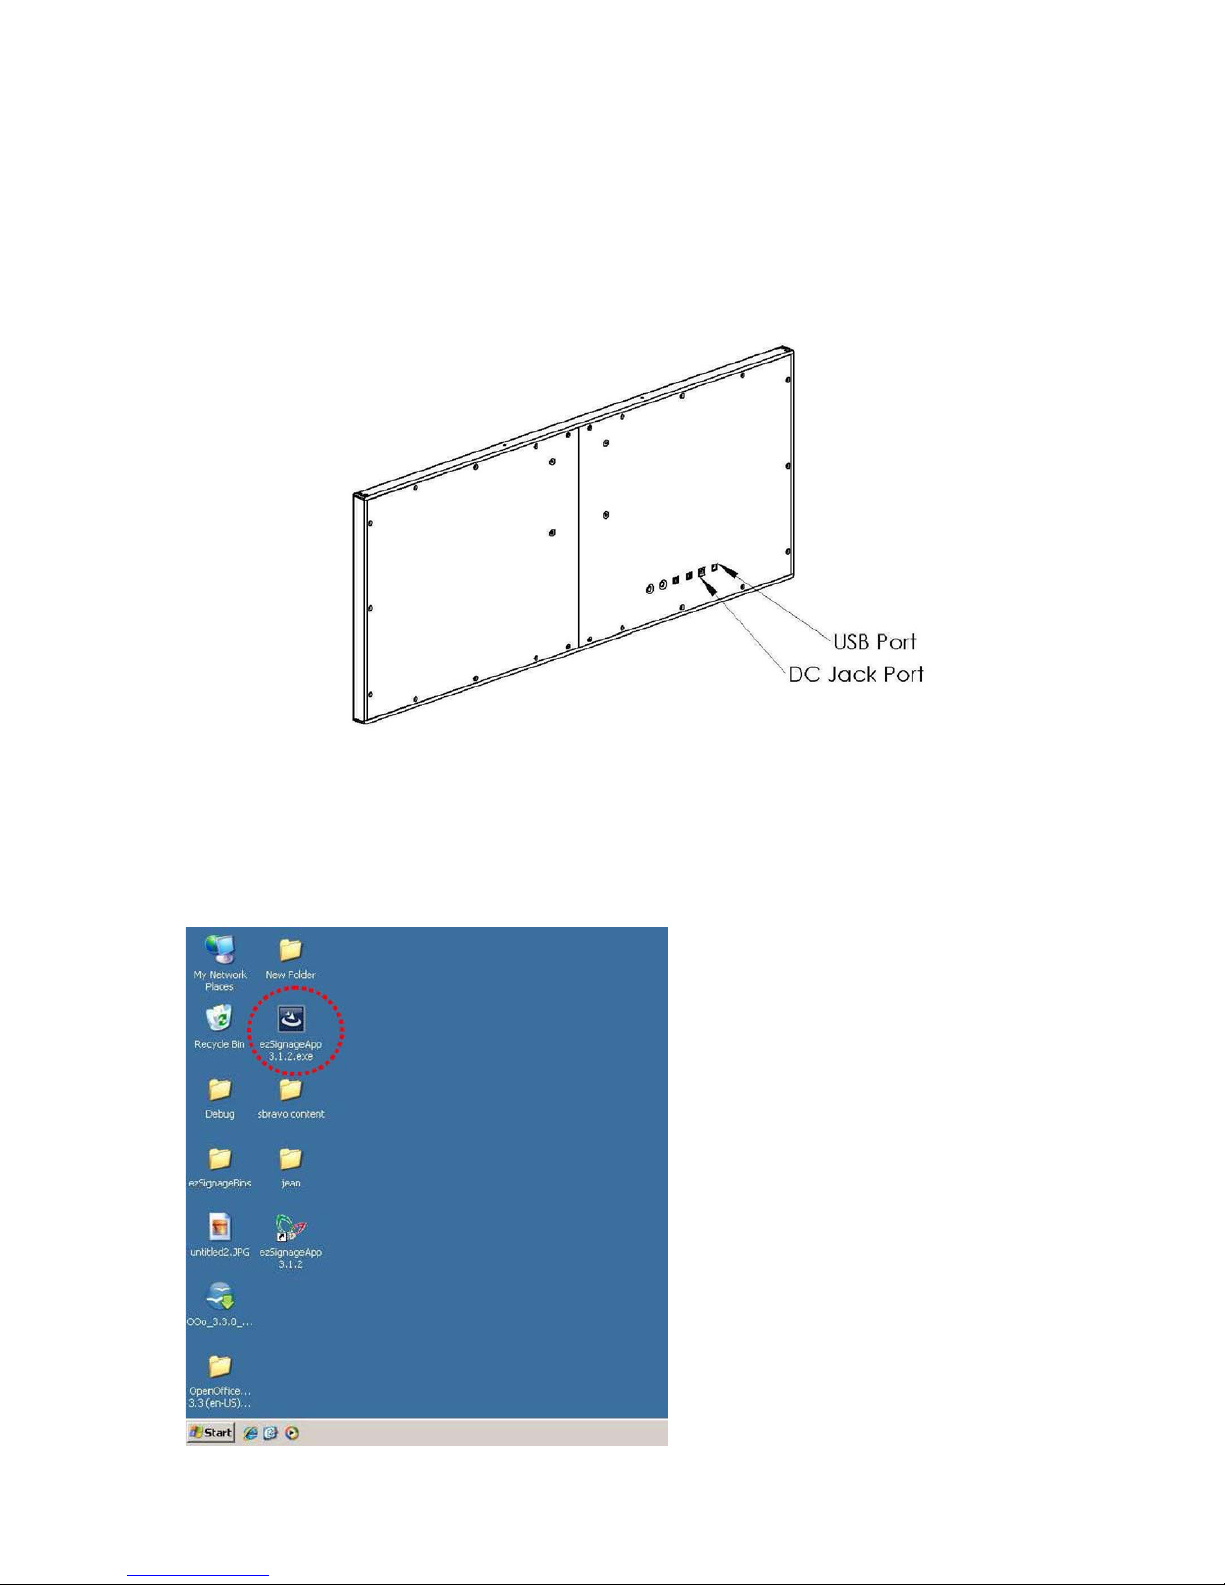
5.2. Plug in the power cable to SLED and connecting the USB cable from your computer to SLED.
(as Figure. 7.)
Figure 7
5.3. Insert the SLED software, which is attaching with SLED, to PC.
For Windows XP
A. Please execute “SLEDApp3.x.x.exe ” .
14.
Page 16
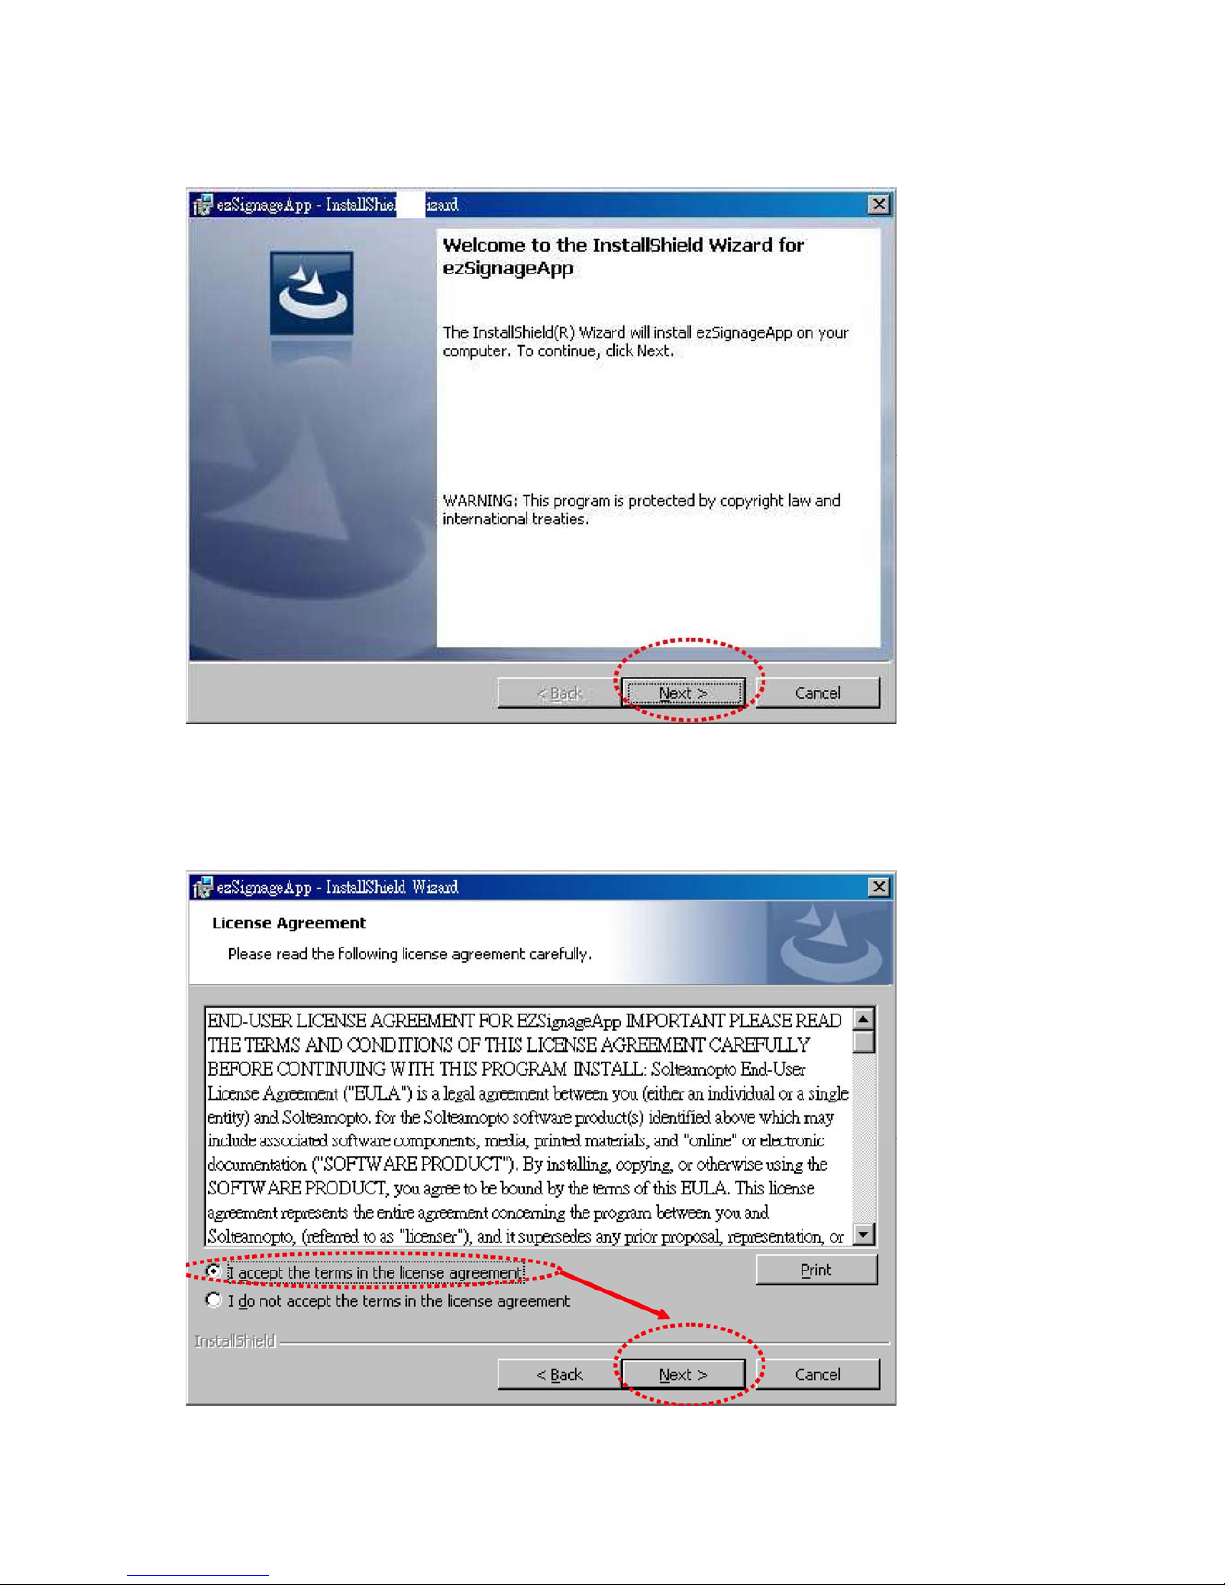
B. Click NEXT> to start installation.
C. When enter to License Agreement dialog, please select I accept the terms in the
license agreement and click Next> to next step.
15.
Page 17
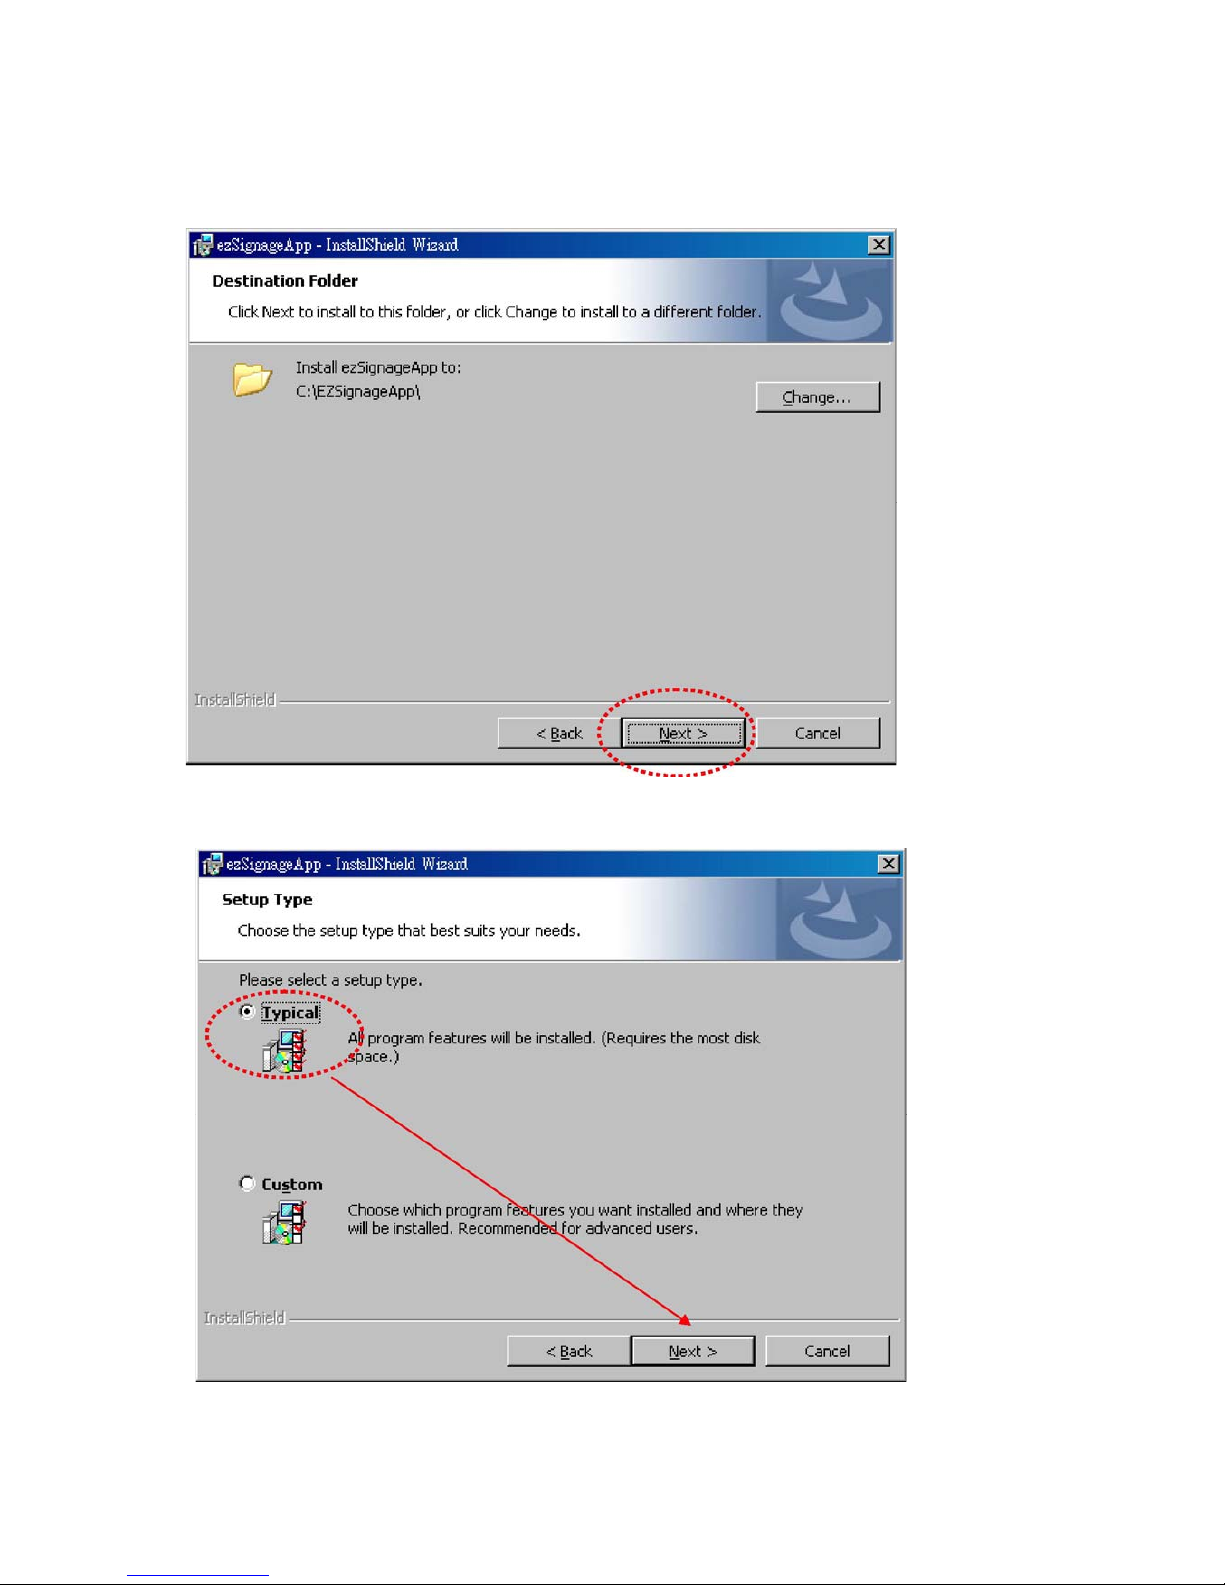
D. Please click NEXT> to next step.
E. When enter Setup Type dialog, please select Typical and click NEXT> to next step.
16.
Page 18

F. When enter to Ready to Install the Program dialog, please click Install button to install
SLED APP and the status bar will track the installation status.
17.
Page 19

G. Please click Finish button to finish the installation.
H. Then please install WinPcap. Please click NEXT> to next step.
18.
Page 20

I. The click NEXT> to next step.
J. When enter to License Agreement dialog, please select I Agree.
19.
Page 21

K. The please click Install button to start installation.
L. The click Finish to finish the installation.
20.
Page 22
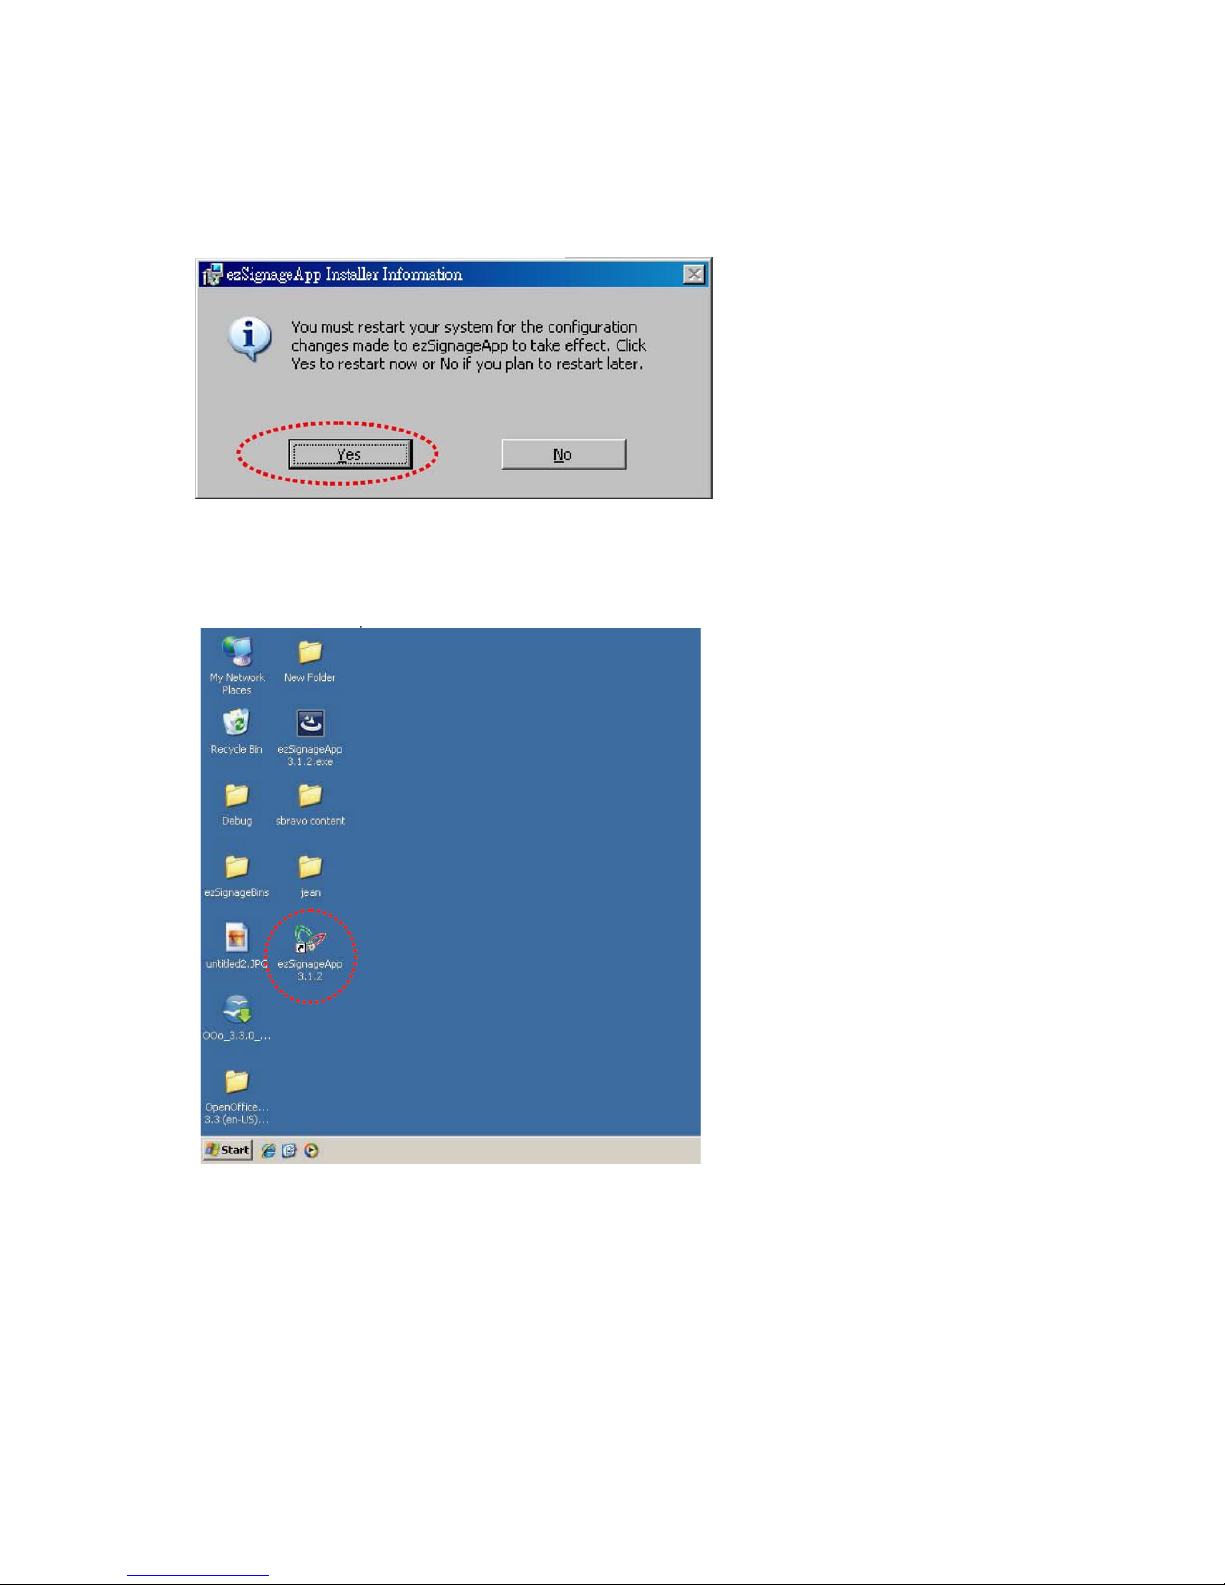
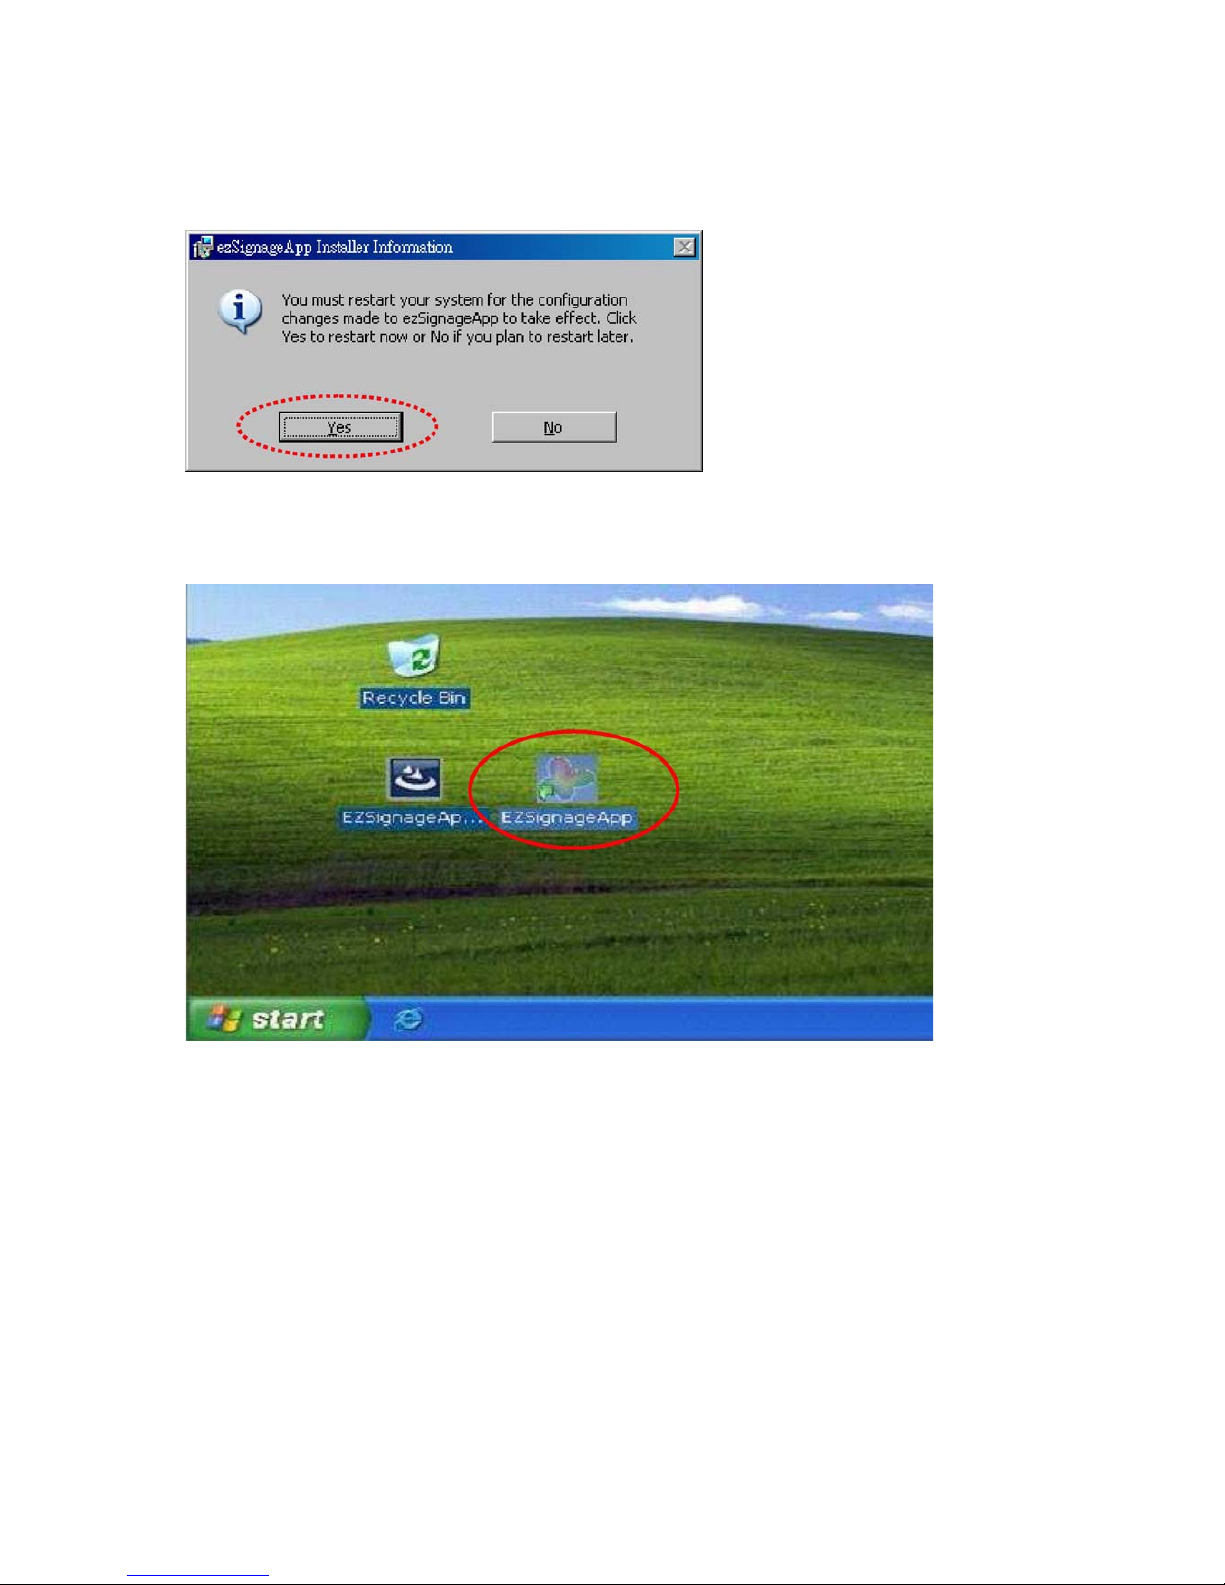
M. Please select Yes to re-start your system.
N. After re-starting the system and installed the software successfully, you may find SLEDAPP shortcut
on the desktop.
21.
Page 23

【P.S.】You may also find ezSignageAPP as below figure list.
22
Page 24
For Windows 7
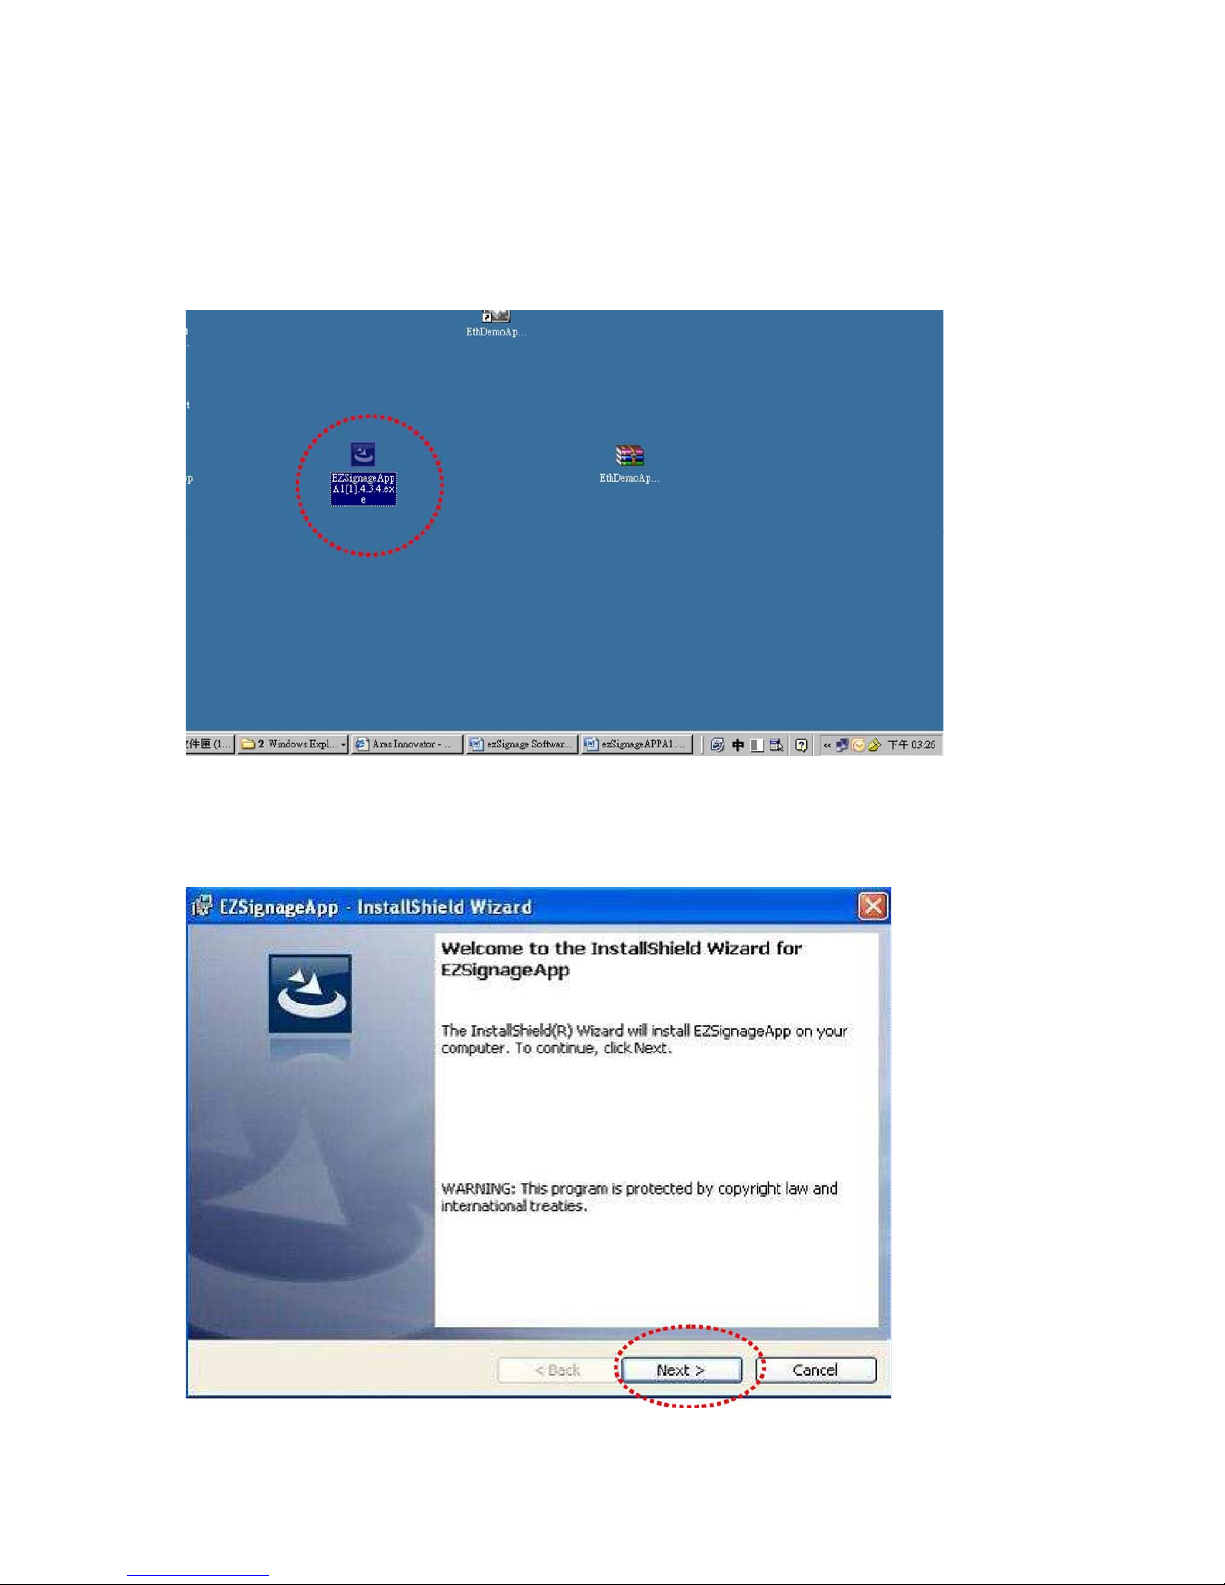
A. Please execute “ezSignageAPPA3.x.x.exe
B. Click NEXT> to install EZSignageAPP
23.
Page 25
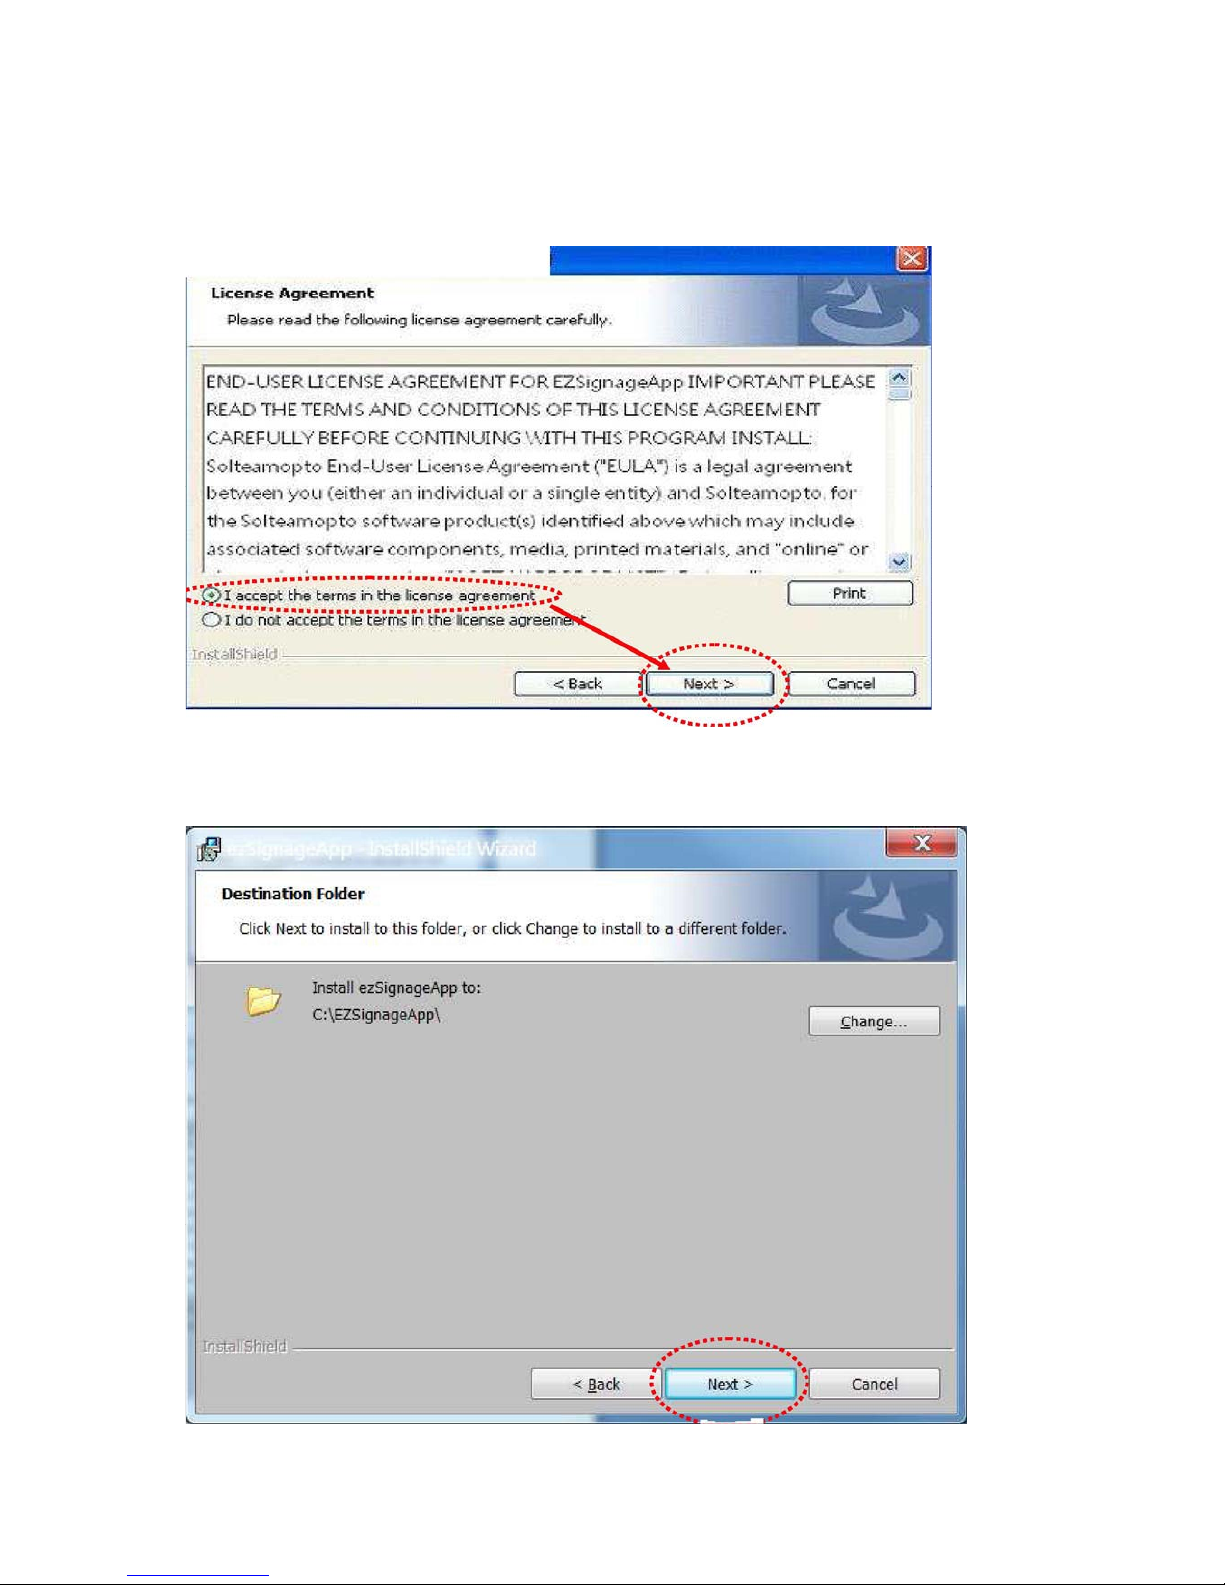
C. When enter License Agreement dialog, please select I accept the terms in the license
agreement then click Next> to next step (as below figure).
C-1. Then click NEXT> to next step (as below figure).
»-m^^
24.
Page 26

D. When enter Setup Type dialog, please select Typical, then click NEXT> to next step.
(as below figure).
E. When Ready to Install the Program dialog appeared, please click Install to start software
installation.
25
■■L...JB''
Page 27

F. Please select Install this driver software anyway to next step.
26.
Page 28

G. Then click Finish to finish the installation.
H . After finished the software installation, the WinPcap setup diagram will appeared, please click
NEXT> to next step.
27.
Page 29

I. Then click NEXT> to next step.
J. When enter License Agreement dialog, please click I Agree to next step.
28.
Page 30

K. Please click Install to start installation.
L. Please click Finish to finish the installation.
29.
Page 31

M. Please click NEXT> to install ReadyDriver Plus。
N. Please select I accept the agreement and click Next> to next step.
30.
Page 32
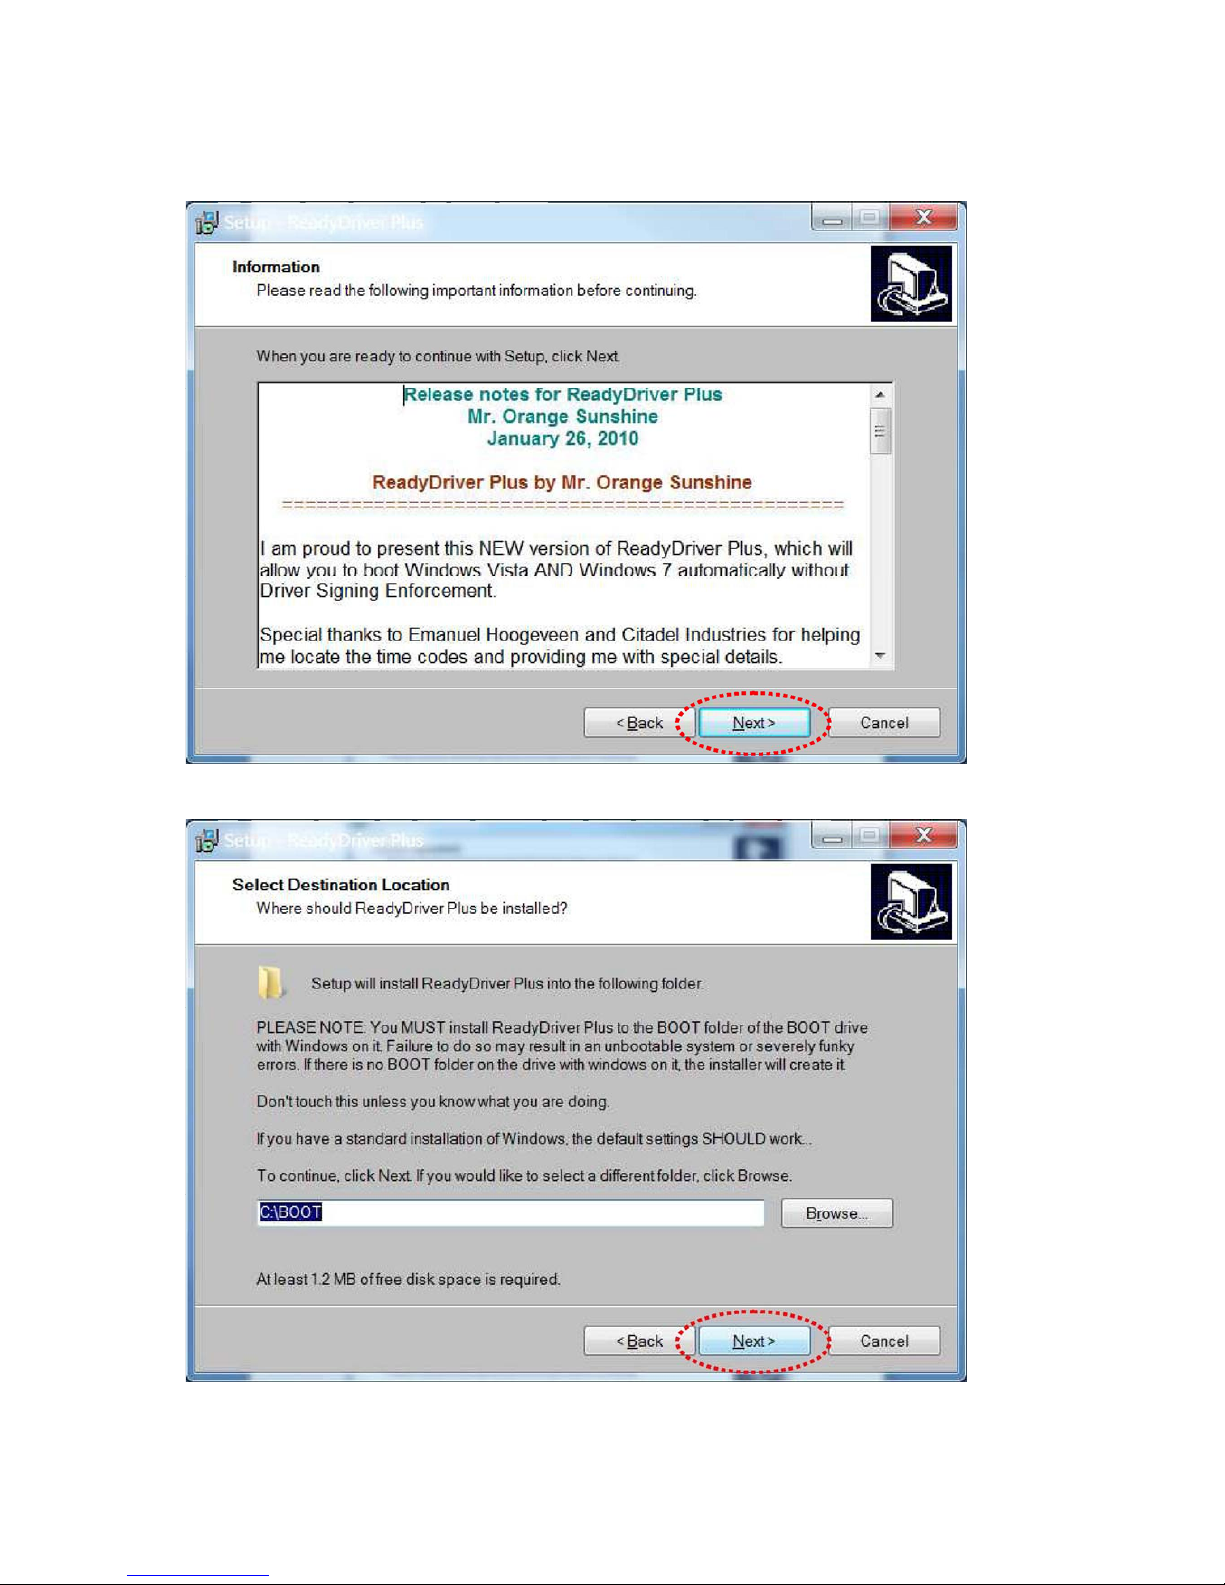
O. Then click Next> to next step.
P. Please select the initial setting and click Next> to next step.
31.
Page 33
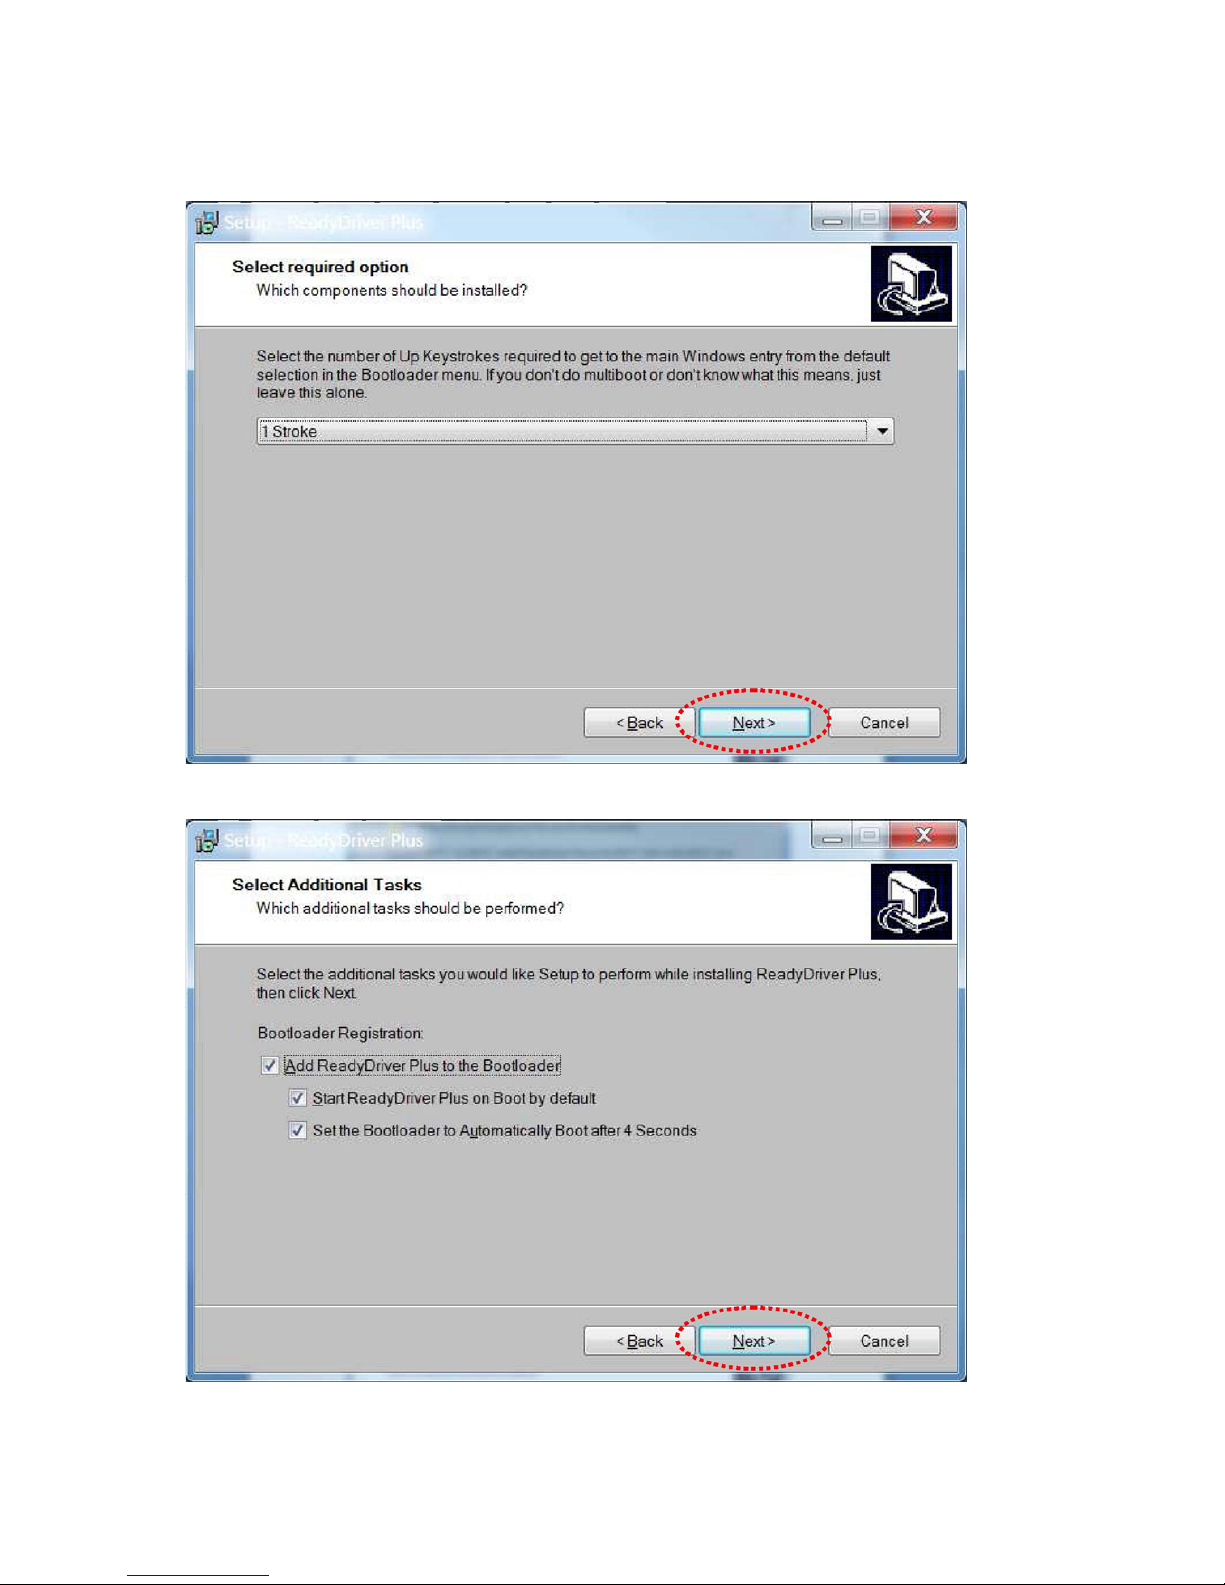
Q. Please select initial setting and click Next>
R. Please click Next>.
32.
Page 34
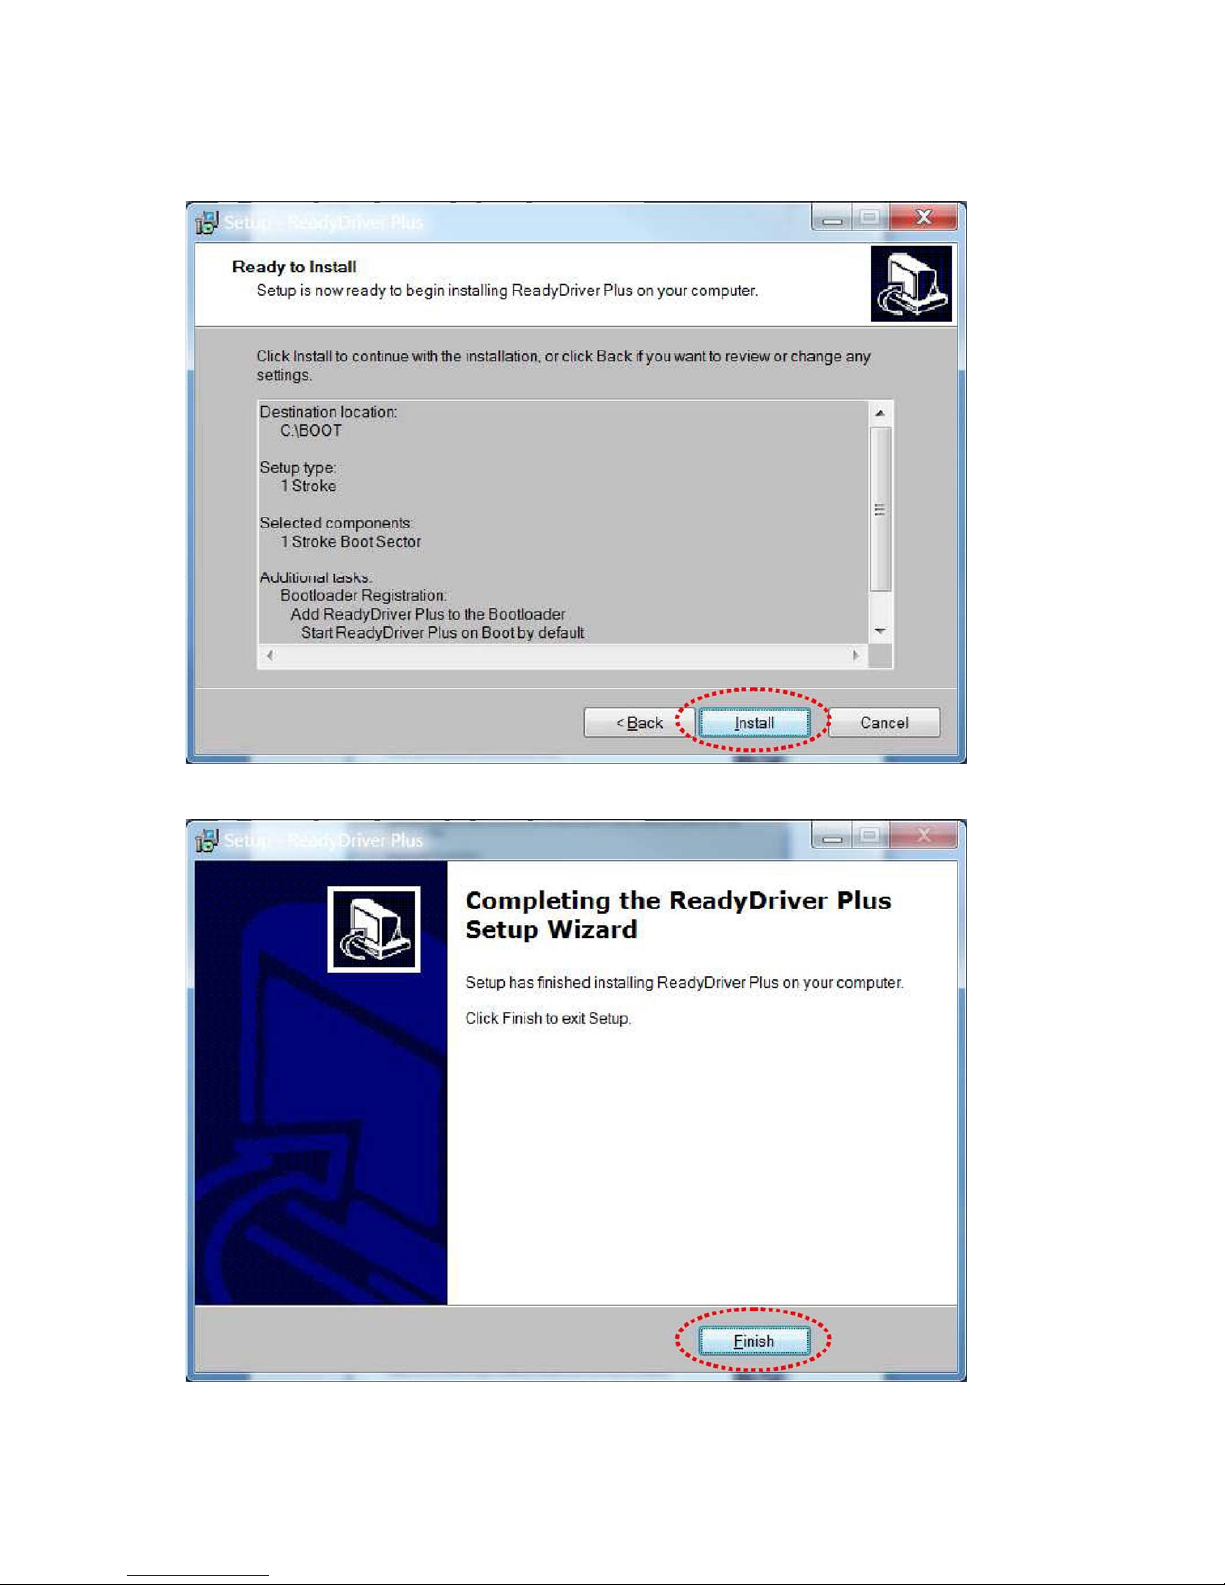
S. Please select Install to start installation.
T. Please select Finish to finish installation.
33.
Page 35
U. Please select Yes to restart.
V .You will find ezSignageApp shortcut on desktop when you restart the PC.
34.
Page 36

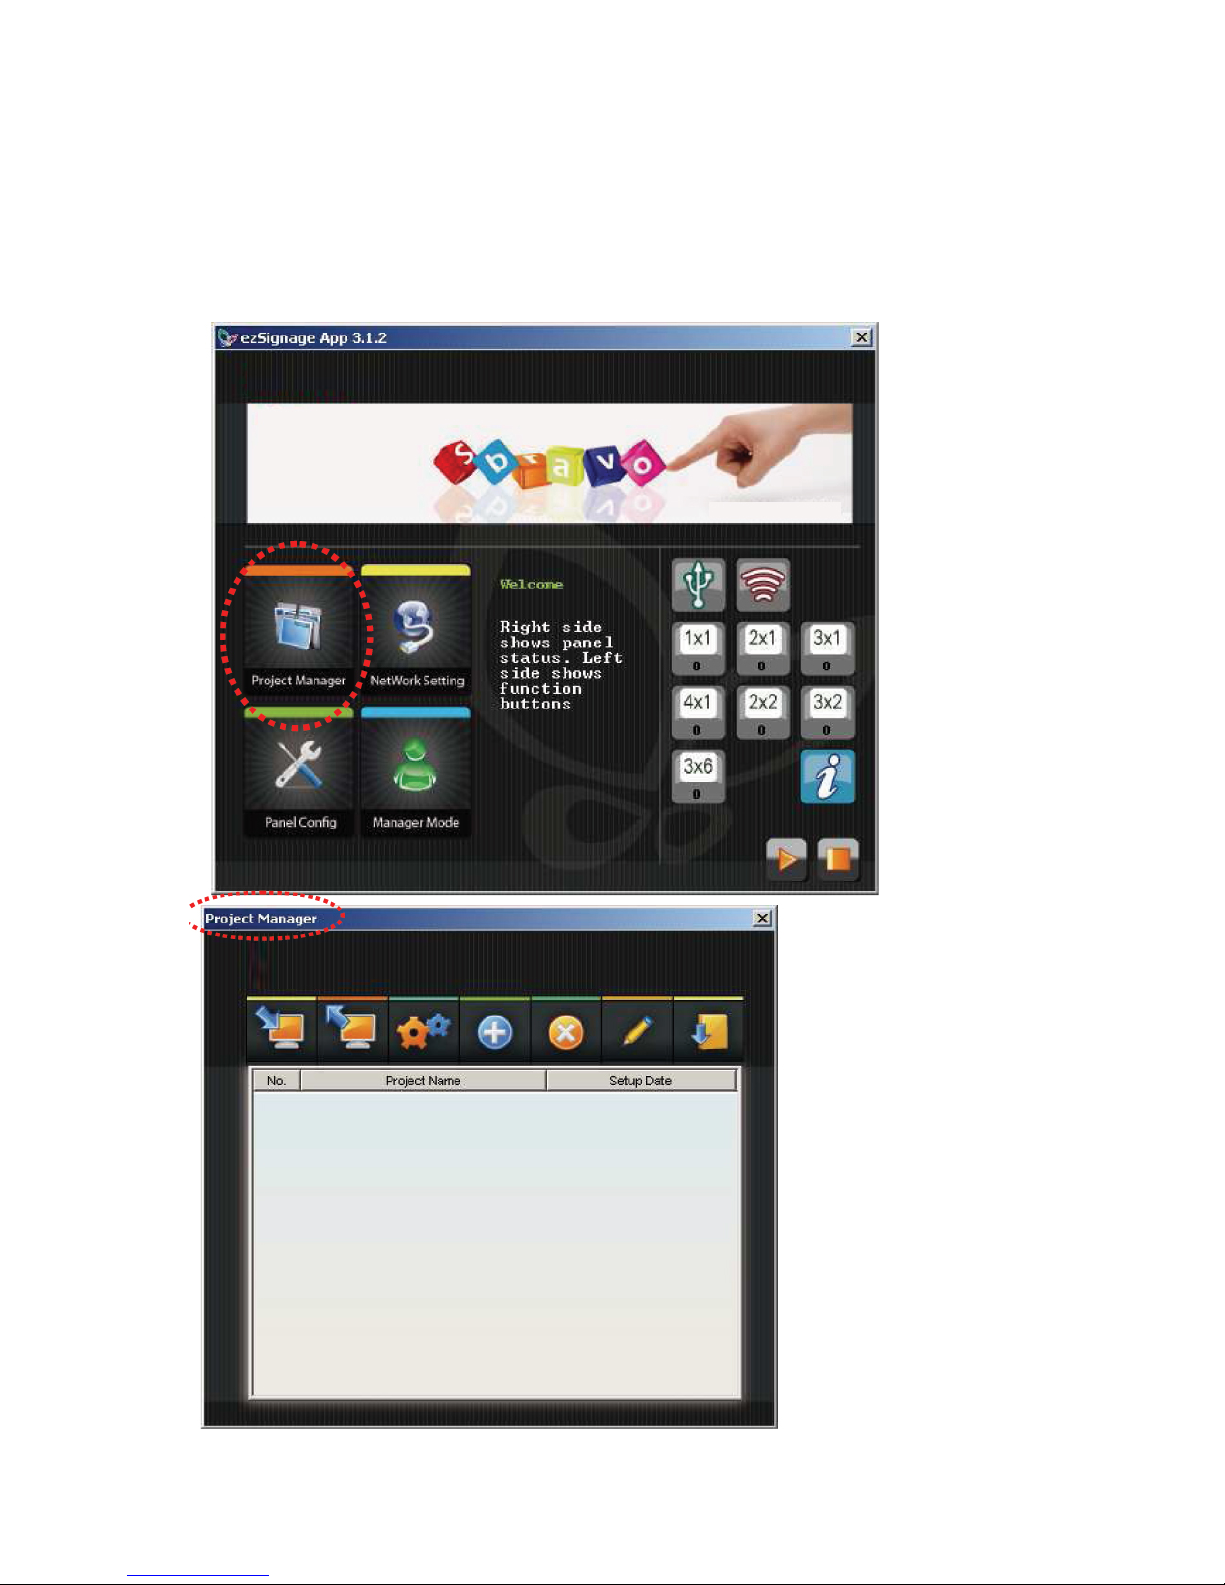
5.4. Please execute ezSignageAPP short cut
The introduction and function of ezSignageAPP are:
35.
Page 37

Project Manager : The function of Project Manager is using for adding, editing, deleting,
importing, exporting projects or download projects to SLED.
Network Setting : The function is used for searching SLED or download contents to
SLED by Ethernet.
【Remark】The function is only available for connecting Sbravo’s remote cont rol system.
Panel Config : Display signage information. Such as Firmware version, brightness
and re-set default setting…etc.
Manager Mode : The function is only for LED panel manager for setting LED screen.
To display the connection status between SLED and PC. If this Icon is green color
which means the SLED connects with PC properly. If it’s grey color which means
SLED didn’t connect with PC, or connection is improperly.
Display the connection status between SLED and remote control system. If icon is orange color
which means the connection between SLED and remote control system is properly.
If connection is improperly the icon will be grey color.
[Remark] The function is invalid if without connecting Sbravo’s remote control system.
Information about iTechLCD and software version.
Display all .bin files which saved to SLED.
Stop playing .bin file.
36.
Page 38

Display the model number and quantity which connect with PC.
For example, which means there is one model 1x1 (SLED6448F-6)
connects with PC. The green “1” means the signage quantity which
connects with PC.
37.
Page 39
6. Software Operation
6.1. Create one project
Please connect SLED with PC firstly, then click the shortcut of ezSignageAPP to enter the main menu.
Please click “Project Manager” icon to enter Project Manager dialog to edit files.
38.
Page 40

6.1.1. Add one Project
A. Please click to add project
39.
Page 41

C. If project creates successfully, below dialog will appear. Please click OK to next step.
D. After click OK, the Select Signage Type Dialog will appear (as below figure). The signage model
number and quantity which connect with PC will be showed on this dialog. For example, below figure
means there is one 1x1 which connects with PC. You may edit the file when SLED connects with
PC. As the relevant function introduction as follows.
Select the model number that you plan to display.
SLED setting information.
40.
Page 42

Zoom in
Zoom out Zoom all
Signage Location setting
G0: Same Group,G1: Another Group
S0:Master LED screen
S1 : Slaver LED Screen
Yellow area:Current editing LED Signage
↑Upward Arrow:The text scroller texts are facing front.
↓Downward Arrow:The text scroller texts are facing
opposite, like specular reflection.
When you click the icon of Frame (as left figure), the signage frame which showed
on Panel Position will be marked in Green color. The signage won’t overlap with
the others signage if you click the Frame icon.
Key In Offset Value : Adjust the ezSigange location by key in the offset value on both X and
Y axles.
Rotate Panel : You my rotate the LED signage by this icon.
Set the all order panel: Set the connection priority for all SLED.
41.
Page 43
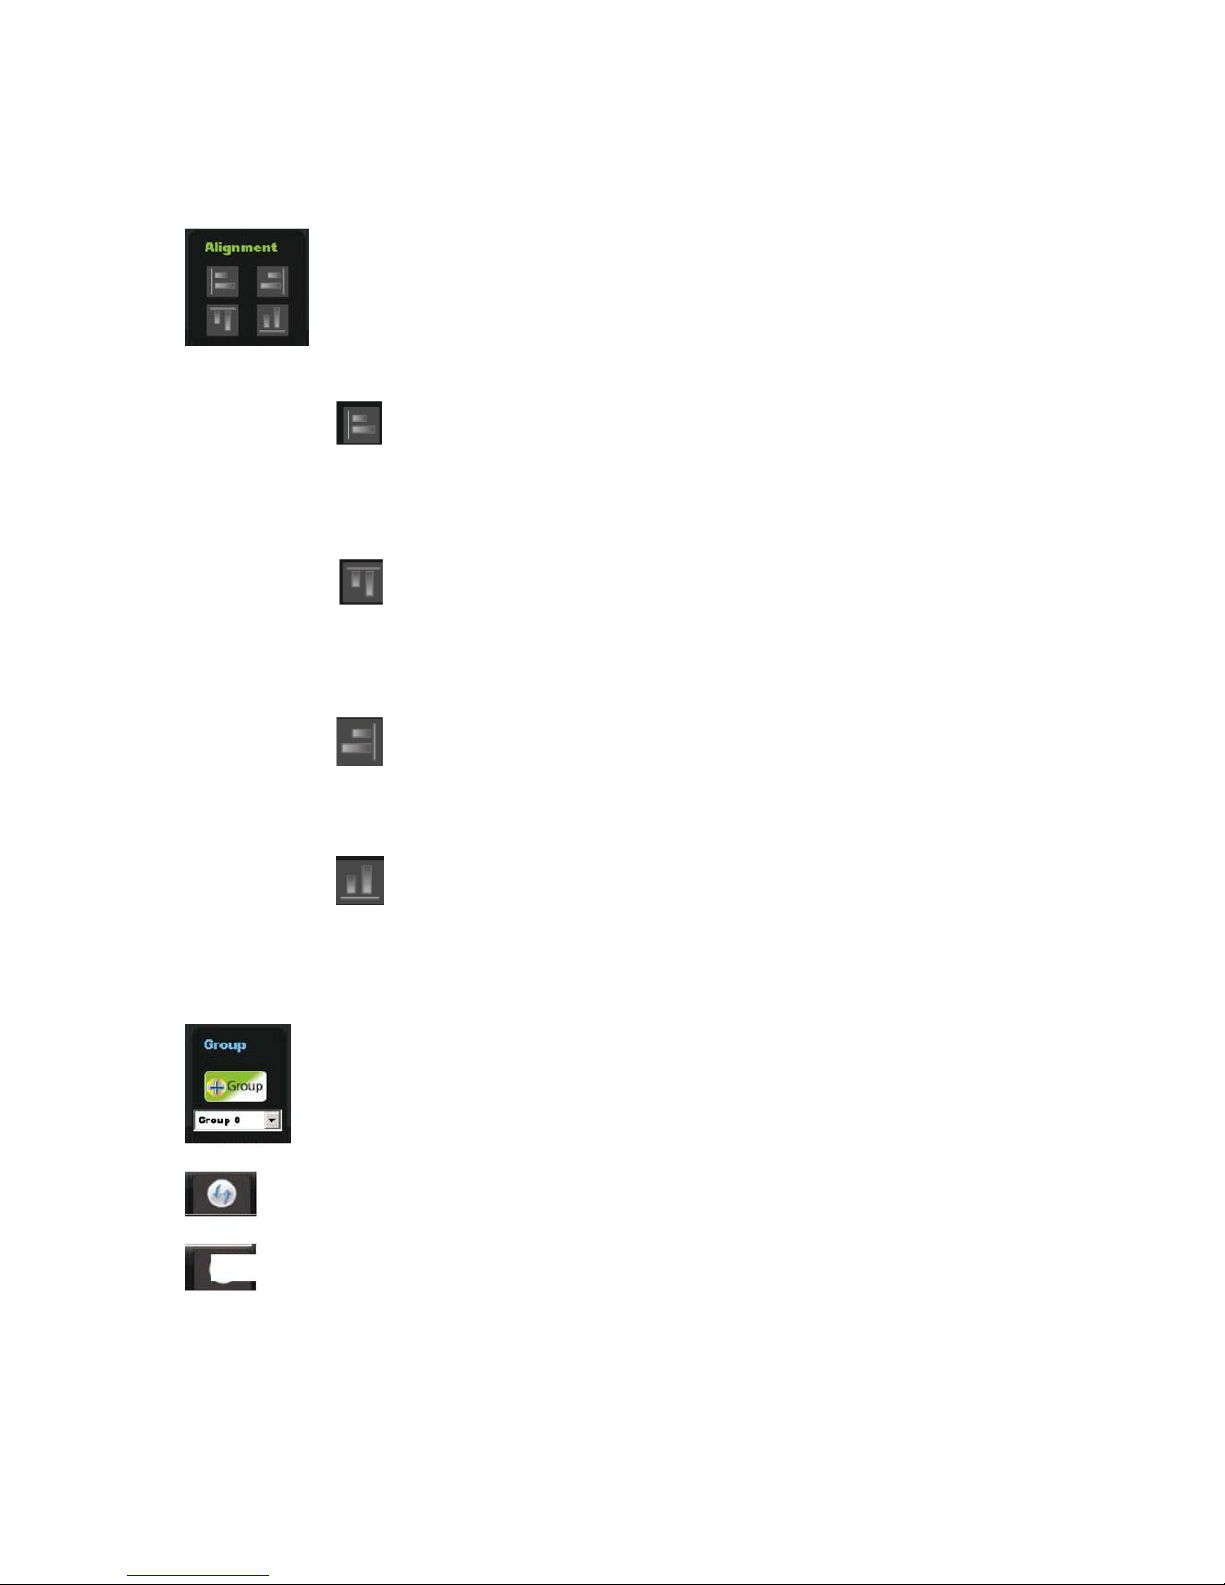
Alignment
■ Long-press “shift” button and select all signage to set all signage as a group to move
them at same time. >
■ All signage play the same media : Overlap all signage on Panel Position.
: Align signage against leftward:Long-press “shift” button and select the
signage which should be alignment. The position of 1st signage will be the aimed for
all signage that you selected.
: Align signage against upward:Long-press “shift” button and select the
signage which should be alignment. The position of signage will be the aimed for all
signage that you selected.
: Align signage against rightward: Long-press “shift” button and select the
signage which should be alignment. The position of 1st signage will be the aimed for
all signage that you selected.
: Align signage against downward:Long-press “shift” button and select the
signage which should be alignment. The position of 1st signage will be the aimed for
all signage that you selected.
Add a Group : The function is setting several signage as a group for synchronization
function.
Clear all signage quantity setting.
42
Quit the dialog after edited and saved the contents.
Page 44

6.1.2. Edit media file (both video and picture)
Please select SLED model and make sure the signage connects PC before edit media file.
You may find the model number and quantity that you plan to connect with pc on Panel Info (as below
figure).
Add Video
Add Picture
Edit Media
Increase Media Playback Order
Decrease Media Playback Order
43.
Page 45

OK: Confirmation
6.1.2.1 Edit Media file
A. You may start editing media file after added video file or picture.
44.
Delete Media
Page 46

B. Please select the video or picture that you plan to edit, then click to enter Edit Media Dialog
(as below figure).
C. When enter Edit Media Dialog, you may start editing, as the relevant function introduction as
follows: a) Edit Video
45.
Page 47

b) Edit Picture
Media Info : Display the resolution of media file.
Duration:Set the playing time for picture. (The function didn’t support
Video file).
Zoom in
Zoom out
Zoom all
Fit Medai size to LED Panel
46.
View : Display the ratio for current playing video file.
Page 48
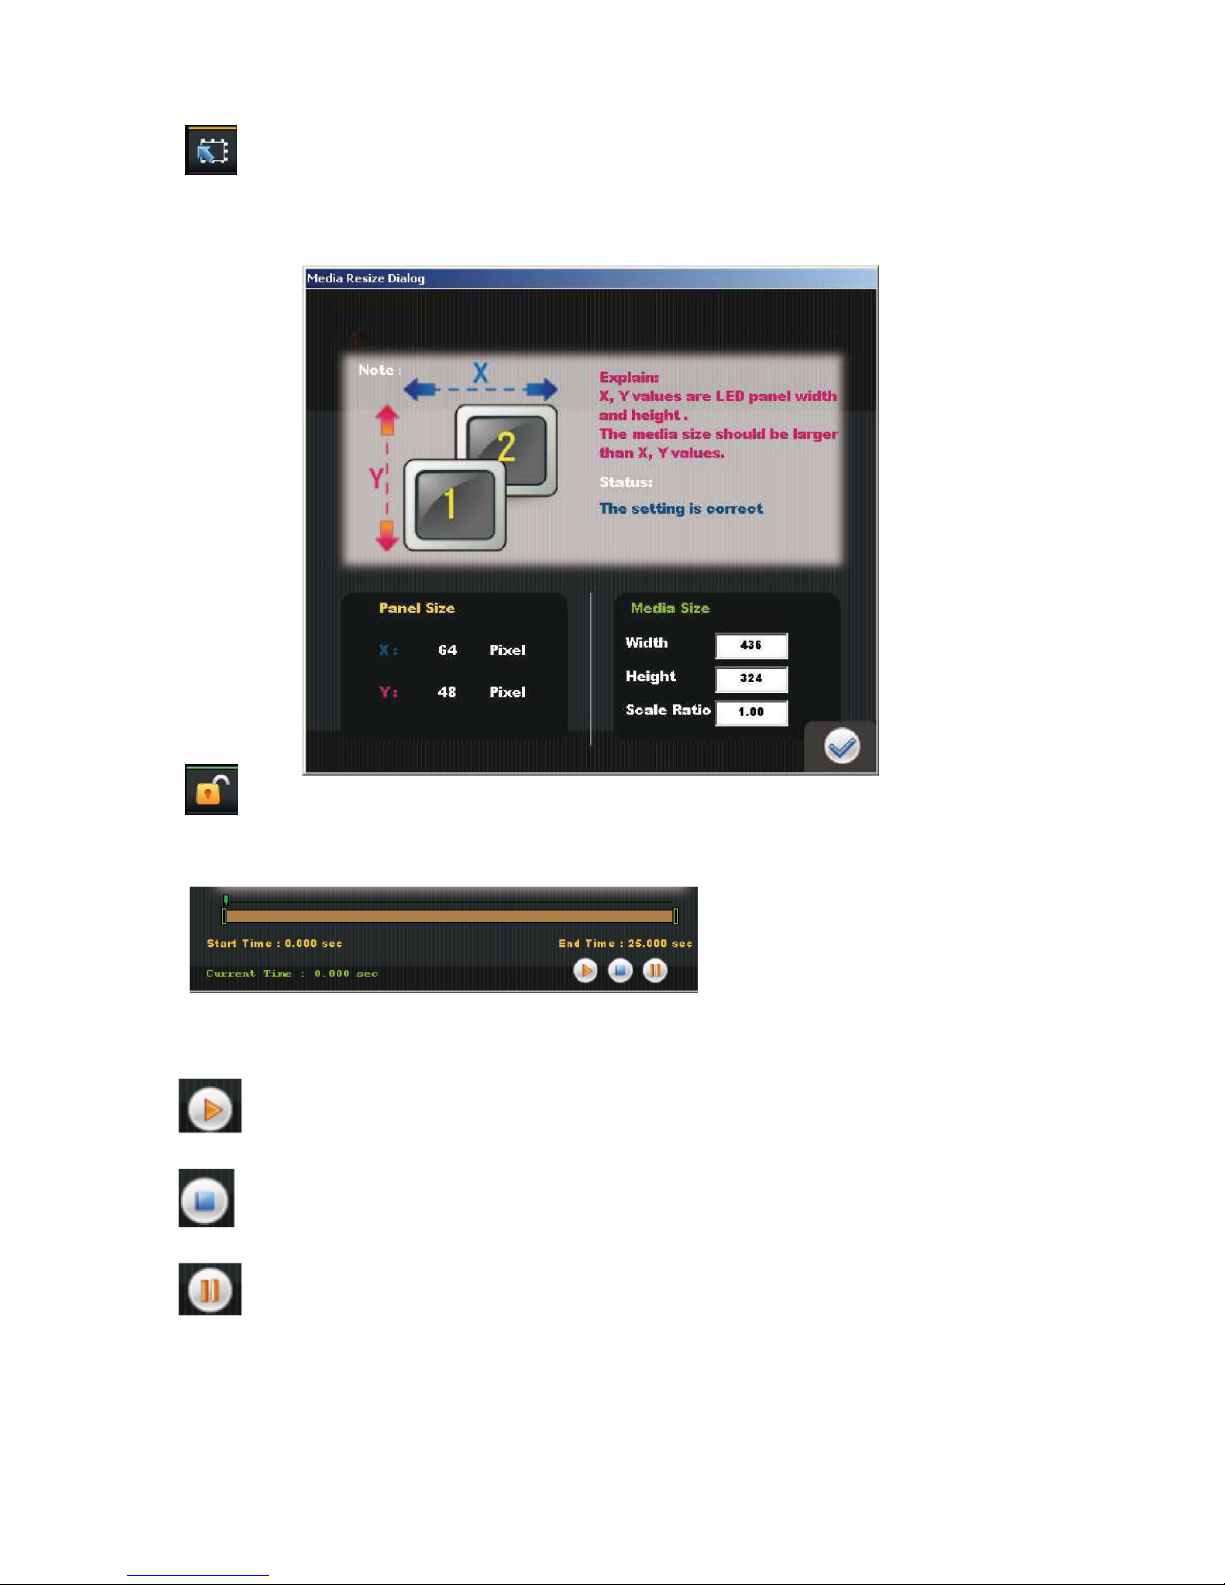
Adjust size of media : Below figure appears when click the icon of Adjust size of media. The
Media size has to be bigger than Pane Size (value of X, Y axles), please click Enter button
after the value setting.
Unlock Media: Click this icon before your editing. (The original text scoller will be
Deleted when click this icon.)
Playing (Only for Video file)
Stop (Only for Video file)
Pause (Only for Video file)
Display the start playing time and ending playing
time. You may drag the time bar to the point that
you’d like to display. (The function only for Video
file)
47.
Page 49

Upload the picture resolution based on the radio of 1:1 to the LED signage.
(This function is only available for picture file, which cannot support Video
file.)
【Remark】The function will be disable if you already excute
(fit media size to the panel), or (adjust size of media file).
Create Text Scroller : Edit Text Scoller dialog will appear when click this icon (as below). More
function will be introduced at 6.1.2.2
OK: Save all the setting and exit the dialog.
48
Clear Text scroller
Page 50
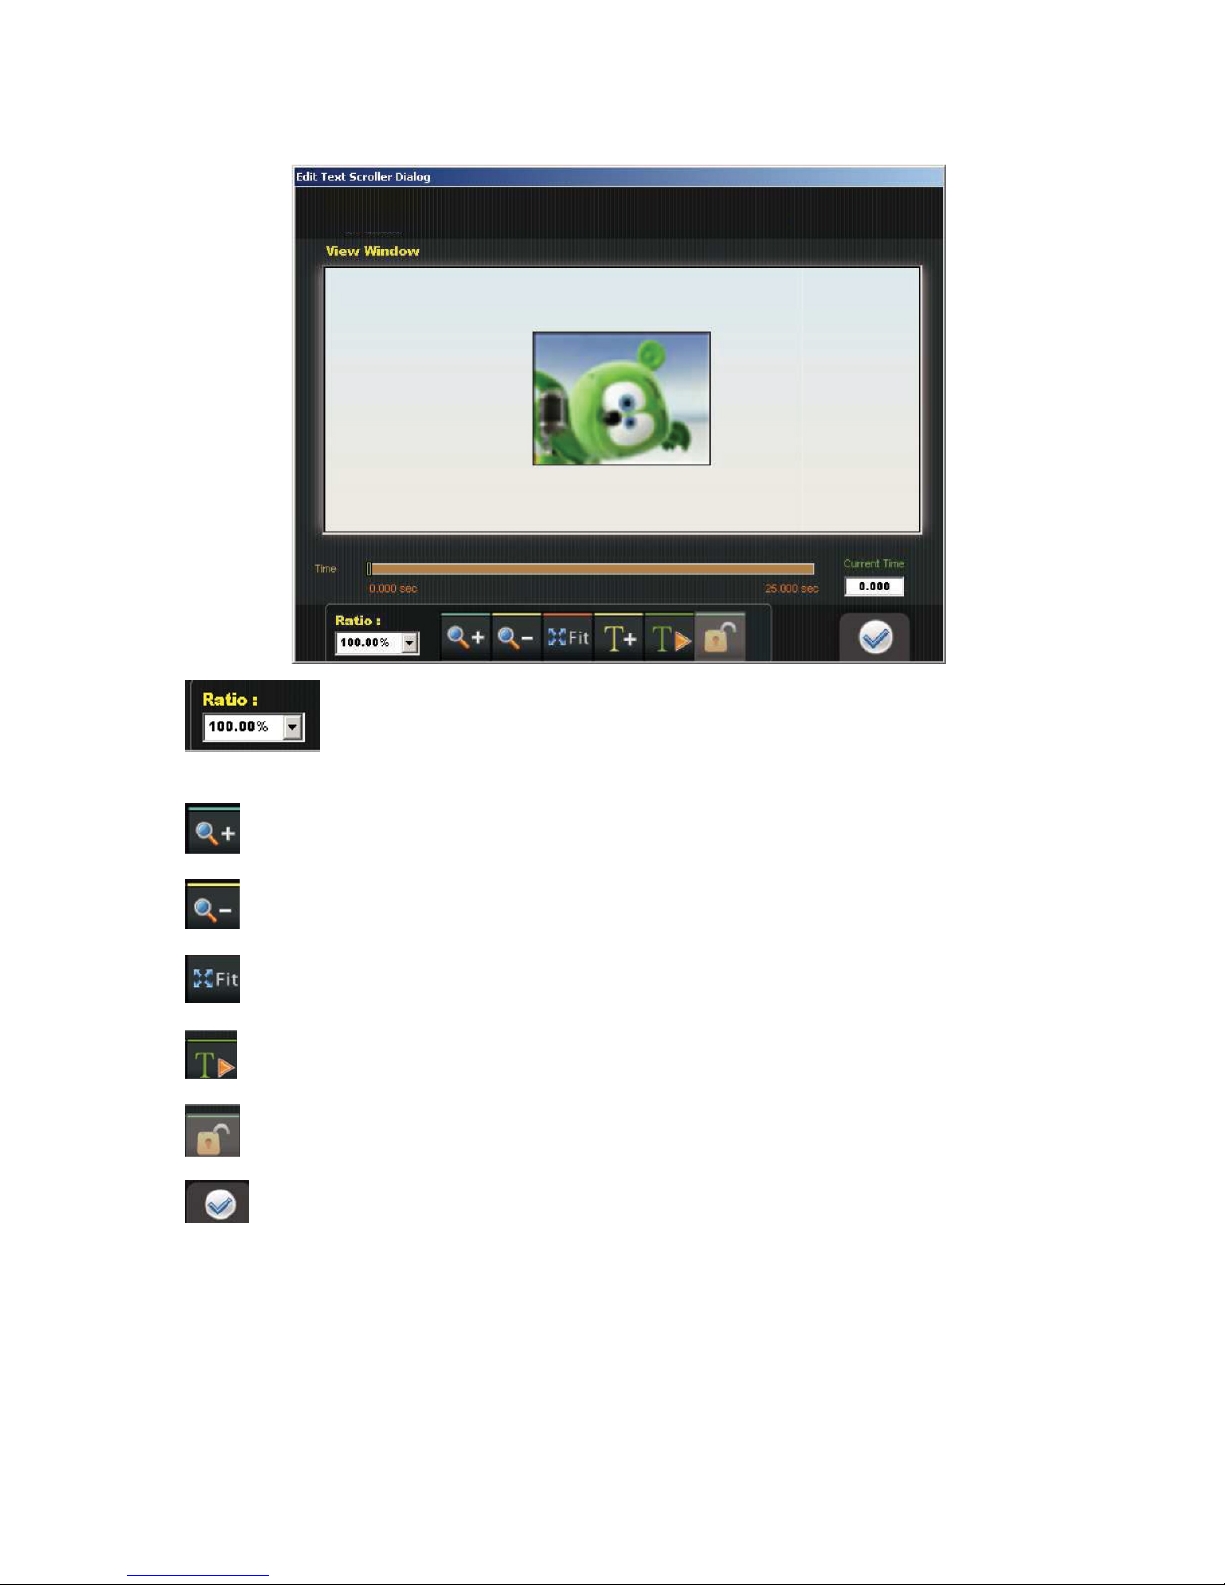
6.1.2.2 Edit Text Scoller
Display the ratio of Current video file
Zoom in
Zoom out
Zoom all
Display all the texts
Unlock media file
OK:Save all the setting and exit the dialog.
49.
Page 51

Add TextBox: The TextBox List dialog will appear when click this icon. The relevant functions
introduction as follows:
You may type the texts that you’d like to display on
this area.
You may set the font by the Font function key (as left figure)
Select the text gradient by Gradient function key (as left figure).
50.
Page 52
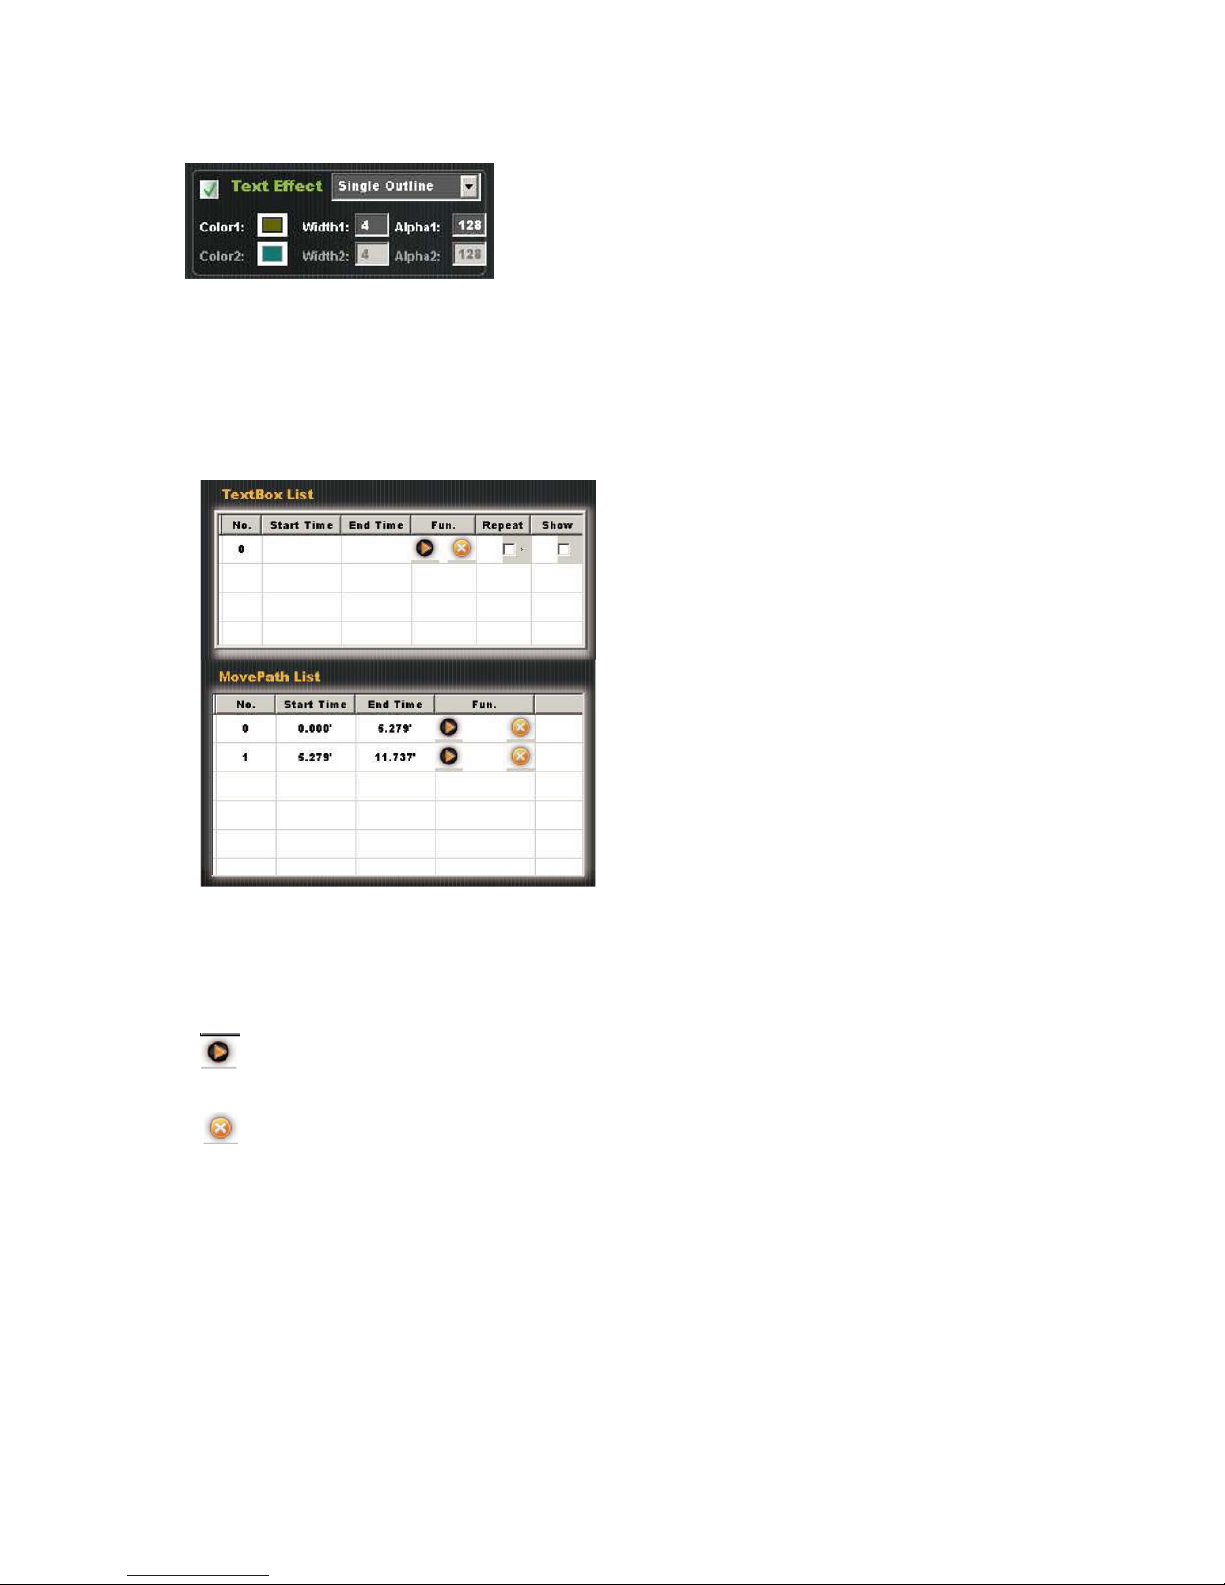
You may set Text Effect, such as fonts outline color,
thickness by the Text Effect function key. (as left
side figure).
Set the shadow effect, diffused shadow by the left
side function key.
Width:The shadow thickness;
Alpha:Set the transparent for the shadow effect.
Offset X/ Y : Shadow location.
No. : Assign the number to text scroller
Start Time : Start playing time
End Time : End playing time
: Play the text scroller
: Delete the text scroller
Repeat : Repeat the text scroller
Show : Please click this icon to avoid overlapped by two text scrollers.
51.
Page 53

■ Example
A. When enter Edit Media Dialog, please click
to enter the View Window.
B. Please click to start editing the text scroller (running text).
52
Page 54

C. Please type the text in the area that we marked in red color on below figure. For example, type
Sbravo~ If you’d like to edit the text color and effect, please refer to Page 37 and P38 for details.
D. Please set Start position and End position on the View Window dialog after typed the text that you’d
like to display.
a) Set Start Position: Please set the start playing time (please remove time bar as below figure)
then move mouse to the text scroller area, click right button of mouse and set it as start time.
53
Page 55
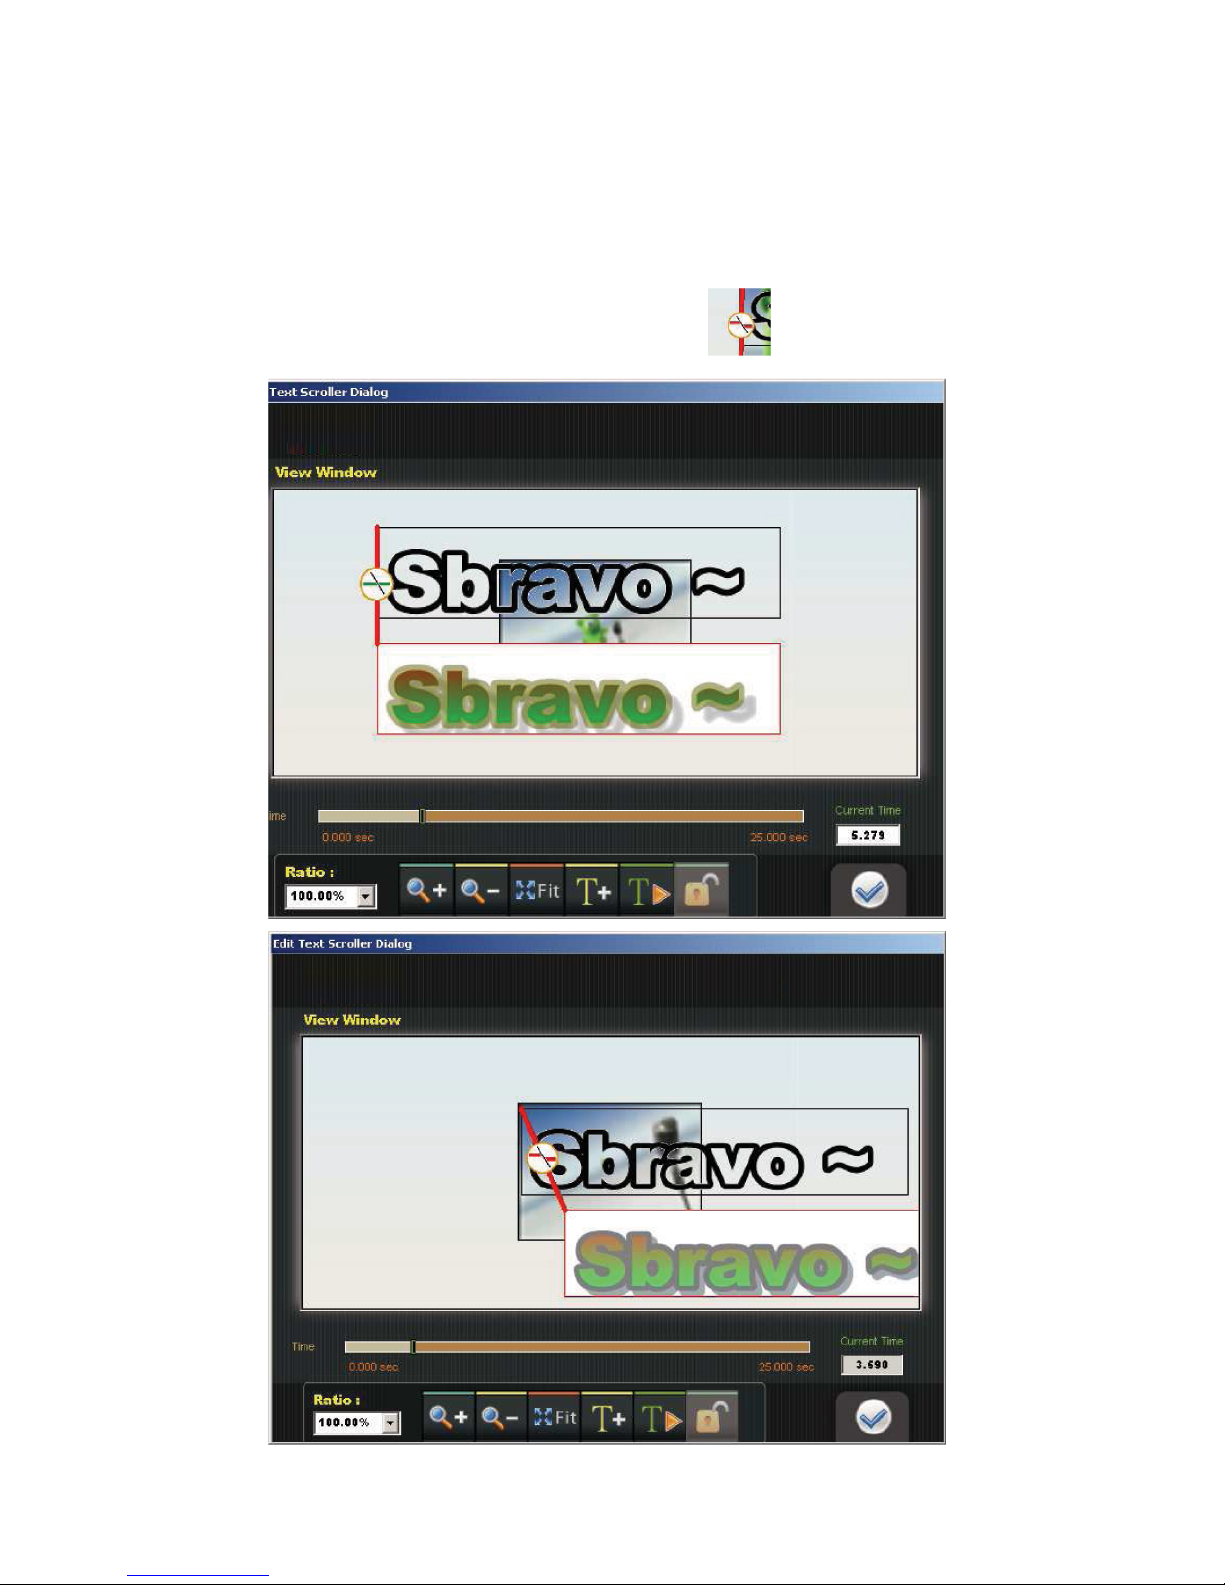
b) Set the running direction of text scroller (running text): Please remove mouse to the text
scroller (running text) display area after setting of start position and end position, then keep
pressing the left button of mouse and move the text running direction that you need. (the
direction could be up, down, left and right).
【Remark】If running path is available, the symbol of will appear when removing
mouse.
54
Page 56
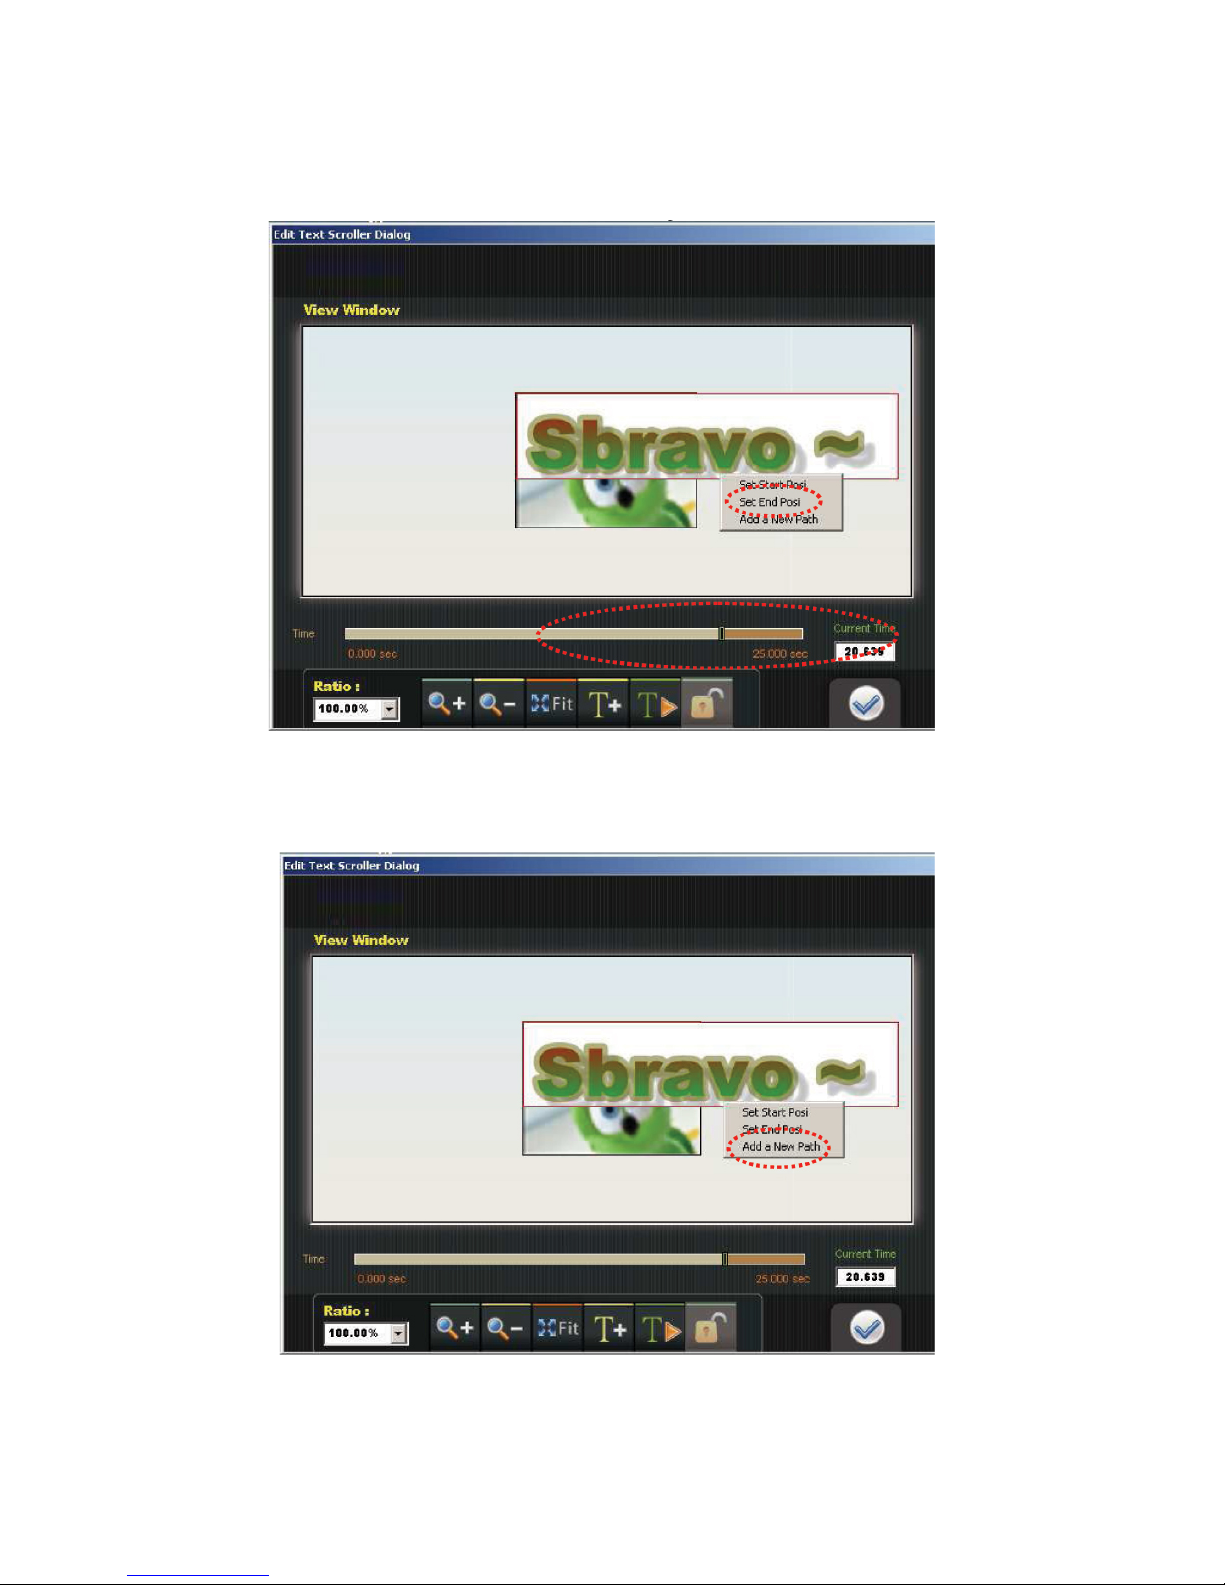
c) Set End Position: Please set the End playing time (please remove time bar as below figure)
then move mouse to the text scroller area, click right button of mouse and set it as end time.
d) If you’d like to display the text scroller (running text) by different direction, please click Add a
New Path (as below figure) then follow above list step a, , b, c to add the new text running
direction.
55.
Page 57

【Remark】You will find two text scroller (running text) on MovePath List (as below figure) when
you finished the two text running setting.
D. Please click
Dialog.
(as below figure) to review the text scroller running direction in View Window
56.
Page 58

E. Please click to quit the Edit Text Scroller Dialog if your setting of text scroller are correct.
【Remark】If click
you won’t be able to adjust any parameters. Please re-set the text scroller
(running text) if you’d like to make any adjustment.
F. The column of Edit Flg and Edit Text will mark Yes if the media file and text scroller (running text)
were edited. Otherwise, it will mark No. (As below figure).
57.
Page 59

6.1.3. Convert the media file after created project
A. Please click to load the media file to signage after project created.
【Remark】Please make sure SLED connects with PC.
B. After click
below dialog will appear, please click “ Yes” to load the contents to SLED.
If click No, the media file will be transferred to “.bin” file only, but file won’t be loaded to SLED.
58.
Page 60

C. Please refer to below figure for contents loading status.
D. Please click “Yes” to start playing contents.
59.
Page 61

6.1.4. Edit the media file which exists on the created project.
A) Please click the Project that you plan to edit, then click
60.
B) Then click the media name that you plan to edit, and click . The right side function key
introduction as follows:
Page 62

: Rename Project. When click the icon, the Project Rename Dialog will appear (as
below figure), please input the new project name and click
Display the relevant project information, includes, model number and quantity.
C) When below dialog appears, please refer to 6.1.2. Edit media file to start editing.
61.
Page 63

6.1.5. Export Project
A) Please select the project that you plan to export, then click
B) Then set the object that you plan to save the project and click OK.
62.
Page 64
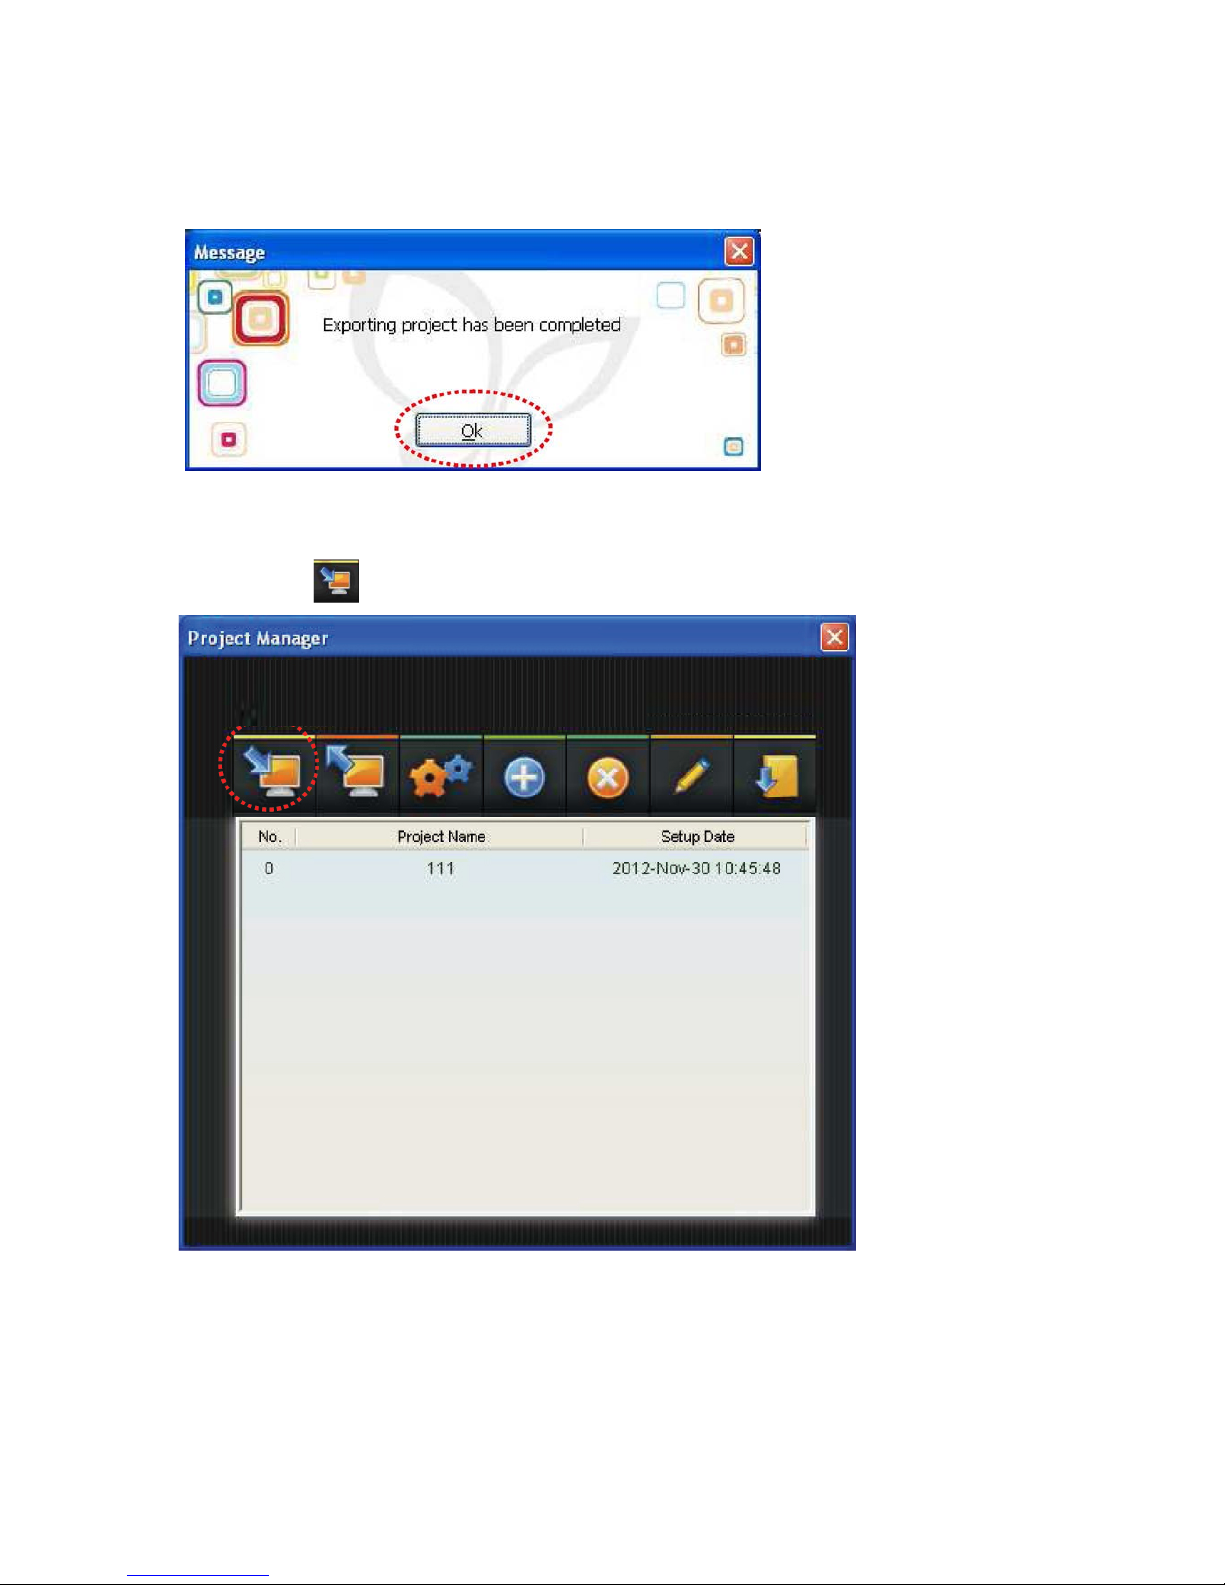
C) Below dialog will appear if project export is successful, then click OK.
6.1.6. Import Project
A) Please click if you plan to import the other project to be yours project.
63.
Page 65

C) The project name that you import will be appeared if your select import path is successful.
64.
B) Please click to select the import path.
Page 66
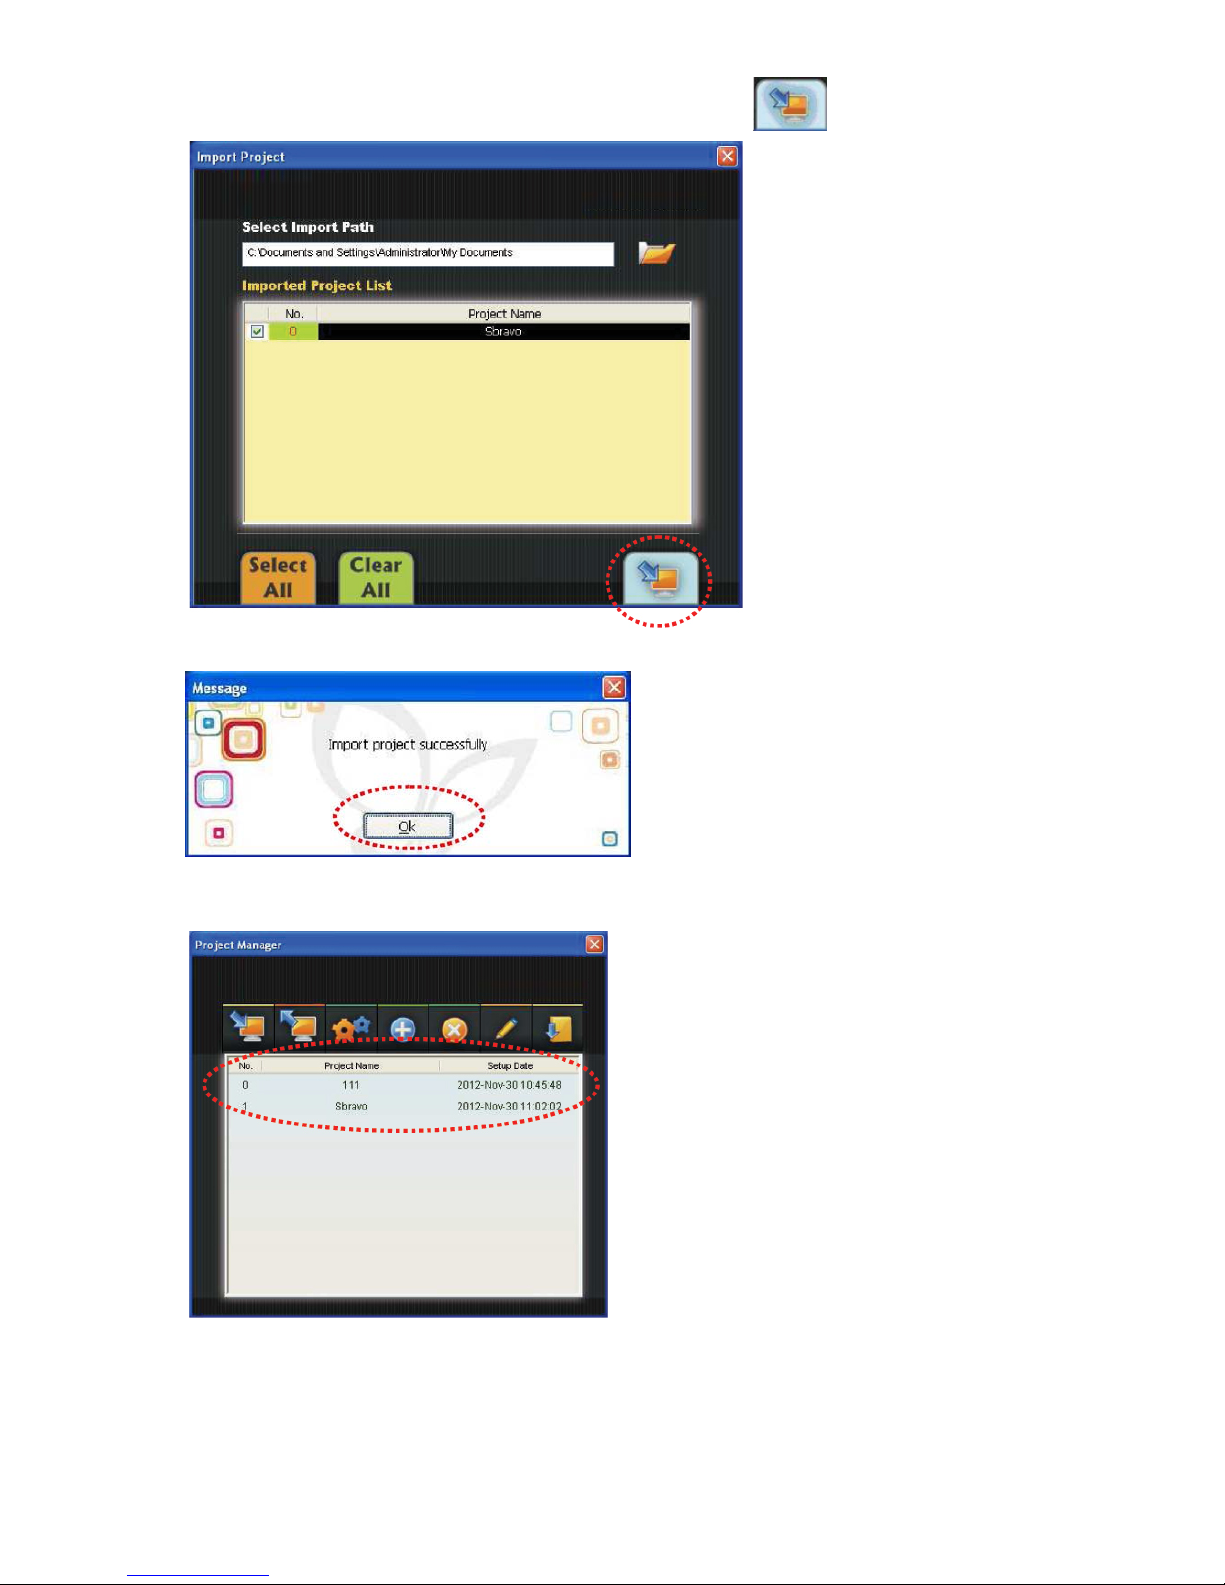
D) Please make sure the project that you import is correct, then click
to start importing.
E) Below dialog will appear if the import project is successful.
F) After click OK, the import project information will appear, as below figure.
65.
Page 67
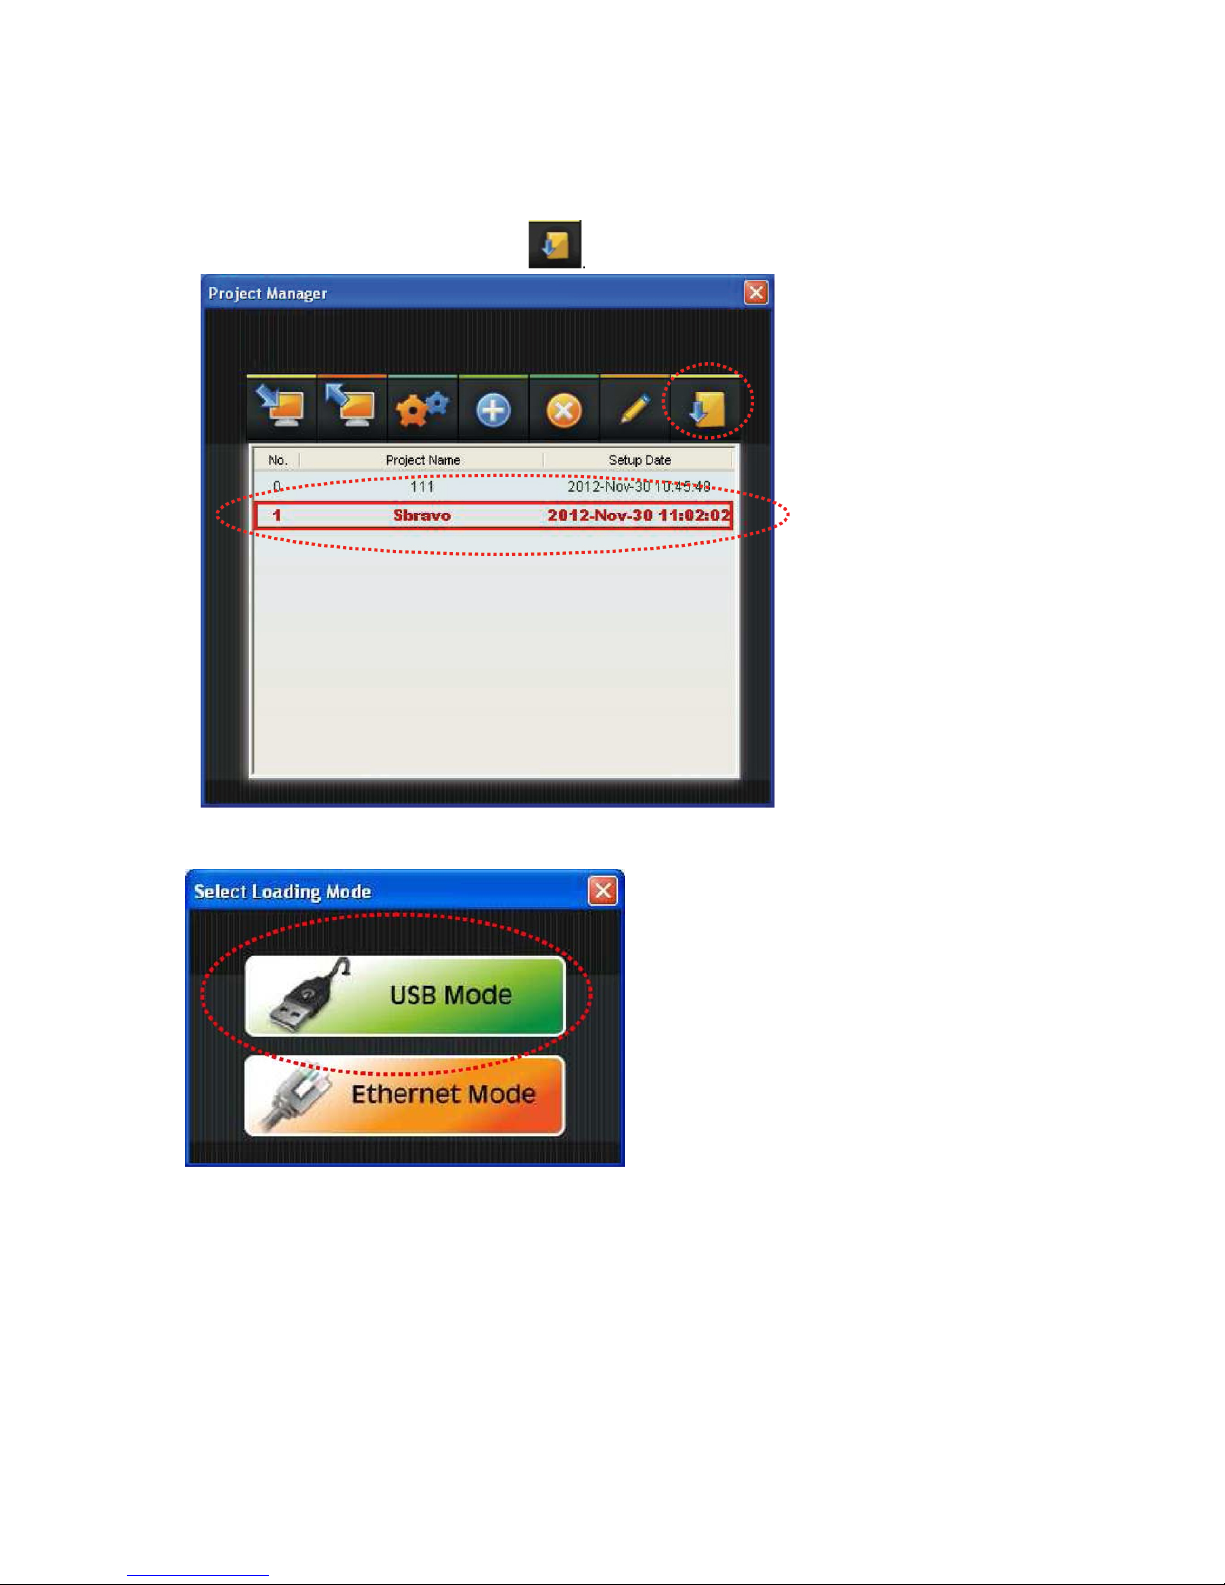
6.1.7. Load the import project to SLED
A) Please select project name then click
B) Please select USB Mode to load the project to signage.
66.
Page 68
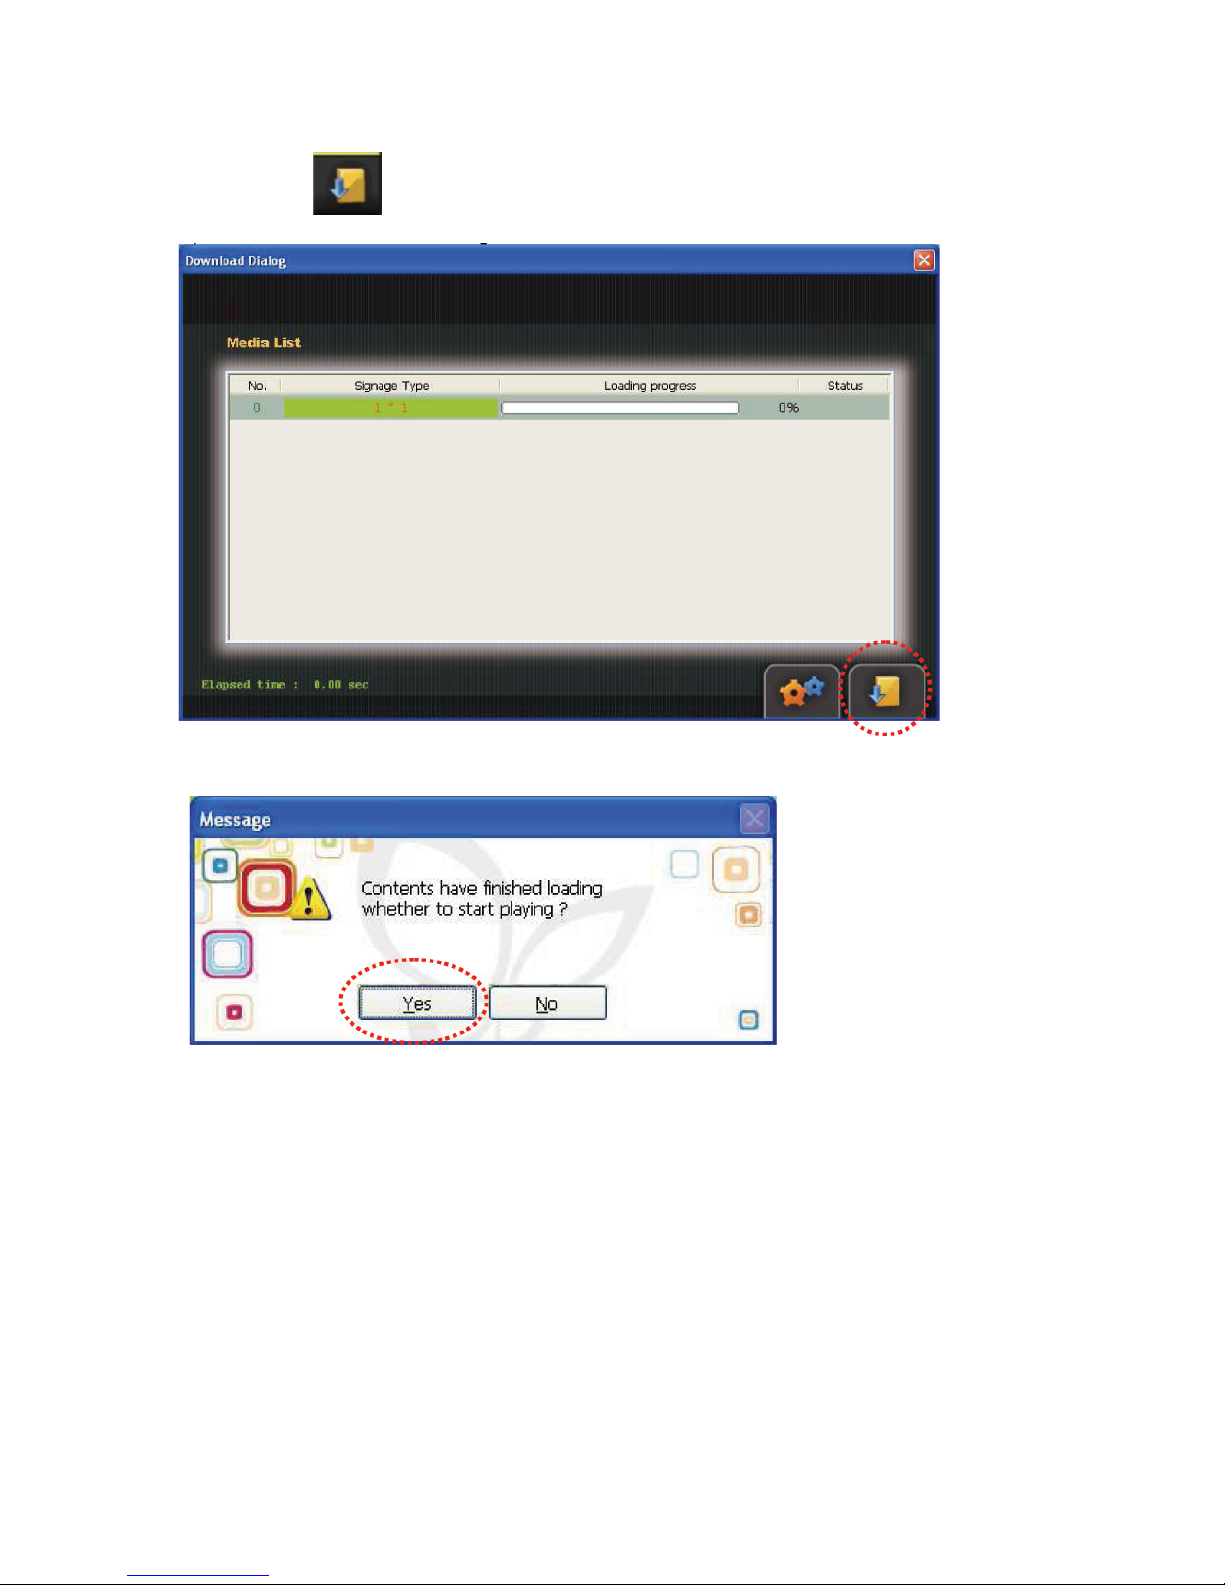
C) Then click to start loading.
D) Please click “Yes” to start playing after loaded the contents.
67.
Page 69

6.2. Panel Config
A) Please click Panel Config icon if you plan to adjust parameters of sigange.
68.
Page 70
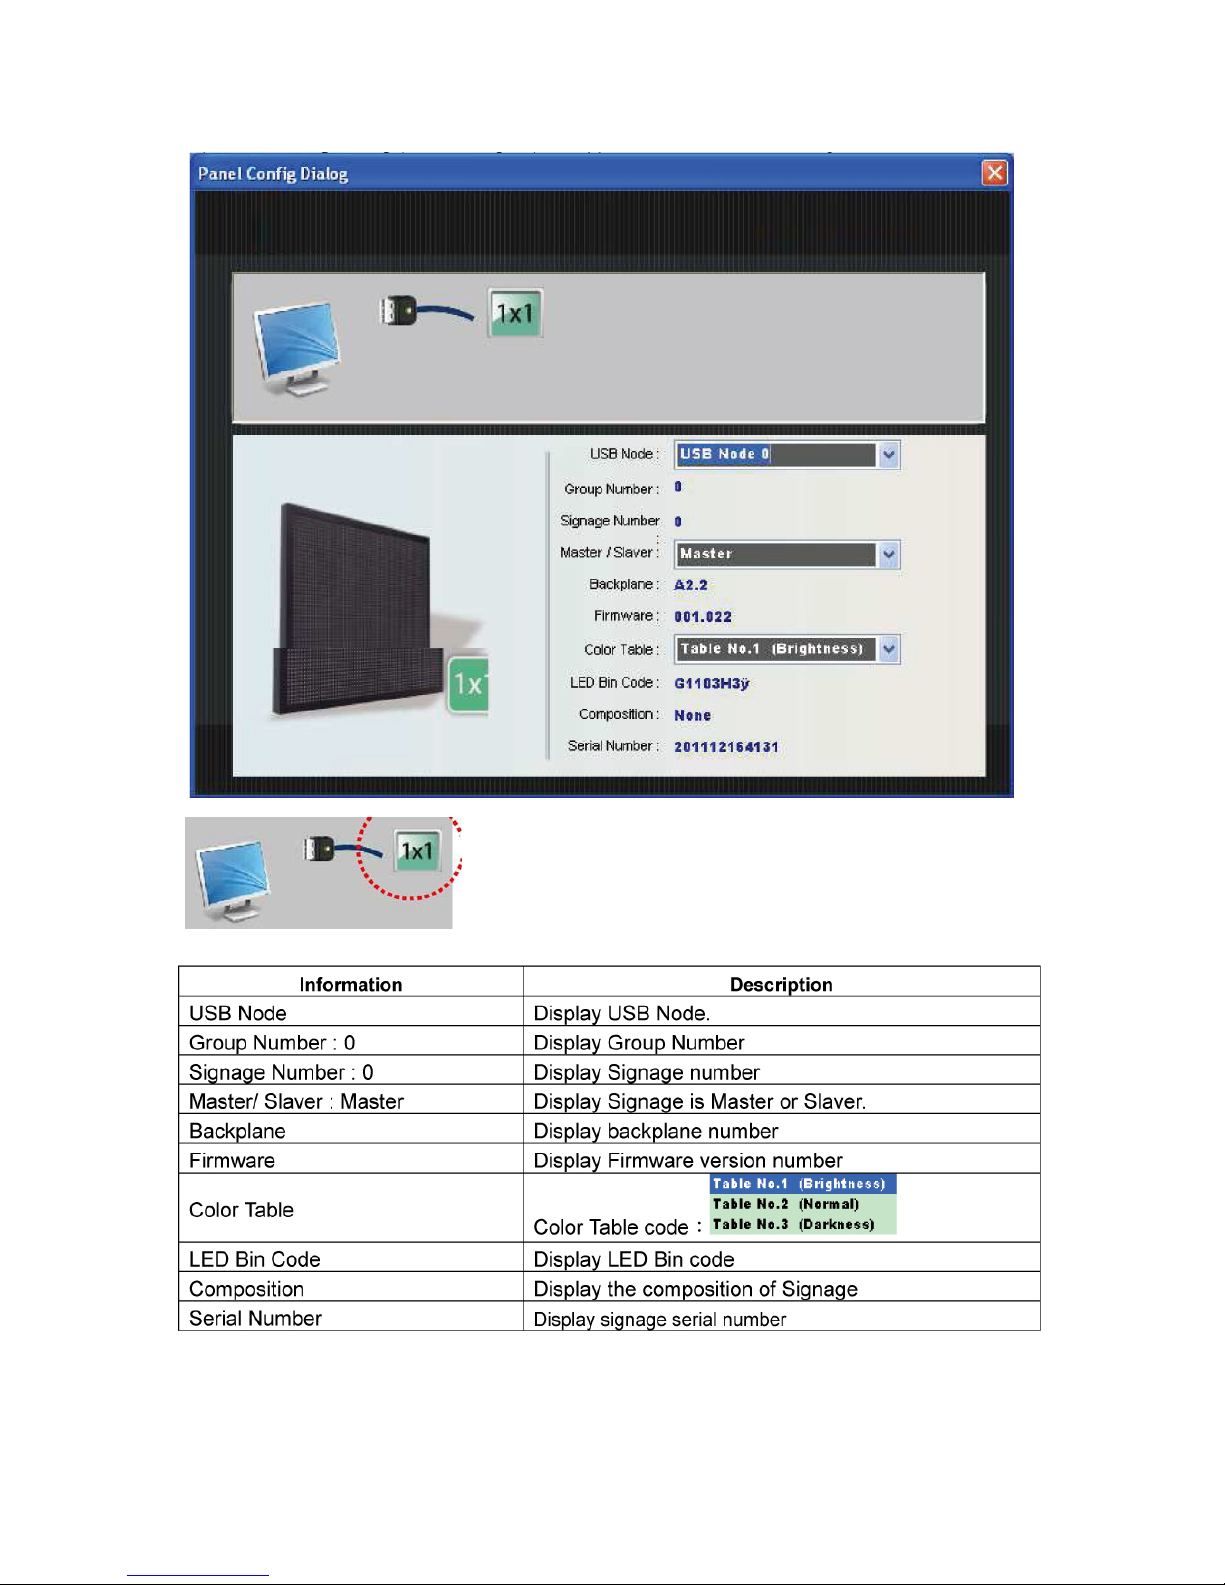
B) Panel Config dialog (as below figure) will appear after click Panel Config icon.
Display the model number which connects PC
69.
Page 71
7. Turning the Signage On and Off
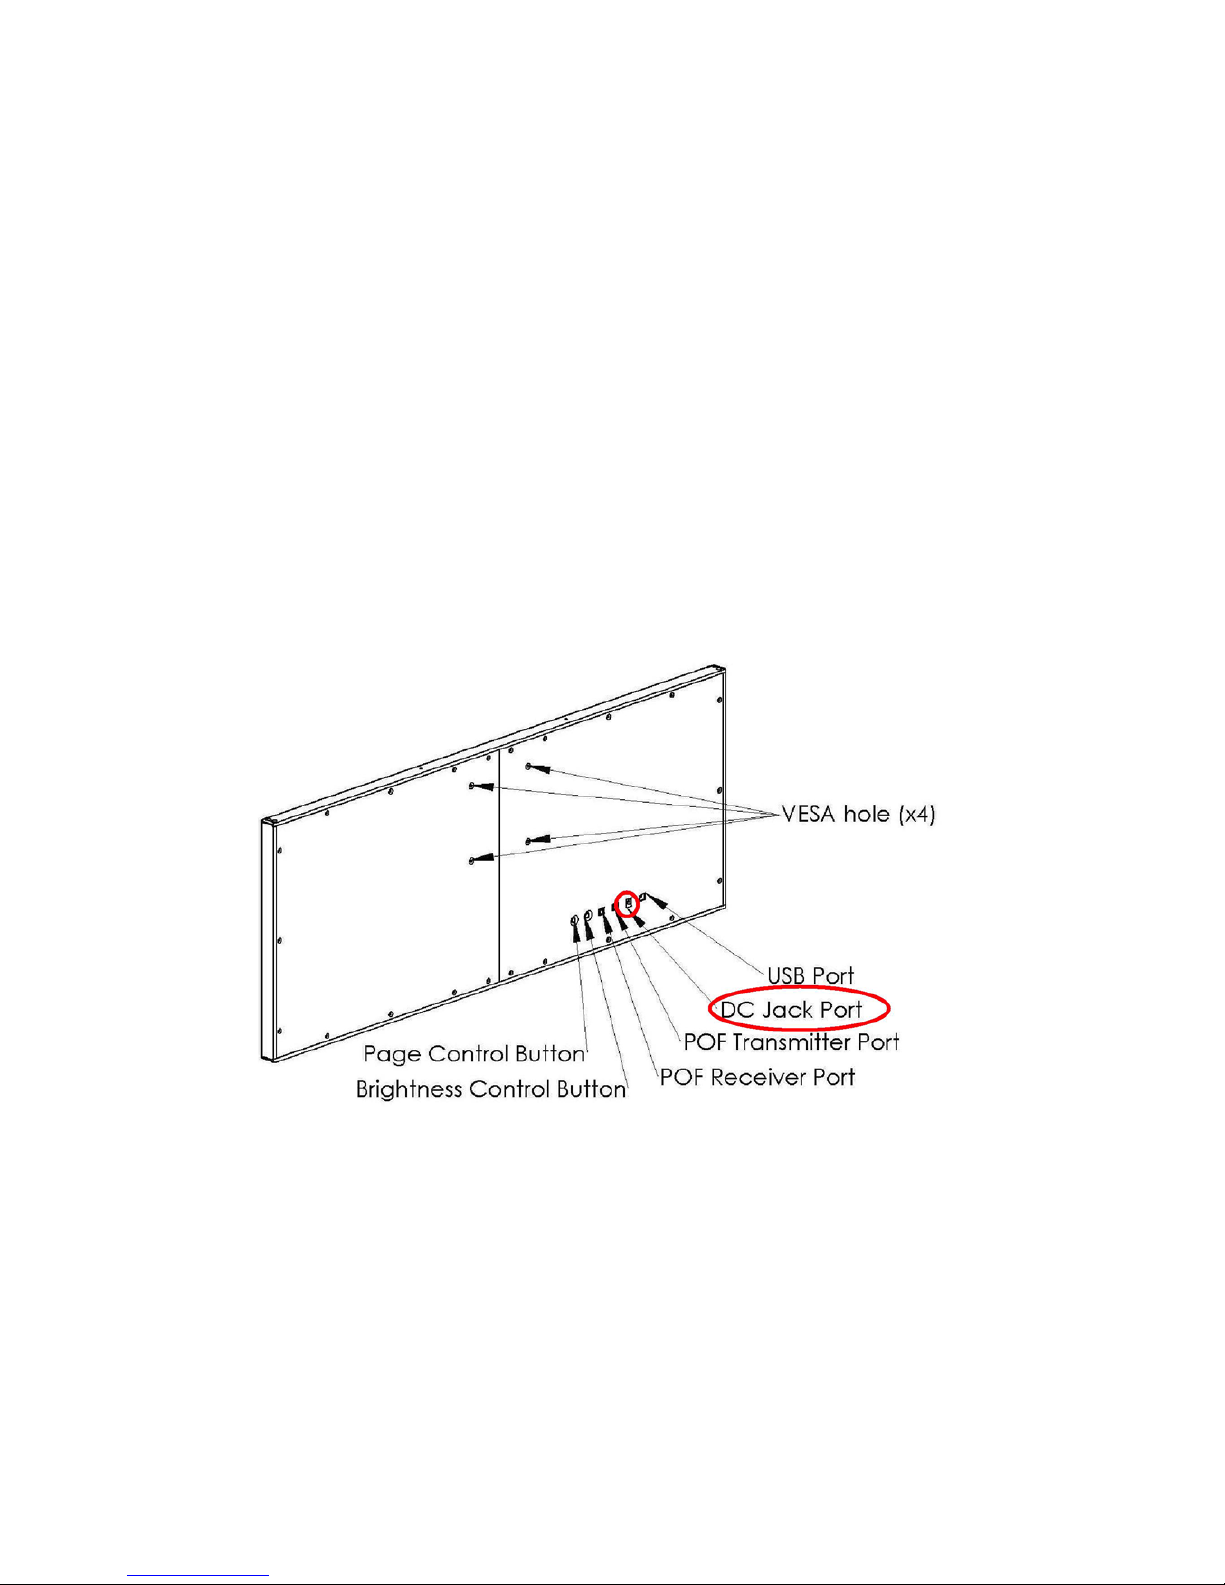
7.1 Turn on SLED by using power adaptor attached. Connect one end of the power
adaptor to power supply (100 ~ 240 AC) and the other end to DC jack connector on
the back of SLED.
(Note: Don’t use any power adaptor that is not confirmed by iTechLCD)
7.2 Turn the signage off: Unplug the power adaptor directly.
Figure 62
70.
Page 72
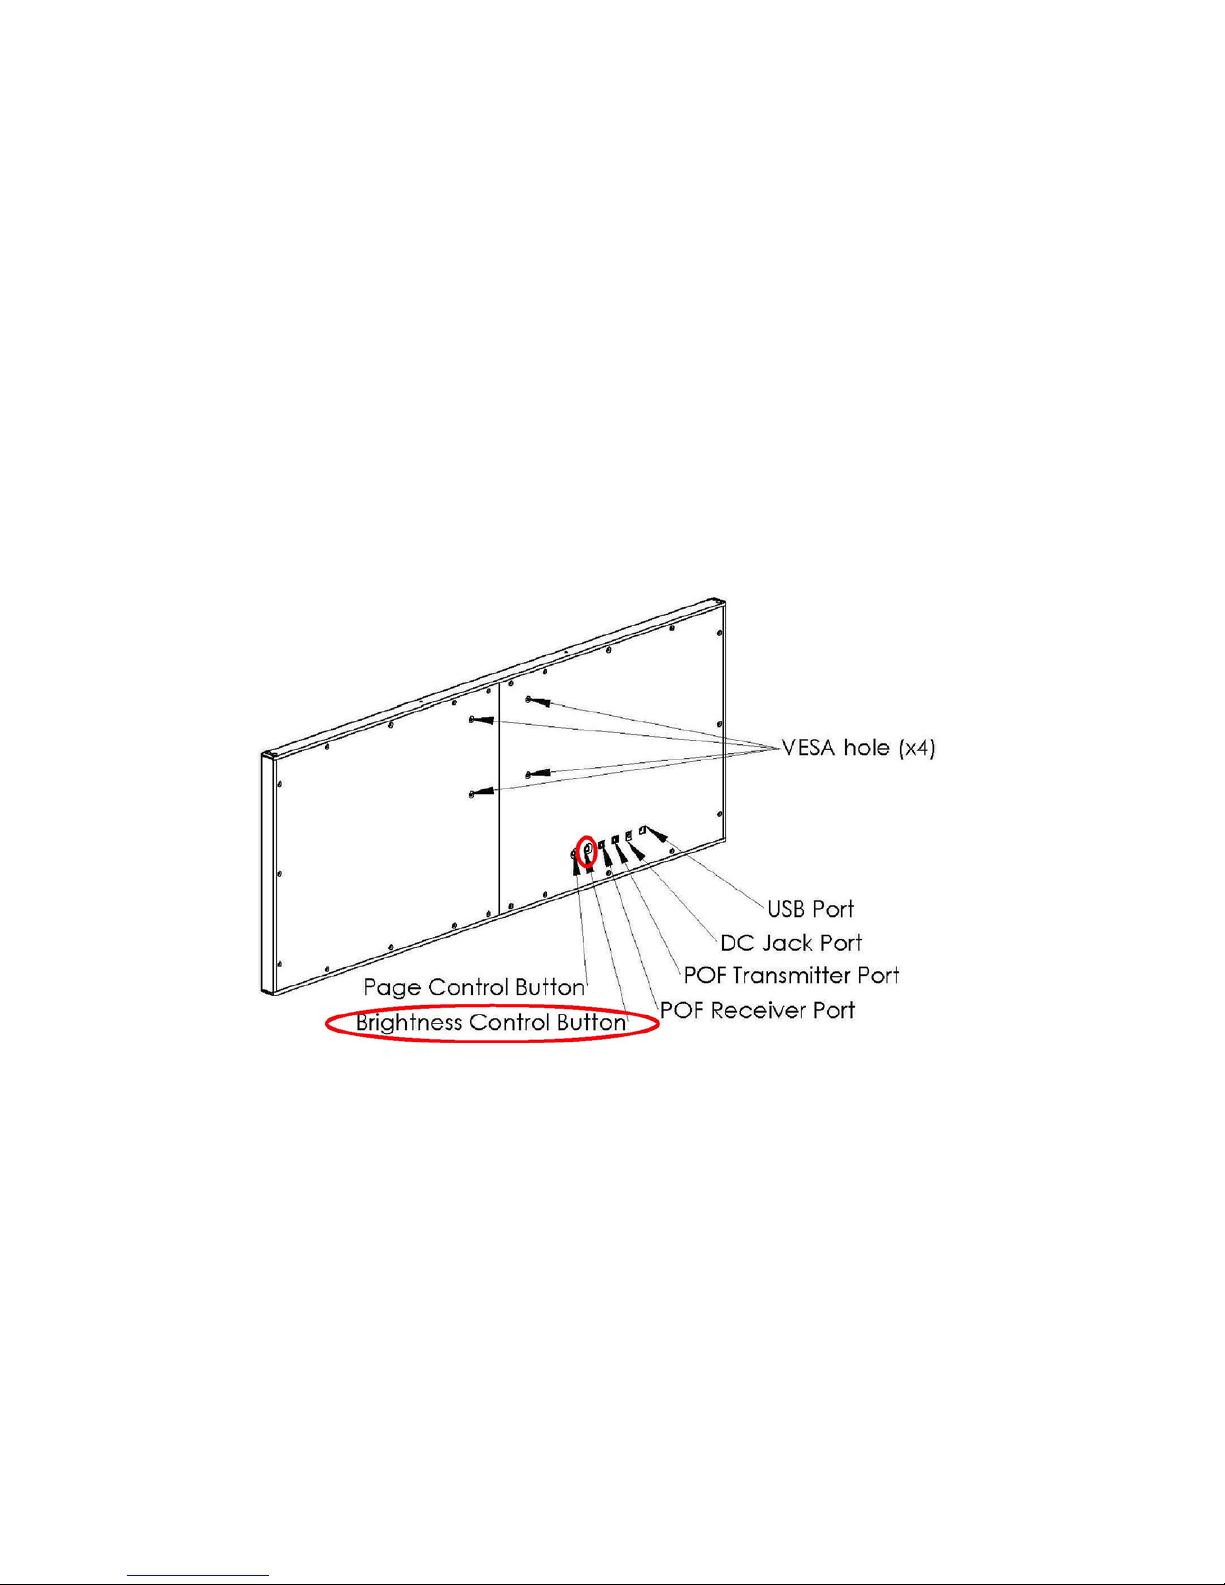
8. Brightness Adjustment
SLED is built-in one ambient light sensor module which is able to detect and adjust the
brightness of LED panel automatically. Besides, SLED also provide 5 options (100%, 25%,
50%, 75% and Auto) to adjust the brightness. You may adjust the brightness by pressing the
Brightness Control Button on the rear side of Signage. The initial setting of SLED is 100%
when power on.
Figure 63
71.
Page 73

9. Video playing Controlling
You may set to play a certain video file repeatedly by pressing Page Control Button.
For example, if you combine 3 video files and transformation them to SLED, the initial
setting of SLED is playing 1st video file, then 2nd video file and 3rd video file and repeatedly.
You may press Page Control Button once to set playing 1st Video only and repeatedly.
Press Page Control Button twice to set playing 2nd Video only and repeatedly. Same as 3rd
Video file.
Figure 64
72.
Page 74

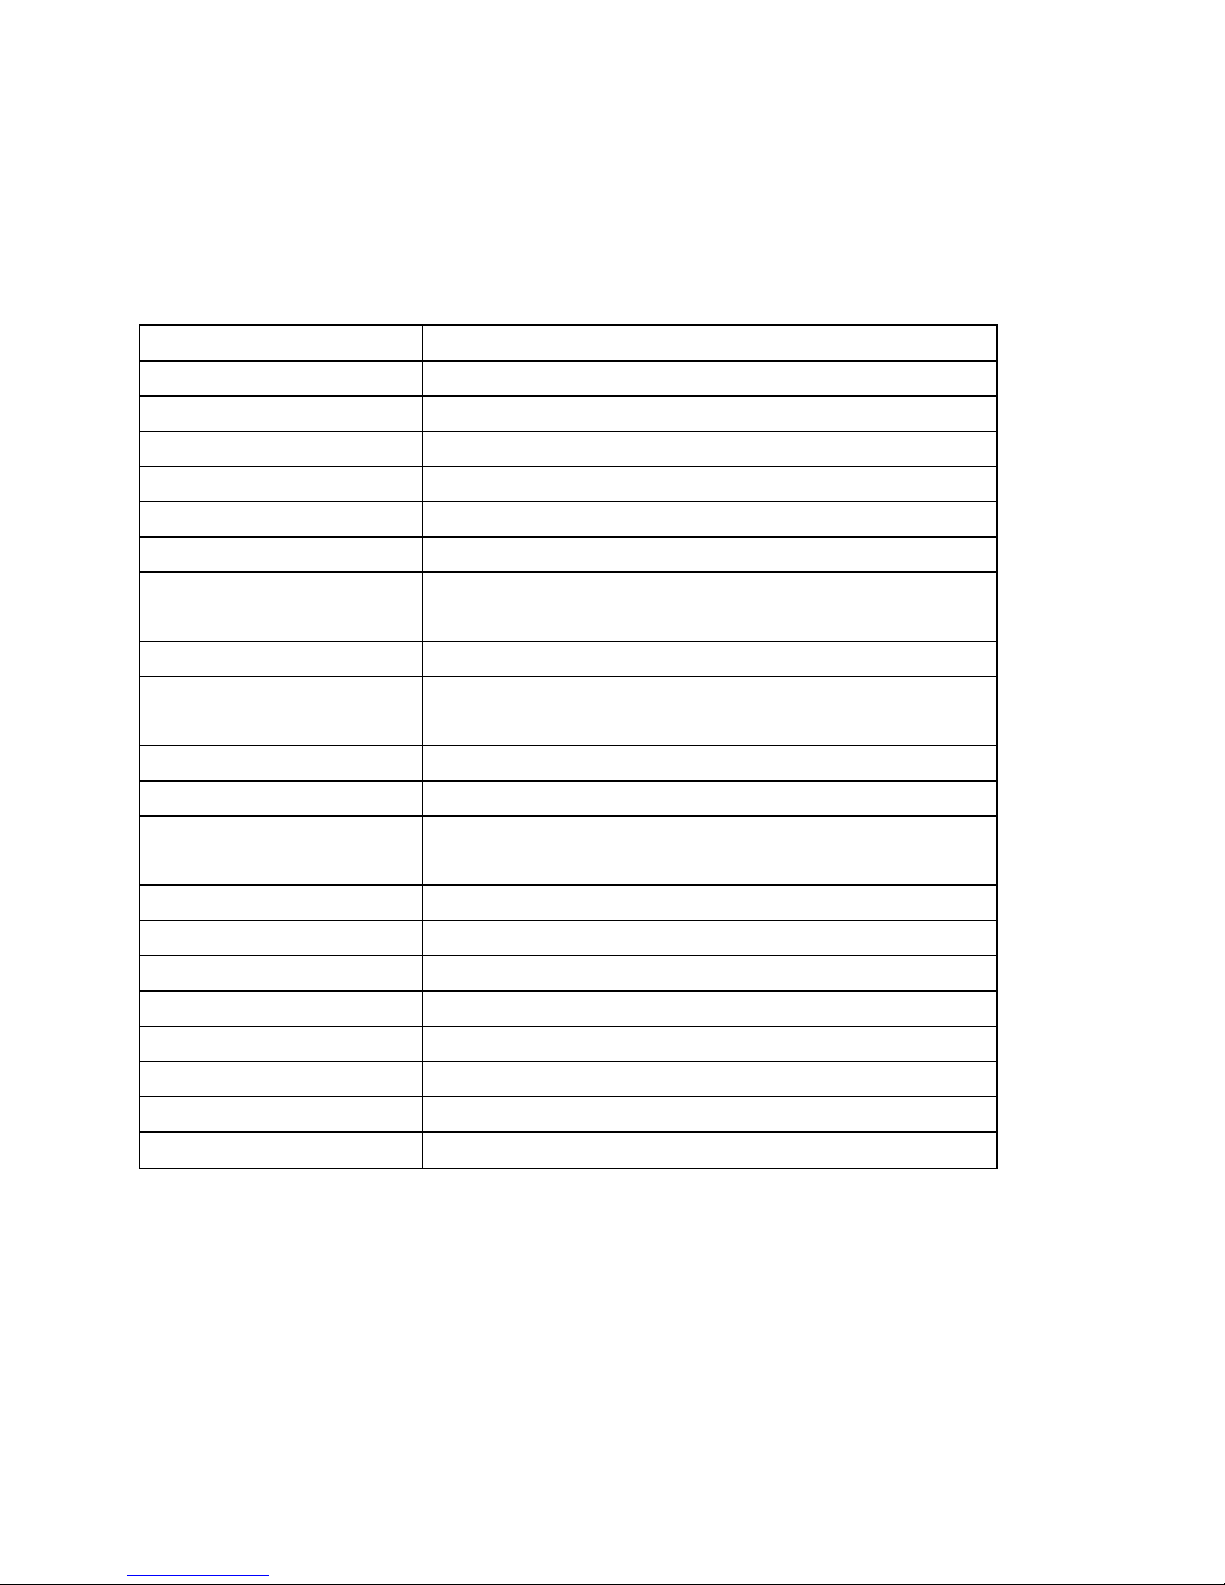
10. File Format Supported
Any format as long as supported by windows can be input in SLED for display, such as:
Windows Media○R Video (WMV)
Advanced Systems Format (ASF)
Motion Picture Experts Group (MPEG)
Audio-Video Interleaved (AVI)
QuickTime (version 2 and lower)
Windows Media Video
ISO MPEG-4 video version 1.0
Microsoft MPEG-4 version 3
Digital Video (DV)
MPEG-1 (decompression only)
73.
Page 75
11. Specification of SLED
11.1 Model No.: SLED6448F-6
Items Specification
LED Pixel Pitch 6 mm
LED Type 3 in 1 SMD LED
Horizontal dots 64 dots
Vertical dots 48 dots
Total LED dots 3,072 dots of 3-in-1 RGB LED
Brightness 2,500 nits (cd/m2)
Gradation Level 10 bits for each color;
totally 1024 * 1024 * 1024 colors
Life Time 50,000h ( 50% Brightness )
Power Supply 100 ~ 240V AC, 50 ~ 60Hz,
(power adaptor: 19V to 28V input, 60W)
Power Consumption Typical < 30W ; Maximum 60W
Interface(Input) USB 2.0, CF Card
Dimension LED Area : 384mm (W) * 288mm (H)
With Frame : 421mm (W)* 325mm (H) * 28mm (D)
Temperature
operation : -5 to 40℃ ; storage : -20 to 60 ℃
Relative humidity < 95% RH
Driving Mode point to point (static)
Refresh Rate 120 Hz
Frame Rate 30 frames per second
View Angle
Horizontal : 130・ , Vertical : 130・
Weight 3 Kgs, w/o accessory
Memory 1 CF card inside, 2GB
74.
Page 76

11.2 Model No.: SLED12848F-6
Items Specification
LED Pixel Pitch 6 mm
LED Type 3 in 1 SMD LED
Horizontal dots 128 dots
Vertical dots 48 dots
Total LED dots 6,144 dots of 3-in-1 RGB LED
Brightness 2,500 nits (cd/m2)
Gradation Level 10 bits for each color;
totally 1024 * 1024 * 1024 colors
Life Time 50,000h ( 50% Brightness )
Power Supply 100 ~ 240V AC, 50 ~ 60Hz,
(power adaptor: 19V to 28V input, 60W)
Power Consumption Typical < 60W ; Maximum 120W
Interface(Input) USB 2.0, CF Card
Dimension LED Area : 768mm (W) * 288mm (H)
With Frame : 805mm (W)* 325mm (H) * 28mm (D)
Temperature
operation : -5 to 40℃ ; storage : -20 to 60 ℃
Relative humidity < 95% RH
Driving Mode point to point (static)
Refresh Rate 120 Hz
Frame Rate 30 frames per second
View Angle
Horizontal : 130・ , Vertical : 130・
Weight 6 KGS, w/o accessory
Memory 1 CF card inside, 2GB
75.
Page 77

11.3 Model No.: SLED19248F-6
Items Specification
LED Pixel Pitch 6 mm
LED Type 3 in 1 SMD LED
Horizontal dots 192 dots
Vertical dots 48 dots
Total LED dots 9,216 dots of 3-in-1 RGB LED
Brightness 2,500 nits (cd/m2)
Gradation Level 10 bits for each color;
totally 1024 * 1024 * 1024 colors
Life Time 50,000h ( 50% Brightness )
Power Supply 100 ~ 240V AC, 50 ~ 60Hz,
(power adaptor: 19V to 28V input, 60W)
Power Consumption Typical < 90W ; Maximum 180W
Interface(Input) USB 2.0, CF Card
Dimension LED Area : 1,152mm (W) * 288mm (H)
With Frame : 1,189mm (W)* 325mm (H) * 28mm (D)
Temperature
operation : -5 to 40℃ ; storage : -20 to 60 ℃
Relative humidity < 95% RH
Driving Mode point to point (static)
Refresh Rate 120 Hz
Frame Rate 30 frames per second
View Angle
Horizontal : 130・ , Vertical : 130・
Weight 9 KGS, w/o accessory
Memory 1 CF card inside, 2GB
76.
Page 78

11.4 Model No.: SLED25648F-6
Items Specification
LED Pixel Pitch 6 mm
LED Type 3 in 1 SMD LED
Horizontal dots 256 dots
Vertical dots 48 dots
Total LED dots 12,288 dots of 3-in-1 RGB LED
Brightness 2,500 nits (cd/m2)
Gradation Level 10 bits for each color;
totally 1024 * 1024 * 1024 colors
Life Time 50,000h ( 50% Brightness )
Power Supply 100 ~ 240V AC, 50 ~ 60Hz,
(power adaptor: 19V to 28V input, 60W)
Power Consumption Typical < 120W ; Maximum 240W
Interface(Input) USB 2.0, CF Card
Dimension LED Area : 1,536mm (W) * 288mm (H)
With Frame : 1,573mm (W)* 325mm (H) * 28mm (D)
Temperature
operation : -5 to 40℃ ; storage : -20 to 60 ℃
Relative humidity < 95% RH
Driving Mode point to point (static)
Refresh Rate 120 Hz
Frame Rate 30 frames per second
View Angle
Horizontal : 130・ , Vertical : 130・
Weight 12 KGS, w/o accessory
Memory 1 CF card inside, 2GB
77.
Page 79

11.5 Model No.: SLED12896F-6
Items Specification
LED Pixel Pitch 6 mm
LED Type 3 in 1 SMD LED
Horizontal dots 128 dots
Vertical dots 96 dots
Total LED dots 12,288 dots of 3-in-1 RGB LED
Brightness 2,500 nits (cd/m2)
Gradation Level 10 bits for each color;
totally 1024 * 1024 * 1024 colors
Life Time 50,000h ( 50% Brightness )
Power Supply 100 ~ 240V AC, 50 ~ 60Hz,
(power adaptor: 19V to 28V input, 60W)
Power Consumption Typical < 120W ; Maximum 240W
Interface(Input) USB 2.0, CF Card
Dimension LED Area : 768mm (W) * 576mm (H)
With Frame : 805mm (W)* 613mm (H) * 28mm (D)
Temperature
operation : -5 to 40℃ ; storage : -20 to 60 ℃
Relative humidity < 95% RH
Driving Mode point to point (static)
Refresh Rate 120 Hz
Frame Rate 30 frames per second
View Angle
Horizontal : 130・ , Vertical : 130・
Weight 12 KGS, w/o accessory
Memory 1 CF card inside, 2GB
78.
i-Tech Company LLC
TOLL FREE: (888) 483-2418 • EMAIL: info@iTechLCD.com • WEB: www.iTechLCD.com
 Loading...