

Page 1

CMP1000 Media Player
(
Now that your CMP1000hardware is set up, let's play some media! If you haven't already plugged
your CMP1000to audio & video devices such as TV, please refer to the CMP1000Setup Guide.
Select a compatible storage card or a USB flash drive.
Compatible cards:
CF (Compact Flash)
SD (Secure Digital)
MMC (MultiMedia)
MS (Memory Stick)
xD (extreme Digital)
User Manual
USB flash drive:
Load pictures, songs, or movies onto the card.
You may use a computer that has a card reader to copy files such as .JPG images, MPG movies,
or MP3 music to the card. These files can be placed on the root of the file structure or nested
inside a folder. The CMP1000will locate the file either way.
If you’ve been taking photos with a digital camera, you can remove the flash card from the
camera and use it without modification.
Now insert the card into the MP-01. If you’re using a CF card, plug it into the left slot. If using an SD, MS, MMC, or xD card, plug it into the right slot. Make sure the card is level and
straight when inserting. Press in until it seats.
Power up the CMP1000unit
Check all connections to make sure they’re securely plugged into the appropriate
sockets. Then power up the unit by pressing the “I” symbol on the power switch.
You can check the green LED on front of the CMP1000to verify that power is on.
A few seconds after powering up the MP-01, an image should appear on your monitor or
TV. If no display is present, please try pressing the PC/AV button on your remote. This
button switches between VGA and RCA video outputs.
i-Tech Company LLC
TOLL FREE:
888) 483-2418 • EMAIL: info@i-techcompany.com • WEB: www.i-techcompany.com
Page 2
When the CMP1000first starts up, a blue background with white clouds is
y
b
(
displayed. At this point the system is searching through all storage devices
that are plugged into the unit, so that it may find compatible media to play.
If Auto Start (see p3, #8) is enabled, media will be automatically displayed.
If you need to turn off the power you have 2 options: You can use the power switch at rear of the system (press O
to shut down the system), or you can use the POWER button on the remote control. Please be aware: if the power
switch at rear of s
stem is turned off, then POWER
utton on the remote will not be able to power the system up
Setup menu - main screen
Press the SETUP button on the remote control. The remote must be pointed toward the infrared receiver
(labeled as IR on the MP-01) to transmit signals.
After pressing the setup button, you’ll be presented
with a menu screen (pictured to the left). You may
use the ^"'r -^4^ buttons on the remote to browse
through this menu. Clicking the Enter button will
select or activate whichever item is currently
highlighted.
When you’ve selected a submenu item such as ON
or OFF, press Enter to activate the selection, then
press the <- button to go back one level. Or you
may press the SETUP button to save your selection
and exit the setup menu completely.
once more.
In the following pages we’ll describe the Setup menu options in detail If at any time you’d like to exit the Setup
menu, simply press the setup button
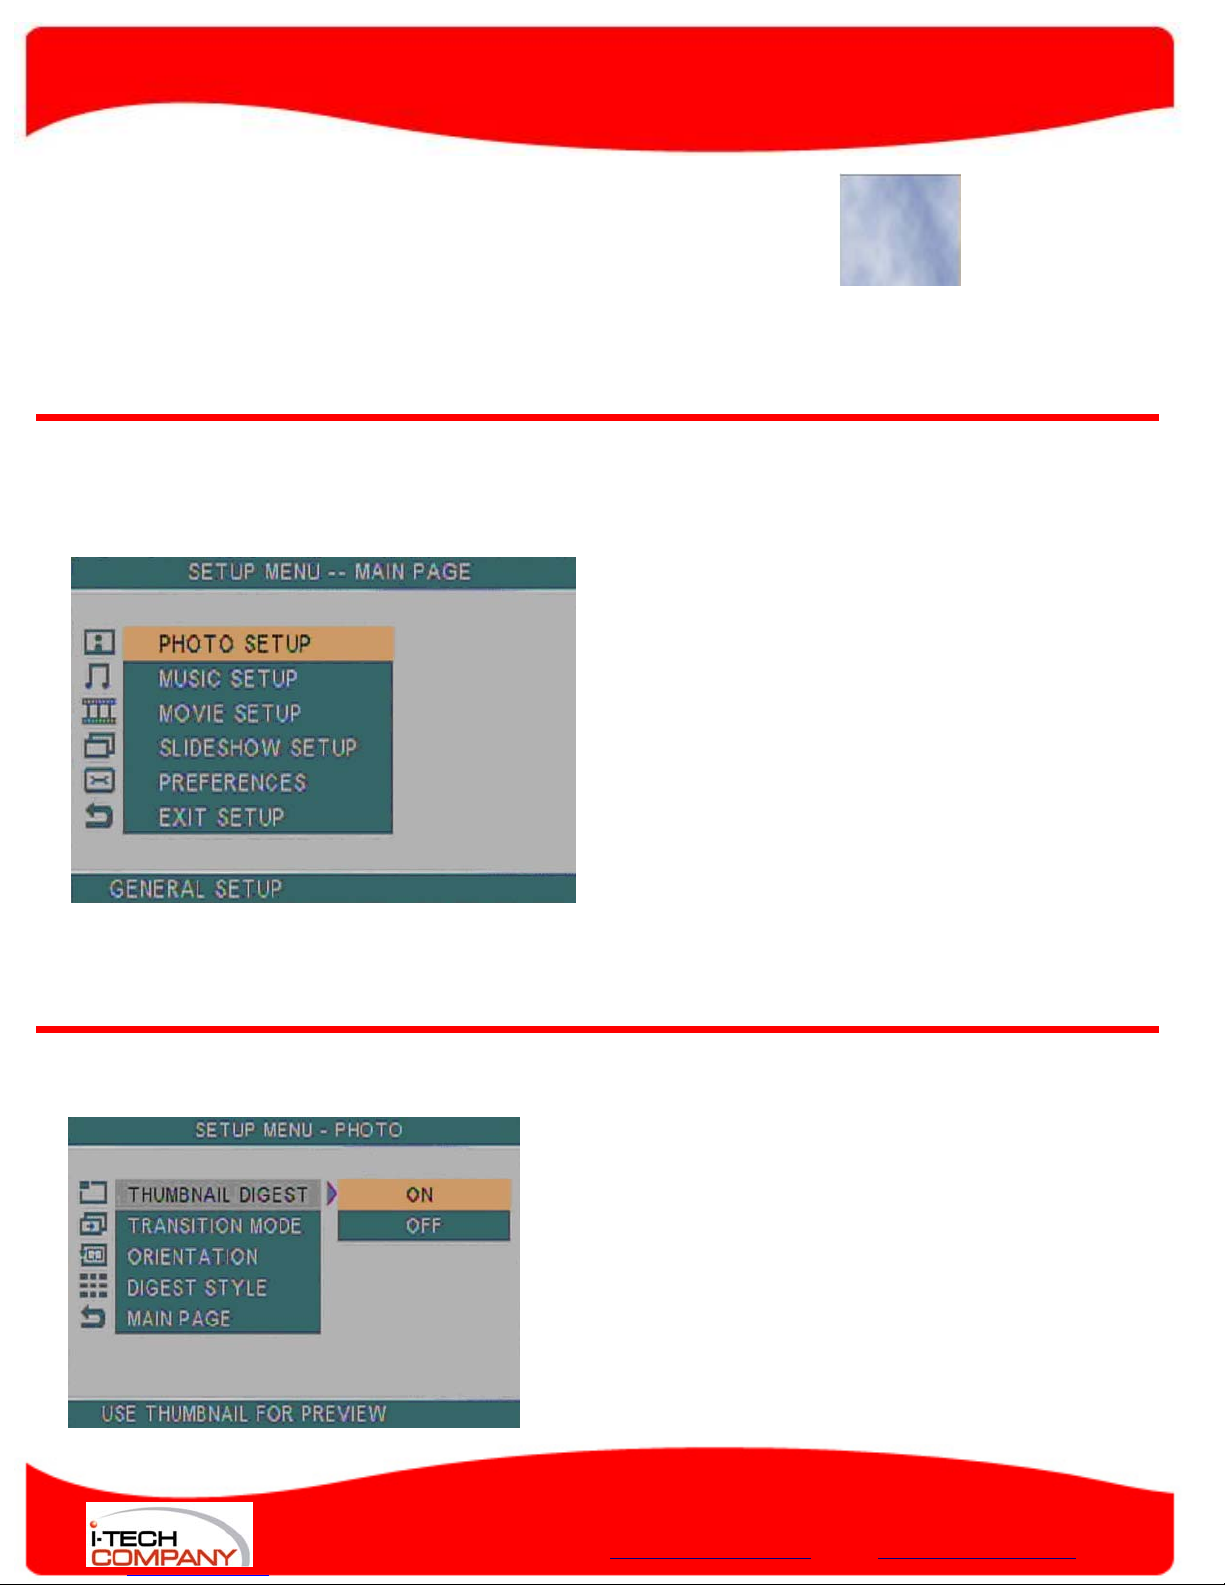
Photo Setup menu
configuration of image display.
Thumbnail Digest: sets resolution of thurmbnail images
ON: lower resolution (faster display) OFF: higher
resolution (better image, but slower)
Transition Mode: Time spent during changeover from one
image to the next
FAST: approximately 1 second
SLOW: 2-3 seconds
Orientation: Choose whether or not to use custom
Rotate
settings when displaying images
Default: use the custom changes
Ignore: Display photos as they were before changes
were made.
i-Tech Company LLC
TOLL FREE:
888) 483-2418 • EMAIL: info@i-techcompany.com • WEB: www.i-techcompany.com
Page 3

(
Digest Style: Controls how many thumbnails will be displayed at once when browsing videos (after
pressing the PHOTO button). Note: Pages load quicker if smaller matrix sizes are chosen in Digest
Style 2X2 Matrix: 4 thumbnails per screen 4X4 Matrix: 16 thumbnails per screen
3X3 Matrix: 9 thumbnails per screen 5X5 Matrix: 25 thumbnails per screen
Music Setup menu
Controls repeat mode for music files
Repeat Mode:
ONE: repeats the same song OFF:
Plays songs only once each. ALL: Plays
all songs, then repeats
Movie Setup menu
Preferences for selection and playback of video files
Note: Pages oad quicker if smaller matrix sizes l
are chosen i Digest Style n
Repeat Mode: Controls repeat mode for video files
ONE: Repeats the same movie continuously
OFF: No videos are repeated ALL: Plays
all videos, then repeats all
Digest Style: Controls how many thumbnails will be dis-
played at once when browsing videos (after pressing the
VIDEO button)
2X2 Matrix: 4 thumbnails per screen
3X3 Matrix: 9 thumbnails per screen
4X4 Matrix: 16 thumbnails per
screen 5X5 Matrix: 25 thumbnails
per screen
Subtitle: Here you may choose which language subtitles
to use during video playback. Availability of specific language subtitles depends on the video file being played.
i-Tech Company LLC
TOLL FREE:
888) 483-2418 • EMAIL: info@i-techcompany.com • WEB: www.i-techcompany.com
Page 4

Slideshow Setup menu
(
Preferences for playback of images in slideshow mode
Preferences menu
System displa configuration
y
Slideshow Mode: Determines how photos will advance
Manual: You must press NEXT to advance Auto:
Slideshow advances automatically
Folder Repeat: Choose whether the slideshow will re-
peat only images in current folder or move on to others.
ON: Only images in current folder will be shown OFF:
Slideshow will move to other folders as well
Interval Time: Choose length of time that you’d like
image to be displayed before moving to next one.
Transition: Choose type of visual effect that will be
used when changing between 2 images
Auto Start: Determines whether or not slideshow will
begin automatically when you power up the
CMP1000ON: Slideshow will start automatically OFF:
You must press SLIDE SHOW button
TV Type: Choose which type of analog televison you use
with the MP-01
Multi. System: Some TV sets will accept both
types of input. NTSC: Standard for USA, Canada,
Japan, South Korea, Taiwan, Philippines,
Mexico, and some other countries. PAL:
Standard for most of Europe and Africa,
Australia, Brazil, and some other countries.
TV Display: Determines display format from the S-video connector.
Normal/PS: Standard 4:3 aspect ratio. When widescreen media is displayed, the edges will be
cropped and image will fill the screen (no letterboxing). Norma/LB: Standard 4:3 aspect ratio.
When widescreen media is displayed, the image will be
reduced in size in order to fit the entire image on screen. Black bars will be used in empty
spaces on top and bottom of screen.
Wide:Widescreen 16:9 aspect ratio
i-Tech Company LLC
TOLL FREE:
888) 483-2418 • EMAIL: info@i-techcompany.com • WEB: www.i-techcompany.com
Page 5

Video Output: Choose which video output you’ll be using with your display. S-Video
(
CVBS: Uses the round 4-pin S-video connector VGA: Uses the round yellow RCA
connector
OSD Language: Choose the preferred language to be used for the MP-01’s OSD (On Screen Display). These
languages are available:
English Italian Spanish Hungarian
Chinese Swedish Polish Greek
French
Dutch Portugese Russian Norwegian
OSD Message: Determines whether or not messages will be displayed on screen when the CMP1000is starting a
ON: Messages will be displayed on screen
OFF: Messages will not be displayed.
Setup Values: Allows you to reset all CMP1000options to their default values.
Default: If you click the Enter button while this choice is highlighted, all CMP1000settings will be returned to
their default values. ANy changes that you’ve made up to this point will be eliminated.
Remote Control features
Control your CMP1000system with its lightweight
Danish Czech Finnish
program, making a change, indicating an error, or when a button on the remote has been pressed.
POWER: Turns the system on or off. Note: The
rocking power
switch at rear of the CMP1000must be in the On
position at all
times in order for the remote control to use this
feature
SETUP: Used to access the setup menu so that
you may choose
how the CMP1000behaves (See p2, #4)
DISPLAY: Depending on which screen is currently
being shown,
this button can have 2 different functions. When
viewing a
photo, video, or listening to music, information
about the
media will be displayed. When browsing for files
options
will be displayed, such as copy, delete, rename, new
folder,
and properties.
i-Tech Company LLC
TOLL FREE:
888) 483-2418 • EMAIL: info@i-techcompany.com • WEB: www.i-techcompany.com
Page 6

HOME: If Auto Start (p3, #8) is enabled, media will begin
(
playing when HOME is pressed. If Auto Start is disabled or if you’re browsing the file menu, HOME allows
you to choose which type of card to read and which type of files to browse (Photo, Music, Video, File)
PHOTO: Displays a thumbnail list of all picture files currently available in the CMP1000system
MUSIC: Displays a list of all music files currently available in the CMP1000system
VIDEO: Displays a thumbnail list of all movie files currently available in the CMP1000system
FILE: Accesses the file menu so that you may browse all files in the system.
ROTATE: When a photo is being displayed and the ROTATE button is pressed, the image rotates 90°
ZOOM: When a photo is being displayed and the ZOOM button is pressed, the image size is magnified
REPEAT: Toggles folder repeat mode on/off while photos, video, or music are being played
SLIDE SHOW: When system is in Photo or Music mode, this button will play photos with music. When a
REW: Rewinds a video/audio file.
FF: Increases speed of video/audio playback
PREV: Moves to previous media during playback, or to previous page when browsing files
NEXT: Moves to next media during playback, or to next page when browsing files
PC/AV: Toggles display mode between computer monitor and TV style outputs
SLIDE INTERVAL: Toggles time between photo changes during SLIDESHOW
Enter: Activates any items that are currently highlighted onscreen.
II: Pause playback ■: Stop Playback ▲►▼◄: Navigation Controls
VOLUME: + increases audio level, - decreases it. MUTE: turns off all sound
VOB video file is being played, this button causes video to step through each frame.
i-Tech Company LLC
TOLL FREE:
888) 483-2418 • EMAIL: info@i-techcompany.com • WEB: www.i-techcompany.com
 Loading...