

Page 1

Bluetooth Virtual Keyboard
For Windows 2000 / XP
User Guide v1.3
Page 2

Table of Contents
Introduction................................................................................................................................ 4
General Production Description........................................................................................4
Laser Safety Precaution.................................................................................................... 4
Disclaimer .........................................................................................................................5
Trademarks.......................................................................................................................5
Getting Started........................................................................................................................... 6
Your Virtual Keyboard....................................................................................................... 6
Overview........................................................................................................................... 6
Switching On.....................................................................................................................7
Virtual Keyboard, your Windows PC and Bluetooth.........................................................8
Installing the driver on your Windows PC......................................................................... 9
Pairing your Keyboard............................................................................................................. 12
Preparing your keyboard for pairing................................................................................12
Pairing with your Computer............................................................................................. 12
Connection with your Computer ..................................................................................... 15
Connecting via HID Profile..................................................................................... 15
Connecting via Serial Port Profile (SPP)................................................................ 15
Running the Driver................................................................................................................... 15
Opening the VKB driver.................................................................................................. 15
Setting up a Connection.................................................................................................. 16
Application Demonstration.............................................................................................. 18
Using the VKB Driver Software ............................................................................................... 19
Enabling the Keyboard.................................................................................................... 19
Battery Level ..........................................................................................................19
Projection intensity................................................................................................. 19
Sound Effects......................................................................................................... 20
Properties........................................................................................................................ 20
Sensitivity............................................................................................................... 20
Reset to Default...................................................................................................... 20
Time-Outs............................................................................................................... 21
AutoRepeat..................................................................................................................... 21
Enable AutoRepeat................................................................................................21
Repeat Rate........................................................................................................... 22
Initial Repeat Delay................................................................................................ 22
Special Short-Cuts.......................................................................................................... 22
2
Page 3

About Page.....................................................................................................................23
The Virtual Keyboard Status Icon ................................................................................... 24
General Handling Instruction................................................................................................... 25
Micro-switch.................................................................................................................... 25
General Maintenance...................................................................................................... 25
Resetting the Device for Bluetooth Pairing..................................................................... 25
Troubleshooting....................................................................................................................... 26
Specifications........................................................................................................................... 27
Special Combination Keys....................................................................................................... 29
3
Page 4

Introduction
Congratulations on choosing the VKB Virtual Keyboard for Windows 2000 and
XP systems. So throw away that old clunky keyboard, free up valuable desk
space and put an end to sticky keys.
Please take a few minutes to review the simple operating instructions in order
to get the most out of your keyboard.
General Production Description
The Virtual Keyboard is a miniature, stand-alone accessory that emulates the
function of a standard, full-sized keyboard. The Virtual Keyboard can connect
via Bluetooth to almost any information appliance, including: PCs, Tablet PCs,
Laptops, PDAs and Smartphones, with the use of an appropriate driver.
Laser Safety Precaution
The Virtual Keyboard device emits two laser beams. One beam (red) projects
the keyboard image, and the other beam (invisible) is used for sensing which
keys have been touched.
The radiation levels of both laser beams do not exceed the Accessible
Emission Limits of Class 1, as defined by the international standard IEC
60825-1 (A2) and the American standard 21 CFR 1040.10. The Virtual
Keyboard device is, therefore, a “Class 1 Laser product”.
This means that the Virtual Keyboard device is safe under reasonably
foreseeable conditions of operation.
Although the emitted laser beams are safe (as defined by the above standard),
it is highly recommended not to stare directly into laser beams.
4
Page 5

Disclaimer
The manufacturer shall not be liable for errors contained herein or for
incidental or consequential damages in connection with the furnishing,
performance or use of this material. This document contains proprietary
information, which is protected by international patent applications and
copyright. All rights reserved. No part of this document may be photocopied,
reproduced or translated without prior written consent of the manufacturer. The
manufacturer reserves the right to revise this publication and to make changes
from time to time in the contents hereof without obligation to notify any person
of such revision or change. The manufacturer also reserves the right to change
the specifications without notice
Trademarks
Windows 2000 and Windows XP, are registered trademarks of Microsoft
Corporation.
VKB Virtual Keyboard is a registered trademark of VKB Inc.
Bluetooth is a registered trademark of Bluetooth SIG.
5
Page 6

Getting Started
Your Virtual Keyboard
Unpack and inspect your Virtual Keyboard. Take a few moments to familiarize
yourself with device using the diagram below.
Overview
Power Key
Status indicator
(LED)
Charging
Socket
Reset
button
Keyboard projection window
Keyboard sensing
receiver window
Figure 1 – Getting to know your Virtual Keyboard
Before using your Virtual Keyboard:
• Ensure that you remove all protection materials including the protection
sheet on the laser windows.
• Your Virtual Keyboard will need to be charged for at least 2 hours.
6
Page 7

Switching On
Place the Virtual Keyboard (VKB) on a flat surface with the Keyboard
projection and sensing windows facing you. To switch it on press the On/Off
button, located on the upper-left hand side.
Once the unit is switched on an image of a keyboard is projected on to the
surface. Notice that the keyboard image is the basic English keyboard,
including 4 Arrow keys, 1 Control, 2 Shift keys, 1 Alt and a VKB dedicated Fn
function key.
A two-color LED located at the top of the unit indicates the current status of the
Virtual Keyboard, where:
Colour Status/Cause Action
Blinking
Blue
Long Flash
Blue
Blinking Red
Virtual Keyboard is ready to
pair to a Bluetooth device
Virtual Keyboard is paired to
a Bluetooth device
Virtual Keyboard’s battery is
low.
Solid Red
The area of the projected
keyboard is exposed to direct
sun-shine or some other
source of direct light.
Table 1 – Functional Status Indicator
Recharge the
Virtual Keyboard
Move the Virtual
Keyboard to a
shaded location
7
Page 8

Virtual Keyboard, your Windows PC and Bluetooth
The Virtual Keyboard you have is equipped with Bluetooth, a short-ranged
wireless communications technology allowing you to communicate with your
Windows PC up to 10 meters away without the need for a physical connection.
The keyboard Bluetooth supports both the HID (i.e. Human Interface Devices)
service as well as the SPP (Serial Port Profile) service. For information on
which Bluetooth services are provided by your computer, refer to the
documentation on the Bluetooth software installed on your PC.
If your computer Bluetooth software supports HID no VKB Driver software
installation is required.
If your computer Bluetooth software does not support HID, you may use SPP
and you’ll need to install the VKB Driver on your computer.
8
Page 9

Installing the driver on your Windows PC
1) Insert the VKB CD into a CD-ROM drive on your computer.
2) Insert the Bluetooth Virtual Keyboard & User Guide Disk into a
CD-ROM drive on your computer. (The CD should run automatically
however if it does not start by itself, please open the CD and run
setup.exe)
3) Follow the onscreen prompts to arrive at the PCs page.
4) Select Install Software and follow the onscreen instructions to install
the software onto your PC.
5) Press Next.
9
Page 10
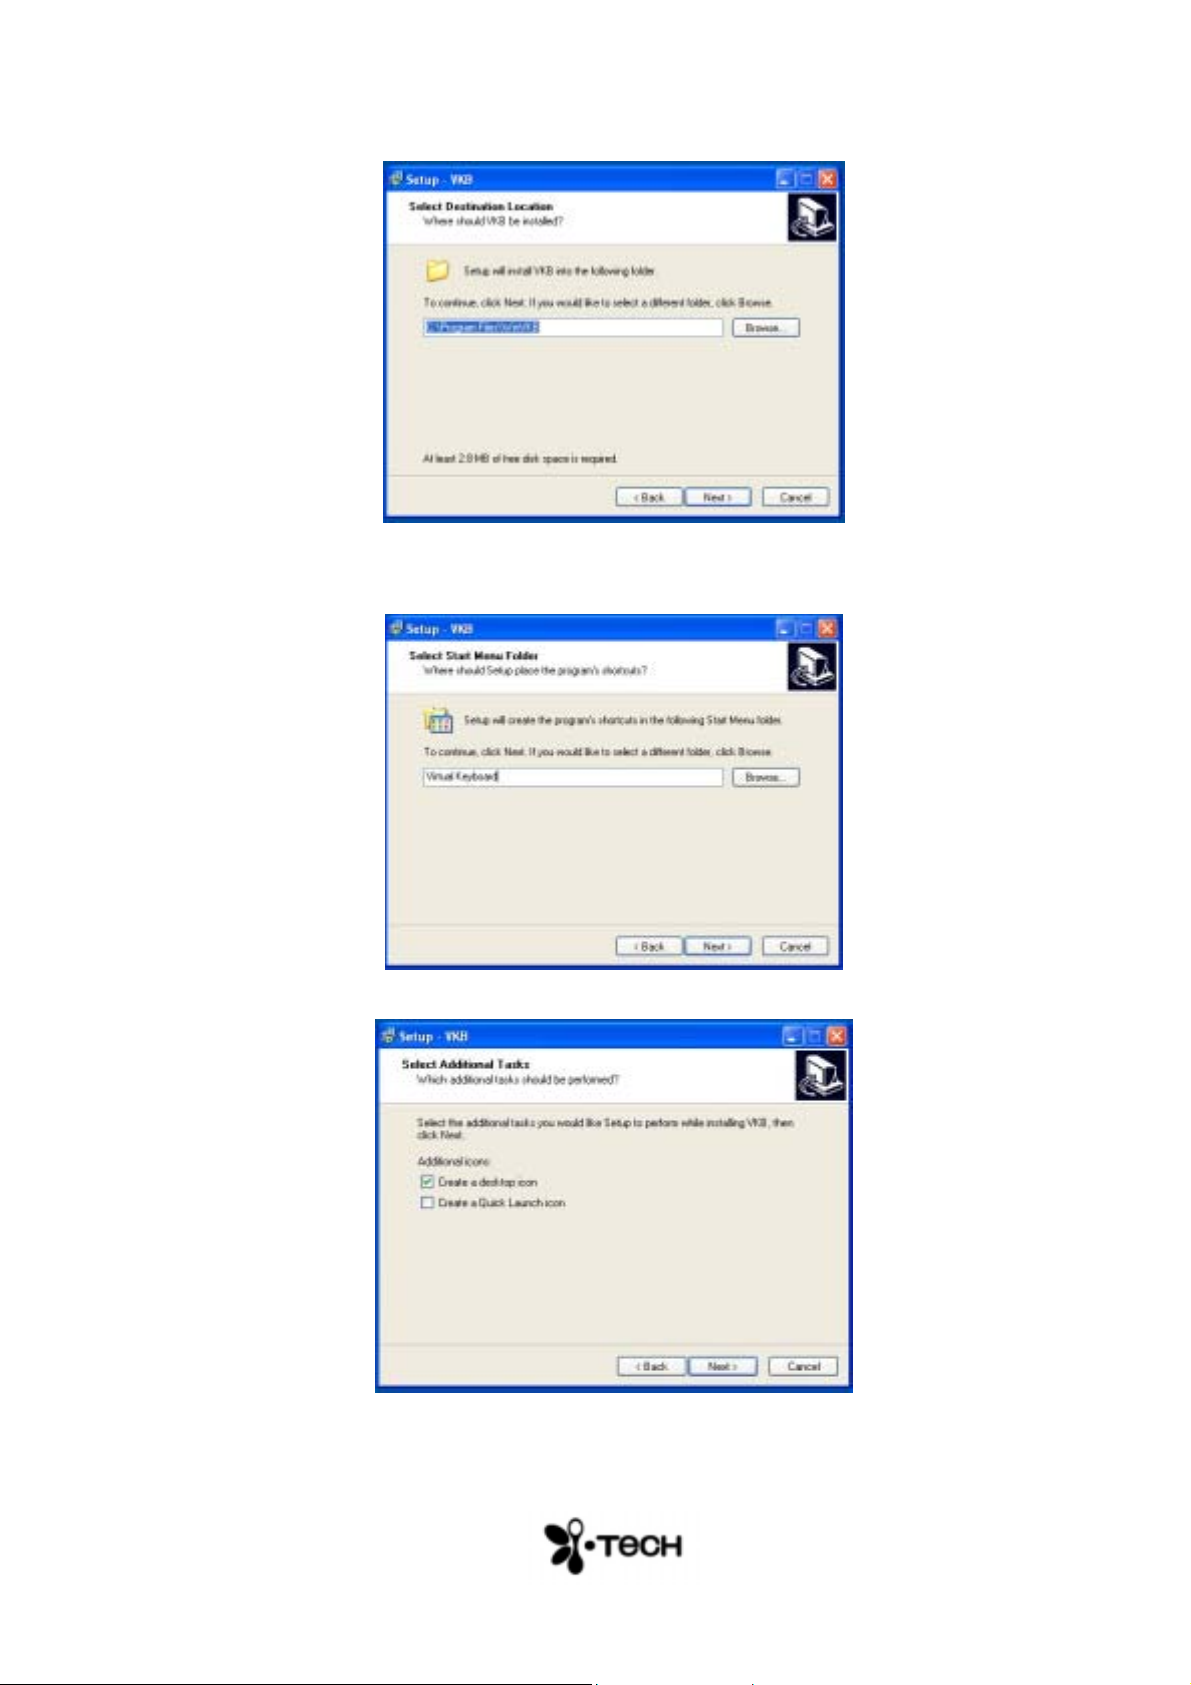
6) Change or Confirm the install location of the software. Press Next
7) Change or confirm the Shortcut Folder name. Press Next
8) Select which additional tasks you wish to complete. Press Next.
10
Page 11

9) Review the installation options and press Install.
The VKB Driver is now installed on your Windows PC.
As with all Bluetooth devices, to connect with your computer you will now need
to do the following:
Pair/bond your Windows to the virtual keyboard…
…open the VKB Driver to set up a connection…
…and connect.
11
Page 12

Pairing your Keyboard
Preparing your keyboard for pairing
Place the Virtual keyboard on a flat surface and turn it on. The blue LED at the
top should flash at about twice a second. This signifies that the Virtual
Keyboard is currently “unpaired” with any device. If this is not the case, please
see “Resetting the Device for Bluetooth Pairing” on page 25.
Pairing with your Computer
Note: The figures in the next sections are for illustrative purposes only.
Depending on the Bluetooth Software on your PC the User Interface may
differ. Please refer to you PC’s documentation for instructions on pairing with
devices.
1) Open the Control Panel on your computer and run the Bluetooth
software.
2) Press the Add button and follow the on-screen instructions to discover
nearby Bluetooth devices.
12
Page 13

3) Once the VKB Keyboard is detected, press Next to initiate the pairing
process.
4) When prompted, select “Let me choose my own passkey” and enter a
Passkey of between 1 and 8 characters.
13
Page 14

5) Press Next and then enter the same Passkey followed by <Enter>
using the keyboard image projected by the Virtual Keyboard.
6) Your Virtual Keyboard is now successfully paired with your Windows
PC.
Note: Remember the number of the COM port to which the Virtual Keyboard
has been assigned. You will need this information later.
14
Page 15

Connection with your Computer
Once the keyboard and computer are paired, the Discover Services function
on your computer will allow you to connect via HID (if supported on your
computer) or SPP. Check your computer’s Bluetooth software to see which
services your computer provides and ensure that your preferred service is
enabled.
Connecting via HID Profile
If you would like to use HID Profile, select HID and connect. At this point your
computer may start to install HID related modules. This is normal, please wait
for the installation to complete. Once finished, the blue LED on the keyboard
will go on signifying a successful connection. You are now ready to use the
keyboard.
See for a list of special key combinations that use may use for navigation and
keyboard settings.
Connecting via Serial Port Profile (SPP)
1) If you would like to use SPP, select Serial Port and connect.
2) Upon successfully connecting, the blue LED on the keyboard will go on.
3) Turn off the keyboard and then turn on.
4) The keyboard is designed to automatically re-establish a connection.
5) Depending on your computer’s Bluetooth software settings, you may be
notified of the virtual COM port your keyboard has reconnected on. If
not, please look at the settings for SPP on your computer.
6) Note the virtual COM port allocated to incoming connections.
Running the Driver
Opening the VKB driver
1. Locate the software driver, ( ) on your Windows under Programs.
2. Open the VKB page by clicking on the VKB icon ( ).
NOTE: Ensure that the Enable Keyboard box is NOT checked.
15
Page 16

Go to the Connection T AB….
Setting up a Connection
The Virtual Keyboard Driver has been setup to communicate with the Virtual
Keyboard via any of the provided physical or virtual COM ports. Check the
configuration of the Bluetooth Software running on your computer for the
virtual COM port that has been allocated to incoming connections. (See Figure
3 - IVT Service Properties
Figure 4 - Widcom Bluetooth Configuration screen).
In the VKB Connection Page, please select the appropriate COM port.
Figure 2 - VKB Connection Menu Screen
16
Page 17

Figure 3 - IVT Service Properties
Figure 4 - Widcom Bluetooth Configuration screen.
17
Page 18

Application Demonstration
To test the keyboard open any application (e.g. Notepad) and start typing.
Figure 5 – Using the Virtual Keyboard to type in Notepad
18
Page 19

Using the VKB Driver Software
Enabling the Keyboard
Return to the VKB TAB and press on the Enable Keyboard box so that it is
checked.
Figure 6 -VKB main menu screen
On the Virtual Keyboard device the blue LED will go on signifying a successful
connection. You are now ready to use the keyboard.
Battery Level
The battery level, displays the current level of the battery in the Virtual
Keyboard. Use this indicator to check when the Virtual Keyboard required
charging. If the battery level drops too low during use a “Low Battery” indicator
will flash in your System Tray. (See Indicators). You need to recharge your
batteries.
Projection intensity
You may adjust the intensity of the projected keyboard to so that it is visible in
different light conditions. You may select from between Low, Medium and High
settings.
19
Page 20

Sound Effects
The Virtual Keyboard can be set up to emit a “key-click” whenever you press a
key on the projected virtual keyboard. Using the checkboxes you can set the
key-click to be emitted by your computer and/or the Virtual Keyboard.
NOTE: Before turning your device off, it is recommended to disable the driver
by removing the check in 5 Enable VKB.
Properties
Figure 7 - Properties Page
Sensitivity
You can adjust the sensitivity of the Virtual Keyboard’s key-press detection.
The default value for this parameter is 10, however you may need to adjust this
for optimal use. If you are experiencing missed key presses, try raising the
setting. If you are experiencing extra key presses, try lowering the sensitivity.
Reset to Default
Pressing the Reset To Default button will cause the Virtual Keyboard and
driver to reset the sensitivity to the keyboard’s factory settings.
20
Page 21

Time-Outs
To conserve the battery of the Virtual Keyboard it can be set to switch off
automatically if it has not been used for a while. There are two separate
settings which may be adjusted to suit you. Projection Timeout switches off the
projected keyboard. Auto Timeout switches off the whole device. When a
period exceeding the Projection Timeout has elapsed without typing on the
keyboard, the projection will automatically turn off. Pressing anywhere will
cause the keyboard to be projected again. When the Auto Time-Out has
elapsed the Virtual Keyboard will switch off. If this occurs, press the button on
the Virtual Keyboard to turn it on again.
AutoRepeat
Figure 8 - AutoRepeat Page
The AutoRepeat feature employed by the VKB Driver allows the system to
automatically repeat a key that is being pressed.
Enable AutoRepeat
Selecting the Enable AutoRepeat checkbox switches the AutoRepeat function
on and off.
21
Page 22

Repeat Rate
The rate at which the key depression occurs is set using the Repeat Rate
slider.
Initial Repeat Delay
The period before the key press is repeated can be set between 1 and 4
seconds using Initial Repeat Delay drop down box.
Special Short-Cuts
Figure 9 – VKB Short-Cuts Page
The Short-Cuts page, displays the Virtual Keyboard’s special combination
keys, which may be accessed without exiting the application you may be
working with.
22
Page 23

About Page
Figure 10 – VKB About Page
The About Page displays the Virtual Keyboard Driver’s software version as
well as the software version of the Virtual Keyboard. If you have encountered,
and are reporting a problem, please relay information displayed on this page.
23
Page 24

The Virtual Keyboard Status Icon
When active, the VKB icon is displayed upon encountering one of the following
problems. Fix the problem and the icon will disappear.
Message Cause Action
Not Connected
The Virtual Keyboard
Driver can not
communicate with the
Virtual Keyboard
Low Battery
The Virtual Keyboard’s
battery is low.
Too Much Light The area of the
projected keyboard is
exposed to sunshine or
- Check that the Virtual
Keyboard is switched on.
- Check the Bluetooth pairing
procedures is performed
correctly.
- Check that Bluetooth has
been selected in the
Connections Page.
- Ensure the Bluetooth
connection is not being used by
another application.
- Recharge the Virtual
Keyboard
- Move the Virtual Keyboard to
a more shaded area.
some other source of
direct light.
Table 2 – Virtual Keyboard Status Icon Troubleshooting.
24
Page 25

General Handling Instruction
Micro-switch
The device is equipped with a micro-switch which disables the Virtual
Keyboard lasers when the device is picked up. This is a safety measure. Do
not attempt to override this micro-switch.
General Maintenance
• Avoid touching the keyboard sensing receiver window.
• Never touch the keyboard projection element.
• Avoid exposing the keyboard to moisture or extreme temperatures.
• Do not disassemble or try to touch the inside of the device.
• Do not attempt to charge the device with a different charger than the
one provided by VKB.
• If the windows become dirty clean only with a soft, lint free dry cloth. Do
not use any solvents or cleaners.
Resetting the Device for Bluetooth Pairing
1) Turn the keyboard on and gently insert the end of a paperclip into the
reset hole found under the rubber flap on the right side of the keyboard.
Press for about half a second and then remove the clip.
2) After about 2 seconds, the keyboard will emit a short “beep” and the
LED will flash blue.
3) Pick up the keyboard and wait for it to turn off,
4) Place the Virtual Keyboard back on the flat surface and turn it on.
5) The Virtual Keyboard is now ready for pairing/bonding.
http://www.sapientum.com
25
Page 26

Troubleshooting
Problem Possible cause Corrective action
My keyboard is connected, but
little or no keys are being
detected
When typing, multiple and/or
erroneous keys are displayed in
addition to those I have pressed.
Device is not resting on a firm flat surface Reposition device to a firm surface.
My keyboard doesn’t show the
battery indicator when enable
checkbox is clicked
My computer doesn’t accept the
authentication of my keyboard
while pairing
My computer doesn’t emit
typewriter sounds when pressing
a key
My keyboard is turned on but no
image appears.
Device is overheated Move device to a cooler location and wait a few minutes
Device is not resting on a firm flat surface Reposition device to a firm surface and verify that the micro-switch is fully
Micro-switch stuck Clean micro-switch
After first connection keyboard
does not re-connect.
“Bluetooth” does not appear as
option in Connections list
The detection sensitivity is too low. Raise the detection sensitivity setting and try again.
The detection sensitivity setting is too high. Lower the detection sensitivity setting and try again.
Device is not pairing on a Bluetooth
compatible device
Device is not entering matched passkey to
request authentication check
Sound affects, on your PC, have not been
enabled.
Device is not charged Charge device
Your PC is not setup to accept incoming
connections.
Your Windows PC does not have Bluetooth or
it has not been activated.
Start pairing the device.
Re-start pair device to re-enter the matched p asskey.
Enable Sound affects on the PC, device driver.
depressed.
Install or turn on Bluetooth on your PC
26
Page 27

Specifications
Keyboard
Projector
Keystroke
Sensor
Light source Red diode laser
Keyboard layout 63 key / full sized QWERTY layout
Keyboard size 295 x 95mm projected keyboard size
Keyboard position 60mm from VKB unit
Projection surface Non-reflective, opaque flat surface
Visibility Good contrast up to 600 lux ambient
Ambient illumination Works under all standard indoor
Detection rate Up to 400 characters per minute
Detection algorithm Multiple keystroke support
Effective keystroke Approximately 2mm
Operating surface Any firm flat surface with no
illumination
illuminations up to 600 lux
protrusions greater than 1mm
Bluetooth
Electrical
Bluetooth
Specification
Bluetooth Profile
Supported
Range of Frequency 2.4GHz Spectrum
Transmission range 9m
Number of supported
passkeys
Power source Integrated, rechargeable lithium-ion
Voltage 3.6 Volts
Battery capacity > 120 minutes continuous typing
Interface Bluetooth v1.1 class 2
Connector – to
charger
Bluetooth v1.1 class 2
HID and SPP
5
battery
Vbat, Gnd
27
Page 28

Software Compatibility MS Windows 2000 / XP, PalmOS5,
PocketPC2003, Smartphone,
Symbian
Mechanical &
Environmental
Certification &
Safety*
*Certification will be completed prior to commercial introduction
Dimensions Approximately 35 x 92 x 25 mm
Weight ~90 gram
Temperature operation
Temperature storage
EMC per CE EN 55024; 55022; EN 61000-3-2; -3-3
BQB, CE, FCC
Laser safety IEC 60825-1; Class 1 laser enclosure
10 – 35 Cº
-10 – 75 Cº
28
Page 29

Special Combination Keys
Short Cuts Windows Note
Fn 1 through Fn 0 F1 through F10
Fn Up Arrow Page Up
Fn Down Arrow Page Down
Fn Left Arrow Left Mouse key (Mouse-enabled
keyboard only)
Fn Right Arrow Right Mouse key (Mouse-enabled
keyboard only)
Fn M Start Menu
Fn S Toggle Key Clicks
Fn B <Break Pairing>
Fn R <Reset Sensitivity>
Fn Up Arrow Increase Projection Intensity
Fn Down Arrow Decrease projection intensity
Fn Right Arrow Increase sensitivity
Fn Left Arrow Decrease sensitivity
Fn Alt 4 Pound Symbol (£)
Fn Alt 5 Euro Symbol (€)
29
 Loading...