

Page 1

USB-C / USB-A 3.0 3x 4K Docking Station
1x HDMI (1x 4K@30Hz, available when connected via USB-C) / 2x Display Port (1x 5K@60Hz or 2x 4K@60Hz) /
1x Gigabit LAN / 4x USB-A 3.0 / 1x USB-A 3.0 Fast Charge Port / 1x USB-C Data Port / 1x Audio Jack / 1x Mic Jack /
On/Off Switch / Kensington Lock / for Laptops, Tablets, Smartphones / Windows, Mac OS, Linux, Android /
Thunderbolt 3 compatible
(GB) User's manual
(DE) Gebrauchsanweisung
(FR) Guide d’instructions et mode d’emploi
(CZ) Manuál
(PL) Instrukcja
(SK) Manuál
(LT) Vadovas
Page 2

ENGLISH
INTRODUCTION
Thank you for buying the multi-purpose docking station i-tec. Increase your effectiveness by simple
connecting the docking station to your laptop or tablet with help of a single cable. By this, you will gain
access to the connection (it applies to connection by means of USB-C or Thunderbolt 3; in case of connection
by means of USB 3.0, it is not technologically possible to recharge a laptop via the docking station), up to
three monitors with resolution of 4K, or to two monitors (one monitor with resolution of 5K/4K and the
second one with resolution of 4K). Five USB 3.0 ports and one USB-C port will enable you to connect all
your favorite accessories. Thanks to this docking station, you will avoid persistent connecting and
disconnecting all devices every time when you take your laptop or tablet along. The benefit is a possibility
of connection of the docking station to USB-A 3.0 or USB-C port of your laptop or tablet. The both
possibilities of connection (a cable of USB-C to C, an adapter of USB-C to A) are a part of the package.
Installation of drivers is automatic from the operation system of Win 10; for other operation systems, it is
necessary to perform a simple installation procedure.
Warning: HDMI port is only operable in case of connection of the docking station by means of USB-C
(connectivity of the docking station via USB 3.0 will provide operation of two Display Ports, the HDMI
port cannot be technologically used).
Please read the entire manual carefully before using the docking station. Detailed manual is
available on our website www.i-tec-europe.eu in the tab „Download“. In case of any problems,
contact our technical support: support@itecproduct.com.
TERMINOLOGY
Interface / port / connector / input / slot – a place where two devices are physically connected.
Chipset – a semiconductor device in a laptop, tablet or PC controlling the function of a port.
USB-C / USB Type-C – is a new symmetric connector and standard, introduced by USB-IF in their
specification USB 3.1. Windows 10 (Microsoft), Mac OS X (Apple) and Chrome OS and Android (Google) have
introduced native support for this connector. It allows faster charging, energizing, double-function (a host
but also a guest), support for alternative modes (DisplayPort, MHL, Thunderbolt) and error messaging using
Billboard equipment.
USB 3.1 / 3.0 / 2.0 – a standard for USB interface / port for connection of various USB devices. Various USB
devices can be connected to the docking station or adapter using the USB interface type A. USB type B is
used for connecting the docking station or adapter to a laptop or tablet.
HDMI / Display Port – a standard for digital graphical interface / port for connection of monitors and other
graphical display devices.
LAN (Local Area Network) – the local computer network is now the most popular Ethernet that achieves a
theoretical transfer rate of up to 1 Gbit/s at the docking station - GLAN / RJ-45.
Audio – designation for audio input (microphone) or output (earphones / loudspeakers).
PACKAGE CONTENTS
i-tec USB-C / USB-A 3.0 Docking Station
Cable USB-C 3.1 to USB-C (100 cm)
Adapter USB-C 3.1 to USB-A
Power adapter (output DC: 20V/6.75A, DC cable 150 cm)
Quick Start
Page 3

SPECIFICATION AND DESCRIPTION
Front panel:
1. On/Off switch for the docking station switching on and off
2. 1x blue LED on after switching-on the docking station
3. 1x green LED on after connection of USB-A or USB-C HDD case
4. 1x USB-C 3.1 port for connection of your USB-C device, is only determined for data transfer (5
Gbps)
5. 1x USB-A 3.0 port for connection of your existing USB 3.1/3.0/2.0 devices and data transfer (5
Gbps), supports functions of USB Hot Swapping and quick recharging according to BC 1.2
6. 1x 3.5 mm Audio out 5.1
7. 1x 3.5 mm Mic in
Rear panel:
8. Power supply input – external power adapter (output: DC 20V/6.75A)
9. USB-C port for connection of the docking station to a laptop with a USB-C or USB-A interface (the
supply contains an adapter of USB-C/F to USB-A/M for connection to a USB-A port). In case of
connection to a USB-C or Thunderbolt 3 port of your laptop, the docking station also supports a
function of Power Delivery in profile 4 (standardly 60W, max. 85W upkeeping) for your laptop
recharging.
10. 1x Ethernet GLAN RJ-45 port for fast network and Internet access with Gigabit Ethernet connection,
it supports speeds of 10 / 100 / 1000 Mbps
11. 1x HDMI (the HDMI port is only available in case of connection of the docking station to a USB-C
port of your laptop)
12. 2x Display Port
Resolution:
- 1 monitor connected via 2 Display Port cables: 1x DP + 1x DP supports up to 5K 5120x2880@60Hz
(the graphic card in your computer doesn’t need to support 5K resolution), and at the same time 1
monitor connected via HDMI supporting up to 1x 4K 3840x2160@30Hz (the HDMI port is only available
in case of connection of the docking station to a USB-C port of your laptop)
- 2 monitors connected by means of Display Ports support up to 4K 4096x2160@60Hz and 1 monitor
connected via HDMI supporting up to 4K 3840x2160@30Hz (the HDMI port is only available in case of
connection of the docking station to a USB-C port of your laptop)
13. 4x USB-A 3.0 port for connecting USB 3.1/3.0/2.0 devices and high-speed data transmission up to 5
Gbps; supports USB Hot Swapping function
Page 4

Chipset: DisplayLink DL6950, VIA VL813, Texas Instruments TPS65983
Power adapter: input 100-240V 50/60Hz 1.8A; output: 20V/6.75A
Product dimensions: 245 x 95 x 30 mm
Product weight: 330 g
A remark for macOS and monitors with two DP cables:
Some displays with the resolution higher than 4K require two Display Port cables for the image transfer in full
resolution:
Dell UP2715K 5K 27-inch monitor is supported at iMac (Retina 5K, 27-inch, the end of 2014) or newer and
at Mac Pro (the end 2013) with OS X Yosemite 10.10.3 or newer.
HP Z27q 5K monitor is supported at iMac (Retina 5K, 27-inch, the end of 2014) or newer and at Mac Pro
(the end of 2013) with macOS Sierra.
SYSTEM REQUIREMENTS
Hardware requirements: Laptop / tablet with a free USB-A or USB-C port
Operating system: Windows 7 / 8 / 8.1 / 10 32/64 bit, Mac OS X, Linux Ubuntu 14.04 / 16.04, Android 6 or
later. Windows 10 – automatic installation of OS drivers. Other operating systems – manual installation of
drivers. Firmware updates automatically.
For routine work on multiple monitors
Processor: Intel Core i5 2+GHz / AMD Trinity or higher
RAM: 4GB
Graphic processor: Intel HD 4000, ATI Radeon HD7xxx, NVidia GeForce 5xxM or higher
Port USB 3.0 / USB-C
Video playback
Processor: Intel Core i7 2+GHz / AMD Richland A10-575x / AMD Kaveri A10-7400P or higher
RAM: 8GB
Graphic processor: Intel HD 4000, ATI Radeon HD 8650, NVidia GeForce 7xxM or higher
Port USB 3.0 / USB-C
In less powerful laptops, they can handle 4K/5K video playback, but the result is not ideal (interruption,
video tearing).
DRIVER INSTALLATION IN WINDOWS 7 / 8 / 8.1 / 10 (32/64 BIT)
ATTENTION! Do not connect the docking station to your laptop / tablet until you have installed the
appropriate drivers. Drivers must only be installed before first use. Before installation, make sure that your
system has installed the latest drivers for your device and updated BIOS.
For Windows 7 / 8 / 8.1, download the drivers from our website www.i-tec-europe.eu on the “Download”
tab of this product. Run the installation from the downloaded file, select the installation language, and
follow the instructions on the screen.
In Windows 10, the docking station can be connected directly, drivers are automatically installed from the
system when connected to the Internet.
In Windows 7 / 8 / 8.1 / 10, install the drivers as the “Administrator” user. The screen may blink while the
drivers are being installed, this is a standard process. Once the installation is complete, we recommend
restarting the notebook / tablet.
In the environment with more than one laptops equipped with Windows 7, 8, 8.1 operating system, a singleshot corporative installation by the system administrator can be performed. For more information on a
method of installation, please refer to the instructions below):
http://www.displaylink.com/downloads/corporate
Page 5

HARDWARE INSTALLATION (CONNECTING THE DOCKING STATION TO LAPTOP / TABLET)
1) Turn on the laptop / tablet and connect the power adapter to the docking station.
2) Connect the docking station power adapter to the AC 110 V / 230 V network and press the ON
button.
3) Connect the USB-C cable to the USB-C port on the back panel of the docking station. For connection
to a USB-A port of your laptop / tablet, please use an adapter of USB-C to USB-A.
4) Connect the other end to the free USB 3.0 / USB-C port of your laptop / tablet.
5) Subsequently, the automatic installation of ports in each system starts.
6) After the installation is complete, restart the laptop / tablet.
In Windows, the LAN port appears in Start → Control Panel (Show Small Icons) → Device Manager →
Network Adapters as “USB Ethernet”. The docking station appears in Start → Control Panel (Show Small
Icons) → Device Manager → Graphic Adapters as “ USB-C Triple-4K Dock ”. Audio ports can be found
in Start → Control Panel (Show Small Icons) → Device Manager → Audio, Video and Game Controllers as
“USB Audio“.
Displaying LAN, display and audio ports in Device Manager
If any of these devices are marked with yellow ! or ?, then the docking station is not installed correctly. In
this case, disconnect the docking station, uninstall the existing drivers (see chapter “Uninstalling Drivers”),
and reinstall the latest drivers available on our website www.i-tec-europe.eu on the "Download" tab of this
product. Then reconnect the docking station to the laptop / tablet. In case of problems, please contact our
technical support: support@itecproduct.com.
DRIVER INSTALLATION IN MAC OS X
ATTENTION! Do not connect the dock to your Mac until you install the appropriate drivers. Drivers must only
be installed before first use. We recommend that you have the latest MacOS operating system installed.
Download drivers from our website www.i-tec-europe.eu on the “Download” tab of this product and run
the installation:
Unpack the file on your MacBook desktop as a virtual disk, select “Drivers” and then “DisplayLink Software
Installer”. Then select the installation language and follow the on-screen instructions, enter the user
password if necessary. The screen may blink while the drivers are being installed, this is a standard process.
After the installation is complete, restart the MacBook.
Page 6

Driver installation in Mac OS X
HARDWARE INSTALLATION (CONNECTING THE DOCKING STATION TO MACBOOK)
1) Turn on the MacBook and connect the power adapter to the docking station.
2) Connect the docking station power adapter to the AC 110 V / 230 V network and press the ON
button.
3) Connect the USB-C cable to the USB-C port on the back panel of the docking station. For connection
to a USB-A port of your laptop / tablet, please use an adapter of USB-C to USB-A.
4) Connect the other end to the free USB 3.0 / USB-C port of your MacBook.
5) Subsequently, automatic port installations are started.
6) After the installation is complete, restart the MacBook.
The installed ports are displayed in Mac OS X as “ USB-C Triple-4K Dock“ in “About This Mac“ → “System
Profiler“ → “Hardware“ → “USB“.
Zobrazení dokovací stanice v macOS
INSTALLING DRIVERS IN OTHER OPERATING SYSTEMS
For Android, Chrome OS and Ubuntu, use the DisplayLink chipset drivers. These are available for download
on our website www.i-tec-europe.eu on the “Download” tab of this product or here:
http://www.displaylink.com/downloads.
CONNECT THE HDMI / DISPLAY PORT MONITOR
Use an HDMI / DP cable to connect the monitor to the docking station. During the installation of an
additional monitor, the laptop / tablet monitor may may blink, this is a normal state. The docking station
offers a graphic interface: 2x Display Port and 1x HDMI (the HDMI port is only available in case of
connection of the docking station to a USB-C port of your laptop). The docking station supports:
Page 7

a) Connection up to three 4K monitors at the same time (1x HDMI 4K 3840x2160@30Hz and 2x 4K
4096x2160@60Hz Display Port monitor)
b) Connection of one 5K and one 4K monitor at the same time (1x HDMI 4K 3840x2160@30Hz and 1x
5K 5120x2880@60Hz Display Port monitor). To achieve 5K resolution, it is necessary to connect a
DP monitor with two DP cables, the graphic card in your computer doesn’t need to support 5K
resolution).
A remark for macOS and monitors with two DP cables:
Some displays with the resolution higher than 4K require two Display Port cables for the image transfer in full
resolution:
Dell UP2715K 5K 27-inch monitor is supported at iMac (Retina 5K, 27-inch, the end of 2014) or newer and
at Mac Pro (the end 2013) with OS X Yosemite 10.10.3 or newer.
HP Z27q 5K monitor is supported at iMac (Retina 5K, 27-inch, the end of 2014) or newer and at Mac Pro
(the end of 2013) with macOS Sierra.
USING IN WINDOWS OS
In the hidden icons on the Start bar, click on the network connection icon:
Here you can choose:
a) DisplayLink Manager
b) Audio settings
c) Advanced Configuration
Page 8

Options for controlling the monitor with attached docking station
Ad a) DisplayLink Manager – the software version is displayed after selecting.
Installed software version
Ad b) Audio settings – this will allow audio settings (settings similar to Control Panels → Audio). For use,
select 2-channel headphones and a 3.5mm jack microphone. In audio devices, set “DisplayLink Audio” as
input and output as the default device.
Audio settings
This can be used to set up Skype, for example.
Audio settings for Skype
Ad c) Advanced configuration – clicks to display the Windows Display Resolution settings.
Page 9

Display Resolution in Windows 10
Now you can set Extend and Mirror mode:
Mirror mode: on the monitor select the 2nd Monitor, select Several monitors → Mirror this display
→ OK.
Extend mode: on the monitor select the 2nd Monitor, select Several monitors → Extend this display
→ OK.
By selecting the “Set this monitor as primary” field, you select the additional monitor as the primary
monitor.
By clicking on the second monitor and moving it you can position this monitor as required relative to the
original monitor of your laptop / tablet.
Placing one additional monitor to the original laptop / tablet monitor
Page 10
The Standby / Hibernate mode and the Video port – after the activation of the laptop / tablet from the
Standby / Hibernate mode the primary (original) monitor is displayed, for this reason we recommend using
the monitor that is integrated with the laptop / tablet as the primary monitor, so that you can log on to the
system again.
The Mirror mode – the additional monitor takes on the parameters of the original monitor in the system,
i.e., if you select the Mirror mode and the original monitor resolution is e.g. 1280x1024 then the screen will
be displayed on the additional monitor with a resolution of max. 1280x1024 (even if you set a higher
resolution).
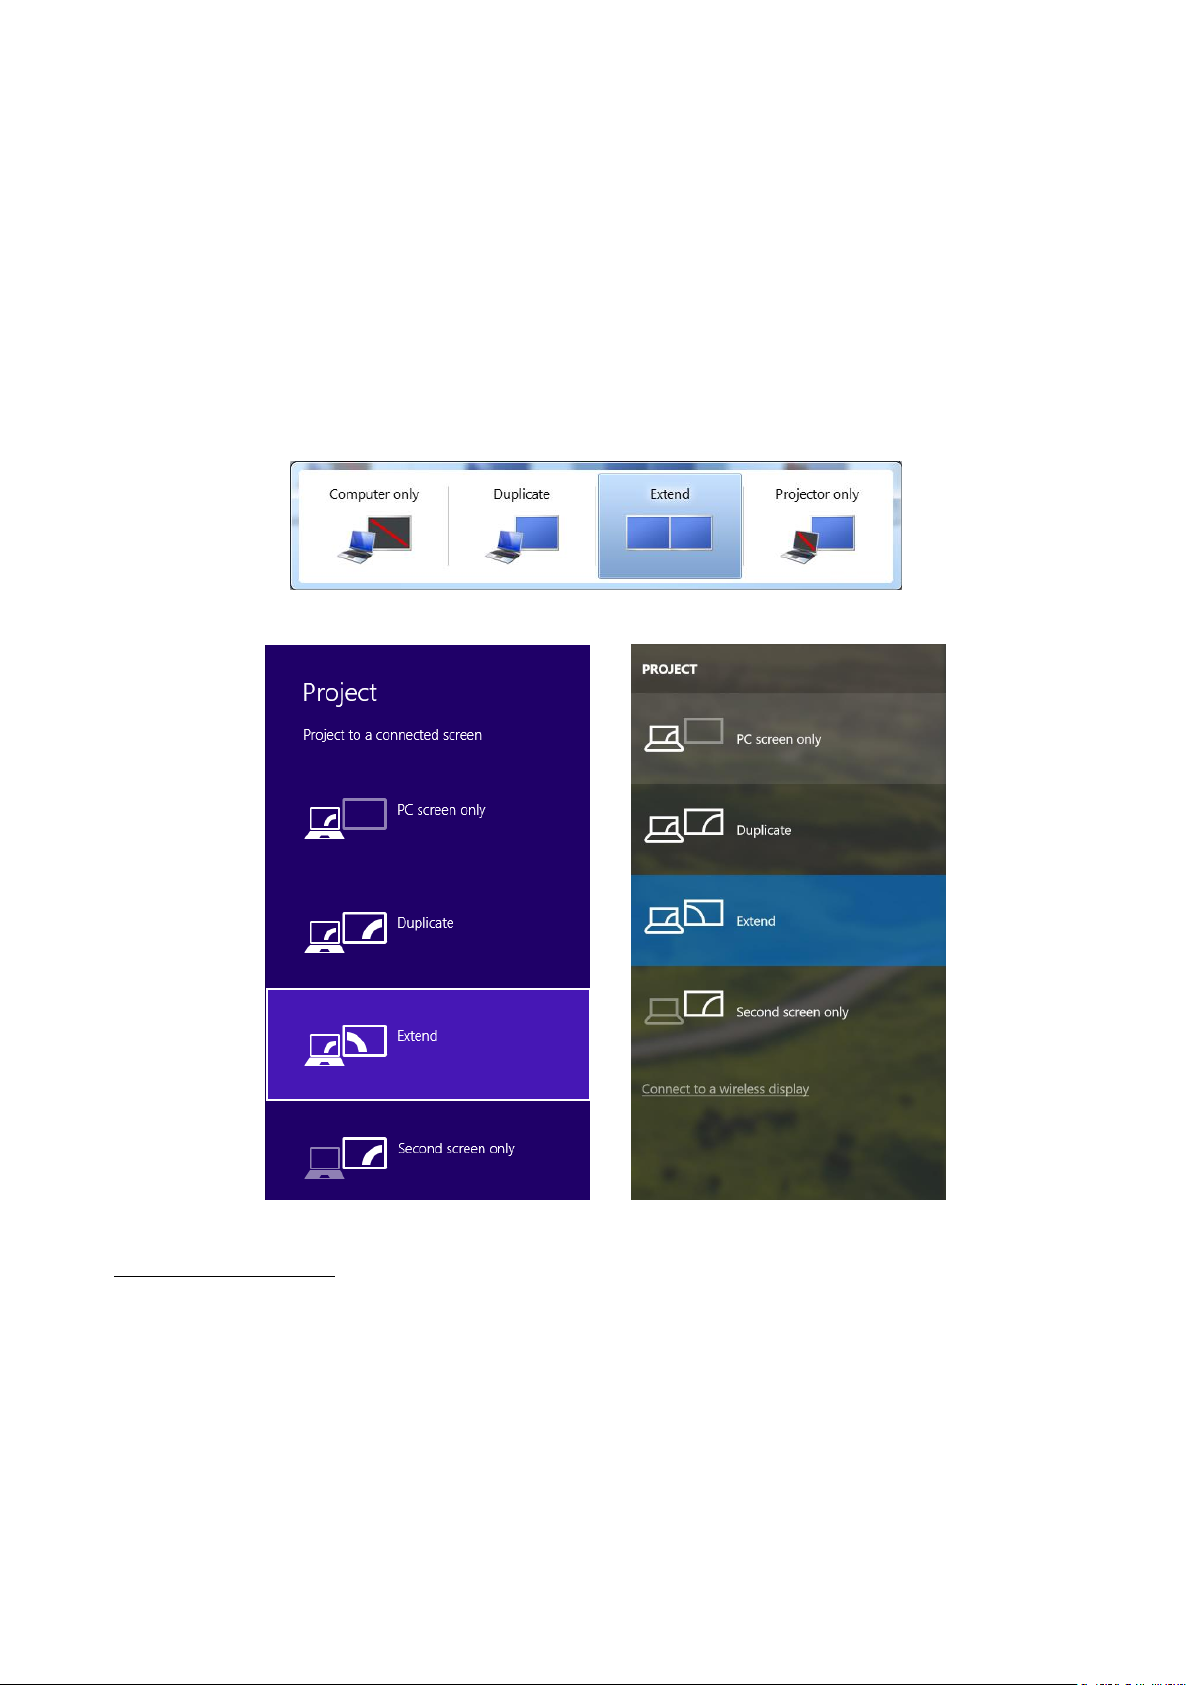
Pressing the keys „Windows“ + P you can also easily control the monitors (this keyboard shortcut works
only from Windows 7 and higher). For using a monitor in Windows 7 you can select: Computer Only,
Duplicate, Extend, and Projector Only. For using a monitor in Win 8 / 8.1 / 10 you can select: Computer
screen only, Mirror, Extend, Second screen only.
Control the monitor in Windows 7
Control the monitor in Windows 8 / 8.1 and Windows 10
UNINSTALLING DRIVERS
Go to Control Panel → All Control Panel Items → Programs and Features → Remove: DisplayLink Core
Software for Video drivers. During uninstalling, confirm your choices.
Page 11

Uninstalling drivers
USING IN MAC OS
After connecting the monitor, the screen on your Mac will glimmer, which is a standard condition, after
stabilization it is possible to perform standard setting of the monitor here: System Preferences-Displays:
Click on Arrangement and in the default mode (Extended desktop) click on the new monitor and drag it as
necessary vis-à-vis the Mac monitor. If you select Mirror displays the mode will change to Mirror (the
resolution of the monitors will be automatically adjusted according to their parameters and the highest
possible resolution will be set on both monitors). By cancelling the Mirror displays option you will return to
the Extended desktop mode.
Page 12

Extended mode: The arrow indicates the possible position of the connected monitor
vis-à-vis the Mac monitor.
Extended mode: In this mode you can choose the Main monitor by dragging the Menu Bar.
Mirror mode: This mode can only be used if supported by the Mac.
Click on Gather Windows: using this option you can choose the settings of the corresponding monitor –
Scaled (offers available resolutions), Rotation (Standard, 90°, 180° and 270°) and Refresh rate (if offered).
Below the following setting options are displayed. This may vary, depending on your monitor.
Page 13

Display option 1
Display option 2
In Scaled mode click on the required icon, the resolution is displayed below
(which looks like this, 3008x1692 = 4K@30Hz)
Closed-display mode – It is possible to work on the connected monitor when the Mac monitor is closed,
but you will require power supply and mouse and keyboard connection. More information can be found
here: https://support.apple.com/en-us/HT201834
Most problems with renewing the screen on the connected monitor after hibernation of the Mac, after using
screensaver, after restarting the Mac, after turning the Mac off / on can be solved by turning the docking
station off and turning on after approximately 10 s. Please wait for completion of connection of all
peripherals.
OTHER FUNCTIONS
Connecting USB devices – after the USB device is connected to the USB 3.0 port of the docking station (USB
external HDD, USB keyboard, USB mouse, USB Hub, USB graphics adapter), these devices are used in a
standard way.
Charging – docking station supports charging of USB mobile devices, such as smart phones, e-book readers,
multimedia players, navigation devices, and tablets. Simply connect the device that you want to charge
using the original cable to the USB port of the docking station.
Audio
Audio output devices, for listening through graphic output, need to be set / verified here: System
Preferences-Sound-Output – select USB Audio Device.
Page 14

Setting the audio output device to both the earphones and the monitor simultaneously can be done in
Open-Applications-Utilities-Audio settings MIDI.app – click on „+“ on the left at the bottom – Create
device with multiple outputs and select the desired outputs from the offered options on the Device with
multiple outputs.
Note: The majority of problems with the docking station and the connected peripheral devices can be solved
by turning the docking station off and turning on after approximately 10 s.
SAFETY INSTRUCTIONS
Do not expose to extreme temperatures and air humidity.
Use the device on flat surfaces – this will prevent it from slipping and potentially causing damage to
the product.
Keep the user manual for future reference.
In co-operation with the service department:
Check the functionality if the product receives any damage.
Send the device back if it does not work in accordance with the user manual.
FREQUENTLY ASKED QUESTIONS
Question: On my MacBook 13" / 15" 2016 and later, wi-fi or Bluetooth stops working; or USB 3.0 devices
connected to the docking station disconnect. Where is the problem?
Answer: This problem is caused by interference in the range of 2.4GHz. A possible solution is to connect the
docking station to the Thunderbolt 3 (USB-C) port of the Mac on the left side nearest to you or use the
ports on the right side. These ports are situated farthest from the wi-fi antenna. The next solution is the use
of the 5GHz zone and the placement of the docking station as far as it could be from the monitor of your
Mac. For more information, please refer to: https://support.apple.com/en-gb/HT201163
Question: In Windows, some wireless devices (WLAN dongle or, for example, Microsoft Wireless set
3000/5000), which are connected in the docking station, stop working or irregularly disconnect. Where is
the problem?
Answer: Sometimes, USB 3.0 ports are cancelled with a 2.4GHz wireless device. The wireless device should
be placed outside of the close proximity of USB 3.0 ports and cables. Place the wireless device as far from
the USB 3.0 ports and cables as possible. You could use for these purposes, for example, an extension cord
for the connection of WLAN dongles or sets.
Question: May I use an adapter to transform a signal from HDMI/Display Port to VGA/DVI port?
Answer: We don’t recommend you to use signal converters from Digital signal (HDMI/Display Port) to
Analogue (VGA/DVI) by a reason of technological limitation of Analogue ports (due to their low
transmittivity); these signal converters doesn’t need to be 100% functional.
Question: Is there a limitation for 5K resolution for macOS?
Answer: Some of displays with the resolution higher than 4K require two Display Port cables for the image
transfer in full resolution:
Dell UP2715K 5K 27-inch monitor is supported at iMac (Retina 5K, 27-inch, the end of 2014) or newer and
at Mac Pro (the end 2013) with OS X Yosemite 10.10.3 or newer.
HP Z27q 5K monitor is supported at iMac (Retina 5K, 27-inch, the end of 2014) or newer and at Mac Pro
(the end of 2013) with macOS Sierra.
Question: After installing Windows 10, the device stopped working. With Windows 7/8 / 8.1, the device
worked smoothly.
Answer: Please install the latest drivers. Download drivers from our website www.i-tec-europe.eu in the
“Download” tab of this product.
Question: After Mac OS X 10.12.x installation, the device stopped working. The previous version worked
smoothly.
Answer: Please install the latest drivers. Download drivers from our website www.i-tec-europe.eu in the
“Download” tab of this product. The docking station is supported from DisplayLink 3.1.
Page 15

Question: I have a problem with detecting the docking station in my USB-C / USB 3.0 port on my laptop /
tablet.
Answer: The problem may be the outdated drivers for the USB-C / USB 3.0 port on your laptop / tablet.
Please install the latest USB-C / USB 3.0 chipset drivers in your laptop / tablet.
Question: The LAN port does not work or operates at only 10/100 Mbps.
Answer: Check all wiring between the docking station and the active element and push the RJ-45
connectors. Also, you can replace the Ethernet cable between the docking station and and the active
network element (HUB, Switch, Router) for a certified one.
Question: Can I get more detailed information about docking station problems?
Answer: Surely, you can find useful information on our website www.i-tec-europe.eu on the “FAQ” tab of
this product or on http://www.displaylink.com/support/knowledgebase.php, or contact our technical
support: support@itecproduct.com.
In case of any questions or problems with the docking station, contact our technical support:
support@itecproduct.com.
Page 16

DEUTSCH
EINLEITUNG
Wir bedanken uns für den Kauf von universaler i-tec Docking Station. Erhöhen Sie Ihre Effektivität durch
einfachen Anschluss der Docking Station an Ihr Notebook oder Tablet-PC mit Hilfe von einem einzigen
Kabel. Sie gewinnen Zugang zur Versorgung (es gilt für den Anschluss über USB-C oder Thunderbolt 3; beim
Anschluss über USB 3.0 ist es technologisch nicht möglich, ein Notebook aufzuladen), von bis zu drei
Bildschirmen mit 4K Auflösung, gegebenenfalls von zwei Bildschirmen mit 4K Auflösung (einem mit 5K/4K
Auflösung und einem mit 4K Auflösung). Fünf USB 3.0 Ports und ein USB-C Port ermöglichen Ihnen Ihr
ganzes Lieblingszubehör anzuschließen. Dank dieser Docking Station müssen Sie Ihre Geräte nicht immer
wider anschließen und abzuschalten, wenn Sie Ihr Notebook oder Tablet-PC irgendwohin mitnehmen.
Vorteil gehört die Möglichkeit, die Docking Station an den USB-A 3.0 oder USB-C Port Ihres Notebooks /
Tablet-PCs anschließen zu können. Beide Anschlussmöglichkeiten (USB-C Kabel auf C, USB-C Adapter auf A)
gehören zum Lieferumfang. Die Treiber werden vom System Win 10 automatisch installiert, unter andreren
Betriebssystemen ist eine einfache Installation nötig.
Hinweis: Der HDMI Port funktioniert nur in dem Falle, wenn die Docking Station über USB-C
angeschlossen wird (die Docking Station Konnektivität über USB 3.0 sichert den Gang von zwei
DisplayPorts, technologisch ist es nicht möglich, den HDMI Port auszunutzen).
Lesen Sie sich bitte vor der Arbeit mit der Docking Station die Gebrauchsanweisung sorgfältig
durch. Die ausführliche Gebrauchsanweisung ist auch auf unserer Webseite
www.i-tec-europe.eu unter „Download“ bei diesem Produkt zu finden. Bei Problemen wenden
Sie sich bitte auf unsere technische Abteilung unter: support@itecproduct.com an.
BEGRIFFSWÖRTERBUCH
Schnittstelle / Port / Anschluss / Eingang / Steckplatz – Stelle, an der zwei Geräte physisch verbunden
werden.
Kontroller – Halbleiterbestandteil (s.g. Chipsatz) in Notebook, Tablet-PC, der die Arbeit eines der Ports
sichert.
USB-C / USB Type-C – ist ein neuer symmetrischer Stecker und Standard, der von USB-IF in seiner USB 3.1
Spezifikation angegeben wurde. Es wurde die native Unterstützung dieses Steckers unter Windows 10
(Microsoft), Mac OS X (Apple) und Chrome OS und Android (Google) vorgestellt. Er ermöglicht schnellere
Aufladung, so gen. Doppelrolle (Gastgeber sowie Gast), Unterstützung so gen. Alternativer Betriebe – Alt
Mode (DisplayPort, MHL, Thunderbolt 3, Power Delivery) und Fehleranzeige über Gerätebillboard.
USB 3.1 / 3.0 / 2.0 – Standard für USB Schnittstelle / Port für den Anschluss von verschiedenen USB Geräten.
An Docking Station oder Adapter ist es möglich, verschiedene USB Geräte mit Hilfe von USB Schnittstelle
Type A anzuschließen. Port USB Type B dient zum Anschluss von Docking Station oder Adapter an Notebook
/ Tablet-PC.
HDMI / Display Port – Standard für digitale Grafikschnittstelle / Port, die zum Anschluss von Bildschirmen
und anderen Grafikbildschirmgeräten dient.
LAN (Local Area Network) – lokales Computernetzwerk, zurzeit gehört zu den populärsten so gen. Ethernet,
das bei Docking Station eine theoretische Übertragungsgeschwindigkeit bis zu 1 Gbit/s erreicht –
Bezeichnung GLAN / RJ-45.
Audio – Bezeichnung für Toneigangs- (Mikrophon) oder Ausgangsgeräte (Kopfhörer / Lautsprecher).
LIEFERUMFANG
i-tec USB-C / USB-A 3.0 Docking Station
USB-C 3.1 Kabel auf USB-C (100 cm)
USB-C 3.1 Adapter auf USB-A
Versorgungsadapter (DC Ausgang: 20V/6.75A, DC Kabel 150 cm)
Quick Start
Page 17

SPEZIFIKATION UND BESCHREIBUNG
Vorderseite:
1. On/Off Schalter für Einschaltung und Ausschaltung der Docking Station
2. 1x blaue LED-Kontrollleuchte leuchtet nach dem Einschalten der Docking Station
3. 1x grüne LED-Kontrollleuchte leuchtet nach dem Anschluss von USB-A oder USB-C HDD Case
4. 1x USB-C 3.1 Port für den Anschluss Ihrer USB-C Geräten, er ist nur für Datenübertragung (5 Gbps)
bestimmt
5. 1x USB-A 3.0 Port für den Anschluss Ihrer bestehenden USB 3.1/3.0/2.0 Geräte und hohe
Datenübertragungsgeschwindigkeit (5 Gbps), Unterstützung der USB Hot Swapping Funktion und
schneller Aufladung nach BC 1.2
6. 1x 3.5 mm Audio Out 5.1
7. 1x 3.5 mm Mic In
Hinterseite:
8. Eingang für Versorgung – externer Versorgungsadapter (Ausgang: DC 20V/2A)
9. USB-C Port für den Anschluss der Docking Station an Notebook mit USB-C oder USB-A Schnittstelle
(USB-C/F Adapter auf USB-A/M zum Anschluss an USB-A Port gehört zum Lieferumfang). Beim
Anschluss an USB-C oder Thunderbolt 3 Port Ihres Notebooks unterstützt die Docking Station auch
die Power Delivery Funktion unter Profil 4 (standardmäßig 60W, max. 85W) für die Aufladung Ihres
Notebooks.
10. Ethernet GLAN RJ-45 Port für Hochgeschwindigkeitszugang zum Netzwerk und Internet über
Gigabit Ethernet, unterstützt die Geschwindigkeiten 10 / 100 / 1000 Mbps
11. 1x HDMI (HDMI Port steht nur beim Anschluss der Docking Station an USB-C Port Ihres Notebooks
zur Verfügung)
12. 2x Display Port
Auflösung:
- 1 Bildschirm angeschlossen über 2 Display Port : 1x DP + 1x DP unterstützt bis zu 5K 5120x2880@60Hz
(die Grafikkarte in Ihrem Computer muss 5K Auflösung unterstützen), und gleichzeitig 1 Bildschirm
angeschlossen über HDMI unterstützt bis zu 1x 4K 3840x2160@30Hz (HDMI Port steht nur beim
Anschluss der Docking Station an USB-C Port Ihres Notebooks zur Verfügung)
- 2 Bildschirme angeschlossen über Display Ports unterstützen bis zu 4K 4096x2160@60Hz und 1
Monitor angeschlossen über HDMI unterstützt bis zu 4K 3840x2160@30Hz (HDMI Port steht nur beim
Anschluss der Docking Station an USB-C Port Ihres Notebooks zur Verfügung)
13. Port für den Anschluss Ihrer bestehenden USB 3.1/3.0/2.0 Geräte und hohe Datenübertragung
(5 Gbps), Unterstützung der USB Hot Swapping Funktion
Page 18

Chipset: DisplayLink DL6950, VIA VL813, Texas Instruments TPS65983
Versorgungsadapter: Eingang 100-240V 50/60Hz 1.8A; Ausgang: 20V/6.75A
Produktabmessungen: 245 x 95 x 30 mm
Produktgewicht: 330 g
Bemerkung für macOS und Bildschirme mit DP Kabel:
Einige Displays mit höherer Auflösung als 4K erfordern zwei Display Port Kabel zur Bildübertragung in voller
Auflösung:
27 Zoll 5K Bildschirm Dell UP2715K wird unter iMac (Retina 5K, 27 Zoll, Jahresende von 2014) oder
neuerem und unter Mac Pro (Jahresende von 2013) mit OS X Yosemite 10.10.3 oder neuerem unterstützt.
5K Bildschirm HP Z27q wird unter iMacu (Retina 5K, 27 Zoll, Jahresende von 2014) oder neuerem und
unter Macu Pro (Jahresende von 2013) mit macOS Sierra unterstützt.
SYSTEMANFORDERUNGEN
Hardware-Anforderungen: Notebook / Tablet-PC mit einem freien USB-A oder USB-C Port
Betriebssystem: Windows 7 / 8 / 8.1 / 10 32/64 bit, Mac OS X, Linux Ubuntu 14.04 / 16.04, Android 6 und
höher. Windows 10 – automatische Treiberinstallation vom BS. Andere Betriebssysteme – manuelle
Treiberinstallation. Firmware wird automatisch installiert.
Für übliche Arbeit an mehreren Bildschirmen
Prozessor: Intel Core i5 2+GHz / AMD Trinity oder besser
RAM: 4GB
Grafikprozessor: Intel HD 4000, ATI Radeon HD7xxx, NVidia GeForce 5xxM oder besser
USB 3.0 / USB-C Port
Für Videoabspielen
Prozessor: Intel Core i7 2+GHz / AMD Richland A10-575x / AMD Kaveri A10-7400P oder besser
RAM: 8GB
Grafikprozessor: Intel HD 4000, ATI Radeon HD 8650, NVidia GeForce 7xxM oder besser
USB 3.0 / USB-C Port
Es gilt bei weniger leistungsfähigen Übertragungscomputers, dass sie zwar das Abspielen von 4K/5K Video
schaffen können, aber das Ergebnis ist nicht ideal (Unterbrechungen, Bildreißen).
TREIBERINSTALLATION UNTER WINDOWS 7 / 8 / 8.1 / 10 (32/64 BIT)
HINWEIS! Schließen Sie die Docking Station an Ihr Notebook / Tablet PC nicht an, bis die betreffenden
Treiber nicht installiert sind. Die Treiber sind nur vor erster Benutzung zu installieren. Vergewissern Sie sich
vor der Installation, dass Sie im System die neuesten Treiber für Ihr Gerät installiert haben und BIOS
aktualisiert ist.
Für Windows 7/8/8.1 sind die Treiber unter unserer Internetseite www.i-tec-europe.eu unter „Download“
bei diesem Produkt herunterzuladen. Starten Sie die Installation von heruntergeladener Datei, wählen Sie
die Installationssprache aus und gehen Sie nach Anweisungen auf dem Bildschirm vor.
Unter Windows 10 ist die Docking Station direkt anzuschließen, die Treiber werden nach Internetanschluss
vom System automatisch installiert.
Unter Windows 7 / 8 / 8.1 / 10 werden die Treiber unter dem Benutzer „Administrator“ installiert. Der
Bildschirm kann während der Treiberinstallation blinzeln, es geht um Standardprozess. Nach der Installation
empfehlen wir das Notebook / Tablet PC neuzustarten.
Wenn es um mehrere Notebooks ausgestattet mit Betriebssystem Windows 7, 8, 8.1 geht, ist eine einmalige
kollektive Installation durch Systemadministrator möglich. Für mehrere Informationen über diese
Installationsmöglichkeit lesen Sie die Anweisung hier: http://www.displaylink.com/downloads/corporate
Page 19

HARDWARE INSTALLATION (ANSCHLUSS DER DOCKING STATION AN NOTEBOOK / TABLET PC)
1) Schalten Sie das Notebook / Tablet PC ein und schließen Sie den Versorgungadapter an Docking
Station an.
2) Schließen Sie den Versorgungsadapter der Docking Station an Netzwerk AC 110 V / 230 V an und
drücken Sie die ON Taste.
3) Schließen Sie USB-C Kabel an USB-C Port auf der Rückseite der Docking Station an. Für den
Anschluss an USB-A Ihres Notebooks / Tablet-PCs nutzen Sie den USB-C Adapter auf USB-A.
4) Das andere Ende schließen Sie an einen freien USB-A 3.0 / USB-C Port Ihres Notebooks / Tablet PCs
an.
5) Nachfolgend wird die automatische Installation der Ports unter einzelnen Systemen gestartet.
6) Starten Sie Ihr Notebook / Tablet PC nach der Installation neu.
Unter Windows wird der LAN Port unter Start → Systemsteuerung (Kleine Schaltflächen anzeigen) →
Gerätemanager → Netzwerkadapter als „USB Ethernet“ angezeigt. Die Docking Station wird unter Start →
Systemsteuerung (Kleine Schaltflächen anzeigen) → Gerätemanager → Grafikadapter als „USB-C Triple-4K
Dock“ angezeigt. Die Audio Ports sind unter Start → Systemsteuerung (Kleine Schaltflächen anzeigen) →
Gerätemanager → Steuereinheit für Ton, Video und Spiele als „USB Audio“.
Anzeige von LAN, Display und Audio Ports unter Gerätemanager
Falls einige Geräte durch gelbes ! oder ? gezeichnet sind, ist die Docking Station nicht richtig installiert. In
diesem Falle schalten Sie die Docking Station ab, deinstallieren Sie die bestehenden Treiber (Sieh. das
Kapitel „Treiberdeinstallation“) und installieren Sie nochmals die neuesten Treiber, die unter unserer
Internetseite www.i-tec-europe.eu unter „Download“ bei diesem Produkt herunterzuladen sind. Dann
schließen Sie die Docking Station an Notebook / Tablet PC wieder. Falls Sie auf Probleme stoßen, wenden
Sie sich auf unserer technische Abteilung unter: support@itecproduct.com.
TREIBERINSTALLATION UNTER MAC OS X
HINWEIS! Schließen Sie die Docking Station an Ihren Mac nicht an, bis die betreffenden Treiber nicht
installiert sind. Die Treiber sind nur vor erster Verwendung zu installieren. Wir empfehlen das neueste
Betriebssystem macOS zu installieren.
Die Treiber sind unter unserer Internetseite www.i-tec-europe.eu unter „Download“ bei diesem Produkt
herunterzuladen und so werden sie installiert:
Entpacken Sie die Datei auf die Arbeitsfläche Ihres MacBooks als eine virtuelle Festplatte, wählen Sie
„Drivers“ und dann „DisplayLink Software Installer“. Nachfolgend wählen Sie die Installationssprache und
Page 20

gehen sie nach den Anweisungen auf dem Bildschirm vor, bei Bedarf geben Sie das Benutzerpasswort ein.
Der Bildschirm kann während der Installation blinzeln, es geht um Standardprozess. MacBook ist nach der
Installation neuzustarten.
Treiberinstallation unter Mac OS X
HARDWARE INSTALLATION (ANSCHLUSS DER DOCKING STATION AN MACBOOK)
1) Schalten Sie Ihr MacBook ein und schließen Sie den Adapter an Docking Station an.
2) Schließen Sie den Adapter der Docking Station an das Netzwerk AC 110 V / 230 V an und drücken
Sie die ON Taste.
3) Schließen Sie USB-C Kabel an USB-C Port auf der Rückseite der Docking Station an. Für den
Anschluss an USB-A Ihres Notebooks / Tablet-PCs nutzen Sie den USB-C Adapter auf USB-A.
4) Das andere Ende schließen Sie an einen freien USB 3.0 / USB-C Port Ihres MacBooks an.
5) Nachfolgend wird die automatische Installation der Ports gestartet.
6) Starten Sie Ihr MacBook nach der Installation neu.
Die installierten Ports warden unter Mac OS X als „USB-C Triple-4K Dock“ unter „About This Mac“ →
„System Profiler“ → „Hardware“ → „USB“ angezeigt.
Anzeige der Docking Station unter Mac OS
TREIBERINSTALLATION UNTER WEITEREN BETRIEBSSYSTEMEN
Für Android, Chrome OS und Ubuntu benutzen Sie die Treiber vom Hersteller des DisplayLink Chipsatzes.
Sie sind unter unserer Internetseite www.i-tec-europe.eu unter „Download“ bei diesem Produkt oder hier
zu finden: http://www.displaylink.com/downloads.
ANSCHLUSS VON HDMI / DISPLAY PORT DES BILDSCHIRMS
Zum Bildschirmanschluss an Docking Station benutzen Sie HDMI / DP Kabel. Während der Installation eines
zusätzlichen Bildschirms an Notebook / Tablet PC kann der Bildschirm blinzeln, es geht um
Standardprozess. Die Docking Station bietet folgende grafische Schnittstelle an: 2x Display Port und 1x
HDMI (HDMI Port steht nur beim Anschluss der Docking Station an USB-C Port Ihres Notebooks zur
Verfügung). Die Docking Station unterstützt:
Page 21

a) Anschluss von bis zu drei 4K Bildschirmen gleichzeitig (1x HDMI 4K 3840x2160@30Hz und 2x
Display Port 4K Bildschirm 4096x2160@60Hz)
b) Anschluss von einem 5K und einem 4K Bildschirm gleichzeitig (1x HDMI 4K 3840x2160@30Hz und
1x Display Port 5K Bildschirm 5120x2880@60Hz). Um 5K Auflösung zu erreichen, ist es nötig, einen
DP Bildschirm über zwei DP Kabel anzuschließen, die Grafikkarte in Ihrem Computer muss 5K
Auflösung nicht unterstützen.
Bemerkung für macOS und Bildschirme mit DP Kabel:
Einige Displays mit höherer Auflösung als 4K erfordern zwei Display Port Kabel zur Bildübertragung in voller
Auflösung:
27 Zoll 5K Bildschirm Dell UP2715K wird unter iMac (Retina 5K, 27 Zoll, Jahresende von 2014) oder
neuerem und unter Mac Pro (Jahresende von 2013) mit OS X Yosemite 10.10.3 oder neuerem unterstützt.
5K Bildschirm HP Z27q wird unter iMacu (Retina 5K, 27 Zoll, Jahresende von 2014) oder neuerem und
unter Macu Pro (Jahresende von 2013) mit macOS Sierra unterstützt.
VERWENDUNG DER DOCKING STATION UNTER WINDOWS BS
Klicken Sie auf die Schaltfläche Netzverbindungen-DisplayLink, die unter versteckten Schaltflächen auf der
Startleiste zu finden ist:
Hier können Sie dann wählen:
a) DisplayLink Manager
b) Toneinstellungen
c) Fortgeschrittene Konfiguration
Page 22

Wahlen zur Bildschirmbedienung mit angeschlossener Docking Station
Ad a) DisplayLink Manager – nach der Wahl wird die installierte Softwareversion angezeigt.
Installierte Softwareversion
Ad b) Toneinstellung – ermöglicht die Toneinstellung (die Einstellung unter Gerätemanager → Ton). Für
Verwendung wählen Sie 2-Kanal Kopfhörer und Mikrofon mit 3.5 mm Jack. In Tongeräten stellen Sie als
Eingang und Ausgang „USB Audio“ als Ausgangsgerät ein.
Toneinstellung
Es kann dann für die Einstellung von z. B. Skype ausgenutzt werden.
Toneinstellung für Skype
Ad c) Fortgeschrittene Konfiguration – nach dem Klicken wird die Einstellung für Anzeigeauflösung unter
Windows System angezeigt.
Page 23

Anzeigeauflösung unter Windows 10
Es ist möglich Erweitern (Extend) und Spiegeln / Duplizieren (Mirror) einzustellen):
Modus Erweitern (Extend): Wählen Sie auf dem Bildschirm für mehrerer Bildschirme → diese
Abbildung erweitern → OK.
Modus Spiegeln / Duplizieren (Mirror): Wählen Sie auf dem Bildschirm Für mehrere Bildschirme →
diese Abbildung auf 2 und 3 duplizieren → OK.
Durch die Wahl des Feldes „Diesen Bildschirm zum Primärbildschirm einstellen“ wird der zusätzliche
Bildschirm zum Hauptbildschirm eingestellt.
Nach dem Klick auf den zweiten Bildschirm und nach seinem Verschieben können Sie ihn nach Bedarf
gegenüber dem primären Bildschirm von Ihrem Notebook / Tablet-PC platzieren.
Position eines zusätzlichen Bildschirms gegenüber dem ursprünglichen Bildschirm von Notebook / Tablet PC
Standby / Hibernate Betrieb und Video Port – nach der Aktivierung des Notebooks / Tablet-PCs /
Computers aus dem Standby / Hibernate Betrieb wird das bestehende Display (Primärdisplay) angezeigt,
deswegen empfehlen wir, den Notebook- / Tablet-PC- als Primärdisplay zu verwenden, um sich wieder im
System anmelden zu können.
Page 24

Mirror Betrieb – das Zusatzdisplay richtet sich nach den Parametern des Gerätedisplays, d.h. falls Sie den
Mirror Betrieb einstellen und das integrierte Display über die Auflösung von 1280x1024 verfügt, wird der
Bildschirm mit der maximalen Auflösung von 1280x1024 übertragen (auch wenn eine höhere Auflösung
eingestellt wird).
Mit Hilfe der Tastenkombination „Windows“ + P ist es auch möglich, beide Displays einfach zu bedienen
(diese Tastaturabkürzung funktioniert erst ab Windows 7 und höher). Zur Bildschirmbenutzung unter
Windows 7 dienen folgende Vorwahlen: Nur Computer, Duplizieren, Erweitern und Nur Projektor. Unter
Windows 8 / 8.1 kann gewählt werden: Nur PC-Bildschirm, Duplizieren, Erweitern, Nur zweiter Bildschirm.
Bildschirmeinstellungen unter Windows 7
Bildschirmeinstellungen unter Windows 8 / 8.1 und Windows 10
TREIBERDEINSTALLATION
Standardmäßig gehen Sie folgendermaßen vor: Systemsteuerung → Systemsteuerung → Programme und
Funktionen → Abnehmen: DisplayLink Core Software für Videotreiber. Während der Deinstallation
bestätigen Sie die angebotenen Wahlen.
Page 25

Treiberdeinstallation
VERWENDUNG UNTER MAC OS
Nach dem Anschluss von Bildschirm wird das Display auf Ihrem Mac blinken, was ein Standardzustand ist,
und nach der Stabilisierung kann die Standardeinstellung hier vorgenommen werden:
Systemeinstellungen-Bildschirme.
Klicken Sie auf Anordnen und im erweiterten Modus klicken Sie auf den neuen Bildschirm und ziehen ihn
nach Bedarf hin zum Mac Bildschirm. Durch die Wahl „Bildschirme spiegeln“ wird der Modus auf
„Spiegeln“ (die Auflösung der Bildschirme wird automatisch nach ihren Parametern geändert und auf die
möglichst höchste Auflösung auf beiden Bildschirmen eingestellt) eingestellt. Durch Rücknahme der Wahl
„Bildschirme spiegeln“ kehren Sie zum Modus „Erweitern“ zurück.
Page 26

Modus „Erweitern“: Der Pfeil zeigt die mögliche Position des angeschlossenen
Bildschirms zu Mac Bildschirm an.
Modus „Erweitern“: In diesem Modus können Sie den Hauptbildschirm
durch Bewegen der Leiste Menu Bar wählen.
Modus „Spiegeln“: Kann verwendet werden, wenn er von Mac angeboten wird.
Klicken Sie auf „Fenster sammeln“: durch diese Wahl können Sie die Einstellung des entsprechenden
Bildschirms wählen – Auflösung (zeigt verwendbare Auflösungen an), Drehung (Standard, 90°, 180° und
270°) und Wiederholrate (falls angeboten wird). Abhängig von verwendetem Bildschirm gibt es folgende
Einstellungsmöglichkeiten:
Page 27

Abbildung 1
Abbildung 2
Im angepassten Modus klicken Sie auf die von Ihnen gewählte Schaltfläche, unter
dem Bildschirm erscheint die Auflösung (hier zum Beispiel 3008x1692 = 4K@30Hz)
Modus des zugeklappten Bildschirms – Die Arbeit auf angeschlossenem Bildschirm, wenn der Mac
Bildschirm zugeklappt ist, ist nur bei Netzversorgung und angeschlossener Maus und Tastatur möglich.
Mehr Informationen finden Sie hier: https://support.apple.com/de-de/HT201834
Der überwiegende Teil von Problemen mit Displayerneuerung an angeschlossenem Bildschirm nach dem
Standby Betrieb von, nach der Verwendung des Sperrbildschirms, nach dem Neustart von Mac, nach der
Aus- / Einschaltung von Mac kann mit Hilfe von On/Off Schalter oder dadurch gelöst werden, dass das USB
Kabel der Docking Station vom USB Port von Mac abgeschaltet und nach etwa 10 Sek. Wieder
angeschlossen wird. Dann warten Sie bitte, bis alle Peripherien angeschlossen werden.
ANDERE FUNKTIONEN
Anschluss von USB-Geräten – nach dem Anschluss der USB Geräte an USB 3.0 Port der Docking Station
(externe USB HDD, USB Tastatur, USB Maus, USB Hub, USB Grafikadapter) werden diese Geräte
standardmäßig benutzt.
Laden – die Docking Station unterstützt die Aufladung angeschlossener USB-Mobilgeräte, wie zum Beispiel
Smartphones, E-Book-Lesegeräte, Multimediaplayer, Navigationsgeräte und Tablet-PCs. Aufzuladende
Geräte sind mit dem Originalkabel an den USB Port der Docking Station anzuschließen.
Audio
Toneinstellungen, für Hören über Grafikausgang, ist einzustellen / zu überprüfen unter:
Systemeinstellungen-Ton-Ausgang – wählen Sie USB Audio Device.
Page 28

Toneinstellungen für Kopfhörer und Bildschirm können unter Öffnen-Applikationen-Utilities-Einstellung
von Audio MIDI.app gewählt werden – klicken Sie auf „+“ links unten – Gerät mit mehreren Ausgängen
herstellen und wählen Sie unter Gerät mit mehreren Ausgängen die benötigten Ausgänge aus der Liste
aus.
Der überwiegende Teil der Probleme mit Docking Station und den angeschlossenen Peripherien kann mit
Hilfe von On/Off Schalter oder dadurch gelöst werden, dass das USB Kabel der Docking Station vom USB
Port von Notebook / Tablet PC / Mac abgeschaltet und dann nach etwa 10 Sek. wieder angeschlossen wird.
SICHERHEITSHINWEISE
Extremen Temperaturen und Luftfeuchtigkeit nicht ausstellen.
Gerät auf flachen Unterlagen nutzen – so vermeiden Sie Abrutschen und Sturz auf den Boden.
Bewahren Sie das Benutzerhandbuch für spätere Verwendung auf.
In Zusammenarbeit mit der Serviceabteilung:
Überprüfen Sie die Funktionsfähigkeit nach einem Sturz ins Wasser oder auf den Boden.
Überprüfen Sie die Funktionsfähigkeit bei Bruch des Deckels.
Reklamieren Sie das Gerät, wenn es nicht so funktioniert, wie im Benutzerhandbuch beschrieben.
OFT GESTELLTE FRAGEN
Frage: Auf meinem MacBook 13" / 15" 2016 (und neuere Versionen) treten Probleme mit WLAN und
Bluetooth auf, oder es schalten sich die an Docking Station angeschlossene USB 3.0 Geräte ab. Worin
könnte das Problem liegen?
Antwort: Dieses Problem wird durch Interferenz im Bereich von 2.4GHz verursacht. Möglicherweise hilft
der Anschluss der Docking Station an den Thunderbolt 3 (USB-C) Anschluss des Macs auf der linken Seite,
der am nähesten zu Ihnen liegt oder Sie verwenden die Anschlüsse auf der rechten Seite. Weiter ist es
möglich, den Bereich von 5 GHz zu benutzen und die Docking Station am weitesten vom Bildschirm Ihres
Macs anzuschließen. Ausführlichere Informationen finden Sie hier:
https://support.apple.com/en-gb/HT201163
Frage: Unter Windows funktionieren nicht oder hören auf zu arbeiten einige drahtlose Geräte (WLAN
Dongle oder z.B. Microsoft Wireless Set 3000/5000), die an die Docking Station angeschlossen sind. Worin
könnte das Problem liegen?
Antwort: Manchmal kommt es dazu, dass USB 3.0 Ports durch 2.4 GHz Wireless Geräte gestört werden. Ein
drahtloses Gerät sollte sich deshalb nicht in unmittelbarer Nähe von USB 3.0 Ports und Kabel befinden.
Versuchen Sie, das drahtlose Gerät weiter von USB 3.0 Ports und Kabel zu platzieren. Dazu kann z. B. ein
Verlängerungskabel zum Anschluss von WLAN Dongle oder Set verwendet werden.
Frage: Kann ich einen Transmitter zur Signaltransmission von HDMI/Display Port auf VGA/DVI Port
benutzen?
Antwort: Es ist nicht empfehlenswert, Transmitter von Digitalsignal (HDMI/Display Port) auf Analogsignal
(VGA/DVI) aus dem Grunde technologischer Beschränkung von Analogports (ihre niedrige Durchlässigkeit)
zu benutzen, diese Transmitter müssen nicht 100-prozentig funktionieren.
Frage: Gibt es eine Beschränkung für 5K Auflösung für macOS?
Antwort: Einige Displays mit höherer Auflösung als 4K erfordern zwei Display Port Kabel zur Bildübertragung in
voller Auflösung:
27 Zoll 5K Bildschirm Dell UP2715K wird unter iMac (Retina 5K, 27 Zoll, Jahresende von 2014) oder
neuerem und unter Mac Pro (Jahresende von 2013) mit OS X Yosemite 10.10.3 oder neuerem
unterstützt.
5K Bildschirm HP Z27q wird unter iMacu (Retina 5K, 27 Zoll, Jahresende von 2014) oder neuerem und
unter Macu Pro (Jahresende von 2013) mit macOS Sierra unterstützt.
Frage: Nach der Installation von Windows 10 funktioniert das Gerät nicht mehr. Unter Windows 7 / 8 / 8.1
gab es keine Probleme.
Antwort: Installieren Sie bitte die neuesten Treiber. Die Treiber sind unter unserer Internetseite
www.i-tec-europe.eu unter „Download“ bei diesem Produkt herunterzuladen.
Page 29

Frage: Nach der Installation von Mac OS X 10.12x funktioniert das Gerät nicht mehr. Unter vorheriger
Version gab es keine Probleme.
Antwort: Installieren Sie bitte die neuesten Treiber. Die Treiber sind unter unserer Internetseite
www.i-tec-europe.eu unter „Download“ bei diesem Produkt herunterzuladen. Die Docking Station wird ab
der Version DisplayLink 3.1 unterstützt.
Frage: Es gibt Probleme mit der Erkennung der Docking Station unter USB-C / USB 3.0 Port in meinem
Notebook / Tablet PC.
Antwort: Das Problem kann in veralteten Treibern für USB-C / USB 3.0 Port in Ihrem Notebook / Tablet PC
liegen. Installieren Sie bitte die neuesten Treiber für USB-C / USB 3.0 Chipsatz in Ihrem Notebook / Tablet
PC.
Frage: Der LAN Port funktioniert oder arbeitet nur mit Geschwindigkeit 10/100 Mbps.
Antwort: Kontrollieren Sie die ganze Verkabelung zwischen der Docking Station und dem aktiven Element
und drücken Sie die RJ-45 Anschlüsse fest. Es hilft auch, wenn das Ethernet Kabel zwischen der Docking
Station und dem aktiven Netzwerkelement (HUB, Switch, Router) für ein zertifiziertes Kabel ausgetauscht
wird.
Frage: Wo kann ich ausführlichere Informationen über die Probleme mit Docking Station finden?
Antwort: Natürlich, nützliche Informationen sind unter unserer Internetseite www.i-tec-europe.eu unter
„FAQ“ bei diesem Produkt oder unter Internetseite von DisplayLink zu finden:
http://www.displaylink.com/support/knowledgebase.php, gegebenenfalls können Sie sich auf unsere
technische Abteilung unter: support@itecproduct.com wenden.
Bei weiteren Fragen oder Problemen mit der Docking Station wenden Sie sich auf unsere technische
Abteilung: support@itecproduct.com.
Page 30

FRANÇAIS
INTRODUCTION
Nous vous remercions d'avoir acheté la station d'accueil universelle i-tec. Augmentez votre efficacité en
branchant simplement votre station d'accueil sur votre ordinateur portable ou tablette à l’aide d’un seul
câble. Vous pouvez connecter (fonction s'appliquant lors d’une connexion via USB-C, ou Thunderbolt 3,
technologiquement impossible de charger l’ordinateur par la station d’accueil lors d’une connexion via USB
3.0), jusqu'à trois moniteurs avec une résolution 4K ou deux moniteurs (un avec une résolution de 5 K / 4K
et un avec une résolution 4K). Cinq ports USB 3.0 et un port USB-C vous permettent de connecter tous vos
accessoires préférés. Grâce à cette station d'accueil, vous éviterez de devoir constamment connecter et
déconnecter tous les appareils à chaque fois que vous emporterez votre ordinateur portable ou votre
tablette. Un avantage est la possibilité de connecter la station d'accueil à un port USB-A 3.0 ou USB-C de
votre ordinateur portable ou tablette. Les deux options de connexion (câble USB-C vers C, adaptateur USB-
C vers A) sont incluses. L'installation du pilote est automatique dans Win 10, les autres systèmes
d'exploitation nécessitent une installation manuelle simple.
Attention: Le port HDMI ne fonctionne que lorsque la station d'accueil est connectée via USB-C (la station
d'accueil USB 3.0 connecte deux DisplayPorts, il est techniquement impossible d’utiliser le port HDMI).
Veuillez lire attentivement le manuel en entier avant de commencer à travailler avec la station
d'accueil. Un manuel détaillé est disponible sur notre site internet www.i-tec-europe.eu sous
l'onglet "Download" de ce produit. Si vous avez des problèmes, veuillez contacter notre équipe
de support à support@itecproduct.com.
GLOSSAIRE DES TERMES TECHNIQUES
Interface / port / connecteur / entrée / emplacement - endroit où deux périphériques sont physiquement
connectés.
Contrôleur - composant semi-conducteur (chipset) se trouvant dans un ordinateur portable / tablette,
permettant le fonctionnement de l'un des ports.
USB-C / USB Type-C - nouveau connecteur symétrique et standard introduit par USB-IF dans sa spécification
USB 3.1. Windows 10 (Microsoft), Mac OS X (Apple) et Chrome OS et Android (Google) ont introduit un
support natif pour ce connecteur. Permet un chargement plus rapide, l’alimentation, appelé double rôle
(non seulement hôte, mais aussi client), supporte différents modes alternatifs -. Mode Alt (DisplayPort, MHL,
Thunderbolt 3, Power Delivery) et les notifications d'erreurs au travers du panneau d'affichage.
USB 3.1 / 3.0 / 2.0 - standard pour interface / port USB pour la connexion de divers périphériques USB.
Possibilité de connecter différents périphériques USB à l’adaptateur ou la station d’accueil via USB type A. Le
port USB type B est adapté pour la connexion de la station d'accueil ou de l'adaptateur à l'ordinateur
portable / tablette.
Port HDMI / Display - Standard pour interface graphique numérique / le port convient pour la connexion de
moniteurs et autres périphériques d'affichage graphique.
LAN (Local Area Network) - Réseau informatique local, plus couramment dénommé Ethernet et permettant
à la station d'accueil d’atteindre un taux de transfert théorique jusqu'à 1 Gbit / s - marquage GLAN / RJ-45.
Audio - Marquage pour entrée audio (microphone) ou périphérique de sortie (casque / haut-parleurs).
CONTENU DE L'EMBALLAGE
Station d'accueil i-tec USB-C / USB-A 3.0
USB-C 3.1 vers USB-C (100 cm)
Adaptateur USB-C 3.1 vers USB-A
Adaptateur d'alimentation (sortie DC: 20V / 6.75A, câble DC 150 cm)
Quick Start
Page 31

SPÉCIFICATIONS ET DESCRIPTION
Panneau avant:
1. Interrupteur marche / arrêt permettant de mettre en fonction et d’éteindre la station d'accueil
2. 1x LED bleue indiquant que la station d'accueil est en fonction
3. 1x LED verte indiquant que le boîtier du disque dur USB-A ou USB-C est connecté
4. 1x port USB-C 3.1 pour connecter vos périphériques USB-C, conçu uniquement pour le transfert de
données (5 Gbps)
5. 1x port USB-A 3.0 permettant de connecter vos périphériques USB 3.1 / 3.0 / 2.0 existants et le
transfert de données (5 Gbps), supporte la fonction USB Hot Swapping et le chargement rapide
selon norme BC 1.2
6. 1x sortie audio 3,5 mm 5.1
7. 1x entrée micro 3,5 mm
Panneau arrière:
8. Entrée d'alimentation - adaptateur secteur externe (sortie: DC 20V / 6.75A)
9. Port USB-C permettant de connecter la station d'accueil à l’ordinateur portable via l’interface USB-
C ou USB-A (un adaptateur USB-C/F vers USB-A/M pour connexion sur port USB-A est inclus dans
l’emballage ). Lorsque d’une connexion au port USB-C ou Thunderbolt 3 de votre ordinateur
portable, la station d'accueil prend également en charge la fonction Power Delivery - profil 4 (60W
standart, 85W maximum) pour recharger votre ordinateur portable.
10. Port Ethernet GLAN RJ-45 permettant un accès haut débit au réseau et à internet au travers de
l’Ethernet Gigabit, supporte des vitesses de 10 / 100 / 1000 Mbps
11. 1x HDMI (le port HDMI est uniquement disponible lorsque la station d’accueil est connecté au port
USB-C de votre ordinateur portable)
12. 2x Display Port
Résolution:
- 1 moniteur connecté via 2 câbles Display Port: 1x DP + 1x DP permet une résolution 5K jusqu'à
5120x2880@60Hz (il n’est pas obligatoire que la carte graphique de votre ordinateur supporte la résolution
5K), tandis qu'un moniteur connecté via la prise HDMI permet une résolution 4K jusqu'à 3840x2160@30Hz
(le port HDMI n'est disponible que si la station d'accueil est connectée au port USB-C de votre ordinateur
portable)
- 2 moniteurs connectés via Display Port permet une résolution 4K jusqu'à 4096x2160@60Hz et 1 moniteur
connecté via HDMI permet une résolution 4K jusqu'à 3840x2160@30Hz (le port HDMI n'est disponible que
si la station d'accueil est connectée au port USB-C de votre ordinateur portable)
13. 4x port USB-A 3.0 permettant de connecter vos périphériques USB 3.1 / 3.0 / 2.0 existants et le
transfert de données (5 Gbps), et supportant la fonction USB Hot Swapping
Page 32

Composants: DisplayLink DL6950, VIA VL813, Texas Instruments TPS65983
Adaptateur secteur: entrée 100-240V 50/60Hz 1,8A; sortie: 20V/6.75A
Dimensions du produit: 245 x 95 x 30 mm
Poids du produit: 330 g
Note pour macOS et moniteurs avec deux câbles DP:
Certains écrans ayant une résolution supérieure à 4K nécessitent 2 câbles Display Port pour l’affichage
d'images en pleine résolution .
Le moniteur 5K de 27 pouces Dell UP2715K est pris en charge sur iMac (Retina 5K, 27 pouces, fin
2014) ou ultérieur et sur Mac Pro (fin 2013) avec OS X Yosemite 10.10.3 ou version ultérieure.
Le moniteur 5K HP Z27q est pris en charge sur iMac (Retina 5K, 27 pouces, fin 2014) ou ultérieur et
sur Mac Pro (fin 2013) avec MacOS Sierra.
EXIGENCES SYSTÈME
Configuration matérielle requise: Ordinateur portable / tablette avec port USB-A ou USB-C libre
Système d'exploitation: Windows 7/8 / 8.1 / 10 32/64 bits, Mac OS X, Linux Ubuntu 14.04 / 16.04, Android 6
et supérieur. Windows 10 - Installation automatique des pilotes du système d'exploitation. Autres systèmes
d'exploitation - installation manuelle du pilote. Mises à jour automatique du micrologiciel.
Pour un travail courant sur plusieurs moniteurs
Processeur: Intel Core i5 2+GHz / AMD Trinity ou meilleur
Mémoire RAM: 4 Go
Processeur graphique: Intel HD 4000, ATI Radeon HD7xxx, NVIDIA GeForce 5xxM ou meilleur
Port USB 3.0 / USB-C
Pour la lecture vidéo
Processeur: Intel Core i7 2+GHz / AMD Richland A10-575x / AMD Kaveri A10-7400P ou meilleur
Mémoire RAM: 8 Go
Processeur graphique: Intel HD 4000, ATI Radeon HD 8650, NVIDIA GeForce 7xxM ou meilleur
Port USB 3.0 / USB-C
Possibilité pour les ordinateurs portables moins puissants, de gérer la lecture vidéo 4K/5K, mais le résultat
n'est pas idéal (interruptions, coupures vidéo).
INSTALLATION DES PILOTES SOUS WINDOWS 7/8 / 8.1 / 10 (VERSION 32/64 BIT)
AVERTISSEMENT! Ne connectez pas la station d'accueil à votre ordinateur portable / tablette avant
installation des pilotes appropriés. Les pilotes doivent être installés avant la première utilisation. Assurezvous, avant installation, d'avoir le dernier pilote disponible pour votre appareil et un BIOS mis à jour installé
sur votre système.
Pour Windows 7/8 / 8.1, téléchargez les pilotes sur notre site web www.i-tec-europe.eu dans l'onglet
"Download" du produit. Exécutez l'installation à partir du fichier téléchargé, sélectionnez la langue
d'installation et suivez les instructions à l'écran.
Dans Windows 10, la station d'accueil peut être connectée directement, les pilotes s’installeront
automatiquement à partir du système lors de la connexion à internet.
Sous Windows 7/8 / 8.1 / 10, installez les pilotes en tant qu'utilisateur "Administrateur". L'écran peut
scintiller pendant l'installation des pilotes, il s'agit d'un processus normal. Une fois l'installation terminée,
nous vous recommandons de redémarrer le portable / tablette.
Dans un environnement de plusieurs ordinateurs portables équipés de Windows 7, 8, 8.1, il est possible
d’effectuer une installation d'entreprise ponctuelle par un administrateur système. Pour plus d'informations
sur l'installation, lisez les instructions ici: http://www.displaylink.com/downloads/corporate
Page 33

INSTALLATION MATERIELLE (CONNEXION DE LA STATION D’ACCEUIL A L'ORDINATEUR PORTABLE /
TABLETTE)
1) Mettez l'ordinateur portable / tablette sous tension et connectez l'adaptateur secteur à la station
d'accueil.
2) Connectez l'adaptateur d'alimentation de la station d'accueil au réseau AC 110 V / 230 V AC et
appuyez sur le bouton ON.
3) Branchez le câble USB-C dans le port USB-C situé sur le panneau arrière de la station d'accueil.
Utilisez l'adaptateur USB-C sur USB-A pour la connexion au port USB-A de votre ordinateur
portable.
4) Connectez l'autre extrémité au port USB-A 3.0 / USB-C libre de votre ordinateur portable / tablette.
5) Démarrage de l’installation automatique des ports dans chaque système.
6) Redémarrez l'ordinateur portable / tablette lorsque l'installation est terminée.
Sous Windows, le port LAN apparaît dans Démarrer → Panneau de configuration (Afficher les petites
icônes) → Gestionnaire de périphériques → Cartes réseau sous «USB Ethernet». La station d'accueil
apparaît dans Démarrer → Panneau de configuration (Afficher les petites icônes) → Gestionnaire de
périphériques → Cartes graphiques sous «Station USB-C Triple-4K». Pour les ports audio, allez dans
Démarrer → Panneau de configuration (Afficher les petites icônes) → Gestionnaire de périphériques →
Contrôleurs audio, vidéos et jeux sous «Audio USB».
Affichage des ports LAN, d'affichage et audio dans le gestionnaire de périphériques
Si l'un de ces appareils est marqué en jaune! ou ?, cela signifie que la station d'accueil n'est pas
correctement installée. Dans ce cas, déconnectez la station d’accueil, désinstallez les pilotes existants (voir
chapitre "Désinstallation des pilotes"), et réinstallez les derniers pilotes disponibles sur notre site internet
www.i-tec-europe.eu sous l'onglet "Download" du produit. Puis reconnectez la station d'accueil à
l'ordinateur portable / tablette. Si vous avez des problèmes, veuillez contacter notre équipe de support à
support@itecproduct.com.
INSTALLATION DE PILOTES DANS MAC OS X
AVERTISSEMENT! Ne connectez pas la station d'accueil à votre Mac avant d'avoir installé les pilotes
appropriés. Les pilotes doivent être installés avant la première utilisation. Nous vous recommandons d'avoir
installé le dernier système d'exploitation MacOS.
Téléchargez les pilotes de notre site Web www.i-tec-europe.eu sous l'onglet "Download" de ce produit et
lancez l'installation:
Page 34

Décompressez le fichier sur le bureau de votre MacBook en tant que disque virtuel, sélectionnez "Pilotes"
puis "Installateur de logiciels (Software Installer) DisplayLink". Sélectionnez ensuite la langue d'installation
et suivez les instructions à l'écran, entrer le mot de passe utilisateur si nécessaire. L'écran peut clignoter
pendant l'installation des pilotes, il s'agit d'un processus standard. Une fois l'installation terminée,
redémarrez le MacBook.
Installation de pilotes dans Mac OS X
INSTALLATION MATERIELLE (RACCORDEMENT DE LA STATION D'EMBALLAGE MACBOOK)
1) Mettez le MacBook sous tension et connectez l'adaptateur secteur à la station d'accueil.
2) Connectez l'adaptateur d'alimentation de la station d'accueil au réseau AC 110 V / 230 V AC et
appuyez sur le bouton ON.
3) Branchez le câble USB-C dans le port USB-C sur le panneau arrière de la station d'accueil. Utilisez
l'adaptateur USB-C sur USB-A pour la connexion au port USB-A de votre ordinateur portable /
tablette.
4) Branchez l'autre extrémité dans le port USB 3.0 / USB-C libre de votre MacBook.
5) Démarrage de l'installation automatique des ports.
6) Redémarrez votre MacBook une fois l'installation terminée.
Les ports installés s'affichent sous la forme «USB-C Triple-4K Dock» dans «À propos de ce Mac» →
«System Profiler» → «Matériel» → «USB» dans Mac OS X.
Affichage de la station d'accueil dans macOS
INSTALLATION DES CONTRÔLEURS DANS D'AUTRES SYSTÈMES D'EXPLOITATION
Pour Android, Chrome OS et Ubuntu, utilisez les pilotes du fabricant de composants DisplayLink. Vous
pouvez les télécharger sur notre site Web à l'adresse www.i-tec-europe.eu sous l'onglet "Download" pour
ce produit ou ici: http://www.displaylink.com/downloads.
CONNEXION HDMI / MONITEUR DISPLAY PORT
Utilisez le câble HDMI / DP pour connecter le moniteur à la station d'accueil. Pendant l'installation d'un
moniteur supplémentaire, le moniteur d'ordinateur portable / tablette peut clignoter, ce qui est un état
standard. La station d'accueil offre une interface graphique: 2 ports d'affichage et 1 port HDMI (le port
HDMI n'est disponible que lorsque la station d'accueil est connectée au port USB-C de votre ordinateur
portable). La station d’accueil supporte:
Page 35

a) Jusqu'à trois moniteurs 4K peuvent être connectés simultanément (1x HDMI 4K 3840x2160@30Hz
et 2x moniteur Display Port 4K 4096x2160@60Hz)
b) Connectez simultanément un moniteur 5K et un moniteur 4K (1x HDMI 4K 3840x2160@30Hz et 1x
moniteur Display Port 5K 5120x2880@60Hz). Pour obtenir une résolution 5K, vous devez connecter
le moniteur DP avec deux câbles DP (il n’est pas indispensable que la carte graphique de votre
ordinateur prenne en charge la résolution 5K).
Note pour macOS et moniteurs avec deux câbles DP:
Certains écrans ayant une résolution supérieure à 4K nécessitent 2 câbles Display Port pour l’affichage
d'images en pleine résolution .
Le moniteur 5K de 27 pouces Dell UP2715K est pris en charge sur iMac (Retina 5K, 27 pouces, fin
2014) ou ultérieur et sur Mac Pro (fin 2013) avec OS X Yosemite 10.10.3 ou version ultérieure.
Le moniteur 5K HP Z27q est pris en charge sur iMac (Retina 5K, 27 pouces, fin 2014) ou ultérieur et
sur Mac Pro (fin 2013) avec MacOS Sierra.
UTILISATION DE LA STATION D’ACCUEIL SOUS SYSTEME D’EXPLOITATION WINDOWS
Dans les icônes cachées de la barre de démarrage, cliquez sur l'icône de connexion réseau DisplayLink:
Ici vous pouvez choisir:
a) Gestionnaire DisplayLink
b) Paramètres sonores
c) Configuration avancée
Page 36

Options de contrôle du moniteur avec station d'accueil connectée
Ad a) DisplayLink Manager - la version du logiciel est affichée après la sélection.
Version du logiciel installée
Ad b) Paramètres audio - Permet de régler le son (les paramètres sont similaires à ceux du Panneau de
configuration → Son). Pour l'utiliser, sélectionnez un casque à deux canaux et un microphone avec prise
jack 3,5 mm. Dans les appareils audio, réglez "USB Audio" entrée et sortie comme périphérique par défaut.
Paramètres audio
Cela peut être utilisé pour configurer Skype, par exemple.
Nastavení zvuku pro Skype
Ad c) Configuration avancée – après avoir cliqué s’affiche les paramètres de résolution d'affichage
Windows.
Page 37

Résolution d'affichage dans Windows 10
Vous pouvez maintenant exécuter les paramètres Etendre (Extend) et Miroir (Mirror):
Étendre: sur l'écran, sélectionnez sur plusieurs moniteurs → Étendre cette vue → OK.
Miroir: Sur l'écran, sélectionnez sur plusieurs moniteurs → Dupliquer cette vue vers 2 et 3 → OK.
En sélectionnant "Définir ce moniteur comme moniteur principal", vous choisissez le moniteur principal
comme moniteur primaire.
Lorsque vous cliquez sur le second moniteur et le faites glisser, placez-le au besoin sur le moniteur d'origine
de votre ordinateur portable / tablette.
Placez un moniteur supplémentaire sur le moniteur d'ordinateur portable / tablette d'origine
Mode veille / Mise en veille prolongée et port vidéo - après avoir activé l'ordinateur portable / tablette et
être sorti du mode veille / Mise en veille prolongée celui-ci affiche le moniteur primaire (original), il est
recommandé d'utiliser comme le moniteur primaire qui est intégré à l’ordinateur portable / tablette, de
sorte que vous puissiez vous reconnecter au système.
Page 38

Mode miroir - le moniteur supplémentaire est contrôlé par les paramètres du moniteur d'origine
Si vous réglez le mode miroir et que le moniteur primaire a une résolution de 1280x1024, le moniteur
supplémentaire aura également une résolution de 1280x1024, même si vous le réglé avec une résolution
plus élevée.
L’utilisation du clavier "Windows" + P permet également de facilement contrôler les moniteurs (ce
raccourci ne fonctionne que sous Windows 7 et ultérieur). Pour utiliser le moniteur sous Windows 7, il y a
des options: Ordinateur seul, Dupliquer, Etendre, Projecteur seul. Sous Windows 8 / 8.1, vous pouvez
choisir: Ecran d'ordinateur seul, Dupliquer, Etendre, Second écran seul.
Contrôle du moniteur sous Windows 7
Contrôle du moniteur sous Windows 8 / 8.1 et Windows 10
PILOTES DE DÉSINSTALLATION
Par défaut, allez dans Panneau de configuration → Tous les éléments du panneau de configuration →
Programmes et fonctionnalités → Supprimer: Logiciel DisplayLink Core pour pilotes vidéo. Veuillez
confirmer vos choix lors de la désinstallation
Page 39

Désinstallation des pilotes
UTILISATION DE LA STATION D’ACCUEIL AVEC MAC OS
Une fois le moniteur connecté, l'écran de votre Mac clignote, ce qui correspond à un état normal. Après la
configuration, vous pouvez définir les paramètres ici: Préférences Système-Moniteurs:
Sous l'onglet Disposition et en mode par défaut (Étendre), cliquez sur le nouveau moniteur et faites-le
glisser sur le moniteur Mac si nécessaire. Lorsque Moniteurs miroirs est sélectionné, le mode passe à
Miroir (la résolution du moniteur est réglée automatiquement en fonction des paramètres réglés et la
résolution la plus élevée possible sur les deux moniteurs est définie). Désélectionnez Moniteurs miroirs afin
de revenir au mode Etendre.
Page 40

Mode extension: La flèche indique l'apparence qu’a le moniteur connecté par rapport au moniteur Mac.
Mode étendu: Dans ce mode, vous pouvez sélectionner le moniteur principal
en faisant glisser la barre de menus.
Mode miroir: Peut être utilisé uniquement avec Mac
En sélectionnant Rassembler les fenêtres, vous pouvez choisir les paramètres du moniteur approprié Résolution personnalisée (offre les résolutions utilisables), Rotation (Standard, 90 °, 180 ° et 270 °) et Taux
de rafraîchissement (si disponible). Selon le moniteur utilisé, les paramètres sont les suivants:
Page 41

Option d'affichage 1
Option d'affichage 2
En mode personnalisé, cliquez sur l'icône choisie sous l'écran s’affiche la résolution
(ici, visuellement 3008x1692 = 4K@30Hz)
Mode d'affichage fermé - Le travail sur le moniteur externe connecté lorsque le moniteur Mac est en
position capot fermé, n'est possible que lorsque le Mac est sous tension et que la souris et le clavier sont
connectés. Pour plus d'informations, rendez-vous sur https://support.apple.com/fr-fr/HT201834
La plupart des problèmes de restauration de l’affichage sur un moniteur connecté après mise en veille du
Mac, après utilisation d’un économiseur d'écran, peuvent être résolus en utilisant l’interrupteur Marche /
Arrêt ou en déconnectant le câble USB reliant la station d'accueil au port USB de votre Mac puis en le
rebranchant après environ 10s . Veuillez, ensuite, attendre que tous les périphériques soient connectés.
AUTRES FONCTIONS
Connexions de périphériques USB - Lorsque vous connectez un périphérique USB à un port USB 3.0 de la
station d'accueil (disque dur externe avec USB, clavier avec USB, souris avec USB, concentrateur avec USB,
carte graphique avec USB), ces périphériques s’utilisent de manière standard.
Chargement - La station d'accueil supporte la recharge des appareils mobiles USB connectés tels que
smartphones, lecteurs de livres numériques, lecteurs multimédias, navigation et tablettes. Il suffit de
connecter le chargeur avec le câble d'origine au port USB de la station d'accueil.
Page 42

Audio
Les périphériques de sortie audio pour l'écoute via une sortie graphique doivent être configurés / vérifiés
ici: Préférences système-Audio-Sortie-régler dispositif USB Audio.
Les périphériques de sortie audio en même temps que les écouteurs et les moniteurs peuvent être
sélectionnés dans Ouvrir-Applications-Utilitaire-Réglages Audio MIDI.app - Cliquez sur "+" en bas à gauche
- Créer plusieurs périphériques de sortie et sélectionnez plusieurs périphériques de sortie pour les sorties
désirées parmi les choix proposés.
L'essentiel des problèmes rencontrés entre la station d'accueil et les périphériques connectés peut être
résolus en utilisant l'interrupteur Marche / Arrêt ou en déconnectant le câble USB reliant la station d'accueil
au port USB de la tablette / Mac et en le rebranchant après environ 10 secondes.
INSTRUCTIONS DE SECURITE POUR L'UTILISATION DE LA STATION DE RESERVATION
Ne pas exposer à des températures et à une humidité extrêmes.
Utilisez l'appareil sur des surfaces planes afin d’éviter qu'il ne glisse et ne tombe au sol.
Stockez les pilotes et le manuel pour une utilisation ultérieure.
En coopération avec le Service Après Vente:
Vérification de la fonctionnalité après être tombé dans l'eau ou au sol.
Vérifier la fonctionnalité lorsque le couvercle est cassé.
L'équipement ne fonctionne pas conformément au manuel.
QUESTIONS FRÉQUEMMENT POSÉES
Question: Sur mon MacBook 13 "/ 15" 2016 et ultérieur, mon wi-fi ou Bluetooth cesse de fonctionner ou
mes périphériques USB 3.0 connectés à la station d’accueil se déconnectent. Où est le problème?
Réponse: Ce problème est dû à des interférences dans la bande 2,4 GHz. La solution possible est que vous
connectiez la station d'accueil au port Thunderbolt 3 (USB-C) de votre Mac sur le côté gauche le plus proche
de vous ou utilisiez les ports sur la droite. Ces ports sont ceux situés le plus loin de l'antenne wi-fi. Une
autre solution consiste à utiliser la bande 5 GHz et à placer la station d'accueil aussi loin que possible de
votre moniteur Mac. Des informations plus détaillées peuvent être trouvées ici:
https://support.apple.com/fr-fr/HT201163
Question: Sous Windows, certains périphériques sans fil (dongle WLAN ou par exemple Microsoft Wireless
Set 3000/5000) connectés à la station d'accueil ne fonctionnent plus ou se déconnectent de manière
irrégulière. Où est le problème?
Réponse: Parfois, le fonctionnement des ports USB 3.0 sont perturbés par l’utilisation de périphériques
sans fil 2,4 GHz. L'appareil sans fil doit être situé en dehors et à distance de la zone d’utilisation immédiate
des ports et câbles USB 3.0. Essayez donc de déplacer votre périphérique sans fil à distance des ports et des
câbles USB 3.0. Par exemple, vous pouvez utiliser un câble d'extension pour connecter un dongle ou un
ensemble WLAN.
Question: Puis-je utiliser une réduction pour convertir le signal du port HDMI / Display en port VGA / DVI?
Réponse: Nous ne recommandons pas d'utiliser des convertisseurs de signal numérique (HDMI / affichage)
vers analogique (VGA / DVI) en raison des limitations technologiques des ports analogiques (leur faible
débit), ces convertisseurs peuvent ne pas fonctionner à 100%.
Question: Y at-il une limitation pour la résolution 5K pour macOS?
Réponse: Certains affichages avec une résolution supérieure à 4K nécessitent deux câbles Display Port afin
d’obtenir un affichage en pleine résolution:
Le moniteur de 27 pouces UP2715K de Dell est pris en charge sur iMac (Retina 5K, 27 pouces, fin
2014) ou ultérieur et sur Mac Pro (fin 2013) avec OS X Yosemite 10.10.3 ou version ultérieure.
Le moniteur HP Z27q 5K est pris en charge sur iMac (Retina 5K, 27in, fin 2014) ou ultérieur et sur
Mac Pro (fin 2013) avec MacOS Sierra.
Page 43

Question: Après installation de Windows 10, l'appareil a cessé de fonctionner. Il fonctionnait sans
problèmes sous Windows 7/8 / 8.1.
Réponse: Veuillez installer les derniers pilotes. Téléchargez les pilotes sur notre site Web
www.i-tec-europe.eu sur l'onglet "Download" de ce produit.
Question: Après installation de Mac OS X 10.12.x, le périphérique a cessé de fonctionner. Il fonctionnait
sans problèmes sous la version précédente.
Réponse: Veuillez installer les derniers pilotes. Téléchargez les pilotes sur notre site Web
www.i-tec-europe.eu sur l'onglet "Download" de ce produit. La station d'accueil est supportée à partir de la
version DisplayLink 3.1.
Question: J'ai un problème avec la détection de la station d'accueil dans mon port USB-C / USB 3.0 sur mon
ordinateur portable / tablette.
Réponse: Le problème peut provenir de pilotes obsolètes pour le port USB-C / USB 3.0 de votre ordinateur
portable / tablette. Veuillez installer les derniers pilotes pour le chipset USB-C / USB 3.0 dans votre
ordinateur portable / tablette.
Question: Le port LAN ne fonctionne pas ou fonctionne à seulement 10/100 Mbps.
Réponse: Vérifiez tout le câblage entre la station d'accueil et l'élément actif et enfoncez les connecteurs RJ-
45. L’échange du câble Ethernet entre la station d'accueil et l'élément de réseau actif (concentrateur,
commutateur, routeur) peut également aider au diagnostique.
Question: Puis-je obtenir des informations plus détaillées sur les problèmes de station d’accueil ?
Réponse: Bien sûr, vous trouverez les informations utiles sur notre site web www.i-tec-europe.eu dans
l'onglet "FAQ" de ce produit ou sur DisplayLink http://www.displaylink.com/support/knowledgebase.php,
ou contactez notre support technique à support@itecproduct.com.
Si vous avez d'autres questions ou problèmes avec votre station d'accueil, vous pouvez contacter notre
équipe du Service Après-Vente à support@itecproduct.com.
Page 44

ESPAÑOL
INTRODUCCIÓN
Gracias por adquirir el replicador de puertos de i-tec. Aumente su eficiencia simplemente conectando su
replicador de puertos a su computadora portátil o tableta con un solo cable. Tiene acceso a la alimentación
(solo cuando está conectado mediante USB-C o Thunderbolt 3; cuando está conectado a través USB 3.0 no
es posible cargar su portátil), permite hasta tres pantallas externas/monitores con resolución 4K o dos
pantallas (una con resolución 5K/4K y la otra con 4K). Cinco puertos USB 3.0 y un puerto USB-C le permiten
conectar todos sus accesorios favoritos. Gracias a este replicador de puertos, evita la conexión y
desconexión constantes de todos los dispositivos cada vez que lleva su computadora portátil o tableta. Una
ventaja es la posibilidad de conectar el replicador de puertos a un puerto USB-A 3.0 o USB-C en su
computadora portátil o tableta. Ambas opciones de conexión (cable USB-C a C, adaptador USB-C a A) están
incluidas. La instalación del controlador es automática desde Win 10, para otros sistemas operativos
requiere una instalación simple.
Notificación: El puerto HDMI funciona solo cuando el replicador de puertos está conectado a través de
USB-C (la conexión a través USB 3.0 permite dos DisplayPorts, el puerto HDMI no se puede usar en este
caso).
Lea atentamente todo el manual antes de comenzar a trabajar con el replicador de puertos. El
manual detallado está disponible en nuestro sitio web, www.i-tec-europe.eu bajo la pestaña
"Download" de este producto. Si tiene algún problema, póngase en contacto con nuestro
equipo de soporte técnico en: support@itecproduct.com.
GLOSARIO DE TÉRMINOS
Interfaz / puerto / conector / entrada / ranura - Un lugar donde dos dispositivos están físicamente
interconectados.
Unidad de control (UC) – Un componente semiconductor (llamado chipset) en una PC/ tableta, que
proporciona la operación de uno de los puertos.
USB-C / USB Tipo-C – Es el nuevo conector simétrico y estándar que USB-IF introdujo en su especificación
USB 3.1. Windows 10 (Mac), Mac OS X (Apple) y Chrome OS y Android (Google) introdujeron soporte nativo
para este conector. Permite la carga más rápida, Dual Role (no sólo USB host, sino también USB device), el
apoyo a los modos alternativos – Alt Mode (DisplayPort, MHL, Thunderbolt 3, Power Delivery) e informes de
errores a través de dispositivos Billboard.
USB 3.1 / 3.0 / 2.0 Interfaz USB / puerto estándar para conectar diferentes dispositivos USB. Puede conectar
dispositivos USB diferentes al replicador de puertos o al adaptador mediante un puerto USB de tipo A. El
puerto USB de tipo B se utiliza para conectar un replicador de puertos o un adaptador para portátil /
tableta.
Puerto HDMI/Display Estándar Interfaz gráfica / puerto para conectar pantallas y otros dispositivos de
visualización gráfica.
LAN (Red de área local) - la red de área local, ahora la Ethernet más popular, que tiene una tasa de
transferencia teórica de hasta 1 Gbit/s en el replicador de puertos – GLAN / RJ-45
Audio – nombre de la entrada de audio (micrófono) o dispositivo de salida (auriculares / altavoces).
CONTENIDO DEL EMBALAJE
i-tec Replicador de Puertos USB-C / USB-A 3.0
Cable USB-C 3.1 a USB-C (100 cm)
Adaptador USB-C 3.1 a USB-A
Adaptador de corriente (salida DC: 20 V/6.75A, cable DC 150 cm)
Inicio rápido (Quick Start)
Page 45

ESPECIFICACIONES Y DESCRIPCIÓN
Panel frontal:
13. Interruptor de ON/OFF para encender y apagar el replicador de puertos
14. 1x Indicación LED azul, se ilumina cuando el replicador de puertos está encendido
15. 1x Indicación LED verde, se ilumina cuando está conectado HDD case a través de USB-A o USB-C
16. 1x USB-C 3.1 puerto para conectar su dispositivo USB-C y transferencia de datos a alta velocidad
(5 Gbps)
17. 1x USB-A 3.0 puerto para conectar su dispositivo USB 3.1/3.0/2.0 y transferencia de datos a alta
velocidad (5 Gbps), apoyo de tecnología USB Hot Swapping y carga rápida BC 1.2
18. 1x Enchufe mini-jack de 3,5mm Audio out 5.1
19. 1x Enchufe mini-jack de 3,5mm Mic in
Panel trasero:
20. Entrada de alimentación – adaptador de corriente externo (salida: DC 20V/6.75A)
21. USB-C puerto para conectar a un ordenador portátil con interfaz USB-C o USB-A, ambos cables de
conexión incluidos (incluye un adaptador USB-C/Hembra a USB-A/Macho para conexión a puerto
USB-A). Cuando se conecta a un puerto USB-C o Thunderbolt 3 en su portátil, el replicador también
soporta la función de Power Delivery en el perfil 4 (60 W, máximo 85 W) para cargar su portátil.
22. Puerto Ethernet GLAN RJ-45 para redes de alta velocidad y acceso a internet a través de Gigabit
Ethernet, soporta 10/100/1000 Mbps
23. 1x HDMI (El puerto HDMI está disponible solo cuando el replicador de puertos está conectado al
puerto USB-C de su computadora portátil)
24. 2x Display Port
Interfaz gráfica:
- 1 pantalla conectada a través de 2 cables Display Port: 1x DP + 1x DP soporta hasta 5K
5120x2880@60Hz (la tarjeta gráfica de su computadora no debe soportar 5K de resolución) y al mismo
tiempo 1 pantalla externa conectada a través de HDMI con soporte de hasta 4K 3840x2160 a 30Hz (El
puerto HDMI está disponible solo cuando el replicador de puertos está conectado al puerto USB-C de su
computadora portátil)
- 2 pantallas conectadas simultáneamente a través de Display Ports soportan hasta 4K
4096x2160@60Hz y 1 pantalla externa conectada a través HDMI soporta hasta 4K 3840x2160 a 30Hz
(El puerto HDMI está disponible solo cuando el replicador de puertos está conectado al puerto USB-C de
su computadora portátil)
25. 4x USB-A 3.0 puertos para conectar sus dispositivos USB 3.1/3.0/2.0 y transferencia de datos a alta
velocidad (5 Gbps), apoyo de tecnología USB Hot Swapping
Page 46

Chipset: DisplayLink DL6950, VIA VL813, Texas Instruments TPS65983
adaptador de corriente: entrada 100-240V 50/60Hz 1.8A; salida: 20V/6.75A
Dimensiones del producto: 245 x 95 x 30 mm
Peso del producto: 330 g
Notificación para macOS y pantallas externas con dos cables DP:
Algunas pantallas con resolución superior a 4K requieren dos cables de Display Port:
El monitor de 27 pulgadas y 5K de Dell UP2715K es compatible con iMac (Retina 5K, 27 pulgadas,
finales de 2014) o superior y con MacPro (finales de 2013) con OS X Yosemite 10.10.3 o superior.
El monitor HP Z27q 5K es compatible con iMac (Retina 5K, 27in, finales de 2014) o superior y con
MacPro (final de 2013) con MacOS Sierra.
REQUISITOS DEL SISTEMA
Requisitos de hardware: portátil / tableta con puerto USB-A o USB-C libre
Sistema operativo: Windows 7 / 8 / 8.1 / 10 32/64 bit, Mac OS X, Linux Ubuntu 14.04 / 16.04, Android 6 y
superior. Windows 10 - Instalación automática de controladores de OS. Otros sistemas operativos –
instalación manual de controladores. El firmware se actualiza automáticamente.
Para trabajos de rutina en varios monitores
Procesador: Intel Core i5 2+GHz / AMD Trinity o superior
RAM: 4 GB
Procesador gráfico: Intel HD 4000, ATI Radeon HD7xxx, NVIDIA GeForce 5xxM o superior
Puerto USB 3.0/USB-C
Para reproducir video
Procesador: Intel Core i7 2+GHz / AMD Richland A10-575x / AMD Kaveri A10-7400P o superior
RAM: 8 GB
Procesador gráfico: Intel HD 4000, ATI Radeon HD 8650, NVIDIA GeForce 7xxM o superior
Puerto USB 3.0 / USB-C
Para reproducir videos Ultra HD 4K/5K, su computadora / portátil debe ser capaz de decodificar este video
con su procesador gráfico. Especialmente en computadoras portátiles menos potentes, pueden manejar la
reproducción de vídeo 4K/5K, pero el resultado no es ideal (interrupción, desgarramiento de video).
INSTALACIÓN DE CONTROLADORES EN WINDOWS 7 / 8 / 8.1 / 10 (VERSIÓN DE 32/64 BIT)
¡ADVERTENCIA! No conecte el replicador de puertos a su computadora, portátil / tableta hasta que haya
instalado los controladores adecuados. Los controladores sólo se deben instalar antes del primer uso. Antes
de instalar, asegúrese de tener los controladores más recientes para su dispositivo y un BIOS actualizado
instalado en su sistema.
Para Windows 7 / 8 / 8.1, descargue los controladores de nuestro sitio web www.i-tec-europe.eu en la
pestaña "Download" de este producto. Ejecute la instalación desde el archivo descargado, seleccione el
idioma de instalación y siga las instrucciones de la pantalla.
En Windows 10, el replicador de puertos se puede conectar directamente, los controladores se instalan
automáticamente desde el sistema cuando están conectados a Internet.
En Windows 7 / 8 / 8.1 / 10, instale los controladores como un usuario "Administrador". La pantalla puede
parpadear mientras se instalan los controladores, este es un proceso estándar. Una vez finalizada la
instalación, le recomendamos que reinicie la computadora, el portátil / tableta.
En múltiples entornos portátiles equipados con Windows 7, 8, 8.1, es posible que el administrador del
sistema realice una instalación corporativa por única vez. Para obtener más información acerca de cómo
instalar, lea las instrucciones aquí: http://www.displaylink.com/downloads/corporate
Page 47

INSTALACIÓN DEL HARDWARE (CONEXIÓN DEL PORTÁTIL / TABLET)
1) Encienda portátil / tableta o la computadora y conecte el adaptador de corriente al replicador de
puertos
2) Conecte el adaptador de corriente del replicador de puertos a la red AC 110 V / 230 V y presione el
botón ON.
3) Conecte el USB-C a USB 3.0 cable, o USB-C a USB-C cable en el puerto USB-C en el panel trasero del
replicador de puertos
4) Conecte el otro extremo del cable al puerto USB 3.0 / USB-C libre en su computadora portátil /
tableta.
5) Posteriormente, se inicia la instalación automática de los puertos en cada sistema.
6) Reinicie el portátil / tableta cuando la instalación esté completa.
En Windows, el puerto LAN aparece en Inicio → Panel de control (Mostrar iconos pequeños) →
Administrador de dispositivos → Adaptadores de red como "Ethernet USB". El replicador de puertos
aparece en Inicio → Panel de control (Mostrar iconos pequeños) → Administrador de dispositivos →
Adaptadores gráficos como " USB-C Triple-4K Dock ". Los puertos de audio se pueden encontrar en Inicio
→ Panel de control (Mostrar iconos pequeños) → Administrador de dispositivos → Controladores de audio,
vídeo y juegos como "Audio USB".
Ver puertos LAN, de pantalla y de audio en el administrador de dispositivos
Si alguno de estos dispositivos está marcado con amarillo “!” o “?” el replicador de puertos no está
instalada correctamente. En este caso, desconecte la base, desinstale los controladores existentes (consulte
el capítulo "Desinstalación de los controladores") y vuelva a instalar los controladores más recientes
disponibles en nuestro sitio web en www.i-tec-europe.eu bajo la pestaña "Download" de este producto. A
continuación, vuelva a conectar la estación de acoplamiento a la computadora, portátil / tableta. Si tiene
algún problema, póngase en contacto con nuestro equipo de soporte técnico en support@itecproduct.com.
INSTALACIÓN DE DRIVERS EN MAC OS X
¡ADVERTENCIA! No conecte el replicador de puertos a su Mac hasta que instale los controladores
adecuados. Los controladores sólo se deben instalar antes del primer uso. Le recomendamos que tenga
instalado el último sistema operativo de MacOS.
Descargue los controladores desde nuestro sitio web www.i-tec-europe.eu en la pestaña "Download" de
este producto y ejecute la instalación:
Para descomprimir el archivo en el escritorio de MacBook como disco virtual, seleccione "Drivers" y luego
"DisplayLink Software Installer". A continuación, seleccione el idioma de instalación y siga las instrucciones
Page 48

en pantalla para introducir la contraseña de usuario si es necesario. La pantalla puede parpadear mientras
se instalan los controladores, este es un proceso estándar. Una vez finalizada la instalación, reinicie el
MacBook.
Instalar controladores en Mac OS X
INSTALACIÓN DEL HARDWARE (CONECTANDO EL REPLICADOR DE PUERTOS MACBOOK)
1) Encienda el MacBook y conecte el adaptador de alimentación al replicador de puertos
2) Conecte el adaptador de corriente del replicador de puertos a la AC 110 V/230V AC y presione el
botón ON.
3) Conecte el USB-C a USB 3.0 cable o USB-C a USB-C cable en el puerto USB-C en el panel trasero del
replicador de puertos
4) Conecte otro extremo del cable al puerto USB 3.0 / USB-C libre en su MacBook.
5) Posteriormente, se inician las instalaciones automáticas de puertos.
6) Reinicie MacBook después de que la instalación esté completa.
Los puertos instalados se muestran en Mac OS X como " USB-C Triple-4K Dock " en "Acerca de esta Mac"
→ "System Profiler" → "Hardware" → "USB".
Ver el replicador de puertos en macOS
INSTALACIÓN DE CONTROLADORES EN OTROS SISTEMAS OPERATIVOS
Para Android, Chrome OS y Ubuntu, utilice el controlador de chipset DisplayLink. Estos están disponibles
para descargar en nuestro sitio web www.i-tec-europe.eu bajo la pestaña "Download" para este producto o
aquí: http://www.displaylink.com/downloads.
CONEXIÓN DE LA PANTALLA MEDIANTE HDMI / DISPLAY PORT
Utilice un cable HDMI/DP para conectar la pantalla al replicador de puertos. Durante la instalación de una
pantalla adicional, la pantalla de portátil / tableta puede parpadear, que es el estado estándar. El
replicador admite hasta dos monitores. Interfaz gráfica: 2x Display Port y 1x HDMI. (El puerto HDMI está
disponible solo cuando el replicador de puertos está conectado al puerto USB-C de su computadora portátil).
El replicador de puertos soporta:
Page 49

a) Conexión de hasta tres pantallas externas 4K simultáneamente (1x HDMI 4K 3840x2160 @ 30Hz y 2x
Display Port 4K 4096x2160 @ 60Hz)
b) Conexión de una pantalla externa 5K y un monitor 4K simultáneamente (1x HDMI 4K 3840x2160 @ 30Hz
y 1x Display Port 5K 5120x2880 a 60Hz). Para lograr una resolución de 5K, debe conectar la pantalla externa
con dos cables de DP; la tarjeta gráfica en su portátil no necesita soportar resolución de 5K).
Notificación para macOS y pantallas externas con dos cables DP:
Algunas pantallas con resolución superior a 4K requieren dos cables de Display Port:
El monitor de 27 pulgadas y 5K de Dell UP2715K es compatible con iMac (Retina 5K, 27 pulgadas,
finales de 2014) o superior y con MacPro (finales de 2013) con OS X Yosemite 10.10.3 o superior.
El monitor HP Z27q 5K es compatible con iMac (Retina 5K, 27in, finales de 2014) o superior y con
MacPro (final de 2013) con MacOS Sierra.
USO DE LA ESTACIÓN DE DOSIFICACIÓN DE WINDOWS
En los iconos ocultos de la barra de inicio, haga clic en el icono de red - DisplayLink:
Aquí puede elegir:
a) Administrador de DisplayLink
b) Ajustes de sonido
c) Configuración avanzada
Page 50

Opciones para controlar la pantalla con el replicador de puertos conectado
Ad a) Administrador de DisplayLink: la versión del software se muestra después de seleccionar.
Versión de software instalada
Ad b) Ajustes de sonido: le permite ajustar el sonido (el ajuste es similar al Panel de control → Sonido).
Para su uso, seleccione auriculares de 2 canales y un micrófono con jack de 3,5 mm. En dispositivos de
audio, configure "USB Audio" como entrada y salida como el dispositivo predeterminado.
Ajustes de sonido
Esto se puede utilizar para configurar Skype, por ejemplo.
Ajustes de sonido para Skype
Ad c) Configuración avanzada: hace clic para mostrar la configuración de Resolución de pantalla de
Windows.
Page 51

Resolución de la pantalla en Windows 10
Ahora puede realizar los ajustes Extender y Espejo:
Modo Extender: En la pantalla, seleccione varias pantallas → Ampliar esta vista → Aceptar.
Modo Espejo: En la pantalla, seleccione varias pantallas → Duplicar esta pantalla a 2 y 3 → Aceptar.
Al seleccionar el campo "Establecer esta pantalla como principal", selecciona la pantalla adicional como
pantalla principal.
Cuando haga clic en la segunda pantalla, arrástrelo, colóquelo según sea necesario en el monitor original de
su computadora portátil o tableta.
Coloque un monitor adicional en el monitor portátil / tableta original
Modo de suspensión / Hibernación y puerto de vídeo - Cuando se enciende el ordenador portátil / tableta
desde el modo de espera / hibernación, se muestra la pantalla principal (original), por lo que
recomendamos utilizar el principal integrado con el portátil o tableta para poder volver a entrar en el
sistema.
Page 52

Modo espejo - El monitor adicional es controlado por los parámetros del monitor original en el sistema, Si
configura el modo Espejo y su monitor original tiene una resolución de 1280x1024, la pantalla se transfiere
a un monitor adicional con una resolución de hasta 1280x1024, incluso si la ajusta a una resolución más
alta.
Con el teclado "Windows" + P, también puede controlar las pantallas (este acceso directo sólo está
disponible desde Windows 7 o superior). Para utilizar la pantalla en Windows 7, hay opciones: Sólo equipo,
Duplicar, Extender y Sólo proyector. En Windows 8/8.1, puede elegir: Sólo pantalla de PC, Duplicar,
Extender, Sólo segunda pantalla.
Control de pantalla en Windows 7
Control de pantalla en Windows 8/8.1 y Windows 10
DESINSTALACIÓN DE LOS CONTROLADORES
Normalmente vaya a Panel de Control → Programas → Programas y características → Desinstalar:
DisplayLink Core Software para controladores de vídeo. Durante la desinstalación, confirme sus opciones.
Page 53

Desinstalar controladores
USO DEL REPLICADOR DE PUERTOS EN MAC OS
Una vez que la pantalla está conectada, la pantalla de su Mac parpadeará, que es el estado estándar. Una
vez configurado, puede realizar la configuración aquí: Preferencias del Sistema-Pantallas:
En la pestaña Alineación y en Modo predeterminado (Extender), haga clic en el nuevo monitor y arrástrelo
según sea necesario desde la pantalla Mac. Cuando se selecciona Pantallas duplicadas, el modo se cambia
a Espejo (la resolución de la pantalla se ajusta automáticamente según sus parámetros y se establece la
resolución más alta posible en ambas pantallas). Anule la selección Pantallas duplicadas para reanudar el
modo de extensión.
Page 54

Modo Extender: La flecha indica la opción de colocar la pantalla conectada en relación con la pantalla Mac.
Modo Extender: En este modo, puede seleccionar la pantalla principal arrastrando la barra de menú.
Modo Pantallas Duplicadas: Sólo se puede utilizar cuando se ofrece con MacBook.
Seleccionando Reunir Ventanas, puede elegir la configuración de la pantalla - Resolución personalizada
(ofrece resoluciones utilizables), Rotar (Estándar, 90 °, 180 ° y 270 °) y Frecuencia de Actualización (si está
disponible). Dependiendo de la pantalla que esté utilizando, estos ajustes son:
Page 55

Opción de visualización 1
Opción de visualización 2
En el modo Personalizado, haga clic en el icono elegido debajo de la pantalla para describir la resolución
(Aquí 3008x1692 = 4K@30Hz)
Modo de visualización cerrado - El trabajo en el monitor externo conectado cuando el monitor Mac está
inclinado, sólo es posible cuando el Mac está alimentado y el ratón y el teclado están conectados. Para
obtener más información, visite: https://support.apple.com/es-es/HT201834
La mayoría de los problemas con la restauración de la pantalla a la pantalla externa después de suspender
Mac, después de usar un protector de pantalla, después de un reinicio de Mac, después encendido/apagado
se puede resolver mediante con el interruptor de ON/OFF o desconectando el cable USB del replicador de
puertos desde el puerto USB de Mac y reconectándolo durante unos 10s. Espere a que todos los periféricos
se completen.
OTRAS FUNCIONES
Conexión de un dispositivo USB – estos dispositivos se utilizan de la manera estándar cuando el dispositivo
USB está conectado al puerto USB 3.0 del replicador de puertos (HDD externo, USB teclado, USB ratón, USB
Hub, adaptador de gráficos de USB).
Carga – alimentación – replicador de puertos permite carga los dispositivos USB conectados como los
Smartphones, lectores de libros electrónicos, reproductores multimedia, navegación y tabletas. Puede
conectar el cargador por el cable original al puerto USB del replicador de puertos.
Audio
El dispositivo de salida de sonido para escuchar a través de la salida gráfica se hace aquí: Sistema de
preferencias de audio y salida exprés – configurar el dispositivo de audio USB.
Page 56

Dispositivo de salida de sonido para controlar de forma simultánea la pantalla y los auriculares, se puede
seleccionar en el Abrir-Programas-Utilidad-Controlador de MIDI.app – haga clic en "+" en la parte inferior
izquierda - Crear dispositivos de múltiples salidas y seleccione el dispositivo de múltiples salidas
necesarias salidas de las opciones disponibles.
La mayoría de los problemas con el replicador de puertos y los periféricos conectados se pueden resolver
mediante el interruptor ON/OFF o desconectar el cable USB del puerto USB del replicador de puertos del
portátil / tableta / Mac y volver a conectar después de unos 10 segundos.
INSTRUCCIONES DE SEGURIDAD PARA EL USO DEL REPLICADOR DE PUERTOS
No exponga a temperaturas y humedad extremas.
Utilice el dispositivo en arandelas planas para evitar que se resbale y caiga al suelo.
Guarde los controladores y el manual para uso posterior.
En cooperación con el Departamento de Servicios:
Verificar la funcionalidad después de caer en el agua o en el suelo.
Verificar la funcionalidad cuando la cubierta está rota.
Reivindique que el equipo no funcione de acuerdo con el manual.
PREGUNTAS FRECUENTES
Pregunta: En mi MacBook 13 "/15" 2016 y superiores mi wi-fi o Bluetooth deja de funcionar, o desconecto
dispositivos USB 3.0 conectados a replicador de puertos. ¿Dónde está el problema?
Respuesta: Este problema se debe a interferencias en la banda de 2,4 GHz. La solución posible es que
conecte el replicador de puertos al puerto Thunderbolt 3 (USB-C) en el lado izquierdo más cercano o use los
puertos a la derecha. Estos puertos están situados más alejados de la antena wi-fi. Otra solución es utilizar
la banda de 5 GHz y colocar el replicador de puertos lo más lejos posible de su pantalla. Puede encontrar
información más detallada en: https://support.apple.com/es/HT201163
Pregunta: En Windows, algunos dispositivos inalámbricos (WLAN dongle o, por ejemplo, Microsoft Wireless
Set 3000/5000) conectados al replicador de puertos dejan de funcionar o desconectarse de forma irregular.
¿Dónde está el problema?
Respuesta: A veces los puertos USB 3.0 están interfiriendo con dispositivos inalámbricos de 2,4 GHz. Los
dispositivos inalámbricos deben ubicarse fuera de la distancia inmediata de los puertos y cables USB 3.0.
Intente mover el dispositivo inalámbrico lejos de los puertos y cables USB 3.0. Por ejemplo, puede utilizar
un cable de extensión para conectar un set o WLAN dongle.
Pregunta: ¿Puedo usar un adaptador para convertir la señal del puerto HDMI / Display Port a VGA / DVI
puerto?
Respuesta: No recomendamos utilizar los adaptadores/convertidores de señal digital (HDMI / pantalla) a
señal analógico (VGA / DVI) debido a las limitaciones tecnológicas de los puertos analógicos (su bajo
rendimiento), estos convertidores pueden no ser 100% funcionales.
Pregunta: ¿Hay algún límite para la resolución de 5K para macOS?
Respuesta: Algunas pantallas externas con una resolución 4K y más requieren dos cables de Display Port
para transferencia de video en resolución máximo:
El monitor de 27 pulgadas y 5K de Dell UP2715K es compatible con iMac (Retina 5K, 27 pulgadas,
finales de 2014) o superior y con MacPro (finales de 2013) con OS X Yosemite 10.10.3 o superior.
El monitor HP Z27q 5K es compatible con iMac (Retina 5K, 27in, finales de 2014) o superior y con
MacPro (final de 2013) con MacOS Sierra.
Pregunta: Después de instalar Windows 10, el dispositivo dejó de funcionar. Windows 7 / 8 / 8.1 ha
funcionado sin problemas.
Respuesta: Instale los controladores más recientes. Descargue los controladores desde nuestro sitio web
www.i-tec-europe.eu en la pestaña "Download" de este producto.
Pregunta: Después de instalar Mac OS X 10.12.x, el dispositivo dejó de funcionar. La versión anterior
funcionó sin problemas.
Page 57

Respuesta: Instale los controladores más recientes. Descargue los controladores desde nuestro sitio web
www.i-tec-europe.eu en la pestaña "Download" de este producto. El replicador de puertos es compatible
con DisplayLink 3.1.
Pregunta: Tengo un problema con la detección del replicador en el puerto USB-C / USB 3.0 en mi
computadora portátil / tableta.
Respuesta: El problema puede estar en los controladores obsoletos para el puerto USB-C / USB 3.0 en su
computadora portátil / tableta. Instale los controladores más recientes para el chipset USB-C / USB 3.0 en
su computadora portátil / tableta.
Pregunta: El puerto LAN no funciona o funciona a sólo 10/100 Mbps.
Respuesta: Compruebe todos los cables entre el replicador de puertos y el elemento activo y presione los
conectores RJ-45. También ayuda a intercambiar el cable Ethernet entre el replicador y el elemento de red
activo (HUB, Switch, Router) como certificado.
Pregunta: ¿Puedo obtener información más detallada sobre los problemas del replicador de puertos?
Respuesta: Por supuesto, puede encontrar información útil en nuestro sitio web www.i-tec-europe.eu en la
pestaña "FAQ" de este producto o en DisplayLink
http://www.displaylink.com/support/knowledgebase.php, o póngase en contacto con nuestro soporte
técnico en support@itecproduct.com.
En caso que tenga más preguntas o problemas con el replicador de puertos, puede ponerse en contacto con
nuestro equipo de soporte técnico en support@itecproduct.com.
Page 58

ITALIANO
INTRODUZIONE
Vi ringraziamo per aver acquistato questa Stazione dock universale della i-tec che vi permette di aumentare
il rendimento del lavoro collegando i dispositivi preferiti a notebook/tablet tramite un solo cavo USB. In
questo modo avrete la possibilità di alimentare fino a 3 monitor con risoluzione 4K, o eventualmente 2
monitor (uno con risoluzione 5K/4K e uno con risoluzione 4K). Questa caratteristica è pienamente
soddisfatta in caso di collegamento tramite la porta USB-C o la porta Thunderbolt 3, invece in caso di
collegamento tramite la porta USB 3.0 il notebook non può essere ricaricato dalla Stazione dock per motivi
tecnici. Le 5 porte USB 3.0 e 1 porta USB-C permettono di collegare tutti gli altri dispositivi preferiti.
Grazie a questa Stazione dock non occorre più collegare e scollegare in continuazione i rispettivi dispositivi
quando bisogna andare via e portare con sé il notebook o il tablet. Il vantaggio di questa Stazione dock è la
possibilità di collegarla con la porta USB-A 3.0 o la porta USB-C del notebook/tablet. Sono possibili
entrambe le modalità di collegamento siccome il cavo da USB-C a C e l’adattatore da USB-C a A fanno parte
della confezione. L’installazione degli strumenti dal sistema operativo Win 10 è automatica e per gli altri
sistemi operativi basta avviare un’installazione semplificata.
Istruzione: La porta HDMI funziona soltanto in caso di collegamento della Stazione dock tramite la porta
USB-C. La Stazione dock connessa tramite la porta USB 3.0 provvede al funzionamento di 2 porte Display
Port, ma la porta HDMI non può essere usata per motivi tecnici.
Leggere attentamente tutto il Libretto d’uso prima di attivare la Stazione dock. Il Libretto d’uso
è a disposizione anche sulla scheda “Download” del nostro sito web: www.i-tec-europe.eu. Per
qualsiasi problema non esitate a contattare il nostro Centro di assistenza tecnica:
support@itecproduct.com.
TERMINI TECNICI
Interfaccia / porta / connettore / ingresso / slot – punto di collegamento materiale di due dispositivi.
Unità di controllo – componente semiconduttore di notebook/tablet (cd. chipset) che provvede al
funzionamento di porte.
USB-C / USB Type-C – nuovo connettore standard e simmetrico che l’organizzazione USB-IF ha introdotto
nella sua specifica USB 3.1. Windows 10 (Microsoft), Mac OS X (Apple) e Chrome OS; l’Android (Google) ha
annunciato il supporto nativo a questo connettore. Esso permette la ricarica più veloce, l’alimentazione a
doppio ruolo (non soltanto come master ma anche come slave), il supporto di modalità alternative: Alt
Mode (DisplayPort, MHL, Thunderbolt 3, Power Delivery) e la comunicazione di errori tramite il dispositivo
Billboard.
USB 3.1 / 3.0 / 2.0 – standard per l’interfaccia USB / porta per connettere dispositivi USB. Alla Stazione dock
o all’adattatore possono essere collegati diversi dispositivi USB tramite l’interfaccia USB-A. La porta USB-B
serve per collegare la Stazione dock o l’adattatore a notebook/tablet.
HDMI / Display Port – standard per l’interfaccia grafica digitale / porta per collegare monitor o altri
dispositivi di visualizzazione grafica.
LAN (Local Area Network) – rete computeristica locale; oggi la rete più diffusa è la rete Ethernet che
raggiunge la velocità di trasmissione teorica presso la Stazione dock fino a 1 Gbit/s; essa è denominata
come GLAN / RJ-45
Audio – denominazione di un dispositivo audio all’entrata (microfono) o all’uscita (cuffie/altoparlanti).
CONTENUTO CONFEZIONE
i-tec Stazione dock USB-C / USB-A 3.0
Cavo USB-C 3.1 per USB-C (100 cm)
Adattatore da USB-C 3.1 a USB-A
Adattatore di alimentazione (uscita DC: 20V/6.75A, cavo DC 150 cm)
Quick Start
Page 59

DESCRIZIONE E SPECIFICAZIONI TECNICHE
Pannello frontale:
1. Interruttore On/Off per accendere/spegnere la Stazione dock
2. 1 spia LED blu che segnala l’accensione della Stazione dock
3. 1 spia LED verde che segnala il collegamento di un HDD case USB-A o USB-C
4. 1 porta USB-C 3.1 per collegare dispositivi USB-C, indicata soltanto per trasmettere dati (5 Gbps)
5. 1 porta USB-A 3.0 per collegare tutti gli attuali dispositivi USB 3.1/3.0/2.0 e per trasmettere dati
(5 Gbps), la porta supporta la funzione USB Hot Swapping e la ricarica rapida secondo la specifica
BC 1.2
6. 1 porta audio out 3.5 mm 5.1
7. 1 porta audio in 3.5 mm Mic
Pannello posteriore:
8. Ingresso per l’adattatore di alimentazione esterno (uscita: DC 20 V / 6.75 A)
9. 1 porta USB-C per collegare la Stazione dock a un notebook dotato di interfaccia USB-C e USB-A
(l’adattatore da USB-C/F a USB-A/M per la porta USB-A fa parte della confezione). La Stazione dock,
una volta collegata alla porta USB-C o alla porta Thunderbolt 3 del notebook, supporta anche la
funzione Power Delivery, profilo 4, per la ricarica del notebook stesso (60 W standard, mass. 85 W
di mantenimento).
10. Porta Ethernet GLAN RJ-45 per collegare la Stazione dock alla rete e all’internet ad alta velocità
tramite la porta Gigabit Ethernet; supporta le velocità di 10/100/1.000 Mbps
11. 1 porta HDMI (La porta HDMI è disponibile soltanto se la Stazione dock è collegata alla porta USB-C
del notebook.)
12. 2x Display Port
Risoluzione:
- 1 monitor connesso tramite 2 porte Display Port (1 cavo DP + 1 cavo DP) che supportano la
risoluzione fino a 5K 5.120 x 2.880, 60 Hz (la scheda grafica del computer può anche non supportare la
risoluzione 5K), e 1 monitor connesso contemporaneamente tramite la porta HDMI che supporta fino a
4K 3.840 x 2.160, 30 Hz (La porta HDMI è disponibile soltanto se la Stazione dock è collegata alla porta
USB-C del notebook.)
- 2 monitor connessi tramite le porte Display Port che supportano fino a 4K 4.096 x 2.160, 60 Hz e 1
monitor connesso tramite la porta HDMI che supporta fino a 4K 3.840 x 2.160, 30 Hz (La porta HDMI è
disponibile soltanto se la Stazione dock è collegata alla porta USB-C del notebook.)
13. 4 porte USB-A 3.0 per collegare dispositivi USB 3.1/3.0/2.0 e per trasmettere dati ad alta velocità (5
Gbps), supporta la funzione USB Hot Swapping
Chipset: DisplayLink DL6950, VIA VL813, Texas Instruments TPS65983
Page 60

Adattatore di alimentazione: ingresso 100–240 V, 50/60 Hz, 1.8 A; uscita: 20 V / 6.75 A
Dimensioni prodotto: 245 x 95 x 30 mm
Peso prodotto: 330 g
Nota per i sistemi operativi macOS e i monitor connessi con 2 cavi DP:
Alcuni display con risoluzioni superiori a 4K richiedono 2 cavi Display Port per poter trasmettere l’immagine
a piena risoluzione:
i monitor 5K a 27 pollici Dell UP2715K sono supportati dall’iMac (Retina 5K, 27 pollici, fine anno
2014) o da quelli più recenti e dal Mac Pro (fine anno 2013) con OS X Yosemite 10.10.3 o da quelli
più recenti.
i monitor 5K HP Z27q sono supportati dall’iMac (Retina 5K, 27 pollici, fine anno 2014) o da quelli più
recenti e dal Mac Pro (fino anno 2013) con macOS Sierra.
REQUISITI DI SISTEMA
Requisiti hardware: Notebook/tablet con una porta USB-A o USB-C libera
Sistemi operativi: Windows 7/8/8.1/10 32/64 bit, Mac OS X, Linux Ubuntu 14.04/16.04, Android 6 o
superiore. L’installazione automatica degli strumenti dal sistema operativo Windows 10 e l’installazione
manuale degli strumenti dagli altri sistemi operativi. I firmware vengono aggiornati automaticamente.
Per uso abituale con più monitor
Processore: Intel Core i5 2+GHz / AMD Trinity o superiore
Memoria RAM: 4 GB
Processore grafico: Intel HD 4000, ATI Radeon HD7xxx, NVidia GeForce 5xxM o superiore
Porta USB 3.0 / USB-C
Per riprodurre il video
Processore: Intel Core i7 2+GHz / AMD Richland A10-575x / AMD Kaveri A10-7400P o superiore
Memoria RAM: 8 GB
Processore grafico: Intel HD 4000, ATI Radeon HD 8650, NVidia GeForce 7xxM o superiore
Porta USB 3.0 / USB-C
I computer portatili meno potenti possono riprodurre i video 4K/5K ma con risultati non perfetti
(interruzioni, scatti).
INSTALLAZIONE DEGLI STRUMENTI DAL SISTEMA OPERATIVO WINDOWS 7/8/8.1/10 (VERSIONE 32/64
BIT)
AVVERTENZA! Non collegare la Stazione dock al notebook/tablet senza aver installato prima i rispettivi
strumenti. Gli strumenti vengono installati soltanto prima del primo uso. Verificare prima dell’installazione
degli strumenti se il sistema operativo dispone della versione più recente degli strumenti utili per i vostri
dispositivi e se il sistema BIOS è aggiornato.
Scaricare gli strumenti per il sistema operativo Windows 7 / 8 / 8.1 dalla scheda “Download” del nostro sito
web: www.i-tec-europe.eu. Avviare l’installazione dal file scaricato, selezionare la lingua dell’installazione e
seguire le istruzioni visualizzate sullo schermo.
Nell’ambiente Windows 10 la Stazione dock può essere collegata direttamente siccome i rispettivi
strumenti vengono installati automaticamente dal sistema operativo dopo il collegamento all’internet.
Installare gli strumenti nel sistema operativo Windows 7/8/8.1/10 come “Amministratore”. Lo schermo può
lampeggiare nel corso dell’installazione degli strumenti, ma è un fenomeno normale. Finita l’installazione, si
consiglia di riavviare il notebook/tablet.
Con più notebook dotati del sistema operativo Windows 7, 8 o 8.1 è possibile effettuare un’installazione in
unica soluzione. Per ulteriori informazione sull’installazione si vedano le rispettive istruzioni qui:
http://www.displaylink.com/downloads/corporate.
Page 61

INSTALLAZIONE DELL’HARDWARE (COLLEGAMENTO DELLA STAZIONE DOCK AL NOTEBOOK / TABLET)
1) Accendere notebook/tablet e collegare l’adattatore di alimentazione alla Stazione dock.
2) Collegare l’adattatore di alimentazione della Stazione dock alla rete elettrica AC 110 V / 230 V e
premere l’interruttore ON.
3) Inserire il cavo USB-C nella porta USB-C posizionata sul pannello posteriore della Stazione dock. Per
effettuare il collegamento tramite la porta USB-A del notebook/tablet usare l’adattatore da USB-C a
USB-A.
4) Inserire l’altra estremità del cavo nella porta USB 3.0 / USB-C del notebook/tablet.
5) Dopodiché viene avviata l’installazione automatica delle porte dai singoli sistemi operativi.
6) Finita l’installazione, riavviare il notebook/tablet.
La porta LAN viene visualizzata nel sistema Windows nel seguente modo: Start → Pannello di controllo
(Icone piccole) → Amministratore del sistema → Adattatori di rete “USB Ethernet”. La Stazione dock viene
visualizza nel sistema Windows nel seguente modo: Start → Pannello di controllo (Icone piccole) →
Amministratore del sistema → Adattatori grafici “USB-C Triple-4K Dock”. Le porte audio si trovano qui:
Start → Pannello di controllo (Icone piccole) → Amministratore del sistema → Controller audio, video e
giochi “USB Audio”.
Visualizzazione del LAN, delle porte display e dell’audio nella finestra Amministratore del sistema
Qualora uno dei dispositivi venga contrassegnato con un ! o ? giallo, la Stazione dock non è installata
correttamente. In tal caso scollegarla, disinstallare gli attuali strumenti (si veda il capitolo “Disinstallare gli
strumenti”) e installare di nuovo gli strumenti più recenti che possono essere scaricati dalla scheda
“Download” sul nostro sito web: www.i-tec-europe.eu. Dopodiché ricollegare la Stazione dock
al notebook/tablet. In caso di problemi persistenti non esitare a contattare il nostro centro di assistenza
tecnica: support@itecproduct.com.
INSTALLAZIONE DEGLI STRUMENTI DAL SISTEMA OPERATIVO MAC OS X
AVVERTENZA! Non collegare la Stazione dock al Mac senza aver installato prima i rispettivi strumenti. Gli
strumenti vengono installati soltanto prima del primo uso. Verificare prima dell’installazione degli strumenti
se il Mac dispone del sistema operativo più recente.
Scaricare gli strumenti dalla scheda “Download” del nostro sito web: www.i-tec-europe.eu.
Aprire il file sullo schermo del MacBook come un disco virtuale e scegliere “Drivers“ e poi “DisplayLink
Software Installer”. Dopodiché selezionare la lingua dell’installazione, seguire le istruzioni visualizzate sullo
schermo e digitare il password dell’utente, se occorre. Nel corso dell’installazione degli strumenti lo
schermo può lampeggiare ma è un fenomeno normale. Finita l’installazione, riavviare il MacBook.
Page 62

Installazione degli strumenti dal sistema operativo Mac OS X
INSTALLAZIONE DELL’HARDWARE (COLLEGAMENTO DELLA STAZIONE DOCK AL MACBOOK)
1) Accendere il MacBook e collegare l’adattatore di alimentazione alla Stazione dock.
2) Collegare l’adattatore di alimentazione della Stazione dock alla rete elettrica AC 110 V / 230 V e
premere l’interruttore ON.
3) Inserire il cavo USB-C nella porta USB-C posizionata sul pannello posteriore della Stazione dock. Per
effettuare il collegamento tramite la porta USB-A del notebook/tablet usare l’adattatore da USB-C a
USB-A.
4) Inserire l’altra estremità nella porta USB 3.0 / USB-C del MacBook.
5) Dopodiché viene avviata l’installazione automatica delle porte.
6) Finita l’installazione, riavviare il MacBook.
Le porte installate vengono visualizzate nel sistema operativo Mac OS X come segue: “USB-C Triple-4K
Dock” in “About This Mac” → “System Profiler” → “Hardware” → “USB”.
Visualizzazione della Stazione dock nel sistema Mac
INSTALLAZIONE DEGLI STRUMENTI DAGLI ALTRI SISTEMI OPERATIVI
Per i sistemi operativi Android, Chrome OS o Ubuntu usare gli strumenti del rispettivo produttore del
chipset DisplayLink. Essi possono essere scaricati dalla scheda “Download” sul nostro sito web www.i-teceurope.eu o dalle seguenti pagine web: http://www.displaylink.com/downloads.
COLLEGAMENTO DEL MONITOR TRAMITE LA PORTA HDMI / DISPLAY PORT
Per collegare il monitor alla Stazione dock usare il cavo HDMI / DP. Nel corso dell’installazione del monitor
secondario del notebook/tablet lo schermo può lampeggiare ma è un fenomeno normale. La Stazione dock
offre la seguente interfaccia grafica: 2 porte Display Port e 1 porta HDMI (La porta HDMI è disponibile
soltanto se la Stazione dock è collegata alla porta USB-C del notebook.). La Stazione dock supporta:
Page 63

a) la connessione contemporanea fino a tre monitor 4K (1 porta HDMI 4K 3.840 x 2.160, 30 Hz e 2 porte
Display Port 4K 4.096 x 2.160, 60 Hz)
b) la connessione contemporanea di un monitor 5K e di un monitor 4K (1 porta HDMI 4K 3.840 x
2.160, 30 Hz e 1 porta Display Port 5K 5.120 x 2.880, 60 Hz). Per ottenere la risoluzione 5K occorre
collegare il monitor DP con due cavi DP; la scheda grafica del computer può non supportare la
risoluzione 5K.
Nota per i sistemi operativi macOS e i monitor connessi con 2 cavi DP:
Alcuni display con risoluzioni superiori a 4K richiedono 2 cavi Display Port per poter trasmettere l’immagine
a piena risoluzione:
i monitor 5K a 27 pollici Dell UP2715K sono supportati dall’iMac (Retina 5K, 27 pollici, fine anno
2014) o da quelli più recenti e dal Mac Pro (fine anno 2013) con OS X Yosemite 10.10.3 o da quelli
più recenti.
i monitor 5K HP Z27q sono supportati dall’iMac (Retina 5K, 27 pollici, fine anno 2014) o da quelli più
recenti e dal Mac Pro (fino anno 2013) con macOS Sierra.
USO DELLA STAZIONE DOCK NEL SISTEMA OPERATIVO WINDOWS
Cliccare sull’icona Collegamento di rete ubicata tra le icone nascoste della barra delle applicazioni:
A questo punto potete scegliere:
a) DisplayLink Manager
b) Impostazione audio
c) Configurazione avanzata
Page 64

Funzioni optional per comandare il monitor con la Stazione dock connessa
a) DisplayLink Manager – scelta questa funzione, viene visualizzata la versione del software.
Versione software installata
b) Impostazione audio – permette di impostare l’audio (l’impostazione è simile all’impostazione dell’audio
tramite il Pannello di controllo → Audio). Scegliere la cuffia a 2 canali e il microfono con il connettore
jack di 3.5 mm. Impostare l’ingresso e l’uscita del “DisplayLink Audio” come dispositivo predefinito tra i
dispositivi audio.
Impostazione audio
Questa modalità può essere utilizzata ad es. in Skype.
Impostazione audio in Skype
c) Configurazione avanzata – cliccando su questa funzione optional, viene visualizzata l’impostazioni della
Risoluzione dell’immagine nel sistema Windows.
Page 65

Risoluzione dell’immagine nel SO Windows 10
A questo punto si può procedere all’impostazione della modalità: Immagine estesa / Immagine speculare /
Immagine duplicata:
Modalità Immagine estesa: selezionare la variante Più monitor → Estendere l’immagine → OK.
Modalità Immagine speculare / Immagine duplicata: selezionare la variante Più monitor → Duplicare
immagine a 2 e a 3 → OK.
Barrando la variante “Impostare questo monitor come monitor principale”, il monitor collegato assume la
funzione del monitor principale.
L’altro monitor può essere posizionato rispetto al monitor originario del notebook/tablet cliccando sullo
stesso e trascinandolo a seconda del bisogno.
Posizionamento del monitor secondario rispetto al monitor primario del notebook/tablet
Page 66

Modalità Standby / Hibernate e Video port – dopo l’attivazione del notebook/tablet nella
modalità Standby/Hibernate viene visualizzato il monitor primario (originario) perciò si consiglia di utilizzare
lo schermo integrato nel notebook/tablet come monitor primario per poter rifare il log-in al sistema.
Modalità Immagine speculare – il monitor secondario segue i parametri del monitor primario, quindi, se
viene impostata la modalità Immagine speculare e il monitor primario ha la risoluzione 1.280 x 1.024,
l’immagine trasmessa al monitor secondario avrà la risoluzione massima di 1.280 x 1.024, anche è stato
impostato a una risoluzione superiore.
I monitor possono essere comandati semplicemente agendo sul tasto “Windows + P” (questa
combinazione di tasti funziona a partire dal SO Windows 7 e superiore). Nel sistema operativo Windows 7
esistono le seguenti varianti optional per usare il monitor: Solo desktop 1, Duplicare, Estendere, Solo
desktop 2. Nel sistema operativo Windows 8/8.1 esistono le seguenti varianti optional per usare il monitor:
Solo computer, Duplica, Estendi, Solo proiettore.
Impostazione del monitor nel sistema Windows 7
Impostazione del monitor nei SO Windows 8/8.1 e Windows 10
DISINSTALLAZIONE DEGLI STRUMENTI
Procedere in modo standard tramite il Pannello di controllo → Mostra tutto → Programmi e funzionalità →
Disinstallare: DisplayLink Core Software per gli strumenti video. Confermare ogni scelta nel corso della
disinstallazione.
Page 67

Disinstallazione degli strumenti
USO DELLA STAZIONE DOCK NEL SISTEMA OPERATIVO MAC OS
Collegato il monitor, lo schermo lampeggia ma è un fenomeno normale. Quando il lampeggio finisce,
l’impostazione può essere effettuata qui: Preferenze di sistema Monitor:
Aprendo la scheda Disposizione nella modalità default (Estendere), cliccare sul nuovo monitor e trascinarlo
rispetto al monitor Mac a seconda del bisogno. Se viene scelta la modalità Immagine speculare, la modalità
cambia a quella Speculare e la risoluzione dei monitor si adegua automaticamente secondo i loro parametri
impostando la risoluzione più alta possibile su entrambi i monitor. Eliminando la modalità Immagine
speculare, si ripristina la modalità Estendere.
Page 68

Modalità Estendere: La freccia indica la posizione possibile
del monitor collegato rispetto al monitor Mac.
Modalità Estendere: In questa modalità il Monitor principale può essere scelto
trascinando la barra Menu Bar.
Modalità Immagine speculare: Può essere usata solo se è a disposizione nel sistema Mac.
Per impostare il rispettivo monitor scegliere la modalità Raggruppa le finestre – Risoluzione (visualizza le
risoluzioni disponibili), Rotazione (Standard, 90°, 180° e 270°) e Frequenza di aggiornamento (se
disponibile). Vengono offerte le seguenti varianti a seconda del monitor usato:
Page 69

Variante della visualizzazione n. 1
Variante della visualizzazione n. 2
Cliccare sull’icona della Modalità selezionata.
In basso appare la rispettiva risoluzione (in questo caso 3.008 x 1.692 = 4K, 30 Hz)
Modalità display chiuso – questa funzione permette di usare il monitor esterno connesso quando lo
scherma Mac è chiuso; il Mac deve essere alimentato e il mouse e la tastiera devono essere connessi. Per
ulteriori informazioni cliccare qui: https://support.apple.com/it-it/HT201834.
La maggioranza dei problemi connessi all’attivazione del monitor connesso dopo la sospensione del Mac,
dopo aver usato lo screensaver, dopo aver riavviato il Mac o dopo il suo spegnimento e riaccensione, può
essere risolta agendo sull’interruttore On/Off oppure scollegando il cavo USB della Stazione dock dalla porta
USB Mac e ricollegandolo dopo ca. 10 secondi. Si consiglia di attendere alla fine del procedimento di
collegamento di tutti i dispositivi periferici.
ALTRE FUNZIONI
Collegamento del dispositivo USB – i dispositivi USB collegati alla porta USB 3.0 della Stazione dock (HDD
esterno USB, tastiera USB, mouse USB, Hub USB, adattatore grafico USB) vengano usati abitualmente.
Ricarica – la Stazione dock supporta la ricarica dei dispositivi mobili collegati e dotati di una porta USB tipo
smartphone, lettori di e-book, lettori multimediali, navigatori o tablet. E’ sufficiente collegare il dispositivo
da ricaricare alla porta USB della Stazione dock tramite il cavo originale.
Audio
Il dispositivo audio collegato tramite l’uscita grafica deve essere impostato e controllato qui: Selezioni di
sistema-Audio-Uscita – impostare USB Audio Device.
Page 70

L’audio nelle cuffie e nel monitor può essere impostato come segue: Aprire-Applicazioni-UtilitàImpostazione audio MIDI.app – cliccare su “+” in basso a sinistra – Creare dispositivo con più uscite e
scegliere le uscite richieste da quelle offerte sul Dispositivo con più uscite.
Nota: La maggioranza dei problemi connessi alla Stazione dock e al collegamento dei dispositivi periferici
può essere risolta agendo sull’interruttore On/Off oppure scollegando il cavo USB della Stazione dock dalla
porta USB del notebook/tablet/Mac e ricollegandolo dopo ca. 10 secondi.
ISTRUZIONI DI SICUREZZA PER L’USO DELLA STAZIONE DOCK
Evitare i valori estremi della temperatura e dell’umidità.
Usare il dispositivo su un supporto orizzontale per evitare la caduta per terra a causa del suo
scivolamento.
Conservare gli strumenti e anche il Libretto d’uso.
In collaborazione con il Centro di assistenza tecnica
controllare il funzionamento del dispositivo dopo la sua caduta per terra o nell’acqua
verificare il funzionamento del dispositivo in caso di rottura dell’involucro
sporgere il reclamo se il dispositivo non funziona secondo il Libretto d’uso.
DOMANDE FREQUENTI
Domanda: Il collegamento Wi-Fi o Bluetooth non funziona più con il MacBook 13” / 15” 2016 o superiore, o
eventualmente s’interrompe il collegamento dei dispositivi USB 3.0. Di quale problema si tratta?
Risposta: Questo problema è causato dall’interferenza nella banda 2.4 GHz. Si può provare a collegare la
Stazione dock alla porta Thunderbolt 3 (USB-C) del Mac posizionata a sinistra il più anteriormente possibile
oppure a usare le porte sul lato destro. Queste porte si trovano il più lontano possibile dall’antenna Wi-Fi.
Oppure si può provare a usare la banda 5 GHz e collocare la Stazione dock il più lontano possibile dal
monitor Mac. Per ulteriori informazioni cliccare qui: https://support.apple.com/it-it/HT201163
Domanda: Alcuni dispositivi senza filo (WLAN dongle o Microsoft Wireless set 3000/5000) collegati alla
Stazione dock non funzionano più nell’ambiente Windows o si scollegano ogni tanto. Di quale problema si
tratta?
Risposta: A volte succede che le porte USB 3.0 interferiscono con i dispositivi senza filo 2.4 GHz. Il
dispositivo senza filo dovrebbe essere posizionato lontano dalle porte e dai cavi USB 3.0. Quindi, provare a
spostare il dispositivo senza filo più lontano possibile dalle porte e dai cavi USB 3.0. Per questa soluzione
usare una prolunga per collegare il dongle o il set WLAN.
Domanda: Posso usare l’adattatore dalla porta HDMI/Display Port alla porta VGA/DVI per convertire il
segnale?
Risposta: Si sconsiglia di usare i convertitori dal segnale digitale (HDMI/Display Port) a quello analogico
(VGA/DVI) a causa delle limitazioni tecnologiche delle porte analogiche, in particolare del loro passaggio
limitato; questi convertitori possono non funzionare al 100%.
Domanda: Esistono limitazioni per la risoluzione 5K nei sistemi operativi macOS?
Risposta: Alcuni display con risoluzioni superiori a 4 K richiedono per la trasmissione dell’immagine in piena
risoluzione due cavi Display Port:
i monitor 5K a 27 pollici Dell UP2715K sono supportati dall’iMac (Retina 5K, 27 pollici, fine anno
2014) o da quelli più recenti e dal Mac Pro (fine anno 2013) con OS X Yosemite 10.10.3 o da quelli
più recenti.
i monitor 5K HP Z27q sono supportati dall’iMac (Retina 5K, 27 pollici, fine anno 2014) o da quelli più
recenti e dal Mac Pro (fino anno 2013) con macOS Sierra.
Domanda: Dopo aver installato il Windows 10 il dispositivo non funziona più, ma con il sistema operativo
Windows 7/8/8.1 funzionava senza problemi.
Risposta: Installare gli strumenti più recenti. Per scaricarli consultare la scheda “Download” sul nostro sito
web: www.i-tec-europe.eu.
Domanda: Dopo l’installazione del sistema operativo Mac OS X 10.12.x il dispositivo non funziona più, ma
Page 71

con la versione precedente funzionava senza problemi.
Risposta: Installare gli strumenti più recenti. Per scaricarli consultare la scheda “Download” sul nostro sito
web: www.i-tec-europe.eu. La stazione dock è supportata a partire dalla versione DisplayLink 3.1.
Domanda: Il rilevamento della Stazione dock nella porta USB-C / USB 3.0 del notebook/tablet è
problematico.
Risposta: Questa situazione può essere causata dagli obsoleti strumenti della porta USB-C / USB 3.0 del
notebook/tablet. Installare gli strumenti più recenti per il chipset USB-C / USB 3.0 del notebook/tablet.
Domanda: La porta LAN non funziona, o funziona soltanto a velocità di 10/100 Mbps.
Risposta: Controllare tutti i cavi tra la Stazione dock e il dispositivo attivo e inserire i connettori RJ-45 fino in
fondo. Il problema può essere risolto anche sostituendo il cavo Ethernet tra la Stazione dock e il dispositivo
di rete attivo (HUB, switch, router) con quello certificato.
Domanda: Posso ricevere ulteriori informazioni sui problemi con la Stazione dock?
Risposta: Certo, per ulteriori informazioni consultare la scheda “FAQ” sul nostro sito web:
www.i-tec-europe.eu o le pagine web della DisplayLink:
http://www.displaylink.com/support/knowledgebase.php, eventualmente contattare il nostro centro di
assistenza tecnica: support@itecproduct.com.
Per ogni informazione o problema con la Stazione dock non esitate a rivolgervi al nostro centro di assistenza
tecnica: support@itecproduct.com.
Page 72

ČESKY
ÚVOD
Děkujeme za zakoupení univerzální dokovací stanice i-tec. Zvyšte svou efektivitu jednoduchým připojením
dokovací stanice k vašemu notebooku nebo tabletu za pomocí jediného kabelu. Získáte přístup k napájení
(platí při zapojení prostřednictvím USB-C, nebo Thunderbolt 3; při připojení prostřednictvím USB 3.0 není
technologicky možné notebook dokovací stanicí nabíjet), až třem monitorům v rozlišení 4K, případně dvěma
monitorům (jeden s rozlišením 5K/4K a jeden s rozlišením 4K). Pět USB 3.0 portů a jeden USB-C port vám
umožní připojit veškeré vaše oblíbené příslušenství. Díky této dokovací stanici se vyhnete neustálému
připojování a odpojování všech zařízení pokaždé, když si berete váš notebook nebo tablet s sebou. Výhodou
je možnost připojení dokovací stanice do USB-A 3.0 nebo USB-C portu vašeho notebooku nebo tabletu. Obě
možnosti propojení (kabel USB-C na C, adaptér USB-C na A) jsou součástí balení. Instalace ovladačů je
automatická ze systému Win 10, pro ostatní operační systémy je zapotřebí jednoduchá instalace.
Upozornění: HDMI port funguje pouze v případě připojení dokovací stanice prostřednictvím USB-C
(konektivita dokovací stanice přes USB 3.0 zajistí chod dvou DisplayPortů, HDMI port není možné
technologicky využít).
Prosíme o pečlivé přečtení celého manuálu před zahájením práce s dokovací stanicí. Podrobný
manuál je k dispozici na našem webu www.i-tec.cz v záložce „Download“ u tohoto produktu.
V případě problémů se můžete obrátit na naši technickou podporu: support@itecproduct.com.
SLOVNÍK POJMŮ
Rozhraní / port / konektor / vstup / slot – místo, kde se fyzicky propojují dvě zařízení.
Řadič – polovodičová součástka (tzv. chipset) v notebooku / tabletu, zajišťující činnost některého z portů.
USB-C / USB Type-C – je nový symetrický konektor a standard, který uvedla USB-IF ve své specifikaci USB
3.1. Windows 10 (Microsoft), Mac OS X (Apple) a Chrome OS a Android (Google) představil nativní podporu
tohoto konektoru. Umožňuje rychlejší nabíjení, napájení, tzv. dvojroli (nejen hostitel, ale i host), podporu tzv.
alternativních režimů - Alt Mode (DisplayPort, MHL, Thunderbolt 3, Power Delivery) a oznamování chyb přes
Billboard zařízení.
USB 3.1 / 3.0 / 2.0 – standard pro USB rozhraní / port pro připojení různých USB zařízení. K dokovací stanici
nebo adaptéru lze připojovat různá USB zařízení pomocí USB rozhraní typu A. Port USB typu B slouží pro
připojení dokovací stanice nebo adaptéru k notebooku / tabletu.
HDMI / Display Port – standard pro digitální grafické rozhraní / port sloužící k připojení monitorů a jiných
grafických zobrazovacích zařízení.
LAN (Local Area Network) – místní počítačová síť, nyní je nejrozšířenější tzv. Ethernet, který u dokovací
stanice dosahuje teoretické přenosové rychlosti až 1 Gbit/s – označení GLAN / RJ-45.
Audio – označení pro zvukové vstupní (mikrofon) nebo výstupní zařízení (sluchátka/reproduktory).
OBSAH BALENÍ
i-tec USB-C / USB-A 3.0 dokovací stanice
Kabel USB-C 3.1 na USB-C (100 cm)
Adaptér USB-C 3.1 na USB-A
Napájecí adaptér (výstup DC: 20V/6.75A, DC kabel 150 cm)
Quick Start
Page 73

SPECIFIKACE A POPIS
Přední panel:
1) Přepínač On/Off pro zapnutí a vypnutí dokovací stanice
2) 1x modrá LED svítí po zapnutí dokovací stanice
3) 1x zelená LED svítí po připojení USB-A nebo USB-C HDD case
4) 1x USB-C 3.1 port pro připojení vašich USB-C zařízení, je určen pouze pro přenos dat (5 Gbps)
5) 1x USB-A 3.0 port pro připojení vašich stávajících USB 3.1/3.0/2.0 zařízení a přenos dat (5 Gbps),
podpora funkce USB Hot Swapping a rychlého nabíjení dle BC 1.2
6) 1x 3.5 mm Audio out 5.1
7) 1x 3.5 mm Mic in
Zadní panel:
8) Vstup pro napájení – externí napájecí adaptér (výstup: DC 20V/6.75A)
9) USB-C port pro připojení dokovací stanice k notebooku s USB-C nebo USB-A rozhraním
(součástí balení je adaptér USB-C/F na USB-A/M pro připojení do USB-A portu). Při připojení k USB-
C nebo Thunderbolt 3 portu vašeho notebooku podporuje dokovací stanice také funkci Power
Delivery v profilu 4 (standardně 60W, max. 85W udržovací) pro nabíjení vašeho notebooku.
10) Ethernet GLAN RJ-45 port pro vysokorychlostní přístup k síti a internetu přes Gigabit Ethernet,
podporuje rychlosti 10 / 100 / 1000 Mbps
11) 1x HDMI (HDMI port je k dispozici pouze v případě připojení dokovací stanice do USB-C portu vašeho
notebooku)
12) 2x Display Port
Rozlišení:
- 1 monitor připojený přes 2 Display Port kabely: 1x DP + 1x DP podporuje až 5K 5120x2880@60Hz
(grafická karta ve vašem počítači nemusí podporovat 5K rozlišení), a zároveň 1 monitor připojený přes
HDMI s podporou až 1x 4K 3840x2160@30Hz (HDMI port je k dispozici pouze v případě připojení
dokovací stanice do USB-C portu vašeho notebooku)
- 2 monitory připojené prostřednictvím Display Portů podporují až 4K 4096x2160@60Hz a 1 monitor
připojený přes HDMI s podporou až 4K 3840x2160@30Hz (HDMI port je k dispozici pouze v případě
připojení dokovací stanice do USB-C portu vašeho notebooku)
13) 4x USB-A 3.0 port pro připojení vašich stávajících USB 3.1/3.0/2.0 zařízení a přenos dat (5 Gbps),
podpora funkce USB Hot Swapping
Chipset: DisplayLink DL6950, VIA VL813, Texas Instruments TPS65983
Napájecí adaptér: vstup 100-240V 50/60Hz 1.8A; výstup: 20V/6.75A
Rozměry produktu: 245 x 95 x 30 mm
Hmotnost produktu: 330 g
Page 74

Poznámka pro macOS a monitory se dvěma DP kabely:
Některé displeje s rozlišeními vyššími než 4K vyžadují k přenosu obrazu v plném rozlišení dva kabely Display Port:
27palcový 5K monitor Dell UP2715K je podporován na iMacu (Retina 5K, 27palcový, konec roku 2014)
nebo novějším a na Macu Pro (konec roku 2013) s OS X Yosemite 10.10.3 nebo novějším.
5K monitor HP Z27q je podporován na iMacu (Retina 5K, 27palcový, konec roku 2014) nebo novějším a na
Macu Pro (konec roku 2013) s macOS Sierra.
SYSTÉMOVÉ POŽADAVKY
Hardwarové požadavky: Notebook / tablet s volným USB-A nebo USB-C portem
Operační systém: Windows 7 / 8 / 8.1 / 10 32/64 bit, Mac OS X, Linux Ubuntu 14.04 / 16.04, Android 6 a
vyšší. Windows 10 – automatická instalace ovladačů z OS. Ostatní operační systémy – manuální instalace
ovladačů. Firmware se aktualizuje automaticky.
Pro běžnou práci na více monitorech
Procesor: Intel Core i5 2+GHz / AMD Trinity nebo lepší
Paměť RAM: 4GB
Grafický procesor: Intel HD 4000, ATI Radeon HD7xxx, NVidia GeForce 5xxM nebo lepší
Port USB 3.0 / USB-C
Pro přehrávání videa
Procesor: Intel Core i7 2+GHz / AMD Richland A10-575x / AMD Kaveri A10-7400P nebo lepší
Paměť RAM: 8GB
Grafický procesor: Intel HD 4000, ATI Radeon HD 8650, NVidia GeForce 7xxM nebo lepší
Port USB 3.0 / USB-C
U méně výkonných přenosných počítačů platí, že mohou zvládat přehrávání 4K/5K videa, ale výsledek není
ideální (přerušování, trhání videa).
INSTALACE OVLADAČŮ VE WINDOWS 7 / 8 / 8.1 / 10 (32/64 BIT VERZE)
UPOZORNĚNÍ! Nepřipojujte dokovací stanici ke svému notebooku / tabletu dokud nenainstalujete příslušné
ovladače. Ovladače je třeba nainstalovat pouze před prvním použitím. Před samotnou instalací se ujistěte,
že máte v systému nainstalovány nejnovější ovladače pro vaše zařízení a aktualizovaný BIOS.
Pro Windows 7 / 8 / 8.1 si ovladače stáhněte z našeho webu www.i-tec.cz v záložce „Download“ u tohoto
produktu. Spusťte instalaci ze staženého souboru, zvolte jazyk instalace a postupujte dle pokynů na
obrazovce.
Ve Windows 10 lze dokovací stanici připojit přímo, ovladače se v případě připojení k internetu instalují
automaticky ze systému.
Ve Windows 7 / 8 / 8.1 / 10 instalujte ovladače jako uživatel „Administrator“. Obrazovka může v průběhu
instalace ovladačů problikávat, jedná se o standardní proces. Po dokončení instalace doporučujeme restart
notebooku / tabletu.
V prostředí s více notebooky, vybavených operačním systémem Windows 7, 8, 8.1 je možné jednorázová
korporátní instalace systémovým administrátorem. Pro více informací o způsobu instalace si pokyny
přečtěte zde: http://www.displaylink.com/downloads/corporate
HARDWAROVÁ INSTALACE (PŘIPOJENÍ DOKOVACÍ STANICE K NOTEBOOKU / TABLETU)
1) Zapněte notebook / tablet a připojte napájecí adaptér k dokovací stanici.
2) Zapojte napájecí adaptér dokovací stanice do sítě AC 110 V / 230 V a stiskněte tlačítko ON.
3) Zapojte USB-C kabel do USB-C portu na zadním panelu dokovací stanice. Pro zapojení do portu USB-
A Vašeho notebooku / tabletu použijte adaptér USB-C na USB-A.
4) Druhý konec připojte do volného USB-A 3.0 / USB-C portu vašeho notebooku / tabletu.
5) Následně se zahájí automatická instalace portů v jednotlivých systémech.
6) Po dokončení instalace restartujte notebook / tablet.
Page 75

V systému Windows se LAN port zobrazí ve Start → Ovládací panely (Zobrazit Malé ikony) → Správce
zařízení → Síťové adaptéry jako „USB Ethernet“. Dokovací stanice se zobrazí ve Start → Ovládací panely
(Zobrazit Malé ikony) → Správce zařízení → Grafické adaptéry jako „USB-C Triple-4K Dock“. Audio porty
najdete ve Start → Ovládací panely (Zobrazit Malé ikony) → Správce zařízení → Řadiče zvuku, videa a her
jako „USB Audio“.
Zobrazení LAN, display a audio portů ve správci zařízení
V případě, že některé z těchto zařízení je označeno žlutým ! nebo ?, pak není dokovací stanice správně
nainstalována. V tom případě dokovací stanici odpojte, odinstalujte stávající ovladače (viz kapitola
„Odinstalování ovladačů“) a znovu nainstalujte nejnovější ovladače, které jsou ke stažení na našem webu
www.i-tec.cz v záložce „Download“ u tohoto produktu. Poté znovu připojte dokovací stanici k notebooku /
tabletu. V případě problémů se můžete obrátit na naši technickou podporu: support@itecproduct.com.
INSTALACE OVLADAČŮ V MAC OS X
UPOZORNĚNÍ! Nepřipojujte dokovací stanici ke svému Macu, dokud nenainstalujete příslušné ovladače.
Ovladače je třeba nainstalovat pouze před prvním použitím. Doporučujeme mít nainstalován nejnovější
operační systém macOS.
Ovladače si stáhněte z našeho webu www.i-tec.cz v záložce „Download“ u tohoto produktu a spusťte
instalaci:
Soubor rozbalte na plochu vašeho MacBooku jako virtuální disk, zvolte “Drivers“ a následně „DisplayLink
Software Installer“. Poté zvolte jazyk instalace a postupujte dle pokynů na obrazovce, v případě potřeby
zadejte heslo uživatele. Obrazovka může v průběhu instalace ovladačů problikávat, jedná se o standardní
proces. Po dokončení instalace restartujte MacBook.
Instalace ovladačů v Mac OS X
Page 76

HARDWAROVÁ INSTALACE (PŘIPOJENÍ DOKOVACÍ STANICE K MACBOOKU)
1) Zapněte MacBook a připojte napájecí adaptér k dokovací stanici.
2) Zapojte napájecí adaptér dokovací stanice do sítě AC 110 V / 230 V a stiskněte tlačítko ON.
3) Zapojte USB-C kabel do USB-C portu na zadním panelu dokovací stanice. Pro zapojení do portu USB-
A Vašeho notebooku / tabletu použijte adaptér USB-C na USB-A.
4) Druhý konec připojte do volného USB 3.0 / USB-C portu vašeho MacBooku.
5) Následně se zahájí automatická instalace portů.
6) Po dokončení instalace restartujte MacBook.
Nainstalované porty jsou v Mac OS X zobrazeny jako „USB-C Triple-4K Dock“ v „About This Mac“ →
„System Profiler“ → „Hardware“ → „USB“.
Zobrazení dokovací stanice v macOS
INSTALACE OVLADAČŮ V DALŠÍCH OPERAČNÍCH SYSTÉMECH
Pro Android, Chrome OS a Ubuntu použijte ovladače od výrobce chipsetu DisplayLink. Ty jsou ke stažení na
našem webu www.i-tec.cz v záložce „Download“ u tohoto produktu nebo zde:
http://www.displaylink.com/downloads.
PŘIPOJENÍ HDMI / DISPLAY PORT MONITORU
Pro připojení monitoru k dokovací stanici použijte HDMI / DP kabel. Během instalace přídavného monitoru
může monitor na notebooku / tabletu problikávat, což je standardní stav. Dokovací stanice nabízí grafické
rozhraní: 2x Display Port a 1x HDMI (HDMI port je k dispozici pouze v případě připojení dokovací stanice do
USB-C portu vašeho notebooku). Dokovací stanice podporuje:
a) Připojení až tří 4K monitorů současně (1x HDMI 4K 3840x2160@30Hz a 2x Display Port monitor 4K
4096x2160@60Hz)
Page 77

b) Připojení jednoho 5K a jednoho 4K monitoru současně (1x HDMI 4K 3840x2160@30Hz a 1x Display Port
monitor 5K 5120x2880@60Hz). K dosažení 5K rozlišení je třeba připojit DP monitor dvěma DP kabely,
grafická karta ve vašem počítači nemusí podporovat 5K rozlišení).
Poznámka pro macOS a monitory se dvěma DP kabely:
Některé displeje s rozlišeními vyššími než 4K vyžadují k přenosu obrazu v plném rozlišení dva kabely Display Port:
27palcový 5K monitor Dell UP2715K je podporován na iMacu (Retina 5K, 27palcový, konec roku 2014)
nebo novějším a na Macu Pro (konec roku 2013) s OS X Yosemite 10.10.3 nebo novějším.
5K monitor HP Z27q je podporován na iMacu (Retina 5K, 27palcový, konec roku 2014) nebo novějším a na
Macu Pro (konec roku 2013) s macOS Sierra.
POUŽITÍ DOKOVACÍ STANICE V OS WINDOWS
Ve skrytých ikonách na liště Start klikněte na ikonku síťového připojení-DisplayLink:
Zde pak můžete zvolit:
a) DisplayLink Manager
b) Nastavení zvuku
c) Pokročilá konfigurace
Volby pro ovládání monitoru s připojenou dokovací stanici
Ad a) DisplayLink Manager – po zvolení se zobrazí nainstalovaná verze softwaru.
Nainstalovaná verze softwaru
Page 78

Ad b) Nastavení zvuku – umožní nastavení zvuku (nastavení je obdobné jako Ovládací panely → Zvuk). Pro
použití zvolte 2-kanálová sluchátka a mikrofon s 3.5 mm jackem. Ve zvukových zařízeních si nastavte jako
vstup a výstup „USB Audio“ jako výchozí zařízení.
Nastavení zvuku
To je pak možno využít pro nastavení např. Skype.
Nastavení zvuku pro Skype
Ad c) Pokročilá konfigurace – po kliknutí se zobrazí nastavení pro Rozlišení zobrazení ze systému Windows.
Rozlišení zobrazení ve Windows 10
Nyní lze provádět nastavení Rozšířit (Extend) a Zrcadlit / Duplikovat (Mirror):
Režim Rozšířit (Extend): na obrazovce zvolte u Více monitorů → Rozšířit toto zobrazení → OK.
Režim Zrcadlit / Duplikovat (Mirror): na obrazovce zvolte u Více monitorů → Duplikovat toto
zobrazení na 2 a 3→ OK.
Page 79

Zaškrtnutím pole „Nastavit tento monitor jako hlavní“ si přídavný monitor zvolíte jako hlavní.
Po kliknutí na druhý monitor a jeho přetažením si jej podle potřeby umístíte vůči původnímu monitoru
vašeho notebooku / tabletu.
Umístění jednoho přídavného monitoru vůči původnímu monitoru notebooku / tabletu
Standby / Hibernate režim a Video port – po aktivaci notebooku / tabletu ze Standby / Hibernate režimu se
zobrazuje primární (původní) monitor, proto doporučujeme používat jako primární ten, který je integrován
s notebookem / tabletem, abyste se mohli opětovně přihlásit do systému.
Mirror režim – přídavný monitor se řídí parametry původního monitoru v systému, tzn. jestliže si nastavíte
režim Mirror a původní monitor má rozlišení 1280x1024, pak se obrazovka přenáší na přídavný monitor
v rozlišení maximálně 1280x1024, i když jej nastavíte na vyšší rozlišení.
Pomocí volby na klávesnici „Windows“ + P lze také jednoduše monitory ovládat (tato klávesová zkratka je
funkční až od Windows 7 a vyšší). Pro použití monitoru ve Windows 7 jsou zde volby: Pouze počítač,
Duplikovat, Rozšířit a Pouze Projektor. Ve Windows 8 / 8.1 můžete zvolit: Jenom obrazovka počítače,
Duplikovat, Rozšířit, Jenom druhá obrazovka.
Ovládaní monitoru ve Windows 7
Page 80

Ovládaní monitoru ve Windows 8 / 8.1 a Windows 10
ODINSTALOVÁNÍ OVLADAČŮ
Standardně postupujte přes Ovládací panely → Všechny položky Ovládacích panelů → Programy a funkce →
Odebrat: DisplayLink Core Software pro Video ovladače. V průběhu odinstalování potvrďte nabízené volby.
Odinstalování ovladačů
Page 81

POUŽITÍ DOKOVACÍ STANICE V MAC OS
Po připojení monitoru bude obrazovka na Vašem Macu problikávat, což je standardní stav. Po ustálení lze
provádět nastavení zde: Předvolby systému-Monitory:
V záložce Uspořádání a v defaultním režimu (Rozšířit), klikněte na nový monitor a přetáhněte jej dle
potřeby vzhledem k monitoru Macu. Při volbě Zrcadlit monitory se změní režim na Zrcadlit (rozlišení
monitorů se automaticky upraví podle jejich parametrů a nastaví se nejvyšší možné rozlišení na obou
monitorech). Zrušením volby Zrcadlit monitory obnovíte režim Rozšířit.
Režim rozšířit: Šipka naznačuje možnost umístění připojeného monitoru vzhledem k Mac monitoru.
Režim rozšířit: V tomto režimu si můžete zvolit Hlavní monitor přetažením lišty Menu Bar.
Page 82

Režim zrcadlit: Lze použít jen v případě, že je nabízen Macem.
Volbou Shromáždit okna si můžete zvolit nastavení odpovídajícího monitoru – Přizpůsobené rozlišení
(nabízí využitelná rozlišení), Otočení (Standardní, 90°, 180° a 270°) a Obnovovací frekvence (jestli je
nabízena). Podle používaného monitoru jsou tyto možnosti nastavení:
Varianta zobrazení 1
Varianta zobrazení 2
V Přizpůsobeném režimu klikněte na Vámi vybranou ikonku, pod obrazovkou se popíše dané rozlišení
(zde vzhledově 3008x1692 = 4K@30Hz)
Page 83

Režim zavřeného displeje – práce na připojeném externím monitoru, když je monitor Macu sklopený, je
možná pouze, když je Mac napájen a je připojena myš a klávesnice. Bližší informace najdete zde:
https://support.apple.com/cs-cz/HT201834
Převážnou část problémů s obnovením obrazovky na připojeném monitoru po uspání Macu, po použití
spořiče, po restartu Macu, po vypnutí / zapnutí Macu lze vyřešit pomocí přepínače On/Off nebo odpojením
USB kabelu dokovací stanice od USB portu Macu a jeho opětovným připojením asi po 10s. Poté prosím
vyčkejte na dokončení připojení všech periférií.
OSTATNÍ FUNKCE
Připojení USB zařízení – po připojení USB zařízení do USB 3.0 portu dokovací stanice (USB externí HDD, USB
klávesnice, USB myš, USB Hub, USB grafický adaptér) se tato zařízení používají standardním způsobem.
Nabíjení – dokovací stanice podporuje nabíjení připojených USB mobilních zařízení, jako jsou smartphony,
čtečky e-knih, multimediální přehrávače, navigace a tablety. Nabíjené zařízení stačí připojit originálním
kabelem k USB portu dokovací stanice.
Audio
Výstupní zařízení zvuku pro poslech přes grafický výstup je třeba nastavit / ověřit zde: Předvolby systému-
Zvuk-Výstup – nastavit USB Audio Device.
Výstupní zařízení zvuku současně do sluchátek i monitoru lze volit v Otevřít-Aplikace-Utility-Nastavení
audio MIDI.app – klikněte na „+“ vlevo dole – Vytvořit zařízení s více výstupy a zvolíte na Zařízení s více
výstupy požadované výstupy z nabízených voleb.
Převážnou část problémů s dokovací stanicí a připojenými perifériemi lze vyřešit pomocí přepínače On/Off
nebo odpojením USB kabelu dokovací stanice od USB portu notebooku / tabletu / Macu a jeho opětovným
připojením asi po 10s.
BEZPEČNOSTNÍ POKYNY PRO POUŽITÍ DOKOVACÍ STANICE
Nevystavujte extrémním teplotám a vlhkosti vzduchu.
Používejte zařízení na plochých podložkách – vyvarujete se tím sklouznutí a pádu na zem.
Uschovejte ovladače i manuál pro pozdější možné použití.
V součinnosti se servisním oddělením:
Ověřte funkčnost po pádu do vody nebo na zem.
Ověřte funkčnost při prasknutí krytu.
Reklamujte zařízení nefungující dle manuálu.
ČASTO KLADENÉ OTÁZKY
Otázka: Na mém MacBooku 13" / 15" 2016 a pozdější mi přestává fungovat wi-fi nebo Bluetooth, případně
se mi odpojují USB 3.0 zařízení připojená k dokovací stanici. Kde je problém?
Odpověď: Tento problém je způsoben interferencí v pásmu 2.4GHz. Možným řešením je, že dokovací
stanici připojíte k Thunderbolt 3 (USB-C) portu Macu na levé straně nejblíže k vám nebo použijete porty na
pravé straně. Tyto porty jsou umístěny nejdále od wi-fi antény. Dalším řešením je použití pásma 5GHz a
umístění dokovací stanice co nejdále od monitoru vašeho Macu. Podrobnější informace naleznete zde:
https://support.apple.com/cs-cz/HT201163
Otázka: Ve Windows mi přestávají pracovat nebo se nepravidelně odpojují některá bezdrátová zařízení
(WLAN dongle nebo např. Microsoft Wireless set 3000/5000), která jsou připojena v dokovací stanici. Kde je
problém?
Odpověď: Někdy se stává, že USB 3.0 porty se ruší s 2.4GHz wireless zařízením. Bezdrátové zařízení by se
mělo umísťovat mimo bezprostřední vzdálenost USB 3.0 portů a kabelů. Zkuste tedy přemístit bezdrátové
zařízení dále od USB 3.0 portů a kabelů. K tomu lze použít např. prodlužovací kabel pro připojení WLAN
donglu nebo setu.
Page 84

Otázka: Můžu použít redukci k převedení signálu z HDMI/Display Port na VGA/DVI port?
Odpověď: Nedoporučujeme používat převodníky z Digitálního signálu (HDMI/Display Port) na Analogový
(VGA/DVI) z důvodu technologického omezení Analogových Portů (jejich nízká propustnost), tyto
převodníky nemusí být 100% funkční.
Otázka: Je nějaké omezení pro rozlišení 5K pro macOS ?
Odpověď: Některé displeje s rozlišeními vyššími než 4K vyžadují k přenosu obrazu v plném rozlišení dva kabely
Display Port:
27palcový 5K monitor Dell UP2715K je podporován na iMacu (Retina 5K, 27palcový, konec roku 2014)
nebo novějším a na Macu Pro (konec roku 2013) s OS X Yosemite 10.10.3 nebo novějším.
5K monitor HP Z27q je podporován na iMacu (Retina 5K, 27palcový, konec roku 2014) nebo novějším
a na Macu Pro (konec roku 2013) s macOS Sierra.
Otázka: Po instalaci Windows 10 přestalo zařízení fungovat. Na Windows 7 / 8 / 8.1 fungovalo bez
problémů.
Odpověď: Nainstalujte si prosím nejnovější ovladače. Ovladače si stáhněte z našeho webu www.i-tec.cz
v záložce „Download“ u tohoto produktu.
Otázka: Po instalaci Mac OS X 10.12.x přestalo zařízení fungovat. Na předchozí verzi fungovalo bez
problémů.
Odpověď: Nainstalujte si prosím nejnovější ovladače. Ovladače si stáhněte z našeho webu www.i-tec.cz
v záložce „Download“ u tohoto produktu. Dokovací stanice je podporována od verze DisplayLink 3.1.
Otázka: Mám problém s detekcí dokovací stanice v USB-C / USB 3.0 portu svého notebooku / tabletu.
Odpověď: Problém může být v zastaralých ovladačích pro USB-C / USB 3.0 port ve Vašem notebooku /
tabletu. Prosím, nainstalujte si nejnovější ovladače pro USB-C / USB 3.0 chipset ve vašem notebooku /
tabletu.
Otázka: LAN port nefunguje nebo pracuje rychlostí pouze 10/100 Mbps.
Odpověď: Zkontrolujte veškerou kabeláž mezi dokovací stanicí a aktivním prvkem a dotlačte konektory RJ-
45. Pomáhá také výměna Ethernet kabelu mezi dokovací stanicí a aktivním síťovým prvkem (HUB, switch,
router) za certifikovaný.
Otázka: Mohu získat podrobnější informace o problémech s dokovací stanici?
Odpověď: Jistě, užitečné informace naleznete na našich webových stránkách www.i-tec.cz v záložce „FAQ“
u tohoto produktu nebo na stránkách DisplayLinku
http://www.displaylink.com/support/knowledgebase.php, případně se můžete obrátit na naši technickou
podporu: support@itecproduct.com.
V případě dalších dotazů nebo problémů s dokovací stanicí se můžete obrátit na naši technickou podporu:
support@itecproduct.com.
Page 85

POLSKI
WPROWADZENIE
Dziękujemy za zakup wielozadaniowej stacji dokującej i-tec. Zwiększ swoją efektywność, podłączając stację
dokującą do laptopa lub tabletu za pomocą jednego kabla. W ten sposób uzyskasz możliwość ładowania
(dotyczy to połączenia za pomocą USB-C lub Thunderbolt 3, w przypadku połączenia za pomocą USB 3.0, nie
jest możliwe technologiczne ładowanie laptopa przez stację dokującą), możliwość podłączenia do trzech
monitorów o rozdzielczości 4K lub do dwóch monitorów (jeden monitor o rozdzielczości 5K / 4K i drugi o
rozdzielczości 4K). Pięć portów USB 3.0 i jeden port USB-C umożliwiają podłączenie wszystkich ulubionych
akcesoriów. Dzięki tej stacji dokującej unikniesz ciągłego łączenia i odłączania wszystkich urządzeń za
każdym razem, gdy zabierasz swój laptop lub tablet ze stanowiska pracy. Zaletą jest możliwość podłączenia
stacji dokującej do portu USB-A 3.0 lub USB-C w laptopie lub tablecie. Obie możliwości połączenia (kabel
USB-C do C, adapter USB-C do A) są dołączone do zestawu. Instalacja sterowników odbywa się
automatycznie z systemu operacyjnego Win 10; w przypadku innych systemów operacyjnych konieczne jest
wykonanie prostej procedury instalacji.
Uwaga: Port HDMI działa tylko w przypadku podłączenia stacji dokującej za pomocą USB-C (połączenie
stacji dokującej przez USB 3.0 zapewni obsługę dwóch Display Portów, port HDMI nie będzie
funkcjonować z powodu ograniczeń technologicznych)
Przed użyciem stacji dokującej należy dokładnie przeczytać całą instrukcję obsługi. Szczegółowy
podręcznik jest dostępny na naszej stronie internetowej www.i-tec.pl w zakładce "Download".
W razie jakichkolwiek problemów skontaktuj się z naszym działem pomocy technicznej:
support@itecproduct.com.
TERMINOLOGIA
Interfejs / port / złącze / wejście / gniazdo - miejsce, gdzie fizycznie połączone są dwa urządzenia.
Chipset - urządzenie półprzewodnikowe w laptopie, tablecie lub komputerze sterującym funkcją portu.
USB-C / USB Type-C - nowe złącze symetryczne i standardowe, wprowadzone przez USB-IF w specyfikacji
USB 3.1. Windows 10 (Microsoft), Mac OS X (Apple) i Chrome OS oraz Android (Google) wprowadziły
natywną obsługę tego łącznika. Umożliwia szybsze ładowanie oraz podwójne działanie (jako host i jako
klient), obsługa alternatywnych trybów (DisplayPort, MHL, Thunderbolt) i komunikowanie błędów za
pomocą urządzeń Billboard.
USB 3.1 / 3.0 / 2.0 - standardowy interfejs USB / port służący do podłączania różnych urządzeń USB. Różne
urządzenia USB można podłączyć do stacji dokującej lub adaptera za pomocą interfejsu USB typu A. Typ USB
typu B służy do podłączania stacji dokującej lub adaptera do laptopa lub tabletu.
HDMI / port wyświetlacza - standard cyfrowego interfejsu graficznego / portu do podłączania monitorów i
innych graficznych urządzeń wyświetlających.
LAN (Local Area Network) - lokalna sieć komputerowa jest obecnie najbardziej popularną siecią Ethernet,
która osiąga teoretyczną szybkość transferu do 1 Gbit/s przy stacji dokującej - GLAN / RJ-45.
Audio - oznaczenie wejścia audio (mikrofonu) lub wyjścia (słuchawki / głośniki).
ZAWARTOŚĆ OPAKOWANIA
i-tec Stacja dokująca USB-C / USB-A 3.0
Kabel USB-C 3.1 do USB-C (100 cm)
Adapter USB-C 3.1 do USB-A
Zasilacz (wyjście DC: 20V/6.75A, kabel DC 150 cm)
Quick Start
Page 86

SPECYFIKACJA I OPIS
Przedni panel:
1) Przełącznik wł. / Wył. Włączający i wyłączający stację dokującą
2) 1x niebieska dioda LED, świeci po włączeniu stacji dokującej
3) 1x zielona dioda LED, świeci po podłączeniu obudowy USB-A lub USB-C HDD
4) 1x port USB-C 3.1 do podłączenia twojego urządzenia USB-C, służy jedynie dla transferu danych (5
Gb/s)
5) 1x port USB-A 3.0 do podłączenia istniejących urządzeń USB 3.1/3.0/2.0 i transferu danych (5 Gb/s),
obsługuje funkcje USB Hot Swapping i umożliwia szybkie ładowanie zgodnie z BC 1.2
6) 1x 3,5 mm Wyjście audio 5.1
7) 1x 3,5 mm wejście mikrofonowe
Tylny panel:
8) Wejście zasilania - zewnętrzny zasilacz (wyjście: DC 20V/6.75A)
9) USB-A (w zestawie znajduje się adapter USB-C/F do USB-A/M do podłączenia do portu USB-A). W
przypadku podłączenia do portu USB-C lub Thunderbolt 3 w stacji dokującej, stacja dokująca
obsługuje także funkcję Power Delivery w profilu 4 (standardowo 60W, maksymalnie 85W) do
ładowania laptopa.
10) 1x port Ethernet GLAN RJ-45 umożliwiający szybką łączność sieciową i internetową z łącznością
Gigabit Ethernet, obsługuje prędkości 10/100/1000 Mb/s
11) 1x HDMI (port HDMI jest dostępny tylko w przypadku podłączenia stacji dokującej do portu USB-C
Twojego laptopa)
12) 2x Display Port
Rozdzielczość:
- 1 monitor podłączony przez dwa kable Display Port: 1x DP + 1x DP obsługuje do 5K 5120x2880@60Hz
(karta graficzna komputera nie musi obsługiwać rozdzielczości 5K), a jednocześnie 1 monitor podłączony
przez HDMI obsługuje do 1x 4K 3840x2160@30Hz (port HDMI jest dostępny tylko w przypadku podłączenia
stacji dokującej do portu USB-C Twojego laptopa)
- 2 monitory połączone za pomocą Display Port obsługują do 4K 4096x2160@60Hz i 1 monitor podłączony
przez HDMI obsługujący do 4K 3840x2160@30Hz (port HDMI jest dostępny tylko w przypadku podłączenia
stacji dokującej do portu USB-C Twojego laptopa)
13) 4x port USB-A 3.0 do podłączania urządzeń USB 3.1 / 3.0 / 2.0 i szybkiej transmisji danych do 5 Gb/s; obsługuje
funkcję USB Hot Swap
Page 87

Chipset: DisplayLink DL6950, VIA VL813, Texas Instruments TPS65983
Zasilacz: wejście 100-240V 50/60Hz 1.8A; wyjście: 20V/6,75A
Wymiary produktu: 245 x 95 x 30 mm
Waga produktu: 330 g
Uwaga dla macOS i monitorów z dwoma kablami DP:
Niektóre wyświetlacze o rozdzielczości wyższej niż 4K wymagają dwóch kabli Display Port do przesyłania
obrazów w pełnej rozdzielczości:
27-calowy monitor Dell UP2715K 5K jest obsługiwany w iMacu (Retina 5K, 27-calowy, koniec 2014
r.) Lub nowszym, a na Mac Pro (koniec 2013 r.) W systemie OS X Yosemite 10.10.3 lub nowszym.
Monitor HP Z27q 5K jest obsługiwany w iMacu (Retina 5K, 27-calowy, koniec 2014 r.) Lub nowszym,
a na Mac Pro (koniec 2013 r.) Z systemem macOS Sierra.
WYMAGANIA SYSTEMOWE
Wymagania sprzętowe: Laptop / tablet z wolnym portem USB-A lub USB-C
System operacyjny: Windows 7/8 / 8.1 / 10 32/64 bit, Mac OS X, Linux Ubuntu 14.04 / 16.04, Android 6 lub późniejszy.
Windows 10 - automatyczna instalacja sterowników systemu operacyjnego. Inne systemy operacyjne - ręczna instalacja
sterowników. Firmware aktualizuje się automatycznie.
Do rutynowych prac na wielu monitorach
Procesor: Intel Core i5 2 + GHz / AMD Trinity lub nowszym
RAM: 4 GB
Procesor graficzny: Intel HD 4000, ATI Radeon HD7xxx, NVIDIA GeForce 5xxM lub nowszy
Port USB 3.0 / USB-C
Odtwarzanie wideo
Procesor: Intel Core i7 2 + GHz / AMD Richland A10-575x / AMD Kaveri A10-7400P lub szybszy
RAM: 8 GB
Procesor graficzny: Intel HD 4000, ATI Radeon HD 8650, NVIDIA GeForce 7xxM lub nowszy
Port USB 3.0 / USB-C
W mniej wydajnych laptopach, podczas odtwarzania wideo w formacie 4K / 5K, mogą się zdarzyć
zakłócenia, przerwania transmisji.
INSTALACJA STEROWNIKA W SYSTEMIE WINDOWS 7/8 / 8.1 / 10 (32/64 BIT)
UWAGA! Nie podłączaj stacji dokującej do laptopa / tabletu, dopóki nie zostaną zainstalowane odpowiednie
sterowniki. Sterowniki muszą być zainstalowane tylko przed pierwszym użyciem. Przed instalacją sprawdź,
czy w systemie zainstalowano najnowsze sterowniki dla urządzenia i zaktualizowanego systemu BIOS.
Dla Windows 7/8 / 8.1 pobierz sterowniki z naszej strony internetowej www.i-tec.pl na karcie "Download"
tego produktu. Uruchom instalację z pobranego pliku, wybierz język instalacji i postępuj zgodnie z
instrukcjami.
W Windows 10 stacja dokująca może być podłączona bezpośrednio, sterowniki są automatycznie
instalowane z systemu po podłączeniu do Internetu
W systemie Windows 7/8 / 8.1 / 10 zainstaluj sterowniki jako użytkownik "Administrator". Ekran może
migać, gdy sterowniki są instalowane, jest to standardowy proces. Po zakończeniu instalacji zalecamy
ponowne uruchomienie notebooka / tabletu.
W środowisku z więcej niż jednym laptopem wyposażonym w system operacyjny Windows 7, 8, 8.1 można
wykonać jednorazową instalację korporacyjną przez administratora systemu. Aby uzyskać więcej informacji
na temat metody instalacji, zapoznaj się z instrukcjami poniżej):
http://www.displaylink.com/downloads/corporate
Page 88

INSTALACJA SPRZĘTU (PODŁĄCZENIE STACJI DOKUJĄCEJ DO LAPTOPA / TABLETU)
1) Włącz laptop / tablet i podłącz zasilacz do stacji dokującej.
2) Podłącz zasilacz stacji dokującej do sieci AC 110 V / 230 V i naciśnij przycisk WŁĄCZ.
3) Podłącz kabel USB-C do portu USB-C na tylnym panelu stacji dokującej. W celu połączenia się z
portem USB-A laptopa / tabletu, użyj adaptera USB-C do USB-A.
4) Podłącz drugi koniec do wolnego portu USB 3.0 / USB-C swojego laptopa / tabletu.
5) Następnie automatycznie rozpocznie się automatyczna instalacja portów w każdym systemie.
6) Po zakończeniu instalacji ponownie uruchom laptopa / tablet.
W systemie Windows port LAN jest wyświetlany w menu Start → Panel sterowania (Pokaż małe ikony) →
Menedżer urządzeń → Adaptery sieciowe jako "USB Ethernet". Stacja dokująca jest wyświetlana w menu
Start → Panel sterowania (Pokaż małe ikony) → Menedżer urządzeń → Adaptery graficzne jako " USB-C
Triple-4K Dock". Porty audio można znaleźć w menu Start → Panel sterowania (Pokaż małe ikony) →
Menedżer urządzeń → Kontrolery audio, wideo i gier jako "USB Audio".
Wyświetlanie portów LAN, wyświetlaczy i audio w Menedżerze urządzeń
Jeśli którykolwiek z tych urządzeń jest oznaczony żółtym ! lub ?, stacja dokująca nie jest prawidłowo
zainstalowana. W tym przypadku odłącz stację dokującą, odinstaluj istniejące sterowniki (zobacz rozdział
"Dezinstalacja sterowników") i zainstaluj najnowsze sterowniki dostępne na naszej stronie internetowej
www.i-tec.pl na karcie "Pobierz" tego produktu. Następnie podłącz stację dokującą do laptopa / tabletu. W
razie problemów skontaktuj się z naszym działem pomocy technicznej: support@itecproduct.com.
INSTALACJA STEROWNIKA W MAC OS X
UWAGA! Nie podłączaj stacji dokującej do komputera Mac, dopóki nie zostaną zainstalowane odpowiednie
sterowniki. Sterowniki muszą być zainstalowane tylko przed pierwszym użyciem. Zalecamy zainstalowanie
najnowszego systemu operacyjnego MacOS.
Pobierz sterowniki z naszej strony internetowej www.i-tec.pl na karcie "Download" tego produktu i
uruchom instalację:
Rozpakuj plik na MacBook’u jako dysk wirtualny, wybierz "Sterowniki", a następnie "DisplayLink Software
Installer". Następnie wybierz język instalacji i postępuj zgodnie z instrukcjami wyświetlanymi na ekranie, w
razie potrzeby wprowadź hasło użytkownika. Ekran może migać, gdy sterowniki są instalowane, jest to
standardowy proces. Po zakończeniu instalacji zrestartuj MacBooka.
Page 89

Instalacja sterowników w systemie Mac OS X
INSTALACJA SPRZĘTU (PODŁĄCZANIE STACJI DOKUJĄCEJ DO MACBOOKA)
1) Włącz MacBook i podłącz zasilacz do stacji dokującej.
2) Podłącz zasilacz stacji dokującej do sieci AC 110V / 230V i naciśnij przycisk WŁĄCZ.
3) Podłącz kabel USB-C do portu USB-C na tylnym panelu stacji dokującej. W celu połączenia się z
portem USB-A laptopa / tabletu, użyj adaptera USB-C do USB-A.
4) Podłącz drugi koniec do wolnego portu USB 3.0 / USB-C w MacBooku.
5) Następnie uruchamiane są automatyczne instalacje portów.
6) Po zakończeniu instalacji zrestartuj MacBooka.
Zainstalowane porty są wyświetlane w systemie Mac OS X w postaci " USB-C Triple-4K Dock " w "About
This Mac" → "System Profiler" → "Hardware" → "USB".
Instalace ovladačů v Mac OS X
INSTALOWANIE STEROWNIKÓW W INNYCH SYSTEMACH OPERACYJNYCH
W przypadku Androida, Chrome OS i Ubuntu użyj sterowników chipsetu DisplayLink. Są one dostępne do
pobrania na naszej stronie internetowej www.i-tec.pl na karcie "Download" tego produktu lub tutaj:
http://www.displaylink.com/downloads.
PODŁĄCZANIE MONITORA HDMI / DISPLAY PORT
Użyj kabla HDMI / DP, aby podłączyć monitor do stacji dokującej. Podczas instalacji dodatkowego monitora
może migać monitor laptopa / tabletu, jest to stan normalny. Stacja dokująca oferuje interfejs graficzny: 2x
Display Port i 1x HDMI (port HDMI jest dostępny tylko w przypadku podłączenia stacji dokującej do portu
USB-C Twojego laptopa). Stacja dokująca obsługuje:
a) Podłączenie do trzech monitorów 4K jednocześnie (1x HDMI 4K 3840x2160@30Hz i 2x 4K
4096x2160@60Hz Display Port)
Page 90

b) Podłączenie jednego monitora 5K i jednego monitora 4K w tym samym czasie (1x HDMI 4K
3840x2160@30Hz i 1x 5K 5120x2880@60Hz Display Port). Aby uzyskać rozdzielczość 5K, konieczne
jest podłączenie monitora DP za pomocą dwóch kabli DP, karta graficzna komputera nie musi
obsługiwać rozdzielczości 5K).
Uwaga dla macOS i monitorów z dwoma kablami DP:
Niektóre wyświetlacze o rozdzielczości wyższej niż 4K wymagają dwóch kabli Display Port do przesyłania obrazów
w pełnej rozdzielczości:
27-calowy monitor Dell UP2715K 5K jest obsługiwany w iMacu (Retina 5K, 27-calowy, koniec 2014 r.) Lub
nowszym, a na Mac Pro (koniec 2013 r.) W systemie OS X Yosemite 10.10.3 lub nowszym.
Monitor HP Z27q 5K jest obsługiwany w iMacu (Retina 5K, 27-calowy, koniec 2014 r.) Lub nowszym, a na
Mac Pro (koniec 2013 r.) Z systemem macOS Sierra.
KORZYSTANIE Z SYSTEMU WINDOWS
W ukrytych ikonach na pasku Start kliknij ikonę połączenia sieciowego:
Tutaj możesz wybrać:
a) Menedżer DisplayLink
b) Ustawienia dźwięku
c) Konfiguracja zaawansowana
Page 91

Opcje do sterowania monitorem za pomocą dołączonej stacji dokującej
Ad a) DisplayLink Manager - wersja oprogramowania jest wyświetlana po wybraniu.
Zainstalowana wersja oprogramowania
Ad b) Ustawienia audio - umożliwia to ustawienie dźwięku (ustawienia podobne do paneli sterowania →
audio). W celu użycia wybierz 2-kanałowe słuchawki i mikrofon z gniazdem 3,5 mm. W urządzeniach audio
ustaw jako parametr "DisplayLink Audio" jako wejście domyślne.
Ustawienia dźwięku
Może to zostać użyte do skonfigurowania Skype'a.
Ustawienia dzwięku Skype
Ad c) Konfiguracja zaawansowana - kliknij, aby wyświetlić ustawienia rozdzielczości wyświetlania systemu
Windows.
Page 92

Rozdzielczość ekranu w systemie Windows 10
Teraz możesz ustawić tryb Extend and Mirror:
Tryb powiel: na monitorze wybierz 2. Monitor, wybierz Kilka monitorów → Powiel ten ekran → OK.
Tryb rozszerz: na monitorze wybierz 2. Monitor, wybierz Kilka monitorów → Rozszerz ten ekran →
OK.
Wybierając pole "Ustaw ten monitor jako główny", wybierz monitor dodatkowy jako główny monitor.
Klikając drugi monitor i przesuwając go, można umieścić ten monitor zgodnie z wymaganiami oryginalnego
monitora laptopa / tabletu.
Dodanie jednego dodatkowego monitora do oryginalnego monitora laptopa / tabletu
Page 93

Tryb gotowości / hibernacji oraz port Video - po aktywacji laptopa / tabletu w trybie gotowości / hibernacji
wyświetlany jest główny (oryginalny) monitor, dlatego zaleca się używanie monitora, który jest
zintegrowany z laptopem / tabletem głównego monitora, aby można było ponownie zalogować się do
systemu.
Tryb powiel - dodatkowy monitor przyjmuje parametry oryginalnego monitora w systemie, tzn., Jeśli
wybierzesz tryb powiel i oryginalna rozdzielczość monitora to np. 1280x1024 ekran będzie wyświetlany na
dodatkowym monitorze z rozdzielczością maks. 1280x1024 (nawet jeśli ustawisz większą rozdzielczość).
Naciśnięcie klawiszy "Windows" + P umożliwia również łatwe sterowanie monitorami (ten skrót
klawiaturowy działa tylko z Windows 7 i wyżej). Do korzystania z monitora w systemie Windows 7 można
wybrać: Tylko komputer, Duplicate, Extend i Projector Only. Do korzystania z monitora w Win 8 / 8.1 / 10
można wybrać: Tylko ekran komputera, Mirror, Extend, tylko drugi ekran.
Steruj monitorem w systemie Windows 7
Steruj monitorem w systemie Windows 8 / 8.1 i Windows 10
ODINSTALOWANIE STEROWNIKÓW
Przejdź do Panelu sterowania → Wszystkie elementy panelu sterowania → Programy i funkcje → Usuń:
Oprogramowanie Core DisplayLink dla sterowników wideo. Podczas deinstalacji potwierdź wybór.
Page 94

Odinstalowanie sterowników
KORZYSTANIE Z SYSTEMU MAC OS
Po podłączeniu monitora ekran na komputerze Mac będzie migotać, co jest warunkiem standardowym, po
stabilizacji można wykonać standardowe ustawienie monitora: Preferencje systemowe - wyświetlanie:
Kliknij Rozmieszczenie iw trybie domyślnym (Rozszerzony pulpit) kliknij nowy monitor i przeciągnij go w
razie konieczności w stosunku do monitora Mac. Jeśli wybierzesz opcję Mirror, tryb zmieni się na powielony
ekaran (rozdzielczość monitorów będzie automatycznie dostosowywana do ich parametrów, a najwyższa
rozdzielczość zostanie ustawiona na obu monitorach). Wyłączenie opcji Mirror displays spowoduje powrót
do trybu Extended desktop.
Page 95

Tryb rozszerzony: strzałka wskazuje możliwą pozycję podłączonego monitora w stosunku do monitora Mac.
Tryb rozszerzony: w tym trybie można wybrać Monitor główny, przeciągając pasek menu.
Tryb lustra: ten tryb może być używany tylko wtedy, gdy jest obsługiwany przez komputer Mac
Kliknij opcję Gather Windows: za pomocą tej opcji można wybrać ustawienia odpowiedniego monitora skalowane (dostępne rozdzielczości), obrót (standard, 90 °, 180 ° i 270 °) i częstotliwość odświeżania (jeśli
są oferowane). Poniższe opcje ustawień są wyświetlane. Może się to różnić w zależności od monitora.
Page 96

Wyświetl opcję 1
Wyświetl opcję 2
W trybie Skalowania kliknij odpowiednią ikonę, rozdzielczość zostanie wyświetlona poniżej (co wygląda tak:
3008x1692 = 4K@30Hz)
Closed-display mode - możliwe jest monitorowanie podłączonego monitora, gdy monitor Mac jest
zamknięty, ale musisz podłączyć zasilanie, a także podłączyć myszy i klawiaturę. Więcej informacji można
znaleźć tutaj: https://support.apple.com/pl-pl/HT201834
Większość problemów związanych z odnowieniem ekranu na podłączonym monitorze po hibernacji
komputera Mac, po ponownym uruchomieniu komputera Mac za pomocą wygaszacza ekranu, po włączeniu
/ wyłączeniu komputera Mac można rozwiązać, wyłączając stację dokującą i włącz ją po około 10 s. Proszę
czekać na zakończenie połączenia wszystkich urządzeń peryferyjnych.
INNE FUNKCJE
Podłączanie urządzeń USB - po podłączeniu urządzenia USB do portu USB 3.0 stacji dokującej (zewnętrzny
dysk twardy USB, klawiatura USB, mysz USB, koncentrator USB, adapter grafiki USB), urządzenia te są
standardowo używane.
Ładowanie - stacja dokująca obsługuje ładowanie urządzeń przenośnych USB, takich jak telefony
inteligentne, czytniki książek elektronicznych, odtwarzacze multimedialne, urządzenia nawigacyjne i tablety.
Wystarczy podłączyć urządzenie, które chcesz ładować, używając oryginalnego kabla do portu USB stacji
dokującej.
Audio
W tym miejscu należy ustawić / zweryfikować urządzenia wyjściowe audio do słuchania za pomocą wyjścia
graficznego: System Preferences-Sound-Output – - wybierz urządzenie USB Audio Device.
Page 97

Ustawianie urządzenia wyjściowego audio zarówno na słuchawkach, jak i monitorze można wykonać
jednocześnie w aplikacji Open-Applications-Utilities-Audio MIDI.app - kliknij na "+" z lewej strony na dole -
Utwórz urządzenie z wieloma wyjściami (Create device with multiple outputs) i wybierz pożądane wyjście
z oferowanych opcji na urządzeniu.
Większość problemów ze stacją dokującą i podłączonych urządzeń peryferyjnych można rozwiązać,
wyłączając stację dokującą i włączając ją po około 10 s.
INSTRUKCJE BEZPIECZEŃSTWA
Nie wystawiaj na działanie wysokich temperatur i wilgoci.
Używaj urządzenia na płaskich powierzchniach - zapobiegnie to ześlizgnięciu które może
spowodować uszkodzenie urządzenia.
Zachowaj instrukcję obsługi w celu późniejszego wykorzystania.
We współpracy z działem serwisowym:
Sprawdź, czy urządzenie nie jest uszkodzone.
Reklamuj / zgłoś nieprawidłowości gdy urządzenie nie działa zgodnie z instrukcją obsługi.
CZĘSTO ZADAWANE PYTANIA
Pytanie: Wi-Fi lub Bluetooth przestają działać na moim MacBooku 13 "/ 15" 2016 i nowszym, lub
urządzenia USB 3.0 podłączone do adaptera są odłączone. Gdzie jest problem?
Odpowiedź: Ten problem jest spowodowany zakłóceniami w zakresie 2,4 GHz. Możliwe rozwiązanie polega
na podłączeniu stacji dokującej do portu Thunderbolt 3 (USB-C) na komputerze Mac z lewej strony, do
którego się znajdujesz lub z portów po prawej stronie. Porty te znajdują się najdalej od anteny wi-fi.
Następnym rozwiązaniem jest użycie strefy 5GHz i umieszczenie stacji dokującej tak daleko, jak to możliwe,
z monitora komputera Mac. Więcej informacji można znaleźć na stronie https://support.apple.com/pl-
pl/HT201163
Pytanie: W systemie Windows niektóre urządzenia bezprzewodowe (Adapter WLAN lub na przykład zestaw
bezprzewodowy Microsoft 3000/5000), które są podłączone do stacji dokującej, przestają działać lub
nieregularnie rozłączać. Gdzie jest problem?
Odpowiedź: Czasami porty USB 3.0 są wyłączane za pomocą urządzenia bezprzewodowego 2.4GHz.
Urządzenie bezprzewodowe powinno być umieszczone poza z bliskością portów i kabli USB 3.0. Umieść
urządzenie bezprzewodowe tak daleko od portów i kabli USB 3.0, jak to tylko możliwe. Możesz użyć do tego
celu, na przykład przedłużacza do podłączania urządzeń lub zestawów WLAN.
Pytanie: Czy mogę użyć adaptera do transformacji sygnału z portu HDMI / Display Port na VGA / DVI?
Odpowiedź: Nie zalecamy stosowania konwerterów sygnału od sygnału cyfrowego (HDMI / Display Port) do
analogowego (VGA / DVI) z powodu ograniczenia technologicznego portów analogowych (ze względu na ich
małą przepustowość); te konwertery nie muszą być w 100% funkcjonalne.
Pytanie: Czy dla systemu MacOS istnieje ograniczenie rozdzielczości 5K?
Odpowiedź: Niektóre wyświetlacze o rozdzielczości wyższej niż 4K wymagają dwóch kabli Display Port do
przesyłania obrazów w pełnej rozdzielczości:
27-calowy monitor Dell UP2715K 5K jest obsługiwany w iMacu (Retina 5K, 27-calowy, koniec 2014
r.) Lub nowszym, a na Mac Pro (koniec 2013 r.) W systemie OS X Yosemite 10.10.3 lub nowszym.
Monitor HP Z27q 5K jest obsługiwany w iMacu (Retina 5K, 27-calowy, koniec 2014 r.) Lub nowszym,
a na Mac Pro (koniec 2013 r.) Z systemem macOS Sierra.
Pytanie: Po zainstalowaniu systemu Windows 10 urządzenie przestało działać. W systemie Windows 7/8 /
8.1 urządzenie pracowało sprawnie.
Odpowiedź: Zainstaluj najnowsze sterowniki. Pobierz sterowniki z naszej witryny internetowej www.i-tec.pl
na karcie "Download" tego produktu.
Pytanie: Po zainstalowaniu systemu Mac OS X 10.12.x urządzenie przestało działać. Poprzednia wersja
działała płynnie.
Page 98

Odpowiedź: Zainstaluj najnowsze sterowniki. Pobierz sterowniki z naszej witryny internetowej www.i-tec.pl
na karcie "Download" tego produktu. Stacja dokująca jest obsługiwana z DisplayLink 3.1.
Pytanie: Mam problem z wykrywaniem stacji dokującej w moim portie USB-C / USB 3.0 na moim laptopie /
tablecie.
Odpowiedź: Problem może być przestarzałym sterownikiem portu USB-C / USB 3.0 na laptopie / tablecie.
Zainstaluj najnowsze sterowniki chipsetu USB-C / USB 3.0 w laptopie / tablecie.
Pytanie: Port LAN nie działa lub działa tylko z prędkością 10/100 Mb/s.
Odpowiedź: Sprawdź wszystkie przewody między stacją dokującą a elementem aktywnym i wciśnij łączniki
RJ-45. Można również wymienić kabel Ethernet między stacją dokującą i aktywnym elementem sieciowym
(HUB, Switch, Router) w celu uzyskania certyfikatu.
Pytanie: Czy mogę uzyskać bardziej szczegółowe informacje na temat problemów stacji dokującej?
Odpowiedź: Na pewno znajdziesz przydatne informacje na naszej stronie internetowej www.i-tec.pl na
karcie "FAQ" tego produktu lub na stronie http://www.displaylink.com/support/knowledgebase.php lub
skontaktuj się nasze wsparcie techniczne: support@itecproduct.com.
W przypadku jakichkolwiek pytań lub problemów ze stacją dokującą, skontaktuj się z naszym działem
pomocy technicznej: support@itecproduct.com.
Page 99

SLOVENSKY
ÚVOD
Ďakujeme za zakúpenie univerzálnej dokovacej stanice i-tec. Zvýšte svoju efektivitu jednoduchým
pripojením dokovacej stanice k vášmu notebooku alebo tabletu pomocou jediného kábla. Získate prístup
k napájaniu (platí pri zapojení prostredníctvom USB-C, alebo Thunderbolt 3; pri pripojení prostredníctvom
USB 3.0 nie je technologicky možné notebook dokovacou stanicou nabíjať), až trom monitorom v rozlíšení
4K, prípadne dvom monitorom (jeden s rozlíšením 5K/4K a jeden s rozlíšením 4K). Päť USB 3.0 portov a
jeden USB-C port vám umožní pripojiť všetko vaše obľúbené príslušenstvo. Vďaka tejto dokovacej stanici sa
vyhnete neustálemu pripájaniu a odpájaniu všetkých zariadení vždy, keď si beriete váš notebook alebo
tablet so sebou. Výhodou je možnosť pripojenia dokovacej stanice do USB-A 3.0 alebo USB-C portu vášho
notebooku alebo tabletu. Obe možnosti prepojenia (kábel USB-C na C, adaptér USB-C na A) sú súčasťou
balenia. Inštalácia ovládačov je automatická zo systému Win 10, pre ostatné operačné systémy je potrebná
jednoduchá inštalácia.
Upozornenie: HDMI port funguje iba v prípade pripojenia dokovacej stanice prostredníctvom USB-C
(konektivita dokovacej stanice cez USB 3.0 zaistí chod dvoch DisplayPortov, HDMI port nie je možné
technologicky využiť).
Prosíme o dôkladné prečítanie celého manuálu pred zahájením práce s dokovacou stanicou.
Podrobný manuál je k dispozícii tiež na našom webe www.i-tec-europe.eu v záložke
„Download“ pri tomto produkte. V prípade problémov sa môžete obrátiť na našu technickú
podporu: support@itecproduct.com.
SLOVNÍK POJMOV
Rozhranie / port / konektor / vstup / slot – miesto, kde sa fyzicky prepájajú dve zariadenia.
Radič – polovodičová súčiastka (tzv. chipset) v notebooku, tablete, PC, zaisťujúca činnosť niektorého z
portov.
USB-C / USB Type-C – je nový symetrický konektor a štandard, ktorý uviedla USB-IF vo svojej špecifikácii USB
3.1. Windows 10 (Microsoft), Mac OS X (Apple) a Chrome OS a Android (Google) predstavil natívnu podporu
tohto konektora. Umožňuje rýchlejšie nabíjanie, napájanie, tzv. dvojrolu (nielen hostiteľ, ale i hosť), podporu
tzv. alternatívnych režimov - Alt Mode (DisplayPort, MHL, Thunderbolt 3, Power Delivery) a oznamovanie
chýb cez Billboard zariadenie.
USB 3.1 / 3.0 / 2.0 – štandard pre USB rozhranie / port pre pripojenie rôznych USB zariadení. K dokovacej
stanici alebo adaptéru môžete pripájať rôzne USB zariadenia pomocou USB rozhrania typu A. Port USB typu
B slúži pre pripojenie dokovacej stanice alebo adaptéra k notebooku / tabletu.
HDMI / Display Port – štandard pre digitálne grafické rozhranie / port slúžiaci na pripojenie monitorov a
iných grafických zobrazovacích zariadení.
LAN (Local Area Network) – miestna počítačová sieť, teraz je najrozšírenejší tzv. Ethernet, ktorý pri
dokovacej stanici dosahuje teoretickú prenosovú rýchlosť až 1 Gbit/s – označenie GLAN / RJ-45
Audio – označenie pre zvukové vstupné (mikrofón) alebo výstupné zariadenie (slúchadlá / reproduktory).
OBSAH BALENIA
i-tec USB-C / USB-A 3.0 dokovacia stanica
Kábel USB-C 3.1 na USB-C (100 cm)
Adaptér USB-C 3.1 na USB-A
Napájací adaptér (výstup DC: 20V/6.75A, DC kábel 150 cm)
Quick Start
Page 100

ŠPECIFIKÁCIE A POPIS
Predná strana:
1. Prepínač On/Off pre zapnutie a vypnutie dokovacej stanice
1. 1x modrá LED svieti po zapnutí dokovacej stanice
2. 1x zelená LED svieti po pripojení USB-A alebo USB-C HDD case
3. 1x USB-C 3.1 port pre pripojenie vašich USB-C zariadení, je určený iba pre prenos dát (5 Gbps)
4. 1x USB-A 3.0 port pre pripojenie vašich terajších USB 3.1/3.0/2.0 zariadení a prenos dát (5 Gbps),
podpora funkcie USB Hot Swapping a rýchleho nabíjania podľa BC 1.2
5. 1x 3.5 mm Audio out 5.1
6. 1x 3.5 mm Mic in
Zadná strana:
7. Vstup pre napájanie – externý napájací adaptér (výstup: DC 20V/6.75A)
8. USB-C port pre pripojenie dokovacej stanice k notebooku s USB-C alebo USB-A rozhraním
(súčasťou balenia je adaptér USB-C/F na USB-A/M pre pripojenie do USB-A portu). Pri pripojení k
USB-C alebo Thunderbolt 3 portu vášho notebooku podporuje dokovacia stanica tiež funkciu Power
Delivery v profile 4 (štandardne 60W, max. 85W udržovaciu) pre nabíjanie vášho notebooku.
9. 1x Ethernet GLAN RJ-45 port pre vysokorýchlostný prístup k sieti a internetu cez Gigabit Ethernet,
podporuje rýchlosti 10/100/1000 Mbps
10. 1x HDMI (HDMI port je k dispozícii iba v prípade pripojenia dokovacej stanice do USB-C portu vášho
notebooku)
11. 2x Display Port
Rozlíšenie:
- 1 monitor pripojený cez 2 Display Port káble: 1x DP + 1x DP podporuje až 5K 5120x2880@60Hz
(grafická karta vo vašom počítači nemusí podporovať 5K rozlíšenie), a zároveň 1 monitor pripojený cez
HDMI s podporou až 1x 4K 3840x2160@30Hz (HDMI port je k dispozícii iba v prípade pripojenia
dokovacej stanice do USB-C portu vášho notebooku)
- 2 monitory pripojené prostredníctvom Display Portov podporujú až 4K 4096x2160@60Hz a 1 monitor
pripojený cez HDMI s podporou až 4K 3840x2160@30Hz (HDMI port je k dispozícii iba v prípade
pripojenia dokovacej stanice do USB-C portu vášho notebooku)
12. 4x USB-A 3.0 port pre pripojenie vašich terajších USB 3.1/3.0/2.0 zariadení a vysokorýchlostný
prenos dát (5 Gbps), podpora funkcie USB Hot Swapping
Chipset: DisplayLink DL6950, VIA VL813, Texas Instruments TPS65983
Napájací adaptér: vstup 100-240V 50/60Hz 1.8A; výstup: 20V/6.75A
Rozmery produktu: 245 x 95 x 30 mm
Hmotnosť produktu: 330 g
 Loading...