

Page 1
AV-BOX
INSTRUCTION MANUAL
Page 2

ITEC AV-BOX
2 www.itec-audio.com
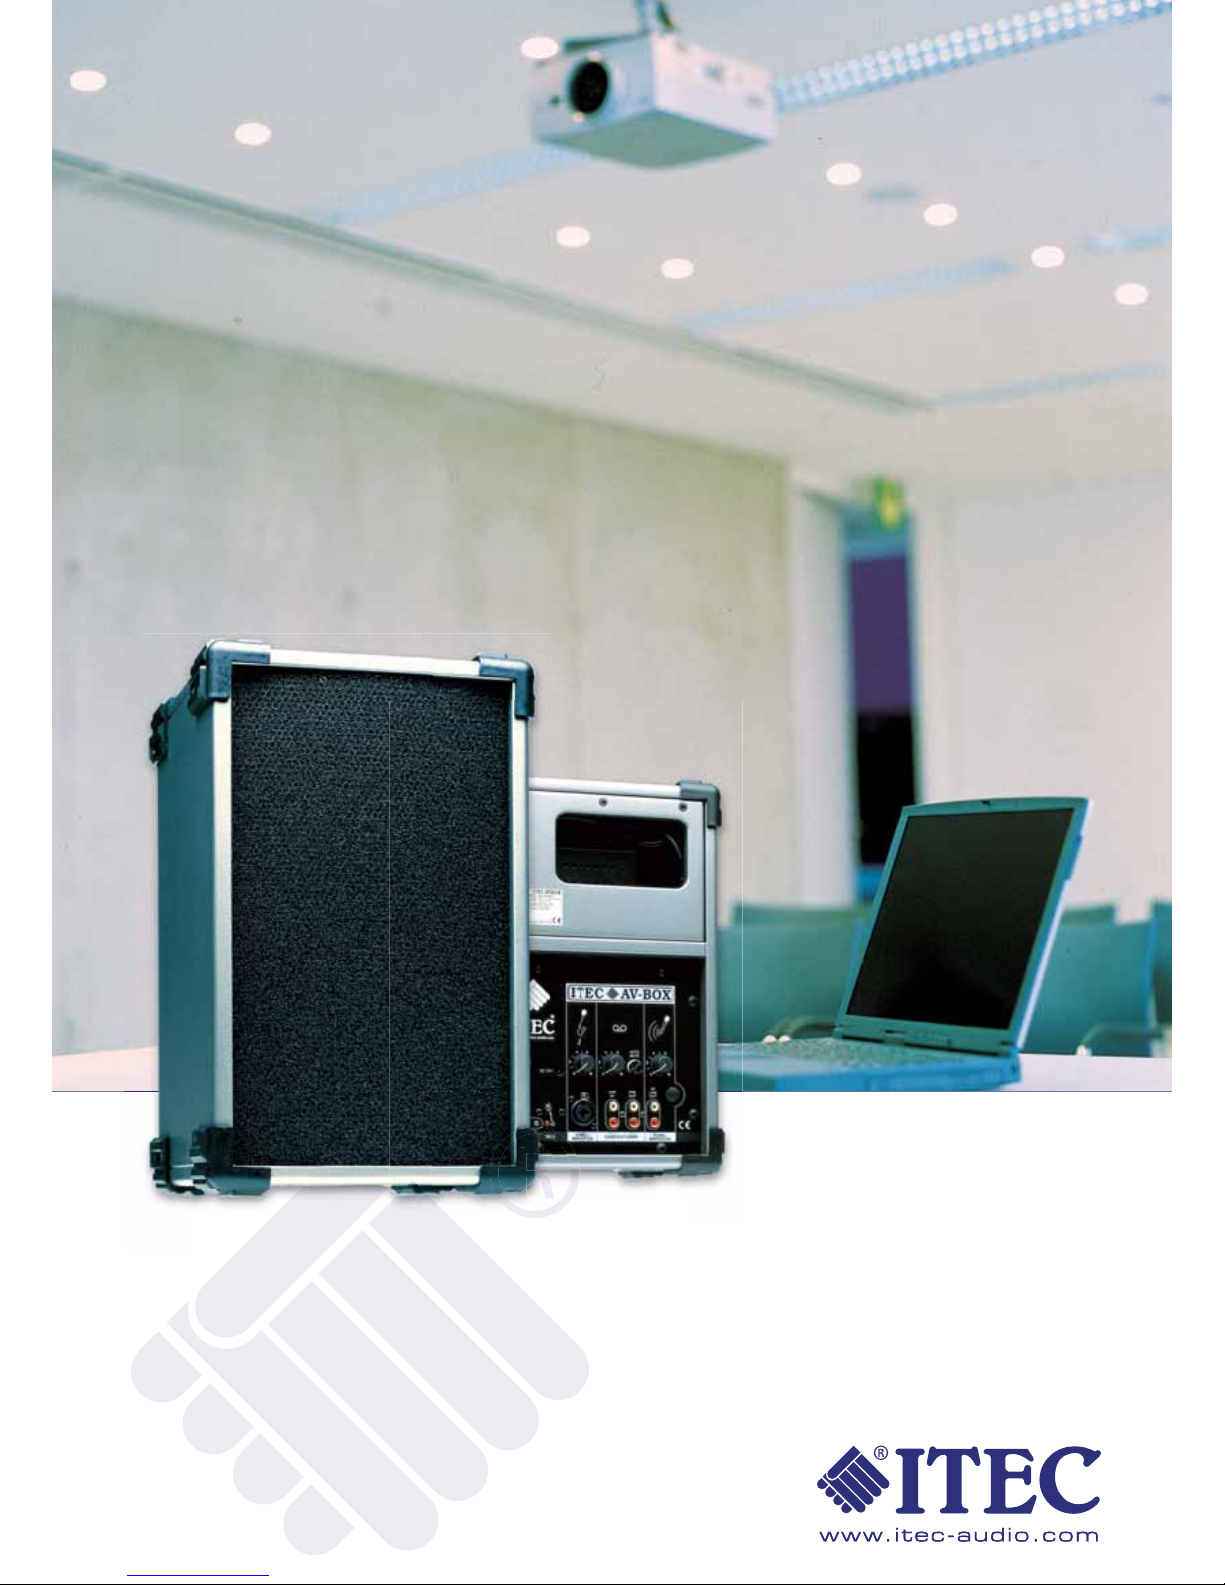
AV-BOX
Dear Customer!
ITEC AV-BOX – yet another product in our wide range of mobile, mains independent loudspeaker systems.
Use the ITEC AV-BOX as an independent audio system with cable or radio microphones with laptops or video
beamers with playbacks from your tape recorder or CD player.
Use the ITEC AV-BOX as an additional and enriching sub-system together with the ITEC LECTERN SUCCESS
interfaced either via cable orwireless via radio-transmission.
However you are going to use the versatile ITEC AV-BOX, you will certainly add the perfect sound to many
successful events with this compact, high performance tool so easy to handle.
sincerely,
Your ITEC acoustic team
Page 3

ITEC AV-BOX
www.itec-audio.com 3
AV-BOX
TABLE OF CONTENTS
1. How to use the tripod-stand 4
2. How to start 4
3. Using a cable microphone 4
4. Playback 5
5. Music attenuation 5
6. Using a radio microphone 5
7. Connecting the ITEC LECTERN SUCCESS 6
8. Recording 6
9. Connecting an external amplifi er 6
10. Connecting an external radio receiver 6
11. DC 12V socket 7
12. Recharging the ITEC AV-BOX 7
13. General advice 7
14. Changing batteries of radio microphones 8, 9
15. Controls 10
Page 4

ITEC AV-BOX
4 www.itec-audio.com
AV-BOX
1. How to use the tripod-stand
Loosen the lower adjusting screw of the aluminium light-weight tripod and open the legs of the tripod (as amply
as space allows). Once you have found a solid stand, tighten lower adjusting screw.
Loosen the upper adjusting screw, position the pull-out tube at the height requested and tighten screw again.
Attention: make sure the ITEC AV-BOX does not collapse, particularly when used outdoors (wind).
2. How to start
- General:
Turn on the ITEC AV-BOX by turning the ON/OFF switch (1) to the right (position ON); the ON/OFF indicator
light (2) will show.
- Battery mode (optional):
In case the power supply is not plugged in, the ITEC AV-BOX will be supplied by an integrated rechargeable
battery. The average operating time with a fully charged battery will be 6 to 10 hours. The ON/OFF indicator
light will be green if the battery has suffi cient power; it will be red if the battery is low. You can still operate the
ITEC AV-BOX, yet the device will switch off automatically when the power becomes too low (built-in discharge
protection).
- Mains supply:
In case the ITEC AV-BOX is connected (socket 10) to the mains supply (220V), the red mains indicator light (3)
will show in addition to the ON/OFF indicator light (2). As soon as you switch off the ITEC AV-BOX the battery
will start recharging immediately with the mains indicator light (3) staying On and the ON/OFF indicator light
(2) disappearing (see 12. recharging the ITEC AV-BOX).
3. Using a cable microphone
Plug in the cable microphone in the microphone socket (4) and adjust its volume at the volume control for the
cable microphone (6). See 13. general advice ....
Technical information:
The multi-jack microphone socket (3) lets you plug in microphones with XLR or 1/4” jack.
Use either dynamic microphones or electret condenser microphones.
Connecting balanced microphones: by means of a XLR plug or a stereo ¼” jack.
Connecting balanced microphones with phantom supply: by means of a XLR plug.
Connecting unbalanced microphones: by means of a mono ¼” jack.
In case you have a long microphone cable, an interference free operation can only be guaranteed when you use
both balanced microphones and balanced microphone cables.
no phantom voltage
signal
12
3
1 earth (US = ground)
2 signal +
3 signal -
signal
earth (US = ground)
earth (US = ground)
¼” stereo jack, balanced
phantom voltage 12V
XLR plug, balanced
no phantom voltage
¼” stereo jack, unbalanced
signal
Page 5

ITEC AV-BOX
www.itec-audio.com 5
AV-BOX
4. Playback
The cinch sockets (5A) will accept any tape recorder, CD player, radio, etc. The volume can be adjusted at the
corresponding control (7).
5. Music attenuation
Should your device have an automatic music attenuation the volume of the music playback will be turned down
while somebody is speaking. You determine the volume of the attenuated playback by means of the appropriate
control (9).
control position left: while speaking, the music is turned off completely
control position middle: while speaking, the music volume is halved
control position right: even while speaking, the music volume remains the same,
i.e. no attenuation at all.
Attenuation adjustment: while speaking into the microphone adjust the playback volume you want during your
announcement. Attenuation will be started when using a radio microphone or cable microphone and takes effect
on music playbacks via the line-in socket (external equipment).
6. Using a radio microphone
switch on the radio microphone and adjust the volume at the corresponding control (8). See 13. general
advice.
When using a radio microphone make sure the batteries are alright:
Using ITEC WT-702, ITEC WT-801 or AKG: This is the case when red LED fl ash after switching on; permanently
red light means to change the batteries.
Using ITEC WM-702 or TOA: This is the case when the green LED light shows; when the red LED light shows
the batteries should be replaced.
Page 6

ITEC AV-BOX
6 www.itec-audio.com
AV-BOX
7. Connecting the ITEC LECTERN SUCCESS
Cable connection: the ITEC AV-BOX is connected to the LECTERN SUCCESS by means of the attached cable.
At the ITEC AV-BOX plug the signal cable in one of the CASS/CD LINE IN cinch sockets(5a), at the LECTERN
SUCCESS plug it in one of the LINE OUT cinch sockets. The volume control CASS/CD (7) lets you choose how
loud the ITEC AV-BOX shall be in proportion to the LECTERN SUCCESS; the best way of doing this is to
- set up the LECTERN SUCCESS and the ITEC AV-BOX/ES, connect them with the devices left off;
- connect the microphone to the LECTERN SUCCESS;
- switch on the LECTERN SUCCESS and adjust the volume;
- switch on ITEC AV-BOX/ES and turn up the volume (control CASS/CD, 7) making sure
that there is no feedback.
Radio transmission: requirements: the LECTERN SUCCESS needs to have a radio transmitter, and the ITEC
AV-BOX needs to have a radio receiver. The volume control WIRELESS (8) lets you choose how loud the ITEC
AV-BOX shall be in proportion to the LECTERN SUCCESS; the best way of doing this is to
- set up the LECTERN SUCCESS and the ITEC AV-BOX/ES, connect them with the devices left off;
- connect the radio transmitter to the LECTERN SUCCESS: plug an MC 12 in one of the
LINE OUT cinch sockets;
- connect the microphone to the LECTERN SUCCESS;
- switch on the LECTERN SUCCESS and adjust the volume;
- switch on the radio transmitter and ITEC AV-BOX/ES and turn up the volume (control
WIRELESS, 7) making sure that there is no feedback.
8. Recording
Connect a tape recorder, MD player or speech mike recording system to the ‘PRE OUT’ cinch socket (5B). You
can record cable microphone, radio microphone and music playback. The output level will depend on how you
have adjusted the controls.
9. Connecting an external amplifi er
The adjusted signal of the ‘PRE OUT’ cinch socket (5B) may be connected to an external amplifi er (see 9.
Recording). However, in most cases, the integrated radio receiver will be needed. In this case, please plug in the
‘HF LINE OUT’ (5C) socket. As for volume, be aware that now the signal of the radio receiver/s overrides your
volume adjustments.
10. Connecting an external radio receiver
To connect an external radio receiver use socket 11 (1/4” mono jack) for audio line input. If needed 12V-DC is
supplied on socket 10 (500mA max)
Page 7

ITEC AV-BOX
www.itec-audio.com 7
AV-BOX
11. DC 12V socket
For the use of additional ITEC equipment, e.g. the CONFERENCE SET, use socket (10) for voltage supply. The
maximum current is 0.5A, a built-in safety advice switching off the device in case of overcharge.
12. Recharging the ITEC AV-BOX (Option: rechargeable battery)
simply connect the ITEC AV-BOX to the mains (110/220V) and leave the ITEC AV-BOX switched off. The power
indicator light (3) is on, the ON/OFF indicator light (2) is not. After approximately 10 hours the battery will be fully
recharged. The power indicator light will remain on! The ITEC AV-BOX can remain plugged in without causing
any damage.
Maintenance of the battery
The integrated lead battery is rechargeable and maintenance free; however, a few basic rules ought to be
heeded:
Do not store below a temperature of 5°C
Recharge after use.
Not having used the ITEC AV-BOX for months we recommend you switch it on for several hours and then
recharge it.
13. General advice
- Do not place microphones and speakers close to each other in order to avoid acoustic feedback too great
a distance, on the other hand, between microphone and speaker has an unnatural effect on the audience
(the sound, bear in mind, does not come from the person speaking) and makes speaking more diffi cult
(sonic speed, as we now know, is not all that fast). We recommend a distance between mike and speaker
of between 5 and 15 metres.
- Furthermore, make sure the speaker does not face the mike directly.
- Perfect as the loudspeaker system may be, the person speaking ought to annunciate loudly and clearly.
An audience of 10 should be able to understand him perfectly well without any technical support.
- The distance between the mouth and the microphone should be between 5 and 10 cms.
- It is advisable always to have an attendant near the loudspeaker controls, e.g. should the person
speaking suddenly come too close to the speaker with his mike the resulting feedback could be
remedied.
Advice on radio microphones
- Make sure the batteries of the radio microphone/s are in good condition
- High voltage cables, iron gates, metal roofs, etc. can cause interference
- Do not place the receiver or the microphone/s anywhere near potential interference sources (computers,
mobile phones etc.)
Page 8

ITEC AV-BOX
8 www.itec-audio.com
AV-BOX
14. Changing batteries of radio microphones
Attention: old batteries are hazardous waste; dispose of properly!
ITEC WM-716 - hand held microphone
(also WM 816 and WM 702)
Slide battery lid open, remove top battery and then pull the white plastic
strip to remove the other two batteries from the battery compartment.
Insert 3 new batteries!
Mind the poles (+ is at the bottom)!
Battery type: 3 pcs Mignon „AA“ 1.5 V
Batteries are okay: green LED is on
Batteries are low: red LED is on
ITEC WT-716 - button microphone
(also WT 816 and WT 702)
Open lid at the bottom of the casing and exchange all three batteries.
Mind the poles !
Battery type: 3 pcs Mignon „AA“ 1.5 V
Batteries are okay: red LED blinking
Batterie are low: red LED permanently on
ITEC WM-5100 - hand held microphone
Unscrew lid at the bottom end of the microphone and insert two new batteries.
Mind the poles (+ is at the bottom)!
Battery type: 2 pcs Mignon „AA“ 1.5V
Batteries are okay: red LED blinking
Batterie are low: red LED permanently on
The status of the battery is also shown on the LCD-display.
ITEC WT-5100 - button microphone
Open lid at the bottom of the casing and exchange both batteries.
Mind the poles!
Battery type: 2 pcs Mignon „AA“ 1.5V
Batteries are okay: red LED blinking
Batterie are low: red LED permanently on
The status of the battery is also shown on the LCD-display.
Page 9

ITEC AV-BOX
www.itec-audio.com 9
AV-BOX
14. Changing batteries of radio microphones (AKG)
Attention: old batteries are hazardous waste; dispose of properly!
1. Depress the snap hook on the battery compartment lid.
2. Pull the battery compartment lid down to remove it from the transmitter.
The foam pads on the inside of the battery compartment lid holds the batteries in place. Do not remove the
foam pad. If you do, the batteries will not be held in place properly and may cause rattling noise.
3. Insert the supplied batteries into the battery compartment conforming to the polarity marks.
The transmitter will not function with incorrectly inserted batteries.
4. Set the on/off switch to “ON” to switch the power to the transmitter on.
The status LED will fl ash momentarily.
If the batteries are in good condition, the status LED will extinguish.
If the status LED illuminates the batteries will be dead within about 50 minutes: Replace the batteries with new
ones as soon as possible.
If status LED fails to fl ash momentarily the batteries are dead: Insert new batteries.
5. To close the batterie compartment, slide the battery compartment lid onto the battery
compartment from below to the point that it will click shut.
Page 10

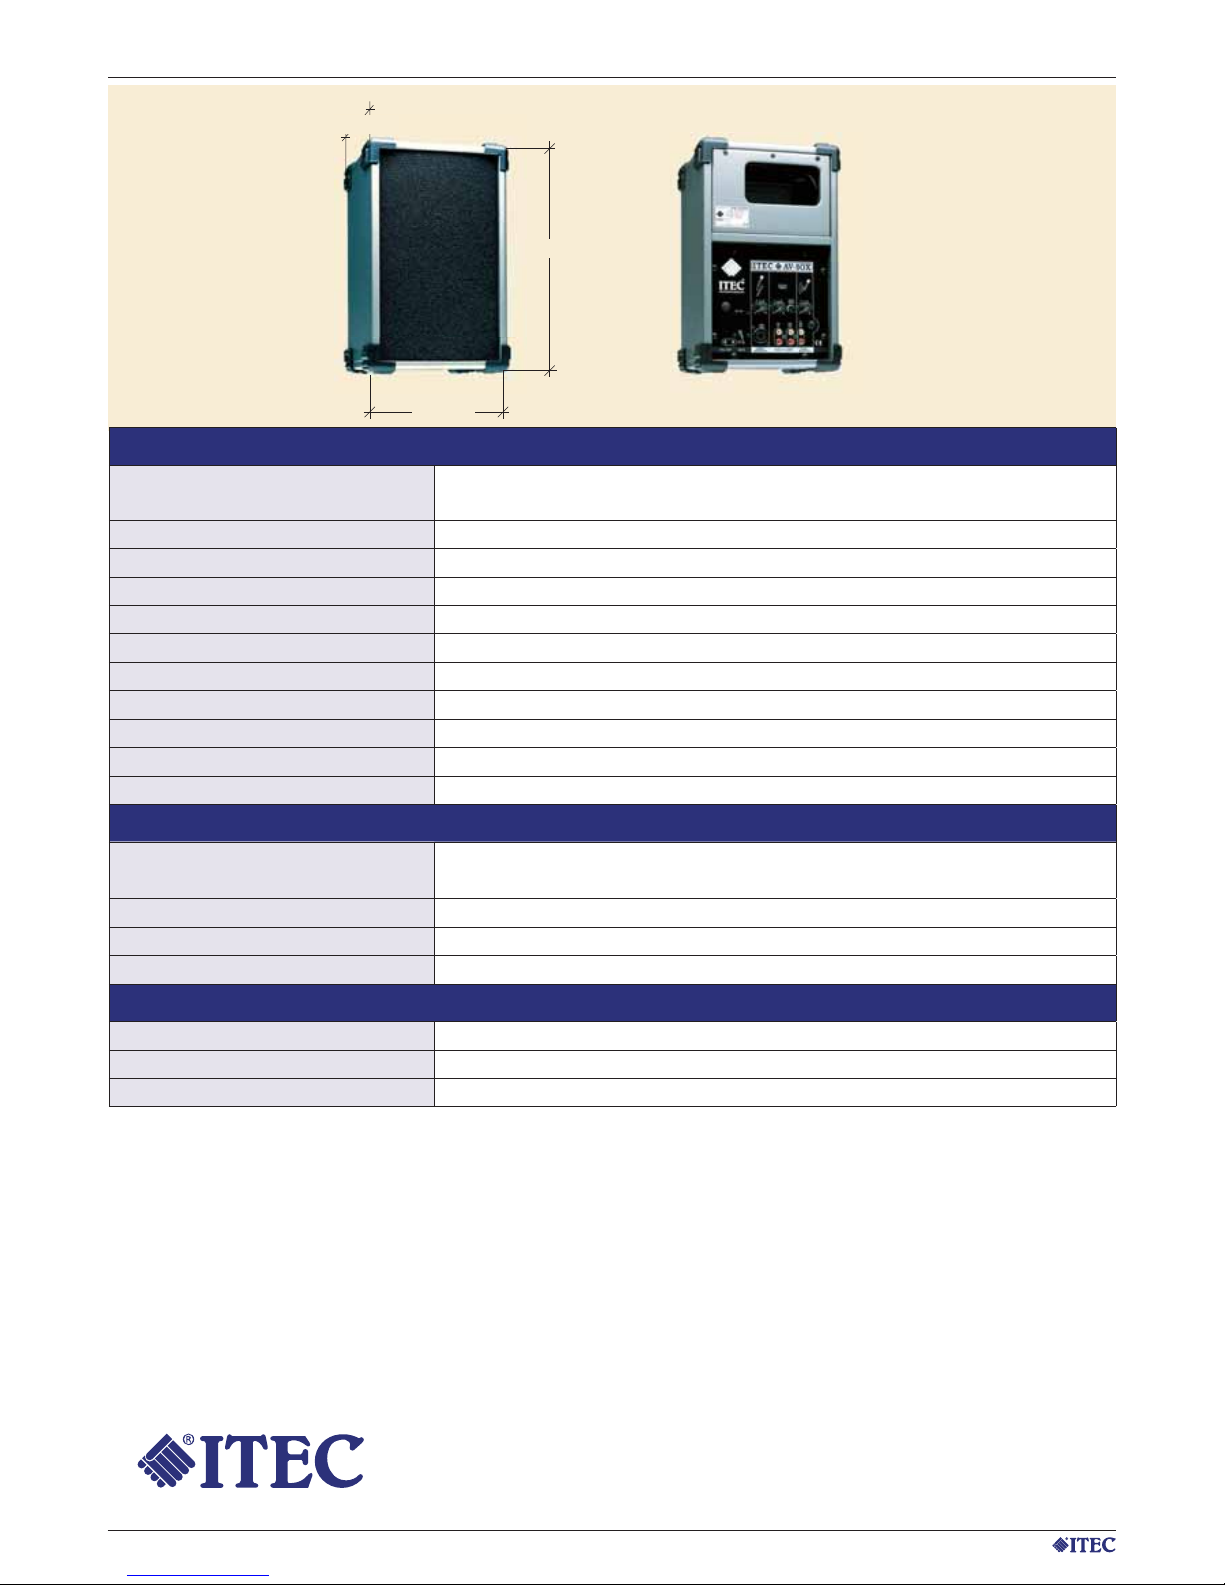
AV-BOX
1 ON/OFF switch
2 ON/OFF indicator light
3 mains indicator light
4 socket for microphone
(1/4 “ stereo jack, XLR)
5a LINE IN cinch sockets
(for external audio supply)
5b PRE OUT cinch sockets
(for external recording device)
5c HF LINE OUT cinch sockets
(Radio reception, not controlled)
6 volume control for cable microphone
7 volume control for external audio source
8 volume control for radio microphone
9 AUTO MUTE for music attenuation (optional)
10 DC 12V socket (for additional ITEC equipment)
11 socket for external radio receiver
(1/4” stereo jack)
15. Controls
AUTO
MUTE
http://www.itec-audio.com
DC 12V=
4
6
8
10
0
2
4
6
8
10
0
2
4
6
8
10
0
2
LINE INPRE
OUT
HF
LINE
OUT
AUS / EIN
NE
TZ
KABEL-
MIKROFON
FUNK-
MIKROFON
CASS/CD/TUNER
ITEC AV-BOX
1
5a
5c
11
2
3
4
6
9
7
8
10
5b
ITEC AV-BOX
10 www.itec-audio.com
Page 11

Page 12
ITEC AV-BOX
12 www.itec-audio.com
220 mm
220 mm
340 mm
ITEC- Tontechnik und Industrieelektronik GesmbH, A-8200 Lassnitzthal 300 / Austria / Europe
Tel.: +43 (0)3133 / 3780-0, offi ce@itec-audio.com, www.itec-audio.com
AV-BOX - SPECIFICATIONS
GENERAL
Portable, active speaker system with built-in amplifi er, rechargeable battery, 3-channel mixer, po-
wer supply unit with automatic charging module and a high-performance 2-way speaker system
Amplifi er Output Power W / RMS 75
1 bass / mid-range cone speaker 6 ½ inch, 1 dome tweeter 1 inch
SPL max: 108 dB (Powerful enough for an audience of approx. 150 listeners)
3-channel pre-amplifi er Microphone/Wireless/Auxiliary
Auto Mute Automatic music volume reduction
Power supply unit with automatic charging module (built-in)
Tripod fl ange for use with box tripod
Dimensions mm 220 x 220 x 340
Weight kg 5,6
Colour Silver-grey varnishing or black, shock-resistant polyurethane coating
OPTIONS and ACCESSORIES
Up to 2 wireless microphone receiver modules (UHF or VHF) with separate volume
adjustment may be built in
Cable microphones
High-capacity lead-gel rechargeable battery 7.5 Ah / 12 V
Tripod, transport bag
CONNECTIVITY
Microphone connector, symmetrical, combinational XLR/jack plug, 12V phantom power
Line-Input Stereo-cinch socket
Line-Output Stereo-cinch socket for recording devices
 Loading...