

Page 1
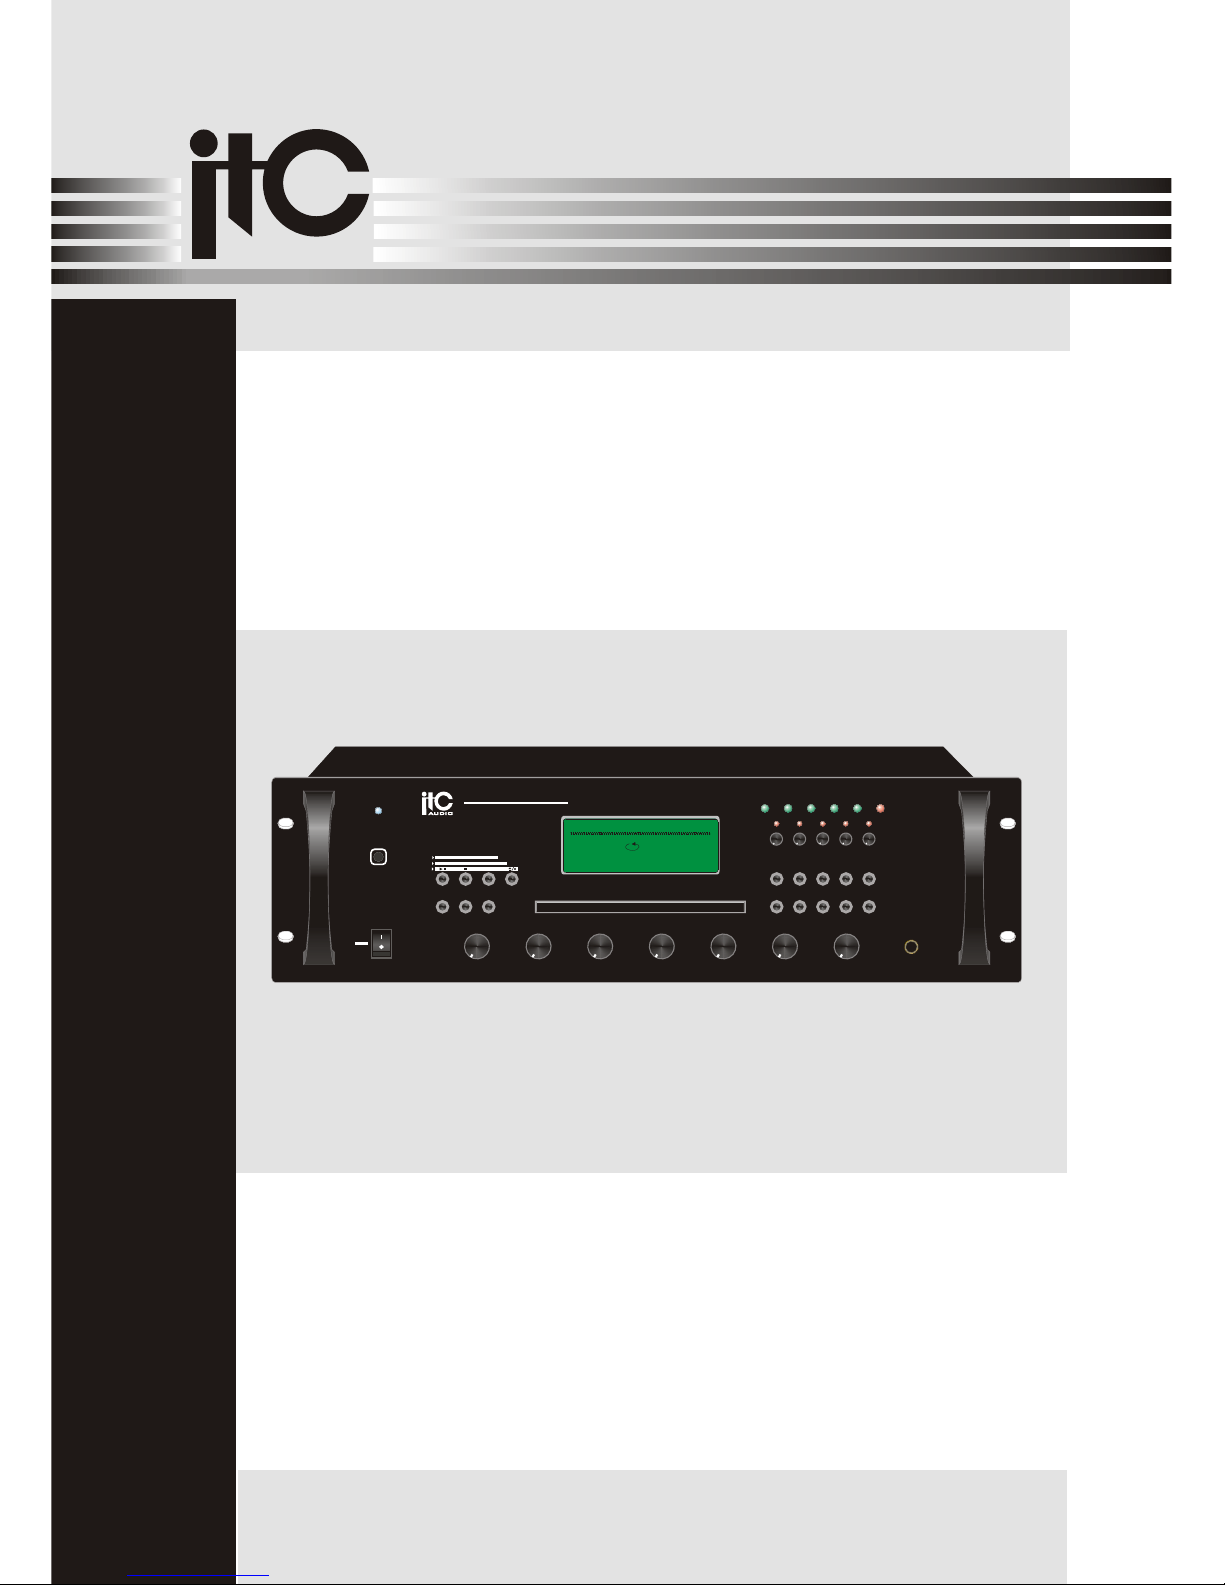
Please follow the instructions in this manual to obtain the optimum results from this unit.
We also recommend that you keep this manual handy for future reference.
3 IN 1 POWER AMPLIFIER
T-6635
OPERATION MANUAL
AUDIOAUDIO
PUBLIC ADDRESS SYSTEM
T-6624
T-6612
T-6601
POWER LED
SELECT DOWN UP
MP3
RADIO
CD
PLAY
AM/FM
STOP
Hz/NO
REPEAT
PAUSE
AUTO/AMNUAL
14:57:43
Audio:MP3
Intraday Next:
2 4 6 8 10 12
CH 2CH 1 CH 3 CH 4 CH 5
MIC
1 2 3 4 5
6 7 8 9
0/--
Wednesday 06/10/31
01
00:01:02
No operate
STANDBY
BASS TREBLE MP3 RADIO CD AUX MIC VOLUME
0
-5
-4
-3
-2
-1 +1
+2
+3
+4
+5
0
-5
-4
-3
-2
-1 +1
+2
+3
+4
+5
5
0
1
2
3
4 6
7
8
9
10
5
0
1
2
3
4 6
7
8
9
10
5
0
1
2
3
4 6
7
8
9
10
5
0
1
2
3
4 6
7
8
9
10
5
0
1
2
3
4 6
7
8
9
10
ON
OFF
T-6635
3 IN 1 POWER AMPLIFIER
Page 2

TABLE OF CONTENTS
2
1. SAFETY PRECAUTIONS .......................................................................................3
2. GENERAL DESCRIPTION ....................................................................................5
3. FEATURES ...............................................................................................................5
4. NOMENCLATURE AND FUNCTIONS
4.1 Front Panel .............................................................................................................6
4.2 Rear Panel..............................................................................................................7
4.3 Remote Device........................................................................................................7
5. CONNECTIONS
5.1. Speaker Connections .............................................................................................8
5.2. XLR Connections .................................................................................................8
6. APPLICATIONS ...................................................................................................... 9
7.1 Boot-starp Interface ............................................................................................. 10
7.2 CD Operate ......................................................................................................... 10
7.3 MP3 Operate ........................................................................................................10
7.4 AM/FM Tuner ................................................................................................. ......10
7.5 Paging Selector Con trol Manual .............................................................................11
7.6 Time Setup............................................................................................................11
7.7 Editing Process .....................................................................................................11
7.8 Simple Faults Exclusive ........................................................................................ 11
7.9 Installation Attention ............................................................................................. 11
8.0 Note................................................................................................................... 12
8. SPECIFICATIONS ................................................................................................13
9. DIMENSIONAL DIAGRAM ..................................................................................14
7. BALSIC OPERATION
Page 3
Be sure to read the instructions in this section carefully before use.
Make sure to observe the instructions in this manual as the conventions of safety symbols and messages
regarded as very important precautions are included.
We also recommend you keep this instruction manual handy for future reference.
Safety Symbol and Message Conventions
Safety symbols and messages described below are used in this manual to prevent bodily injury and property
damage which could result from mishandling. Before operating your product, read this manual first and
understand the safety symbols and messages so you are thoroughly aware of the potential safety
Indicates a potentially hazardous situation which, if mishandled, could
result in death or serious personal injury.
Indicates a potentially hazardous situation which, if mishandled, could
result in moderate or minor personal injury, and/or property damage.
When Installing the Unit
Do not expose the unit to rain or an environment
where it may be splashed by water or other liquids,
as doing so may result in fire or electric shock.
Use the unit only with the voltage specified on the
unit. Using a voltage higher than that which is
specified may result in fire or electric shock.
Do not cut, kink, otherwise damage nor modify the
power supply cord. In addition, avoid using the
power cord in close proximity to heaters, and never
place heavy objects -- including the unit itself -- on
the power cord, as doing so may result in fire or
electric shock.
Be sure to replace the unit's terminal cover after
connection completion. Because high voltage is
applied to the speaker terminals, never touch these
terminals to avoid electric shock.
Be sure to ground to the safety ground (earth)
terminal to avoid electric shock. Never ground to a
gas pipe as a catastrophic disaster may result.
Avoid installing or mounting the unit in unstable
locations, such as on a rickety table or a slanted
surface. Doing so may result in the unit falling
down, causing personal injury and/or property
damage.
When the Unit is in Use
Should the following irregularity be found during
use, immediately switch off the power, disconnect
the power supply plug from the AC outlet and
contact your nearest dealer. Make no further
attempt to operate the unit in this condition as this
may cause fire or electric shock.
If you detect smoke or a strange smell coming
from the unit.
If water or any metallic object gets into the unit
If the unit falls, or the unit case breaks
If the power supply cord is damaged (exposure of
the core, disconnection, etc.)
If it is malfunctioning (no tone sounds.)
To prevent a fire or electric shock, never open nor
remove the unit case as there are high voltage
components inside the unit. Refer all servicing to
your nearest dealer.
ITC
ITC
Do not place cups, bowls, or other containers of
liquid or metallic objects on top of the unit. If they
accidentally spill into the unit, this may cause a fire
or electric shock.
Do not insert nor drop metallic objects or
flammable materials in the ventilation slots of the
unit's cover, as this may result in fire or electric
shock.
3
1.SAFETY PRECAUTIONS
Page 4
An all-pole mains switch with a contact separation of at least 3 mm in each pole shall be incorporated in
the electrical installation of the building.
When Installing the Unit
Never plug in nor remove the power supply plug
with wet hands, as doing so may cause electric
shock.
When unplugging the power supply cord, be sure
to grasp the power supply plug; never pull on the
cord itself. Operating the unit with a damaged
power supply cord may cause a fire or electric
shock.
When moving the unit, be sure to remove its power
supply cord from the wall outlet. Moving the unit
with the power cord connected to the outlet may
cause damage to the power cord, resulting in fire or
electric shock. When removing the power cord, be
sure to hold its plug to pull.
Do not block the ventilation slots in the unit's cover.
Doing so may cause heat to build up inside the unit
and result in fire.
Avoid installing the unit in humid or dusty locations,
in locations exposed to the direct sunlight, near the
heaters, or in locations generating sooty smoke or
steam as doing otherwise may result in fire or
electric shock.
When the Unit is in Use
Do not place heavy objects on the unit as this may
cause it to fall or break which may result in
personal injury and/or property damage. In
addition, the object itself may fall off and cause
injury and/or damage.
Make sure that the volume control is set to
minimum position before power is switched on.
Loud noise produced at high volume when power is
switched on can impair hearing.
Do not operate the unit for an extended period of
time with the sound distorting. This is an indication
of a malfunction, which in turn can cause heat to
generate and result in a fire.
Contact your dealer as to the cleaning. If dust
is allowed to accumulate in the unit over a long
period of time, a fire or damage to the unit may
result.
ITC
If dust accumulates on the power supply plug or in
the wall AC outlet, a fire may result. Clean it
periodically. In addition, insert the plug in the wall
outlet securely.
Switch off the power, and unplug the power supply
plug from the AC outlet for safety purposes when
cleaning or leaving the unit unused for 10 days or
more. Doing otherwise may cause a fire or electric
shock.
4
SAFETY PRECAUTIONS
Page 5
5
3. FEATURES
We are grateful to you for purchasing our PA System and we have full confidence to present you the high
performance and we have full confidence to present you the high performance products,system units to you,
because every process has strict control from design to delivery.Please read the manual within the packaging
carefully before operation, and keep well for later reference.
2. GENERAL DESCRIPTION
1.Inner MP3, DVD, 3kinds of audio sources, 5 power selector, 1 priority MIC input and 1line input and
preamplifier control . It can achieve simple install
paging system when connect with speakers. All
installation steps are very easy and convenient.
2. .
3. .
4.
Powerful IR remote controller, it can meet various operation ways demands
Power standby function. It can save power supply when it is standby states
4 inch LCD, English interface are available.
5.Super strong auto programmable control function, it can achieve timing,designated point, and designated
program auto operation control function.
6.Program operation can up to 80 steps by each day, It can only edit and implement one program in each time
7.Build-in programmable control MP3, storage space can be expandable, it can remote operation and direct
operation, support 100 songs and can be controlled by the remote controller.
8.Build-in tuner FM/AM,store 50 channels beforehand,and can manually input the channels number and stored
channels,auto/manual search and store channels.
9. .Build-in DVD decode, support DVD, CD, MP3 format
10.
. MIC feature the priority.
Uild-in 5 channel amplifier zones and audio output, convenient for big power connection for different power
application requirement.It is really achieve integrated system
11.Power 60W\120W\240W\350W are available.
Page 6
MP3
RADIO
CD
PLAY
AM/FM
STOP
Hz/NO
REPEAT
PAUSE
AUTO/AMNUAL
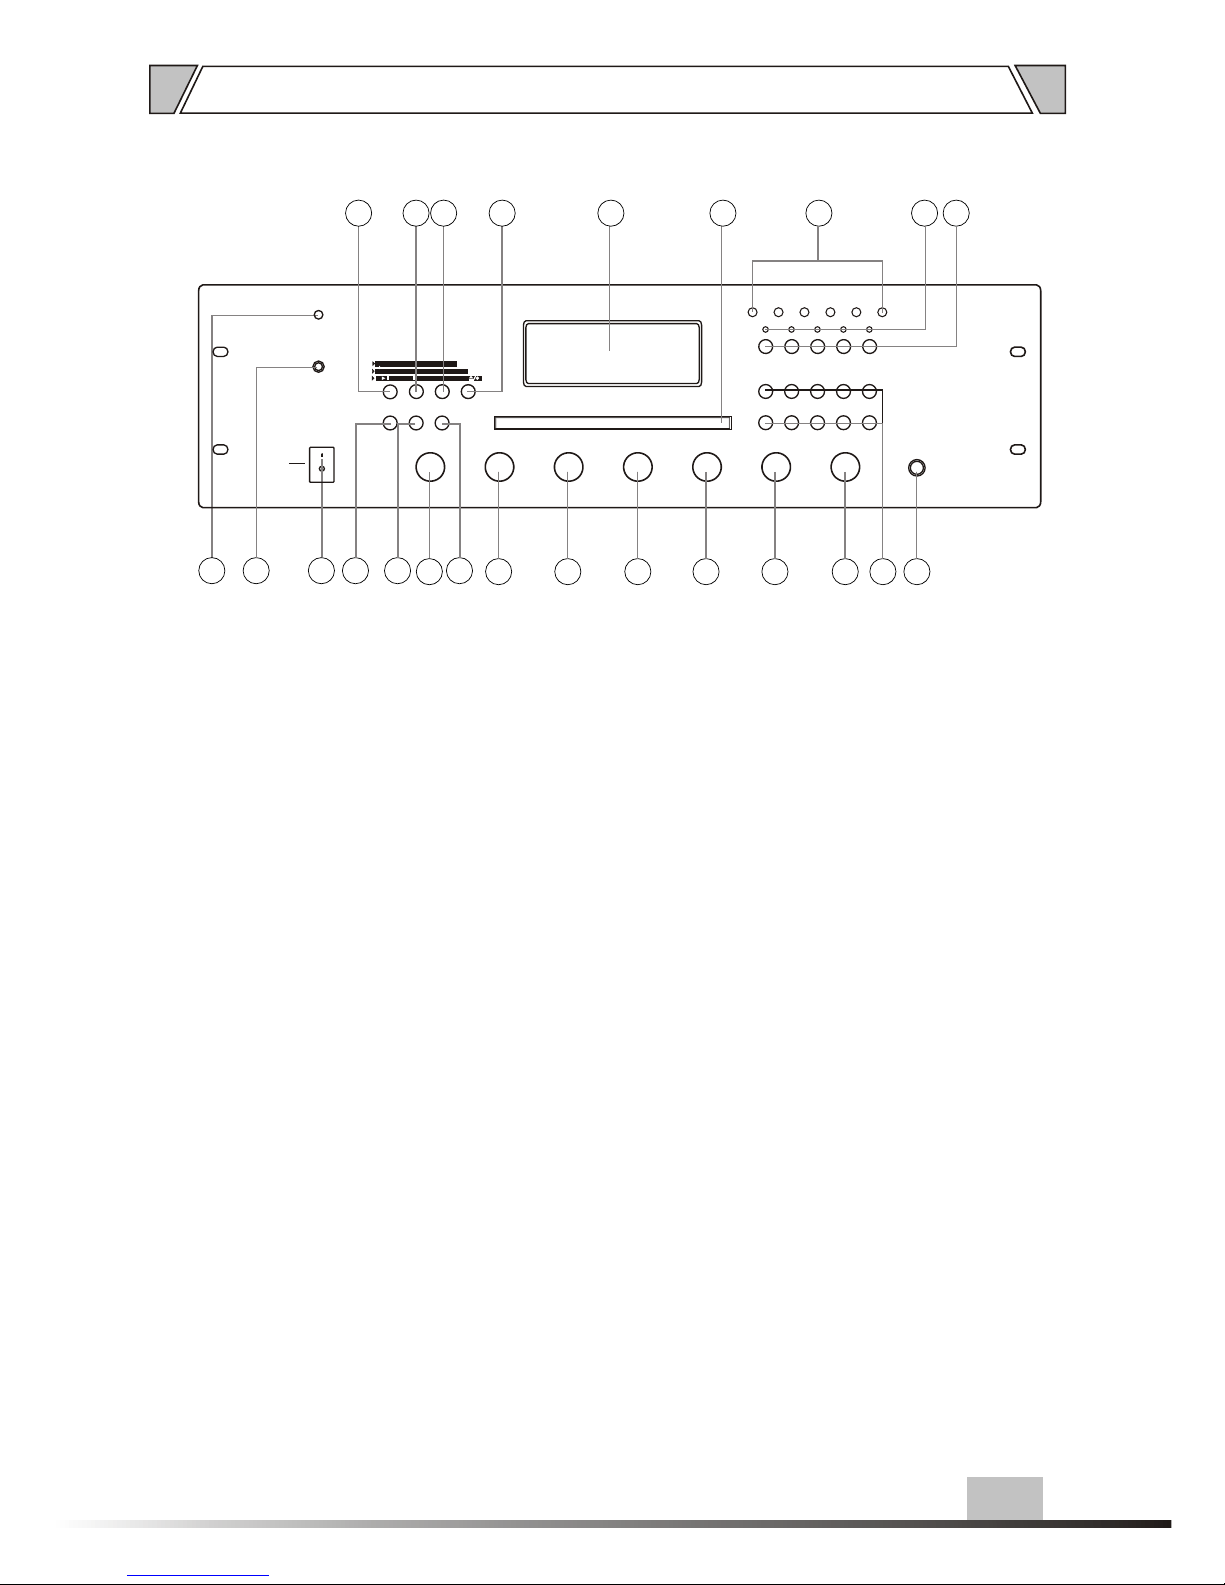
4.1 FRONT PANEL
6
2
6
8
16
12.AUX
AUX volume control
13.MIC VOLUME
MIC volume control
14.
MIC
MIC input 6.3 Microphone jack input
16.(CH1~CH5)
17.(CH1~CH5)
(CH1~CH5)
18.LEVEL
Level meters 6 output level indicators
19.
20.
21.
button
22.
Pause/Repeat button
23.STOP/RETURN
Stop/Return button
24.PLAY
Play button
NUMBER
(0-9) number key
15.
Paging Selector buttons
Selector indicator
OPEN/ CLOSE
LCD DISPLAY
OPEN/CLOSE
Open/Close
AUTO/ MANUAL
1. POWER
Power indicator Indicator green lights when
power on
2.
3. POWER SWITCH
On top of the opening Power
Press the end, power shut down
4. SELECT
5. DOWN
Down search channel
6. BASS
Adjust bass response. Rotate clockwise to increase
bass output and anticlockwise to reduce it.
7. UP
UP search channel
8. TREBLE
Adjust treble response. Rotate clockwise to increase
treble output and anticlockwise to reduce it.
9. MP3
MP3 volume control
10.RADIO
control
11.CD
CD volume control
REMOTE DEVICE INCEPT
Channel selection buttons
Radio volume
4. NOMENCLATURE AND FUNCTIONS
1
POWER LED
SELECT DOWN UP
MP3
CH 2CH 1 CH 3 CH 4 CH 5
1 2 3 4 5
6 7 8 9 0/--
STANDBY
BASS TREBLE MP3 RADIO CD AUX MIC VOLUME
0
-5
-4
-3
-2
-1 +1
+2
+3
+4
+5
0
-5
-4
-3
-2
-1 +1
+2
+3
+4
+5
5
0
1
2
3
4 6
7
8
9
10
5
0
1
2
3
4 6
7
8
9
10
5
0
1
2
3
4 6
7
8
9
10
5
0
1
2
3
4 6
7
8
9
10
5
0
1
2
3
4 6
7
8
9
10
ON
OFF
3 4 5
7
9
10
11
12 13
1514
1718192021222324
MIC
2 4 6 8 10 12
Page 7
7
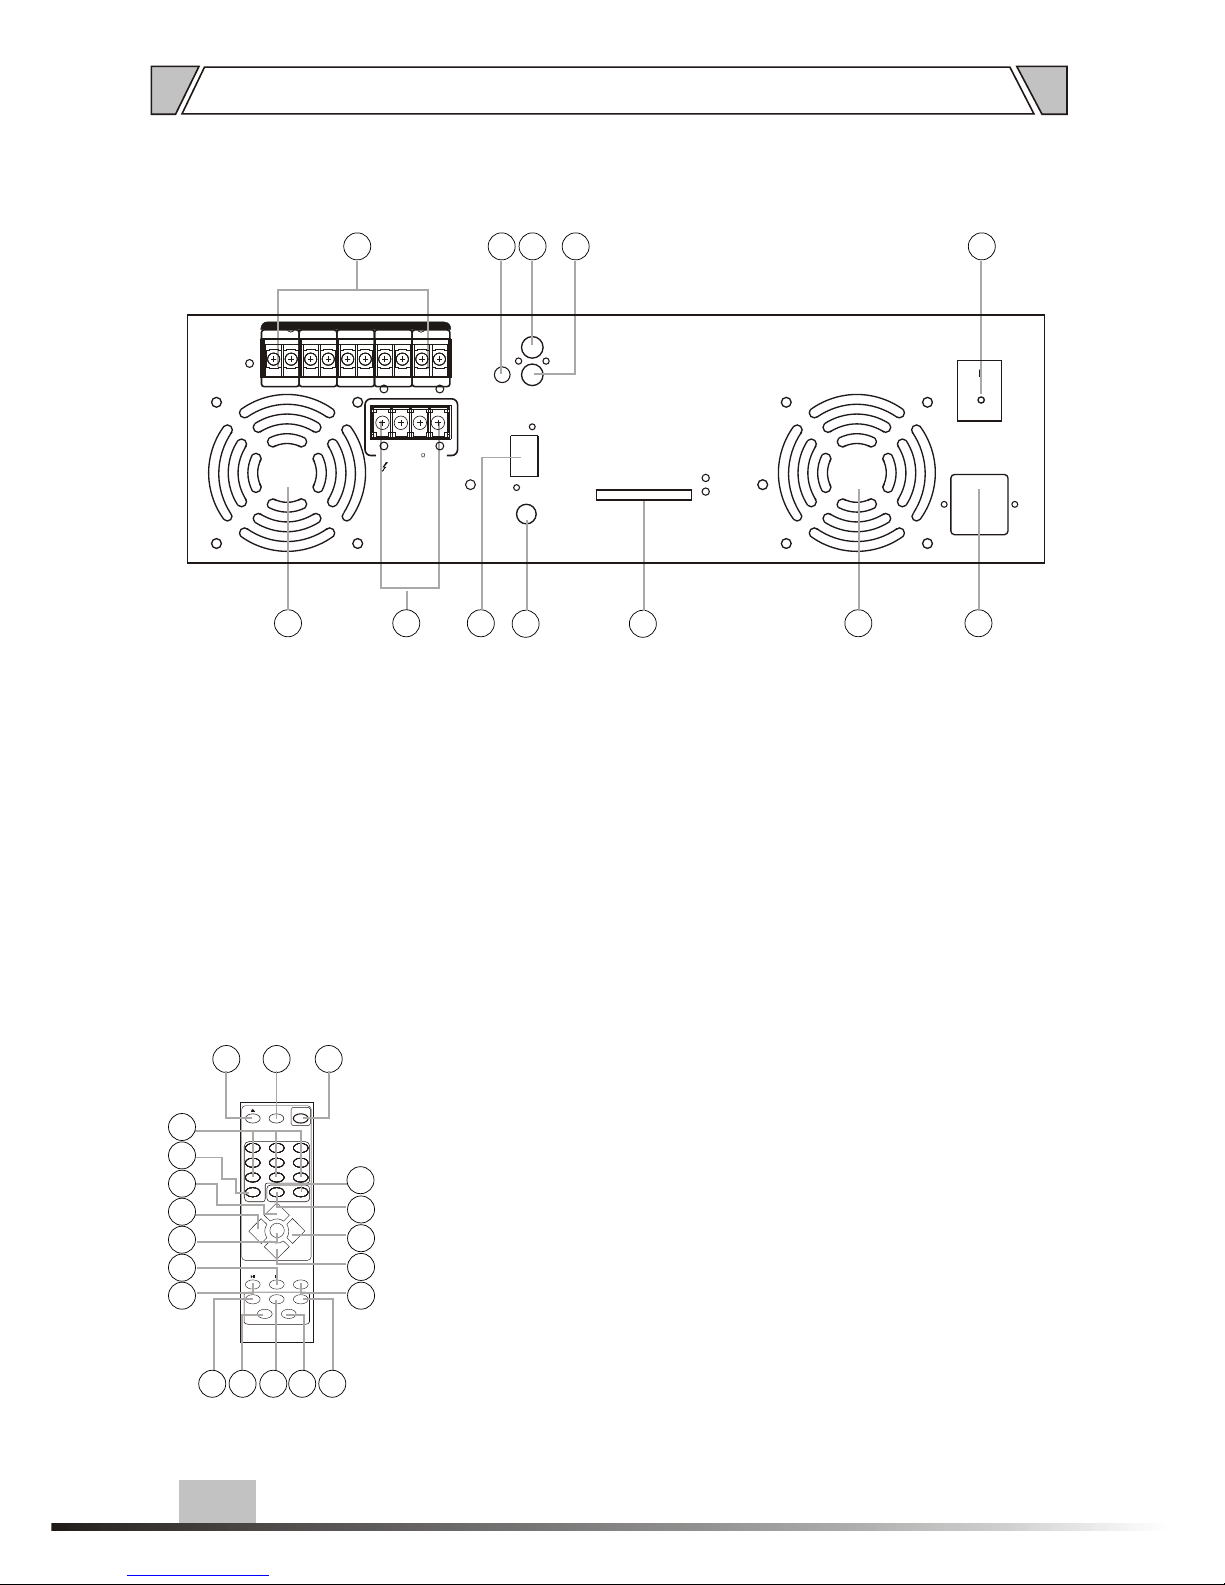
4.2 REAR PANEL
31
32.AUX OUT
Auxiliary output jack, Non-equilibrium of connecting
peripherals signal
33.AUX IN
Auxiliary input jack, Non-equilibrium of connecting
peripherals signal
34.MUTE
Mute Microphone mute level control
35. ZONE(1~5) OUTPUT TERMINAL (100V)
Connecting speakers
25.FAN
26.SPEAKER TERMINALS
Connectors for 4 ohms or 70V and 100V speaker
27.AM ANTENNA
Am-band antenna
28.FM ANTENNA
Fm band 75 ohm antenna
29.SD CARD
30. AC POWER INPUT
31.POWER MAIN SWITCH
NOMENCLATURE AND FUNCTIONS
26
25
FM ANTENNA
AM ANTENNA
AUX OUT
OUTPUT
CH 5 CH 1CH 2CH3CH 4
POWER
MUTE
100V COM 100V COM 100V COM 100V COM 100V COM
100V 70V 4C OM
27
28 29
25 30
32333435
4.3 REMOTE DEVICE
1
3
6
4
97
SELECT
TIME A
REPEAT
AM/FM
AUTO/NORMAL
FREQUENCY
MEMORY
CH
POWER
EDIT
UP
DOWN
LEFT
RIGHT
OK
2
5
8
0/--
132
4
5
6
7
8
910111213
14
15
16
17
18
19
20
1. OPEN/ CLOSE
2. EDIT
3. POWER
4. TIME Addition
5. SELECT
6. RIGHT
7. DOWN
8. REPEAT
9. MEMORY
10. CH
11.AUTO/NORMAL
12.FREQUENCY
13.AM/FM
14.PLAY/PAUSE
15.STOP
16.OK
17.LEFT
18.UP
19.TWO-DIGITAL INPUT AND ZONE COMPLEX
20.NUMBER KEY
SD
AUX IN
ERROR
PLAYING
Page 8
8
70V 100V
COM 4-16
70V 100V
COM 4-16
(T-6601)
(T-6612)
(T-6624)
(T-6635)
167
83
41
28
100V LINE
70V 100V
COM 4-16
(T-6601)
(T-6612)
(T-6624)
(T-6635)
81
41
20
14
70V LINE
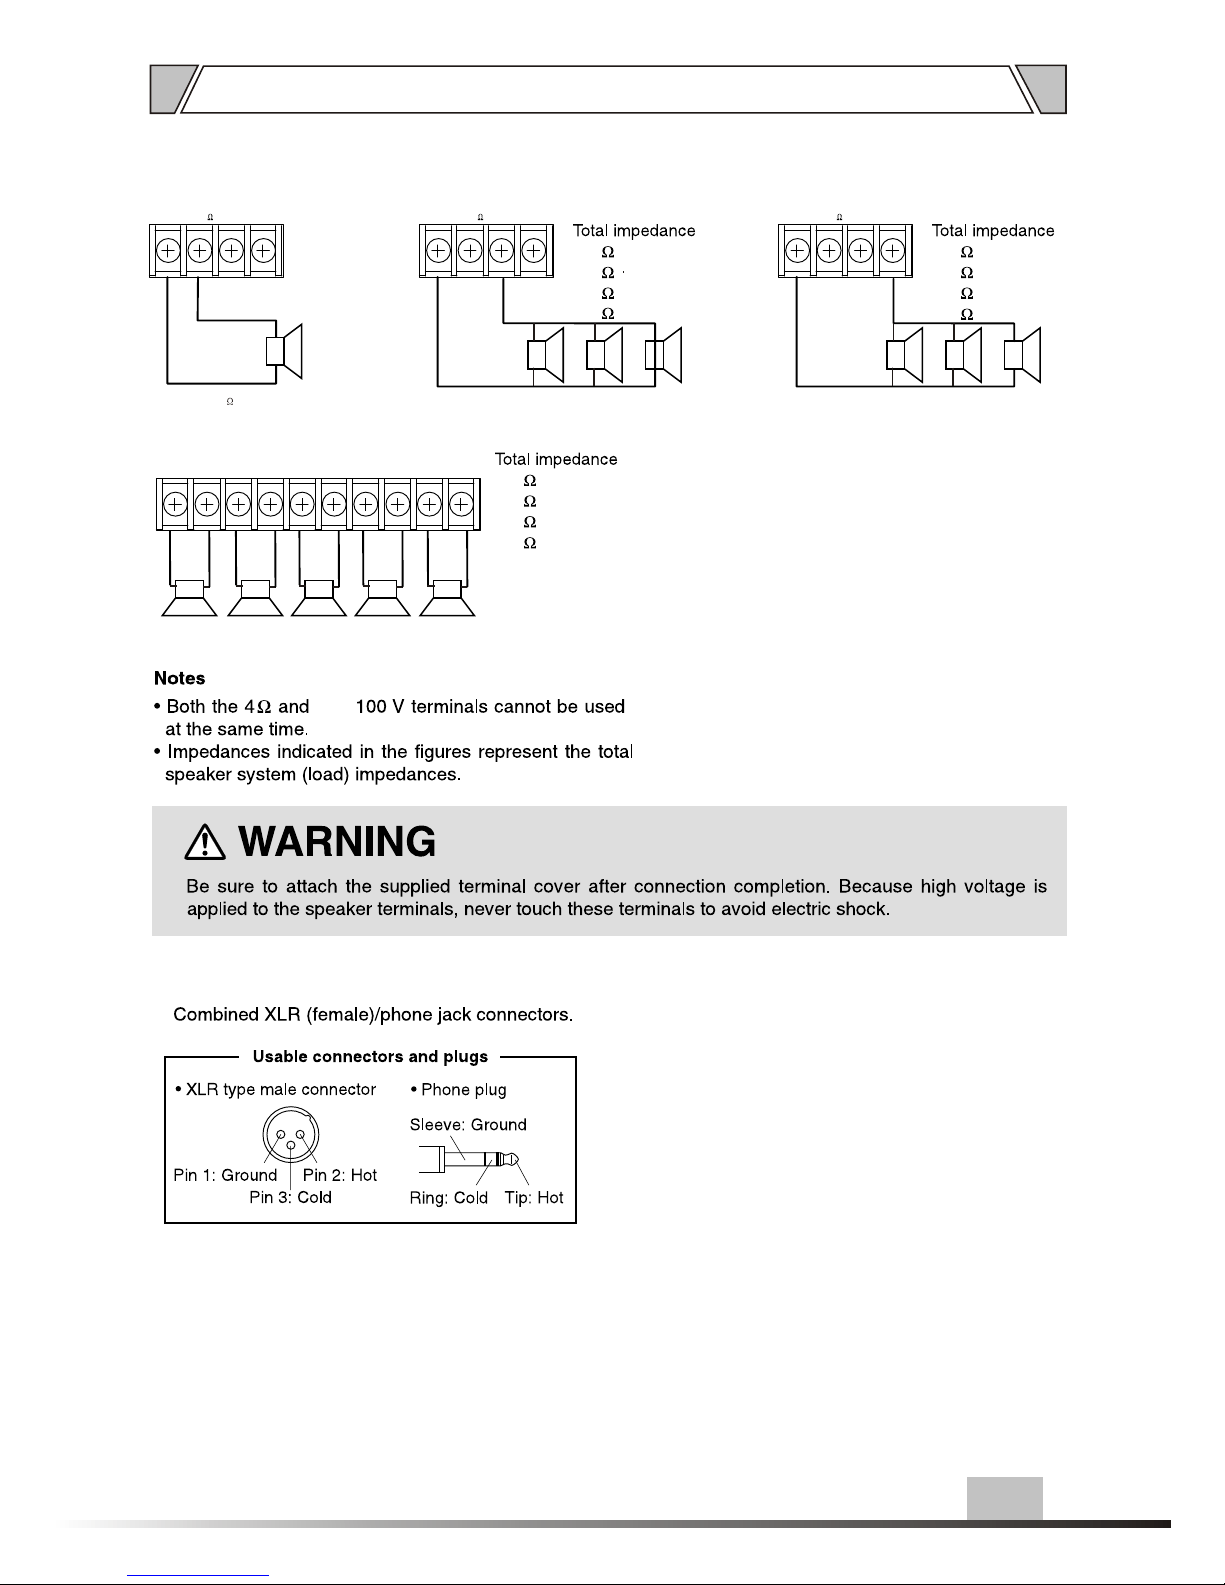
5.1 SPEAKER CONNECTIONS
5.2 XLR CONNECTIONS
4
COM 100V COM 100V COM 100V COM 100V
COM 100V
ZONE 1 ZONE 2 ZONE 3 ZONE 4 ZONE 5
100V LINE 100V LINE100V LINE100V LINE100V LINE
5. CONNECTIONS
(T-6601)
(T-6612)
(T-6624)
(T-6635)
167
83
41
28
70V/
Page 9
FM ANTENNA
AM ANTENNA
AUX OUT
OUTPUT
CH 5 CH 1CH 2CH3CH 4
POWER
MUTE
100V COM 100V COM 100V COM 100V COM 100V COM
100V 70V 4 COM
SD
AUX IN
ERROR
PLAYING
9
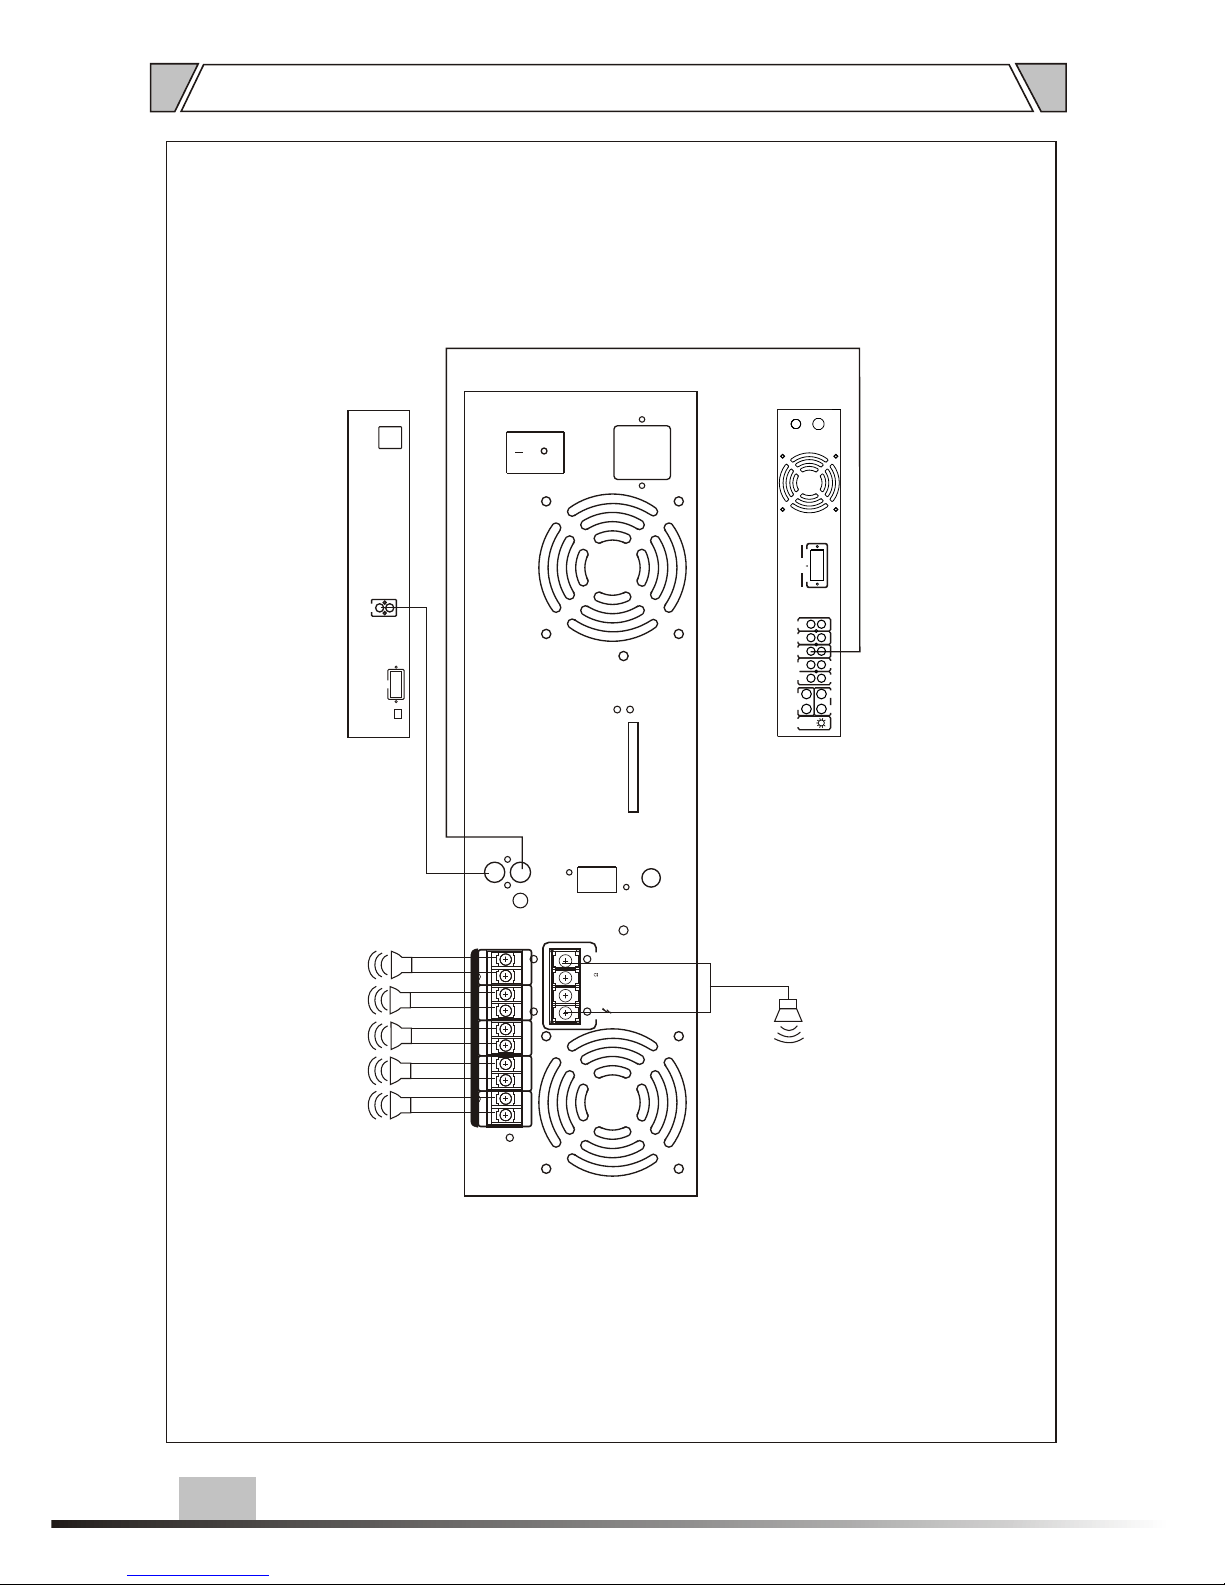
6. APPLICATIONS
AUX2
OUT
AUX1
MIC2
MIC3
MUTE
EMC INPUT
MIC2
MIC3
LINE INPUT
OUTPUT
COM 4-16 70V 100V
MIXER AMPLIFIFER
CONNECT WITH SPEAKERS
SPEAKERS
AUDIO
OUT
AUDIO
OUT
RR
LL
AUDIO SOURCES
COM
ADRESS TAG
Page 10
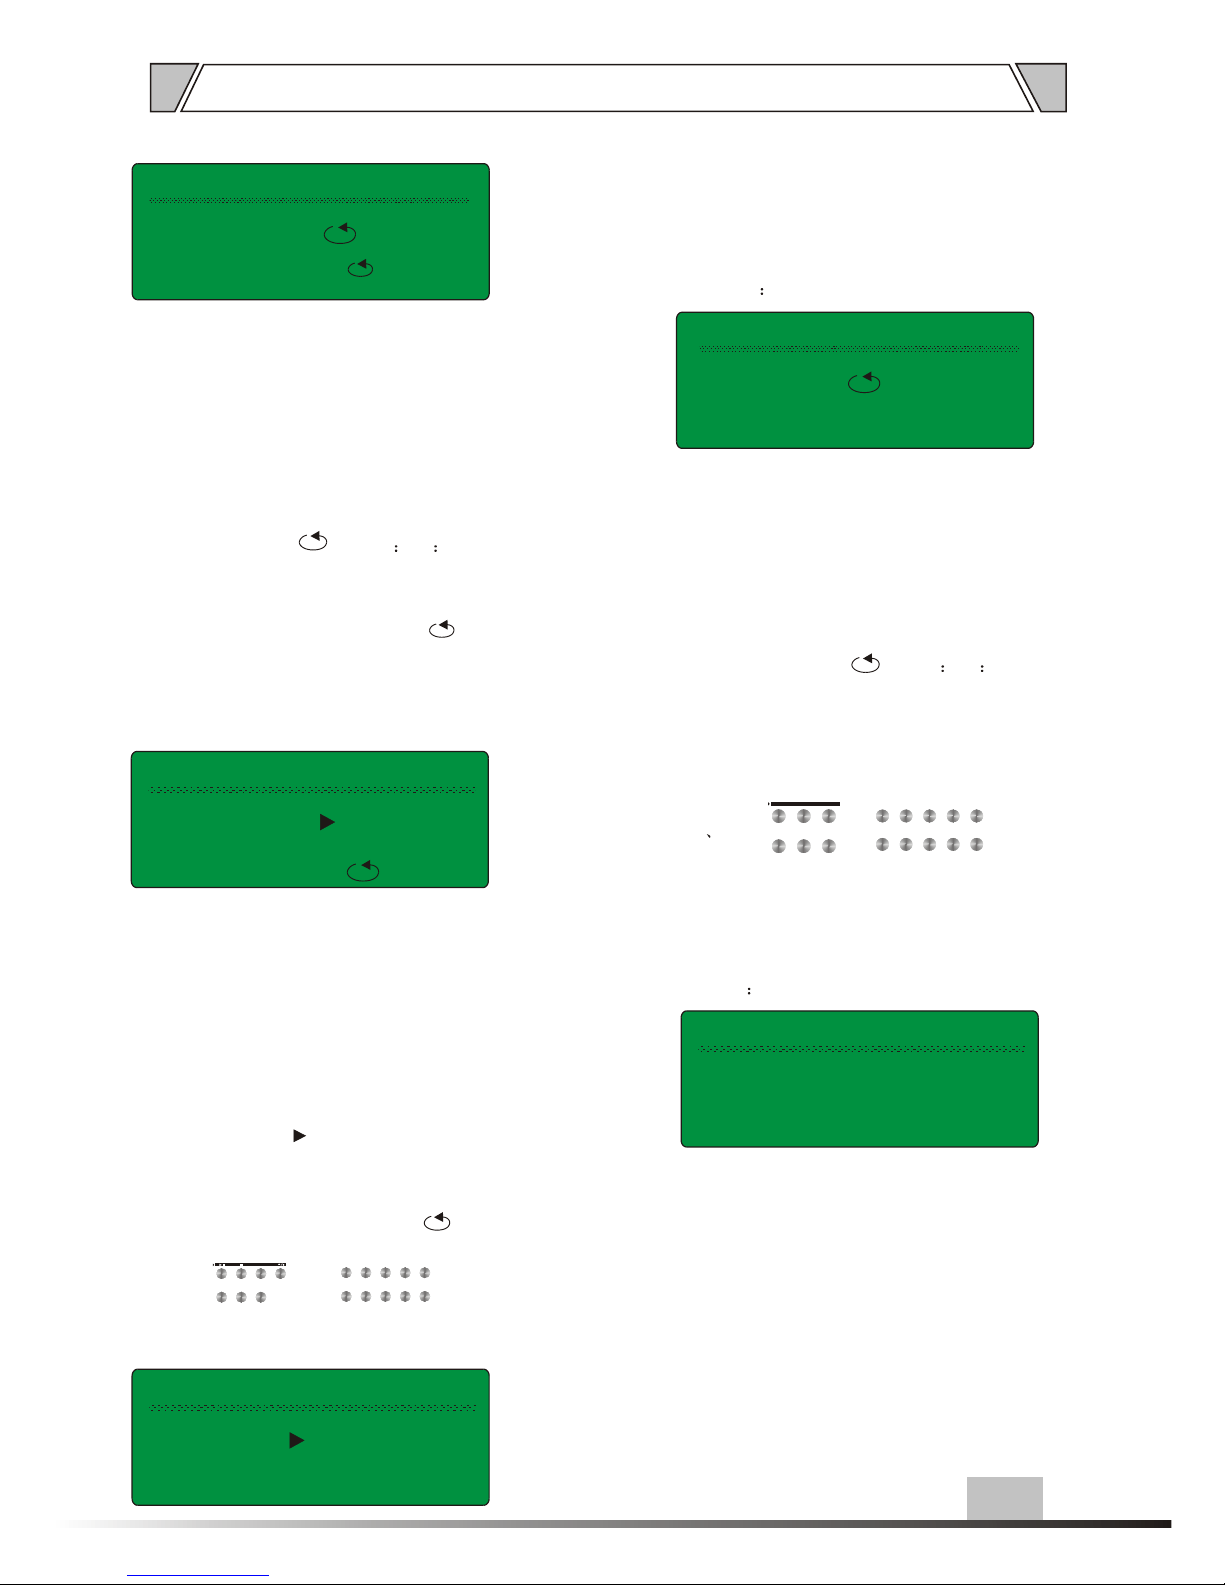
14:57:43
MP3Intraday Next:
Wednesday
01
05
06/10/31
00:01:02
ALL
16:30
Audio:MP3
7.1 BOOT-STRAP INTERFACE
7. BALSIC OPERATION
10
For example:14:57:43 Wednesday 06/10/31
Time minute second week year/month/day
The second line: audio selector, circle single
song/ circle
All song operate state
For example: MP3 01 00 01 02
The third line: programme indication, programme content
For example: Intraday Next: MP3
05
16:30
1. Press select key, or remote device,Display:
14:57:43
01 01:10:20
Fist line: system time, Week, date display
For example Wednesday 06/10/31
Time minute second Week, year/month/day
The second line: audio selector, circle single song/circle all
song operate state
For example: CD
The third line: programme indication, programme content
For example: Intraday Next: CD
07
16:30
14:57:43 Wednesday 06/10/31
14:57:43
Intraday Next: CD
01
07 16:30
Audio:CD
7.2 CD OPERATE
2 . Here,
1 2 3 4 5
6 7 8 9 0/BIT
SELECT DOWN UP
CD REPEAT
and
are CD's operate key,
Play, Stop; circle manner,key of Open/Close.
-- " "
"
If play the 13th songs, press 0/ then press 1
and 3"
Display :
14:57:43 Wednesday 06/10/31
--
00:00:00
Intraday Next: No operate
Audio:CD
7.3 MP3 OPERATE
1
.Press select key,or remote device.
Display
14:57:43
Intraday Next: No operate
Wednesday
01
06/10/31
00:01:02
Audio:MP3
01 00 01 02
Fist line: system time, Week, date display
For example: 14:57:43 Wednesday 06/10/31
Time minute second Week year/month/day
The second line: audio selector, circle single song/
circle all song operate state
For example: MP3
The third line: programme indication, programme
content
For example: Intraday Next: No operate
2 Here
1 2 3 4 5
6 7 8 9 0/BIT
SELECT DOWN UP
MP3 PLAY STOP PAUSE
and
are Mp3
Operate key,Play,Stop; circle manner.
7.4 AM/FM TUNER
1
.Press select key,or remote device.
Display
14:57:43 Wednesday 06/10/31
Audio:AUDIO
89.50
Intraday Next: No operate
FM01
Fist line: system time, week, date display
For example: 14: 57:43 Wednesday 06/10/31
Time minute second week year/month/day
The second line: audio selector, frequency, broad-
casting station
For example: AM/FM TUNER FM01 89.50
The third line:programme indication, programme
content
Fist line:system time,Week,date dispay
For example: Intraday Next: No operate
Page 11
BALSIC OPERATION
2 . Here
are FN/AM switch.
1 2 3 4 5
6 7 8 9 0/BIT
SELECT DOWN UP
and
RADIO
AM/FM Hz/NO AUTO/AMNUAL
3
4
5
. Storage broadcasting station with manual, first input
broadcasting station, then input frequency number,
press remote device available
. Manual frequency operate. First press panel key-press
(Hz/ No) or remote device (Frequency) key, then press
broadcasting station frequency's number key input
frequency is ok.
. Automatic search broadcasting station. Press panel key
or remote device select auto function. Then press up or
down search automatic
When display red, show Selector on play.
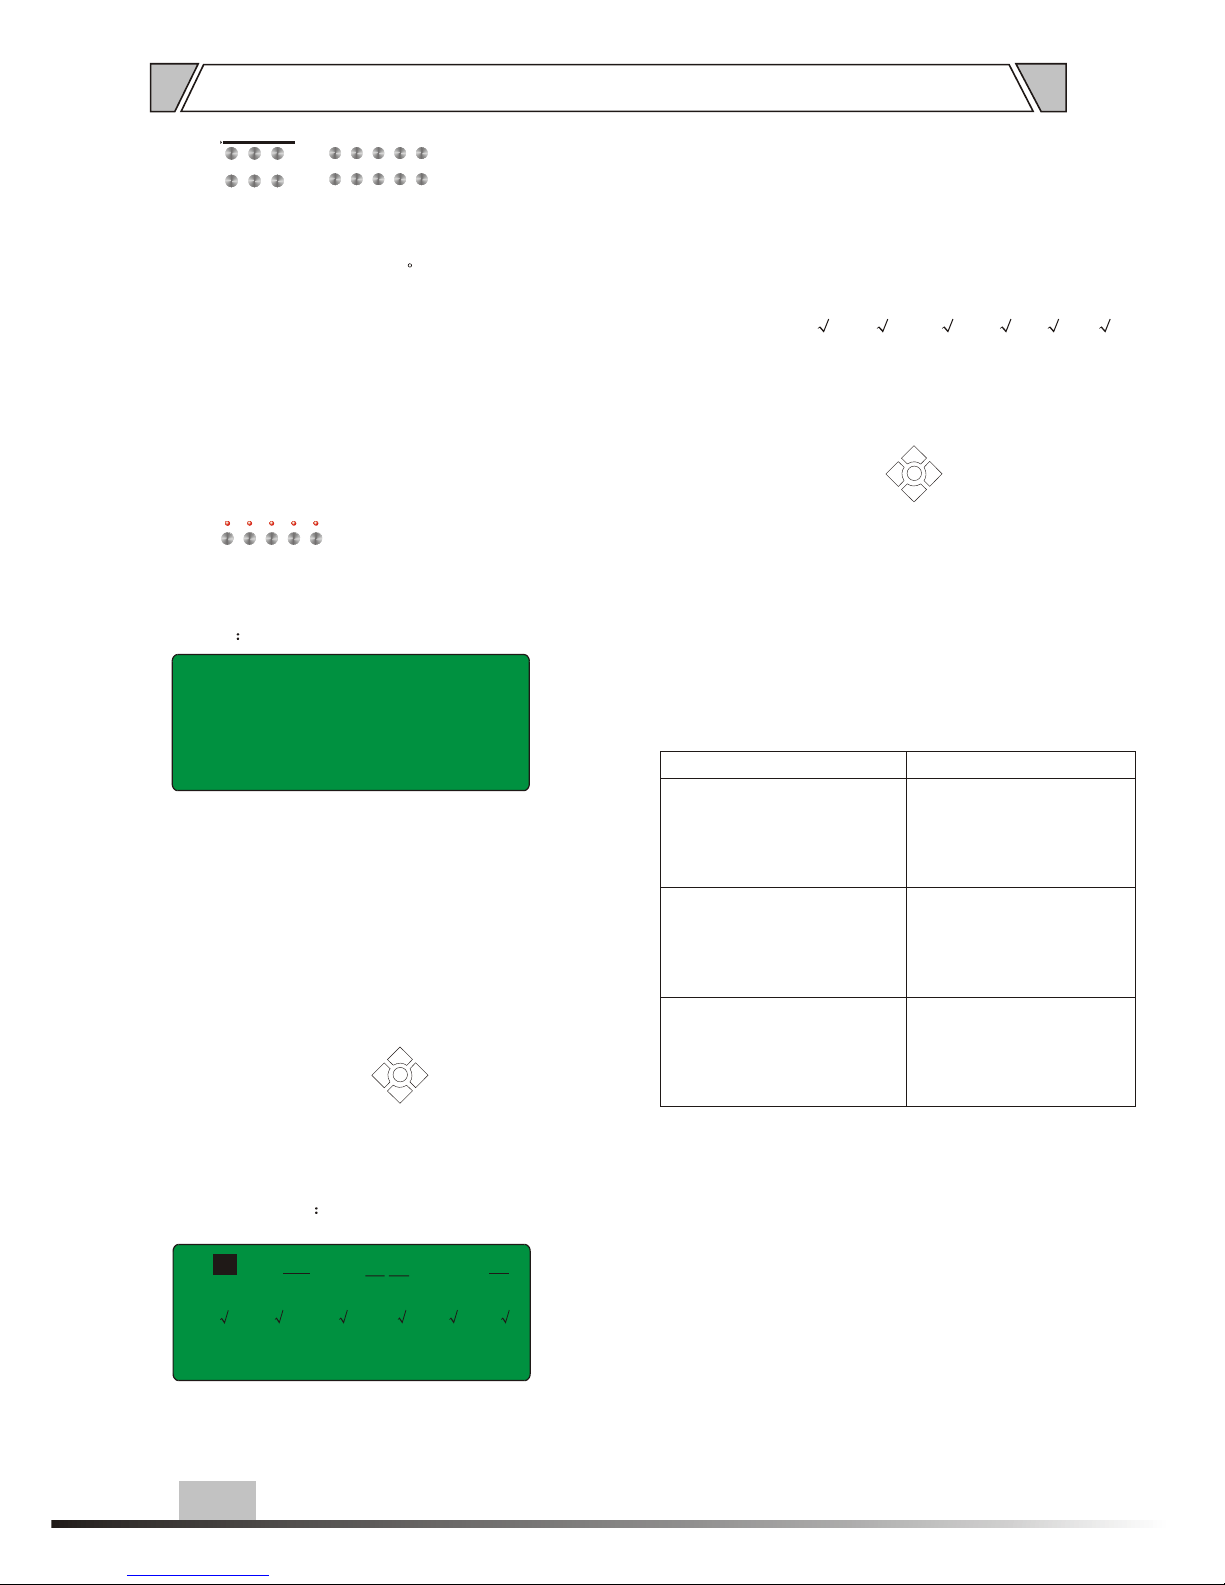
CH 2CH 1 CH 3 CH 4 CH 5
7.5 PAGING SELECTOR CONTROL MANUAL
7.6 TIME SETUP
Throughout TIME ADJ key of remote device, display
following
Time Setup
06/10/01
10:33:48
Wednesday
Fist line: time setup title
The second line: date, time display
For example: 06/ 10/ 01 10:33:48
year/month/day time
The third line: week
For example: Wednesday
Throughout remote device key combination operation.
UP
DOWN
LEFT
RIGHT
OK
7.7 EDITING PROCESS
Press select key, or remote device.
Display following
NO:
CD
Song: 01
Cancel Exit
Mon
01
12:10
Tue Wed The Fri
FM Cancel all
Sot
Fist line: step, audio state, time, music display
For example:01 step AM/FM TUNER 12:10 music 01
Step audio time music
The second line: affirm process which day run
For example:
Mon Tue Wed
FriThe Sot
Express execute process, express not execute
process
X
The third line: Operate select,Delete (present
process),Enter, cancel (Editing process)
Throughout remote device combine
UP
DOWN
LEFT
RIGHT
OK
Note:1. Process approach only express Process
position, not Process execute order
2.Only edit one process in same minute same
day.
If it has several processes in same minute,
only execute first process, another was ignored
7.8 SIMPLE FAULTS EXCLUSIVE
Faults situation
1.Connecting well, but there
is no sound output
2.Normal power on, but there
is warning when using
3.Normally use but suddenly
there is no sound output
Faults cause
1 Power off or plug touch
no good
2 Fuse burned
3 Minimum volume
4 No input signal
1 Overload short circuit or
destroy
2 Inconstant power voltage,
it is too low or too high
3 too heavy overload
1 Too high temperature,
machine input temper ature protection
2 connecting wires touch
no good
7.9 INSTALLATION ATTENTION
1.Do not jam blow-hole
2.It should be stop to use the destroy power wires
immediately
3.Amplifier should not be put in the no good blow-hole
place such as : dusty, humidity, sunshiny, high
temperature or near heat place, or vibrated place.
4.Machine shell should be touchdown safely
5.Power jack and socket should be connected wel
6.When power on and input signals, if you hear the
short warning sound, it means output short circuit
faults, it should cut off the power immediately to
exclusive power on again.l
11
Page 12

BALSIC OPERATION
8.0 NOTE
1. Because of organic computer apron string, be incapable of
sequence celerity ON/OFF Power . If happen any function
fault be likely to cause static or interfere arose. Pray before
organic power supply, wait 5 second any boot-strap,so that
let computer entireness restoration if here function up to
snuff follow organic can up to snuff Employment.
2. Please use the positive and quality DISC in order to get
more stable program operations, it also avoid to influence
the programs implemented and shorten the life of CPU
caused by hard read of the DISC.
12
Page 13
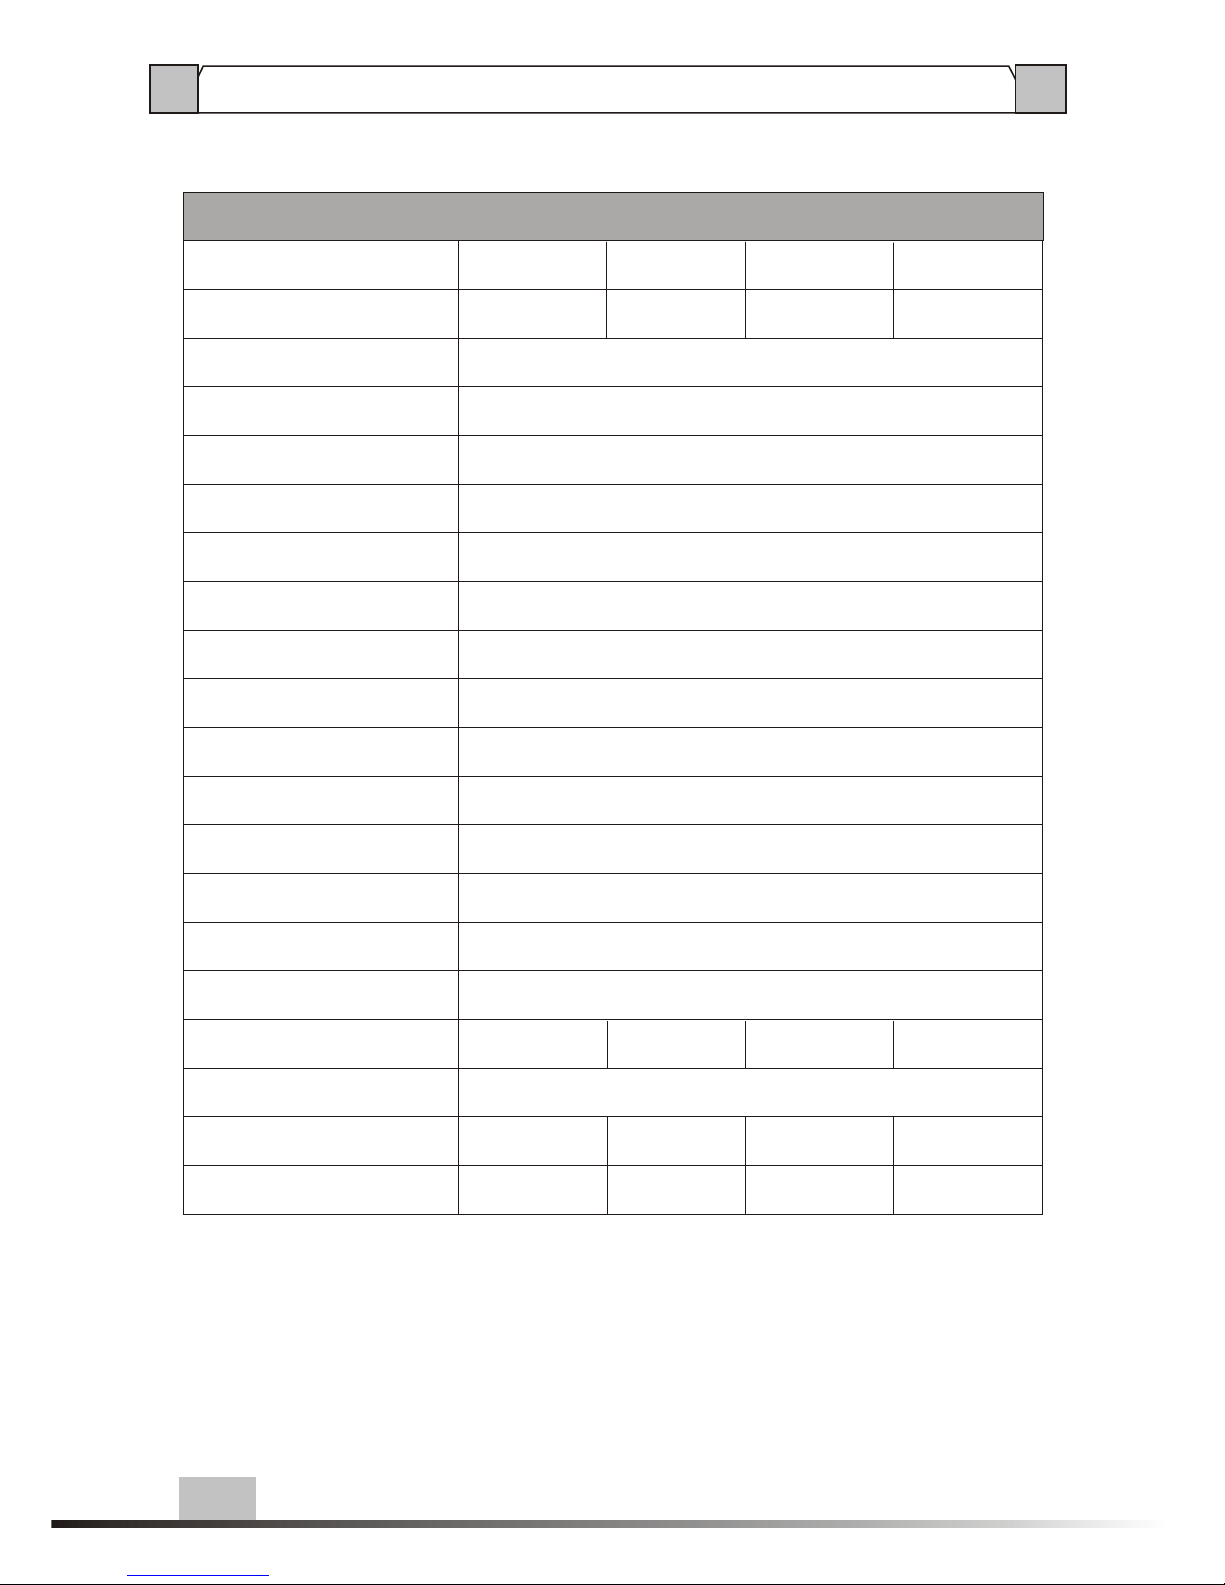
8. SPECIFICATIONS
13
Response 105dB
80Hz--15KHz ¡À1.5dB
50KHz
Overtremperature¡¢Overload¡¢Short¡¢Circuit
MODEL
RATED OUTPUT POWER
INPUT SENSITIVITY
DAMP QUOTIETY
SNR
FREQUENCY
TUNER AM FREQUENCY
AM
TUNER FM FREQUENCY
FM
THD
SPEEDUP RATIO
RADIATOR METHOD
INDICATOR LIGHT
PROTECT
POWER
-1V 0dBV
400
Compulsive wind cooling
<1%
70V/ms
522-1611
9KHz
87-108
60W
T-6601 T-6612
120W
T-6624
240W
T-6635
350W
3 IN 1 POWER AMPLIFIER
RATED POWER
DIMENSION(MM)
N/W(KG)
G/W(KG)
160W
484¡Á448¡Á132
15.5Kg
14Kg
17.6Kg
16.1Kg
22.1Kg
20.6Kg
23.8Kg
21.8Kg
220W
340W 450W
X
~ 220-240V 50/60Hz
X
Page 14
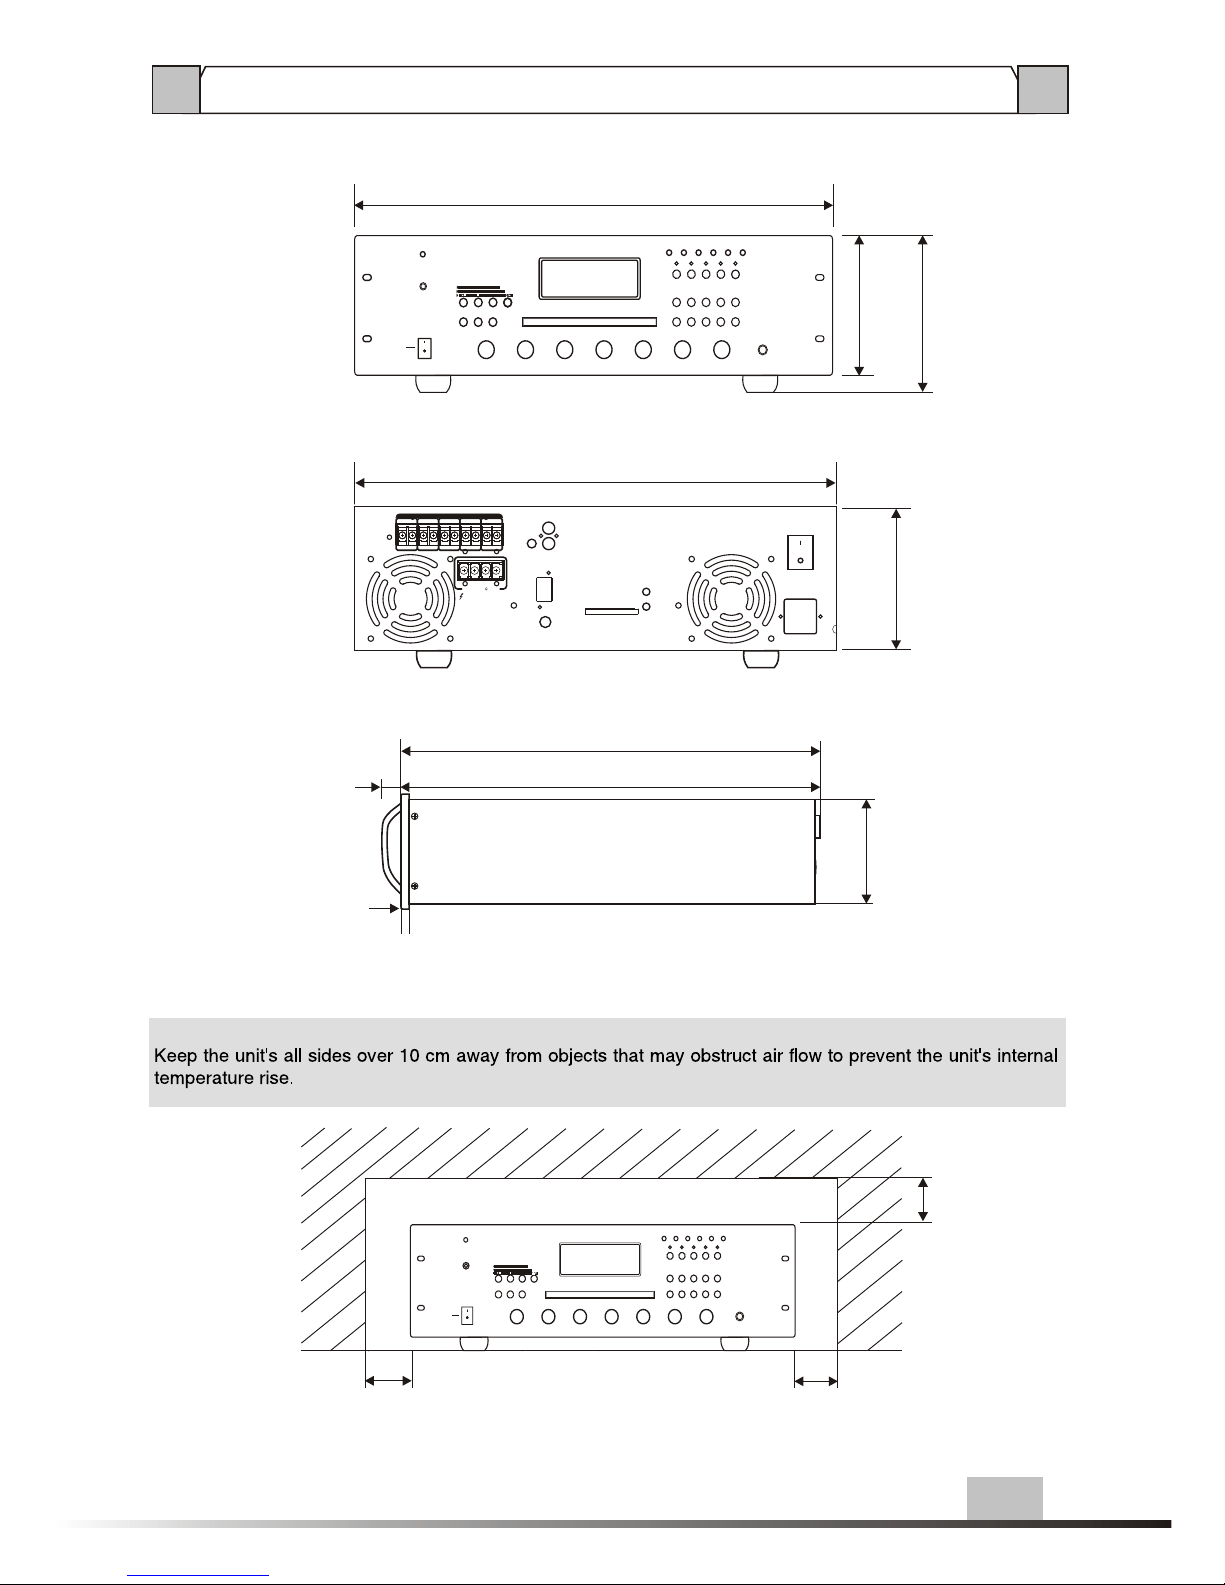
128
132
138
436
484
100
Over
100
Over
Over
100
UNIT :mm
9. DIMENSIONAL DIAGRAM
UNIT :mm
POWER LED
SELECT DOWN UP
2 4 6 8 10 12
CH 2CH 1 CH 3 CH 4 CH 5
MIC
1 2 3 4 5
6 7 8 9
0/--
STANDBY
BASS TREBLE MP3 RADIO CD AUX MIC VOLUME
0
-5
-4
-3
-2
-1 +1
+2
+3
+4
+5
0
-5
-4
-3
-2
-1 +1
+2
+3
+4
+5
5
0
1
2
3
4 6
7
8
9
10
5
0
1
2
3
4 6
7
8
9
10
5
0
1
2
3
4 6
7
8
9
10
5
0
1
2
3
4 6
7
8
9
10
5
0
1
2
3
4 6
7
8
9
10
ON
OFF
MP3
RADIO
CD
PLAY
AM/FM
STOP
Hz/NO
REPEAT
PAUSE
AUTO/AMNUAL
POWER LED
SELECT DOWN UP
2 4 6 8 10 12
CH 2CH 1 CH 3 CH 4 CH 5
MIC
1 2 3 4 5
6 7 8 9 0/BIT
STANDBY
BASS TREBLE MP3 RADIO CD AUX MIC VOLUME
0
-5
-4
-3
-2
-1 +1
+2
+3
+4
+5
0
-5
-4
-3
-2
-1 +1
+2
+3
+4
+5
5
0
1
2
3
4 6
7
8
9
10
5
0
1
2
3
4 6
7
8
9
10
5
0
1
2
3
4 6
7
8
9
10
5
0
1
2
3
4 6
7
8
9
10
5
0
1
2
3
4 6
7
8
9
10
ON
OFF
MP3
RADIO
CD
PLAY STOP
REPEAT
PAUSE
AUTO/AMNUAL
FM ANTENNA
AM ANTENNA
AUX IN
AUX OUT
OUTPUT
CH 5 CH 1CH 2CH3CH 4
POWER
MUTE
100V COM 100V COM 100V COM 100V COM 100V COM
100V 70V 4 COM
128
25
423
417
6
14
SD
ERROR
PLAYING
Hz/NOAM/FM
Page 15

AUDIOAUDIO
PUBLIC ADDRESS SYSTEM
Version:V0.1
 Loading...