

ITC VISIONS 3000 Quick Start Manual

International Temperature Control, Inc. 2415 E. Huron, P.O. Box 805, Au Gres, MI 48703 USA Ph: (989) 876-8075 Fax: (989) 876-6640 Web: www.itc-controls.com E-mail: sales@itc-controls.com
1
2
3
VISIONS 3000
3 Phase Power Cord Wiring For 4
Wire ’Delta’ Sys tems.
Note: The phases are wired using
numbers 1—3. With ground being
the 4
th
. wire.
C
AUTION: Shut-off & Lock-out
p
ower before working on any
e
lectrical devices
US 4-Wire Wiring
VISIONS 3000
VISIONS 3000
QUICK START GUIDE
QUICK START GUIDE
Change Zone Output Power
In RUN, MONITOR or DATABASE
screen, press the EDIT ZONE hotkey to bring up Set Zone Power
dialog box. Enter Zone number
and then the output power percentage
Link A Zone To Another Zone
Turn Off Zone
Change Temperature Of Group Of Zones
In RUN, MONITOR or DATABASE
screen, repeatedly press EDIT ZONE
hotkey to bring up “Link Zones
Together” dialog box. Enter zone
number which you wish to link
then number of the zone to which
you wish to link to.
In RUN, MONITOR or DATABASE
screen, press the EDIT ZONE hotkey and enter the number of the
zone you wish to turn off and enter
“0” for the value.
In RUN, MONITOR or DATABASE
screen, repeatedly press the
GLOBAL hotkey to bring up the “Set
Global Temperature” dialog box.
Enter the number of the start and
end of the block of zones you wish
to change, then enter the new
temperature.
Change Output Power For A Range Of Zones
In RUN, MONITOR or DATABASE screen,
repeatedly press the GLOBAL hotkey to
bring up the “Set Global Power” dialog
box. Enter the number for the start and
end of the block of zones you wish to
change, then enter the new output
power
Change To Graph Mode
In RUN, STOP or MONIOTR screen,
press SETUP hotkey and enter any
password into the Password dialog
box. From the Setup dialog box
enter “12” for Graph Mode.
Increment Zone Temperatures
In RUN, MONITOR or DATABASE
screen, repeatedly press the
GLOBAL hotkey to bring up the “Set
Global Temperature” dialog box.
Press the GLOBAL INC hotkey in the
dialog box, enter start and end
numbers of the block of zones you
wish to change, then enter the
temperature value you wish to
increase.
Decrement Zone Temperatures
In RUN, MONITOR or DATABASE
screen, repeatedly press the GLOBAL
hotkey to bring up the “Set Global
Temperature” dialog box. Press the
GLOBAL DEC hotkey in the dialog
box, enter the start and end numbers
for the block of zones you wish to
change, then enter the temperature
value you wish to decrease.
Apply Boost
In RUN screen, press BOOST hotkey
to activate boost mode. Note that
boost mode only affects the cavity
zones.
Activate Standby
In RUN screen, press STANDBY hotkey to activate standby mode. Note
that standby mode applies to all
zones.
Save A Toolset
In RUN, MONITOR or STOP screen,
press SETUP hotkey and enter a valid
password into the Password dialog
box—the Setup hotkey will then
change to show access. From the
Setup dialog box enter “14” to enable
saving of the current operational
data as either a new toolset or as
new data for an existing toolset.
Load A Toolset
In RUN, MONITRO or STOP screen,
press SETUP hotkey and enter any
password into the password dialog
box. From the Setup dialog box,
enter “13” to enable loading on a
new toolset. Dialog box will warn if
an existing toolset will be overwritten.
Change between “oF” and “oC”
In RUN, MONITOR or STOP screen,
press setup hotkey and enter a valid
Password into the password dialog
box—the Setup hotkey will change to
show access. In the Setup parameter
dialog box, enter “49” to change
from degrees “F” to “C” or from “C” to
“F”.
Change between type “J” and “K” T/C
In RUN, MONITOR or STOP screen,
press Setup hotkey and enter a valid
password into the password dialog
box—The Setup hotkey will change to
show access in the Setup parameter
dialog box, enter “47” to change
between type “J:” or “K” thermocou-
ples.
Temperature Limits
In RUN, MONITOR or STOP screen,
press Setup hotkey and enter a valid
password into the password dialog
box—The Setup hotkey will change to
show access in the Setup parameter
dialog box, enter “4” to change the
maximum setpoint limit for the cavity
zones. Enter “9” to change maxi-
mum setpoint limit for manifold
zones..
Power Limits
In RUN, MONITOR or STOP screen,
press Setup hotkey and enter a valid
password into the password dialog
box—The Setup hotkey will change to
show access in the Setup parameter
dialog box, enter “3” to change the
maximum power limit for the cavity
zones. Enter “8” to change maximum
setpoint limit for manifold zones..
Change The Time
In RUN, MONITOR or STOP screen,
press Setup hotkey and enter a
valid password into the password
dialog box—The Setup hotkey will
change to show access in the
Setup parameter dialog box, enter
“20” to change the time
Change Screen Mode
In RUN, MONITOR or STOP screen,
press Setup hotkey and enter a
valid password into the password
dialog box—The Setup hotkey will
change to show access in the
Setup parameter dialog box, enter
“23” to change screen mode. 0 =
display normal mode. 1 = highdensity mode and 2 = low density
mode.
Change Passwords
In STOP or MAIN screen , press
Setup hotkey. When in Setup
dialog box entering “11” enables
you to change the current access
level by entering a new numeric
password. Press enter key to log
the password.
POWER CONNECTION:
With the VISIONS 3000 turned off, connect the
input power cord to a suitably rated power supply
using the wiring details contained in the diagram.
TOOL CONNECTION:
Connect the mold power & thermocouple cables
to both the mold and VISIONS 3000. Ensure the
cables are undamaged and connected to the
appropriate connectors.
NOTE: Swapping power & thermocouple cables
can lead to tool and controller damage.
POWER ON:
Switch on the VISIONS 3000 using the Isolator
mounted on the front door. After approximately
30 seconds the log screen will appear.
CAUTION:
E
lectrical connections must only be made by qualified technicians. To prevent electrical shock from
e
xposed current carrying components, Only Female inserts must be used on connectors which
o
utput power to another device, while Male inserts must be used on connectors which receive
p
ower from another device.
VISIONS 3000 QUICK START
GUIDE
International Temperature Control, Inc. 2415 E. Huron, P.O. Box 805, Au Gres, MI 48703 USA Ph: (989) 876-8075 Fax: (989) 876-6640 Web: www.itc-controls.com E-mail: sales@itc-controls.com
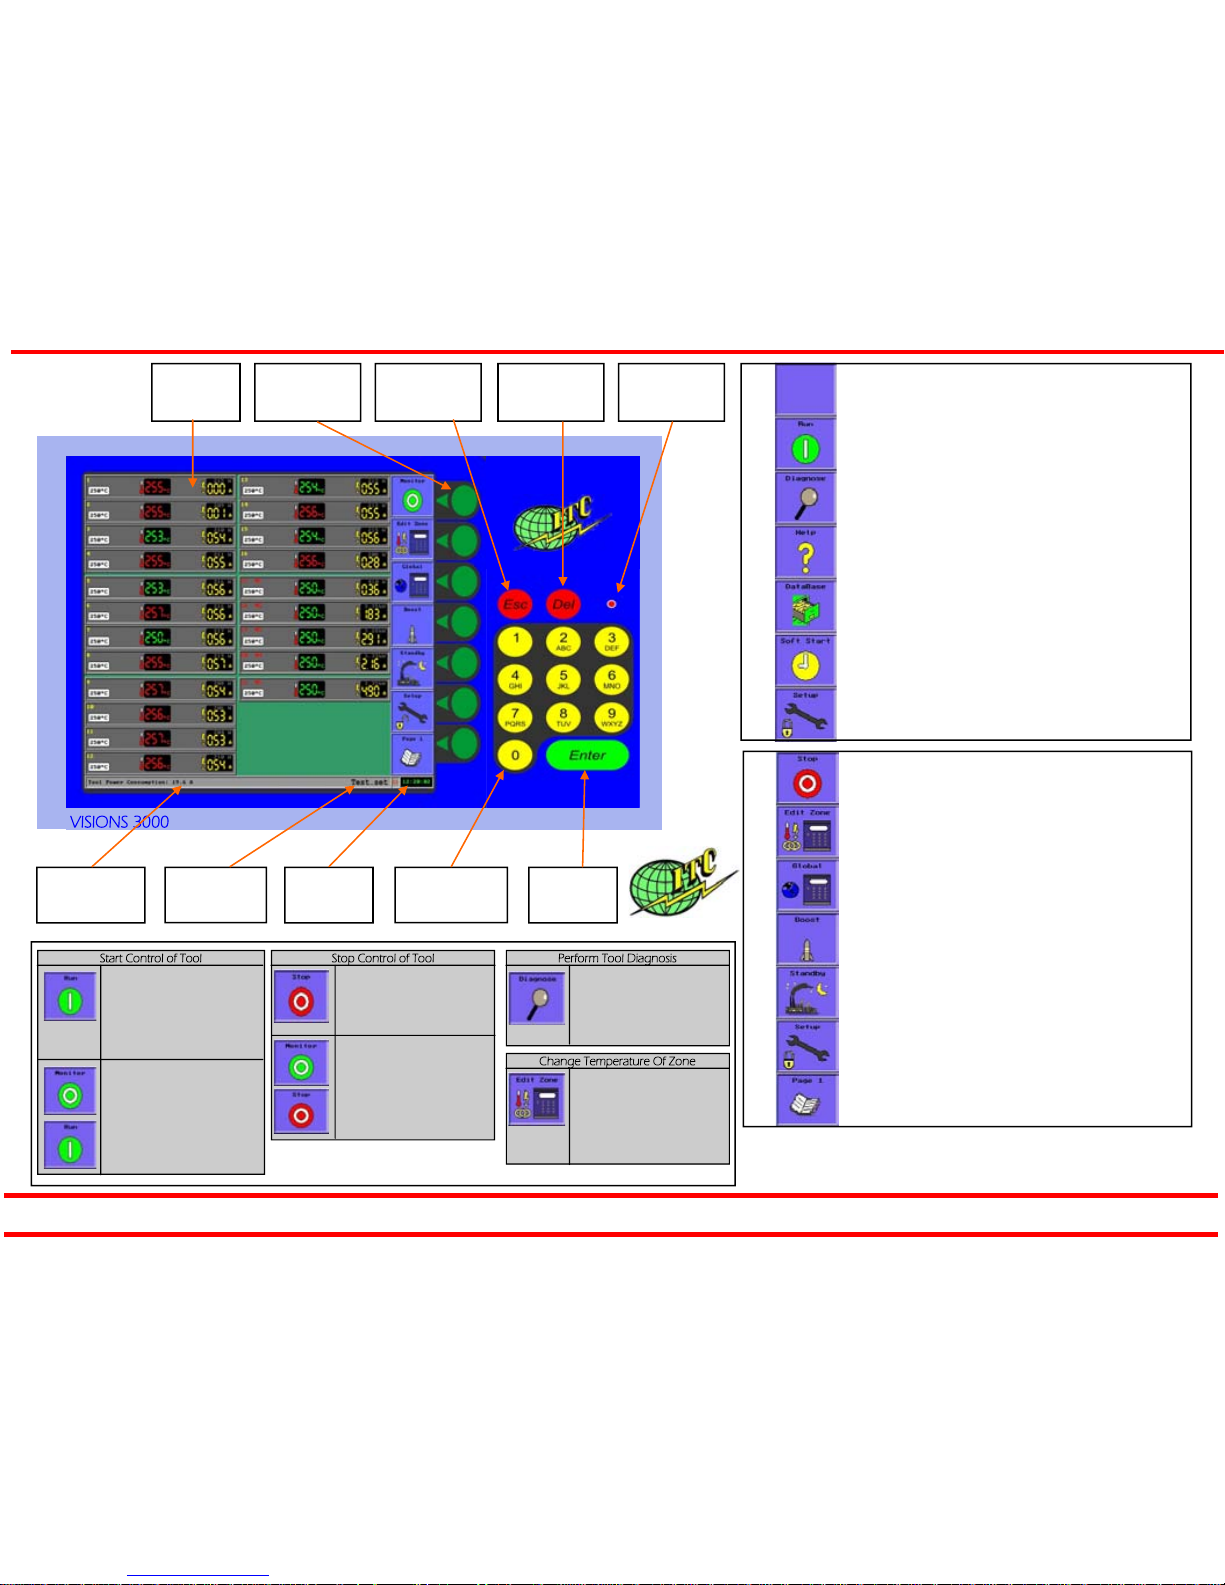
TOP BOX
Main Screen
Hotkeys
Use to select
desired function
Esc(ape) Key
Use to cancel
current operation
Del(ete) Key
Use to delete
entered value
Active Tool-
set*
Real Time
Clock
Numeric Keypad
Use to enter value
for parameter
Enter Key
Use to select
entered value
Power Reading*
Shows total power
consumption
Press once to cancel RUN mode and enter STOP mode. Press
twice, quickly to stop control but remain in the RUN screen to
view updated measured values.
Select to bring up dialogue box that will allow editing of zone
setpoint, output power or linked zone. Enter zero to turn zone off.
Select to bring up dialogue box that will allow editing of a
defined group of zone setpoints, output powers of linked zones.
Enter zero to turn zones off.
Press to temporarily boost the setpoints of the cavity zones. Use
Setup to define Boost parameters.
Press to drop all zone setpoints until Standby is cancelled. Use
Setup to define Standby parameters.
Use to bring up dialogue boxes that enable you to configure the
system. Note that Setup access is password protected.
Pressing this hotkey will step through pages of zones. This will
only work if the number of zones configured on the system
exceeds a single screen.
RUN MODE SCREEN
Press to enter RUN mode and start control of the mold tool
This hotkey selects the tool diagnosis function.
Selects the help screens.
Enter the Database area where it is possible to select, delete and
load toolsets.
Select this function to introduce reduced power to the tool for a
predefined period of time. Use SETUP to define Soft Start parameters.
Use to bring up dialogue boxes that enable you to configure the
system. Note that Setup access is password protected.
STOP MODE SCREEN
VISIONS 3000
Start Control of Tool
From the Start UP screen,
press the RUN hotkey to
enter RUN mode and start
control of the tool. An automatic soft start, power ramp
will be appl ied.
If the Monitor function is ON,
press MONITOR hotkey to
enter Monitor mode, then
press RUN hotkey to enter
RUN mode. An automatic
soft start power ramp will be
applied.
Stop Control of Tool
While in RUN mode, press
STOP hotkey to stop control
of the tool and return to the
Start up (Stop) screen.
If Monitor function is ON,
press the MONITOR hotkey
to enter Monitor mode,
then press STOP hotkey to
stop control of the tool.
Perform Tool Diagnosis
In Stop screen, press the
DIAGNOSE hotkey to
enter tool diagnose section and perform a full tool
validation.
Change Temperature Of Zone
VISIONS 3000 QUICK START GUIDE
June 15, 2010
In RUN, MONITOR or DATABASE screen, press EDIT
ZONE hotkey. In next dialog box, enter the zone
number and the new tem-
Power On
Light
 Loading...