

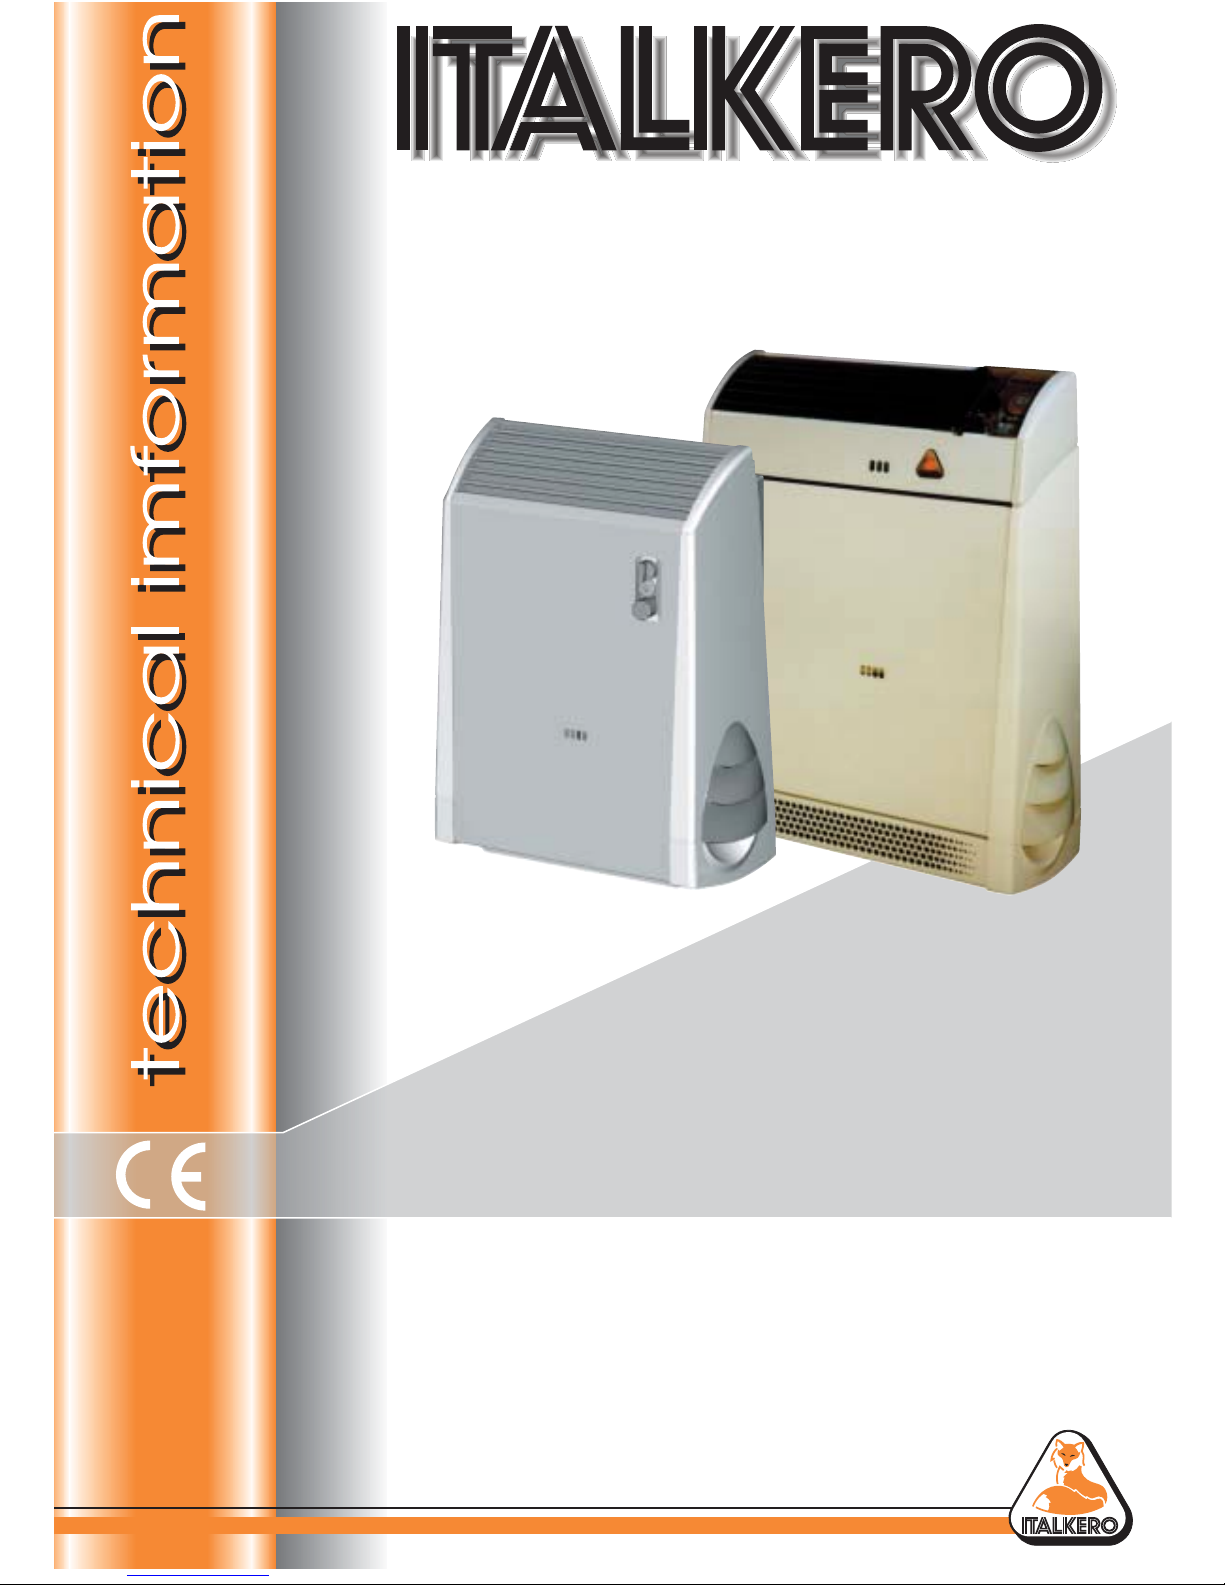
Wall gas radiator.
0694
n°
BN3612
- NATURAL -
INSTRUCTION MANUAL
for the USER
Echo XN 18
Echo XN 30
Echo XN 45
Models: TC, TV-TVO, Compact

user
Index
Basic safety rules Pag. 5
General advice “ 6
Finding out the "Echo" convector “ 8
Convector use:
- Setting service. “ 9
- Timer and watch regulation. “ 12
- Thermostat environment regulation “ 13
- Fan start “ 13
Long periods shut down “ 14
Cleaning “ 15
Maintenance “ 15
Anomalies and solutions “ 15

user
Kind customers
Congratulations on your purchase of our Echo convector!
We thank you for choosing our Echo convector.
This high quality, product will provide you efficiency, comfort, quietness
and safety for years to come.
An Authorized Technical Service Centre is prepared
to maintain this product’s high efficiency, answer to any of your
questions, as well as provide you with any replacement parts.
This manual contains important safety instructions
that must be read and understood prior to the use of the Echo convector.
user
The Echo Fox convector
which you have purchased, has a
Certificate Warranty
that begins from the date that the technical
service has given confirmation.
We recommend you to contact an Authorized Technical Service
if you experience any difficulty or may have any questions
regarding the use of this product. The Service Centre’s telephone number
may be found in the internet pages of the Costructor.
We invite you to call tempestivly at a Technical authorized
Service if you are experiencing any difficulty.
The Technical service Assistance can gave you a good advice
for the proper work of your convector.
The Echo convector
are conformed at:
• Gas directive 90/396/CEE
• Electromagnetic Directive
Compatibility 89/336/CEE
• Low Tension Directive 73/23/CEE
0694
In this manual are used these symbol:
ATTENTION: for actions that require particular caution and adequate preparation.
PROHIBITED: for actions that don’t have to be absolutely perform.
user
Electrical Hazard: Do not touch the convector with part of your body wet.
Do not touch the grill when hot air is coming out.
To reduce the risk of injury, always unplug
this machine before performing any maintenance to it, such as cleaning any part of the convector. Never disassemble this machine, or try to
do any maintenance, which has not been recommended by this manual.
Do not pull, take apart, or wring the elec-
trical cable that is outside of the convector
Do not put objects on top of the convec-
tor this will cause a malfunction or serious damage to the convector.
Security rule
When using a product with combustion or
electrical energy, always follow basic safety
precautions to reduce the risk of injury. Read
this manual carefully to learn its use and limitations as well as potential hazards associated
with its use.
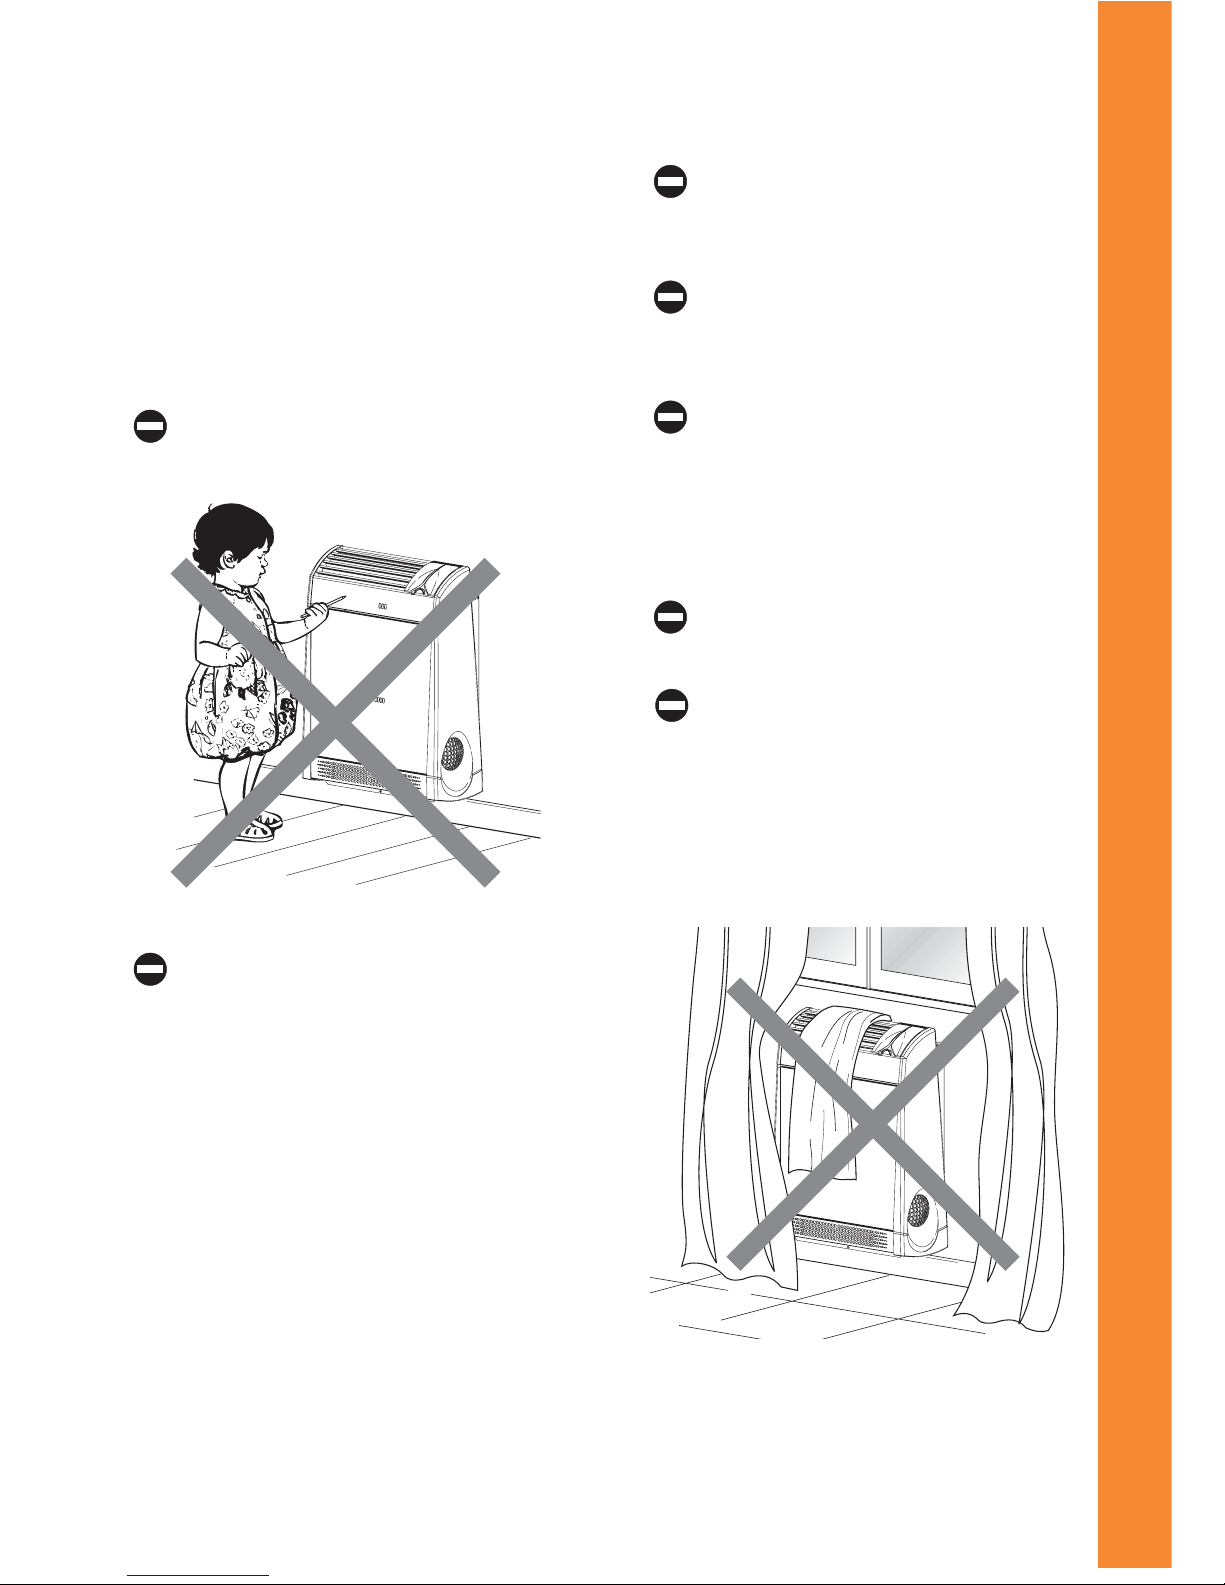
It prohibited to children and disabled persons
the use of the convector.
Do not use this product in the presence of
an explosive gaseous fume.
In this case:
• Open the doors and windows.
• Close the combustion device.
• Call the Technical Service for
assistance.
5

The convector is guaranteed to do the
work that it has been created for from
the manufacturer. The warranty does not apply
where: persons other than the Authorized
Technical Service Centre have made repairs or
attempted repairs.
Things to do if the convector is going to
be shut down:
• Position the switch to “off”
• Unplug the main electric cable.
• Turn off the gas switch.
The convector has to be installed by a
qualified technical for the low of the 5-
march 1990 n 46 as indicated in this manual.
READ AND SAVE ALL INSTRUC-
TIONS FOR FUTURE REFERENCE.
Your T echnical service Assistance may be contacted to replace this manual if it becomes
damaged or is lost.
6
user
General considerations

user
7
Convector
ECHO Fox
Gas convector type C for heating.
Convector
ECHO XC
compact
Convector
ECHO XN

8
user
The Echo convector
The Echo convector is a gas radiator with an atmospheric burner assisted by a high efficiency fan. This convector is the series of type C .The fan
that is assembled has two velocities.
A transparent cover is provided to avoid damage to the main power
control panel. To open the panel, simply lift it up.
The convector can be ordered with a humidification cup.
The function radiator with the timer programming.
Shut down of the radiator with the watch.
Start of the radiator with the atmospheric thermostat.
16
17
18
19
20
21
22
23
24
1
2
3
4
5
6
7
8
9
10
11
12
13
14
1
5
16
17
1
8
1
9
20
21
22
23
24
1
2
3
4
5
6
7
8
9
10
11
12
1
3
1
4
15
1
7
6
5
4
3
2
1
7
6
5
4
3
2
5
Atmospheric Thermostats
Has the capacity to regulated the temperature you want in the atmosphere.
6
On/Off fan function switch
3
Pressure screw regulation
4
Selectors functionIs capable to choose the following functions:
2
Timer. This option permits to program the periods of function,
and the shut down of the radiator.
Starting handle
1

9
user
Focus ser vice
The first thing to focus is that, if Echo convector has been installed from Technical Service
Assistance. As long this is being done, the
Technical is going to show you the start of the
convector, and what are the things to do for a
long period shut down.
• See if the gas switch is turned on.
• Check if the wall switch is positioned (on)
• See if the electric extension is inserted in the
socket and the plug is inserted under the convector.
• Adjust the atmospheric thermostat at number
7 for a fast heating or as you prefer.
1
20
21
22
23
24
1
2
3
4
5
6
7
8
9
10
11
12
3
2
1
22
23
2
4
1
2
3
4
5
6
7
8
9
10
11
1
7
6
5
4
3
2
ON

10
user
• Position the Timer to manual
• Start the convector:
- Rotate the thermostatic handle in position 7
- Push the starting handle
- Rotate subsequently of _ the staring handle,
from the off position to the starting position
pressing always down the start handle.
• V erify that during the previous phase there is
the injection spark burst
• At injector start hold down for a few seconds
the starting handle, than release the handle and
verify that the starting injector remains permanently started.
• With the injector started, rotate the starting
handle to the main burner start verifying the
correct start.
• Rotate the thermostatic handle in the position
you want
- Position 1 = minimum temp
- Position 2 = minimum temp
16
17
18
19
20
21
22
23
2
4
1
2
3
4
5
6
7
8
9
10
11
12
13
14
15
19
20
21
22
23
2
4
1
2
3
4
5
6
7
8
9
10
11
12
13
1
7
6
5
4
3
2
16
17
18
19
20
21
22
23
24
1
2
3
4
5
6
7
8
9
10
11
12
13
14
15
16
1
7
18
19
20
21
22
23
2
4
1
2
3
4
5
6
7
8
9
10
11
12
1
3
1
4
15
16
17
18
19
20
21
22
23
24
1
2
3
4
5
6
7
8
9
10
11
12
13
14
15
16
17
18
19
20
21
22
23
2
4
1
2
3
4
5
6
7
8
9
10
11
12
1
3
14
15
1
2
0
21
22
23
2
4
18
19
20
2
1
22
23
2
4
1
2
2
1
2
3
1
7
6
5
4
3
2

11
user
• The burner it going to work until it will reach
the regulated temperature.
• At reached temperature, the main burner will
shut off; the injector start will remain turned
on.
• If there are going to be any problems, the convector is going to affect a “ stop of block”, and it's
going to illuminate the trigger release button. . To
restart the convector, wait a 1-minute to unblock
the “inter lock” dispositive (cold thermocouple),
than repeat the restart of the convector.
This operation can be repeated only 2 or
3 times. If the convector doesn't start
after three attempts, place the main button to
“off” and call Technical Service Assistance or
the Manufacturer.
• When the convector is in function, regulate
the watch dial on the exact hour, and the
“timer” in the automatic functioning.
• To activate the convector automatic function,
it enough positioning on "watches” the function selector (optional).
16
17
18
19
20
21
22
23
2
4
1
2
3
4
5
6
7
8
9
10
11
12
13
14
15
16
17
18
19
20
21
22
23
2
4
1
2
3
4
5
6
7
8
9
10
11
12
1
3
1
4
15
5
4
3
2
16
17
18
19
20
21
22
23
24
1
2
3
4
5
6
7
8
9
10
11
12
13
14
15
16
17
18
19
20
21
22
23
2
4
1
2
3
4
5
6
7
8
9
10
11
12
1
3
1
4
15

12
user
Watch regulation (optional)
The first regulation that you have to do on the
watch is the minutes and the hours, and subsequently the function periods or the convector
halt.
• How to adjust the current time;
Rotate only clockwise the clock dial until the
right hour is indicated from the present point
that is on the control panel.
• Function periods (ON):
If you move carefully from the centre of the
watch to the outside the cordless plug, you
insert the minutes or the hours you want the
convector to work.
• Stop periods (OFF):
Move the dials toward the outside the corresponding cordless plug. T o the time band in the
way you desire, the convector to remain deactivated.
The convector can be stopped with the
function selector on the (0 position) or
with the main switch. In the first case the
Timer watch rest in function, in the second
case the watch stops and the current hour have
to be newly regulated at the electrical restoration.
1
24
23
22
21
20
19
18
17
16
15
14
13
12
11
10
9
8
7
6
5
4
3
2
1
24
23
22
21
20
19
18
17
16
15
14
13
12
11
10
9
8
7
6
5
4
3
2
ON
OFF
16
17
18
19
20
21
22
23
24
1
2
3
4
5
6
7
8
9
10
11
12
13
14
15
16
17
18
19
20
21
22
23
2
4
1
2
3
4
5
6
7
8
9
10
11
12
1
3
1
4
15
1
6
5
4
3
2

13
user
Atmospheric thermostat
regulation
The handle can regulate the atmospheric thermostat; if you want to increase the temperature
you move the handle rotating clockwise on
number 7, to decrease the temperature,
counter-clockwise on number 1. After that the
new regulation is effect wait that the convector
has completed the function cycle, and verified
the states obtained. Repeat the operations until
coming at the desired conditions.
Fan Start (optional)
Put the fan switch on the “ start 1” the fan start
it going to noted that is working by the backlight on the switch.
Note: the fan start when the thermostatic fan
has reached the right temperature.
16
17
18
19
20
21
22
23
24
1
2
3
4
5
6
7
8
9
10
11
12
13
14
15
19
20
2
1
22
23
2
4
1
2
3
4
5
6
7
8
9
10
11
12
1
3
1
7
6
5
4
3
2
16
17
18
19
20
21
22
23
24
1
2
3
4
5
6
7
8
9
10
11
12
13
14
15
16
17
18
19
20
2
1
22
23
2
4
1
2
3
4
5
6
7
8
9
10
11
12
1
3
1
4
15
1
7
6
5
4
3
2

14
user
Long periods shut down
If the convector is going to be stopped for a
long period of time, is important to follow
these sequences.
• Position the function selector on 0 (optional).
• Position the starting handle on the control
panel to the “off” position
• Place the wall switch to the “off” position.
Disconnect the electric cord and, unplug the
plug under the convector.
• Close the gas tap.
16
17
18
19
20
21
22
23
24
1
2
3
4
5
6
7
8
9
10
11
12
13
14
15
16
17
18
19
20
2
1
22
23
2
4
1
2
3
4
5
6
7
8
9
10
11
12
1
3
1
4
15
16
17
18
19
20
21
22
23
24
1
2
3
4
5
6
7
8
9
10
11
12
13
14
15
16
17
18
19
20
21
22
23
2
4
1
2
3
4
5
6
7
8
9
10
11
12
1
3
1
4
15
ON
OFF

Technical service Assistance
Sir...................................................................
......................................................................
Street..............................................................
.......................................................................
Tel..................................................................
15
user
Solution and Problems
• Electrical alimentation.
If you have turned the main switch to the
“on” position and it does not illuminate the
button, be sure that the main electrical cable
is inserted in the proper way under the convector.
If there is a problem, call the Technical
Service Assistance.
• Shut down:
Verified the gas tap is open.
Verified that the combustion is available.
Verified that the main cable is inserted in the
proper way.
To restart the convector, push the trigger
release button. This operation may only be
repeated 2-3 times. If there is a problem, call
Technical Service Assistance.
Clean out
The only necessary cleaning by the owner is to
clean the cover.
Before effecting:
• It is important that the wall switch and switch
on the control penal is turned to the “off” position.
• Wait that the convector gets cold completely.
The only cleaning that is required by the owner,
involves removing the cover, and wiping the dust,
which may have collected. Do not put grease or
lubricants on any parts of the convector.
For the cover cleaning, use dampened
clothes to do the operation that you want.
Do not allow liquids on the cover or, on
other parts of the convector. Try to avoid
damages.
Maintenance
The convector maintenance is important for the
efficiency, and the reliability of the radiator .We
recommend that Technical Service Assistance perform the maintenance once a year.

3520010066 - Rev.1 - 11/2002
ITALKERO S.r.l.
Via Lumumba, 2 - Zona Ind. Torrazzi - 41100 Modena - Italy -
Tel +39 59 2550711 - FAX +39 59 250126 (
ordini +39 59 250160)
http://www.italkero.it - E-mail: info@italkero.it
 Loading...