

Page 1

Kiwi-tv
User Manual
Page 1 of 22
Page 2

Contents
1 Safety Precautions···········································································································4
2 Your Mobile Phone·········································································································5
2.1 Keys and functions······································································································5
3 Get Started ······················································································································5
3.1 On/off·························································································································5
3.2 Assembling of battery and SIM card···········································································6
3.3 Assembling of memory card ·······················································································7
3.4 Battery Recharge·········································································································7
4 Safety Password··············································································································8
4.1 PIN number·················································································································8
4.2 PIN2 number···············································································································8
4.3 PUK number···············································································································8
4.4 Mobile phone password······························································································8
5 Quick Use Guide·············································································································8
5.1 Call functions··············································································································8
5.1.1 Make a call··············································································································9
5.1.2 Answer a call··········································································································9
5.1.3 View the missed calls······························································································9
5.1.4 Options available during a call··············································································10
5.1.5 Volume control······································································································10
5.2 Input text···················································································································10
6 Main Menu···················································································································10
6.1 File Manager ·············································································································10
6.2 Phonebook················································································································10
6.2.1 Save phone numbers and names············································································11
6.2.2 Searching numbers in phonebook··········································································11
6.2.3 Phonebook options································································································11
6.3 Messages···················································································································11
6.4 Call center·················································································································14
In the Call settings, you can carry out the following operations:···········································14
6.5 User Profiles ·············································································································15
6.6 Multimedia················································································································15
6.6.1 Camera····················································································································15
6.6.2 Image Viewer··········································································································16
6.6.2 Video Recorder ·······································································································16
6.6.3 Video Player············································································································17
6.6.4 Audio player ···········································································································
6.6.5 FM Radio················································································································17
6.7 TV·····························································································································17
6.8 Settings·····················································································································18
6.8.1 Phone settings·······································································································18
17
Page 2 of 22
Page 3

6.8.2 Network settings···································································································18
6.8.3 Security settings····································································································18
6.8.4 Connectivity··········································································································19
6.8.5 Restore factory setting···························································································19
6.9 Facebook···················································································································19
6.10 Twitter·······················································································································19
6.11 Services·····················································································································19
6.12 Organizer··················································································································19
6.13 Game ························································································································20
6.14 Alarm························································································································20
6.15 Extra·························································································································20
6.16 Bluetooth ·················································································································· 20
7 FAQ and Solutions········································································································20
This product has 4 frequency bands and contains functions that not operational in US Territories.
850 MHz - US Cellular: 824-849 MHz (TX), 869-894 MHz (RX). Available in US.
1900 MHz - US PCS: 1850-1910 MHz (TX), 1930-1990 MHz (RX). Available in US.
900 MHz - EGSM: 880-915 MHz (TX, 925-960 MHz (RX). Not available in US.
1800 MHz - DCS: 1710-1785 MHz (TX), 1805-1880 MHz (RX). Not available in US.
Page 3 of 22
Page 4

1 Safety Precautions
Read and abide by the instructions set forth as below to avoid dangers or violation
against the law.
Drive safely at all times
Do not use a hand-held phone while driving. Park the vehicle first.
Switch off the phone when refueling
Do not use the phone at a refueling point(service station) or near fuels or che m icals.
Switch off in an aircraft
Wireless phones can cause interference. Using them in an aircraft is both illegal and
dangerous.
In hospital
Hospitals or health care facilities may be using equipment that could be sensitive to
external radio frequency energy. Follow any regulations or rules in force.
Your Device
Interference
All wireless phones may be subject to interference, which could affect their performance
Special Regulations
Meet any special regulations in force in any area and always switch off your phone
whenever it is forbidden to use it, or when it may cause interference or danger .
Sensible use
Use only in the normal position (held to your ear).
Accessories and batteries
Use only approved batteries and accessories.
Qualified service
Only qualified service personnel may repair your phone.
Page 4 of 22
Page 5
2 Your Mobile Phone
Our company reserves the right to make modifications to the contents of this manual
without any prior notices.
2.1 Keys and functions
Name Functions
Center key Enter the main menu interface
Left soft key Enter menu; carry out the corresponding operations
displayed on the left right bottom of the screen
Right soft key Enter the phonebook; carry out the corresponding operations
displayed on the right bottom of the screen.
Dial key Answer, dial, receive calls for SIM1
End key Short press: return to standby interface in any mode
Long press: Power off(Power on in power off state)
Navigation keys Idle screen:
Left & right navigation keys – select Google home screen or
Normal home screen
Up and down navigation keys – In Google home screen,
select google search bar
Numeric
keys
Note: In this manual, “short press” a key means press then quickly release the key;
“long press” a key means press the key and hold for not less than 2 seconds
1 Short press: go to number input screen and input number 1
0, 2~9 Short press: go to number input interface, and input
numbers 0, 2~9.
*
# Short press: go to number input screen and input #
Short press: go to number input screen and shift input *
3 Get Started
3.1 On/off
Long press end key to power on/off your mobile phone.
If you start up your mobile phone without inserting SIM card, the following two
situations will appear:
“insert SIM ” –indicates no SIM card found, but you can call emergency call.
“Enter Phone Lock Code” – indicates that you have set mobile phone lock.
After inserting SIM card, the handset will automatically check if the SIM is valid.
Then, the following prompts will be displayed in order on the screen :
“Enter Phone Lock Code” – in the case you have set mobile phone lock.
“Enter PIN” – in the case you have set SIM password.
Page 5 of 22
Page 6
“Invalid SIM” –in the case you log on other networks, you can only dial emergency .
”Searching” –mobile phone will search until proper network access is found.
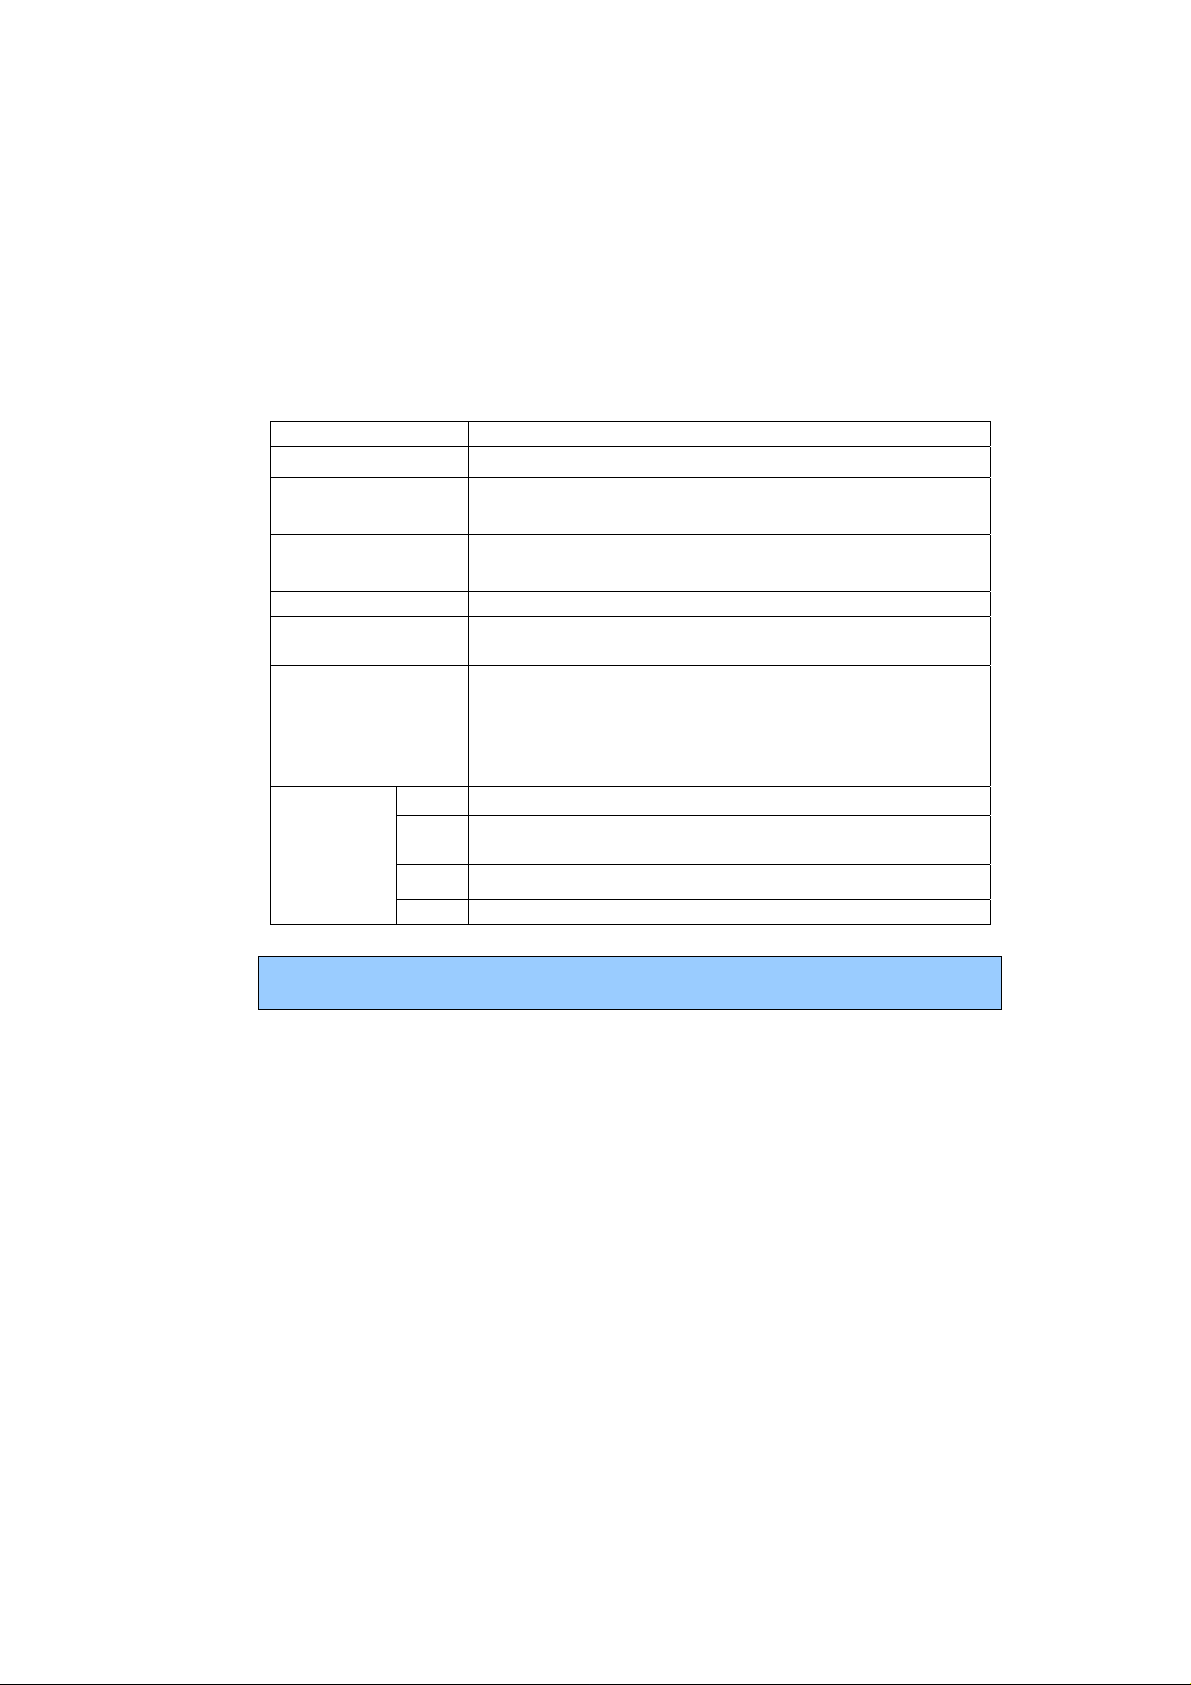
3.2 Assembling of battery and SIM card
Before your can operate the mobile phone, you should get a valid SIM card from
the service operator, otherwise, you could not make any call except emergency
call.
1) Take out the battery
Pull down the battery cover as the figure
Take out the battery
2) Assemble SIM card
Insert the SIM card to the SIM socket.
3) Assemble battery
Assemble the battery as the figure; be careful that the contact metal of the battery
should be consistent with the socket of the mobile phone.
Push up the battery cover as the figure.
Page 6 of 22
Page 7
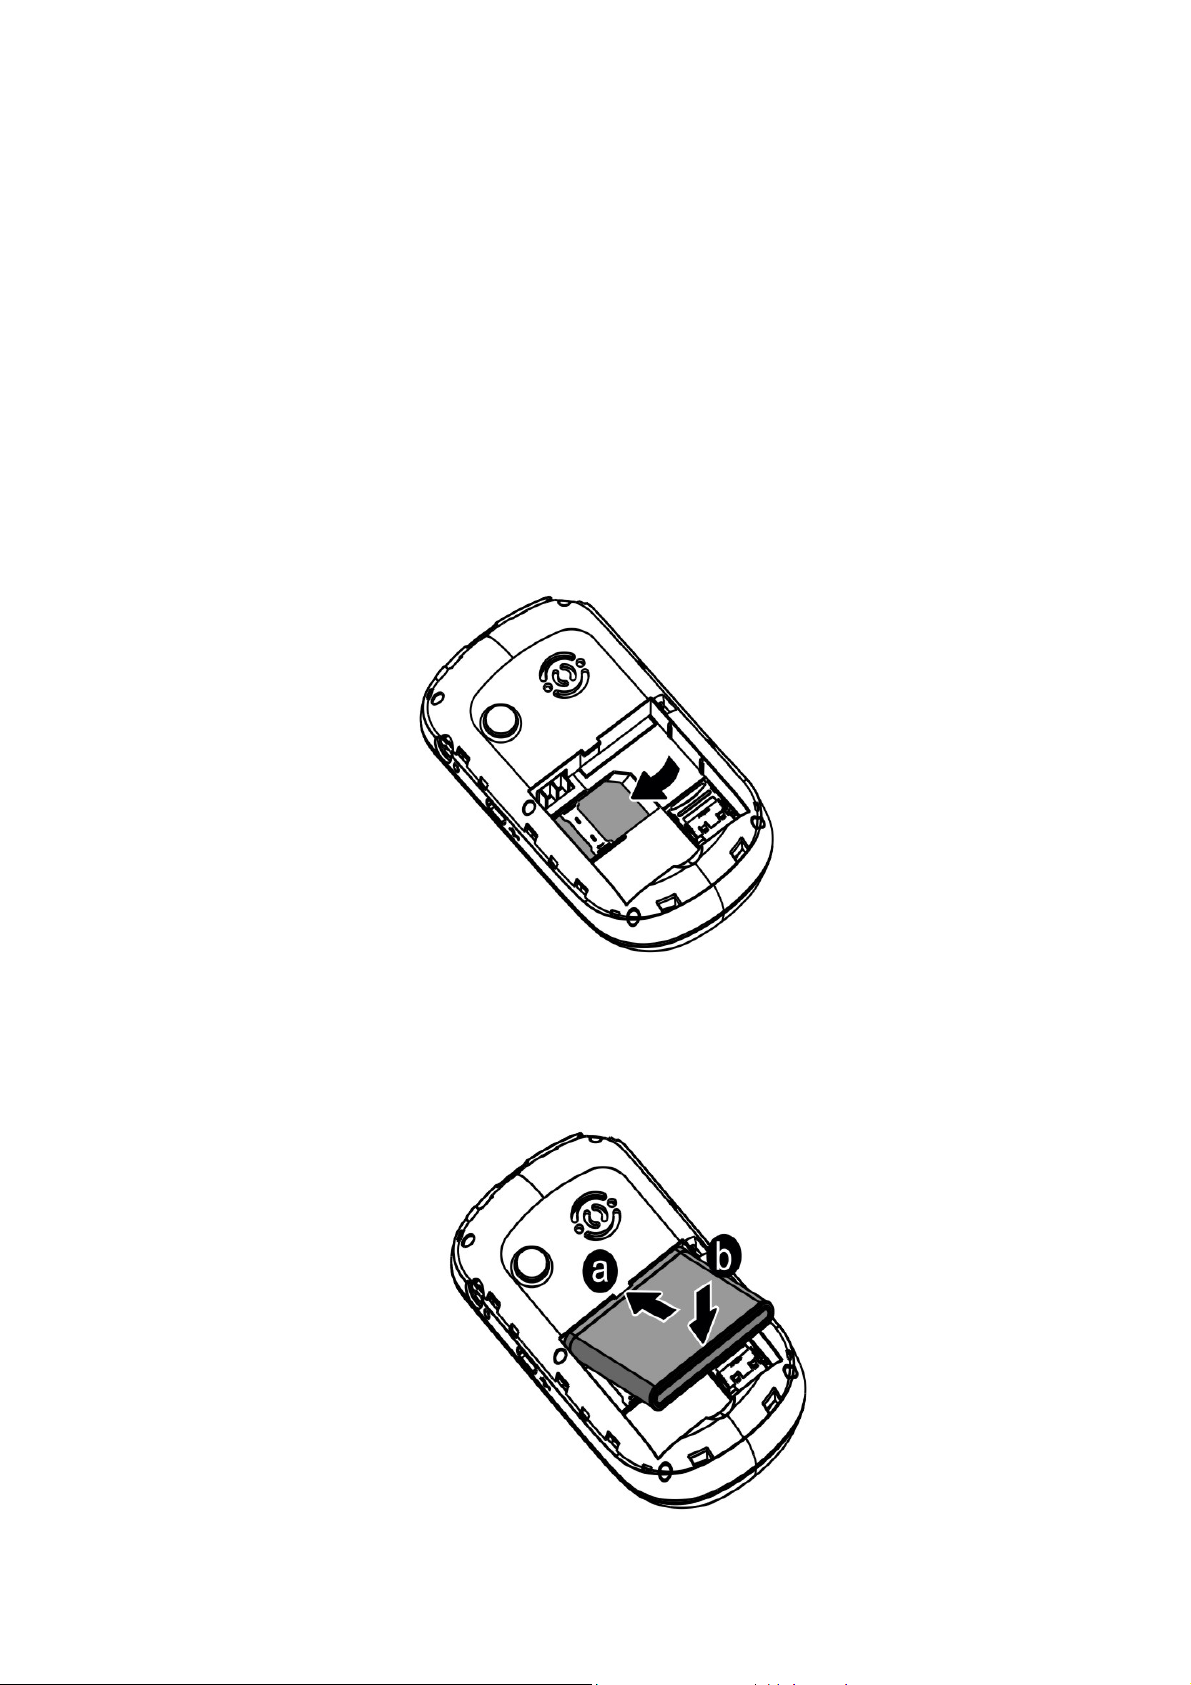
3.3 Assembling of memory card
This mobile phone supports T-Flash card, which is a small multimedia memory
card used to increase the memory of your mobile phone. Take care when
assembling or disassembling to avoid the damage.
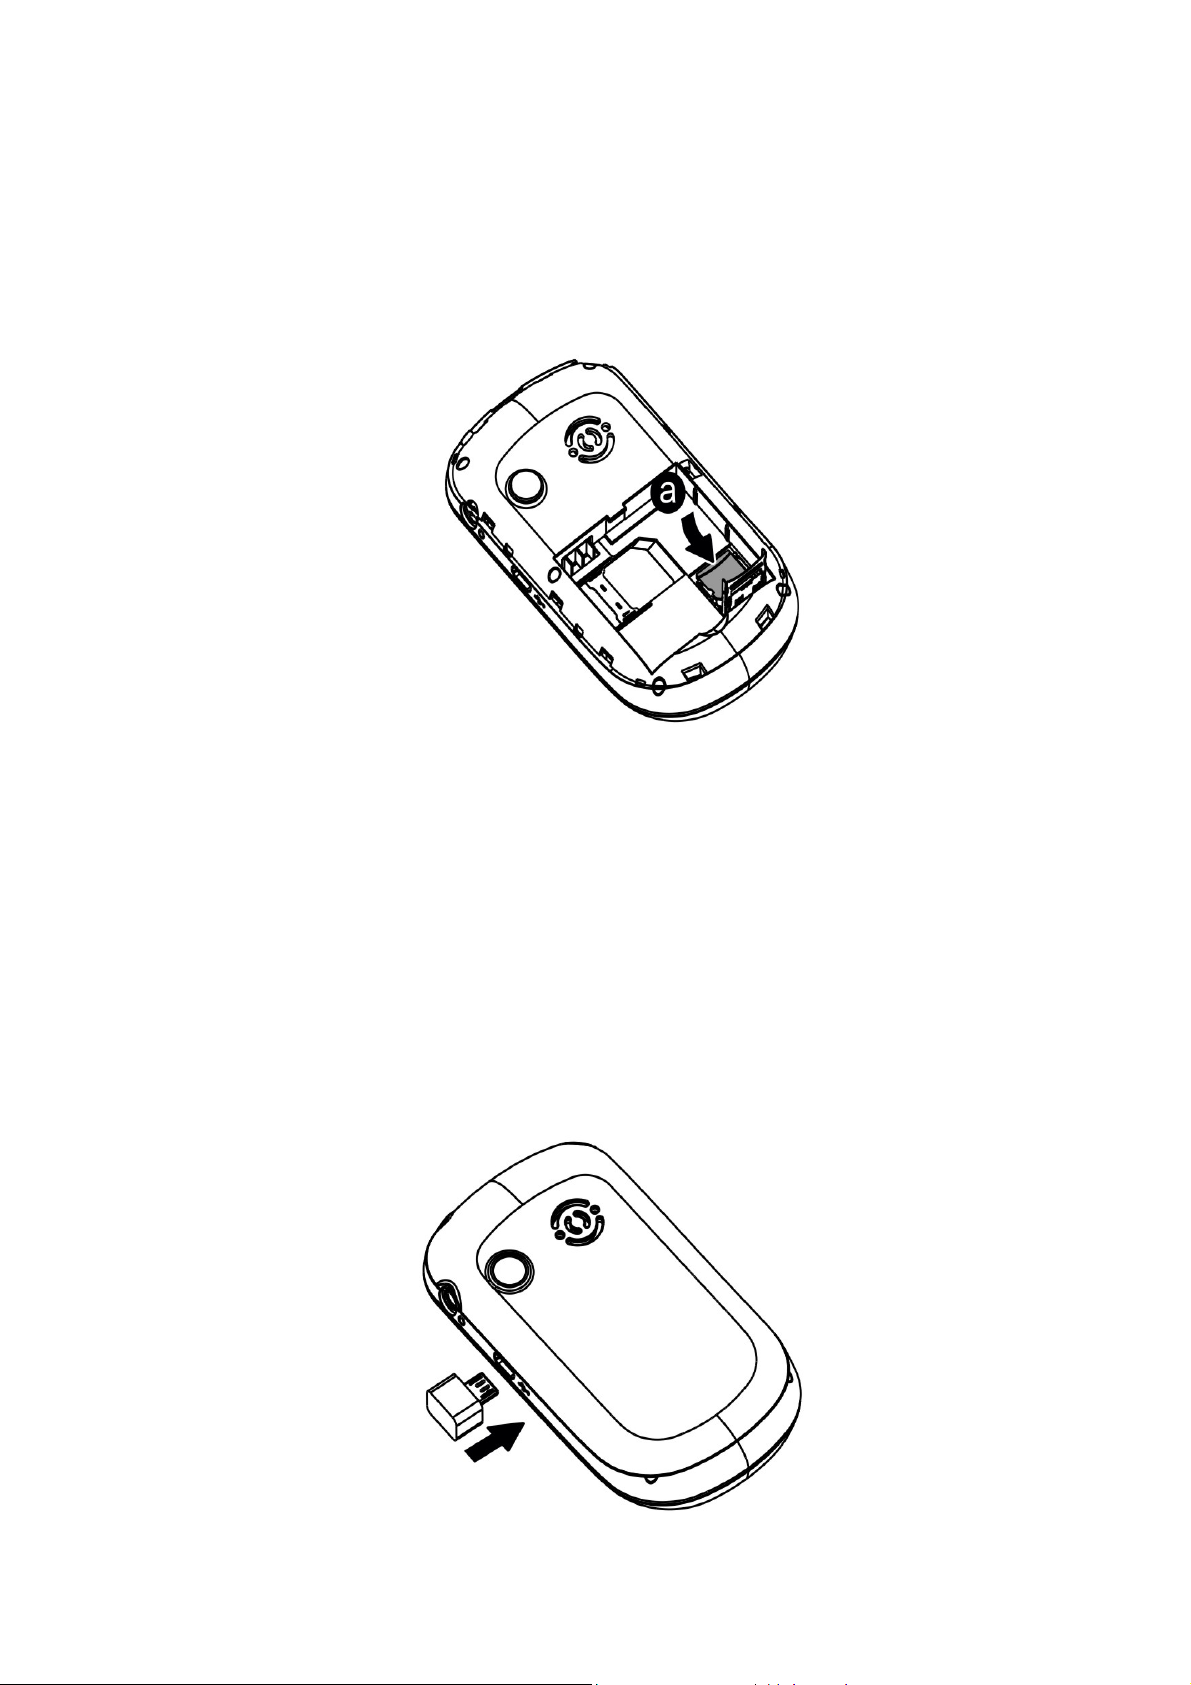
3.4 Battery Recharge
Connect the battery charger to a power outlet, plug the connector of the battery
charger into the mobile phone. Then the power level indicator at upper right
screen will flash. If the phone is off when charging, the screen will display
“charging” indicating the battery is being charged. If the phone is deposited for
long time, the power indicator may take some time to appear on the screen. If the
power indicator at upper right screen of the phone displays battery full and stops
to flash, it means that the charge is done. If the phone is off, the screen will display
a Charge Completed indicator. During charge, it is normal if the battery, mobile
phone and battery charger are hot. After the charge, disconnect the AC outlet
and mobile phone with the battery charger.
Page 7 of 22
Page 8

This phone is just 50% charged when delivery. Please use up the power and recharge
it fully. This is the case with the second recharge. After three repetitions, the battery
can achieve its best performance.
4 Safety Password
4.1 PIN number
By setting PIN number (Personal identification number), it can pre vent others from
using your SIM card without authorization.
4.2 PIN2 number
In order to go to “call cost” and “fixed dialing”, please cont act your netwo rk se rvice
provider to confirm whether your SIM card supports such functions. After 3 times
of error PIN2 number, the PIN2 number will be locked. Only af ter the correct PUK2
number is input can PIN2 number be unlocked. PUK2 number may be provided
along with the SIM card.
4.3 PUK number
In order to unlock the blocked PIN number, you need to input PUK number
(Personal Unlocking Key).
4.4 Mobile phone password
In order to prevent unauthorized user from using your mobile phone, you ca n set a
password to protect your mobile phone. If you select this function, you need to
input the password every time when starting up your phone. Otherwise, you
cannot unlock your phone, and cannot dial or answer phone calls. Also, your can
deactivate this password.
In the case of you forgetting your password, you must cont act yo ur retailer or local
authorized service center to unlock the password of your mobile phone.
5 Quick Use Guide
5.1 Call functions
In any country using digital GSM network, so long as you are in network covering
range (to know it by examining the indication bar of the network signal intensity at
upper left corner of the screen), you may use the emergency call function. If your
network service provider offers no roaming service in this region, the screen will
display “EMERGENCY”, reminding you of making this kind of call. If you are in the
Page 8 of 22
Page 9

network covering range, you may make emergent call without SIM card.
5.1.1 Make a call
The information scales displayed on the upper left screen indicate the intensity of
network signal. The calling quality will be largely affected by the barriers, so the
movement within small extension can improve the intensity of signal effectively.
Ways to enter into the call screen:
Dialing numbers in standby mode: please input the numbe rs in the cursor input
box, and dial the number by pressing the dial send key.
Dialing numbers in phonebook: in standby mode, press right soft key to go to
the phonebook menu. After find the contact, dial the number by pressing the dial
key.
Dialing numbers in call list: in standby mode, press center key to enter into main
menu, and then press direction keys to select call center. Through the list of
missed calls, dialed calls and received calls, select the corresponding call and dial
the number by directly pressing dial key, or dial the number by entering into the
options in the current list to select the number.
Domestic number: zone code + tel. number + dial key
An extension to a fixed phone: zone code + switchboard number + “P” + extension
number + dial key (Input “P” as below: press the key “p”)
International fixed number: “+” country code + telephone number + dial
key (Input “+” press “+” key)
When inputting the numbers to dial, you can proceed with the following
operations:
Press the “del” key to delete the character before the cursor.
Press the center key to save the input number.
During dialing, you can press the end key to end the call you are dialing.
5.1.2 Answer a call
When a call comes in, it enters into the phone-in screen, alert you with presetting
ringing tone or vibration.
If the number does not exist in the phonebook, the caller’s number appears.
Otherwise, caller name appears
5.1.3 View the missed calls
In the main menu interface, you can select call list via direction keys. Then,
select the missed call under the call history to view the missed call information.
Page 9 of 22
Page 10

5.1.4 Options available during a call
In the calling interface, you can select options to go to call options interface. These
call options can be seen only during a call. Moreover, such functions as “call
divert”, “many calls”, “call barring”, “call waiting” require network support, so
please contact your network service provider for such functions.
With call options, you may carry out the following operations:
Hold single call: In “many calls”, you can hold one call.
End single call: End your call.
New call:In “many calls”, after pausing one call, you can make a new call.
Phonebook:Go to the phonebook menu.
Messages:Go to message function menu.
Voice changer: change the voice
Sound Recorder:Record the call.
Mute/Restore:Switch on/off the mute mode.
DTMF:If it is off, then it will not send the sound of DTMF for the inputted numeric
figures.
Note:
Some menu items only appear in particular situations or require local network
support.
5.1.5 Volume control
After connected to call, adjust the volume by pressing up key and down key.
5.2 Input text
This mobile phone supports multiple input methods: letter input, numeric input,
symbol input, etc
6 Main Menu
6.1 File Manager
File Manager manages the memory space of the mobile phone and the T-flash card.
Access the files stored on a T-flash card. This menu is only available when you insert
T-flash card into the phone.
6.2 Phonebook
By Saving phone numbers and the name of corresponding contact in the phone
and SIM card, you can carry out related operations just via viewing the
Page 10 of 22
Page 11

phonebook.
6.2.1 Save phone numbers and names
In standby mode, input the phone number directly. Press center key to save
current number either in phone or SIM card. Then, input the name or related
information. Finally, confirm the operation according to the prompts.
When inputting wrong number, name or other related information, press del
key to delete the character before the cursor.
For inputting names and other related information, refer to chapter 5.2 “input
text”.
6.2.2 Searching numbers in phonebook
In standby mode, press right soft key to go to phonebook, and select quick search
to go to the interface view the phonebook. If you insert SIM card, the numbers
include phone and SIM card.
Select different records by upward and downwa rd keys of direction keys
Quick search for the records in phonebook: input corresponding content at
the cursor, it will immediately display all records according to your conditions
Under abc input status, input “a”,it displays all records with “a” as first
letter like “amy”, “andy” etc; input “n”,it displays all records starting with
“an”, like “andy”;
Under id input status, input “a”,it displays all records with “a” as first
letter like “amy”, “andy” etc; input “n”,it displays all records starting with
“an”, like “andy”;
Press aA key to switch into other input methods.
You can also select search contact in the phonebook interface. By inputting the
name of contact, you will directly arrive at the corresponding record.
6.2.3 Phonebook options
In the phonebook interface, in addition to the above-mentioned two options: quick
search and search contact, and also support the following options: View, Send
SMS, Send MMS, Call, Edit, Delete, Copy, Move, Caller groups, Phonebook
settings.
6.3 Messages
In order to use SMS services, select SMS by pressing direction keys to go to the
text message menu.
Write message
First input the contents of the short message, and insert special marks when
the punctuation simulation keypad is activated (all punctuation marks are
available when the input method of capital and small letters is selected).
Page 11 of 22
Page 12

Select “Option” and carry out the following operations:
Send to: Enter number or Add from phonebook. Can add multiple recipients
here.
Input method: change input method.
Advanced: Insert number, Insert name from the phonebook or Insert
bookmark from WAP bookmark
Inbox
The short message list includes read and unread short messages. These short
messages are listed in the sequence of their receipt time.
Following the SMS icon is the telephone number that has sent this short message.
If this number has been stored in the phonebook, the name of the sender is
displayed.
The followings operations can be carried out after a short message is read:
Reply, Call sender, Forward, Delete, Delete all, Delete same name, Advanced.
Outbox
The following operation can be carried out after reading a short message:
send, edit, delete, delete all, use number 。
MMS
Your handset also can transmit and receives the MMS.Through the MMS service,
you may transmit message which contain the picture ﹑ sound and the text.
When transmits the MMS, your addressee must use one to have the MMS
function handset, only then read your message.
Write messages
With this option, you can edit new multimedia message. However, you need to
input the receiver, copy, Bcc, subject and contents;
To, CC and B CC:you can input the tele phon e num ber or email a ddress
via numeric keys;
Subject: edit the subject for the multimedia message;
Contents: Edit the contents of the multimedia message. During the
edition, you can select different input methods via options, and you can
also select to insert pictures, sound, movies or other attached files;
After editing the multimedia message, with the screen prompts, you can
select “Done” to send the multimedia message. The operations include:
Send Only, Save and Send, Save to Drafts, Send Options, Exit
Save and Send: save the current multimedia message into the
outbox while sending;
Save to Draft: save directly the current multimedia message into
draft without sending;
Send Options: select to set Validity period, Delivery report, read
report, and priority;
Exit: remind you if you want to exit the current multimedia message
Page 12 of 22
Page 13

after saving.
If you choose to save, then the current multimedia message will be
saved into the draft box.
Inbox: All the received multimedia messages will be stored here. For other
operations, please refer to Text Messages.
Outbox: All the multimedia messages sent by send and save will be stored
here. For other operations, please refer to Text Messages.
Drafts: All the multimedia messages unsent but to be saved will be stored
here. For other operations, please refer to Outbox.
MMS Settings: set other information for multimedia messages, including:
Profiles, Compose, Send, Receive, Filter, and Mem ory status.
Broadcast Message
Please contact your network service provide for this function, and you need to set
language and subject.
In the cell broadcast, you can carry out the following operations:
Receiving mode: set whether to receive cell broadcast short messages.
Read message: After receiving CB short messages, you can read them one
by one.
Languages: Press the center key to select whether to select all languages.
Channel settings: Set CB channels, and you can select, add, edit and delete
CB channels.
Message settings
SMS Settings:
Profile settings
Store or modify the number of the SMS center necessary for sending a short
message, or get the number from the network operator, or set short message
storage time limit.
Voice mail server
Is the use of telephone voice mail system provides users with storage,
extraction of voice messages and other auxiliary functions of a service. Users
to apply for the telecommunications sector and to complete the formalities to
obtain their own voice mailbox number and password. Message that other
people can dial this number, I dialed the number and enter your password to
listen to a message
Common settings
Set message report and reply path. After enabling message report, you can
get the status report from SMS center on whether the short message has
been successfully sent. Whether this function is supported depends on the
network operator.
Memory Status
Check the percentage of the short messages stored in SIM card and mobile
Page 13 of 22
Page 14

Preferred Storage
MMS Settings:
Data account
Common settings
Service message
Enable push
Enable service loading
6.4 Call center
In standby mode, press the center key to go to the main menu, and then select the call
center to view the phonebook and call log.
Call center include the following sub-menus: Call history and General call settings
In the Call history, you can carry out the following operations:
phone in total capacity. The specific capacity is determined according to the
contents of short messages, mobile phone and SIM card.
Set the default storage position of short messages (SIM or phone).
Set the MMS data account
Compose, Sending, Retrieval, Preferred storage, and Memory status.
Missed Calls: record for missed calls.
Dialed Calls: record for dialed calls.
Received Calls: record for received calls.
Delete Log: delete the record of missed calls, or dialed calls, or received
calls.
In the Call settings, you can carry out the following operations:
Call settings: you can set call waiting, call divert, call barring, line
switching.
Call waiting: you can set this function on or off, and can also view the
current settings via query.
Call divert: You can set to divert the incoming calls in different cases.
Call barring: In order to activate this service, it requires the services
provided by the network service provider.
Outgoing calls: You can select to bar all calls, international calls,
or excluding international calls.
Incoming calls: You can select to reject all incoming calls, or
incoming calls when roaming.
Activate all:
All calls can be activated
Cancel all: cancel all option settings. When carrying out the
operations for these options, it is required to forbid password
operations.
Change barring password: You need to input the old password.
Page 14 of 22
Page 15

Line switching: switch between line 1 and line 2.
Advanced settings
6.5 User Profiles
You can select different modes on different occasions to carry out the personal
settings in the environment modes such as ring tone, vibration, volume, etc. This
function makes it possible to get adjusted to different situations without changing the
ring tone settings at multiple places, and you only need to switch to the pre-set
environment mode.
General mode: It is ringing alert by default;
Silent mode: It does not have ringing and vibrating alert
Meeting mode: It is vibrating alert by default;
Outdoor mode: It uses the maximum volume, vibration + ringing alert, by
default;
My style mode: You can set your own alert mode.
In every mode, you can edit the following in a separate manner:
Volume: set the volume for the ring tone and key tone.
Alert type: 4 manners are available: ringing, vibration, vibration and ringing,
and vibration then ringing.
Incoming call: set the tones for incoming calls, power on, power off, messages
tone and keypad tone, respectively.
Ringtone volume: set the incoming ringtone volume
Message: set the tones for message
Message volume: set the message tone volume
Keypad: set the keypad tone
Keypad volume: set the keypad tone volume
Power on: set the power on tone
Power off: set the power off tone
System alert: switch on or off the system alert
It is up to the network service provider if you can make calls on line 2.
Auto redial: You can select to redial the number automatically when a
call is not connected.
Call time reminder: After setting this function on, it will offer
warning tone towards the end of every minute sharp during the call
process, so you will be reminded of the call time at any time when
calling.
Answer mode: Set Any key or Auto answer when headset mode
6.6 Multimedia
6.6.1 Camera
Select Camera in the main menu, you can enter into the photo-taking preview
Page 15 of 22
Page 16

interface.
By pressing the left soft key to select options, you can go to the Photos, camera
settings, image settings, white balance, scene modes, effect settings, and restore
default.
Photos : Open the Image viewer to view the photos. The Options include:
View, Image information, browse style, Send, Use as, Rename, Delete, Sort
by, Delete All Files, and Sto rage.
View: To view the photos
Image information: photo information: filename, date, file size, image
width and height
Browse style: you can select list mode or matrix mode to view the
pictures.
Send: You can send the photo via MMS or Bluetooth
Use as: You can set the photos to wallpaper, screensaver, power on
display, power off display, caller picture.
Rename: Rename the photos
Delete: Delete the selected photo
Sort by: You can select to sort the photos by name, type, time, size.
Delete All Files: You can delete all the photos
Storage: You can select to view the photos from phone or memory card
Camera Setting:Settings for the shutter sound, EV, Anti-flicker, Contrast,
Delay timer, Cont. shot
Image Setting: Set size and quality of photo.
White balance: Set white balance, and you can select auto, daylight,
tungsten, fluorescent, cloudy and Incandescent.
Scene modes: You can select auto and night modes
Effect setting:You can select normal, grayscale, sepia, sepia green, sepia
blue and color invert.
Storage: select to store the photo to phone or memory card
Restore default:Restore the settings of the camera to the initial state
6.6.2 Image Viewer
Browse all the images stores in the phone and the T-flash card.
6.6.2 Video Recorder
This mobile phone provides video recording function. Select menu “Video
Recorder” and press the Center key to record video.
Press Option to access:
Camcorder Settings: select this option to set parameters of recorder.
Page 16 of 22
Page 17

Video settings: set the size, quality, time limit reached and record audio of
videos.
White balance: select the brightness of videos.
Effect Settings: set the special good effect of videos.
Storage: Save in mobile phone or memory card.
Restore default: Restore all settings to factory default.
6.6.3 Video Player
Open Video Player Interface; then select the video file, press th e center key, select
Options, including Play , Rename, Delete, Delete All Files, Sort
After entering the function of video recorder, pre ss the center key to start recordin g,
and then press center key to open the “Options” menu to perform the following
operations:
Play: play the specified video file;
Send: As multimedia or via Bluetooth
Rename: rename the specified video file;
Delete: delete the specified video file
Delete all files: delete all video files;
Sort by: sort all video files according to name, type, time, size and none.
Storage: select a path for storing the video files in your mobile phone or
memory card.
6.6.4 Audio player
Press the center key selects the music player to enter into the Music Player
interface, and play the saved Audio Files
Press keys in the Musical Player interface to do the following operations:
Play/Pause: by pressing Up Key
Stop: by pressing Down Key
Shift Music: by pressing the Left and Right direction keys
Sound Volume Adjustment: by pressing the “+/-” Keys
Press the center key or use to select ”options” in the playing list,
and you can see such options as: Play, Details, Add to Ringtones,
Refresh List, and Settings.
6.6.5 FM Radio
You need to plug in earphone to use this function.
Press the center key to select Options, and carry out the operations, including
Channel list, Manual input, Auto search ,Settings, Play/stop: by pressing down
Key
6.7 TV
Open Analog TV interface, and press the left soft key to enter the TV options
Page 17 of 22
Page 18

menu.
Set Region – set the country / region of the current location
Input channel – open the specific channel directly
Program list – Show the scanned channels list
Scan – To scan the TV channels
Full screen – change the current TV screen in to full screen display
6.8 Settings
6.8.1 Phone settings
In Phone Settings, you may set functions, such as the language, time and date,
according to your preferences and operation habits. You can see the following setting
options in the phone setting interface
Time and Date; you can set home city, time and display format.
Schedule Power ON/Off: You can set 4 auto power on/off times. In default
settings, the function is off.
Language: set the language displayed in the screen of your mobile phone.
Shortcuts: set the shortcuts of the phone functions
Preferred writing language: set the default writing language
Display settings:
Wallpaper: You can select your wallpaper
Screen saver: You can se lect to set or not the scre ensaver, the waiting time
and picture of the screensaver.
Power on display: You can select the power on logo
Power off display: You can select the power off logo
Show date and time: set the display time and date on or off.
Dedicated key: Set the up, down, left and right navigation keys functions
Flight mode: You can set general mode, flight mode or query mode to ensure the
safety on plane
Misc.settings: You can adjust the phone's brightness and backlight wait time
6.8.2 Network settings
Network Selection:Select the network to be used while roaming outside of your
home area, or let the network be chosen automatically.
Preferences:You can select your favorite network manually.
6.8.3 Security settings
You can set up the safety options for your mobile phone via this menu to prevent your
mobile phone or SIM card from unauthorized use
Security settings
SIM lock: Press Activate to enable PIN lock, which will require you to
input a password when the mobile phone is started up. Otherwise, the SIM
card is unavailable.
Fixed dial: Set the phone to restrict calls to a limited set of phone numbers,
Page 18 of 22
Page 19

if supported by your SIM card.
Change password: You can change the password of PIN, PIN2.
Phone security
Phone Lock: after the phone lock is activated, the correct password is
required to start up the phone or restore the factory settings. The factory
setting is 0000 by default.
Change Password: you can change phone password.
Auto Keypad Lock: press the left soft key to deactivate the keypad lock, or
select automatic lock after 5s, 30s, 1 minute, or 5 minutes.
6.8.4 Connectivity
Can edit/ add / view the GPRS data account
6.8.5 Restore factory setting
Some function settings can be reset to factory settings by this option.
This function requires the correct password to be executed.
The factory password is preset as 0000.
6.9 Facebook
Is a social network service website, you can use it to view or do other social
activities.
6.10 Twitter
Twitter is a social networking and micro-blog service.
6.11 Services
STK
WAP
6.12 Organizer
This feature is provided by your network service provider. Depending on the
SIM card services, new menus or options may appear. Use a variety of
additional services offered by your service provider.
For network connection. You want to make the right choice set, and then
enter the appropriate URL to access the network
Calendar
You can view the calendar, also view the tasks, Add task, jump to date, or go to
the weekly view on or off, via options.
Tasks
You can add events, time, it will remind you to do.
Wor ld cloc k
Page 19 of 22
Page 20

You can look up the time of major cities around the world and set the time as
your display time of your device. Press direction keys to view the time of major
cities in other countries.
Notes
You can add/ view notes here.
6.13 Game
You can enjoy and play the games.
6.14 Alarm
There are 5 alarm clocks set in the system. You can open one or all according to your
need (The clock is off by default). You can set on or off, snooze time and alert type
for individual alarm clocks.
6.15 Extra
Calculator
Use the direction key and number key via the cues on th e displa y screen to make
the calculator available.
Stopwatch
It is a timer. Common stopwatch and multi-directional stopwatch are available.
Typical Stopwatch:
Split Timing: record the time of every circle or every person.
Lap Timing: record the circle time of a person.
View record: view the recorded time
.nWay Stopwatch: you can press the Direction keys to record the time of
four persons and the total time. When the timing is stopped, press and hold the
Left soft key to clear the records
Ebook reader
T card you can load and read e-book
Torch
You can turn on/off the torch.
6.16 Bluetooth
Can transfer file via Bluetooth or talking phone call via Bluetooth headset
7 FAQ and Solutions
Before contacting your after-sales services provider, please conduct some simple
inspections as below. In this way, you may save unnecessary maintenance time and
costs
Page 20 of 22
Page 21

FAQ Causes and solutions
Unable to
boot up
Ensure you hav e pressed and held the power on key for at least 1
second;
Check the battery for proper connection. Dissemble and reinstall
the battery, and then try to restart the phone;
Check whether the battery power has been used up. Please
re-charge your battery.
Access to
network
failed
Display
information
during
startup
Poor voice
quality
Shorter
standby
time
SIM card
error
Unable to
make calls
For weak signal, move to another place and retry;
Out of reach of the network service provider;
SIM card is inactive. Contact your network service provider.
Check the SIM card to see if the SIM card is correctly installed;
Automatic lock function is checked. Enter the phone lock
password before use;
The PIN code is displayed. The PIN function has been checked.
Enter the PIN code each time when the phone is started up; (For
the first use, enter the PIN code provided with the SIM card)
Enter PUK code: If wrong PIN code s are entered for three times
consecutively, the mobile phone will be locked. In this case, input
the PUK code provided by the network service provider.
Please check whether the volume control is suitable;
When the phone is used in places with poor telecommunications,
such as high rises or basement, the radio wave cannot be
transmitted efficiently;
When you use the phone in the rush hour of calls, line congestion
will disable calls.
The standby time is associated with the network system setup. In
this case, you are possibly in place with poor communication.
When the signal is not available, the phone will continue to search
for the base station. This will consume a lot of battery power,
making standby time much shorter. To continue to use, move to a
place with strong signal, or shut down the phone temporarily;
Replace the battery with a new battery.
If the metal surface of the SIM card is dirty, clean the metal
contact with a clean piece of cloth;
SIM card has not been properly installed;
If SIM card is damaged, contact your network service provider.
Check whether the Dial key is depressed after the number is
inputted;
Check whether your calls have been barred due to insufficient
mobile phone fee;
Check whether the SIM card is effective;
Check whether the call barring function has been set;
Check whether the fixed dialing function has been set.
Your caller
is unable to
access to
you
Check that your phone has been started up and accessed to the
network;
Check whether your phone has been restricted because of
insufficient mobile phone fee;
Check whether the SIM card is valid;
Check whether the call barring function has been set;
Check whether the fixed dialing function has been set.
Page 21 of 22
Page 22

Unable to
re-charge
the battery
Not well connected. Check whether the plug is properly connected;
Charge the battery under 10 ℃ or above 55℃. Please chang e to
another environment;
The battery or battery charge is damaged. If necessary, change it.
Unable to
set up some
functions
Operation errors;
The network service provider doesn’t support this function, or you
have not applied for this function.
FCC Caution
Any Changes or modifications not expressly approved by the party responsible for
Compliance could void the user’s authority to operate the equipment.
This device complies with part 15 of the FCC Rules. Operation is subject to the
Following two conditions: (1) This device may not cause harmful interference, and
(2) This device must accept any interference received, including interference that
may cause undesired operation.
Note: This equipment has been tested and found to comply with the limits for a
Class B digital device, pursuant to part 15 of the FCC Rules. These limits are
designed to provide reasonable protection against harmful interference in a
residential installation. This equipment generates uses and can radiate radio
frequency energy and, if not installed and used in accordance with the instructions,
may cause harmful interference to radio communications. However, there is no
guarantee that interference will not occur in a particular installation. If this equipment
does cause harmful interference to radio or television reception, which can be
determined by turning the equipment off and on, the user is encouraged to try to
correct the interference by one or more of the following measures:
—Reorient or relocate the receiving antenna.
—Increase the separation between the equipment and receiver.
—Connect the equipment into an outlet on a circuit different from that to which the
receiver is connected.
—Consult the dealer or an experienced radio/TV technician for help.
Specific Absorption Rate (SAR) information
This wireless phone meets the government’s requirements for exposure to radio waves.
The guidelines are based on standards that were developed by independent scientific
organizations through periodic and thorough evaluation of scientific studies. The
standards include a substantial safety margin designed to assure the safety of all persons
regardless of age or health.
The exposure of measurement known as the Specific Absorption Rate, or SAR, The SAR
limit set by the FCC is 1.6 W/Kg.
Page 22 of 22
 Loading...