

Page 1

B1
User Manual
1
Page 2

Table of Contents
Safety Information ............................................................................................. 3
Appearance and Introduction Key Operations ............................................... 4
Switch your Mobile Phone ON/OFF ................................................................. 5
Install/Remove the SIM Card and Battery ....................................................... 5
Install/Remove the Memory Card ..................................................................... 6
Charge the Battery ............................................................................................ 7
Storage ............................................................................................................... 7
Call Functions .................................................................................................... 8
Contacts ............................................................................................................. 9
Messages .......................................................................................................... 11
Internet Browser .............................................................................................. 12
Camera ............................................................................................................. 13
Photos .............................................................................................................. 14
Google Play Music........................................................................................... 15
Sound Recorder ............................................................................................... 16
Alarm Clock ...................................................................................................... 17
Calculator ......................................................................................................... 17
Google Calendar .............................................................................................. 18
FM Radio .......................................................................................................... 19
Gmail ................................................................................................................. 19
Google Play ...................................................................................................... 20
Settings ............................................................................................................ 21
Applications for TELCEL ................................................................................ 26
Notices for the use of phone .......................................................................... 27
2
Page 3

Safety Information
Please carefully read the iterms bellow:
Do not use the phone in situations where it might cause danger.
Transportation Safety
Please observe all transportation laws and regulations.
Please drive with both hands on the wheel.
Hospitals
Please follow limitations.
Please turn off your mobile phone when near medical instruments.
Airports
Remember to follow all airport and flight safety regulations.
Please do not use your phone during flight.
Toxic Chemicals
Do not use your mobile phone around fuels or chemicals.
Accessories and Batteries
Use only Blu authorized batteries and accessories.
Making Repairs
Never take your phone apart. Please leave that to the professionals. Unauthorised repairs
could break the terms of your warranty.
Water
Your phone is not waterproof. Keep it away from water and liquids.
SOS Emergency Calls
Make sure your mobile phone is switched on and in a service area. In home screen, tap the
phone key and dial 911 and send.
3
Page 4
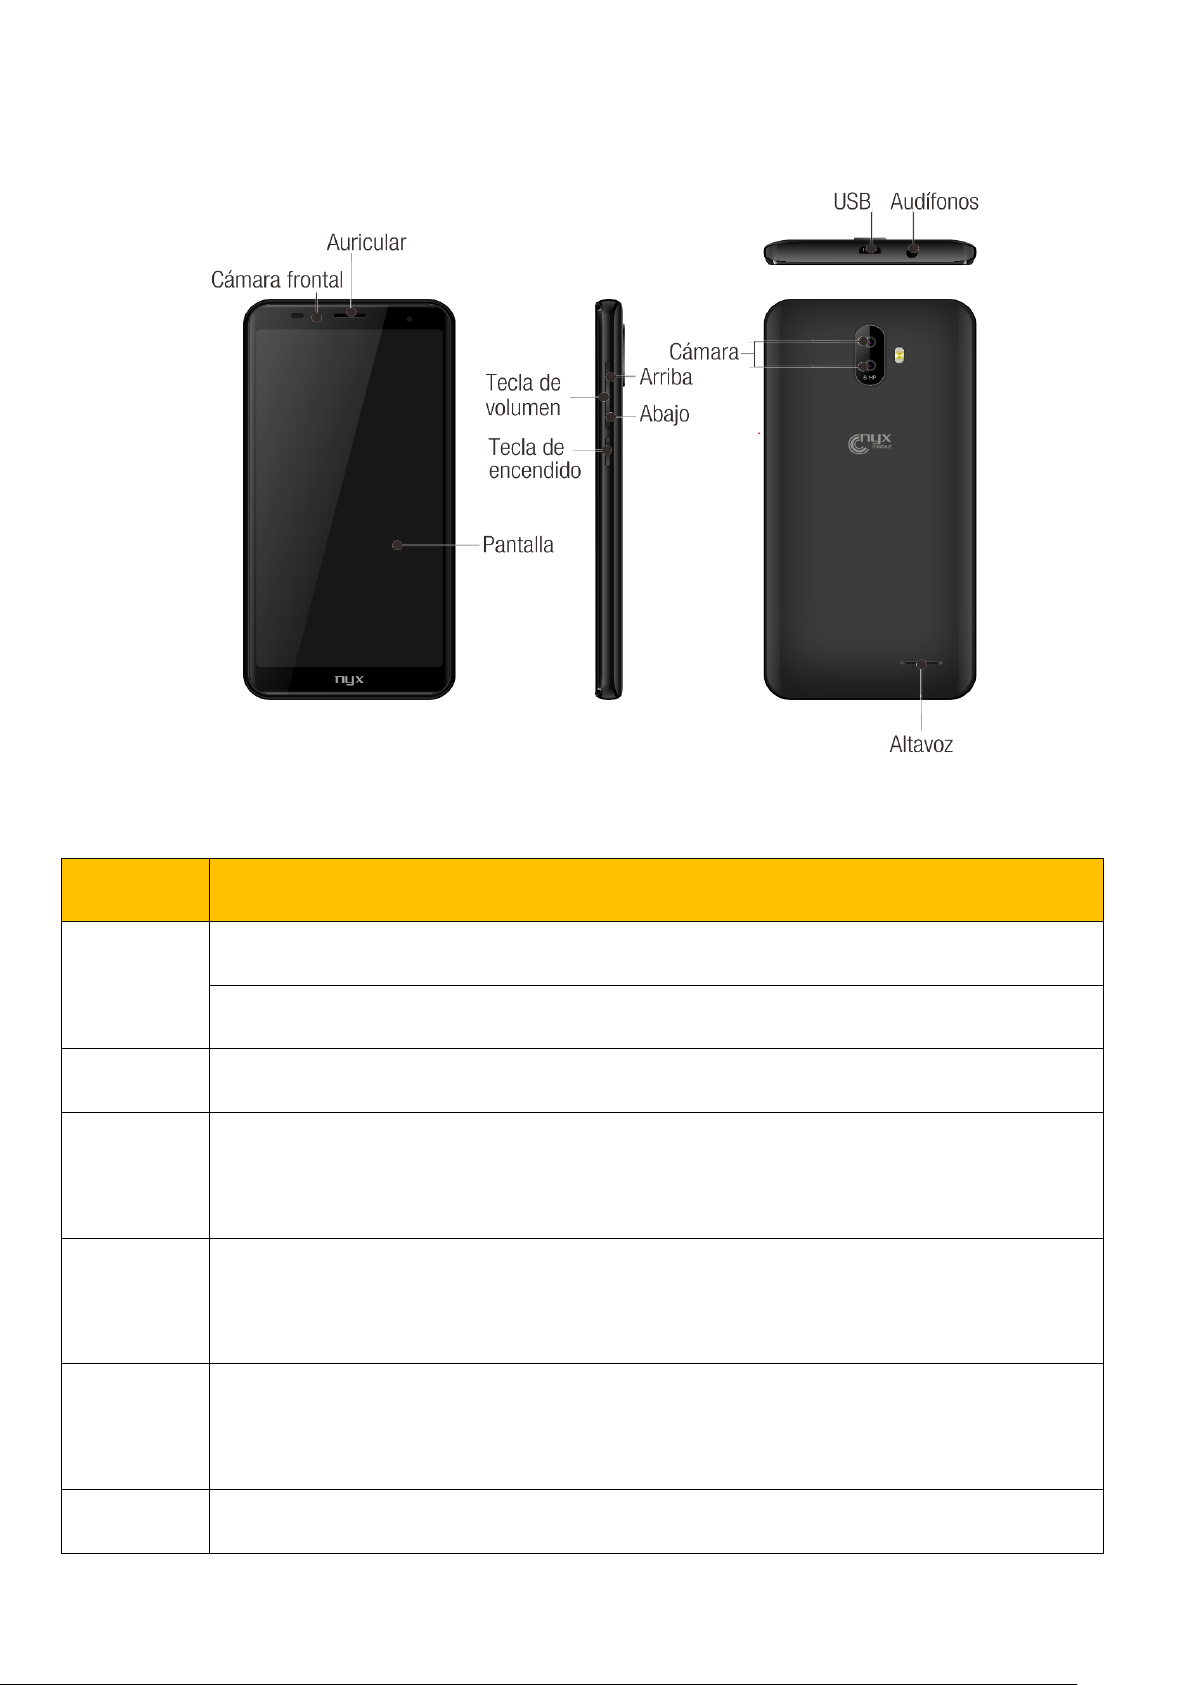
Keys
Functions
Home
Press this button to return home from any application or interface.
Long press it to open Google™ search.
Menu
Press it to open recently opened application window.
Back
Press it to return to the previous interface, or to close dialog box /options’
menu/notification panel or the keypad.
Power
Press it to open the phone’s menu,then you could choose to lock the screen、
turn off the phone,or set it to the silent mode .
Up
Press it to increase the volume
Press it to turn the phone to vibration mode from the silent mode.
Down
Press it to decrease the volume.
Appearance and Introduction Key Operations
4
Page 5
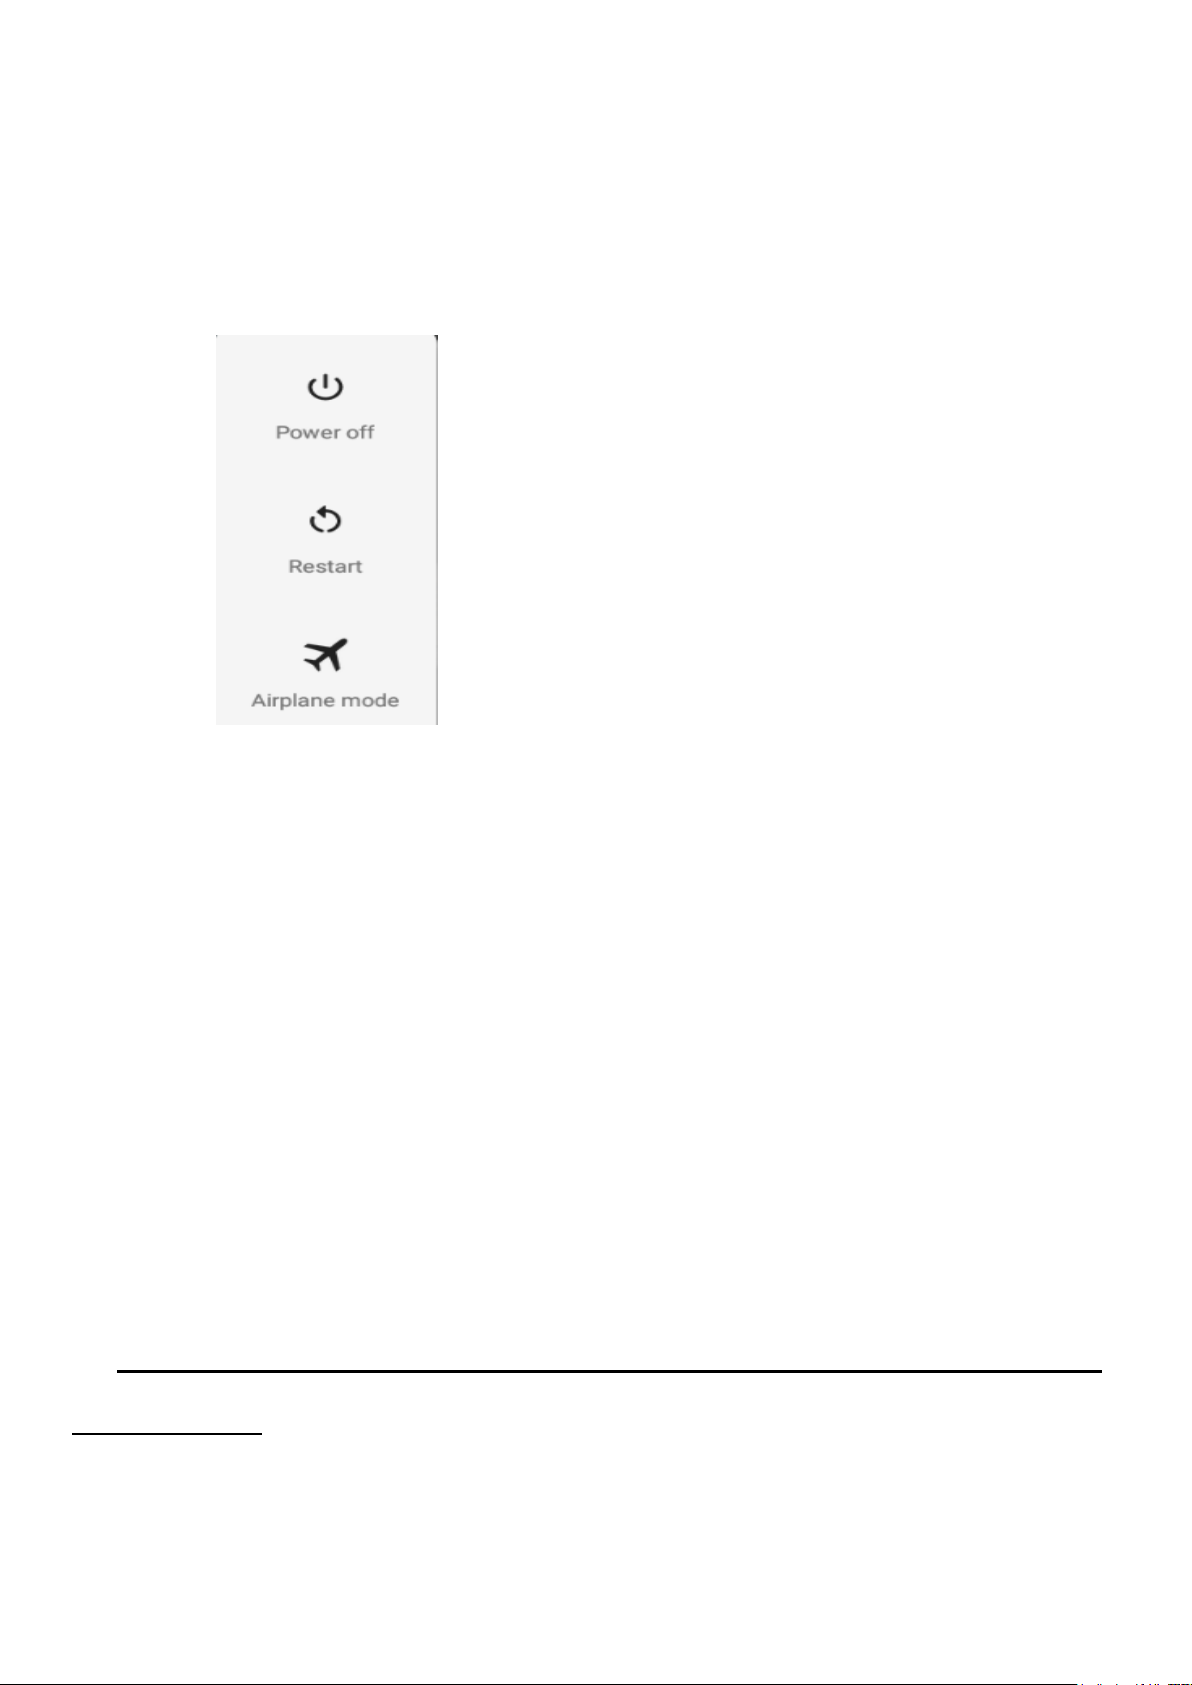
Switch your Mobile Phone ON/OFF
To switch your mobile phone ON, press and hold the Power Key until an animation appears
on the screen. Make sure the battery is charged and inserted properly.
To switch OFF, press and hold the Power Key until a window pops up.
Install/Remove the SIM Card and Battery
Make sure to switch off the device and disconnect from charger before installing and
removing the SIM card and battery. To install/remove the SIM card and battery, perform the
following:
1.Turn the mobile phone OFF.
2.Snap open the phone’s back cover and pull out the battery.
3.Carefully insert the SIM card into the SIM card slot, making sure that the card’s gold plate
is facing down and in proper alignment with the phone’s metal contacts.
4.Carefully return the battery into its slot and put the cover back on.
Notice: If the screen displays that the SIM card is locked permanently, please consult your
network operator.
5
Page 6
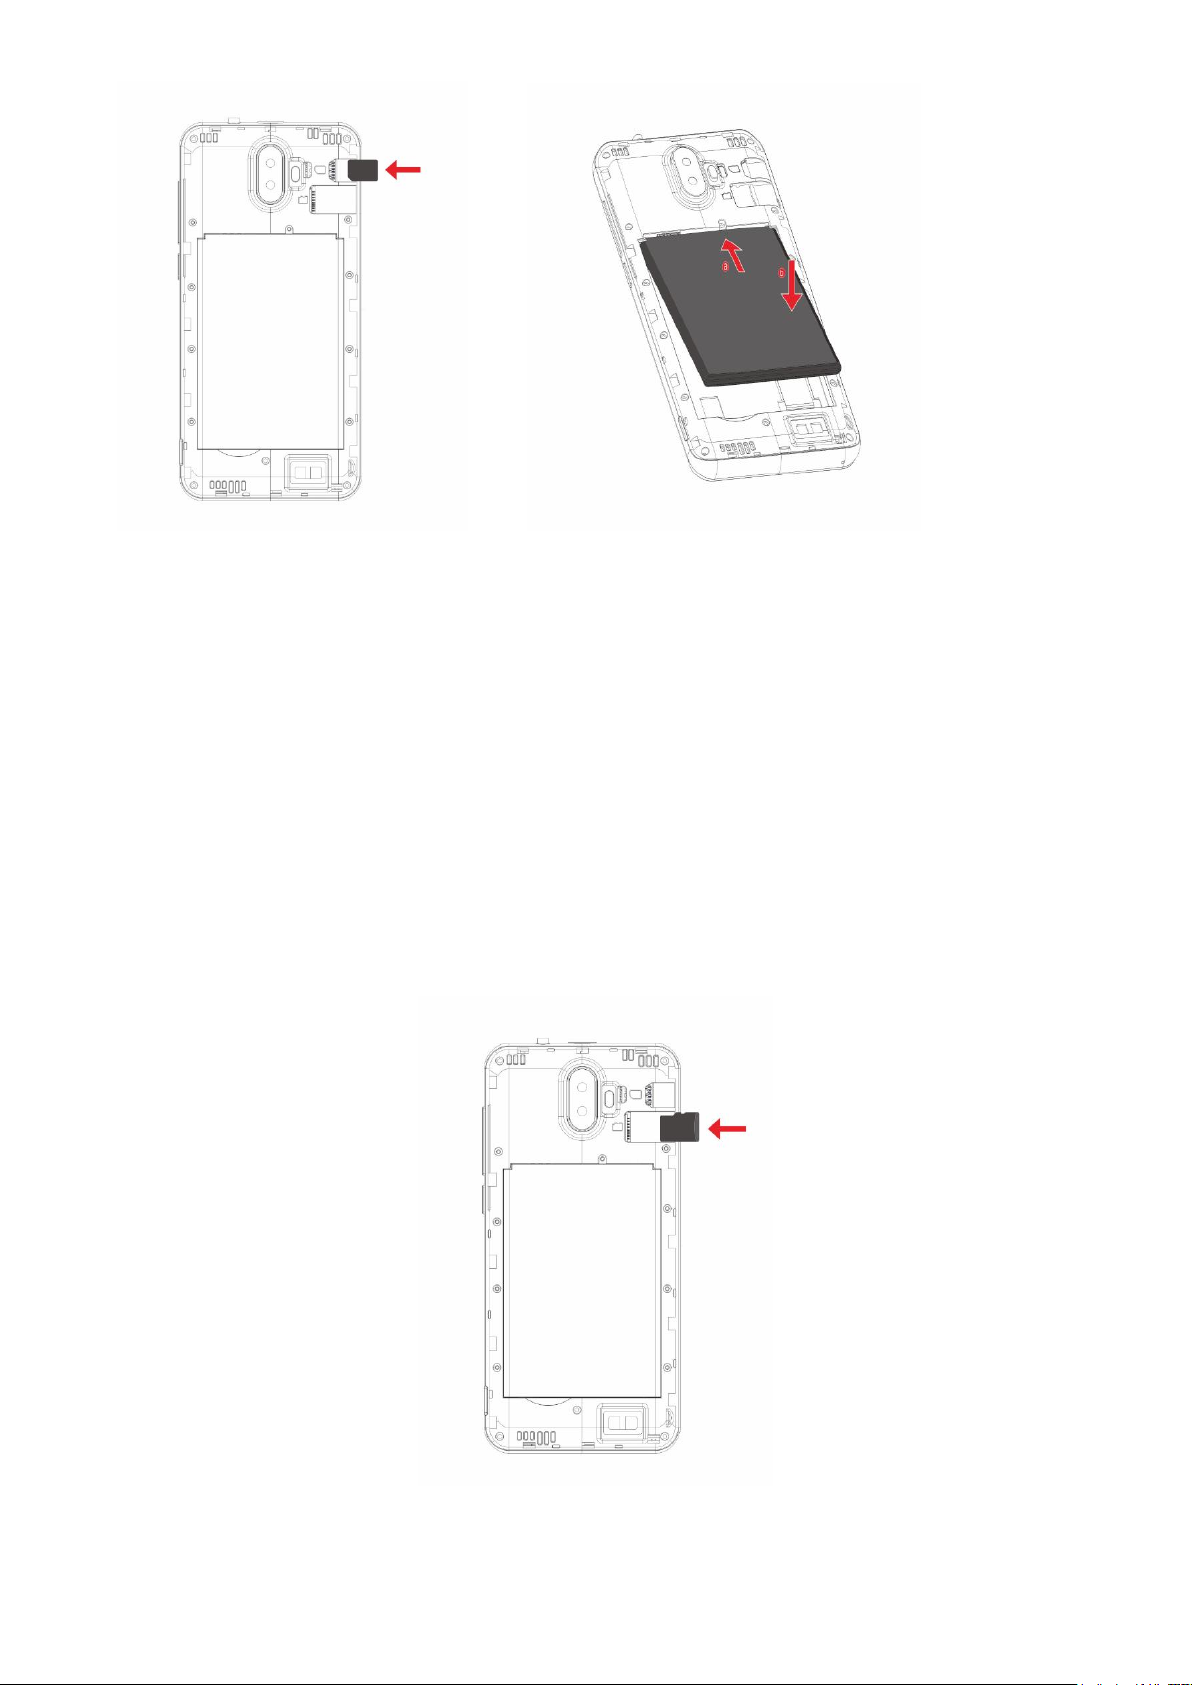
Install/Remove the Memory Card
The Memory Card is a handy mobile storage device that expands the mobile phone’s storage
capacity.
To install/remove the memory card, perform the following:
1. Turn the mobile phone OFF.
2. Snap open the phone’s back cover.
3. Carefully insert the Memory Card into the slot, making sure that the card’s gold plate is
facing down and in proper alignment with the phone’s metal contacts.
4.To remove, carefully pull the card out of the slot.
6
Page 7

Charge the Battery
Plug the charger into the electrical outlet.
Connect the small end of the charger connector into the mobile phone’s charging slot.
The battery indicator icon will flash until charging is finished. When charging is complete, i.e.
the battery charging icon stops flashing, disconnect the phone from the charger.
Notice:
a.Do not forget to unplug the charger from the electrical outlet after charging.
b.Only use approved charger and other accessories.
c.You can use the phone while charging, but charging time may increase. When charging
the handset in its Power Off state, a charging indicator will appear on the screen.
Storage
Connect the phone with the USB cable provided. Once connected, a connection interface will
appear. In the connection mode interface, select MTP and turn on from the connection screen
to be able to transfer files. Other storage options are also available.
7
Page 8
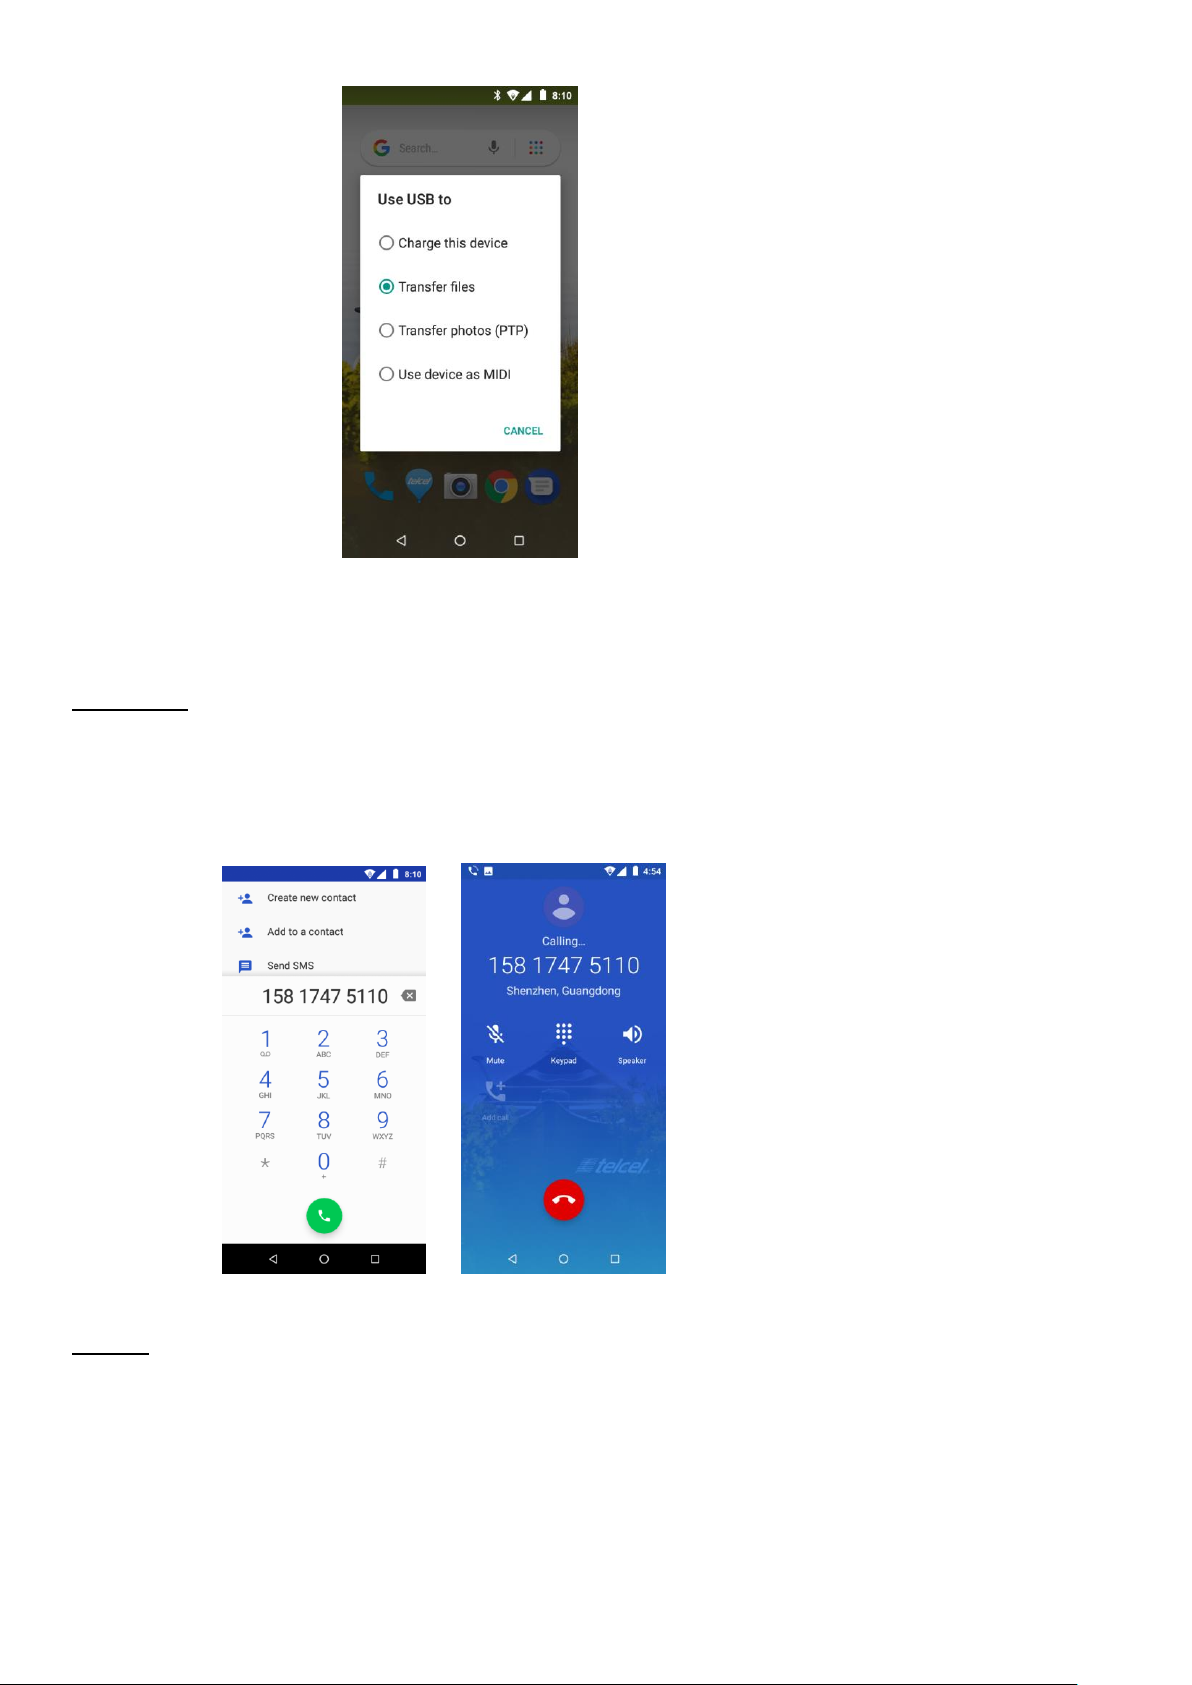
Call Functions
Make calls
At the dial keyboard, input the phone number and then click the dial key. If dialing an
extension, you may click the dial pad icon in the bottom of the screen to open the interface and
enter the number of the extension. You may also press and hold the 0 key to add a (+) sign
when adding an international dialing prefix.
History
Every telephone number called and received will be saved in the history. All numbers in the
history can be dialed directly by clicking the CALL BACK on the screen. When the number
appears on the list, click it to view details.
8
Page 9
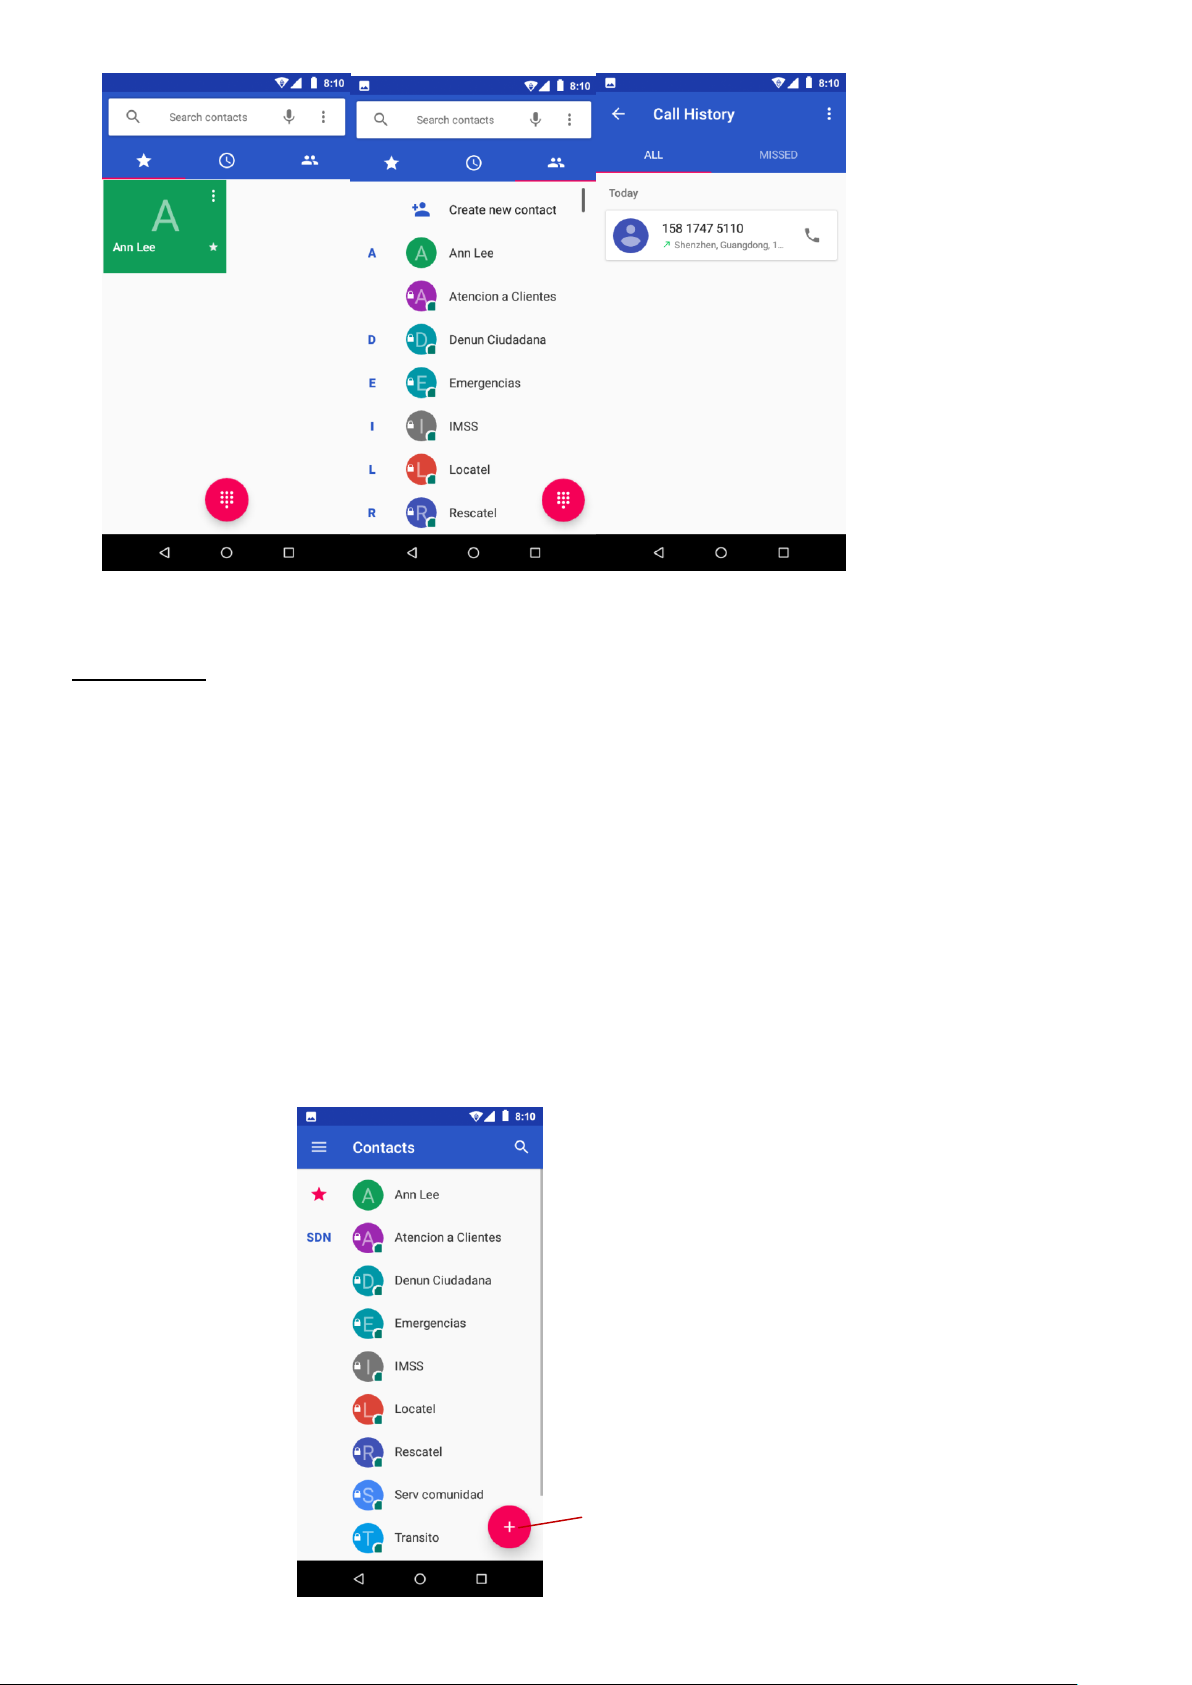
Add Contact
Call Options
There are different options that can be used in the history and dialing interface. You may
press the MORE while in the dial interface and adjust speed dial and call settings. In the
dialing interface, you may press the search button to browse through contacts list or set default
contact resources.
Contacts
Enter: Click on the applications menu and select contacts.
9
Page 10

• The default display is the phone contacts and SIM card contacts.
•The contacts are organized alphabetically by default.
Click the Search icon to enter the contact search interface.
Any numbers or letters associated with any of the contacts
Saved in the list will be shown in the search results.
Add New Contact
1. Click the add contact icon (+) to add contact.
2. Select to save your contacts to the Google account, the phone or the SIM card.
3. You may enter different contact details which include adding a picture, name, telephone
number, group, address, and email among other options.
4. Click to finish and save contact.
10
Page 11

Messages
You may use this function to exchange text messages and multimedia messages with your
family and friends. The messages from the same contact or phone number will be saved into a
single conversation so you may see the entire message history conveniently.
Send an SMS
Application Menu » Messaging » New message (or shortcut icon)
1. Click to enter recipient (You may enter contacts from contact book or enter a new number)
2. Compose Message
11
Page 12

3. Send
Send an MMS
When creating message, the default message style is SMS. The message will automatically
convert to MMS when adding an attachment.
1.Click the attachment icon in the messaging interface.
2. Click to add attachments and create an MMS message.
Internet Browser
Menu Functions
• Recent tab
• After browsing through multiple pages, this option will return the user to the previous page.
Windows
• You may view all windows open by clicking the windows icon in the upper right part of the
browser.
Bookmarks
• Click the save to Bookmarks option to make the current URL as a saved Bookmark.
• Click Bookmarks/History to opened saved bookmarks.
• Find on page: Search current page.
• Share page: Select to share the current page.
• Bookmarks/History: Show your browsing history and view the most visited pages.
• Settings: Contains a variety of browser settings.
12
Page 13

Camera
Camera
Prior to use: Insert SD card before using the camera or video camera. All photos or videos
taken by the phone are typically stored in the memory card for large storage capacity of
images.
Open Camera
1. Applications Menu » Camera
2.Switch to video mode if you want to record videos.
13
Page 14

Note: You may place a camera shortcut icon on any of the screens
Take Pictures
1. Aim the object that the picture will be taken.
2. Press the “Shutter” button on the screen.
3. After taking the picture, the file will be saved in the camera’s gallery folder.
4. You can view the photos by clicking the preview box button.You may adjust various settings
for the camera by pressing Menu while in the camera interface. When in the camera viewfinder
mode, you can switch to video or photos’ gallery.
Photos
Open Images
Applications Menu » Photos
Share Pictures
You may share pictures by sending them through different
types of installed applications. You may also send pictures
through the MMS message function by composing a message
and attaching the picture. Any image can also be sent via the Bluetooth function by selecting
Bluetooth equipment that has been paired.
Adjust Image
Press Menu and Edit to adjust images.
You may select from different effects that may include: Auto, West, Palma, Metro, Eiffel,
Blush,Modena,Reel,Vogue,Ollie,Bazaar,Alpaca,Vista, among other settings that can be used
to adjust picture images.
14
Page 15

View Images
In the picture interface, click on an album to view images
In the photo album, scroll the picture towards left to view the next picture or towards right to
view the previous one.
Crop Pictures
If you want to adjust the size of the picture, use the crop tools. Once the arrow appears, pinch
your fingers in or out to adjust the size. If you want to adjust the image and keep its proportion,
please hold down any of the four corners of the image and adjust accordingly.
Google Play Music
Open Music
Application Menu » Music
Search Music
You may choose to search for music from media folder through artist name, song name, album
name. The following formats are available: AMR, MIDI, MP3, WAV, and OGG.
15
Page 16

Sound Recorder
The Sound Recorder can record voice or any audio.
You may send any recorded audio via Bluetooth or MMS and also have the option to make any
recorded audio the phones default ring tone.
The recorder uses 3GPP and OGG format.
16
Page 17

Click to delete
alarms
Click to add
alarms
Click to
edit alarms
Record
-Keep the phone’s microphone near the voice source.
-Click the record button to record the audio.
-Click the stop button to stop recording the audio.
All recordings will be saved in the recording folder in the default music program and can be
accessed from the sound recorder application.
Alarm Clock
1. Click on the Clock icon in the application menu
2. Click set alarm button and enter the alarm clock set interface where you may delete and edit
alarms
Calculator
This function can turn your phone into calculator, it can do some simple calculations.
Touch the number keys to make it appear in the blank box.
17
Page 18

In the interface of calculator, press MENU button or hold down the screen to the left, then the
senior panel appears.
Google Calendar
Enter the calendar program, use white color on the surface of the month or peimeter to
highlight on the same day, the default to display this week.
18
Page 19

FM Radio
Through this program, you may listen to FM radio on the device, FM radio use the wired
headset as an antenna to receive signals, before opening this program
Gmail
Allows you set up your Gmail accounts. Gmail on your phone is automatically
synchronized with your google account on the web.
Open Gmail, you can activate or edit existing e-mail accounts as well as create a new
e-mail account.
When loading a mail account, if you want to delete it, you need to restore factory settings.
When loading a second one, you could press the menu button to delete it.
Notices: many functions depend on Gmail Account, fox example: Play store,
Chrome,Contact,Calendar,etc
19
Page 20

Search and select
between different Play
Store categories
Google Play
Google Play allows you to download music, movies, and even games. Click the Play icon to
sign in with your Google account.
20
Page 21

Settings
Network & Internet
Wi-Fi: Wi-Fi to power on. When on, the Wi-Fi will automatically search for available
networks. Any unsecured network can be used directly and any secured network
requires a password or credentials prior to connection.
Mobile network: Press the switch to enable/disable data roaming and VoLTE
option.Select preferred network type, view the Access Point Names and Network
operators.
Data usage: View the mobile data usage
Hotspot & tethering: Use hotspot and tethering to provide Internet to other devices
through your mobile data connection. Apps can also create a hotspot to share content
with nearby devices.
VPN: Add VPNs, and need to set a lock screen PIN or password before you can use
credential storage.
Airplane Mode: Press the switch to turn on/off flight mode.
Note: When in flight mode, all network connections will turn off automatically.
Connected devices
Bluetooth: Press the switch to power on Bluetooth. Once on, the Bluetooth will
automatically scan for any nearby open equipment.
Cast: Cast photos & videos to other devices
Printing: Need to download the "CloudPrint.apk" from the Internet and install.
USB: Can select storage option when connected with PC
Apps & notifications
See the all app informations,include installed apps and system apps
21
Page 22

Manage and delete installed applications.
Press the ‘Force Stop’ button to stop any of the services listed
Battery
General power usage and power management
Note: battery usage data is approximate and can change based on usage
Display
Brightness level, Adaptive brightness, Wallpaper, Sleep, Auto-rotate screen,Font size,
Display size,Font style
Sound
This option can set the Media/Alarm/Ring volume, phone ringtone, default notification
sound, default alarm sound,other sounds and vibrations, also vibrate for calls
Storage
View the phone memory usage.
DuraSpeed
Press the switch to power on DuraSpeed to allow APPs running in background,some
notifications may be postponed or not received
DureSpeed does not restrict background activities of APPs switched on in the list
Security & location
Security status
Google Play Protect regularly checks your apps and device for harmful behavior
Find My Device helps you locate this device remotely. It also helps you keep your data
safe, if the device is lost.
22
Page 23

Security update: Check Android™ version and security patch level
Set up screen locks
Use Swipe, Pattern, PIN or password to lock the screen.
Pattern: The first time there will be simple unlock instructions and examples. Click “next
step” to continue the security pattern step.
PIN: Enter PIN number to unlock the screen.
Password: Use password to unlock the screen
You may stop the security feature at any time.
Set up SIM card PIN lock
SIM card PIN (Personal Identification Number) is used to prevent unauthorized use of
SIM card. To change a blocked PIN code, you will need to unlock the SIM lock then go
to the Change Password screen. The phone will automatically prompt you enter the old
PIN code and ask to enter a new PIN code twice. The phone will then prompt you that
the change was successful. If you enter the PIN incorrectly three times, the SIM and
PIN codes will be automatically locked. You will need the PUK code to unlock the phone
which is available through your service provider. If you enter the PUK code incorrectly
10 times, the SIM card will be permanently locked. Please see your service provider for
a new SIM card.
Show passwords: Display characters briefly as you type.
Encryption & credetials: Allow applications to visit security credentials or other
credentials.
Screen pinning: When this setting is turned on, you can use screen pinning to keep the
current screen in view until you unpin. To use screen pinning:
23
Page 24

1. Make sure screen pinning is turned on.
2. Open the screen you want to pin.
3. Tap Overview
4. Swipe up and then tap the pin icon.
Location:Use wireless services to find locations in applications.When using the GPS,
power on to set satellite positioning for accuracy.
Apps with usage access: Allows an app to track what other apps you’re using and how
often, as well as your carrier language settings, and other details.
Users & accounts
Add account: Add accounts for owner, include Exchange,Google,IMAP,Personal(POP3)
Emergency information: Adding medical information and emergency contacts can help
first responders in an emergency.
Automatically sync data: Let apps refresh data automatically
Accessibility
Power button ends call and auto-rotate screen
Speak Passwords and large text
Google
View all kinds of google services & preferences
System
Language & Input
Language:Change the language of the phone.
Personal dictionary: Add or delete words to the custom dictionary.
24
Page 25

Keyboard & inputs: Virtual keyboard,Physical keyboard
Input assistance: Spell checker, Autofill service,Personal dictionary,Pointer
speed,Text-to-speech output
Gestures
Jump to camera: To quickly open camera, press the power button twice. Works from any
screen.
Date & Time
Automatic date & time: Use network-provided time, Use GPS-provided time,off
Automatic time zone: Select use network-provided time zone
Date and Time adjustment: Set date and time what you want.
Select time zone: Select Time Zone according to where your location.
Select Date Format : There are 2 kinds of formats you can choose from: 12-hour &
24-hour format.
Backup
Back up to Google Drive: Will back up all application data, WLAN passwords, and other
settings to Google Drive server,and this device’s backup data in Google Drive will be
permanently deleted if you select TURN OFF & DELETE option.
Account: Add backup account
Reset options
DRM rest: Deletes all DRM licenses
Reset Wi-Fi, mobile & Bluetooth: This will reset all network settings, including: Wi-Fi,
Mobile data and Bluetooth
25
Page 26

Reset app preferences: This will reset all preferences for: Disabled apps, Disabled app
notifications, Default applications for actions, Background data restrictions for apps and
Any permission restrictions.
Erase all data(factory reset): This will erase all data from your phone’s internal storage,
including: Your Google account, System and app data and settings, Downloaded apps,
Music, Photos and Other user data.
About phone
Phone information status and firmware updates
Applications for TELCEL
SIM Telcel
You can access the SIM Telcel tool kit via this menu.
Telcel
Telcel apps is a container that collects famous telcel services.You can
access any telcel services via this apps.
Mi Telcel
You can access the Mi Telcel service via this menu.
Claro mú sica
You can access the TELCEL music service via this menu.
Claro drive
You can access the Claro drive service via this application
Some system settings, hardware, and UI options may vary depending on final version.
26
Page 27

Notices for the use of phone
Your phone is a product of superior design and craftsmanship and should be treated with care.
The following suggestions can help you comply with the terms of repair kits, to extend the life of
mobile phone.
1)Place the mobile phone and their parts and components out of reach of small children.
2)Keep the phone dry, rain, humidity and all types of liquids which contain minerals will corrode
electronic circuits.
3)Don’t touch the phone with wet hands when charging, it will cause electric shock or damage
the phone.
4)Avoid place the device in high temperature environment. Temperatures will shorten the life of
electronic devices, damage batteries, and warp or melt certain plastics.
5)Avoid place the device in too low temperature environment. When the temperature rises, the
phone will produce water vapor that may damage electronic circuit.
6)Avoid place the phone in dusty, dirty places, otherwise parts may be damaged.
7)To avoid the phone in a lit cigarette, near open flame or any heat source.
8)Do not open the device, non-professional approach will do damage to the phone.
9)Do not throw it from height, knock or shake the phone, rough handling can damage internal
circuit boards.
10)Do not paint the phone, because the paint will block headphones, microphones or other
removable parts, and lead it not work.
11)Use clean, soft, dry cloth to clean the camera, light sensor lenses. Prohibit the use of
harmful chemicals and cleaning agents, cleaning fluids to clean the phone
12)If mobile phone, battery, charger, or mobile phone accessories are defective, send to
the nearest qualified service center for inspection.
27
Page 28

13)If necessary, Service Centre staff will assist you and will arrange for phone repairs.
Google, Android, Google Play and other marks are trademarks of Google LLC.
The Android robot is reproduced or modified from work created and shared by Google and used
according to terms described in the Creative Commons 3.0 Attribution License.
The UNII band 1 is indoor use only.
28
Page 29

FCC Statement
15.19 Labeling requirements.
This device complies with part 15 of the FCC Rules. Operation is subject to the following two conditions: (1) This device
may not cause harmful interference, and (2) this device must accept any interference received, including interference
that may cause undesired operation.
15.21 Information to user.
Any Changes or modifications not expressly approved by the party responsible for compliance could void the user's
authority to operate the equipment.
15.105 Information to user.
This equipment has been tested and found to comply with the limits for a Class B digital device, pursuant to Part 15 of
the FCC Rules. These limits are designed to provide reasonable protection against harmful interference in a residential
installation. This equipment generates uses and can radiate radio frequency energy and, if not installed and used in
accordance with the instructions, may cause harmful interference to radio communications. However, there is no
guarantee that interference will not occur in a particular installation. If this equipment does cause harmful interference
to radio or television reception, which can be determined by turning the equipment off and on, the user is encouraged to
try to correct the interference by one or more of the following measures:
-- Reorient or relocate the receiving antenna.
-- Increase the separation between the equipment and receiver.
-- Connect the equipment into an outlet on a circuit different from that to which the receiver is connected.
-- Consult the dealer or an experienced radio/TV technician for help.
Specific Absorption Rate (SAR) information:
This product meets the government's requirements for exposure to radio waves. The guidelines are based on
standards that were developed by independent scientific organizations through periodic and thorough evaluation of
scientific studies. The standards include a substantial safety margin designed to assure the safety of all persons
regardless of age or health.
FCC RF Exposure Information and Statement The SAR limit of USA (FCC) is 1.6 W/kg averaged over one gram of
tissue. This device was tested for typical body-worn operations with the back of the handset kept 10mm from the body.
To maintain compliance with FCC RF exposure requirements, use accessories that maintain a 10mm separation
distance between the user's body and the back of the handset. The use of belt clips, holsters and similar accessories
should not contain metallic components in its assembly. The use of accessories that do not satisfy these requirements
may not comply with FCC RF exposure requirements, and should be avoided.
Body-worn Operation
This device was tested for typical body-worn operations. To comply with RF exposure requirements, a minimum
separation distance of 10mm for body worn must be maintained between the user’s body, including the antenna.
Third-party belt-clips, holsters, and similar accessories used by this device should not contain any metallic components.
Body-worn accessories that do not meet these requirements may not comply with RF exposure requirements and
should be avoided. Use only the supplied or an approved antenna.
29
 Loading...