


Owner’s Operating Manual
Before operating the unit, please read this manual thoroughly,
and retain it for future reference.
iTach Tablet TV
TE55 IT01 /- TE65 IT01 / TE70 IT01 / TE80 IT01---

9
15
35
36
36
2
1
Contents
Safety Warning
Connecting and Setting
Menu Operation
Care and Maintenance
Display Mode
Installation
Troubleshooting

Safety Warning
Before operating the unit, please read this manual thoroughly,
and retain it for future reference.
Do not place the unit on an unstable cart, stand, tripod, bracket, table, or shelf.
Do not expose the unit to direct sunlight and other sources of heat.
Do not handle liquids near or on the unit.
Never spill liquid of any kind into the unit
Placement
Power Supply
LED Screen
Sight Distance
Temperature
Humidity
Ventilation
Earphone
Standby
Battery
Do not put the unit near appliances that create magnetic fields.
Do not put heavy objects on top of the unit.
Check that the unit’s operating voltage is identical with your local power supply.
the weather is thunder-storm or lightning.Please unplug power supply and aerial plug when
please unplug power supply, when there is nobody at home or didn't use over a long period of time .
Please keep power cord from physical or mechanical damage.
Please use exclusive power cord, don't modify or lengthen it.
Please check and ensureAC source is connected with the ground.
Never use any other tough or sharp object to replace the written pen.
Unplug the power supply plug before cleaning.
Clean the screen with a soft dustless and dry cloth.
Never use water or the spray type detergent to clean the unit.
For deep clean, contact an authorized service center.
Please don't display the high brightness image on the screen for a long time.
The best distance between audience and screen is 5-7 times that of screen diagonal.
The best watching angle between audience and screen as top and bottom, or so inside 176 degrees.
Do not place the unit near or over a radiator or a heater register.
If your unit is suddenly moved from a cold to a warm place, unplug the power cord for at least.
two hours so that moisture that may have formed inside the unit can dry completely.
Do not expose machine in rain, damp or place near water.
Ensure the indoor drying, cool.
Keep the ventilation openings clear.
Ensure that the unit has enough space for ventilation around: left, right and back >10cm, top> 20cm.
It will while using the earphone listen noisy sound for a long time.effect the hearing
Before using earphone, please turn down the volume in advance.
It will enter standby mode but not turn off the unit while press the standby key on the side panel.
It will under the internal PC mode .enter to standby mode by double-click the standby key
Accurate transaction and recall scrap battery after using.
Please don't let kid touch battery, in case of dangerous don't throw battery into fire.
Normal operating temperature is 5 ~ 40℃
For 55/65/70/80 inch Display equipment: Fuse in inlet, 4A, 250 VAC.
CAUTION
This is a ClassA product, in the living environment, this product may cause radio interference.In this case,
you may need to take practical measures to users of its interference.
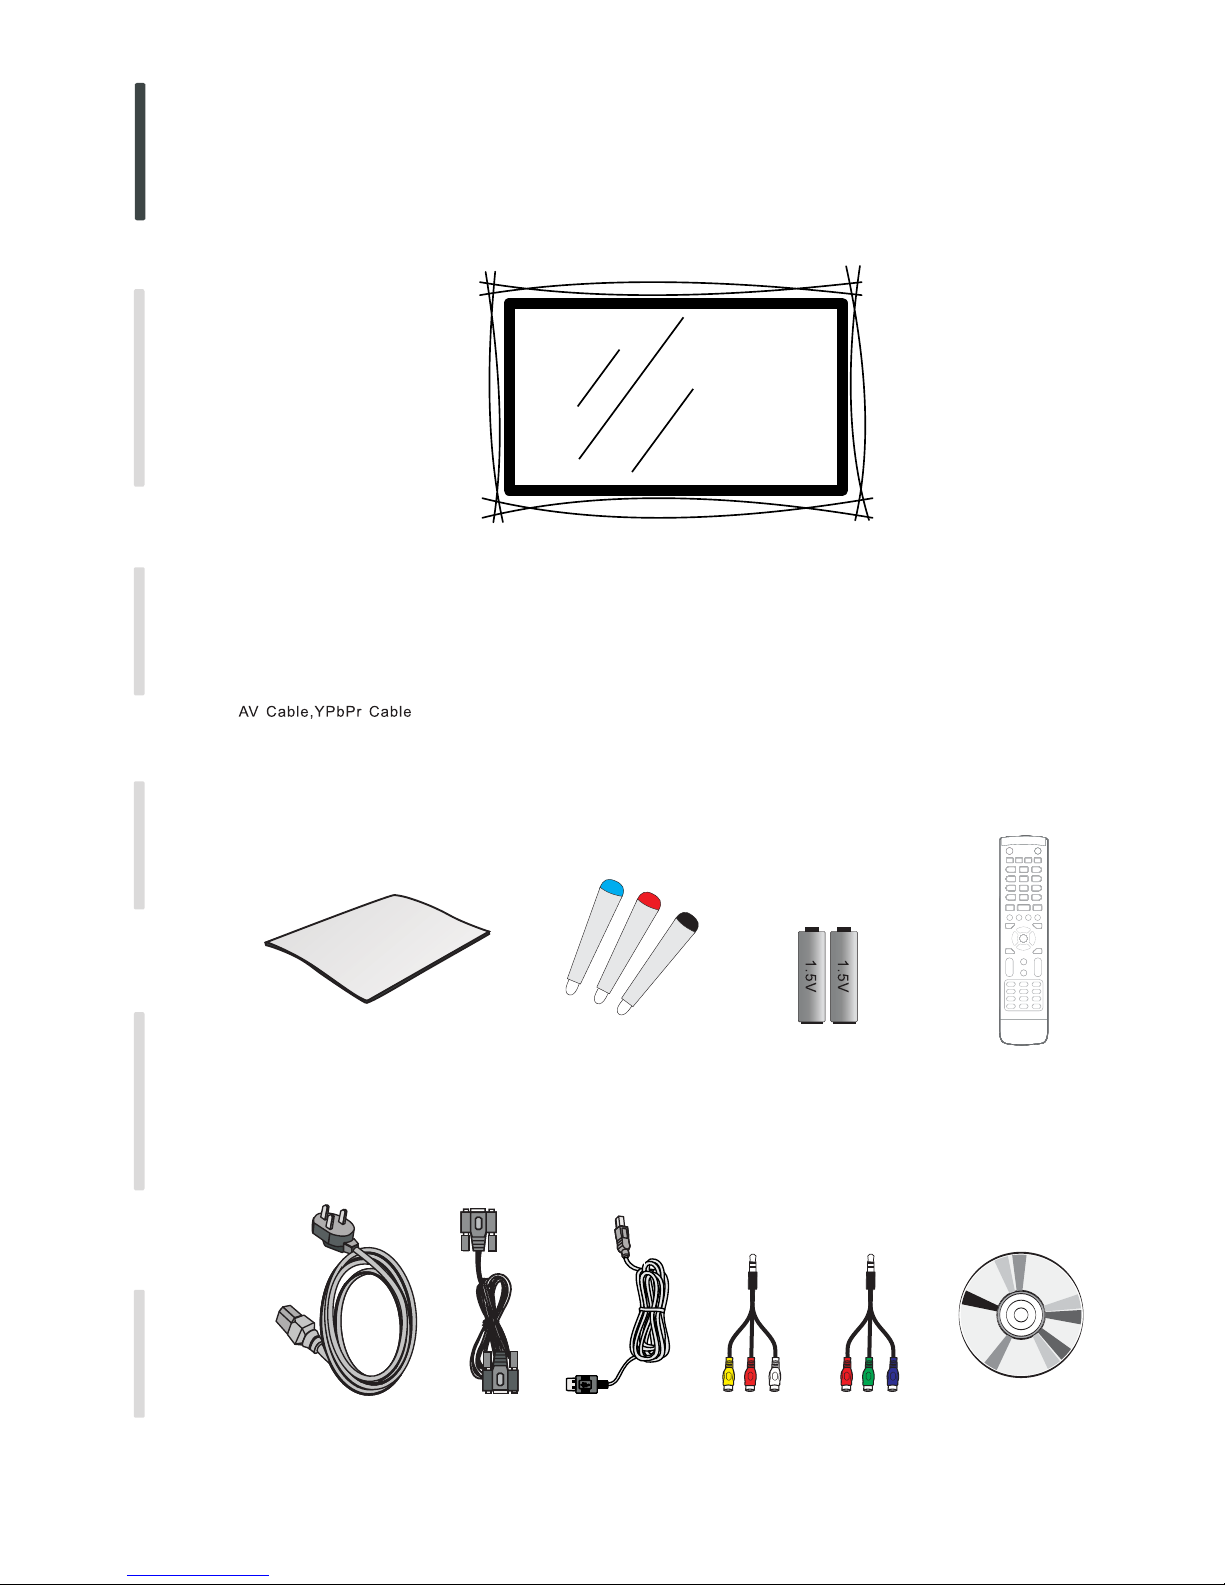
Quick Use , Remote Control, Battery, Power Cord, VGA , USB , handwritten pen ,CDGuide Cable Cable
2
1) Checking parts:
Installing
Quick Use Guide
Handwritten pen
Battery
Remote control
Power Cord
1 Open your package
Connecting and Setting
Installation
Menu Operation
Troubleshooting
Care and Maintenance
Display Mode
VGA Cable CDUSB Cable AV Cable YPbPr Cable
3
INPUTINPUT
MENU
6
INPUT
MENU
7
VOL
VOL
CH.
VOL+/-
CH.
CH.
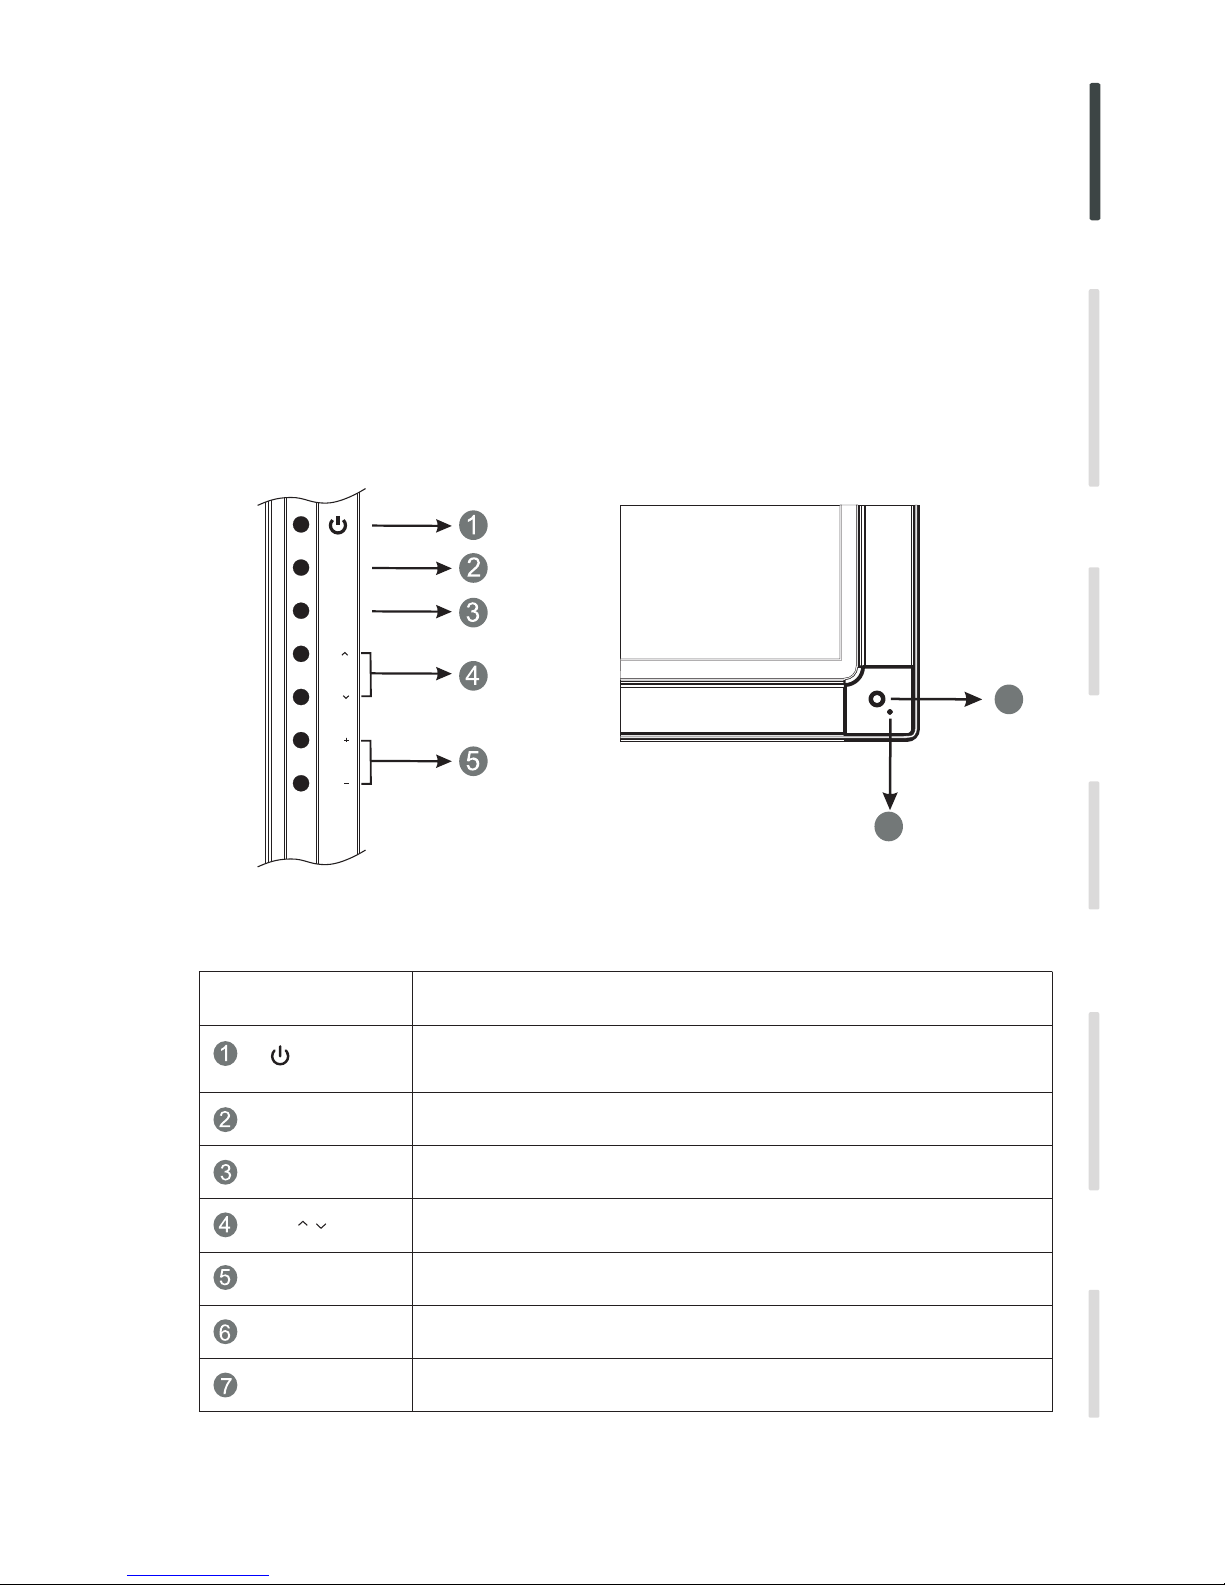
3 Control Panel
2) Installation
1).Please read “ Installing Instruction” while installing.Mobile Bracket
Item
Function Description
Power on/off
Switch to different source
Menu
Receive the remote control signal
Indicator color shows the status of power on/off
Power indicator
Remote control
signal receiver
Switch channel according to channel number order
Volume adjust
2).The mobile bracket(matched)takes material object as the standard
3).The wall bracket(matched)takes material object as the standard
2).Please read “Wall Bracket Installing Instruction” while installing.
Connecting and Setting
Installation
Menu Operation
Troubleshooting
Care and Maintenance
Display Mode

4
4 Terminal Interface
Power supply switch, Turn the on and offAC source
POWER
AC IN
AC source input
RF IN CATV interface
YPbPr IN
AV IN
Compound video, Audio-IN
TOUCH OUT
MEDIA
LAN IN
VGA OUT
USB IN
MIC
AUDIO OUT
COAX OUT
HDMI
VGA IN
AUDIO IN
Item
Function Description
NOTE: Do not include interface 1,2,3,4,5 when it without internal PC.
Coaxial output
Connect PCAudio from external sources
Connect PC Image from external sources
YPbPr signal input, connect DVD, set -top -box with YPbPr
Connect the device with Earphone-IN
Connect a collect device with microphone
Connect USB device, such as Hard Disk, USB keyboard mouse etc.
Connect the display with VGA-IN
Standard net orifice, Connect Rj45 net interface
Multimedia USB-IN
High Definition Multimedia Interface
External PC touch signal input. The default function can be use under
the internal PC. You can control the external compute through
this unit under the situation that the driving has installed. the touch
function can be available at the PC, VGAand HDMI source)
(
EARPHONE
Connect the device with Earphone
Connecting and Setting
Installation
Menu Operation
Troubleshooting
Care and Maintenance
Display Mode
5
34
35
36
37
38
39
40
41
42
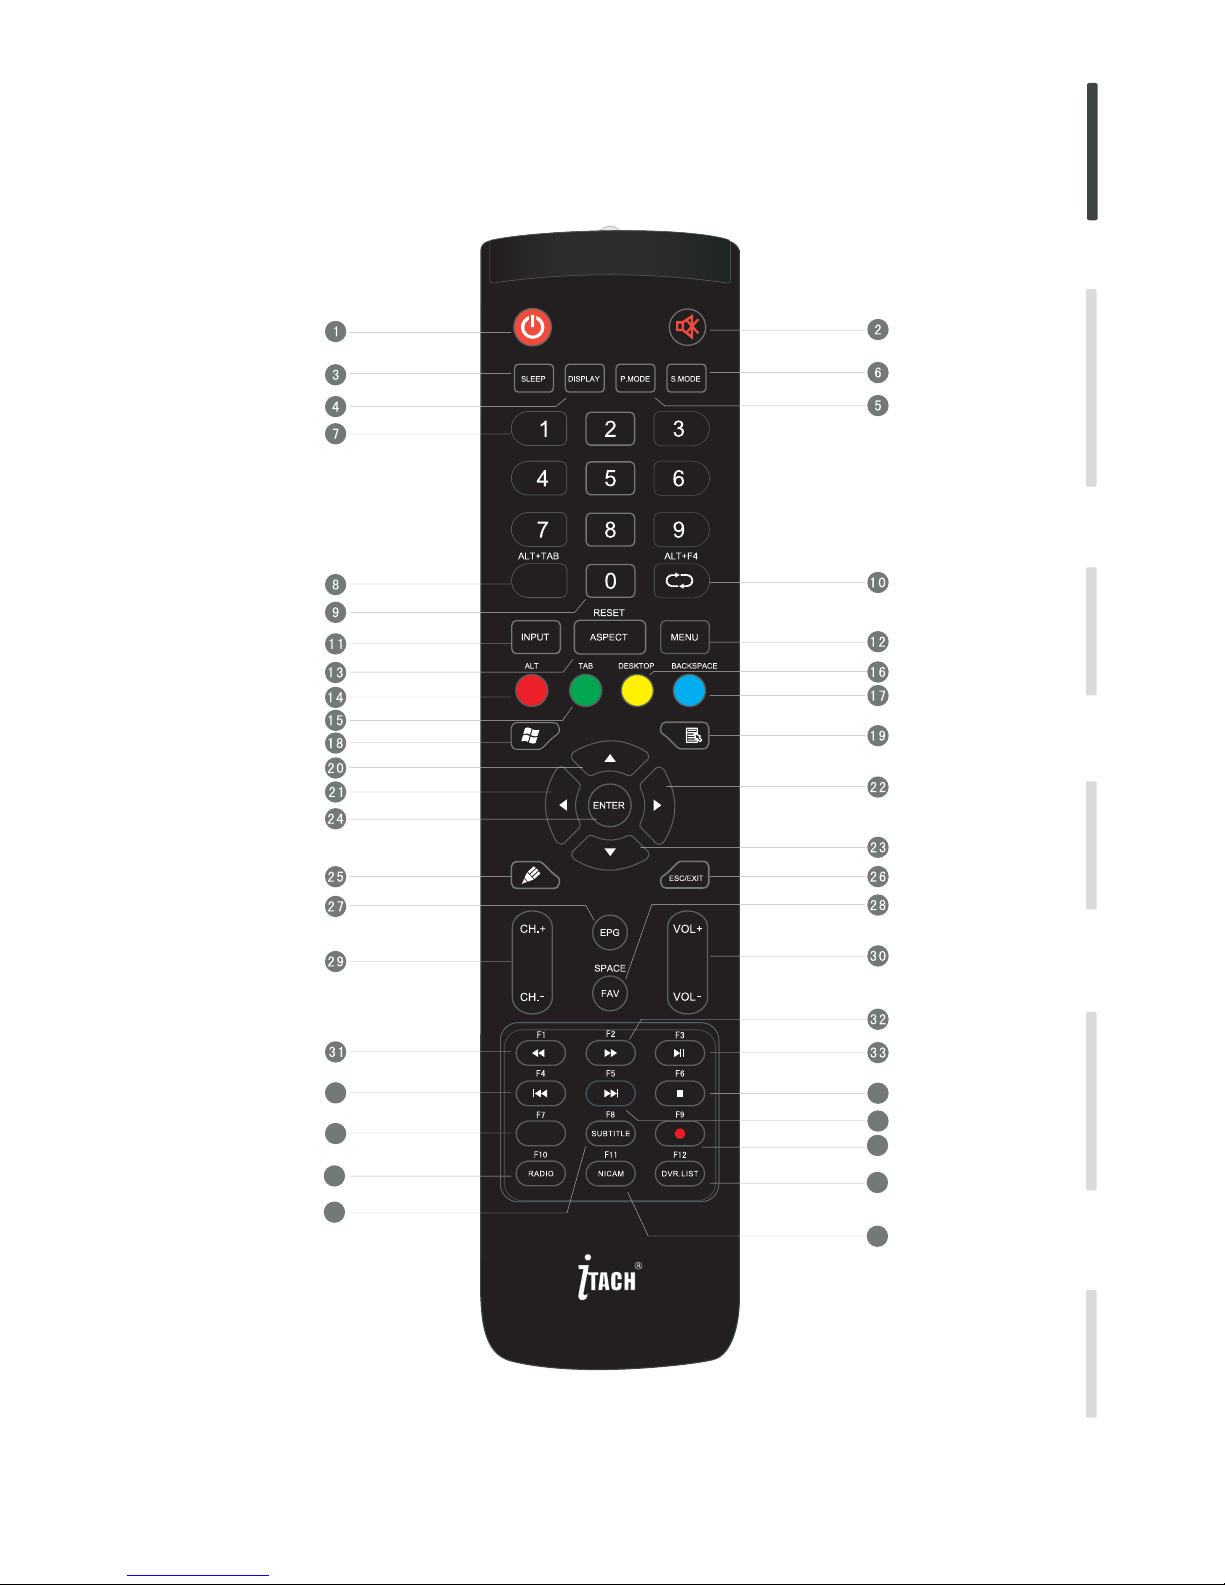
5 Remote control
CH.LIST
Connecting and Setting
Installation
Menu Operation
Troubleshooting
Care and Maintenance
Display Mode

6
SLEEP:
DISPLAY
P.MODE
S.MODE
CH LIST ALT TAB.、+
0
、 +ALT F4
INPUT
MENU
RESET+ASPECT
RED+ALT
GREEN TAB+
YELLOW+DESKTOP
BLUE+BACKSPACE
ENTER
/ESC EXIT
EPG
FAV SPACE、
CH CH.+、 .-
VOL VOL+、 -
Remote Control Buttons` Function Description
Mute ON/OFF.
Press to POWER ON/OFF; Extended press 5s to shut down.
Set the sleep time.
Display the information of the current source.
Picture mode selection.
Sound Mode selection.
Numeric button TV channel numeric input button.
TV channel list; Internal PC programs window switch button.
TV numeric input button.
Return to previous channel; Internal PC programs window close button.
Source selected button.
Menu display, input source selection.
Lengthways press 3 reset touch frames under the PC, HDMI, VGA source; Adjust the picture ratio.
TV source ; Internal PC to reset functionbutton button.
Internal PC Windows .button
Direction , press to up.button
Enter , press to select status.button
Startup the writing software; Fast to choose the writing pen.
ESC/EXIT , Press to exit current statusbutton .
Digital program guide.
Favorite channel, Space y.button
Channel add and subtract.
Volume increase and decrease.
Internal PC menu .button
TV source ; Internal PC to reset functionbutton button.
TV source ; Fast switch to internal PC desktopbutton button.
TV source ; Internal PC backspacebutton button.
Direction button, press to left.
Direction button, press to right.
Direction button, press to down.
Connecting and Setting
Installation
Menu Operation
Troubleshooting
Care and Maintenance
Display Mode

34
35
36
、F1
、F2
、F3
、F4
、F5
、F6
37
F7
38
39
40
41
42
SUBTITLE F8、
F10 RADIO、
F11 NICAM、
F12 DVR.LIST、
F9、
7
NOTE: All the function relate to computer can not work while it is without internal PC.
Fast reverse; F1 Function button.
Fast forward; F2 Function button.
Play/Pause; F3 Function button.
Previous; F4 Function button.
Next; F5 Function button.
Stop; F6 Function button.
F7 Function button.
Digital TV sub-title button; F8 Function button.
F9 Function button; Digital TV recorder button.
F10 Function button; Digital TV radio button.
F11 Function button; Nicam button.
F12 Function button; Digital TV recorder channel list.
Connecting and Setting
Installation
Menu Operation
Troubleshooting
Care and Maintenance
Display Mode
8
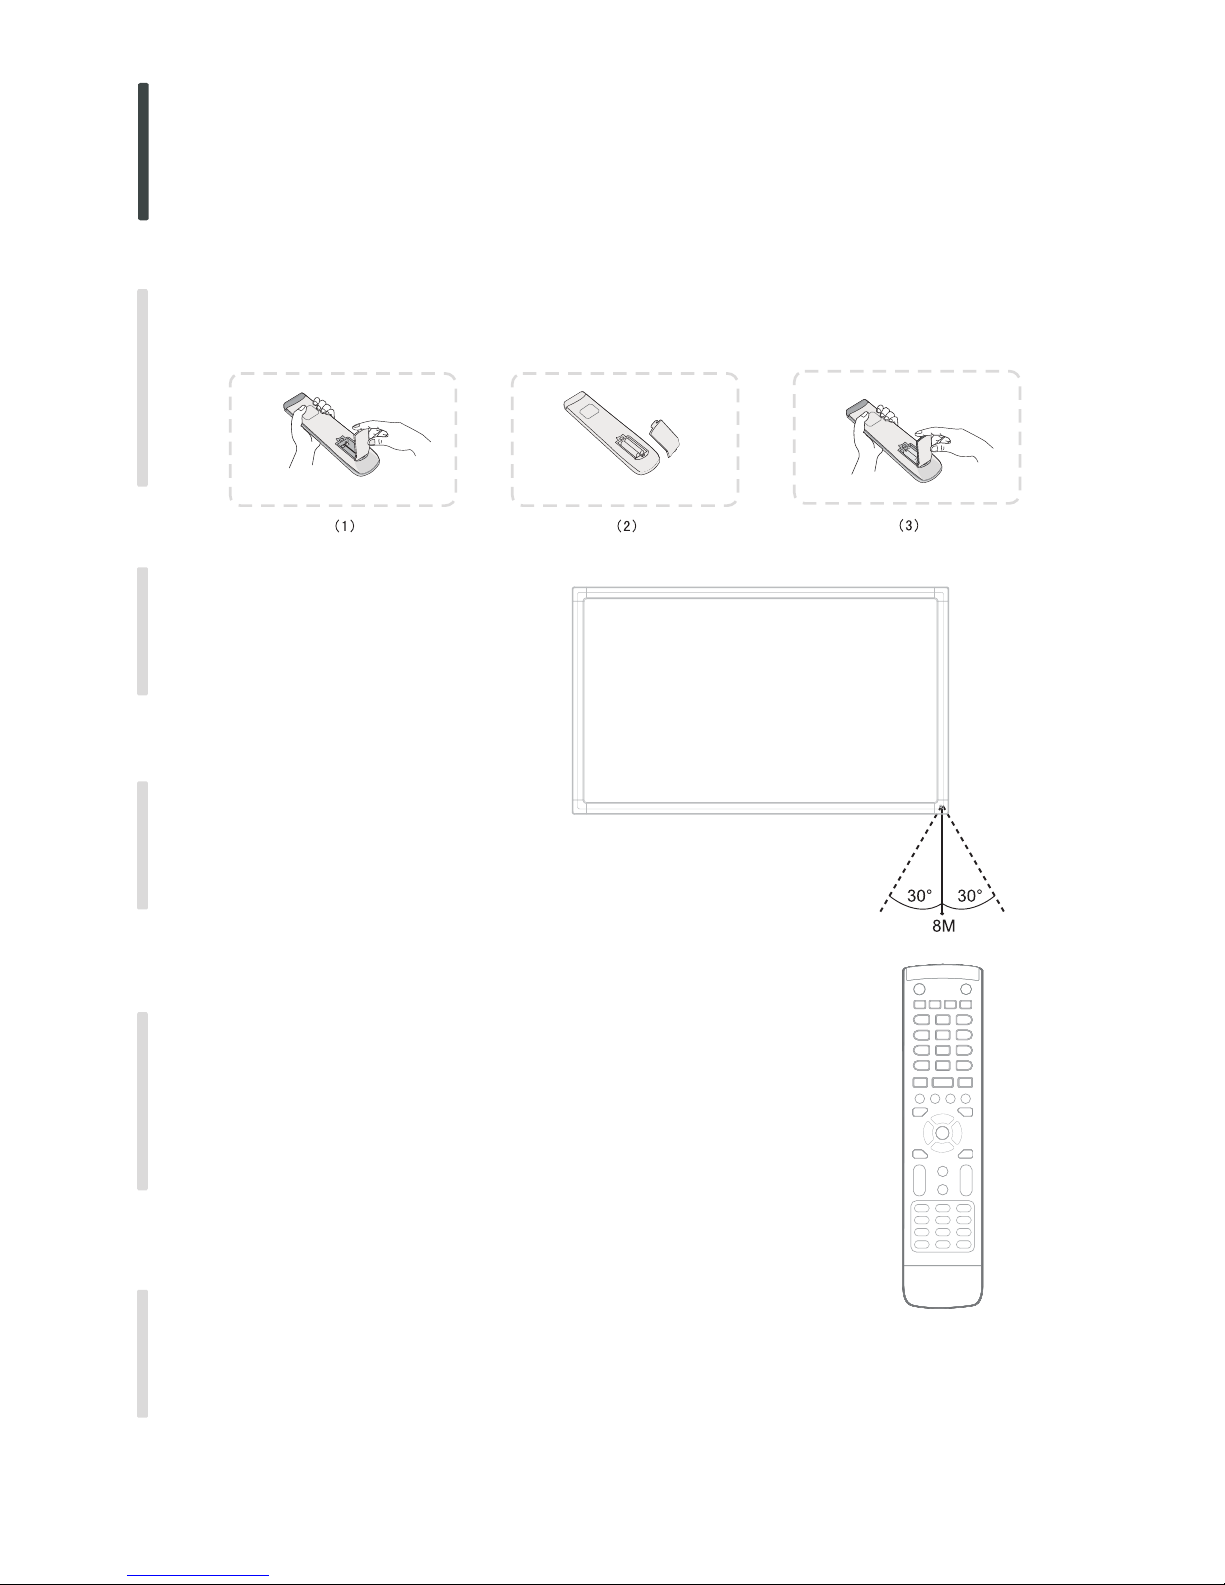
Insert the Batteries
1 Remove the cover on the rear of the remote control
2 Insert two AAA battery and care to respect the polarities
on the battery against on the battery against
Please do not mix the battery
“” :
+ +,- - .
3 Replace the cover by aligning the new and old batteries it with the base of the remote control
and pressing it back into place.
remote control area
2 Remote Control Instruction
The range of r as shown.
Please throw the scrap batteries into the recycle bin
.
emote control receiver
by way of environmental protection
CAUTION
RISK OF EXPLOSION IF BATTERY IS REPLACED
BY AN INCORRECT TYPE
DISPOSE OF USED BATTERIESACCORDING
TO THE INSTRUCTIONS
Connecting and Setting
Installation
Menu Operation
Troubleshooting
Care and Maintenance
Display Mode
9
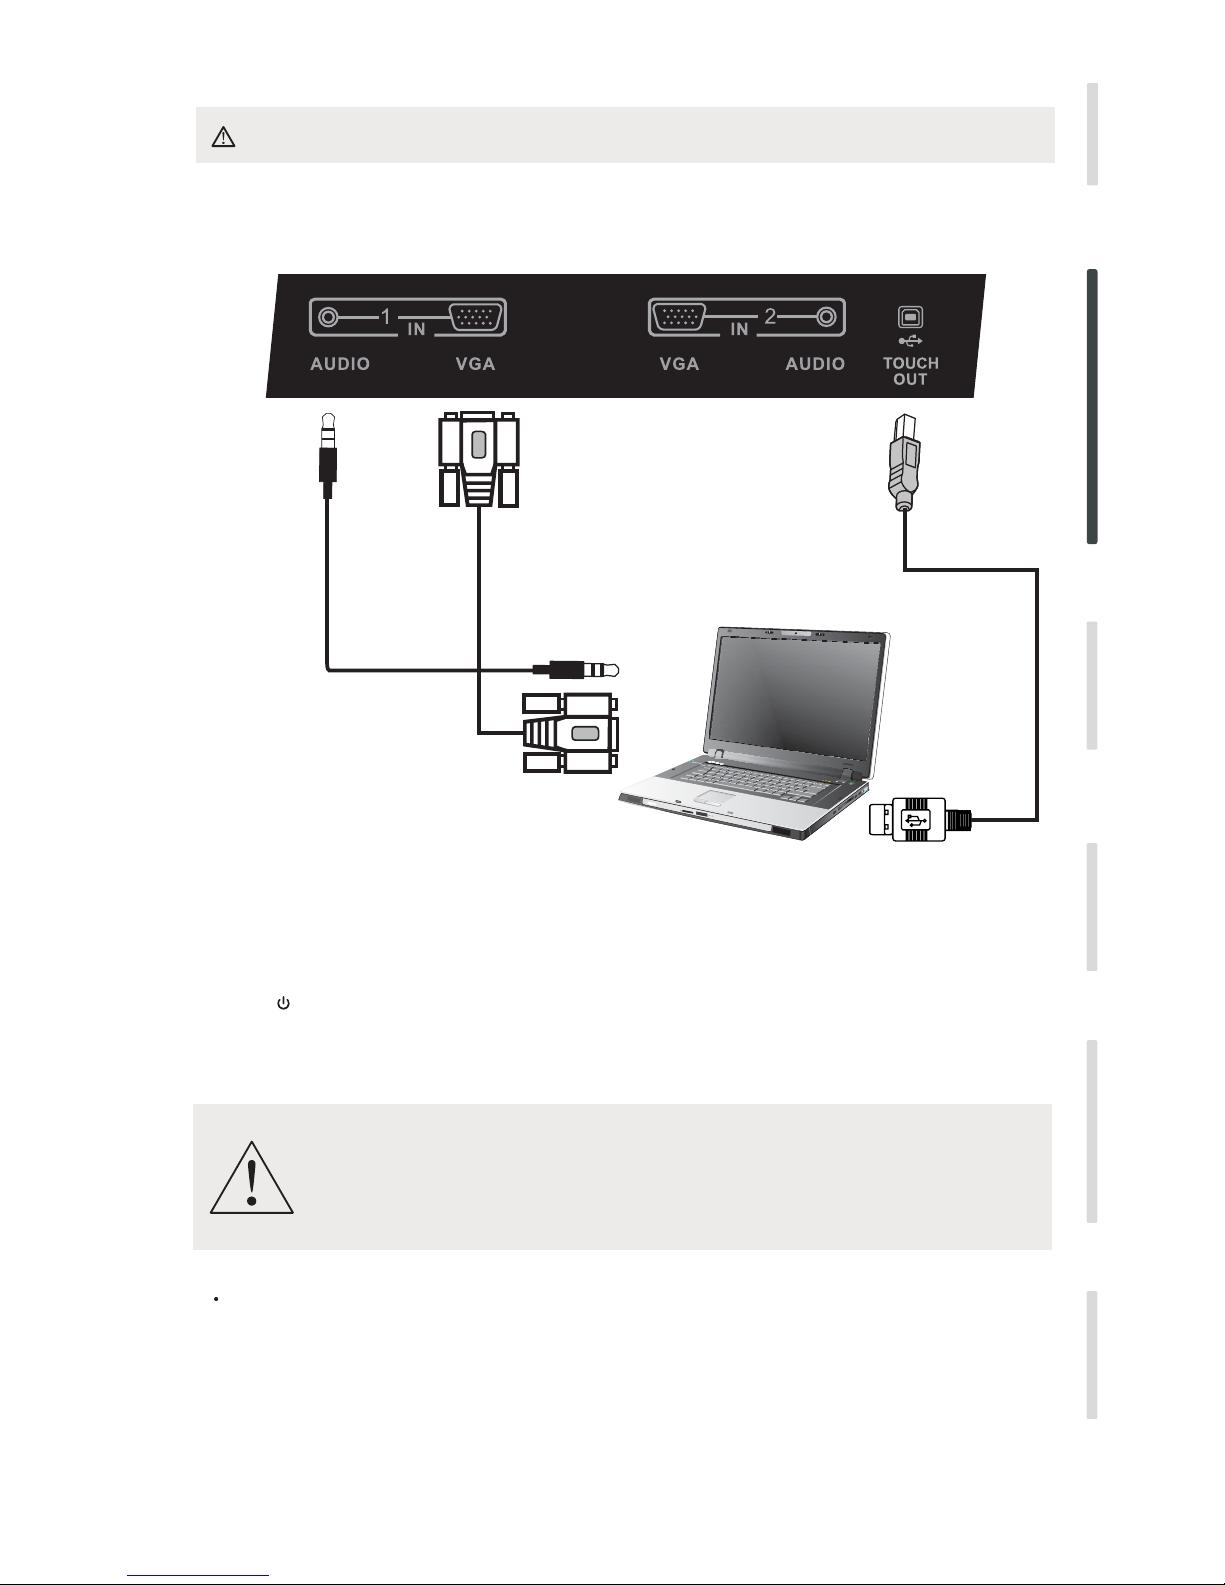
Connecting and Setting
For the safety of you and your unit, please do not connect any power supply before the external device prepared
1 External Computer and Touch Connecting
Audio cable
VGA cable
USB cable
PC
NOTE:
The best resolution of is 1920*1080external computer input
The unit can connect with the external PC via HDMI.
Suggest Configuration of computer
2.0GBHZ Processor, 1GB Memory More than 256 color display card
1GB Available Hard Drive
VGA-OUT/HDMI-OUT Audio-OUT USB Interface、、
Support Resolution 800*600,1024*768
(5)Press to turn the power on
(6)Press INPUT switch to VGAsource
(3)Plug the POWER cord and switch it on from the rear panel.
(1)Connect a VGA cable (15pin) between the VGAand external PC.
Connect a earphone cable between the PC and audio at the same time.
(2)Connect a USB cable between the external PC and USB terminal
(4)Startup the external computer(Setup the touch driver)
Connecting and Setting
Installation
Menu Operation
Troubleshooting
Care and Maintenance
Display Mode
10
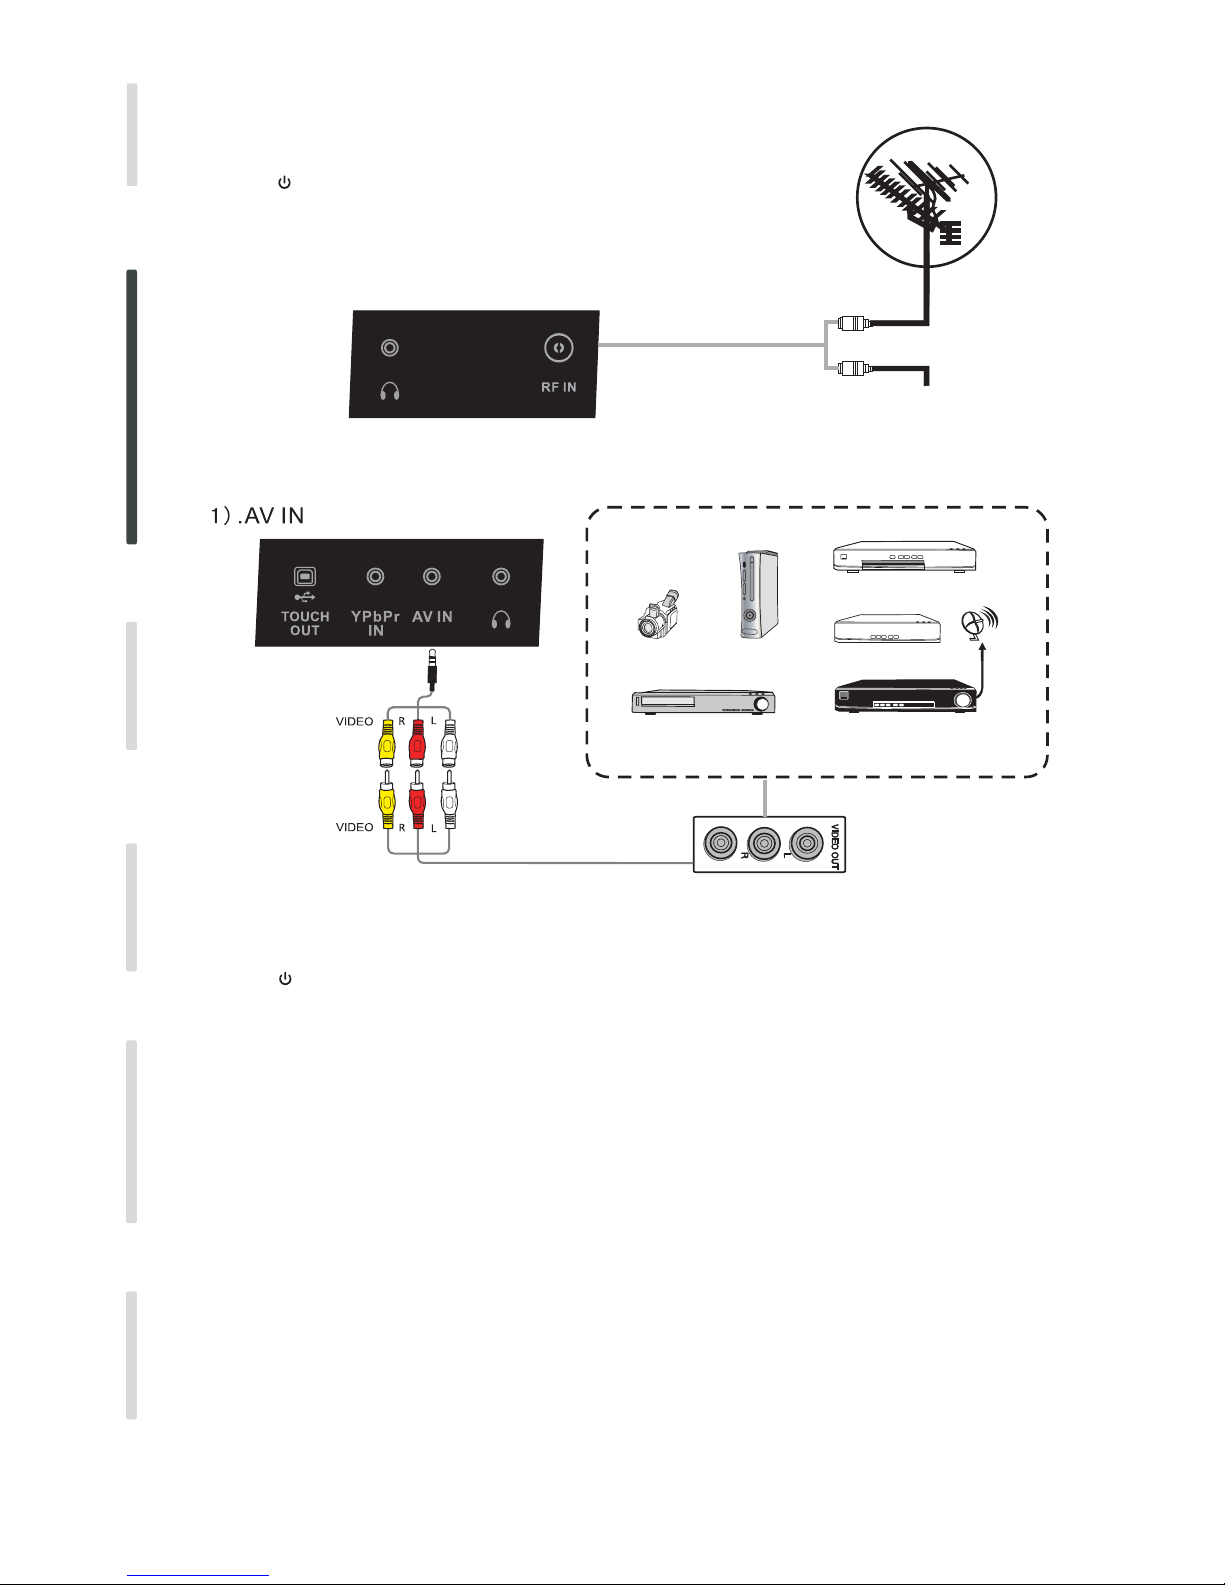
TV aerial
Multi-media system
The terminal board RF interface
CATV
3 A/V Connecting
Video Game
Set-top
Satellite TV receiver
Video recorder
Camera
DVD
AV cable
(3)Press to turn the power on
(4)Press INPUT switch to AV source
(2)Plug the POWER cord and switch it on from the rear panel.
(1)Connect aAV cable with the device with AV-OUT( ).Yellow is Video, Red is Audio-R, White isAudio-L
(3)Press to turn the power on
(4)Press INPUT switch to TV source
(2)Plug the POWER cord and switch it on from the rear panel.
(1)Connect a RF cable with CATV terminal.
2 TV Aerial
(5)Press MENU to search
Connecting and Setting
Menu Operation
Troubleshooting
Care and Maintenance
Display Mode
Installation

11
R
L
YPbPr
Component cable
AV cable
Camera
Video recorder
Video Game
Set-top
Satellite TV receiver
HDMI cable
DVD
(3)Press to turn the power on
(4)Press INPUT switch to YPbPr source
(2)Plug the POWER cord and switch it on from the rear panel.
(1)Connect a YPbPr cable with the device with YPbPr.
(3)Press to turn the power on
(4)Press INPUT switch to HDMI source
(2)Plug the POWER cord and switch it on from the rear panel.
(1)Connect a HDMI cable with the device with HDMI.
Connecting and Setting
Installation
Menu Operation
Troubleshooting
Care and Maintenance
Display Mode

12
4 Coaxial Connecting
AV cable
Efficacy/Acoustics equipment
5 Video-OUT
1) VGA-OUT
Projector
Note: VGA-OUT can output the image in the internal computer only
(3)Press to turn the power on
(4)Press INPUT switch to PC source
(2)Plug the POWER cord and switch it on from the rear panel.
(1)Connect a VGA cable with the device with VGA, .Connect a Earphone cable with theAudio-OUT
(3)Press to turn the power on
(2)Plug the POWER cord and switch it on from the rear panel.
(1)Connect a Coaxial cable with the device with Coaxial.
(5)Setup the VGA-OUT or Multi-Screen in the internal computer
Connecting and Setting
Menu Operation
Troubleshooting
Care and Maintenance
Display Mode
Installation

13
Connect other display
AV-OUT output the picture and sound of TV S-VIDEO and AV source
3 USB Device
4 Network Cable
USB Device
The network signal output
like router etc.
5 Microphone
Audio cable
Network Cable
USB cable
Microphone
Av cable
Display
2AV-OUT
Connecting and Setting
Installation
Menu Operation
Troubleshooting
Care and Maintenance
Display Mode

14
HDMI
Input Source
DTV
VGA1
MEDIA
OK
AV
ATV
VGA2
HDMI2
HDMI1
PC
YPbPr
Menu Operation
Connecting and Setting
Menu Operation
Troubleshooting
Care and Maintenance
Display Mode
Installation

Please select an OSD Language
English
SimpleChinese
Chinese
OK
Country
China
HongKong
MaCao
OK
MENU
Channel Tuning
TV 5 Programme(s):
21%... 536.15MHz (TV)
DTV 5 Programme(s):
Radio 5 Programme(s):
Tune Type DTV ATV+
China
HongKong
Macao
MENU
15
Connecting and Setting
Menu Operation
Troubleshooting
Care and Maintenance
Display Mode
Installation

16
CHANNEL
DTV Mannal Tuning
ATV Mannal Tuning
Programme Edit
Signal Information
Auto Tuning
2 Signal Information is available only for DTV with signal.
DTV Manual Tuning
Bad Normal Good
UHF CH 21
+
-
NO SIGNAL
ATV Manual Tuning
Storage To 1
+
-
Frequency 48 25MHz.
System BG
Current CH 1
Search
Fine Tune
-
Save
MENU
Connecting and Setting
Menu Operation
Troubleshooting
Care and Maintenance
Display Mode
Installation

17
Programme Edit
2 C03
ATV
3 C04
ATV
1 C02
ATV
Delete Rename Move Skip Favorite
MENU
OK
FAV
Connecting and Setting
Menu Operation
Troubleshooting
Care and Maintenance
Display Mode
Installation

18
PICTURE
Color Tempreture
Aspect Ratio
Noise Reduction
Picture Mode
120Hz Mode
Brightness 50
Color 50
Sharpness 50
Tint 50
MENU
Pictuer UserMode
Contrast 50
Color Temperature
Green 50
Blue 50
MENU
Color Temperature User
Red 50
when Color Temperature is set to User,the following settings can be manually adjusted.
Screen
Standard
Standard
16:9
Middle
Pass
Standard/Mild/User/Dynamic
Tint is available when NTSC system AV or S video--.
Standard
Connecting and Setting
Menu Operation
Troubleshooting
Care and Maintenance
Display Mode
Installation

19
43:
16 9:
Zoom1
Zoom2
MENU
Aspect Ratio
Auto
Just Scan
Low
Middle
High
MENU
Noise Redaction
Off
Screen
only in PC DB15 or DVI mode.when DVI signal input,only
and can be adjusted.
Horizontal Position
Vertical Position
Horizontal Pos 50.
Vertical Pos 50.
Size 50
Screen
Auto Adjust
Phase17
OK
120 Hz Mode
The MEMC function adjustment, open MEMC function can make
the motion picture smoother.
Connecting and Setting
Menu Operation
Troubleshooting
Care and Maintenance
Display Mode
Installation

20
SOUND
Balance
Auto Volume
Surround Sound
Sound Mode
AD Switch
Bass 50
MENU
SOUND User
Treble 50
MENU
Balance
0
+
-
MENU
Surround Sound
Off
Surround
Surround Sound
Set the sourround sound on or off.
Standard/Music/Movie/Sports/User
Only in User mode,the follow items can be adjusted.
Standard
0
Off
Off
Off
Connecting and Setting
Menu Operation
Troubleshooting
Care and Maintenance
Display Mode
Installation

21
TIME
Off Time
On time
Sleep Timer
Clock
Auto Sleep
and you can manually select also.
It will get time from the digital input signal,
MENU
Clock
Date 01
+
-
Month Jan
Year 2000
Hour 11
Minute 21
Off Time/On Time
It is timer switch machine function.
Off/Once/Every Day/Mon.~Fri./Mon.~Sat./Sat.~Sun./Sunday
MENU
Off Time Once
Hour 00
Minute 00
MENU
On time Once
Hour 00
Minute 00
Volume 30
ATV
Channel 01
Hour/Minute Select the switch .time
ATV Select to boot.the default source
CHANNEL Select to boot,only the source is TV.the default channel default
VOLUME Select the default volume to .boot
01 Jan 11 19/:
Off
Off
Off
Off
Connecting and Setting
Menu Operation
Troubleshooting
Care and Maintenance
Display Mode
Installation

22
MENU
Sleep Timer
Off
10Min
20Min
30Min
60Min
90Min
Connecting and Setting
Menu Operation
Troubleshooting
Care and Maintenance
Display Mode
Installation

23
OPTION
Audio Language
Subtitle Language
Hearing Impaired
OSD Language
Country
PVR File System
Restore Factory Default
OSD Animation
Restore Factory Default
OSD Animation On
select the OSD animation on/off.
When input source is DTV,the following settings can be manually adjusted.
Audio Language
Subtitle Language
Hearing Impaired
Country
PVR File System
set the audio language.
set the subtitle language.
select the country of TV system.
Software Update USB()
English
English
English
Off
HongKong
Off
MENU
OSD Language
SimpleChinese
Chinese
English
Connecting and Setting
Menu Operation
Troubleshooting
Care and Maintenance
Display Mode
Installation

24
S
Connecting and Setting
Menu Operation
Troubleshooting
Care and Maintenance
Display Mode
Installation

25
+
Connecting and Setting
Menu Operation
Troubleshooting
Care and Maintenance
Display Mode
Installation

26
LOCK
Set Password
Block Program
Lock System
Block Program
2 C03
ATV
3 C04
ATV
1 C02
ATV
Lock
MENU
OK
4 C05
ATV
The default password is 0000"".
Connecting and Setting
Menu Operation
Troubleshooting
Care and Maintenance
Display Mode
Installation

27
USB 2.0
PHOTO MUSIC MOVIE TEXT
Blue:Yes; Gray:No
PHOTO see page 29-30.
MUSIC see page 31.
MOVIE see page 32-33.
TEXT see page 34.
Connecting and Setting
Menu Operation
Troubleshooting
Care and Maintenance
Display Mode
Installation

28
Press to play or pause.
Connecting and Setting
Menu Operation
Troubleshooting
Care and Maintenance
Display Mode
Installation

29
Connecting and Setting
Menu Operation
Troubleshooting
Care and Maintenance
Display Mode
Installation

30
--/--
Pause FB FF Prev. Next Stop Rep ALL. MUTE
Press to play or pause.
Press to display the information of the current music
Connecting and Setting
Menu Operation
Troubleshooting
Care and Maintenance
Display Mode
Installation

31
--/--
Pause FB FF Prev. Next Stop Rep ALL. Set A
AB
Press to play or pause.
Press to select the repeat mode:-AB
Connecting and Setting
Menu Operation
Troubleshooting
Care and Maintenance
Display Mode
Installation

32
Press to display the information of the current music
Press to play steper.
Set the display aspect ratio till the picture is fit onto the screen.
Set the left and right sound channels.
Connecting and Setting
Menu Operation
Troubleshooting
Care and Maintenance
Display Mode
Installation

33
Prev Page Next Page Prev. Next Stop InfoPlaylist
Connecting and Setting
Menu Operation
Troubleshooting
Care and Maintenance
Display Mode
Installation

34
Troubleshooting
PC mode
Touch Function
Video not working properly
Audio not working properly
Remote control
out of order
The unit shuts down
automatically
1.Check whether there is object between remote control and TV receiver.
2.Check whether the batteries polarities in remote control is right.
3.Check whether the batteries are drained.
1.Sleeping mode setting.
2.Check whether there is sudden power failure.a
3.Check for signal to system and control.
1.Check display setting.
Out of signal
Background streaking
False color
Unsupport format
2.Check the resolution.
3.Adjust the Hs & Vs (synchronization) in the menu.
1.Choose auto adjust.
2.Adjust clock and phase.
1.Check the VGA.
2.Adjust chroma, brightness and contrast.
1.Choose auto adjust.
2.Adjust clock and phase.
Touch function void
Not allow to touch
1.Check driver are installed correctly.
2.Reinstall driver.
1.Check setup and align it.
2.Reinstall driver.
3.Check whether the touch pen is working properly.
No picture/No sound
Picture trembles
Poor picture
No sound
One speaker
VGA-OUT silence
1.Check POWER status.
2.Check the signal cable.
3.Check the internal PC.
1.Check the signal cable.
2.Check for other electronics interrupting signal .
1.Adjust chroma, brightness and contrast in the menu.
2.Check the signal cable.
1.Check the mute key.
2.Adjust volume.
3.Check the audio cable.
1.Check for proper earphone connection.
1.Adjust sound balance in the menu.
2.Check sound control panel of computer.the setting in
3.Check the audio cable.
Connecting and Setting
Menu Operation
Troubleshooting
Care and Maintenance
Display Mode
Installation

1.YPbPr Mode
i
35
Resolution / Display mode
Vertical frequency (Hz)
Resolution / Display mode
Vertical frequency (Hz)
2.VGA Mode
Display mode
Care and Maintenance
With proper care, your unit will give you many years of service. Please follow these guidelines to get
the maximum performance from your unit.
Cleaning
Don't use machine for a long time
Unplug the unit from the wall outlet before cleaning or polishing it.
Do not use liquid cleaners or aerosol cleaners.
Use a cloth lightly dampened with water for cleaning the exterior of the unit.
Don't use system for long periods of time, please ,
To prevent system .
unplug unit when not in use
failures and power supply surges use power surge protector
Repeat several times, Do not handle liquids near or on the unit.
Connecting and Setting
Installation
Menu Operation
Troubleshooting
Care and Maintenance
Display Mode

i
36
HDMI Mode
Resolution / Display mode
Vertical frequency (Hz)
Connecting and Setting
Menu Operation
Troubleshooting
Care and Maintenance
Display Mode
Installation
 Loading...