

iTach 55-IT02, 65-IT02, 70-IT02, 84-IT02 User's Operating Manual

1
iTach Tablet TV
User’s Operating Manual
55-IT02 / 65-IT02 / 70-IT02 / 84-IT02
This manual should not be copied fully or partially in any kind without
written approval by iTach Company.
Technical parameters and other contents in this manual are for reference
only and subject to change without notice.
Before using our product please read this manual carefully especially the
safety instruction. Keep nearby this manual in case of need.
At time of disposal of this product, treat it as industrial waste according
to all applicable laws and regulations.

2
Safety Precautions
(Reading this content is strongly recommended)
In order to ensure the safe and correct installation and use of this product and
to prevent personal injury and property damage, please read following
contents carefully before installation and use of this product.
WARNING!
Warning means there is a risk of death or fatal injuries to people or malfunction
of the product.
CAUTION!
Caution means there is a risk of moderate or light injuries to people or
malfunction of the product.
NOTICE!
Notice means there is a possibility of damage or malfunction of the product.
WARNING!
SERIOUS INJURY OR DEATH MAY OCCUR DUE TO THE PRODUCT
FALLING DOWN DURING MOUNTING ON WALL OR ON A MOBILE
STAND, MOUNTING WORK SHOULD BE PERFORMED BY
INSTALLING PROFESSIONALS ONLY.
USE MOUNTING SUPPORTS PROVIDED BY SUPPLIER ONLY.
KEEP THE WALL MATERIALS IN MIND WHEN INSTALLING ON A
WALL, CONSULTING PROFESSIONALS IF YOU ARE NOT SURE THE
WALL CAN HOLD THE PRODUCT.
INSTALL THIS PRODUCT ON A FLAT SURFACE.
TIGHTEN ALL MOUNTING SCREWS FIRMLY TO AVOID FALLING
DOWN OF THIS PRODUCT.
DO NOT PLACE WATER OR LIQUID OF ANY KIND ON OR NEAR THE
UNIT.
NEVER SPILL LIQUID OF ANY KIND INTO THE UNIT
CAUTION!
Placement
Do not expose the unit to direct sunlight and other sources of heat.
Do not put the unit near appliances that create magnetic fields
Do not put heavy objects on top of the unit.
Power Supply
Check that the unit’s operating voltage is identical with your local power
supply.

3
Please unplug power supply and aerial plug when the weather is
thunder-storm or lightning.
Please unplug power supply, when there is nobody at home or didn't use
over a long period of time
Please keep power cord from physical or mechanical damage.
Please use exclusive power cord, don't modify or lengthen it.
Please check and ensure AC source is connected with the ground.
For 55/65/70/80 inch Display equipment: Fuse in inlet, 4A, 250 VAC.
LED Screen
Never use any other tough or sharp object to replace the written pen.
Unplug the power supply plug before cleaning.
Clean the screen with a soft dustless and dry cloth.
Never use water or the spray type detergent to clean the unit.
For deep clean, contact an authorized service center.
Please don't display the high brightness image on the screen for a long
time.
Sight Distance
The best distance between audience and screen is 5-7 times that of
screen diagonal.
The best watching angle between audience and screen is within 176
degrees.
Temperature
Do not place the unit near or over a radiator or a heater register.
If your unit is suddenly moved from a cold to a warm place, unplug the
power cord for at least two hours so that moisture that may have formed
inside the unit can dry completely.
Normal operating temperature is 5 ~ 40℃
Humidity
Do not expose machine in rain, damp or place near water.
Ensure the indoor drying, cool.
Ventilation
Keep the ventilation openings clear.
Ensure that the unit has enough space for ventilation around: left, right and
back >10cm, top> 20cm.
Earphone
It will affect the hearing while using the earphone to listen noisy sound for a
long time.
Before using earphone, please turn down the volume in advance.
Battery
Accurate transaction and recall scrap battery after using.
Please don't let kid touch battery, to avoid danger don't throw battery into
fire.

4
Contents
Tablet TV Installation ......................................................................................................................... 5
1 Checking parts ..................................................................................................................... 6
2 Installations .......................................................................................................................... 7
Connecting and Setting ..................................................................................................................... 8
1 Internal OPS PC Connection............................................................................................. 8
2 External PC Connections ................................................................................................... 9
3 Connect a DMB-TH Antenna........................................................................................... 11
4 A/V Connection.................................................................................................................. 12
5 YPbPr Connection ............................................................................................................ 13
6 Coaxial Connection ........................................................................................................... 13
7 Connect a Earphone ......................................................................................................... 14
8 Connect a RS232 Terminal ............................................................................................. 14
9 Insert a USB disk ............................................................................................................... 14
Operation Introduction ................................................................................................................... 15
1 Software Installation, Start and Uninstallation .............................................................. 15
2 One key Opens Software ................................................................................................. 19
3 Tablet TV Intelligent Power On/Off ................................................................................. 20
4 Use RCU to Control Internal OPS PC............................................................................ 20
5 Floating Icon and Touch Menu ....................................................................................... 20
6 TV Control Panel ............................................................................................................... 22
7 TV Terminal Interface ....................................................................................................... 23
8 RCU (Remote Control Unit) ............................................................................................. 24
9 TV Menu Operations ........................................................................................................ 27
Troubleshooting .............................................................................................................................. 41
5
Tablet TV Installation
WARNING!
SERIOUS INJURY OR DEATH MAY OCCUR DUE TO THE PRODUCT
FALLING DOWN DURING MOUNTING ON WALL OR ON A MOBILE STAND,
MOUNTING WORK SHOULD BE PERFORMED BY INSTALLING
PROFESSIONALS ONLY.
USING MOUNTING SUPPORTS PROVIDED BY SUPPLIER ONLY.
KEEP THE WALL MATERIALS IN MIND WHEN INSTALLING ON A WALL,
CONSULTING PROFESSIONALS IF YOU ARE NOT SURE THE WALL CAN
HOLD THE PRODUCT.
INSTALL THIS PRODUCT ON A FLAT SURFACE.
TIGHTEN ALL MOUNTING SCREWS FIRMLY TO AVOID FALLING DOWN OF
THIS PRODUCT.
6
1 Checking parts
1-1 Accessory box
Inside the accessory box there are these parts: User guide, Remote control,
Battery, Power cord, VGA cable, USB cable, Audio cable, HDMI cable, AV
mini-cable, YPbPr mini-cable, Handwritten pen, Marker, USB disk.
( )
User manual (Stored in USB disk) RCU Battery Writing pen
BS Power cord VGA cable HDMI cable USB cable
YPbPr mini-cable AV mini-cable Audio cable USB disk
Part name
Description
Number
Remarks
User manual
1 Stored in USB disk
RCU(Remote control unit)
1
Battery
2 AAA
Power cord
1 Fitted with BS 1362 5A fuse
VGA cable
5 Meters
1
USB cable
5 Meters
1
One end type A and another
type B connector
Audio cable
5 Meters
1
7
HDMI cable
2 Meters
1
AV mini-cable
20Centimeters
1 YPbPr mini-cable
20Centimeters
1
Writing pen
Red/Blue/ D8*1000mm( 6
sections)
2 USB disk
2G
1
Contains PC driver and iTach
software
1-2 Wall bracket box
Inside a wall bracket box there are these parts: TV hanger, Wall mounting
bracket, TV hanger screw, and Wall bracket screw.
TV hanger and bracket M8X45mm TV hanger screw Wall bracket expansion screw & nut
Part name
Description
Number
Remarks
TV hanger
650X36mm
2
Iron
Wall mounting bracket
1300X261mm
1
Iron
TV hanger screw
M8X45mm
4
Iron
Expansion screw & nut
M8X80mm
6
Iron
2 Installations
Install the product on a mobile stand according to Mobil Stand Installation
Instruction.
Install the product on the wall according to Wall Installation Instruction.

8
Connecting and Setting
WARNING!
FOR THE SAFETY OF YOU AND YOUR UNIT, PLEASE DO NOT CONNECT ANY POWER SUPPLY
BEFORE THE INTERNAL OR EXTERNAL DEVICE PREPARED
1 Internal OPS PC Connection
This product combines an internal OPS computer and internal HDMI and USB
onnections have been completed and all function of this product is ready for
use. If you want to connect this PC to external devices, kindly refer to
following:
Connect with earphone through earphone out socket.
Connect with a microphone through MIC socket.
Connect with an external monitor through a VGA/HDMI connector.
Connect with a LAN cable through LAN port.
Insert USB disk through USB3.0 or USB 2.0 for data transmission.
9
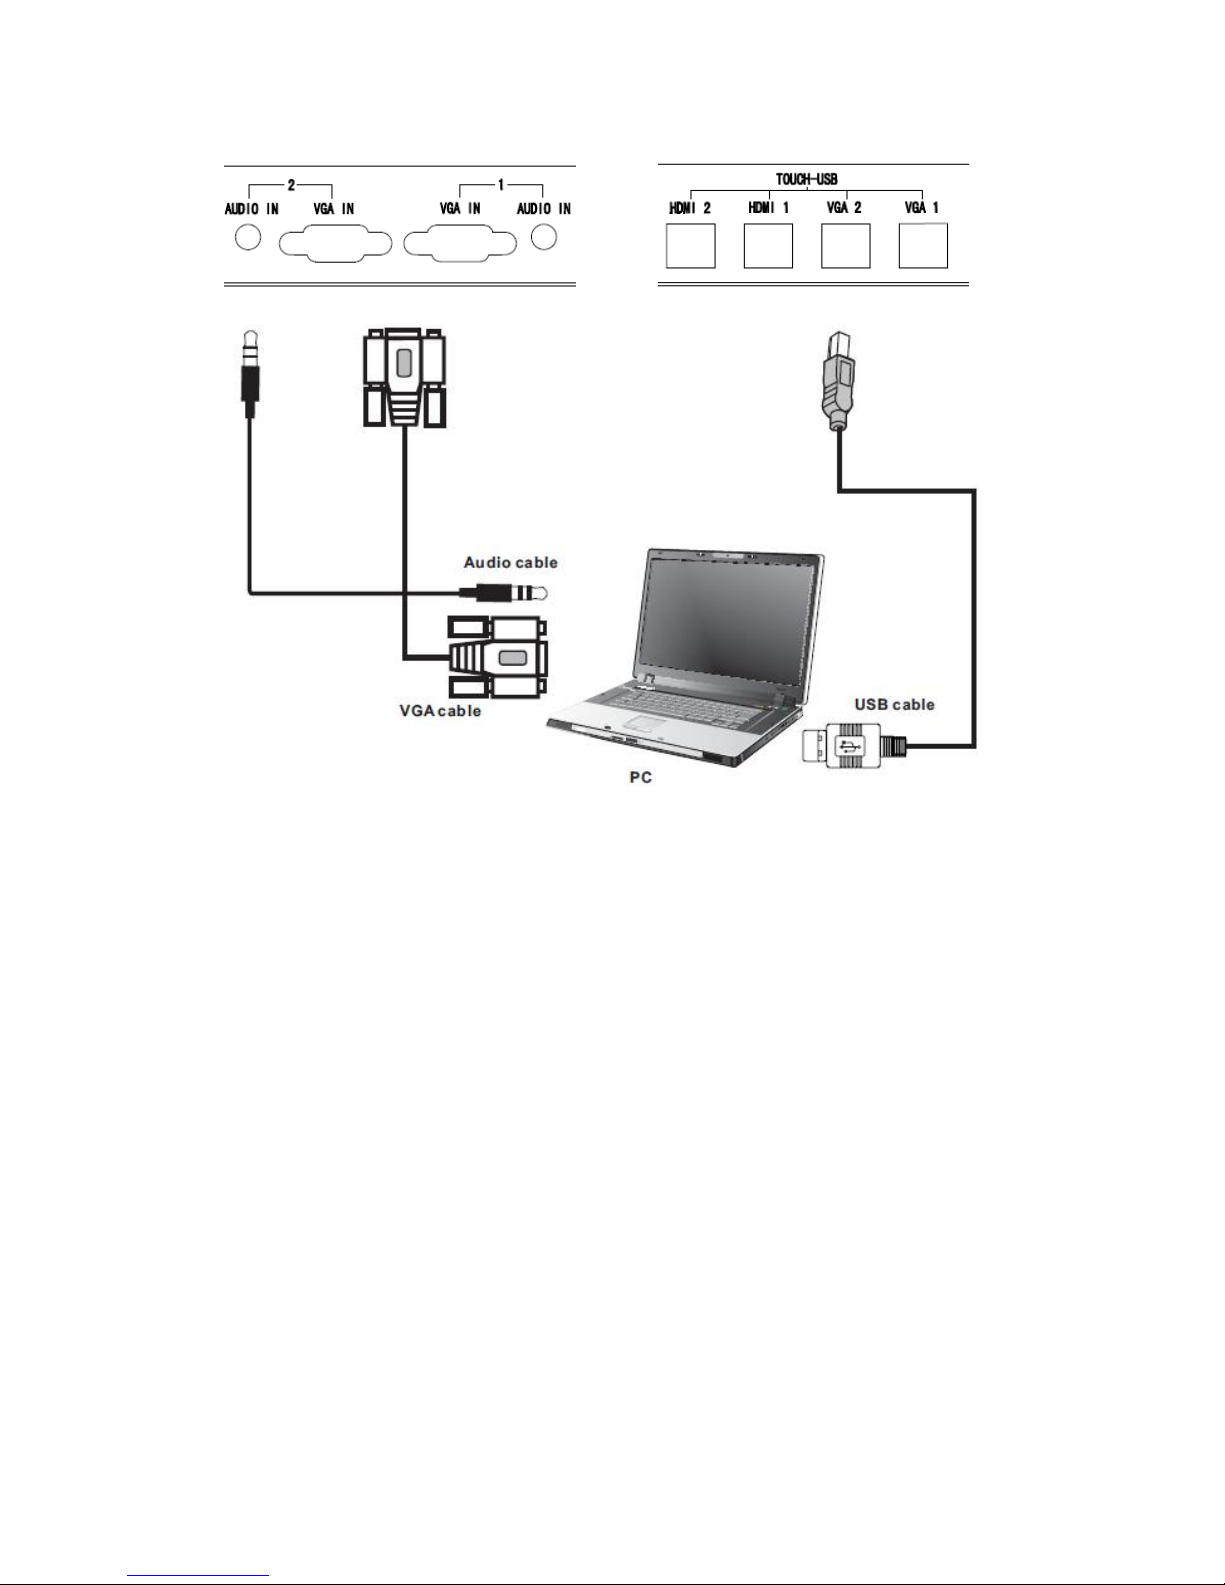
2 External PC Connections
If you want to connect external PC and use the external PC touch function,
kindly refer to follow instruction.
All VGA and HDMI ports could be connected at the same time and touch
function could be available when corresponding TOUCH-USBs are correctly
connected.
2-1 Connect external PC through VGA cable
Connect a VGA cable (15pin) between the VGA connector and an external
PC.
Connect an audio cable between the Audio In connector and an external
PC at the same time.
Connect a USB cable between the corresponding TOUCH-USB port and
an external PC(i.e. channel VGA 1 to TOUCH-USB VGA 1)
Plug the POWER cord of TV set and switch it on from the rear panel
Startup the external computer.
Set external computer display mode(Computer only, Duplicate, extend,
Projector only)
Select corresponding VGA channel to show the external PC contents.
10
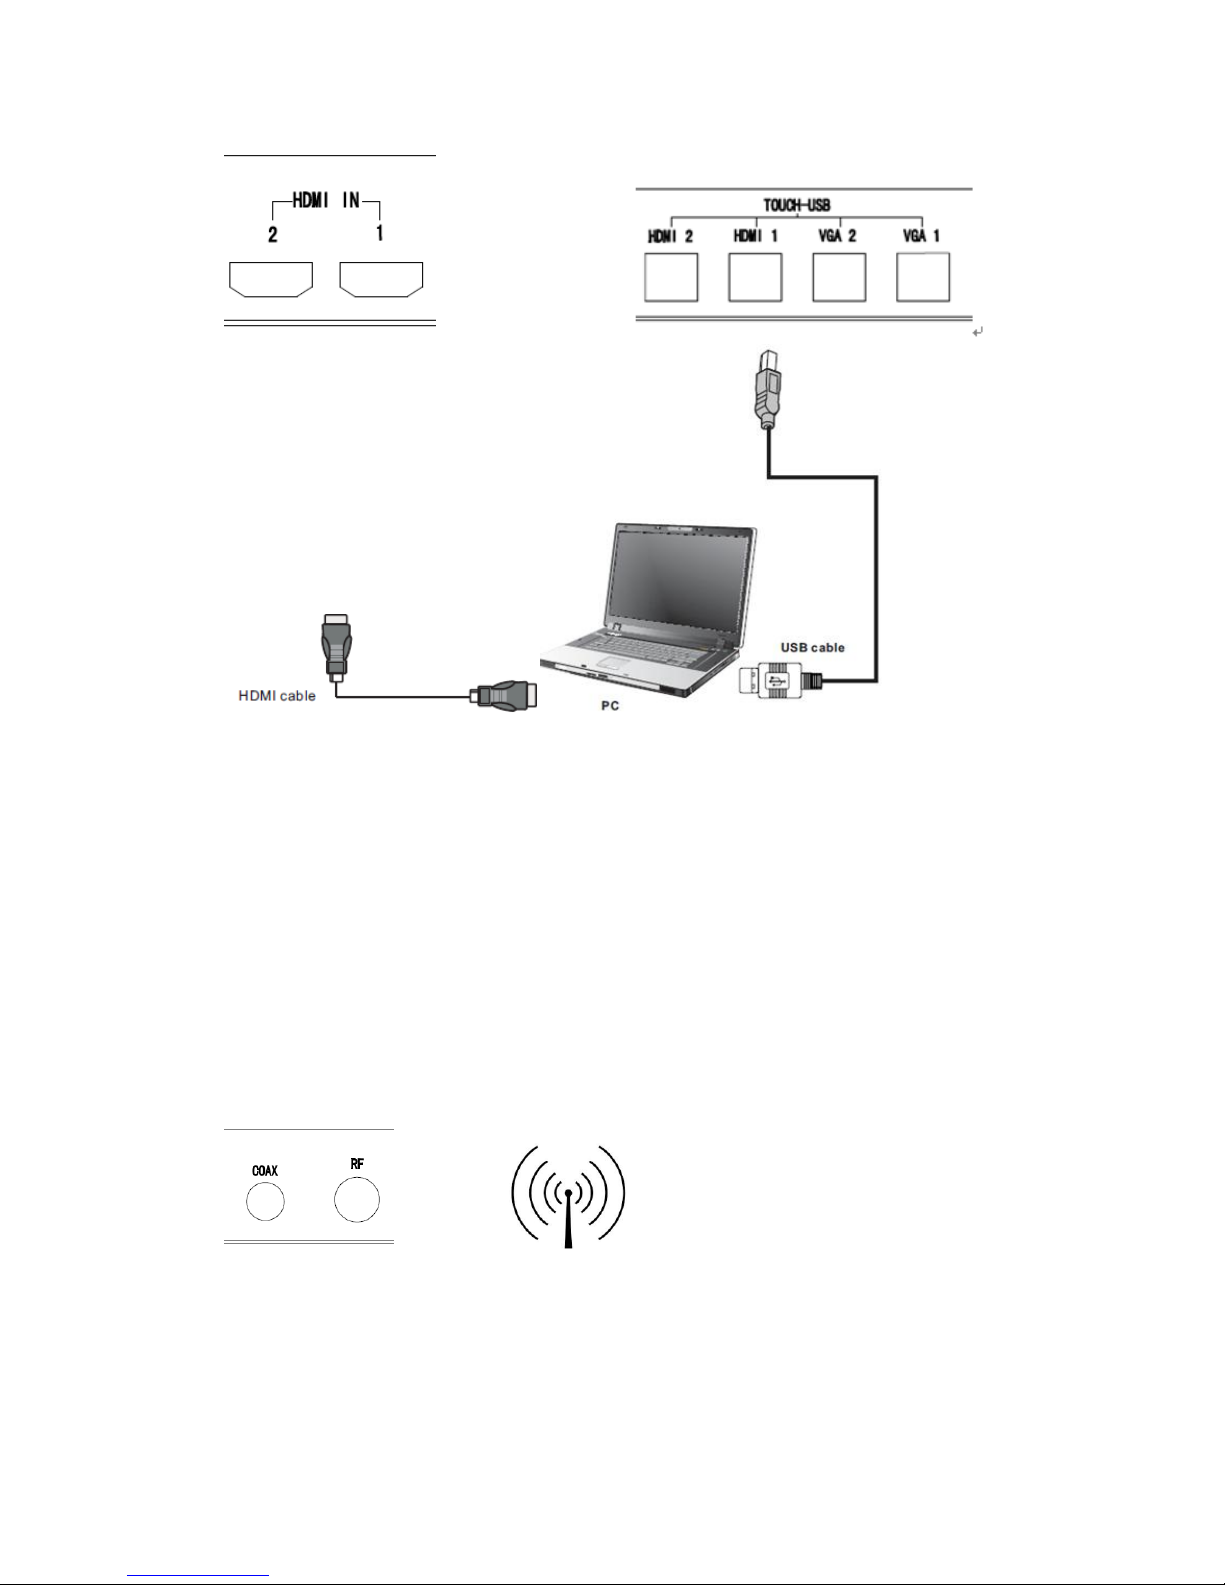
2-2 Connect external PC through HDMI cable
Connect a HDMI cable between the HDMI connector and an external PC.
Connect a USB cable between the corresponding TOUCH-USB port and
an external PC(i.e. channel HDMI 1 to TOUCH-USB HDMI 1)
Plug the POWER cord of TV set and switch it on from the rear panel
Startup the external computer.
Set external computer display mode(Computer only, Duplicate, extend,
Projector only)
Select corresponding HDMI channel from TV panel, RCU or Touch Menu
to show the external PC contents.
11
3 Connect a DMB-TH Antenna
This Tablet PC product supports DMB-TH digital signal. User can enjoy
DMB-TH digital programs after connecting to a DMB-TH antenna.
Connect a RF connector with DMB-TH antenna cable
Plug the POWER cord and switch it on from the Tablet PC rear panel
Select DTV channel and auto search and watch TV programs.
12
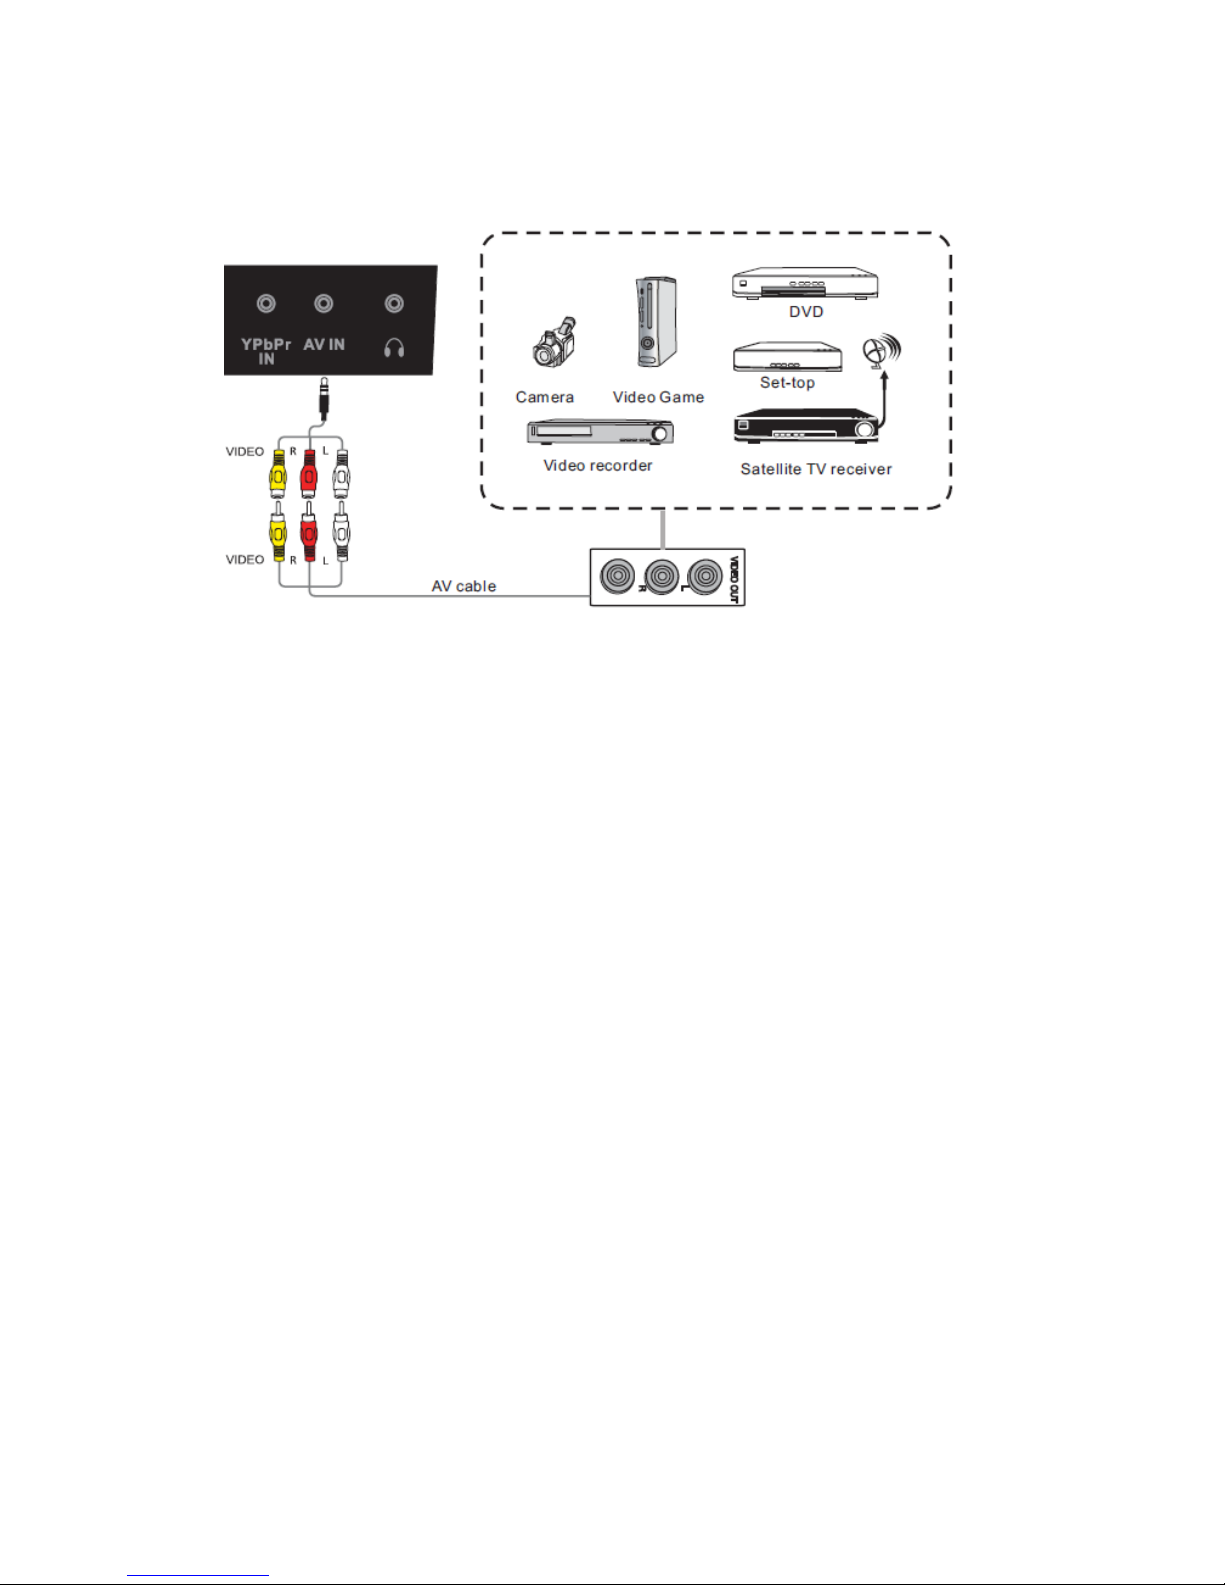
4 A/V Connection
Connect a AV cable with the device with AV-OU T(Yellow is Video, Red is
Audio-R, White is Audio-L ).
Press to turn the power on
Plug the POWER cord of Tablet TV and switch it on from the rear panel
Select corresponding AV channel from TV panel, RCU or Touch Menu to
watch AV programs
13
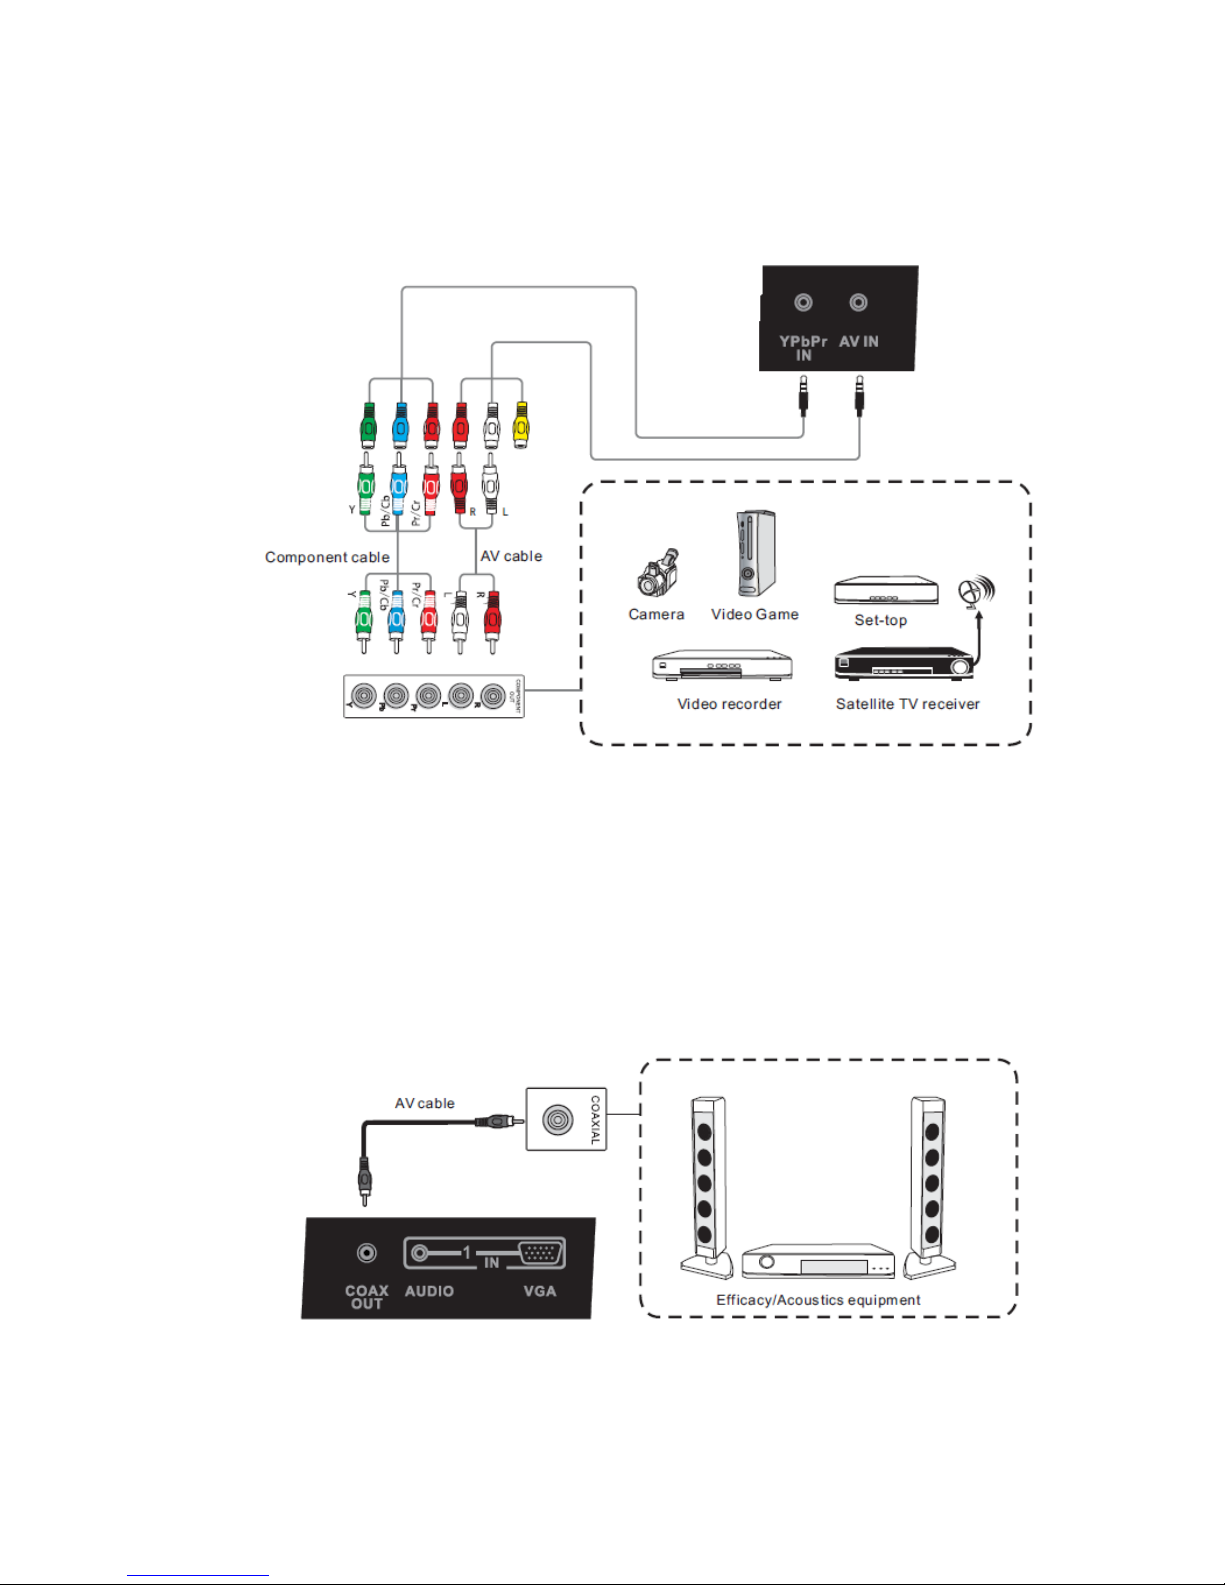
5 YPbPr Connection
Connect a YPbPr cable with the device YPbPr-OU T ( Using same red
Audio-R and white Audio-L as audio input ).
Plug the POWER cord of Tablet TV and switch it on from the rear panel
Select corresponding YPrPr channel from TV panel, RCU or Touch Menu
to watch YPbPr programs
6 Coaxial Connection
Connect a Coaxial cable with the device Coaxial Input.
Plug the POWER cord of Tablet TV and switch it on from the rear panel
Adjust acoustic equipment to listen digital audio.
 Loading...