


1
iSysmart
ZigBeeTM- Door Lock
User Manual
Door Lock
Model: SGZB05A

2
iSysmart
Table of Contents
1. Introduction ................................................................................................................................................................ 4
2. Product Appearance ............................................................................................................................................... 5
3. Specification .............................................................................................................................................................. 6
4. Installation and Adjustment ................................................................................................................................. 7
4.1. Assembly drawing ............................................................................................................................................ 7
4.2. Installation ......................................................................................................................................................... 8
5. Setting up SGZB05A ............................................................................................................................................. 14
5.1. Join the ZigBee Network ............................................................................................................................... 14
5.2. Binding ............................................................................................................................................................. 14
5.3. Sleeping Mode ................................................................................................................................................. 14
5.4. Announce ......................................................................................................................................................... 14
5.5. Lock/Unlock the Door ................................................................................................................................... 15
5.6. Battery .............................................................................................................................................................. 15
5.7. Tamper-Proof ................................................................................................................................................. 15
5.8. Latch Bolt Notification .................................................................................................................................. 15
5.9. Duress-open Notification ............................................................................................................................... 15
5.10. Restore to Factory Setting .......................................................................................................................... 15
6. Home Automation Clusters for SGZB05A ..................................................................................................... 17
7. Door Lock Settings ................................................................................................................................................ 19
7.1. Factory Setting ................................................................................................................................................ 19
7.2. Password/Fingerprints/Remote Control Permission ................................................................................ 19
7.3. Keypad ............................................................................................................................................................. 21
7.4. System Menu ................................................................................................................................................... 21
7.5. Fingerprint Manage ....................................................................................................................................... 21
7.6. MF Card Manage ........................................................................................................................................... 22
2

3
iSysmart
7.7. Password Manage........................................................................................................................................... 22
7.8. Wireless Setting .............................................................................................................................................. 23
7.9. System Setting ................................................................................................................................................. 23
7.10. Input Fingerprint ......................................................................................................................................... 24
7.11. Unlock the Door ............................................................................................................................................ 24
7.12. Emergency Access Power Supply .............................................................................................................. 25
7.13. Batteries Installation .................................................................................................................................... 26
7.14. Battery Safety and Maintenance ............................................................................................................... 26
8. Important Maintenance Instructions ............................................................................................................... 27
3

4
iSysmart
1. Introduct ion
iSysmart SGZB05A, a door lock, acts as an End Device in ZigBee network. SGZB05A supports multi-way
accessibilities. Users are able to manage it using mechanical override key, access code, fingerprint, MF
card, or remote control. Via ZigBee technology, users could wirelessly monitor and manage the door lock.
What is ZigBee?
ZigBee is a short range wireless transmission technology based on IEEE802.15.4 standard and supports
multiple network topologies such as point-to-point , po i nt-to-multipoint, and mesh networks. It is defined
for a general-purpose, cost-effective, low-power-consumption, low-data-rate, and easy-to-install wireless
solution for industrial control, embedded sensing, medical data collection, smoke and intruder warning,
building automation and home automation, etc.
4

5
iSysmart
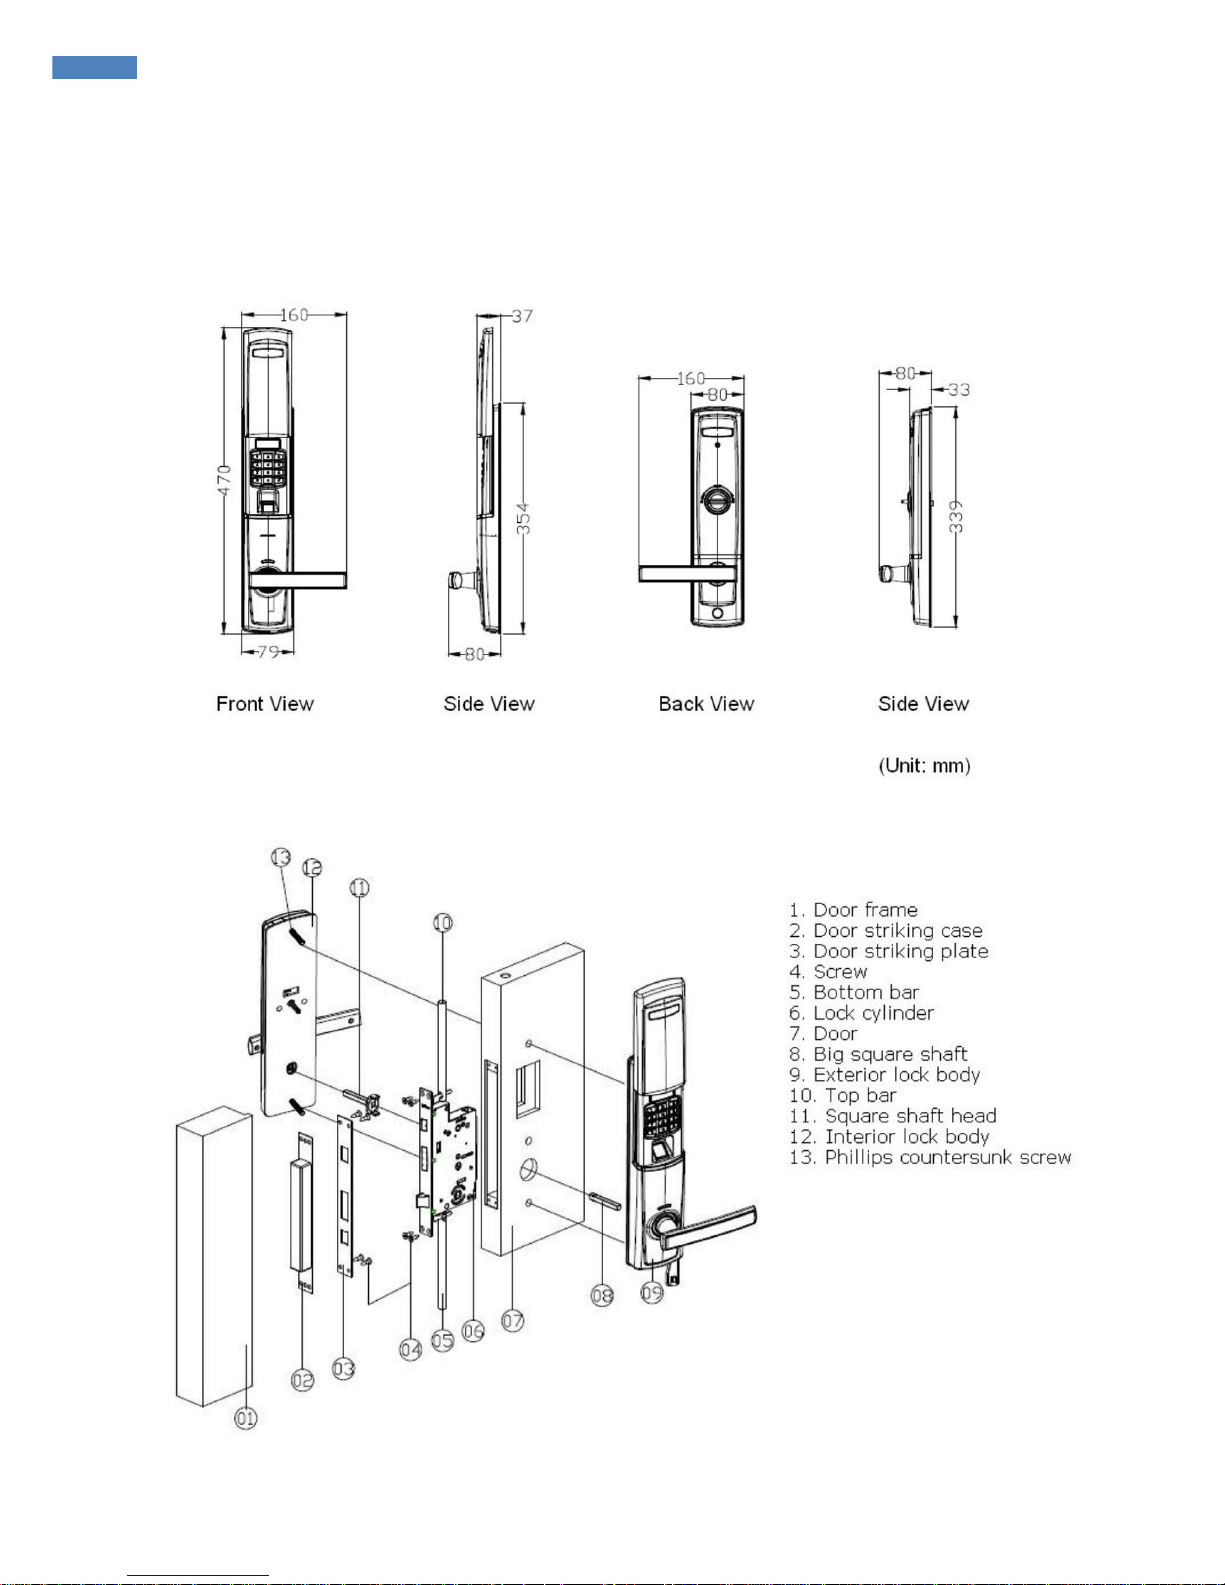
2. Product Appearance
Binding Key
Network Indicator
5

6
iSysmart
3. Specification
Fully IEEE 802.15.4 compliant
Utilizes 2.4GHz ISM band; up to 16 channels
Power supply: 8 x AA batteries (4 batteries x 2 sets)
Emergency access power supply: 9V battery
Up to 250 meters wireless transmission range in non-obstacle space
Accessibility: mechanical override key/ access code/ f in gerprint/ MF card / remote control
Low battery notification
Real-time clock: recording the log of locking/unlocking via ZigBee
Anti-theft
Voice notification
6
7
iSysmart
4. Installation and Adjustment
4.1. Assembly drawing
7

8
iSysmart
4.2. Installation
Template of Door
The product can be used on wooden doors and anti-burglar doors. The hole pattern is as below:
8

9
iSysmart
Template of Door Striking Box
Drill the mounting hole of door striking case according to the following figure. The height should
be in accordance with the door lock. The front and rear position should make the door lock be
parallel and level to the door frame.
9

10
iSysmart
Direction of the Latch Bolt
Before installing the lock cylinder, check the direction of the latch bolt, if it is in the wrong
direction, unfasten the scr e ws, and pull the latch bolt o ut and rotate it by 180 deg r e e, then install it.
10
11
iSysmart
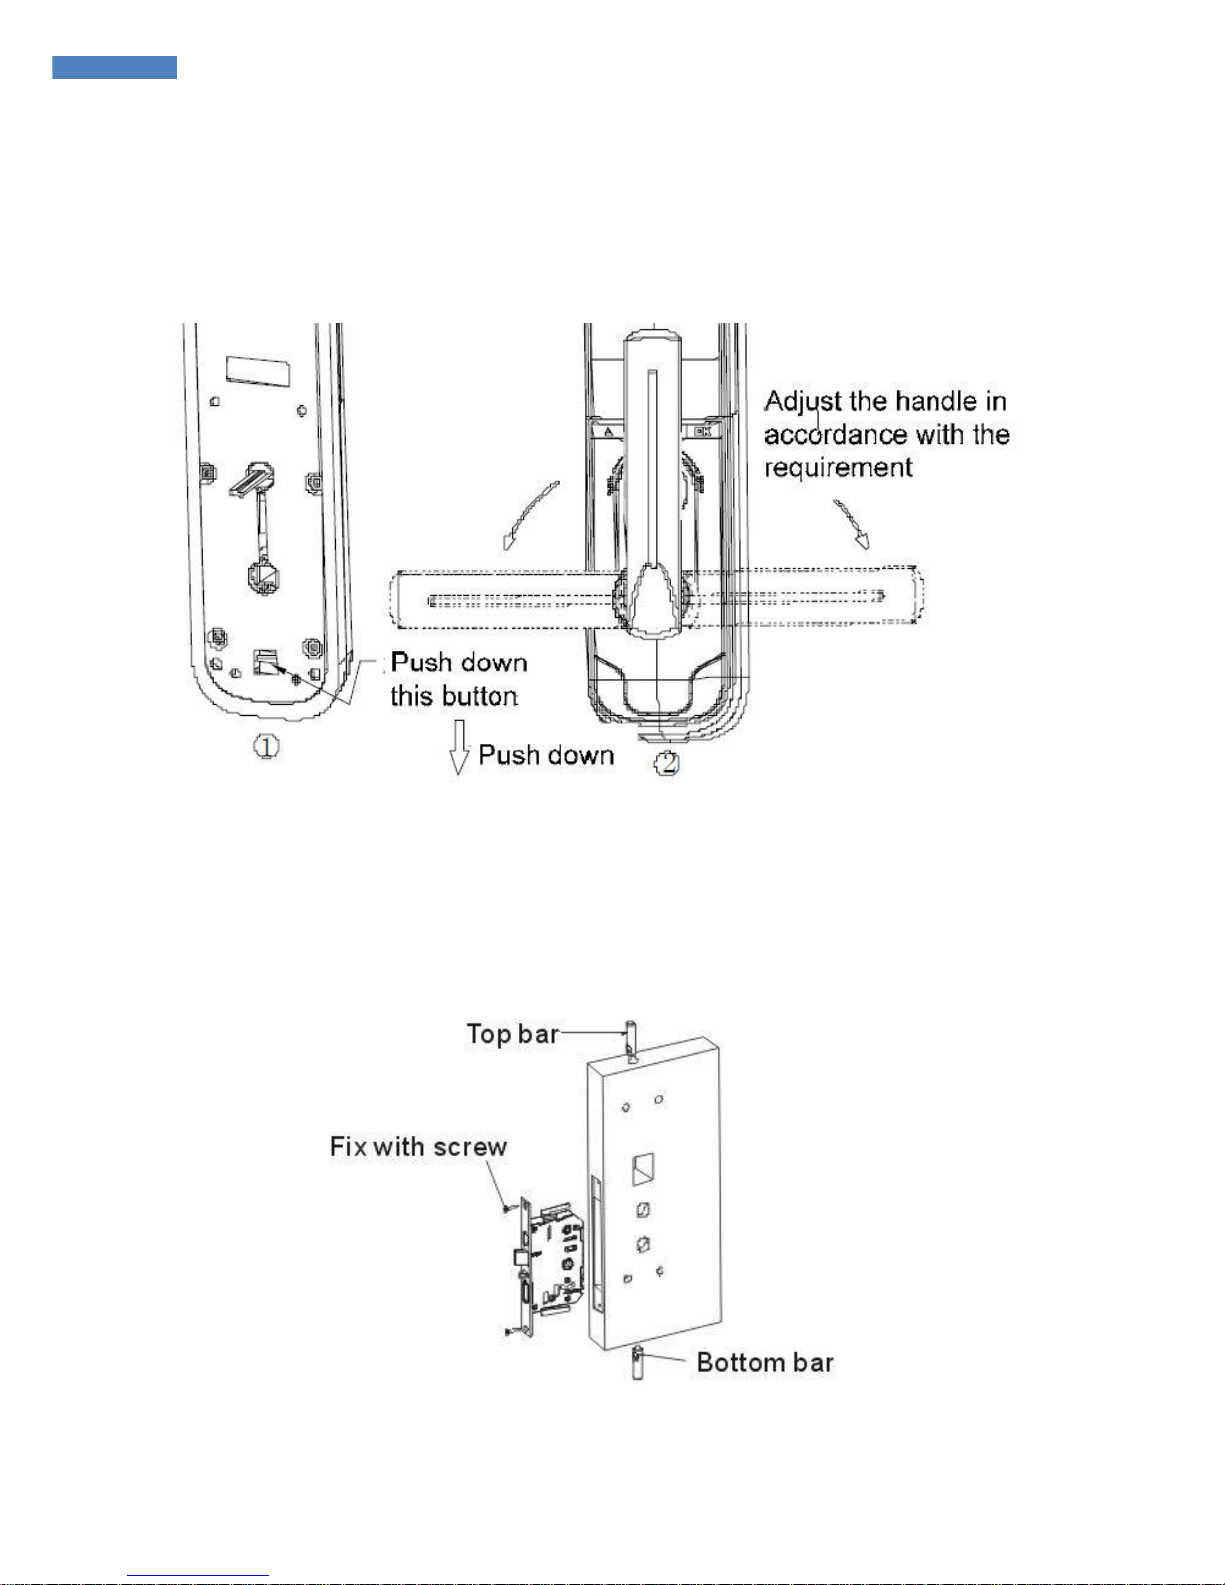
Direction of the Handle
After fixing the front and back lock body, decide the direction of the interior handle
according to the direction of opening.
Fix the Lock
Fix the lock cylinder, top bar, and bottom bar to the door panel with screws.
11
12
iSysmart
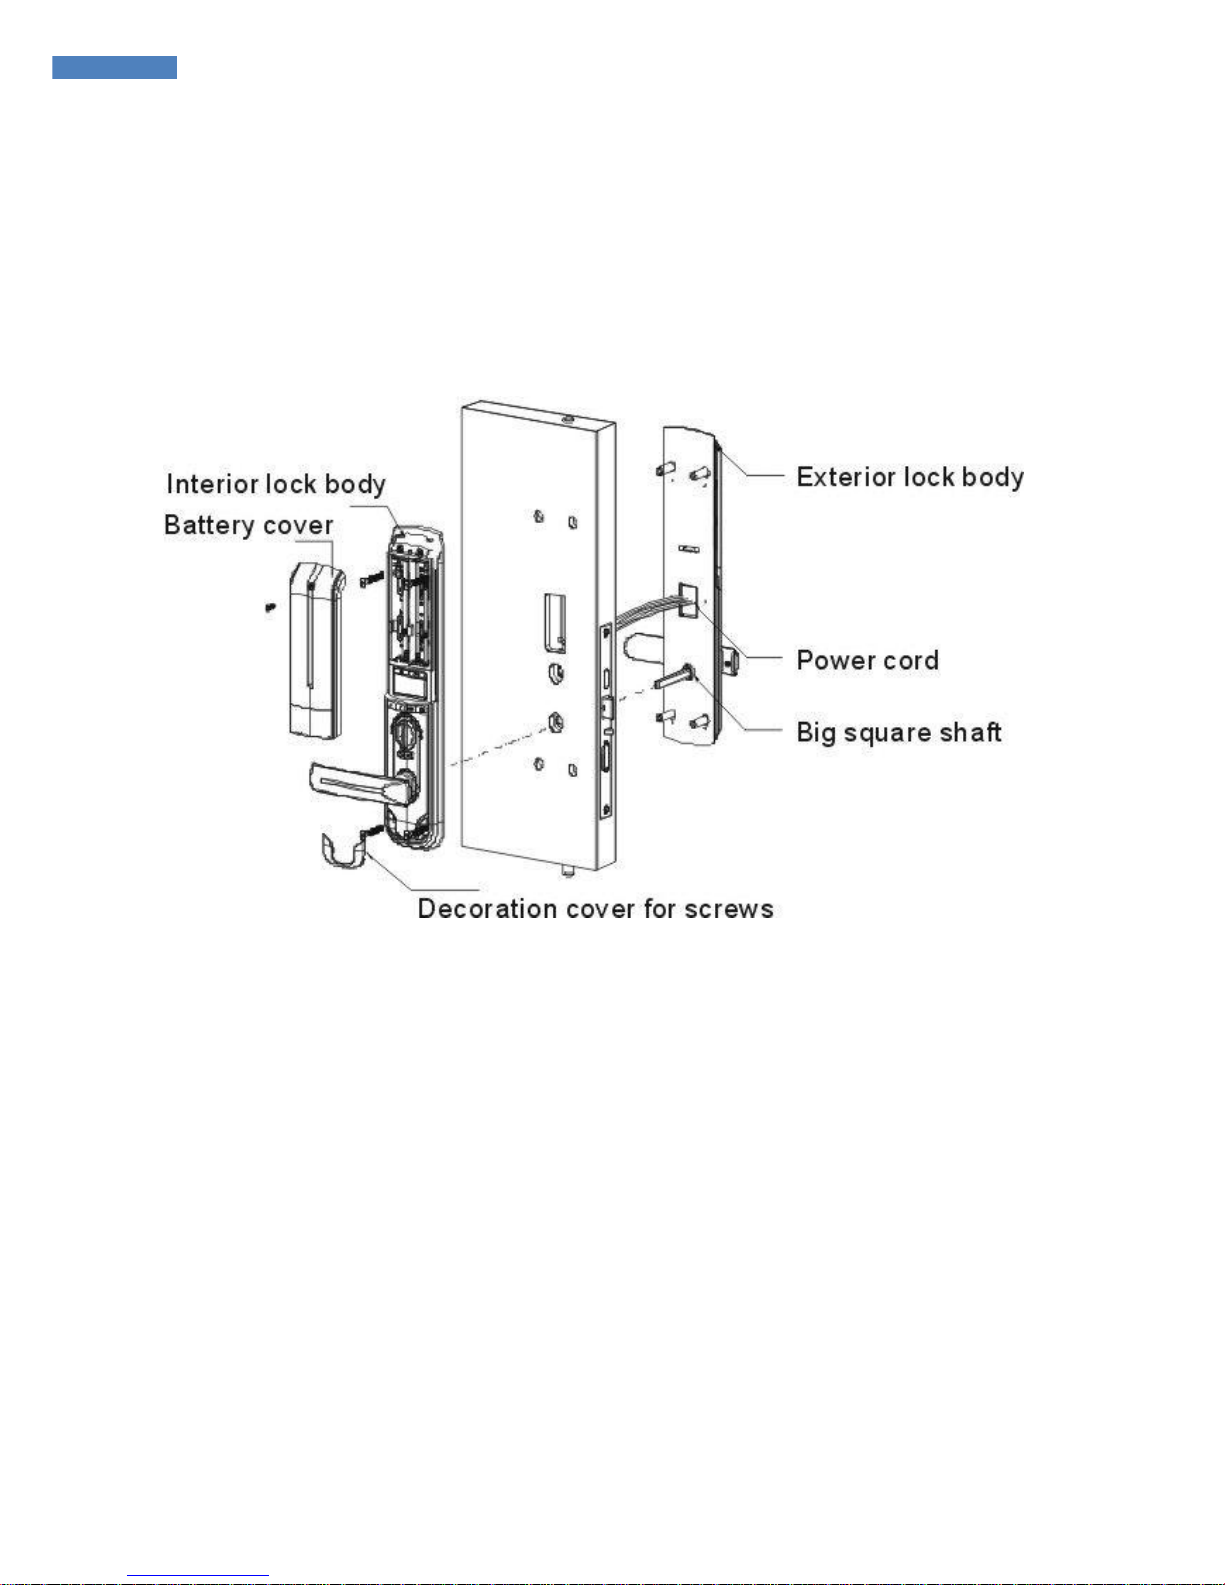
Mount the Power Cord and Square Shaft
Pass the power cord of lock body trough the hole to behind the door and mount the big square
shaft to the door hole in alignment with the cylinder bore, and connect the power cord. Mount
the square shaft of interior lock body handle in alignment with the big square shaft and the
small knob in alignment with the cylinder bore. Fix the exterior and interior lock body with
screws through the holes behind. Then cover the battery cover and decoration cover of screw.
12

13
iSysmart
Mount the Door Frame Box
Mount the door frame box to the door frame and mount the door striking plate and fix
them with screws. Inspect whether the lock cylinder can move smoothly at last.
13

14
iSysmart
5. Setting up SGZB05A
5.1. Join the ZigBee Network
After SGZB05A is powered on, it will search for an existing ZigBee network and send a request to join
the network automatically. While SGZB05A is under the coverage from a coordinator or a router
whose permit-join feature is enabled, SGZB05A will be permitted to join the network. Typically, the
default permit-join period of time is 60 seconds. Please refer to the following steps to complete the join:
Step1. Enable the permit-join function (valid for 60 seconds) of a coordinator or a router (please
refer to the user manual of the coordinator or the router to enable the permit-join feature).
Step2. Power on SGZB05A. It will start to search and join the network. The Network Indicator
will flash blue once when it finds out a network to join.
Step3. After SGZB05A is joined successfully, the Network Indicator will flash blue 5 times
5.2. Binding
SGZB05A can be bound with the door lock controller (DoorLock cluster: 0x0101).
Step1. Press and hold the Binding Key for 3 seconds. The Network Indicator will flash
once. Step2. Enable the binding feature of the door lock controller.
Step3. The indicator flashes 5 times after the binding is completed; otherwise, it will flash 10 times.
It is able to bind with up to 16 devices.
5.3. Sleeping Mode
SGZB05A is designed to go into sleeping mode for power-saving in some situations:
A. While the device is in the network → the sleeping period is 1 second; it will wake up every
second to keep online.
B. When it doesn’t find a network to join → SGZB05A will g o to sleeping mode . It will wake up
every 15 minutes to search a network to join.
C. Once SGZB05A was joined to a network and by any chance the network is no longer existed
or the device is out of the network → SGZB05A will wake up every 15 minutes to find the
network it joined before.
It never keeps in sleeping mode and continues to find out a network every 15 minutes. This condition
would consume up to 30 times power spending compared to normal-operating status. To prevent this
unwanted power consumption, we recommend that users remove the battery to power off the device.
5.4. Announce
When SGZB05A is in a ZigBee network, users could announce its device information such as IP address & IEEE
14

15
iSysmart
address using the following tips:
A. Press the Binding Key.
B. The Network Indicator will flash 5 times.
C. SGZB05A will broadcast its device information.
5.5. Lock/Unlock the Door
There are 2 lock/unlock methods: General mode & Encryption mode. When it is in Encryption
mode, users have to register a password to unlock the door.
For first-time use, users have to do password data (EEPROM) cleansing.
5.6. Battery
When the operating voltage is lower than 4.8V, SGZB05A will send a low-power report to the ZigBee
network. The voltage-check interval is 1 hour.
5.7. Tamper-Proof
SGZB05A features tamper-proof. When SGZB05A detects tampering, it will send a tampering report
to the ZigBee network.
5.8. Latch Bolt Notification
SGZB05A comes with the latch bolt notification. It will send the alert report to the ZigBee network
when the latch bolt is in unlocked condition for a long time.
5.9. Duress-open Notification
When user is forced to open/unlock the door, the duress-open password is available for send the notification.
5.10. Restore to Factory Setting
When users would like SGZB05A to join a new network, a factory reset is required. To restore it
to factory setting, please follow the steps:
Step1. Power off SGZB05A.
Step2. Press and hold the Binding Key, and then power on SGZB05A.
Step3. After the Network Indicator shows fast flashes, release the button to complete the restore.
15

16
iSysmart
After the factory restore, reboot SGZB05A to initiate
it.
The default superkey is 123456 after restore.
16

17
iSysmart
6. Home Automation Clust ers for SGZB05A
A cluster is a set of related attributes and commands which are grouped together to provide a specific
function. A simple example of a cluster would be the On/Off cluster which defines how an on/off switch
behaves. This table lists the clusters which are supported by SGZB05A.
1.End Point(s):0x01
2.Device ID:Door Lock(0x000A)
3.EndPoint Clu ster ID
Cluster ID for SGZB05A
Server side
Client side
EP 0x01 (Device ID: Door Lock (0x000A) )
Basic(0x0000) None
Power Configuration(0x0001)
Identify(0x0003)
Groups(0x0004)
Scenes(0x0005)
Commissioning(0x0015)
Poll Control(0x0020)
Door Lock(0x0101)
Diagnostics(0x0B05)
This lists the attributes of the basic information.
Attributes of the Basic Information
Identifier
Name
Type
Range
Access
Default
Mandatory
/ Optional
0x0000
ZCLVersion
Unsigned
0x00 –
Read only
0x02
M
8-bit integer
0xff
0x0001
ApplicationVersion
Unsigned
0x00 –
Read only
0x0A
O
8-bit integer
0xff
0x0002
StackVersion
Unsigned
0x00 –
Read only
0x33
O
8-bit integer
0xff
0x0003
HWVersion
Unsigned
0x00 –
Read only
0x02
O
8-bit integer
0xff
0x0004
ManufacturerName
Character
0 – 32
Read only
iSysmart
O
string
bytes
0x0005
ModelIdentifier
Character
0 – 32
Read only
SGZB05AE3E
D
O
17

18
iSysmart
string
bytes
0x0006
DateCode
Character
0 – 16
Read only
O
string
bytes
0x0007
PowerSource
8-bit
0x00 –
Read only
0x03
M
Enumeration
0xff
0x0010
LocationDescription
Character
0 – 16
Read/write
O
string
bytes
0x0011
PhysicalEnvironment
8-bit
0x00 –
Read/write
0x00
O
Enumeration
0xff
0x0012
DeviceEnabled
Boolean
0x00 –
Read/write
0x01
M
18

19
iSysmart
7. Door Lock Settings
7.1. Factory Setting
A. Factory Default Settings:
The fingerprint library is null. The MF card library is null. The default administrator password
is 00123456.
Time: 24-hour clock
Language: Simplified Chinese
Voice: Mandarin
NOTE: We recommend that you change the administrator password to prevent unauthorized
access to the door lock system.
B. Restore to Factory Setting
Step1. Remove the battery cover and power off SGZB05A.
Step2. Use the pins to press and hold both Fingerprint Button and Password Button, and then
power on SGZB05A.
Step3. Enter the administrator password and press # to complete the restore. The fingerprint
library is null. The MF card library is null. The default administrator password is 00123456.
C. Reset the password of administrator ID 00
Step1. Press and hold P ass word Butt on for 10 seconds.
Step2. Follow the voice instruction to enter the 6-digit password and press # to complete the setting.
D. Delete all of the user IDs (access code, fingerprint, MF card, and remote
control) Step1. Press and hold Fingerprint Button for 10 seconds.
Step2. Follow the voice instruction to enter the password of administrator ID 00 and press # to
complete the setting.
7.2. Password/Fingerprints/Remote Control Permission
Item
Amount
ID
Permission
Reset administrator fingerprint/ password/ MF card.
Administration
00
Add/delete user password/ fingerprint/ MF card/ remote
10
control.
Password
01~09
Add/delete user password/ fingerprint/ MF card/ remote
control.
User Password
70
10~79
Open the door
19

20
iSysmart
Password for
10
80~89
Open the door (Only valid for once)
Once
Duress-open
10
90~99
Open the door
Password
Administration
10
00~09
Add/delete user password/ fingerprint/ MF card/ remote
Fingerprint
control.
User
70
10~79
Open the door
Fingerprint
Temporal
10
80~89
Open the door
Fingerprint
Duress-open
10
90~99
Open the door
Fingerprint
Administration
10
00~09
Add/delete user password/ fingerprint/ MF card/ remote
MF Card
control.
User MF Card
70
10~79
Open the door
Temporal MF
10
80~89
Open the door
Card
Duress-open
10
90~99
Open the door
MF Card
ZigBee Module
1
Open/Close the door
A. Password:
The capacity of password storage is100; including 10 administration passwords.
The password is 8-digit (2-digit ID + 6-digit number).
Different ID can use the same number. For example, ID 03 and ID 08 both can use number
123456 as the password 03123456 and 08123456. However, we recommend that users use
different number for different ID for access protection.
B. Fingerprint:
The capacity of fingerprint storage is100; including 10 administration fingerprints.
Fingerprint ID: 00~99. One fingerprint can only be used for one ID.
Registering and identifying fingerprint features are enable when the fingerprint indicator is ON.
C. MF Card:
The capacity of MF card storage is100; including 10 administration MF cards.
One MF card can only be used for one ID.
D. The functions of Temporal MF Card/Temporal Fingerprint are equal to the functions of User MF
Card/User Fingerprint.
E. T he fingerprint/MF card library is null for factory setting. Please enter the administrator password
to manage administration password/ fingerprint / MF card.
20

21
iSysmart
7.3. Keypad
Key number 3 is also used for selecting “UP ↑”
Key number 6 is also used for selecting “DOWN ↓”
Key #: In the regular condition, it is used for identifying fingerprint. In the menu, it is used for OK.
Key *: Cancel/ Return/ Delete.
7.4. System Menu
Press the number + # to enter the sub-menu.
7.5. Fingerprint Manage
Press the number + # to enter the sub-menu.
ID:
Normal User: 10~79; Temp. User: 80~89; Duress User: 90~99; Admin User;
00~09
Name:
Length: 0~8-digit; Name can be empty.
Input fingerprint: Place the finger on the fingerprint window. Follow the instruction to input the same
finger for 3 times.
21

22
iSysmart
7.6. MF Card Manage
Press the number + # to enter the sub-menu.
ID:
Normal User: 10~79; Temp. User: 80~89; Duress User: 90~99; Admin User;
00~09
Name:
Length: 0~8-digit; Name can be empty.
Punch MF: Place the MF card in front of the keypad (distance 0~2cm). The “BEE” sound will be
generated when the setting is completed.
7.7. Password Manage
Press the number + # to enter the sub-menu.
ID:
Normal User: 10~79; Temp. User: 80~89; Duress User: 90~99; Admin User;
00~09
Name:
Length: 0~8-digit; Name can be
empty.
Password:
The password is 8-digit (2-digit ID + 6 -digit number). Follow the instruction to input the same password
22

23
iSysmart
twice.
7.8. Wireless Setting
Register ZigBee wireless repeater:
Choose “5 Increase RP” and press # to complete the
registration.
Deregister ZigBee wireless repeater:
Choose “6 Delete RP” and press # to complete the deregistration.
7.9. System Setting
Normally Open:
To cancel normally open: 1-Unlock the door once using fingerprint, password, or MF card; 2Lock/Unlock the door once using remote control; 3-Lock the door using the turning button.
Time:
23

24
iSysmart
Use the keypad to enter the time; # : OK; * :
return.
Group Setting:
Only registered fingerprint/password can be used for Group combination. Administration
fingerprint, administration password, and temporal password cannot be used. Either fingerprint or
password can only be used for one Group.
View Info:
Press Up (3) or Down (6) to view the information.
7.10. Input Fingerprint
Please pose the finger correctly to input and identify fingerprint. Put your finger on the fingerprint
window with moderate touch, and the finger should be flat as much as possible.
7.11. Unlock the Door
Users can use either way below to unlock the door. The unlocked period of time is 5-second.
Mechanical
override key
Unlock the door using the mechanical override key, and rotate down the handle to open it.
Access
password
Step1. Slide the cover up. Enter the 8-digit password (2-digit ID + 6-digit number) and press #. Step2.
After the access granted, the indicator shows green. Rotate down the handle to open the door
24

25
iSysmart
When the password is used for Group combination, please follow the voice instructions to
input the fingerprint for the combination.
Fingerprint
Step1. Slide the cover up. The light of the fingerprint window will be ON. Place the registered
fingerprint on the fingerprint windo w.
Step2. After the access granted, the indicator shows green. Rotate down the handle to open the door
When the fingerprint is used for Group combination, please follow the voice instructions to input the
grouped fingerprint for the com binat ion.
Group Combination:
1. Users can enter either of the password/fingerprint of the Group combination first, and then enter
another password/fingerpr i nt. Users don’t have to follow the orders of the Group combination.
2. The unlocking logs of the combination will be saved.
3. The unlocking message only shows one of the password/fingerprint of the Group combination.
4. When the Group combination contains the duress-open password/fingerprint, it will generate the
duress-open alarm after the combination is used.
5. After one of the password/fingerprint of the Group combination is deleted, the Group will also be
deleted. However, the rest password/fingerprint still can be used for unlocking the door.
MF Card
Step1. Slide the cover up. Place the MF card in front of the keypad (distance 0~2cm).
Step2. After the access granted, the indicator shows green. Rotate down the handle to open the door
ZigBee Remote
Control
Via ZigBee application, users are able to lock/unlock the door remotely.
7.12. Emergency Access Power Supply
When the operating voltage is low, users are able to use a 9V battery for emergency access.
Mechanical override key still can be used even though the power is low.
25

26
iSysmart
7.13. Batteries Installation
Remove the screw and the battery cover. Insert the batteries and install the cover and the screw back.
7.14. Battery Safety and Maintenance
Use batteries with the size and type specified.
Remove batteries from the door lock that will be stored unused for extended periods.
Make sure to insert new batteries correctly. Do not use new and old batteries at the same time.
Follow the symbols for positioning the positive (+) and negative (-) ends of each battery.
Dispose of batteries according to the local laws and regulations of your region.
Do not place batteries at the place where children and pets can reach.
When the battery broke and contents touched the eyes or skin, wash the area with water, and then get
medical help.
26

27
iSysmart
8. Im por tant Mai n tenance Instruct io n s
Please keep the device in a dry place. Precipitation, humidity, and all types of liquids or
moisture can contain minerals that corrode electronic circuits. In cases of accidental liquid
spills to a device, please leave the device dry properly before storing or using.
Do not use or store the device in dusty or dirty areas.
Do not use or store the device in extremely hot temperatures. High temperatures may damage the
device or battery.
Do not use or store the device in extremely cold temperatures. When the device warms to its
normal temperature, moisture can form inside the device and damage the device or battery.
Do not drop, knock, or shake the device. Rough handling would
break it. Do not use strong chemicals or washing to clean the device.
Do not paint the device. Paint would cause improper operation.
Handle your device, battery, and accessories with care. The suggestions above help you keep your
device operational. For damaged device, please contact the authorized service center in your area.
27
 Loading...