

Page 1
Version IS7110C-061413-01 1
Page 2

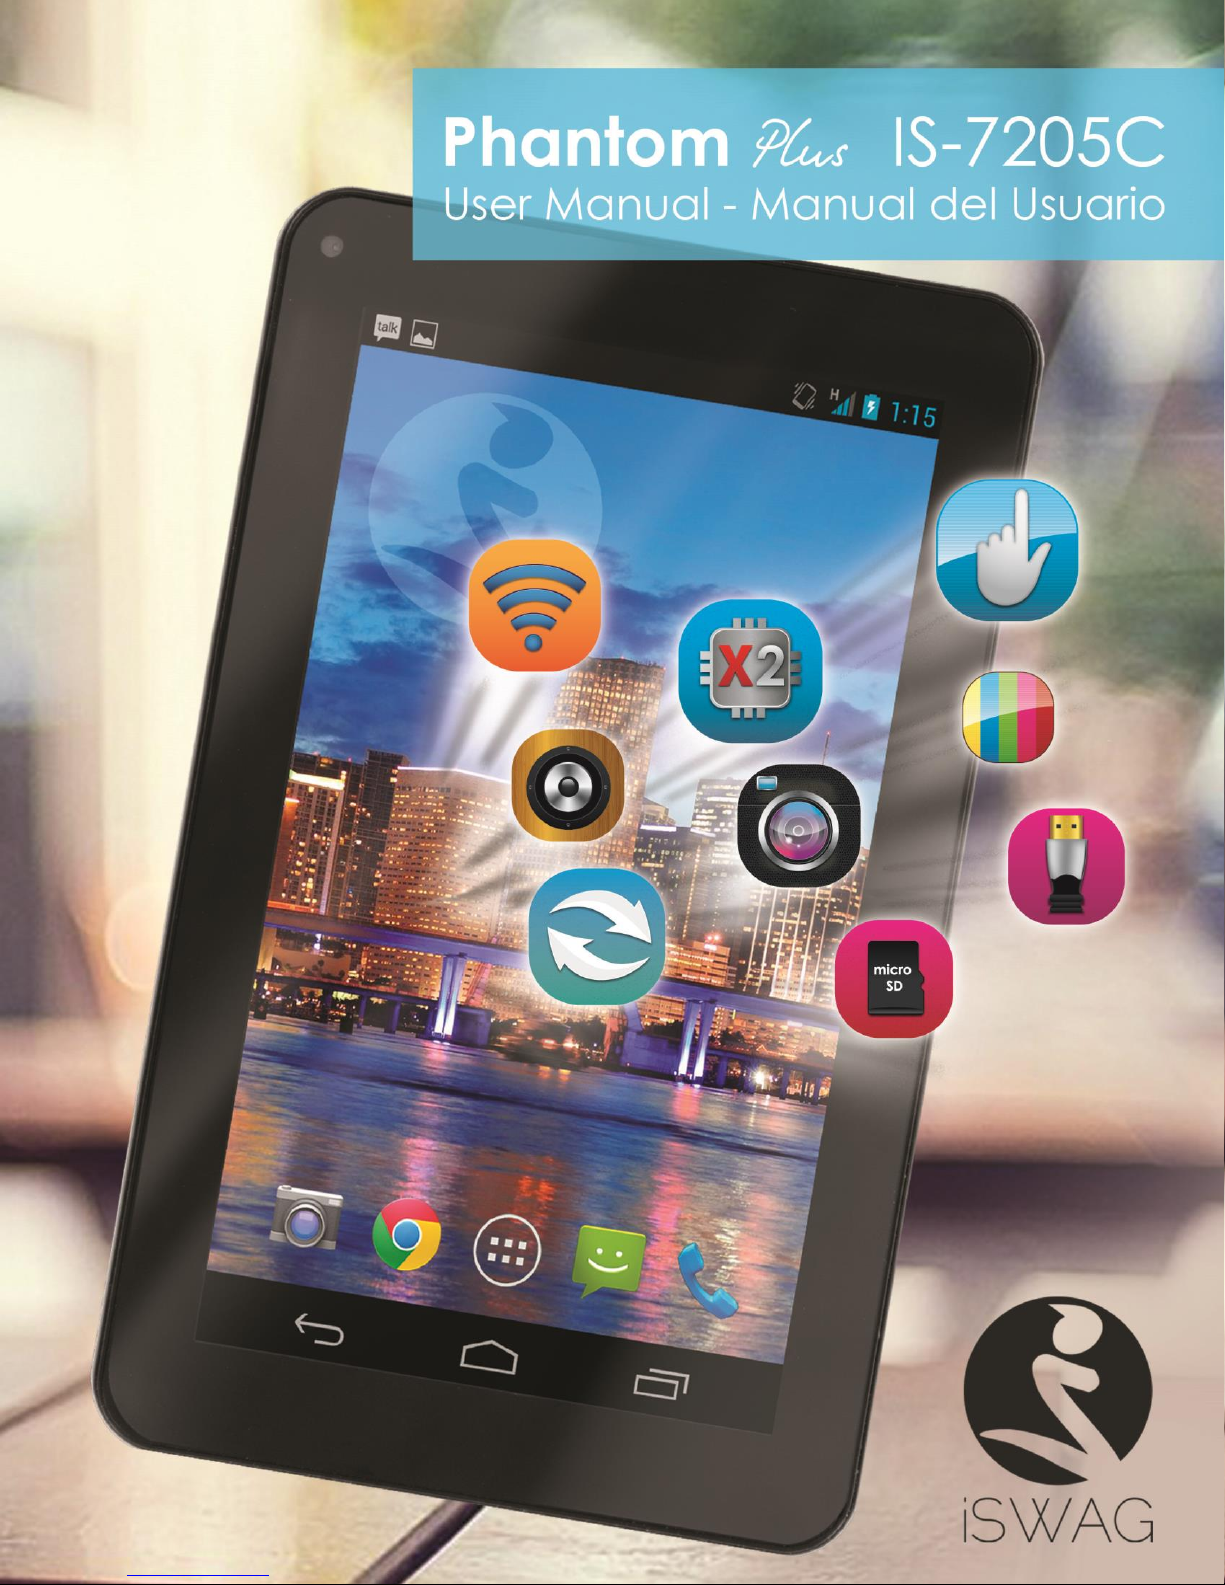
iSWAG Phantom Plus IS-7205C User Manual
Statements, Disclosures and Precautions................................................................. 3
1. Getting to Know Your iSWAG Phantom Plus Tablet ............................................ 5
2. Switching Your Tablet On/Off ................................................................................ 5
3. Touch Screen ........................................................................................................... 6
4. Using a Micro SD Card ............................................................................................ 6
5. Getting Started ........................................................................................................ 6
6. Desktop ..................................................................................................................... 7
7. Lock Screen .............................................................................................................. 8
8. Installed Applications .............................................................................................. 9
9. Desktop Menu ........................................................................................................ 10
10. Managing Applications ...................................................................................... 10
11. Clock ..................................................................................................................... 11
12. Installing Software Online ................................................................................... 12
13. Browser .................................................................................................................. 13
14. Calendar .............................................................................................................. 14
15. Camera................................................................................................................. 14
16. Calculator ............................................................................................................. 15
17. Sound Recorder ................................................................................................... 15
18. Email ...................................................................................................................... 15
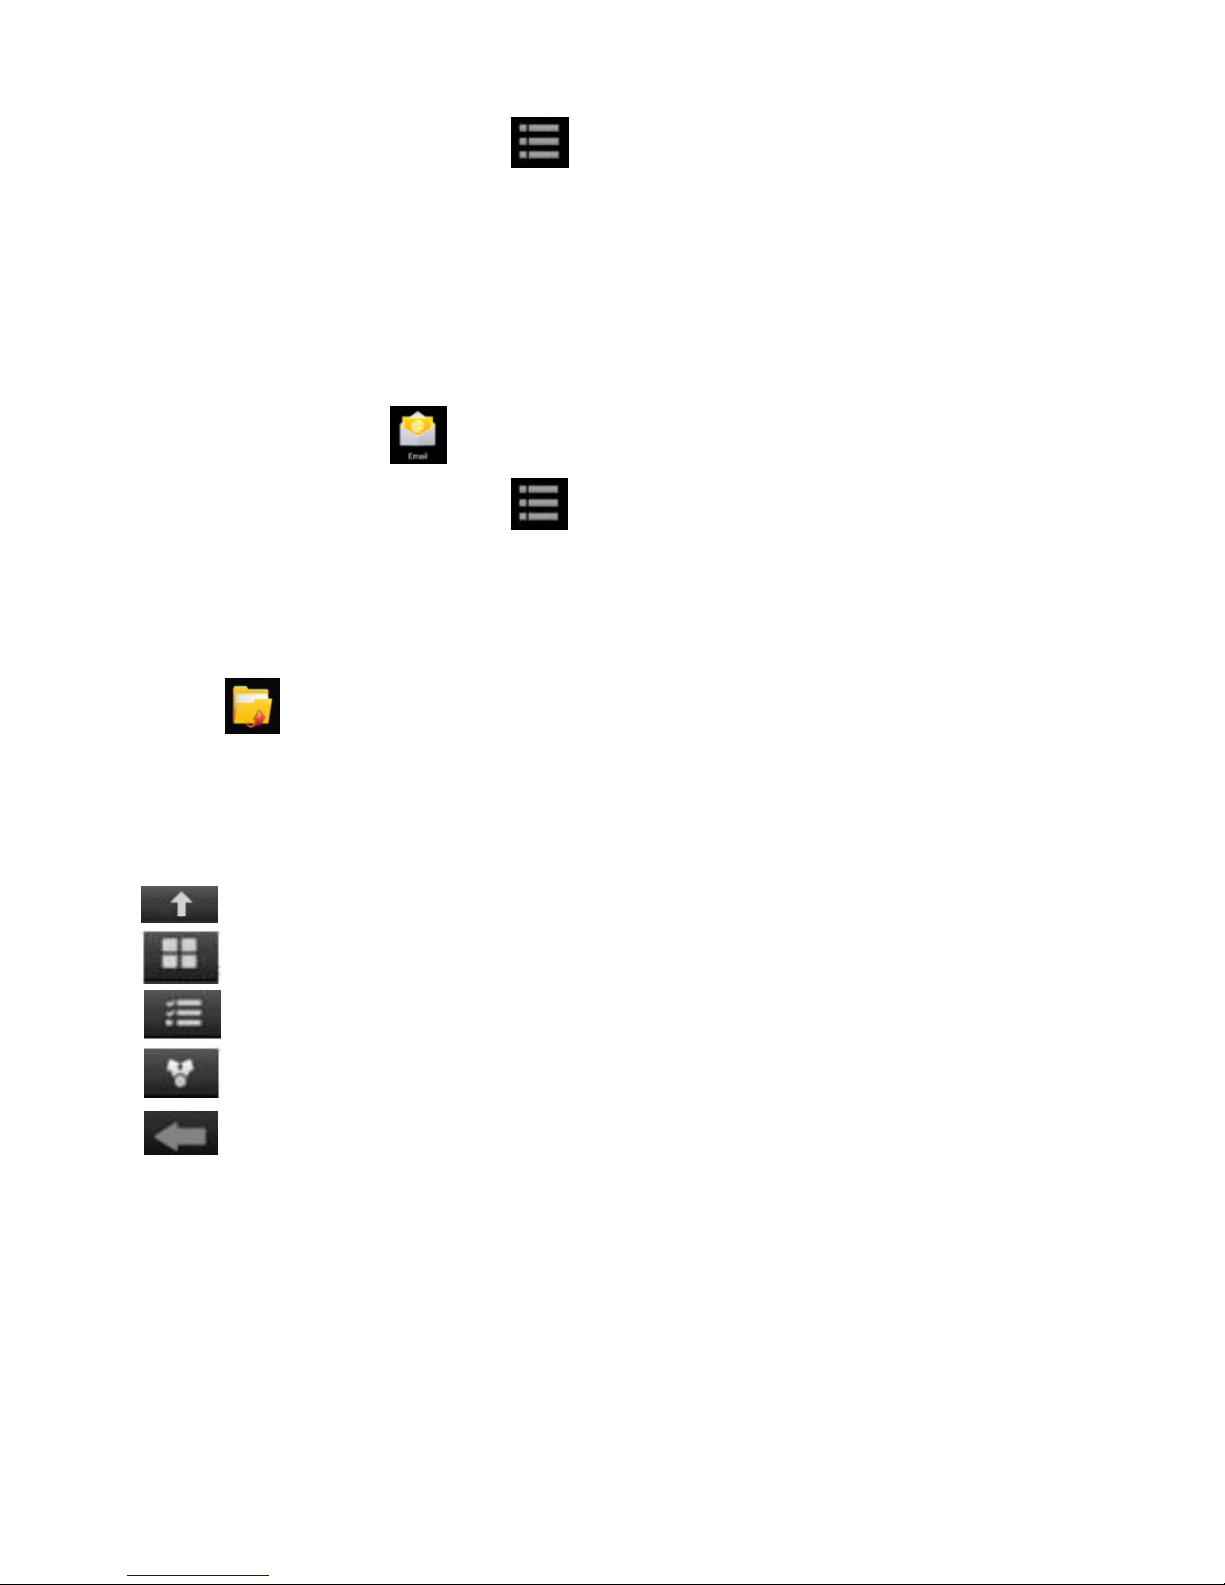
19. File Manager ........................................................................................................ 17
20. Music ..................................................................................................................... 18
21. HD Video Player ................................................................................................... 19
22. Configuring Bluetooth ......................................................................................... 20
23. Settings .................................................................................................................. 20
24. HDMI Connection ................................................................................................ 23
FAQ .............................................................................................................................. 26
Device Specifications ............................................................................................... 28
Battery management ............................................................................................... 29
Important safety instructions .................................................................................... 30
Version IS7110C-061413-01 2
Page 3

Thank you for purchasing this innovative tablet from iSWAG. We invite you to read the
instructions contained in this user manual so you can configure and utilize all the
functions of your new tablet. For additional information you can visit us at:
iswagmobile.com.
Warnings and Precautions
Please do not disassemble; this is a highly precise electronic product.
Avoid any heavy impact or collision with this product
Avoid using this product in the following conditions: high or low temperatures, moist
or dusty environments, strong magnetic fields, and/or long term exposure to sunlight.
If cleaning is necessary, only use a soft moist cotton cloth to wipe the outer shell of
the product. Do not use any other chemical cleaning solutions.
Avoid placing this product near any liquids in case there is accidental spillage onto
or into the product
Excess use of headphones at high volume may cause permanent hearing
impairment.
Please only use permitted batteries, chargers, and accessories with this product; use
of any other types will violate the warranty regulations and may be dangerous.
Please follow the relevant local environmental regulations to deal with obsolete
products and accessories.
If the product becomes faulty at any point, iSWAG assumes no responsibility for any
loss of data/music/video and/or any other files. Please follow the user manual for
standard operation and timely backups.
Version IS7110C-061413-01 3
Page 4

Statements and Disclosures
Specifications are subject to change without prior notice.
While the utmost care has been taken in producing this manual, Swagtek, Inc.,
iSWAG, or any other affiliated company assumes no responsibility for any mistakes or
errors contained in this document.
Screen captures presented in this manual are for reference purposes, actual screens
may vary.
iSWAG and the iSWAG logo are registered trademarks of Swagtek, Inc. Other
trademarks are the property of their respective owners.
Always remember to back-up important data; we assume no responsibility for any
errors with this product
Please read the operating instructions carefully. Use the accessories supplied with
the product to avoid any unexpected damage. Warranty cannot be honored if the
product is used with incompatible accessories.
Although the latest version of Android available at the time of the products
manufacturing is compatible with tablet specifications, iSWAG assumes no
responsibility for the performance of the Android software supplied by Google
and/or any errors/software bugs/software failures.
There may be slight discrepancies between pictures/data in this manual and the
actual product. The actual product is accurate.
We cannot be responsible for any act of downloading illegal software and/or
anything else that is considered illegal.
iSWAG cannot support the Android Operating System or offer any support for any
Android based software that the user may download, install, and/or purchase.
Version IS7110C-061413-01 4
Page 5
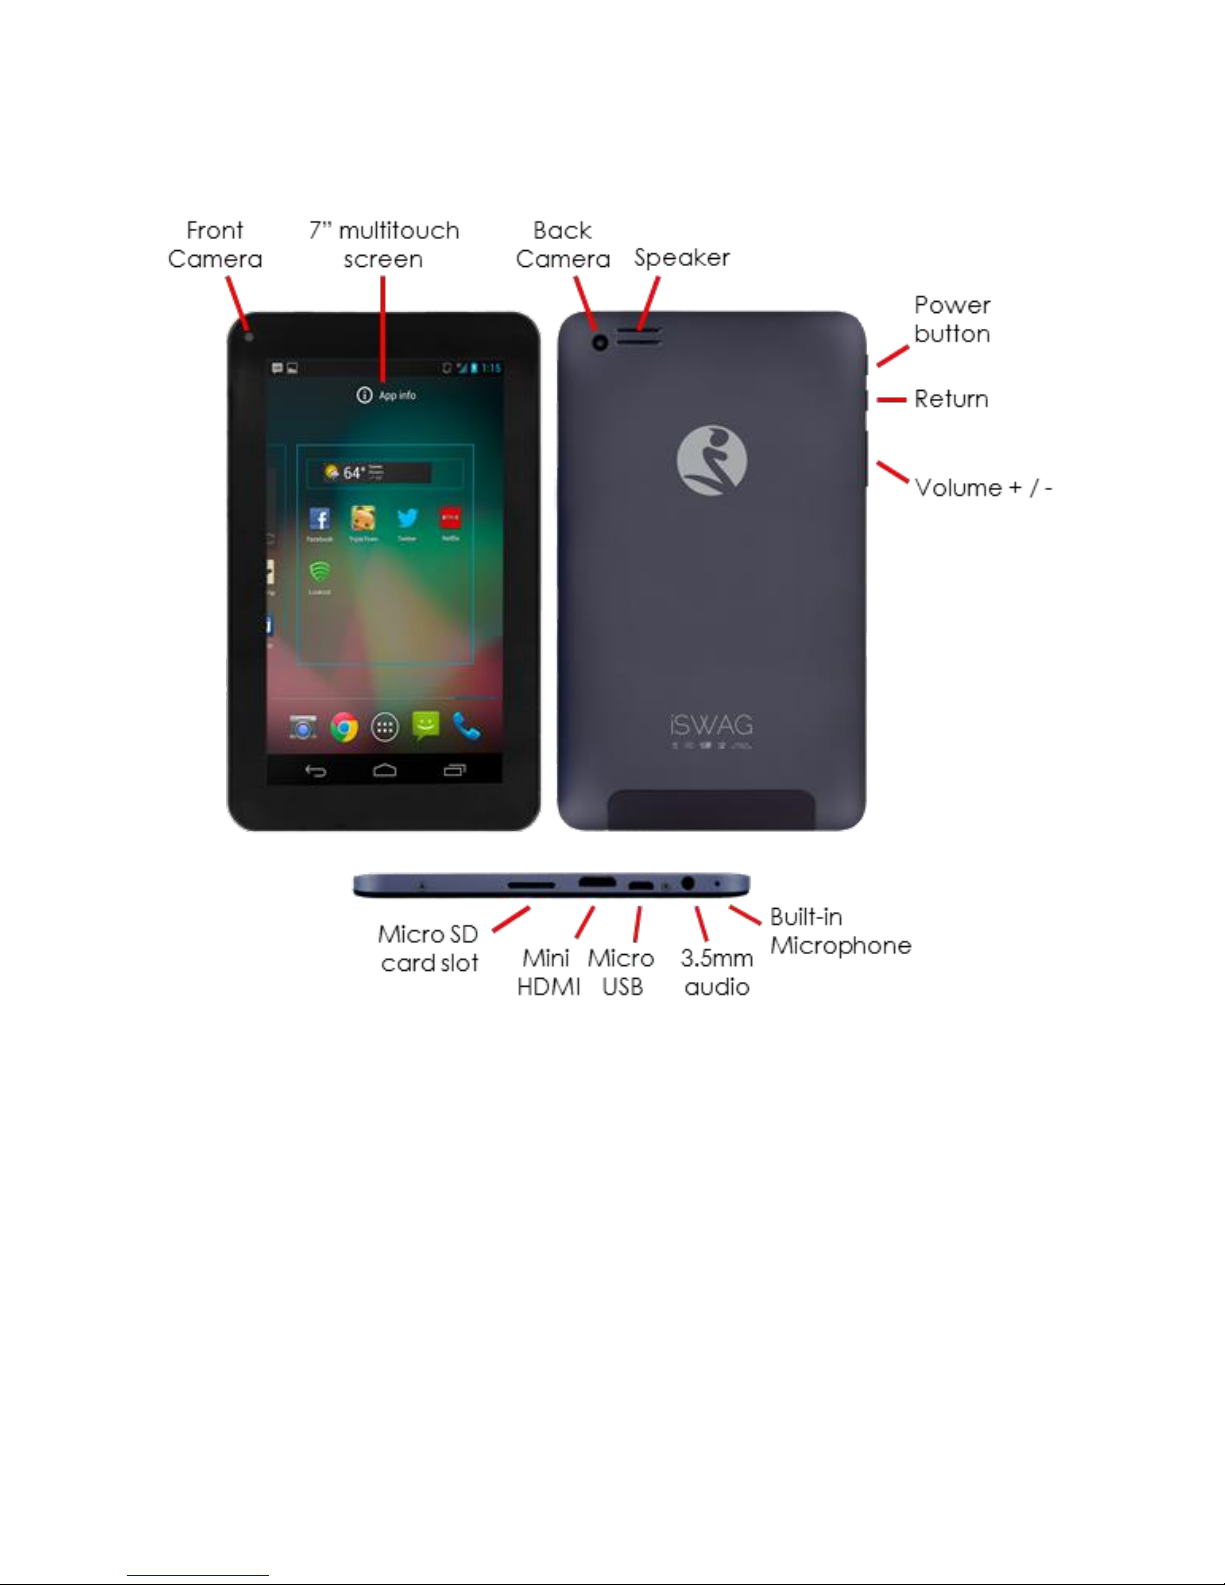
1. Getting to Know Your iSWAG Phantom Plus IS-7205C
2. Switching Your Tablet On/Off
To switch on: press and hold the power switch for 3 seconds and wait for startup.
To switch off: press and hold the power switch for 3 seconds → click Power off → click
OK.
Lock/unlock screen: briefly press the power switch to lock/unlock the screen.
Forced shout down: if the device is not responding, press and hold the power switch for
7 seconds to force a shut-down.
Warning: a forced shut-down may cause unexpected errors in the system!
Version IS7110C-061413-01 5
Page 6

3. Touch Screen
The touch screen is easy and convenient to use.
You can use the touch screen in the following methods:
Single click: briefly touch the screen with your finger and then move away.
Click and hold: click the screen with your finger and hold for about 2 seconds.
Drag: click a certain icon on the screen and hold, then move your finger, the icon will
move accordingly.
To avoid damaging the screen, never put anything on it.
4. Using a Micro SD Card
Your device supports up to a 32GB storage card.
Insert the card into the card slot, and push it in with your finger until a “click” is heard.
Now the card is ready for use.
Removing Micro SD card
First, close all programs or files on the card. Click Settings → Storage → Remove SD
card → OK. Then press the card with your finger, and simply remove it when it is
ejected.
Avoid inserting and removing the card repeatedly in a short time, this may cause
damage to the card. We suggest you use name brand cards to ensure compatibility.
5. Getting Started
Charging the device
You may use the device while it is charging, but this may prolong the charging time.
To charge device: connect one end of the AC adaptor to the power outlet and the
other end to the Micro USB port on the device (it may take about 5 hours to fully charge
the device).
The battery icon will roll during charging, and when it is full (it will stop rolling),
please disconnect the AC adaptor.
Starting the device
Press and hold the power switch for 3 seconds and wait for system startup.
Wi-Fi settings
We suggest you configure your Wi-Fi network before using your new tablet, as many
functions require it to work normally.
1. Click Settings→ Wireless and Network
2. Switch the Wi-Fi on. The device will search for and list all available Wi-Fi networks. If
an icon is displayed, you need to enter the correct password to connect to that Wi-Fi
network.
Version IS7110C-061413-01 6
Page 7
3. Click the desired Wi-Fi network → Enter the password (if any) → Click Connect.
1 Search
2 Click to view all applications
3 Return
4 Return to desktop directly
5 Task
6 Current time
7 Wi-Fi signal
8 Battery status
9 Web browser
10 Camera
11 Video player
12 Music player
13 Settings
14 Email
2
1
9
10
11
12
13
14
3 4 5 6 7
8
4. Click Return to return to the desktop.
If the Wi-Fi network is set as hidden it will not be discovered automatically. In this case
you need to click Add Wi-Fi Network and enter the necessary information manually.
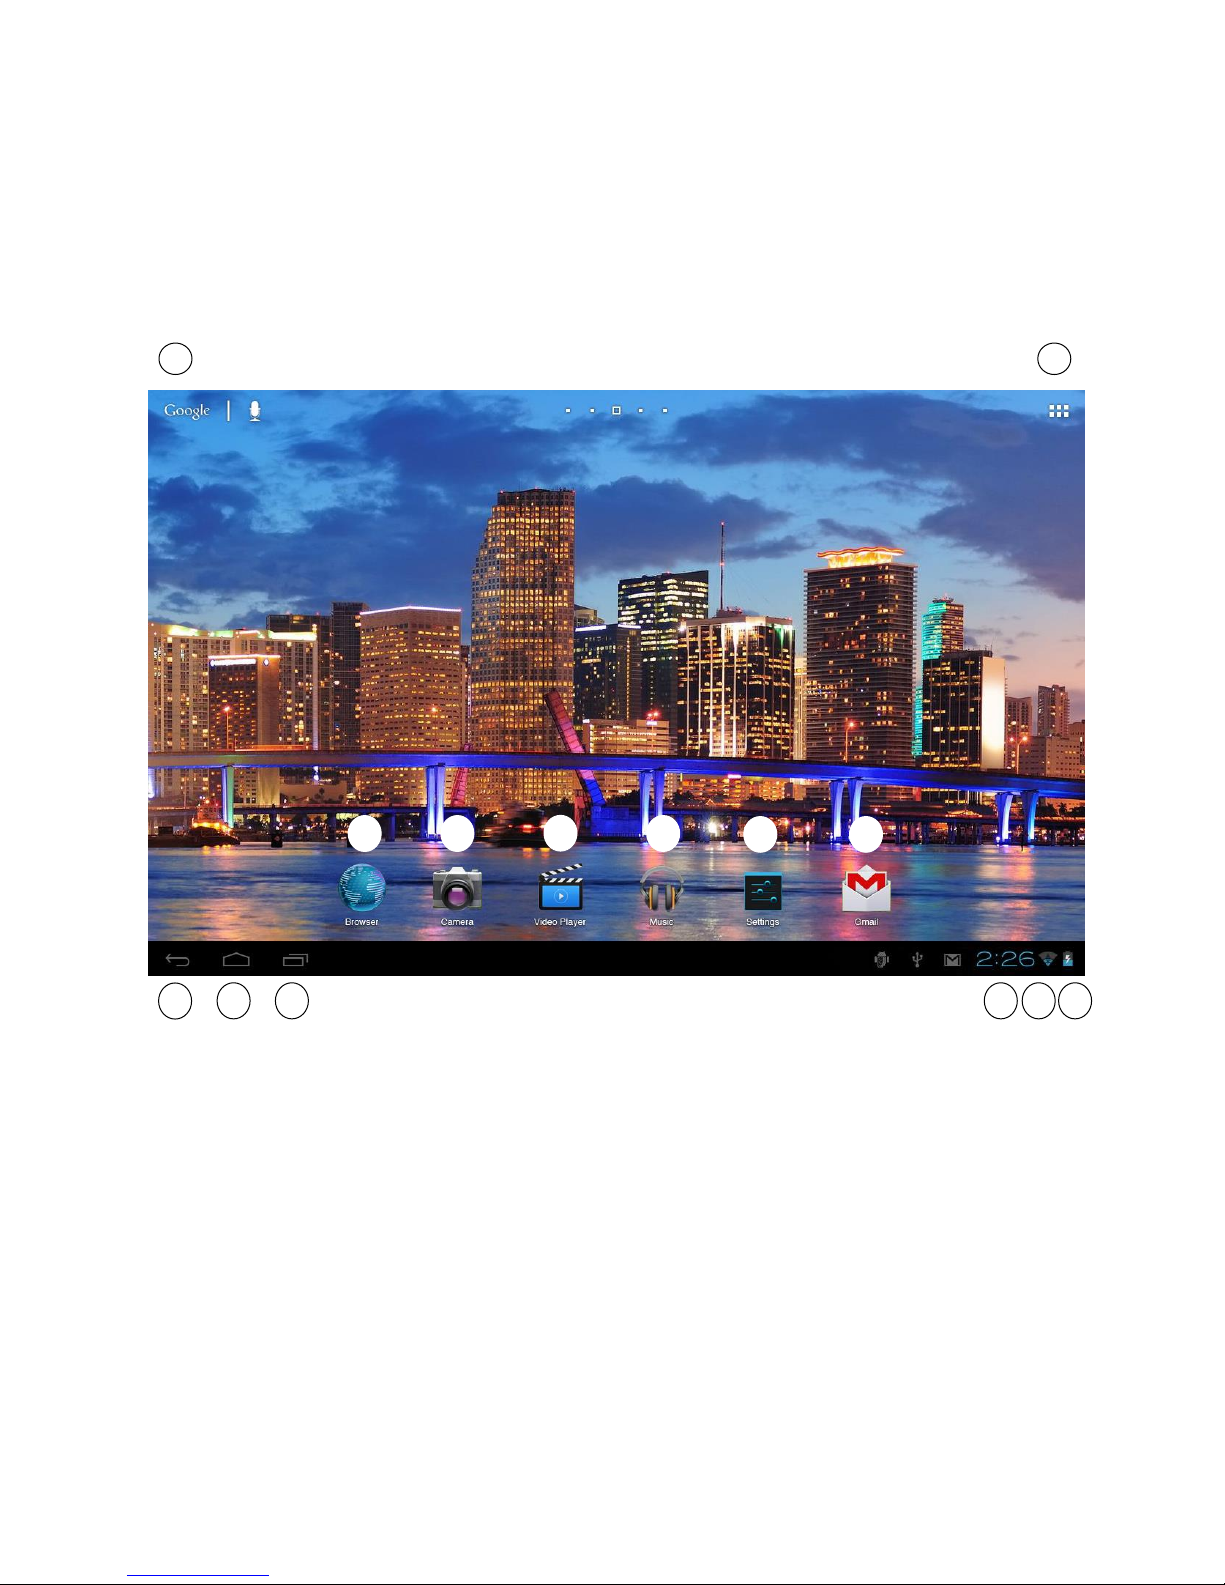
6. Desktop
Version IS7110C-061413-01 7
Page 8
Click any icon to open the document or run the application.
Click and drag the icon to move it to another location on the screen.
Click and drag the icon to to delete it from the desktop.
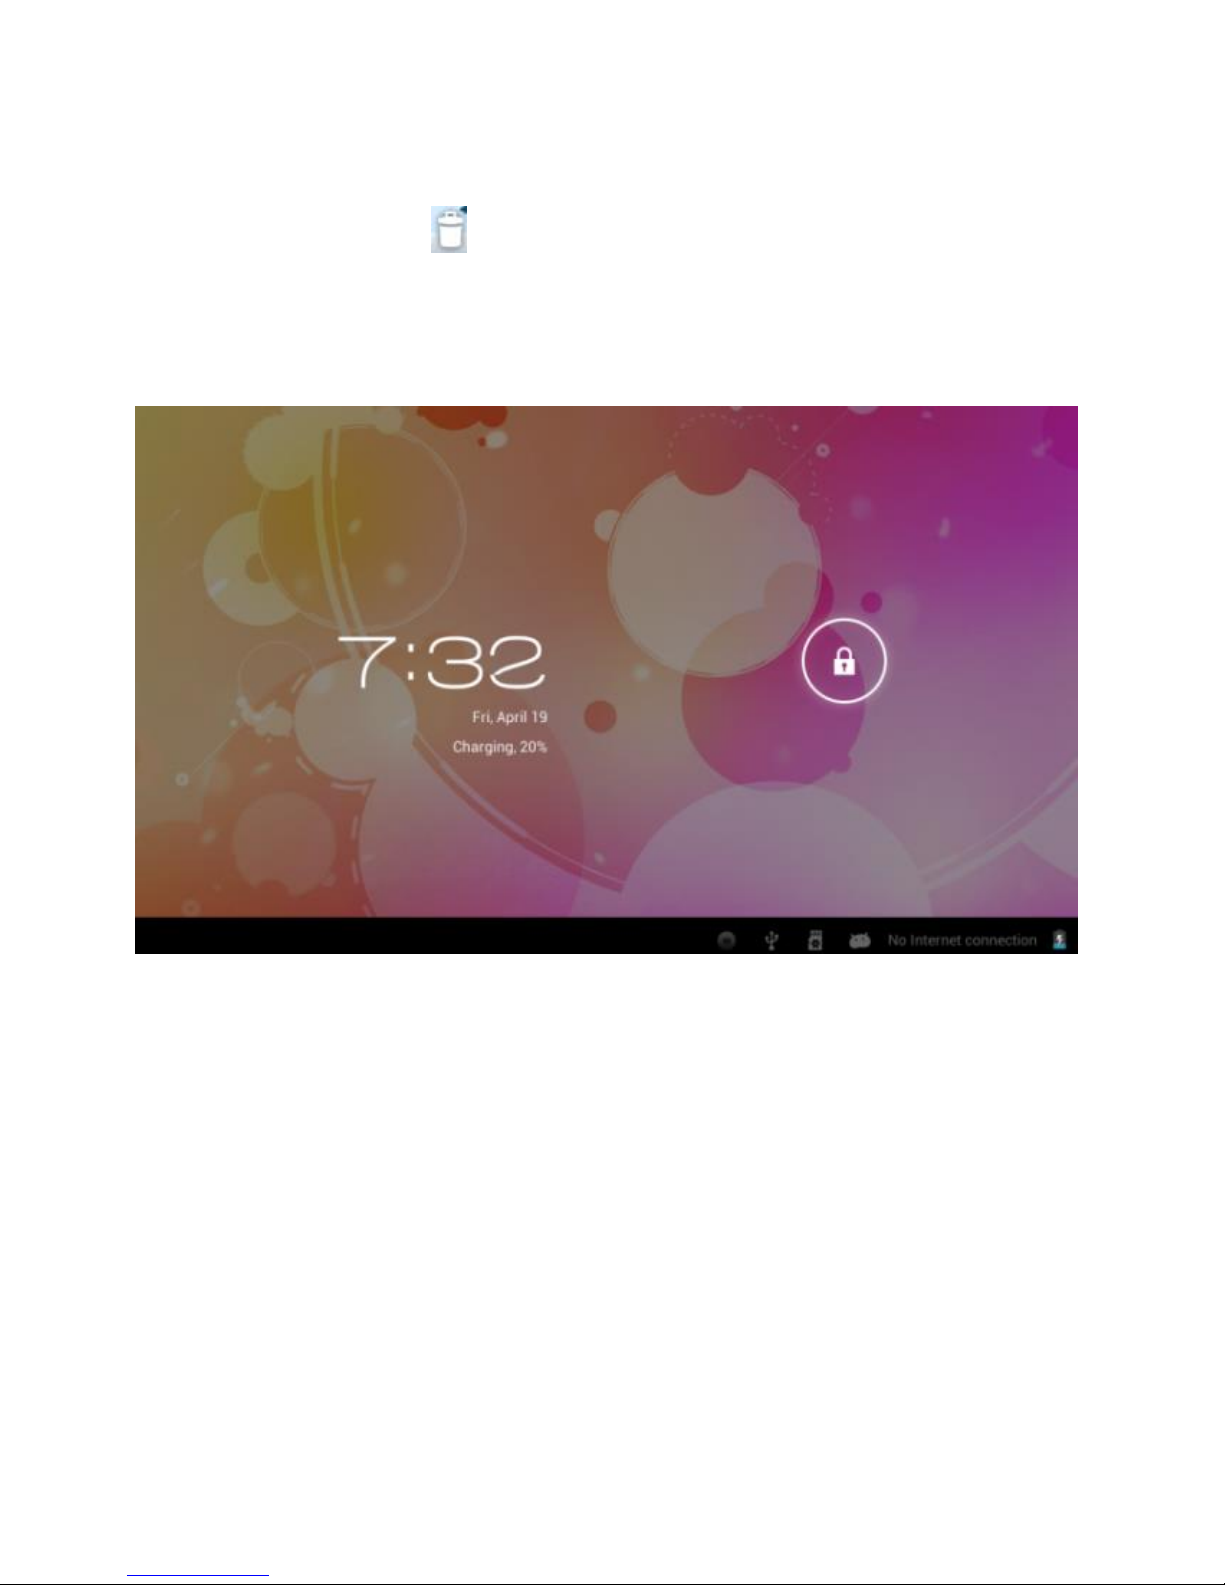
7. Lock Screen
You can set auto lock screen or lock screen manually by pressing the power switch. The
lock screen interface is as follows:
Slide at the right to unlock the screen.
Version IS7110C-061413-01 8
Page 9
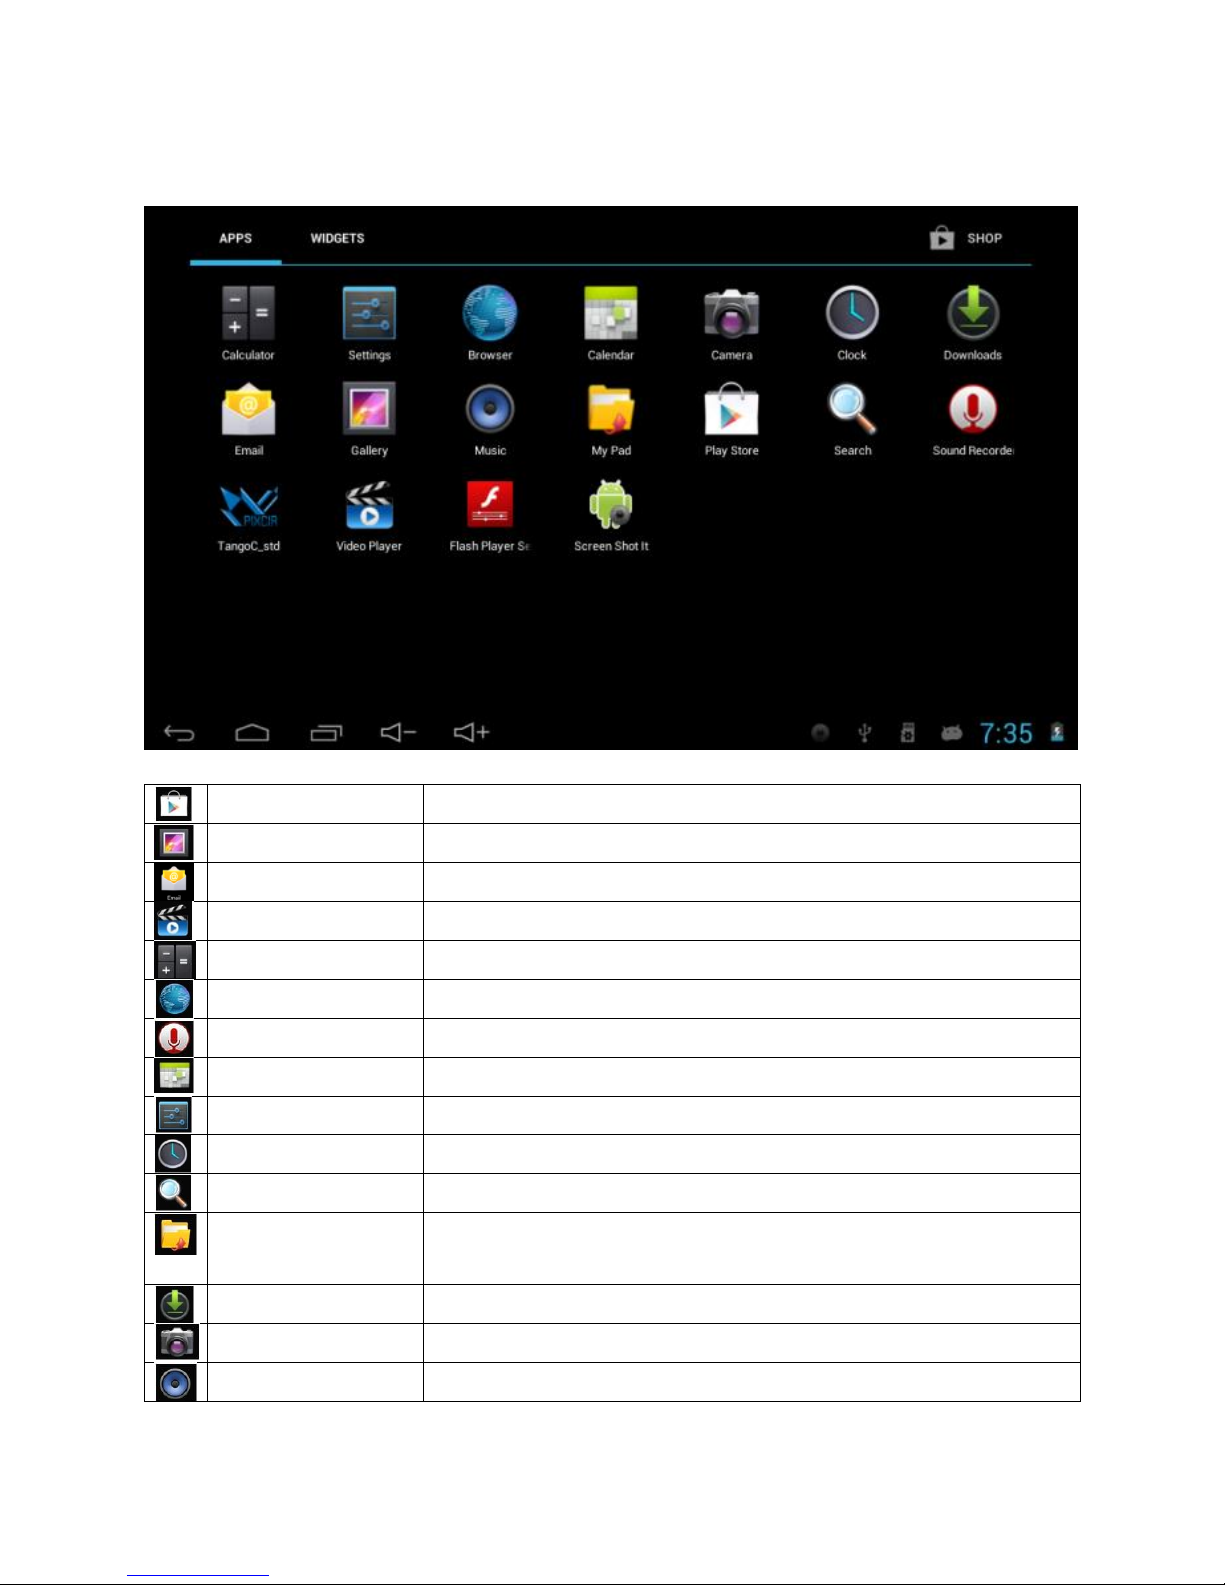
8. Installed Applications
Play Store
Download applications easily and conveniently.
Photo album
View your pictures.
Email
Send and receive emails via your email address.
HD video player
Play and manage your videos.
Calculator
For arithmetic operations.
Browser
Connect to and explore the Internet.
Sound Recorder
Record and play-back sounds.
Calendar
Calendar for setting schedules and agendas.
Settings
Personalize your tablet’s settings.
Clock
View current time and set alarm clock.
Search
Google search tools.
File manager
View and manage your files and applications. Install
Android applications and backup files on SD card.
Downloaded files
History of downloaded files.
Camera
Take photos of your favorite moments.
Music
Play and manage your music files.
Version IS7110C-061413-01 9
Page 10
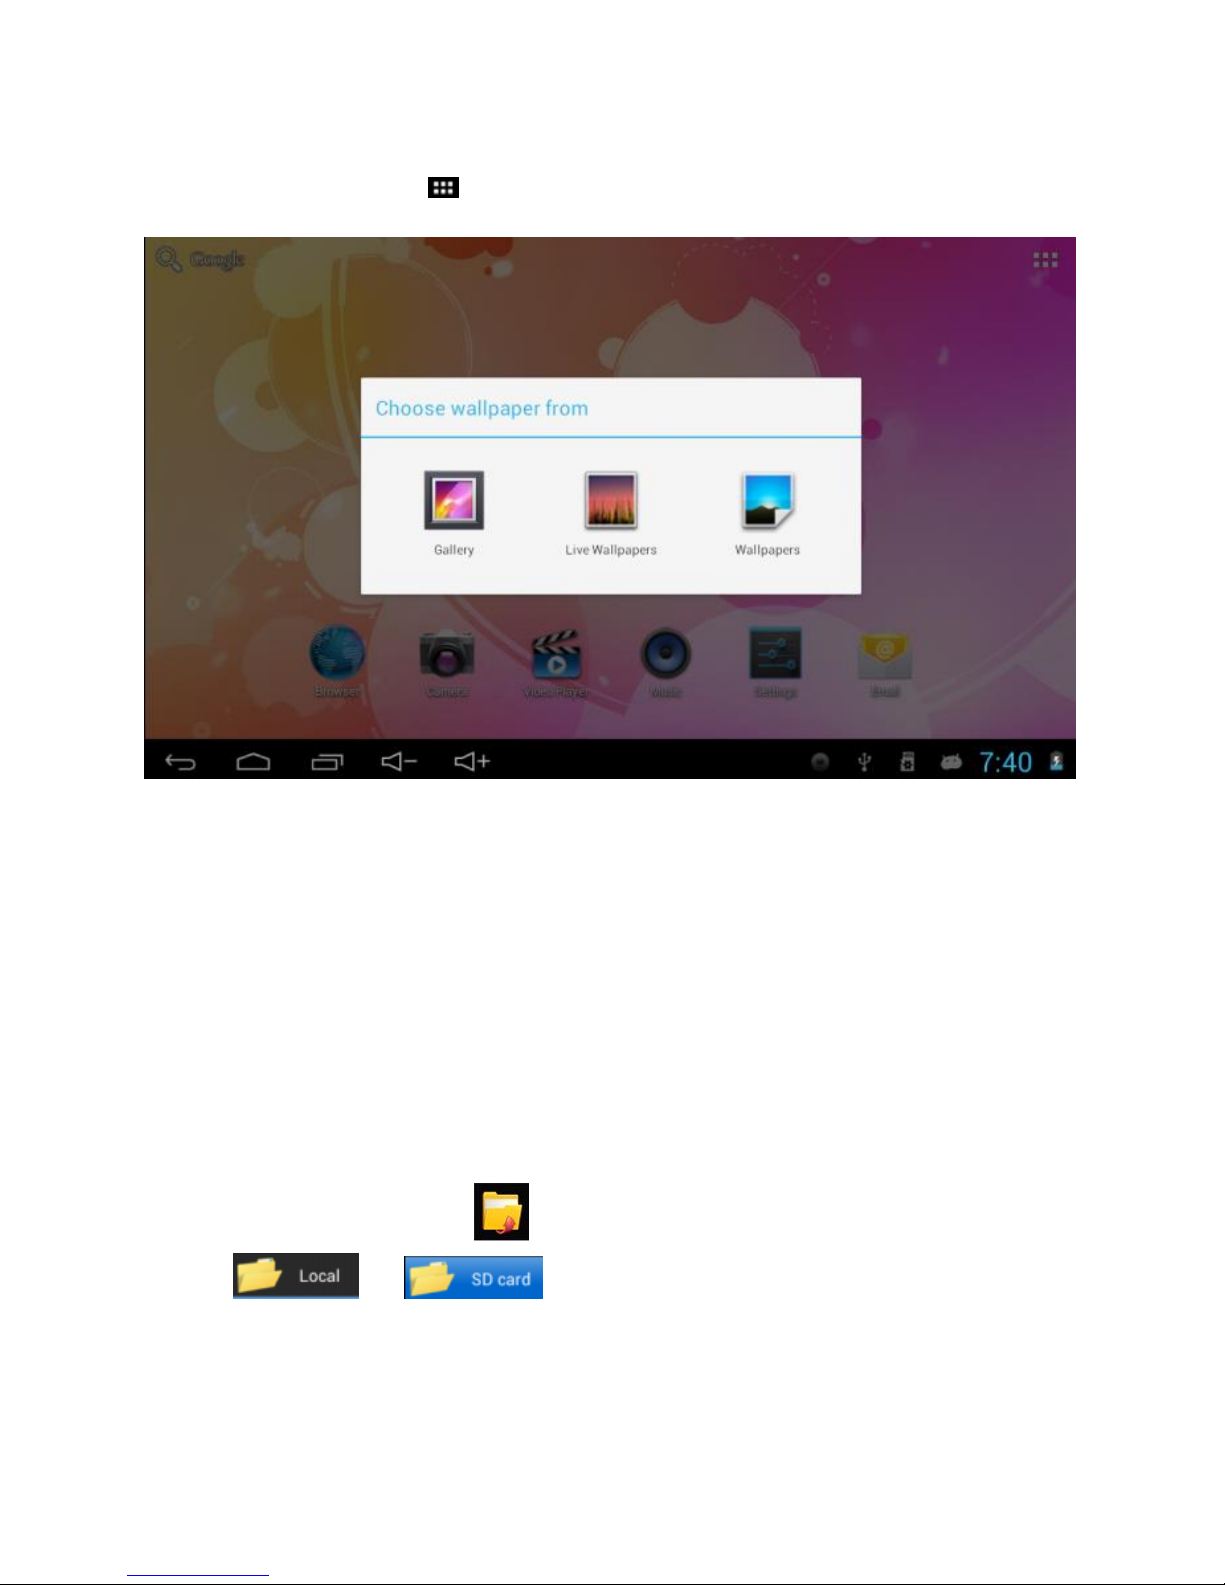
9. Desktop Menu
On the desktop, click icon to display menu functions.
You can select your desired wallpaper from the images available.
10. Managing Applications
Installing
You can find many interesting and free Android applications through the internet.
Simply open the browser and search for“Android Applications”.
Your purchased or downloaded Android applications can be quickly and simply
installed through the File Manager .
1. Copy the .apk file you want to install to the SD card or USB disk → insert the card or
connect the USB disk to the device.
2. Click the File Manager icon .
3. Click or and find the folders containing .apk files.
4. Select an .apk file → Install.
Now the application is installed and the application icon will appear on the
applications screen.
Version IS7110C-061413-01 10
Page 11
5. Click Open to run the application, or click Complete to return to the File Browser
interface.
Downloading applications from the internet
You can conveniently download and install Android applications from the internet to
your device.
1. Click Browser icon to connect to the internet.
2. Enter the URL and click the link of the application you want to install.
3. After the application has downloaded, press and hold the downloaded file (in the
Downloaded Files screen) → Click to open → Install.
Uninstalling an application
You can easily uninstall Android applications.
1. Click → Settings → Applications → Manage Applications.
2. Click the application you want to uninstall → Uninstall.
3. Click OK to uninstall the application.
11. Clock
Click Clock icon to view the current date and time.
Alarm clock
The device supports more than one alarm clock at the same time.
When the icon appears in the status bar on the top of the screen, it means at
least one alarm clock is activated.
Add alarm clock
1. Click Clock icon .
2. Double click Set alarm clock→ + Add alarm clock.
3. Set your desired alarm.
4. Click Activate alarm clock.
5. Click Complete.
Stop the alarm clock
When the set time is reached, a window will pop up showing the name of the
alarm. If you want the clock to alarm again 10 minutes later, you can click Pause
and repeat. Click Cancel to stop the alarm clock.
Version IS7110C-061413-01 11
Page 12
Activate the snooze feature
Use this function when the alarm is activated but you want to stop it temporarily
without deleting it.
1. In the alarm clock interface, select the alarm clock you want to activate.
2. Click Reactivate.
Edit the alarm clock
1. Click Clock icon → Click .
2. Click the alarm clock you want to edit → Edit the alarm clock.
Delete the alarm clock
1. Click Clock icon → Click .
2. Click the alarm clock you want to delete.
3. Click to delete the alarm clock.
Click to return to desktop.
12. Installing Software Online
There are many applications available for download from the Google Play website. You
can easily and quickly download them onto your device.
Downloading applications
1. Click the Google Play icon .
If this is the first time you use this function, the system will ask you to register and
login. If you don’t have a registered account, you need to click Register to establish
a Google account. If you already have a Google account, simply click Login and
enter your account information, click Login again to login.
2. You can select applications from the Top Rated or from the Featured list. You can
also search for the application you want by entering a specific name in the search
box.
3. Click an application → Download.
4. When downloading completes, click Install.
5. Click Open to run the application, or click Complete to return to Google Play.
Record
When downloading completes, click Record to manage the installed application. You
can submit your comments to the application or view other users’ comments. You can
also uninstall applications.
Version IS7110C-061413-01 12
Page 13
Menu function
Click to display the menu functions for Google Play.
Personal folder
Click to view personal information. You can change your password, change email
address and save your password. Click the Login icon at the top right corner of the
personal folder to logout of your account.
About
Display the version and support information for Google Play.
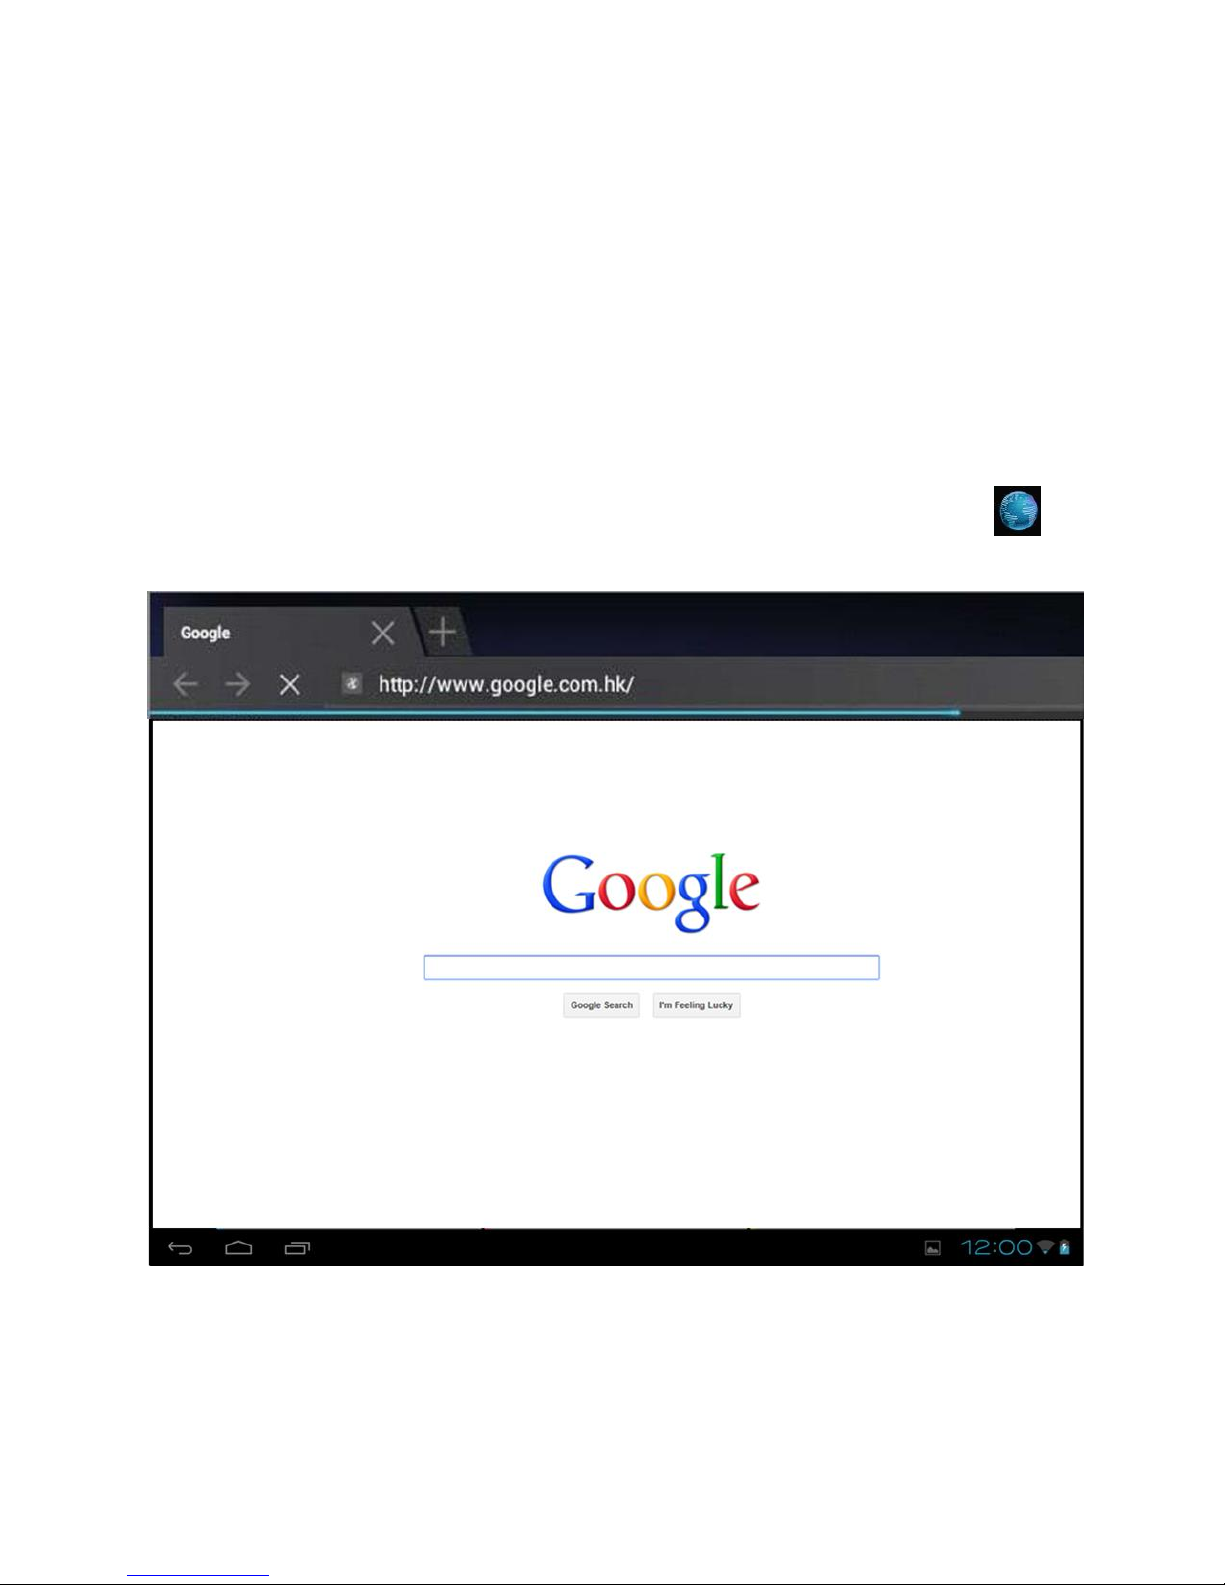
13. Browser
You can connect to the internet through the browser. Click the Browser icon on
the desktop to open the browser.
Version IS7110C-061413-01 13
Page 14
14. Calendar
Click the Calendar icon .
If this is the first time you use the calendar function, you need to create an Exchange
account. Enter your email address and password, click Next, and follow the instructions
to complete the account configuration. Now you are ready to use the Calendar.
Adding a new activity or event
1. From the calendar interface, click the date you want to add an activity.
2. Select the time of the activity → enter the details of the activity in the field provided.
3. Click Complete.
4. Click icon to select your desired calendar interface.
The date with agenda is displayed in grey.
15. Camera
Click Camera icon.
Menu function
1. Press the Menu button to bring up the menu list, which includes: Switch to video /
Switch to camera and My album/My video.
2. From the camera interface, click My album to view your photos.
3. From the video recording interface, click My video to view the video list.
Taking a photo
1. From the camera interface, click to take a photo.
2. The photo will be saved automatically.
3. Click the thumbnail to enter My album to view full size photos.
4. Click Return to return to camera.
5. Click to exit camera and return to the desktop.
Recording a video
1. Click to switch to video mode to record videos.
2. Click to start recording, click to stop.
3. The recorded video will be saved automatically.
4. Click the thumbnail to play the video.
5. Click Return to return to camera.
Version IS7110C-061413-01 14
Page 15
6. Click to switch back to camera interface.
7. Click to exit camera and return to the desktop.
16. Calculator
1. Click the Calculator icon.
2. Click the numbers and operators to make operations.
3. Click Clear to clear the entry one by one, or click and hold Clear to clear all entries.
17. Sound Recorder
1. Click the Sound Recorder icon .
2. Click the icon to start recording.
3. When recording is complete, click the icon to stop recording.
4. Click the Play icon to play the recorded sound.
18. Email
The email application supports POP3 and SMTP accounts.
Creating a new email account
You can set-up one or more email accounts that you want to use on the device.
1. Click the Email icon .
2. In the Your account interface, click Next.
3. Click Email address option → Enter your email address.
4. In the Password option → Enter your email password.
5. Click complete.
6. Manual setting (optional): the server will automatically select an email provider
(such as gmail.com) according to the email address you have entered. However, if
you need to change the server settings, you can click Manual settings and make
the necessary changes. Click Next.
7. Optional: enter account name.
8. Enter the signature → Click Complete.
After completing the set-up process, if you cannot connect to your email account,
please confirm with your email provider whether there sever supports (POP) and (SMTP)
protocols.
Version IS7110C-061413-01 15
Page 16
Inbox
1. Click the Email icon .
2. If only one email account is configured, that account will be opened directly. If
there are multiple accounts they will all be listed.
3. Click the email account you want to open → Click Inbox.
Open an email
1. From the Inbox interface, click an email to open it.
2. If there is an attachment, click Open to activate the corresponding application, or
click Save to save it to a Micro SD card.
3. If you want to reply, click Reply or Reply all.
a. Enter the reply you want to send.
b. Click Send to send the email. If you save it as a draft, the message will be saved
but not sent; if you don’t save it or send it, it will be discarded.
4. Click Cancel to cancel an email immediately.
Compose an email
1. From the Inbox interface, click → Compose your email.
2. Click Send to option to enter the address of the Recipient.
3. If you wish to cc or bcc others, click the icon → Add cc and bcc, then enter
the corresponding email addresses.
4. In the title bar of the email, enter the subject of your email.
5. Click Compose email option to enter your message.
6. If sending an attachment with your message, click → Add attachment.
7. When completed, click →Send.
Edit email account
1. Click the Email icon .
2. From the Inbox interface, click → Account setting.
3. Edit your email account settings.
4. Click to return to the Inbox interface.
Delete an email account
If you have more than one account, and you have deleted the default account, then
the next account on the list will become the default.
1. Click the Email icon .
Version IS7110C-061413-01 16
Page 17
2. From the Inbox interface, click → Account.
3. Click and hold the account you want to delete.
4. In the pop up Account option window, click Delete account.
5. Click Ok to confirm to delete.
Set default email account
You should always have a default email account. If you have more than one account,
you can select which one will be the default.
1. Click the Email icon .
2. From the Inbox interface, click →Account setting.
3. Click and select the default account.
If the default account is deleted, the next account on the list will become the default.
19. File Manager
Click File Browser icon to view the files contained in all storage mediums
including: internal storage, Micro SD card and USB disk. You can also quickly and easily
install Android applications onto the device.
Functions of the File Manager icons are as follow:
Previous folder
View
Multi select
Send email
Previous folder
UDISK1 USB disk
SDCARD1 Micro SD card
Copy files between a PC and your device
You can use the File Browser to copy files between a PC and the external/internal
storage mediums. When copying files to your device, you have the option of copying
to the Micro SD card or USB disk.
Version IS7110C-061413-01 17
Page 18
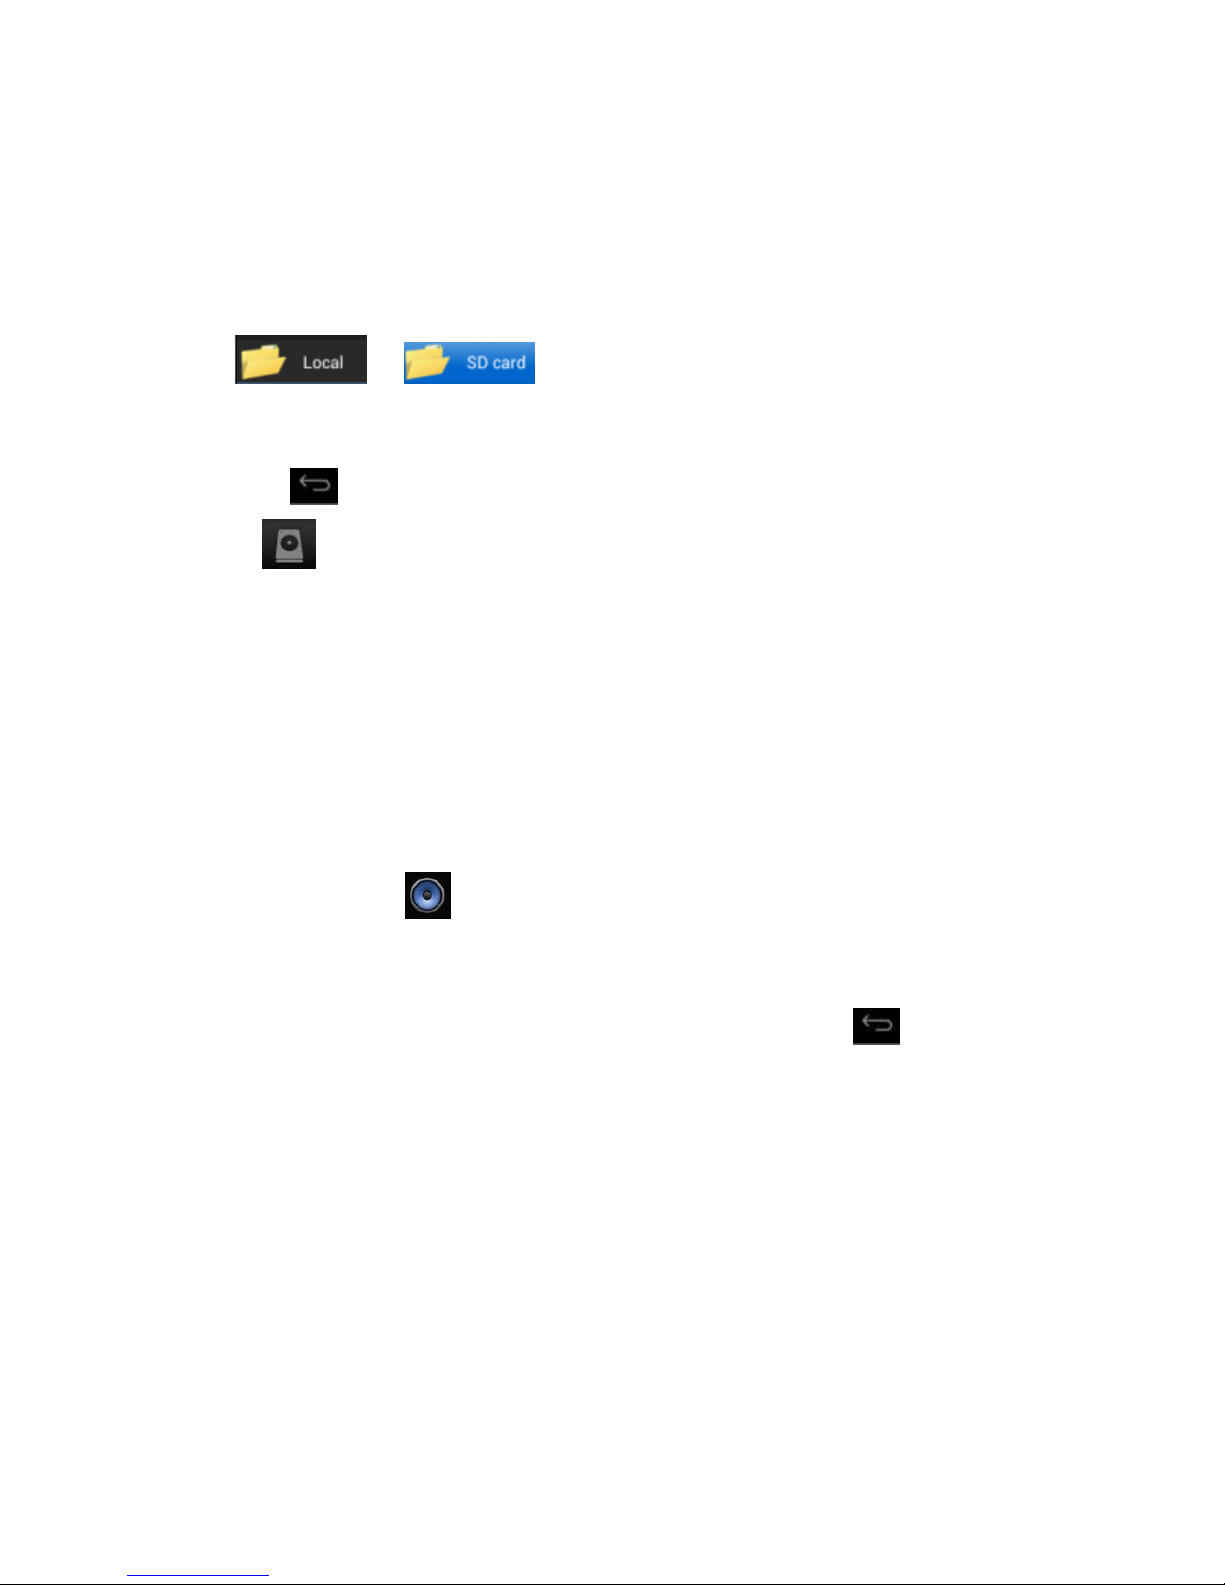
The folder name of the internal storage medium is “Local”, the name of the storage
card is “sdcard”, and the name of the USB disk is “udisk”.
The following example shows you how to copy a file to the device from a Micro SD card
or USB disk. You can use the same method to copy files from the device to the Micro SD
card or USB disk. After, you can connect your storage medium to your PC and copy
the files to the desired folder.
1. Click or to display the files contained on the storage
medium.
2. Click and hold the file or folder you want to copy → click Copy.
3. Click icon to return to internal storage medium → click the folder you want to
copy to → click Paste.
Delete a file
Select the file or folder you want to delete → click Delete → click OK to delete.
20. Music
The music player supports: MP1, MP2, MP3, WMA, OGG, APE, FLAC, WAV, AC3, AAC,
AMR, DTS, RA, M4A formats.
Playing your music
1. Click My music icon .
2. Select the track you want to play from All/Album/Artist/Album/Track/Play list/Now
playing.
3. Click to play the desired track.
4. To return to the previous screen while playing a track, click to return to the
desktop.
Version IS7110C-061413-01 18
Page 19
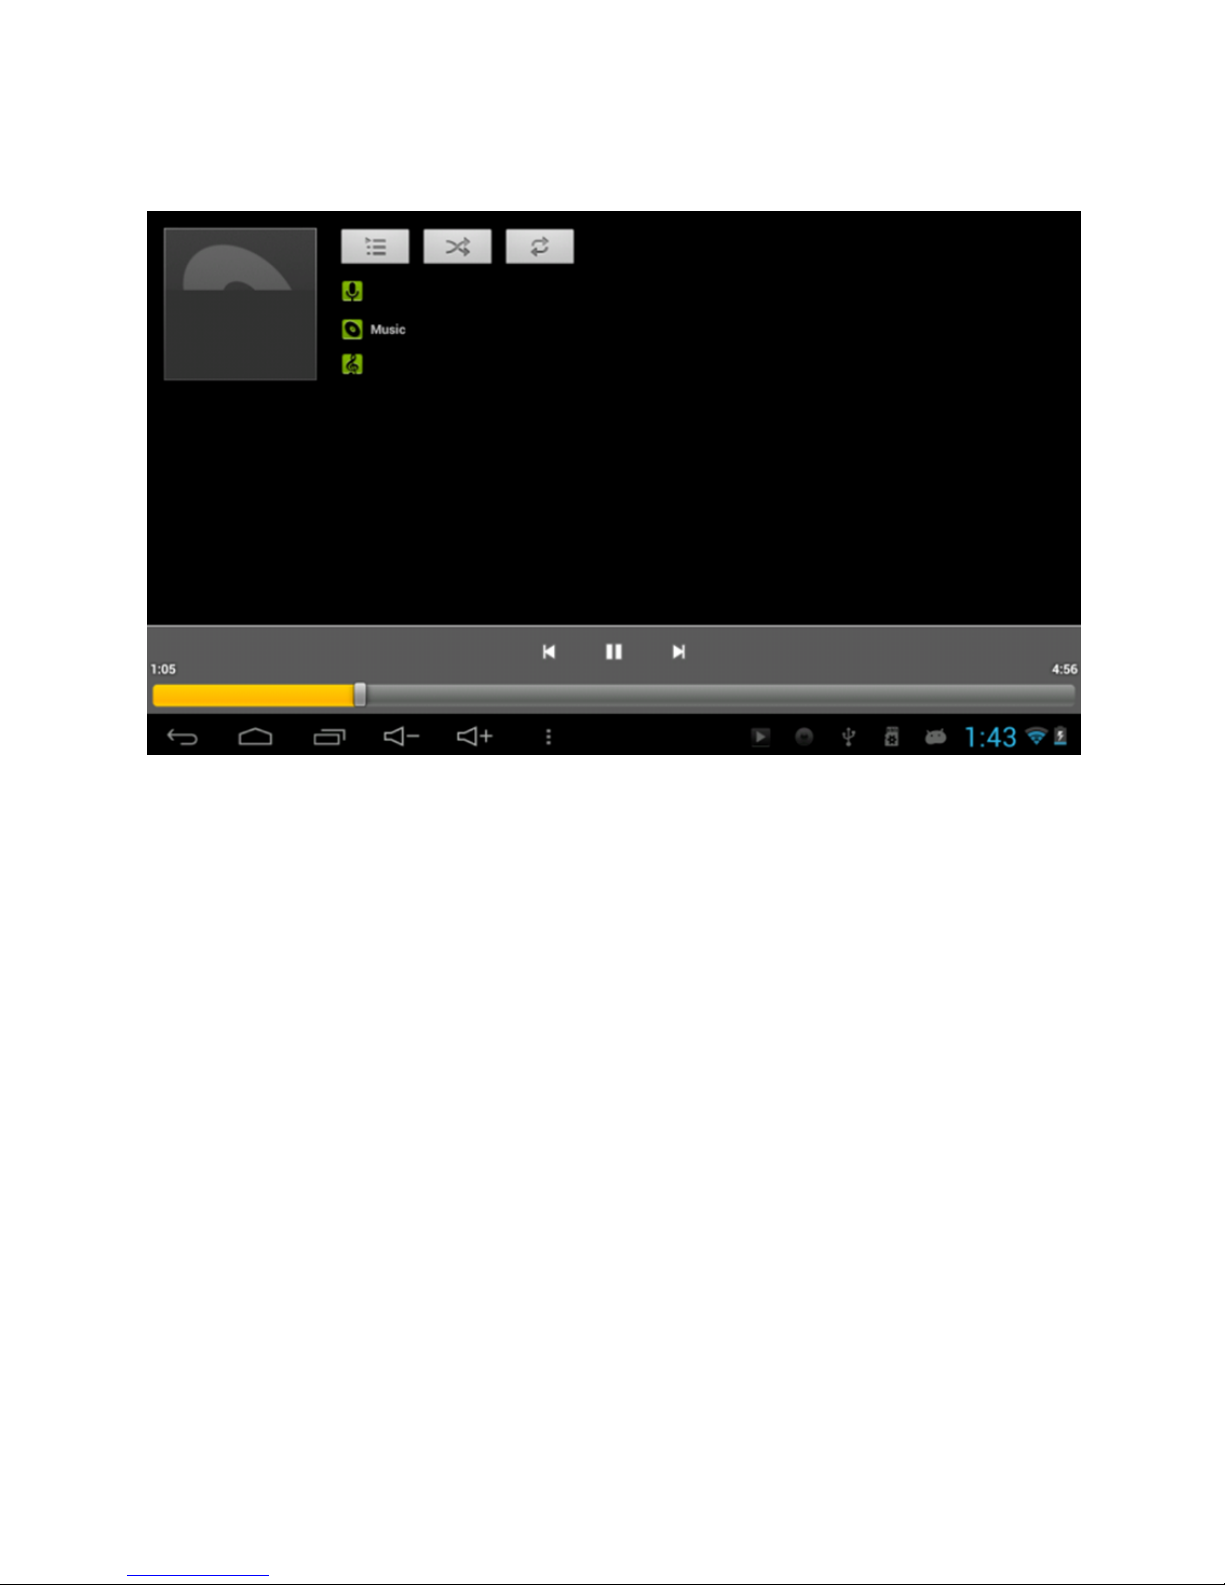
Click the track in the list to enter Music Player. The Music Player interface is the
following:
From this interface, you can access operations such as Search, Play/Pause, Next
track/Previous track, Repeat all and Random play.
Functions in the play list
New play list
1. Click setting, and click Add play list
2. Enter the name of the play list.
3. Click OK.
Rename or delete the play list
Click and hold the play lists → click Rename or Delete.
New track
Click and hold the track you want to add to play list, → click “Add to play list”.
Delete track
Click and hold the track you want to delete → click Delete.
21. HD Video Player
The video player supports: RM, RMVB, MKV (H.264), MPEG (AVI), MOV, FLV, MPG, VOB,
MPE, DAT formats. It also supports 2160P, 3840×2160.
Supported picture formats: JPG, JPEG, BMP and PNG.
Version IS7110C-061413-01 19
Page 20
Wireless
and networks
Wi-Fi
Enable Wi-Fi.
Wi-Fi
Setting
Mobile network
Set roaming, network, APN
option.
Bluetooth
Bluetooth
Enable Bluetooth
Bluetooth
Search for Bluetooth devices
nearby, and when the device is
paired, select the desired item.
Sound
Mute mode
Mute except media and alarm
clock.
Volume
Adjust volume of media, alarm
clock and notification. Click and
move the slider
, then click OK.
Notification ringtone
Select desired notification
ringtone.
Operation tone
Tone played when selecting on
screen.
Screen lock promote
tone
Tone played when
locking/unlocking
screen.
1. Click the HD Video Player icon .
2. Select the video or picture you want to play from All/Content/My favorite/Personal
list.
3. Click on the screen to adjust the video (including volume, pause/play, brightness,
etc.).
4. Click the picture to preview or play in slide.
5. Click to return to list.
21. Configuring Bluetooth
Your device comes standard with Bluetooth technology that allows you to connect
wirelessly to a number of Bluetooth-enabled devices, such as speakers, headsets,
hands-free kits computers, printers, and other wireless devices.
The Bluetooth configuration screen is found under the Settings section. When Bluetooth
is turned on your device will automatically search for Bluetooth devices that are in
range. When the device is paired, you can select the desired item.
Once your Bluetooth connection is active the following icon will appear in the
status bar.
22. Settings
Version IS7110C-061413-01 20
Page 21

Display
Brightness
Click and move slider to
adjust brightness of the screen
and click OK to confirm.
Auto rotate screen
When it is selected, the screen
will switch between Portrait and
Landscape according to the
direction of the device.
G-sensor coordinate
system
Use the different coordinate
system mode, which is necessary
under certain conditions.
Animation
Whether or not to display in
animation in the operation
Screen timeout
Adjust the time before screen
lock.
Location and security
Use wireless network
Use wireless network to view
location in applications (such as
Google Maps).
Set screen lock
Use picture, PIN or password to
lock screen.
Visible password
The entered password is visible.
Select device
manager
Add or delete device manager.
Use security
credential
Allow application to access to
security credentials and other
credentials.
Install from TF card
Install encrypted certificate from
SD card.
Set password
Set or change credential
password.
Clear storage
Clear all credentials and rest the
password.
Applications
Unknown source
Allow installing applications
supplied by electronic market.
Manage application
Manage and delete installed
applications.
Service in process
View and control the services in
process.
Storage status
View the space occupation of
the application.
Development
Set application development
options.
Account and
synchronization
Background data
Set whether or not the
applications will synchronize,
send and receive data from
time to time.
Auto synchronization
Auto data synchronization of the
application.
Version IS7110C-061413-01 21
Page 22

Privacy
Back up my data
Back up the application data,
Wi-Fi password and other
settings to Google server.
Auto recovery
When an application is
reinstalled, the system will
recover the back-up settings or
other data.
Restore factory setting
Click to clear all data on the
device. Click Reset the device
to, or click to cancel and
return to the previous screen.
Warning: the following data will
be deleted from the device:
~ Google account.
~ Data and settings of the
system and applications.
~ All downloaded applications.
The following data will not be
deleted:
~ System software and
preinstalled applications.
~ Files on the Micro SD card,
such as music and photos.
Storage
Total capacity, free
space
Display when a TF card or USB
disk is inserted.
Remove SD card/USB
disk
When a TF card or USB disk is
inserted, click Remove SD
card/USB disk to remove them.
Format SD card/USB
disk
Format (clear) TF card/USB disk.
Language and
input/output
Select language
Select language according to
your location.
Personal dictionary
Add words to the user
dictionary.
Android keypad
Screen keypad setting.
Listening example
Play short voice examples.
Preferred engine
Set the voice combination
engine for switching between
text and voice.
Voice speed
Play speed after the texts are
converted into voice.
Pico TTS
Pico TTS setting.
Version IS7110C-061413-01 22
Page 23

Date and time
Auto
Use the network value, i.e. to
synchronize with the network
time.
Set date
Set date.
Set time
Set time.
Select time zone
Select time zone.
Use 24-hour time
system
Select 24-hour time system or
12-hour time system.
Select date format
Select date format.
About the device
View status, battery status, legal
information, model, Android
version, kernel version and
version number, lock.
23. HDMI Connection
1. Connect HDMI cable to tablet, click the “HD” icon to enter the “HD settings” as
shown below:
Version IS7110C-061413-01 23
Page 24

2. Click the “Devices” icon and select “HDMI”
Version IS7110C-061413-01 24
Page 25

3. Click ”resolution” and select ”1280x720-50Hz”.
Version IS7110C-061413-01 25
Page 26

FAQ
Android
Q: What is the Android version that comes preloaded on my device?
A: 4.1.1
Basic function of the device
Q: Do I need to charge the device before use?
A: Yes. You need to charge the battery for at least 4 hours, but you can operate the
device while it is charging. When charging, always use the AC adaptor.
Email
Q: Can I use my own email account to send and receive emails?
A: The device supports POP3 and SMTP accounts. The device may not support some
free email accounts. Please consult your email provider for details.
Storage card
Q: What storage card does the device support?
A: Micro SD card up to 32GB.
Music
Q: What audio formats does the device support?
A: MP2, MP3, WAV, AAC, WMA
Version IS7110C-061413-01 26
Page 27

Q: How can I add music to the device?
A: You can copy the audio files from your PC to the Micro SD card or USB disk then
copy them to the device through the File Browser.
Pictures
Q: What picture formats does the device support?
A: JPG, JPEG, BMP and PNG.
Q: How can I add pictures to the device?
A: You can copy pictures from your PC to the Micro SD card or USB disk then copy
them to the device through the File Browser.
Video
Q: What video formats does the device support?
A: MPEG1/2/4, MJPG, H263, H264. H264 supports 720×480 (other formats supported),
1280×720.
Q: Can I play YouTube videos on my device?
A: Yes. You can click the YouTube icon to play videos.
Q: How can I add videos to the device?
A: You can copy the video files from your PC to the Micro SD card or USB disk, then
copy them to the device through the File Browser.
Wi-Fi
Q: Do I need an external Wi-Fi device to connect to the internet?
A: No. The device has built in Wi-Fi connectivity.
Version IS7110C-061413-01 27
Page 28

iSWAG Phantom Plus IS-7205C Specifications
CPU
X15 Cortex A5 Dual-Core, 1.2Ghz
OS
Android 4.1
Touch screen
Type: capacitive, multitouch
Size: 7", 16:9 TFT (800*480)
RAM
1GB DDR3
Internal memory
8GB
External memory
1x Micro SD card slot, up to 32GB
Camera
Front 0.3 MP
Back 2.0 MP
HDMI
19pin MINI HDMI port
Earphones
3.5mm stereo phone jack
WIFI
802.11 b/g/n
G sensor
3 axis
AC/DC
INPUT:100-240VAC
OUTPUT:5.0V/2.5A
Battery
3.7V/2000mAH
Weight
322.8g
Dimensions
189.6*114.5*9.5mm
USB port
1*Micro USB (OTG)1
3G Dongle
Support
Bluetooth
Yes
Additional
Neoprene sleeve included
1
USB OTG (on-the-go) allows USB peripherals and devices to communicate directly with
each other without the need of a PC.
Version IS7110C-061413-01 28
Page 29

Battery management
We suggest you charge the battery for at least 4 hours before using your device.
Many times the useful life of the battery can be extended by following these simple tips:
● Use the device at least once every week.
● Fully charge the battery on a regular basis.
● Never keep the battery discharged for a long period of time.
● Keep the device and the battery away from heat.
Charging the battery
To charge device: connect one end of the AC adaptor to the power outlet and the
other end to the Micro USB port on the device (it may take about 5 hours to fully charge
the device). You can use the device while it’s charging.
The battery icon will display the battery status in the lower right corner of the status bar.
Important safety instruction
Please follow the following safety instructions while using the device to avoid risk of fire,
electric shock or injury:
● Keep the product away from rain and humidity.
● Keep the product away from direct sunlight and heat.
● Protect the power cord. When connecting the power cord, do not step on it or
place anything on it. Use care to protect the connectors of the power cord.
● Please only use the approved AC adaptor for charging. Using other adaptors may
cause damage.
● Never dissemble or try to repair the device. If your device needs servicing visit
iswagmobile.com for support information.
Cleaning the device
Clean the screen with care. To clean fingerprints or dust on the screen, we suggest you
use a soft cloth (like a camera lens cloth). Do not use any rough cloths or harsh
chemicals.
Version IS7110C-061413-01 29
Page 30

This device complies with FCC requirements and is subject to the condition that it does
not cause harmful interference.
For additional information you can reference the full user’s manual contained in the
unit itself or you can visit us at www.iswagmobile,com.
For support contact information visit our web site www.iswagmobile.com.
For detailed warranty information visit our web site www.iswagmobile.com.
Made in CHINA
Electrical Specifications: 5V 2.5A
Version IS7110C-061413-01 30
Page 31

iSWAG Phantom Plus IS-7205C Manual del Usuario
Avisos, declaraciones y precauciones .................................................................. 32
1. Conozca su iSWAG Phantom Plus IS-7205C....................................................... 34
2. Como encender y apagar su equipo ................................................................ 34
3. Pantalla Táctil ......................................................................................................... 35
4. Uso de tarjetas Micro SD ....................................................................................... 35
5. Para Comenzar ...................................................................................................... 36
6. Escritorio .................................................................................................................. 37
7. Pantalla de Seguridad .......................................................................................... 38
8. Aplicaciones .......................................................................................................... 39
9. Menús de Función del Escritorio .......................................................................... 40
10. Manejo de Aplicaciones .................................................................................... 40
11. Reloj ....................................................................................................................... 41
12. Instalación de Software en línea ...................................................................... 42
13. Navegador ........................................................................................................... 44
14. Calendario ........................................................................................................... 44
15. Cámara ................................................................................................................ 45
16. Calculadora ......................................................................................................... 45
17. Grabadora de Audio .......................................................................................... 46
18. Correo Electrónico .............................................................................................. 46
19. Administrador de Archivos ................................................................................. 48
20. Música ................................................................................................................... 49
21. Reproductor de Video HD ................................................................................. 51
21. Configuración de Bluetooth .............................................................................. 51
22. Configuración ...................................................................................................... 52
23. Puerto HDMI ......................................................................................................... 56
Preguntas Frecuentes ............................................................................................... 59
Especificaciones ........................................................................................................ 61
Manejo de la Batería ................................................................................................ 62
Información Importante de Seguridad .................................................................. 63
Version IS7110C-061413-01 31
Page 32

Gracias por haber adquirido una tablet innovadora de iSWAG. Lo invitamos a leer las
instrucciones presentes en este manual del usuario para que pueda configurar y utilizar
todas las funciones de su dispositivo nuevo. Para mayor información puede visitar:
iswagmobile.com.
Avisos y precauciones
- Por favor no desarme la unidad. Este es un equipo electrónico muy delicado y
complejo.
- Evite todo tipo de impacto o golpe contra este equipo.
- Evite usar este producto bajo las siguientes condiciones: temperaturas extremas (muy
altas o bajas), ambientes húmedos o con mucho polvo, ambientes con campos
magnéticos fuertes y/o exposición prolongada a la luz directa del sol.
- Si necesita limpiarlo, solamente pase un paño de algodón muy ligeramente por la
parte exterior del equipo. No use ninguna solución química de limpieza.
- Evite colocar este equipo cerca de cualquier líquido por si se produce un derrame
accidental sobre o cerca del mismo.
- El uso excesivo de auriculares a un volumen alto puede causar pérdida de audición
permanente.
- Por favor utilice sólo las baterías, cargadores y accesorios autorizados para uso con
este equipo. El uso de cualquier otro tipo anula la garantía y también pudiera
resultar peligroso.
- Por favor, siga las regulaciones ambientales locales correspondientes para el manejo
de los equipos y accesorios obsoletos.
- Si el equipo llega a dañarse en cualquier momento, SWAGTEK no asume ninguna
responsabilidad por la pérdida de datos / música / vídeos y / o cualquier otros
archivos. Por favor, siga las instrucciones detalladas en el Manual del Usuario para la
operación correcta del equipo y para efectuar copias de respaldo de toda su
información.
Version IS7110C-061413-01 32
Page 33

Declaraciones y comentarios
- Las especificaciones están sujetas a cambio sin previo aviso.
- Este manual se ha elaborado con el mayor cuidado pero ni Swagtek, Inc., iSWAG ni
ninguna de sus empresas afiliadas tomaran responsabilidad por cualquier error o
errores contenidos en este documento.
- Los ejemplos de las pantallas presentados en este manual son para referencia
solamente, las pantallas actuales del equipo pudieran variar.
- Swagtek, iSWAG Inc. y el logo de iSWAG son marcas registradas de Swagtek, Inc.
Todos los derechos reservados. Las demás marcas registradas que aparecen son
propiedad de sus respectivos dueños.
- Recuerde de siempre tener una copia de respaldo de su información importante,
nosotros no asumimos ninguna responsabilidad por errores con este equipo.
- Por favor, lea cuidadosamente todas las instrucciones del equipo. Utilice solo los
accesorios suministrados con el equipo para evitar cualquier daño imprevisto. La
garantía no tendrá validez si el producto se utiliza con accesorios incompatibles.
- Aunque el Tablet y sus especificaciones son compatibles, al momento de
fabricación, con la última versión del sistema operativo Android, iSWAG no se
responsabiliza, de ninguna forma, por el rendimiento o funcionamiento del sistema
Android suministrado por Google ni por errores/bugs o fallas del sistema operativo.
- Pueden haber pequeñas discrepancias entre las imágenes / datos en este manual y
el producto actual. El producto actual es el correcto.
- Nosotros no podemos ser responsables por cualquier descarga ilegal de aplicaciones
ni por cualquier otro acto ilegal.
- iSWAG no le puede brindar apoyo al sistema operativo Android ni ofrecer ningún tipo
de soporte para otras aplicaciones basadas en el sistema Android que el usuario
haya descargado, instalado y / o comprado.
Version IS7110C-061413-01 33
Page 34

2. Conozca su iSWAG Phantom Plus IS-7205C
2. Como encender y apagar su equipo
Para encender: presione y mantenga oprimido el botón de encendido durante 3
segundos y espere a que prenda el equipo.
Para apagar: presione y mantenga oprimido el botón de encendido durante 3
segundos → haga clic en Apagar → Aceptar.
Bloquear / desbloquear la pantalla: presione brevemente el botón de encendido para
bloquear / desbloquear la pantalla.
Apagado forzado: si el dispositivo no responde, mantenga presionado el botón de
encendido durante 7 segundos para forzar un apagado.
Version IS7110C-061413-01 34
Page 35

Advertencia: el apagado forzado puede causar errores inesperados en el sistema.
3. Pantalla Táctil
La pantalla táctil es muy conveniente y fácil de utilizar. Solo utilice sus dedos para
manipular los íconos, botones, menús, y el teclado así como otros artículos que hay en
la pantalla. Ud. también puede cambiar la orientación de la pantalla.
Para seleccionar o activar algo, simplemente tóquelo. Para escribir algo, tal como un
nombre, una contraseña y/o llevar a cabo una búsqueda, simplemente toque donde
Ud. quiere escribir. Un teclado aparecerá para que pueda escribir en ese campo.
En la pantalla puede realizar las siguientes funciones:
“Tocar y Mantener”: toque y mantenga un artículo en la pantalla tocándolo sin
levantar el dedo hasta que la acción se lleve a cabo.
“Arrastrar”: toque y mantenga un artículo por un momento y luego sin levantar su dedo
muévalo por la pantalla hasta que llegue a la posición que quiere. Por ejemplo, Ud.
puede reposicionar iconos en la “Pantalla de Inicio o Presentación”.
“Deslizar o mover”: rápidamente mueva su dedo a través de la pantalla sin pausar.
(Esto no es para mover ni arrastrar artículos). Por ejemplo Ud. puede deslizar una
“Pantalla de Inicio o Presentación” hacia la derecha o izquierda para ver otras
pantallas.
“Pellizcar”: en algunas aplicaciones (tales como Mapas, Navegador, Galerías) Ud.
puede ampliar o reducir el tamaño de las imágenes en pantalla colocando dos o tres
dedos en la pantalla y pellizcándolos juntos (para reducir la imagen) o separándolos
(para ampliar la imagen).
Para evitar daños a la pantalla, no coloque objetos en su superficie.
4. Uso de tarjetas Micro SD (accesorio opcional)
Su equipo es compatible con tarjetas de memoria Micro SD de hasta 32GB.
Como insertar una tarjeta Micro SD: inserte la tarjeta Micro SD en la ranura hasta que
sienta un “clic” lo cual indicará que está en su lugar. No la fuerce. En unos segundos
Ud. verá un mensaje que le indica “Tarjeta Micro SD Montada”
Como retirar una tarjeta Micro SD: cierre todas las aplicaciones o documentos en la
tarjeta que se encuentren abiertos. Presione la tarjeta ligeramente y se expulsará
parcialmente, permitiendo que se pueda retirar.
No inserte y retire la tarjeta Micro SD de forma seguida en un período corto de tiempo.
Esto puede dañar la tarjeta Micro SD, y posiblemente el dispositivo.
Version IS7110C-061413-01 35
Page 36

Se recomienda utilizar tarjetas de memoria de marcas reconocidas para evitar
problemas de compatibilidad.
Si el equipo no reconoce su tarjeta Micro SD, formatéela usando su PC e intente de
nuevo. Si aún no es reconocida, remplácela.
5. Para Comenzar
Como cargar la batería
Ud. puede utilizar el dispositivo mientras se está cargando pero esto puede prolongar
el tiempo de carga.
Su tablet tiene una batería interna recargable. Este equipo trae puertos DC 2.0 y Micro
USB. Sugerimos que utilice el puerto DC 2.0 con el cargador de pared para cargar su
equipo.
Antes del primer uso, debe de cargar la batería durante el transcurso de la noche.
Esto ayuda a mantener el rendimiento de la batería.
Para cargar el dispositivo: conecte el adaptador de CA a la toma de corriente y el
conector de alimentación al puerto del dispositivo (puede tomar 5 horas para cargar
el dispositivo).
El icono de la batería indica el estado de la carga. Cuando el icono se muestra
lleno la batería está cargada y puede desconectar el cargador.
Como encender el equipo
Presione y mantenga oprimido el botón de encendido por 2 ó 3 segundos hasta que
Ud. vea que la pantalla ha prendido.
Configuración del Wi-Fi
Le sugerimos que configure la conexión Wi-Fi antes de utilizar su tablet por primera vez
porque muchas aplicaciones y funciones dependen de esta conexión.
1. Clic Configuración → Conexiones Inalámbricas y redes
2. Encienda el Wi-Fi. El dispositivo mostrará todas las redes Wi-Fi disponibles. Si aparece
un icono, es necesario ingresar la contraseña correcta para conectarse a esa
red.
3. Seleccione la red Wi-Fi deseada → Ingrese la contraseña (si es requerida) →
Seleccione Conectar.
4. Seleccione Retorno para volver al escritorio.
Si la red inalámbrica que usted busca está configurada como oculta, el dispositivo no
la podrá detectar automáticamente. En ese caso, para agregar la red, es necesario
hacer clic en Agregar red Wi-Fi e ingresar toda la información necesaria manualmente.
Version IS7110C-061413-01 36
Page 37

6. Escritorio
1 Búsqueda en Google
2 Aplicaciones
3 Atrás
4 Inicio
5 Aplicaciones recientes
6 Reloj
7 Wi-Fi
8 Estado de la batería
9 Navegador
10 Cámara
11 Reproductor de video
12 Reproductor de música
13 Configuración
14 Correo electrónico
2
1
9
10
11
12
13
14
3
4 5 6 7 8
Haga clic en el icono de esa aplicación para iniciarla.
Haga clic y mantenga oprimido, luego deslice los íconos para reposicionarlos en la
pantalla.
Para borrar un icono de la pantalla, haga clic y mantenga oprimido, luego deslice el
icono al icono de para borrarlo.
Version IS7110C-061413-01 37
Page 38

7. Pantalla de Seguridad
La pantalla se puede bloquear de forma automática. Si desea activar la pantalla de
seguridad manualmente solo tiene que oprimir el botón de encendido. La siguiente es
la pantalla de seguridad:
Para desbloquear el tablet y entrar a la pantalla inicial solo deslice su dedo en
la pantalla hacia la derecha.
Version IS7110C-061413-01 38
Page 39

8. Aplicaciones
Google Play
Sitio de Google Play para descargar más aplicaciones
Android.
Galería
Para ver fotos.
Correo
Electrónico
Envíe/Reciba correos electrónicos.
Reproductor de
video
Aplicación para reproducir películas y videos.
Calculadora
Para realizar cálculos.
Navegador web
Acceso a Internet, navegar por la Web.
Grabadora de
audio
Para grabar voces y sonidos mediante el micrófono.
Calendario
Calendario con agenda.
Configuración
Para ajustar y personalizar todas las configuraciones de su
equipo.
Reloj
Reloj con despertador y alarmas programables.
Búsqueda
Utilice “Google Search” para efectuar búsquedas en la
Web.
Administrador de
archivos
Para el manejo de los archivos en los dispositivos, tarjetas
SD, USB.
Version IS7110C-061413-01 39
Page 40

Administrador de
descargas
Registro de documentos y archivos que se han
descargado al equipo.
Cámara
Para tomar fotos y videos.
Reproductor de
música
Para reproducir archivos de música desde la unidad o la
tarjeta Micro SD.
9. Menús de Función del Escritorio
Desde la pantalla del Escritorio Ud. puede hacer clic en el ícono de MENÚ o presionar
el botón de MENU para entrar al Menú de Funciones:
Del menú en pantalla usted puede escoger el fondo de pantalla de las imágenes
disponibles.
10. Manejo de Aplicaciones
Instalar
Esta opción lo llevará directamente a Configuración/Aplicaciones. Desde aquí Ud.
verá las Aplicaciones que están instaladas en su Tablet. Ud. puede escoger de todas
las Aplicaciones, las Aplicaciones que Ud. ha descargado, las Aplicaciones en la
Tarjeta SD o todas las Aplicaciones que se encuentran abiertas en ese momento.
Por medio de la aplicación de Administrador de archivos, Ud. puede instalar, de forma
rápida y fácil, todas las aplicaciones que haya comprado o descargado.
Version IS7110C-061413-01 40
Page 41

1. Copie el archivo .Apk que desea instalar en la tarjeta SD o disco USB → inserte la
tarjeta o conecte el disco USB al dispositivo.
2. Haga clic en el icono del Administrador de archivos .
3. Seleccione o para buscar los archivos .Apk.
4. Seleccione un archivo Api. → Instalar.
Ahora la aplicación está instalada y el icono aparecerá en la pantalla de
aplicaciones.
5. Haga clic en Abrir para ejecutar la aplicación, o haga clic en Aceptar para
volver a la aplicación de Administrador de archivos.
Descargar Aplicaciones del Internet
Usted puede encontrar muchas aplicaciones Android interesantes y gratuitas por
medio del Internet. Solo tienen que abrir el navegador y hacer una búsqueda por
"Aplicaciones Android". Ud. puede descargar e instalar aplicaciones Android del
Internet a su dispositivo. Una de las formas más populares de conseguir
aplicaciones/juegos nuevos es por medio del sitio Google Play.
1. Haga clic en el icono del Navegador para entrar al internet.
2. Ingrese la dirección URL y haga clic en el enlace de la aplicación que desea
instalar.
3. Después de descargar la aplicación, presione y mantenga presionado el archivo en
pantalla (desde la pantalla de Archivos descargados) → Haga clic en Abrir →
Instalar.
Como eliminar una aplicación Android
Ud. puede desinstalar o eliminar rápidamente las aplicaciones Android que ha instalado de la
siguiente manera:
1. Haga clic → Configuración → Manejo de Aplicaciones.
2. Seleccione la aplicación que desea desinstalar y luego elija Aceptar.
11. Reloj
Haga clic en el icono del reloj para ver la fecha y la hora.
Despertador/Alarma
El dispositivo le permite establecer más de una alarma a la vez.
Cuando el icono del reloj aparece en la parte superior de la pantalla, significa que hay por lo
menos una alarma activa.
Version IS7110C-061413-01 41
Page 42

Agregar una alarma
1. Haga clic en el icono del reloj .
2. Haga doble clic en Alarmas → + Agregar alarma.
3. Fije la hora deseada.
4. Clic activar alarma.
5. Clic Aceptar.
Apagar la alarma
Cuando suena la alarma una ventana aparece en pantalla con el nombre de la
alarma.
Si desea que la alarma vuela a sonar en 10 minutos, puede hacer clic en Pausa y
Repetir.
Haga clic en Cancelar para apagar la alarma.
Función para repetir la alarma
Utilice esta función después que haya sonado la alarma pero usted desea
desactivarla temporalmente sin eliminarla.
1. En la pantalla de alarma, seleccione la alarma que desea activar.
2. Haga clic en Activar.
Cambiar la hora de la alarma
1. Haga clic en el icono del reloj → clic .
2. Haga clic en la alarma que desea editar → Editar alarma.
Borrar alarma
1. Haga clic en el icono del reloj → clic .
2. Haga clic en la alarma que desea eliminar.
3. Haga clic para eliminar la alarma.
Haga clic en para volver al escritorio.
12. Instalación de Software en línea
Hay muchas aplicaciones disponibles desde el sitio Google Play que usted puede
descargar fácilmente y rápidamente a su dispositivo.
Version IS7110C-061413-01 42
Page 43

Descargar aplicaciones
1. Haga clic en el icono de Google Play . Si es primera vez que entra al
sitio el sistema le pedirá que ingrese su información de usuario. Si usted no
tiene una cuenta registrada, es necesario establecer una cuenta de Google.
2. Usted puede seleccionar aplicaciones de la lista de aplicaciones más
populares o usted puede buscar la aplicación que desee mediante una
búsqueda.
3. Haga clic en la aplicación → Descargar.
4. Cuando la aplicación haya terminado de descargar, haga clic en Instalar.
5. Haga clic en Abrir para ejecutar la aplicación, o haga clic en Aceptar para
volver a Google Play.
Descargas
Cuando termine de descargar la aplicación, haga clic en Descargas para manejar la
aplicación instalada. Puede enviar sus comentarios de la aplicación y ver los
comentarios de otros usuarios. También puede desinstalar aplicaciones de esta
pantalla.
Función del menú
Haga clic para mostrar las funciones del menú de Google Play.
Carpeta personal
Haga clic para ver la información personal. Usted puede cambiar su contraseña,
cambiar la dirección de correo electrónico y guardar su contraseña. Haga clic en el
icono de la sesión en la esquina derecha superior de la carpeta personal para cerrar.
Acerca de
Muestra la versión y la información de soporte de Google Play.
Version IS7110C-061413-01 43
Page 44

13. Navegador
Puede conectarse al Internet utilizando el navegador. Haga clic en el icono del navegador que
aparece en la pantalla del escritorio para abrir el navegador.
14. Calendario
Haga clic en el icono del Calendario .
Si esta es la primera vez que utilice la función de calendario, es necesario crear una
cuenta de Exchange. Ingrese su dirección de correo electrónico y una contraseña,
haga clic en Siguiente y siga las instrucciones para completar la configuración de la
cuenta. Ahora ya está listo para utilizar el Calendario.
Agregar actividad o evento
1. Desde la pantalla del calendario, haga clic en la fecha donde desea agregar una
actividad.
2. Seleccione la hora de la actividad → ingrese los detalles en el campo
correspondiente.
Version IS7110C-061413-01 44
Page 45

3. Seleccione Aceptar.
4. Haga clic en el icono para seleccionar la pantalla de calendario deseada. La fecha de
su agenda aparecerá en gris.
15. Cámara
Haga clic en el icono de Cámara .
Función del menú
1. Oprima el botón de Menú para mostrar las opciones del menú, que incluyen:
Cambiar a vídeo / Cambiar a cámara y Mi álbum / Mi vídeo.
2. Desde la pantalla de la cámara, haga clic en Mi álbum para ver sus fotos.
3. Desde la pantalla de la grabadora de vídeo, haga clic en Mi vídeo para ver la lista
de sus videos.
Tomar una foto
1. Desde la pantalla de la cámara, haga clic en el icono para tomar una foto.
2. La foto será guardada automáticamente.
3. Haga clic en el icono para entrar en mi álbum y ver las fotos a tamaño
completo.
4. Haga clic en Aceptar para regresar a la cámara.
5. Haga clic en para salir de la cámara y volver al escritorio.
Grabar un vídeo
1. Haga clic en el icono para cambiar al modo de vídeo, para grabar vídeos.
2. Haga clic para iniciar la grabación, haga clic para terminar la grabación.
3. El vídeo grabado se guardará automáticamente
4. Haga clic en el icono para ver el video grabado.
5. Haga clic en para salir de la cámara y volver al escritorio.
16. Calculadora
1. Haga clic en el icono de la calculadora .
2. Utilice los números y operaciones que aparecen en pantalla para hacer sus
cálculos.
3. Haga clic en Borrar para borrar un número, u oprima la tecla para borrar todos los
números ingresados.
Version IS7110C-061413-01 45
Page 46

17. Grabadora de audio
1. Haga clic en el icono de la grabadora .
5. Haga clic en el icono para comenzar a grabar.
6. Para terminar la grabación haga clic en el icono .
7. Para escuchar la grabación haga clic en el icono .
18. Correo electrónico
La aplicación de correo electrónico es compatible con cuentas POP3 y SMTP.
Configuración de una cuenta nueva de correo electrónico
Se puede crear una o varias cuentas de correo electrónico para utilizar en el
dispositivo.
1. Seleccione el icono de correo electrónico .
2. En la interfaz de su cuenta, Seleccione Siguiente.
3. Seleccione la opción Correo electrónico → Ingrese su dirección de correo
electrónico.
4. En la opción de contraseña → Ingrese su contraseña.
5. Seleccione Siguiente.
6. Configuración manual (opcional): de acuerdo a la dirección que usted haya
ingresado (como gmail.com) el servidor intentara configurar automáticamente
ciertos parámetros. Sin embargo, si necesita cambiar la configuración del
servidor, puede hacer clic en Configuración manual y realizar los cambios
necesarios.
7. Seleccione Siguiente.
8. Opcional: ingrese el nombre de cuenta.
9. Ingrese la firma electrónica→ Seleccione Final.
Después de configurar su cuenta, si no puede conectarse a su correo electrónico, por
favor confirme con su proveedor para verificar que la cuenta es compatible con los
protocolos POP y SMTP.
Version IS7110C-061413-01 46
Page 47

Bandeja de entrada
1. Seleccione el icono de correo electrónico .
2. Si ha configurado solo una cuenta de correo electrónico, esa cuenta abrirá
automáticamente. Si existen varias cuentas, todas aparecerán listadas en pantalla.
3. Seleccione la cuenta que desea abrir → Seleccione bandeja de entrada.
Abrir un correo electrónico
1. Desde la bandeja de entrada, seleccione el correo electrónico que desea abrir.
2. Si hay un archivo adjunto, seleccione Abrir para activar la aplicación
correspondiente al archivo o seleccione Guardar para salvar el archivo a una tarjeta
Micro SD.
3. Si desea responder al mensaje, seleccione Responder o Responder a todos.
a. Escriba el mensaje que desea enviar.
b. Seleccione Enviar para enviar el correo electrónico. Si guarda el mensaje
como un borrador quedara salvado pero sin enviar. Si usted no lo guarda ni lo
envía, el mensaje será descartado automáticamente.
4. Seleccione Cancelar para cancelar, de forma inmediata, un correo electrónico.
Crear un correo electrónico
1. Desde la Bandeja de entrada, seleccione → Crear correo electrónico.
2. Seleccione → Para y escriba la dirección del destinatario.
3. Para enviar copias del correo a otros usuarios, puede utilizar las funciones de
CC./Cco. Seleccione el icono → Añadir CC./Cco., de esa pantalla puede
añadir destinatarios adicionales.
4. Donde indica Asunto puede incluir una descripción del correo.
5. Seleccione Crear para escribir su mensaje.
6. Si es necesario, seleccione → Añadir archivo para adjuntar datos a su mensaje.
7. Cuando haya terminado seleccione → Enviar.
Editar cuenta de correo electrónico
1. Seleccione el icono de correo electrónico .
2. Desde la Bandeja de entrada, seleccione → Ajustes y seleccione la cuenta que
desea editar.
3. De la siguiente pantalla puede editar la configuración de su cuenta de correo
electrónico.
4. Seleccione para regresar a la Bandeja de entrada.
Version IS7110C-061413-01 47
Page 48

Eliminar una cuenta de correo electrónico
Si tiene más de una cuenta, y ha eliminado la cuenta predeterminada, la siguiente
cuenta disponible pasara a ser la cuenta predeterminada.
1. Seleccione el icono de correo electrónico .
2. Desde la Bandeja de entrada, seleccione → Ajustes.
3. De la siguiente pantalla seleccione y mantenga presionada la cuenta que desea
eliminar.
4. En la pantalla de opciones que aparece, seleccione Eliminar cuenta.
5. Seleccione Aceptar para confirmar la acción.
Asignar cuenta de correo electrónico predeterminada
Siempre debe tener una cuenta de correo electrónico predeterminada. Si tiene más
de una cuenta, usted puede seleccionar cual utilizar como la predeterminada.
1. Seleccione el icono de correo electrónico
2. Desde la Bandeja de entrada, seleccione → Ajustes.
3. De la siguiente pantalla seleccione la cuenta que quiere
asignar como la predeterminada.
Si se elimina la cuenta predeterminada, la siguiente cuenta disponible será utilizada
como la predeterminada.
19. Administrador de Archivos
Haga clic en el icono de para entrar al administrador de archivos que le permitirá
ver todos los archivos guardados en su dispositivo: memoria interna, tarjeta Micro SD y
USB. Desde administrador de archivos también se pueden instalar aplicaciones
Android.
Funciones del Administrador de archivos:
Archivo anterior
Ver archivos
Seleccionar varios archivos
Enviar correo electrónico
Archivo anterior
Version IS7110C-061413-01 48
Page 49

UDISK1 USB disk
SDCARD1 Micro SD card
Copiar archivos de una PC a su dispositivo
Puede utilizar el administrador de archivos para copiar archivos entre una PC y su
dispositivo.
Usted tiene la opción de copiar los archivos a la tarjeta Micro SD o disco USB.
El nombre de la memoria interna es "local", el nombre de la tarjeta Micro SD es "sdcard"
y el nombre del disco USB es "udisk.
Este es un ejemplo de cómo copiar un archivo al dispositivo desde una tarjeta Micro SD
o disco USB. Usted puede utilizar el mismo método para copiar archivos desde el
dispositivo a la tarjeta Micro SD o disco USB. Después, también puede copiar los
archivos de su dispositivo a su PC.
1. Haga clic en o para mostrar los archivos.
2. Haga clic y mantenga oprimido el archivo o la carpeta que desea copiar → haga
clic en Copiar.
3. Haga clic en el icono para volver a la pantalla de los medios de
almacenamiento → haga clic en la carpeta que desee copiar → haga clic
en Pegar
Borrar un archivo
Seleccione el archivo o carpeta que desea borrar → haga clic en Borrar → haga clic en Aceptar
para borrar el archivo.
20. Música
El reproductor de música es compatible con los siguientes formatos de audio: MP1,
MP2, MP3, WMA, OGG, APE, FLAC, WAV, AC3, AAC, AMR, DTS, RA, M4A.
Reproductor de Música
1. Haga clic en el icono del reproductor de música .
2. Seleccione la canción que desea escuchar: todo / álbum / artista / álbum /
canción / lista /canción que se está reproduciendo.
3. Haga clic para reproducir la canción deseada.
4. Para volver a la pantalla anterior durante la reproducción de una canción, haga
clic en para volver al escritorio.
Version IS7110C-061413-01 49
Page 50

Haga clic en una canción de la lista para entrar al reproductor de música. La pantalla del
reproductor de música es la siguiente:
Desde esta pantalla puede llevar a cabo operaciones tales como: búsqueda,
reproducción / pausa, próxima canción / canción anterior, repetir todo, reproducir en
orden aleatoria.
Funciones del reproductor
Crear lista nueva de reproducción
1. Haga clic en configuración, y haga clic en Agregar lista de reproducción.
2. Ingrese el nombre de la canción en la lista de reproducción.
3. Haga clic en Aceptar.
Cambiar el nombre o eliminar una lista de reproducción
Haga clic y mantenga oprimida la lista de reproducción → haga clic en el nombre o
eliminar.
Agregar una canción
Haga clic y mantenga oprimida la canción que desea agregar a la lista de
reproducción, → haga clic en "Añadir a la lista de reproducción".
Borrar una canción
Haga clic y mantenga oprimida la pista que desea eliminar → haga clic en Eliminar.
Version IS7110C-061413-01 50
Page 51

21. Reproductor de video de alta definición (HD)
El reproductor de video es compatible con los siguientes formatos de video: RM, RMVB,
MKV (H.264), MPEG (AVI), MOV, FLV, MPG, VOB, MPE, DAT. También es compatible con
2160P, 3840×2160.
Formatos de fotografías: JPG, JPEG, BMP and PNG.
1. Haga clic en el icono del reproductor de video .
2. Seleccione el vídeo o la imagen que desea reproducir: Todo / Contenido / Mi
favorito / Personal / Lista.
3. Haga clic en la pantalla para ajustar el video (incluyendo volumen, pausa /
reproducir, brillo, etc.).
4. Haga clic en una fotografía para ver en pantalla o en forma de presentación.
5. Haga clic en el icono de para volver a la lista.
21. Configuración de Bluetooth
Su dispositivo viene con la tecnología avanzada Bluetooth que le permite conectarse,
de forma inalámbrica, a un gran número de dispositivos. Algunos de estos dispositivos
incluyen: parlantes, auriculares, kits de manos libres, computadoras, impresoras y otros
dispositivos inalámbricos.
La pantalla de configuración de Bluetooth se encuentra bajo Configuración. Cuando
el Bluetooth está activado el dispositivo buscará automáticamente los dispositivos
Bluetooth que estén a su alcance. Cuando está hecho el vínculo, puede seleccionar el
dispositivo Bluetooth que desea utilizar.
Cuando el Bluetooth se encuentra activo, el siguiente icono aparecerá en pantalla
.
Version IS7110C-061413-01 51
Page 52

23. Configuración
Conexiones
inalámbricas y redes
Wi-Fi
Activar Wi-Fi.
Wi-Fi
Configuración
Redes móviles
Activar roaming, Ethernet, APN
Bluetooth
Bluetooth
Activar Bluetooth
Bluetooth
Buscar dispositivos Bluetooth y
vincular el tablet con otros
dispositivos Bluetooth.
Seleccionar dispositivos
Bluetooth para utilizar.
Sonido
Silenciar sonidos
Silenciar todos los sonidos menos
multimedios y alarmas.
Volumen
Ajuste del volumen de todos los
medios, alarmas y
notificaciones. El volumen lo
puede ajustar con el control en
pantalla.
Notificación de
llamadas
Puede seleccionar la
notificación de llamadas.
Tonos táctiles
Ajuste del tono que se escucha
cuando se toca la pantalla.
Tono del bloqueo de
pantalla
Ajuste del tono que se escucha
al bloquear/desbloquear la
pantalla. El tono se puede
ajustar con el control en
pantalla.
Pantalla
Brillo
Ajustar el brillo de la pantalla.
Rotación automática
de la pantalla
Al activar esta función la
pantalla rota automáticamente
vertical y horizontal dependiendo de
cómo se está utilizando el
dispositivo.
Sensor de movimiento
Utilice el modo de sistema de
coordenadas, necesario
cuando se utilizan ciertas
aplicaciones.
Animación
Seleccione si aparecen o no
animaciones cuando se
efectúan ciertas operaciones
en pantalla.
Suspender pantalla
Tiempo de espera de la
pantalla: le permite ajustar el
tiempo antes de que la pantalla
se apague automáticamente.
Version IS7110C-061413-01 52
Page 53

Servicios de ubicación
y seguridad
Uso de redes
inalámbricas
Antes de utilizar aplicaciones
como Maps de Google y buscar
su ubicación o lugares de
interés, debe habilitar la opción
Utilizar redes o la opción Usar
satélites GPS.
Activar bloqueo de
pantalla
Configurar el bloqueo de
pantalla por medio de una
contraseña, un patrón o un PIN.
Mostrar las
contraseñas
Puede configurar el dispositivo
para que muestre la contraseña
a medida que la escribe, en vez
de usar asteriscos (*).
Administradores del
dispositivo
Ver o desactivar los
administradores del dispositivo.
Administración de los
credenciales de
seguridad
Esta opción permite que ciertas
aplicaciones accedan los
certificados de seguridad y otros
credenciales. Los certificados
pueden ser instalados en la
tarjeta Micro SD.
Instalar desde la
tarjeta Micro SD
Instalar certificados de
seguridad desde la tarjeta Micro
SD.
Activar contraseña
Activar o cambiar contraseña.
Eliminar credenciales
Borrar todos los credenciales de
seguridad.
Aplicaciones
Fuentes desconocidas
Permitir instalar aplicaciones que
no vengan directamente del
sitio de Google Play.
Administrar
aplicaciones
Administrar las aplicaciones
descargadas, en la tarjeta Micro
SD o activas.
Servicios en
ejecución
Permite ver y controlar los
servicios actualmente en
ejecución
Espacio de
almacenamiento
Permite ver el espacio ocupado
por las aplicaciones instaladas.
Opciones de
desarrollo
Estas características se utilizan
para propósitos de desarrollo
solamente.
Cuentas y sincronización
Sincronización de
información
Configurar la forma en que las
aplicaciones sincronizan,
reciben y envían información.
Sincronización
automática
Configurar el dispositivo para
que sincronice los datos de
forma automática.
Version IS7110C-061413-01 53
Page 54

Privacidad
Respaldo de
seguridad
El dispositivo se puede
configurar para que haga
copias de seguridad de
Su configuración, datos,
aplicaciones y contraseñas al
servidor de Google.
Restablecer
Al instalar de nuevo una
aplicación el sistema restaura
automáticamente la
configuración previa de esa
aplicación.
Restablecer
configuración de
fabrica
Esta operación borra todos los
datos almacenados en el
dispositivo.
Haga clic para efectuar esta
operación o seleccione
para cancelar y regresar a la
pantalla anterior.
Aviso: esta operación borra
todos los siguientes datos:
~ Cuenta de Google.
~ Datos y configuración del
sistema y todas las
aplicaciones instaladas.
~ Todas las aplicaciones
descargadas.
La siguiente información no será
afectada:
~ Sistema operativo y todas las
aplicaciones instaladas de
fábrica.
~ Archivos almacenados en la
tarjeta Micro SD (archivos de
música y fotografías).
Espacio de
almacenamiento
Capacidad de
almacenamiento total
y disponible
Muestra si hay una tarjeta Mico
SD o una unidad USB instalada.
Desmontar tarjeta
Micro SD/unidad de
USB
Opción para desmontar, de
forma segura, una tarjeta Micro
SD o unidad USB.
Preparar tarjeta Micro
SD card/unidad de
USB
Antes de utilizar una tarjeta
Micro SD o unidad de USB la
tienen que preparar o habilitar
para ser utilizada.
Version IS7110C-061413-01 54
Page 55

Teclado e idioma
Idioma
Seleccionar el idioma del
sistema.
Diccionario personal
Para añadirle palabras al
diccionario interno.
Teclado de Android
Configuración del teclado en
pantalla de Android.
Síntesis de voz
Configuración de la síntesis de
voz de Google.
Motor preferido
Configuración de la salida de
texto a voz.
Velocidad de la voz
Velocidad en la que se habla el
texto.
Pico TTS
Configuración de Pico TTS.
Fecha y hora
Automática
Utilizar la hora proporcionada
por la red.
Fecha
Ajustar la fecha.
Hora
Ajustar la hora.
Zona horaria
Configuración de la zona
horaria.
Utilizar formato de 24
horas
Utilizar sistema de 24 horas o de
12 horas.
Formato de la fecha
Configurar el formato de la
fecha.
Acerca del tablet
Ver el estado del sistema, la
bacteria, información legal,
modelo, versión de Android,
versión del núcleo, número de
compilación y más.
Version IS7110C-061413-01 55
Page 56

24. Puerto HDMI
1. Conecte el cable HDMI a su tableta, haga clic en el icono "HD" para entrar a la
pantalla de "configuración HD".
Version IS7110C-061413-01 56
Page 57

2. Haga clic en el icono "Dispositivos" y seleccione "HDMI”.
Version IS7110C-061413-01 57
Page 58

3. Haga clic en ”resolución” y seleccione”1280x720-50Hz”.
Version IS7110C-061413-01 58
Page 59

Preguntas Frecuentes
Android
P. ¿Qué versión de Android viene instalada en mi dispositivo?
R. 4.1.1
Funciones básicas del Dispositivo
P. ¿Debo de Cargar la batería antes de usar el tablet?
R. Ud. debería cargar la batería por los menos por cuatro horas, pero lo puede utilizar
mientras está cargando. Utilice el cargador de pared incluido.
P. ¿Porque mi dispositivo está operando muy despacio?
R. Ud. tiene muchas aplicaciones abiertas al mismo tiempo. Use “Configuración”
(“Settings”) > “Manejo de Aplicaciones” (“Manage Apps”) para cerrar las aplicaciones
que no esté utilizando.
Correo Electrónico
P. ¿Puedo utilizar mis cuentas personales de correo electrónico para enviar/recibir
correos?
R. Sí. El dispositivo es compatible con los protocolos POP3 y SMTP.
Por favor consulte a su proveedor de correo electrónico para obtener más información.
Tarjetas de Memoria (Media)
P. ¿Cuáles tarjetas de memoria son compatibles con mi equipo?
R. Las tarjetas Micro SD de hasta 32GB.
Música
P. ¿Qué tipo de archivos de música puedo reproducir con mi equipo?
R. MP2, MP3, WAV, AAC, WMA.
P. ¿Como el puedo añadir música a mi tablet?
R. Copie la música de su computadora a una tarjeta SD o a un dispositivo USB. Luego
use el “Administrador de Archivos” (“File Manager”) para copiar la música a su equipo.
La otra forma es conectando su tablet a su computadora vía el cable USB y por medio
del Explorador de Windows (Windows Explorer) copiar los archivos de la manera
normal.
Fotos
P. ¿Qué tipo de fotos puedo ver en mi equipo?
R. Fotografías en formato JPG, JPEG, BMP, PNG.
P. ¿Cómo le añado fotos a mi tablet?
R. Copie la foto de su computadora a una tarjeta SD o a un dispositivo USB. Luego use
el “Administrador de Archivos” (“File Manager”) para copiar la música a su equipo. La
otra forma es conectando su tablet a su computadora vía el cable USB y por medio
del Explorador de Windows (Windows Explorer) copiar los archivos de la manera
normal.
Version IS7110C-061413-01 59
Page 60

Video
P. ¿Qué tipo de video puedo reproducir en mi tablet?
R. MPEG1/2/4, MJPG, H263, H264. H264-720×480 (y otros formatos), 1280×720.
P. ¿Puedo reproducir videos de YouTube en mi equipo?
R. Sí. Ud. puede tocar el ícono de la aplicación de YouTube para tener acceso
inmediato a los videos.
P. ¿Cómo le añado videos a mi dispositivo?
R. Copie los videos de su computadora a una tarjeta SD o a un dispositivo USB. Luego
use el “Administrador de Archivos” (“File Manager”) para copiar la música a su equipo.
La otra forma es conectando su tablet a su computadora vía el cable USB y por medio
del Explorador de Windows (Windows Explorer) copiar los archivos de la manera
normal.
Conexión Inalámbrica (Wi-Fi)
P. ¿Necesito un adaptador adicional para conectarme a las redes inalámbricas y al
Internet?
R. No. El adaptador inalámbrico está incorporado al equipo.
Version IS7110C-061413-01 60
Page 61

iSWAG Allure Plus IS-7110C
Procesador
X15 Cortex A5 Dual-Core, 1.2Ghz
Sistema Operativo
Android 4.1
Pantalla
Tipo: táctil, capacitiva
Tamaño: 7", 16:9 TFT (800*480)
RAM
512MB DDR3
Memoria interna
4GB
Memoria externa
Ranura para tarjeta Micro SD,
hasta 32GB
Cámara
Frontal de 0.3MP
HDMI
Puerto HDMI Mini de 19 pines
Conector de audio
Conector estéreo de 3,5mm
Wi-Fi
802.11 b/g/n
Sensor de
movimiento
Sensor de 3 ejes (G sensor)
Fuente de
alimentación
Entrada: CA 100-240V
Salida: CD 5.0V/2.5A
Batería
3.7V/2000mAH
Peso
322,8 g
Dimensiones
189,6 * 114,5 *9,5 mm
Puerto USB
1 * Micro USB (OTG)1
Celular
Soporte para adaptador 3G
Especificaciones
1
El puerto USB OTG (on-the-go) permite que los periféricos y dispositivos USB
comunicarse directamente entre ellos sin la necesidad de una PC.
Version IS7110C-061413-01 61
Page 62

Manejo de la batería
Le recomendamos que cargue la batería por lo menos 4 horas antes de utilizar el
dispositivo por primera vez. La vida útil de la batería se puede extender, siguiendo
estas recomendaciones sencillas:
● Utilizar el dispositivo al menos una vez cada semana.
● Cargue la batería completamente de forma regular.
● Nunca deje la batería descargada por un periodo largo.
● Mantenga el dispositivo y la batería lejos del calor.
Carga de la batería
Para cargar el dispositivo: utilice el cargador CA. Conecte el adaptador CA a la toma
de corriente y el otro extremo al puerto DC 2.0 del dispositivo (puede tardar hasta 5
horas para cargar completamente el dispositivo). Usted puede utilizar el dispositivo
mientras que se carga.
El icono de la batería mostrará el estado de la batería en la esquina inferior derecha
de la pantalla.
Instrucciones de seguridad importantes
Por favor, siga las instrucciones de seguridad cuando utilice su dispositivo para evitar el
riesgo de incendio, descarga eléctrica o lesiones:
● Mantenga el producto lejos de la lluvia y la humedad.
● Mantenga el producto lejos del sol y calor directo.
● Proteja el cable de alimentación. Al conectar el cable de alimentación procure no
pisarlo ni colocar nada encima. Proteja los conectores del cable de alimentación.
● Utilice solamente el adaptador CA proporcionado con el equipo. El uso de otros
adaptadores puede causar daños.
● Nunca intente abrir o reparar el dispositivo por su cuenta. Si el dispositivo necesita
mantenimiento visita iswagmobile.com para obtener información de soporte.
Limpieza del dispositivo
Limpie la pantalla con cuidado. Para limpiar la pantalla, le sugerimos que utilice un
trapo suave (como un paño para lente de cámara). No utilice paños ásperos o
productos químicos fuertes.
Version IS7110C-061413-01 62
Page 63

Este equipo cumple con las normas de la FCC. Funcionamiento está sujeto a la
condición que este equipo no causa interferencia nociva.
Para mayor información puede consultar el manual del usuario contenido en la unidad
o puede visitar www.iswagmobile.com.
Para información de contacto para soporte al usuario visite nuestra página web
www.iswagmobile.com
Para información de garantía más detallada visite nuestra página web
www.iswagmobile.com.
Hecho en CHINA
Especificaciones Eléctricas: 5V 2.5A
Version IS7110C-061413-01 63
Page 64

Version IS7110C-061413-01 64
 Loading...