

iSun 3509 User Manual

GPS Navigator Manual
Welcome to use this GPS navigator
The company (iSun) keeps the final explanation right on this user’s manual.
This manual is subject to changes without prior notice.``````
Please copy your important data as our company takes no responsibility for the loss of data.
This manual has been reviewed.But we can not ensure the preciseness without any mistakes
or error. Please contact our service center when a mistake gets discovered.
Please read carefully the operations and instructions on user’s manual and use the
accessories only provided by the original factory to avoid unexpected damages. If you don’t
use it according to the correct process or connect the incompatible accessories, the
guarantee will be automatically invalid and this can even cause hurt to you and others. Our
company would not take the responsibility for this.
It is possible that the electronic navigation data is not consistent with the real traffic
instructions because of the traffic construction development. Please do comply with the real
condition and obey the traffic rules. It will probably cause a serious accident if you check or
use the navigator when you are driving, and our company will not take the responsibility for
any loss.
The updating and upgrading information on firmware will be put on our website. It’s depend
on you weather or not to update or upgrade.
The pictures on the manual is just for reference, subject to the real machine

Welcome to use
1.1 THE PACKING ................................................................................................................................. 1
1.2 USER’S MANUAL ...............................................................................................................................
2.1 PRODUCT APPEARANCE .................................................................................................................. 2
2.2 POWER SUPPLY AND CHARGE ............................................................................................................ 3
2.2.1 POWER SUPPLY ........................................................................................................................... 3
2.2.2 CHARGING BY ADAPTOR ................................................................................................................ 3
2.2.3 CHARGING BY CAR LIGHT ADAPTOR ................................................................................................. 4
2.3 BASIC USE ..................................................................................................................................... 4
2.3.1 TURN ON/OFF THE BATTERY .......................................................................................................... 4
2.3.2 POWER ON/OFF .......................................................................................................................... 4
2.3.3 RESET THE SYSTEM ....................................................................................................................... 5
2.3.4 CAR-USE BAR SHOE TO FIX NAVIGATOR ............................................................................................ 5
2.3.5 CAR-USE ANTENNA ................................................................................................................... 6
2.3.6 TOUCH PEN ............................................................................................................................... 6
2.3.7 SD/MMC CARD ......................................................................................................................... 7
2.4 CONNECT WITH COMPUTER ............................................................................................................ 7
2.5 TABLE LIST AND PRIMARY FUNCTION ................................................................................................. 8
2.6 TEND AND PROTECT YOUR GPS NAVIGATION ....................................................................................... 9
3.1 NAVIGATING FUNCTION AND FEATURE .............................................................................................. 10
3.2 THE IMPORTANT KNOWLEDGE ......................................................................................................... 10
4.1 FUNCTIONS AND FEATURES ............................................................................................................. 12
4.2 INTERFACE OPERATION .................................................................................................................. 12
5.1 FUNCTIONS AND FEATURES ............................................................................................................. 14
5.2 INTERFACE OPERATION .................................................................................................................. 14
6.1 FUNCTIONS AND FEATURES ............................................................................................................. 17
6.2 INTERFACE OPERATION .................................................................................................................. 17
7.1 FUNCTIONS AND FEATURES ............................................................................................................. 20
7.2 INTERFACE OPERATION .................................................................................................................. 20
8.1 VOLUME ADJUST .......................................................................................................................... 23
8.2 POWER SET ................................................................................................................................. 23
8.3 BACK LIGHT SET .......................................................................................................................... 24
8.4 TIME AND DATE SET ...................................................................................................................... 25
8.5 LANGUAGE CHOOSING ................................................................................................................... 26
8.6 SYSTEM INFORMATION .................................................................................................................. 27

1.1 Packing
The following accessories are contained in the GPS box, please check it:
1 . GPS receiver.
2 . Adaptor.
3 . Car light adaptor
4 .MINI USB line
5 . Earphone.
6 . User’s manual.
7 . Windscreen mount.
1.2 The use of the manual
In order to take the best function of your machine, and acquire more operate details, please
read the User’s manual carefully.
On the using process, you will see the following supplementary information.
【note】: Explanation on topic;
【relative information】: Expand information on relative topic
【important】: warning indication on relative topic. Please pay more attention on this
information and comply with the operation, otherwise, you will hurt your self and others.
This User’s manual is only applicable for GPS navigation product.
In this Chapter we will introduce the outer equipment and their basic operation to let you
familiar with all the basic operations as soon as possible.
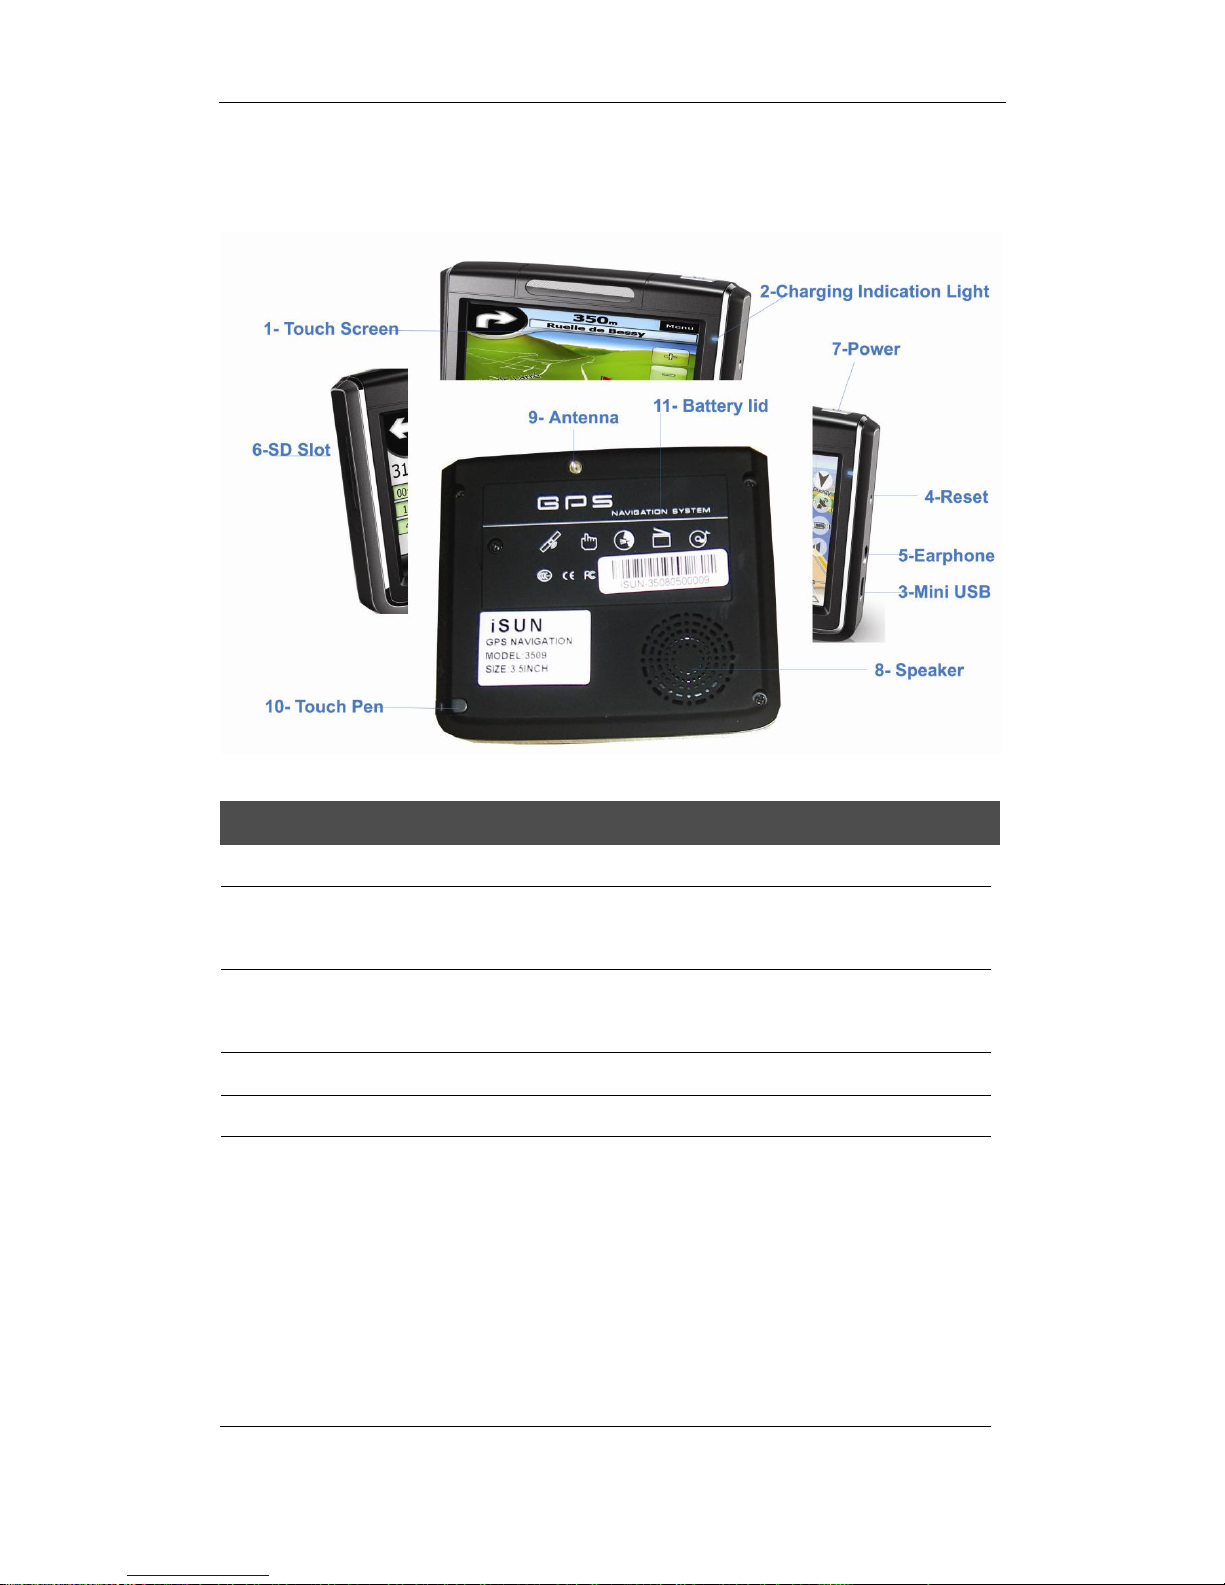
2.1 Features
1
To uch-screen
Display main menu
2
Charging indication light.
Indicates weather the outside power is linked; it is
red when charging and turn blue after well charged.
3
MINI USB port
Communicate with computer through MINI
USB/connect adaptor
4
Reset key
Reset the system
5
Stereo earphone jack
Connect stereo earphone
6
SD/MMC card slot
The machine is attached with the SD/MMC card,
which contains the map firmware, map data, and
user’s file. Please don’t take the card out when the
machine been using
【note】If you pull out the card for during use please
press the resetting key on the left side to activate the
system.

7
Power key
Power on/ off
8
Outside speaker
Play sound (such as voice indication, music etc)
9
GPS Antenna
Antenna for satellite signal.
10
Touch pen
It is used to click and write on the screen. Draw it out
when using, Draw it back after used.
11
Battery lid
The cover for the Li-ion battery
2.2 Power supply and charge
Give full overnight charge before use.
2.2.1 Power supply
Types of supply power for this GPS device: Battery and Eternal power.
The GPS navigator uses the Li-battery to supply power when it is not connected with adaptor.
The symbol [ ] on the up right of receiver and the symbol [ ] on the
screen.
GPS navigator uses the External power supply when it is connected with the adaptor.
【note】This machine has a built-in, unchangeable Lithium battery. Under normal conditions (if
the back light is not so bright), a fully charged battery can be used for up to 10 hours. This may
vary with the type of use. Some functions (audio playing, video playing, bright back light) will
consume a large quantity of battery power, which can reduce the usage.
【Important】This machine has a built-in, unchangeable Lithium battery. In order to avoid fire and
burning, please do not dispose of this GPS unit in the fire.
2.2.2 Charging by adaptor
At the first use, you should use the adapter to charge the navigator.
1. Connect the DC of adaptor to the electric port on the right part of the machine;
2. The other end is connected with electric socket to supply power and also charging at the
same tine.
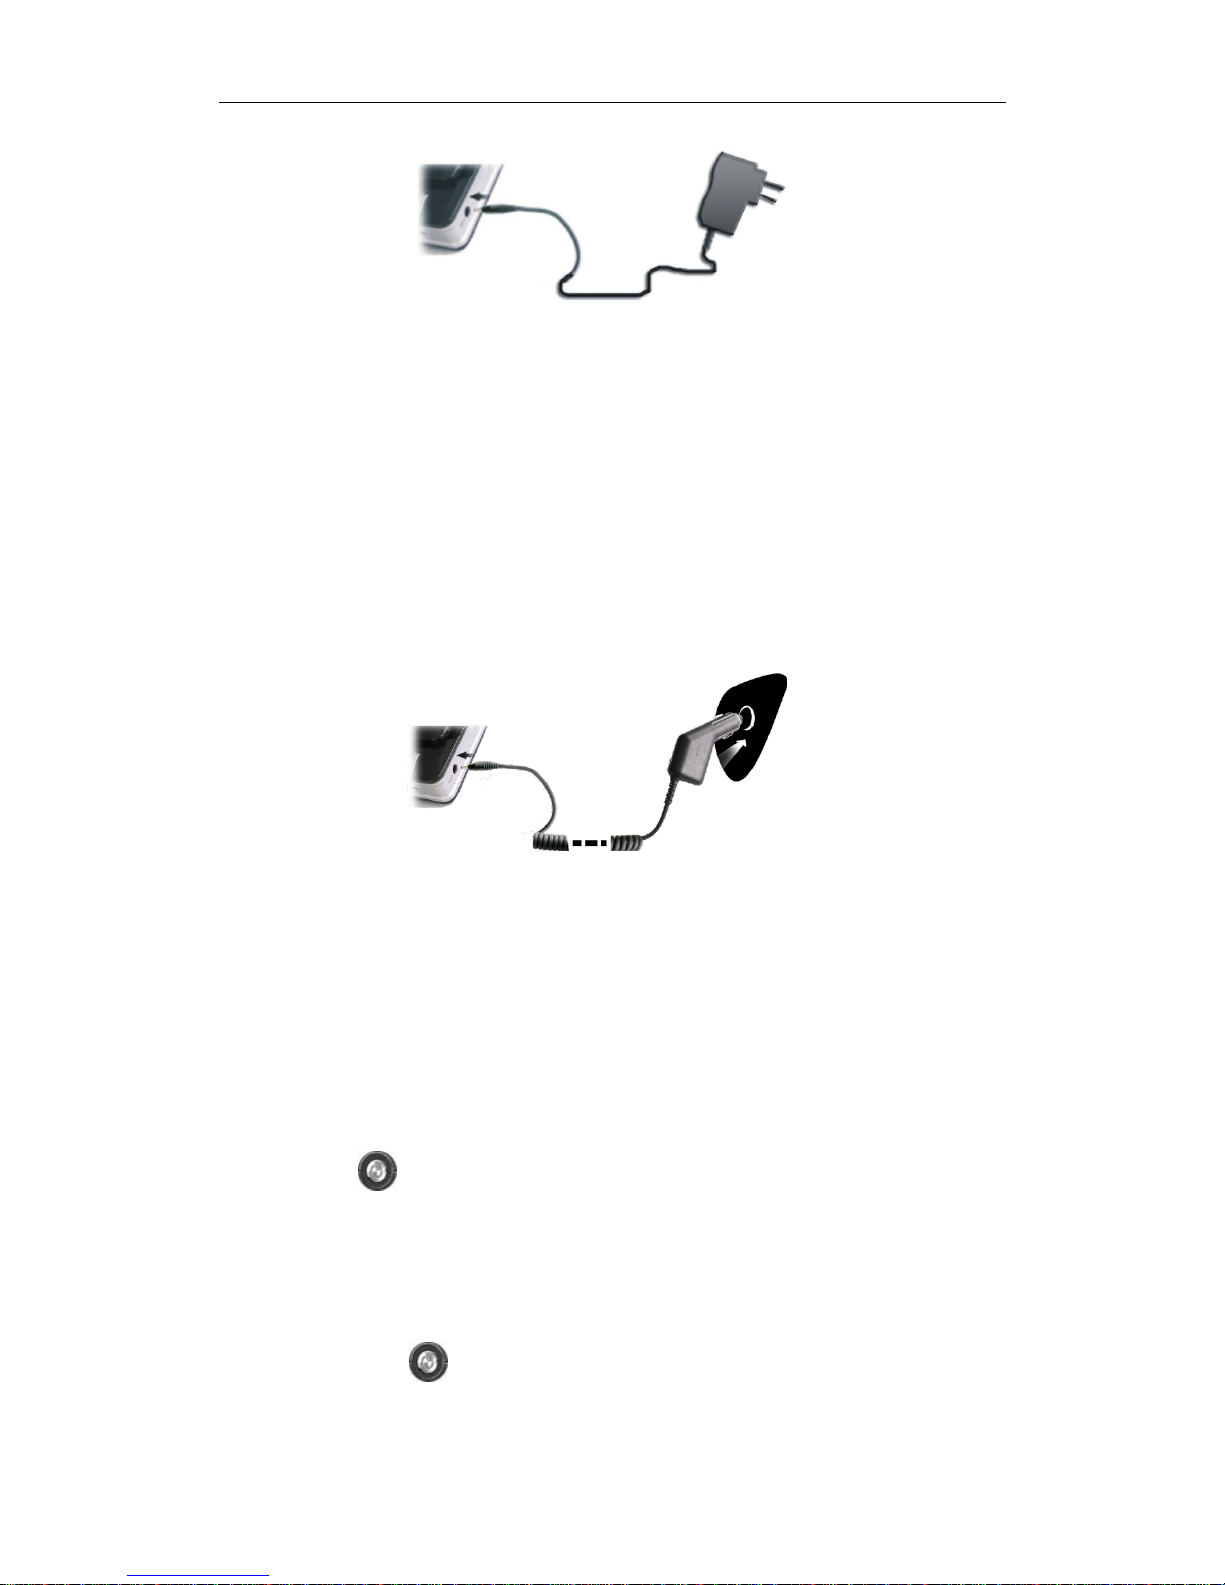
【note】The indication light is red when charging. Please do not pull out the adaptor until the
light turn blue as it is well charged.
2.2.3 Charging by car light adaptor
1. Please connect one end of the car adaptor to the electric port on the right part of the
machine.
2. The other end is connected with the car adaptor to supply power and also charging at the
same time.
【Important】To avoid a power surge and damage to your receiver it is necessary that you plug
the device into the car only after the engine is running.
2.3 Basic use
2.3.1 Power on/off
The power key [ ] can control the power on/off. Power off indicates the system is saving
power; the system can keep the last operation position when you power on again.
1. Power on:
Please check:The battery is well charged, or the machine is connected with adaptor.
Press the “power” key * ] on the top of machine to power on.
【Important】When you carry the machine from one place to another, you need to wait until the

machine is adapted to the environment to avoid short circuit caused by the humidity fluctuation.
2. Power off
Please press the Power key [ ] on top of the receiver to power off. The system will enter the
sleep mode and the system can keep the last operation position when you power on again.
2.3.2 Resetting system
If the system cannot work, you can reset the system in the following two ways.
Click the reset key on the right part of the machine to reset the system by using Touch Pen.
【Information】: It may not respond in the following conditions.
1. The shift between pictures is delayed.
2. The Touch Pen function does not work normally.
3. The power key does not work.
【Important】The unsaved data will be lost as you reset the system when the system has no
response. Please copy the data other time.
2.3.4 Windscreen mounting
When using the GPS receiver in your car, you should fix this machine down to the panel of the
windscreen by using the suction bracket.
【Important】When using the bracket, please take care of the position. Please don’t fix the
navigator to a position that will block or distract the driver line of sight with the road.

2.3.5 Car antenna
The car-use antenna can improve the ability to receive the signal. Connect one end to the
car antenna hole [ ] on the right part of the navigator; another end is absorbed with the
roof.
【Note】The navigation function is affected with the GPS receiving ability, position accuracy and
position speed. If you need the function when you are driving, we suggest you use the car
antenna.
2.3.6 Touch pen
The touch pen is the communication tool between you and your navigator. Please keep it
carefully.
一、single click :
Single click the screen with the Touch Pen point。
二、double click:
Double click the screen with the Touch Pen point.
三、drawing:
Click one point and hold, and then draw the Touch Pen on the screen.
【Important】A broken Touch Pen, ball pen or any acute and harsh object will scratch and destroy
the LCD.
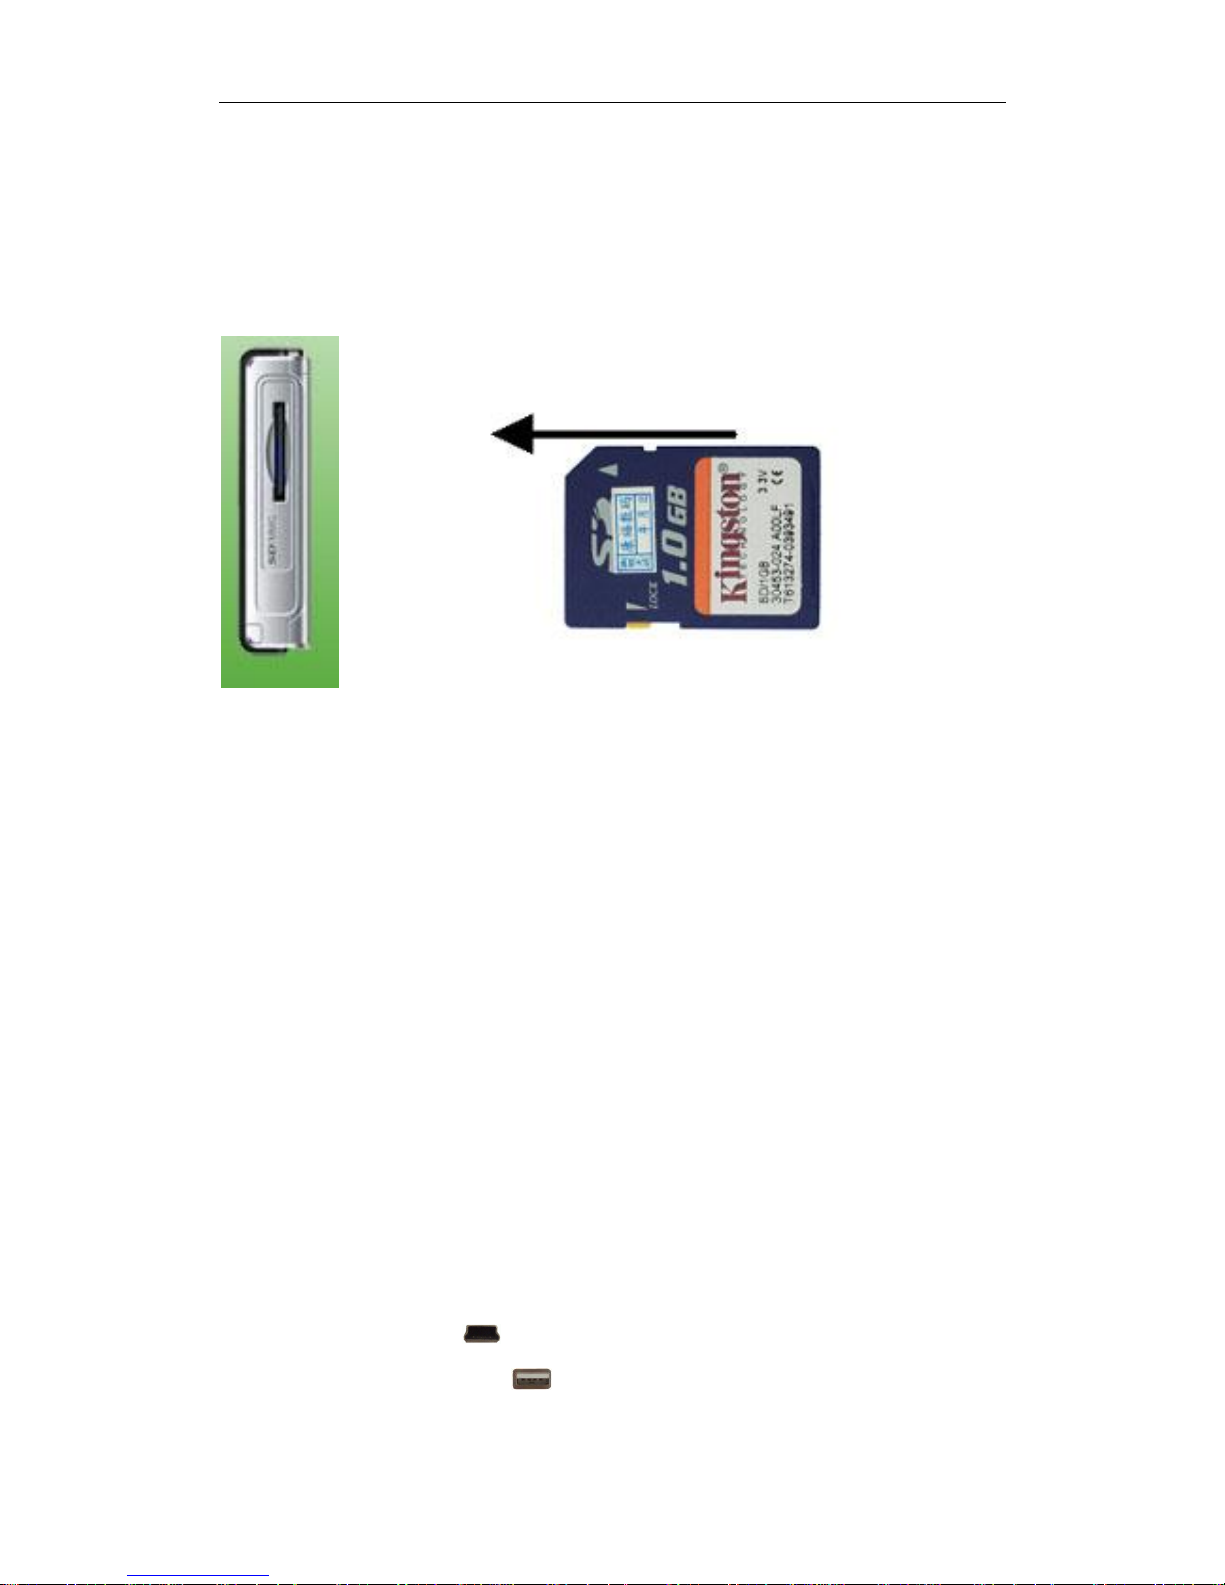
2.3.7 SD/MMC card
The attached SD/MMC card contains the map software, map data and media file. Please
insert the card correctly when in use.
【Important】Please do not take out the SD/MMC card when the system is navigating or playing.
【Important】
1. Don’t bend, stress or curve the SD/MMC card.
2. Avoid high temperature or high humidity when in use and store the card, don’t put the
card direct to sunlight.
3. To avoid damage, please pay attention to the heading when inserting the SD/MMC card.
2.4 Connect with computer
The machine can be connected with the computer through the MINI USB on its left part. You
can copy files between navigator and computer or copy the data from GPS navigator to computer
so as to recover the data in GPS when you are in need of them.
1. Please confirm the GPS navigator is power on;
2. Connect the MINI end [ ] of USB cable with the USB port on the left part of GPS
machine and the normal end [ ] with the Host port on computer.
3. After connection, the computer can recognize and find the new hardware unit automatically.
GPS navigator will stop operating the current procedure and shift to the online interface.
4. Please pull out the MINI USB cable as you finished your operation, the GPS navigator will
return to the pre-operation interface.
【Important】Data security: Please copy the data to the outer storage device every time before
you update your system data. Our company takes no responsibility for any loss of data.
【Note】The GPS navigator will stop any other operation when it is connected with computer.
【Important】In the process of communication, the following operations will break off the
connection with computer, the unfinished data will be lost.
1. Pull out the MINI USB cable;
2. Power off
3. Reset the system by using resetting key or electric switch
4. Click the close button on the top right corner.
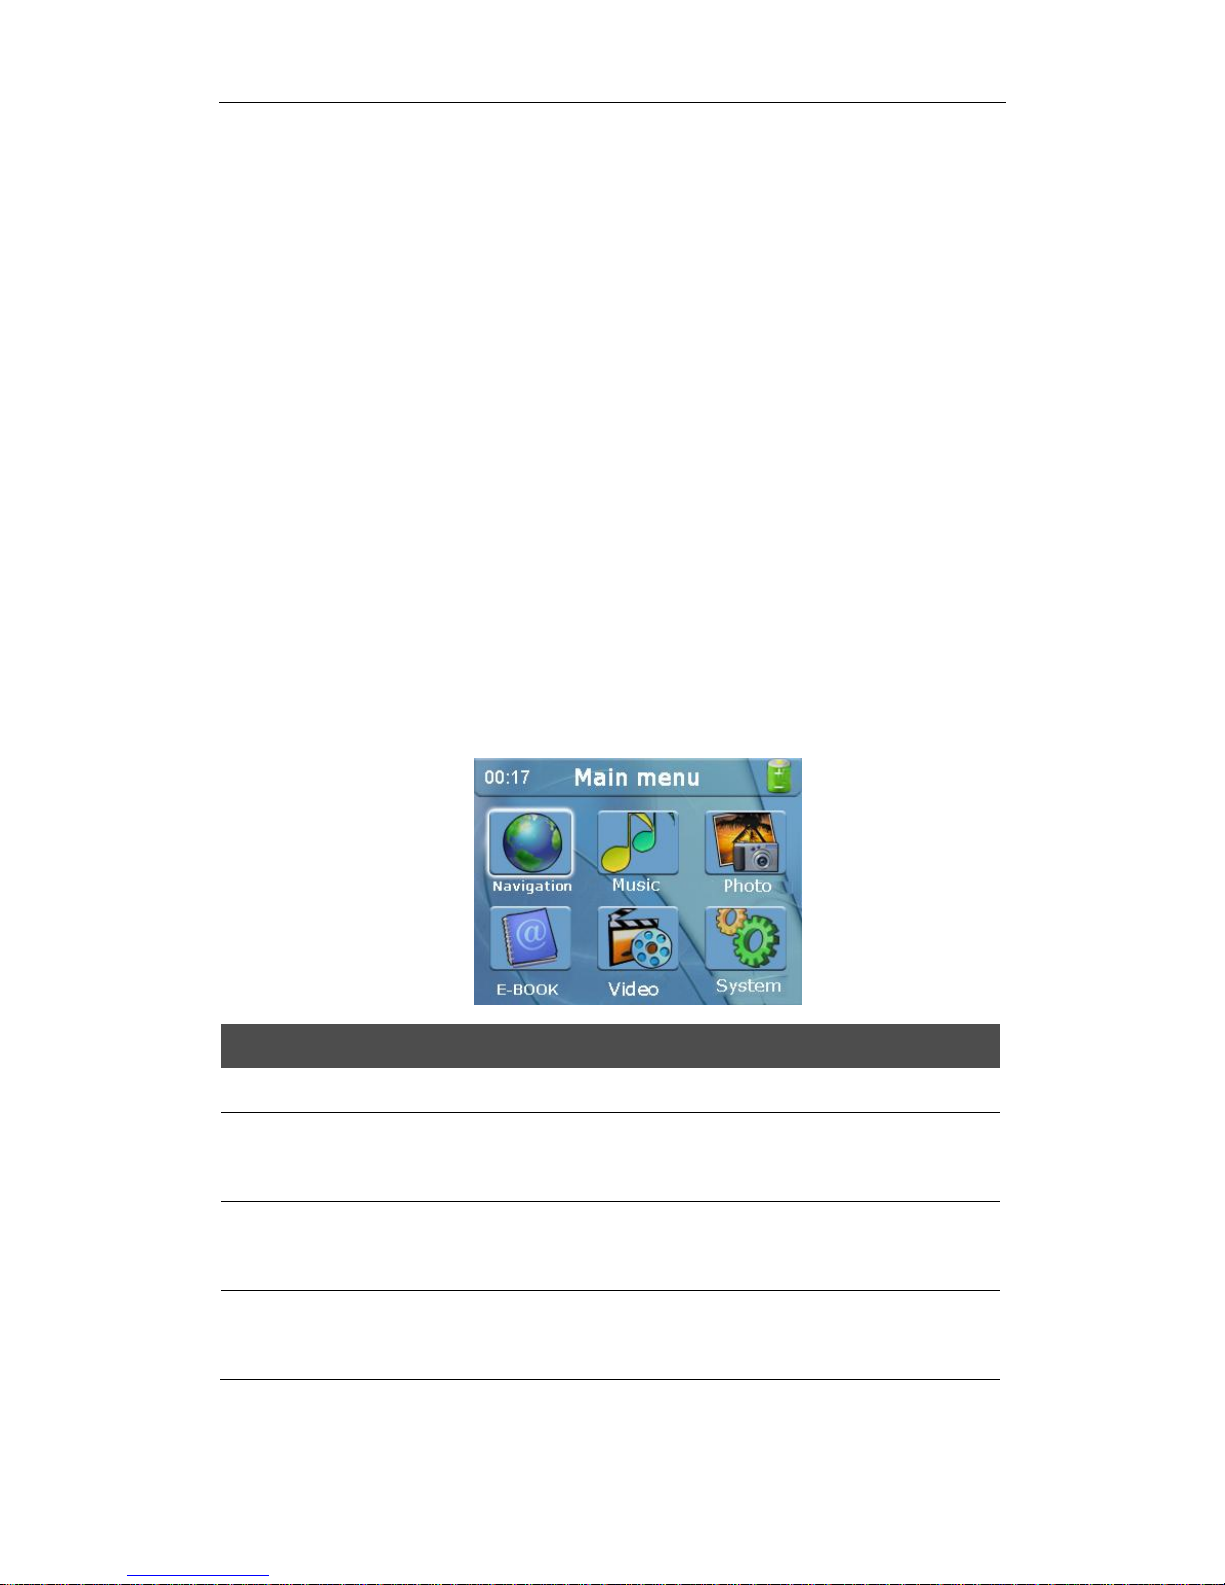
2.5 Table list and primary function.
1. Main menu:
2. Function introduction:
Navigation
Afford the navigation reference
Video player
Video playing format: wmv, asf and avi.
Support schedule adjustment, pause, full screen playing.
Photo skimming
Photo format: JPG, GIF, BMP, PNG.
Support picture revolve, picture zoom, and power point.
E-book
Text format: txt.
Support page option
 Loading...