

Version 1.10 | 2017-10-05
INSTALLATION AND USER INSTRUCTIONS

DISCLAIMER
Collabstor AB/ISOVOX® makes no representations
or warranties with respect to this manual and, to the
maximum extent permitted by law, expressly limits
its liability for breach of any warranty that may be
implied to the replacement of this manual with another.
Furthermore, Collabstor AB/ISOVOX® reserves the right
to revise this publication at any time without incurring an
obligation to notify any person of the revision.
The information provided in this documentation contains
general descriptions and/or technical characteristics of
the performance of the products contained herein. This
documentation is not intended as a substitute for and is
not to be used for determining suitability or reliability of
these products for specic user applications. It is the duty
of any such user or integrator to perform the appropriate
and complete risk analysis, evaluation and testing of the
products with respect to the relevant specic application
or use thereof. Neither Collabstor AB/ISOVOX® nor
any of its afliates or subsidiaries shall be responsible
or liable for misuse of the information that is contained
herein. If you have any suggestions for improvements
or amendments or have found errors in this publication,
please notify us.
All pertinent state, regional, and local safety regulations
shall be observed when installing and using this product.
For reasons of safety and to help ensure compliance
with documented system data, only the manufacturer
should perform repairs to components.
When devices are used for applications with technical
safety requirements, the relevant instructions shall be
followed.
Failure to observe this information can result in injury or
equipment damage.
Copyright © 2017 by Collabstor AB/ISOVOX
®
All rights reserved. No part of this publication may be
reproduced, distributed, or transmitted in any form or
by any means, including photocopying, recording, or
other electronic or mechanical methods, without the
prior written permission of the publisher. For permission
requests, write to the publisher, addressed “Attention:
Permissions Coordinator,” at the address below.
Collabstor AB/ISOVOX® Trade Center Halmstad,
Sweden. Kristian IV:s Road.
www.isovoxbooth.com
TRADEMARKS
Collabstor AB/ISOVOX® has made every effort to
supply trademark information about company names,
products and services mentioned in this manual.
Trademarks shown below were derived from various
sources. All trademarks are the property of their
respective owners.
General Notice: Some product names used in this
manual are used for identication purposes only and
may be trademarks of their respective companies.

3
INSTALLATION AND USER INSTRUCTIONS
TABLE OF CONTENTS
1 PREFACE 5
1.1 Description of the User 5
1.2 Conventions Used in This Manual 5
1.3 Explanation of Safety Warnings 6
1.4 Retaining Instructions 6
1.5 Obtaining Documentation and Information 7
1.5.1 Internet 7
1.5.2 Ordering documentation 7
1.5.3 Documentation feedback 7
2 DESCRIPTION OF THE PRODUCT 8
2.1 Intended Use and Reasonably Foreseeable Misuse 8
2.2 Technical Data 8
3 SAFETY INSTRUCTIONS 9
4 PREPARATION OF THE PRODUCT FOR USE 10
4.1 How to Install the Product 10
4.1.1 Unpacking the product and checking the contents 10
4.1.2 Installation of the product 11
5 OPERATION/USE 18
5.1 How to Use the ISOVOX 2 18
5.1.1 Vocal practice guidelines 18
5.1.2 Vocal recording guidelines 19
5.1.3 Ventilation of the ISOVOX 2 19
5.2 What to Do in Case of Dizziness or Trouble Breathing 19
6 MAINTENANCE 20
6.1 How to Clean the Product 20
6.2 How to Replace the Batteries 20
7 TROUBLESHOOTING AND REPAIR 21
7.1 How to Identify and Solve Problems 21
7.2 How to Repair the Product 23
8 STORAGE 24
8.1 How to Disassemble and Store the Product 24
9 DISPOSAL 24
9.1 How to Recycle Parts 24
9.2 How to Dispose of the Product 25
9.2.1 Disposal of electronic components 25
9.2.2 Disposal of batteries 25
9.2.3 Disposal of packaging waste 25
10 APPENDICES 26
10.1 Supplied Accessories, Consumables and Spare Parts 26
10.1.1 Spare/replacement parts 26

5
INSTALLATION AND USER INSTRUCTIONS
1 PREFACE
1.1 DESCRIPTION OF THE USER
The product is intended for the end user of the ISOVOX 2. This manual is part of the
product. It contains important information on safety as well as the installation, use and
disposal of the product. Please familiarize yourself with all the included information before
using the product. The product may only be used as described in this manual and for the
specied application scenarios. As a user of this product, you should be experienced with
easy self-assembly products. You don’t need to be an experienced vocalist, producer or
artist to use the nished product. This product is restricted for use under the age of 16.
1.2 CONVENTIONS USED IN THIS MANUAL
The following style conventions are used in this document:
Bold
Names of product elements, commands, options, programs, processes, services, and
utilities
Names of interface elements (such as windows, dialog boxes, buttons, elds, and menus)
Interface elements the user selects, clicks, presses, or types
Italic
Publication titles referenced in text
Emphasis (for example, a new term)
Variables
1.3 EXPLANATION OF SAFETY WARNINGS
Danger indicates a hazard with a high level of risk which, if not avoided, will result in
death or serious injury.
Warning indicates a hazard with a medium level of risk which, if not avoided, could result
in death or serious injury.
Caution indicates a hazard with a low level of risk which, if not avoided, could result in
minor or moderate injury.
1.4 RETAINING INSTRUCTIONS
Read and understand this manual and its safety instructions before using this
product. Failure to do so can result in serious injury or death.
Follow all the instructions. This will avoid re, explosions, electric shocks or
other hazards that may result in damage to property and/or severe or fatal
injuries.
The product shall only be used by persons who have fully read and
understand the contents of this user manual.
Keep all safety information and instructions for future reference and pass them
on to subsequent users of the product.

7
INSTALLATION AND USER INSTRUCTIONS
The manufacturer is not liable for cases of material damage or personal injury
caused by incorrect handling or non-compliance with the safety instructions. In
such cases, the warranty will be voided.
1.5 OBTAINING DOCUMENTATION AND INFORMATION
1.5.1 Internet
The latest version of the documentation is available at the following address:
www.isovoxbooth.com/setup.
1.5.2 Ordering documentation
Documentation, user instructions and technical information can be ordered by entering
www.isovoxbooth.com/setup or calling Collabstor AB/ISOVOX
®
at +46702519862
or by emailing info@isovoxbooth.com.
1.5.3 Documentation feedback
If you are reading Collabstor AB/ISOVOX
®
product documentation on the internet,
any comments can be submitted on the support website. Comments can also be sent to
info@isovoxbooth.com.
We appreciate your comments.

2 DESCRIPTION OF THE PRODUCT
2.1 INTENDED USE AND REASONABLY FORESEEABLE MISUSE
The ISOVOX 2 is intended to be used as a device for professional vocal practice and
recording. The ISOVOX 2 is intended for indoor use only. The ISOVOX 2 shall not be used
outdoors, in locations with the presence of a corrosive or explosive atmosphere or close to
medical equipment.
Only use the ISOVOX 2 within the specied performing limits. The ISOVOX 2 shall only be
used according to the instructions as described in this manual. All use other than described
in this manual is seen as unintended use.
The ISOVOX 2 shall be used with the following original accessories and components only:
• Osram LEDstixx with micro (AAA) alkaline battery 1.5V
• Floor stand (PA-speaker stand) with min. centric carry weight of 35 kg (77 lb), safety
hatch and feet that reach a 60 cm (24 inch) radius.
2.2 TECHNICAL DATA
Parameter Unit
Product Name ISOVOX
Type 2
Voltage/frequency Non-electrical

9
INSTALLATION AND USER INSTRUCTIONS
3 SAFETY INSTRUCTIONS
Read and understand this manual and its safety instructions before using this product.
Failure to do so can result in serious injury or death.
• Never leave the ISOVOX 2 unattended when children and/or animals are around.
The product may be put out of balance and may fall, hurt or in worst case even cause
fatal injuries.
• Don’t stand inside the cabin for longer than 2 minutes. Take a 5 minute break after
each 2 minute session. Make sure to properly ventilate the product by opening
the back cover and waving fresh air in. Always make sure your room is properly
ventilated. An open window is recommended.
• Mount the ISOVOX 2 on a oor stand that meets the minimum requirements for stability.
The oor stand (PA-speaker stand) should be able to handle 35 kg (77 lb) centric
load. Make sure to use a stand with a safety hatch. The feet of the stand shall be fully
extended and at least reach a 60 cm (24 inch) radius from center.
• Do not let children play with the product. The product can cause suffering and/or
suffocation if the child get stuck and/or stays in the cabin.
• Don’t use this product when pregnant or during suspected pregnancy. The product has
not been tested for use during pregnancy.
• Secure a circular area around the ISOVOX 2, so it does not harm your surroundings if
it should fall.
• The ISOVOX 2 shall always be transported in the packaging it was delivered in or in
the Ofcial Carry-Bag (not included) to ensure safe transport.

4 PREPARATION OF THE
PRODUCT FOR USE
4.1 HOW TO INSTALL THE PRODUCT
4.1.1 Unpacking the product and checking the contents
To unpack the product:
1. Open the outer packaging. Inside you will nd a white box.
2. Turn packaging and lift outer packaging.
3. Open inner packaging.
4. Take out the cover. Remove the tape of the cover. Spread the cover on the clean oor.
5. Put the product parts on the oor cover according to the illustration. Make sure the
packaging contains the following items:
a. Roof with back cover
b. Left side
c. Right side
d. Base plate
e. Main absorber
f. Front screen/vocal enhancer
g. Mic holder (ex on – ex off)
h. Nut for securing the mic pole
i. Mic pole
j. LED light
A
D
E
F
J
B C
G
I
H

11
INSTALLATION AND USER INSTRUCTIONS
4.1.2 Installation of the product
To install the product:
1. Place the base plate
Ⓓ with the metal
thread hole away from you.
2. Attach the left side
Ⓑ and right side Ⓒ to the base plate Ⓓ.
2cm/0,8in
The edge of the base plate Ⓓ should be in line with the edge of the Velcro fastener on
the left side
Ⓑ and right side Ⓒ. This way you will get enough material that can bend
over the wooden edge. Failure to do this may result in damage to the product and is not
covered by warranty.

3. Attach the main absorber Ⓔ
to the front screen
Ⓕ.
4. Place the main absorber
Ⓔ and front screen Ⓕ on the base plate Ⓓ.

13
INSTALLATION AND USER INSTRUCTIONS
5. Place the roof Ⓐ on the main absorber Ⓔ
and front screen
Ⓕ.
6. Turn the sides
Ⓑ upward. Zip the parts together. Attach the roof flap Ⓐ to the base
plate
Ⓓ with the Velcro fasteners.

Make sure to fully pull the zippers all the way down on the back side.
7. Make sure that your ISOVOX 2
looks like this.

15
INSTALLATION AND USER INSTRUCTIONS
8. Install your stand (not included) according to the
user instructions from the manufacturer. The stand
shall meet the minimum requirements for stability.
The oor stand (PA-speaker stand) should be able
to carry 35 kg (77 lb) centric load and feature a
35 [mm] mounting pole. Make sure to use a
stand with a safety hatch to prevent it from
falling. Feet shall be fully extended or at least
reach a 60 [cm] = 24 [in] radius from center.
The radius is measured on the ground from the
center of the mounting pole to the outer edge of
the tripod feet. The diameter is 2x the radius.
The acceptable and recommended height limit is
178 cm (70 in).
9. Mount the ISOVOX 2 on the stand.
Always lift the product with two people. Put yourself in an ergonomic position. Failure to do
so may cause injuries.
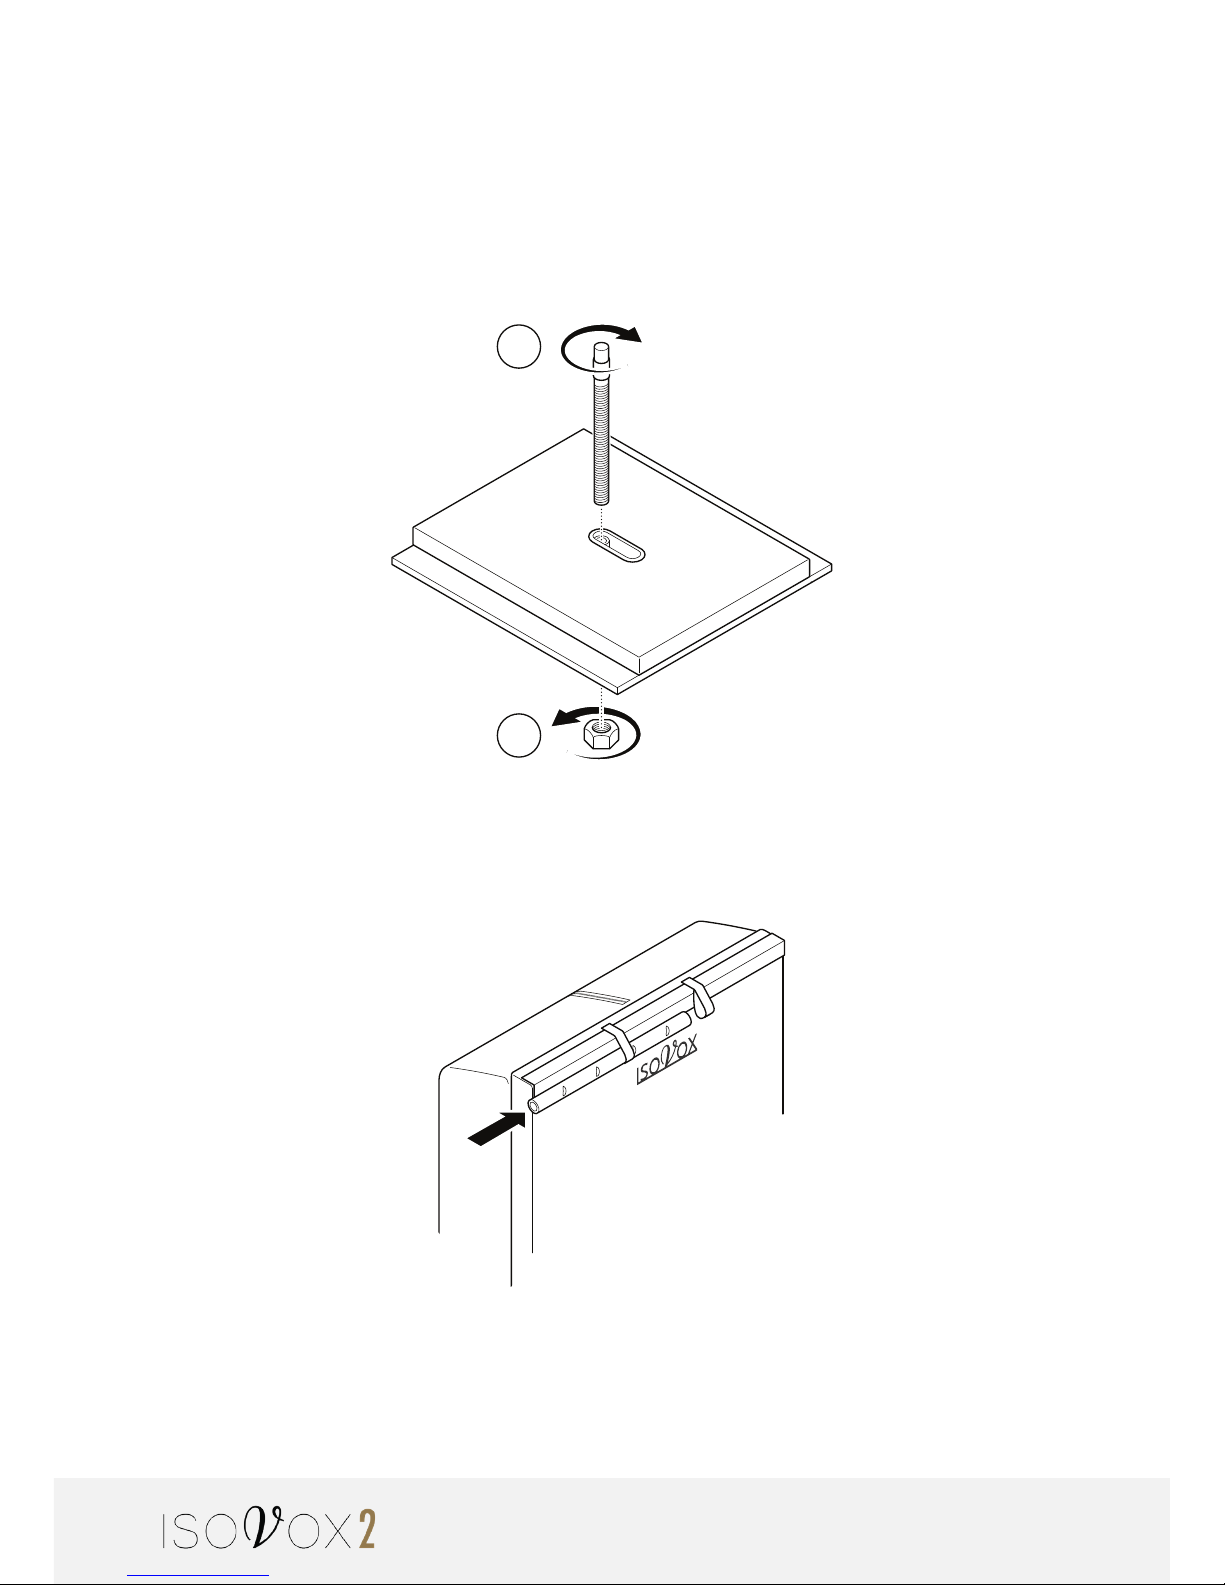
10. Screw the mic pole Ⓘ in the thread hole of the base plate Ⓓ. Adjust the
mic pole
to the desired height. Fasten the mic pole Ⓘ with the nut for securing
the mic pole
Ⓗ at the bottom of the base plate Ⓓ.
II
I
11. Attach the LED light Ⓙ to the holder pocket on the front screen Ⓕ.
17
INSTALLATION AND USER INSTRUCTIONS
12. Attach the mic holder Ⓖ to the mic pole Ⓘ. Attach your microphone (not included)
to the mic holder
Ⓖ. The mic holder is exible and the arms will ex around almost
any standard diameter of microphones. Squeeze the body of the microphone onto the
arms of the mic holder so that it snaps on.
I
II
13. Attach a pop lter (not included) to the mic pole Ⓘ.
5 OPERATION/USE
5.1 HOW TO USE THE ISOVOX 2
5.1.1 Vocal practice guidelines
1. If needed, switch on the LED light
Ⓙ.
2. Make sure you have connected all equipment.
3. Take your place in the ISOVOX 2 to start practicing vocals.
NOTICE!
Always leave the
back cover
Ⓐ open for better air ow, to minimize the risk of lower air quality, and to
avoid potential health consequences.

19
INSTALLATION AND USER INSTRUCTIONS
5.1.2 Vocal recording guidelines
To record vocals:
1. If needed, switch on the LED light
Ⓙ
2. Make sure you have connected all equipment.
3. Close the back cover to reduce unwanted room reections and coloration from behind.
Don’t leave it closed for longer than
2 minutes. After every 2 minutes, take a
5 minute break and make sure to
properly ventilate the product. See
Ventilation of the ISOVOX 2.
4. Take your place in the ISOVOX 2 to start
recording vocals.
5.1.3 Ventilation of the ISOVOX 2
To make sure that there is enough ventilation:
1. Open a window in the room.
2. Open the back cover and wave fresh air into the cabin for 1 minute while standing
outside the cabin.
5.2 WHAT TO DO IN CASE OF DIZZINESS OR TROUBLE BREATHING
In case of dizziness or trouble breathing:
1. Immediately stop using the product.
2. Take a break for 15-30 minutes.
3. Go outside and supply fresh air.
4. Make sure to properly ventilate the room and the ISOVOX 2 cabin. See Ventilation of
the ISOVOX 2.

6 MAINTENANCE
6.1 HOW TO CLEAN THE PRODUCT
To clean the product:
1. Use a vacuum cleaner on the lowest possible suction grade to remove dust. Do not
vacuum near the logo or the LED lamp.
2. Use a cloth dampened with a mild detergent solution or lukewarm water to remove
stains on the outer shell.
NOTICE!
Do not use alcohols (e.g. spirits) or chemical
cleansers and solvents as these can damage the surface and components.
3. To remove stains on the fabric interior, use hot water and a well bound cloth like
Wettex kitchen or similar. Rub carefully against the material, without soaking the
interior.
6.2 HOW TO REPLACE THE BATTERIES
Beware that there is a risk of explosion if replacing the batteries with an incorrect type.
Use only AAA batteries from OSRAM (model LED-Stixx).
To replace the batteries:
1. Unscrew the end at the opposite side of the on/off switch.
2. Pull out the battery holder.
3. Replace the batteries.
4. Dispose of used batteries according to the instructions. See Disposal.
Keep used batteries away from children. RISK OF EXPLOSION! Beware that there is
a risk of explosion if replacing the batteries with an incorrect type. Handle the used
batteries according to the manufacturer’s instructions.

21
INSTALLATION AND USER INSTRUCTIONS
7 TROUBLESHOOTING AND REPAIR
7.1 HOW TO IDENTIFY AND SOLVE PROBLEMS
Error Cause Solution
Zipper is stuck 1. Zipper is not attached
properly.
2. Material is stuck between
the zippers.
3. Another zipper handle
may be stuck between the
zippers.
1. Try to reconnect the zippers
carefully.
2. See if there is any material stuck
between the zippers. If so, carefully
pull on the zipper while pulling out
the material.
3. Drag down the zipper, use your
nger to push away the zipper
handle that may have gotten stuck.
Microphone does
not t
1. Microphone is not a studio
condenser mic.
2. Microphone is a dynamic
mic that needs to be mounted
horizontally.
3. Microphone has the 3/8”
adaptor in the mounting hole.
1. Please check with your dealer if
your mic is supported.
2. ISOVOX 2 is not designed for
use with dynamic microphones.
3. Remove the 3/8” adaptor (this
is often golden). After you have
removed this, it will t the internal
mic pole of ISOVOX 2.
Can't mount my
own shock mount
1. You have tried the wrong
method.
2. It has the 3/8” adaptor in
the mounting hole.
1. Hold the 5/8” tting over the
Mic Pole (Part B), and screw the
Mic Pole onto the Shock Mount.
2. Remove the 3/8” adaptor (often
this is golden). After you have
removed this, it will t the internal
mic pole of ISOVOX 2.
Adjust the height
of the stand
See the instructions that came
from the manufacturer of the
stand.

OSRAM LED-STIXX
Lamp not working
1. AAA batteries need to be
changed.
1. Unscrew the white end at the
opposite side of the on/off switch.
Pull out the battery holder in the
same direction as the on/off switch.
Replace the batteries. Make sure to
recycle your old batteries, and keep
them away from children. See the
included manual from OSRAM for
further details.
Neighbors
hearing me
1. The unit is not height
adjusted properly.
2. You have unusually thin
walls.
1. Adjust the height so that there is
some room for your shoulders, but
not too much.
2. Place the ISOVOX 2 as far as
possible from your closest neighbor.
The unit seems
unstable and may
fall
1. The oor stand is not set
up properly.
2. You have mounted the
base plate
in the wrong
direction.
3. You have set the height
over the acceptable and
recommended limit =
178 cm (70 in) and/or not
extended the tripod feet to
their minimum. The required
radius is 60 cm (24 in).
1. See the oor-stand manual
supplied by the manufacturer.
Usually when it’s unstable, it’s
because the feet are not fully
extended.
2. Check if you have mounted the
base plate
Ⓓ in the right direction.
See Installation of the product.
3. Lower the height to stabilize.
The included FlexMount does not t
my microphone
1. You have not squeezed
enough.
2. My microphone falls out of
the arms of the Flex Mount 2.
1. Carefully squeeze the arms of the
Flex Mount 2 onto the body of your
microphone. It will ex and adapt to
the diameter of your microphone.
2. If the microphone falls out of the
Flex Mount then it is too small or
too big. Please use your own shock
mount instead or buy an OnStage
MY330, which will usually work
well with larger microphones.
I'm missing a part
Contact us at info@isovoxbooth.com

23
INSTALLATION AND USER INSTRUCTIONS
7.2 HOW TO REPAIR THE PRODUCT
Don’t repair the product by yourself. Contact the ISOVOX 2 dealer where you bought the
product or contact us at info@isovoxbooth.com.

8 STORAGE
8.1 HOW TO DISASSEMBLE AND STORE THE PRODUCT
To disassemble and store the product:
1. Remove the mic pole
Ⓘ and the nut for securing the mic pole Ⓗ
2. Remove the stand and place the ISOVOX 2 on the oor.
3. Unzip all sides and remove all parts.
4. Place the parts in the original packaging.
NOTICE!
Place the hard parts in a separate
bag, or the original bag that it was delivered in.
5. Store the product.
NOTICE!
The storage conditions shall not exceed:
• Storage temperature range: 0ºC to +50ºC
• Relative humidity: max 50% at +50ºC
9 DISPOSAL
9.1 HOW TO RECYCLE PARTS
To recycle the ISOVOX 2:
1. Go to your local recycling station.
• Dispose of all absorption material in the plastic recycling bin.
• Dispose of the base plate in the wood bin.
• Dispose of metal in the hardware bin.
NOTICE!
If unsure, ask the local recycling
station employee.
• For disposal of the LED light, see Disposal of electronic equipment.
• For disposal of the batteries, see Disposal of batteries.
• For disposal of the packaging, see Disposal of packaging.

25
INSTALLATION AND USER INSTRUCTIONS
9.2 HOW TO DISPOSE OF THE PRODUCT
9.2.1 Disposal of electronic components
The symbol on the product, the accessories or packaging indicates
that this device shall not be treated as unsorted municipal waste,
but shall be collected separately! Dispose of the device via a
collection point for the recycling of electrical and electronic
equipment waste if you live within the EU or in other European
countries that operate separate collection systems for electrical and
electronic equipment waste. By disposing of the device in the
proper manner, you help to avoid possible hazards for the
environment and public health that may otherwise be caused by improper treatment of
waste equipment. The recycling of materials contributes to the conservation of natural
resources. Therefore do not dispose of your old electrical and electronic equipment with the
unsorted municipal waste.
9.2.2 Disposal of batteries
The product contains batteries. Batteries may not be disposed of with the usual domestic
waste. They may contain toxic heavy metals and are subject to hazardous waste
regulations. For this reason, dispose of used rechargeable batteries at a local collection
point.
9.2.3 Disposal of packaging waste
The packaging is made of environmentally friendly materials, which may be disposed of
through your local recycling facilities. By disposing of the packaging and packaging waste
in the proper manner, you help to avoid possible hazards for the environment and public
health. The symbol on the packaging indicates that the packaging is made of PAP.

10 APPENDICES
10.1 SUPPLIED ACCESSORIES, CONSUMABLES AND SPARE PARTS
10.1.1 Spare/replacement parts
Parts Name Article Nr.
A. Roof 1
B. Left side 2
C. Right side 3
D. Base plate 4
E. Main absorber 5
F. Front screen / vocal enhancer 6
G. Mic holder (ex on – ex off) 7
H. Nut for securing the mic pole 8
I. Mic pole 9
J. LED light (AAA batteries incl.) 10
Collabstor AB/ISOVOX
®
Trade Center Halmstad, Sweden. Kristian IV:s Road.
www.isovoxbooth.com
 Loading...