

Gebrauchsanweisung
Luftfilter
Art.-Nr. 34060
Sehr geehrter Kunde,
herzlichen Glückwunsch zum Erwerb eines unserer Qualitätsprodukte. Bitte lesen Sie die
Gebrauchsanweisung vor Inbetriebnahme sorgfältig durch und bewahren Sie diese auf.
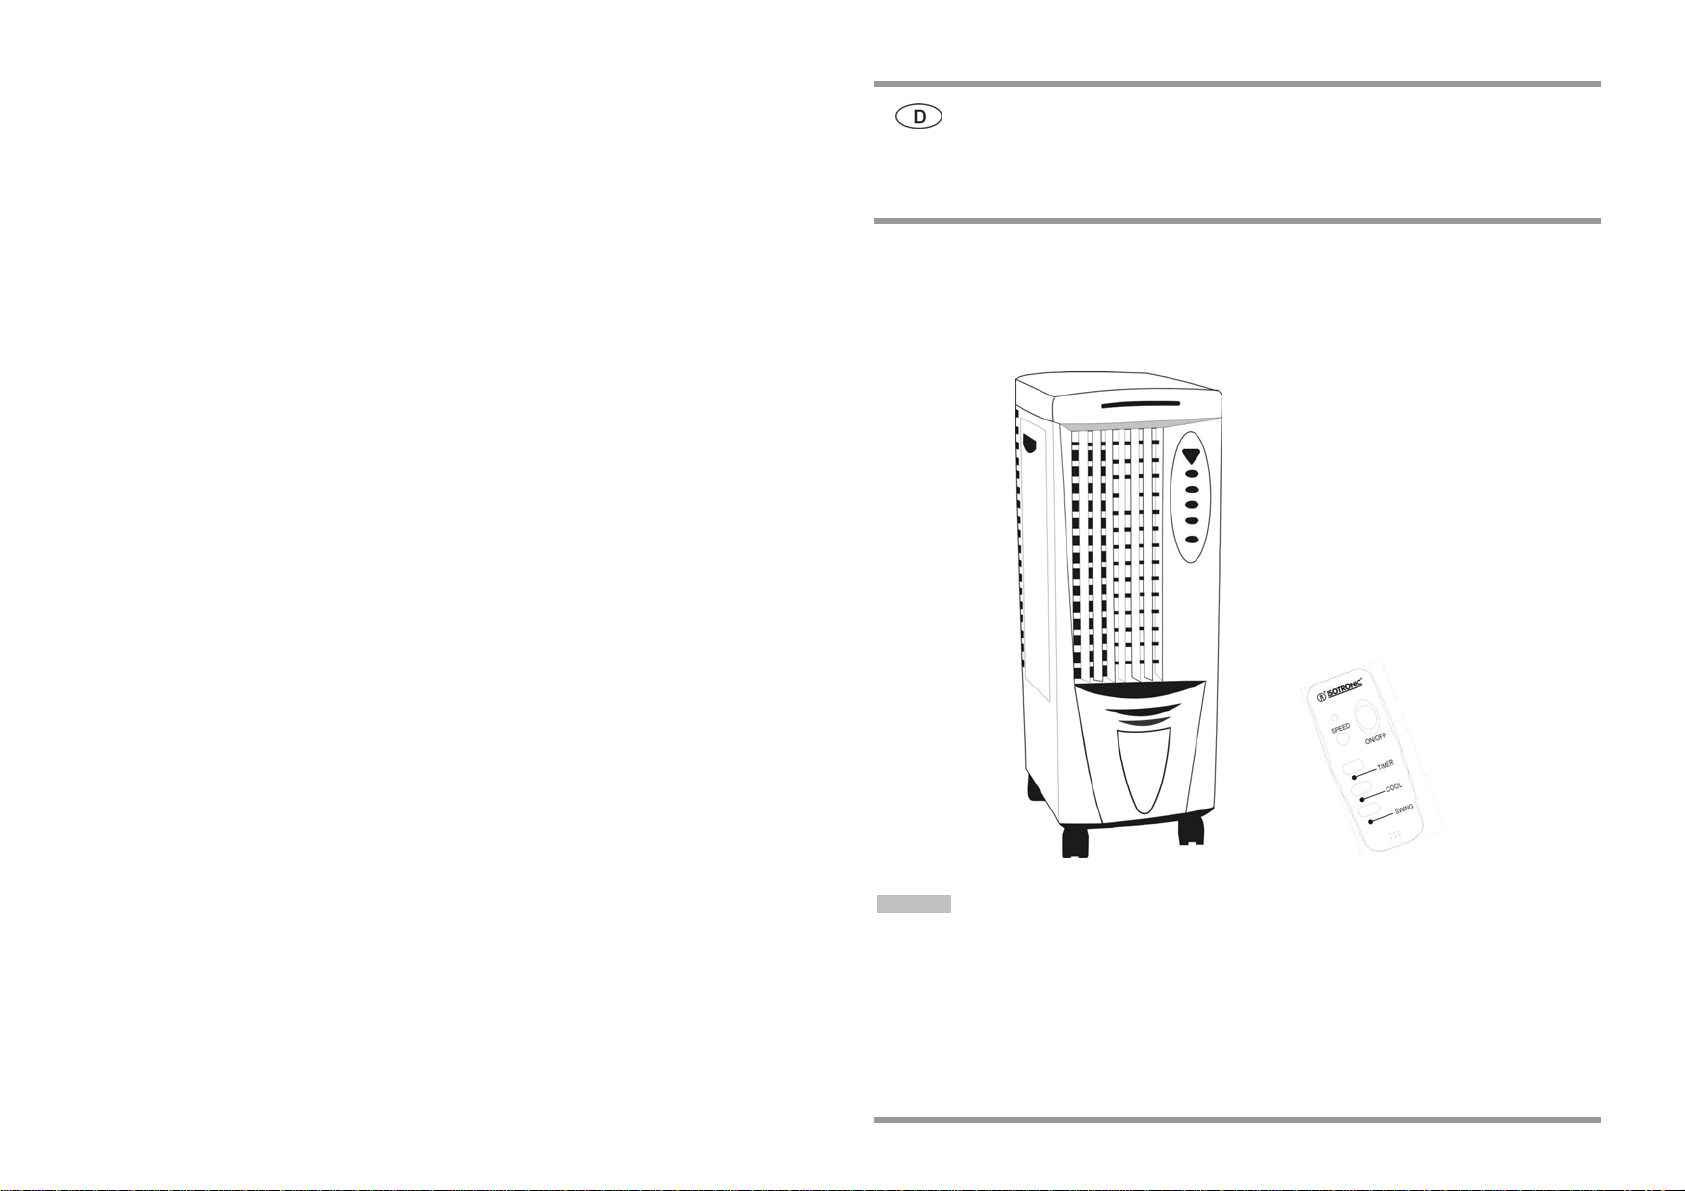
(Abb. 1)
Merkmale
• Luftkühlung, -befeuchtung und -reinigung
• Photokatalyse-Technologie, Wassertank und Wasserkreislaufsystem
• Einstellbare Luftgeschwindigkeit
• Abdeckung eines waagrechten Bereichs von 60 Grad durch automatische Hin- und Herbewegung
• Zeitschaltuhr (von 0,5 bis 7,5 Stunden einstellbar)
• Fernbedienung
• Alarm bei niedrigem Wasserstand
Für sicheren und leistungsfähigen Betrieb
- Achten Sie darauf, das Netzkabel nicht zu beschädigen.
- Wenn das Gerät nicht in Gebrauch ist, trennen Sie das Netzkabel vom Netz. Ziehen Sie dabei
niemals am Kabel, sondern stets am Stecker.
- Bauen Sie das Gerät nicht auseinander und verändern Sie es keinesfalls.
- Betreiben Sie das Gerät nicht in Bereichen, wo extreme Temperaturen auftreten (unter 0°C oder
über 50°C) oder wo es direkter Sonneneinstrahlung ausgesetzt ist.
- Bewegen Sie das Gerät langsam, wenn sich Wasser im Tank befindet, damit dieses nicht herausschwappt.
- Stellen Sie das Gerät nicht in die Nähe von Explosivstoffen.
- Legen Sie keine schweren Gegenstände auf das Gerät, um Beschädigungen oder Störungen zu
vermeiden.
- Achten Sie darauf, daß Kinder nicht mit dem Gerät spielen.
- Bevor Sie Wasser einfüllen, schalten Sie das Gerät AUS und ziehen Sie den Netzstecker. Achten
Sie darauf, das Gerät nicht zu überfüllen.
- Da das Gerät auch über eine Luftbefeuchtungsfunktion verfügt, sollten Sie es nicht für längere Zeit
in einem luftarmen Raum (z.B. einem kleinen geschlossenen Zimmer) betreiben, um eine zu hohe
Feuchtigkeitsentwicklung zu vermeiden.
- Wenn Sie das Gerät für längere Zeit außer Betrieb nehmen, leeren Sie den Wassertank und
ziehen Sie den Netzstecker.
- Wechseln Sie das Wasser häufig, damit es stets sauber ist.
- Das Gerät ist senkrecht aufzustellen.
- Das Gerät sollte nicht mit tropfendem oder spritzendem Wasser in Berührung kommen.
- Stellen Sie das Gerät nicht in einem engen, begrenzten Raum wie z.B. einem Bücher- oder
Einbauschrank auf.
A C H T U N G : DAS GERÄT SOLLTE NUR VON QUALIFIZIERTEM WARTUNGS-
PERSONAL EINGESTELLT ODER REPARIERT WERDEN !
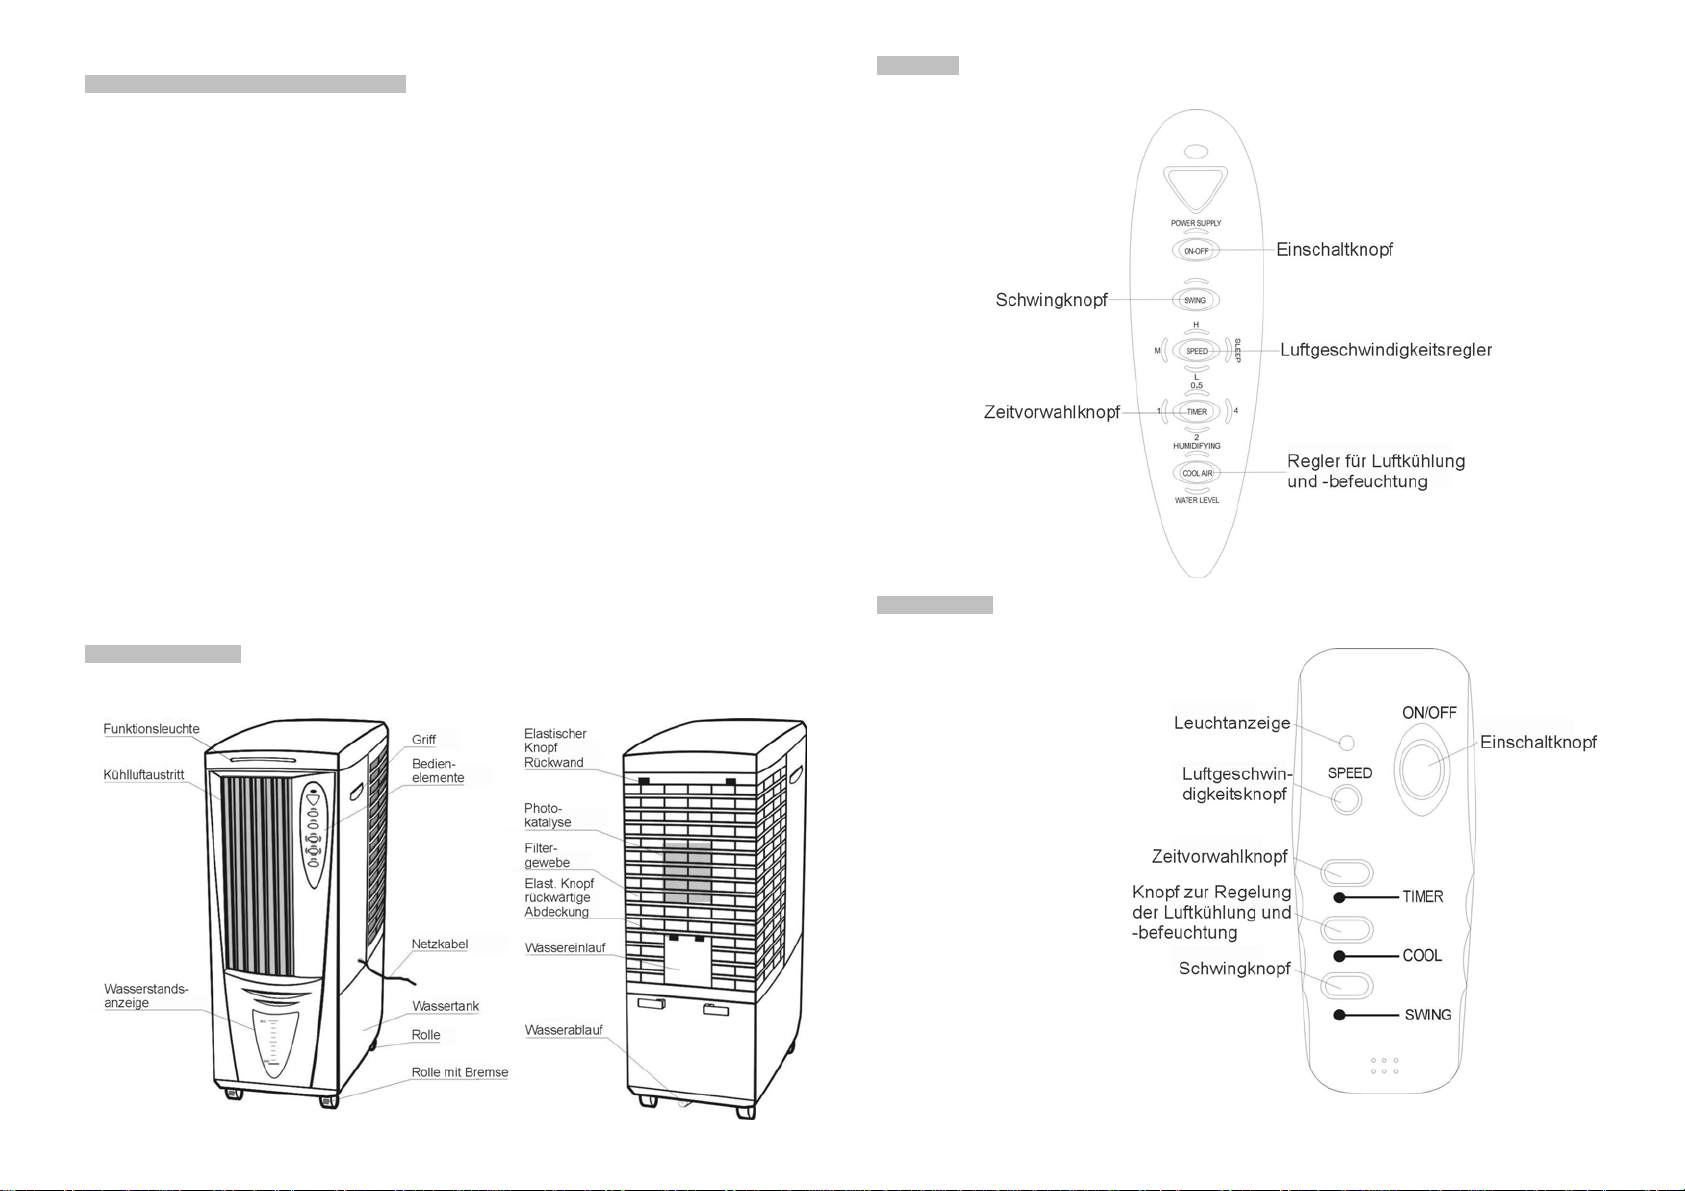
Gerätebeschreibung
(Abb. 2)
Bedienfeld
(Abb. 3)
Fernbedienung
(Abb. 4)
Ferngesteuerter Betrieb
1) Schieben Sie den Batteriefachdeckel am Boden der Fernbedienung auf. Legen Sie 2 Stk. 1,5V
Micro AAA Batterien ein. Achten
Sie dabei auf die richtige Polarität
(s.Abb. im Batteriefach).Schließen
Sie das Batteriefach wieder.
2) Die Anzeige leuchtet jedes Mal,
wenn Sie einen Knopf betätigen.
3) Wenn die Fernbedienung selbst
in geringer Entfernung vom Gerät
nicht funktioniert, wechseln Sie
die Batterien.
4) Stellen Sie sicher, daß Kinder
nicht mit dem Gerät spielen.

Vor dem Betrieb
1. Füllen Sie den Wassertank mit Wasser, bevor Sie das Gerät in Gebrauch nehmen.
2. Vor dem Befüllen entfernen Sie die rückwärtige Abdeckung, dann füllen Sie Wasser entlang dem
schwarzen Netz in den Tank.
3. Zur Erhöhung der Luftkühlung öffnen Sie die rückwärtige Abdeckung und geben Sie eine der
zuvor tiefgekühlten (mitgelieferten) Eisboxen in den Wassertank.
H I N W E I S E : • Geben Sie die Eisbox nicht in den vollen Wassertank, da das Wasser
sonst überläuft.
• Öffnen Sie die Eisboxen nicht und wechseln Sie das sich darin
befindliche Wasser nicht aus.
Zum Reinigen des Wassertanks siehe den Abschnitt ‚WARTUNG’.
Betrieb Allgemein
1. EINSCHALT-Knopf
- Stecken Sie den Stecker in die Steckdose. Dabei hören Sie einen Piepton.
- Drücken Sie den EINSCHALT-Knopf. Die Funktionsleuchte sowie die Anzeigen
Stromversorgung und Geschwindigkeit ‚Hoch’ leuchten mit einem Piepton auf. Das Gerät läuft
nun auf höchster Stärke. Zum Ausschalten drücken Sie den EINSCHALT-Knopf erneut.
2. Knopf GESCHWINDIGKEIT Gebläse
- Drücken Sie den Knopf einmal. Die Geschwindigkeitsanzeige ‚Mittel’ leuchtet auf, und es tritt
Luft mit mittlerer Geschwindigkeit aus.
- Bei zweimaligem Drücken des Knopfs leuchtet die Anzeige ‚Niedrig’ auf, und es tritt Luft mit
niedriger Geschwindigkeit aus.
- Bei dreimaligem Drücken leuchten die Anzeigen ‚Hoch’ und ‚Schlaf’ auf, und es tritt Luft mit
hoher Geschwindigkeit im Schlafmodus aus.
SCHLAF-Modus: Im Zeitraum von 30 Minuten tritt abwechselnd jeweils für ca. 2 Min. Luft mit
hoher und für ca. 1 Min. Luft mit mittlerer Geschwindigkeit aus. Danach
schaltet die Betriebsart für rund 30 Min. um auf ‚Mittel’ + ‚Schlaf’, danach
wird die Betriebsart ‚Niedrig’ + ‚Schlaf’ bis zum Ausschalten beibehalten.
- Bei viermaligem Drücken leuchten die Anzeigen ‚Mittel’ und ‚Schlaf’ auf, und es tritt Luft mit
mittlerer Geschwindigkeit im Schlafmodus aus.
SCHLAF-Modus: Im Zeitraum von 30 Minuten tritt abwechselnd jeweils für ca. 2 Min. Luft mit
mittlerer und für ca. 1 Min. Luft mit niedriger Geschwindigkeit aus. Danach
schaltet die Betriebsart für rund 30 Min. um auf ‚Niedrig’ + ‚Schlaf’, danach
wird die Betriebsart ‚Niedrig’ + ‚Schlaf’ bis zum Ausschalten beibehalten.
- Bei fünfmaligem Drücken leuchten die Anzeigen ‚Niedrig’ und ‚Schlaf’ auf, und es tritt Luft mit
niedriger Geschwindigkeit im Schlafmodus aus.
SCHLAF-Modus: Abwechselnd ca. 2 Min. Betriebsart ‚Niedrig’ und ca. 1 Min. kein Gebläse,
bis das Gerät AUSgeschaltet wird.
H I N W E I S : • Richten Sie das Gerät nicht direkt auf Ihren Körper, damit es im
Schlafmodus nicht zur Unterkühlung kommt.
- Durch sechsmaliges Drücken kehrt das Gerät wieder zur ursprünglichen Betriebsart ‚Hoch’
zurück.
3. SCHWING-Knopf
- Drücken Sie den SCHWING-Knopf, die Anzeige leuchtet, und das Gebläse bewegt sich hin und
her. Es deckt einen horizontalen Bereich von 60 Grad ab. Drücken Sie den Knopf erneut, um
die Bewegung in der gewünschten Position anzuhalten. Die Anzeige erlischt.
4. ZEITVORWAHL-Knopf
- Drücken Sie den Zeitvorwahl-Knopf jeweils einmal, um die Vorwahlzeit um eine halbe Stunde
bis zu 7,5 Stunden zu verlängern.
- 1 Mal drücken: Vorwahlzeit 30 Min., die Anzeige 0,5 leuchtet auf.
- 2 Mal drücken: Vorwahlzeit 1 Std., die Anzeige 1 leuchtet auf.
- 3 Mal drücken: Vorwahlzeit 1,5 Std., die Anzeigen 0,5 + 1 leuchten auf.
- 4 Mal drücken: Vorwahlzeit 2 Std., die Anzeige 2 leuchtet auf.
- 5 Mal drücken: Vorwahlzeit 2,5 Std., die Anzeigen 0,5 + 2 leuchten auf.
- 6 Mal drücken: Vorwahlzeit 3 Std., die Anzeigen 1 + 2 leuchten auf.
- 7 Mal drücken: Vorwahlzeit 3,5 Std., die Anzeigen 0,5, 1 + 2 leuchten auf.
- 8 Mal drücken: Vorwahlzeit 4 Std., die Anzeige 4 leuchtet auf.
- 9 Mal drücken: Vorwahlzeit 4,5 Std., die Anzeigen 0,5 + 4 leuchten auf.
- 10 Mal drücken: Vorwahlzeit 5 Std., die Anzeigen 1 + 4 leuchten auf.
- 11 Mal drücken: Vorwahlzeit 5,5 Std., die Anzeigen 0,5, 1 + 4 leuchten auf.
- 12 Mal drücken: Vorwahlzeit 6 Std., die Anzeigen 2 + 4 leuchten auf.
- 13 Mal drücken: Vorwahlzeit 6,5 Std., die Anzeigen 0,5, 2 + 4 leuchten auf.
- 14 Mal drücken: Vorwahlzeit 7 Std., die Anzeigen 1, 2 + 4 leuchten auf.
- 15 Mal drücken: Vorwahlzeit 7,5 Std., die Anzeigen 0,5, 1, 2 + 4 leuchten auf.
- 16 Mal drücken: Zurück zur Betriebsart Zeitvorwahl, alle Anzeigen erlöschen.
5. Knopf LUFTKÜHLUNG (-BEFEUCHTUNG)
- Drücken Sie den Knopf LUFTKÜHLUNG. Die rote Anzeige ‚WASSERSTAND’ blinkt, um Sie
daran zu erinnern, den Wasserstand zu überprüfen. Die Anzeige ‚LUFTBEFEUCHTUNG’
leuchtet automatisch auf, sobald der korrekte Wasserstand erreicht ist, und die Pumpe beginnt
zu arbeiten, sobald die rote Anzeige erlischt.
- Nach ca. 3 Minuten tritt angenehm feuchte Luft aus.
- Drücken Sie den Knopf zum Ausschalten erneut. Die Anzeige ‚LUFTBEFEUCHTUNG’ erlischt
und es tritt frische, trockene Luft aus.
H I N W E I S E : • Bei zu niedrigem Wasserstand (min. 2,7 l) ertönt ein Alarm (5 Mal),
und die rote Anzeige ‚WASSERSTAND’ blinkt, es tritt jedoch nach wie
vor kühle Luft aus.
• Nach einer Stunde ertönt der Alarm erneut (5 Mal), und das Gebläse
wird automatisch angehalten, bis das Wasser wieder aufgefüllt wird.
Die rote Anzeige ‚WASSERSTAND’ leuchtet auf, und die grüne
Anzeige ‚BEFEUCHTUNG’ erlischt.
6. Hebel zur RICHTUNGSÄNDERUNG
- Bewegen Sie den Flügel im Inneren mit Hilfe des Hebels. Dadurch können Sie die
Luftausblasrichtung nach oben und unten verändern.
H I N W E I S : • Das Gerät kann ohne Wasser als normaler elektrischer Ventilator
betrieben werden. Lassen Sie dazu den Knopf LUFTKÜHLUNG
ausgeschaltet. (Die Anzeigen ‚BEFEUCHTUNG’ und ‚WASSERSTAND’
leuchten nicht.)
Technische Daten
Spannungsversorgung: 230 V AC / 50 Hz
Leistungsaufnahme: 80 W
Schutzklasse: I
Fassungsvermögen Wassertank: ca. 11 l
Wasserverbrauch: ca. 1,8 l/h
Gewicht: ca. 9,5 kg
Abmessungen: L x B x H: 268 x 402 x 753 mm
Stromversorgung Fernbedienung: 2 x 1,5V Micro AAA Batterien (nicht enthalten)
Wartung
Reinigen Sie das Filtergewebe und den Wassertank.
Reinigen Sie das Filtersystem einmal wöchentlich, damit stets eine gute Luftbefeuchtung und
-reinigung gewährleistet ist.
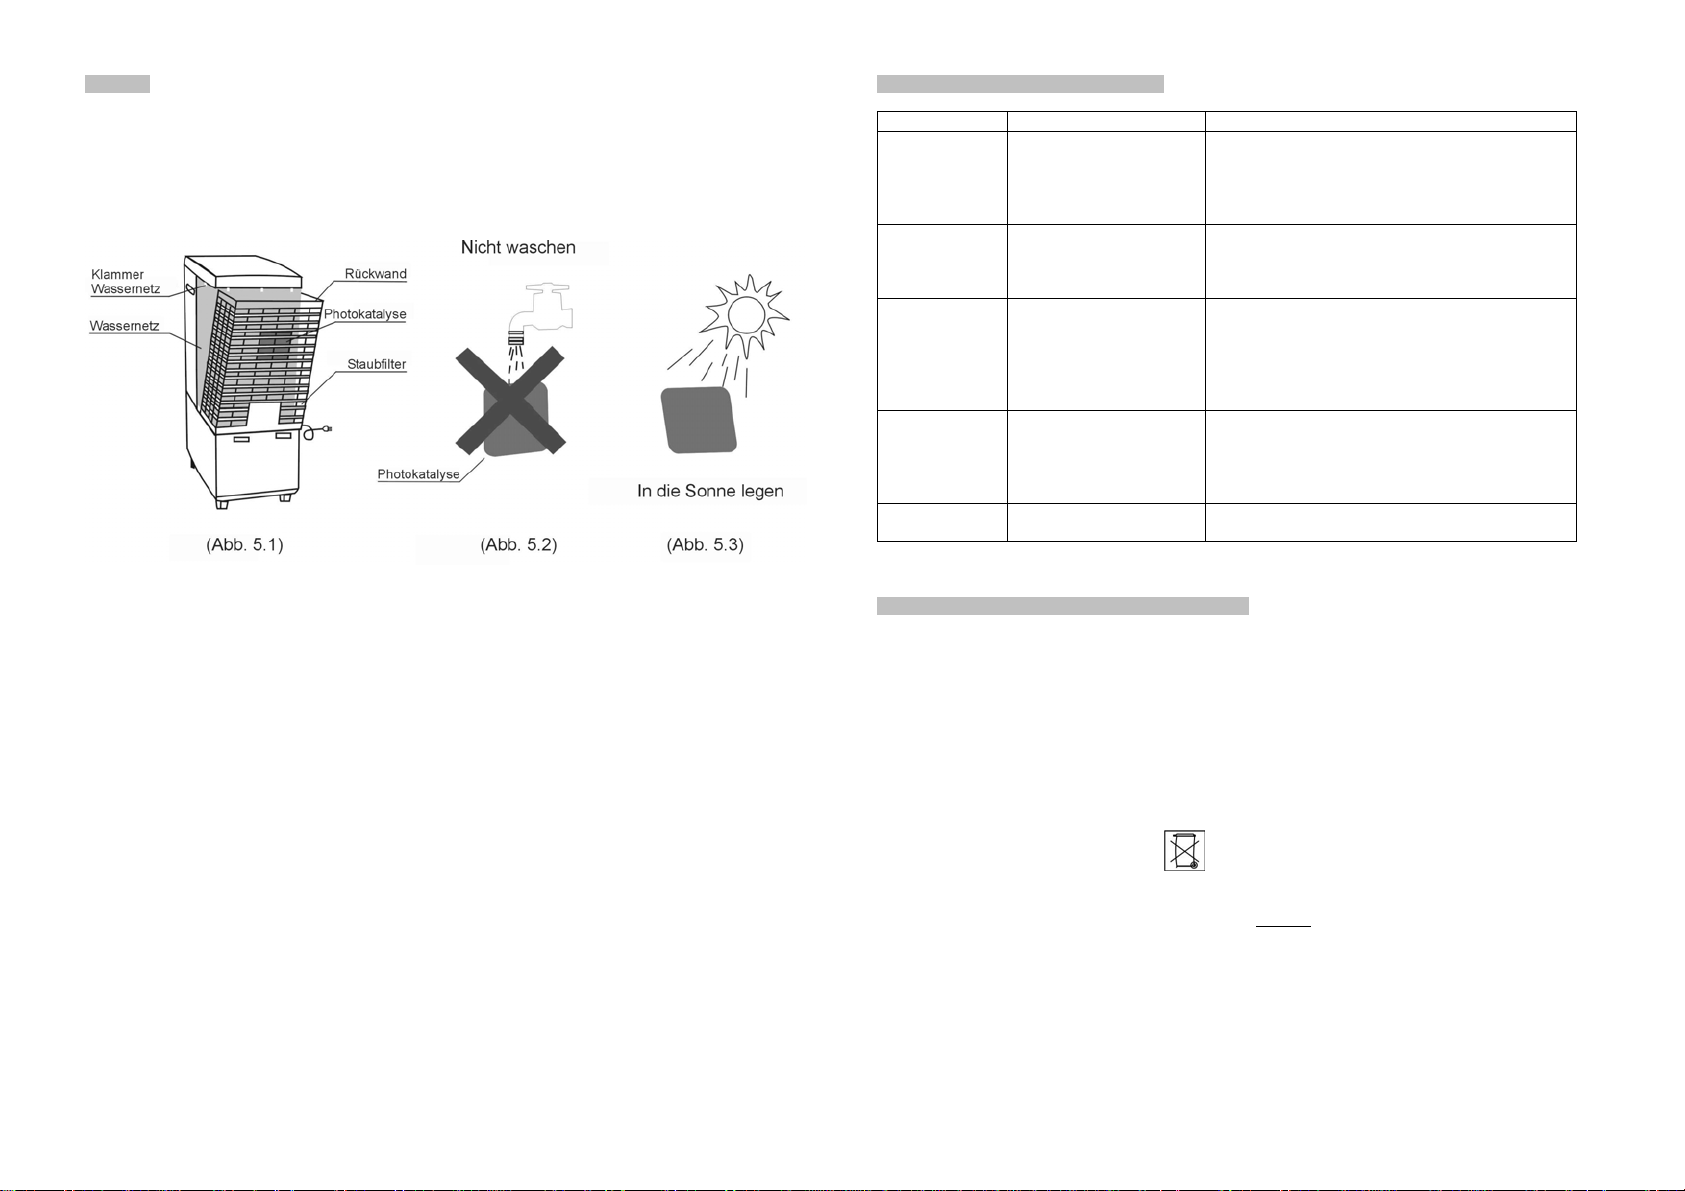
(Abb. 5)
1. Ziehen Sie das Netzkabel aus der Steckdose.
2. Schrauben Sie die rückwärtige Abdeckung ab, drücken Sie die elastischen Knöpfe oben an der
Abdeckung und nehmen Sie diese vom Gerät ab.
3. Entfernen Sie das Filtergewebe und den Photokatalysefilter von der Abdeckung.
4. Waschen Sie das Filtergewebe mit Wasser, und legen Sie den Photokatalysefilter zum
Reaktivieren in die Sonne. Waschen Sie den Photokatalysefilter keinesfalls mit Wasser.
5. Befestigen Sie das getrocknete Filtergewebe und den Photokatalysefilter wieder an der
rückwärtigen Abdeckung.
6. Reinigen Sie das Wassernetz mit einer Bürste. Ein Herausnehmen aus dem Gerät ist nicht
erforderlich.
7. Bringen Sie die rückwärtige Abdeckung wieder am Gerät an.
8. Füllen Sie Wasser in den Tank, stecken Sie das Kabel in die Steckdose. Drücken Sie den
EINSCHALT-Knopf und dann den Knopf LUFTKÜHLUNG. Nach 5 Minuten schalten Sie alle
Knöpfe aus, und ziehen Sie den Stecker aus der Steckdose. Öffnen Sie die Gummikappe am
WASSERABLAUF, und leeren Sie das Schmutzwasser aus.
9. Bevor Sie das Gerät wieder in Betrieb setzen, lesen Sie bitte den Abschnitt ‚VOR DEM BETRIEB’
durch.
Hinweis
Trocknen Sie das Filtergewebe und den Photokatalysefilter wenn Sie das Gerät für längere Zeit nicht
in Betrieb nehmen werden. Entfernen Sie auch das Wasser im Gerät restlos.
Allgemeine Störungen und Behebung
Störung
Ursache
Behebung
Es tritt keine
Luft aus
• Kein Strom
• Gerät nicht in Betrieb
• Teile des Geräts sind
beschädigt
• Schließen Sie das Netzkabel ordnungsgemäß
an die Steckdose an
• Drücken Sie den EINSCHALT-Knopf am Gerät
• Bringen Sie das Gerät zum Wartungsfachmann
Das Gerät
lässt sich nicht
abschalten
• Der EINSCHALT-Knopf
ist nicht gedrückt
• Teile des Geräts sind
beschädigt
• Drücken Sie den EINSCHALT-Knopf zum
Ausschalten des Geräts
• Bringen Sie das Gerät zum Wartungsfachmann
Das Gerät
macht
Geräusche
• Es befinden sichFremdkörper im rückwärtigen
Teil des Geräts
• Es liegt eine Störung
des Motors vor
• Das Luftrad ist locker
• Nehmen Sie die rückwärtige Abdeckung und
das Filtergewebe ab, entfernen Sie die
Fremdkörper
• Bringen Sie das Gerät zum Wartungsfachmann
• Bringen Sie das Gerät zum Wartungsfachman
Keine
Befeuchtung
• Es fehlt Wasser
• Es liegt eine Störung
der Pumpe vor
• Das Wasserrohr ist
abgefallen
• Füllen Sie Wasser nach
• Bringen Sie das Gerät zum Wartungsfachmann
• Bringen Sie das Gerät zum Wartungsfachmann
Keine Hin- und
Herbewegung
• Es liegt eine Störung
des Blattmotors vor
• Bringen Sie das Gerät zum Wartungsfachmann
Wichtige Batteriehinweise für die Fernbedienung
• Wir empfehlen die Verwendung von Alkaline Batterien für eine bestmögliche Leistung.
• Mischen Sie niemals alte und neue Batterien oder Einweg-Batterien und Akkus.
• Verwenden Sie niemals verschiedene Batteriearten (z.B. Alkaline und Zink Kohle) zur gleichen
Zeit.
• Entfernen Sie die Batterien, wenn Sie das Gerät für längere Zeit nicht in Gebrauch haben. Ein
Auslaufen der Batterien kann das Gerät dauerhaft beschädigen.
• Hinweise zur Batterieentsorgung:
Batterien sind schadstoffhaltig und unterliegen gesetzlichen Bestimmungen. Sie müssen daher
nach Gebrauch an der Verkaufsstelle oder einer Schadstoffsammelstelle der öffentlich-rechtlichen
Entsorgungsträger zurückgegeben werden. Auf keinen Fall dürfen Batterien in den Hausmüll,
Gelben Sack o.ä. gegeben werden. Batterien nur im entladenen Zustand in die AltbatterieSammelbehälter geben und Vorsorge gegen Kurzschlüsse treffen (z.B. Abkleben der Pole).

Sicherheitshinweise
Wichtig: Es besteht kein Garantieanspruch bei Schäden, die durch Nichtbeachtung der
Bedienungsanleitung entstehen. Für daraus resultierende Folgeschäden übernimmt ISOTRONIC
keine Haftung.
- Gerät nur mit der dafür vorgesehenen Spannung betreiben.
- Bei evtl. Reparaturen sollten nur Original-Ersatzteile verwendet werden, um ernsthafte Schäden
zu vermeiden.
- Zuleitungen und spannungsführende Kabel, mit denen das Gerät verbunden ist, auf
Bruchstellen oder Isolationsfehler prüfen. Bei Feststellung eines Fehlers oder bei sichtbaren
Schäden darf das Gerät nicht in Betrieb genommen werden.
- Eine Reparatur oder andere Arbeiten, wie z.B. Auswechseln einer Sicherung, etc. dürfen nur vom
Fachmann durchgeführt werden.
- Es ist zu beachten, dass Bedien- oder Anschlussfehler außerhalb des Einflussbereichs
der ISOTRONIC liegen und für daraus resultierende Schäden keinerlei Haftung
übernommen werden kann.
- In jedem Fall ist zu prüfen, ob das Gerät für den jeweiligen Einsatzort geeignet ist.
Allgemeine Hinweise
1. Elektrogeräte, Verpackungsmaterial usw. gehören nicht in den Aktionsbereich von Kindern.
2. Verpackungs- und Verschleißmaterial (Folien, ausgediente Produkte) umweltgerecht entsorgen.
3. Die Weitergabe des Produktes sollte mit der dazugehörigen Gebrauchsanweisung erfolgen.
4. Änderungen des Designs und der technischen Daten ohne Vorankündigung bleiben im
Sinne ständiger Produktverbesserungen vorbehalten.
Garantie
Auf dieses Gerät gewähren wir 2 Jahre Garantie. Die Garantieleistung umfasst die Beseitigung aller
Mängel, die auf nicht einwandfreies Material oder Fabrikationsfehler zurückzuführen sind. Es wird
keine Gewähr auf Verschleißteile gegeben. Da ISOTRONIC keinen Einfluss auf die richtige und
sachgemäße Montage oder Bedienung hat, kann verständlicherweise nur die Gewähr der
Vollständigkeit und einwandfreien Beschaffenheit übernommen werden. Es wird weder eine Gewähr
noch Haftung für Schäden oder Folgeschäden im Zusammenhang mit diesem Produkt übernommen.
Dies gilt vor allem dann, wenn Veränderungen oder Reparaturversuche an dem Gerät vorgenommen
wurden, Schaltungen abgeändert oder andere Bauteile verwendet wurden oder in anderer Weise
Fehlbedienungen, fahrlässige Behandlung oder Missbrauch zu Schäden geführt haben.
Ihr
ISOTRONIC-Team D- 72160 Horb
Stand: 07/08
Hinweise zum Umweltschutz
Dieses Produkt darf am Ende seiner Lebensdauer nicht über den normalen Haushaltsabfall entsorgt
werden, sondern muss an einem Sammelpunkt für das Recycling von elektrischen und elektronischen
Geräten abgegeben werden. Das Symbol auf dem Produkt, der Gebrauchsanweisung oder der
Verpackung weist darauf hin. Die Werkstoffe sind gemäß ihrer Kennzeichnung wieder verwertbar. Mit
der Wiederverwendung, der stofflichen Verwertung oder anderen Formen der Verwertung von
Altgeräten leisten Sie einen wichtigen Beitrag zum Schutze unserer Umwelt. Bitte erfragen Sie bei der
Gemeindeverwaltung die zuständige Entsorgungsstelle.

Mode d‘emploi
Filtre à air
N° art. 34060
Cher client,
Nous vous félicitons de votre choix qui s‘est porté sur l‘un de nos produits de qualité. Prière de lire
attentivement et en entier le mode d‘emploi avant la mise en service et de le conserver pour
consultation ultérieure.
(Illustr. 1)
Caractéristiques
• refroidissement, humidification et purification de l‘air
• technologie par photocatalyse, réservoir d‘eau et système de circulation d‘eau
• vitesse de l‘air réglable
• couverture d‘une zone horizontale de 60 degrés par mouvement de va-et-vient automatique
• minuterie (réglable de 0,5 à 7,5 heures)
• télécommande
• alarme en cas de niveau bas de l‘eau

Pour une exploitation performante en toute sécurité
- Veiller à ne pas endommager le câble d‘alimentation au secteur.
- Quand l‘appareil n‘est pas utilisé, débrancher le câble du secteur d‘alimentation.
- Pour ce faire, ne jamais tirer sur le câble même mais toujours à la fiche.
- Ne pas démonter l‘appareil et n‘effectuer en aucun cas des modifications.
- Ne pas faire fonctionner l‘appareil dans des zones soumises à des températures extrêmes
(en dessous de 0°C ou au dessus de 50°C) ou qui sont soumises à une exposition directe au
rayonnement du soleil.
- Déplacer lentement l‘appareil lorsque le réservoir contient de l‘eau afin qu‘elle ne déborde pas.
- Ne pas placer l‘appareil à proximité de matières explosives.
- Ne pas déposer d‘objets lourds sur l‘appareil afin d‘éviter tout endommagement ou toute panne.
- Veiller à ce que les enfants ne puissent pas jouer avec l‘appareil.
Avant d‘effectuer le remplissage d‘eau, placer l‘appareil en position ARRÊT puis débrancher le
câble d‘alimentation au secteur. Veiller à ne pas trop remplir l‘appareil.
- L‘appareil disposant d‘une fonction d‘humidification de l‘air, il est déconseillé de l‘utiliser sur une
période prolongée dans un milieu appauvri en air (par ex. une petite pièce fermée) afin d‘éviter un
développement trop important d‘humidité.
- Si l‘appareil n‘est pas utilisé pendant longtemps, il convient de le débrancher et de vider le
réservoir d‘eau.
- Vidanger régulièrement l‘eau afin de n‘utiliser que de l‘eau propre.
Placer l‘appareil à la verticale.
- L‘appareil ne doit pas entrer en contact avec de l‘eau qui goutte ou qui gicle.
- Ne pas placer l‘appareil dans un endroit trop étroit et limité comme par ex. sur une étagère ou dans
un placard intégré.
A T T E N T I O N : L‘APPAREIL DOIT ÊTRE RÉGLÉ OU REPARÉ UNIQUEMENT PAR
DU PERSONNEL DE MAINTENANCE QUALIFIÉ !
Description de l‘appareil
(Illustr. 2)
Champ de commande
(Illustr. 3)
Télécommande
(Illustr. 4)
Mode télécommandé
1) Faire glisser le couvercle du boîtier
des piles situé sous le socle de la
télécommande. Insérer 2 piles de 1,5 V
Micro AAA. Prière de respecter la bonne
polarité (voir illustr. dans le boitier des
piles). Refermer le boîtier.
2) Le voyant s‘allume à chaque fois
qu‘un bouton est actionné.
3) Lorsque la télécommande ne
fonctionne pas même à faible
distance de l‘appareil, changer
les piles.
4) S‘assurer que les enfants ne puissent
pas jouer avec l‘appareil.

Avant la mise en service
1. Remplir le réservoir d‘eau avant de mettre l‘appareil en service.
2. Ôter le chassis arrière avant le remplissage, puis remplir le réservoir d‘eau le long du filet noir.
3. Pour augmenter le refroidissement de l‘air, ouvrir le capot arrière et placer dans le réservoir
d‘eau une des recharges de glace (livrées avec l‘appareil) auparavant congelée.
I N D I C A T I O N S : • Ne pas placer la recharge de glace dans le réservoir rempli à ras
bord, l‘eau viendrait sinon à déborder.
• Ne pas ouvrir les recharges de glace ni les vidanger de leur eau.
Pour le nettoyage du réservoir, voir paragraphe «ENTRETIEN».
Fonctionnement Généralités
1. Bouton de MISE EN MARCHE
- Brancher la fiche dans la prise au secteur. Un signal sonore doit alors se faire entendre.
- Appuyer sur le bouton de MISE EN MARCHE. Le voyant de fonctionnement ainsi que les
indicateurs d‘alimentation électrique et de vitesse «haut» s‘allument, accompagnés d‘un signal
sonore. L‘appareil fonctionne maintenant à plein régime. Pour l‘arrêter, appuyer de nouveau sur
le bouton de MISE EN MARCHE.
2. Bouton VITESSE ventilateur
- Appuyer une fois sur le bouton. L‘indicateur de vitesse «moyen» s‘allume et de l‘air se dégage à
moyenne vitesse.
- En appuyant deux fois sur le bouton, l‘indicateur de vitesse «bas» s‘allume et de l‘air se dégage à
basse vitesse.
- En appuyant trois fois sur le bouton, les indicateurs «haut» et «sommeil» s‘allument, et de l‘air se
dégage à haute vitesse en mode sommeil.
Mode SOMMEIL : En l‘espace de 30 minutes, de l‘air se dégage en alternance à haute vitesse
pendant env. 2 mn puis à vitesse moyenne pendant env. 1 mn. Le mode de
fonctionnement bascule ensuite pendant environ 30 mn sur «moyen» +
«sommeil» pour rester après constamment en mode «bas» + «sommeil»
jusqu‘à l‘arrêt de l‘appareil.
- En appuyant quatre fois sur le bouton, les indicateurs «moyen» et «sommeil» s‘allument, et de
l‘air se dégage à moyenne vitesse en mode sommeil.
Mode SOMMEIL : En l‘espace de 30 minutes, de l‘air se dégage en alternance à moyenne
vitesse pendant env. 2 mn puis à basse vitesse pendant env. 1 mn. Le mode
de fonctionnement bascule ensuite pendant environ 30 mn sur «bas» +
«sommeil» pour rester après constamment en mode «bas» + «sommeil»
jusqu‘à l‘arrêt de l‘appareil.
- En appuyant cinq fois sur le bouton, les indicateurs «bas» et «sommeil» s‘allument, et de l‘air se
dégage à basse vitesse en mode sommeil.
Mode SOMMEIL : en alternance env. 2 mn en mode «bas» et env. 1 mn sans ventilation jusqu‘à
l‘arrêt de l‘appareil.
I N D I C A T I O N : • Ne pas orienter l‘appareil directement vers le corps afin d‘éviter toute
hypothermie en mode sommeil.
- En appuyant six fois, l‘appareil revient en mode initial «haut».
3. Bouton d‘OSCILLATION
- Appuyer sur le bouton d‘OSCILLATION , le voyant s‘allume et la ventilation s‘effectue en va-et-
vient. Cela couvre une zone horizontale de 60 degrés. Appuyer de nouveau sur le bouton pour
maintenir l‘appareil dans la position voulue. Le voyant s‘éteint.
4. Bouton de PRÉRÉGLAGE MINUTERIE
- Appuyer à chaque fois une fois sur le bouton de préréglage de la minuterie pour prolonger la
minuterie d‘une demi-heure à 7,5 heures.
- Appuyer 1 fois : préréglage minuterie 30 mn, le voyant 0,5 s‘allume.
- Appuyer 2 fois : préréglage minuterie 1 h, le voyant 1 s‘allume.
- Appuyer 3 fois : préréglage minuterie 1,5 h, les voyants 0,5 + 1 s‘allument.
- Appuyer 4 fois : préréglage minuterie 2 h, les voyants 2 s‘allument.
- Appuyer 5 fois : préréglage minuterie 2,5 h, les voyants 0,5 + 2 s‘allument.
- Appuyer 6 fois : préréglage minuterie 3 h, les voyants 1 + 2 s‘allument.
- Appuyer 7 fois : préréglage minuterie 3,5 h, les voyants 0,5, 1 + 2 s‘allument.
- Appuyer 8 fois : préréglage minuterie 4 h, le voyant 4 s‘allume.
- Appuyer 9 fois : préréglage minuterie 4,5 h, les voyants 0,5 + 4 s‘allument.
- Appuyer 10 fois : préréglage minuterie 5 h, les voyants 1 + 4 s‘allument.
- Appuyer 11 fois : préréglage minuterie 5,5 h, les voyants 0,5, 1 + 4 s‘allument.
- Appuyer 12 fois : préréglage minuterie 6 h, les voyants 2 + 4 s‘allument.
- Appuyer 13 fois : préréglage minuterie 6,5 h, les voyants 0,5, 2 + 4 s‘allument.
- Appuyer 14 fois : préréglage minuterie 7 h, les voyants 1, 2 + 4 s‘allument.
- Appuyer 15 fois : préréglage minuterie 7,5 h, les voyants 0,5, 1, 2 + 4 s‘allument.
- Appuyer 16 fois : retour au mode préréglage minuterie, tous les voyants s‘éteignent.
5. Bouton REFROIDISSEMENT (et HUMIDIFICATION) D‘AIR
- Appuyer sur le bouton REFROIDISSEMENT d‘AIR. Le voyant rouge «NIVEAU D‘EAU» clignote
pour rappeler de vérifier le niveau de l‘eau. Le voyant «HUMIDIFICATION D‘AIR» s‘allume
automatiquement dès qu‘un niveau d‘eau correct est atteint ; la pompe se met en route dès que
le voyant rouge s‘éteint.
- Environ 3 minutes après se dégage de l‘air agréablement humide.
- Appuyer de nouveau sur le bouton pour arrêter l‘appareil. Le voyant «HUMIDIFICATION D‘AIR»
s‘éteint et de l‘air agréablement frais et sec se dégage.
I N D I C A T I O N S : • Si le niveau d‘eau est trop bas (au moins 2,7 l), un signal d‘alarme
sonore retentit (5 fois), et le voyant «NIVEAU D‘EAU» clignote, mais de
l‘air frais se dégage cependant comme auparavant.
• Une heure après, un signal d‘alarme sonore retentit de nouveau
(5 fois), le ventilateur est automatiquement stoppé jusqu‘au
remplissage de l‘eau. Le voyant rouge «NIVEAU D‘EAU» s‘allume et le
voyant vert «HUMIDIFICATION D‘AIR» s‘éteint.
6. Levier de CHANGEMENT DE DIRECTION
- Bouger la pale située à l‘intérieur à l‘aide du levier. Ceci change le sens de projection de l‘air vers
le haut et vers le bas.
I N D I C A T I O N : • Sans eau, l‘appareil peut fonctionner comme un ventilateur électrique
classique. Il suffit pour cela de laisser à zéro le bouton
REFROIDISSEMENT d‘AIR. (Les voyants «HUMIDIFICATION D‘AIR» et
«NIVEAU D‘EAU» ne s‘allument alors pas.)
Données techniques
Tension d‘alimentation : 230 V ca / 50 Hz
Puissance d‘entrée : 80 W
Classe de protection : I
Capacité réservoir d‘eau : env. 11 l
Consommation d‘eau : env. 1,8 l/h
Poids : env. 9,5 kg
Dimensions : Long. x larg. x haut. : 268 x 402 x 753 mm
Alimentation télécommande : 2 piles x 1,5 V Micro AAA (non incluses)

Entretien
Nettoyer le tissu filtrant et le réservoir d‘eau.
Nettoyer le système de filtration une fois par semaine afin d‘assurer la purification et une bonne
humidification de l‘air
(Illustr. 5).
1. Débrancher le câble d‘alimentation à la prise du secteur.
2. Dévisser le capot arrière, appuyer sur les boutons élastiques en haut du capot pour les retirer de
l‘appareil.
3. Retirer le tissu filtrant et le filtre photocatalyseur du capot.
4. Nettoyer le tissu filtrant avec de l‘eau et déposer le filtre photocatalyseur au soleil pour le
réactiver. Ne nettoyer en aucun cas le filtre photocatalyseur à l‘eau.
5. Fixer de nouveau le tissu filtrant sec et le filtre photocatalyseur sur le capot arrière.
6. Nettoyer le tamis à eau à l‘aide d‘une brosse. Il n‘est pour cela pas nécessaire de le retirer de
l‘appareil.
7. Remettre en place le capot arrière sur l‘appareil.
8. Remplir le réservoir d‘eau, brancher le câble à la prise du secteur. Appuyer ensuite sur le bouton
de MISE EN ROUTE puis surle bouton REFROIDISSEMENT d‘AIR. 5 minutes après, arrêter
tous les boutons et retirer le câble de la prise du secteur. Enlever le capuchon en plastique à la
SORTIE de l‘EAU et vidanger l‘eau sale.
9. Avant de remettre l‘appareil en route, prière de lire entièrement le paragraphe «AVANT LA MISE
EN ROUTE».
Indication
Sécher le tissu filtrant et le filtre photocatalyseur lorsque l‘appareil n‘est pas en service pour une
longue période. Vidanger également toute l‘eau se trouvant dans l‘appareil.
Causes générales de panne et remédiation
Panne
Cause
Remède
Aucun air ne se
dégage
• pas de courant
• l‘appareil n‘est pas en
marche
• des parties de l‘appareil sont
endommagées
• rebrancher correctement le câble à la
prise réseau
• appuyer sur le bouton de MISE EN
MARCHE de l‘appareil
• amener l‘appareil chez un spécialiste pour
réparation
L‘appareil ne s‘arrête
pas
• le bouton de MISE EN
MARCHE n‘est pas appuyé
• des parties de l‘appareil sont
endommagées
• appuyer sur le bouton de MISE EN
MARCHE pour éteindre l‘appareil
• amener l‘appareil chez un spécialiste pour
réparation
L‘appareil fait des
bruits
• il y a des corps étrangers
dans la partie arrière de
l‘appareil
• le moteur est défectueux
• la roue de ventilation est mal
serrée
• Ôter le capot arrière et retirer le tissu
filtrant, enlever les corps étrangers
• amener l‘appareil chez un spécialiste pour
réparation
• amener l‘appareil chez un spécialiste pour
réparation
Pas d‘humidification
• il manque de l‘eau
• la pompe est en panne
• la conduite d‘eau est tombée
• rajouter de l‘eau
• amener l‘appareil chez un spécialiste pour
réparation
• amener l‘appareil chez un spécialiste pour
réparation
Pas de va-et-vient
• le moteur à lame est
défectueux
• amener l‘appareil chez un spécialiste pour
réparation
Attention: Recommandations importantes sur les piles « Télécommande »
• Nous vous recommandons l´utilisation de piles alcalines pour un rendement optimal.
• Ne mélangez jamais des piles usagées et des piles neuves ou des piles jetables et des
accumulateurs.
• N´utilisez jamais en même temps des piles de types différents (par exemple des piles alcalines et
des piles zinc charbon).
• Retirez les piles, si vous n´utilisez pas l´appareil pendant un certain temps. Un écoulement des
piles peut endommager de manière définitive votre appareil.
• Recommandations sur le recyclage des piles:
Les piles sont soumises à des réglementations législatives. Aussi, vous devez après utilisation
rapporter vos piles usagées soit au magasin de vente, soit à un point de collecte des filières de
recyclage des services publiques agrées. Vous ne devez en aucun cas jeter vos piles usagées
dans les ordures ménagères, dans les sacs jaunes ou semblables. Veuillez vous assurer, avant
de jeter vos piles usagées dans les containers de collecte, qu´elles soient déchargées et qu´elles
soient protégées contre un potentiel court-circuit (par exemple, en collant les pôles).
Consignes générales
1. Les appareils électriques, le matériel d’emballage, etc. doivent être tenus hors de portée des
enfants.
2. L’emballage et le matériel d‘usure (films, produits usagés) doivent être évacués sans nuire à
l’environnement.
3. La remise d’un produit à un tiers doit être accompagnée de son mode d‘emploi.
4. Afin d´améliorer constamment nos produits, nous nous réservons le droit d´apporter des
modifications sur le design et les données techniques sans information préalable.

Consignes de sécurité
Important : Le droit à garantie expire pour les dommages résultant de la non observation des
instructions de service. ISOTRONIC décline toute responsabilité pour les dommages en résultant.
- L’appareil doit uniquement être exploité avec la tension prévue.
- Dans le cas de réparations, seules des pièces détachées d’origine doivent être utilisées
pour exclure des dommages sérieux.
- Les conduites d’alimentation et les câbles conducteurs de tension reliés à l’appareil doivent être
contrôlés pour savoir s’ils présentent des ruptures ou des défauts d’isolation. Si un défaut devait
être constaté ou dans le cas d’un dommage apparent, l’appareil ne doit pas être mis en service.
- Une réparation ou d’autres travaux comme le remplacement d’un fusible, etc. doivent
uniquement être confiés à un spécialiste.
- Ne pas oublier que les erreurs d’utilisation ou de branchement sont hors de la garantie
d‘ISOTRONIC et que la société décline toute responsabilité pour les dommages en résultant.
- Dans chaque cas, il convient de contrôler si l’appareil convient à l’utilisation prévue.
Garantie
Nous accordons une garantie de 2 ans sur cet appareil. La garantie porte sur l’élimination de tous les
vices dus à un matériel non correct ou à un défaut de fabrication. Aucune garantie n'est donnée sur
des pièces d'usure. Etant donné qu‘ISOTRONIC n’a aucune influence sur le montage ou la
commande correcte et adéquate, elle n’assure que la garantie de l’intégralité et du matériel correct.
Le fabricant décline toute responsabilité pour les dommages ou dommages subséquents liés à ce
produit. Ceci est notamment valable lorsque des modifications ou des tentatives de réparation sont
effectuées sur l’appareil, lorsque des circuits sont modifiés ou que d’autres composants ont été
utilisés ou encore lorsque les dommages résultent d’erreurs de commande, d’un traitement négligent
ou abusif.
Votre
Équipe ISOTRONIC D- 72160 Horb
Mise à jour : 07/08
Consigne sur la protection de l´environnement
Ce produit ne doit pas être jeté dans vos ordures ménagères lorsqu´il parvient en fin vie, mais doit
être déposé dans un centre de collecte pour le recyclage d´appareils électriques et électroniques.
Le symbole indiqué sur le produit, dans le mode d´emploi ou sur l´emballage le signale. Les
matériaux sont réutilisables selon leurs caractéristiques. Grâce au recyclage, à la réutilisation
matérielle ou toute autre forme de recyclage, vous contribuez considérablement à la protection de
notre environnement. Veuillez vous informer auprès de votre municipalité pour connaître le centre
de collecte compétent.

Instructions for Use
Air filter
Art.-Nr. 34060
Dear Client,
Congratulations for choosing one of our quality products. Please follow these instructions carefully
and keep them with you.
(Fig. 1)
Features
• Air cooling, humidifying and air purifying
• Photo-catalysis technology, water tank and water circulation system.
• Adjustable air speed
• Coverage of a horizontal area of 60 degrees by automatic back-and-forth movement
• Time switch (adjustable from 0.5 to 7.5 hours)
• Remote control
• Low water level alarm

For safe and powerful operation
- Please take care not to damage the mains power supply cable.
- When the unit is not in use, disconnect the mains power cable. Never pull on the cable, but always
on the plug.
- Do not take the unit apart and never make any modifications to it.
- Do not use the unit in areas with extreme temperature conditions (below 0ºC or above 50ºC) or
where it is exposed to direct sunlight.
- Move the unit slowly when it is filled with water to prevent it from spilling.
- Do not place the unit close to explosives.
- Do not place heavy objects on the unit, to prevent damage or malfunctions.
- Please take care that children do not play with the unit.
- Switch the unit OFF and pull the plug out before filling up with water. Please take care not to
overfill the unit.
- Because the unit also has a humidifying function, it should not be operated in a room low on fresh
air supply (e.g. a small closed room), in order to avoid too high humidity.
- When the unit is not in use for a longer period, empty the water tank and pull the mains power
supply plug.
- Replace the water regularly to ensure it is clean.
- Place the unit in an upright position.
- The unit should not come into contact with dripping or spraying water.
- Do not place the unit in a cramped, closed in space, such as a bookcase or built-in wardrobe.
CAUTION: THE UNIT SHOULD ONLY BE ADJUSTED OR REPAIRED BY QUALIFIED
MAINTENANCE STAFF!
Description of unit
(Fig. 2)
Operator panel
(Fig. 3)
Remote control
(Fig. 4)
Remote-controlled operation
1) Slide open the battery cover at
the bottom of the remote control.
Insert the 2 x 1.5V Micro AAA
batteries. Please observe the correct
polarity (see illustration in battery
compartment). Close the battery
compartment again.
2) The display lights up every time a
button is pressed.
3) If the remote control does not
function even a short distance away
from the unit, replace the batteries.
4) Please take care that children do
not play with the unit.

Before operation
1. Fill the water tank with water before operating the unit.
2. To fill up with water, remove the back cover and pour the water along the black net in the tank.
3. To increase the air-cooling capacity, open the back cover and place the (supplied) pre-frozen ice
box into the water tank.
INSTRUCTIONS: • Do not place the ice box in a full water tank, otherwise the water will
overflow.
• Do not open the ice box and do not replace the water in it.
For the cleaning of the water tank, see the section ‘MAINTENANCE’.
Operation – general
1. ON/OFF SWITCH
- Plug the unit into the wall socket. You will hear a beep.
- Push the ON/OFF SWITCH. The function lights as well as the power supply and speed ‘High’
displays lights up with a beep. The unit now runs at top strength. Push the ON/OFF SWITCH
again to switch the unit off.
2. Fan SPEED button
- Push the button once. The speed display ‘Medium” lights up and air is blown out at medium
speed.
- By pressing the button twice, the “Low” display lights up and air is blown out at low speed.
- By pressing the button three times, the displays ‘High’ and ‘Sleep” light up and air is blown out
at high speed in sleep mode.
SLEEP mode: In a 30-minute period, higher speed air of approximately two minutes
alternates with medium-speed air of approximately one minute. Thereafter the operating mode
switches to ‘Medium’ + ‘Sleep’ for around 30 minutes before switching to ‘Low’ + ‘Sleep’ up to
switching off.
- By pressing the button several times, the displays ‘Medium’ and ‘Sleep” light up and air is
blown out at medium speed in sleep mode.
SLEEP mode: In a 30-minute period, medium-speed air of approximately two minutes
alternates with lower speed air of approximately one minute. Thereafter the operating mode
switches to ‘Low’ + ‘Sleep’ for around 30 minutes and continues in the ‘Low’ + ‘Sleep’ mode up
to switching off.
- By pressing the button five times, the displays ‘Low’ and ‘Sleep” light up and air is blown out at
low speed in sleep mode.
SLEEP mode: Approximately 2 minutes “Low” and approximately 1 minute blowing
alternates until the unit switches OFF.
INSTRUCTIONS:• Do not direct the unit straight at you body, so that it does not cause
hypothermia.
- By pressing the button six times, the unit returns to its original operating mode 'High'.
3. SWING button
- Press the SWING button, the display lights up and the fan moves back and forth. It covers a
horizontal area of 60 degrees. Press the button again to stop the movement at the required
position. The display turns off.
4. TIMER button
- Always press the timer button once to increase the set time by half an hour up to 7.5 hours.
- Press once: set time 30 min., the display 0.5 lights up.
- Press twice: set time 1 hour, the display 1 lights up.
- Press 3 times: set time 1.5 hours, the displays 0.5 + 1 light up.
- Press 4 times: set time 2 hours, the display 2 lights up.
- Press 5 times: set time 2.5 hours, the displays 0.5 + 2 light up.
- Press 6 times: set time 3 hours, the displays 1 + 2 light up.
- Press 7 times: set time 3.5 hours, the displays 0.5, 1 + 2 light up.
- Press 8 times: set time 4 hours, the display 4 lights up.
- Press 9 times: set time 4.5 hours, the displays 0.5 + 4 light up.
- Press 10 times: set time 5 hours, the displays 1 + 4 light up.
- Press 11 times: set time 5.5 hours, the displays 0.5, 1 + 4 light up.
- Press 12 times: set time 6 hours, the displays 2 + 4 light up.
- Press 13 times: set time 6.5 hours, the displays 0.5, 2 + 4 light up.
- Press 14 times: set time 7 hours, the displays 1, 2 + 4 light up.
- Press 15 times: set time 7.5 hours, the displays 0.5, 1, 2 + 4 light up.
- Press 16 times: Return to set time operating mode, all displays turn off.
5. AIR COOLING (HUMIDIFYING) button
- Push the AIR COOLING button. The blinking red display ‘WATER LEVEL’ is to remind you to
check the water level. The display ‘HUMIDIFYING’ automatically lights up as soon as the
correct water level is reached and the pump begins to operate as soon as the red display turns
off.
- Pleasant humid air blows out after approximately 3 minutes.
- Push the button again to switch the unit off. The ‘HUMIDIFYING’ display turns off and fresh, dry
air blows out.
INSTRUCTIONS: • At a too low water level (min. 2.7 litres) an alarm sounds (5 times) and
the red display ‘WATER LEVEL’ blinks, even though cool air is still
blown out.
• After one hour the alarm again sounds (5 times) and the fan stops
until the water is refilled. The red ‘WATER LEVEL’ display lights up
and the green ‘HUMIDIFYING’ display turns off.
6. CHANGE OF DIRECTION lever
- Move the fins on the inside with the lever. With that the airflow direction can be changed
upwards or downwards.
INSTRUCTION: • The unit can also be operated as a normal electric fan without water.
Leave the AIR COOLING button switched off for that purpose. (The
‘HUMIDIFYING’ and ‘WATER LEVEL’ displays do not light up.)
Technical data
Power supply: 230 V AC / 50 Hz
Power input: 80 W
Protection class: I
Water tank capacity: approx. 11 l
Water consumption: approx. 1.8 l/h
Weight: approx. 9.5 kg
Dimensions: L x W x H: 268 x 402 x 753 mm
Remote control power supply: 2 x 1.5V Micro AAA batteries (not included)

Maintenance
Clean the filter fabric and the water tank.
Clean the filter system once a week to guarantee a proper humidifying and cleaning process.
(Fig. 5)
1. Pull the mains power cable from the wall socket.
2. Unscrew the back cover, press the elastic buttons at the top of the cover and remove from unit.
3. Remove the filter fabric and the photo-catalytic filter from the cover.
4. Wash the filter fabric with water and place the photo-catalytic filter in the sun for reactivation.
Never wash the photo-catalytic filter with water.
5. Reaffix the dry filter fabric and the photo-catalytic filter to the back cover.
6. Clean the water net with a brush. It is not necessary to remove it from the unit.
7. Replace the back cover on the unit.
8. Pour water into the tank and plug the cable into the wall socket. Push the ON/OFF SWITCH and
then the AIR COOLING button. Switch off all buttons after 5 minutes and pull the plug from the
wall socket. Open the rubber plug on the WATER OUTFLOW and let the dirty water out.
9. Before reactivating the unit, read the section on ‘BEFORE OPERATION’.
Instruction
Dry the filter fabric and the photo-catalytic filter when the unit will not be used for a longer period of
time. Also empty all water from the unit.
General malfunctions and troubleshooting
Malfunction
Cause
Troubleshooting
No airflow
• No power
• Unit not in operation
• Parts of unit damaged
• Connect the power cable properly to the wall
socket
• Push the ON/OFF SWITCH on the unit.
• Take the unit to a professional service
technician
The unit does
not switch off
• The ON/OFF SWITCH
has not been pushed
• Parts of unit damaged
• Push the ON/OFF SWITCH to switch the unit
off
• Take the unit to a professional service
technician
The unit emits
noises
• There are foreign
objects in the back part of
the unit
• The motor is
malfunctioning
• The fan is loose
• Take off the back cover and filter fabric and
remove the foreign object
• Take the unit to a professional service
technician
• Take the unit to a professional service
technician
No humidifying
• Lack of water
• The pump is
malfunctioning
• The water pipe has
dropped off
• Refill with water
• Take the unit to a professional service
technician
• Take the unit to a professional service
technician
No back-andforth
movement
• The blade motor is
malfunctioning
• Take the unit to a professional service
technician
Attention: Important battery notice
• We recommend to use alkaline batteries for best possible performance.
• Never mix old and new batteries or one-way batteries and accumulators.
• Never use different types of batteries (eg alkaline and zinc carbon) at the same time.
• Remove the batteries if the device is not used for a long time. Leakage of batteries can cause
permanent damage to the device.
• Instructions for battery disposal:
Batteries are subject to legal provisions. After use they must therefore be returned to the point of
sale or to a collecting point of public facilities for harmful substances. Batteries may never be
disposed as household waste, in the yellow sack or other. Dispose of batteries only when
completely discharged into a waste batteries collecting container and take precautions against
short circuit (eg by masking the poles).
Safety instructions
Important: Damage caused by not adhering to the operating instructions is not covered by
guarantee. ISOTRONIC accepts no liability whatsoever for any resulting consequent damages.
- Only operate the device at its intended voltage.
- In case of repairs, only use original spare parts, to avoid serious damage.
- Check feed cables and conducting cables connected to the device for breaks or insulation defects.
If you find a defect, or there is visible damage do not use the device.
- Repairs or other works, e.g. changing a fuse, etc. may only be carried out by an appropriately
trained, skilled person.
- It must be noted that operator or connecting errors lie outside the influence of ISOTRONIC and we
cannot accept any liability for resulting damages.
- Always check whether the device is suitable for the respective place where you intend using it.

General information
1. Electric appliances, packaging material etc. should be kept away from children.
2. Dispose packaging and worn out material correctly and in an environmentally friendly way.
3. Do only pass on the device including the operation manual.
4. Subject to change of design and technical data without notice for the sake of constant product
improvement.
Guarantee
We grant a two year guarantee for this device. Since ISOTRONIC has no influence on correct and
appropriate assemblage and operation it is obvious that guarantee applies only on completeness and
proper condition. ISOTRONIC takes on neither liability nor guarantee for damages or consequential
damages in connection with this product. This applies especially when the device was altered or
repaired, when circuits were changed or non-original spare parts were used or when damage was
caused by false or negligent operation or abuse.
Your
ISOTRONIC-Team D- 72160 Horb
Status: 07/08
Environmental protection notice
At the end of its life span this product may not be disposed as normal household waste but must be
disposed of at a collecting place for recycling of electrical and electronic equipment. The icon on the
product, in the manual, or on the packing points to this fact. The materials are recyclable according to
their labelling. Through reusing, material recycling, or other forms of utilisation of old devices you
make an important contribution to the protection of the environment. Please ask the local
administration for the responsible waste disposal centre.
 Loading...