

Page 1
Ice maker Clear installation and
first usage
Page 2
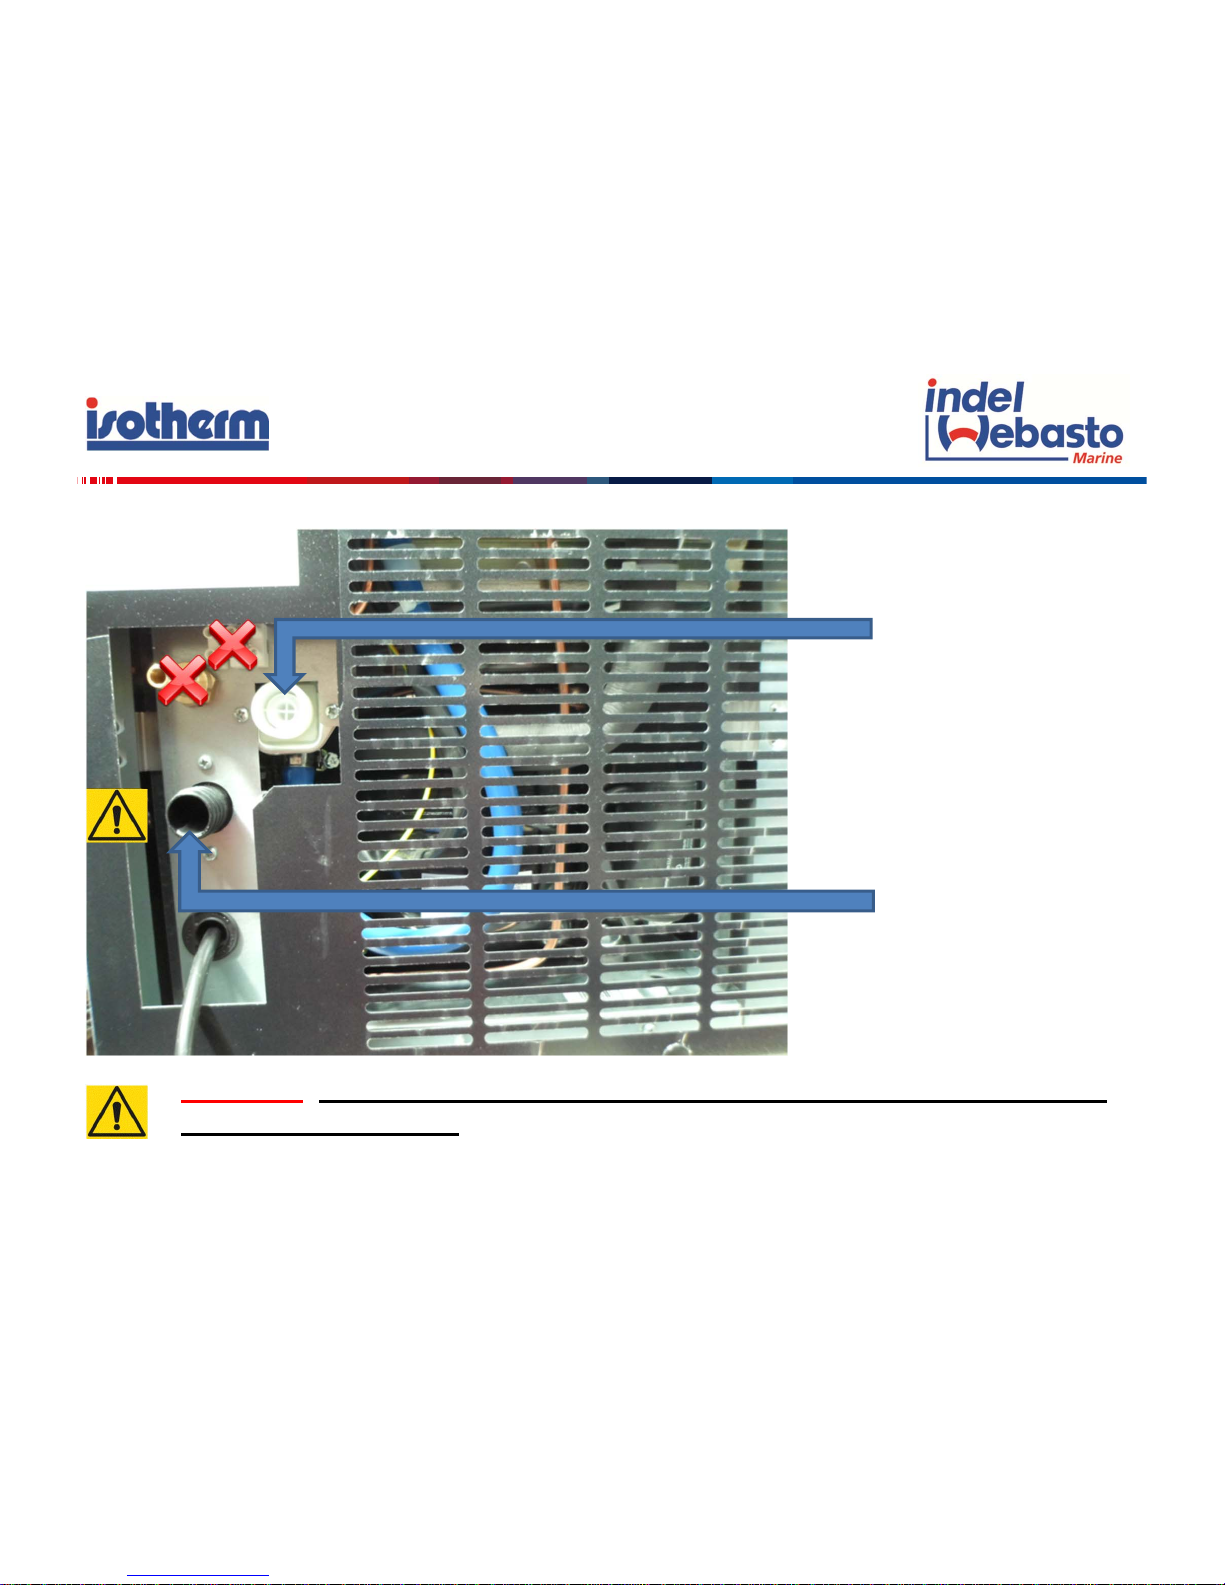
Like all Indel Webasto Marine products the most important thing is:
VENTILATION
Producing ice requires a higher heat removal so ventilation must be more than
adequate. The ice-maker gets fresh air off the front grid and blows it off the back
much hotter. To make the ice-maker work perfectly it’s important that the front grid
is always open and not partially or completely blocked. At the same time on the
back of the installation hole a ventilation grid has to be created to let hot air out.
If ventilation is difficult to achieve Indel Webasto Marine can supply a ventilation kit
which allows to direct the hot air flux to the outside, making the installation more
versatile.
Ventilation kit 230V 50-60Hz spare part number SBE00094AA
Ventilation kit 115V 60Hz spare part number SBE00108AA
Page 3

The ice-maker gets fresh air off the front grid and blows it out off the back
Page 4

Connection to boat main water system
On the back of the ice-maker there are all the necessary connections to connect it
on the boat main water system. The ice-maker is supplied with a water inlet hose
(blue) and a water outlet hose (grey).
The package also inlcudes:
• Plastic scoop
• 4 plastic feet
• Instruction manual
Page 5
Water inlet – connect
included blue hose
Water outlet –
connect included
grey hose
Attention: water falls by gravitu, keep the water outlet hose lower than
the exit. Avoid loops.
Page 6

It is important also to prime the ice-maker manually before first usage.
Lift up the ice-maker lid and lift up the flappers. Pour 3 liters of potable or mineral
water into the water bin. Indel Weabsto Marine ice-maker is especially built to work
with potable or mineral water only.
Page 7

Connect the ice-maker to the main power
supply system.
Press the button in front of the ice-maker to turn
it on.
Page 8

The ice-maker has been correctly installed, it has been correctly connected and has
been manually primed: it’s now ready to produce ice.
Once on the ice-maker takes 30-40 minutes for the first ice cycle. This is because
the ice-maker has to cool all the water inside the water bin as well as all the cooling
system.
After the first cycle the ice-maker takes 10 minutes to make any other ice cycle; this
until the ice bin is full or the ice-maker is manually turned off.
Attention: the time needed for the first ice cycle may vary depending on the
ambient temperature: the higher the temperature the more time it takes, the lower
the temperature the less.
Page 9

Beneath the vent grid
Ice-bin thermostat. This thermostat regulates the quantity
of ice to be stored in the ice bin before turnin g the icemaker off automatically.
Evaporator thermostat. This thermostat regulates the
temperature of the evaporator and the «thickness» of
the ice.
Timer. The timer regulates the frost and defrost time
span. Attention: the timer turns clockwise only
Page 10

Thermostats setting
Evaporator thermostat and ice bin thermostat are both set between 4 and 5 on a
scalefrom1to7;It’s important not to alter their setting even when working
with high ambient temperatures.
Ice formation cycle. In this phase the pump is
sprays water onto the evaporator and starts
creating ice cubes.
Defrost cycle. While the timer is in this position the
ice-maker refills automatically and ice falls into the
ice bin. Pump isn’t working
Page 11

It’s also possible to use the ice-maker with a water-kit (sold separately) to make ice
out of mineral water..
Water kit 230V 50-60Hz spare part number SGG00001LA
Water kit 115V 60Hz spare part number SGG00002MA
On the back of the ice-maker there are all the connections needed to make ice out
of mineral water. Inside the water-kit package there are 2 hoses and a kit of
stainless steel bands for the installation of the water-kit.
Page 12

Water outlet – connect
the 18 mm hose included
in the water-kit package
Terminal for the waterkit pump connection
Indel Webasto Marine
made modification for
water inlet – connect
the 9 mm hose included
in the water kit package
Page 13

To connect the water-kit pump to the
ice-maker check the sticker applied to
the back of the ice maker. See the
small wiring diagram
Whether the water-kit is 115V or 230V
one of the pump wiring has writings on
it. This wiring has to be connected
on«L» while the other one on «N».
Page 14

It is important also to prime the ice-maker manually before first usage.
Lift up the ice-maker lid and lift up the flappers. Pour 3 liters of potable or mineral
water into the water bin. Indel Weabsto Marine ice-maker is especially built to work
with potable or mineral water only.
Page 15

Loading the water-kit
First it’s necessary to clean accurately the water-kit to remove eventaul impurities.
The lid on top of the water-kit is removable. Once cleaned up it’s now possible to
tight the lid. Now it’s possible to fill the water-kit up which can store up to 15 liters of
potable or mineral water.
To fill up the water-kit it’s enough to pour water into the ice bin.
This way water falls directly into the
water-kit, making the filling operation
fast and easy.
Page 16

• Indel Webasto Marine Clear ice maker produces18kg per day
• The ice bin is not refrigerated
• In case of long time shutdown it’s necessary to do maintenance on the icemaker as reported at the beginning of the included installation manual.
 Loading...