

Page 1
Page 2

ENGLISH
Thank you for choosing iSocket®. Please take a few minutes to read through these
operating instructions carefully before using the product so that you can get full advantage
of the functionality and get maximum enjoyment from it. Pay special attention to the
safety instructions in Chapter 2! Incorrect use could affect your guarantee or jeopardise
health or property. We reserve the right to make design changes on the device and its
software without prior notice. Deviations not mentioned in this instruction might exist in
the software, which is considered acceptable and not considered a defect. The latest
version of these instructions can be found on our website www.isocketsystems.com. Be
sure to read the terms of warranty before using the device, so that you do not to lose
your rights under the guarantee as a result of improper operation (Chapter 17). You agree
with the terms of warranty and limitation of liability described in Chapter 17 when you
purchase this product. Please keep these operating instructions in a safe place for easy
access when needed. We hope you thoroughly enjoy using your iSocket.
NOTE!
The software supplied with this product is the exclusive property of iSocket
Systems. As an end-user you are granted a non-exclusive license to use
this software solely in combination with the device on which it is installed
and with which it is supplied. The license is non-transferable and you do
not have the rights to grant sublicenses.
Your iSocket device has a unique feature - iSocket
®
Online 24/7 - that gets
the device back online even after a break in the cellular network. However
the device needs a strong cellular signal in the area - it has an internal
antenna and may not operate efficiently if the signal in your area is weak.
Ensure that you have a strong network before using the device. Do not put
metal or other conductive objects near the device - this may cause signal
loss. This product is designed for home and office use only.
This product uses a Lithium-ion battery and MUST NOT be used outside the
specified temperature! Please refer to technical information (Chapter 15)
for detailed information about operating conditions and read the safety
instruction (Chapter 2) carefully.
If you wish to use the iSocket
®
Power Notifier feature (power failure /
power restored alerts), plug in the device for 20 hours before use. This will
charge the built-in battery.
If you use a prepaid card you might be need to activate it first with your
cell phone network provider. More information is available from
http://isocket.me/prepaid
Page 3

iSocket® 3G
www.isocket3g.com
© Copyright iSocket Systems 2017
All rights reserved. Version 1.0.2-EN - 2 - English
Content
Content ............................................................................................................ 2
1. Device Description ......................................................................................... 3
2. Safety Instructions ......................................................................................... 5
3. Quick Start .................................................................................................... 7
4. Managing the iSocket Device ........................................................................... 8
4.1 Managing by Text Commands ..................................................................... 8
4.2 Managing by Phone Call.............................................................................. 9
4.3 Manual Managing ..................................................................................... 10
4.4 Multi Texting Mode .................................................................................. 10
5. Security & Notifications Settings .................................................................... 11
5.1 Security Numbers List Settings .................................................................. 11
5.2 Password Protection ................................................................................. 12
5.3 Configuration of the Numbers for Alerts ...................................................... 12
6. Command Confirmation ................................................................................ 13
6.1 Confirmation of SMS-commands ................................................................ 13
6.2 Free of Charge Confirmation by Call Back ................................................... 14
6.3 Incorrect Commands, Later Configuration and Commands from Unauthorised
Users ........................................................................................................... 14
7. Measurement and Control of Temperature ....................................................... 15
7.1 Thermometer, Temperature Calibration & Display Format ............................. 16
7.2 iSocket Smart Thermostat with Energy Saving & Equipment-Friendly Mode..... 17
7.3 Temperature Monitoring – Notifications, iSocket® Temperature Notifier .......... 19
8. Power Outage & Power Restore Alerts ............................................................. 20
8.1 iSocket® Power Notifier & BALET Feature .................................................... 20
8.2 Equipment-Friendly Power Restore Mode .................................................... 22
9. Date and Time ............................................................................................. 22
10. Scheduler .................................................................................................. 23
11. Credit Information and Subscription Management (experimental) ..................... 24
12. Identification, Device Information & Open API ................................................ 24
13. Original Factory Settings & Remote Update .................................................... 25
14. LED Indicators ........................................................................................... 26
15. Technical Data ........................................................................................... 26
16. Troubleshooting ......................................................................................... 27
17. Limits of Warranty and Liability .................................................................... 28
18. Contacts, Support, News & Social Networks ................................................... 29
Page 4

iSocket® 3G
www.isocket3g.com
© Copyright iSocket Systems 2017
All rights reserved. Version 1.0.2-EN - 3 - English
1. Device Description
iSocket® 3G is the world’s first 3G smart plug that notifies about power outages and
temperature changes on remote sites directly to a cell phone via modern 3G networks,
without using cloud connections - to eliminate delay or possible failure and make such
notification reliable. iSocket 3G does not require Wi-Fi or any other Internet connection at
the remote site, but a cellular network – either GSM or 3G (HSDPA) from operators such
as T-Mobile, AT&T, Rogers, Bell, Telus, Telstra, Optus, Vodafone and many others
worldwide.
Features. While prompt notifications are the main features of iSocket 3G, it has plenty of
other features on its software. Among them are a smart thermostat and remote reboot by
a call. For example, you can reboot your router when it hangs remotely and even do it free
of charge - see Chapter 4.2 and 6.2 for configuration. You will find a list of almost all
features in this user manual. For developers who want to use API we recommend you
check our website www.isocket3g.com for updates and subscribe to our newsletter – go to
http://isocket.me/sub. The information from this user manual will also be useful for
developers.
Temperature monitoring (OPTIONAL). With an optional precision external sensor
connected to iSocket 3G you can measure the temperature of almost any element: air,
water, oil, solid surfaces, etc. Information about temperature will be sent to your cell
phone. iSocket will notify you when the temperature rises beyond, or falls below specified
levels. iSocket has a thermostat that turns equipment on and off according to your
settings. The unique features of iSocket® Smart Software allow you to create an advanced
temperature monitoring system.
How to manage iSocket 3G. This smart plug is controlled remotely by text messages
and therefore can be managed from any cell phone – either smartphones or “classical” cell
phones from any manufacturer. While pure texting mode is the best way to go right from
the box, iSocket 3G has an API developed by iSocket Systems that enables third parties
to build any apps and services around this product. iSocket Systems will also provide
simple apps to work with iSocket 3G – see http://isocket.me/apps for details.
No fees. iSocket Systems do not charge monthly fees! You pay once for the equipment up front - and you are then free to buy a SIM card from any provider you like or use
prepaid SIM cards. We provide some advice on suitable SIM cards for different countries –
please visit http://isocket.me/prepaid. We also plan to sell devices with SIM cards in the
future. When using prepaid cards without monthly fees and pure texting mode to operate
with the device, the cost of ownership will be minimal.
Security. iSocket 3G has been designed with rigid security in mind. We protect your device
from unwanted intrusion – see Chapter 5 for details. Using cellular network technology
instead of a Wi-Fi connection raises the level of security significantly
Remote update. This new iSocket supports FOTA (Firmware Over The Air). If your SIM
card provides a data connection, you can update remote firmware very simply – see
Chapter 13. Please note, the SIM card will be charged for traffic as per rates of your SIM
card provider. The traffic is just a few kilobytes. Ensure there is uninterrupted power to
your iSocket during a firmware update.
Page 5
iSocket® 3G
www.isocket3g.com
© Copyright iSocket Systems 2017
All rights reserved. Version 1.0.2-EN - 4 - English
For more information about the technical characteristics of iSocket 3G see Chapter 15 and
also visit www.isocket3g.com
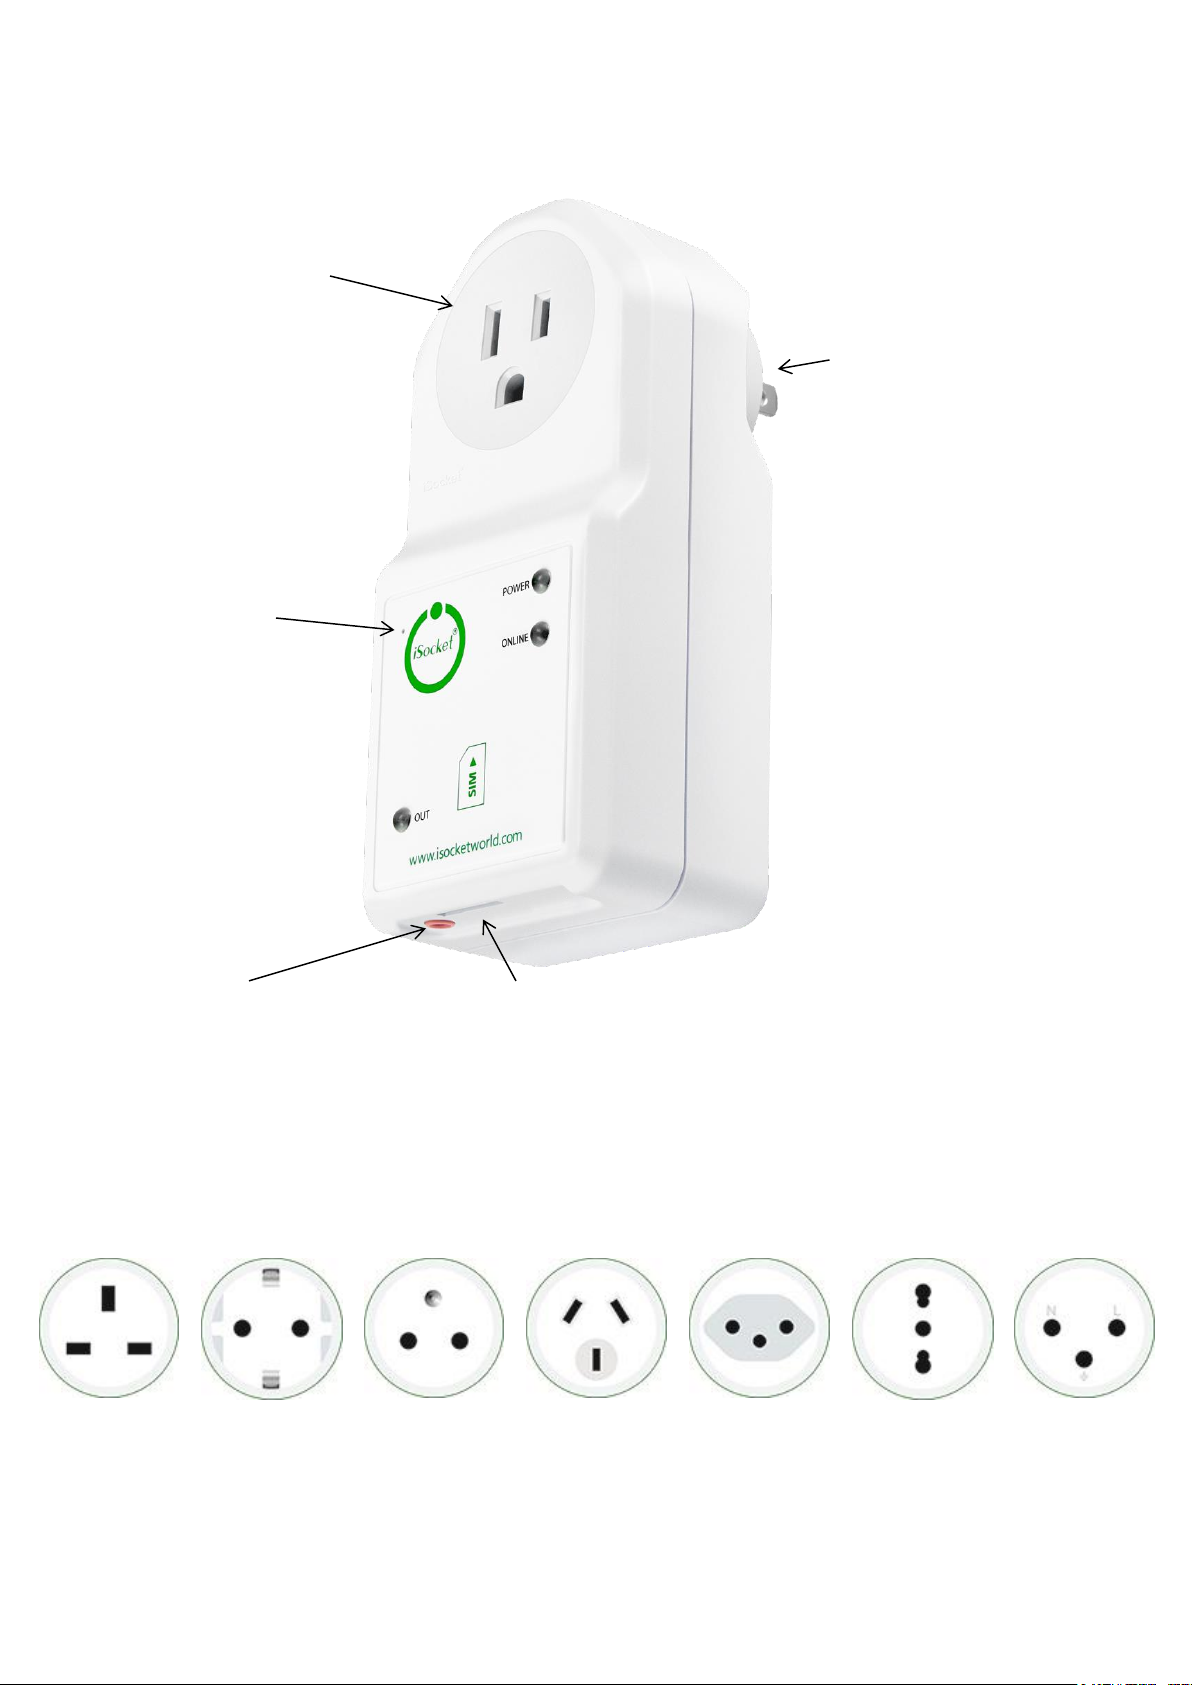
Main power socket
Socket for connecting
external electrical
equipment, which can
be controlled remotely.
(Figure shows
plug/socket type NEMA
5-15, North America,
model IS3GUS).
Hidden button
Used to switch the
main socket manual
(Chapter 4.3) or reset
device (Chapter 13).
OUT
Indicator of output
power for main
socket.
Plug to connect
iSocket to the wall
socket to provide
power for device and
for connected
appliance.
POWER
Indicator of input
power from power
network.
ONLINE
Status indicator for
mobile network.
Additional information
about the indicators is
given in Chapter 14.
Socket for
TEMPERATURE sensor
3.5mm jack, RED (See
Chapter 7)
Socket for SIM- card (micro SIM)
Pictures below describe the plugs and sockets of other models.
Socket/Plug:
BS 1363
(British)
Socket/Plug:
CEE 7/4,
German
"Schuko"
Socket/Plug:
CEE 7/5
(French)
Socket/Plug:
AS/NZS 3112
(Australian)
Socket/Plug:
SEV 1011
(Swiss)
Socket/Plug:
CEI 23-50
S17/P17
(Italian)
Socket/Plug:
SI32 (Israeli)
Page 6

iSocket® 3G
www.isocket3g.com
© Copyright iSocket Systems 2017
All rights reserved. Version 1.0.2-EN - 5 - English
2. Safety Instructions
This appliance complies with accepted technological standards with regard to safety. Nevertheless, as
manufacturers we consider it our obligation to make you aware of the following safety information. To
ensure years of trouble-free enjoyment, and to maintain your guarantee, please note the following.
Never carry out repairs yourself! There are no serviceable parts in the device.
The operating voltage of the appliance and the mains voltage as well as the type of current must
match (see the rating plate on the underside of the appliance).
Only plug into a correctly installed earthed mains socket.
Provide easy access for a maintenance or emergency disconnection.
Do not connect this device to another one similar device.
The device is not intended for direct plug-in equipment, which are not equipped with a plug.
External equipment that connects to the device must have a cord with appropriate plug.
Some devices are supplied with their own switch, which needs to be disconnected before they are
unplugged. Do not use this product with such devices - it cannot disable the switch of a remote
device.
Do not use external equipment with a faulty plug!
Do not connect to appliances which cannot be left unattended (e.g. certain heaters)!
Do not exceed power load limit and other electrical parameters specified in the technical
characteristics. Check the power of the connected device!
The device is intended only for domestic private non-commercial use. Do not use in emergency
environments: e.g. military, hospitals etc!
This product is not designed for safe disconnection of the controlled equipment from power
network; the device is not equipped with a residual-current device (RCD). Make sure that your
home electrical network meets safety standards.
The product is designed for indoor use in dry area. Do not use it in wet or chemically aggressive
environments! For example, do not use it in the bathroom. It is also not designed for industrial
operation in aggressive environments.
Do not use this device if the casing is damaged!
Do not shake or drop the product. This could cause damage!
Keep away from direct sunlight.
Keep out of reach of children!
Block access to the management and set-up of the device to unauthorised users (Chapter 5).
Read additional safety information in Chapter 17.
iSocket Systems hereby declares that this iSocket 3G complies with the essential
requirements and other relevant provisions of Directive 1999/5/EC.
At the end of the product's useful life, please dispose of it at appropriate collection points
provided in your country.
NOTE: This equipment has been tested and found to comply with the limits for a Class B digital
device, pursuant to Part 15 of the FCC Rules. These limits are designed to provide reasonable
protection against harmful interference in a residential installation. This equipment generates,
uses and can radiate radio frequency energy and, if not installed and used in accordance with
the instructions, may cause harmful interference to radio communications. However, there is
no guarantee that interference will not occur in a particular installation. If this equipment does
cause harmful interference to radio or television reception, which can be determined by turning
the equipment off and on, the user is encouraged to try to correct the interference by one or
more of the following measures: reorient or relocate the receiving antenna by reorienting or
relocating the equipment; increase the separation between the equipment and receiver;
connect the equipment into an outlet on a circuit different from that to which the receiver is
connected; consult the dealer or an experienced radio/TV technician for help. Any changes /
modifications not approved by the responsible party could void the user’s authority to operate
the equipment. This equipment must be installed to provide a separation distance of at least
20 cm from all persons. The equipment contains transmitter module FCC ID: UDV1103022011008 located inside the equipment on the printed circuit board of the modem.
Page 7

iSocket® 3G
www.isocket3g.com
© Copyright iSocket Systems 2017
All rights reserved. Version 1.0.2-EN - 6 - English
Safety Instructions for the Battery
This unit use a Li-ion battery. The safety instruction does not tell you how to maintain the
battery, because this battery is installed inside the unit. It is strictly prohibited to replace
the battery yourself - an authorised specialist must be consulted. However this safety
instruction does describe the care of units using a Li-ion battery.
Read all the safety information and instructions. Failure to comply with the
safety information and instructions may cause fire and / or serious injury.
We pay a great deal of attention to the design of every battery to ensure that we supply
you with batteries which offer maximum durability and safety. Despite all the safety
precautions, caution must always be exercised when handling devices with batteries.
Studies have shown that incorrect use and poor care are the main causes of the damage
caused by batteries. The following points must be obeyed at all times to ensure safe use:
Don't throw battery or device with battery into an open fire. There is a risk of
explosion!
Always comply with the storage conditions (see Chapter 15)! Don't keep the device
with its battery in places where the temperature is liable to reach levels outside
those specified. In particular, do not leave the device in a car that is parked in
sunshine.
If the battery suffers overloading and/or overheating, the integrated protective cut-
off will switch off the charging/discharging for safety reasons. If this happens you
will not be able to get a power failure alert. Using the battery at temperatures
outside those specified in the technical information (Chapter 15) will cause chemical
damage and may cause a fire.
In the event of incorrect use, fluid may escape from the battery. Avoid contact with
this fluid. If you touch it by mistake, rinse the affected area with water. If you get
the fluid in your eyes, seek medical advice. Stop using the device if fluid is coming
from it!
Li-ion batteries are subject to a natural ageing process. The battery must absolutely
be replaced when its capacity falls just 80% from the capacity as new. A weak, old
battery is no longer capable of meeting the high power requirements and therefore
poses a safety risk.
Exhaustive discharge will damage the battery. The most common cause of
exhaustive discharge is lengthy storage or non-use of a partly discharged battery.
Don't allow the device to be stored for a long time without use. Never use a batterydriven device if you suspect that the last time the battery was charged was more
than 12 months ago. There is a high probability that the battery has already suffered
dangerous damage (exhaustive discharge).
Rechargeable batteries contain materials that are potentially harmful to the
environment. Batteries may not be disposed of with normal domestic waste. You
should dispose of used batteries at your local collection point.
Page 8

iSocket® 3G
www.isocket3g.com
© Copyright iSocket Systems 2017
All rights reserved. Version 1.0.2-EN - 7 - English
3. Quick Start
Quick Start comprises three simple steps:
Step 1. Install SIM card.
You need to fit a micro SIM card from a GSM or 3G operator into the unit. If you use a
prepaid card you might need to activate it first with an unlocked cell phone. Please see our
advice for sim cards here http://isocket.me/prepaid
Install SIM card into the special slot and push until fixed (you will hear a click). SIM card
orientation is shown on the front side of the device. Do not insert or eject the SIM card on
a running device! Switch off the device before you insert or eject SIM card. Do not use
SIM cards that contain messages! Remove all messages from the SIM card. Do not use
SIM cards with NFC chip embedded in a SIM (chip for payments from mobile phone).
Step 2. Apply power to the device.
Connect iSocket to a wall socket. POWER and OUT indicators blink three times
simultaneously. If everything is functioning correctly the POWER indicator will be a
constant green light. The ONLINE indicator is lit constantly during the network search,
blinks every second when the network has been found, or blinks more often during data
exchange (e.g. during firmware update). More information about the indicators in Chapter
14.
Step 3. Execute your first command and make yourself the main user.
Your device with iSocket® Smart Software has the unique feature "Make Me Boss!". Send
SMS-command MAKEMEBOSS to the phone number of the SIM card installed in the unit
and it will automatically assign the phone number from which you have sent it as the
number for all types of alerts and will also enable protection by the list of phone numbers
and will add the number to the list.
First test.
The device is now ready to work! You can carry out a simple test. Connect an appliance to
the iSocket, e.g. a desk lamp (don't forget to turn on the lamp switch). Send the message
ON to the SIM card number and the lamp will switch on. Remove the iSocket from the
wall-socket. You will soon get a power failure alert! Your iSocket 3G is now ready to work
and secure. Read more about all features and advanced configurations in the following
Chapters.
NOTE! You must disable PIN-code authorisation for the SIM card! You can only disable
PIN authorisation by using mobile phone that support micro SIM card. Insert the SIM
card into mobile phone and disable PIN usage using the phone menu. You can find more
information in the manual for the phone or ask assistance from the shop, where you
purchased the card. If you have forgotten to disable the PIN-code the ONLINE indicator
will light constantly and the POWER indicator will signal this by specific blinks (see
Chapter 14). The POWER and OUT indicators will blink specifically (see Chapter 14)
when the SIM card is not inserted correctly or is damaged.
NOTE! Make sure that you don't use the "hide my number" option for the number from
which you execute the command. If the system cannot recognise the number it will not
add it to the number for alerts and to the security list. Alternatively you can use the
methods of adding these numbers which is described in Chapter 5.1 (for security
numbers) and 5.3 (for alert numbers).
Page 9

iSocket® 3G
www.isocket3g.com
© Copyright iSocket Systems 2017
All rights reserved. Version 1.0.2-EN - 8 - English
4. Managing the iSocket Device
You can manage the device directly by text commands, by phone call, via apps or
manually. This new iSocket also supports Multi Texting Mode. For management via apps
please see http://isocket.me/apps
4.1 Managing by Text Commands
Commands are sent in form of SMS messages to the SIM card number of the iSocket.
Messages have the following syntax:
COMMAND (for example, STATUS).
If a password was configured (see Chapter 5), then you must use following syntax:
passwordCOMMAND (for example, 12345STATUS), where 12345 is a password set
by the command PASSWORD=12345 (more details in Chapter 5).
There are three types of commands on device:
1. Configuration commands (marked "Conf" in the tables).
These commands configure some parameters on the device and usually (not always) have
the syntax COMMAND=VALUE, so they have symbol "=" after the command name. The
configuration can only be performed within 30 minutes after device has been powered on
or after the last configuration command has been received. If you try to configure device
after 30 minutes, then you will get the message "command – Time for configuration
expired!" (only if ERROR=ON - see Chapter 6). To disable this limitation you must
configure security on device – see Chapter 5. Settings are stored in non-volatile
memory and are not lost when power is off. Each configuration command has a
default value. This is the value that was installed at the factory (for details see Chapter
13).
2. Information commands (marked "Inf" in the tables).
These commands inform you about different statuses of the device or about other
corresponding statuses, so they have information nature. If a command has a question
mark at the end (COMMAND?), then this command will inform you about current value of
the parameter, which has the same name as the command. These commands are
available at any time. Should a configuration command have different values these will all
be seen in response to the information command associated with this configuration
command. The values will be comma-separated and the current active value will be
indicated in parentheses. For example, you send the information command "COMMAND?".
In response you will get the reply "COMMAND=VALUE1,(VALUE2)". This means that the
current active value is "VALUE2", and "VALUE1" is another value acceptable for this
command. This syntax is made for your convenience - you do not need to refer to the
manual each time when to remember all possible values. They will be given in the
response. The first value in the response is the factory default value (see Chapter 13).
NOTE! Commands are not case sensitive. “STATUS”, “status” or “Status” will all be
processed in the same way.
Page 10

iSocket® 3G
www.isocket3g.com
© Copyright iSocket Systems 2017
All rights reserved. Version 1.0.2-EN - 9 - English
3. Control and management commands (marked "Ctrl" in the tables).
Used to control the iSocket device - perform some active action. They are not limited by
configuration window and can be used at any time.
You will get a response after sending the commands. This can be disabled if desired (see
Chapter 6). If you make a mistake in the command and send an incorrect command, you
will receive a message "COMMAND - No such command exists on the device!" (Only if
ERROR=ON - see Chapter 6). If a command longer than 30 characters was sent, it will be
deleted without any response notifications.
The list of simple commands for management and configuration is shown in the following
table. The real response may differ from those indicated in the table, depending on the
command. For default settings please see Chapter 13.
Command
Description
Response
Type
ON
Turn on main power socket
Power socket ON
Ctrl
OFF
Turn off main power socket
Power socket OFF
Ctrl
ON30
Turn on main power socket for 30 seconds.
Maximum value is 65500 seconds.
Power ON for 30 seconds
Ctrl
OFF30
Turn off main power socket for 30 seconds.
Maximum value is 65500 seconds.
Power OFF for 30 seconds
Ctrl
RESTART
Restart (return to the same status after a certain
period of time) main socket. Time for restart set
by RESTARTTIME.
Power socket restarted
Ctrl
RESTARTTIME=5
Configures time (in seconds) for RESTART
command. Values 1-600 seconds.
RESTARTTIME=5 – OK
Conf
RESTARTTIME?
Informs about RESTARTTIME value
RESTARTTIME=5 seconds
Inf
PULSE
Send a pulse to relay. The duration of the pulse
can be configured by command PULSETIME. By
default this is 2 seconds. This operation works
similarly to the RESTART operation. So, if main
socket was turned off it will be turned on for a 2
seconds and then turned off. And if the socket
was initially turned on, then after this action it
will be turned off for 2 seconds and then turned
on again. So this pulse can be used as a
pushbutton to start and stop, for example,
magnetic starters or to open a gate. Values 1600 seconds.
Pulse on/off for 2 seconds
was sent to relay
Pulse off/on for 4 seconds
was sent to relay
Ctrl
PULSETIME=2
Configures time (in seconds) for PULSE
command. Values 1-600 seconds.
PULSETIME=2 – OK
Conf
PULSETIME?
Informs about PULSETIME value
PULSETIME=2 seconds
Inf
STATUS
Request for main power socket status,
temperature, network and time
Power socket ON
Signal: Good(-67dBm),
HSDPA
TEMP: 70F (21C)
Time: y/m/d,h:m:s
Ctrl
TEMPERATURE
Informs about temperature. See details in
Chapter 7.
TEMPERATURE: 70F (21C)
Ctrl
RUNTIME
Informs how long main power socket has been
turned on (since last restart or power on). If you
turn on the main socket manually before the
correct date was installed on the device, the
start-up time of the device will not be
recorded correctly.
Power socket is ON from:
y/m/d,h:m:s
Ctrl
4.2 Managing by Phone Call
The main socket for external electrical equipment can also be managed by cell or landline
phone. For example, you can call to the phone number of the SIM card in the device and
Page 11

iSocket® 3G
www.isocket3g.com
© Copyright iSocket Systems 2017
All rights reserved. Version 1.0.2-EN - 10 - English
the equipment connected to the device (e.g. router) will be restarted. After a call to iSocket
the action occurs immediately. The action must be pre-configured. There is no action
configured by default. Keep in mind that you are not able to configure the active actions if
the security number list (Chapter 5.1) is not configured. This is because the password
protection is not available for calls, so anyone can call to the SIM card number if there is
no security numbers list protection and this call may cause unwanted reboot. Accordingly,
if you are going to disable the security numbers list protection, then the option RING goes
into the value "NOACTION" automatically. However, you can allow anyone access to the
active action by call using the command RINGPUBLIC=ON. This will allow any number even landline phones or phone numbers that cannot be recognized - to perform an action
by calling the iSocket. This will not affect other security settings (Chapter 5).
In response to the activating call the device will send you a message. You can configure a
call response instead of an SMS. Read more about this in Chapter 6.2. The following table
indicates which actions can be pre-configured.
Command
Description
Response
Type
RING=SWITCH
Switching (changing status to negative) main
power socket by phone call
RING=SWITCH – OK
SECLIST is not active!
Conf
RING=RESTART
Restart (return to the same status after a certain
period of time) main socket by phone call. Time for
restart set by RESTARTTIME.
RING=RESTART – OK
SECLIST is not active!
Conf
RING=PULSE
Send a pulse to a relay by phone call. The duration
of the pulse can be configured by command
PULSETIME.
RING=PULSE – OK
Conf
RING=ON
Turn on main power socket by phone call
RING=ON - OK
Conf
RING=OFF
Turn off main power socket by phone call
RING=OFF - OK
Conf
RING=NOACTION
Ignore phone calls
RING=NOACTION – OK
Conf
RING?
Informs what action configured
RING=(NOACTION),
RESTART,SWITCH
Inf
RINGPUBLIC=ON
Allows one of the above actions for any number. It
will ignore security list settings configured in
Chapter 5. Use this setting only if you understand
the consequences!
RINGPUBLIC=ON - OK
Conf
RINGPUBLIC=OFF
Does not allow any action for unauthorized
numbers. The defaultt factory setting.
Recommended!
RINGPUBLIC=OFF - OK
Conf
RINGPUBLIC?
Informs about RINGPUBLIC value
RINGPUBLIC=(OFF),ON
Inf
4.3 Manual Managing
The main power socket can be managed manually. You can switch it manually by a hidden
button which is on the front panel next to the logo. The button can be activated with a
suitable thin mechanic tool. Pressing this button switches the main power socket to a
negative value. So, if it was turned off, it will be turned on and vice versa.
4.4 Multi Texting Mode
If you want to send several commands at once, you may use a semi-colon “;” between
commands. Do NOT use spaces. This syntax allows you to save credit and time by using
only one message. This syntax is also designed for developers. Commands will be
executed one by one in the order they are written. You should understand all features of
the device well before you start to benefit from the Multi Texting Mode.
Example: MAKEMEBOSS;RING=RESTART;RESTARTTIME=5
Page 12

iSocket® 3G
www.isocket3g.com
© Copyright iSocket Systems 2017
All rights reserved. Version 1.0.2-EN - 11 - English
5. Security & Notifications Settings
Block access to iSocket management for unauthorised users! If there are no security
settings, then anyone who knows the phone number of the SIM card will be able
to manage the device and deplete the card's credit - which is not advisable! The
device uses two methods of protection against unauthorised access:
Only allowing access to authorised phone numbers
Authentication by password
Both methods can be used separately or together. In the first method the device ignores
SMS-commands and calls from numbers that are not listed. The list can contain up to 10
numbers. The second method involves the use of individual 5-characters password. This
password must be typed before the SMS-commands without any space or special
characters as shown here:
passwordCOMMAND (for example, 12abcSTATUS), where 12abc is a password set by the
command PASSWORD=12abc (more details below).
5.1 Security Numbers List Settings
The security list allows you to configure up to 10 numbers and up to 17 digits for one
phone number. By default, the security list is disabled and does not contain any numbers.
The first number can be added in a simple way by executing command MAKEMEBOSS see introduction to this feature in the "Quick Start" (Chapter 3, Step 3). However all the
next numbers must be added using the command ADDSECNUM, described in the table
below, because all the next numbers from which you try to execute the MAKEMEBOSS
command will already be treated as non-authorised.
Example of how to add/remove the number to/from the security list:
ADDSECNUM+12125555555 / DELSECNUM+12125555555
Here 1 is the United States country code, 212 is the city code for New York and 5555555
is a 7-digit local number.
For this new iSocket you can add a number with access limited to only Ctrl and Inf
commands. Such a number will not be allowed to configure the device. Add “LIMITED” to
the end of the number for such limitation.
For example: ADDSECNUM+12125555555Limited
Note! If you add a number to the list when the list is not activated, the protection will be
disabled. Do not forget after adding number to activate security list by command
Would you like to see more features? You are welcome to send us your
feedback: http://isocket.me/feedback
IMPORTANT NOTE! We recommend you always add telephone numbers in international
format (with country code), without spaces or hyphens. This will ensure safe and reliable
operation. See examples below.
Page 13

iSocket® 3G
www.isocket3g.com
© Copyright iSocket Systems 2017
All rights reserved. Version 1.0.2-EN - 12 - English
SECLIST=ON. If you deleted all the numbers by command DELSECNUMALL, the protection
will be disabled automatically (SECLIST=OFF became active).
Below is a list of commands for the security list settings.
Command
Description
Response
Type
MAKEMEBOSS
This will add the number from which
you send message to the list and will
enable security list (SECLIST=ON
will be active), also it will add your
number for all types of other alerts
(Chapter 7.3, 8.1 and 10)
Your phone number
has been assigned for
all types of alerts and
was added to security
list which has been
activated
Conf
ADDSECNUMyour_number
Add new number to security list. Use
international format (with country
code) without spaces or hypens – see
examples above.
+12125555555 added
(secnum)
Conf
ADDSECNUMnumberLIMITED
Add a new number with limited
access. This number will not have
access to configuration commands.
+35895555555 added
(limited secnum)
DELSECNUMyour_number
Delete specific number from security
list
+12125555555
removed (secnum)
Conf
DELSECNUMALL
Delete all numbers from the list
DELSECNUMALL – OK
Conf
SECNUMBERS
Request for security list numbers
SECNUMBERs
+12125555555,
35895555555 (limited)
Inf
SECLIST=ON
Activate security list
SECLIST=ON – OK
Conf
SECLIST=OFF
Disable security list
SECLIST=OFF – OK
Conf
SECLIST?
Information about security list
activation
SECLIST=OFF,(ON)
Inf
5.2 Password Protection
The following table shows how to set a password for managing access. The password must
consist of 5 characters. Do not use a simple combination of numbers for a password!
Password 12345, 11111, abcde and other such passwords are not secure! NOTE! Don't
forget to add the old password before the command PASSWORD=x if you are
going to remove password protection or update the password.
Command
Description
Response
Type
PASSWORD=12abc
Set password 12abc
PASSWORD=***** – OK
Conf
PASSWORD=NO
Disable password
PASSWORD=NO – OK
Conf
5.3 Configuration of the Numbers for Alerts
Before enabling different alerting (Chapter 7.3, 8.1 and 10) you must setup at least one
number for alerts. There are few optional ways to setup this number. One is the feature
"Make me boss!" (see introduction in the "Quick Start", Chapter 3, Step 3 and more in
Chapter 5.1). Another option is the feature "Alert me!" – send the command ALERTME
from the number which you want to be the number for alerts and the system will
IMPORTANT NOTE! Make sure that you don't use the "hide my number" option. All
numbers that the system does not recognise are considered to be unauthorised
numbers.
NOTE! We suggest that you always use security list protection, even if you use
password protection. Chapter 6.3 lists more reasons for this.
Page 14

iSocket® 3G
www.isocket3g.com
© Copyright iSocket Systems 2017
All rights reserved. Version 1.0.2-EN - 13 - English
automatically assign the phone number from which you have sent it as the number for all
types of alerts. You can send ALERTME from any number which is included on the security
list and is not the limited number (see Chapter 5.1). You can also use the command
ADDALERTNUM to add a number for alerts manually (see description in the table below).
Command
Description
Response
Type
ALERTME
This will automatically add the
number from which you send the
message to the list for all types of
alerts.
Your phone number has
been assigned for all
types of alerts!
Conf
ADDALERTNUMyour_number
Set the number for alerts manually.
Instructions how to add a number are
similar to those given in Chapter 5.1
(see examples there). We strongly
recommend that you always add
numbers in international format
(with country code). This will ensure
reliable alerting on any network.
+12125555555 added
(alertnum)
Conf
DELALERTNUMyour_number
Remove number from list
+12125555555 removed
(alertnum)
Conf
DELALERTNUMALL
Remove all numbers
DELALERTNUMALL – OK
Conf
ALERTNUMBERS
Information about numbers
ALERTNUMBERs:
+12125555555
Inf
6. Command Confirmation
It is important to confirm that the command was executed successfully. For this purpose
we have implemented notifications of each executed command. If you wish to receive
execution confirmations the setting “hide my number” should NOT be activated on the
phone from which you are sending messages or making calls to iSocket.
6.1 Confirmation of SMS-commands
If you activate this notification, you will be informed about each command execution. It
is the default setting, but you can disable these notifications to save the cost of SIM card
messages.
Command
Description
Response
Type
SMSCONFIRM=ON
Response messages to SMS-commands will
be sent
SMSCONFIRM=ON – OK
Conf
SMSCONFIRM=OFF
Do not send response messages to SMScommand
SMSCONFIRM=OFF – OK
Conf
SMSCONFIRM?
Information about SMSCONFIRM configuration
SMSCONFIRM=ON,(OFF)
Inf
The next commands are not affected by the SMSCONFIRM setting due to the specific
nature of the commands: STATUS, TEMPERATURE, RUNTIME, CREDIT, DEVINFO, DATE and
all information commands ("Inf").
NOTE! Make sure that you don't use the "hide my number" option for the number from
which you execute the command ALERTME and make sure that the number is in the
security list and is not the limited number. If the system cannot recognise the number or
if the number is not authorised it will not add it to the number for alerts.
NOTE! Do not keep wrong or non-existent numbers on the list! Ignoring this advice will
delay alerts to good numbers. Do not keep numbers in local format in the list, use only
the international format (with country code).
Page 15

iSocket® 3G
www.isocket3g.com
© Copyright iSocket Systems 2017
All rights reserved. Version 1.0.2-EN - 14 - English
6.2 Free of Charge Confirmation by Call Back
When managing by phone call, your command will be also confirmed by return SMS, but
you can configure the device to call back to the mobile phone instead of sending SMS. In
this case iSocket will call to your phone within about 15 seconds and then ring off (hang
up). So, SIM card credit will not be spent. This allows you to perform reboot or switch
operations free of charge! If you pick up the phone, iSocket will drop the call and you will
receive an SMS notification about the command that has been executed. This is
convenient if you forgot which command was configured for call action and/or want to see
the result of a call.
Note! Confirmation by call is not sent to the numbers for alerting, but to the number from
which you called to the device. Make sure the device can see your number (do not use
“hide my number” option).
Command
Description
Response
Type
RINGCONFIRM=SMS
Send response SMS after call to
device
RINGCONFIRMTYPE=SMS - OK
Conf
RINGCONFIRM=CALL
iSocket call back to your phone
within 15 seconds and then hang-up
RINGCONFIRMTYPE=CALL - OK
Conf
RINGCONFIRM=OFF
Don't notify results after phone call
to the device
RINGCONFIRM=OFF – OK
Conf
RINGCONFIRM?
Information about RINGCONFIRM
configuration
RINGCONFIRM=(SMS),CALL,OFF
Inf
6.3 Incorrect Commands, Later Configuration and Commands from
Unauthorised Users
If an incorrect command was sent to the device (typo mistake, for example), you will get
the "command - No such command exists on the device!" response. If you have password
protection, but forgot to specify it before command (see Chapter 5.2), you will get the
"Invalid access password!" response. If you are trying to assign an invalid value to the
configuration command, you get the message "Incorrect value!". You will get "Time for
configuration is expired (Conf)!" response when you try to send a configuration command
after the configuration time is up (see Chapter 4). If an unexpected error occurred during
the command execution you will get the message "Execute error!". You can disable all the
above error messages by setting options ERROR=OFF.
If the security list was configured (see Chapter 5.1) and someone tries to execute a
command no response will be received until you install SMSCONFIRMUNAUTH=ON. If you
set "ON" value for this parameter, then unauthorised numbers will receive the message
"Access deny!" in response to an attempt to execute any command. We do not
recommend you to set "ON" value for this option, because unauthorised users
who know the phone number of the SIM card can deplete the card's credit with
such response messages. Therefore, we also strongly suggest using protection
with security list (Chapter 5.1), and not just password protection! This is due to
the fact that a command typed without a password is considered an incorrect command
and the illegal sender will receive "command - No such command exists on the device!" in
response. And he can also deplete SIM card credits by such responses.
Generally, it should be noted that the ERROR=OFF command disables all reports about
errors and later configuration for all senders. By default, this option is set to "ON", so that
during the familiarisation period you can get all responses about errors and will not be
confused when there is no response from the device. Once you are familiar with the device,
Page 16

iSocket® 3G
www.isocket3g.com
© Copyright iSocket Systems 2017
All rights reserved. Version 1.0.2-EN - 15 - English
you can then disable the error message responses. In the beginning however, we strongly
recommend configuring the list of allowed numbers (Chapter 5.1) and keeping the option
SMSCONFIRMUNAUTH, which is set to OFF by default.
Command
Description
Response
Type
ERROR=ON
Activates sending of information SMS
for each received SMS command,
which was not executed due to any
error.
ERROR=ON - OK
Conf
ERROR=OFF
Disable the error messages responses
ERROR=OFF - OK
Conf
ERROR?
Information about ERROR configuration
ERROR =(ON),OFF
Inf
SMSCONFIRMUNAUTH=ON
Send reports (errors, not permitted,
time out) to unauthorized numbers
SMSCONFIRMUNAUTH
=ON – OK
Conf
SMSCONFIRMUNAUTH=OFF
Don't send reports to unauthorized
numbers
SMSCONFIRMUNAUTH
=OFF – OK
Conf
SMSCONFIRMUNAUTH?
Information about
SMSCONFIRMUNAUTH configuration
SMSCONFIRMUNAUTH
=(OFF),ON
Inf
7. Measurement and Control of Temperature
iSocket 3G supports one external digital temperature sensor that can measure the
temperature of different elements (air, liquid, solid, etc) from -67F (-55C) to 248F (120C)
with an accuracy of ±0.5˚C. You can buy sensors with different lengths of cable from us.
The sensor must be connected to the RED 3.5mm jack socket on the rear of device.
Short sensor to measure
temperature near a device. Can
be a good option if you want to
monitor the temperature just
inside a room. No messy
cables. (Model: ITS00J).
Sensor with long cable, e.g. 10ft (3m). This sensor can
be a good option to measure the temperature outside.
The probe is weatherproof and has a “wingnut” for
screwing. This sensor is also a good option if iSocket is
located close to the heating system, which may affect
temperature measurements. Long cable will allow you to
install the sensor far from the source of heating, and then
you can measure the temperature at precisely the point
you want: e.g. ceiling, floor or in the middle of room.
(Model: ITS30J). This sensor can be used for measuring
the temperature of water, but this is not recommended –
please consider Temperature Sensor Pro for these
purposes. For heavy-duty conditions such as a fish tank
with salt water or a boiler that heats up to 212F (100C),
or oil, the Temperature Sensor Pro with IP68 protection
class will be the best solution. (Model: ITS30JPRO).
IMPORTANT NOTE! Do not insert or remove the temperature sensor on a running
device! Switch off the device before you insert or remove the temperature sensor.
Do NOT apply excessive force! – This will damage the jack!
Page 17

iSocket® 3G
www.isocket3g.com
© Copyright iSocket Systems 2017
All rights reserved. Version 1.0.2-EN - 16 - English
NOTE! Check that the sensor is inserted
all the way into the 3.5mm red jack
socket right to the very end. You must
ensure that there is no gap between the
connector of the sensor and the jack
socket. Do NOT apply excessive force!
– This will damage the jack! If
insertion of the sensor feels stiff,
gently ease it in rotating it clockwise
then counter clockwise.
7.1 Thermometer, Temperature Calibration & Display Format
The external temperature sensor measures the temperature of the environment in the
particular area where it is installed and iSocket can provide this information via SMS or
API. Information about the temperature will be available immediately the sensor is
connected to iSocket. Our sensors are quite precise, but you may want to calibrate the
value for some reason. We provide this option with the command TEMPCAL.
Temperature display format or temperature related configurations are available in
Fahrenheit and Celsius. The preferable format can be configured by the command
TEMPINFO. This command may have the following values:
F – temperature will be displayed in Fahrenheit without symbol “F”, e.g. 50 (common for USA);
CC – temperature will be displayed in Celsius with symbol “C”, e.g. 10C (common for most other
countries);
FC – temperature information will be provided both in F and C in the following format: 50F (10C);
CF – temperature information will be provided both in C and F in the following format: 10C (50F);
FF – temperature will be displayed in Fahrenheit with symbol “F”, e.g. 50F;
C - temperature will be displayed in Celsius without symbol “C”, e.g. 10.
If TEMPINFO is configured to F, FC or FF then all temperature related setting that you
attempt to set to the device without any temperature symbol will be treated as if you were
configuring them in Fahrenheit. E.g. TEMPCAL=2 will be treated as though you wish to set
2F. If TEMPINFO is configured to CC, CF or C then the device will accept the value as if you
were setting them in Celsius. We would recommend that you either configure a suitable
TEMPINFO value for you or always set the temperature values with symbol F or C, e.g.
TEMPCAL=2F or TEMPCAL=2C.
The following table describes how to use the above commands.
Command
Description
Response
Type
TEMPERATURE
Informs about temperature and temperature
rise/fall thresholds (Chapter 7.3)
TEMPERATURE: 70F (21C), trise: off, t-fall: 32F (0C)
Ctrl
TEMPCAL=2F
or
TEMPCAL=1C
Changes calibration constant. Values from -36F
to 36F or from -20C to 20C.
TEMPCAL=2F (1C) – OK
Conf
TEMPINFO=CC
or
TEMPINFO=F
Sets how to display the temperature
information. See all values and other important
information above in this chapter.
TEMPINFO=CC - OK
Conf
Page 18

iSocket® 3G
www.isocket3g.com
© Copyright iSocket Systems 2017
All rights reserved. Version 1.0.2-EN - 17 - English
7.2 iSocket Smart Thermostat with Energy Saving & Equipment-Friendly
Mode
iSocket® Smart Software has an advanced thermostat feature that allows you to control
both heating and cooling systems with a wide choice of settings and be very simple in the
same time. The thermostat feature allows you to control the main power socket and
change it depending on the pre-configured “switch-off” temperature. The interval between
temperature readings from sensors is one minute.
Example of heating system control. A typical example of temperature control would
be heating activation in remote area if the temperature drops below 50F (10C). The
following settings must be used: THERMOSTAT=HEATING, SWITCHOFFTEMP=50F (or
SWITCHOFFTEMP=10C), THERMOSTATON. With these settings the thermostat will keep
the temperature in the range of about 50F (10C). This means that as soon as the room is
heated up to 50F (10C) the main socket is turned off. If the current temperature in the
room is over 50F (10C) the main socket does not turn on until the temperature drops
below 50F (10C).
Example of cooling system control. Another example is air conditioning activation
when the temperature exceeds 72F (22C): THERMOSTAT=COOLING,
SWITCHOFFTEMP=72F (or SWITCHOFFTEMP=22C), THERMOSTATON. This means that as
soon as the room is cooled to 72F (22C) the main socket is turned off. If current
temperature in the room is less than 72F (22C) the main socket does not turn on until the
temperature rises above 22C (72F).
Energy Saving and Equipment-Friendly Mode (ESEFM)
Some cooling or heating systems do not like being switched too often while the thermostat
is working. For that purpose we have implemented a deviation value TEMPGAP
(hysteresis) that is 2F or 1C by default, but can be changed by up to 36F or 20C.
Example of cooling system control with ESEFM. If you want to cool down a room for example a wine cellar - to 50F (10C), but you can accept a temperature of up to 57F
(14C) in that room, you can set the deviation (TEMPGAP) to 7F (or 4C). In this case, the
cooling equipment will switch less often. The cooling system will be turned on after the
temperature exceeds 57F (14C) and will turn off when the temperature drops to 50F
(10C). The next time the cooling will switch on again is when the temperature exceeds
57F (14C). Thus in the range 50F-57F (10C-14C) no switching occurs, which is positive
for the relay of the iSocket as well as your cooling equipment, and may save energy.
Example of heating system control with ESEFM. If you wish to maintain the
temperature on the site - for example a greenhouse - at 82F (28C) by heating, but you
accept that the temperature may drop to 75F (24C), the settings are as follows.
THERMOSTAT=HEATING, SWITCHOFFTEMP=82F (or SWITCHOFFTEMP=28C),
NOTE! When the thermostat function is in operation it will override any other attempts to
change the status of the main power socket. The thermostat has the highest priority since
this is the only logical behavior. If you wish to control the socket manually you have to
disable the thermostat. When you disable the thermostat, the relay remains in the status
it had just before you disabled the function, because the device does not know why you
are disabling the thermostat, or what status of the power socket you wish to have after
that. You would need to switch the socket on or off depending what you require.
Page 19

iSocket® 3G
www.isocket3g.com
© Copyright iSocket Systems 2017
All rights reserved. Version 1.0.2-EN - 18 - English
TEMPGAP=7F (or TEMPGAP=4C). In this case, the thermostat will operate in heating
mode with less switching and will maintain the temperature in the region of 75F-82F
(24C-28C). The heater will be activated at 75F (24C) and will be turned off at 82F
(28C). The next time the heating will only be activated when the temperature falls to
75F (24C).
Useful note. When you configure the thermostat you usually need to execute 4 SMS
commands or less. You may use Multi Texting Mode to execute them in one message –
see Chapter 4.4. for details.
iSocket Smart Thermostat also supports the configuration of so-called profiles through a
scheduler – you may change the SWITCHOFFTEMP setting at a particular time of day.
Please see details in Chapter 10.
Command
Description
Response
Type
THERMOSTATON
Activate thermostat
Thermostat function is working
now.
Mode: Heating
Switch-off temperature: 50F (10C)
Ctrl
THERMOSTATOFF
Disables thermostat. Please
note, disabling of the thermostat
will not change the relay status.
Thermostat function was disabled!
The relay remains in the same
status.
Ctrl
THERMOSTAT=
HEATING
Set the condition of thermostat.
Use this value if heating system
is connected to device
THERMOSTAT=HEATING – OK
Switch-off temperature: 50F (10C)
Thermostat: Enabled
Conf
THERMOSTAT=
COOLING
Set the condition of thermostat.
Use this value if cooling system
is connected to device
THERMOSTAT=COOLING – OK
Switch-off temperature: 72F (22C)
Thermostat function: Enabled
Conf
SWITCHOFFTEMP=10C
or
SWITCHOFFTEMP=50F
Set the temperature for turning
off the main socket when
thermostat enabled. Values
from -67F to 248F, or from 55C to 120C. Do not forget to
type F (means Fahrenheits) or
C (means Celsius) after the
value. Only integer values must
be used!
SWITCHOFFTEMP=50F (10C) – OK
Mode: Cooling
Thermostat function: Disabled
Conf
THERMOSTAT?
Information about thermostat
configuration
Thermostat function: Disabled
Mode: Cooling
Switch-off temperature: 50F (10C)
Inf
TEMPGAP=5F
or
TEMPGAP=3C
Sets the deviation for the
thermostat – see description
above in this Chapter. Values
from 1F to 30F or from 1C to
20C. It is set to 2F (1C) by
default.
TEMPGAP=5F (3C) - OK
Conf
NOTE! You save energy when there are no abrupt changes of the temperature or frequent
changes beyond the specified range on the controlled site. The value of TEMPGAP must be
calculated individually for each individual case.
Do you particularly agree, or disagree with anything in our software?
Give us your opinion: http://isocket.me/feedback
Page 20

iSocket® 3G
www.isocket3g.com
© Copyright iSocket Systems 2017
All rights reserved. Version 1.0.2-EN - 19 - English
7.3 Temperature Monitoring – Notifications, iSocket® Temperature Notifier
Before enabling alerts you must set up at least one number for alerts – see Chapter 5.3.
There are several type of alerts related to temperature in iSocket Smart Software installed
on your iSocket 3G: switch-off alert (SWITCHOFFALERT), temperature fall alert
(TFALLALERT), temperature rise alert (TRISEALERT), and alert when temperature
sensor has failed (TSENSFAILALERT).
SWITCHOFFALERT - enable SMS sending when “switch-off” temperature is reached
and a relay was therefore deactivated. This just allows you to know that main power
socket was switched off and shows at which temperature this happened. This feature is
related with thermostat and works only if thermostat is enabled. Note! It will send an
alert every time the “switch-off” temperature was reached, so this event could be too
often during the work of thermostat. We do not recommend to enable this alert!
TSENSFAILALERT - send alert if some temperature sensor has failed or a reading
problem occurred on an active temperature sensor. Only one alert will be sent until you
change something in thermostat settings and some new failure occurred. If a
temperature sensor has failed, then the thermostat will remain activated, but will not
operate.
Command
Description
Response
Type
SWITCHOFFALERT=ON
Enable SMS sending when
SWITCHOFFTEMP is reached and main
socket is therefore deactivated.
Works only if thermostat is
enabled.
SWITCHOFFALERT=ON – OK
Conf
SWITCHOFFALERT=OFF
Disable above alert
SWITCHOFFALERT=OFF – OK
Conf
SWITCHOFFALERT?
Show current settings for
SWITCHOFFALERT
SWITCHOFFALERT=(OFF),ON
Inf
TSENSFAILALERT=ON
Enable sending alerts if some
temperature sensor failed.
TSENSFAILALERT=ON - OK
Conf
TSENSFAILALERT=OFF
Disable failed alerts
TSENSFAILALERT=OFF - OK
Conf
TSENSFAILALERT?
Show current settings of
TSENSFAILALERT
TSENSFAILALERT
=(ON),OFF
Inf
TRISEALERT=35C
or
TRISEALERT=96F
Set the temperature at which you
should receive a temperature rise
alert. Values from -67F to 248F or
from 55C to 120C. Do not forget to
type F (means Fahrenheits) or C
(means Celsius) after value. Only
integer values must be used!
TRISEALERT=96F (35C) –
OK
Conf
TRISEALERT=OFF
Disable temperature rise alert
TRISEALERT=OFF – OK
Conf
TRISEALERT?
Show current settings for TRISEALERT
TRISEALERT=96F (35C)
Inf
TFALLALERT=15C
or
TFALLALERT=60F
Set the temperature at which you
should receive a temperature fall
alert. Values from -67F to 248F or
from 55C to 120C. Do not forget to
type F (means Fahrenheits) or C
(means Celsius) after value. Only
integer values must be used!
TFALLALERT=60F (15C) – OK
Conf
TFALLALERT=OFF
Disable temperature fall alert
TFALLALERT=OFF – OK
Conf
TFALLALERT?
Show current settings for TFALLALERT
TFALLALERT=60F (15C)
Inf
NOTE! These two types of alert are related to the thermostat and work only if thermostat
is enabled. We do NOT recommend to enable SWITCHOFFALERT!
Page 21

iSocket® 3G
www.isocket3g.com
© Copyright iSocket Systems 2017
All rights reserved. Version 1.0.2-EN - 20 - English
iSocket® Temperature Notifier - a feature of the iSocket device which notifies you in
the event of the room temperature falling below (TFALLALERT) or rising above
(TRISEALERT) critical levels. This is another type of temperature alert which your iSocket
can provide for you. This feature does not affect the thermostat and can work
independently. This feature is not related to output, but to temperature sensors connected
to the unit. If you need to know when the temperature drops below the specified level,
set TFALLALERT. If you need to know when the temperature exceeds the specified value,
set TRISEALERT.
You will get temperature fall/rise notification when temperature fall below or rise above
2F or 1C from configured values.
8. Power Outage & Power Restore Alerts
The new iSocket 3G was primarily designed for power outage notification and this feature
was totally redesigned for this new iSocket model. It now has a number of useful settings.
8.1 iSocket® Power Notifier & BALET Feature
iSocket® Power Notifier - the feature of iSocket 3G that notifies you if power has failed
or is restored on a remote site. Your iSocket is equipped with a high quality Li-ion rechargeable battery with excess capacity unlike other cheap products with weak batteries
or an unreliable supercapacitor. Using such a battery ensures that the customer will
receive a power failure notification even in the event of a break in the cellular network.
The iSocket Smart Software is able to detect a break and wait for a signal before sending
the power failure message. The high quality battery allows a delay. As soon as the
message is sent the device will shut down. The battery will be charged later, when device
is powered again.
“Be Always Alerted” (BALET) – this feature ensures that you won’t miss a power
“failure” or “restore” notification. BALET comprises two main features – the ability to set
up a delay for power failure detection, which is set to zero by default (means “no delay”,
or report almost any interruption of the power supply) and the ability to notify you by call.
iSocket will call you figuratively speaking, "be aware" once the power has failed or been
restored. By default, notification by SMS only is configured. We would not recommend
only configuring a call notification, because if your number is busy or unavailable you will
not be notified – see “Notification cycle logic” below. Use notification either by both SMS
and call or only SMS. See more options in the following table.
If power failure/restore alerts are disabled then the PFAILDELAY setting decides the delay
for turning off the iSocket. So basically, this setting decides the delay for when to treat a
power interruption as a power failure event.
IMPORTANT NOTE! When a thermostat was deactivated because of temperature sensor failure
or when you disable a thermostat manually, the relay will remain in the same condition as it was
just before thermostat was disabled. This means that disabling the thermostat won't change the
previous status of relay and you must do it yourself if you need to.
NOTE! With PFAILDELAY set to zero you will probably detect even small flickers. However, we
can’t guarantee this, because it will depend on your environment and how fast the capacitors are
discharged, but in most cases it will detect about 200ms interruptions. If you don’t want to detect
such short interruptions we would recommend that you change this setting to 1 or 2 seconds.
Page 22

iSocket® 3G
www.isocket3g.com
© Copyright iSocket Systems 2017
All rights reserved. Version 1.0.2-EN - 21 - English
Command
Description
Response
Type
POWERALERT=SMS
Notification about power failure and
power restoring by text message
POWERALERT=SMS - OK
Conf
POWERALERT=CALL
Notification about power failure and
power restoring by call
POWERALERT=CALL - OK
Conf
POWERALERT=BOTH
Notification about power failure and
power restoring by both text message
and call
POWERALERT=BOTH - OK
Conf
POWERALERT=CALLFAIL
Notification about power failure by
call, but about power restoration by
text message
POWERALERT=CALLFAIL
- OK
POWERALERT=OFF
Do not send power failure/restore
alerts
POWERALERT=OFF - OK
Conf
POWERALERT?
Information about POWERALERT
setting
POWERALERT=(SMS),
CALL,BOTH,CALLFAIL,OFF
Inf
PFAILDELAY=2
Sets the delay before considering a
power interruption as a power failure
event. See more above in this
Chapter. Values from 0 to 90 seconds,
increment 0.1.
PFAILDELAY=2 - OK
Conf
PFAILDELAY?
Information about PFAILDELAY setting
PFAILDELAY=2
Inf
Notification cycle logic. If you have configured notification by SMS the device will send
messages to all numbers and then will shut down waiting for power restoration. No
settings will be lost no matter how long power was interrupted for. Once power is restored
it will notify all numbers by SMS again. If your number was not available at the moment
the message was sent, you will receive that message later from the mobile operator’s
pool. iSocket sends messages to the cellular network and then shuts down. Messages are
stored on your operator’s network.
If call alerts are configured, the device will call your number directly within about 15
seconds. If you answer (pick up the handset) within these 15 seconds, the device will
drop that call and will try to reach the next number on the list. If you don't answer or if
you drop the call yourself, after 15 seconds the device will try to reach the next number
on the list. The device will only try to call each number once. The call-notification cycle is
considered complete as soon as all numbers are called. The device will shut down after
that. If no numbers were available you will miss the alert. Therefore we would not
recommend that you only use call alerting unless you have arranged for a service provider
who is always available to pick up the call and action it accordingly.
If you have configured notification by both calls and SMS then the device will first send
messages to all numbers on the list and will then start the call cycle. This ensures that all
numbers are notified even in the unlikely case of the battery not having the capacity to
notify all numbers by call.
Note for developers. If you are a developer and you want to build a service around this
feature we provide power failure/restore information via API immediately when the event
occurs and you may decide how to work with that data, how many users to notify, when
and how.
NOTE! To enable such notifications you must setup at least one number for alerts (see
Chapter 5.3). Place the most important numbers for notifications at the beginning of the
list. Read below to understand the reason.
NOTE! Do not keep wrong or non-existent numbers on the list! This will delay alerts to
good numbers.
Page 23

iSocket® 3G
www.isocket3g.com
© Copyright iSocket Systems 2017
All rights reserved. Version 1.0.2-EN - 22 - English
8.2 Equipment-Friendly Power Restore Mode
Some equipment requires manual intervention when power has been interrupted. For
example, some servers need attention from an administrator when it is powered back on
again after power interruption. iSocket remembers the previous state of the power to
connected equipment by default, and will return to this state when power is restored –
which means it will either keep your equipment turned on or off depending on the status
before the interruption. Soon after power restoration, the thermostat will start working
again (if it was enabled) and the relay will follow its logic. This is the most suitable
configuration for standard equipment. However, if the equipment connected to iSocket
needs your manual attention before it is turned on again, you would need to set
POWERSTATE=OFF. Finally, if you always need to turn on the power to connected
equipment after power interruption, you would have to set POWERSTATE=ON.
NOTE! This setting is not affected by the PFAILDELAY setting (see above), because this
feature is designed for a different purpose – for equipment-friendly power restoration
mode. That is why the main power socket always follows the setting of POWERSTATE –
every time mains power supply fails – and will ignore PFAILDELAY settings. Be very careful
if your equipment requires manual intervention and you set POWERSTATE=OFF together
with a high value for PFAILDELAY. In that case there could be a situation when you get
the power to your equipment switched off without any notification! We recommend that
you keep PFAILDELAY=0 in that case.
Command
Description
Response
Type
POWERSTATE=
REMEMBER
The main power socket remembers its state
and returns to it after the resumption of
power supply to the device.
POWERSTATE=
REMEMBER – OK
Conf
POWERSTATE=ON
The main power socket always turns on
when resuming power supply to the device
POWERSTATE=ON – OK
Conf
POWERSTATE=OFF
Main power socket is always turned off when
resuming power supply to the device
POWERSTATE=OFF – OK
Conf
POWERSTATE?
Information about POWERSTATE
configuration
POWERSTATE=
(REMEMBER), ON, OFF
Inf
9. Date and Time
Date and time are used to configure the scheduler (Chapter 10). It can also be seen in
different responses. The device automatically sets the date/time as soon as you start to
use it. Automatic date/time settings are based on the SIM card providers's network. If for
some reason at the beginning of the operation an incorrect date or time was set you can
change it manually. Usually the best way to do this is to use DATE+- command for offset
the time. The device saves date and time settings for several hours after a power failure.
Command
Description
Response
Type
DATA+-hh:mm
Offsets the time for a certain value.
Examples: DATE-5 or DATE+2:30
DATE-5 - OK
Conf
DATESMS
This message sets date/time based on time
taken from the SIM card providers's network.
DATE yy/mm/dd,
hh:mm:ss+zz – OK
Conf
DATE=yy/mm/dd,h
h:mm:ss+zz
Fully manual configuration of the date and time
zz – is GMT time zone (currently is not
supported, can be omitted)
hh must be in 24h format (e.g. 15 for 3pm)
DATE=yy/mm/dd,
hh:mm:ss+zz – OK
Conf
DATE
Request for actual date and time in device
DATE yy/mm/dd,
hh:mm:ss+zz
Ctrl
Page 24

iSocket® 3G
www.isocket3g.com
© Copyright iSocket Systems 2017
All rights reserved. Version 1.0.2-EN - 23 - English
10. Scheduler
The main power socket can be controlled in the automatic mode, based on pre-scheduled
rules. Some other commands could be executed at pre-defined intervals. For example,
enable/disable thermostat function or regularly send status of the device. Information
about statuses is sent to the alert numbers – see Chapter 5.3 for configuration. The
schedule accepts a maximum of 20 rules.
Command
Description
Response
Type
SCHEDULER+hh:
mm,day,action
This command adds a new rule for a specified
time
SCHEDULER+hh:mm,day,
action – OK
Ctrl
SCHEDULERhh:mm,day
Delete record for configured time and day
SCHEDULER-hh:mm,day
- OK
Ctrl
SCHEDULER-ALL
Remove all tasks
SCHEDULER-ALL - OK
Ctrl
SCHEDULERS
Request for scheduler configuration
Tasks:
11:59,*,TON
6:00pm,MON,INF
Inf
* - any day, Mon - Monday, Tue - Tuesday, Wed - Wednesday, Thu - Thursday, Fri - Friday, Sat
- Saturday, Sun - Sunday
NOTE! The scheduler supports both 12h and 24h formats. You can set the time in either
format, e.g. 6:05pm or 18.05 means the same. Display format will depend on your
TEMPINFO setting. If your preferable format is set to Fahrenheit, then display format for
the scheduler will be 12h, otherwise 24h – see Chapter 7.1 for details about TEMPINFO
settings.
Actions:
ON - Turn on main power socket
OFF - Turn off main power socket
INF - Send status of iSocket (STATUS command execute)
TON - Thermostat function activation
TOFF - Thermostat function deactivation
RESTART - Restart main power socket (RESTART command execute)
PULSE - Send a pulse to relay (PULSE command execute)
SOT=xxC or SOT=xxF – Set “Switch-off” temperature (see Chapter 7.2) in Fahrenheit or
Celsius
Examples:
SCHEDULER+8:00,*,ON Turn on main power socket every day at 8:00
SCHEDULER+9:00,Mon,TON Activate thermostat function every Monday at 9:00
SCHEDULER+5:00pm,Sat,INF Send status of iSocket every Saturday at 5pm (17:00)
SCHEDULER+7:00am,*,SOT=68F Set “switch-off” temperature to 68F every day at 7am
SCHEDULER+7:00,*,SOT=20C Set “switch-off” temperature to 20C every day at 7.00
iSocket Smart Thermostat Profiles
With this unique iSocket Smart Thermostat feature you can maintain different
temperatures on a remote site depending on the day and time, automatically. For
example, you can configure iSocket to support a lower temperature at night and heat the
room up to the desired temperature just before your arrival. Say you want to maintain
64F (18C) every night after 6pm (18.00), but you want to heat the room up to 73F (23C)
Would you like to see more features or is there something in our software or
documentation that you dislike? You are welcome to send us your feedback!
http://isocket.me/feedback
Page 25

iSocket® 3G
www.isocket3g.com
© Copyright iSocket Systems 2017
All rights reserved. Version 1.0.2-EN - 24 - English
until 8 o’clock in the morning every day except weekends and support this temperature
till night-time. Even that complex setup is possible if you add the following rules to the
scheduler:
SCHEDULER+6:00pm,*,SOT=64F
SCHEDULER+7:00am,*,SOT=73F
SCHEDULER+7:01am,Sat,SOT=64F
SCHEDULER+7:01am,Sun,SOT=64F
Let’s look at this example. Every day at 6pm (18.00) we set the “switch-off” temperature
to 64F, but every day at 7am (7.00) we override this to 73F. Why not at 8am (8.00)? We
suppose the room will heat up to the desired temperature in one hour. Because we don’t
want to heat the room at weekends we override the temperature to 64F again just one
minute later after it was set to 73F – on Saturday and Sunday only. For Celsius the logic
is the same, just use values in Celsius with “C” at the end. Provided the thermostat
function is enabled, the thermostat is configured for heating mode and the temperature
sensor is functioning properly - see Chapter 7 for details.
11. Credit Information and Subscription Management
(experimental)
You can get SIM card credit information. Not all operators provide such service. With
prepaid cards this service is usually available. For the monthly mobile subscriptions it is
usually not available. You can also activate some UMS codes remotely.
Command
Description
Response
Type
CREDITUMS=*X#
To install UMS code for balance check. For
ex., CREDITUMS=*100#. Ask UMS code
from your mobile operator
CREDITUMS =*100# OK
Conf
CREDITUMS=NO
Remove UMS code for balance from memory
CREDITUMS =NO - OK
Conf
CREDITUMS?
Information about CREDITUMS settings
CREDITUMS: *100#
Inf
CREDIT
Information about balance (CREDITUMS
must be pre-installed)
Response from mobile
operator
Ctrl
SIMCARD*X#
To manage your subscription by UMS codes
Response from operator
Conf
12. Identification, Device Information & Open API
Business customers with several locations can configure each individual iSocket with a
unique ID and use this ID as an identifier on their service pool. The ID must have a
maximum of 8 characters – only latin characters and numbers are allowed. You may store
the ID on the device permanently and enable or disable the display of this ID with an
additional setting.
Open API for developers
iSocket 3G has Open API for developers who want to build any apps or services around
this product. All settings mentioned in this user manual can be configured via that API
over the cellular network. Protocol is MQTT. Please contact us for details and follow our
project on the following websites www.isocket3g.com, www.cecohome.com,
www.isocketsystems.com
NOTE! Correct operation of these experimental features cannot be guaranteed. We reserve the
right to remove these features in future versions of devices. The absence or incorrect function
of these features on your device will not be covered by warranty.
Page 26

iSocket® 3G
www.isocket3g.com
© Copyright iSocket Systems 2017
All rights reserved. Version 1.0.2-EN - 25 - English
Command
Description
Response
Type
ID=123456ab
Sets the ID. Maximum 8 characters. ID is
stored in non-volatile memory once
configured.
ID=123456ab - OK
Conf
ID?
Shows current ID settings
ID: 123456ab
Inf
IDSHOW=ON
Enables display of ID at the end of each
message
IDSHOW=ON - OK
Conf
IDSHOW=OFF
Do not show ID at the end of messages
IDSHOW=ON - OK
Conf
IDSHOW?
Informs about IDSHOW settings
IDSHOW=ON,(OFF) - OK
Inf
IMEISHOW=ON
The IMEI number of the device will be
included at the end of each SMS from the
device.
IMEISHOW=ON - OK
Conf
IMEISHOW=OFF
Do not show IMEI
IMEISHOW=OFF - OK
Conf
IMEISHOW?
Informs about IMEISHOW settings
IMEISHOW=(OFF),ON
Inf
DEVINFO
Reports information about the device
include serial number, firmware version,
etc. Please provide this information every
time you contact technical support.
iSocket 3G
S/N: 12345678987654321
FW: v1.0.0
(c) iSocket Systems
Ctrl
13. Original Factory Settings & Remote Update
Each new device has pre-configured factory settings. These are the so-called default
values. These settings are described below. The device can be returned back to these
default values at any time. The reset button is positioned on the front panel next to the
logo (see Chapter 1). To reset the device, press this button with a suitable thin object,
hold it for about 5 seconds until the POWER and OUT indicators start blinking
simultaneously. Then release the button and the reset procedure will start. Reset will take
about 5 seconds or less. Then the device will restart - the POWER and OUT indicators blink
3 times and the device starts to search the network. Your device is now returned to the
original factory configuration.
Default factory setting
Main socket is switched off
Scheduler is empty
Thermostat is not activated
ID is emtpy
RESTARTIME=10
PULSETIME=2
RING=NOACTION
RINGPUBLIC=OFF
SECLIST=OFF
PASSWORD=NO
SMSCONFIRM=ON
RINGCONFIRM=SMS
ERROR=ON
SMSCONFIRMUNAUTH=OFF
CREDITUMS=NO
IDSHOW=OFF
IMEISHOW=OFF
POWERALERT=SMS
PFAILDELAY=0
POWERSTATE=REMEMBER
TEMPINFO=FC
THERMOSTAT=HEATING
SWITCHOFFTEMP=50F(10С)
TEMPGAP=2F(1C)
TEMPCAL=0F(0C)
SWITCHOFFALERT=OFF
TSENSFAILALERT=OFF
TRISEALERT=OFF
TFALLALERT=OFF
TSENSFAILALERT=OFF
Remote Firmware Update
This new iSocket supports FOTA (Firmware Over The Air). Make sure that your SIM card
provider allows data on your SIM card. Firmware update will not use a lot of data traffic just a few kilobytes. Ensure that power to iSocket will not be interrupted during the remote
update. Only update the firmware if have found a malfunction or if you know that we have
released new features. Downgrade of firmware is not supported. NOTE! We do not
guarantee that the server for the update will always be available. We don’t publish new
firmware often, because the device is well tested. This is why we do not support the update
server continually online. If your iSocket cannot connect to the server, please try later or
contact us if you think that your iSocket requires updating. Begin the update procedure by
simply texting the command FWUPDATE to iSocket. You might need to configure APN
if your provider will not support automatic configuration – contact us for details.
NOTE! All your personal settings will be erased during this reset procedure.
Page 27

iSocket® 3G
www.isocket3g.com
© Copyright iSocket Systems 2017
All rights reserved. Version 1.0.2-EN - 26 - English
14. LED Indicators
The LED positions were described in Chapter 1. Below we list possible LED modes.
POWER (green)
Lights constantly
Input power to device is OK
Blinks 4 times per second then lights
2 seconds
SIM card is missed or incorrect placed
ONLINE (blue)
Lights constantly
Not logged to the network yet – either searching, or poor signal,
or SIM card problem
Blinks every second
Logged to the cellular network
Blinks fast
Data exchange (e.g. during firmware update or working via API
with a remote server)
OUT (red)
No light
Main power socket is turned off
Lights constantly
Main power socket is turned on
Blinks very fast (4 times per second)
A possible hardware error – see the behavior of other indicators
POWER and OUT blink 3 times
together only once
This blinking indicates that the firmware has started and usually
you will see it only once after powering up the device or after a
remote firmware update
POWER and OUT blink together 4
times per second then light 2
seconds
SIM card problem (PIN protection is enabled, no communication
with SIM card, wrong or bad SIM card)
POWER and OUT blinks alternately
iSocket is upgrading firmware after you have sent FWUPDATE to
it. Do not switch off the power! Just wait
15. Technical Data
Product
iSocket 3G
Available
Socket/Plug
Socket/Plug: NEMA 5-15 (North America) - Model Number: IS3GUS
Socket/Plug: AS/NZS 3112 (Australian) - Model Number: IS3GAU
Socket/Plug: BS 1363 (British) - Model Number: IS3GUK
Socket/Plug: CEE 7/4 ("Schuko") - Model Number: IS3GEU
Socket/Plug: CEE 7/5 (French) - Model Number: IS3GFR
Socket/Plug: CEI 23-50 S17/P17 (Italian) - Model Number: IS3GIT
Socket/Plug: SEV 1011 (Swiss) - Model Number: IS3GCH
Socket/Plug: SI32 (Israeli) - Model Number: IS3GIL
Power Input
100-240VAC, 50-60Hz
Consumption
Stand-by power <1W, Green Power
Output Relay
Max. switching 16A/250VAC, protected by 15A fuse. Turn on/off or restart of
120VAC/240VAC appliances by sms or call.
Hidden button
For manual switching of main relay and for reset to factory defaults.
Input for
Temperature
Sensor
Mini-jack 3.5mm connector on the rear of the device, RED color. Only sensors from the
original manufacturer are supported. Sensors are weather-proof or water-proof,
measurement limits from -67F (-55C) to 248F (120C). ±0.5°C accuracy from -10°C to
+85°C.
Temperature
control
Thermometer and thermostat features, temperature measurement provided by SMS,
turn on/off equipment by thermostat's settings. iSocket® Temperature Notifier –
send temperature rise/fall notifications.
Indicators
POWER green, ONLINE blue, OUT red
Built-in
rechargeable
battery
Li-ion or Li-po high quality batteries with excess capacity cater for signal delays in the
event of a break in the cellular network before sending the power failure alert. Charging
from internal charger about 20 hours if totally discharged. iSocket® Power Notifier –
power failure/restore alerts.
SIM socket
Micro SIM, push-push type, plug-in SIM card 1.8/3V, contract or prepaid (PAYG) SIM
cards
Page 28

iSocket® 3G
www.isocket3g.com
© Copyright iSocket Systems 2017
All rights reserved. Version 1.0.2-EN - 27 - English
Mobile
Network
Built-in antenna
iSocket® Online 24/7 – gets the device back online even after a break in the mobile
network
Model IS3GUS:
Quad-Band GSM/GPRS/EDGE (2G) 850/900/1800/1900MHz
Dual-Band UMTS/HSDPA (3G) 850/1900MHz
Models IS3GAU, IS3GUK, IS3GEU, IS3GFR, IS3GIT, IS3GCH, IS3GIL:
Quad-Band GSM/GPRS/EDGE (2G) 850/900/1800/1900MHz
Dual-Band UMTS/HSDPA (3G) 900/2100MHz
Scheduler
Scheduling the following functions to be executed at a particular time: turn on/off,
restart or pulse relay, activation/deactivation of thermostat, sending status with
temperature information, configuring “switch-off” temperature.
Security
Password, phone number list, limited configuration interval.
Operation
conditions,
Store
conditions
Operation conditions: Indoors, dry conditions, 14F – 104F (-10C – +40C)
Store conditions: -22F – 122F (-30C – +50C)
Important notes! While the product can operate at low temperatures (below 0C/32F)
this is not supported due to the technical specification for most SIM cards. A SIM card is
not supplied with the device and is therefore not a part of the device. You must not turn
on the device when the temperature falls below 0C/32F - the device must be already
turned on at this moment, and then the heat from the electronics will compensate for
the low ambient temperature. You must not turn on the device if there has been an
abrupt change of conditions from cold to warm or vice versa. Please wait a few hours to
stabilise conditions before turning on the device.
Weight /
Dimensions
Net/Gross: 258g (0.56lb) / 410g (0.9lb)
Temperature sensors: ITS00J 7g (0.24oz), ITS30J 72g (2.5oz)
Product dimensions (approx.) LxWxH: 65x45x140 mm
Packaging (LxWxH): 170x115x80 mm
Shipping weight: 500g (1.1lb)
16. Troubleshooting
Please read the safety instructions carefully (Chapter 2) as well as the warranty terms (Chapter 17). You
may not repair the device yourself. Here are descriptions of the possible problems and their rectification.
Only the simplest problems are mentioned. More information can be found on the website
www.isocketsystems.com. Some of the described situations may not be a malfunction. If you are unable to
eliminate any problem yourself, then, during the warranty service, you can take the device to the store from
which you bought it. Post warranty service is provided by the manufacturer or authorised service centres if
such exist. Some advice can be given by e-mail. When contacting sure to specify the device model, firmware
version and network signal quality report (you can check these by texting DEVINFO to iSocket).
Please read Chapter 14 for information about the indicators. Indicators can signal different faults.
Possible malfunction: No lights on indicators after iSocket switched into a wall outlet.
Possible solution: Make sure that the wall outlet is functioning and that power is available.
Possible malfunction: The device is plugged into a wall outlet, the POWER indicator is on, but the device
does not accept any commands.
Possible solution: Make sure that all indicators are correctly lit (see Chapter 14), the SIM card is inserted
correctly, PIN-code authorisation is removed on the SIM card and cellular network is available.
Possible malfunction: The device attached to the main socket will not turn on, although the main socket
itself is working.
Possible solution: Check whether the connected device functions and whether its own switch is turned
on.
Possible malfunction: Command was sent, but no response and nothing happens.
We recommend that you also check our FAQ http://isocket.me/faq
Page 29

iSocket® 3G
www.isocket3g.com
© Copyright iSocket Systems 2017
All rights reserved. Version 1.0.2-EN - 28 - English
Possible solution: The iSocket could have lost contact with cellular network or there is no electricity in the
home network. If you're away from the device and cannot verify the existence of electricity or cellular signal
in the home network you can carry out a simple test. Try to call to the device's number. If this works, you
will hear a ringing tone instead of a "subscriber not available" signal (only if RING=NOACTION). If you are
sure that the device is online, you need to look for other possible problems. One possibility is that the phone
number from which you send a message is unauthorised and therefore you will not receive any messages
and no action will be carried out (Chapter 5.1). A mistake in writing the command could have occurred and
error suppression could have been set (ERROR=OFF). In this case you would not know if you had made a
mistake in the command. Check your outgoing messages to see what command was sent and check that it
was written correctly, according to the manual. Read about other potential problems below.
Possible malfunction: The OUT indicator reports an error (blinking 4 times per second)
Possible solution: If the OUT indicator blinks 4 times per second, even only occasionally (e.g. at the start
of the device), it is likely that there is some problem with the SIM card. Check that the SIM card in the
device doesn't contain any data (such as stored phone numbers and messages). If the SIM card has data
on it then clean it using your cell-phone. Also try using another SIM card. If the OUT indicator is blinking
constantly and the blue ONLINE indicator is always off, there is probably a problem with the power of the
module. Contact the service department or technical support.
Possible malfunction: The phone from which device was controlled has been lost, but the number was
recorded in the list of allowed numbers. So you cannot control the device any longer.
Possible solution: The device must be reset to the factory defaults and set again with another phone.
(Chapter 13).
Possible malfunction: The device is behaving strangely – e.g. no response to commands.
Possible solution: Try to reset to factory default and configure the device again (Chapter 13). You can
also check that the SIM card in the device doesn't contain any data (such as stored phone numbers and
messages). If the SIM card has data on it then clean it using your cell-phone.
Possible malfunction: The device doesn't send power failure / power restore alerts.
Possible solution: Make sure that the number for alerts is installed properly (see Chapter 5.3). Lithium-
ion batteries are subject to a natural ageing process. When the capacity falls below a critical value you will
not be able to receive the power failure alerts. If this happens during the warranty period you have the right
to get a replacement battery for your product. If you use the device outside the specified temperature range
this can also be the reason for not receiving power failure alerts.
17. Limits of Warranty and Liability
These Warranty and Liability Terms (“terms“) are subject to change without notice. Current terms are available
from https://www.isocketsystems.com/warranty/. The warranty terms below apply to customers who purchase
products directly from iSocket Systems for personal use. Warranty terms for products purchased from dealers may
be different. Contact the dealer who sold you the product for details. Our products are subjected to stringent final
quality inspection. iSocket Systems guarantees that your device is free from material and production defects.
iSocket Systems will not be liable for any direct or indirect material loss to the owner or other persons caused by
use of this device. This warranty only covers production defects. The rights and benefits under this guarantee are
additional to your statutory rights which are not affected by this guarantee. If your device produces any of the
defects mentioned above within a period of 12 months after purchase (for some countries 2 or 3 years extended
warranty is available – check our website), iSocket Systems offers, at its discretion, either a free-of-charge repair
or exchange. The guarantee applies only for you as the original end customer. It does not apply to damage to
fragile components such as the housing, damage caused by improper use, culpable damage, damage caused by
breakage, heat, water or acts of God, damage caused by unauthorised tampering with the device or exposure to
chemicals, damage caused by overloading in the house power network. The life cycle of the relays depends on
how often it is turned on and off, but iSocket Systems guarantees its function at least during the warranty period.
Any replacement hardware product will be warranted for the remainder of the original warranty period, or thirty
(30) days, whichever is longer or for any additional period of time that may be applicable in your jurisdiction (on
condition that the device was purchased through an authorised channel). iSocket Systems does not guarantee the
preservation of personal settings on the device after its repair. Repair or replacement may involve the use of
functionally equivalent new or used parts. Replaced parts become the property of iSocket Systems. The warranty
will be lost if safety instructions not complied with (see Chapter 2) when using the device, and if the conditions of
use were violated. iSocket Systems disclaims any responsibility for damage to health or property suffered as a
result of using this device and failure to comply with safety instructions. Improper use, disassembling or product
modification causes warranty loss. iSocket Systems does not guarantee that this product will provide uninterrupted
operation of the controlled equipment; this device is not an uninterruptible power supply (UPS). This product is
not designed for safe disconnection of the controlled equipment from power network; the device is not equipped
Page 30

iSocket® 3G
www.isocket3g.com
© Copyright iSocket Systems 2017
All rights reserved. Version 1.0.2-EN - 29 - English
with a residual-current device (RCD). Correct function of the switching function all that is guaranteed. Alarm
features in this device, as well as functions related to temperature control, are optional and cannot be considered
as a substitute for professional systems. iSocket Systems assumes no liability for damage to property in connection
with the operation of these functions. The ability to send different types of alerts depends on the mobile network
and other factors. iSocket Systems provides the best technological solutions to perform these operations
successfully, but iSocket Systems do not allow use of the device for purposes related to life support and assumes
no liability for damage to property, loss of profit or any other loss in connection with the operation of device. The
maximum liability is limited by the cost of device in a case of its failure. iSocket Systems provides protection
against unauthorised access to the device, but gives no guarantees regarding the impossibility of such access and
is not responsible for the consequences of such lack of access. iSocket Systems reserves the right to modify the
device and its software without further notice. Differences in the software not covered in these instructions are
acceptable and not considered as defects and cannot be a matter for warranty service. Releasing new software,
including new functions, is not an excuse for its replacement under warranty terms and can be done for an
additional fee. Illegal use of remote listening option and the illegal extraction of information is a violation of the
law in most countries. Before using this function consult with a lawyer. iSocket Systems categorically prohibits the
use of this device for unlawful purposes and is not responsible for illegal use of the device. Please make sure that
mobile network is available in the area. Bad coverage is not a warranty matter. Please ensure that mobile phones
are permitted in the area before operating the unit (eg, hospitals, petrol stations, etc.). If the use of a mobile
phone is forbidden, do not use the device, as it can have negative influence to other electronic systems. iSocket
Systems will not be responsible for changes in mobile operators' networks if they for example cancel a service,
reduce performance, change network settings or shut down a network, which is required for operation of the
device. If the device stops operating due to any changes on mobile network it may not be considered as warranty
case. To get warranty service, you must provide proof of payment and this guarantee. The guarantee must be duly
filled in and must specify the serial number of the device, if it does not contradict the legislation of the country
where product was legitimately purchased.
18. Contacts, Support, News & Social Networks
The latest information about iSocket 3G can be found on the website www.isocket3g.com and
The World of iSocket website, which is the online catalog for all iSocket products
www.isocketworld.com.
For technical support please visit Support Resources on our corporate website
www.isocketsystems.com.
You may also ask short questions via our official Twitter https://twitter.com/isocketworld or
Facebook https://www.facebook.com/isocketworld
We would love to see pictures of your iSocket applications! Please don’t hesitate to post them our
Facebook page.
Follow the company on LinkedIn https://www.linkedin.com/company/isocket-systems or add us
to your circles on Google+ https://plus.google.com/+iSocket
Subscribe to our YouTube channel to get useful videos about how to work with iSocket
https://www.youtube.com/c/iSocket
If you are a developer, see our new project www.cecohome.com and join our professional group
on LinkedIn https://www.linkedin.com/groups/8405025 and Google Community
https://plus.google.com/communities/113010550250951727963
Finally, subscribe to a suitable mail list to get fresh updates on your product
http://isocket.me/sub
We hate spam!
Thank you for choosing iSocket from a true European manufacturer!
Page 31

© Copyright iSocket Systems 2017
All information and content included on this User Manual, including, but not limited to,
text, tables, graphics, logos, icons, images is the property of iSocket Systems or its
suppliers and is protected by copyright laws. You may not modify, copy, distribute,
transmit, display, publish, sell, or license any information from this User Manual without
the express written consent of iSocket Systems and any applicable third-party. You may
not create derivative works, or use any information available in this User Manual for
commercial or public purposes without the express written consent of iSocket Systems or
any applicable third-party. In addition, you may not reproduce, transmit, transcribe, store
in a retrieval system, or translate into any human or computer language any part of the
material from this User Manual in any form or by any means whatsoever without the
express written consent of iSocket Systems.
 Loading...