

Islander MR3 Maintenance Manual

Maintenance Manual
MR3
Copyrig ht © 2017 Islander Pr ecision Reel s. All Right s Reserved.
Spe cica tions and in form ation co ntain ed in thi s manua l are fur nishe d for info rmati onal us e only, and are subj ect to ch ange at an y time wit hout no tice.
Pro duct s and corp orat e names ap pear ing in thi s manua l may or may no t be regis tere d trade mark s or copyr ight s of their respec tive co mpani es, and are
use d only for id enti cati on or exp lanat ion and to the ow ners ’ bene t, wit hout th e intent to infri nge.
info@islander.com | www.islander.com
Reel Main tenance K it
Use the sam e lubri cant as the pros! A well lub ricated and cle an reel will la st you a lifetime. We
recom mend Isla nder’s Reel Main tenance Kit. It co mes with all t he lubri cants you ne ed for your MR3 reel.
Oil: Super Lu be® Multi-P urpose Synthe tic-based Oil wit h PTFE ®
Grease: Super Lube® Multi-Purpose Lubricant with Teon®
Contact your local dealer or visit www.islander.com.
General Information
Thank you for purchasing an Islander MR3 mooching reel.
In this manual you will nd tips and ins truc tions on how to keep your re el funct ioning like new for
yea rs to com e. Co ncise illu stratio ns wi ll he lp you clean and lu br icate e ach impo r tant compo nen ts .
Features of the MR3
• Ful l frame cons tr uc tion wi th o ne-pi ece spoo l and frame .
• Large arbor, ultra-light spool with vent ilated ar bor. The large ar bor allows for two to three
tim es the re tr iev al r ate of a st an dar d ar bor.
• A huge 2-7/16” drag surface using Island er’s proven graphi te impregnated cork material . This,
cou ple d with a du al phospho r bronze pawl sys te m, prod uce s inc re dib le s top pin g pow er.
• Con ver ts fro m ri ght to lef t-han d ret ri eve in seconds.
• Large , con toure d pal ming ri m and han dle s.
• Butter y smo oth sea led sta inles s steel bearin gs .
• Large scul pte d dr ag k nob .
Technical Support
Telephone 1-250-544-4856
E-Mail info@islander.com
Major Components
Clicker Assembly
Bearing
Clutch Assembly
Pawl Assembly
Dragknob
Spool
Retaining
Screw
Handle Assembly
Foot
Frame
How To Disassemble Your Reel
1. Rem ove the spin dle screw by tu rn ing
it counter -clockwise wi th a at bladed
screw driver.
2. Remove the dr agknob by hand, turning
it counter -clockwise untill you can
remove it.
Under neath the dragknob there will be
a stainless steel washer. It will eit her be
stuck to the bot tom of the dragknob or
to th e top of the dra gs pring.
3. Grasp the outside of the frame wi th one
hand and the spool with the other, and
pul l the fra me and sp ool apa rt.
At this point the re should be 6 free
assemblies: Ret aining Screw, Dragk nob,
Dragknob Washe r, Dragspr ing, Spool,
and Fra me.
Reassembly is the opposite of disassembly. Whe n you are reins talling the
drag knob, make sure the stainless steel wa sher is unde r the drag kno b
and not un de r the dra gspri ng.
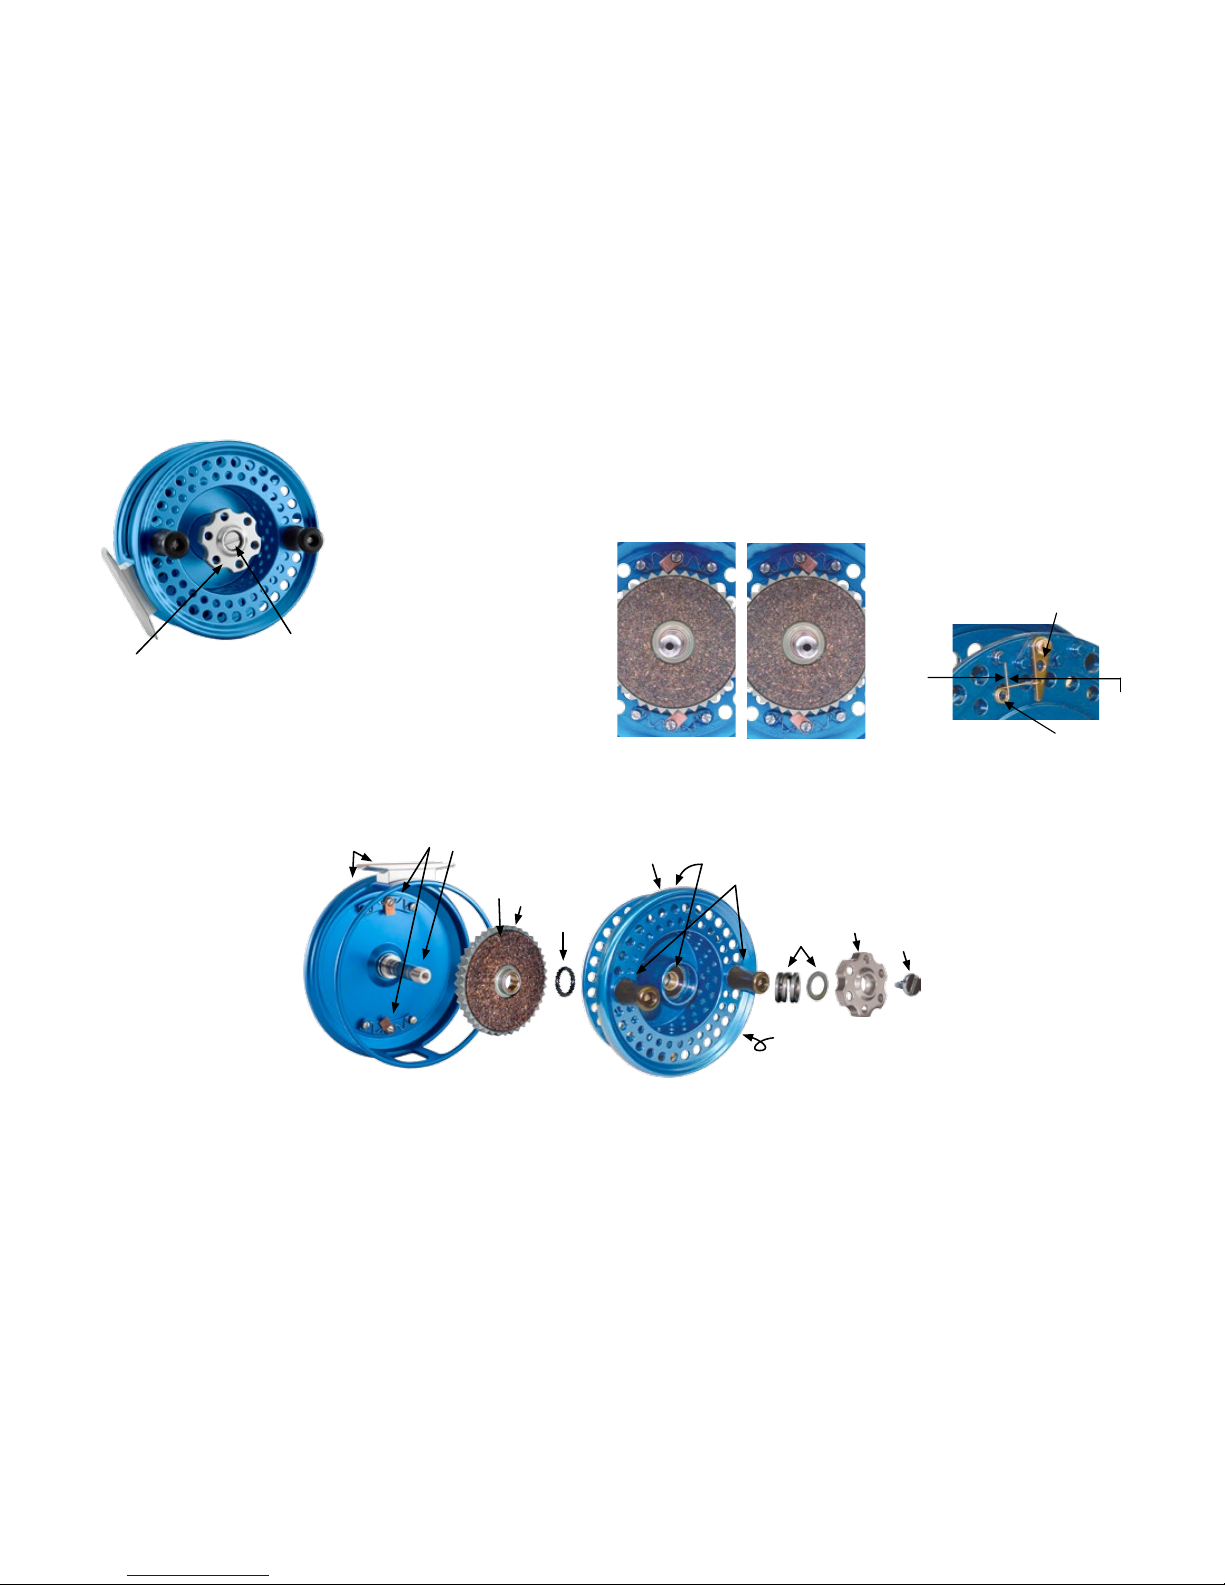
(B) Dragknob
Figure 1
(A) Retaining Screw
1) Clicker
A) For a loud er
outgoing click
Figure 4
2) Clicker Spring
B) For a sof ter
outgoing click
Figure 2
Left-H and Retrieve
Figure 3
Right-H and Retrieve
Tuning
It’s possible to tune the outgoing click (somewhat). For these
adjust ments, you will ne ed to disassemble your reel.
1. To make t he outgo ing clic k lou der, push the clic ker
spring in the direction shown by [A], Figure 4.
Push the spr ing until the clicker [1] is pointing
dir ec tl y at th e beari ng on the rear of th e spo ol.
2. To make the outgoing click softer, push the clicker
spring [2] in the direction shown by [B], Figure 4.
Do not push spring more than a few degr ees, as
pus hing too far will dise ngage t he cl ick er.
1. Disa ss em bl e you r re el .
2. Remove the sp in dl e O- Ring (see exploded vie w).
3. Lif t th e Clu tch As se mbly (se e ex pl od ed vi ew).
4. Arr an ge the pa wl direc ti on as per Fig. 3 or Fig . 4.
5. Re pl ac e Clu tch As se mb ly an d Sp in dl e O- Ri ng .
6. Rea ss em bl e you r re el .
Retrieve Conversion (Right & Left-Hand)
Cleaning and Lubricating Your Reel
1. Frame Assembly an d Foo t / Ree l
Sea t - Ri nse and dry after us e.
2. Pawl Asse mblies - Remove old oil and
any grit . Apply a drop of oil around
the spr ing s and pawl.
3. Spindl e - Remove all the old lubr icant
and any grit from the spindle and
apply a small amount of greas e to the
bas e of the sp ind le.
4. Clutch Surface - Wipe cor k surf ace to
remove excess oil and graphite. Apply
a small amount of oil and powdered
graphite to the cork sur face and work
it in wit h you r nger.
5. Clutch As sembly - Remove old grease and any grit from the bearing , inside and out . Apply
a small amount of grease to the bearing. Remove old grease from betwee n the teeth of the
clu tch . Ap ply a sma ll am oun t of gr ea se betwee n the teeth.
6. S pin dle O- Ring - Re move old g rea se and an y gr it pr ior to clutc h ins talla tion.
This level of c leaning or lubrication should be carried
out once every 3-4 shing tr ips. Because of saltwater
conditions, it is important that t he reel be r insed of f under
a warm water stream after each trip. While the reel is
saltwa ter safe, t he quick r inse will help your reel perform
better in the long run. Avoid immersing t he spool in water,
because moisture will be retained by the backing and line.
7. Spool Assemb ly - Rin se an d dr y af te r
use.
8. Front and Rear Spool Bearings - Remove
old grease and grit with a dry cloth. Apply
a small amount of grease to the exposed
bearing shields.
9. Handle Assemblies - If the handles star t
to stick , you can remove the handle from
the base by undoing the handle screw and
remove any gr it. No lubr icati on is req uir ed .
10. Dragspring and Dr ag Knob Washer Rem ove old gr ea se and any gri t.
11. Drag Kno b - Rem ove old gr ea se and any
grit . Clean cente r threads using a cotton
swab or a small clot h. Apply a small amount
of gr ea se to the in side th reads .
12. Spindle Screw - Remove old grease and
any grit . Apply a very small amount of
grease around the threads.
13. Clicker Assem bly - Remove old oil and any
grit . Apply a drop of oil through each hole
on the clicker, arou nd the screw head and
around the clic ker spr ing .
Your reel comes from th e factor y lubricated.
Periodic lubrication is recommended to maintain
optimum performance.
1.
2. 3.
4.
7. 8.
9.
10.
11.
12.
13.
5.
6.
 Loading...