

Islander ARMR2, MR2-LA Maintenance Manual
Maintenance Manual
ARMR2
Copyrig ht © 2017 Islander Pr ecision Reel s. All Right s Reserved.
Spe cica tions and in form ation co ntain ed in thi s manua l are fur nishe d for info rmati onal us e only, and are subj ect to ch ange at an y time wit hout no tice.
Pro duct s and corp orat e names ap pear ing in thi s manua l may or may no t be regis tere d trade mark s or copyr ight s of their respec tive co mpani es, and are
use d only for id enti cati on or exp lanat ion and to the ow ners ’ bene t, wit hout th e intent to infri nge.
info@islander.com | www.islander.com
Reel Main tenance K it
Use t he same l ubric ant as th e pros! A well lu bric ated an d cle an reel will l ast you a li fetim e. We reco mmend
Isl ander ’s Reel M ainte nance K it. It com es wit h all th e lubr ica nts you ne ed for you r ARMR 2 reel .
Oil: Super Lu be® Multi-P urpose Synthe tic-based Oil wit h PTFE ®
Grease: Super Lube® Multi-Purpose Lubricant with Teon®
Contact your local dealer or visit www.islander.com.
General Information
Thank you for purchasing an Islander ARMR 2 model mooching reel.
In this manual you will nd information on how to take care of your new reel. Concise illus trations
wil l help you ide nti fy, clea n, a nd lu br icate each i mpo r tant compo nen t to he lp keep your ree l
performing like new.
Features of the ARM R2
• Han dles st ay s ta tio nary w hil e the line is pl ayi ng ou t.
• Ful l frame cons tr uc tion wi th o ne-pi ece spoo l and frame .
• Fre e spool o per ation cont rolle d with fr am e-sid e recess ed leve r.
• One way la rg e cor k disc dr ag s ys tem .
• Face sid e adj us table dra g knob.
• Islander classic outgoing clicker.
• A gen erous palm ing rim .
• Engraved serial number on spool and fr ame. (Note: you may notice that your spool and frame
ser ial num ber do not match, which is by design .)
Technical Support
Telephone 1-250-544-4856
E-Mail info@islander.com
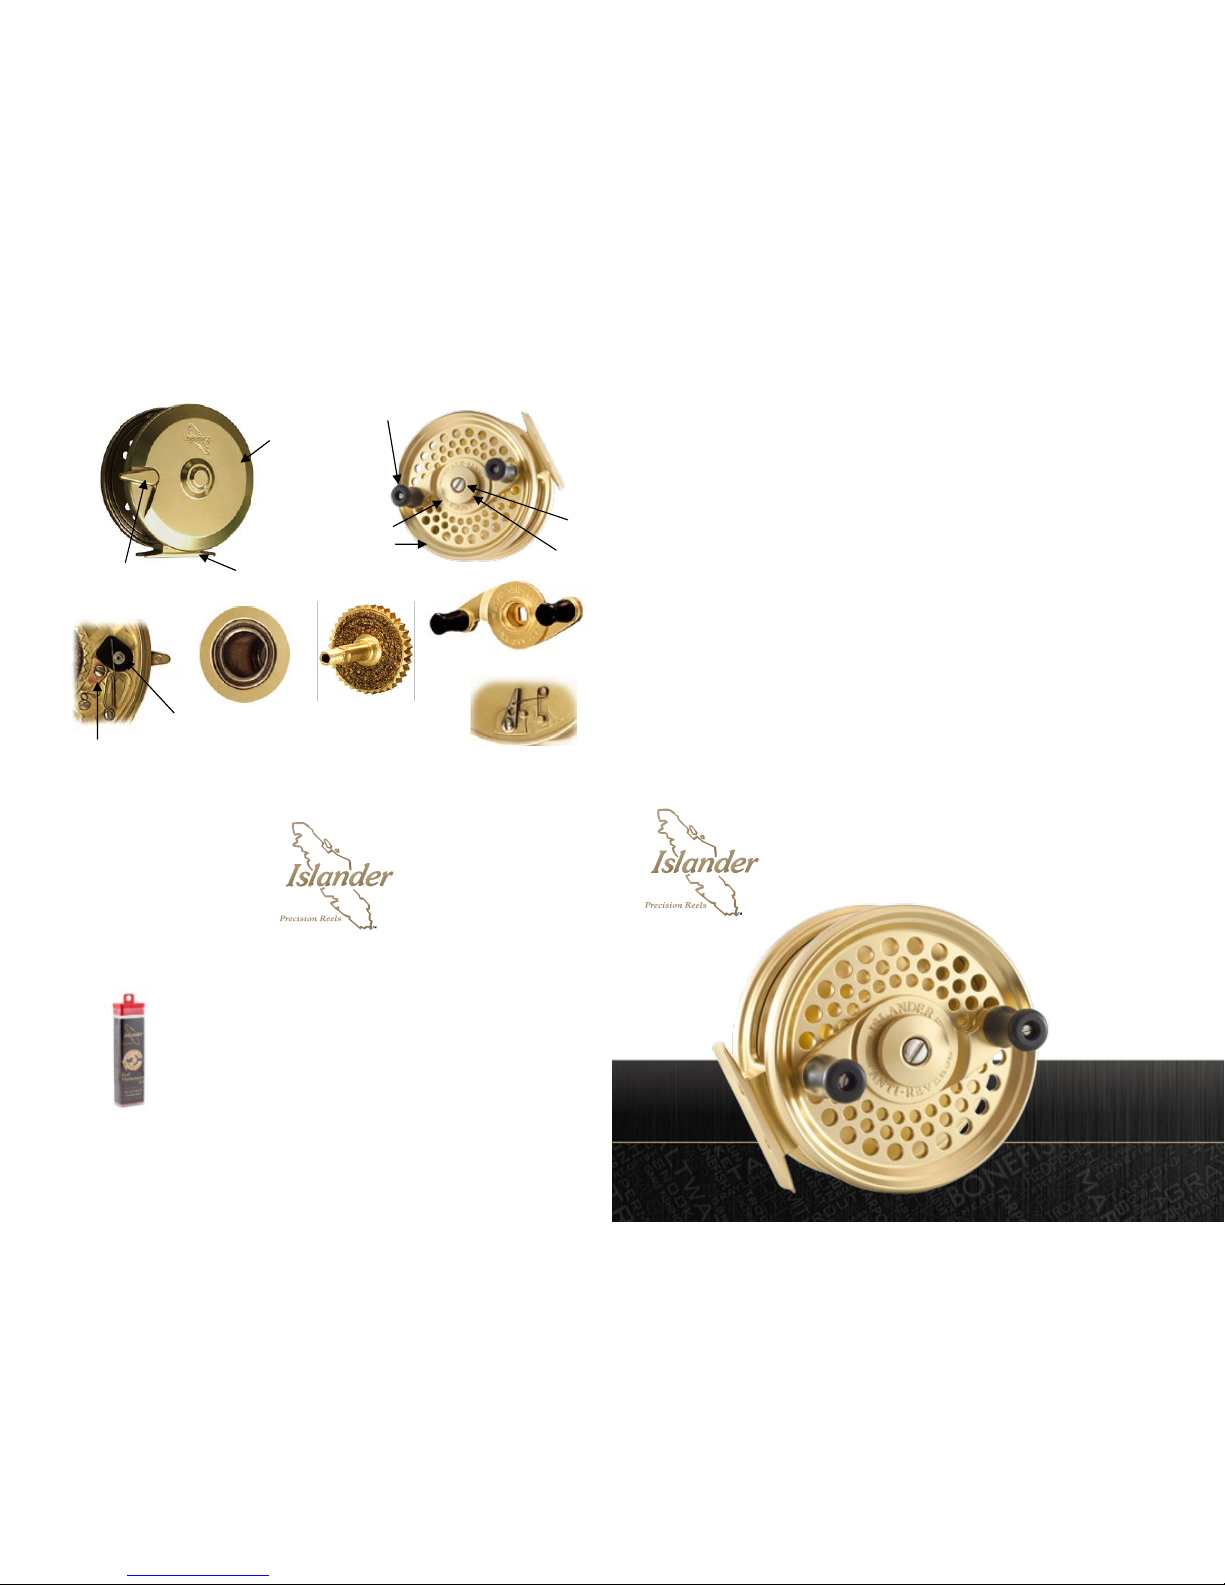
Major Components
Clicker Assembly
Dragknob
Crank
Spool
Retaining
Screw
Handle Assembly
BearingClutch Assembly
Pawl Assembly
Cam
Assembly
Foot
Frame
Draglever
Crank Assembly
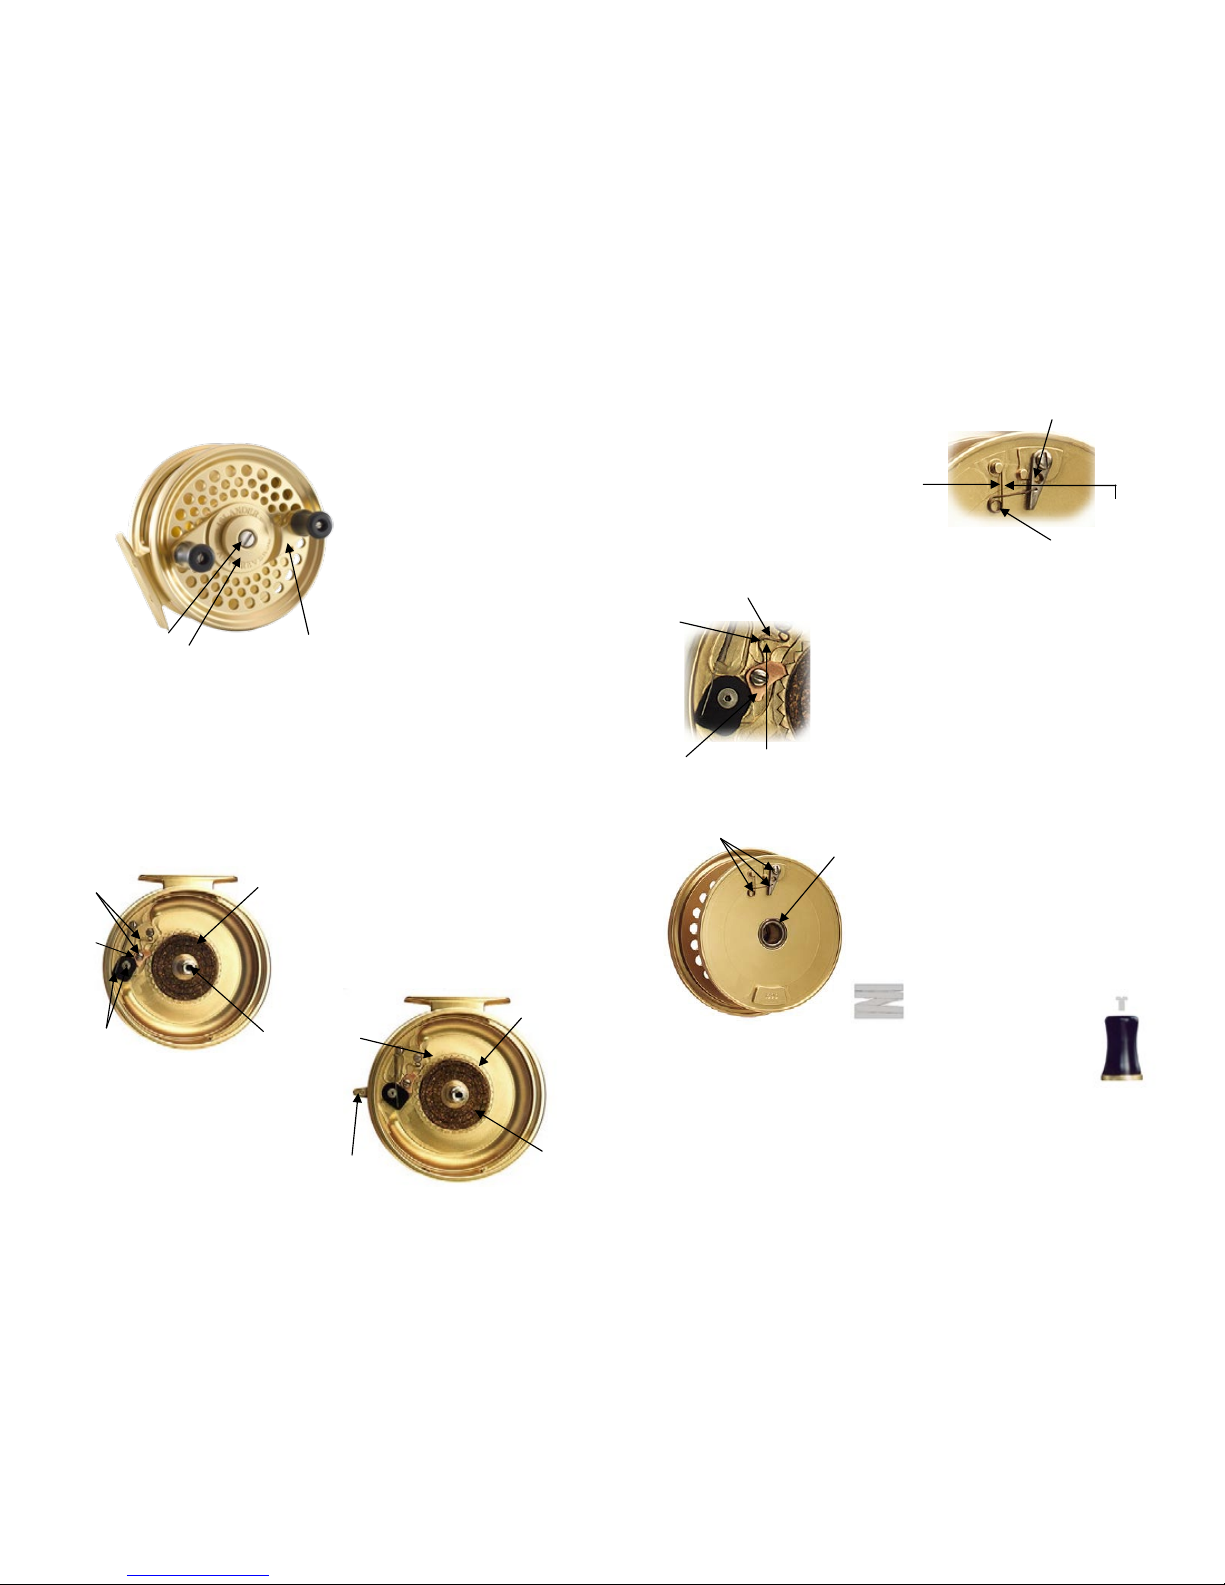
Cleaning and Lubricating Your Reel
1. Dis as sem ble you r ree l as show n above .
2. Re move the clu tch ass emb ly [1] .
3. Clean the clu tch assembly. Remove old gre ase and
grit us ing a sof t clo th.
4. Clean the base of the spindle, [2]. Remove any old
greas e and gri t fr om us ing a sof t cloth .
5. Clean the pawl/cam assem bly [A] and [B]. Remove
any old oi l and gri t using a bru sh or swa b.
6. O il an d greas e all ind ica ted loc ati ons .
7. After lubri cation , work the Draglever [3] back
a forth a few time s to work the lubr ication
thr ou gh th e ca m and pawl assemb lies.
8. With the Draglever [3] in the “disengaged”
position, lower the clu tch back into posi tion,
cor k side up . Re-engage th e Dr agl eve r [3] .
A) Oil Pawl
B) Oil Cam
C) Greas e
Cam
2) Spindl e
1) Clutch
Assembly
Figure 2
Figure 3
F) Grea se Bearing
Under Clutch
3) Draglever
D) Grease
Teeth of
Clutch
E) Oil Cl utch
Cork
Your reel comes from th e factor y lubricated. Per iodic lubrication is recommended to maint ain
optimum performance.
F) Oil Cl icker
Assembly
Figure 4
Figure 5 - Dr ag Spring
G) Greas e Bearings
(front of sp ool and
rear of sp ool)
Figure 6 -
Handle Assembly
9. Remove old oil from the around the clicke r
assem bly using a br us h or sw ab .
10. Remove old grease from the sur face of
the bear ings. One bearing is located at [G],
while the oth er beari ng is on the other side
of the spool. If the dr agspr ing [Figu re 5] has
not been removed, please do so to clean
and lubric ate thi s bea ri ng.
11. The cr ank req uires a small am oun t of
lubri cation on the white Teon disk. The
drags pring does not requir e any lubrication.
Just wip e the dragspring off
with a soft clot h.
12. The handle assembly need not be lubricated. Simply remove the scr ew holding the
handle wi th a at bladed screw driver and clean thoroughly with warm, soapy water.
This level of cleaning or lubricat ion should be carried out once ever y 3-4 shing trips.
Because of the conditions that this style of reel is used under (saltwater), it is important
that the reel be rinsed off under a warm water stre am after each trip. While the reel is saltwater safe,
the quick ri nse will help your reel perform better in the long run. Avoid immersing the spool in water,
bec aus e moi sture will be retained by the backing.
Tuning
It is possible to tune bot h incoming and out going
clicks, to a certain extent. For these adjustments,
you w ill need to dis assemble yo ur r eel .
2. If you nd that your reel is too loud on the
outgoing click, push the clicker spr ing [2] in the
direc tion indicated by [B], Figure 7. Do not push
spring more than a few degre es, as pushing too
far will rem ove the outg oin g cli ck al toget her.
3. If you nd that your reel is too quiet on the
incoming click, push the pawl spring [4] in the
dir ec tion in dic ated by [C ], Figu re 8.
4. If you nd that your ree l is too loud on the
incoming click, push the pawl spring [4] in the
direc tion indicated by [D], Figure 8. Do not push
thi s sprin g more th an a degr ee .
Figure 8
C) For lou der
incomming click
4) Pawl Sp ring
3) Pawl
D) For a quie ter
incoming click
1) Clicker
A) For a loud er
outgoing click
Figure 7
2) Clicker Spring
B) For a quie ter
outgoing click
1. If yo u nd that your ree l is to o quiet on
the outgoing click, push the clicker spr ing
in the direc tion indicated by [A], Figure
7. Push the spring until the clicker [1] is
pointing directly at the bearing on the
rear of the sp ool .
How To Disassemble Your Reel
1. Rem ove the r etain ing scre w by tu rn ing
it counter-clockwise, using a snug-tting
at bladed screw drive r or coin. (It is
impor tant that whichever tool you
choose to use ts well, as one that is too
sma ll ma y dam age the ret ain ing scr ew.)
2. Remove the dr agknob by turning it
counter-clockwise until it is loose.
Under neath the dragknob there will be a
nylon washer. It will eithe r be stuck to the
bottom of the dragknob or to the top of
the dragspring.
3. Remove the cr ank by pulling it away fr om
the spool. Grasp the outside of the frame
with one han d and the spool wit h the
other, and pull the fr ame and spool apart .
On the back of the spool you may notice
that the clutch is stuck to the back of the
spool. You can remove this by graspi ng
the teeth of t he cl utch an d pul lin g.
At this point the re should be 8 free assemblies: Retaining Screw, Dragknob,
Dr agk no b Was her, Dra gspri ng, Clu tch , Cr an k, S poo l, and Fr am e.
(B) Dragknob
Figure 1
(A) Retaining Screw (C) Crank
 Loading...