

User Guide


User Guide
Copyright © 2017 ISLA Instruments. All Rights Reserved.
www.islainstruments.com
Revised 9.20.2017
1
2

Contents
Power Up ...............................................................................................................................6
Play Modes .............................................................................................................................6
Play Modes – Key + MOD ....................................................................................................................6
Play Modes – Diatonic Mode .................................................................................................................8
Progression Suggestion .............................................................................................................. 9
Play Modes – Diatonic Strum................................................................................................................. 9
Play Modes – Polyphonic Keys ..............................................................................................................10
User Chord creation in quick mode ...................................................................................................10
Notes for entering user chords, quick mode...........................................................................................10
File Manager ...........................................................................................................................11
Mounting and Unmounting..................................................................................................................11
Formatting.................................................................................................................................11
Create System Card.........................................................................................................................11
Save / Load System Data ...................................................................................................................11
Saving System Data.................................................................................................................12
Loading System Data................................................................................................................12
Settings ...............................................................................................................................13
MIDI IO Setup ..............................................................................................................................13
Setups .....................................................................................................................................13
Changing MOD keys.................................................................................................................13
Changing NOTE keys ................................................................................................................14
Changing MEM keys.................................................................................................................14
Foot Controller Configuration................................................................................................................14
Expression Pedal....................................................................................................................14
Foot Switch.........................................................................................................................14
Arpeggio Builder............................................................................................................................15
Arpeggiator’s Inner Self .............................................................................................................15
3

Patterns............................................................................................................................15
Using the Arpeggio Builder ..................................................................................................................16
Editing Note Patterns (Yellow) .......................................................................................................16
Editing Velocity Patterns (Green) .....................................................................................................16
Editing Rhythm patterns (Purple) ....................................................................................................17
Scale Builder ...............................................................................................................................17
KordBot Common Built In Functions.......................................................................................................19
Arp Division ................................................................................................................................19
Arp Note Len ...............................................................................................................................19
Arp Speed..................................................................................................................................19
Arp Swing..................................................................................................................................19
Chord Hold Time............................................................................................................................19
Chord Spread...............................................................................................................................19
MIDI CC ....................................................................................................................................20
Slider damping .............................................................................................................................20
Tempo . . . . . . . . . . . . . . . . . . . . . . . . . . . . . . . . . . . . . . . . . . . . . . . . . . . . . . . . . . . . . . . . . . . . . . . . . . . . . . . . . . . . . . . . . . . . . . . . . . . . . . . . . . . . . . . . . . . . . . . . . . . . . . . . . . . . . 20
Velocity humanize ..........................................................................................................................20
Velocity offset..............................................................................................................................20
Arp On/Off/Even ...........................................................................................................................20
Arp Style U/D ..............................................................................................................................20
Arp Note Pat ...............................................................................................................................21
Arp Quantize ...............................................................................................................................21
Arp Repeat / Latch..........................................................................................................................21
Arp Rthm pat...............................................................................................................................21
Arp Vel pat .................................................................................................................................21
Chord Hold On/Off..........................................................................................................................21
MIDI CC ....................................................................................................................................21
4

Midi Clock Out..............................................................................................................................21
Midi In Ports ...............................................................................................................................21
Midi Out Port...............................................................................................................................21
Midi Sync Int/Ext ...........................................................................................................................21
Q Notes/Measure ..........................................................................................................................21
Push Changes ..............................................................................................................................21
Turn Changes ..............................................................................................................................22
Diatonic Progression Editing .............................................................................................................22
Diatonic Theory.........................................................................................................................23
Scales .....................................................................................................................................23
Chords.....................................................................................................................................24
Diatonic Progressions.......................................................................................................................24
Appendix X – MIDI Continuous Controller Values ...........................................................................................25
5
Power Up
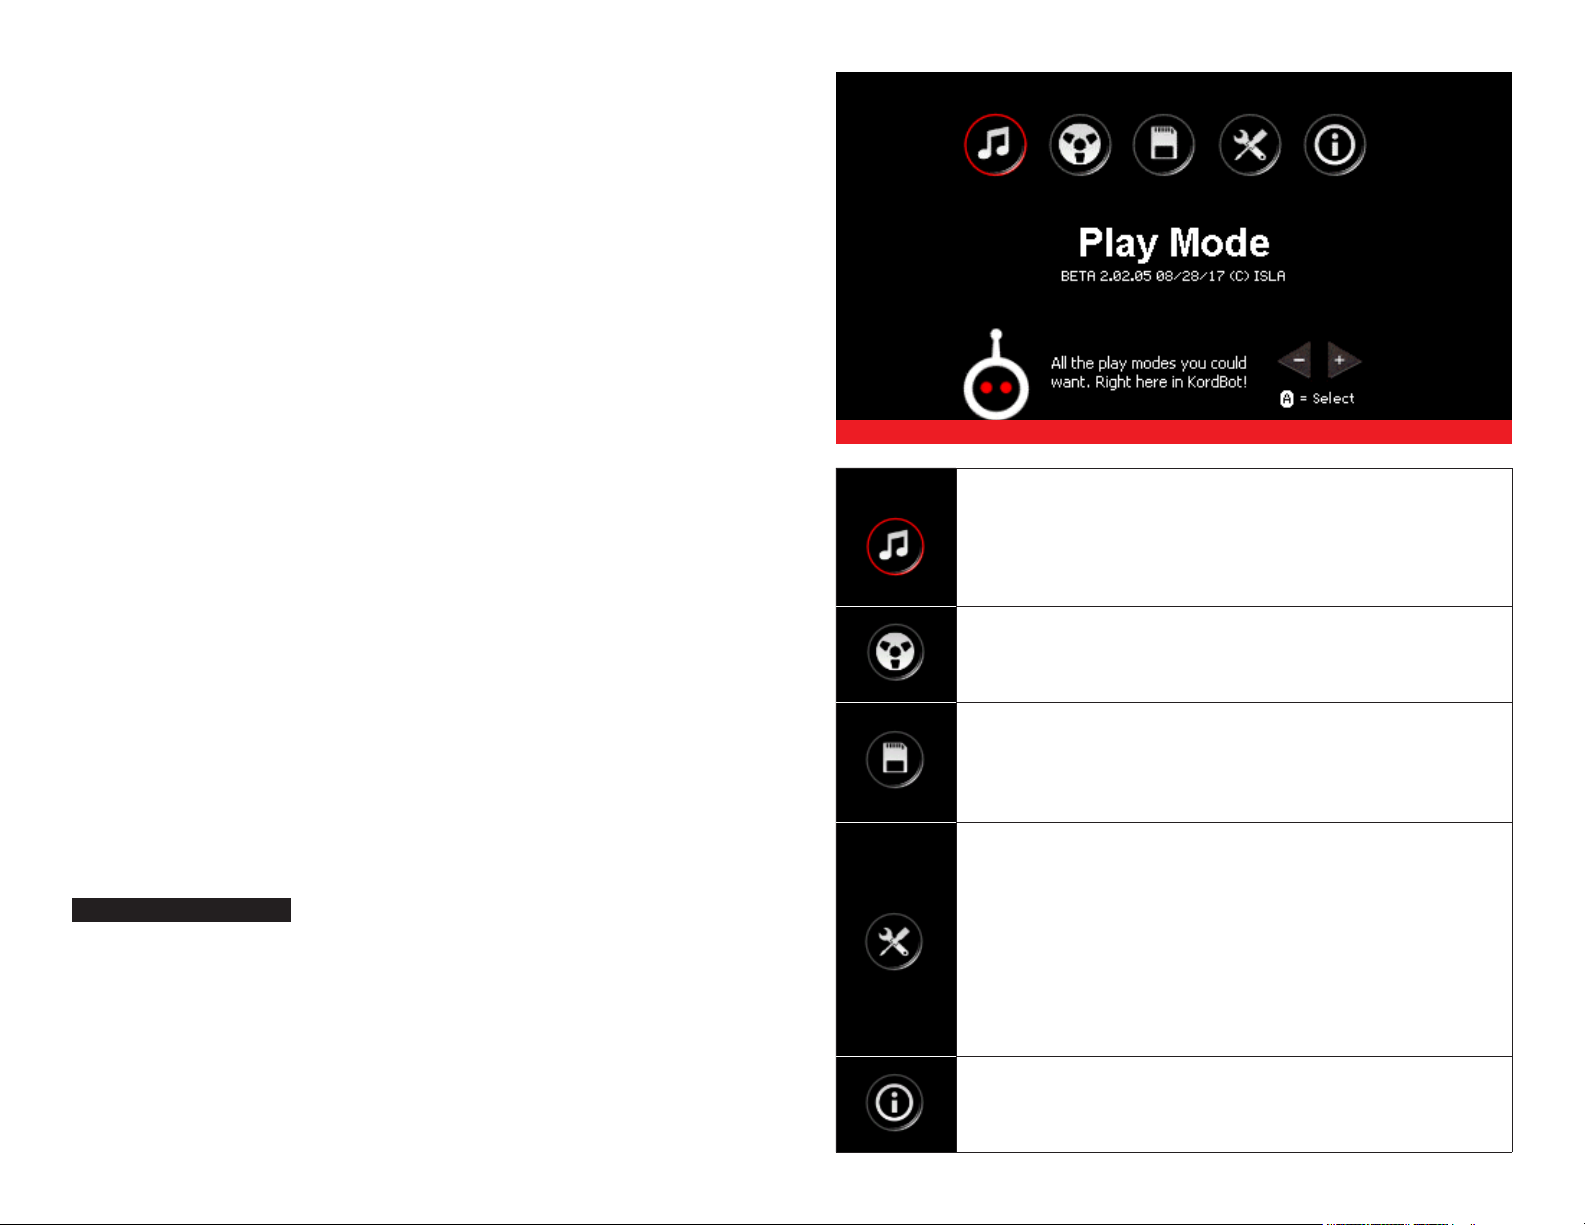
After powering up your KordBot unit you should see the screen shown in
Figure 1. This is the main menu screen from which all KordBot functions are
accessed. Rotary Encoder A is used to navigate to the desired icon.
Play Modes
There are 4 play modes available with the current KordBot firmware: Key + MOD,
Diatonic Mode, Diatonic Strum and Polyphonic Keys. These modes allow you the
freedom to configure and use the KordBot in many ways, from live performance
to studio recording and anything between. Each mode has configuration options
to allow you to tailor your workflow to whatever suits you best. Plus, the system can be saved, so you can store and retrieve configurations at your leisure.
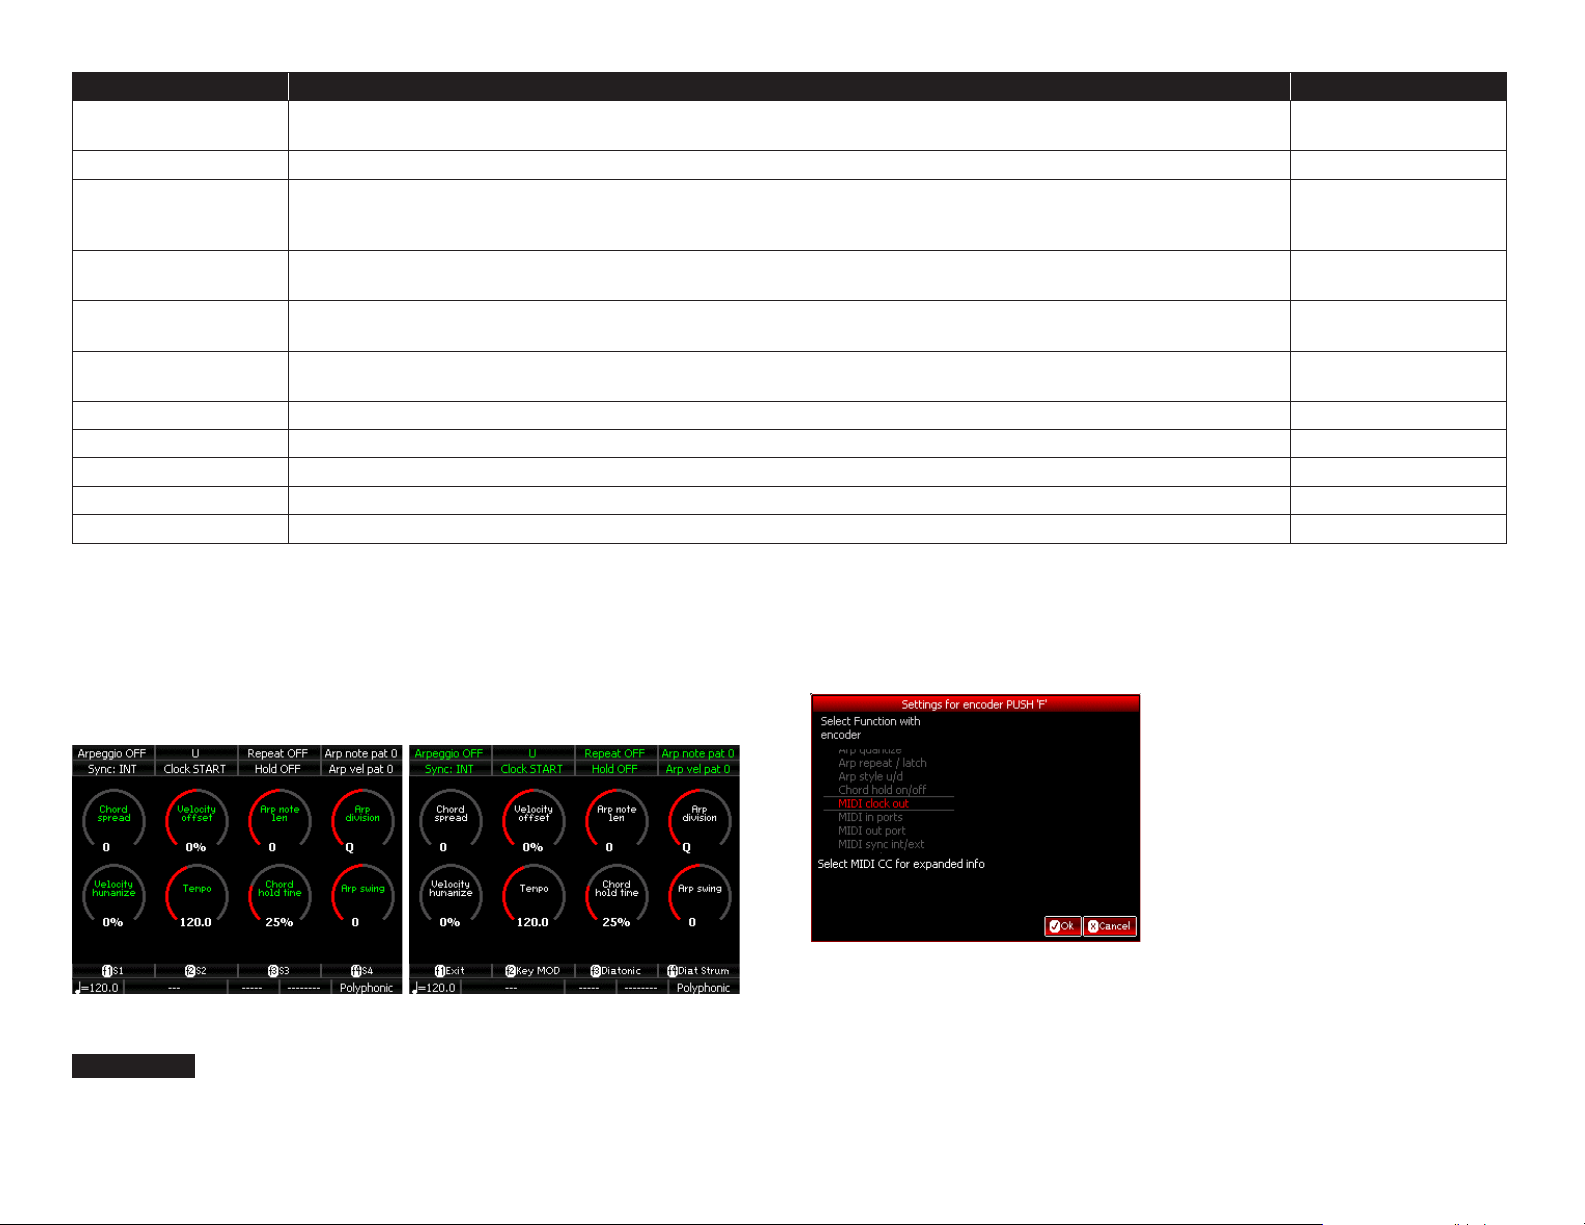
Each mode has a common graphical interface. There are 8 encoder rotary position indicators in the center of the screen. The functions available by pushing the encoder switch are shown at the top of the screen. Finally, there is a
hot-key menu and a status grid at the bottom of the screen. See Figure 2.
The 8 “push” functions and the 8 “rotary” functions can be assigned to various KordBot control functions as well as all MIDI Continuous Controller
(MIDI CC) functions. The available MIDI CC control subset for the encoder push functions are limited to MIDI CC messages which were designed for
two-state conditions, such as toggling Portamento on or off. For more information see Appendix X “Supported MIDI Continuous Controllers.”
Figure 1
Play Mode
Instantly access the KEY+MOD, Diatonic, Diatonic Strum
and Polyphonic Keyboard play modes. This is where
you will spend most of your time on KordBot®. See
page X-Y “Play Modes” for more information.
Sequencer
~ Future version of firmware ~ See page X-Y
“Sequencus Maximus” for more information.
File Manager
Access all the SD Card functions – Mount and Unmount the
drive, Format, Create System Disk and Save and Load Setups.
See page X-Y “The File Manager” for more information.
For a list of available rotary and push KordBot control functions, see page X-Y “KordBot Common Built In Functions.”
Play Modes: Key + MOD
Key + MOD mode uses the pre-programmed chord modifier keys in conjunction
with the NOTE keys of the piano style keyboard (see “Parts Of The KordBot on
page X-Y). Pressing and holding a NOTE key (for example C) sets the “root” note.
Then, pressing a chord modifier key (for example m7) will cause the KordBot to emit
a chord known as a Cm7 or C minor seventh chord. Like wise pressing a D NOTE
key along with the Maj9 chord modifier key will produce a DMaj9 or D Major 9th
chord. Note that the LEDs under the NOTE keys will also light up to show you the
notes in the chord you’ve just played. So for the Cm7 chord, the NOTE keys for C,
Eb, G and Bb will light. For D9 you should see the NOTE keys D, F#, A, C# and E light
6
Settings
This is the place to go when you want to select MIDI communications
over USB / Wireless or MIDI DIN inputs and outputs. This is
also where you are able to configure MIDI channels for each
key of the KordBot®. You can configure the Footswitch and the
Expression pedals under this menu. Finally, you will be able to
build musical elements with the Arpeggio and the Scale Builder.
In a future firmware release, you will also be able to access the
Chord Builder. See page X-Y “Settings” for more information.
About
Informational scrolling screen about the KordBot®

Encoders
AA
E
Figure 2
B
F
C
G
D
H
up. Also, the display will show the note name, octave and chord type played. This
appears in the bottom status line, to the left of the mode indicator (Key + MOD).
In addition, you can press one of the f keys 1-4 to play an inversion of the chord.
So, pressing the Maj MOD key, f1 and then the C NOTE key you can play a CMaj
or C Major chord in the first inversion. The C NOTE will light because you pressed
it, but then you’ll also see the E, G and C an octave above light up. A C Major in the
first inversion has the notes E, G and C. Likewise the second inversion is G, C and
E, which you can get by pressing the Maj, f2 and C keys. Third and fourth inversions are available but note that for chords with only 3 notes, the third inversion
actually repeats the root position of C, E and G, only an octave higher. If you try
using inversions with more complex chord MOD keys – such as the Maj9, you’ll see
that the notes are all the same, but in order according to the inversion selected.
If you wish to store an inversion of the chord, press the INVERSION key AND the
SHIFT key and then press the MEM pad you want to save the inversion to. So, as in the
above example, if you press the chord modifier dim7 and key note D keys, to form a
D°7 ( D diminished 7th), then wanted to save the first inversion of that chord, press f1,
SHIFT and then the MEM key you wish to save it to. Note that you can also “mix and
match”. Any chords you enter into MEM slots will be available in all the other modes.
You may also elect to save a chord template to a MEM key. Chord templates do not store the key note and act essentially like the MOD keys. It
means you must press a note key along with the MEM key to play a chord.
The advantage here is you can carry this stored key to other modes – for instance you might want to have a 7sus4 chord in memory so that you can
add that to your available choices of chords in, say, the Diatonic Mode.
Key + MOD mode was designed to offer the largest palette of 32 chord types
and up to 4 inversions per type, for a total of 128 chord type variations. If
you can’t find the sound you’re looking for in that batch, don’t worry: elsewhere in this guide you can learn how to easily create your own chords.
Each mode has the ability to store up to 12 chords in the MEM key pads (M1-M12).
For the Key + MOD mode, this is simply done. First, play any chord – you just have
to play it, not keep the keys pressed. Next, press the SHIFT key and press one of
the MEM pads M1- M12. The chord that was played last is now stored into the slot
you chose, including the scale or key note you played. So, for instance, if you press
the chord modifier dim7 and key note D keys, it forms a D°7 ( D diminished 7th)
To save the chord as a template play the desired chord modifier and any note (the
note will be ignored). For instance, pressing the “Maj 9” and a “C”. Then simply press
the ALT and SHIFT keys at the same time and finally press the MEM key you wish to
save it to. Note that in the current firmware, you may not store inversions of chord
templates (but you can play them back with inversions). In KEY+MOD mode, play
the template back by pressing the MEM key and any note key. If you hold the MEM
key down and change notes, the chord will re-play with the new note selected.
Changing octaves in the Key + MOD mode is simple. Pressing the octave up or octave down changes the octave of the notes played on
the NOTE keys. Holding A LT and pressing the octave up or down
keys shifts the octave of whatever is stored in the MEM pads.
7
That is the basic concept of the Key + MOD mode. Much, much more can be
done in this mode, using the built-in KordBot functions. Things like arpeggiation,
chord spreading, tempo change and velocity imodifications all designed to enhance your playing experience. Since these functions can be used in other modes,
they are covered in depth in the section “KordBot Common Built In Functions”.
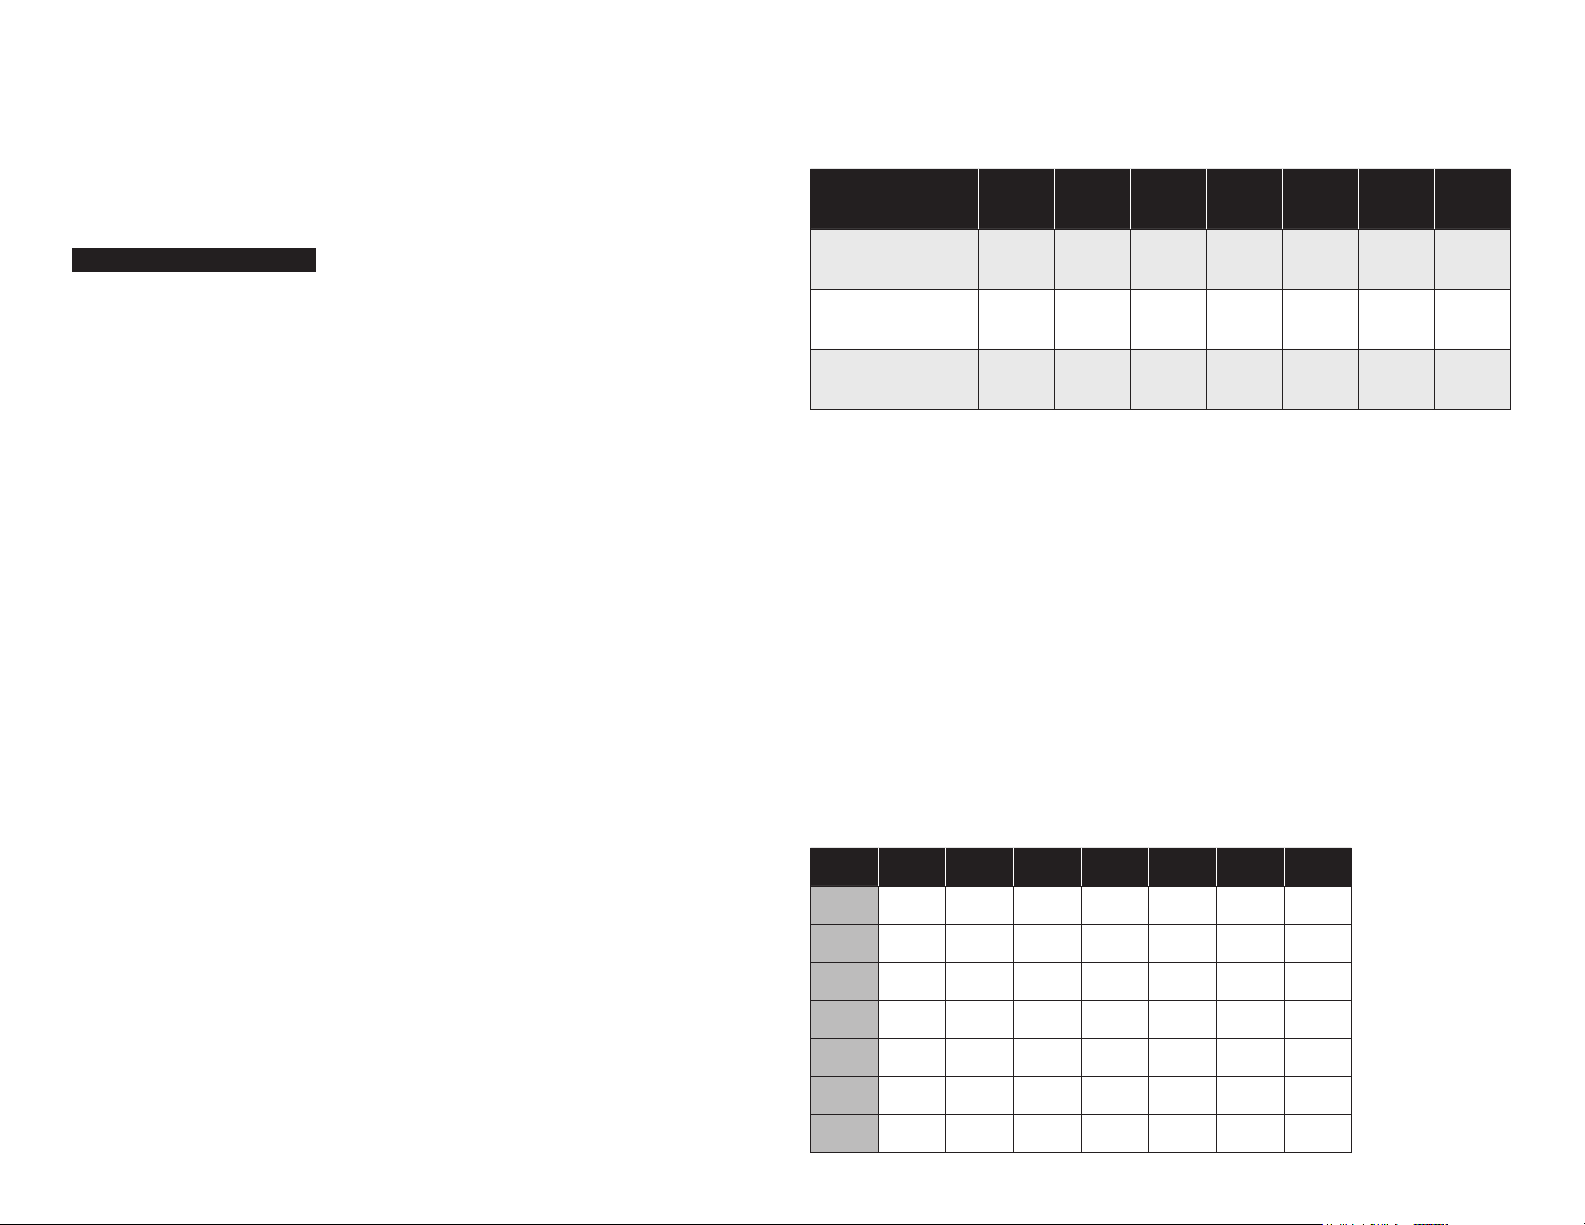
In the top row, the chords are laid out in standard diatonic progression for a Major scale in the key of C.
MOD key legend Maj 6 7 Maj7 9 Maj9 Maj11
Play Modes – Diatonic Mode
The Diatonic mode is the most complex mode that KordBot offers. While
it may seem daunting, once you get the hang of it, you will be able to explore musical areas few other MIDI controllers have ventured into.
To jump to the Diatonic mode, from any other mode, press the ALT key. The hotkey menu on the bottom will then show the fn key to press to jump to the Diatonic
mode. The screen will refresh and you should see all the same controls as before,
with the mode in the lowest right status box noting “Diatonic” for the mode.
In this mode, the layout of the MOD keys is different from the Key + MOD mode.
Here, each row of 8 MOD keys are comprised of 7 diatonically related (normally) chords, based on a scale. Using the advanced setup features, you can make
these 7 chords related, unrelated, random or whatever you desire. But the basic reason for the mode is that the MOD keys alone generate chords. The NOTE
keys allow the user to play along with the chords, providing 6-note polyphony.
If you would like to refresh your memory, or learn about diatonic theory, please refer to the chapter “Diatonic Theory”
The default key and scale rows on the KordBot are C Major, G Yo, C Natural Minor
(Aeolian mode) and Ab Blues. The default progression for each row is also the default for that scale type. The key and scale can be changed by choosing from a list.
But there are also 10 “User” progressions. In those 10, you can change the scale
to any pre-programmed scale, or you can build your own scale. Then you can also
change the chord type for each of the 7 ‘slots’. Currently you can pick from any of
the chord modifier key chord types (Maj through 9sus4). In a future release you
will also be able to create your own chord templates and choose those as well.
Chord C Maj D m Em F Maj G Maj A min B dim
Jazz notation I ii iii IV V vi vii°
Nashville Number 1 2m 3m 4 5 6m 7°
With just this small ‘palette’ of chords, you have the ability to play literally millions of songs. There are an uncountable number of hits that use just the I, IV and
V chords. Throw in the vi chord and you have an uncountable number more.
Each mode has the ability to store up to 12 chords in the MEM key pads (M1-M12).
For the Diatonic mode, this is done similarly to the Key + MOD mode. . First, play any
chord – you just have to play it, not keep the keys pressed. Note, you do not need to
press a key note, since diatonic chords already know which note is their key note.
Next, press the SHIFT key and press one of the MEM pads M1- M12. The chord
that was played last is now stored into the slot you chose. If you wish to store
an inversion of the chord, press the inversion key AND the SHIFT key and then
press the MEM pad you want to save the inversion to. So, for instance, if you
press an Em (third key on the top row in the default Diatonic mode) chord and
then wanted to save the first inversion of that chord, press f1, SHIFT and then
wv I ii iii IV V vi vii°
I √ √ √ √ √ √ √
ii √ √ √ √
iii √ √
For now, we’ll look at the default C Major row – the top row of MOD keys.
Refer to the section on “Diatonic Progression Editing” for more advanced features. Also, since all the encoder functions are shared by each play mode, you
might want to look at the section “KordBot Common Built In Functions”.
8
IV √ √ √ √
V √ √ √
vi √ √ √
vii° √ √ √

the MEM key you wish to save it to. Note that you can also “mix and match”.
Any chords you enter into MEM slots will be available in all the other modes.
You may also elect to save the chord as a template but since the Diatonic
mode also allows a polyphonic keyboard, playing the stored chord back requires pressing the MEM key after a note is pressed. This is because the playing of keyboard notes must be prioritized over playing a MEM chord.
To save the chord as a template play the desired chord (the chord’s key note will be
ignored). Then simply press the ALT and SHIFT keys at the same time and finally press
the MEM key you wish to save it to. Note that in the current firmware, you may not
store inversions of chord templates (but you can play them back with inversions).
Changing octaves in the Diatonic mode is simple. Pressing the octave up
or octave down changes the octave of the notes played on the NOTE keys.
Holding SHIFT and pressing the octave up or down keys shifts the octave of the MOD keys. Holding ALT and pressing the octave up or down
keys shifts the octave of whatever is stored in the MEM pads.
Progression Suggestion
Music theory also has a concept that, in every diatonic progression there are
“allowed” movements to other chords. This set of rules has been broken more
often than not, but KordBot has included this feature because it can stimulate all sorts of creativity. In future versions of the firmware, the user will be
able to create their own map of suggestions to mate up with any user scales
and user chords. This is because the traditional 17th century method was designed around a very limited set of scales – mostly the Major scale.
To activate the Progression Suggestion mode, simply press the last MOD key in any
row. A message box lets you know it’s been activated. Press OK and then press the
Maj MOD key to play a C Maj chord. All the LEDs in that row light up, indicating that,
from the I chord in a Major scale, you are ‘allowed’ to progress to any other chord. If
you next press the Dm chord (the MOD key labeled ‘6’) you will see that the number
of choices has dwindled to a total of 4. You can hit the Dm (ii) chord again, or choose
from the F Maj (IV), G Maj (V) or B dim (vii°) chords. In any sequence, the total progression you develop would make Mozart a happy guy, since you followed the rules.
Play Modes – Diatonic Strum
Diatonic strum mode works mostly like regular Diatonic mode – the chord modifier
keys are set up to produce harmonically related chords and the note keys offer 6
note polyphony. The major difference is how the MOD and MEM keys are played.
These keys are held and the user’s finger activates the notes by using the touch sensitive slider strip on the right of the KordBot. The touch strip responds to 12 zones
which are capacitance sensors. Bringing your finger near a zone will activate the
note associated with that zone. Wiping the finger causes a strumming effect and
can be done right or left and start and stop anywhere along the strip. Also one can
‘pick’ the zones much like a guitar player or banjo player plucks the strings. One of
the KordBot controls available is a touch strip sensitivity control. At the default level,
generally the finger will activate 2 notes at a time. Adjusting the ‘Slider damping’ value changes the sensitivity of each zone, allowing different expression capabilities.
The sequence of the 12 notes assigned from left to right are controlled by the
Arpeggio note pattern setting. The movement right to left moves down the
arpeggio and from the left the pattern ascends. The velocity humanize and
offset values also affect each note as they would during an arpeggio.
Since the touch strip is tied to the arpeggio, you can set the play mode to allow the
strip to stay on after releasing a MOD or MEM key by turning the Chord hold to ON and
the Arp repeat to LATCH. Using the Arp note length setting will increase or decrease
the ‘ring out’ of the note. This is most effective during the simulated picking mode as
a short tap emits a short pluck and a tap and hold lets the note stay on (depending
of course on the destination patch’s sustain setting). With Arp note length set to
max, the short tap lets the note ring out thru the release cycle on the destination.
Changing octaves in the Diatonic strum mode is simple. Pressing the octave up or octave down changes the octave of the notes played on the
NOTE keys. Holding SHIFT and pressing the octave up or down keys shifts
the octave of the MOD keys. Holding A LT and pressing the octave up or
down keys shifts the octave of whatever is stored in the MEM pads.
9

Play Modes – Polyphonic Keys
Polyphonic key mode turns all the MOD keys into single note keys. This is useful
for working with a destination unit which allows you to set up triggers based on
a MIDI note. For instance, you might trigger a bank of 16 sound samples with the
MIDI notes from 0 to 15. In that case, the top 2 MOD key rows would be set up to
play notes 0-15. Also, since each key is capable of having its own MIDI channel and
destination, you could have the top row of notes 0-7 assigned to different channels on a USB port and 8-15 assigned to output over channel 10 on the MIDI DIN.
Up to 6 notes can be played at once, so you could trigger hits and still play a
melody at the same time on yet another MIDI channel. The KordBot was designed to be flexible and configurable for most things you can imagine.
User Chord Creation In Quick Mode
The storing of MEM key chords is a bit different in this mode.
Essentially, you will be “recording” up to 16 notes that are stored
in KordBot chord format. Therefore, the process is:
1. Press SHIFT and the MEM key you want to store the chord
to. Note that the MEM key will stay lighted.
2. Play up to 16 single notes from the NOTE keys. The sequence that you enter
them in is the sequence they will be played back in an arpeggio, when the arpeggiator is set to note pattern 0 and the U or Up arpeggio style is used.
3. On the 16th note, the recording will stop automatically and save
the chord. If you desire fewer notes in the chord you may press
the lighted MEM key to stop recording and save the chord.
You may also save a custom chord as a template. Again, inversions cannot be used if
you wish to save the chord as a template. The big advantage in having a custom template comes when you use this chord in the KEY+MOD mode because it expands on
the 32 MOD keys already provided. To enter a custom chord and save it as a template:
1. Press SHIFT and the MEM key you want to store the chord
to. Note that the MEM key will stay lighted.
2. Play up to 16 single notes from the NOTE keys. The sequence that you enter
them in is the sequence they will be played back in an arpeggio, when the arpeggiator is set to note pattern 0 and the U or Up arpeggio style is used.
3. Before reaching the 16th note, press and hold the A LT key. After the 16th note
is entered, the template version of the chord you designed will be saved.
4. Optionally, for fewer than 16 notes, press and hold the ALT key
while stopping the recording by pressing the lit MEM key.
Notes For Entering User Chords, Quick Mode:
You can enter a minimum of 1 note to a maximum of 16 notes per MEM key.
To replace a stored chord simply record over it.
The chords you create in this mode will remain in the MEM key
even if you go to another mode. This way you can bring custom chords quickly into Diatonic strum mode, for instance.
When you play back your chord, since it has no name, the chord type status will
show as “polySave”. Also the note status will show the first note in the sequence.
4. Optionally, for less than 16 notes, you can use one of the inversion keys to
make a saved inversion of the chord you entered. Just make sure to hold the
desired inversion key down as you press the MEM key to stop recording.
10
Changing octaves in the Polyphonic mode is simple. Pressing the octave up
or octave down changes the octave of the notes played on the NOTE keys as
well as the notes of the MOD keys. Holding ALT and pressing the octave up
or down keys shifts the octave of whatever is stored in the MEM pads.

The File Manager
The KordBot uses an SD card as an external storage drive. With the File Settings
menu, the user can mount or unmount the drive, format a new SD card, create a
system disk and save and load the entire configuration of the unit. SD cards of 2
and 4Gbytes are supported. Users may use 8Gbyte cards, but the SD driver limits
storage to 4 Gbytes, which should be enough room for a lot. A lot a lot. Lots of a lot.
Mounting and Unmounting
Before data can be written to or read from the SD card, the KordBot needs to
know about the SD card. Mounting is a term that basically means the system opens the card and reads its configuration information so it knows how
to perform operations with the media. Unmounting is just the reverse of
that; it allows the KordBot to clean up any files that still need to be closed
and to release certain resources. It is highly recommended that you Unmount
any mounted card prior to removing it or powering off the KordBot.
Create System Card
Once formatted, the SD card needs to be prepared with necessary files for KordBot
to successfully work with the card. While you can add folders and store other data
on the SD card, it is recommended that you devote an SD card to just KordBot use.
Save / Load System Data
Once formatted and having been initialized as a KordBot system, the SD card is
ready to receive system data. This step saves all system settings from encoder
settings and positions to MIDI routings and channels, arpeggio settings, custom
scales, chords, arpeggios, foot pedal settings, etc. - Basically it creates a snapshot
of the entire system. In future firmware, these will be saved in named folders so
that you would be able to perform a system load for any setup you have saved and
switch configurations without needing ‘patch charts’ or memorizing settings.
Saving System Data
Once the card is mounted it will show the amount of free space. If the SD card
is write protected, that will also be shown. The write-protect tab must be in
the ‘unlocked’ position in order to format, create a system disk or save the system data. If the card is locked, it still can read the system files, however.
Formatting
The SD card must be formatted prior to use. You can use a pre-formatted card if you
wish, however the KordBot names the volume so that you can easily recognise it on
other systems. We have tested with 2, 4 and 8 Gbyte cards and haven’t any problems.
Not sure if 8G cards actually use all 8G, even though the KB reports the size correctly.
Initially after creating a system disk there is a blank category with one project: CATEGRY0/PROJECT0. It is advisable to save the default KordBot settings in this slot. When it comes time to save your own projects, you can create
new slots to save named projects in. There is enough room for 100 categories each with 100 projects – a total of 1,000 slots to store your projects in!
continued on next page
11

To start, click on the File Manager’s Save System Data menu. The Save screen
will appear. Encoder A can be used to select an existing Category, or to create
a new one by selecting >New Category. The New Category naming dialog appears and you may use encoders A through H to roll up a name. Click on the
letter or number to select it, forming the name. Pressing Ok will create the new
Category. Since this is a new Category, you must roll down to it and click Encoder
A to select it. The Save To: name should then show this new category.
Loading System Data
Loading projects is very similar to the save process. Use Encoder A to select the category you want. Next use encoder E to select the project.
Next, use encoder E to select >New Category and enter a name for the new
project. Again, select the new slot with the encoder (E) and click to select it.
The Save To: name should not show the category name and the project name.
You will also see a message that [0] files are in this project – since it was
just created. Now, by pressing the Ok button, the KordBot will save all system files into this slot. Afterwards, you will see confirmation of the save.
12
The Open From: area will show your progress as you select the items. Once you
have chosen the category and project, press Ok and the system will begin loading the files. When KordBot is done, you will see a load confirmation message.

Settings
The Settings menu allows the user to configure much of the KordBot to tailor the
system as desired. MIDI Input/Output routing and channel set ups for individual keys,
banks or segments of banks is available here.
MIDI Channel Setups
All screens are the same for each mode, but the data is saved in different areas of the system. Therefore you can have different channel settings in Polyphonic mode, Diatonic mode and Key + MOD mode.
Changing MOD Keys
Setup for the functions of the foot switch and the expression pedal, along with their MIDI channel settings is also available in this menu.
Three builders also live here. Bob, unfortunately, isn’t one of them. The advanced Arpeggio builder lets the user create up to 10 arpeggio note patterns, 10 velocity patterns and 10 rhythm patterns. The scale builder is used in conjunction with Diatonic Mode and allows the creation of
user scales. The chord builder will be available in a future release.
MIDI IO Setup
The MIDI IO setup is a simple screen that allows you to select MIDI DIN, USB and
Wireless MIDI inputs and outputs. Pressing the control keys shown on-screen
allows the toggling of the checkbox next to the input or output types desired.
In order to assign values for MOD keys, navigate to the MOD tab with SHIFT+f1, if
not already there. Select the key you wish to change by pressing it on the KordBot.
The circle representing that key on-screen will turn white, indicating it has been
selected. Choose the type of port as shown on-screen, with f1, f2 or f3. For each
checked box, you can change the MIDI channel number for that port with the octave up and down keys. For instance, if f1 and f2 are checked both the MIDI port
and the USB MIDI channel numbers will increase or decrease when you use the
octave keys. Once you have the desired ports and channel for that key, you can
select another key and change its values. Note that you also have the option of
using ALT+f4 to assign the changed values to all MOD keys, or use SHIFT+f4 to
assign that value to all the keys in the same horizontal row as the selected key.
Once done with the MOD keys, you can either save the changes with the Ok button,
discard the changes by pressing the Cancel button or continue on to other key banks.
continued on next page
13

Changing NOTE Keys
Pressing SHIFT+f2 switches to the note key setup tab. The process is the
same here as outlined in the MOD key, above except the SHIFT+f4 selection. In this case, the octave in which the currently selected key is in
will have all its values changed, just like the rows in the MOD keys.
an expression pedal is plugged into the F.SWITCH or vice versa. Also, the best results
are achieved if the pedals are plugged into the KordBot prior to applying power.
Pressing the f1 key allows the user to toggle between the expression pedal settings and the foot switch settings tabs.
Once done with the MOD keys, you can either save the changes with the Ok button,
discard the changes by pressing the Cancel button or continue on to other key banks.
Changing MEM Keys
Pressing SHIFT+f3 switches to the memory pad key setup tab. The pro-
cess is the same here as outlined in the MOD key, above.
Once done with the MOD keys, you can either save the changes with the Ok button,
discard the changes by pressing the Cancel button or continue on to other key banks.
Foot Controller Configuration
Expression Pedal
The expression pedal is an analog value which is best used to control items
that have a range of values from off to full on. Currently, only MIDI CC (continuous controller) messages are supported. Future versions of the firmware may have additional options, such as controlling the KordBot built in
functions like chord spread, velocity offset or arpeggio note length.
Each MIDI CC can be routed to different channels of the MIDI DIN, USB and
Wireless connections. Note that these are only sent if the respective port is
enabled in the MIDI I/O screen. So if you have USB out turned off, the setting of the USB channel here is ignored. Please note that MIDI CC messages from 120 to 127 are Channel Mode Messages and the channel number for
those messages are ignored, since the controller value is sent to all channels.
Note that the default setting is for the pedal to use the Volume MIDI
CC message, MIDI CC # 7. Some devices (such as the Korg Minilogue)
use this CC message in a non-standard way, such that you may need
to check your device’s settings if the volume is not affected.
Using SH IFT+f1, the user may elect to reverse the foot pedal’s values. Normally,
a pedal in its fully up position emits the lowest value and positioned fully down is the maximum value. By checking the invert pedal box, KordBot will
flip the value so that the lowest value occurs when the pedal is fully down
and the maximum value is sent with the pedal fully in its up position.
The two pedal inputs at the rear of the KordBot are configured with this screen. The
input labeled “F.SWITCH” is for a mechanical switch type pedal. The “PEDAL” input
is for a passive resistor based ‘volume’ or ‘expression’ pedal. Care must be taken to
connect these devices correctly. The system will be confused and may be damaged if
14
Foot Switch
The foot switch generates a digital value of either on or off. Generally, it is on when
pressed and off when not pressed. This, as in the expression pedal, can be ‘flipped’
by checking the ‘invert footswitch’ box with SHIFT+f1. This means the pedal
would generate an off signal when pressed and an on signal when not pressed.
A smaller subset of the MIDI CC messages are available because the list is limited
to those MIDI CC messages that represent digital on/off values, such as the sustain pedal (MIDI CC# 64, which is the default value). As with the expression pedal,
check your device to make sure that you select the correct controller number.

Arpeggio Builder
The arpeggio builder is probably the most complex screen the KordBot has. Technically,
it is actually a “broken chord” designer, since an arpeggio is a specific type of broken
chord. For simplicity and due to it mostly being referred to as an arpeggio, that’s
what we’ll stick with. It is intended for advanced manipulation of the note, velocity
and rhythm patterns available in the arpeggiator. While it may seem daunting at first,
once you get the hang of it, your arpeggios will be like nothing else on the planet.
Arpeggiator’s Inner Self
Understanding exactly how the arpeggiator works is critical to being able to create
your own patterns. This section is for reference, so come back to it at your leisure.
A C Maj chord would be C-E-G. Therefore the note position 0 of the arpeggiator note pattern 0 would be “C”. Position 1 would contain the “E” and position 2 the “G”. Internally, the KordBot adds the octave to the top of the chord,
so position 3 has the C an octave higher than the position 0 note. This is
calculated ‘behind the scenes’ to create a normal arpeggio sequence.
Likewise, if the chord is a C dim chord, the notes are C-Eb-Gb. Position
0 has the “C”, position 1 has an “Eb” and position 2 has a “Gb”.
Patterns
The first component of the arpeggiator is the pattern. This is the sequence of notes, velocities and rhythms you will hear when the arpeggiator is running. The notes, velocity and rhythm values are applied based on where the arp is at any given time in its sequence.
Each arpeggiator pattern sequence position can contain an assignable value
for a chord note, another for velocity and a third to create a rhythm. The note,
velocity and rhythm values all exist in their own patterns, so you can mix and
match. You select the pattern each element uses in the play modes, so, for instance, you can use note pattern 0, velocity pattern 8 and rhythm pattern 2.
The note indicator is a value which picks one of the notes from the current chord’s structure. Velocity and rhythm values are used directly at whatever value you set them to in each position. They are a simple list of values. The actual note to be played in each position is calculated
from the chord data and requires a little bit more to understand.
This means that the sequence will change in length, depending on how many notes
are in the chord. A C 7 chord would have its 7th in the position 3 slot, rather than
the octave C. The “Arp EVEN” setting, discussed in the Arpeggio section of the
Common Built In Functions, allows you to change this behavior by making all chords
play the same number of positions (adjustable with the Chord spread function).
These diagrams represent a single cycle of the arpeggiator. In the simple case
of the “U” style and pattern 0, once the cycle is complete, the arpeggiator goes
back to the beginning. i.e. the pattern for the C 7 chord is 0,1,2,3,4,0,1,2,3,4.
The style type dictates how the pattern is used. So if the “D”, or “down” style
15

is chosen, the sequence is 4,3,2,1,0,4,3,2,1,0. For the “UD” or “up/down” style
it would first run up then down as in 0,1,2,3,4,3,2,1,0,1,2,3,4. Note that in this
case, the top and bottom notes are only played once, for a smooth transition.
Using the “*” versions of the style, the top and/or bottom notes are played twice,
as in “U*D*” where the pattern is 0,0,1,2,3,4,4,3,2,1,0,0,1,2,3,4 and so on.
Using the Arpeggio Builder
When the Arpeggio Builder is first opened, it is set up to show note pattern 0, with an
arp style of “U” selected and the data for a C Maj chord loaded (shown in the status
display area as it would in the play screen – as “C3 M”). To change to a different note
pattern, use SHIF T+f1 to cycle through the 10 available patterns (0-9). To switch to
the velocity patterns, select f2. At that point you can cycle through the 10 velocity
patterns using SHIFT+f2. Likewise, f3 brings up the rhythm patterns and SHIFT-f3
selects the pattern. In this way you can coordinate the patterns if you so desire.
For instance you might want to work on the number 5 patterns for all 3 elements
so they always work together. Alternatively, you may just want to cycle through
and see which pattern combinations look interesting, for future exploration.
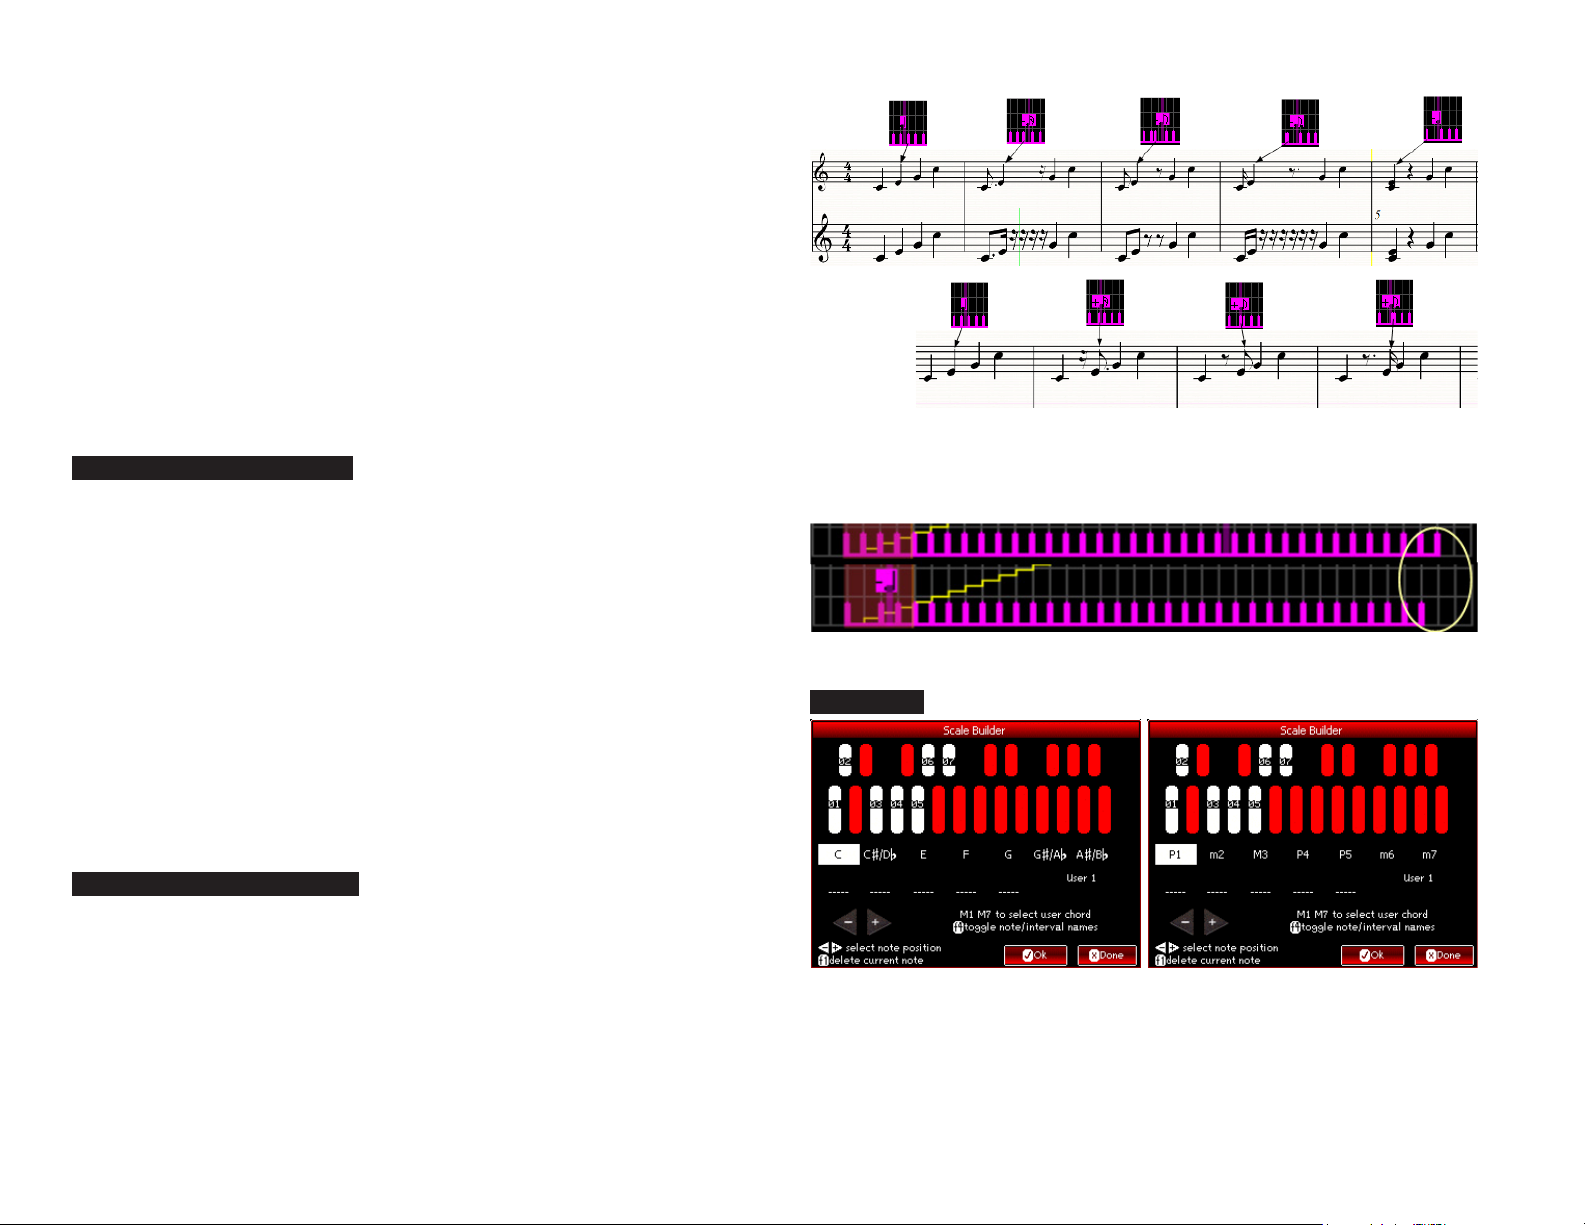
At the top, the status display area shows the position in which
the edit cursor currently sits. It also shows the currently selected play speed, arpeggio style and current chord name.
The red shaded rectangle shows the length of the currently chosen chord. The dark
yellow rectangle indicates the effect of extending the chord by way of the chord
spread function. The total length that this chord will play at is the length of the red
box plus the length of the yellow box. This feature is included simply for testing the
arpeggio on this screen, rather than having to jump back and forth to the play screen.
The controls for testing playback are shown on the lower part of the screen.
Pressing a MOD key and a NOTE key operates like the Key + MOD mode. To stop
the note playing, hit the fn key that corresponds to mode you are editing – f1 for
chord note sequence, f2 for velocity or f3 for rhythm. Encoder A’s rotary knob is
used to move the edit cursor back and forth. Pushing Encoder A toggles the edit
mode for the current position. Chord spread is effected by turning encoder B and
pressing it toggles the use of the arp EVEN control. Finally, encoder C’s knob is
used to adjust a relative speed of playback (at 9 levels from -20 to +20). Pushing
encoder C allows you to pick the style of the arp - “U”, “D”, “UD” and so on.
The yellow line on the graph represents the chord sequence note pattern. The
green line represents the velocity offset for the arp velocity pattern at each position. The purple lines represent the arp rhythm pattern positions. These can be
selected for editing by the radio buttons on the lower right side of the screen.
Editing Note Patterns (Yellow)
In pattern 0, we see the notes are all steadily rising from low to high. This represents a true “arpeggio” in musical terms. As the “edit cursor” is moved (using
Encoder A), you will see a change in the note pitch value and the number underneath it. The note pitch value shows the letter name of the note to be played at
this position as well as its octave number (based on the currently loaded chord).
The number below that is the sequence number of the note to be played from
the chord data. The sequence number is what is stored in the note pattern.
For instance, in note pattern 0, if the loaded chord is an A3 M (A Major in the 3rd
octave) the position 2 letter name will be E3 and the chord position will be 2.
In note pattern 1, however, the position 2 letter is C#/Db3 and the chord position shows as 1. So in pattern 0 the arpeggio with a “U” style plays the notes
A3(0), C#3(1), E3(2) and A4(3) (which is a ‘standard’ arpeggio pattern in music).
In note pattern 1, the note sequence is A3(0), E3(2), C#3(1) and A4(3) (technically a ‘broken chord’ in musical terms). The chord is the same, but the order in which the arpeggiator plays the notes of the chord is different.
Normal Chord Position 0 (A3) 1 (C#3) 2 (E3) 3 (A4) 4 (C#4)
Pattern 0 0 (A3) 1 (C#3) 2 (E3) 3 (A4) --
Pattern 1 0 (A3) 2 (E3) 1 (C#3) 3 (A4) --
Pattern 2 0 (A3) 2 (E3) 4 (C#4) 1 C#3) --
To change the sequence, move the edit cursor to the desired position and click the
Encoder A button. The screen will go into edit mode. Turning Encoder A now raises
or lowers the yellow line in that position. The note value with its octave number will
change to show what the output would be. Remember, this is for the currently selected chord. The number below that is the sequence note position number for all chords.
16
This is an important point and is critical to understanding the arpeggios.
In the section above entitled “Arpeggiator’s Inner Self”, I show how the position number for a C Maj chord relates to a C 7 chord. One can see that position 3 in the C Maj chord is a “C”, but in the C 7 chord that position holds a Bb.
Likewise, if you move the edit cursor into position 3 and play a C Maj chord,
the edit cursor shows that position holds a note/octave of “C4”. Playing a C
7 chord and examining position 3, it shows as an “A#/Bb3”. As it should be.
Position 3 is saying, in effect, “play the 3rd note in the chord’s list of notes”.
Once you are done editing, press Encoder A again to exit editing of the position. From there, you may continue editing the
note pattern or switch to velocity (f2) or rhythm (f3).
Editing Velocity Patterns (green)
Editing velocity patterns works the same way as editing notes. Move the edit
cursor to the desired position and click the Encoder A button. The difference is
that raising the value increases the overall velocity for that note position and
lowering it subtracts from the overall velocity. Since the velocity is also affected by other things like the Velocity offset and Velocity humanize functions, you
may need to adjust other settings in order to hear the changes made here.
The value shown by the edit cursor is 0 for no change and a negative (lower velocity) when you go below 0. It’s, of course, positive if you go above
0. The minimum value is -112 and the maximum is +112 in steps of 16.
2): It is possible to “crush” the pattern, moving more than 1 note over the top of another. This is an experimental feature and must be used carefully. Note below how
spaces are “stolen” from the end of the pattern. Therefore, it is possible to “run off
the end” if the chord size + the chord spread is longer than the crushed pattern.
Scale Builder
Once you are satisfied with the value, click Encoder A again to leave
the editing of that position. From there, you may continue editing the note pattern or switch to notes (f1) or rhythm (f3).
Editing Rhythm patterns (purple)
Editing rhythms is a bit different. The purple lines are representing the distance between arpeggio notes. Normally this is a quarter note. When editing the rhythm, there are several things to keep in mind.
1) Any note can be ‘pushed’ forward or backward in time, in 16th note steps. But as
in mathematics, what you take away on one side must be added to the other side to
maintain the spacing. So if you ‘push’ note position 3 to the left by one eighth note, the
KordBot does the math automatically and adds an eighth note on the other side. This
ensures that the next note knows where the quarter note beat is. If this didn’t happen, then all notes following position 3 would hit an eighth note sooner, for example.
The Scale builder allows you to create your own scales, comprised
of up to 12 notes. At present only the first 7 are used. Future firmware is planned which will be able to access all 12 notes.
For the time being, this screen will be used in conjunction with the Diatonic mode
“diatonic progression editing” screen. The first 7 notes of the scale will be used to
create the pitch of the chords in a sequence. The progression editor will then be
17

able to use these notes and will allow the chord type for each pitch to be chosen.
M1 and M7 MEM pads allow you to move through the list of 10 user
chords. The top of the screen shows which notes are currently used in the
scale by highlighting in white. The numbers on the selected notes refers to the order in which they appear in the scale sequence.
Below that is the actual list of note names. Pressing f4 will toggle this display between note names and music interval names. The interval names
and meanings are available in the Diatonic Theory section’s chart of interval names and are relative to whatever note is in the first slot.
Use the octave up and down keys to move to any of the 12 note slots. Press a NOTE
key to enter a note in that position. Alternatively, you can pick a starting point and
just press NOTE keys, and the KordBot will advance to the next slot (wrapping back
to the start, if necessary). Pressing the f1 key will delete the note in the current
slot, leaving a blank which can then be filled by pressing a different NOTE key.
When you are satisfied with your changes, press “Ok”. This will bring up the dialog
allowing you to enter a name for this chord. The top 4 encoders (A-D) allow selection
of the first 4 characters and encoders E-H select the last 4 characters. Roll up the
character you desire and press the encoder push button to select the letter or number. When done, press Ok and you will receive confirmation that the chord is saved.
From that point, you may edit more scales, or press “Done” to exit
the screen. When you next enter the Diatonic progression editor, the
chord will be listed under the name you saved the scale under.
18

KordBot Common
Built In Functions
There are 2 types of built in functions available in the KordBot. The ‘turn’ functions
are used for the rotary encoders and have a value which is selected by turning
the knob. Most often these are linear values in some range. The other functions
are assignable to the ‘push’ function of the encoders. These represent either
an on and off condition or allow you to step through a sequence of choices.
Function Description Range
Arp humanize (Future rmware)
Arp division Allows note resolution tempo change of the arpeggio. Normally, the arpeggiator emits quarter notes at the current tempo. Using this
adjustment, the arpeggiation is re-scaled to another note value. Using this divisor will aect certain other features, such as the Arp swing.
This is due to the re-scaling factor. Normally, the KordBot internal clock maintains a 240 pulses per quarter note timebase (24 ppq when
using external sync). This value will divide or multiply the timebase, in eect speeding up or slowing down the note stream. So by changing to 8th note division, each 8th note operates on a 120 ppq basis. 16th notes use 60 ppq and 32nd notes use 30 ppq. The Arp swing, for
example, then has a dierent eect, since it is not re-scaled at the same time.
Arp note len Controls how long each note of the arpeggio plays. Normally, this is adjustable from a Staccatissimo (1 tick out of 24) to a legato (a full
quarter note of 24 ticks)
Arp speed Linear values for changing the arpeggio tempo. Works like the Arp division control, but suitable for a more random, non-rhythmic setting. -23 to +46 (MIDI beat clock
Arp swing Causes odd numbered quarter notes in an arpeggio to be delayed or advanced by up to an eighth note. The Arp division factor will aect
this setting. For example, if you have the swing value at 60 with the Arp division set to “Q” (quarter notes) then the delay is equal to a 16th
note. If you then change the division to 8th notes, this value is interpreted as an eighth note. This is necessary to keep the ratio intact.
Otherwise, the delay factor would ‘ip’ with larger swing values and the arpeggiator would attempt to play the delayed odd numbered
note before it played the next non-delayed even note in the sequence.
Chord hold time When Chord Hold is o, this value can be adjusted to let a chord play for a nite length of time. Similar to the eect of staccato (0%) versus
legato (100%). Of course, this will depend on the sound generator’s patch setting. For decaying sounds, such as piano, the decay will start
after the hold time has elapsed. For keyed sounds, such as an organ, the sound will stop abruptly at the elapsed time.
Chord spread Increases or decreases the number of chord notes played by the KordBot. Each chord has a minimum number of notes – for triads, there
are 3 notes (plus the octave). For seventh chords, for instance, there are 4 notes plus the octave. Internally, there are up to three octaves
available at a time. The chord spread value represents a ratio of how many notes are available and how many of them will be played. Since
chords have varying lengths, this value reects a percentage of the total. In essence, the value determines how many more notes from
higher octaves will be played. 100% meaning all available notes in all available octaves.
For block chords (i.e. not arpeggiated) this can ll out the sound by playing a chord in many octaves – more than a keyboard player could
play with 10 ngers. It provides a very rich, full sound for orchestra patches, for instance.
32nd notes to double
whole notes
-23 to +23 (MIDI beat clock
ticks)
ticks)
-120 to 120 (MIDI beat clock
ticks)
0 to 100%
For arpeggios, it ‘stretches’ them out across the octaves. So at a setting of 0, you will hear just the ‘normal’ number of notes the chord
has. At higher values, more notes in higher octaves are added to the nal arpeggio. Note, in some cases you will want or need to use the
“EVEN” feature of the arpeggiator (see below). This is because the lowest note lengths of the chord spread are based on the number of
notes in the selected chord. Chords like major, minor, diminished, etc, have 3 notes. A Major 13th has 7 notes: arpeggiating them in the
same song can cause problems since the 3 note chord would play 2 times with an extra note in the same time it takes to play all 7 notes of
the 13th chord.
19

Function Description Range
MIDI CC See MIDI CC section
Slider damping
Tem po Increases / decreases the beats per minute (BPM) tempo generated by the KordBot. 30 to 240 (BPM)
Velocity Humanize
Velocity offset
Affects the sensitivity of the slider zones. Depends also on the user’s finger width and skin capacitance value. It can also be affected by humidity and ambient temperatures.
Adds and subtracts a random amount from the overall velocity of notes. It works in block chords as well as arpeggios. For instance, repeating block chords with this value at maximum and the Velocity offset (see below) at minimum, you can get a random melodic effect as different notes are louder each press of the chord.
Adds or subtracts a set amount of velocity from the overall velocity. Useful to ‘level out’ the velocity when using the Velocity humanize and the Arp velocity patterns at the same time.
Turns the arpeggiator on or off. EVEN lets the user specify an even number of notes that will play for each arpeggiated chord,
regardless of how many notes make up the chord. Normally, the arpeggio knows the start and end notes of any given chord.
This means if it’s a triad, there will be 4 notes to play. For a seventh chord, for instance, it knows there are 5 notes to play.
Therefore, without EVEN turned on, the KordBot will play the arpeggio type “U” for each of those chords as follows:
1 to 50
0 to 100
-64 to 64
cycle 1 1 1 1 2 2 2 2 3
C M C3 E3 G3 C4 C3 E3 G3 C4 C3
cycle 1 1 1 1 1 2 2 2 2
C 7 C3 E3 G3 Bb3 C4 C3 E3 G3 Bb3
Arp on/off/even
As you can see, this makes for potential timing problems in some cases. Using the
EVEN setting and setting the length to 6, here is the difference:
cycle 1 1 1 1 1 1 2 2 2
C M C3 E3 G3 C4 C3 E3 C3 E3 G3
cycle 1 1 1 1 1 1 2 2 2
C 7 C3 E3 G3 Bb3 C4 C3 C3 E3 G3
However, please realize that setting the EVEN value too low would prevent the notes in larger chords from playing – so
9ths, 11ths and 13ths would sound the same as sevenths, for instance, if the EVEN value were set to play only 4 notes.
Arp style u/d Controls the style of the arpeggio generated by the KordBot.
ON / EVEN / OFF
U, D, UD, DU, U*D, UD*,
U*D*, DU*, D*U, D*U*
20
Function Description Range
Arp Note pat
Arp quantize <future firmware>
Arp repeat / latch
Arp Rthm pat
Arp Vel pat
Chord hold on/off
MIDI CC See MIDI CC section ON / OFF
MIDI Clock Out Used to START or STOP the MIDI beat clock (MBC) messages sent out by the KordBot START / STOP
Midi In/Out Ports An alternative to the Settings menu MIDI routing screen
Midi Sync Int/Ext Allows the KordBot to receive MIDI beat clock (MBC) messages and adjust its internal tempo to match. INT / EXT
Q notes/measure Future use – will allow the user to select 3 or 4 quarter notes per virtual measure. 3 / 4
Selects one of 10 arpeggio (broken chord) patterns which choose the order of the notes played
from the chord. See the Arpeggio builder for more in depth information.
If repeat is selected when the arpeggio is ON or EVEN, the arpeggio will repeat as long as the chord is being
played. In LATCH mode, the arpeggio will continue until another chord is pressed or LATCH is turned off.
In Diatonic Strum mode, LATCH (along with chord hold) can latch the chords for the strummer.
Selects one of 10 rhythm patterns for the arpeggiator. The rhythm patterns can delay the onset of a note for
+ or – 1 quarter note, in 16th note steps. See the Arpeggio builder for more in depth information.
Selects one of 10 velocity patterns for the arpeggiator. Allows customization of the velocity for each step of the arpeggio. See the Arpeggio builder for more in depth information.
When on, the any non-arpeggio chords will hold as long as the user holds down the play keys. In
Diatonic Strum mode, it is used in conjunction with the Arp latch mode as noted above
0 to 9
ON/LATCH
0 to 9
0 to 9
ON / OFF
The assignment of functions to the encoders is done in the Play mode screens.
All modes operate the same way. By pressing the SHIFT key, the rotary function may be changed. Pressing the ALT key allows selection of a push function.
In each case the text will turn green, which denotes the functions affected.
Push Changes
To change a push function, hold the ALT key and press the encoder whose function
you want to change. This will bring up the selection screen for that encoder. Using
the same encoder you clicked, turn the knob to select the desired function and
press the same encoder’s push to select it. For all but the MIDI CC functions, you
may then press Ok to return to the play screen with the new function installed.
When you choose the MIDI CC function, another screen pops up to allow selection of the MIDI CC you wish to assign. Note that this is a limited list of MIDI
CC functions – ones that are only digital (on or off) in nature. Here, also, you
may assign a number for any or all of the MIDI outputs. Note that the MIDI
output needs to be active in order for the changes here to take effect.
After choosing the settings you desire, you may press the Ok button to return to the play screen, with the new function installed.
21

Turn Changes
The process is exactly the same for the turn functions except that to start
the process, use SHIFT and press the encoder you want to change.
In this situation, the full 128 MIDI CC functions are available. Choosing
one that is an on/off message, for instance Portamento on/off, will require turning the knob quite a bit, as the off state is 0-64 and the
on state triggers when the value is > 64, in most cases.
Diatonic Progression Editing
The Diatonic Mode (along with the Diatonic Strum mode) is a great wonderland of
magical music exploration. There are 59 diatonic banks to experiment with, including
10 programmable slots. For those, you can alter the scale (through the Scale builder)
and then modify the flavor of each of the 7 chords in those banks.
A future version of the firmware will include a diatonic rule composer, as well,
so you will be able to make your own Progression Suggestion charts.
To use the editing feature, go into the Diatonic or Diatonic Strum modes. Each
of the 4 rows of keys that make up the MOD keys are pre-programmed. To
change a row, simply press the SHIFT key and the rightmost key of the diatonic row you wish to change. This enters the Diatonic Bank setup screen.
22
Use Encoder A to sift through the available scales. Note that in the top list, you’ll
see a numbered list of entries to choose from. Each row lists the Scale name and
the list of diatonically related chords. Note that for all the exotic scales (such as
the Yo, Scottish, Pentatonic Major, etc), the chord list has been chosen to provide various ‘flavors’. As mentioned elsewhere in this manual, a Pentatonic
scale really doesn’t fit the concept of a diatonic progression. So we made those
chords lists based on what we thought would sound best for that scale.
To choose a new scale just turn the knob until the scale you desire is between
the two horizontal lines in the middle of the list. Press Encoder A to select. Next,
press any NOTE key to select the Key signature of the scale. Finally, press OK to
return to the play screen with the new scale attached to the row you selected.
Working with a user scale, there is one other step. If you’ve been in the Scale
Builder and have saved any chords, they will appear in the top list by name.
Otherwise, the user scales will be named user1 to user10. When you select a

user scale, the row of chord type lists shows red selected chords. Using encoders B – G, you can select a different chord type (major, minor diminished,
etc) by rolling up to your choice and pressing the encoder’s push button.
From this chart, we can do anything in music. This “diatonic map” of the
landscape of western music allows us to build scales, chords, counter-melodies and pretty much anything harmonically needed in music.
Once your user scale is selected, and you’ve picked your list of chord types, you
may also press any NOTE key to select the Key signature of the scale. Finally,
press OK to return to the play screen in order to experiment and create!
Diatonic Theory
Intervals are sort of like a basic unit in the diatonic world. Any two notes are
related by some pitch difference. If we press the lowest note C, for instance,
and then move to the next available E on the keyboard, that would be an interval. In musical terms E is 4 half-steps up from C because each key on the
keyboard is a half-step from its closest neighbor. So C to C# is one half-step;
C# to D is one half-step and so on. Two halves make a whole and so two halfsteps also make a whole step. So moving from C to D is one whole step.
The number of steps or half-steps between notes are called intervals. In music theory, each one has a name:
Note Name # Steps From “C” Interval Name Interval Shorthand
C 0 perfect unison P1
C#/Db 1 half-step minor second m2
D 2 half steps / whole step major second M2
D#/Eb 3 half-steps minor third m3
E 4 half-steps / 2 whole steps major third M3
F 5 half-steps perfect fourth P4
F#/Gb 6 half-steps / 3 whole steps
G 7 half-steps perfect fifth P5
G#/Ab 8 half-steps / 4 whole steps augmented fifth /
minor sixth A5 / m6
A 9 half-steps major 6th M6
A#/Gb
B 11 half-steps major seventh M7
C 12 half-steps / 6 whole steps perfect octave P8
*The tritone is a special interval that generally isn’t identified from the root of the scale.
In C major, the tritone would be from the “F” to the “B”; i.e. the fourth to the seventh.
Since F# is not in the key of C major, we normally do not refer to that interval of C to
F# as a “tritone”, but rather as an augmented fourth or a diminished fifth.
10 half-steps / 5
whole steps
augmented fourth /
diminished fifth (sometimes
called a tritone*)
minor seventh m7
A4 / D5
Scales
To create scales, all we have to do is build a set of rules: a sequence of allowed intervals. A ‘road map’ if you will, of what the scale should look like and what relationships
all the notes have to each other. Sounds like we’re building a Frankenstein monster...
There are a number of scales available in the KordBot. 48 to be exact, with another 10 slots available for advanced scale building. But to understand this
diatonic thing, we’ll use the simple example of a Major scale. This scale has
been around a really long time. Tried and true. It’s laid out like this: “whole
steps between all notes except the 3rd and 4th notes and the 7th and 8th
notes, which have half-steps”. Remember, a half-step is the next nearest
note to the note you’re on. Okay then. Let’s just chart that out, shall we?
1 whole 2 whole 3 half 4 whole 5 whole 6 whole 7 half 8
Now let’s choose a starting note of C:
C Major Scale
1 whole 2 whole 3 half 4 whole 5 whole 6 whole 7 half 8
C whole D whole E half F whole G whole A whole B half C
Using A Starting Note Of E:
1 whole 2 whole 3 half 4 whole 5 whole 6 whole 7 half 8
C whole F# whole G# half A whole B whole C# whole D# half E
With that simple technique, you can now form any of the 12 major scales. Also, if you change the rules of where the whole steps and half
steps are, you can form your own scale. Of course, someone else has likely already thought of it... Like the natural minor scale, with whole steps between all notes except the 2nd and 3rd and the 5th and 6th notes:
23

A Natural Minor Scale
1 whole 2 half 3 whole 4 whole 5 half 6 whole 7 whole 8
A whole B half C whole D whole E half F whole G whole A
While we’ve only shown 8 note scales, KordBot also has scales built on 5
notes (pentatonic scales) and other, even weirder, scales types. But the
same basic rules apply: scales are built by using a series of intervals.
Chords
Chords use intervals, too, but in a slightly different way than scales do.
As a matter of fact, you could say chords are meta-scales. They use intervals that are a part of the scale they are built upon. So a chord is a series of intervals made up of intervals. Again, it sounds a lot more complicated than it really is. Don’t worry, the tried and true rules come to the rescue.
Now we have enough information to create Diatonic Progressions, as in the
KordBot Diatonic mode. Our example will be in C Major just to make things
a bit easier. The basic rule says that we will form a list of chords from the
scale notes only. We will start each chord in the list on successive degrees
of the scale, so C, D, etc. Finally we will look at every other note with respect to the scale degree we are on. Using those rules, here’s what we see:
Scale
Degree
Note
Name
1 C C, E, G M3, m3 C major 1-3-5 I 1
2 D D, F, A m3, M3 D minor 2-4-6 ii 2m
3 E E, G, B m3, M3 E minor 3-5 -7 iii 3m
4 F F, A, C M3, m3 F major 4-6-8 IV 4
5 G G, B, D M3, m3 G major 5-7-9 V 5
Every
Other
Note
Note
Intervals
Chord Name
Degrees Of
Scale Used
'Jazz' Chord
Shorthand
'Nashville'
Chord
Shorthand
Simple chords are called triads and are made up of 3 and only 3 notes. Somewhere
in the mists of time these triads were called by a qualitative name someone somewhere made up, probably over some period of time somewhere.
It’s one of those things that sort of makes sense when you get used to it.
The rules for each interval between the 1st and 2nd and the 2nd and 3rd
notes (refer to the interval shorthand on the 1st chart in this chapter) are:
Chord Quality Name Description Intervals Example (starting on “C”)
Major bright, triumphant, happy M3,m3 C – E - G
Minor sad, morose, dark m3, M3 C – Eb - G
Diminished tense, crushed, defeated m3, m3 C – Eb - Gb
Augmented confused, hanging on edge M3, M3 C – E - G#
Suspended 2nd mystical, mysterious,
anticipatory
Suspended 4th angelic, emboldened,
anticipatory
M2, P4 C – D - G
P4, M2 C – F - G
Diatonic Progressions
We also know our C major scale has the notes C,D,E,F,G,A and B. If we number them
in place as 1,2,3,4,5,6,7 we call these numbers the degree of the scale. So the 5th
degree of the C major scale is the G, because it is the 5th note in the sequence.
6 A A, C, E m3, M3 A minor 6-8 -10 vi 6m
7 B B, D, F m3, m3 B diminished 7- 9-11 vii° 7°
Therefore, the diatonic progression of chords in the
key of C, based on the Major scale are:
CMaj, Dm, Em, FMaj, GMaj, Am and Bdim
As it turns out the pattern is the same for any major scale: Major, minor,
minor, major, major, minor, diminished. Only the note names change according to the key. Using the key of F, for instance, we would get
FMaj, Gm, Am, BbMaj, CMaj, Dm and Edim
Different sequences are generated if you change the scale type. Minor scales and
the ‘modes’ of scales all generate their own diatonic progressions. For exotic scales,
not often used in western music, it gets tricky. For instance some scales have more
or less than 7 notes. The Pentatonic variants all have only 5 notes in their scale. The
KordBot handles this by ‘faking’ a progression for exotic chords. Future firmware may
include an alternate mode that allows even more variation, but for now, you can use
the Progression editor to set up all sorts of ways to explore this music territory.
24

Appendix X – MIDI Continuous Controller Values
CC# Description
0 Bank select. Used for changing patches on some systems. CC 32 is the MSB
1 Modulation. Patch specific, but usually hooked to vibrato or tremolo
2 Breath controller. Can be used like CC 1 as a modulation control
3 Undefined. As long as no other equipment defines it, use it as anything
4 Foot controller. A generic message sometimes hard wired to a pedal
5 Portamento time. Usually hooked to a patch's portamento. See also CC 84
6 NRPN and RPN MSB used in conjunction with CC 38 and CC's 96 - 101
7 Channel volume. Default for the KordBot expression pedal input
8 Stereo balance. Low values < L. Mid point is center, high values > R
9 Undefined. As long as no other equipment defines it, use it as anything
10 Mono balance (pan). Low values < L. Mid point is center, high values > R
11 Expression. Patch dependent but usually a % of channel volume (CC 7)
12 Effect 1. Usually controls a patch dependent effect (vibrato, filter, etc)
13 Effect 2. Usually controls a patch dependent effect (vibrato, filter, etc)
14 Undefined. As long as no other equipment defines it, use it as anything
15 Undefined. As long as no other equipment defines it, use it as anything
16 General Purpose controller #1. Use it for anything
17 General Purpose controller #2. Use it for anything
18 General Purpose controller #3. Use it for anything
19 General Purpose controller #4. Use it for anything
20 Undefined. As long as no other equipment defines it, use it as anything
21 Undefined. As long as no other equipment defines it, use it as anything
22 Undefined. As long as no other equipment defines it, use it as anything
23 Undefined. As long as no other equipment defines it, use it as anything
24 Undefined. As long as no other equipment defines it, use it as anything
25 Undefined. As long as no other equipment defines it, use it as anything
26 Undefined. As long as no other equipment defines it, use it as anything
27 Undefined. As long as no other equipment defines it, use it as anything
28 Undefined. As long as no other equipment defines it, use it as anything
29 Undefined. As long as no other equipment defines it, use it as anything
30 Undefined. As long as no other equipment defines it, use it as anything
31 Undefined. As long as no other equipment defines it, use it as anything
32 LSB (sort of like fine tuning control) for CC 0
CC# Description
33 LSB (sort of like fine tuning control) for CC 1
34 LSB (sort of like fine tuning control) for CC 2
35 LSB (sort of like fine tuning control) for CC 3
36 LSB (sort of like fine tuning control) for CC 4
37 LSB (sort of like fine tuning control) for CC 5
38 LSB (sort of like fine tuning control) for CC 6
39 LSB (sort of like fine tuning control) for CC 7
40 LSB (sort of like fine tuning control) for CC 8
41 LSB (sort of like fine tuning control) for CC 9
42 LSB (sort of like fine tuning control) for CC 10
43 LSB (sort of like fine tuning control) for CC 11
44 LSB (sort of like fine tuning control) for CC 12
45 LSB (sort of like fine tuning control) for CC 13
46 LSB (sort of like fine tuning control) for CC 14
47 LSB (sort of like fine tuning control) for CC 15
48 LSB (sort of like fine tuning control) for CC 16
49 LSB (sort of like fine tuning control) for CC 17
50 LSB (sort of like fine tuning control) for CC 18
51 LSB (sort of like fine tuning control) for CC 19
52 LSB (sort of like fine tuning control) for CC 20
53 LSB (sort of like fine tuning control) for CC 21
54 LSB (sort of like fine tuning control) for CC 22
55 LSB (sort of like fine tuning control) for CC 23
56 LSB (sort of like fine tuning control) for CC 24
57 LSB (sort of like fine tuning control) for CC 25
58 LSB (sort of like fine tuning control) for CC 26
59 LSB (sort of like fine tuning control) for CC 27
60 LSB (sort of like fine tuning control) for CC 28
61 LSB (sort of like fine tuning control) for CC 29
62 LSB (sort of like fine tuning control) for CC 30
63 LSB (sort of like fine tuning control) for CC 31
64 Foot Switch 1. Sustain pedal KordBot default.
65 Portamento switch On/Off
25

CC# Description
66 Sostenuto switch On/Off
67 Soft Pedal switch On/Off
68 Legato switch On/Off
69 Foot Switch 2. Holds only the sustain portion of the patch's ADSR
70 Sound Controller 1. Depends on patch. 'Sound variation'
71 Sound Controller 2. Depends on patch. Harmonic content / filter resonance
72 Sound Controller 3. Depends on patch. Release time
73 Sound Controller 4. Depends on patch. Attack time
74 Sound Controller 5. Depends on patch. Brightness / VCF center frequency
75 Sound Controller 6. Depends on equipment used
76 Sound Controller 7. Depends on equipment used
77 Sound Controller 8. Depends on equipment used
78 Sound Controller 9. Depends on equipment used
79 Sound Controller 10. Depends on equipment used
80 General Purpose On/Off switch 1
81 General Purpose On/Off switch 2
82 General Purpose On/Off switch 3
83 General Purpose On/Off switch 4
84 Portamento amount. See also CC 5, 37 and 65
85 Undefined. As long as no other equipment defines it, use it as anything
86 Undefined. As long as no other equipment defines it, use it as anything
87 Undefined. As long as no other equipment defines it, use it as anything
88 Undefined. As long as no other equipment defines it, use it as anything
89 Undefined. As long as no other equipment defines it, use it as anything
90 Undefined. As long as no other equipment defines it, use it as anything
91 Effects Depth 1. Depends on equipment. Reverb send
92 Effects Depth 2. Depends on equipment. Tremolo
93 Effects Depth 3. Depends on equipment. Chorus
94 Effects Depth 4. Depends on equipment. Detune
95 Effects Depth 5. Depends on equipment. Phaser
96 Data +1 switch NRPN / RPN. used with CC 38 and CC's 97 - 101
97 Data -1 switch NRPN / RPN. used with CC 38 and CC's 96, 98 - 101
98 NRPN LSB. Non-registered Parameter Number LSB. You'll know if you need it
CC# Description
99 NRPN MSB. Non-registered Parameter Number MSB. You'll know if you need it
100 RPN LSB. Registered Parameter Number LSB. You'll know if you need it
101 RPN MSB. Registered Parameter Number MSB. You'll know if you need it
102 Undefined. As long as no other equipment defines it, use it as anything
103 Undefined. As long as no other equipment defines it, use it as anything
104 Undefined. As long as no other equipment defines it, use it as anything
105 Undefined. As long as no other equipment defines it, use it as anything
106 Undefined. As long as no other equipment defines it, use it as anything
107 Undefined. As long as no other equipment defines it, use it as anything
108 Undefined. As long as no other equipment defines it, use it as anything
109 Undefined. As long as no other equipment defines it, use it as anything
110 Undefined. As long as no other equipment defines it, use it as anything
111 Undefined. As long as no other equipment defines it, use it as anything
112 Undefined. As long as no other equipment defines it, use it as anything
113 Undefined. As long as no other equipment defines it, use it as anything
114 Undefined. As long as no other equipment defines it, use it as anything
115 Undefined. As long as no other equipment defines it, use it as anything
116 Undefined. As long as no other equipment defines it, use it as anything
117 Undefined. As long as no other equipment defines it, use it as anything
118 Undefined. As long as no other equipment defines it, use it as anything
119 Undefined. As long as no other equipment defines it, use it as anything
120 All Sound Off. Channel Mode Message. Mutes all notes in channel
121 Reset Controllers. Resets all equipment controllers to default values
122 Local On/Off. If supported, destination's keyboard is turned on or off
123 All Notes Off. Channel Mode Message, mutes all un-sustained notes
124 Set Omni mode OFF
125 Set Omni mode ON
126 Set destination's mode to Monophonic
127 Set destination's mode to Polyphonic
26

AA
B
C
D
H
G
F
E
27

2834


 Loading...