

ISkin F1 User Manual
Play/Pause Press the Multi-function button once for each command Press / Release
Stop playing Press and Hold Multi-function button until music stops Press / Hold / Release
Skip to next track Press the Next Track button Press / Release
Skip to previous track Press the Previous. Track button Press / Release
Control volume The F1’s volume controls aect only the F1 and does not remotely control the volume of a connected device.
Control volume Up/Down Press either the “+” or “-” on the Volume Control button Press / Release
To: Do this: Remote Functions
Multi-function Button Next/Previous Track Button Volume up/down
The above functions require an iPod equipped with the CERULEAN TX Bluetooth transmitter or a device with AVRCP Bluetooth support (See your
device’s manual. Compatibility may vary).
Remote Control Functions (AVRCP)
Using the Controls on the CERULEAN F1 Page 6 Using the Controls on the CERULEAN F1 Continued Page 7
User’s Guide
Redial Last Number* Press and Hold the Multi-function button until beep Press / Hold / Release
Activate Voice Dial* Press the Multi-function button Press / Release
Answer Incoming Call Press the Multi-function button Press / Release
Reject Incoming Call* Press and Hold the Multi-function button until beep on incoming call Press / Hold / Release
Terminate Current Call Press the Multi-function button during call Press / Release
Mute Mic ON/OFF Press either the Next or Previous Track button Press / Release
Cancel outgoing call Press and Hold the Multi-function during outgoing call Press / Release
Transfer call to/from phone* Press Multi-function button during call until beep Press / Hold / Release
Call Waiting * Press and Hold the Next/Previous Track button during first call until beep Press / Hold / Release
Toggle between Calls* Press and Hold the Next/Previous Track button during call until beep Press / Hold / Release
To: Do this: Headset Controls
(Answer second
incoming call)
Multi-function Button Next/Previous Track Button
The above functions require a device with HFP and HSP Bluetooth support (refer to your device’s manual). *Dependent on mobile phone features.
Headset Controls
General:
Bluetoo th version 2.0, Class I I
Bluetoo th Prole Suppor t A2DP / AVRCP / HSP/ HFP
RF Frequen cy 2.4GH z / 79 Channel / AFH
Operat ional Range Standard 33 feet (10 meters)*
Talk Time (Hea dset ) max.10 hours*
Music Lis tening (Earphon e) max. 8 hou rs*
Standby T ime up to 300 hours
Batter y Charge Time 2.5 hours (Lithi um-Polymer)
Power / Charg ing Method (USB) 5V, 300 mA / DC
*May var y depending on use r habits.
Earph one Driver Uni t:
Diamete r <15mm
Frequenc y Response 20Hz ~ 20KH z
Sound Pre ssure Level 93dB @ 1KHz
Impeda nce 16 @ 1V, 1KHz
Power Ratin g 5mW (M ax)
Other:
Microph one Typ ical : ECM unit (110dB)
S/N Ratio Up to 58dB
Dimensi ons 47mm x 25mm x 23.5mm
(L) x (W) x (H)
Weight 35g (ap prox.)
The Blue tooth® word mark and l ogos are registe red trademark s owned by Blueto oth SIG, Inc.
and any use of s uch marks by iSkin I nc. is under licens e. iSkin and CERULE AN are trademark s of
iSkin Inc ., registered i n Canada, the U.S. a nd other countries .
Light ashes quickly
rep eate dly.
(Discoverable)
Initia l Pairing, looking for new device to pair with.
Occurs when the CERULEAN TX is connected to iPod
or computer.
Light ashes very quick ly,
pauses and repeats.
(Auto-reconnect)
Seeki ng previously paired dev ice to reconnec t to.
Occurs when the CERULEAN TX has previously
connected to a CERULEAN F1 or Bluetooth device
and has lost connection.
STATUS DEFINITION
ON OFF
Light ashes
slowly repeatedly.
(Paired / Connected)
Success fully paired.
Occurs when the CERULEAN TX has been successfully
paired with a CERULEAN F1 or Bluetooth device.
Warranty Service
If the Status LED on my CERULEAN F1 is not on or flashing.
Check that the CERULEAN F1 is powered on. If the power is on but the LED light is off, then try
charging the unit as described in this manual.
If crackling noises and/or interruptions occur when listening to the CERULEAN F1.
Bluetooth is a radio technology. It is sensitive to environmental conditions and objects that may
interrupt the signal. Cordless phones, wireless internet routers or any device that operates on
wireless frequency of 2.4GHz may cause some interference. To ensure clear sound, use the device
within the operational range and conditions specified in this manual.
If you experience difficulty pairing the CERULEAN F1 with a Bluetooth device.
Make certain that the device you are attempting to connect to is compatible with the Bluetooth
profiles supported by the CERULEAN F1. Check that the CERULEAN F1 is set to discovery mode as
explained in this manual. Make sure there are no other Bluetooth devices that may be attempting
to pair with the CERULEAN F1.
If no sound can be heard from the CERULEAN F1.
Verify that the CERULEAN F1 is properly paired with the CERULEAN TX and that the device is set to
and capable of outputting audio via Bluetooth. Check the volume levels on both the connected
device and the CERULEAN F1.
Learn more about Bluetooth and the CERULEAN TX+F1 at www.iSkin.com
CERULEAN F1 Specications Page 8
Troubleshooting
Note: The Serial Number is located in fine print on the inside of the RIGHT (R) ear piece
and rear of the TX.
If the CERULEAN F1 or TX does not seem to function correctly, consult the Troubleshooting
section of this guide and/or visit iSkin.com for further online resources. If the unit
continues to malfunction, visit iSkin.com and check the warranty section for information.
Other questions? Page 9
Status LED Light Denitions (TX)
Enables t he CERULEAN F1 to receiv e stereo audio wire lessly from any (A2 DP) Bluetooth devi ce.
Enables t he CERULEAN TX to tr ansmit stereo aud io wirelessly vi a Bluetooth.
Enables t he CERULEAN F1 to remote ly control speci c features of any (A2D P) Bluetooth devic e.
Enables t he CERULEAN TX to re ceive remote contro l commands via Blue tooth to control the i Pod.
Enables t he CERULEAN F1 to act as a wi reless mono head set for taking p hone calls via a Blu etooth mobile ph one.
Enables t he CERULEAN F1 to remote ly make, answer or ter minate a call on a Blue tooth mobile pho ne.
Turn power on/off: Slide the ON/OFF switch to the desired position
Make discoverable PRESS and Hold the Multi-function button then slide ON/OFF
(enter pairing mode) switch to ON position
Make undiscoverable PRESS the Multi-function button once
(exit pairing mode)
Reconnect to paired device Set the ON/OFF switch to the ON position and Press and Release the
Multi-function button once. Must be initially paired with a device.
To: Do this: Headset Controls
Multi-function Button ON/OFF Switch
Power and Pairing Controls
+
+
Printed in Ch ina
F1F1 F1TX
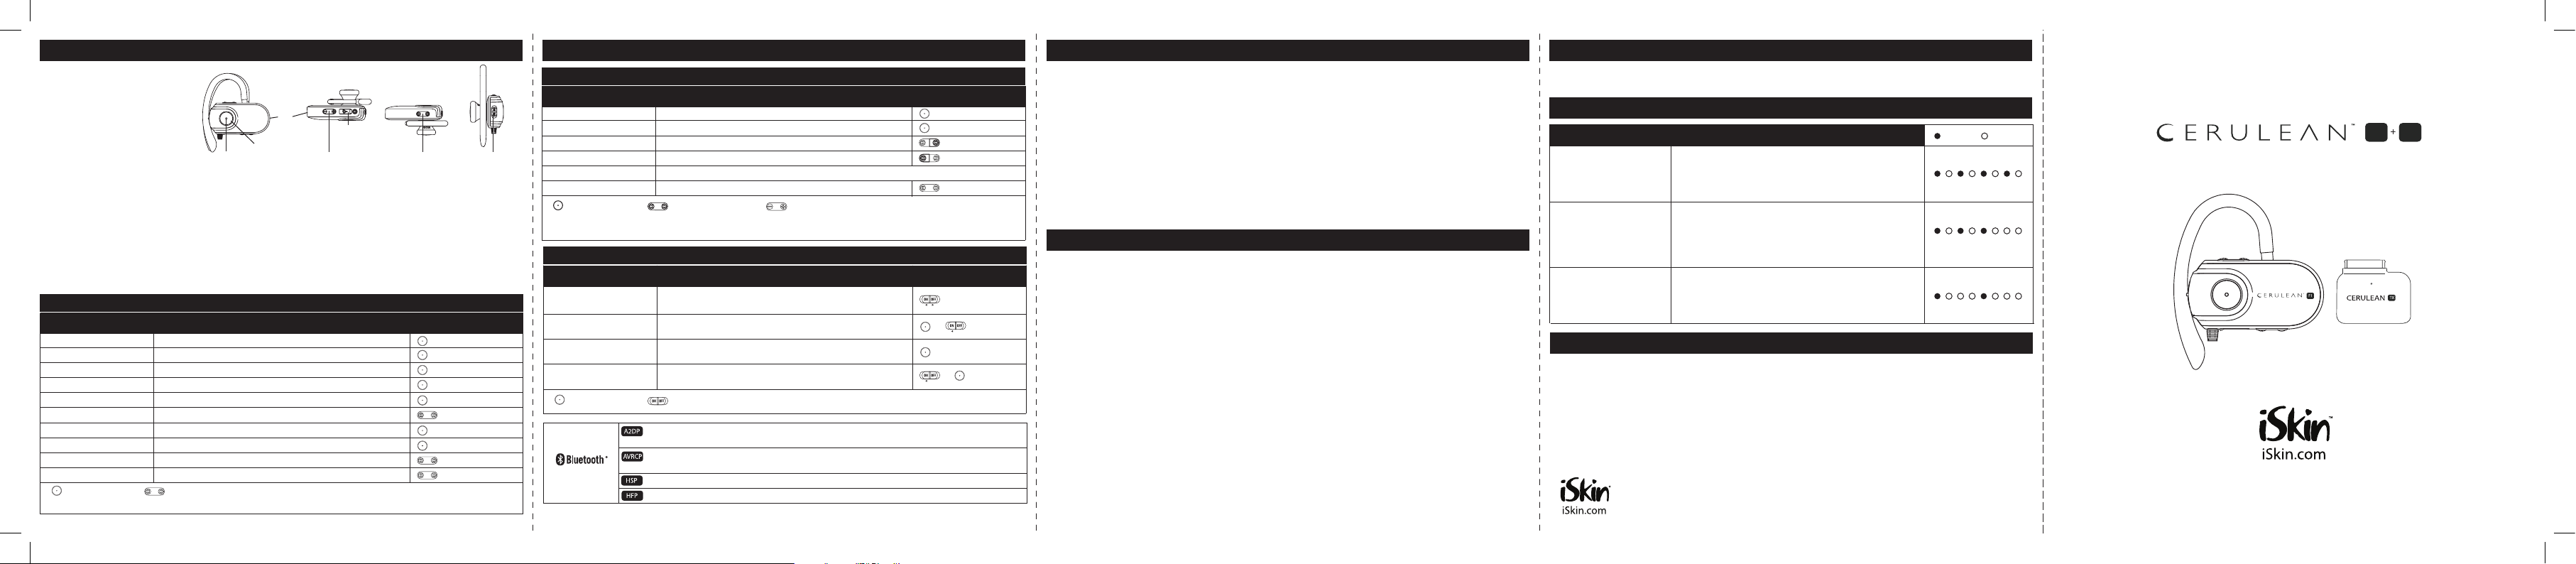
The RIGHT earpi ece contains all
controls i ncluding the powe r switch.
The LEF T earpiece contai ns the
lithium ba ttery.
Switches and Controls
(Right Earpiece)
Front
Status LED
Light
Volume
Controls
Mini USB
Port (Typ e A)
Next/Previous
Tra ck
Power
ON/OFF
Multi-function
Button
Mic
Bottom To p Side
The CERULEAN F1 is both a stereo Bluetooth® earphone and a mono headset. As a stereo
earphone, you can connect to a stereo Bluetooth (A2DP) audio device or iPod® (equipped with
the *CERULEAN TX) and listen to your audio wirelessly. As a mono headset, you can connect to
a Bluetooth mobile phone, accept or reject calls and access other call features.
The CERULEAN F1 uses standard Bluetooth 2.0 dened proles making it capable of
interacting with other Bluetooth devices. These proles allow it to remotely control specic
features of a device, act as wireless stereo earphones and also act as a wireless mono headset
for a mobile phone.
Supported Proles.
Wearing the CERULEAN F1
Following the diagram, install the CERULEAN F1
over each ear and ensure the right (R) and left (L)
earpieces are correctly placed. Then adjust ear
hooks for a secure and comfortable t.
Swapping Ear Hooks
Included with the CERULEAN F1 is an additional
pair of ear hooks. These ear hooks feature a dierent
design and may oer a better t.
Warning!
A headset that covers both ears may impair your
ability to hear environmental sounds. Use of this
headset while operating a motor vehicle or riding a
bicycle may pose a serious hazard to your personal
safety and is not recommended.
Note: Wh en removing ear ho oks, be sure to r mly hold the CERULE AN F1 securely and ca refully snap o the h ook from the base .
Snap repl acement ear hook s over the base whil e ensuring they are f acing the correc t direction (se e diagram above).
Pairing the CERULEAN F1 with your CERULEAN TX equipped iPod Page 2
Step 1. Make the CERULEAN F1 discoverable using the following steps:.
• Check that the CERULEAN F1 is powered o and its battery is charged.
• While pressing and holding down the Multi-function button, switch the power on until "beep".
• When the status LED light on the F1 ashes alternating BLUE/WHITE, release the Multi-function
button. The CERULEAN F1 is now discoverable and ready to pair with the CERULEAN TX.
Reconnecting the CERULEAN F1 to the CERULEAN TX Equipped iPod Page 3
How to wear the CERULEAN F1
1. Ensure that the CERULEAN TX is plugged into the iPod and its status LED light is ashing rapidly
indicating that it was previously paired with F1.
2. Switch the F1’s power ON.
3. Press and release the Multi-function button once.
4. The CERULEAN F1 and TX will automatically reconnect after a few seconds.
5. The status light on both the CERULEAN F1 and TX will ash slowly indicating that they have
successfully reconnected.
Note: If connection fails, power o the CERULEAN F1 and unplug the CERULEAN TX from the iPod
and repeat the steps on page 2.
Correc t ear hook
position
Right ear piece contains all
controls an d microphone.
Note. T he CERULEAN TX is po wered by the iPod and d oes not contain
a batter y. It is designed to se lf power o to conser ve the iPod’s batt ery
life when :
A. The iPo d has been powere d o
B. The CERULE AN TX is unable to est ablish a connec tion with the
CERULEAN F1 wi thin one minute.
It is thus ne cessary to remove a nd re-inser t the CERULEAN TX in to the
iPod to re- establish po wer and connecti on with the CERULEA N F1.
Step 2. Connect the CERULEAN TX to the iPod as shown.
The CERULEAN TX and F1 will automatically pair within 20
seconds. Music from your iPod can be heard on the
CERULEAN F1 when successfully paired.
Status LED li ght on TX ashes
rapidly a s it attempts to pai r
with the CERULEAN F1.
PRESS an d HOLD
(Multi- function but ton)
SWITCH
the power O N
Flashi ng Light BLUE/
WHITE (discoverab le)
Note: T he CERULEAN F1
will rema in discoverable fo r
approxim ately 3 minutes.
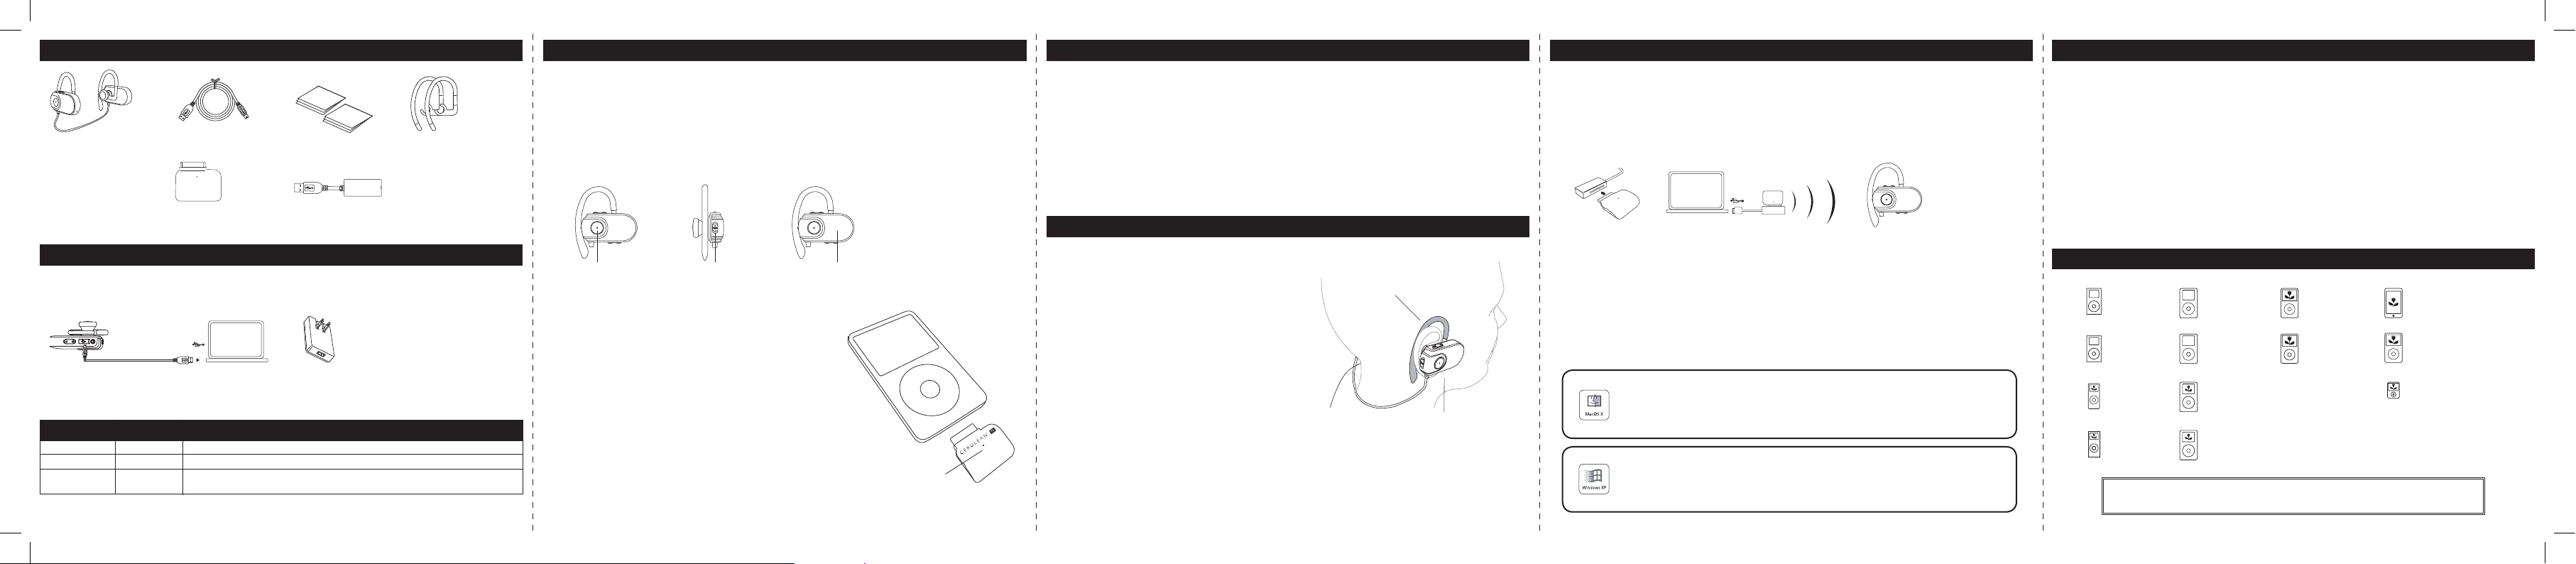
Wirelessly Stream Audio from Your Mac or PC to the F1 Page 4
You can stream audio from any application on your Mac or PC to the F1 using the CERULEAN TX
USB Adapter and CERULEAN TX.
1. Plug TX into the TX USB Adapter.
2. Plug the TX USB Adapter into the USB port on your computer.
3. Pair the CERULEAN F1 with the TX (See Page 2).
(If you have previously paired the F1 with TX, reconnect the devices as described on page 3)
Note: Only the volume controls and Play/Pause functions on the F1 are available when using TX
with your computer. You may also adjust the volume using the application’s volume controls on
your computer.
The Status LED Light on both the TX and F1 will begin to ash rapidly and automatically pair within
twenty seconds. See below for selecting TX as your computer’s output device.
Selecting CERULEAN TX for audio output streaming on your computer.
The iSkin CERULEAN TX will appear as a USB speaker on your Mac/PC. No additional software or
setup is required.
1. Choose "System Preferences" from the Apple Menu.
2. Select the "Sound" preference pane.
3. Select the "Output" Tab.
4. Select "iSkin CERU LEAN TX" from the list of available sound output devices.
1. Select START g Control Panel.
2. Choose the "Sound and Audio Devices" control panel.
3. Select the "Audio" tab.
4. Select "iSkin CERULEAN TX" as the default device from the "Sound playback" list.
CER
ULEAN TX
TX + TX USB Ad apter
Mac or PC
USB
TX
TX USB Adap ter F1 Headset
Multi-point Pairing (Pair CERULEAN TX With iPod and Mobile Phone Together) Page 5
You can pair both your mobile phone and the CERULEAN TX equipped iPod with the CERULEAN F1
to listen to your music and accept incoming phone calls.
1. Pair the CERULEAN F1 with your mobile phone (refer to your device's manual).
2. Pair the CERULEAN F1 with your TX equipped iPod (doing so will temporarily disconnect
your mobile phone).
3. Using your mobile phone’s Bluetooth menu, select the previously paired iSkin CERULEAN F1
as a headset device.
Note: While listening to music from the TX equipped iPod, the F1 is in stereo earphone mode and may
be used to control the iPod. Upon an incoming phone call, the F1 will switch to mono headset mode
and may be used to control your mobile phone. After terminating a phone call, the F1 returns to stereo
earphone mode and resumes music playback. This ability will dependent on mobile phone features.”
iPod Compatibility
It is important that your iPod is up to date with the latest iPod software.
For more information visit: www.apple.com/support
What’s Inside the Box Page 1
Getting Started
Charging the Battery:
It is recommended that you charge the CERULEAN F1's battery at least 6 hours prior to first use;
however, subsequent charges require only 2-3 hours to fully charge.
CERULE AN F1
Stereo Blu etooth Earpho nes
with Head set function ality.
Us
e
r
Ma
n
u
a
l
Warranty
R
L
CERULEAN TX
USB Char ging Cable
Type A to Mini- A 4 pin
User ’s Guide
Warrant y Info
Altern ate Ear
hooks
CERULE AN TX
Stereo Blu etooth 2.0
Transmitte r for iPod
CERULE AN TX USB Adapt er
Using the included USB charging cable, plug the smaller end of the cable into the CERULEAN F1
USB port and the wider end into the USB port on your computer. The following chart describes
battery status indicated by the Status LED light located in the centre of the Multi-function button.
Mac / PC or
USB AC Power Adap ter
Output : 5V(DC)
(sold sep arately)
ON BLUE Batte ry charging in pr ogress
ON WHIT E Batte ry charging com pleted
FLASHIN G B LUE Low batte ry indicator. Char ging required. I n addition, a low ba ttery
sound wil l alert you when re charging is neces sary (3% or b elow)
Status Light Colour Status / Description
Note : Longer distan ces between pa ired devices and hi gher volume level s impact batte ry perform ance. To conserve bat tery
life, tur n the power off whe n not in use.
USB
Warning
iPod
4th generation
20GB
iPod
4th generation
40GB
iPod
4th generation (clour display)
20GB 30GB
iPod
4th generation (clour display)
40GB 60GB
iPod mini
1st genereation
4GB
iPod mini
2nd generation
4GB 6GB
iPod
5th generation
(video)
30GB
iPod touch
8GB 16GB
iPod
5th generation
(video)
60GB 80GB
iPod Classic
6th generation
80GB 160GB
iPod nano
3rd generation
4GB 8GB
iPod nano
2nd generation
2GB 4GB 8GB
iPod nano
1st generation
1GB 2GB 4GB
 Loading...