

Page 1

Add Auxiliary Audio to
Your Factory Radio
Owner’s
Manual
PXAUX
iSimple®
A Division of AAMP of America™
13190 56th Court Clearwater, FL 33760
Ph. 866-788-4237
support@isimplesolutions.com
©2013 AAMP of Florida, Inc.
www.isimplesolutions.com
Rev. 01-23-13
INST020
Page 2

Table of Contents
Pages
Introduction 4
Compatibility Notes 4
Dipswitch Settings 4
Installation 5
Ford/Lincoln/Mercury ISFD531 6
General Motors ISGM531 6
General Motors ISGM532/ISGM533 7
General Motors ISGM534 7
General Motors ISGM535 7
Honda ISHD531 8
Hyundai ISHY531/ISHY532 8
Mazda ISMZ531 8
Nissan ISNI531/ISNI532 8-9
Toyota ISTY531 9
Volkswagen ISVW532 10
Troubleshooting 10
Warranty Information 12
Page 3
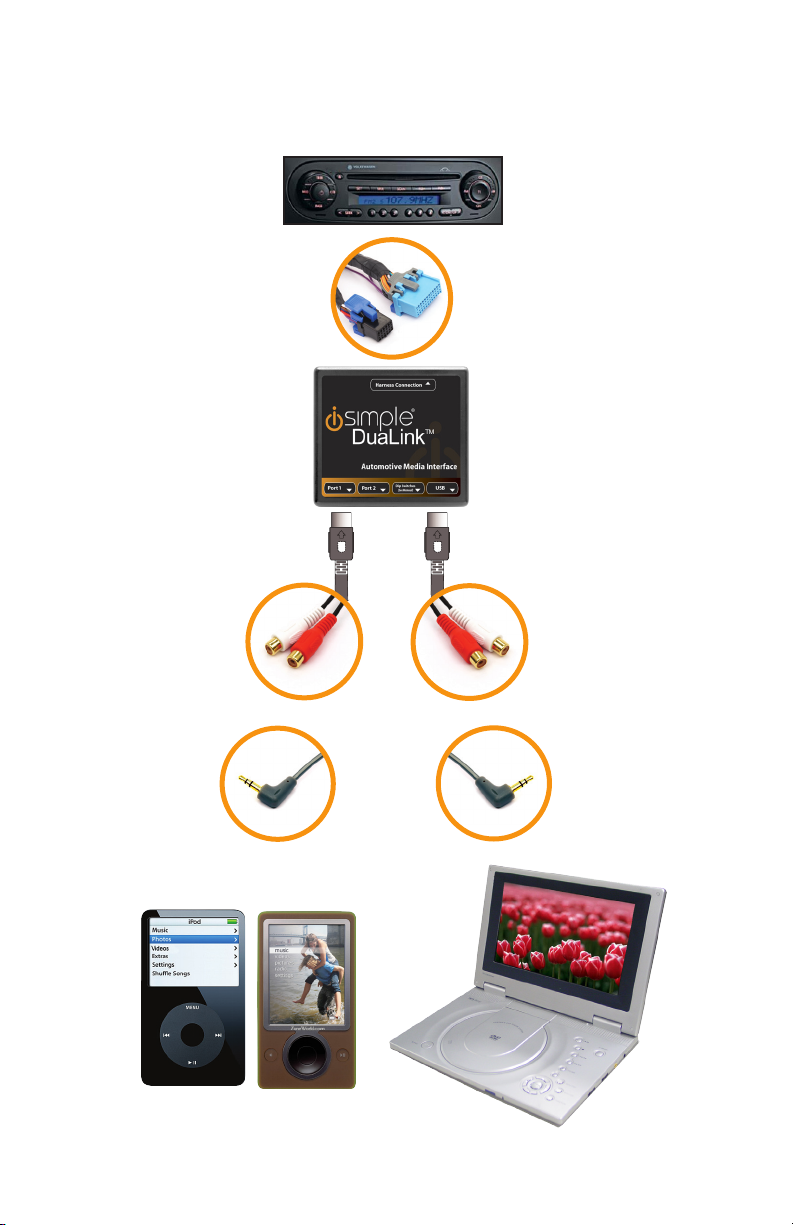
PXAUX & Optional Add-ons
Factory Radio
(not included)
Vehicle Specic Harness
(actual harness may vary)
PXAUX Interface
RCA InputRCA Input
MP3 Player
(not included)
OR
Your Audio Devices
OR
3.5mm Input3.5mm Input
DVD Player
(not included)
Page 4

Introduction
Dipswitch1 Dipswitch2 Dipswitch3 Dipswitch4
AllVehicleswithXMbutton
Of
fOffOffOff
AllvehicleswithoutXMbutton
Of
fOff
On Of
f
2010+Vehiclesequippedwithnavigation
On Off Off Off
AllVehicleswithAM‐SATbutton
Off Off Off Off
AllVehicleswithoutAM‐SATbutton Of
fOff
On Of
f
Scion
AllVehicles
Of
fOffOffOff
2010‐2011CamrywithAM‐SATbutton
On Of
fOffOff
2012+vehiclesequippedwithnon‐navigationtouchscreenradio
On Off Off Off
Vehiclesequippedwithnavigation
On Of
fOffOff
AllOtherVehicleswithAM‐Satbutton
Of
fOffOffOff
AllotherVehiclesWwithoutAM‐Satbutton
Of
fOff
On Of
f
Lexus
Application
Honda
Toyota
Thank you for purchasing the iSimple® PXAUX. The PXAUX is designed to
provide endless hours of listening pleasure from your factory radio. To ensure
that your auxiliary audio input performs correctly with your radio, we recommend
that you read this entire manual before attempting installation of the PXAUX.
This interface allows connectivity for two auxiliary audio inputs.
Compatibility Notes
Please visit www.isimplesolutions.com for the most up to date
application information and to verify your vehicle’s compatibility.
Dipswitch Settings
(ISTY531 & ISHD531 ONLY)
4
Page 5

Installation
1. When making electrical connections it is always recommended that
the vehicle’sbattery be disconnected from the electrical system before
performing the installation.
Please Note: If the radio is equipped with a built in CD
Changer, please remove ALL discs before proceeding to
prevent damage to the radio’s CD mechanism.
2. Carefully remove the trim panels covering the bolts that secure the
radio into the dash cavity. Remove these bolts, and carefully pull the radio
from the dashof the vehicle. This will provide access to the factory radio
connectors where youwill connect the vehicle specic harness.
3. Disconnect the factory harness (if present) from the back of the radio. If
you are installing the PXAUX into a Toyota or Honda with an external CD
Changer and you are using CD Changer emulation mode, the CD
Changer will have to be disconnected at the changer location for proper
operation.
4. Connect the 8-Pin auxiliary input cables to the ports on the PXAUX
5. Plug in the male connectors on the vehicle specic harness into the port
on the back of the radio. Next, connect the factory harness (if present)
into the female connector on the vehicle specic harness. Be sure to
make a rm connection but do not force it. Plug the Black micro-t 24-pin
connector on the vehicle specic harness into the PXAUX.
6. To complete the installation secure the PXAUX into the cavity in the dash
behind the radio. Be sure that the cables and interface modules are not
near moving parts or sharp metal edges as they may damage the cables.
To prevent rattling noises inside the dash, use zip ties, tape, or other
fasteners to mount the interfaces securely.
7. With all connections made, reconnect the vehicle’s battery, insert the key
into the ignition, and turn the vehicle on. Check for proper operation of the
PXAUX before reinstalling the factory dash panels.
8. Note: The rst time you access the PXAUX, your radio may display “DEV
INIT” while the device is initializing. If this is displayed, please wait one
minute then cycle the ignition off and on. Then access PXAUX mode
again to begin normal operation.
5
Page 6

Ford/Lincoln/Mercury ISFD531
Selecting AUX:
Press the “AUX” or “SAT” button (SR123 icon on navigation radio) until
“AUX1” is displayed on the screen. When you press the “AUX” button, you
will see the corresponding “SAT” modes, a slight delay, and then the current
mode will be displayed.
Selecting between AUX1 / AUX2
Press the “AUX” or “SAT” button (SR123 icon on navigation radio) until
“AUX1” or “AUX2” is displayed on the screen.
Operation
General Motors ISGM531
Non Navigation
Selecting AUX
Press the “BAND” button a few times until “XM” is displayed on the screen.
Immediately turn the rotary knob in the top right hand corner to scroll through
available sources. Once “AUX1” is displayed, press the “FWD>>” button to
select it. If you are currently in “SAT” mode you will need to press the “►I
SEEK” button instead of “FWD>>” to select “AUX1” mode.
Selecting between AUX1 / AUX2
If you are currently in “AUX1” or “AUX2” mode turn the rotary knob to cycle
through the available sources. Once “AUX1” or “AUX2” is displayed on the
screen press the “FWD>>” button to select it.
Navigation radio operation
Selecting AUX
Press the “FM” button then press the “XM” button. Immediately turn the rotary
tune knob in the top right hand corner to scroll through available sources.
Once “AUX1” is displayed, press the “►” button on the screen to select it. If you
are currently in “SAT” mode, press the “SEEK ►I” button instead of the “►” button
to select “AUX” mode.
Selecting between AUX1 / AUX2
If you are currently in “AUX1” or “AUX2” mode, turn the rotary knob to
cycle through the available sources. Once “AUX1” or “AUX2” is displayed
on the screen, press the “►” button to select it..
Operation
6
Page 7

General Motors ISGM532/ISGM533
Selecting AUX
Press the “BAND” button a few times until XM is displayed on the screen.
Immediately turn the rotary knob to scroll through available sources. Once
“AUX1” is displayed press PRESET 2 to select it.
Selecting between AUX1 / AUX2
If you are currently in “AUX1” or “AUX2” mode turn the rotary knob to cycle
through the available sources. Once “AUX1” or “AUX 2” is displayed on the
screen press PRESET 2 to select it.
Operation
General Motors ISGM534 Operation
Selecting AUX
Press the “AM/FM” button and then the “XM” button. Turn the rotary tune knob
clockwise until “AUX1” is displayed. Press the “>>>>>” button to select it. (It may be
necessary to press the “CAT” button in order to make the “>>>>>” button visible.)
Selecting between AUX1 / AUX2
Press the “AM/FM” button and then the “XM” button. Turn the rotary tune knob
clockwise until “AUX2” is displayed. Press the “>>>>>” button to select it. (It may
be necessary to press the “CAT” button in order to make the “>>>>>” button
General Motors ISGM535
Non Navigation
Selecting AUX
Press the “BAND” button until “XM” is displayed on the screen. Immediately
turn the rotary knob to scroll through available sources. Once “AUX1” is
displayed, press PRESET 6 to select it.
Selecting between AUX1 / AUX2
If you are currently in “AUX1” or “AUX2” mode turn the rotary knob to cycle
through available sources. Once “AUX1” or “AUX2” is displayed on the
screen press PRESET 6 to select it..
Operation
7
Page 8

Honda/Acura ISHD531
Satellite Radio Mode
Selecting AUX
Press the “XM” button to switch to SAT. Immediately turn the rotary knob
or press TUNE UP to scroll through available sources. Once “AUX1” is
displayed, press PRESET 6 to select it.
Selecting between AUX1 / AUX2
Press the “XM” button to switch to SAT. Immediately turn the rotary knob
or press TUNE UP to scroll through available sources. Once “AUX2” is
displayed, press PRESET 6 to select it.
CD Changer Mode
Selecting AUX
Press the “DISC” or “AUX” button to switch to CD Changer mode. You are
now in the AUX1 mode.
Selecting between AUX1 / AUX2
If you are currently in “AUX1” or “AUX2” mode press the “DISC ▲” button to
cycle between AUX1” & “AUX 2” .Disc up and down are Preset 5 & Preset 6
Operation
Hyundai ISHY531/ISHY532
Selecting AUX
Press the “XM” button to cycle through the PXAUX sources until “AUX1” or
“AUX2” is displayed.
Selecting between AUX1 / AUX2
Press the “XM” button to cycle through the PXAUX sources until “AUX1” or
“AUX2” is displayed.
Operation
Mazda ISMZ531 Operation
Selecting AUX
Press the “SAT” button to enter satellite radio mode. Press the “CATEGORY
UP” or “CATEGORY DOWN” button to scroll through the available sources
until “AUX 1” or “AUX 2” is displayed. If satellite radio is present, the PXAUX
sources will show up AFTER the last satellite radio category.
Selecting between AUX1 / AUX2
Press the “CATEGORY UP” or “CATEGORY DOWN” button to scroll through
the available sources until “AUX 1” or “AUX 2” is displayed.
8
Page 9

Nissan ISNI531/ISNI532
Selecting AUX
Radios equipped with a “SAT” button
Press the “FM” button and then the “SAT” button. Immediately press the
“SEEK>>” button to scroll through the available sources. Once “AUX1” is
displayed, press the “<<TUNE” button to select it.
Radios equipped with a “RADIO” or “AM/FM/SAT” button
Press the “RADIO” or “AM/FM/SAT” button a few times until “SAT” is displayed.
Immediately press the “SEEK ▲” button to scroll through the available
sources. Once “AUX1” is displayed, press the “TUNE ▼” button to select it.
Selecting between AUX1 / AUX2
For radios that have a “SAT” button
Press the “FM” button and then the “SAT” button. Immediately press the
“SEEK >>” button to scroll through the available sources. Once “AUX2” is
displayed, press the “<<TUNE” button to select it.
For radios equipped with a “RADIO” or “AM/FM/SAT” button
Press the “Radio” or “AM/FM/SAT” button a few times until “SAT” is displayed.
Immediately press the “SEEK▲” button to scroll through the available
sources. Once “AUX2” is displayed, press the “TUNE ▼” button to select it.
Operation
Toyota/Scion/Lexus ISTY531
Satellite Radio Mode
Selecting AUX
Press the “AM/SAT” button to switch to AM then again to switch back to SAT.
Immediately turn the rotary knob to scroll through available sources. Once
“AUX1” is displayed, press PRESET 6 to select it.
Selecting between AUX1 / AUX2
If you are currently in “AUX1” or “AUX2” mode turn the rotary knob to cycle
through the available sources. Once “AUX1” or “AUX2” is displayed on the
screen press PRESET 6 to select it.
Operation
9
Page 10

CD Changer Mode
Selecting AUX
Press the “DISC” or “AUX” button to switch to CD Changer mode. You are
now in the AUX1 mode.
Selecting between AUX1 / AUX2
If you are currently in “AUX1” or “AUX2” mode press the “DISC ▲” button to
cycle between AUX1” & “AUX 2” .
Volkswagen ISVW532
Operation
Selecting AUX
Press the “CD” button twice to switch the radio to the CD Changer source.
This will access “AUX1”.
Selecting between AUX1 / AUX2
To select “AUX2” press preset #2. To select “AUX1” press preset #1.
Troubleshooting
Symptom Cause Remedy
Radio shows
“DEV INIT”
Radio does
not recognize
module.
No sound. Auxiliary cable
PXAUX device is
initializing.
Dipswitches are
not set properly
or the unit did not
initialize properly.
is not connected
to accessory or
PXAUX.
This only occurs the rst time the
PXAUX is powered on. Wait a few
minutes, cycle ignition off and on then
enter SAT mode.
See connection diagram for proper
dipswitch setting. If the dipswitches
are set properly disconnect the 24 pin
micro-t connector from the PXAUX for
5 minutes to reset the interface.
Verify that the auxiliary cable is
connected to the PXAUX and the
accessory.
10
Page 11

Notes
11
Page 12

Warranty Information
One Year Limited Warranty
The quality controls used in the manufacture of this product will ensure your satisfaction.
This warranty applies only to the original purchaser of this product from an authorized
iSimple® dealer. This warranty covers any supplied or manufactured parts of this product that, upon inspection by
normal use due to defects in material or workmanship. This warranty does not apply to
installation expenses. Attempting to service or modify this unit, operating this unit under
conditions other than the recommended voltage will render this WARRANTY VOID.
Unless otherwise prescribed by law,
property damage and or any incidental or consequential damages of any kind (including water damage) resulting from malfunctions, defects, misuse, improper installation or
alteration of this product. All parts of this
of 1 year as follows:
Within the rst 12 months from date of purchase, subject to the conditions above,
iSimple® will repair or replace the product at their discretion, if it is defective in material
or workmanship providing it is returned to an Authorized
OF PURCHASE from an authorized
Warning:
This equipment may be reset by unintentional electrostatic discharge during operation.
Exposure to direct sunlight or extreme heat may cause damage or malfunction.
iSimple® authorized personnel, is found to have failed in
iSimple® shall not be liable for any personal injury,
iSimple® product are guaranteed for a period
iSimple® dealer, with PROOF
iSimple® dealer.
For Best Pe rf ormanc e Have It
Professionally Installe d.
12
 Loading...