

Page 1
User Manual
BT32XIS
Page 2

ABOUT THIS PRODUCT
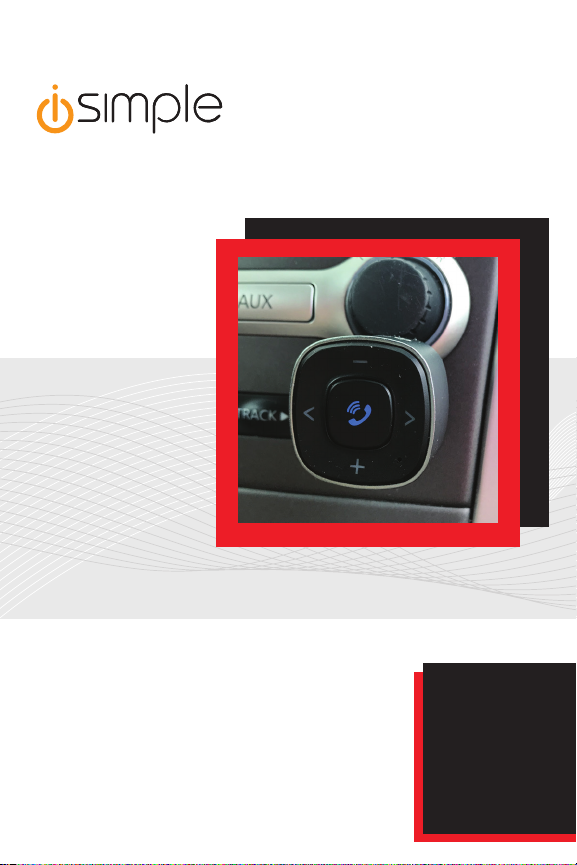
BT32XIS is a Bluetooth adapter that plugs into any standard AUX
jack. This compact little device packs a powerful punch. Just plug
it into your AUX port and sync it with your phone’s Bluetooth. It
takes less than 60 seconds. Now you can enjoy music streaming
from Spotify, Pandora, Google Play, YouTube Red, iTunes, or
whatever else you’re using.
Features
• Compatible with any standard 3.5mm AUX input (in your car or
stereo system) and any device with Bluetooth
• Wireless music streaming
• Control your music’s playback wirelessly
• Pair once, and you’re good to go
• Up to 7 hours of battery life
• Includes in-vehicle charger through 12V socket
BT32XIS IS FOR STREAMING HANDS-FREE MEDIA
AND CALLING FROM YOUR PHONE THROUGH
YOUR CAR’S SPEAKERS.
2
Page 3
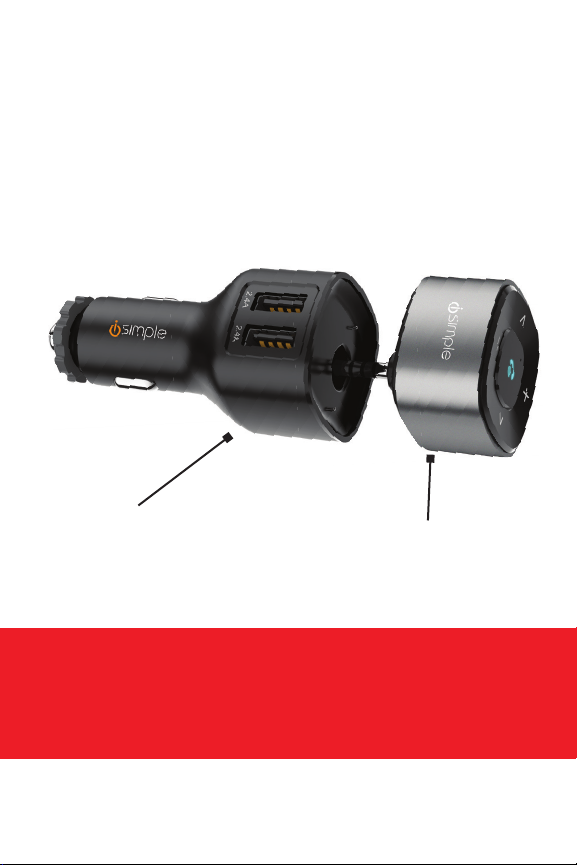
BOX CONTENTS
Be careful when removing all items from the packaging tray.
Take care not to tug or pull on cables.
12V Plug (B) Control Button Module (A)
12V Plug (B)
Plug into your car’s 12V socket
(cig plug) for charging Control
Button Module (A) or your smart
devices (charging cables not
included)
Control Button Module (A)
Plug into your car’s AUX port
after initial charging
INSTALLATION SETUP
NOTE: Make sure you are parked in a safe spot before installation or
whenever you are pairing a device. NEVER WHILE DRIVING.
3
Page 4
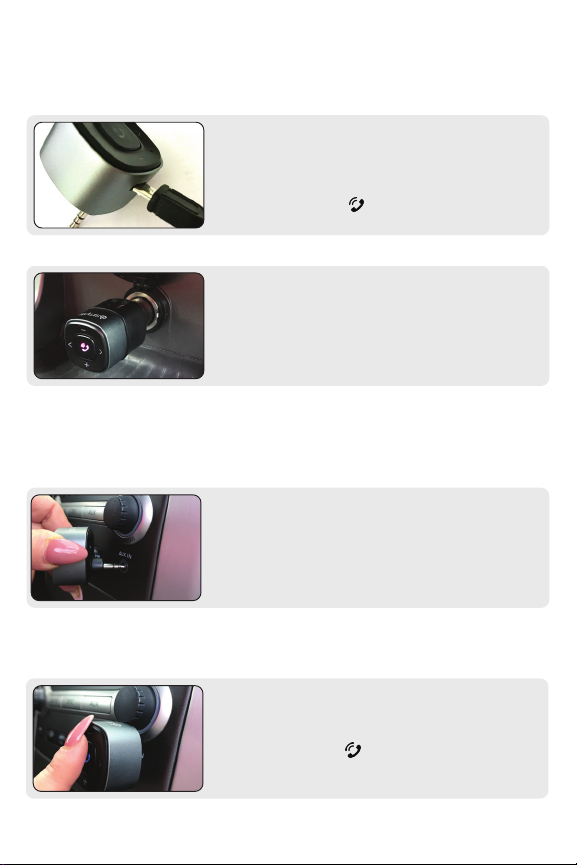
CHARGING GUIDE - THERE ARE 2 OPTIONS
Step 1
Option 1 - With a USB Cable
Plug the micro-USB end of the enclosed BT32XIS charging
cable into the BT32XIS (A). Plug the USB end of the BT32XIS
charging cable into a power source. When connected to a
USB power source, the icon will glow red while charging.
Option 2 - In Your Car
Plug (A) control module into (B) 12V Plug, then insert into
your car’s 12v socket (cig plug)
CHARGING TAKES ABOUT 2 HOURS, AND CONTROLLER WILL
NOT WORK WHILE DEVICE IS CHARGING.
Step 2
After charging you BT32XIS, plug the Bluetooth adapter into
your car’s AUX port.
PAIRING GUIDE
4
Step 1
Turn on BT32XIS by pushing and holding the Bluetooth
button for 3 seconds. icon should begin blinking blue.
Power is now on, and you are now in pairing mode.
Page 5
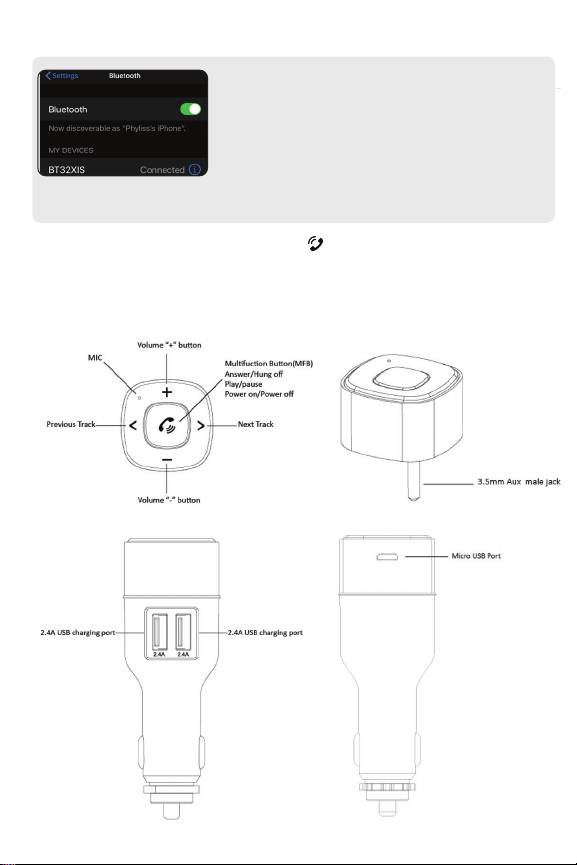
Step 2
After charging your BT32XIS, unplug Bluetooth Adapter (A)
from the USB cable. Make sure the Bluetooth operation on
your phone is turned on.
Open the Bluetooth menu on your smartphone, and scan
for available Bluetooth devices. Find “BT32XIS” from the list,
and select “Connect”.
When a successful connection has been established, LED light will change to a solid blue light
Bluetooth Module Controls
Control buon
5
Page 6
HOW TO PLAY YOUR PHONE’S AUDIO
Step 1
Plug BT32XIS Bluetooth Adapter (A) into the vehicle’s AUX
port.
Step 2
Select the AUX input source on your radio to enjoy your
music.
Step 3
On your device, access your music/media player of choice.
Adjust the volume using your device and radio volume.
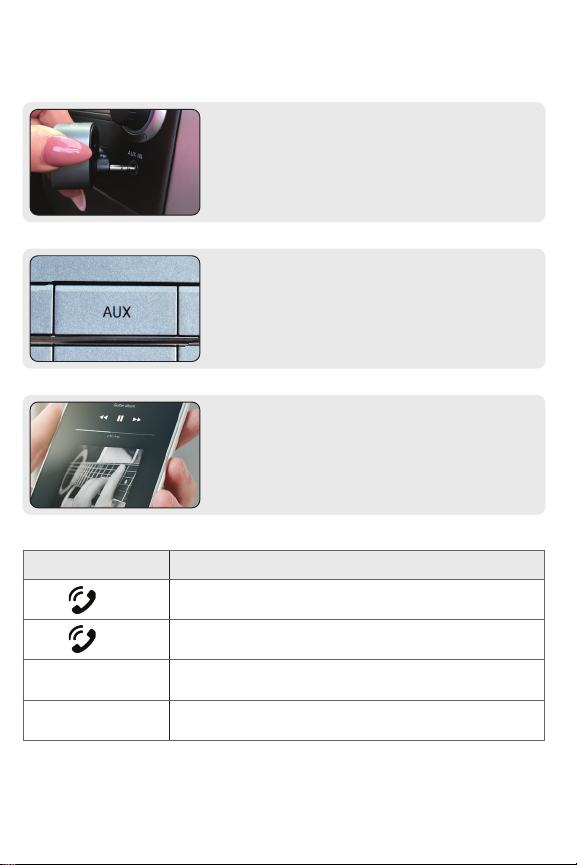
Button Description
Press main control button to play
Press main control button to pause
>
<
6
Press “FORWARD” button to skip track
Press “BACK” button to go back to beginning of track
Double click to go back to previous track
Page 7

How to Power O BT32XIS
To save battery life while not in use, press the control button
(A) for 3 seconds to turn o BT32XIS.
HOW TO SEND/RECEIVE CALLS
To Answer/End Calls
Push control button (A) once.
To Make Calls, Set Your Car to AUX
Select the AUX input source on your radio to stream your
calls through your car’s speakers.
To Make Calls
On your device, make your calls or hold control button
(A) and make calls via voice recognition (see next page).
7
Page 8

LED OPERATION GUIDE
Button Description
Pairing mode Flashing blue light
Paired Steady blue light
Low battery Flashing red light
Charging Steady red light
Full battery No light
HOW TO USE VOICE RECOGNITION
To Use Siri or Google Now
Push control button (A) and hold to activate.
ABOUT AUTO CONNECT
BT32XIS will auto connect after the rst pairing.
ABOUT POWER SAVE MODE
BT32XIS will auto shut-o after 10 minutes of non-use.
8
Page 9

CHARGING YOUR BT32XIS AND SMARTPHONE
When 12v plug (B) is insterted into your car’s 12v socket, you can charge up to two smartphones/
tablets at the same time, Charging cables not included.
The BT32XIS module when not in use can be charged by simply inserting into the 12v plug and then
plugging into the car’s 12V socket (see above photo).
9
Page 10

QUICK GUIDE
Power on Press and hold for 3
Power off Press and hold for 3
Play/Pause music Press once during music
Answer call Press once when there is
End call Press once during call
Redial call Press twice while on
Reject call Press and hold for 2
Adjust the volume Press and hold “+” button:
Choose music Press “<“ button: play the
Switch phone calls
between BT32XIS and
Phone
seconds until ashing and
prompting you with “Power
on”
seconds until prompt
“Power off”
playing
incoming call
standby
seconds when there is an
incoming call
increase volume
Press and hold “-” button:
decrease volume
previous song
Press “>” button: play the
next song
Press and hold for 2
seconds during
conversation
10
Page 11

BT32XIS
SAFETY WARNING
● FCC WARNING
● This device complies with part 15 of the FCC Rules. Operation is subject to the following two conditions: (1) this
device may not cause harmful interference, and (2) this device must accept any interference received, including
interference that may cause undesired operation.
● Any changes or modications not expressly approved by the party responsible for compliance could void the user’s
authority to operate the equipment.
● NOTE: This equipment has been tested and found to comply with the limits for a Class B digital device, pursuant to
Part 15 of the FCC Rules. These limits are designed to provide reasonable protection against harmful interference in
a residential installation. This equipment generates, uses and can radiate radio frequency energy and, if not installed
and used in accordance with the instructions, may cause harmful interference to radio communications. However,
there is no guarantee that interference will not occur in a particular installation.
● If this equipment does cause harmful interference to radio or television reception, which can be determined by
turning the equipment o and on, the user is encouraged to try to correct the interference by one or more of the
following measures:
● -- Reorient or relocate the receiving antenna.
● -- Increase the separation between the equipment and receiver.
● -- Connect the equipment into an outlet on a circuit dierent from that to which the receiver is connected.
● -- Consult the dealer or an experienced radio/TV technician for help.
● To maintain compliance with FCC’s RF Exposure guidelines, This equipment should be installed and operated with
minimum distance between 20cm the radiator your body: Use only the supplied antenna.
● FCC RF exposure statement:
● The equipment complies with FCC Radiation exposure limit set forth for uncontrolled environment. This equipment
should be installed and operated with minimum distance 20cm between the radiator and your body.
●
●
● This equipment may be reset by unintentional electrostatic discharge during operation. Exposure to direct sunlight or
extreme heat may cause damage or malfunction.
● FCC Class B Radio Frequency Interference Statement: This equipment has been tested and found to comply with the
limits for a Class B digital device, pursuant to Part 15 of FCC rules. These limits are designed to provide reasonable
protection against harmful interference in a residential installation. This equipment generates, uses, and can radiate
radio frequency energy and, if not installed and used in accordance with the instructions, may cause harmful
interference to radio communications.
● However, there is no guarantee that interference will not occur in a particular installation. If this equipment does
cause harmful interference to radio or television reception, more of the following measures:
1. Re-orientate or relocate the receiving antenna.
2. Increase the separation between the equipment and receiver.
3. Connect the equipment into an outlet on a circuit dierent from that of which the receiver is connected.
4. Consult the dealer or an experienced radio / television technical for help.
NOTICE: The changes of modications not expressly approved by the party responsible compliance could void the user
authority to operate the equipment
Please Read!
Page 12

Technical Support
US EU
AAMP Global US
Tel.: 866-788-4237
support@iSimple.com
www.iSimple.com
www.iSimple.com
facebook.com/isimplesolutions
AAMP Global UK
Tel.: +01-800-477-2267
support@iSimple.com
www.iSimple.com
 Loading...