


Dessert
Whip.
PLUS
Dessert
Whip
PLUS
Mini.
Inst ructions fo r Use / Gebrauch sanleitung /
Notice d‘utili sation / Istruz ioni pe r l‘uso /
Modo de empleo / H andle iding / Br uksa nvisni ng /
Inst ruções de uso /
Instrukcja użytkowania
Инструкция по эксплуатации /
0.5 L 1 USPT
MAX.
0.25 L 0,5 USPT
MAX.
0.5 L 1 USPT
MAX.
MAX.
0.5 L 1 USPT
MAX.
0.25 L 0,5 USPT
MAX.
MAX.
0.5 L 1 USPT
MAX.
0.25 L 0,5 USPT
MAX.
MAX.
0.5 L 1 USPT
MAX.
0.25 L 0,5 USPT
MAX.
MAX.
0.5 L 1 USPT
MAX.
MAX.
0.25 L 0,5 USPT
MAX.
0.5 L 1 USPT
MAX.
0.25 L 0,5 USPT
MAX.
MAX.
0.5 L 1 USPT
MAX.
0.25 L 0,5 USPT
MAX.
MAX.
0.5 L 1 USPT
MAX.
0.25 L 0,5 USPT
MAX.
MAX.
0.5 L 1 USPT
MAX.
0.25 L 0,5 USPT
MAX.
MAX.
0.5 L 1 USPT
MAX.
0.25 L 0,5 USPT
MAX.
MAX.
Instructions for Use
Gebrauchsanleitung / Notice d‘utilisation /
Istr uzioni per l‘uso / Modo de empleo /
Handleiding / Bruksanvisning / Instruções
de uso /
Инструкция по эксплуатации /
Instrukcja uż ytkowania
MAX.
1.
0.25 L /
0,5 USPT
0.5 L /
1 USPT
6.
7.
2.
> 5×
3.
8.
9.
10.
4.
5.
11.
12.
Cleaning
Reinigung / Net toyage / Pulizi a / Limpieza / Rein iging /
Rengöring / Limpeza
/ Очис тка / Czyszczenie
1.
2.
3.
→
Interim Cleaning
Zwischenrei nigung / Nettoyage inter médiaire /
Pulizia intermedia / Limpieza intermedia /
Tussenreiniging / En kel rengöring / Limpeza
intermediária /
Czyszczenie pobieżne
Промежуточная очистка /
~ 50 °C
122 °F
Expanded Drawing
Explosion szeichnung / Vue éclatée / Es ploso /
Vista detallada / Opengewerkte tekening /
Sprängski ss / Vista explodida /
Покомпонентное изображение
Rysunek rozłożeniowy
/
4.
2325001
2327001
2324001
2326001
2236001
0.5 L
2332001
2333001
0.25 L
5.
2330001
2331001
2321001
2339001
2328001
2329001
2234001
Create.
New.
Taste.
EN
English
2
DE
Deutsch
14
FR
Français
26
ES
Español
50
NL
Nederlands
62
SE
Svenska
74
RU
Русский
98
PL
Polski
110
IT
Italiano
38
PT
Português
86

EN
Thank you for
choosing an iSi
product.
Please read the Whipper instructions
carefully before first-time use.
EN
Discover the
world of iSi:
Visit the iSi website and learn
more about our extensive range of
products: Our comprehensive collection of recipes from simply yummy to
creatively sophisticated combinations
offers you access to the entire culinary
world of iSi. Let yourself be inspired!
Want to speak directly with a cooking
professional? No problem! Our head chef
is happy to answer your questions on
our iSi blog, where you can find up-todate, interesting information all about
iSi. Take a look!
The iSi website provides detailed
product information about all iSi
Whippers/Siphons and iSi Accessories.
The detailed online instructions
provide information about first-time
use, cleaning, and troubleshooting iSi
Whippers and Siphons.
www.isi.com/culinary
www.isi.com/culinary/us
If you have any further questions please
contact info@isi.com
For the US: isinorthamerica@isi.com
2 3

Guaranteed quality:
Every iSi Whipper and Siphon is thoroughly
inspected before leaving the factory. iSi offers
a two-year warranty for materials and machining, as long as faults are not determined to be
the result of improper use. The warranty is effective f rom the date on the purchase receipt.
Register online now and we will extend your
warranty!
Enjoy the benefits of a three-year warranty for
materials and machining.
The warranty is only valid when original whipper parts from iSi are used, as given in the list
of product components. The perfect function of
your Whipper/Siphon can only be guaranteed if
you exclusively use iSi chargers with it. No warranty or liability claim will be upheld for faults,
damage, or consequential damage particularly
determined to be the result of non-compliance
and/or ignorance of the user instructions and
the safety information therein.
FOR U.S. ONLY:
Limited warranty, Limitations and Warning:
iSi products are thoroughly tested before they
leave the factory, and iSi war rants for a period
of two years that its products are free from defects in materials and workmanship and, if used
only with other iSi products, will function as
intended . iSi’s liability in the event of a product’s
failure to meet this warranty is limited to repair
or replacement of the product or, at iSi’s option
or if iSi is unable to deliver a replacement product, to refund the purchase price. In no event,
however, shall iSi be liable for incidental or
consequential damages. Any implied war ranties
are limited to the terms of the express warranties, including the two-year duration. iSi cream
whipping systems, bottles and chargers are
designed and engineered to function together
as a system and involve gas under pressure.
All iSi products and parts bear the iSi logo; iSi
recommends that only iSi parts and products
be used with iSi products, including that only iSi
chargers be used with iSi Whippers/Siphons and
EN
that iSi chargers be used only in iSi Whippers/Siphons. Failure to follow this recommendation or
any failure to follow the instructions for use and
care of the products invalidates this warranty
and all implied warranties in their entirety as to
any consequences of such failure.
WARNING: In addition, failure to follow this
recommendation or any of the instructions for
use and care constitutes misuse of iSi products
and could result in malfunction of the system
and possible personal injury and/or property
damage. In the event of any personal injury,
you should promptly seek appropriate medical
attention.
Simply register online and take
advantage of the extended benefits:
www.isi.com/warranty
For the US please refer to
www.isi.com/warranty/us
4 5

Whipper Data.
EN
Max. service
pressure PS
Min. operating
temperature
Max. operating
temperature
Max. filling volume
Max. number of
chargers to be used
Usage Not approved for
20 bar / 290 psig
1 °C / 34 ° F
30 °C / 86 ° F
0.25L / half US pint
0.5L / 1 US pint
1 iSi cream charger
commercial use.
For fresh, pure
cream, and desserts.
Suitable for cold
preparations only.
Material List.
Description Material
Bottle Stainless steel
Head PBT, POM, silicone,
Head gasket TPE
Decorator tip Adapter: PA
Charger holder PA, silicone
Dispensing piston PA, silicone,
Silicone cover Silicone
Cleaning brush Stainless steel, PA
Technical data is subject to change without
prior notice.
nickel-plated brass,
PU, stainless steel
Spout: PP
stainless steel
6 7
Safety Information.
Failure to follow this safety instructions or any
recommendation for use and care constitutes
misuse of iSi products and could result in malfunction of the system and possible personal
injury and/or property damage.
——— Do not exceed minimum or maximum pres-
sure, minimum or maximum temperature,
maximum filling volume, number of chargers or usage of the iSi Whipper shown in
the Whipper Data! Do not use for any purposes not indicated in these instructions!
——— Please read the instructions for use
carefully to avoid operating er rors and
keep a copy on hand!
——— Do not use force when screwing on or off
the head, using the whipper and during any
operation described in these instructions!
——— Store the iSi Whipper out of the reach of
children!
——— Only charge a whipper that is filled!
——— Never store or use the iSi Whipper
outside of the min. and max. operating
temperatures. Do not store in a f reezer!
——— Only use a head and bottle of the same iSi
Whipper model together!
——— Never combine iSi components with com-
ponents from another brand or manufac-
turer!
——— The head and the charger holder should
always be screwed on straight and comp-
letely tight, never crooked or incompletely
tightened!
——— Only use original iSi cream chargers!

——— When screwing on the charger, do so away
from others and keep face away from the
whipper; do not bend over the whipper!
——— The whipper is a pressure equipment. If
it is dropped or damaged (e.g., cracked or
dented), do not use again because it poses
a risk of injury. Please have the whipper
checked by the iSi service center!
——— Never unscrew the head when the
whipper is pressurized!
——— Never use the lever as a carr ying handle!
——— Proper cleaning is a mandatory requirement
in order to avoid the whipper becoming
blocked and leaking. Check that the
iSi Whip per has been properly cleaned
before use!
——— Only dismantle the iSi Whipper for cleaning
in accordance with the illustration!
——— Only clean by hand using lukewarm water
and domestic hand dishwashing detergent.
The iSi Whipper is not dishwasher safe!
Cleaning the head of the whipper in the
dishwasher may damage the plastic head
and the charger holder, which ultimately
puts your safety when using your iSi Whipper
at risk!
——— Do not make any modifications to the iSi
Whipper. This will void the warranty and
exempt the company from any liability!
——— Never use more chargers than specified
and never overfill the whipper. This will
ensure that the specified maximum
operating pressure is not exceeded!
——— If the pressure will not release, please con-
tact iSi or your service center!
NOTE: Before using the iSi Whipper for the first
time, carry out thorough cleaning as shown in
the Cleaning illustration
NOTE: To avoid the formation of lumps, you
should completely dissolve powdered ingredients such as sugar, etc., in some liquid before
filling. Do not use any ingredients with fruit
pulp or seeds.
NOTE: The silicone cover is used for decoration.
The iSi Whipper can be operated perfectly well
without it.
8 9
EN
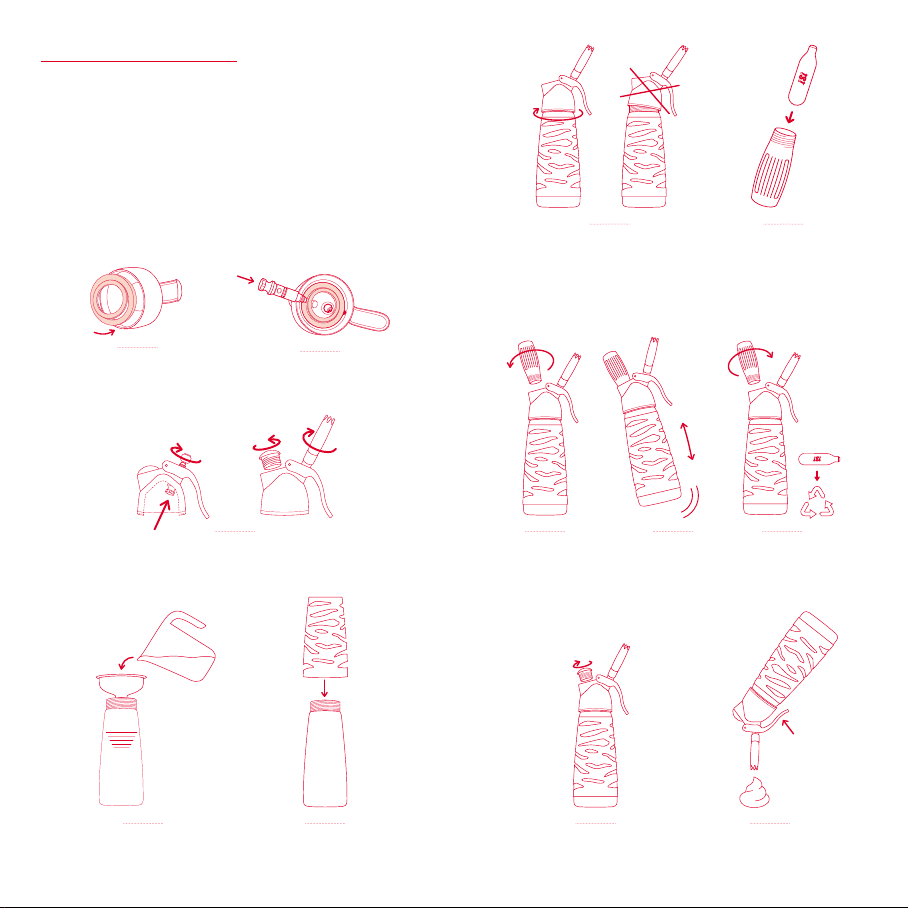
Instructions for Use.
NOTE: Please observe the illustrations
“instructions for use”!
Cream/cream-based desserts should be cold
when filled. Dispense cream/cream-based
desser ts from the iSi Whipper shortly before
eating.
Preparation
1. Make sure that the head gasket is inserted
into the head.
2. Insert dispensing piston into the head.
3. Screw the adapter onto the dispensing
piston, not too tight but enough to be secure, and screw the decorator tip onto the
adapter.
4. Fill bottle with the prepared mi xture.
NOTE: Please note the fill line and marking on
the bottom of the bottle. Do not overfill! The
remaining empty space is required for optimal whipping results. Use a measuring cup.
5. If required, carefully pull the silicone cover
over the bottle from above.
Equipment Setup
6. Screw the head onto the bottle so that it is
straight and tighten by hand.
7. Insert the original iSi cream charger into the
charger holder.
NOTE: Never screw on the charger when
there is no adapter attached to the dispensing piston.
8. Screw the charger holder with the inserted
charger onto the head until you can hear
that all of the charger contents have flowed
into the whipper.
WARNING: The whipper is now pressurized!
9. Shake the whipper vigorously > 5.
10. Unscrew the charger holder and recycle the
empty charger.

NOTE: A slight hissing noise may be heard
when removing the charger holder. This is
normal.
11. Screw the cap onto the thread.
Operation
12. For dispensing, the device must be held „head-
first“ (with the decorator tip facing downwards!) and the lever must be operated gently.
NOTE: Test the consistency of the contents
when the whipper is first used. Shake the
whipper again if the consistency is still too
runny.
Cleaning.
NOTE: Please observe the illustrations
on cleaning!
1. Press the lever until the whipper is completely empty and there is no pressure lef t.
Remove the head from the bottle.
2. Remove the adapter from the dispensing
piston and remove the decorator tip from
the adapter.
3. If the silicone cover was used, remove this
from the iSi bottle by pulling it upwards
and clean by hand using domestic hand dishwashing detergent.
4. Remove the head gasket and the dispensing
piston for basic cleaning.
5. Clean product components by hand using
warm (max. 50°C) potable water along with
domestic hand dishwashing detergent and
clean the dispensing piston and decorator tip
using the cleaning brush. Completely remove
any traces of fat or egg white.
NOTE: Do not use scouring agents or abrasive sponges/brushes.
NOTE: Do not put in the dishwasher and do
not wash in boiling water.
NOTE: The decorator tip can be unscrewed
at any time for periodic cleaning.
10 11
EN
Storage.
If the iSi Whipper is not going to be filled again
immediately, leave the components to air dry
in a clean place and store the iSi Whipper in a
dismantled condition. Never store the whipper
with the head screwed on!
Troubleshooting.
Release the pressure
Place the whipper upright, place a towel over
the decorator tip and gently operate the lever
until the pressure is gone from the iSi Whipper.
Now the head can be removed from the bottle.
If the pressure will not release, please contact
iSi or your service center.
I cannot remove the content and/or the iSi
Whipper sprays.
1. There is a blockage due to undissolved ingre-
dients such as sugar:
——— „Release the pressure“ and then carry
out „Cleaning“.
——— Make sure that powdered ingredients
are dissolved completely.
2. The cream or cream-filled preparation has
become too stiff:
——— Next time decrease the intensity and
frequency of the shaking cycles.
——— For information on the f requency of the
shaking cycles, refer to www.isi.com/
home-edition/whippedcream.
3. Content is too firm due to over-cooling:
——— Leave the whipper to stand at room
temperature for around 5-10 minutes.
——— Avoid freezing the content.
4. No pressure/not enough pressure in the device:
——— Only use original iSi cream chargers.
——— Do not reuse empty chargers. They
should be recycled immediately.
——— Only operate the whipper „headfirst“
with a vertical decorator tip because
otherwise there could be a loss of
pressure.

5. Too many chargers were used:
——— Pay attention to the ma ximum number
of chargers to be used indicated in the
Whipper Data.
——— „Release the pressure“ and then set-up
again.
The content being dispensed is too runny.
1. The whipper was overfilled:
——— „Release the pressure“, pour out the ex-
cess liquid and then set-up the whipper
again.
——— Obser ve the maximum filling amounts.
2. The Whipper was not shaken or not shaken
enough:
——— For information on the f requency of the
shaking cycles, refer to www.isi.com/
home-edition/whippedcream.
3. The content is not cold enough:
——— Place a filled and prepared iSi whipper in
the refrigerator for at least 1-2 hours.
4. An unsuitable charger was used:
——— Only use original iSi cream chargers.
The cream charger will not puncture.
1. The charger being used is not suitable:
——— Only use original iSi cream chargers.
2. The charger was inserted backwards:
——— Insert the charger correctly
(see diagram: Instructions for Use).
3. The puncturing unit has been damaged:
——— Send the whipper to iSi or to a
service center.
During operation , gas is leaking through the
dispensing piston or adapter.
1. The device was used without the adapter:
——— Before screwing on the charger, make
sure that the adapter is attached
to the dispensing piston.
——— „Release the pressure“ and then set-up
the whipper again.
2. The dispensing piston seal has been damaged:
——— The dispensing piston needs to be
replaced and is available as an original
iSi spare part.
EN
During operation , gas is leaking between the
bottle and the head.
1. The head gasket is missing:
——— „Release the pressure“ and insert the
head gasket into the head.
2. The head gasket has been damaged:
——— „Release the pressure.“ The head gasket
needs to be replaced and is available as
an original iSi spare par t.
3. The head was not tightened securely:
——— „Release the pressure“
——— Tighten the head on to the bottle by
hand as per the instructions.
4. The bottle has been damaged on the upper
edge:
——— „Release the pressure“ and send the
whipper to iSi or a ser vice center.
Service.
Replacement parts are available individually
and at an affordable price.
See your specialist dealer for the availability
of replacement par ts. In Austria, you can also
get in contact via info@isi.com. In the US contact isinorthamerica@isi.com
Only send in the complete whipper for repairs.
Replacement parts can be seen in greater
detail on the expanded drawing.
12 13

DE
Vielen Dank,
dass Sie sich für
ein iSi Gerät
entschieden haben.
Bitte lesen Sie sich die
Gebrauchsanleitung vor
der ersten Inbetriebnahme
sorgfältig durch.
DE
Die Welt von iSi
entdecken:
Besuchen Sie die iSi Website und
erfahren Sie mehr über unser viel-
fältiges Angebot: Unsere umfangreiche
Rezeptsammlung von einfach gut bis
kreativ raffiniert eröffnet Ihnen die
ganze kulinarische Vielfalt von iSi.
Lassen Sie sich inspirieren!
Sie wollen sich direkt an einen Koch-
profi wenden? Kein Problem! Auf dem
iSi Blog beantwortet unser Chefkoch
gerne Ihre Fragen. Außerdem erhalten
Sie laufend neue interessante Informati-
onen rund um iSi. Schauen Sie rein!
Die iSi Website versorgt Sie zudem mit
detaillierten Produktinformationen zu
allen iSi Geräten & Accessoires.
Die ausführliche Onlinegebrauchs-
anleitung liefert Ihnen im Detail alle
Informationen zu Inbetriebnahme,
Reinigung und Fehlerbehebung
der iSi Geräte.
www.isi.com/kulinarik
Bei Fragen wenden Sie sich an
info@isi.com
Für Deutschland: isideutschland@isi.com
14 15
Garantierte Qualität:
Jedes iSi Gerät wird eingehend überprüft, bevor
es das Werk verlässt. iSi übernimmt 2 Jahre
Garantie auf Material und Verarbeitung, sofern
nicht durch unsachgemäßen Gebrauch Mängel
entstanden sind. Die Garantie gilt ab dem Datum
des Kaufbeleges.
Registrieren Sie sich jetzt online und wir
erweitern Ihre Garantie!
Für registrierte Kunden verlängert iSi die
Garantie: 3 Jahre Garantie auf Material und
Verarbeitung.
Die Garantie gilt nur bei Verwendung von
original Geräteteilen von iSi, entsprechend der
Liste der Produktbestandteile. Für die einwandfreie Funktion des Gerätes können wir
nur garantieren, wenn zudem ausschließlich iSi
Kapseln verwendet werden. Für Fehler, Schäden und Folgeschäden, die insbesondere durch
Nichtbeachtung und/oder das Nichtlesen der
Gebrauchsanweisung und deren Sicherheitshinweise entstehen, besteht weder Garantie- noch
Haftungsanspruch.
Gerätedaten.
Max. Betriebsdruck PS 20 bar
Minimale
Betriebstemperatur
Maximale
Betriebstemperatur
Max. Füllvolumen
Max. Anzahl zu verwendender Kapseln
Anwendung Für die gewerbliche
1 °C
30 °C
0,25 L
0,5 L
1 iSi Sahnekapsel
Anwendung nicht
zugelassen. Für
frische pure Sahne
& Desserts. Nur für
kalte Anwendungen.
Materialliste.
Bezeichnung Material
Flasche Edelstahl
Gerätekopf PBT, POM, Silikon,
Kopfdichtung TPE
Garniertülle Adapter: PA
Kapselhalter PA, Silikon
Entnahmekolben PA, Silikon , Edelstahl
Silikon-Mantel Silikon
Reiningungsbürste Edelstahl, PA
Messing vernickelt,
PU, Edelstahl
Tülle: PP
DE
Einfach anmelden &
Vorteile sichern:
www.isi.com/garantie
16 17
Technische Daten können ohne vorherige
Ankündigung geändert werden.

Sicherheitshinweise.
Die Nichtbeachtung der Sicherheitshinweise
bzw. jeglicher Empfehlungen für die Handhabung und die Wartung der iSi Produkte kann
zu einer Fehlfunktion des Systems sowie Verletzungen und / oder Sachschäden führen.
——— Das iSi Gerät ist ausschließlich für die An-
wendung gemäß Gerätedaten zugelassen!
——— Gebrauchsanleitung zur Vermeidung von
Bedienungsfehlern sorgfältig lesen und
aufbewahren!
——— Niemals Gewalt anwenden!
——— iSi Gerät für Kinder unerreichbar
aufbewahren!
——— Ausschließlich befülltes Gerät in Betrieb
nehmen!
——— iSi Gerät niemals außerhalb der min. und
max. Betriebstemperatur lagern bzw.
verwenden!
——— Ausschließlich Gerätekopf und Flasche
desselben Gerätetyps kombinieren!
——— Fremdfabrikate niemals mit iSi Teilen
kombinieren!
——— Gerätekopf und Kapselhalter niemals
schief aufschrauben!
——— Nur original iSi Sahnekapseln verwenden!
——— Beim Einschrauben der Kapsel nicht über
das Gerät beugen!
——— Das Gerät ist ein Druckbehälter! Sturz oder
Beschädigung (wie z. B. Risse oder Ver for-
mungen) machen es zur Gefahrenquelle und
es darf nicht mehr in Betrieb genommen
werden! Das Gerät von der iSi Servicestelle
überprüfen lassen!
——— Gerätekopf von einem unter Druck stehen-
den Gerät niemals abschrauben!
DE
——— Hebel niemals als Tragegriff verwenden!
——— Eine ordnungsgemäße Reinigung ist
zwingend erforderlich, um eine Verstopfung und Undichtheiten des Gerätes
zu vermeiden! Prüfen Sie vor jeder
Anwendung, ob das iSi Gerät ordnungsgemäß gereinigt wurde!
——— Zerlegen des iSi Gerätes nur gemäß der
Illustration zur Reinigung!
——— Handreinigung ausschließlich mit lau-
warmem Wasser und haushaltsüblichem
Handgeschirrspülmittel! Das iSi Gerät ist
nicht spülmaschinengeeignet! Die nicht
zugelassene Reinigung des Gerätekopfes
im Geschirrspüler kann den Kunststoffkopf und den Kapselhalter schädigen –
dadurch wird die Sicherheit des Gerätes
beeinträchtigt!
——— Keine Veränderungen am iSi Gerät durch-
führen. Dies führt zum Erlöschen der
Garantie und hat den Haftungsausschluss
zur Folge!
——— Verwenden Sie niemals mehr Kapseln als
angegeben bzw. überfüllen Sie niemals das
Gerät! Dies stellt sicher, dass der maximal
angegebene Betriebsdruck nicht überschritten wird!
——— Lässt sich der Druck nicht abbauen ,
nehmen Sie bitte mit iSi oder Ihrer
Servicestelle Kontakt auf!
HINWEIS: Vor erstmaligem Gebrauch des iSi
Gerätes Reinigung wie in der Illustration zur
Reinigung angegeben durchführen.
HINWEIS: Um Klümpchenbildung zu vermeiden,
pulvrige Zutaten, Zucker etc. vor dem Befüllen
in etwas Flüssig keit vollständig auflösen.
Keine Zutaten mit Fruchtfleisch oder Kernen
verwenden!
HINWEIS: Der Silikon-Mantel dient zur Dekoration. Das iSi Gerät kann auch ohne diesen
einwandf rei in Betrieb genommen werden.
18 19

Gebrauchsanleitung.
Sahne/sahnebasierende Desserts kühl einfüllen.
Sahne/sahnebasierende Desserts möglichst
kurz vor dem Verzehr dem Gerät entnehmen.
Vorbereitung
1. Überprüfen, ob die Kopfdichtung in den
Gerätekopf eingelegt ist.
2. Entnahmekolben in den Gerätekopf ein setzen.
3. Den Adapter auf den Entnahmekolben,
nicht zu fest, nur leicht bis auf Anschlag
aufschrauben und die Garniertülle auf den
Adapter schrauben.
4. Flasche mit der Zubereitung befüllen.
HINWEIS: Äußere Fülllinie und Kennzeich-
nung am Flaschenboden beachten. Nicht
überfüllen! Der verbleibende Leerraum ist für
ein optimales Aufschlagergebnis erforderlich. Verwenden Sie einen Messbecher!
5. Wenn gewünscht, den Silikon-Mantel vorsichtig von oben über die Flasche ziehen.
Inbetriebnahme
6. Den Gerätekopf gerade und handfest auf
die Flasche aufschrauben.
7. Original iSi Sahnekapsel lagerichtig in den
Kapselhalter einlegen.
HINWEIS: Niemals die Kapsel einschrauben,
wenn kein Adapter auf dem Entnahmekolben
aufgeschraubt ist.
8. Kapselhalter mit eingelegter Kapsel auf den
Gerätekopf aufschrauben, bis der gesamte
Kapselinhalt hörbar eingeströmt ist.
ACHTUNG: Gerät steht nun unter Druck!
9. Gerät > 5 kräftig schütteln.
10. Kapselhalter abschrauben und leere Kapsel
der Wiederverwertung zuführen.
HINWEIS: Leises Zischen beim Abschrauben
des Kapselhalters ist systembedingt.
DE
11. Abdeckkappe in das Gewinde schrauben.
Bedienung
12. Zur Entnahme muss das Gerät „kopfüber“
gehalten (Garniertülle senkrecht!) und der
Hebel gefühlvoll betätigt werden.
HINWEIS: Die erste Entnahme zum Testen
der Konsistenz verwenden. Sollte die Konsistenz noch zu flüssig sein, das Gerät nochmals schütteln.
Reinigung.
HINWEIS: Beachten Sie die Illustration zur
Reinigung!
1. Betätigen des Hebels bis das Gerät vollständig entleer t und druckentlastet ist.
Gerätekopf von der Flasche abschrauben.
2. Den Adapter vom Entnahmekolben abschrauben und die Garniertülle vom Adapter
abschrauben.
3. Wenn der Silikon-Mantel verwendet wurde,
diesen von der iSi Flasche nach oben hin
abziehen und mit haushaltsüblichen Hand—
geschirrspülmitteln von Hand spülen.
4. Zur Grundreinigung die Kopfdichtung
entnehmen.
5. Produktbestandteile mit warmem (max.
50°C) Trinkwasser und haushaltsüblichem
Handgeschirrspülmittel von Hand spülen
und mit der Reinigungsbürste Entnahmekolben und Garniertülle reinigen. Fett und
Eiweißreste vollständig entfernen!
HINWEIS: Keinesfalls Scheuermittel oder
kratzende Schwämme/Bürsten verwenden.
HINWEIS: Nicht im Geschirrspüler reinigen
und nicht auskochen!
HINWEIS: Die Garniertülle kann jederzeit zur
notwendigen Zwischenreinigung vom Adapter
abgeschraubt werden.
20 21

Aufbewahrung.
Sofern iSi Gerät nicht sofort wieder befüllt wird,
Bestandteile an einem sauberen Ort an der Luft
trocknen lassen und iSi Gerät in demontiertem
Zustand aufbewahren.
Fehlerbehebung.
Druck ablassen
Das Gerät aufrecht hinstellen, ein Tuch über
die Garniertülle halten und den Hebel so lange
gefühlvoll betätigen, bis sich kein Druck mehr
im iSi Gerät befindet. Erst dann den Gerätekopf
von der Flasche abschrauben.
Lässt sich der Druck nicht abbauen, nehmen Sie
bitte mit iSi oder Ihrer Ser vicestelle Kontakt auf.
Inhalt kann nicht entnommen werden
bzw. iSi Gerät spritzt
1. Verstopfung durch unaufgelöste Zutaten,
wie Zucker
——— „Druck ablassen“ und anschließend
„Reinigung“ durchführen.
——— Sicherstellen, dass pulvrige Zutaten
vollständig aufgelöst sind.
2. Zu steif gewordene Sahne oder sahnehaltige
Zubereitung
——— Intensität und Häufigkeit der Schüttel-
zyklen bei nächster Inbetriebnahme
verringern.
——— Informationen zur Schüttelhäufigkeit
beachten www.isi.com/haushalt/sahne
3. Inhalt ist zu fest durch zu starke Kühlung
——— Gerät bei Zimmertemperatur etwa
5-10 Minuten stehen lassen.
——— Gefrieren des Inhalts vermeiden.
4. Kein Druck/zu wenig Druck im Gerät
——— Nur original iSi Sahnekapseln verwenden.
——— Leere Kapseln nicht wieder verwenden
und sofort der Wiederverwertung zuführen.
——— Gerät ausschließlich „kopfüber“ mit
senkrechter Garniertülle betätigen,
da es sonst zu Druckverlust kommt.
22 23
DE
5. Es wurden zu viele Kapseln verwendet
——— Anzahl der max. zu verwendeten
Kapseln in den Gerätedaten beachten.
——— „Druck ablassen“ und Gerät erneut in
Betrieb nehmen.
Entnommener Inhalt ist zu flüssig
1. Das Gerät wurde überfüllt
——— „Druck ablassen“, überschüssigen
Inhalt ausgießen und Gerät erneut
in Betrieb nehmen.
——— Maximale Füllmenge beachten.
2. Das Gerät wurde zu wenig oder gar nicht
geschüttelt
——— Informationen zur Schüttelhäufigkeit
beachten www.isi.com/haushalt/sahne
3. Der Inhalt ist nicht kalt genug
——— Befülltes und betriebsbereites iSi Gerät
für 1-2 Stunden in den Kühlschrank geben.
4. Es wurde eine nicht geeignete Kapsel
verwendet
——— Nur original iSi Sahnekapseln verwenden.
Sahnekapsel wird nicht aufgestochen
1. Verwendete Kapsel ist nicht geeignet
——— Nur original iSi Sahnekapseln verwenden.
2. Kapsel wurde verkehrt eingelegt
——— Kapsel richtig einlegen (siehe Abbildung:
Gebrauchsanleitung).
3. Aufstecheinheit wurde beschädigt
——— Gerät an iSi oder Servicestelle einsenden.
Bei Inbetriebnahme entweicht Gas durch den
Entnahmekolben oder den Adapter
1. Gerät wurde ohne aufgeschraubten Adapter
in Betrieb genommen
——— Vor dem Einschrauben der Kapsel
sicher stellen, dass der Adapter auf dem
Entnahmekolben aufgeschraubt ist.
——— „Druck ablassen“ und das Gerät wieder
in Betrieb nehmen.
2. Dichtung am Entnahmekolben wurde
beschädigt
——— Der Entnahmekolben muss ersetzt
werden und ist als original iSi Ersatz teil
erhältlich.

Bei Inbetriebnahme entweicht Gas zwischen
Flasche und Kopf
1. Kopfdichtung fehlt
——— „Druck ablassen“, Kopfdichtung in den
Kopf einlegen.
2. Kopfdichtung wurde beschädigt
——— „Druck ablassen“. Die Kopfdichtung
muss ersetzt werden und ist als original
iSi Ersatzteil erhältlich.
3. Kopf wurde nicht fest genug aufgeschraubt
——— „Druck ablassen“.
——— Kopf gemäß Gebrauchsanleitung auf
Flasche handfest aufschrauben.
4. Flaschenkörper wurde am oberen Rand
beschädigt
——— „Druck ablassen“, Gerät an iSi oder
Servicestelle einsenden.
Service.
Ersatzteile sind einzeln und kostengünstig
erhältlich.
Für Ersatzteilbestellungen wenden Sie sich
an Ihren Fachhändler. In Österreich auch unter
info@isi.com möglich.
Zur Reparatur nur komplettes Gerät einsenden.
DE
24 25

FR
Merci d‘avoir
fait le choix
d‘un siphon iSi.
Veuillez lire avec attention
la notice d’utilisation avant
la première mise en service.
FR
Découvrir
le monde d‘iSi:
Consultez notre site Internet et décou-
vrez la variété et la globalité de notre
offre: notre recueil de recettes, de tous
niveaux de difficulté et de goût, vous
ouvre en grand les portes de toute la
diversité culinaire d‘iSi. Laissez mainte-
nant libre cours à votre inspiration!
Voulez-vous consulter directement un
professionnel de la cuisine? Aucun pro-
blème! Notre chef cuisinier répondra
avec plaisir à vos questions sur le blog iSi.
Vous aurez par ailleurs en permanence
des informations intressantes sur le
monde d‘iSi. Venez nous rendre visite!
Le site Internet iSi vous apporte en outre
des informations produit détaillées sur
tous les siphons et accessoires iSi.
La notice d’utilisation disponible en
ligne, vous fournit des informations dé-
taillées relatives à la mise en service, au
nettoyage et à l‘élimination des erreurs
sur les siphons iSi.
www.isi.com/culinary/fr
Pour toute question, contactez
info@isi.com
26 27

Qualité garantie:
Chaque siphon iSi fait l’objet d’une vérification
approfondie avant de quitter l’usine. iSi assure
une garantie de 2 ans pour les défauts imputables
à des vices de fabrication ou à des défauts de
matériel dans la mesure où le produit a été utilisé dans des conditions normales. La garantie
prend effet à compter de la date du bon d’achat.
Enregistrez-vous en ligne et nous étendrons
notre garantie!
Bénéficiez des avantages: 3 années de garantie
pour les défauts imputables à des vices de
fabrication.
La garantie ne s’applique qu’en cas d’utilisation
de pièces originales iSi conformes à la liste des
composants. Nous ne pouvons garantir le parfait
fonctionnement du siphon qu’avec l’utilisation
exclusive de capsules iSi. iSi n’accorde aucune
garantie et se dégage toute responsabilité pour
les erreurs, dégâts et dommages consécutifs,
tout particulièrement en cas de non-respect et/
ou de non-lecture de la notice d’utilisation et
des instructions de sécurité.
Simplement s‘enregistrer et
bénéficier des avantages de prolonga-
tion de garantie:
www.isi.com/garantie/fr
Caractéristiques du siphon.
Pression de service
PS max.
Température de
service min.
Température de
service max.
Contenance max.
Nombre max. de
capsules à utiliser.
Utilisation Homologué pour
20 bar / 290 psig
1 °C / 34°F
30 °C / 86°F
0,25 L
0,5 L
1 capsule iSi à crème
chantilly
une utilisation
domestique.
Pour crème chantilly
& desser ts.
Uniquement pour
préparations froides
Liste des matériaux utilisés.
Désignation Matériau
Bouteille Acier inox
Tête PBT, POM, silicone,
Joint de tête
Douille de garniture Adaptateur: PA
Porte-capsule PA, silicone
Piston de distribution PA, silicone, acier inox
Protection en silicone Silicone
Brosse de nettoyage Acier inox, PA
Les informations techniques peuvent être
modifier sans préavis.
laiton nickelé, PU,
acier inox
TPE
Douille: PP
FR
28 29

Instructions de
sécurité.
Le non-respect des instructions de sécurité
ou des recommandations relatives à la manipulation et à l'entretien des produits iSi peut
entraîner un dysfonctionnement du système
ainsi que des dommages aux personnes ou
aux biens.
——— Le siphon iSi est exclusivement homologué
pour une utilisation domestique conforme
aux caractéristiques de l‘appareil!
——— Ne remplir qu’avec des ingrédients liquides
selon les caractéristiques du siphon. Porter
attention à la marque de remplissage sur la
bouteille iSi.
——— Afin d‘éviter toute er reur d‘utilisation,
lire attentivement et conserver la notice
d‘utilisation!
——— Ne jamais forcer pour exécuter les opéra-
tions décrites!
——— Tenir le siphon iSi hors de portée des enfants!
——— N‘utiliser le siphon que lorsqu‘il est rempli!
——— Ne jamais utiliser le siphon iSi en dehors
des plages de température de ser vice min.
et max. (tableau «Caracté risti que du
siphon»)! En cas de dépassement de la
température maximale, le siphon doit être
refroidi. Pour une température inférieure
à la température minimal(e) le siphon doit
être laissé à température ambiante avant
utilisation.
——— Ne combiner des têtes et des bouteilles que
du même type du siphon!
——— Ne jamais combiner d‘autres marques avec
des composants iSi!
FR
——— Ne jamais visser la tête et le porte-capsule
en biais!
——— N‘utiliser que des capsules iSi à crème
chantilly d‘origine!
——— Ne jamais se pencher au-dessus du siphon
pendant le vissage de la capsule!
——— Le siphon est un conteneur sous pression!
S‘il tombe au sol ou s‘il est endommagé
(p.ex. fissures ou déformations), il représente une source de danger potentielle et
ne doit plus être réutilisé! Faire contrôler
le siphon par le service après-vente iSi!
——— Ne jamais dévisser la tête d‘un siphon
sous pression!
——— Ne jamais se servir du levier comme poignée!
——— Un nettoyage correct est absolument indis-
pensable afin d‘éviter une obstruction et
préserver l'étanchéité de l‘appareil. Avant
chaque utilisation, vérifier si le siphon iSi
a été correctement nettoyé et n’est pas
bouché!
——— Ne démonter le siphon iSi que selon
les illustrations «Mode d’utilisation»
et «Nettoyage» !
——— Le nettoyage manuel doit exclusivement
être réalisé avec de l‘eau tiède et de la
liquide à vaisselle maison. Le siphon iSi n‘est
pas lavable au lave-vaisselle! Le nettoyage
non autorisé de la tête au lave-vaisselle
peut endommager la tête plastifiée et le
porte-capsule! La sécurité du siphon s'en
trouve ainsi altérée!
——— Ne procéder à aucune modification sur le
siphon iSi. Ceci annule la garantie et exclut
toute responsabilité du fabricant! Rem-
placer uniquement les pièces du siphon
comme indiqué dans l’illustration «Vue
éclatée». Se reporter aux illustrations
«Notice d’utilisation» et «Nettoyage»
de cette notice d’utilisation!
——— Ne jamais utiliser plus de capsules qu‘indi-
qué et ne dépassez pas la contenance
indiquée pour le siphon! Cela permet de
garantir que la pression de service maxi-
male indiquée ne sera pas dépassée!
30 31

——— Pour laisser s’échapper la pression :
Déposer l’appareil en position debout, tenir
un chiffon sur la douille de garni ture, et
appuyer délicatement sur le levier jusqu’à
ce qu’il ne se trouve plus de pression dans
le siphon iSi. Ne dévisser la tête du siphon
qu’à ce moment. S’il est impossible de
mettre la bouteille hors pression, prenez
contact avec iSi ou avec votre service
après-vente!
REMARQUE: Avant la première utilisation du
siphon iSi effectuer le nettoyage minutieux
tel qu‘indiqué sur l‘illustration.
REMARQUE: Afin d‘éviter la constitution de
grumeaux, mélanger poudres et sucre avec
un peu de liquide avant de procéder au remplissage. Ne pas utiliser d‘ingrédients avec
pulpe de f ruit ou noyaux!
REMARQUE: La protection en silicone est
décorative. Le siphon iSi peut être utilisé sans
restriction sans cette protection.
Notice d'utilisation
Remplir la crème chantilly/les desserts à base
de crème chantilly lorsqu'ils sont f roids.
Sortir la crème chantilly/les desserts à base
de crème chantilly si possible juste avant leur
dégustation.
Préparation
1. Vérifier si le joint de tête est bien en place
dans la tête.
2. Placer le piston de distribution dans la tête.
3. Visser l'adaptateur sur le piston de distri-
bution, sans forcer, jusqu'à butée et visser
la douille de garniture sur l'adaptateur.
4. Remplir la bouteille avec la préparation.
FR
5. Si désiré, enfiler avec précaution la protection
en silicone contre la chaleur par-dessus la
bouteille.
Mise en service
6. Visser la tête fermement et bien droite sur
le corps de bouteille.
7. Introduire la capsule iSi à crème chantilly
originale dans le porte-capsule.
REMARQUE: Ne jamais visser la capsule si
aucun adaptateur n'est vissé sur le piston de
distribution.
8. Visser le por te-capsule contenant la capsule
sur la tête jusqu'à ce que le bruit du flux de la
totalité du gaz de la capsule soit audible.
ATTENTION: Le siphon est maintenant
sous pression!
9. Agiter vigoureusement le siphon à > 5 reprises.
10. Dévisser le porte-capsule et éliminer la cap-
sule par la voie du recyclage.
REMARQUE: Il est normal d'entendre un léger
sifflement lors du dévissage du porte-capsule.
11. Visser le capuchon sur le pas de vis.
Utilisation
12. Pour sortir la préparation, le siphon doit être
«la tête en bas» (douille de garniture verticale!) et le levier actionné avec précaution.
REMARQUE: Utiliser le début de la préparation
pour effectuer un test de consistance. Si la
consistance est encore trop liquide, secouer
une nouvelle fois le siphon.
REMARQUE: Respecter la marque extérieure
de niveau de remplissage et l'identification figurant sur le fond de la bouteille. Ne dépassez pas
le marquage! L'espace restant est nécessaire
pour obtenir un résultat optimal avec la crème.
Utiliser un verre gradué!
32 33

Nettoyage
REMARQUE: Tenir compte de l'illustration
relative au nettoyage!
1. Actionner le levier jusqu'à ce que le siphon
soit entièrement vide et hors pression.
Dévisser la tête de la bouteille.
2. Dévisser l'adaptateur du piston de distribution et dévisser la douille de garniture
de l'adaptateur.
3. Si la protection en silicone est utilisée, la
retirer de la bouteille iSi par le haut et laver
manuellement avec une liquide à vaiselle
maison.
4. Pour effectuer le nettoyage minutieux,
retirer le joint de tête.
5. Pré-rincer les composants à l'eau chaude
potable (ma x. 50 °C), puis nettoyer à la main
le piston de distribution et la douille de garniture avec une liquide à vaiselle maison et
une brosse. Retirer complètement les restes
de graisse et de blanc d'œuf!
REMARQUE: Ne jamais utiliser de produits
abrasifs ou des éponges/brosses abrasives.
REMARQUE: Ne pas laver au lave-vaisselle et
ne pas faire bouillir!
REMARQUE: La douille de garniture peut être
dévissée à tout moment de l'adaptateur pour
un nécessaire nettoyage intermédiaire.
Conservation
Si le siphon iSi n'est pas immédiatement rempli
une nouvelle fois, laisser sécher les composants
à l'air dans un endroit propre et ranger le siphon
iSi à l'état démonté.
34 35
FR
Élimination des
dysfonctionnements
Évacuer la pression:
Placer l'appareil en position verticale, maintenir
un torchon sur la douille de garniture et actionner le levier avec précaution jusqu'à ce que la
pression soit nulle dans le siphon iSi. Ne dévisser
la tête que lorsque la bouteille est entièrement
hors pression.
S'il est impossible de mettre la bouteille hors
pression, prenez contact avec iSi ou avec votre
service après-vente.
Le contenu ne sort pas ou gicle hors du
siphon iSi
1. Obstruction par des ingrédients non dissous,
tels que le sucre
——— «Évacuer la pression» et exécuter ensuite
un «Nettoyage».
——— S'assurer que les produits pulvérulents
sont entièrement dissous.
2. Crème Chantilly ou préparation crémeuse
trop ferme
——— Réduire l'intensité et la fréquence des
cycles de secousses lors de la prochaine
utilisation
——— Tenir compte des informations relatives
aux cycles de secousses www.isi.com/
usage-domestique/cremechantilly
3. Le contenu est trop ferme en raison d'un
refroidissement trop intense
——— Laisser reposer le siphon à température
ambiante pendant env. 5-10 minutes.
——— Éviter la congélation du contenu.
4. Absence de pression ou pression trop faible
dans le siphon
——— N'utiliser que des capsules iSi à crème
chantilly d'origine.
——— Ne pas réutiliser les capsules vides et les
éliminer immédiatement par la voie du
recyclage
——— Pour éviter les pertes de pression, ne se
servir de l'appareil que «tête en bas»,
avec la douille de garniture en position
verticale.

5. Un trop grand nombre de capsules a été
utilisé
——— Respecter le nombre ma x. de capsules
figurant dans les caractéristiques de
l'appareil.
——— «Évacuer la pression» et procéder à une
remise en service du siphon.
Le contenu est trop liquide à la sortie
1. Le siphon a été trop rempli
——— «Évacuer la pression», vider le contenu
excédentaire et procéder à une remise
en service du siphon
——— Respectez la contenance maximale.
2. Le siphon a été trop peu ou pas du tout agité
——— Tenir compte des informations relatives
aux cycles de secousses www.isi.com/
usage-domestique/cremechantilly
3. Le contenu n'est pas assez froid
——— Placer le siphon iSi rempli et prêt à l'em-
ploi pour 1 à 2 heures au réfrigérateur.
4. Une capsule non adaptée a été utilisée
——— N'utiliser que des capsules iSi à crème
chantilly d'origine.
La capsule crème chantilly n'est pas perforée
1. La capsule utilisée n'est pas adaptée
——— N'utiliser que des capsules iSi à crème
chantilly d'origine.
2. La capsule a été insérée à l'envers
——— Positionner la capsule cor rectement
(voir illustration: Notice d'utilisation).
3. L'unité de perçage est endommagée
——— Envoyer le siphon à iSi ou au service de
maintenance.
FR
Lors de la mise en service, du gaz s'échappe par
le piston de distribution ou par adaptateur
1. Le siphon a été mis en service sans l'adapta-
teur vissé
——— Avant de visser la capsule, s'assurer que
l'adaptateur est bien vissé sur le piston
de distribution.
——— «Évacuer la pression» et procéder à une
remise en service du siphon.
2. Le joint dans le piston de distribution a été
endommagé
——— Le piston de distribution doit être rem-
placé. Il est disponible en tant que pièce
de rechange originale iSi.
Lors de la mise en service, du gaz s'échappe
entre la bouteille et la tête
1. Absence de joint de tête
——— «Évacuer la pression» et placer un joint
de tête dans la tête.
2. Le joint de tête a été endommagé
——— «Évacuer la pression». Le joint de tête
doit être remplacé. Il est disponible en
tant que pièce de rechange originale iSi.
3. La tête n'a pas été suffisamment vissée
——— «Évacuer la pression»
——— Visser la tête sur la bouteille conformé-
ment à la notice d'utilisation .
4. Le bord supérieur du corps de bouteille est
endommagé
——— «Évacuer la pression» et envoyer le
siphon à iSi ou au service après-vente.
Maintenance
Les pièces de rechange sont disponibles à l'unité
et peu onéreuses.
Pour les commandes de pièces de rechange,
prenez contact avec votre revendeur. Possible
également en Autriche sur info@isi.com.
En cas de réparation, envoyer le siphon complet.
36 37

IT
Grazie per
aver scelto
un sifone iSi.
Leggere attentamente
le istruzioni per l‘uso prima
di procedere alla prima
messa in funzione.
IT
Alla scoperta
del mondo di iSi:
Sul sito Web di iSi troverete maggiori
informazioni sulla nostra variegata
offerta: la nostra raccolta completa di
ricette, dalle più semplici alle
più creative e raffinate, vi rivelerà tutta
la varietà gastronomica di iSi.
Lasciatevi ispirare!
Desiderate contattare direttamente un
esperto di cucina? Nessun problema!
Il nostro chef sarà lieto di rispondere
alle vostre domande sull‘iSi Blog.
Inoltre, riceverete continuamente
nuove e interessanti informazioni
su tutto ciò che riguarda iSi.
Venite a dare un‘occhiata!
Sul sito Web di iSi troverete inoltre
informazioni dettagliate su tutti i sifoni
e gli accessori iSi.
Le istruzioni per l‘uso complete
disponibili online descrivono in detta-
glio la messa in funzione, la pulizia e la
risoluzione dei problemi dei sifoni iSi.
www.isi.com/culinary
In caso di domande, inviare una e-mail
all’indirizzo info@isi.com
38 39

Qualità garantita:
Ogni sifone iSi viene controllato minuziosamente in fabbrica. iSi offre una garanzia di 2 anni sui
materiali e sulla lavorazione, purché non siano
insor ti difetti dovuti a uso improprio. La validità
della garanzia decorre dalla data della ricevuta
d‘acquisto.
Registratevi ora e otterrete l‘estensione
della garanzia!
I vantaggi di cui godrete: 3 anni di garan zia sul
materiale e sulla lavorazione.
La garanzia è valida solo se si utilizzano componenti originali per sifoni iSi secondo l‘elenco
dei componenti del prodotto. Si garantisce un
funzionamento regolare del sifone solo se, inoltre, vengono utilizzate esclusivamente capsule
iSi. Non sussiste alcun diritto di garanzia o di responsabilità per difetti, danni diretti e indiretti
causati in particolare dal mancato rispetto e/o
dalla mancata lettura delle istruzioni per l‘uso
e delle relative avvertenze di sicurezza.
Per avere questi vantaggi basta regi-
strarsi su:
www.isi.com/warranty
40 41
Dati sifone.
Pressione di
funzionamento
max. PS
Temperatura di
funzionamento min.
Temperatura di
funzionamento max.
Capacità ma x.
Numero max. di
capsule da utilizzare
Uso Non omologato per
20 bar
1 °C
30 °C
0,25L
0,5L
1 capsula iSi per
panna montata
l‘uso professionale.
Per panna montata
fresca e dessert.
Solo per preparazioni
fredde.
Elenco dei materiali.
Denominazione Materiale
Bottiglia Acciaio
Tes ta PBT, POM, silicone,
Guarnizione testa
Beccuccio per
guarnire
Portacapsule PA, silicone
Pistoncino di dosaggio PA, silicone, acciaio
Rivestimento in
silicone
Spazzole per pulizie Acciaio, PA
Dati tecnici sono soggette a modifiche
senza preavviso.
ottone nichelato,
PU, acciaio
TPE
Adattatore: PA
Beccuccio: PP
Silicone
IT

Avvertenze di
sicurezza.
La mancata osservanza delle avvertenze di
sicurezza o di qualunque raccomandazione
relativa all'utilizzo e alla manutenzione dei
prodotti iSi può comportare il malfunzionamento del sistema nonché danni materiali
e/o corporali!
——— Il sifone iSi è omologato esclusivamente
per l‘uso conforme ai dati del sifone!
——— Leggere attentamente e conservare le
presenti istruzioni d‘uso per evitare errori
di utilizzo!
——— Non esercitare una forza eccessiva!
——— Conservare il sifone iSi lontano dalla portata
dei bambini!
——— Mettere in fun zione il sifone solo dopo
averlo riempito!
——— Mai conservare né utilizzare il sifone iSi al
di fuori della temperatura di funzionamento
min. e max.!
——— Combinare esclusivamente testa e botti-
glia dello stesso modello di sifone!
——— Mai utilizzare prodotti di terzi con i
componenti iSi!
——— Mai avvitare la testa e il portacapsule in
posizione inclinata!
——— Utilizzare solo capsule iSi originali per
panna montata!
——— Non fare forza sul sifone quando si avvita
la capsula!
——— Il sifone è sotto pressione! Eventuali cadute
o danni (ad es. crepe o deformazioni) lo
rendono una fonte di pericolo, pertanto
non deve essere riutilizzato! Far controllare
il sifone dal centro di assistenza iSi!
IT
——— Mai svitare la testa da un sifone sotto
pressione!
——— Mai utilizzare la leva come impugnatura
di traspor to!
——— È assolutamente necessario provvedere
alla cor retta pulizia del sifone per evitare
che si intasi o perda di tenuta! Prima di
utilizzarlo, controllare che il sifone iSi sia
stato pulito correttamente!
——— Smontare il sifone iSi esclusivamente
seguendo l‘illustrazione al paragrafo
„Pulizia“!
——— Eseguire la pulizia manuale utilizzan-
do esclusivamente acqua tiepida e un
comune detersivo per piatti! Il sifone iSi
non è lavabile in lavastoviglie! Il lavaggio
della testa del sifone non è consentito in
lavastoviglie poiché potrebbe danneggiare la testa in plastica e il portacapsule
e compromettere quindi la sicurezza del
sifone stesso!
——— Non appor tare modifiche al sifone iSi! Ne
conseguirà l‘annullamento della garanzia
e l‘esclusione di responsabilità!
——— Mai utilizzare più capsule di quelle indicate
né riempire eccessivamente il sifone! Così
facendo si garantisce che la pressione
di funzionamento massima non venga
superata!
——— Se risulta impossibile scaricare la pres-
sione, contattare iSi o il proprio centro di
assistenza!
NOTA: Prima di usare il sifone iSi per la prima
volta, procedere alla pulizia approfondita come
indicato nell‘illustrazione al paragrafo „Pulizia“.
NOTA: Per evitare la formazione di grumi,
sciogliere completamente gli ingredienti in
polvere, lo zucchero ecc. in un po‘ di liquido
prima di riempire il sifone. Non utilizzare
ingredienti contenenti polpa di frutta o semi!
NOTA: Il rivestimento in silicone ha una funzione
puramente estetica. Il sifone iSi può essere
utilizzato senza problemi anche senza di esso.
42 43

Istruzioni per l'uso.
Versare la panna montata/i desser t a base di
panna montata freddo.
Dosare la panna montata/i dessert a base di
panna montata possibilmente poco prima di
consumarli.
Preparazione
1. Verificare che la guarnizione sia inserita nella
testa.
2. Inserire il pistoncino di dosaggio nella testa.
3. Avvitare l'adattatore sul pistoncino di do-
saggio senza serrarlo, ma solo stringendolo
leggermente fino all'ar resto, dopo di che avvitare il beccuccio per guarnire sull'adattatore.
4. Riempire la bottiglia con il preparato.
NOTA: Rispettare la linea di riempimento
esterna e il segno sul fondo della bottiglia.
Non riempire oltre la capacità massima! Lo
spazio vuoto residuo è necessario per ottenere una montatura ottimale. Utilizzare un
misurino!
5. Se si desidera, mettere il rivestimento in silicone sopra la bottiglia infilandolo dall'alto.
Messa in funzione
6. Avvitare bene e in posizione eretta la testa
sulla bottiglia.
7. Inserire la capsula iSi per panna montata
originale in posizione corretta all'interno
del portacapsule.
NOTA: Mai avvitare la capsula se l'adattatore
non è avvitato sul pistoncino di dosaggio.
8. Avvitare il portacapsule con la capsula inserita sul sifone fino a sentire l'intero contenuto
della capsula defluire all'interno del sifone.
ATTENZIONE: A questo punto il sifone
è sotto pressione!
9. Agitare energicamente il sifone > 5 volte.
10. Svitare il portacapsule e riciclare la capsula
vuota.
44 45
NOTA: Il leggero sibilo durante lo svitamento
del portacapsule è normale.
11. Avvitare il coperchio nella filettatura.
Funzionamento
12. 12. Ai fini del dosaggio, il sifone deve essere
tenuto "a testa in giù" (beccuccio per guarnire in posizione verticale!) e la leva deve
essere azionata delicatamente.
NOTA: Utilizzare il primo dosaggio per testare
la consistenza. Se la consistenza continua a
risultare liquida, agitare ancora il sifone.
Pulizia.
NOTA: Osservare l'illustrazione al paragrafo
"Pulizia"!
1. Azionare la leva fino a quando il sifone risulta
completamente svuotato e depressurizzato.
Svitare la testa del sifone dalla bottiglia.
2. Svitare l'adattatore dal pistoncino di dosaggio
e il beccuccio per guarnire dall'adattatore.
3. Se è stato utilizzato il rivestimento in silicone,
toglierlo dalla bottiglia iSi sfilandolo verso
l'alto e lavarlo a mano con un comune de
tersivo per piatti.
4. Per la pulizia approfondita, rimuovere la
guarnizione della testa.
5. Lavare a mano i componenti del prodotto
con acqua corrente calda (ma x. 50 °C) e un
comune detersivo per piatti e pulire il pistoncino di dosaggio e il beccuccio per guarnire
con l'apposito spazzolino. Rimuovere completamente grasso e residui di albume!
NOTA: Mai utilizzare prodotti o spugne/spazzole
abrasivi.
NOTA: Non lavare in lavastoviglie e non far
bollire!
NOTA: Il beccuccio per guarnire può essere
svitato in qualsiasi momento dall'adattatore
per la necessaria pulizia intermedia.
-
IT

Conservazione.
Se il sifone iSi non viene riempito immediatamente, lasciare asciugare i componenti all'aria
in un luogo pulito e conser varlo da smontato.
Soluzione dei problemi.
Scaricare la pressione
Collocare il sifone in posizione eretta, appoggiare
un panno sul beccuccio per guarnire e azionare
delicatamente la leva fino alla depressurizzazione completa del sifone iSi. Solo a questo
punto si può svitare la testa dalla bottiglia.
Se risulta impossibile scaricare la pressione,
contattare iSi o il proprio centro di assistenza.
Non è possibile dosare il contenuto e/o il sifone
iSi spruzza
1. Intasamento causato da ingredienti non
disciolti, ad esempio zucchero
——— Procedere come descritto in "Scari care
la pressione" e successivamente in
"Pulizia".
——— Accertarsi che gli ingredienti in polvere
siano completamente sciolti.
2. Panna montata o preparato a base di panna
montata troppo denso
——— Ridurre l'intensità e la frequenza dei
cicli di agita zione alla successiva messa
in funzione.
——— Osser vare le informazioni relative alla
frequenza di agitazione www.isi.com/
home-edition/whippedcream
3. Contenuto troppo denso a causa di un
eccessivo raffreddamento
——— Lasciare riposare il sifone a temperatura
ambiente per circa 5-10 minuti.
——— Evitare che il contenuto congeli.
4. Pressione assente/insufficiente all'interno del
sifone
——— Utilizzare solo capsule iSi originali per
panna montata.
IT
——— Non riutilizzare le capsule vuote e
riciclarle immediatamente.
——— Azionare il sifone esclusivamente "a testa
in giù" con il beccuccio per guarnire in
posizione ver ticale. In caso contrario,
si verificheranno perdite di pressione.
5. Sono state utilizzate troppe capsule
——— Rispettare il numero max. di capsule da
utilizzare specificato nei dati del sifone.
——— Procedere come descritto in "Scaricare
la pressione" e rimettere in funzione il
sifone.
Il contenuto dosato è troppo liquido
1. Il sifone è stato riempito eccessivamente
——— Procedere come descritto in "Scaricare
la pressione", versare il contenuto in
eccesso e rimettere in funzione il sifone.
——— Rispettare la capacità massima.
2. Il sifone è stato agitato troppo poco o non è
stato agitato affatto
——— Osser vare le informazioni relative alla
frequenza di agitazione www.isi.com/
home-edition/whippedcream
3. Il contenuto non è sufficientemente f reddo
——— Conservare il sifone iSi pieno e pronto
all'uso in frigorifero per 1-2 ore.
4. Non è stata utilizzata una capsula idonea
——— Utilizzare solo capsule iSi originali per
panna montata.
La capsula per panna montata non viene
forata
1. La capsula utilizzata non è idonea
——— Utilizzare solo capsule iSi originali per
panna montata.
2. La capsula è stata inserita al contrario
——— Inserire la capsula nel senso corretto
(vedere figura al paragrafo "Istruzioni
per l'uso").
3. L'unità di foratura è stata danneggiata
——— Spedire il sifone a iSi o al centro di
assistenza .
46 47

Durante la messa in funzione fuoriesce gas dal
pistoncino di dosaggio o dall'adattatore
1. Il sifone è stato messo in funzione senza
avvitare l'adattatore
——— Prima di avvitare la capsula assicurarsi
che l'adattatore sia avvitato sul pistoncino di dosaggio,
——— procedere come descritto in "Scaricare
la pressione" e rimettere in funzione il
sifone.
2. La guarnizione nel pistoncino di dosaggio è
stata danneggiata
——— Occor re sostituire il pistoncino di dosag-
gio, disponibile come parte di ricambio
iSi originale.
Durante la messa in funzione fuoriesce del gas
fra la bottiglia e la testa
1. Manca la guarnizione della testa
——— Procedere come descritto in "Scaricare
la pressione" e inserire la guarnizione
nella testa.
2. La guarnizione della testa è stata danneggiata
——— Procedere come descritto in "Scarica-
re la pressione". Occor re sostituire la
guarnizione della testa, disponibile come
parte di ricambio iSi originale.
3. La testa non è stata avvitata abbastanza
bene
——— Procedere come descritto in "Scaricare
la pressione".
——— Avvitare bene la testa alla bottiglia
seguendo le istruzioni d'uso.
4. Il bordo superiore del cor po della bottiglia è
stato danneggiato
——— Procedere come descritto in "Scaricare
la pressione" e spedire il sifone a iSi o al
centro di assistenza.
IT
Assistenza.
Le parti di ricambio sono disponibili singolarmente e a prezzi convenienti.
Per ordinare le parti di ricambio, rivolgersi al
proprio rivenditore specializzato. In Austria è
possibile anche inviare un'e-mail all'indirizzo
info@isi.com.
Per la riparazione, spedire sempre l'intero sifone.
48 49

ES
Muchas gracias
por elegir
un sifón iSi.
Lea detenidamente las
instrucciones de uso antes de
la primera puesta en marcha.
ES
Descubrir el
mundo de iSi:
Visite el sitio web de iSi para obtener
más información sobre nuestra ver-
sátil gama de sifones. En nuestro gran
catálogo de recetas, que van de las más
sencillas a las más creativas y refinadas,
podrá descubrir todas las posibilidades
culinarias de iSi. ¡Déjese inspirar!
¿Desea consultar directamente a
un cocinero profesional? ¡Ningún
problema! En el blog de iSi, nuestro
chef responderá a todas sus preguntas.
Además podrá informarse sobre int
resantes novedades en torno a iSi.
¡Visítelo ahora!
El sitio web de iSi le proporciona además
información detallada de producto de
todos los sifones y accesorios iSi.
En las completas instrucciones
de uso en línea podrá ver todos los de-
talles sobre la puesta en marcha,
la limpieza y la reparación
de averías de los sifones iSi.
www.isi.com/culinary/es
Si tiene alguna pregunta, póngase en
contacto con info@isi.com
50 51

Calidad garantizada:
Cada sifón iSi se comprueba exhaustivamente
antes de salir de la fábrica. iSi ofrece una garantía de 2 años sobre el material y la elaboración,
salvo que se hayan producido daños por un uso
inapropiado. La garantía es válida desde la
fecha del recibo de compra.
¡Regístrese ahora en línea y ampliaremos su
garantía!
Benefíciese de las siguientes ventajas: 3 años
de garantía sobre el material y la elaboración.
La garantía solo es válida si se utilizan las piezas
iSi originales especificadas en la lista de componentes del producto. El correcto funcionamiento
del sifón solo se puede garantizar si únicamente
se utilizan cápsulas iSi. En caso de defectos,
daños y daños consecuenciales, provocados
principalmente por no seguir y/o no leer las
instrucciones de uso y sus indicaciones de seguridad, quedarán invalidadas tanto la garantía
como cualquier responsabilidad por nuestra
parte.
Regístrese y aproveche
estas ventajas:
www.isi.com/garantia
52 53
ES
Datos del sifón.
Presión máxima de
funcionamiento (PS)
Temperatura mín. de
funcionamiento
Temperatura máx. de
funcionamiento
Volumen máximo
de llenado
Cantidad má xima de
cápsulas que se deben
utilizar
Aplicación No se permite el uso
20 bar / 290 psig
1 °C / 34 ° F
30 °C / 86 ° F
0,25L
0,5L
1 cápsula iSi para
nata
comercial. Para postres y nata fresca.
Solo para preparaciones frías.
Lista de materiales.
Nombre Material
Botella Acero inoxidable
Cabezal del sifón PBT, POM, silicona,
Junta del cabezal
Boquilla de
decoración
Portacápsulas PA, silicona
Émbolo desmontable PA, silicona,
Recubrimiento de
silicona
Cepillo de limpieza Acero inoxidable, PA
Informaciones tecnicas pueden ser modificadas
sin aviso previo.
latón niquelado,
PUR, acero
inoxidable
TPE
Adaptador: PA
Boquilla: PP
acero inoxidable
Silicona

Información de
seguridad.
El no seguir estas indicaciones de seguridad
o las correspondientes recomendaciones de
uso y de mantenimiento de los productos iSi,
supone un uso inadecuado y puede ocasionar
un funcionamiento incorrecto del sistema así
como daños personales o materiales.
——— ¡ El sifón iSi debe usarse exclusivamente de
acuerdo con los datos del sifón!
——— ¡Lea detenidamente y conserve el manual
de instrucciones para prevenir errores de
uso!
——— ¡No fuerce el sifón!
——— ¡Mantenga el sifón iSi fuera del alcance
de los niños!
——— ¡Ponga el sifón en marcha solo cuando
esté lleno!
——— ¡No use ni almacene el sifón iSi fuera de
la temperatura máxima o mínima de
funcionamiento!
——— ¡Combine solamente cabezales del sifón
y botellas que pertenezcan al mismo tipo
de sifón!
——— ¡No combine productos de otras marcas
con piezas iSi!
——— ¡ No enrosque el cabezal del sifón y el por ta-
cápsulas inclinado!
——— ¡Utilice únicamente cápsulas iSi para nata
originales!
——— ¡No se incline sobre el sifón al enroscar las
cápsulas!
——— ¡El sifón es un recipiente a presión! ¡Si se cae
o deteriora (por ej. aparecen rasgaduras o
54 55
ES
deformaciones) puede resultar peligroso,
de modo que no se podrá utilizar de nuevo!
¡El servicio de asistencia técnica de iSi
efectuará una revisión del sifón!
——— ¡No desenrosque el cabezal del sifón
cuando el sifón esté bajo presión!
——— ¡No utilice la palanca como asa!
——— ¡Es necesario limpiar el sifón de forma
adecuada para evitar obstrucciones y
faltas de estanqueidad! ¡Antes de cada
aplicación, compruebe que el sifón iSi
se haya limpiado de forma adecuada
la última vez!
——— ¡Desmonte el sifón iSi según la ilustración
referente a la limpieza!
——— ¡Realice la limpieza a mano solo con agua
tibia y líquido lavavajillas doméstico
común! ¡El sifón iSi no se puede lavar en
el lavavajillas! ¡Si el cabezal del sifón se
limpia en el lavavajillas contraviniendo
las recomendaciones, se puede dañar el
cabezal de plástico y el portacápsulas, lo
que afectará a la seguridad del sifón!
——— ¡No efectúe ninguna modificación en el
sifón iSi! ¡En caso contrario, provocará la
anulación de la garantía y la consecuente
exención de responsabilidad!
——— ¡Nunca utilice más cápsulas de las que se
especifican ni llene el sifón en exceso! ¡Así
se asegura de que la má xima presión de
funcionamiento especificada no se supera!
——— ¡Si no consigue reducir la presión, póngase
en contacto con iSi o el servicio de asisten-
cia técnica!
ADVERTENCIA: Antes de usar el sifón iSi por
primera vez, realice una limpieza a fondo tal
como se indica en la ilustración referente a la
limpieza.
ADVERTENCIA: Para evitar la formación de grumos, antes del llenado diluya completamente los
ingredientes pulverulentos, azúcares, etc., en
un poco de líquido. No utilice ingredientes con
pulpa o pepitas.
ADVERTENCIA: El recubrimiento de silicona es
decorativo. El sifón iSi también puede ponerse
en marcha correctamente sin él.

Modo de empleo.
Rellene con nata o postres a base de nata fríos.
Saque la nata o los post res a base de nata del
sifón poco antes de que se acabe el contenido.
Preparación
1. Compruebe que la junta del cabezal esté
colocada en el interior del mismo.
2. Coloque el émbolo desmontable en el
cabezal del sifón.
3. Enrosque el adaptador en el émbolo desmontable suavemente y hasta el tope;
enrosque luego la boquilla de decoración
en el adaptador.
4. Llene la botella con el preparado.
ES
ADVERTENCIA: Es normal que se oiga un ligero silbido al desenroscar el portacápsulas.
11. Enrosque la tapa en la rosca.
Manejo
12. Para la extracción, mantenga el sifón
"boca abajo" (con la boquilla de decoración
en posi ción vertical) y accione ligeramente
la palanca.
ADVERTENCIA: Utilice la primera extracción
para probar la consistencia. Si la consistencia aún es demasiado líquida, agite el sifón
varias veces más.
ADVERTENCIA: No sobrepase la línea de
llenado exterior y la señalización en el fondo
de la botella. No la sobrellene. El espacio
vacío restante es necesario para obtener un
resultado óptimo. Utilice un vaso graduado.
5. Si lo desea, cubra la botella con el recubrimiento de silicona ex tendiéndolo de arriba
hacia abajo.
Puesta en marcha
6. Enrosque el cabezal del sifón de manera rec-
ta y firme en la botella.
7. Coloque una cápsula iSi para nata original en
la posición correcta en el portacápsulas.
ADVERTENCIA: No enrosque la cápsula si
no hay ningún adaptador enroscado en el
émbolo desmontable.
8. Enrosque el portacápsulas, con la cápsula
colocada, en el cabezal del sifón hasta que se
oiga que todo el contenido de la cápsula ha
entrado.
ATENCIÓN: El sifón está ahora bajo presión.
9. Agite el sifón enérgicamente > 5 veces.
10. Desenrosque el por tacápsulas y recicle la
cápsula vacía.
56 57
Limpieza.
ADVERTENCIA: Siga las indicaciones de la
ilustración referente a la limpieza.
1. Mantenga la palanca accionada hasta que
el sifón esté completamente vacío y tenga la
presión compensada. Desenrosque el cabezal
del sifón de la botella.
2. Desenrosque el adaptador del émbolo desmontable y la boquilla de decoración del
adaptador.
3. Si ha utilizado el recubrimiento de silicona,
sáquelo de la botella iSi tirando de él hacia
arriba y realice una limpieza a mano con un
líquido lavavajillas doméstico común.
4. Saque la junta del cabezal para limpiar a
fondo el sifón.
5. Realice una limpieza a mano de los componentes con agua potable caliente (máx. 50 °C)
y un líquido lavavajillas doméstico común; a
continuación, limpie el émbolo desmontable
y la boquilla de decoración con el cepillo de
limpieza. Elimine completamente la grasa y
los restos de clara de huevo.
ADVERTENCIA: No utilice en ningún caso
productos abrasivos o esponjas/cepillos que
rasquen.
ADVERTENCIA: No lave el sifón en el lavavajillas
ni en agua hirviendo.

ADVERTENCIA: Hay que hacer limpiezas intermedias de la boquilla. Para ello se puede desenroscar del adaptador en cualquier momento.
Conservación.
Si no se va a llenar el sifón iSi durante un tiempo,
deje que los componentes se sequen al aire en
un sitio limpio y consérvelo desmontado.
Reparación de averías.
Dejar salir la presión
Coloque el sifón en posición vertical, sujete la
boquilla de decoración con un paño y accione
ligeramente la palanca hasta que ya no quede
presión dentro del sifón iSi. A continuación, puede
desenroscar el cabezal.
Si no consigue reducir la presión, póngase en
contacto con iSi o el servicio de asistencia
técnica.
El contenido no se puede sacar o el sifón iSi
salpica
1. Obstrucción causada por ingredientes o
azúcar no disueltos
——— Deje salir la presión y, a continuación,
realice una limpieza.
——— Asegúrese de que los restos se han
disuelto completamente.
2. La nata o el preparado con nata han quedado
demasiado consistentes
——— Agite con menor intensidad y frecuencia
la próxima vez que utilice el sifón.
——— Para obtener más información sobre
la frecuencia de agitaciones consulte
www.isi.com/uso-domestico/nata
3. Contenido demasiado espeso a causa de un
enfriamiento demasiado intenso
——— Deje reposar el sifón a temperatura
ambiente durante unos 5 o 10 minutos.
——— Evite que el contenido se congele.
ES
4. El sifón no tiene presión/tiene muy poca
presión
——— Utilice únicamente cápsulas iSi para
nata originales.
——— No reutilice las cápsulas vacías y
recíclelas de inmediato.
——— Active el sifón siempre "boca abajo" y
con la boquilla de decoración en posición
vertical, ya que de lo contrario perderá
presión.
5. Se han utilizado demasiadas cápsulas
——— Respete la cantidad máxima de cápsulas
que se pueden utilizar, indicada en los
datos del sifón.
——— Deje salir la presión y vuelva a poner el
sifón en marcha.
El contenido extraído es demasiado líquido
1. Se ha llenado demasiado el sifón
——— Deje salir la presión, vacíe el contenido
que sobre y vuelva a poner el sifón en
marcha.
——— Respete el volumen de llenado máximo.
2. El sifón no se ha agitado o se ha agitado muy
poco
——— Para obtener más información sobre
la frecuencia de agitaciones consulte
www.isi.com/uso-domestico/nata
3. El contenido no está lo suficientemente frío
——— Coloque el sifón iSi lleno y listo para
ser activado en el frigorífico durante
1 - 2 horas.
4. Se utilizó una cápsula que no es la adecuada
——— Utilice únicamente cápsulas iSi para
nata originales.
La cápsula para nata no se vacía
1. La cápsula utilizada no es apropiada
——— Utilice únicamente cápsulas iSi para
nata originales.
2. La cápsula se ha colocado al revés
——— Coloque la cápsula de la forma correcta
(vea la figura: Modo de empleo).
3. Se ha estropeado la unidad de vaciado
——— Envíe el sifón a iSi o al servicio de
asistencia técnica.
58 59

Al poner el sifón en marcha se escapa gas a través del émbolo desmontable o del adaptador
1. El sifón se ha puesto en marcha sin que hubiera
un adaptador enroscado
——— Antes de enroscar la cápsula, asegúrese
de que el adaptador está enroscado en el
émbolo desmontable.
——— Deje salir la presión y vuelva a poner el
sifón en marcha.
2. Se ha dañado la junta del émbolo desmontable
——— Debe reemplazar el émbolo desmontable
por una pieza de repuesto iSi original que
puede obtener a un precio asequible.
Al poner el sifón en marcha se escapa gas entre
la botella y el cabezal
1. Falta la junta del cabezal
——— Deje salir la presión y coloque la junta del
cabezal en el cabezal.
2. Se ha dañado la junta del cabezal
——— Deje salir la presión. Debe reemplazar
la junta por una pieza de repuesto iSi
original que puede obtener a un precio
asequible.
3. El cabezal no se ha enroscado con suficiente
firmeza
——— Deje salir la presión.
——— Enrosque el cabezal firmemente en la
botella según el manual de instrucciones.
4. El borde superior de la botella se ha dañado
——— Deje salir la presión y envíe el sifón a iSi
o al servicio de asistencia técnica.
ES
Servicio.
Las piezas de repuesto se pueden adquirir por
separado y a un precio asequible.
Para encargar piezas de repuesto diríjase
a su especialista. En Austria, están también
disponibles en info@isi.com.
En caso de reparación, envíe siempre el sifón
completo.
60 61

NL
Dank u voor het
kiezen van een
iSi-apparaat.
Lees de gebruiksaanwijzing zorgvuldig door voordat u het apparaat
voor de eerste keer gaat gebruiken.
NL
Ontdek de
wereld van iSi:
Bezoek de website van iSi en lees meer
over ons veelzijdige productaanbod:
Dankzij onze uitgebreide verzameling
recepten - van eenvoudig goede tot
creatief verfijnde recepten - opent
zich voor u een wereld aan culinaire
diversiteit van iSi. Laat u inspireren!
Wilt u direct contact hebben met een
kok? Geen probleem! Op het blog van
iSi beantwoordt onze chef-kok al uw
vragen. Daarnaast ontvangt u constant
nieuwe interessante informatie over iSi.
Bekijk de blog maar eens!
De website van iSi bevat gedetai leerde
productinformatie over alle apparaten en
accessoires van iSi.
De uitgebreide online handleiding
bevat gedetailleerde informatie
over het gebruik en de reiniging van
en het oplossen van problemen
met iSi-apparaten.
www.isi.com/culinary
Hebt u nog vragen? Neemt u dan
contact met ons op via info@isi.com
62 63

Gegarandeerde kwaliteit:
Elk iSi-apparaat wordt grondig gecontroleerd
voordat het de fabriek verlaat. iSi verstrekt
2jaar garantie op materiaal en fabricagefouten,
zolang defecten niet ontstaan als gevolg van
verkeerd gebruik van het apparaat. De garantie
is geldig vanaf de aankoopdatum.
Registreer u nu online waarna we uw garantie
zullen verlengen!
Geniet van de voordelen: 3 jaar garantie op
materiaal en fabricagefouten.
De garantie geldt alleen bij gebruik van originele onderdelen van iSi conform de lijst met
productonderdelen. Een goede werking van
het apparaat kunnen we alleen garanderen als
daarnaast uitsluitend capsules van iSi worden
gebruikt. Fouten, schade of gevolgschade, die
met name voortvloeien uit het niet naleven en/
of niet lezen van de handleiding en de daarin
vermelde veiligheidsaanwijzingen, vallen niet
onder de garantie of aansprakelijkheid van iSi.
Eenvoudig aanmelden en gebruik
maken van de voordelen:
www.isi.com/warranty
NL
Apparaatgegevens.
Max. bedrijfsdruk PS 20 bar
Min.
bedrijfstemperatuur
Max.
bedrijfstemperatuur
Max. vulvolume
Max. aantal te
gebruiken capsules
Toe pass ing Niet bestemd voor
1 °C
30 °C
0,25L
0,5L
1 iSislagroomcapsule
professioneel gebruik.
Voor verse slagroom
en desserts.
Alleen voor koude
toepassingen.
Materiaallijst.
Aanduiding Materiaal
Fles Edelstaal
Kop PBT, POM, silicone,
Kopafdichting
Spuitmondje voor
garneren
Capsulehouder PA, silicone
Verwijderbaar
doseerventiel
Siliconenmantel Silicone
Reinigingsborstel Edelstaal, PA
Technische specificaties zijn onderhevig aan
verandering zonder voorafgaande kennisgeving.
messing vernikkeld,
PU, edelstaal
TPE
Adapter: PA
Spuitmondje: PP
PA, silicone, edelstaal
64 65

Veiligheidsaanwijzingen.
Het niet opvolgen van deze veiligheidsvoorschriften of andere aanbevelingen met betrekking tot gebruik en onderhoud van iSi kan leiden
tot systeemstoringen en lichamelijk letsel en/
of materiële schade.
——— Het iSi-apparaat is uitsluitend bestemd
voor gebruik conform de apparaatgegevens!
——— Lees ter vermijding van bedieningsfouten
de handleiding goed door en bewaar deze
zorgvuldig!
——— Gebruik geen excessieve kracht!
——— Bewaar het iSi-apparaat buiten het bereik
van kinderen!
——— Neem uitsluitend een gevuld apparaat
in gebruik!
——— Bewaar of gebruik het iSi-apparaat nooit
boven of onder de aangegeven bedrijfs-
temperatuur!
——— Combineer uitsluitend koppen en flessen
van hetzelfde apparaattype!
——— Combineer nooit onderdelen van andere
merken met iSi-onderdelen!
——— Schroef de kop en de capsulehouder nooit
scheef op de fles!
——— Gebruik uitsluitend originele
iSi-slagroomcapsules!
——— Buig u bij het opschroeven van een capsule
niet over het apparaat!
——— Het apparaat is een houder onder druk!
Als het apparaat is gevallen of beschadi-
gingen (bijvoorbeeld scheuren of vervor-
mingen) vertoont, vormt het apparaat een
gevarenbron en mag het niet meer worden
66 67
NL
gebruikt! Laat het apparaat nakijken door
een iSi-servicepunt!
——— Schroef nooit de kop van een apparaat dat
onder druk staat!
——— Gebruik de hendel nooit als handvat om
het apparaat te dragen!
——— Grondige reiniging is noodzakelijk om te
voorkomen dat het apparaat verstopt
raakt of niet meer hermetisch sluit!
Controleer vóór elk gebruik of het iSiapparaat adequaat is gereinigd!
——— Haal het iSi-apparaat bij reiniging uit-
sluitend uit elkaar zoals op de afbeelding
wordt getoond!
——— Was het iSi-apparaat uitsluitend met de
hand. Gebruik hiervoor lauwwarm water
en gewoon afwasmiddel! Het iSi-apparaat
is niet vaatwasserbestendig! Als de apparaatkop in de vaatwasser gewassen
wordt, kan de kop van kunststof en de
capsulehouder beschadigd raken waardoor
de veiligheid van het apparaat beïnvloed
wordt!
——— Breng geen veranderingen aan het
iSi-apparaat aan. Hierdoor vervalt de
garantie en wordt geen aansprakelijkheid
meer aanvaard!
——— Gebruik nooit méér capsules dan is aange-
geven, en doe het apparaat nooit te vol!
w Zo voorkomt u dat de aangegeven ma ximale bedrijfsdruk wordt overschreden!
——— Als het niet lukt om de druk te laten ont-
snappen, neemt u contact op met iSi of
met uw iSi-servicepunt!
OPMERKING: Voordat u het iSi-apparaat voor
het eerst gebruikt, reinig het apparaat grondig,
zoals wordt aangegeven op de afbeelding met
reinigingsinstructies.
OPMERKING: Om de vorming van klontjes te
vermijden, moeten poederige ingrediënten, suiker
etc. vóór het vullen volledig worden opgelost
in een vloeistof. Gebruik geen ingrediënten met
vruchtvlees of pitjes!
OPMERKING: De siliconenmantel dient alleen
als decoratie. Het iSi-apparaat kan ook probleemloos worden gebruikt zonder de mantel.

Handleiding.
Zorg er bij het maken van slagroom/desserts op
basis van slagroom voor dat u het iSi-apparaat
met gekoelde ingrediënten vult.
Haal de slagroom/desserts op basis van slagroom zo kort mogelijk voor het opdienen uit het
iSi-apparaat.
Voorbereiding
1. Controleer of de kopafdichting in de kop is
geplaatst.
2. Plaats het doseerventiel in de kop.
3. Schroef het adapter op het doseerventiel
(niet te vast, slechts licht, tot aan de aanslag)
en schroef het spuitmondje voor garneren op
het adapter.
4. Vul de fles met de ingrediënten.
OPMERKING: Let op de buitenste vullijn en
de markering op de flesbodem. Doe de fles
niet te vol! De resterende lege ruimte is nodig
om een optimaal eindresultaat te bereiken.
Gebruik een maatbeker!
5. Trek, indien gewenst, de siliconenmantel
voorzichtig van bovenaf over de fles.
Ingebruikname
6. Schroef de kop recht en handvast op de fles.
7. Plaats een originele iSi-slagroomcapsule op
de juiste wijze in de capsulehouder.
OPMERKING:Schroef nooit de capsule erin
als er geen adapter op het doseerventiel is
geschroefd.
8. Schroef de capsulehouder met geplaatste
capsule op de kop totdat de volledige capsuleinhoud hoorbaar in de fles is gestroomd.
PAS OP: Het apparaat staat nu onder druk!
9. Schud > 5 keer krachtig met het apparaat.
10. Schroef de capsulehouder van het apparaat
en leg de lege capsule apart om te worden
gerecycled.
68 69
NL
OPMERKING: Een zacht sissen bij het afschroeven van de capsulehouder is normaal.
11. Schroef het afdekkapje op de schroefdraad.
Bediening
12. Voor het legen moet het apparaat onderste-
boven worden gehouden (het spuitmondje
voor garneren moet loodrecht naar beneden
wijzen!) en de hendel voorzichtig worden
bediend.
OPMERKING: Gebruik de eerste portie
voor het testen van de consistentie. Als de
consistentie nog te vloeibaar is, schudt u het
apparaat nogmaals.
Reiniging.
OPMERKING: Raadpleeg de afbeelding met
reinigingsinstructies!
1. Bedien de hendel tot het apparaat helemaal
leeg is en er geen druk meer op staat. Schroef
de kop van de fles.
2. Schroef de adapter van het doseer ventiel en
schroef het spuitmondje voor garneren van
de adapter.
3. Als u de siliconenmantel hebt gebruikt, trek
deze dan van onderaf naar boven van de
iSi-fles. Maak de mantel vervolgens met
water en wat afwasmiddel schoon. De
mantel mag niet in de vaatwasmachine.
4. Verwijder de kopafdichting om grondig
reinigen mogelijk te maken.
5. Spoel de productonderdelen met warm
(max. 50 °C) water en gewoon afwasmiddel schoon. Reinig het doseerventiel en het
spuitmondje voor garneren met een afwasborstel. Zorg er voor dat u vet-en eiwitresten
helemaal verwijdert!
OPMERKING: Gebruik in geen geval schuurmiddelen of krassende sponzen/borstels.
OPMERKING: Reinig de onderdelen niet in de
vaatwasmachine en was ze niet in kokend water!

OPMERKING: Het spuitmondje voor garneren
kan op elk gewenst moment van de adapter
worden losgeschroefd voor een eventuele
tussen reiniging.
Bewaren.
Als het iSi-apparaat niet meteen weer wordt
gevuld, laat u de onderdelen op een schone
plaats in de lucht drogen. Bewaar het iSi-apparaat vervolgens in gedemonteerde toestand.
Problemen oplossen.
Druk laten ontsnappen
Zet het apparaat rechtop, houd een doek over
het spuitmondje voor garneren en bedien de
hendel net zo lang totdat het iSi-apparaat volledig drukvrij is. Schroef pas daarna de kop van
de fles.
Als het niet lukt om de druk te laten ontsnappen, neemt u contact op met iSi of met uw iSiservice punt.
De inhoud komt niet naar buiten of het iSiapparaat spuit
1. Verstopping door niet opgeloste ingrediënten,
zoals suiker
——— Haal de druk van het apparaat (zie "Druk
laten ontsnappen") en reinig het vervolgens (zie "Reiniging").
——— Zorg ervoor dat poederige ingrediënten
volledig zijn opgelost.
2. Te stijf geworden slagroom of slagroombereiding
——— Schud de fles de volgende keer minder
intensief en minder vaak.
——— Lees hier hoe vaak u moet schudden:
www.isi.com/home-edition/whippedcream
3. De inhoud is te vast door te sterke koeling
——— Laat het apparaat 5 tot 10 minuten
staan bij kamertemperatuur.
——— Laat de inhoud van de fles niet bevriezen.
NL
4. Geen druk/te weinig druk in het apparaat
——— Gebruik uitsluitend originele iSi-slag-
roomcapsules.
——— Gebruik lege capsules niet opnieuw en leg
ze direct apart om te worden gerecycled.
——— Bedien het apparaat uitsluitend onder-
steboven, met het spuitmondje voor
garneren loodrecht naar beneden. Als u
dit niet doet, treedt er drukverlies op.
5. Er zijn te veel capsules gebruikt
——— Houd u aan het maximale aantal te ge-
bruiken capsules, zoals aangegeven in
de apparaatgegevens.
——— Haal de druk van het apparaat (zie
"Druk laten ontsnappen") en neem het
apparaat opnieuw in gebruik.
De inhoud is te vloeibaar wanneer deze naar
buiten komt
1. Het apparaat is te vol
——— Haal de druk van het apparaat (zie "Druk
laten ontsnappen"), giet het teveel aan
vloeistof uit de fles en neem het apparaat
opnieuw in gebruik.
——— Houd u aan het maximale vulvolume.
2. Het apparaat is te weinig of helemaal niet
geschud
——— Lees hier hoe vaak u moet schudden:
www.isi.com/home-edition/whippedcream
3. De inhoud is niet koud genoeg
——— Leg het gevulde en gebruiksklare iSi-
apparaat gedurende 1 tot 2 uur in de
koelkast.
4. Er is een ongeschikte capsule gebruikt
——— Gebruik uitsluitend originele iSi-slag-
roomcapsules.
De slagroomcapsule wordt niet opengeprikt
1. De gebruikte capsule is niet geschikt
——— Gebruik uitsluitend originele iSi-slag-
roomcapsules.
2. De capsule is verkeerd geplaatst
——— Plaats de capsule op de juiste wijze
(zie de afbeelding "Handleiding").
70 71

3. De openprikeenheid is beschadigd
——— Stuur het apparaat naar iSi of naar uw
iSi-servicepunt.
Bij de ingebruikname van het apparaat ontsnapt er gas door het doseerventiel of het
adapter
1. Het apparaat is in gebruik genomen zonder
dat het adapter erop is geschroefd.
——— Controleer voordat u de capsule erin
schroef t, of het adapter op het doseerventiel is geschroefd.
——— Haal de druk van het apparaat (zie "Druk
laten ontsnappen") en neem het apparaat opnieuw in gebruik.
2. De afdichting van het doseerventiel is beschadigd
——— Het doseerventiel, leverbaar als origi-
neel iSi-vervangingsonderdeel, moet
worden vervangen.
Bij de ingebruikname ontsnapt er gas tussen de
fles en de kop
1. De kopafdichting ontbreekt
——— Haal de druk van het apparaat (zie "Druk
laten ontsnappen") en plaats de kopafdichting in de kop.
2. De kopafdichting is beschadigd
——— Haal de druk van het apparaat (zie "Druk
laten ontsnappen"). De kopafdichting,
leverbaar als origineel iSi-vervangingsonderdeel, moet worden vervangen.
3. De kop is niet vast genoeg op de fles geschroefd
——— Haal de druk van het apparaat (zie "Druk
laten ontsnappen").
——— Schroef de kop conform de handleiding
handvast op de fles.
4. De bovenrand van de fles is beschadigd
——— Haal de druk van het apparaat (zie "Druk
laten ontsnappen") en stuur het apparaat naar iSi of naar uw iSi-servicepunt.
NL
Service.
Vervangingsonderdelen zijn afzonderlijk verkrijgbaar tegen geringe kosten.
Als u een vervangingsonderdeel wilt bestellen,
neemt u contact op met de leverancier van uw
iSi-apparaat. In Oostenrijk kunt u vervangingsonderdelen ook per e-mail bestellen via info@
isi.com.
Moet uw iSi-apparaat worden gerepareerd?
Stuurt u dan altijd het complete apparaat op.
72 73

Upptäck iSi-världen:
SE
SE
Tack för att du bestämde dig för en
apparat från iSi.
Läs igenom bruksanvisningen noga inför det första
idrifttagandet.
Besök iSi:s webbplats och läs mer om
vårt stora utbud. Vår omfattande
receptsamling, från enkelt gott till
kreativt raffinerat, öppnar iSi:s hela
akulinariska mångfald. Låt dig inspire-
ras!
Vill du kontakta ett matlagningsproffs
direkt? Inga problem! På iSi:s blogg svarar vår chefskock gärna på dina frågor.
Dessutom får du löpande ny intressant
information som rör iSi.Titta in!
iSi:s webbplats förser dig dessutom med
detaljerad produktinformation om alla
apparater och tillbehör från iSi.
Den utförliga bruksanvisningen som
finns där ger dig detaljerad
information om idrifttagande,
rengöring och åtgärdande av fel
på apparater från iSi.
www.isi.com/culinary
Kontakta oss på info@isi.com, om du
har några frågor.
74 75

Garanterad kvalitet:
Varje apparat f rån iSi kontrolleras ingående,
innan den lämnar fabriken. iSi lämnar 2 års garanti på materialet och bearbetningen, såvida
det inte har uppstått fel på grund av felaktig
användning. Garantin gäller från det datum
som anges på inköpskvittot.
Registrera dig nu online, så förlänger
vi garantin!
Njut av fördelarna med 3 års garanti på
materialet och arbetet.
Garantin gäller bara vid användning av originaldelar f rån iSi enligt listan över produktens
beståndsdelar. Vi kan bara garantera en felfri
funktion för apparaten, om dessutom uteslutande iSi-patroner används. Vid fel, skador
och följdskador som i synnerhet orsakas av
att bruksanvisningen samt dess säkerhetsanvisningar inte följts, upphör vår garanti och
vårt ansvar.
Logga helt enkelt in och
spara fördelarna:
www.isi.com/warranty
Apparatdata.
Maximalt drifttryck PS 20 bar
Minimal
drifttemperatur
Maximal
drifttemperatur
Maximal
påfyllningsvolym
Maximalt antal
patroner
Användning Inte godkänd för
1 °C
30 °C
0,25L
0,5L
1 iSi-gräddpatron
yrkesmässig
användning.
För färsk grädde
och desserter.
Används endast kall.
Materiallista.
Beteckning Material
Flaska Rostfritt stål
Överdel PBT, POM, silikon,
Tätning till överdelen
Garneringsmunstycke Adapter: PA
Patronhållare PA, silikon
Matarkolv PA, silikon,
Silikonmantel Silikon
Rengöringsborste Rostfritt stål, PA
Tekniska data kan komma att ändras utan
föregående meddelande.
förnicklad mässing,
PU, rostfritt stål
TPE
Munstycke: PP
rostf ritt stål
SE
76 77

Säkerhetsanvisningar.
Om dessa säkerhetsinstruktioner eller andra
rekommendationer för användning och underhåll av iSi-produkterna inte följs kan det leda
till att systemet inte fungerar och till personskada och/eller materiella skador.
——— iSi-apparaten är godkänd för användning
endast enligt apparatdatan!
——— Läs bruksanvisningen noga för att undvika
hanteringsfel och förvara den noga inför
framtida behov!
——— Använd inte våld!
——— Förvara iSi-apparaten oåtkomligt för barn!
——— Använd aldrig apparaten när den är tom!
——— Varken förvara eller använd iSi-apparaten
utanför den minimala respektive maxi-
mala drifttemperaturen!
——— Kombinera endast samma typ av överdel
och flaska!
——— Du får aldrig kombinera externa produkter
tillsammans med iSi-delar!
——— Skruva aldrig på huvudet eller patronhål-
laren snett!
——— Använd bara original iSi-gräddpatroner!
——— Luta dig aldrig över apparaten, när du
skruvar fast patronen!
——— Apparaten är en tryckbehållare! Fall eller
skador i form av sprickor eller deforme-
ringar kan förorsaka faror och apparaten
får då inte användas mer! Lämna appara-
ten till en iSi-serviceverkstad för kontroll!
——— Skruva aldrig av överdelen från en appa-
rat som står under tryck!
——— Använd inte spaken som bärhandtag!
SE
——— Det krävs en korrekt rengöring av appa-
raten för att undvika igensättning och
otätheter! Kontrollera inför varje användningstillfälle att iSi-apparaten har
rengjorts korrekt!
——— Ta isär iSi-apparaten endast enligt
rengöringsillustrationen!
——— Rengör den för hand endast med
ljummet vatten och vanligt diskmedel för
hushållet! iSi-apparaten är inte godkänd
för diskmaskiner! Apparatens huvud
och patronhållaren får inte rengöras i
diskmaskin – metallöverdelen kan skadas
och apparatens säkerhet kan därmed inte
garanteras!
——— Gör inga förändringar på iSi-apparaten.
Då upphör garantin och ansvarsundantaget att gälla!
——— Använd aldrig fler patroner än vad som
anges respektive fyll aldrig på för mycket
i apparaten! Det säkerställer att det
maximala drifttrycket inte överskrids!
——— Kontakta iSi eller din serviceverkstad, om
trycket inte går att eliminera!
Anvisning: Rengör iSi-apparaten inför den första användningen, se rengöringsillustrationen.
Anvisning: För att undvika att det bildas klumpar ska pulverfor miga ingredienser, socker med
mera lösas upp i lite vätska före påf yllningen.
Använd inga ingredienser som innehåller fruktkött eller kärnor!
Anvisning: Silikonmanteln är avsedd som dekoration. iSi-apparaten kan enkelt tas i drift även
utan den.
78 79

Bruksanvisning.
Fyll på kall grädde eller kall gräddbaserad
dessert.
Tryck ut grädden respektive desser ten ur apparaten så nära förtäringen som möjligt.
Förberedelse
1. Kontrollera att tätningen sitter i apparatens
överdel.
2. Sätt i matarkolven i apparatens överdel.
3. Skruva fast adaptern till anslaget på matar-
kolven, men inte för hårt. Skruva sedan fast
garneringsmunstycket på adaptern.
4. Fyll på flaskan med beredningen.
ANVISNING: Var uppmärksam på påfyll-
ningslinjen och märkningen på flaskans
botten. Fyll inte på för mycket! Det tomrum
som blir kvar krävs för ett optimalt resultat.
Använd en mätbägare!
5. Dra försiktigt silikonmanteln över flaskan
ovanifrån, om du vill använda silikonmanteln.
Idrifttagande
6. Skruva för hand på apparatens överdel rakt
på flaskan.
7. Lägg i en original iSi-gräddpatron korrekt i
patronhållaren.
ANVISNING: Skruva inte i en patron, om inte
en adapter har skruvats fast på matarkolven.
8. Skruva på patronhållaren med en ilagd
patron på apparatens överdel, tills att du
kan höra, att patronens hela innehåll har
strömmat in.
OBSERVERA: Apparaten står nu under tryck!
9. Skaka sifonen kraftigt > 5 gånger.
10. Skruva av patronhållaren och sopsortera den
tomma patronen för materialåtervinning.
SE
ANVISNING: Det är systemrelaterat att det
susar lite vid avskruvningen.
11. Skruva på täckkåpan i gängan.
Användning
12. Vid uttryckning måste apparaten hållas ”upp
och ned” (lodrätt munstycke) och spaken
måste användas med känsla.
ANVISNING: Tryck först ut lite för att testa
konsistensen. Skaka apparaten igen, om
konsistensen är för flytande.
Rengöring.
ANVISNING: Beakta rengöringsillustrationen!
1. Använd spaken tills att apparaten är helt
tom och inte längre står under tryck. Skruva
av apparatens överdel från flaskan.
2. Skruva av adaptern från matarkolven
och skruva av garneringsmunstycket
från adaptern.
3. Dra av silikonmanteln uppåt från iSi-flaskan
och diska den med ett vanligt handdiskmedel,
om silikonmanteln har använts.
4. Ta bort tätningen inför den grundliga
rengöringen.
5. Rengör produktens delar för hand med
varmt (maximalt 50 °C) dricksvatten och
ett vanligt handdiskmedel samt rengör
matarkolven och garneringsmunstycket
med rengöringsborsten. Ta bort allt fett
och alla äggviterester!
ANVISNING: Använd inte skurmedel eller
repande svampar/borstar.
ANVISNING: Diska inte delarna i en diskmaskin
och koka dem inte!
ANVISNING: Garneringsmunstycket kan när
som helst skruvas av från adaptern, om det
behöver rengöras.
80 81

Förvaring
Låt delarna lufttorka på en ren plats och förvara dem demonterade, om iSi-apparaten inte
ska fyllas på igen direkt.
Åtgärdande av fel
Eliminera trycket
Ställ apparaten rakt, håll en duk över garneringsmunstycket och använd spaken med känsla,
tills att det inte längre finns något tryck kvar i
iSi-apparaten. Skruva först därefter bort överdelen från flaskan.
Kontakta iSi eller din serviceverkstad, om
trycket inte går att eliminera.
Innehållet kan inte tryckas ut eller iSi-apparaten stänker
1. Igentäppning genom tillsatser, exempelvis
socker, som inte lösts upp
——— Släpp ut tr ycket och rengör apparaten.
——— Säkerställ att pulverformade ingredienser
har lösts upp helt.
2. Grädden eller den gräddhaltiga beredningen
är för hård
——— Minska intensiteten eller antalet skak-
ningar vid nästa idrifttagande.
——— Beakta informationen om skaknings-
frekvensen, se www.isi.com/homeedition/whippedcream
3. Innehållet är för fast på grund av för kraf tig
kylning
——— Låt apparaten stå i rumstemperatur i
5-10 m inuter.
——— Undvik att frysa innehållet.
4. Inget eller för lågt tryck i apparaten
——— Använd bara original iSi-gräddpatroner.
——— Använd inte tomma patroner igen utan
sopsortera dem direkt för materialåtervinning.
——— Använd apparaten uteslutande ”upp och
ned” med lodrätt munstycke, ef tersom
det annars leder till tryckförlust.
SE
5. För många patroner har använts
——— Beakta uppgiften i apparatdatan om
det maximala antalet patroner som får
användas.
——— Släpp ut tr ycket och ta apparaten i drift
igen.
Innehållet som trycks ut är för flytande
1. Apparaten har fyllts på för mycket
——— Släpp ut tr ycket, häll ut det överflödiga
innehållet och ta apparaten i drift igen.
——— Beakta den maximala påfyllnings-
mängden .
2. Apparaten skakades för lite eller inte alls
——— Beakta informationen om skaknings-
frekvensen, se www.isi.com/homeedition/whippedcream
3. Innehållet är inte tillräckligt kallt
——— Lägg den påfyllda och driftklara iSi-
apparaten 1-2 timmar i kylskåpet.
4. En olämplig patron har använts
——— Använd bara original iSi-gräddpatroner.
Det sticks inget hål i gräddpatronen
1. En olämplig patron används
——— Använd bara original iSi-gräddpatroner.
2. Patronen har lagts i på fel sätt
——— Lägg i patronen korrekt (se bilden i
bruksanvisningen).
3. Insticksenheten har skadats
——— Skicka apparaten till iSi eller till en
service verkstad.
Vid idrifttagandet kommer det ut gas genom
matarkolven eller adaptern
1. Apparaten har tagits i bruk utan att adaptern
har skruvats fast
——— Säkerställ att adaptern är påskruvad på
matarkolven, innan patronen skruvas i.
——— Släpp ut tr ycket och ta apparaten i drift
igen.
2. Tätningen i matarkolven har skadats
——— Matarkolven måste bytas ut till en original
iSi-reservdel.
82 83

Vid idrifttagandet kommer det ut gas mellan
flaskan och överdelen
1. Tätningen saknas
——— Släpp ut tr ycket och lägg i tätningen i
överdelen.
2. Tätningen har skadats
——— Släpp ut tr ycket. Tätningen måste bytas
ut till en original iSi-reser vdel.
3. Överdelen har inte skruvats fast tillräckligt
hårt
——— Släpp ut tr ycket.
——— Skruva för hand fast överdelen på flaskan
enligt bruksanvisningen.
4. Flaskan har skadats på den övre kanten
——— Släpp ut tr ycket och skicka apparaten
till iSi eller till en serviceverkstad.
Service.
Reser vdelar kan köpas separat och till förmånliga
pr iser.
Kontakta din fackhandel, om du vill beställa
reservdelar. I Österrike går det bra via
info@isi.com.
Vid reparation ska hela apparaten skickas in.
SE
84 85

PT
Muito obrigado
PT
Descubra o
mundo da iSi:
Acesse o site da iSi e saiba mais
sobre o nosso portfólio diversificado:
O nosso grande acervo de receitas com
receitas fáceis até criativamente
refinadas aumenta a diversidade
culinária da iSi. Deixe ser inspirado!
por ter escolhido
um dispositivo iSi.
Antes da primeira utilização,
leia o manual de instruções
atenciosamente.
86 87
Deseja consultar diretamente um chef
profissional? Sem problemas! No blog
da iSi, os nossos chefs de cozinha res-
pondem às suas perguntas. Além disso,
você sempre recebe novas informações
interessantes sobre a iSi. Confira!
O site da iSi fornece informações
detalhadas do produto para todos
os utensílios e acessórios da iSi.
O manual de instruções on-line contém
todas as informações detalhadas
para utilização, limpeza e solução de
problemas do utensílio iSi.
www.isi.com/culinary
Em caso de dúvidas, envie-as para
info@isi.com

Qualidade garantida:
Todos os utensílios da iSi foram verificados
detalhadamente antes sair da fábrica. A iSi
possui uma garantia de 2 anos contra defeitos
do material e da fabricação, desde que o dano
não tenha surgido devido à utilização indevida.
A garantia vale a partir da data do recibo da
compra.
Faça agora o seu registro on-line e ampliaremos a sua garantia!
Aproveite os benefícios: Garantia de 3 anos contra defeitos do material e da fabricação.
A garantia vale somente na utili zação de peças
iSi originais do dispositivo, de acordo com a lista
dos componentes do produto. O funcionamento
perfeito do dispositivo só é garantido se forem
utilizadas somente cápsulas iSi. Não podem
ser realizadas reivindicações de garantia ou
de responsabilidade em caso de erros, defeitos
ou danos resultantes principalmente do não
comprimento e/ou da não leitura do manual
de instruções e das respectivas instruções de
segurança.
Basta acessar e
garantir os benefícios:
www.isi.com/garantia/pt
Dados do aparelho.
Pressão máxima de
funcionamento PS
Temperatura mínima
de funcionamento
Temperatura máxima
de funcionamento
Volume máximo de
enchimento
Quantidade máxima
de cápsulas
Uso Não foi aprovado
20 bar
1 °C
30 °C
0,25L
0,5L
1 cápsula de creme iSi
para uso comercial.
Para creme de leite
puro e sobremesas.
Somente para
usos frios.
Lista de materiais.
Designação Material
Garrafa Aço inoxidável
Cabeça da garrafa PBT, POM, silicone,
Vedação da garrafa
Bico para decoração Adaptador: PA
Suporte da cápsula PA, silicone
Êmbolo de liberação PA, silicone,
Manto de silicone Silicone
Escova de limpeza Aço inoxidável, PA
Dados técnicos estão sujeitos a alterações
sem prévio aviso.
latão niquelado, PU,
aço inoxidável
TPE
Tul es: PP
aço inoxidável
PT
88 89

Instruções de
segurança.
O não cumprimento dos avisos de segurança
e/ou recomendações para o manuseio e manutenção dos produtos iSi pode resultar no mau
funcionamento do sistema, bem como causar
ferimentos e/ou danos materiais.
——— O utensílio iSi somente está aprovado para
usos de acordo com os dados do utensílio!
——— Leia e guarde cuidadosamente as instru-
ções de uso relacionadas às medidas de
prevenção contra erros de utilização!
——— Não usar força!
——— Armazene o utensílio iSi fora do alcance de
crianças!
——— Coloque o utensílio em funcionamento
apenas quando ele estiver cheio!
——— Nunca armazene ou utilize o utensílio iSi
fora da temperatura mínima e máxima de
funcionamento!
——— Combine apenas cabeças e garrafas do
mesmo tipo de utensílio!
——— Nunca combine produtos de outras mar-
cas com as peças do iSi!
——— Nunca aperte a cabeça do dispositivo e o
suporte da cápsula de maneira inclinada!
——— Utilize apenas cápsulas de creme iSi ori-
ginais!
——— Ao rosquear a cápsula, não se debruce
sobre o utensílio!
——— O utensílio é um recipiente sob pressão!
Quedas e danos (por exemplo, rachaduras
e deformações) podem representar perigo
e, nesses casos, o utensílio não deve mais
PT
ser utilizado! O utensílio foi testado pelo
centro de manutenção da iSi!
——— Nunca rosqueie a cabeça da garrafa de um
utensílio que esteja sob pressão!
——— Nunca utilize a alavanca como cabo
de apoio!
——— Limpar corretamente é essencial para
evitar entupimentos e vazamentos do
utensílio! Antes de cada uso, verificar se
o utensílio iSi foi limpado corretamente!
——— Somente desmonte o utensílio iSi para
limpar de acordo com a ilustração!
——— Somente limpeza manual com água quente
e detergentes de uso doméstico para
lavagem de louça manual! O utensílio i Si
não pode ser lavado na máquina de lavar
louça! A limpeza do cabeçote do utensílio
da maneira não permitida, na máquina de
lavar louça, pode danificar o cabeçote de
plástico e o supor te da cápsula! Assim, a
segurança do utensílio fica comprometida!
——— Não faça nenhuma alteração no utensílio
iSi. Isso causa o anulamento da garantia,
ficando o fabricante isento de responsabilidade nesses casos!
——— Nunca utilize mais cápsulas do que o indi-
cado ou encha demais o utensílio! Garanta
que a pressão máxima de funcionamento
indicada não seja ultrapassada!
——— Se a pressão não reduzir, leve para a iSi ou
para o seu contato no centro de manutenção!
OBSERVAÇÃO: Antes do primeiro uso do utensílio
iSi, realize a limpeza básica conforme indicado
na ilustração da limpeza.
OBSERVAÇÃO: Para evitar a formação de
grumos, dissolva os ingredientes em pó (açúcar,
etc.) em algum líquido antes de encher a gar rafa. Não utilize ingredientes contendo polpa de
fruta ou sementes!
OBSERVAÇÃO: O manto de silicone é meramente
decorativo. O utensílio iSi também funciona
corretamente sem este manto.
90 91

Instruções de uso.
Envase o chantilly/sobremesa baseada em
chantilly frio.
Retire o chantilly/sobremesa baseada no
chantilly do utensílio o mais breve possível da
utilização dos mesmos.
Preparação
1. Verifique se a vedação da garrafa está
posicionada na cabeça da mesma.
2. Posicione o êmbolo de liberação na cabeça
da garrafa.
3. Rosqueie o adaptador no êmbolo de liberação até o batente, não apertar de mais ou de
menos, e rosquear o bico para decoração no
adaptador.
4. Encha a garrafa com a mistura.
OBSERVAÇÃO: Observe a linha de enchi-
mento exterior e a indicação no fundo da
garrafa. Não encha demais! O espaço va zio
remanescente é necessário para possibilitar
um resultado ideal de batimento. Utilize um
recipiente medidor!
5. Quando desejado, puxar a proteção de silicone
com cuidado por cima do f rasco.
Utilização
6. Rosqueie a cabeça na gar rafa de forma
reta e firme, com as mãos.
7. Introduza a cápsula de nata iSi original
corretamente no suporte da cápsula.
OBSERVAÇÃO: Nunca rosqueie a cápsula se o
adaptador não estiver rosqueado no êmbolo de
liberação.
8. Rosqueie o supor te contendo a cápsula na
cabeça da garrafa até perceber, através do
ruído, que todo o conteúdo da cápsula foi
introduzido.
ATEN ÇÃO: O utensílio está sob muita pressão!
9. Agite o utensílio vigorosamente > 5.
92 93
PT
10. Solte o suporte da cápsula e mande a cápsula vazia para a reciclagem.
OBSERVAÇÃO: Um leve chiado ao desrosquear o suporte da cápsula é inerente ao
sistema.
11. Rosqueie a tampa na rosca.
Utilização
12. Para a remoção do chantilly, o utensílio deve
ser segurado de cabeça para baixo (bico para
decoração na vertical!) e a alavanca deve
ser pressionada suavemente.
OBSERVAÇÃO: Aproveite a primeira
retirada para testar a consistência. Se
a consistência continuar líquida, sacudir
o utensílio novamente.
Limpeza.
OBSERVAÇÃO: Observe as ilustrações de limpeza!
1. Acione a alavanca até que o aparelho esteja
completamente va zio. Desrosqueie a cabeça
da garrafa.
2. Desrosqueie o adaptador do êmbolo de
liberação e retire o bico para decoração do
adaptador.
3. Se foi utilizada a proteção de silicone, re ti rea para cima da garrafa iSi e limpe manualmente com detergentes de uso domé stico
para lavagem de louça manual.
4. Para a limpeza completa, remova a vedação
da garrafa.
5. Lave as peças do produto manualmente com
água potável morna (máx. 50°C) e detergente
de uso doméstico para lavagem de louça
manual, e limpe o êmbolo de liberação e o
bico para decoração com a escova. Remova
completamente a gordura e os resíduos de
clara de ovo!
OBSERVAÇÃO: Nunca utilize produtos
abrasivos ou esponjas e buchas ásperas.

OBSERVAÇÃO: Não os ferva nem lave em lavalouças!
OBSERVAÇÃO: O bico para decoração sempre
pode ser removido do adaptador para as limpezas
intermediárias necessárias.
Armazenamento.
Se o utensílio iSi não for imediatamente reabastecido, dei xar os componentes secarem ao ar
livre em um local limpo e armazenar o utensílio
iSi no estado desmontado.
Solução de problemas.
Despressurizar
Mantenha o utensílio na vertical, segure uma
toalha sobre o bico para decoração e pressione
a alavanca até que não haja mais pressão no
interior do utensílio iSi. Somente depois disso, a
cabeça do utensílio pode ser desrosqueada da
garrafa.
Se a pressão não reduzir, leve para a iSi ou para
o seu contato no centro de manutenção.
O conteúdo não pode ser removido ou o utensílio iSi o esguicha
1. Entupimento devido a ingredientes não
dissolvidos, como açúcar
——— "Despressurizar" e depois realize a
"limpeza".
——— Garantir que os ingredientes em pó
sejam completamente dissolvidos.
2. Chantilly ou mistura contendo chantilly com
consistência muito firme
——— Diminua a intensidade e a frequência
de agitação ao utilizar novamente o
utensílio.
——— Obser ve as informações sobre a fre-
quência de sacudidas do www.isi.com/
uso-domestico/cremedeleite
PT
3. Conteúdo muito rígido devido a resfriamento
excessivo
——— Deixe o utensílio a temperatura ambiente
de 5-10 minutos.
——— Evite congelar o conteúdo.
4. Pouca ou nenhuma pressão no utensílio
——— Utilize apenas cápsulas para chantilly
originais da iSi.
——— Não reutilize cápsulas vazias e realize a
reciclagem.
——— Utilize o utensílio apenas "de cabeça
para bai xo", com o bico para decoração
na vertical. Do contrário, pode haver
perda de pressão.
5. Excesso de cápsulas utilizadas
——— Obser ve a quantidade má xima de cáp-
sulas que podem utilizadas nos dados
do utensílio.
——— "Despressurizar" e recoloque o utensílio
em funcionamento.
Conteúdo liberado com consistência muito
líquida
1. O utensílio foi enchido além do nível
——— "Despressurizar", esvazie o conteúdo
em excesso e recoloque o utensílio em
funcionamento.
——— Obser ve a quantidade má xima de
enchimento.
2. O utensílio não foi agitado ou então não o
suficiente
——— Obser ve as informações sobre a fre-
quência de sacudidas do www.isi.com/
uso-domestico/cremedeleite
3. O conteúdo não está suficientemente frio
——— Coloque o utensílio iSi cheio e pronto
para uso de 1 - 2 horas na geladeira.
4. Foi utilizada uma cápsula inadequada
——— Utilize apenas cápsulas para chantilly
originais da iSi.
A cápsula para chantilly não é perfurada
1. A cápsula utilizada é inadequada
——— Utilize apenas cápsulas para chantilly
originais da iSi.
94 95

2. A cápsula foi inserida incorretamente
——— Insira a cápsula corretamente (veja a
figura: instruções de uso).
3. A unidade de perfuração foi danificada
——— Envie o utensílio à iSi ou a um centro
de manutenção.
No acionamento escapa gás pelo êmbolo de
liberação ou o adaptador
1. O utensílio foi acionado sem que o adaptador
estivesse rosqueado
——— Antes de rosquear a cápsula, certifique-se
de que o adaptador está rosqueado no
êmbolo de liberação.
——— "Despressurizar" e recolocar o utensílio
em funcionamento.
2. A vedação do êmbolo de vedação foi
danificada
——— O êmbolo de vedação precisa ser subs-
tituído e está disponível como peça de
reposição original da iSi.
Durante o acionamento, há vazamento de gás
entre a gar rafa e a cabeça
1. Falta a vedação da garrafa
——— "Despressurizar", posicione a vedação
da garrafa na cabeça.
2. A vedação da garrafa foi danificada
——— "Despressurizar". A vedação da cabeça
precisa ser substituída e está disponível
como peça de reposição original da iSi.
3. A cabeça não foi rosqueada firme o suficiente
——— "Despressurizar".
——— Rosqueie manualmente a cabeça na
garrafa conforme as instruções de uso.
4. A extremidade superior do cor po da garrafa
foi danificada
——— "Despressurizar", envie o utensílio à iSi
ou a um centro de manutenção.
PT
Manutenção.
As peças sobressalentes podem ser adquiridas
individualmente e a baixo custo.
Para encomendar peças sobressalentes, procure o seu distribuidor. Na Áustria, também é
possível em info@isi.com.
Em caso de reparos, envie sempre o utensílio
completo.
96 97

RU
Благодарим Вас за то,
что выбрали
устройство iSi.
Прежде чем приступить к использованию
устройства, внимательно ознакомьтесь с
инструкцией по эксплуатации.
RU
Откройте для
себя мир iSi:
Посетите веб-сайт iSi и узнайте больше
о нашем многообразном ассортименте
предложений: наша богатая подборка
рецептов – от просто удачных до
по-настоящему изысканных – откроет для
Вас все к улинарное разнообразие iSi.
Почувствуйте вдохновение!
Хотите напрямую пообщаться с истинным
экспертом в вопросах кулинарии?
Без проблем! В блоге iSi наш шеф-повар
с радостью ответит на Ваши вопросы.
Кроме того, Вы будете регулярно
получать новую интересную информацию
о компании iSi. Загляните к нам!
На веб-сайте iSi Вы найдете подробную
информацию обо всех устройствах и
принадлежностях iSi.
Подробная
онлайн-инструкция по эксплуатации
содержит всю необходимую информацию
по вводу устройств iSi в эксплуатацию,
очистке и устранению неисправностей.
www.isi.com/culinary
При наличии вопросов обращайтесь по
электронному адресу info@isi.com
98 99

Гарантированное качество:
Каждое устройство iSi проходит тщательную проверк у перед выпуском его в продаж у. Компания iSi
предоставляет гарантию на материал и исполнение сроком в 2 года, за иск лючением тех с лучаев,
когда причиной возникновения дефектов является
ненадлежащая эксплуатация устройства. Гарантия
вступает в силу с даты, указанной в товарном чеке.
Пройдите процедуру онлайн-регистрации, и мы
расширим Вашу гарантию!
Воспользуйтесь следующими преимуществами:
3 года гарантии на материал и исполнение.
Гарантия действует только при условии использования оригинальных запчас тей iSi в соответс твии
со списком элементов изделия. Исправное функционирование устройства гарантируется только
в случае использования исключительно оригинальных баллончиков iSi. Гарантия не действует и
гарантийные обязате льс тва не вст упают в силу,
если неполадки, повре ждения и косвенный ущерб
возникли вследствие несоблюдения и/или невнимательного прочтения инструкции по эксплуатации, а
также указаний по технике безопасности.
Прос то зарегистрируйтесь и получите свои
преимущества:
www.isi.com/warranty
100 101
Спецификация устройства.
Макс. рабочее
давление (PS)
Мин. рабочая
температура
Макс. рабочая
температура
Макс. емкос ть
Макс. количество
используемых баллончиков
Применение Непригодно для
20 бар
1 °C
30 °C
0,25 л
0,5л
1 баллончик iSi для сливок
промышленного
использования.
Для свежих сливок без
примесей и десертов
Только для холодных блюд
Список материалов.
Наименование Материал
Корпус Высокосортная сталь
Головка устройства ПБТ, ПОМ, силикон,
Уплотнение головки ТПЭ
Насадка для украшения
блюд
Капсулодержатель ПА, Силикон
Съемная колба ПА, Силикон,
Силиконовый чехол Силикон
щётка для очистки Высокосортная сталь,
Технические данные могут быть изменены без
предварительного уведомления.
никелированная
латунь, ПУ,
высокосортная сталь
Адаптер: ПА
Насадка: ПП
Высокосортная сталь
PA
RU

Указания по технике
безопасности.
Несоблюдение данных правил техники безопасности или каких-либо рекомендаций по использованию и техническому уходу приравнивается к
ненадлежащему применению продукции iSi и может
привести к нарушению нормальной работы системы и возможному причинению вреда здоровью и/
или повреждению имущества!
——— Устройство iSi предназначено исключитель-
но для применения согласно спецификации
устройства!
——— Во избежание неисправностей, вызванных
неправильным использованием, внимательно
прочитайте и сохраните инструкцию по эксплуатации!
——— Не прилагайте силу!
——— Храните устройство iSi в недоступном для
детей месте!
——— Вводите в действие только заполненное
устройство!
——— Никогда не храните и не используйте
устройство iSi вне мин. и макс. пределов
диапазона рабочей температуры!
——— Используйте головку устройства и баллон для
одинакового типа устройства!
——— Не используйте изделия других производите-
лей с компонентами iSi!
——— Следите за тем, чтобы головка ус тройства и
держатель баллончика были ввинчены ровно,
без перекоса!
——— Используйте только оригинальные баллончи-
ка iSi для сливок!
——— При ввинчивании баллончика не наклоняйтесь
над устройством!
——— Устройство находится под давлением! В ре-
зультате падения или повреждения (например,
трещин или деформации) оно становится
102 103
RU
опасным и не подлежит дальнейшей эксплуатации! Устройство должно быть проверено в
центре сервисного обслуживания iSi!
——— Не отвинчивайте головку с устройства,
находящегося под давлением!
——— Не поднимайте устройс тво, держа его за рычаг!
——— Чтобы избежать закупорки и нарушения гер -
метичности устройства, следует обязательно
проводить надлежащую очистку! Перед каждым использованием проверяйте, была ли выполнена надлежащая очистка устройства iSi!
——— Разбирайте устройство iSi только согласно
схеме очистки!
——— Проводите ру чную очис тку устройства
только слегк а теплой водой и стандартными
хозяйственными чистящими средствами!
Устройство iSi непригодно дл я мытья в посудомоечной машине! Недопустимая очистка
головки устройства в посудомоечной машине
может повредить пластмассовую головку и
держатель баллончика, таким образом оказывая отрицательное влияние на безопасную
работу устройства!
——— Не вносите никаких изменений в устрой-
ство iSi. Это влечет за собой прекращение
действия гарантии и отказ от выполнения
гарантийных обязательств!
——— Не используйте больше баллончиков, чем
указано, и ни в коем случае не допускайте
переполнения устройства! Соблюдение данного условия обеспечивает, что максимально указанное рабочее давление не будет превышено!
——— Если давление не уменьшается, пожалуйста,
свяжитесь с компанией iSi или ее центром
сервисного обслуживания!
УКАЗАНИЕ. Перед первым применением устройства iSi выполните очис тку согласно указаниям в
схеме очистки.
УКАЗАНИЕ. Перед заполнением растворите
порошкообразные ингредиенты (сахар и т.д.) в небольшом количестве жидкости, чтобы предотвратить образование комков. Не используйте ингредиенты с плодовой мякотью или косточками!
УКАЗАНИЕ. Силиконовый чехол служит для украшения. Устройство iSi может исправно эксплуатироваться и без него.

Инструкция по эксплуатации.
Заполняйте устройство только холодными сливками/десертами на основе сливок.
По возможности используйте устройство для взбивания сливок/десертов на основе сливок незадолго
до употребления.
Приготовление
1. Убедитесь, что на головке устройства установ-
лено уплотнение.
2. Вставьте съемную колбу в головку устройства.
3. Навинтите адаптер на съемную колбу до упора,
но не слишком плотно, а затем навинтите на
адаптер насадк у для украшения блюд.
4. Заполните баллон приготовленной массой.
УКАЗАНИЕ. Следите за уровнем заполнения
и маркировкой на дне баллона. Не допускайте
переполнения! Оставшееся незаполненное
пространство необходимо для оптимального
взбивания. Используйте мерный стакан!
5. При необходимости осторожно натяните сили-
коновый чехол на баллон с верхней стороны.
Ввод в действие
6. Ровно и плотно ввинтите головку устройства в
баллон.
7. Вставьте оригинальный баллончик iSi для сливок
в держатель баллончика в правильном положении.
УКАЗАНИЕ.Не устанавливайте баллончик, если
к съемной колбе не привинчен адаптер.
8. Привинчивайте держатель баллончика с
установленной капсулой к головке до тех пор,
пока не услышите, что содержимое баллончика
полностью вошло внутрь.
ВНИМАНИЕ: Устройство теперь находится под
давлением!
9. С силой встряхните ус тройство > 5 раз.
10. Вывинтите держатель баллончика и отправьте
пустую капсулу на вторичную переработку.
104 105
RU
УКАЗАНИЕ. Слабый шипящий звук при вывинчивании капсулодержателя обусловлен конструктивными особенностями.
11. Установите крышку, навинтив ее на резьбу.
Эксплуатация
12. Для извлечения содержимого необходимо на-
клонить устройство (насадка для украшения
блюд долж на быть в вертикальном положении!)
и мягко нажать рычаг.
УКАЗАНИЕ. Перед использованием сначала
проверьте консистенцию содержимого. Если
консистенция все еще слишком жидкая, повторно встряхните устройство.
Очистка.
УКАЗАНИЕ. Соблюдайте указания схемы очистки!
1. Нажимайте рычаг, пока не будет выпущено все
содержимое и не сброшено давление. Отвинтите головку устройства от баллона.
2. Свинтите адаптер со с ъемной колбы, а затем
свинтите насадк у для украшения блюд с адаптера.
3. Если использовался силиконовый чехол, стяните
его с баллона iSi чер ез верх и вручную ополосните водой с хозяйственными средствами для
ручного мытья посуды.
4. Для выполнения общей очис тки извлеките
уплотнение головки.
5. Ополосните элементы изделия вручную теплой
(макс. 50 °C) питьевой водой с хозяйс твенными
средс твами для ручного мытья посуды, очистите
съемную колбу и насадку с помощью щеточки.
Полностью уд алите жир и остатки бе лка!
УКАЗАНИЕ. Ни в коем случае не используйте абразивные материалы или жесткие губки/щетки.
УКАЗАНИЕ. Не производите очистку в посудомоечной машине и не кипятите!
УКАЗАНИЕ. Для выполнения необходимой промежуточной очистки насадк у для украшения блюд
можно в любое время снять с адаптера.

Хранение.
Если ус тройство iSi не планируетс я заполнять в
ближайшее время, необходимо высушить составные элементы на воздухе, поме стив их в чистое
место, а также хранить устройство iSi в разобранном виде.
Устранение неполадок.
Сброс давления.
Установите устройство вертикально, держите
полотенце перед насадкой дл я украшения блюд и
мягко нажимайте рычаг до тех пор, пока устройство
iSi не перестанет находиться под давлением. Только
после этого снимите головку устройства с баллона.
Если давление не уменьшается, пожалуйста, свяжитесь с компанией iSi или ее центром сервисного
обслуживания.
Содержимое не выходит наружу, либо происходит
разбрызгивание из устройства iSi
1. Закупорка нерастворившимися ингредиентами,
например, сахаром
——— Проведите операции «Сброс давления» и
«Очистка».
——— Убедитесь в том, что порошкообразные
ингредиенты полностью растворились.
2. Слишком затвердели сливки или заготовки,
содержащие сливки
——— При последующей эксплуатации уменьшите
интенсивность и частоту циклов вс тряхивания.
——— Соблюдайте указания о частоте встря-
хивания www.isi.com/home- edition/
whippedcream
3. Содержимое слишком загустело из-за чрезмерного ох лаж дения
——— Оставьте устройство при комнатной темпе-
ратуре на прибл. 5 -1 0 минут.
——— Избегайте замораживания содержимого.
RU
4. Отсутствует давление/слишком низкое давление
в устройстве
——— Используйте только оригинальные баллон-
чики iSi для сливок.
——— Не используйте пустые баллончики по-
вторно и незамедлительно отправьте их на
вторичную переработку.
——— Используйте устройство только в накло-
ненном положении и держите насадку для
украшения блюд вертикально, иначе произойдет потеря давления.
5. Использовано слишком много баллончиков
——— Соблюдайте указания в спецификации
устройства о макс. количестве используемых баллончиков.
——— Выполните «Сброс давле ния» и вновь вве-
дите устройство в действие.
Выдавливаемое из устройства содержимое имеет
слишком жидкую консистенцию
1. Устройство было переполнено
——— Выполните «Сброс давления», вылейте
лишнее содержимое и вновь введите
устройство в действие.
——— Соблюдайте указания о максимальной
емкости.
2. Устройство слишком мало вс тряхивалось либо
совсем не встряхивалось
——— Соблюдайте указания о частоте встря-
хивания www.isi.com/home- edition/
whippedcream
3. Содержимое недостаточно холодное
——— Поместите заполненное и готовое к экс-
плуат ации устройство iSi в холодильник на
1 – 2 часа.
4. Использовался баллончик неподходящего типа
——— Используйте только оригинальные баллон-
чики iSi для сливок.
Баллончик для сливок не прокалывается
1. Используется неподходящий баллончик
——— Используйте только оригинальные баллон-
чики iSi для сливок.
2. Баллончик вставлен не той стороной
——— Вставьте баллончик правильно (см. изображе-
ние: Инструкция по эксплуатации).
106 107

3. Вскрывающий элемент поврежден
——— Отправьте устройство в компанию iSi или
центр сервисного обслуживания.
При эксплуатации газ просачивается сквозь съемную колбу или адаптер
1. Устройство используется без привинченного
адаптера
——— Перед установкой баллончика убедитесь,
что адаптер привинчен к съемной колбе.
——— Выполните «Сброс давле ния» и вновь вве-
дите устройство в действие.
2. Уплотнение в съемной колбе повреждено
——— Необходимо заменить съемную колбу – она
дост упна как оригинальная запасна я деталь
производства компании iSi.
При эксплуатации газ просачивается между баллоном и головкой
1. Отсутствует уплотнение головки
——— Выполните «Сброс давле ния», вставьте
уплотнение в головку.
2. Прокладка повреждено
——— «Сброс давления». Необходимо заменить
прокладку – оно доступно как оригинальная запасна я деталь производства
компании iSi.
3. Головка недостаточно плотно привинчена
——— «Сброс давления».
——— В соответствии с инструкцией по экс-
плуатации плотно привинтите головку к
баллону.
4. Поврежден верхний край корпуса баллона
——— Выполните «Сброс давления», отправьте
устройство в компанию iSi или центр сервисного обслуживания.
RU
Обслуживание.
Любую запасную деталь можно приобрести отдельно по выгодной цене.
Для заказа запасных деталей обращайтесь к местному дилеру. В Авс трии это можно сделать так же по
эл. адресу info@isi.com.
Для ремонта необходимо высылать устройство
только в полной комплектации.
108 109

Odkryj świat iSi:
PL
PL
Dziękujemy
za wybór
urządzenia iSi.
Prosimy o dokładne zapoznanie
się z instrukcją obsługi przed
pierwszym użyciem urządzenia.
Odwiedź stronę internetową firmy iSi
idowiedz się więcej o naszej bogatej
ofercie: nasz bogaty zbiór przepisów,
ułożonych od bardzo prostych do najbardziej
wyrafinowanych, otworzy przed Tobą
pełnię kulinarnej różnorodności iSi. Daj się
zainspirować!
Chcesz skontaktować się bezpośrednio
z ekspertem kulinarnym? Nie ma problemu!
Na blogu firmy iSi nasz szef kuchni odpowie
na Twoje pytania. Co więcej, na bieżąco
będziesz otrzymywać interesujące
informacje ofirmie iSi. Po prostu zajrzyj tam!
Dodatkowo, strona internetowa firmy iSi
zawiera szczegółowe informacje na temat
wszystkich urządzeń i akcesoriów firmy iSi.
Wyczerpująca instrukcja obsługi, dostępna
w formie elektronicznej, przekaże
Ci wszystkie informacje dotyczące
użytkowania, czyszczenia iusuwania
usterek wurządzeniach firmy iSi.
www.isi.com/culinary
Pytania prosimy kierować na adres
info@isi.com
110 111

Gwarantowana jakość:
Każde urządzenie firmy iSi jest dokładnie sprawdzane przed opuszczeniem fabryki. Firma iSi
udziela 2-letniej gwarancji na materiały iwykonanie, o ile usterki nie powstały wskutek
nieprawidłowego użytkowania. Gwarancja
obowiązuje od daty na dowodzie zakupu.
Zarejestruj się teraz online, a my rozszerzymy
zakres Twojej gwarancji!
Skorzystaj z zalet: 3-letnia gwarancja na
materiał i wykonanie.
Gwarancja obowią zuje wyłącznie w przypadku
uży tkowania oryginalnych części urządzenia
iSi, zgodnie z listą elementów produktu firmy
iSi. Niezawodne działanie urządzenia możemy
zagwarantować wyłącznie pod warunkiem
stosowania nabojów iSi. Roszczenia gwarancyjne i odszkodowawcze nie obejmują błędów,
uszkodzeń i szkód powstałych w wyniku niezapoznania się z instrukcją użytkowania oraz
zawartymi w niej zasadami bezpieczeństwa i/
lub niestosowania się do nich.
Po prostu zaloguj się
i zagwarantuj sobie korzyści:
www.isi.com/warranty
112 113
Dane techniczne.
Maks. ciśnienie
robocze PS
Min. temperatura
robocza
Maks. temperatura
robocza
Maks. pojemność
Maks. liczba naboi
Zastosowanie Niedopuszczone
20 bar
1 °C
30 °C
0,25 l
0,5 l
1 nabój do bitej
śmietany iSi
do użytku
przemysłowego.
Do przygotowywania świeżej bitej
śmietany ideserów.
Do zastosowania
tylko do potraw
zimnych .
Wykaz materiałów.
Nazwa Materiał
Butelka Stal szlachetna
Głowica urządzenia
Uszczelka głowicy TPE
Końcówka do
garnirowania
Uchwyt naboju PA, silikon
Tłok PA, silikon,
Otulina silikonowa Silikon
Pędzel czyszczący Stal szlachetna, PA
Dane techniczne mogą ulec zmianie bez
wcześniejszego powiadomienia.
PBT, POM, silikon,
mosiądz niklowany,
PU, stal szlachetna
Adapter: PA
Końcówka: PP
stal szlachetna
PL

Zasady
bezpieczeństwa.
Niestosowanie się do instrukcji bezpieczeństwa
oraz do wszelkich zaleceń dotyczących obsługi
i konserwacji produktów firmy iSi może skutkować nieprawidłowym funkcjonowaniem
systemu lub spowodować obrażenia ciała bądź
szkody materialne.
——— Urządzenie iSi jest dopuszczone wyłącznie
do zastosowania zgodnego zdanymi
technicznymi!
——— Wcelu uniknięcia błędów w obsłudze należy
dokładnie przeczy tać instrukcję uży tkowania
iprzechowywać ją wbezpiecznym miejscu !
——— Nigdy nie używać siły!
——— Urządzenie iSi przechowywać wmiejscu
niedostępnym dla dzieci!
——— Używać tylko napełnionego urządzenia!
——— Nigdy nie przechowy wać ani nie
użytkować urządzenia wtemperaturze
niższej od minimalnej iwyższej od
maksymalnej temperatury roboczej!
——— Łączyć ze sobą jedynie głowicę urządzenia
ibutelkę tego samego ty pu!
——— Nigdy nie łączyć produktów innych
producentów zczęściami urządzenia iSi!
——— Nie przykręcać głowicy i uchwy tu do
naboji krzywo!
——— Stosować tylko oryginalne naboje do bitej
śmietany iSi!
——— Podczas wkręcania nabojów nie pochylać
się nad urządzeniem!
——— Urządzenie jest zbiornikiem ciśnieniowym!
Upadek urządzenia lub jego uszkodzenie
(np. pęknięcie, zniekształcenie) może stać
się źródłem zagrożenia. W takiej sy tuacji
nie należy używać urządzenia! Należy
PL
zlecić kont rolę ur ządzenia wplacówce
serwisowej firmy iSi!
——— Nigdy nie odkręcać głowicy od urządzenia
będącego pod ciśnieniem!
——— Nie używać dź wigni jako uchwytu do
przenoszenia!
——— Prawidłowe oczyszczenie jest bezwzględnie
konieczne wcelu zapobieżenia zatkaniu
inieszczelności urządzenia. Przed każdym
użyciem należy sprawdzić, czy urząd zenie
iSi zostało prawidłowo oczyszczone!
——— Rozkładanie urząd zenia na części jest
dozwolone tylko zgodnie zilustracją
dotyczącą czyszczenia!
——— Czyścić ręcznie wyłącznie pod letnią
wodą iprzy użyciu domowych środków
czyszczących! Urządzenie iSi nie jest
przystosowane do mycia wzmywarce!
Czyszczenie głowicy urządzenia w zmywarce do naczyń jest niedozwolone i może
spowodować uszkodzenie głowicy oraz
uchwytu do naboji z tworzywa sztucznego
oraz zakłócić bezpieczne funkcjonowanie
urządzenia!
——— Nie zmieniać konstrukcji urządzenia iSi.
Prowad zi to do wygaśnięcia gwarancji
iwykluczenia odpowiedzialności!
——— Nigdy nie stosować nabojów innego typu
niż podane inigdy nie przepełniać urządzenia!
To gwarantuje, że nie zostanie przekroczone
maksymalne ciśnienie robocze!
——— Jeżeli nie można zredukować ciśnienia
do zera, skontaktować się zfirmą iSi lub
placówką serwisową!
WSKAZÓWKA: Przed pierwszym użyciem urządzenia iSi należy wykonać czyszczenie zgodnie
zilustracją dotyczącą czyszczenia.
WSKAZÓWKA: Aby uniknąć tworzenia się
grudek, przed napełnieniem należy całkowicie
rozpuścić składniki wproszku, cukier itp. wniewielkiej ilości cieczy. Nie używać składników
zawierających mią ższ lub pestki owoców!
WSKAZÓWKA: Płaszcz silikonowy jest elementem
dekoracyjnym. Urządzenia iSi można bezproblemowo uż ywać także bez tego elementu.
114 115

Instrukcja użytkowania.
Napełnić śmietanką/deserem na bazie śmietany.
Śmietankę/deser na bazie śmietany należy serwować z urządzenia w możliwie krótkim czasie
przed spożyciem.
Przygotowanie
1. Sprawdź, czy w głowicy znajduje się uszczelka.
2. Włóż tłok w głowicę urządzenia.
3. Nakręć adapter na tłok niezbyt mocno, raczej
lekko, aż do wyczucia oporu, a następnie nakręć na adapter końcówkę do garnirowania.
4. Napełnij butelkę produktem.
WSKAZÓWKA: Nie napełniać powyżej linii —
przestrzegać informacji podanych na dnie
butelki. Nie przepełniać! Pozostawienie pustej przestrzeni jest niezbędne do uzyskania
optymalnego efektu ubicia. Stosować pojemnik z miarką do odmier zania!
5. Jeśli to pożądane, ostrożnie zdejmij od góry
osłonę silikonową z butelki.
Przygotowanie do użycia
6. Nakręć głowicę prosto i mocno na butelkę.
7. Włóż do uchwytu oryginalny nabój do bitej
śmietany iSi we właściwej pozycji.
WSKAZÓWKA: Nie należy przykręcać naboju,
jeśli na tłoku nie jest przykręcony adapter.
8. Nakręć na głowicę uchwyt z włożonym
nabojem, tak aby cała zawartość naboju
przelała się do butelki.
UWAGA: Urządzenie znajduje się obecnie pod
ciśnieniem!
9. Mocno wstrząśnij urządzeniem > 5 razy.
10. Odkręć uchwyt i wyjmij pusty nabój. Przekaż
go do punktu odbioru materiałów do ponownego przet worzenia.
WSKAZÓWKA: Ciche syczenie podczas odkręcania uchwytu jest normalnym zjawiskiem.
116 117
PL
11. Nakręć osłonkę na gwint.
Obsługa
12. W celu dozowania zawartości trzymaj
urządzenie do gór y dnem (końcówka do garnirowania ustawiona pionowo!) i delikatnie
naciśnij dźwignię.
WSKAZÓWKA: Przy pierwszej próbie należy
sprawdzić konsystencję produktu. Jeżeli
konsystencja jest zbyt płynna, ponownie
wstrząsnąć urządzeniem.
Czyszczenie.
WSKAZÓWKA: Należy przestrzegać informacji
zawartych na ilustracji dotyczącej czyszczenia!
1. Wciśnij dź wignię, aż urządzenie zostanie całkowicie opróżnione i nie będzie znajdować
się pod ciśnieniem. Odkręć głowicę od butelki.
2. Odkręć adapter od tłoka i odkręć końcówkę
do garnirowania od adaptera.
3. Jeżeli osłona silikonowa znajdowała się na
urządzeniu, należy ją ściągnąć od góry z butelki iSi i ręcznie umyć przy uż yciu domowego
środka do mycia naczyń.
4. Aby gruntownie wyczyścić urządzenie, zdejmij uszczelkę głowicy.
5. Resztki produktu spłucz ręcznie ciepłą wodą
(o temperaturze maks. 50 °C) z dodatkiem
domowego środka do mycia naczyń i za
pomocą szczotki oczyść tłok i końcówkę
do garnirowania. Całkowicie usuń tłuszcz i
resztki białka!
WSKAZÓWKA: W żadnym wypadku nie stosować specjalnych środków szorujących lub
gąbek/szczotek, które mogą zarysować powierzchnię.
WSKAZÓWKA: Nie myć w zmywarce i nie myć
we wrzątku!
WSKAZÓWKA: Końcówkę do garnirowania
można w każdej chwili odkręcić od adaptera,
aby ją oczyścić.

Przechowywanie.
Jeżeli urządzenie iSi nie zostanie natychmiast
napełnione ponownie, pozostawić jego elementy do wyschnięcia w czystym i wentylowanym
miejscu. Urządzenie iSi przechowywać w zdemontowanym stanie.
Usuwanie usterek.
Redukcja ciśnienia
Ustawić urządzenie prosto, nad wylotem końcówki do garnirowania przytrzymać szmatkę i
tak długo delikatnie naciskać dź wignię, aż całe
ciśnienie ulotni się z urządzenia iSi. Dopiero wtedy odkręcić głowicę urządzenia od butelki.
Jeżeli nie można zredukować ciśnienia do zera,
skontaktować się z firmą iSi lub placówką serwisową.
Nie można wyjąć zawartości lub urządzenie iSi
pryska
1. Zatkanie nierozpuszczonymi składnikami np.
cukrem
——— Wykonać procedurę „Redukcja ciśnienia”,
a następnie „Czyszczenie”.
——— Upewnić się, że sproszkowane składniki
zostały całkowicie rozpuszczone.
2. Zbyt sztywna śmietana lub produkt zawierający śmietanę
——— Przy kolejnym użyciu zmniejszyć inten-
sywność i częstotliwość cykli potrząsania.
——— Przestr zegać informacji dotyczących
częstotliwości potrząsania
www.isi.com/home-edition/whippedcream
3. Ze względu na zbyt mocne chłodzenie zawartość jest za bardzo zbita
——— Pozostawić urządzenie w temperaturze
pokojowej na ok. 5–10 minut.
——— Nie zamrażać zawartości .
PL
4. Brak ciśnienia / zby t niskie ciśnienie w urządzeniu
——— Stosować tylko oryginalne naboje do
bitej śmietany iSi.
——— Nie używać ponownie pustych nabojów.
Przekazać je do punktu odbioru materiałów do ponownego przetworzenia.
——— Urządzenia uży wać tylko i wyłącznie
w położeniu do góry dnem, z ustawioną
pionowo końcówką do garnirowania.
W przeciwnym razie może dojść do utraty
ciśnienia.
5. Zastosowano zbyt wiele nabojów
——— Przestrzegać maksymalnej liczby sto-
sowanych nabojów, podanej w danych
technicznych urządzenia.
——— Wykonać procedurę „Redukcja ciśnienia”
i ponownie uruchomić urządzenie.
Konsystencja produktu jest zbyt luźna
1. Urządzenie zostało napełnione zby t dużą
ilością produktu.
——— Wykonać procedurę „Redukcja ciśnienia”,
wylać nadmiar produktu i ponownie
uruchomić urządzenie.
——— Przestrzegać maksymalnego poziomu
napełnienia.
2. Urządzenie zostało zbyt lekko wstrząśnięte
lub nie zostało wstrząśnięte w ogóle.
——— Przestr zegać informacji dotyczących
częstotliwości potrząsania
www.isi.com/home-edition/whippedcream
3. Zawartość nie jest wystarczająco zimna
——— Napełnione i gotowe do użytku urządze-
nie iSi włożyć na 1–2 godzin do lodówki.
4. Użyto nieodpowiedniego naboju
——— Stosować tylko oryginalne naboje do
bitej śmietany iSi.
118 119

Nabój do bitej śmietany nie został przebity
1. Zastosowano nieodpowiedni nabój
——— Stosować tylko oryginalne naboje do
bitej śmietany iSi.
2. Nabój został włożony odwrotnie
——— Włożyć nabój do bitej śmietany pra-
widłowo (patrz ilustracja: Instrukcja
uży tkowania).
3. Przy rząd do przebijania został uszkodzony
——— Odesłać urządzenie do firmy iSi lub pla-
cówki serwisowej.
Podczas uruchamiania przez tłok lub adapter
ulatnia się gaz
1. Urządzenie zostało użyte bez nakręconego
adaptera
——— Przed wkręceniem naboju sprawd zić,
czy na tłok został nakręcony adapter.
——— Wykonać procedurę „Redukcja ciśnienia”
i ponownie uruchomić urządzenie.
2. Uszczelka tłoka została uszkodzona
——— Należy wymienić tłok — jest on dostępny
jako oryginalna część zamienna iSi.
Podczas uruchamiania ulatnia się gaz między
butelką a głowicą
1. Brak uszczelki głowicy
——— Wykonać procedurę „Redukcja ciśnienia”,
włożyć uszczelkę do głowicy.
2. Uszczelka głowicy została uszkodzona
——— „Redukcja ciśnienia”. Należy wymienić
uszczelkę tłoka — jest ona dostępna jako
oryginalna część zamienna iSi.
3. Głowica nie została odpowiednio mocno
dokręcona
——— „Redukcja ciśnienia”.
——— Nakręcić mocno głowicę na butelkę
zgodnie z instrukcją.
4. Korpus butelki został uszkodzony na górnej
krawędzi
——— Wykonać procedurę „Redukcja ciśnie-
nia”, odesłać urządzenie do firmy iSi lub
placówki serwisowej.
PL
Serwis.
Części zamienne są dostępne pojedynczo, w
korzystnych cenach.
Aby zamówić części zamienne, skontaktuj się
ze sprzedawcą. W Austrii zamówienia można
składać także pocztą e-mail pod adresem
info@isi.com.
Do naprawy należy przesłać całe urządzenie.
120 121

Create.
New.
Taste.

iSi GmbH
Kürschnergasse 4
A-1217 Vienna
T +43 (1) 250 99-0
info@isi.com
www.isi.com/culinary
Distribution Deutschland
iSi Deut schland GmbH
D-42719 Solingen
T +49 (212) 397-0
isideutschland@isi.com
www.isi.com/culinary/de
Imported and distributed by
iSi Nor th America, Inc.
Fairfield, NJ 07004
Phone +1 (973) 227-2426
Phone +1 (800) 447-2426
isinorthamerica@isi .com
www.isi.com/culinary/us
947010402
 Loading...