

Page 1

User’s Manual
Ver. 1.02
IMPORTANT
• Read this manual thoroughly, and do not perform installation,
operation, maintenance, or inspection unless you fully
understand all of the contents.
• Keep this manual in a safe place where you can refer to it
easily while installing, operating, and carrying out
maintenance or inspections.
RS-61004-11 1.02
Page 2

© ISHIDA Co., Ltd. 2008 All rights are reserved.
No part of this publication may be reproduced, stored in a retrieval system, or transmitted in any form or by any means
mechanical, electronic, photocopying, recording, or otherwise without prior written permission of ISHIDA.
Page 3

NOTICES
NOTICES
IMPORTANT NOTICE
Those who handle the machine must be aware of the hazards involved. These dangers may not be
obvious, so it is imperative to follow the instructions detailed in this manual when installing, operating,
inspecting, or servicing the machine. Therefore, we recommend that you thoroughly read and
understand this manual before installing, operating, inspecting, or servicing the machine.
ISHIDA is not liable for any damage, loss or injury that results from incorrect operation, insufficient
caution, unauthorized modifications to the machine, or failure to follow the instructions contained in
this manual.
LIMITATIONS OF LIABILITY
ISHIDA assumes no responsibility for special, indirect, or consequential damages, loss of profits or
commercial loss in any way connected with the machine, whether such claim is based on contract,
warranty, negligence, or strict liability.
ISHIDA assumes no responsibility for the user's programming of this machine, or any consequence
thereof.
In no event shall ISHIDA be responsible for warranty, repair, or other claims regarding the machine
unless ISHIDA’s analysis confirms that the machines were properly handled, stored, installed, and
maintained and not subject to contamination, abuse, misuse, or inappropriate modification or repair.
CHANGE IN SPECIFICATIONS
Machine specifications and accessories may be changed at any time due to improvements or other
reasons. Consult with your ISHIDA representative at any time to confirm the actual specifications of
the purchased machine.
ERRORS AND OMISSIONS
The information in this manual has been carefully checked and is believed to be accurate; however,
no responsibility is assumed for clerical, typographical or proofreading errors, or omissions.
UNI-7 User’s Manual i
Page 4

PRECAUTIONS FOR SAFE USE
PRECAUTIONS FOR SAFE USE
It is strongly advised that the following safety measures must be observed to ensure the safe
operation of the machine.
• Prepare a dedicated power source and always use a
power supply with rated voltage. Never connect the
machine power input with an AC power supply
exceeding the rated voltage. To avoid any potential
electrical shock, ensure that the protective ground
wire is connected to the main grounding provision.
A power supply that generates voltage variation may
cause a malfunction, or using the machine outside of the
rated voltage may result in machine failure or danger
such as electric shock.
• Do not install the machine near a TV set or radio.
Doing so may cause static to the TV set and/or radio as
this machine emits week electric wave.
• Do not allow water or any liquids to come into
contact with the machine.
Doing so may result in fire or cause the machine to break
down.
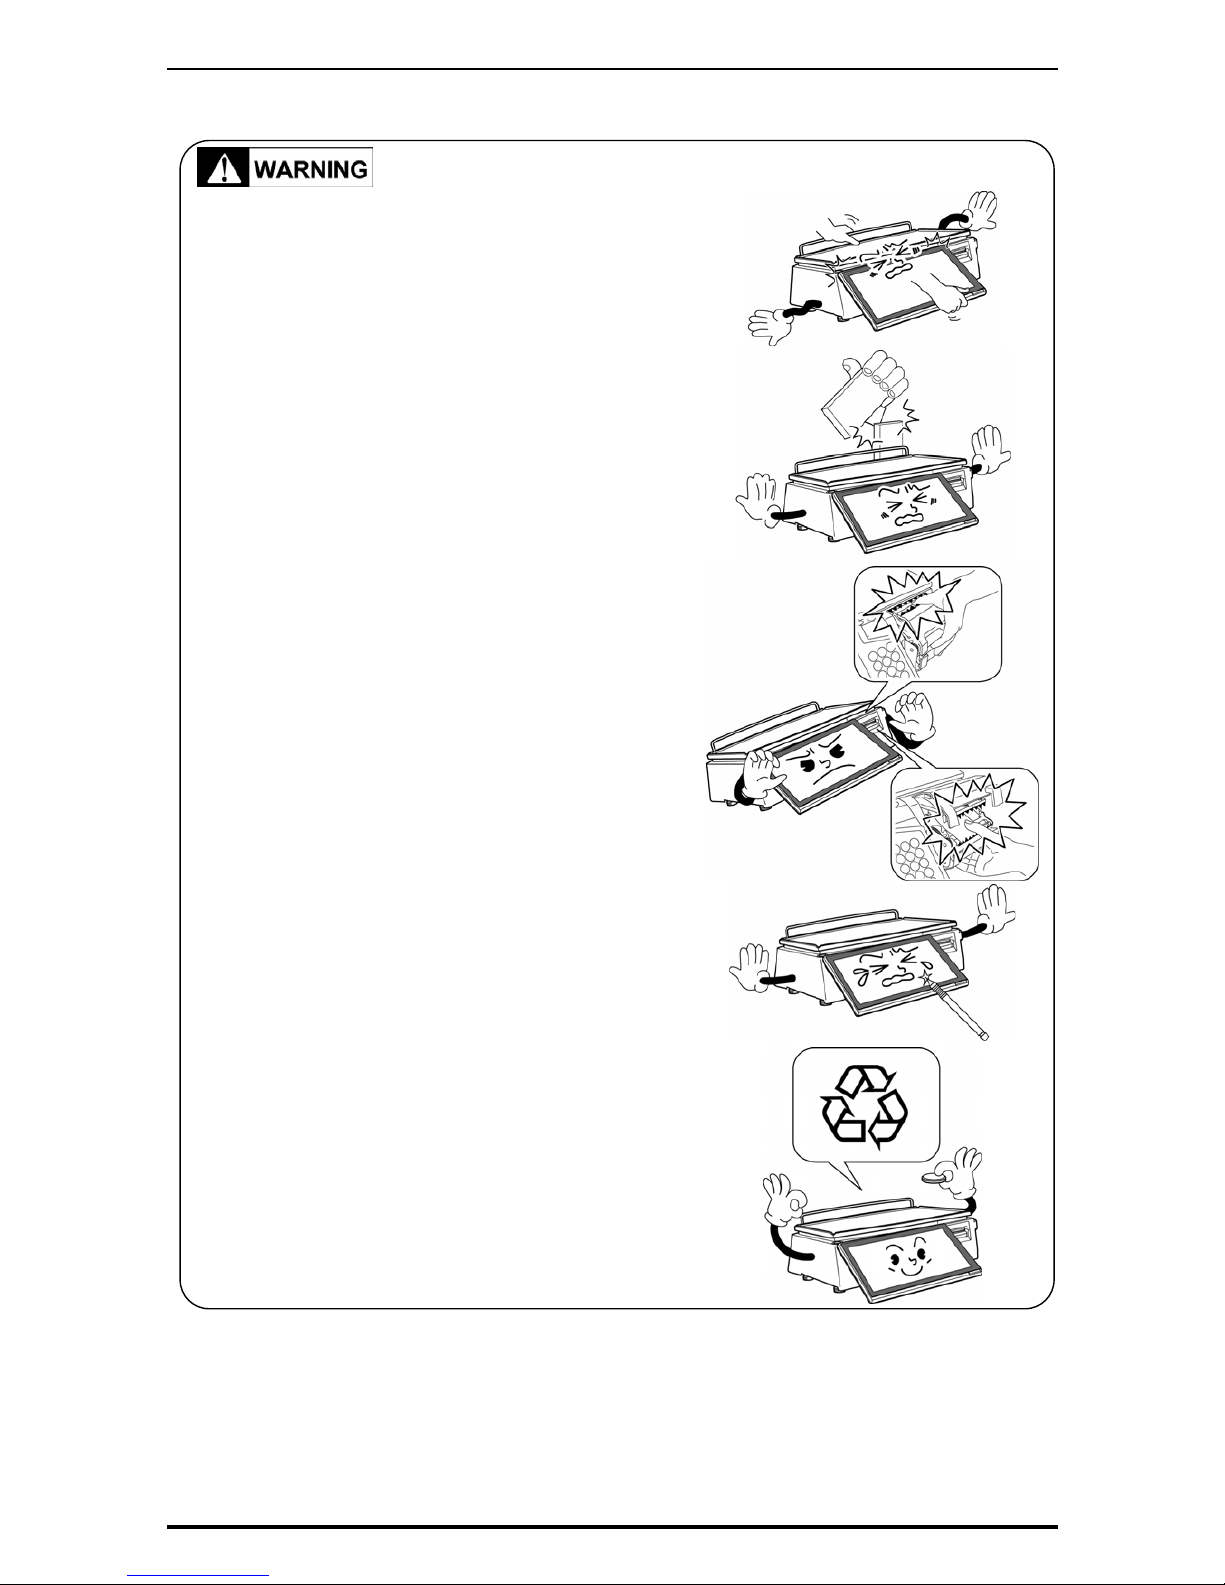
• Do not drop or apply a strong shock to the machine.
Doing so may cause the machine to break down.
• Do not disassemble, modify, or attempt to repair the
machine.
Doing so may damage the original safety functions.
• Do not hold the connector cover when carrying the
machine.
Dropping the machine may result in injury or cause the
machine to break down.
ii UNI-7 User’s Manual
Page 5
PRECAUTIONS FOR SAFE USE
• Do not hold the operation panel or weigh platter
when carrying the machine.
Doing so may cause the operation panel or the platter to
break down.
• Do not hold the customer display for the pole type
when carrying the machine.
Dropping the machine may result in injury or cause the
machine to break down.
• Handle with care when removing or inserting the
cassette.
Careless cassette handling may result in injury or cause
the cassette to break down.
• Do not drop the cassette.
Dropping the cassette may result in injury or cause the
cassette to break down.
• Do not press the touch panel with an edged thing.
Doing so may scratch the panel and cause the machine
to break down.
• Risk of explosion if battery is replaced by an
incorrect type. Make sure to dispose of used
batteries according to the instructions.
UNI-7 User’s Manual iii
Page 6
PRECAUTIONS FOR MACHINE INSTALLATION
PRECAUTIONS FOR MACHINE INSTALLATION
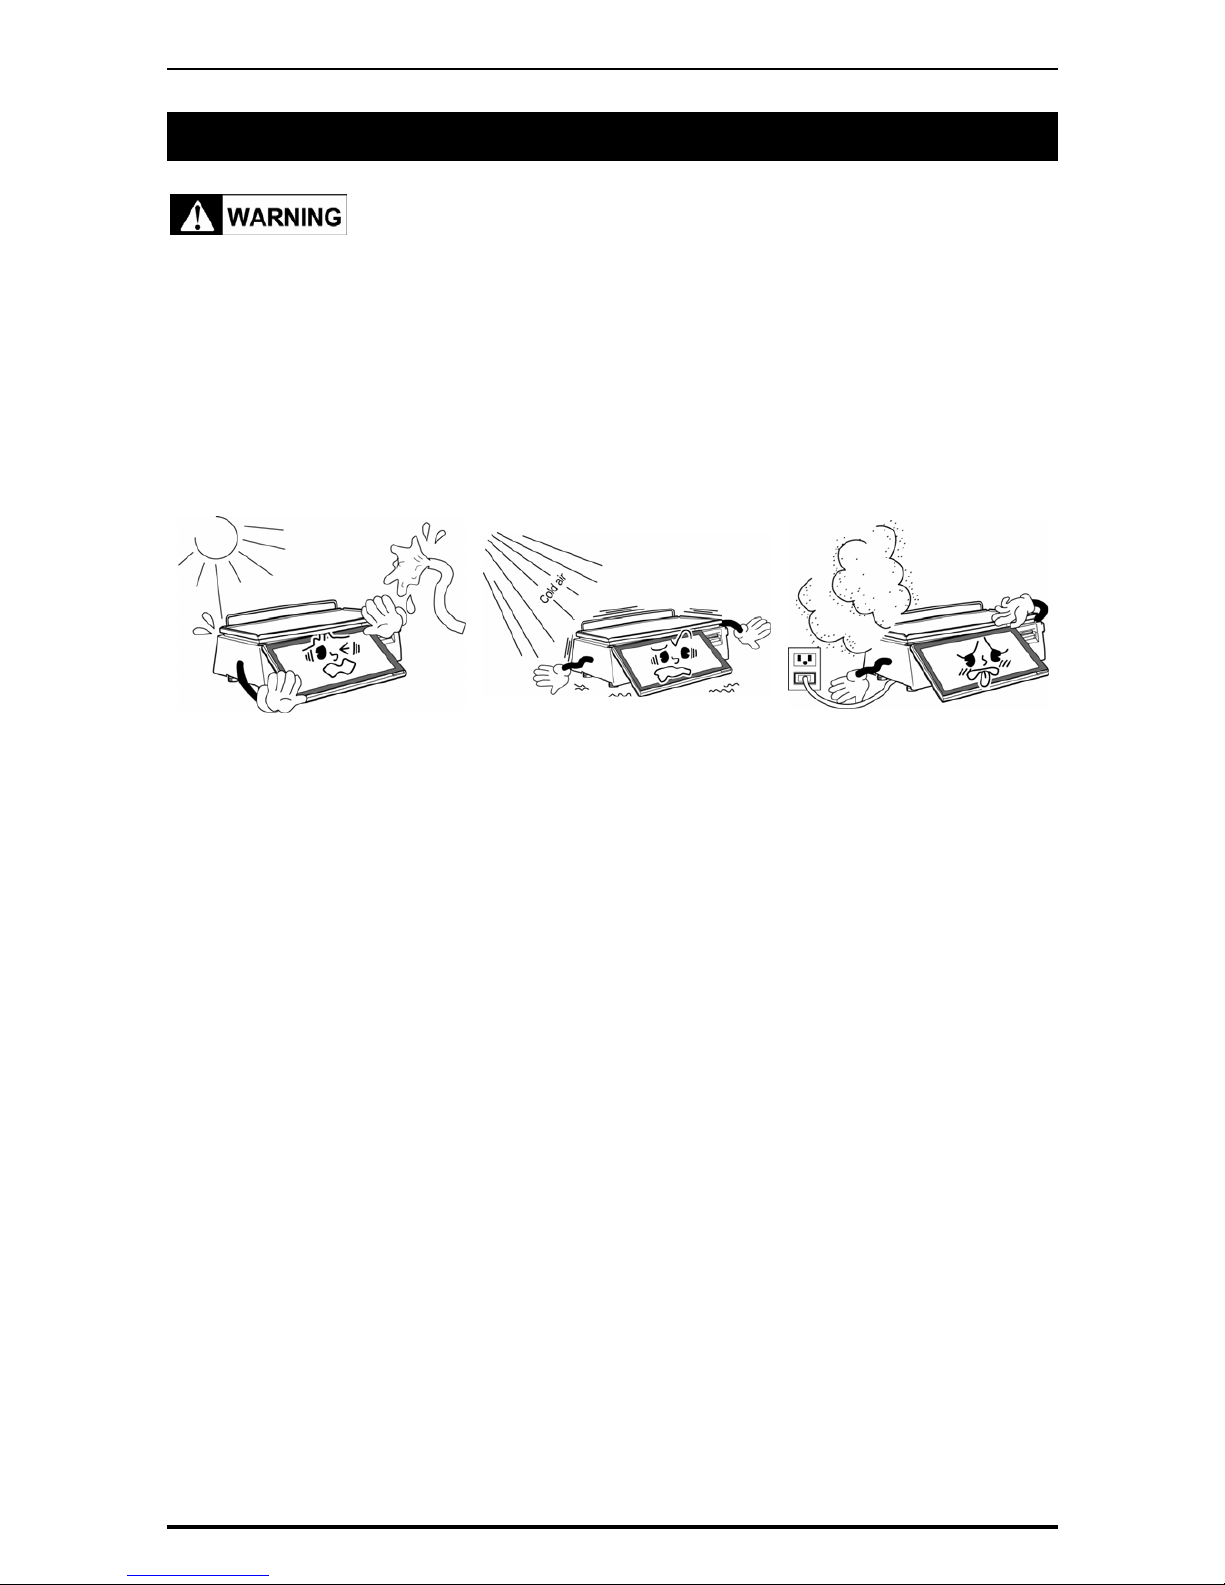
Do not install the machine in the following types of places:
• Places subject to high
temperatures or high humidity
• Places exposed to direct
sunlight
• Places where water or other
liquids are easily spilled on the
machine
• Places subject to excessive
vibration or unstable
foundations
• Places exposed to direct cold
air from air conditioners or
refrigerators
• Places where the floor or
foundation is unstable
• Places subject to a lot of
dust or dirt
• Places with large voltage
fluctuations
iv UNI-7 User’s Manual
Page 7
PRECAUTION SYMBOLS
PRECAUTION SYMBOLS
This machine is manufactured for use according to proper procedures by a qualified person and only
for the purposes described in this manual. The following conventions are used to indicate and classify
precautions depending on the level of danger, or seriousness of potential injury. Always heed the
information provided in this manual. Failure to heed precautions can result in personal injury or
property damage.
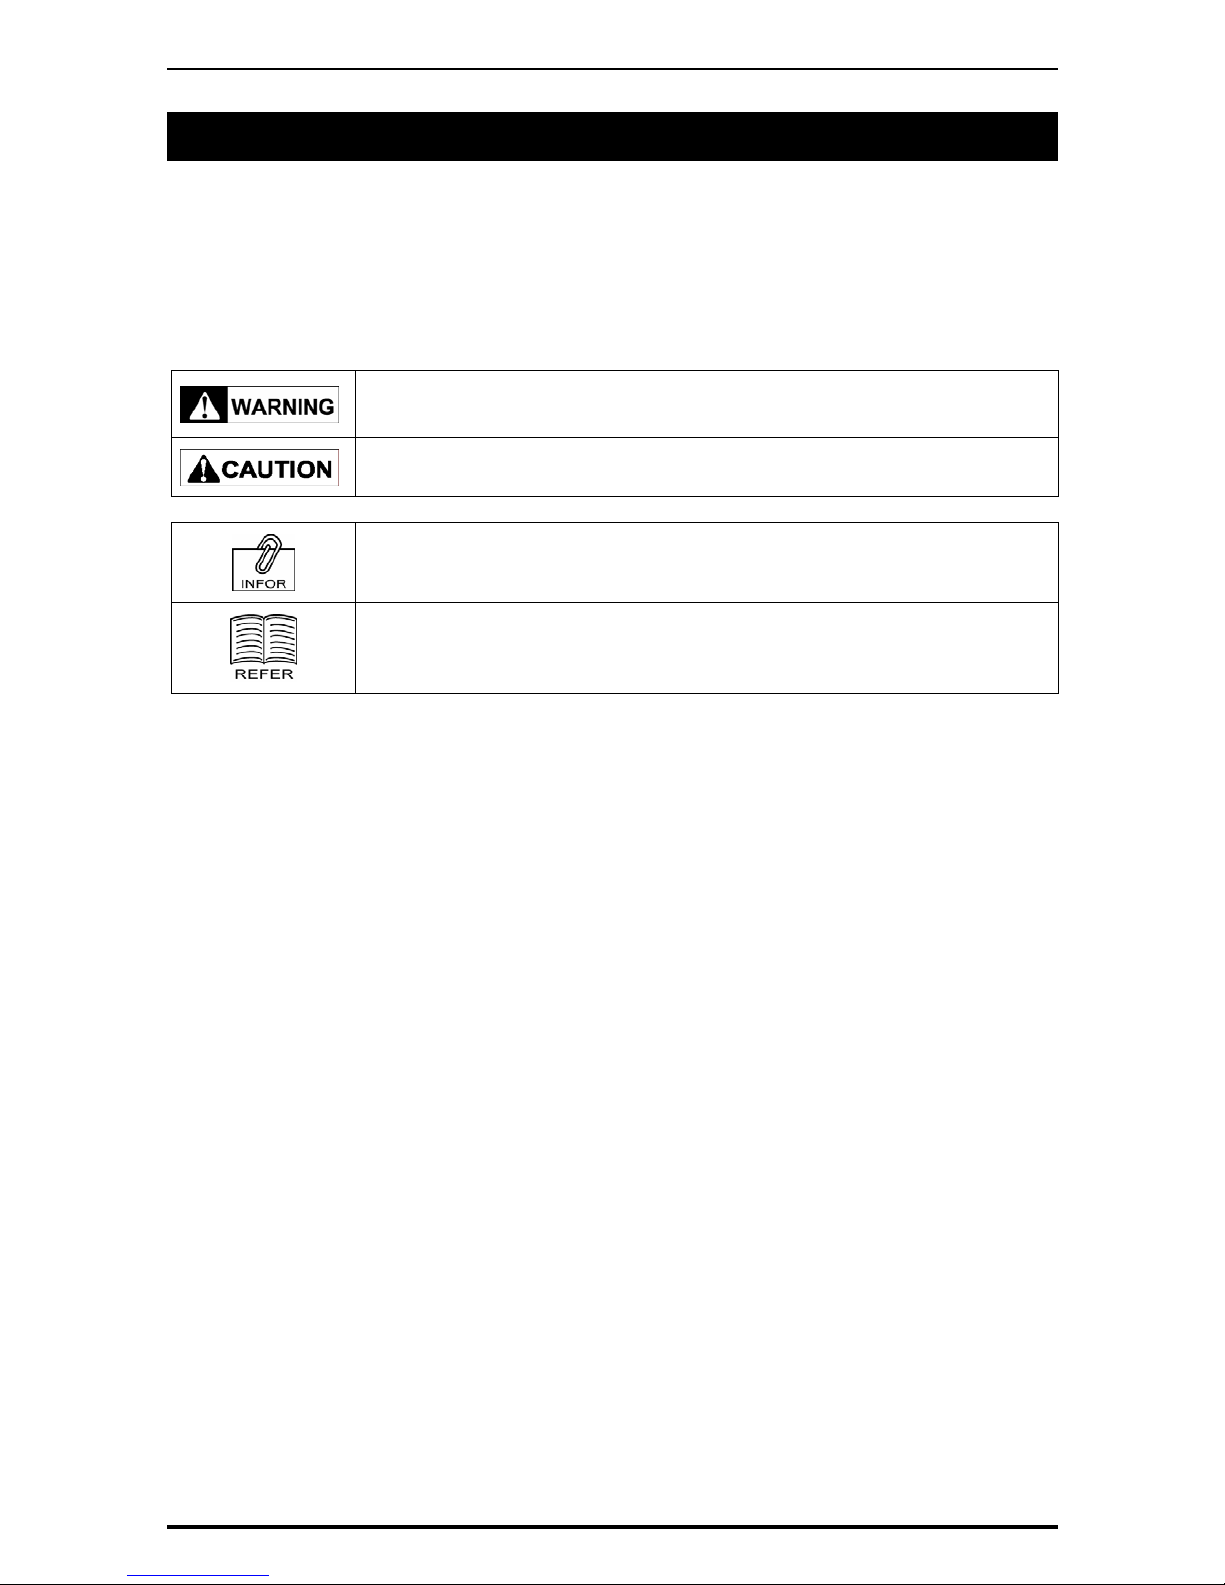
The following precaution symbols are used in this manual.
Indicates a potentially hazardous situation which, if not avoided, may result in
serious injury or death. Additionally, there may be significant property damage.
Indicates a potentially hazardous situation where, if not avoided, may result in
minor or moderate injury or in property damage.
Indicates reference information for operation.
Indicates the referred page for operation.
UNI-7 User’s Manual v
Page 8

TABLE OF CONTENTS
TABLE OF CONTENTS
CHAPTER 1 BEFORE USE....................................................................................................1-1
1.1 SPECIFICATIONS...................................................................................................1-1
1.2 MODEL VARIATIONS..............................................................................................1-2
1.3 PART NAMES AND FUNCTIONS............................................................................1-3
1.3.1 FRONT VIEW (BENCH TYPE).................................................................... 1-3
1.3.2 REAR VIEW (BENCH TYPE)......................................................................1-3
1.4 OPERATION PANEL................................................................................................1-4
1.5 ADJUSTMENTS ......................................................................................................1-5
1.5.1 LEVEL ADJUSTMENT (BENCH TYPE)......................................................1-5
1.5.2 OPERATION PANEL ANGLE ADJUSTMENT (BENCH TYPE)...................1-5
1.6 LABEL / RECEIPT ROLL LOADING........................................................................ 1-6
1.7 REMOVING & REPLACING OF WEIGH PLATTER ................................................1-9
1.7.1 REMOVING THE WEIGH PLATTER........................................................... 1-9
1.7.2 REPLACING THE WEIGH PLATTER..........................................................1-9
1.8 CLEANING OF THE MACHINE.............................................................................1-10
1.8.1 CLEANING OF THE THEREMAL HEAD...................................................1-10
1.8.2 CLEANING OF THE LABEL SENSOR...................................................... 1-11
1.8.3 CLEANING OF THE PRINT ROLLER AND PRISM ..................................1-12
1.8.4 PRECAUTIONS WHEN USING CLEANING FLUIDS...............................1-13
1.9 STARTING PROCEDURES...................................................................................1-14
1.9.1 TURNING ON THE POWER.....................................................................1-14
1.9.2 PERFORMING ZERO ADJUSTMENT ......................................................1-15
1.9.3 GETTING BACK TO THE INITIAL SCREEN.............................................1-16
CHAPTER 2 LABEL ISSUE....................................................................................................2-1
2.1 LABEL ISSUE WITHOUT OPERATOR....................................................................2-1
2.1.1 WEIGHING UNIT PRICE PRODUCTS........................................................2-1
2.1.2 WEIGHING FIXED PRICE PRODUCTS .....................................................2-4
2.1.3 PROCESSING FIXED PRICE PRODUCTS................................................2-7
2.1.4 PROCESSING FIXED WEIGHT/FIXED UNIT PRICE PRODUCTS............ 2-9
2.2 LABEL ISSUE WITH OPERATORS....................................................................... 2-11
2.2.1 WEIGHING UNIT PRICE PRODUCTS...................................................... 2-11
2.2.2 WEIGHING FIXED PRICE PRODUCTS ...................................................2-14
2.2.3 PROCESSING FIXED PRICE PRODUCTS..............................................2-17
2.2.4 PROCESSING FIXED WEIGHT/FIXED UNIT PRICE PRODUCTS.......... 2-19
CHAPTER 3 RECEIPT ISSUE................................................................................................3-1
3.1 SALES BY THE SAME OPRATOR..........................................................................3-1
3.2 SALES BY DIFFERENT OPRATORS....................................................................3-11
3.3 VOIDING PRODUCT REGISTRATION..................................................................3-24
CHAPTER 4 TRACEABILITY PRODUCTS............................................................................4-1
4.1 REFERING TO PREVIOUS TRACEABILITY DATA.................................................4-1
vi UNI-7 User’s Manual
Page 9

TABLE OF CONTENTS
4.2 CHANGING TRACEABILITY DATA .........................................................................4-4
CHAPTER 5 TEMPORARY CHANGE OPERATIONS ........................................................... 5-1
5.1 UNIT PRICE CHANGE ............................................................................................5-1
5.2 FIXED PRICE CHANGE..........................................................................................5-3
5.3 AMOUNT DISCOUNT FOR UNIT PRICE................................................................5-5
5.4 PERCENT DISCOUNT FOR UNIT PRICE ..............................................................5-7
5.5 AMOUNT DISCOUNT FOR TOTAL PRICE.............................................................5-9
5.6 PERCENT DISCOUNT FOR TOTAL PRICE.......................................................... 5-11
5.7 PRODUCT QUANTITY CHANGE.......................................................................... 5-13
5.8 PRINT QUANTITY SETTING.................................................................................5-15
CHAPTER 6 SELF-SERVICE OPERATIONS......................................................................... 6-1
6.1 WEIGHING PRODUCTS ......................................................................................... 6-1
6.2 FIXED PRICE PRODUCTS ..................................................................................... 6-3
CHAPTER 7 ACCUMULATOR MODE ...................................................................................7-1
7.1 MANUAL INPUT ACCUMULATION ......................................................................... 7-1
7.2 WEIGHING ACCUMULATION.................................................................................7-3
7.3 MANUAL INPUT VOID.............................................................................................7-6
7.4 WEIGHING VOID.....................................................................................................7-9
CHAPTER 8 TOTAL ADJUST MODE ....................................................................................8-1
8.1 MANUAL INPUT SUBTRACTION............................................................................ 8-1
8.2 WEIGHING SUBTRACTION....................................................................................8-3
8.3 MANUAL INPUT ADDITION.....................................................................................8-6
8.4 WEIGHING ADDITION ............................................................................................8-9
CHAPTER 9 TOTAL MODE.................................................................................................... 9-1
9.1 DAILY TOTAL...........................................................................................................9-1
9.2 WEEKLY TOTAL ......................................................................................................9-4
9.3 CUMULATIVE TOTAL..............................................................................................9-6
9.4 TRACEABILITY TOTAL ........................................................................................... 9-8
9.5 PRESET REPORT PRINTING.................................................................................9-9
9.6 TOTAL CLEAR....................................................................................................... 9-10
CHAPTER 10 PROGRAM MODE........................................................................................... 10-1
10.1 PROGRAM MODE ENTRY....................................................................................10-1
10.2 PLU FILE REGISTRATION.................................................................................... 10-4
10.3 CAMPAIGN LIST REGISTRATION......................................................................10-14
10.4 OPERATOR REGISTRATION..............................................................................10-19
10.5 PRESET KEY REGISTRATION........................................................................... 10-22
10.5.1 SETTING PRESET FUNCTIONS............................................................ 10-22
10.5.2 ASSIGNING IMAGES ON THE PRESET KEYS ..................................... 10-25
10.5.3 COLORING PRESET KEYS ................................................................... 10-27
10.5.4 CHANGING PRESET KEY SIZES .......................................................... 10-30
UNI-7 User’s Manual vii
Page 10

TABLE OF CONTENTS
10.5.5 EDITING PRESET KEY NAMES............................................................. 10-33
10.5.6 CONFIRMING PRESET KEY DATA........................................................10-36
10.5.7 DELETING PRESET KEYS.....................................................................10-37
10.5.8 MEMBRANE KEYS.................................................................................10-39
10.6 ADVERTISEMENT MESSAGE REGISTRATION................................................10-42
10.7 STORE NAME REGISTRATION..........................................................................10-46
10.7.1 CHANGING EXISTING STORE DATA....................................................10-46
10.7.2 CREATING NEW STORE DATA ............................................................. 10-49
10.8 DEPARTMENT NAME REGISTRATION..............................................................10-53
10.8.1 CREATING NEW DEPARTMENT NAMES.............................................. 10-53
10.8.2 CHANGING EXISITING DEPARTMENT NAMES...................................10-57
10.9 GROUP NAME REGISTRATION.........................................................................10-59
10.9.1 CREATING NEW GROUP NAMES.........................................................10-59
10.9.2 CHANGING EXISITING GROUP NAMES............................................... 10-62
10.10 COOKING INSTRUCTION REGISTRATION....................................................... 10-64
10.10.1 CREA TING NEW INSTRUCTIONS.........................................................10-64
10.10.2 CHANGING EXISITING INSTRUCTIONS............................................... 10-67
10.1 1 NUTRITION FILE REIGISTRATION .................................................................... 10-69
10.11.1 CREATING NEW NUTRITION DATA......................................................10-69
10.1 1.2 CHANGING EXISTING NUTRITION DATA.............................................10-72
10.12 EXTRA MESSAGE REGISTRATION................................................................... 10-75
10.12.1 CREA TING NEW MESSAGES................................................................10-75
10.12.2 CHANGING EXISITING MESSAGES ..................................................... 10-78
10.13 COUPON MESSAGE REGISTRATION............................................................... 10-80
10.13.1 CREA TING NEW MESSAGES................................................................10-80
10.13.2 CHANGING EXISITING MESSAGES ..................................................... 10-83
10.14 POP MESSAGE REGISTRATION.......................................................................10-85
10.15 T AX REGISTRATION...........................................................................................10-87
10.16 SCHEME T ABLE REGISTRATION...................................................................... 10-88
10.16.1 CREA TING NEW TABLES ......................................................................10-88
10.16.2 CHANGING EXISITING MESSAGES ..................................................... 10-92
10.17 GEN T ABLE REGISTRATION..............................................................................10-96
10.18 LOOKUP TABLE REGISTRATION ...................................................................... 10-99
10.18.1 CREA TING NEW TABLES ......................................................................10-99
10.18.2 CHANGING EXISITING TABLES..........................................................10-106
10.19 MINCE TRACEABILITY REGISTRATION ......................................................... 10-1 10
10.20 FIXED PRICE MARK REGISTRATI ON ..............................................................10-111
10.20.1 CREATING NEW PRICE MARKS..........................................................10-111
10.20.2 CHANGING EXISITING PRICE MARKS............................................... 10-113
10.21 FREE MESSAGE REGISTRATION................................................................... 10-115
10.21.1 CREA TING NEW MESSAGES.............................................................. 10-115
10.21.2 CHANGING EXISITING MESSAGES ................................................... 10-1 18
viii UNI-7 User’s Manual
Page 11

TABLE OF CONTENTS
10.22 CHECK LABEL REGISTRATION....................................................................... 10-120
CHAPTER 11 SETUP MODE.................................................................................................. 11-1
11.1 SETUP MODE ENTRY.......................................................................................... 11-1
11.2 MACHINE NUMBER SETTING............................................................................. 11-3
11.3 SALES MODE SETTING....................................................................................... 11-4
11.4 PASSWORD SETTING.......................................................................................... 11-5
11.5 KEY LOCK SETTING .......................................................................................... 11-10
11.6 DATA STORAGE SETTING................................................................................. 11-14
11.7 PRESET REPORT SETTING.............................................................................. 11-15
11.8 AUTO PROGRAM SETTING............................................................................... 11-19
11.9 DEFAULT DATA SETTING................................................................................... 11-21
1 1 .10 PLU UPDATE SETTING...................................................................................... 11-29
11.11 RECEIPT SETTING.............................................................................................11-35
CHAPTER 12 ADJUSTMENT MODE .....................................................................................12-1
12.1 ADJUSTMENT MODE ENTRY..............................................................................12-1
12.2 DATE / TIME ADJUSTMENT ................................................................................. 12-2
12.3 TOUCH PANEL ADJUSTMENT.............................................................................12-4
12.4 DISPLAY CHECK ..................................................................................................12-6
APPENDIX TEXT EDITING .......................................................................................................A-1
A.1 OPERATION PANEL AND KEY FUNCTIONS.........................................................A-1
A.2 NORMAL CHARACTER EDITING...........................................................................A-3
A.3 SPECIAL CHARACTER EDITING...........................................................................A-6
A.4 LINE DELETION......................................................................................................A-8
A.5 CHARACTER DELETION........................................................................................A-9
A.6 CHARACTER BACKSPACING..............................................................................A-11
UNI-7 User’s Manual ix
Page 12

Chapter 1 BEFORE USE
1
BEFORE USE
1.1 SPECIFICATIONS
Items Descriptions
Use conditions
Temperature: 5 to 35°C
Humidity: 30 to 85%, Non condensing.
Power supply: AC100 – 240V, 50 / 60Hz
Power consumption 1.0A/0.5A
Weight Bench type: Approx.11.5 kg
Pole type: Approx.12.5 kg
Weighing capacity 15 kg: 0 to 6/0.002 kg, 6 to 15/0.005 kg
Weighting accuracy 1/3000
Operator/Customer display 7.0 inch color liquid crystal with back light, 480 X 234dots
Printing method Direct thermal method
Thermal head 2 inches (448dots) and 8 dots/mm
Printing speed 100mm/second, 120mm/second
Note: The printing speed may vary according to label conditions.
Printing effective size 56mm
Label size Label width: 30mm to 60mm
Label length: 20mm to 150mm
Number of label cassettes 7 cassettes
Input/Output LAN 1 channel
USB 1 channel
CF 1 channel
Drawer 2 channels
Program store medium Flash ROM (32M bytes)
UNI-7 User’s Manual 1-1
Page 13
Chapter 1 BEFORE USE
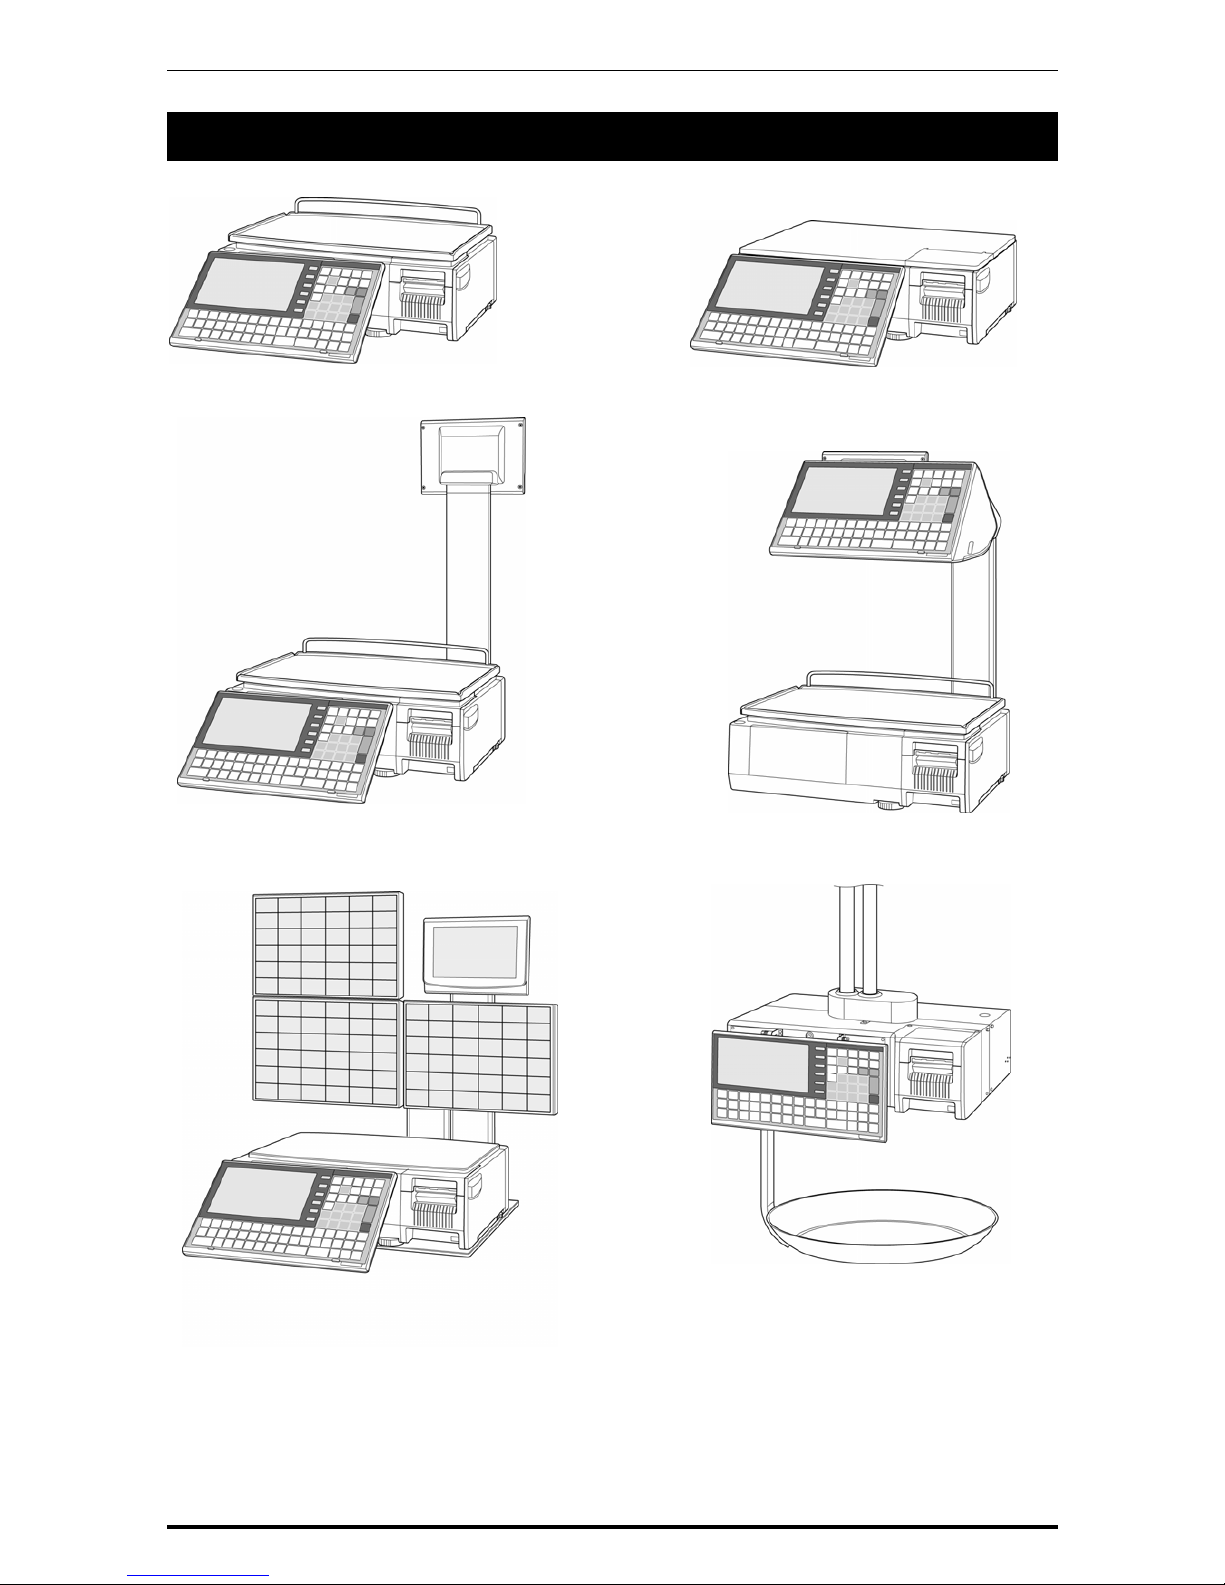
1.2 MODEL VARIATIONS
Bakery Type
Bench Type
Pole Type
Elevated Type
Self-service Type
Hanging Type
1-2 UNI-7 User’s Manual
Page 14

Chapter 1 BEFORE USE
1.3 PART NAMES AND FUNCTIONS
1.3.1 FRONT VIEW (BENCH TYPE)
1.3.2 REAR VIEW (BENCH TYPE)
UNI-7 User’s Manual 1-3
Page 15
Chapter 1 BEFORE USE
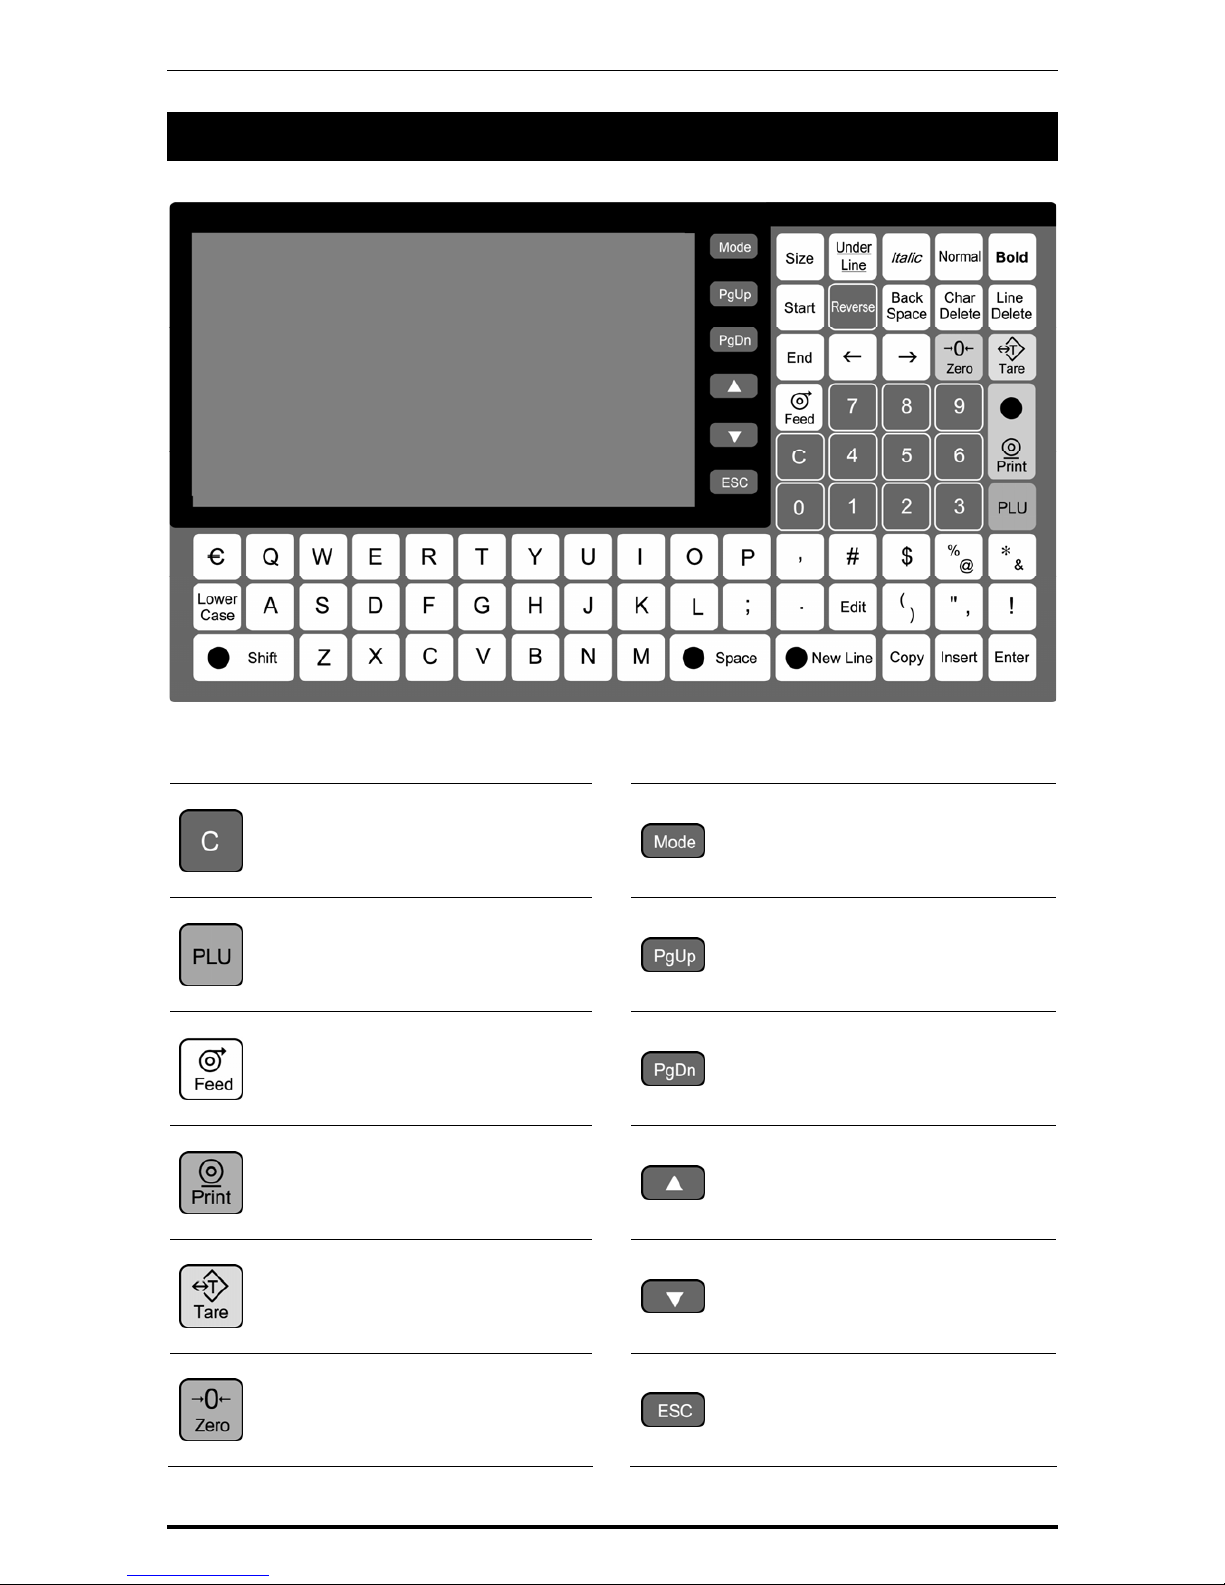
1.4 OPERATION PANEL
Keys for Usual Use
Used to delete an entered
numerical value.
Used to display Menu Select
screen.
Used to call a registered product
data.
Used to turn the previous page.
Used to feed labels.
Used to turn the next page.
Used to issue a label.
Used to jump to the top page.
Used to enter tare weight.
Used to jump to the end page.
Used to reset a weigh to zero.
Used to escape from the current
mode.
1-4 UNI-7 User’s Manual
Page 16
Chapter 1 BEFORE USE
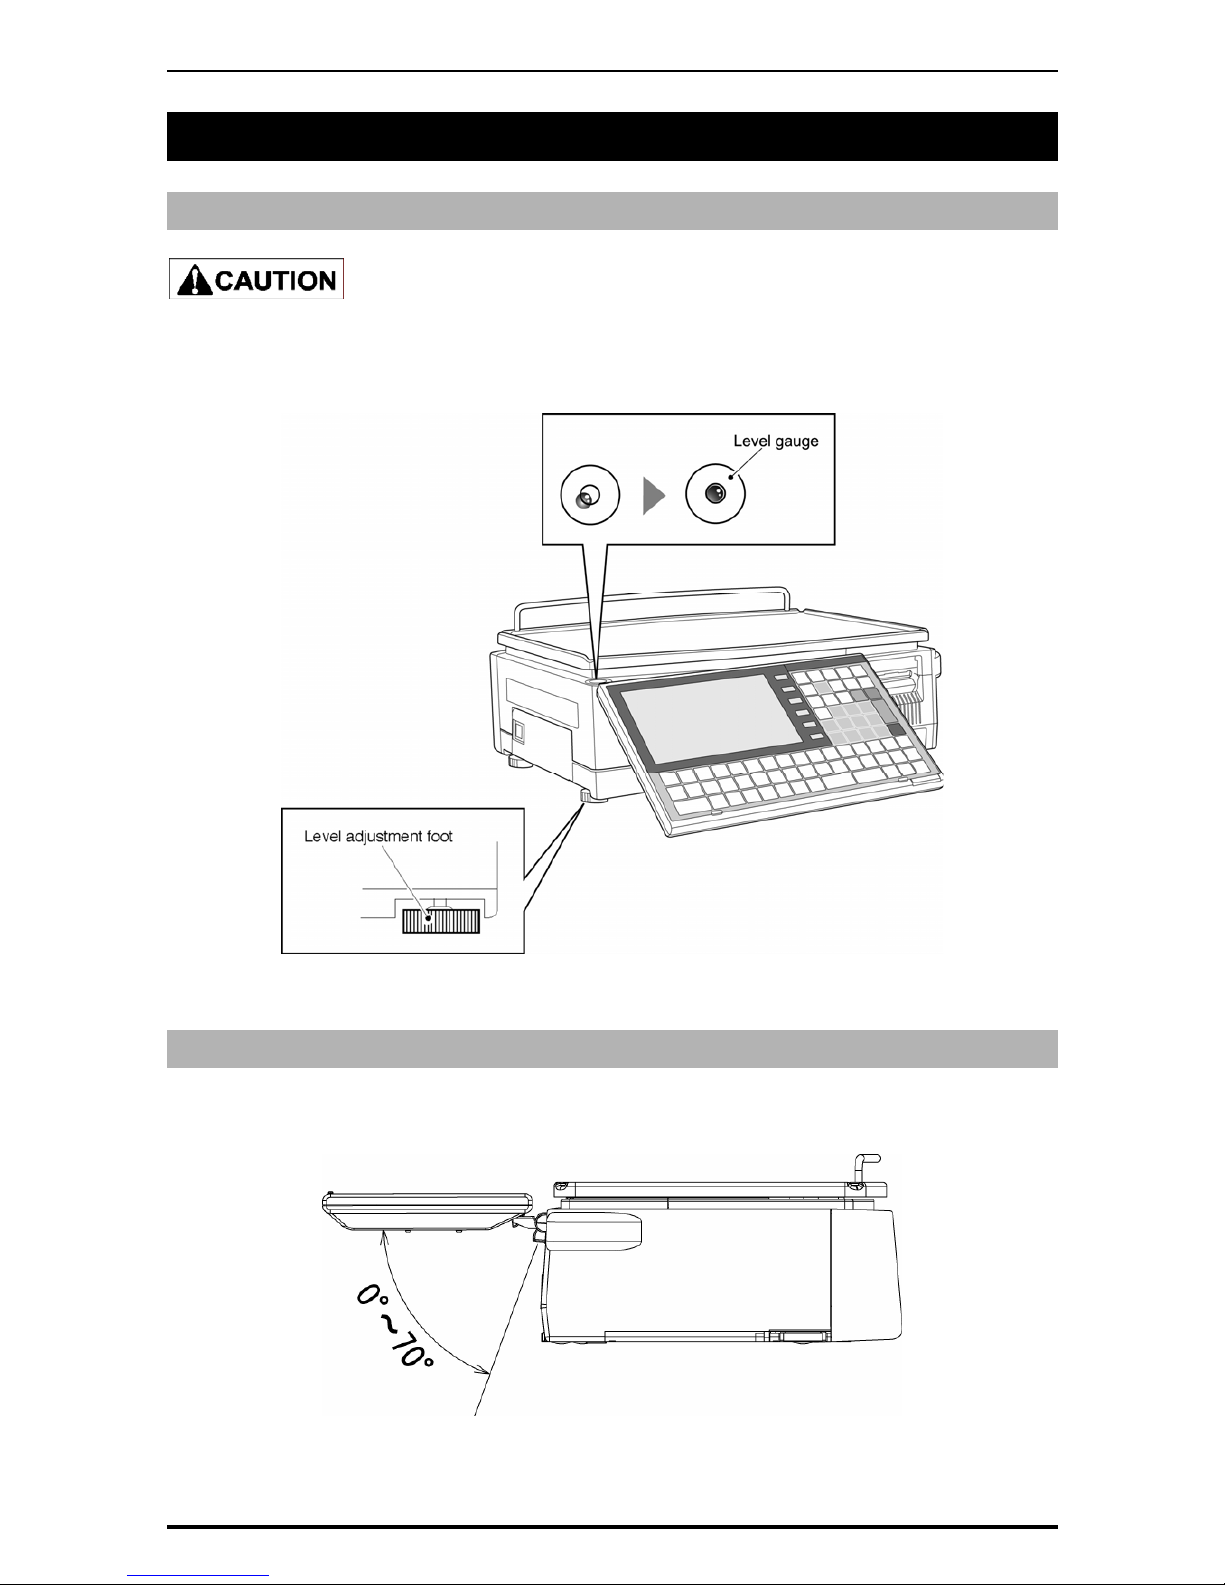
1.5 ADJUSTMENTS
1.5.1 LEVEL ADJUSTMENT (BENCH TYPE)
Install the machine horizontally to use.
Be sure to turn off the power switch before placing the machine on a stable platform, and adjust the
machine inclination by turning the four level adjustment feet so that the bubble is located at the center
of the level gauge. Accurate measurements cannot be performed if it is not installed horizontally.
1.5.2 OPERATION PANEL ANGLE ADJUSTMENT (BENCH TYPE)
To obtain a better view, adjust the angle of the operation panel within the range between 0 and 70
degrees.
UNI-7 User’s Manual 1-5
Page 17
Chapter 1 BEFORE USE
1-6 UNI-7 User’s Manual
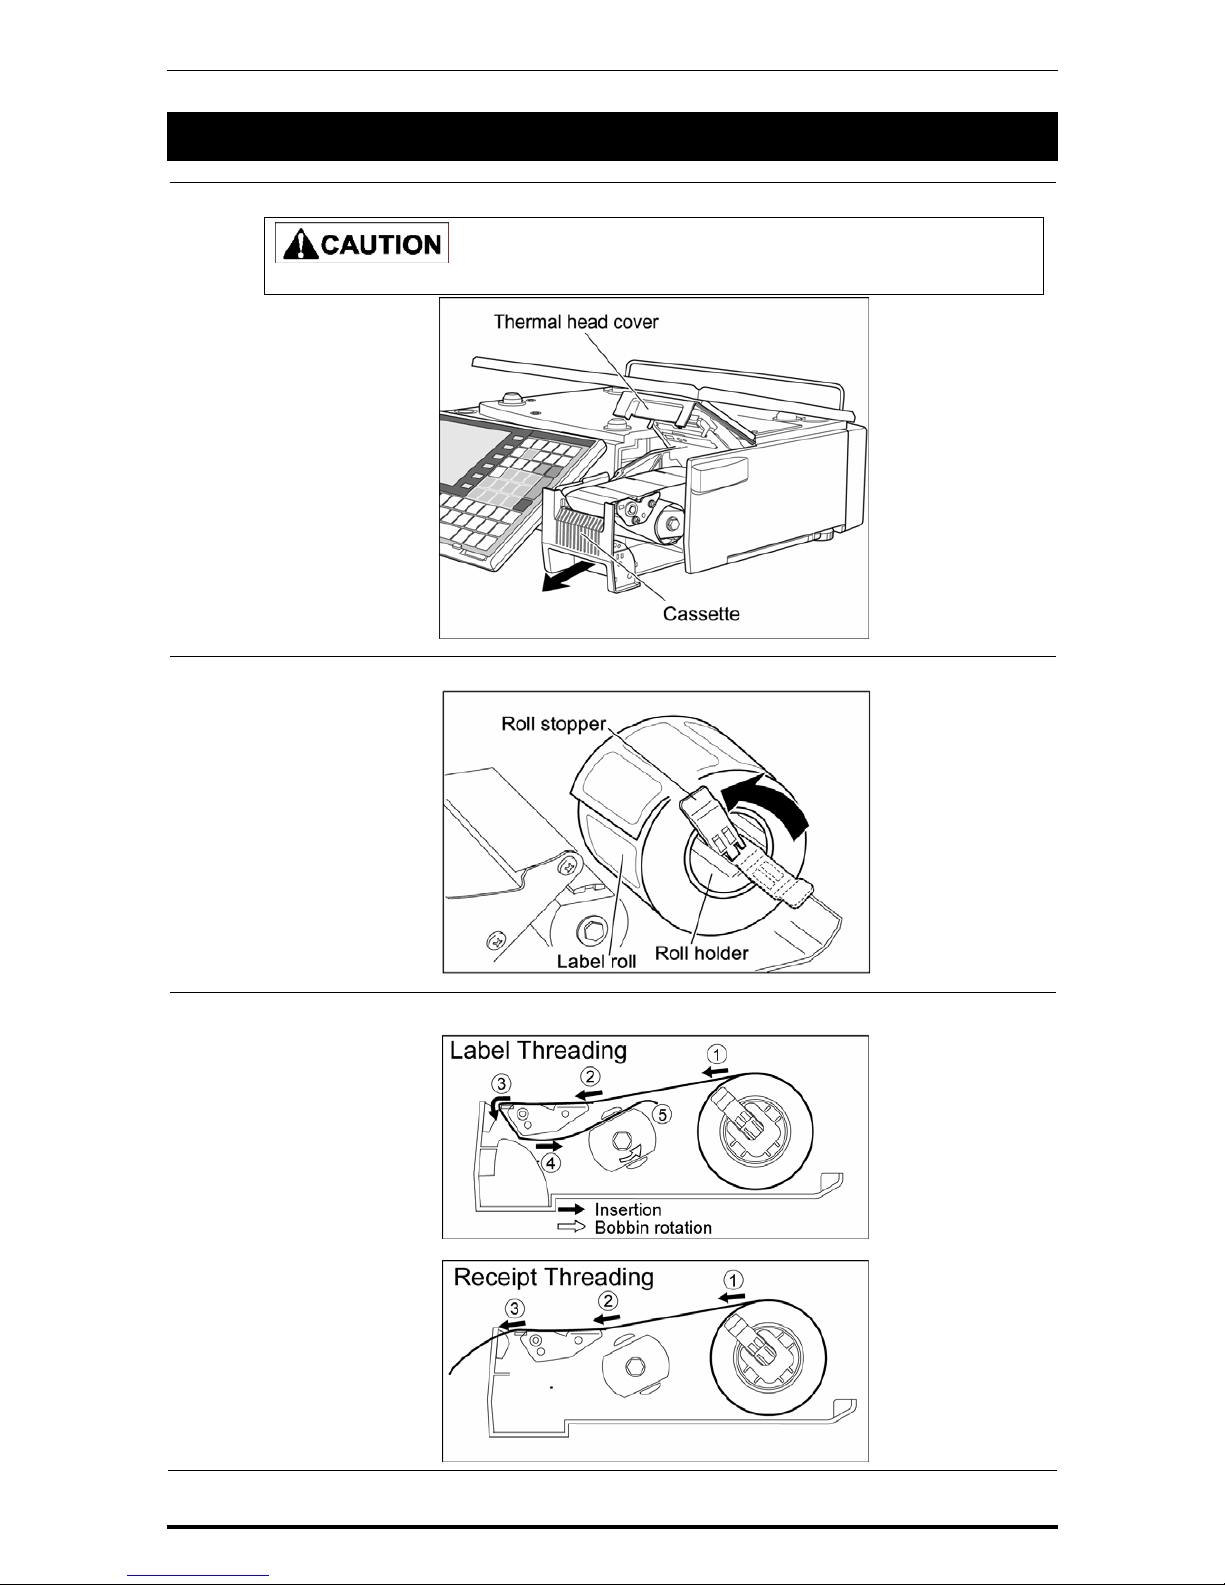
1.6 LABEL / RECEIPT ROLL LOADING
1.
Pull out the cassette from the main body.
Before pulling out the cassette unit, ensure that nothing is placed on the weigh platter.
2.
Set a new roll around the roll holder and raise the roll stopper to fix the roll position.
3.
Thread the paper as shown in the figures below..
Page 18
Chapter 1 BEFORE USE
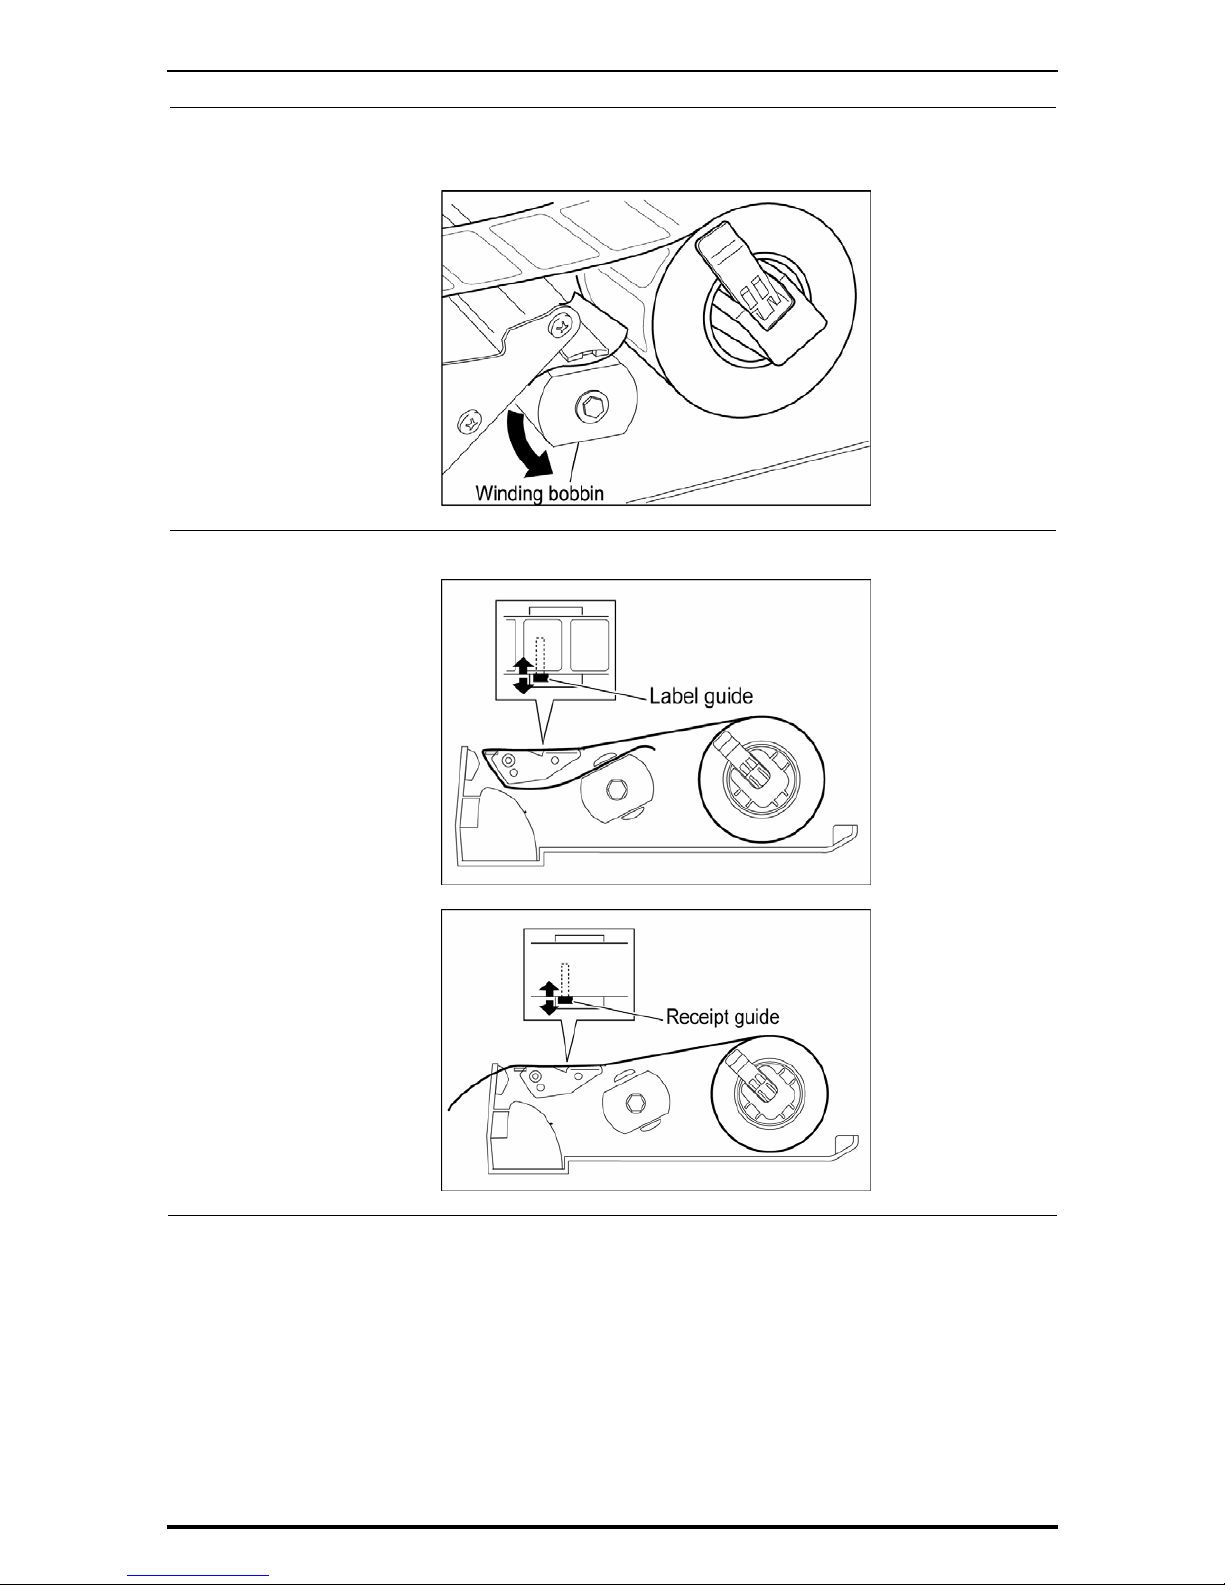
4
For labels, fix the paper end with the backing paper stopper, and gently turn the winding
bobbin counterclockwise until the label becomes tight.
5.
Slide the label/receipt guide to help smooth paper feeding according to the paper width.
UNI-7 User’s Manual 1-7
Page 19
Chapter 1 BEFORE USE
1-8 UNI-7 User’s Manual
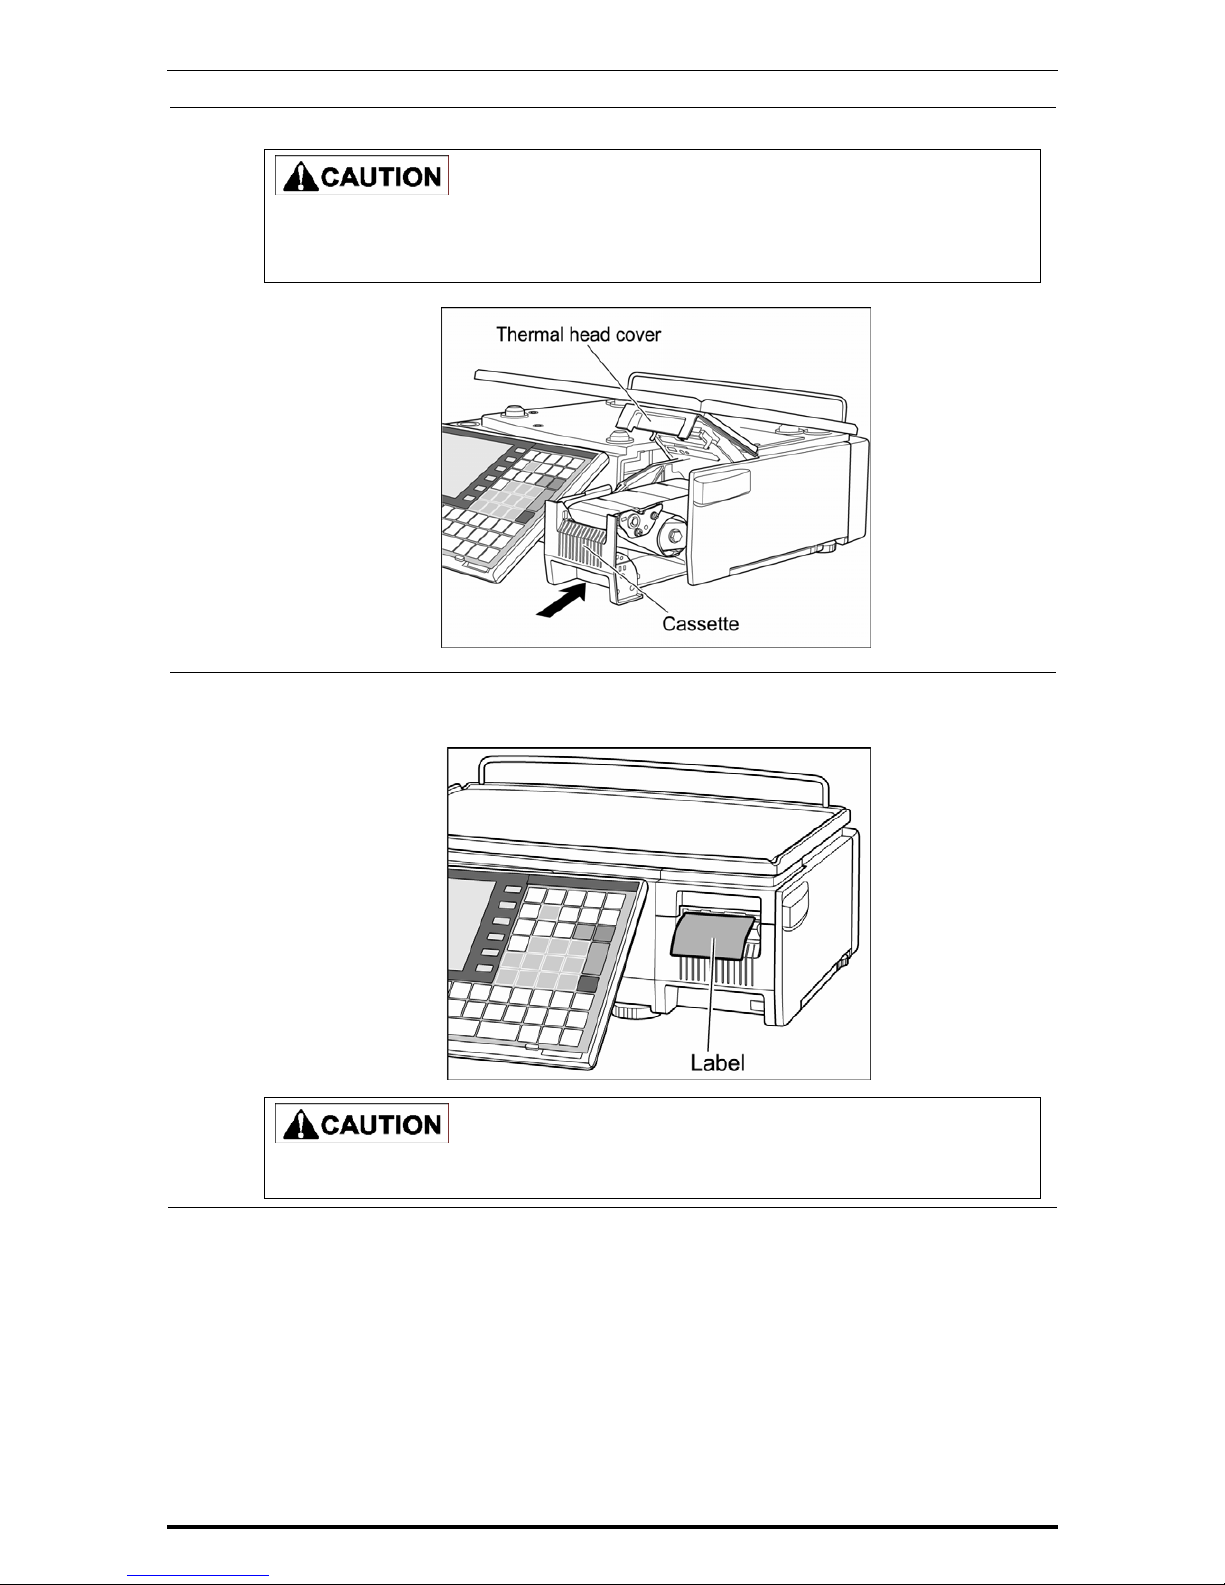
6.
Push the cassette straight into the main body to return to its original position.
yBefore inserting the cassette unit into the main body, ensure that nothing sticks to the
magnet on the bottom of the cassette unit.
yPush the cassette slowly into the main body so as not to get your fingers caught.
7.
For labels, press the [FEED] key on the key sheet to issue a label.
At this time, confirm that the label is completely peeled off.
Confirm that the backing paper is wound up smoothly. If the backing paper is wound up
diagonally, check that the label is set correctly.
Page 20
Chapter 1 BEFORE USE
1.7 REMOVING & REPLACING OF WEIGH PLATTER
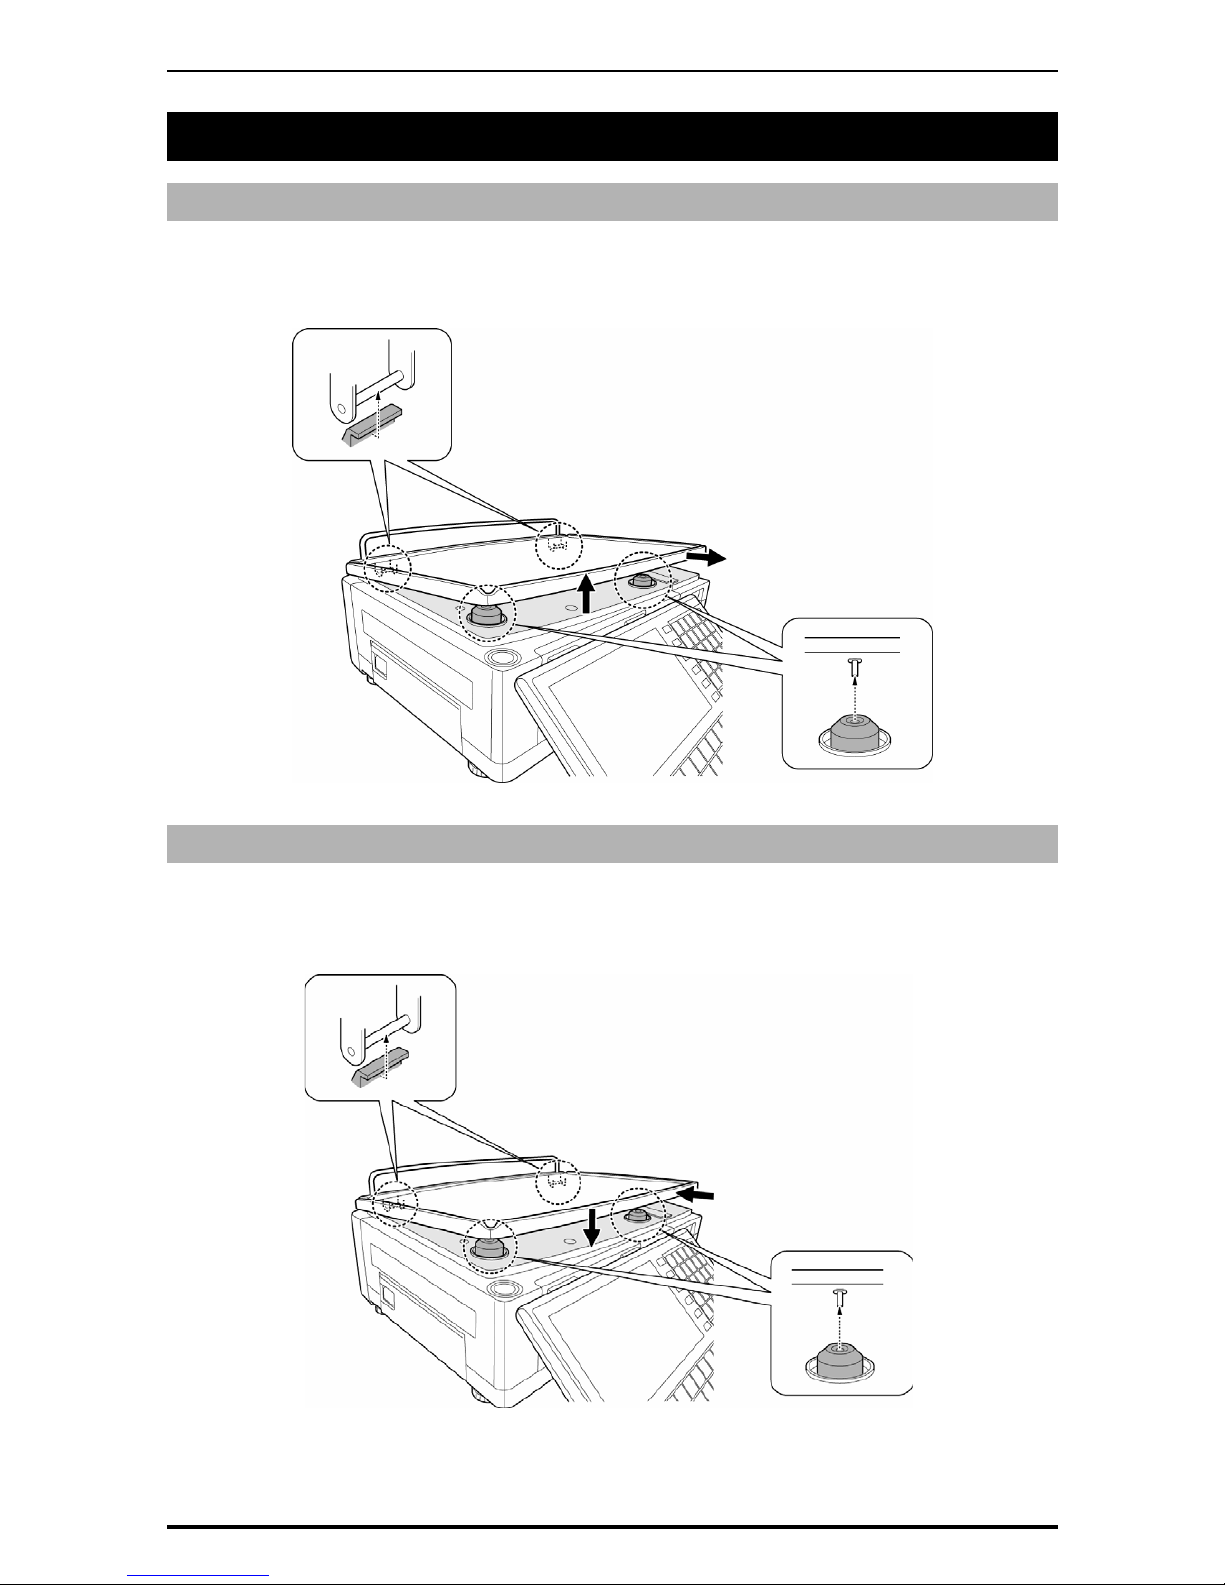
1.7.1 REMOVING THE WEIGH PLATTER
When removing the weigh platter from the main body, lift the front side to pull out the two pins from
the two rubber platter holders and remove the platter by pulling it to disengage the two hooks at the
rear side of the platter.
1.7.2 REPLACING THE WEIGH PLATTER
When replacing the weigh platter onto the main body, engage the two hooks at the rear side of the
platter and lower the platter so that the two pins on the bottom of the platter are inserted into holes of
the rubber platter holders.
UNI-7 User’s Manual 1-9
Page 21
Chapter 1 BEFORE USE
1-10 UNI-7 User’s Manual
1.8 CLEANING OF THE MACHINE
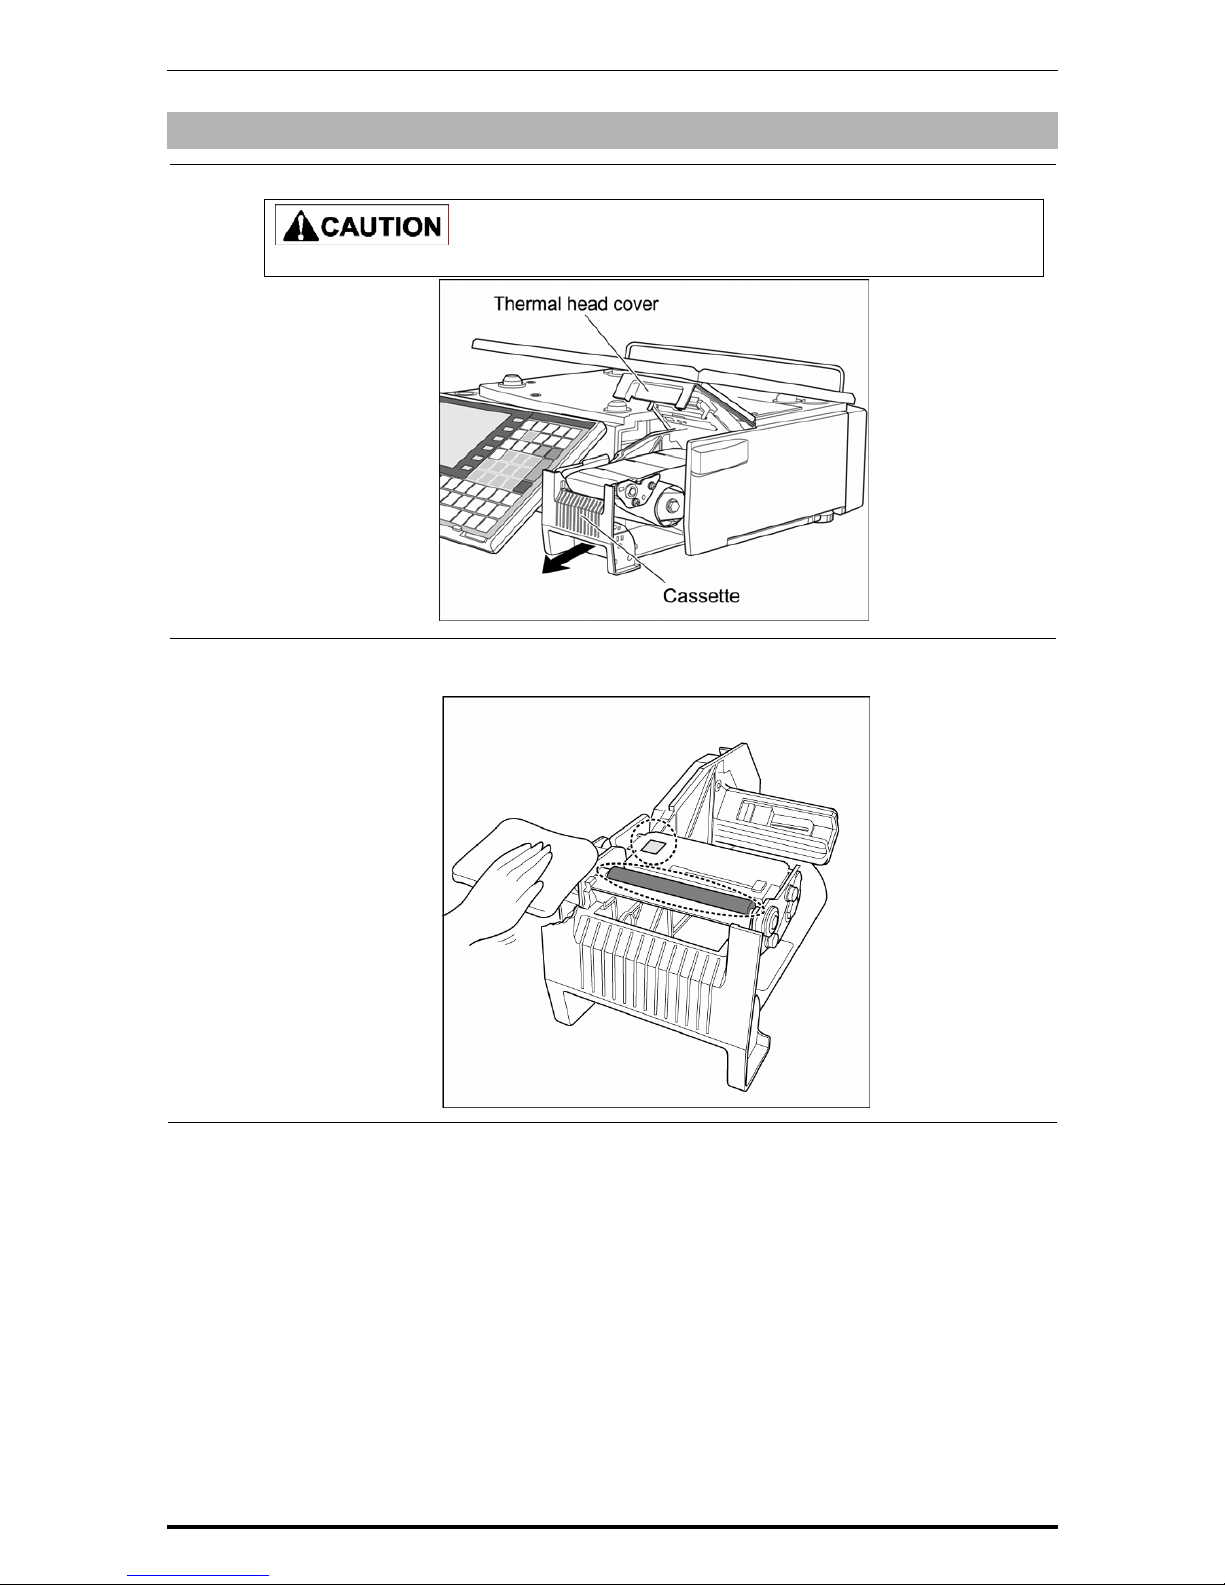
1.8.1 CLEANING OF THE THEREMAL HEAD
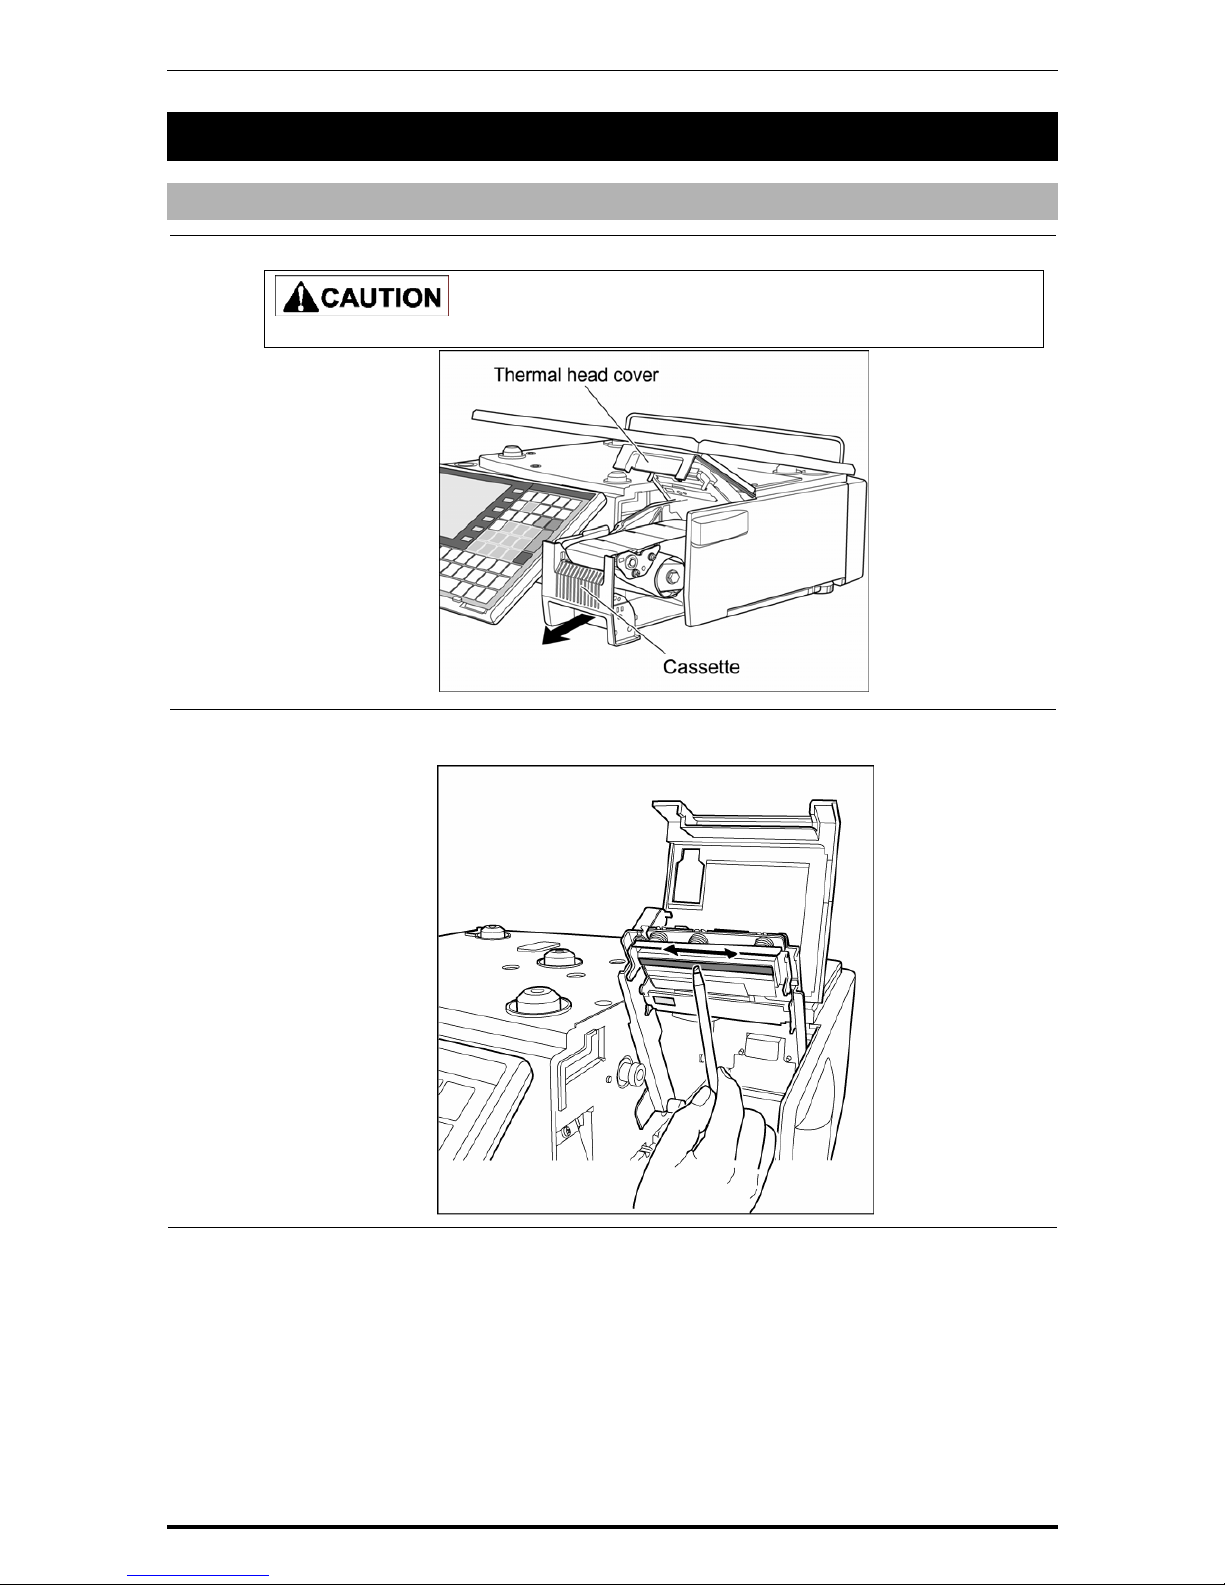
1.
Pull out the cassette from the main body.
Before pulling out the cassette unit, ensure that nothing is placed on the weigh platter.
2.
Use a cotton-tipped swab to clean off the thermal head.
Page 22
Chapter 1 BEFORE USE
1.8.2 CLEANING OF THE LABEL SENSOR
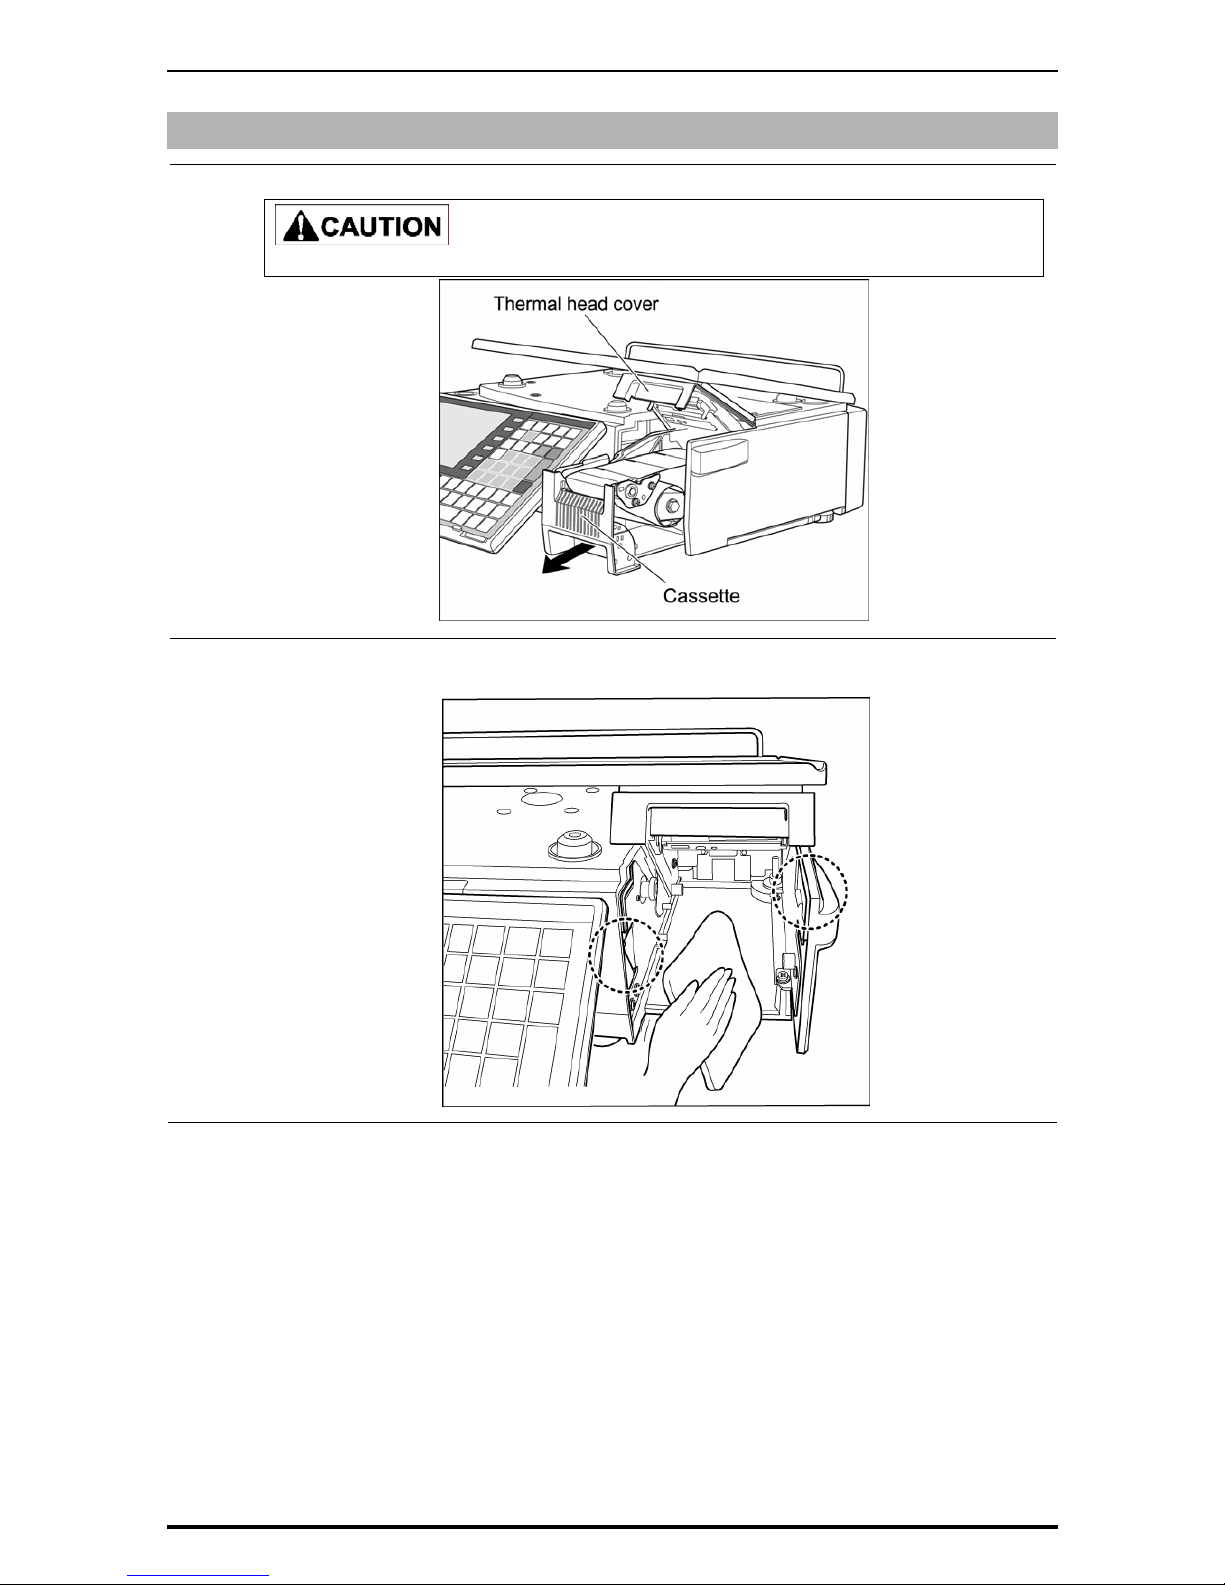
1.
Pull out the cassette from the main body.
Before pulling out the cassette unit, ensure that nothing is placed on the weigh platter.
2.
Use a dry cloth to clean off the emitter and receiver of the label sensor.
UNI-7 User’s Manual 1-11
Page 23
Chapter 1 BEFORE USE
1-12 UNI-7 User’s Manual
1.8.3 CLEANING OF THE PRINT ROLLER AND PRISM
1.
Pull out the cassette from the main body.
Before pulling out the cassette unit, ensure that nothing is placed on the weigh platter.
2.
Use a dry cloth to clean off the print roller and prism.
Page 24

Chapter 1 BEFORE USE
1.8.4 PRECAUTIONS WHEN USING CLEANING FLUIDS
Use a soft cloth and a neutral detergent to clean the machine.
Do not use thinner, benzene, etc. Doing so may damage the original safety functions.
For some parts, use cleaning fluid (isopropyl alcohol).
Do not use cleaning fluid near fire as the fluid is flammable.
Do not use cleaning fluid in a poorly ventilated area. Always provide adequate
ventilation when cleaning.
Take the following actions in the event of an accident:
If the fluid gets in your eye
Immediately wash your eye(s) with water for at least 15 minutes, and consult your
doctor.
If you wear contact lenses, remove and wash them.
If the fluid comes into contact with your skin
Immediately rinse the area of contact with water, and then wash with soap.
If you notice any skin abnormalities at the area of contact, or if any pain persists,
consult your doctor.
If the fumes of the fluid are inhaled
Immediately move the victim to an area where fresh air is available, and have the
victim lie down and keep warm.
If breathing becomes difficult or stops, provide artificial respiration and seek medical
attention immediately.
If the fluid is swallowed
Do not try to induce vomiting.
Do not give the victim anything to drink, and do not rinse the mouth.
If vomiting occurs naturally, have the victim lean forward to reduce risk of aspiration.
Keep the victim warm and seek medical attention.
UNI-7 User’s Manual 1-13
Page 25
Chapter 1 BEFORE USE
1.9 STARTING PROCEDURES
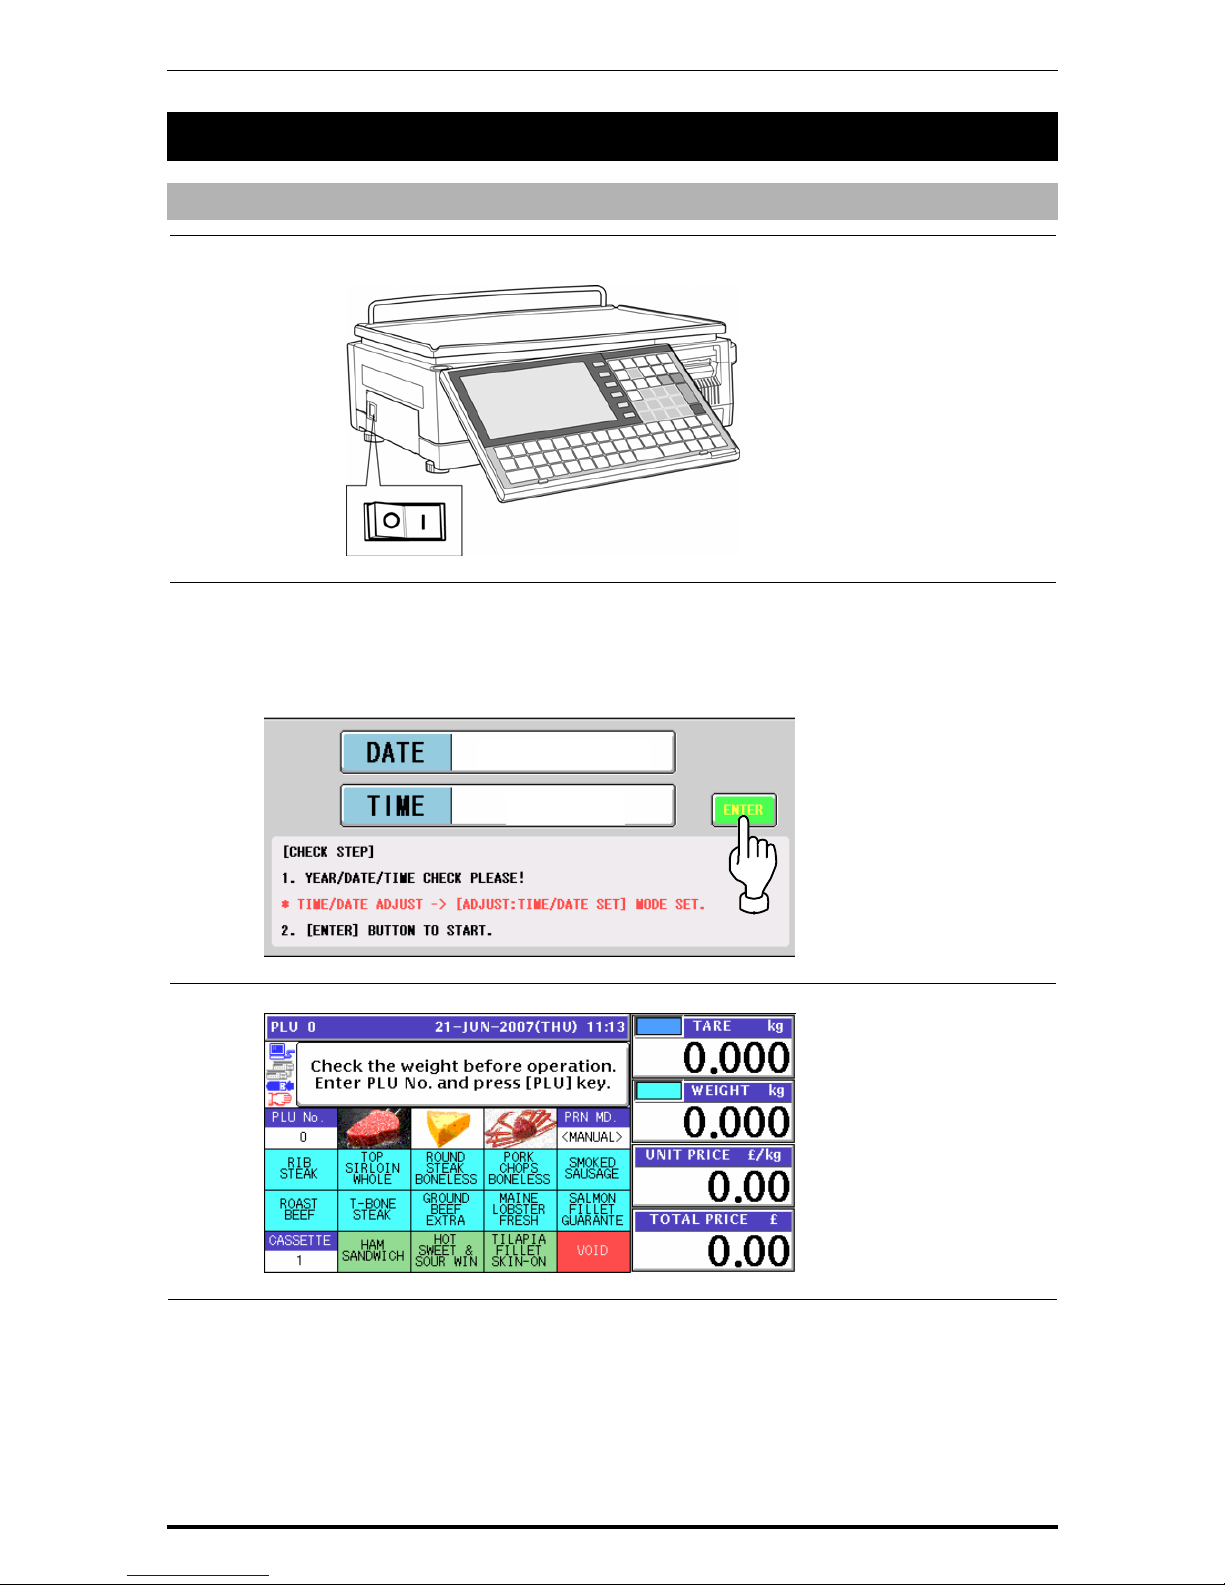
1.9.1 TURNING ON THE POWER
1.
Push down the "I” side of the Power Switch to turn on the power.
2.
The Time Check screen appears.
Then, check that displayed date and time agree with current date and time, and press the
[ENTER] button on the screen to proceed to the next step.
Note: Refer to “Time/Date Set” menu in Adjust Mode when changing the date or time.
3.
After a while, the initial screen appears.
21-JUN-2007
11:13:38
1-14 UNI-7 User’s Manual
Page 26
Chapter 1 BEFORE USE
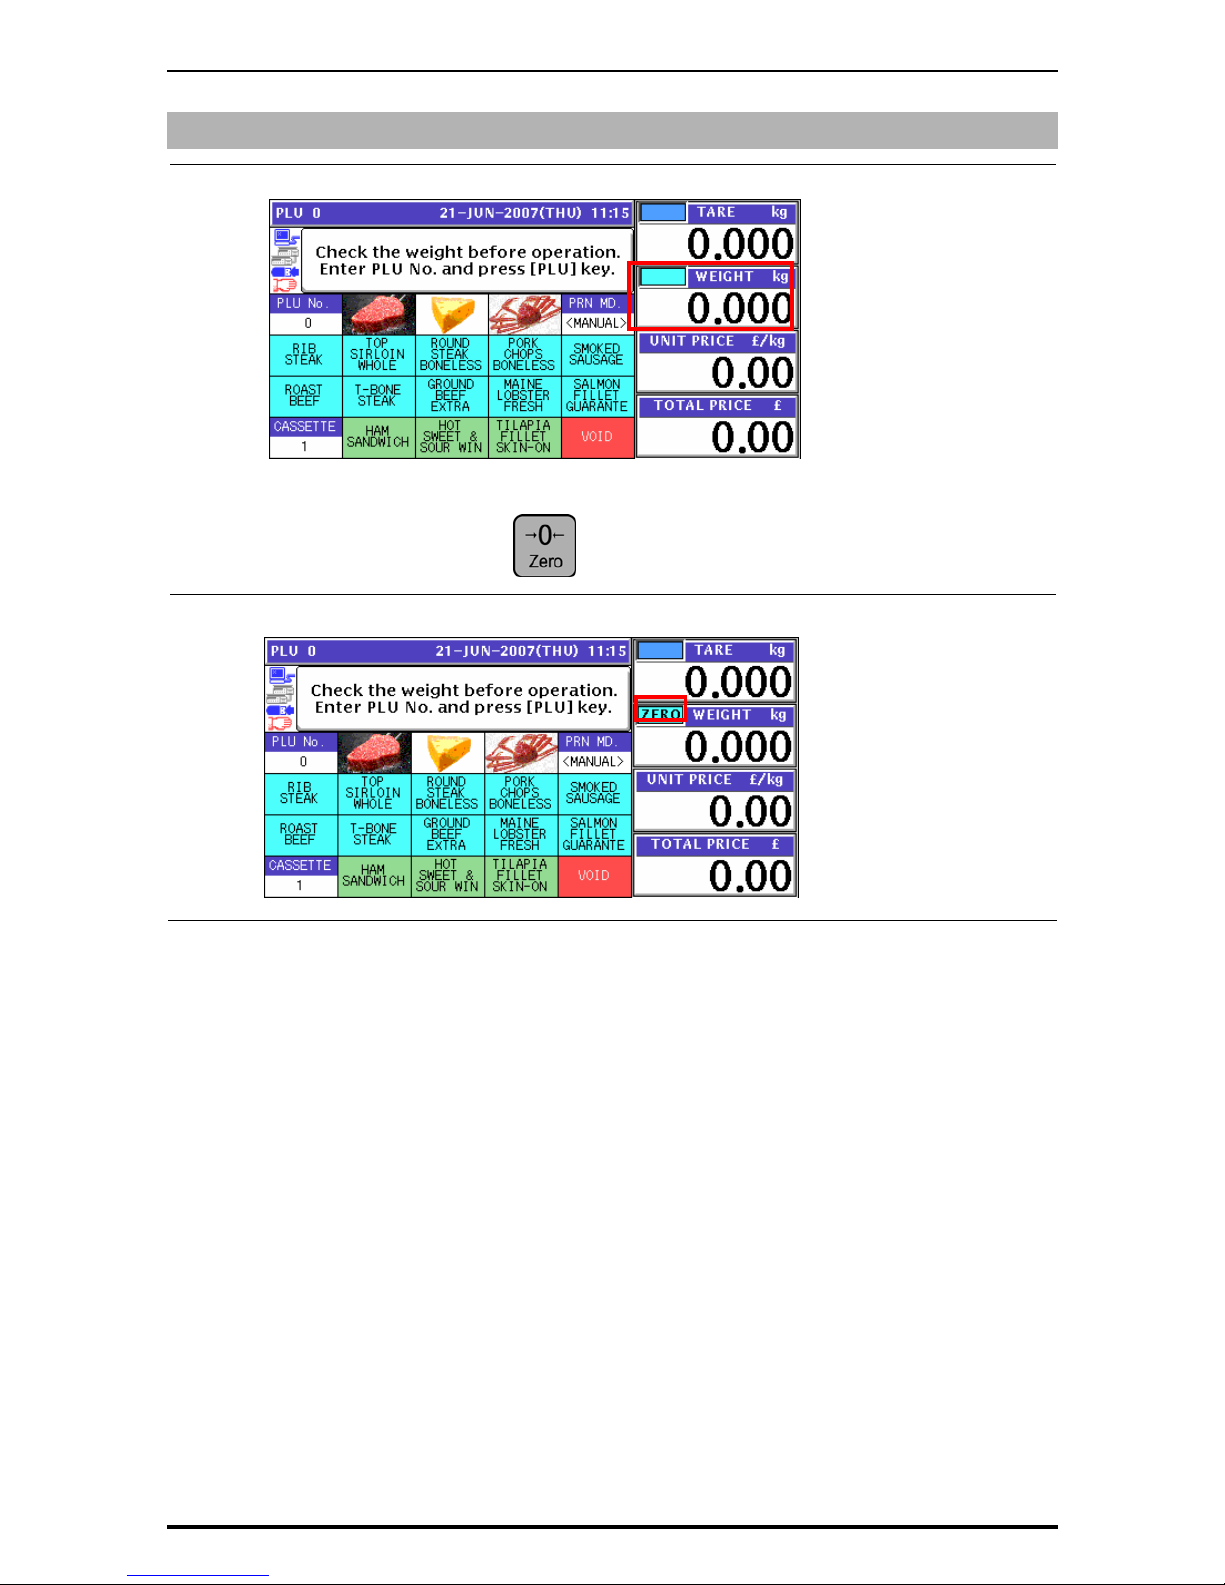
1.9.2 PERFORMING ZERO ADJUSTMENT
1.
If the weight value is not zero on the initial screen,
Press the [ZERO] key on the key sheet to perform zero weight adjustment.
2.
The “ZERO” indicator lights up and the weight value becomes zero.
UNI-7 User’s Manual 1-15
Page 27

Chapter 1 BEFORE USE
1.9.3 GETTING BACK TO THE INITIAL SCREEN
1.
To get back to the initial screen from a Menu Select screen, press either the “SALES” field
or the icon at the bottom right on the screen.
2.
The initial screen appears.
1-16 UNI-7 User’s Manual
Page 28
Chapter 2 LABEL ISSUE
2
LABEL ISSUE
2.1 LABEL ISSUE WITHOUT OPERATOR
2.1.1 WEIGHING UNIT PRICE PRODUCTS
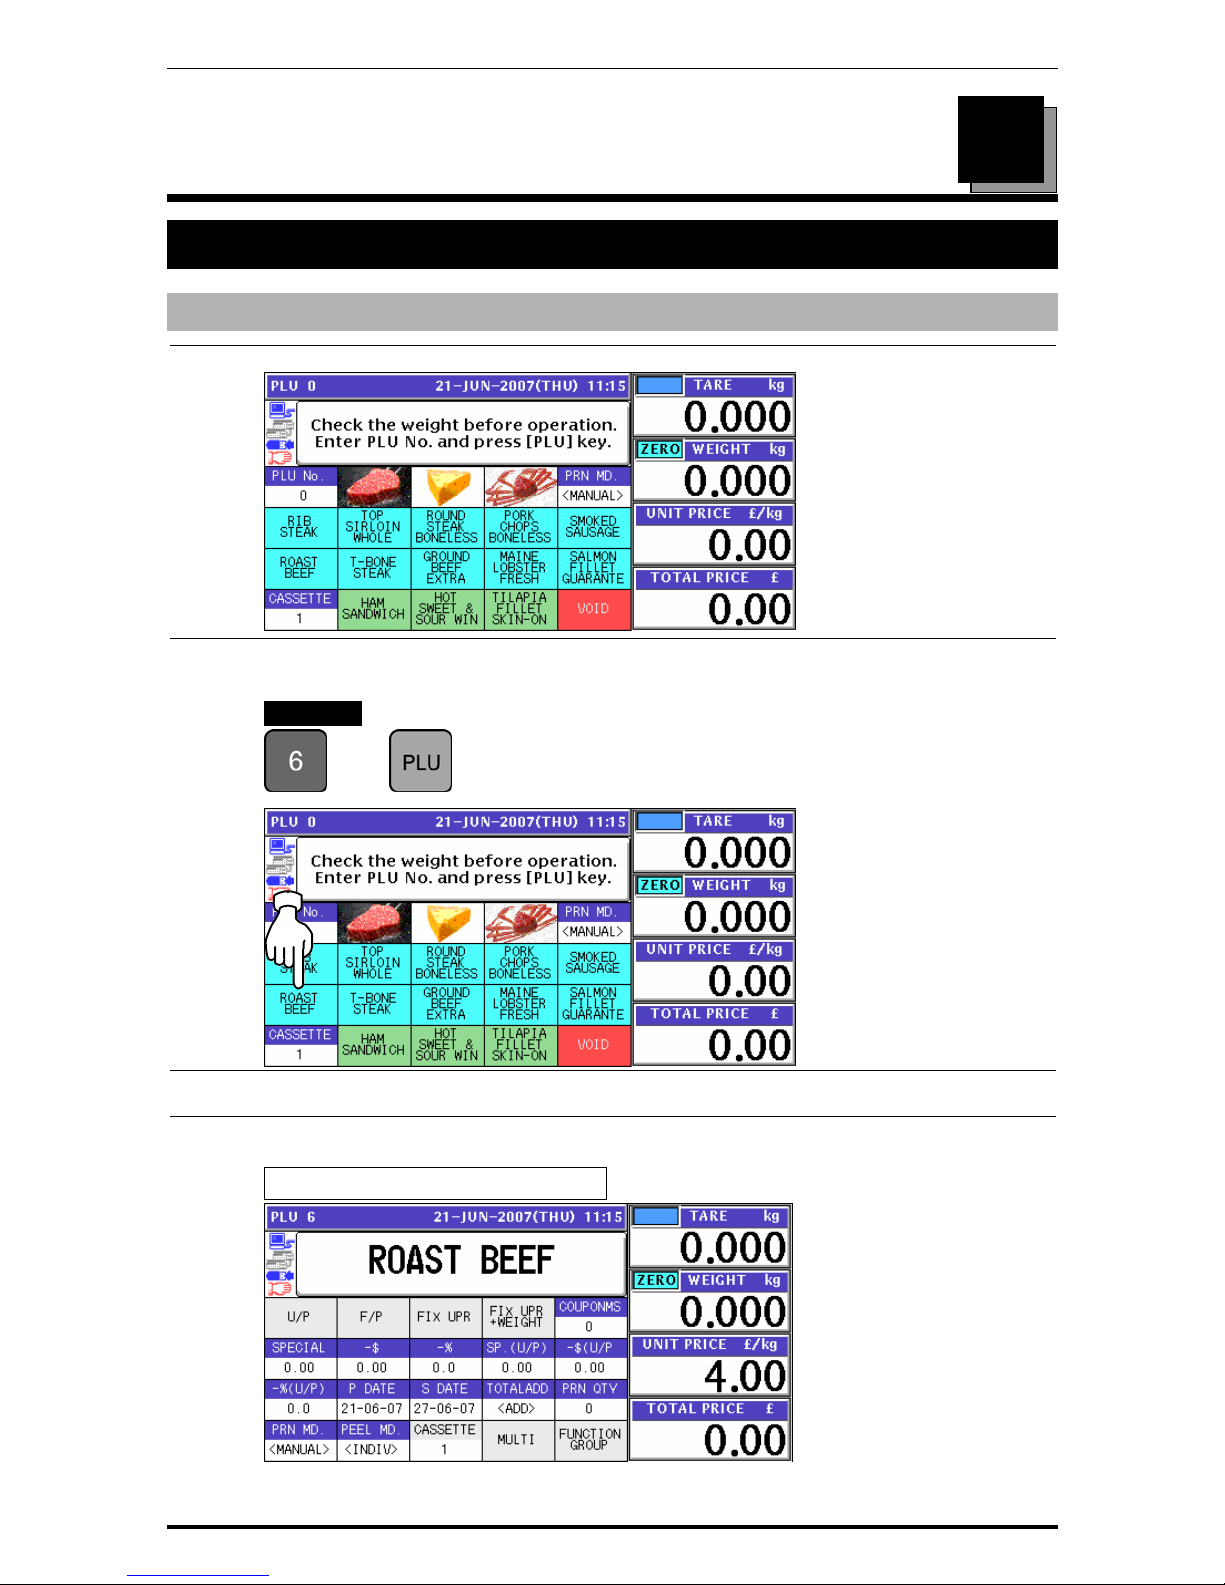
1.
Ensure that the initial screen is displayed.
2.
Enter a desired PLU number using the numeric keys and press the [PLU] key on the key
sheet, or simply press a preset key on the screen where the product is allocated.
EXAMPLE PLU No.6 “Roast Beef”
Î
or
3.
When the product is preset as a traceable item, the traceability screen appears.
See Chapter 4 for more details about traceability products.
4.
The selected PLU screen appears.
Without Preset Tare Weight
Uni-7 User’s Manual 2-1
Page 29

Chapter 2 LABEL ISSUE
With Preset Tare Weight
Manual Tare Entry
To newly enter a tare weight or overwrite an existing tare weight, enter the tare weight
using the numeric keys and press the “TARE” field on the screen.
EXAMPLE Tare weight “50g”
5.
See Chapter 5 for more details about temporary change operations.
6.
Put a product on the weigh platter.
The weight is measured and the total price is calculated.
2-2 Uni-7 User’s Manual
Page 30
Chapter 2 LABEL ISSUE
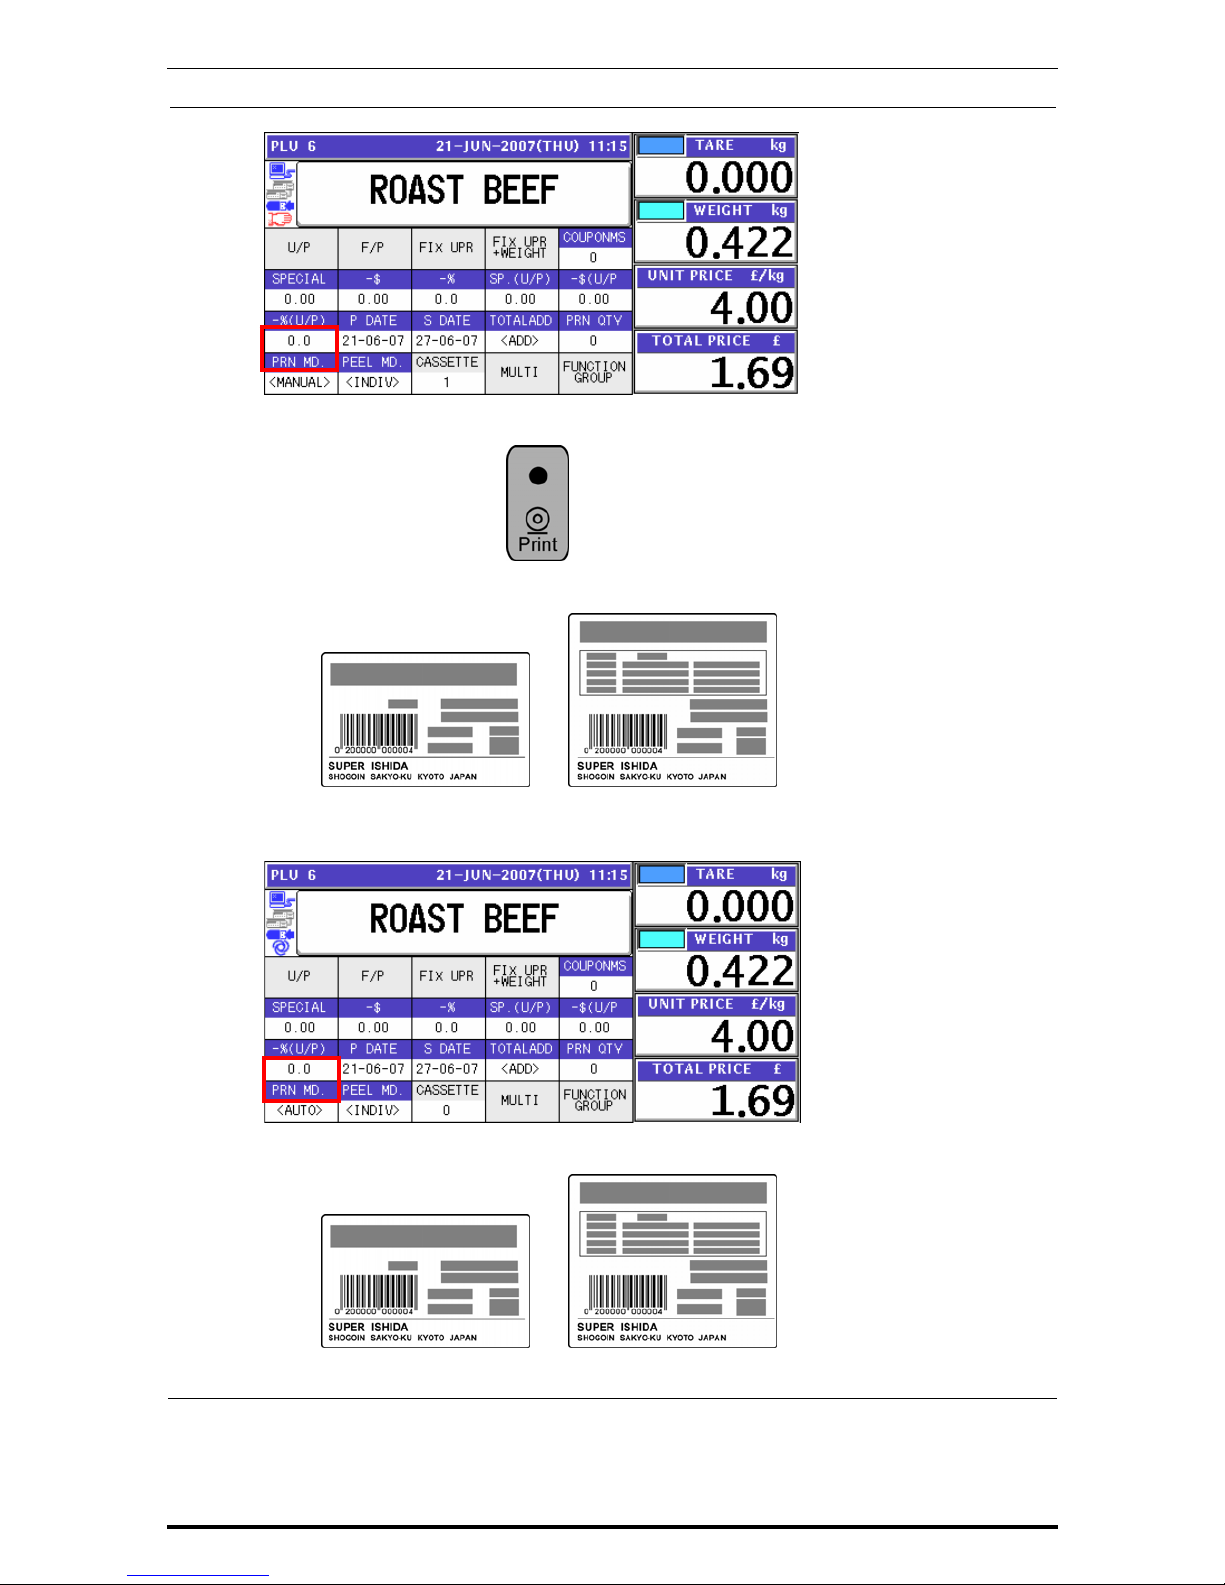
7.
When “MANUAL” is set in the Print Mode,
Press the [PRINT] key on the key sheet.
The label is issued.
Non-traceable products Traceable products
When “AUTO” is set in the Print Mode,
The label is automatically issued as soon as the weighing is stabilized.
Non-traceable products Traceable products
Uni-7 User’s Manual 2-3
Page 31

Chapter 2 LABEL ISSUE
2.1.2 WEIGHING FIXED PRICE PRODUCTS
1.
Ensure that the initial screen is displayed.
2.
Enter a desired PLU number using the numeric keys and press the [PLU] key on the key
sheet, or simply press a preset key on the screen where the product is allocated.
EXAMPLE PLU No.6 “Roast Beef”
Î
or
3.
When the product is preset as a traceable item, the traceability screen appears.
See Chapter 4 for more details about traceability products.
4.
The selected PLU screen appears.
Without Preset Tare Weight
2-4 Uni-7 User’s Manual
Page 32

Chapter 2 LABEL ISSUE
With Preset Tare Weight
Manual Tare Entry
To newly enter a tare weight or overwrite an existing tare weight, enter the tare weight
using the numeric keys and press the “TARE” field on the screen.
EXAMPLE Tare weight “50g”
5.
See Chapter 5 for more details about temporary change operations.
6.
Put a product on the weigh platter.
The weight is measured but the fixed price stays same.
Uni-7 User’s Manual 2-5
Page 33

Chapter 2 LABEL ISSUE
7.
When “MANUAL” is set in the Print Mode,
Press the [PRINT] key on the key sheet.
Non-traceable products Traceable products
When “AUTO” is set in the Print Mode,
The label is automatically issued as soon as the weighing is stabilized.
Non-traceable products Traceable products
2-6 Uni-7 User’s Manual
Page 34

Chapter 2 LABEL ISSUE
2.1.3 PROCESSING FIXED PRICE PRODUCTS
1.
Ensure that the initial screen is displayed.
2.
Enter a desired PLU number using the numeric keys and press the [PLU] key on the key
sheet, or simply press a preset key on the screen where the product is allocated.
EXAMPLE PLU No.6 “Roast Beef”
Î
or
3.
When the product is preset as a traceable item, the traceability screen appears.
See Chapter 4 for more details about traceability products.
4.
The selected PLU screen appears.
5.
See Chapter 5 for more details about temporary change operations.
Uni-7 User’s Manual 2-7
Page 35

Chapter 2 LABEL ISSUE
6.
Press the [PRINT] key on the key sheet to issue the labels.
The label is issued.
Non-traceable products Traceable products
Remove the label.
The next label is issued.
Non-traceable products Traceable products
Note: To stop printing, press the [PRINT] key again.
2-8 Uni-7 User’s Manual
Page 36

Chapter 2 LABEL ISSUE
2.1.4 PROCESSING FIXED WEIGHT/FIXED UNIT PRICE PRODUCTS
1.
Ensure that the initial screen is displayed.
2.
Enter a desired PLU number using the numeric keys and press the [PLU] key on the key
sheet, or simply press a preset key on the screen where the product is allocated.
EXAMPLE PLU No.6 “Roast Beef”
Î
or
3.
When the product is preset as a traceable item, the traceability screen appears.
See Chapter 4 for more details about traceability products.
4.
The selected PLU screen appears.
5.
See Chapter 5 for more details about temporary change operations.
Uni-7 User’s Manual 2-9
Page 37

Chapter 2 LABEL ISSUE
6.
Enter the fixed weight using the numeric keys on the key sheet and press the “FIXED
WEIGHT” field.
EXAMPLE Fixed weight “858g”
7.
Press the [PRINT] key on the key sheet to issue the labels.
The label is issued.
Non-traceable products Traceable products
Remove the label.
The next label is issued.
Non-traceable products Traceable products
Note: To stop printing, press the [PRINT] key again.
2-10 Uni-7 User’s Manual
Page 38

Chapter 2 LABEL ISSUE
2.2 LABEL ISSUE WITH OPERATORS
2.2.1 WEIGHING UNIT PRICE PRODUCTS
1.
Ensure that the initial screen is displayed.
2.
Enter a desired PLU number using the numeric keys and press the [PLU] key on the key
sheet, or simply press a preset key on the screen where the product is allocated.
EXAMPLE PLU No.6 “Roast Beef”
Î
or
3.
When the product is preset as a traceable item, the traceability screen appears.
See Chapter 4 for more details about traceability products.
4.
The selected product screen appears.
Without Preset Tare Weight
With Preset Tare Weight
Uni-7 User’s Manual 2-11
Page 39

Chapter 2 LABEL ISSUE
Manual Tare Entry
To newly enter a tare weight or overwrite an existing tare weight, enter the tare weight
using the numeric keys and press the “TARE” field on the screen.
EXAMPLE Tare weight “50g”
5.
See Chapter 5 for more details about temporary change operations.
6.
Put a product on the weigh platter.
The weight is measured and the total price is calculated.
2-12 Uni-7 User’s Manual
Page 40

Chapter 2 LABEL ISSUE
7.
Press a operator button on the screen to issue the label.
EXAMPLE Operator “BETTY”
The label is issued.
Uni-7 User’s Manual 2-13
Page 41

Chapter 2 LABEL ISSUE
2.2.2 WEIGHING FIXED PRICE PRODUCTS
1.
Ensure that the initial screen is displayed.
2.
Enter a desired PLU number using the numeric keys and press the [PLU] key on the key
sheet, or simply press a preset key on the screen where the product is allocated.
EXAMPLE PLU No.6 “Roast Beef”
Î
or
3.
When the product is preset as a traceable item, the traceability screen appears.
See Chapter 4 for more details about traceability products.
4.
The selected product screen appears.
Without Preset Tare Weight
2-14 Uni-7 User’s Manual
Page 42

Chapter 2 LABEL ISSUE
With Preset Tare Weight
Manual Tare Entry
To newly enter a tare weight or overwrite an existing tare weight, enter the tare weight
using the numeric keys and press the “TARE” field on the screen.
EXAMPLE Tare weight “50g”
5.
See Chapter 5 for more details about temporary change operations.
6.
Put a product on the weigh platter.
The weight is measured and the total price is calculated.
Uni-7 User’s Manual 2-15
Page 43

Chapter 2 LABEL ISSUE
7.
Press a operator button on the screen to issue the label.
EXAMPLE Operator “BETTY”
The label is issued.
2-16 Uni-7 User’s Manual
Page 44

Chapter 2 LABEL ISSUE
2.2.3 PROCESSING FIXED PRICE PRODUCTS
1.
Ensure that the initial screen is displayed.
2.
Enter a desired PLU number using the numeric keys and press the [PLU] key on the key
sheet, or simply press a preset key on the screen where the product is allocated.
EXAMPLE PLU No.6 “Roast Beef”
Î
or
3.
When the product is preset as a traceable item, the traceability screen appears.
See Chapter 4 for more details about traceability products.
4.
The selected PLU screen appears.
5.
See Chapter 5 for more details about temporary change operations.
Uni-7 User’s Manual 2-17
Page 45

Chapter 2 LABEL ISSUE
6.
Press a operator button on the screen to issue the label.
EXAMPLE Operator “BETTY”
The label is issued.
2-18 Uni-7 User’s Manual
Page 46

Chapter 2 LABEL ISSUE
2.2.4 PROCESSING FIXED WEIGHT/FIXED UNIT PRICE PRODUCTS
1.
Ensure that the initial screen is displayed.
2.
Enter a desired PLU number using the numeric keys and press the [PLU] key on the key
sheet, or simply press a preset key on the screen where the product is allocated.
EXAMPLE PLU No.6 “Roast Beef”
Î
or
3.
When the product is preset as a traceable item, the traceability screen appears.
See Chapter 4 for more details about traceability products.
4.
The selected PLU screen appears.
5.
See Chapter 5 for more details about temporary change operations.
Uni-7 User’s Manual 2-19
Page 47

Chapter 2 LABEL ISSUE
6.
Enter the fixed weight using the numeric keys on the key sheet and press the “FIXED
WEIGHT” field.
EXAMPLE Fixed weight “858g”
7.
Press a operator button on the screen to issue the label.
EXAMPLE Operator “BETTY”
The label is issued.
2-20 Uni-7 User’s Manual
Page 48

Chapter 3 RECEIPT ISSUE
3
RECEIPT ISSUE
3.1 SALES BY THE SAME OPRATOR
1.
Ensure that the initial screen is displayed.
2-1
Select a desired product category by pressing the corresponding field on the screen.
EXAMPLE Select “Meat” category.
2-2
The PLU preset screen for the selected category appears.
Then, enter a desired PLU number using the numeric keys and press the [PLU] key on the
key sheet, or simply press a preset key on the screen where a desired product is
allocated.
EXAMPLE Select PLU No.1 “Rib Steak”.
Î
or
Uni-7 User’s Manual 3-1
Page 49

Chapter 3 RECEIPT ISSUE
2-3
The PLU screen appears.
Weighing Unit Price PLU
2-4
Put a product on the weigh platter.
2-5
Press a button on the screen for the operator who has sold the product.
EXAMPLE Select “Operator 002”.
3-2 Uni-7 User’s Manual
Page 50

Chapter 3 RECEIPT ISSUE
2-6
The subtotal for the selected operator is shown on the screen.
3-1
Select a desired product category by pressing the corresponding field on the screen.
EXAMPLE Select “Fish” category.
3-2
The PLU preset screen for the selected category appears.
Then, enter a desired PLU number using the numeric keys and press the [PLU] key on the
key sheet, or simply press a preset key on the screen where a desired product is
allocated.
EXAMPLE Select PLU No.102 “Maine Lobster”.
Î
or
Uni-7 User’s Manual 3-3
Page 51

Chapter 3 RECEIPT ISSUE
3-3
The PLU screen appears.
Fixed Price PLU
3-4
Press a button on the screen for the operator who has sold the product.
EXAMPLE Select “Operator 002”.
3-5
The subtotal for the selected operator is shown on the screen.
4-1
Select a desired product category by pressing the corresponding field on the screen.
EXAMPLE Select “Bakery” category.
3-4 Uni-7 User’s Manual
Page 52

Chapter 3 RECEIPT ISSUE
4-2
The PLU preset screen for the selected category appears.
Then, enter a desired PLU number using the numeric keys and press the [PLU] key on the
key sheet, or simply press a preset key on the screen where a desired product is
allocated.
EXAMPLE Select PLU No.201 “Live Wild Cherry Clam”.
Î
or
4-3
The PLU screen appears.
Weighing Fixed Price PLU
4-4
Put a product on the weigh platter.
Uni-7 User’s Manual 3-5
Page 53

Chapter 3 RECEIPT ISSUE
4-5
Press a button on the screen for the operator who has sold the product.
EXAMPLE Select “Operator 002”.
4-6
The subtotal for the selected operator is shown on the screen.
5-1
Select a desired product category by pressing the corresponding field on the screen.
EXAMPLE Select “Meat” category.
5-2
The PLU preset screen for the selected category appears.
Then, enter a desired PLU number using the numeric keys and press the [PLU] key on the
key sheet, or simply press a preset key on the screen where a desired product is
allocated.
3-6 Uni-7 User’s Manual
Page 54

Chapter 3 RECEIPT ISSUE
EXAMPLE Select PLU No.4 “Pork Chops”.
Î
or
5-3
The PLU screen appears.
Fixed Unit Price PLU
5-4
Enter the weight using the numeric keys on the key sheet, and press the “Fixed Weight”
field on the screen.
EXAMPLE Weight “400g”
Uni-7 User’s Manual 3-7
Page 55

Chapter 3 RECEIPT ISSUE
5-5
Press a button on the screen for the operator who has sold the product.
EXAMPLE Select “Operator 002”.
5-6
The subtotal for the selected operator is shown on the screen.
6.
Press the subtotal field on the screen to display more detailed subtotal data.
7.
The detailed subtotal screen appears for confirmation of product registrations.
Then, confirm that the detail of the transaction is correct.
3-8 Uni-7 User’s Manual
Page 56

Chapter 3 RECEIPT ISSUE
8.
Press the [PRINT] key on the key sheet to issue the receipt.
Uni-7 User’s Manual 3-9
Page 57

Chapter 3 RECEIPT ISSUE
9.
The Subtotal screen appears for the settlement.
3-10 Uni-7 User’s Manual
Page 58

Chapter 3 RECEIPT ISSUE
3.2 SALES BY DIFFERENT OPRATORS
1.
Ensure that the initial screen is displayed.
2-1
EXAMPLE Product registration by “Operator 002”
Select a desired product category by pressing the corresponding field on the screen.
EXAMPLE Select “Meat” category.
2-2
The PLU preset screen for the selected category appears.
Then, enter a desired PLU number using the numeric keys and press the [PLU] key on the
key sheet, or simply press a preset key on the screen where a desired product is
allocated.
EXAMPLE Select PLU No.1 “Rib Steak”.
Î
or
Uni-7 User’s Manual 3-11
Page 59

Chapter 3 RECEIPT ISSUE
2-3
The PLU screen appears.
Weighing Unit Price PLU
2-4
Put a product on the weigh platter.
2-5
Press a button on the screen for the operator who has sold the product.
EXAMPLE Select “Operator 002”.
3-12 Uni-7 User’s Manual
Page 60

Chapter 3 RECEIPT ISSUE
2-6
The subtotal for the selected operator is shown on the screen.
3-1
EXAMPLE Product registration by “Operator 002”
Select a desired product category by pressing the corresponding field on the screen.
EXAMPLE Select “Fish” category.
3-2
The PLU preset screen for the selected category appears.
Then, enter a desired PLU number using the numeric keys and press the [PLU] key on the
key sheet, or simply press a preset key on the screen where a desired product is
allocated.
EXAMPLE Select PLU No.102 “Maine Lobster”.
Î
or
Uni-7 User’s Manual 3-13
Page 61

Chapter 3 RECEIPT ISSUE
3-3
The PLU screen appears.
Fixed Price PLU
3-4
Press a button on the screen for the operator who has sold the product.
EXAMPLE Select “Operator 002”.
3-5
The subtotal for the selected operator is shown on the screen.
4-1
EXAMPLE Product registration by “Operator 001”
Select a desired product category by pressing the corresponding field on the screen.
EXAMPLE Select “Bakery” category.
3-14 Uni-7 User’s Manual
Page 62

Chapter 3 RECEIPT ISSUE
4-2
The PLU preset screen for the selected category appears.
Then, enter a desired PLU number using the numeric keys and press the [PLU] key on the
key sheet, or simply press a preset key on the screen where a desired product is
allocated.
EXAMPLE Select PLU No.201 “Live Wild Cherry Clam”.
Î
or
4-3
The PLU screen appears.
Weighing Fixed Price PLU
4-4
Put a product on the weigh platter.
Uni-7 User’s Manual 3-15
Page 63

Chapter 3 RECEIPT ISSUE
4-5
Press a button on the screen for the operator who has sold the product.
EXAMPLE Select “Operator 001”.
4-6
The subtotal for the selected operator is shown on the screen.
5-1
EXAMPLE Product registration by “Operator 002”
Select a desired product category by pressing the corresponding field on the screen.
EXAMPLE Select “Meat” category.
3-16 Uni-7 User’s Manual
Page 64

Chapter 3 RECEIPT ISSUE
5-2
The PLU preset screen for the selected category appears.
Then, enter a desired PLU number using the numeric keys and press the [PLU] key on the
key sheet, or simply press a preset key on the screen where a desired product is
allocated.
EXAMPLE Select PLU No.4 “Pork Chops”.
Î
or
5-3
The PLU screen appears.
Fixed Unit Price PLU
5-4
Enter the weight using the numeric keys on the key sheet, and press the “Fixed Weight”
field on the screen.
EXAMPLE Weight “400g”
Uni-7 User’s Manual 3-17
Page 65

Chapter 3 RECEIPT ISSUE
5-5
Press a button on the screen for the operator who has sold the product.
EXAMPLE Select “Operator 002”.
5-6
The subtotal for the selected operator is shown on the screen.
6.
Press the subtotal field on the screen to display more detailed subtotal data.
7.
The detailed subtotal screen appears for confirmation of product registrations.
Then, confirm that the detail of the transaction is correct.
3-18 Uni-7 User’s Manual
Page 66

Chapter 3 RECEIPT ISSUE
8.
Press the [PRINT] key on the key sheet to issue the receipt.
9.
The Subtotal screen appears for the settlement.
Uni-7 User’s Manual 3-19
Page 67

Chapter 3 RECEIPT ISSUE
10-1
EXAMPLE Product registration by “Operator 001”
Select a desired product category by pressing the corresponding field on the screen.
EXAMPLE Select “Meat” category.
10-2
The PLU preset screen for the selected category appears.
Then, enter a desired PLU number using the numeric keys and press the [PLU] key on
the key sheet, or simply press a preset key on the screen where a desired product is
allocated.
EXAMPLE Select PLU No.3 “Round Steak”.
Î
or
10-3
The PLU screen appears.
Weighing Unit Price PLU
3-20 Uni-7 User’s Manual
Page 68

Chapter 3 RECEIPT ISSUE
10-4
Put a product on the weigh platter.
10-5
Press a button on the screen for the operator who has sold the product.
EXAMPLE Select “Operator 001”.
10-6
The subtotal for the selected operator is shown on the screen.
Uni-7 User’s Manual 3-21
Page 69

Chapter 3 RECEIPT ISSUE
11
EXAMPLE Receipt issue by “Operator 001”
Press the subtotal field on the screen to display more detailed subtotal data.
12
The Subtotal screen appears for confirmation of product registrations.
13
Press the [PRINT] key on the key sheet to issue the receipt.
3-22 Uni-7 User’s Manual
Page 70

Chapter 3 RECEIPT ISSUE
14
The Subtotal screen appears for the settlement.
Uni-7 User’s Manual 3-23
Page 71

Chapter 3 RECEIPT ISSUE
3.3 VOIDING PRODUCT REGISTRATION
1.
To void a product registration that has been made in the transaction, display the Subtotal
screen for confirmation of product registrations.
2.
Press to select a desired product registration field.
EXAMPLE Void the third item.
Note: To scroll the selection up or down, press the [c] or [d] keys on the key sheet.
3.
Press the [VOID] button on the screen.
4.
The confirmation screen appears. Then, press the [EXEC] button for execution.
3-24 Uni-7 User’s Manual
Page 72

Chapter 3 RECEIPT ISSUE
5.
The selected item has been voided.
6.
Press the [PRINT] key on the key sheet to issue the receipt.
Deleted by a dashed line
Uni-7 User’s Manual 3-25
Page 73

Chapter 3 RECEIPT ISSUE
7.
The Subtotal screen appears for the settlement.
3-26 Uni-7 User’s Manual
Page 74

Chapter 4 TRACEABILITY PRODUCTS
4
TRACEABILITY PRODUCTS
4.1 REFERING TO PREVIOUS TRACEABILITY DATA
1.
Ensure that the initial screen is displayed.
2.
Enter a desired PLU number using the numeric keys and press the [PLU] key on the key
sheet, or simply press a preset key on the screen where the product is allocated.
EXAMPLE PLU number “6”.
Î
or
3.
When the product is preset as a traceable item, the Traceability screen appears.
Uni-7 User’s Manual 4-1
Page 75

Chapter 4 TRACEABILITY PRODUCTS
4.
To refer to the previously processed traceability data, press the [LIST] button.
5.
The Traceability History screen appears. Then, press to select a desired data field.
6.
The selected data appears. Then, press the [SET] button.
7.
The selected PLU screen appears.
Weighing Unit Price Products
4-2 Uni-7 User’s Manual
Page 76

Chapter 4 TRACEABILITY PRODUCTS
Fixed Price Products
Fixed Unit Price Products
Weighing Fixed Price Products
Uni-7 User’s Manual 4-3
Page 77

Chapter 4 TRACEABILITY PRODUCTS
4.2 CHANGING TRACEABILITY DATA
1.
Ensure that the initial screen is displayed.
2.
Enter a desired PLU number using the numeric keys and press the [PLU] key on the key
sheet, or simply press a preset key on the screen where the product is allocated.
EXAMPLE PLU number “6”.
Î
or
3-1
When the product is preset as a traceable item, the Traceability screen appears.
Then, confirm whether information on the screen is correct or not.
When the data is correct, press the [SET] button.
4-4 Uni-7 User’s Manual
Page 78

Chapter 4 TRACEABILITY PRODUCTS
3-2
If the data is not correct, press to select a desired data field.
EXAMPLE Select “France”.
EXAMPLE Change to “Argentina”.
The data has been changed.
To change the “FACTORY” data, press the corresponding field.
Press to select a desired data field.
Uni-7 User’s Manual 4-5
Page 79

Chapter 4 TRACEABILITY PRODUCTS
The data has been changed. Then, press the [SET] button.
4.
When changing the lot data, press the “LOT” filed.
The Traceability Lot Number Set screen appears.
Change the lot number using the [ABC] [ERASE] and [BACK SPACE] buttons, and press
the [BACK] button to finish.
4-6 Uni-7 User’s Manual
Page 80

Chapter 4 TRACEABILITY PRODUCTS
The confirmation screen appears. Then, press the [SAVE] button to save the data.
The Traceability screen appears. Then, press the [SET] button.
5.
The selected PLU screen appears.
Weighing Unit Price Products
Fixed Price Products
Uni-7 User’s Manual 4-7
Page 81

Chapter 4 TRACEABILITY PRODUCTS
Fixed Unit Price Products
Weighing Fixed Price Products
4-8 Uni-7 User’s Manual
Page 82

Chapter 5 TEMPORARY CHANGE OPERATIONS
5
TEMPORARY CHANGE OPERATIONS
5.1 UNIT PRICE CHANGE
1.
Ensure that the selected PLU screen is displayed.
Weighing Products
Fixed Unit Price Products
2.
Enter a desired unit price using the numeric keys and press the “UNIT PRICE” or “FIXED
UNIT PRICE” field.
EXAMPLE “$3.80”
.
Weighing Products
Uni-7 User’s Manual 5-1
Page 83

Chapter 5 TEMPORARY CHANGE OPERATIONS
Fixed Unit Price Products
5-2 Uni-7 User’s Manual
Page 84

Chapter 5 TEMPORARY CHANGE OPERATIONS
5.2 FIXED PRICE CHANGE
1.
Ensure that the selected PLU screen is displayed.
Fixed Price Products
Weighing Fixed Price Products
2.
Enter a desired price using the numeric keys, and press the “FIXED PRICE” field.
EXAMPLE “$3.80”
.
Fixed Price Products
Uni-7 User’s Manual 5-3
Page 85

Chapter 5 TEMPORARY CHANGE OPERATIONS
Weighing Fixed Price Products
5-4 Uni-7 User’s Manual
Page 86

Chapter 5 TEMPORARY CHANGE OPERATIONS
5.3 AMOUNT DISCOUNT FOR UNIT PRICE
1.
Ensure that the selected PLU screen is displayed.
Weighing Unit Price Products
Fixed Unit Price Products
2.
Enter a desired discount amount using the numeric keys, and press the “-$ (U/P)” field.
EXAMPLE Discount amount “$1.00”.
Weighing Unit Price Products
Uni-7 User’s Manual 5-5
Page 87

Chapter 5 TEMPORARY CHANGE OPERATIONS
Fixed Unit Price Products
5-6 Uni-7 User’s Manual
Page 88

Chapter 5 TEMPORARY CHANGE OPERATIONS
5.4 PERCENT DISCOUNT FOR UNIT PRICE
1.
Ensure that the selected PLU screen is displayed.
Weighing Unit Price Products
Fixed Unit Price Products
2.
Enter a desired discount percentage using the numeric keys on the key sheet, and press
the “-% (U/P)” field.
EXAMPLE Discount percentage “10%”.
Uni-7 User’s Manual 5-7
Page 89

Chapter 5 TEMPORARY CHANGE OPERATIONS
Fixed Unit Price Products
5-8 Uni-7 User’s Manual
Page 90

Chapter 5 TEMPORARY CHANGE OPERATIONS
5.5 AMOUNT DISCOUNT FOR TOTAL PRICE
1.
Ensure that the selected PLU screen is displayed.
Fixed Price Products
Weighing Fixed Price Products
2.
Enter a desired discount amount using the numeric keys, and press the “-$” field.
EXAMPLE Discount amount “$1.00”.
Fixed Price Products
Uni-7 User’s Manual 5-9
Page 91

Chapter 5 TEMPORARY CHANGE OPERATIONS
Weighing Fixed Price Products
5-10 Uni-7 User’s Manual
Page 92

Chapter 5 TEMPORARY CHANGE OPERATIONS
5.6 PERCENT DISCOUNT FOR TOTAL PRICE
1.
Ensure that the selected PLU screen is displayed.
Fixed Price Products
Weighing Fixed Price Products
2.
Enter a desired discount percentage using the numeric keys on the key sheet, and press
the “-%” field.
EXAMPLE Discount percentage “10%”.
Uni-7 User’s Manual 5-11
Page 93

Chapter 5 TEMPORARY CHANGE OPERATIONS
Weighing Fixed Price Products
5-12 Uni-7 User’s Manual
Page 94

Chapter 5 TEMPORARY CHANGE OPERATIONS
5.7 PRODUCT QUANTITY CHANGE
1.
Ensure that the selected PLU screen is displayed.
Fixed Price Products
2.
Enter a desired quantity using the numeric keys, and press the “PCS” field.
EXAMPLE Quantity “2 pieces”
.
3.
To select a desired fix price mark, press the “PCS” field again.
Uni-7 User’s Manual 5-13
Page 95

Chapter 5 TEMPORARY CHANGE OPERATIONS
4.
The Fix Price mark List screen appears. Then, select a desired mark by pressing the
corresponding field.
EXAMPLE Price mark “PC. PCS.”
5-14 Uni-7 User’s Manual
Page 96

Chapter 5 TEMPORARY CHANGE OPERATIONS
5.8 PRINT QUANTITY SETTING
1.
Ensure that the selected PLU screen is displayed and “AUTO” is selected in the Printing
Mode.
Fixed Price Products
2.
Enter a desired number of labels and press the “PRN QTY (Print Quantity)” field on the
screen.
EXAMPLE Print quantity “3”.
3.
Press the [PRINT] key on the key sheet.
The set number of labels will be issued.
Note: To interrupt the issue of labels, press the [PRINT] key again.
To continue the issue of labels, press the [PRINT] key again.
Uni-7 User’s Manual 5-15
Page 97

Chapter 6 SELF-SERVICE OPERATIONS
6
SELF-SERVICE OPERATIONS
6.1 WEIGHING PRODUCTS
1.
Ensure that the initial screen is displayed.
2.
Select a desired product by pressing the corresponding button on the screen.
EXAMPLE Select “Roast Beef”
3.
The selected product screen appears.
Uni-7 User’s Manual 6-1
Page 98

Chapter 6 SELF-SERVICE OPERATIONS
4.
Put a product on the weigh platter.
The weight is measured and the total price is calculated.
5.
Press the [LABEL PRINT] button on the screen to issue the label.
The label is issued.
6-2 Uni-7 User’s Manual
Page 99

Chapter 6 SELF-SERVICE OPERATIONS
6.2 FIXED PRICE PRODUCTS
1.
Ensure that the initial screen is displayed.
2.
Select a desired product by pressing the corresponding button on the screen.
EXAMPLE Select “Roast Beef”
3.
The selected product screen appears.
Then, press the [LABEL PRINT] button on the screen to issue the label.
The label is issued.
Uni-7 User’s Manual 6-3
Page 100

Chapter 7 ACCUMULATOR MODE
ACCUMULATOR MODE
7.1 MANUAL INPUT ACCUMULATION
1.
To get the Operation Menu Select screen, press the [MODE] key on the key sheet.
Then, press the “ACC (Accumulator)” filed.
2.
The Accumulator (Input Number Accumulation) screen appears.
3.
Enter a desired PLU number and press the [PLU] key on the key sheet.
EXAMPLE PLU number “6”.
Î
The Input Number Accumulation screen for the selected product appears.
7
Uni-7 User’s Manual 7-1
 Loading...