


User Manual for
Mendor SMART
Blood Glucose Meter
Model Name: GM01CAB
Manufacturer
43, Banpo-daero 28-gil, Seocho-gu, Seoul 06646,
Korea
i-SENS, Inc.
www.i-sens.com

FOR THE USER OF MENDOR SMART BLOOD GLUCOSE METER
TABLE OF CONTENTS
Thank you for selecting Mendor SMART Blood Glucose Monitoring System.
The system provides you with safe, convenient and painless blood glucose
in vitro (i.e., outside the body) diagnostic monitoring. You can obtain accurate
results in just 5 seconds with a small (0.5 μl) blood sample.
Mendor SMART Blood Glucose Meter is capable of sending test results to
Mendor Balance server by using 3G data transmission. Mendor SMART Blood
Glucose Meter securely uploads and manages blood glucose readings, eliminating the need to maintain personal logbooks.
Information
Table of Contents............................................................................................3
Information: Read This First!...........................................................................4
Important Information.....................................................................................5
Specications.................................................................................................7
Mendor SMART Blood Glucose Monitoring System Components...................8
Warnings........................................................................................................9
Mendor SMART Blood Glucose Meter Test Strip............................................10
Mendor SMART Blood Glucose Meter..........................................................11
Meter Display................................................................................................12
Main Menu....................................................................................................13
Operating Mendor SMART Blood Glucose Meter..........................................16
Basic Settings..............................................................................................17
• Setting up the Date and Time.....................................................17
• Setting up the Audio Function.....................................................20
• Setting up the Alarm...................................................................21
• Network.....................................................................................23
• Synchronize................................................................................24
• Security Token............................................................................25
Preparation
Checking the System....................................................................................26
Control Solution Testing................................................................................27
Testing
Testing Your Blood Glucose...........................................................................30
High and Low Message................................................................................33
Additional Function
Viewing test results in Mendor SMART Blood Glucose Meter’s Memory........34
Messages......................................................................................................35
Charging Mendor SMART Blood Glucose Meter...........................................36
Error messages............................................................................................39
Maintenance
Caring for Your System.................................................................................41
General Trouble shooting..............................................................................42
Performance Characteristics........................................................................43
Warranty Information....................................................................................44
Manufacturer Information..............................................................................45

INFORMATION: READ THIS FIRST!
IMPORTANT INFORMATION
To receive safe and optimum system benets, please read the entire manual
contents before using the system. Please note:
• Do not use the system for the diagnosis of diabetes without the guidance of
a healthcare professional or for testing newborns.
• Use only fresh capillary whole blood samples for testing.
• Wash your hands before each measurement. If water is not available, use
disinfectant wipes with 70 % IPA only, dry your hands carefully.
• Milking of nger may affect result.
The following chart explains the symbols you will nd in Mendor SMART Blood
Glucose Meter’s user manual, product packaging, and product inserts.
• Mendor SMART Blood Glucose Monitoring System is intended for selftesting and for outside of the body (in vitro diagnostic) use.
• The glucose in the blood sample mixes with special chemicals on the test
strip that produce a small electrical current through a reaction called glucose
oxidase. The meter detects this electrical current and measures the amount of
glucose in the blood sample.
• Mendor SMART Blood Glucose Meter is designed to minimize code related errors in monitoring by using the no-coding function.
• The Mendor SMART Blood Glucose Meter should be used only with the Mendor
Test Strips.
• Severe dehydration and excessive water loss may cause false low results.
Warning: For personal use only. Do not share the device with other users.
Very high (over 60%) or very low (under 20%) hematocrit can lead to inaccurate
test results. If you experience symptoms inconsistent with your test results after
following the instructions in this manual, contact your healthcare professional.
Consult instructions for use
Fragile
• Follow your local/country laws and regulations for proper disposal of the meter
including the rechargeable battery.
Caution, consult instructions for use
Temperature limitations
Use by
Do not reuse
Manufacturer
Keep away from sunlight
Do not use if package is
damaged
Sterilised using irradiation
Electric and electronic
waste
• Make sure to charge Mendor SMART Blood Glucose Meter for at least 3
hours before rst use.
• When fully charged, Mendor SMART Blood Glucose Meter will have a standby time of 3 days (8 measurements per day). The battery life-time is approximately
250 measurements. It is recommended that you charge Mendor SMART Blood
Glucose Meter battery at least every 2 days to prevent battery outage.
• If the meter fails to charge, please contact the manufacturer of the blood
glucose meter.
• If this user manual is not complied with the protection provided by the device
Batch code
may be impaired.
• Mendor SMART Blood Glucose Meter’s Test Strips can be used up until the
In vitro diagnostic medical
device
Serial number
Recyclable package
Authorized representative
in the European community
expiration date printed on the test strip vial label if the test strips are used and
stored according to the storage and handling conditions presented in this manual. For detailed storage and usage information for test strips, refer also to the
Mendor SMART Blood Glucose Meter’s Test Strip package insert.
• The equipment complies with applicable EMC emission requirements and it
is testes in dynamic electromagnetic elds according to ISO 15197. The equipment is tested for immunity to electrostatic discarge as specied in IEC 610004-2. Emissions of the energy used are low and not likely to cause interference
4 5

IMPORTANT INFORMATION
Caution:
• Do not expose the meter to direct sunlight or heat for an extended period of
time.
• Prevent the entry of dirt, dust, blood, or water at the meter’s test strip port.
• Do not drop the meter or submit it to strong shocks.
• Do not try to x or alter the meter in any way.
• Keep the meter in a cool and airy place.
• Keep the meter away from strong electromagnetic elds such as cell phones
and microwave ovens.
• Do not let the equipment come into contact with surfaces which are too hot
to touch.
• Do not use this meter in a dry environment, especially if synthetic materials
are present. Synthetic clothes, carpets, etc., may cause damaging static discharges in a dry environment. Do not use this meter near cellular or cordless
telephones, walkie talkies, garage door openers, radio transmitters, or other
electrical or electronical equipment that are sources of electromagnetic radiation,
as these may interfere with the proper operation of the meter.
SPECIFICATIONS
Reported result range
Sample size
Test time
Sample type
Calibration
Assay method
Power
Rated voltage/
Rated current
Memory
Dimension
Weight
Product specications
1.1 - 33.3 mmol/L (20 - 600 mg/dL)
Minimum 0.5 μl
5 seconds
Fresh capillary whole blood
Plasma-equivalent
Electrochemical
3.7 V / 580m A, Lithium-polymer battery
(Rechargeable type)
5.0 V / 0.5 A
(Charging with micro USB cable)
500 test results
100.5 mm (height) x 48.0 mm (width) x 18.5 mm
(thickness)
59.1g (with battery)
Operating ranges
NOTE! If you need assistance with using the Mendor SMART Blood Glucose
Temperature
5 - 50 °C (41-122 °F)
Meter, please, contact the manufacturer.
Relative humidity
Hematocrit
6 7
10 - 90 %
20 - 60 %

MENDOR SMART BLOOD GLUCOSE MONITORING SYSTEM COMPONENTS
WARNINGS
Components (provided by the manufacturer):
• Mendor SMART Blood Glucose Meter (rechargeable battery included)
• Mendor SMART Blood Glucose Meter Test Strips
• User manual
• Micro USB cable
Certain components may not be included depending on the place of purchase.
Additionally:
• In order to to clean Mendor SMART Blood Glucose Meter you need 70%
isopropyl alcohol available in local pharmacies.
• In order to to test Mendor SMART Blood Glucose Meter fucntioning you
need Mendor SMART Blood Glucose Meter Control Solution available from the
manufacturer.
NOTE! Please check the completeness and condition of delivery and contact the
manufacturer of the blood glucose meter if any component is missing or damaged.
NOTE! Please contact your healthcare professional for more information about
local disposal requirements for the meter.
Read through the warnings before using the device. Basic safety precautions
should be taken before using the device including those listed in the Warnings.
The Mendor SMART Blood Glucose Meter Test Strips shall be used only with
fresh capillary whole blood samples. Do not use venous or arterial blood samples.
Mendor SMART Blood Glucose Meter may lose current displaying data (just
measurement data) when battery power is extremely low.
Do not test while the battery is being charged.
Do not reuse test strips.
Do not use test strips past the expiration date.
Do not try to open the battery cover or replace the battery. The battery can
not be replaced by user.
Store Mendor SMART Blood Glucose Meter at a temperature of 0 - 35 ˚C
(32 - 95 ˚F).
Store test strips in a cool and dry place at a temperature of 1- 30 ˚C (34 - 86 ˚F).
Keep test strips away from direct sunlight or heat and do not freeze.
Store test strips only in their original vial.
Close the vial tightly immediately after removing a test strip for testing.
Do not bend, cut, or alter test strips in any way.
Handle test strips only with clean and dry hands.
Keep test strips and the test strip vial away from children. The test strips and vial
cap may be choking hazards.
Drying agents in the bottle cap may be harmful if inhaled or swallowed, or may
cause skin or eye irritation.
Use this equipment for that purpose only described in this user manual.
Do not use accessories which are not recommended in this user manual.
Do not use the equipment if it is not working properly or it is visibly broken.
Do not insert anything into the device’s ports if this is not specically instructed.
KEEP THESE INSTRUCTIONS!
8 9

MENDOR SMART BLOOD GLUCOSE METER TEST STRIP
The Mendor SMART Blood Glucose Meter Test Strip supports the accurate
measurement of blood glucose levels in a capillary whole blood sample.
MENDOR SMART BLOOD GLUCOSE METER
Mendor
SMART
Test Strip Vial
Contact bars
Gently push the test strip,
with its contact bars facing
up, into the test strip port of
the meter.
Conrmation window
Check here to see whether
sufcient blood sample has
been applied.
Edge to apply blood sample
Apply blood sample here
for testing.
Detachable vial cap
Meter Display
Display results
and messages.
Up/Down Button
Select or change
cursor or value.
Back Button
Back to the
previous menu.
Test Strip Port
Insert the test
strip here.
Sim Card Slot
Insert mobile
SIM card.
Button
Turn on/off the meter
by pressing the button
for 3 seconds.
Also, used for menu
selection conrmation.
Micro USB Port
Charge battery or
transfer data from
the meter to PC.
10 11

METER DISPLAY
MAIN MENU
Main Menu
The main menu is composed of symbols as shown in the picture below.
Using “ ”, “ ”, and “ ” button, you can enter into each menu.
Sound On/Off
Displays the status
of the sound function.
PP2 Alarm
Appears when the alarm
has been set remotely
using Mendor Balance.
Alarm Symbol
Appears when alarm
has been set.
Year/Month/Day
Displays set date.
Test Wizard
Provides easy
step instructions
for measuring.
Messages
Provides Mendor
Balance server
messages.
Message
Appears when a new
message has been
sent.
Airplane Mode
Displays the status of
the Airplane mode.
Battery Icon
Indicates battery level.
Hour/Minute
Displays set time.
History
Displays the test
results in the meter’s
memory.
Settings
To set e.g. date, time,
sound and alarm.
History
When you select History menu, the screen is displayed as shown in the picture
below.
You can then check measured test results on the screen by using the “ “ button.
Scroll down to see old test results.
Latest measured result
Displays latest stored
result.
20.5
6.3
2.1
Mendor SMART Blood Glucose Meter provides the blood glucose values in
3 different colors (orange, blue and red) to indicate different blood glucose
levels, as following:
• Orange for measurements above 15 mmol/L (270 mg/dL)
• Blue for measurements above and equal to 4 mmol/L (72 mg/dL) and below
and equal to 15 mmol/L (270 mg/dL)
• Red color for measurements below 4 mmol/L (72 mg/dL)
mmol/L
mmol/L
mmol/L
12 13

MAIN MENU
MAIN MENU
Test Wizard
When you select Test Wizard menu, the meter gives stepwise instructions
for the blood glucose measurement with pictures.
Before testing please see section “Testing your blood glucose”
Insertion stage
Insert the test strip with
contact bars facing upwards.
Settings
In Setting mode, you can set Date/Time, Sound, Alarm, Network, Synchronize and
Security Token.
Sound
Set up Audio
Function and
adjust volume.
Date/Time
Set up current date
and time.
Choose from 12 or
24 Hour setting and
Date notation.
Alarm
Set up alarm.
Network
Switch connection On / Off.
Synchronize
Synchronize meter
Security Token
Retrieve Security
with the Mendor
Balance service.
Token for connecting
the meter to Mendor
Balance.
14 15

OPERATING MENDOR SMART BLOOD GLUCOSE METER
BASIC SETTINGS
Turn on Mendor SMART Blood Glucose Meter
You can start Mendor SMART Blood Glucose
Meter by pressing the “ “ button for 3 seconds
and the display will turn on. When the progress
bar animation completes loading, you are ready to
use Mendor SMART Blood Glucose Meter.
Turn off Mendor SMART Blood Glucose Meter
See details in section “Testing Your Blood Glucose”.
When using the Mendor SMART Blood Glucose Meter for the rst time, please,
check and update the meter’s settings prior to using the meter.
Setting up the Date and Time
Step 1: Enter the Settings mode
To enter the setting mode on the main menu, press
the “ ”, “ ” button to position the cursor at “Setting”.
Then, press “ ” button and the meter will be in the
setting mode.
Step 2: Enter the Time Settings
Enter the Time setting mode, by moving the cursor to
“Time Setting” and then press the “ ” button to open
the menu where you can adjust the time.
Step 3: Select Time Setting type
In the Time setting mode, you can select Time setting
type (Auto or Manual) by pressing “ ”, ” ”, and ” ”
buttons.
16 17

BASIC SETTINGS
Step 3a: Auto Set mode
In Auto set mode, by pressing
“Agree” button, the meter sets
automatically to the local timezone. This includes daylight
saving.
BASIC SETTINGS
Step 5: Setting the Time Format
The meter provides two options for your convenience.
You can choose from “12-Hour” or “24-Hour” option.
12 Hour format is displayed as “HH:MM AM/PM”
while 24 Hour format is displayed as “HH:MM”.
OK
Cancel
Step 3b: Manual Set mode
In Manual Set mode you can adjust
the current year, month, day and
time by pressing “ ”, ” ”, and
” ” buttons.
Step 4: Entering the Time Format
In this screen the set time and the current time
format is displayed. You can set the time format
by pressing time format button.
Step 6: Setting the Date notation
The meter provides three options
for your convenience. You can
choose from “yyyy/mm/dd” or
“mm/dd/yyy” or “dd/mm/yyyy”
option.
For example, “yyyy/mm/dd”
format is displayed as
“2014/01/17”.
18 19

BASIC SETTINGS
BASIC SETTINGS
Setting up the Audio function
Step 1: Setting the Sound (Beep)
Enter the Sound mode.
The meter provides 2 different sound options: On and
Off. If the Sound is turned “On” the meter makes the
“beep” sound at certain steps when measuring
the blood glucose level. (Turning on the meter, inserting
the strip, starting Countdown, the test result appears)
Step 2: Deactivating the Sound function (Mute)
Selecting the “Off” button will deactivate (Mute)
the sound function.
Setting up the Alarm
Step 1: Entering the Alarm settings
In this mode, you can select from Alarm or Result Alarm.
Step 2: Entering the Alarm
On the Alarm screen, press “+Add” to set up the alarm
time.
Step 3: Setting the Alarm
You can select the hour by pressing “ ” button then
others selections will become blurred.
Adjust hour setting by pressing “ ” and “ ” buttons
and pressing “ ” button to conrm hour setting.
For other settings, do the same as above.
Also you can select from “On” or “Off” or “Delete”.
If you select “Off” or “ ” button, this alarm is
deactivated and the time setting is saved.
If you selects “Delete”, this alarm is deleted.
20 21

BASIC SETTINGS
BASIC SETTINGS
Step 4: Checking the Alarm
In this mode, you can see current alarm setting. Check
marks indicates that “This alarm is activated.“ Mendor
SMART Blood Glucose Meter provides up to 3 regular
alarms. If you set up 3 normal alarms, “+Add” is deactivated (greyed) as shown on the right.
Step 5: Entering the Result Alarm
In this mode you can activate or deactivate a beep
sound to indicate a result that is too high (over 15
mmol/L, 270 mg/dL) or too low (below 4 mmol/L, 72
mg/dL). Select “On” to activate the function or select
“Off” to deactivate it.
Please note, that by turning the sound function “Off”,
you also turn off the Result Alarm.
Exiting from Settings
After completing meter setting, press the “ ” button to exit from Settings.
Network
Step 1: Enter the Network Settings
Enter the Network settings by moving the cursor to
“Network” and pressing the “ “ button.
In the Network settings you can switch the meter’s
network connectivity on or off (airplane mode).
Step 2: Switching the Network connectivity On/Off
To switch the meter’s network connectivity off, move the
cursor to “Off” and press the “ “ button. An airplane
symbol appears to the upper edge of the display,
indicating that the meter is now in airplane mode.
To switch the meter’s network connectivity back on,
move the cursor to “On” and press the “ “ button.
Please note that when your meter is connected to
a Balance account, all the measurements you have
made in airplane mode will be uploaded to your
account at the same time once you do a
measurement or use the Synchronize function
with the network connectivity switched on again.
22 23

BASIC SETTINGS
BASIC SETTINGS
Synchronize
Step 1: Synchronizing the meter with Balance
When using the meter with Balance, the Synchronize
function can be used to upload measurements from the
meter’s memory to your Balance account (if you have
been using the meter in airplane mode or out of network range), as well as synchronizing alarms and messages when you are doing a glucose proling program
in Balance.
To synchronize the meter with Balance, move the cursor to “Synchronize” and press the “ “ button. You will
see the loading circle and the text “Please wait” while
the meter synchronizes.
Step 2: Synchronization complete
Once the synchronization is complete, you will see the
text “Your meter has been successfully synchronized”.
Press the “ “ button to get back to the Settings menu.
Security Token
Step 1: Retrieving the Security Token
Security Token is a code which is needed for connecting the meter to a Balance account. Move the cursor to
“Security Token” and press the “ “ button to retrieve
the code. You will see the loading circle and the text
“Please wait” while the Security Token is being retrieved.
Step 2: Security Token received
After a little while you can see the Security Token in the
display. You can use the token to connect the meter
while creating a new Balance account, or you can
connect the meter to an already existing account.
One meter can only be connected to one account
at a time.
The Security Token needs to be retrieved only once
when you start using the meter with Balance.
Please note that the Security Token is valid for one
hour after retrieval – if you don’t connect the meter
to a Balance account within that time, you need to
retrieve a new Security Token.
24 25

CHECKING THE SYSTEM
CONTROL SOLUTION TESTING
History
You may check your meter and test strips using Mendor SMART
Checking with control solution
Step 1
Blood Glucose Meter Control Solution, which contains a known
amount of glucose and is used to check that the meter and the
test strips are working properly. The test strip vials have Mendor
SMART Blood Glucose Meter Control Solution ranges printed
on their labels.
Compare the result displayed on the meter to Mendor SMART
Insert a test strip with contact bars facing upwards
into the strip port. Push the strip gently until the
meter beeps. The meter will automatically turn on
and the blood symbol will appear indicating the
meter is ready to test blood glucose”
Blood Glucose Meter Control Solution range printed on the test
strip vial. Before using a new meter or a new vial of test strips,
conduct a control solution test following the procedure on page
25 - 26.
Notes:
• Use only Mendor SMART Blood Glucose Meter Control Solution.
• Check the expiration date printed on the bottle.
When you rst open the control solution bottle, record the discard date
(date opened plus 3 months) in the space provided on the label.
• Make sure your meter, test strips, and control solution are at room temperature
before testing. Control solution tests must be done at room temperature (20 -
Step 2
In measurement mode, you can switch to control
solution mode pressing “ ” button for 3 seconds.
You should use the proper control solution.
When the screen display is as shown on the right,
apply the control solution to the test strip.
25 ˚C, 68 - 77 ˚F).
• Before using the control solution, shake the bottle, discard rst few drops
and wipe the tip clean.
• Close the control solution bottle tightly and store at a temperature of 8 - 30 ˚C
(46 - 86 ˚F).
Step 3
Do a control solution test:
• When using the meter for the rst time.
• Whenever you open a new vial of test strips.
• If the meter or test strips do not function properly.
• If your symptoms are inconsistent with the blood glucose test results
and you feel that the meter or test strips are not working properly.
• If you drop the meter or suspect the meter has been damaged.
Shake the control solution bottle
well. Discard the rst drop of control
solution and squeeze a small drop
of the control solution on a clean
non absorbent surface, such as
the cleaned cap of control solution
bottle. Apply the control solution
NOTE! Mendor SMART Blood Glucose Meter Control Solution and Strips can
be purchased separately. Please contact the manufacturer of the blood glucose
meter.
26 27
to the narrow edge of the test strip
until the meter beeps.
Make sure the conrmation window
lls completely.

CONTROL SOLUTION TESTING
Step 4:
The test result will appear after the meter counts
down from ve (5) to one (1) in 5 seconds.
You can see the control solution mark “Check” on
screen. In this case, the result is stored in the meter
memory but not included in the averages.
Step 5
Compare the result with the control solution
range printed on the Mendor SMART Blood Glucose
Meter Test Strip bag. The result should fall within that
range. Used strips should be discarded safely in dis-
6.7
mmol/L
CONTROL SOLUTION TESTING
Comparing the Control Solution Results
If your control solution test results do not fall within the range printed on the
test strip vial, repeat the test. Out of range results may occur due to the following
factors:
• When the control solution bottle was not shaken well
• When the control solution is past its expiration date or is contaminated
• When the meter, the strip or the control solution were exposed to high or
low temperatures
• When the rst few drops of the control solution were not discarded, or the tip
of the vial was not wiped clean
• When the test strip is past its expiration date
• When the meter is not functioning properly
NOTE! If you cannot perform an acceptable control measurement (that falls
within the control range) do not use the blood glucose monitoring system and
contact the manufacturer of the blood glucose meter.
28 29

TESTING YOUR BLOOD GLUCOSE
TESTING YOUR BLOOD GLUCOSE
Small children (under the age of 10) and handicapped or invalid persons need to
be supervised when they use the equipment.
Preparing the Meter and Test Strip
Step 1
Prepare the usable test strip and lancet. Insert a test
strip with contact bars facing up into the strip port.
Push the strip gently until the meter beeps. The blood
symbol will appear indicating that the meter is ready to
test.
Step 2
The meter is ready for the blood sample.
In this mode, you may switch to control solution
mode by pressing “ ” button for 3 seconds, see
Control Solution Testing for more detailed information.
Applying Blood Sample
Step 3
Obtain a blood sample using a lancing device. Wait a few seconds for a
blood drop to form. A minimum volume of 0.5 micro liter is needed to do the
test. (actual size of 0.5 μl: ). Always use a fresh sample for the measurement.
Step 4
While the symbol is blinking, apply the blood sample to
the narrow edge of the test strip untill the meter beeps.
If the conrmation window is not lled in time because
of abnormal viscosity or insufcient volume, an error
message will appear.
NOTE! The meter may switch off if the blood sample is not applied within
2 minutes of the “apply blood sample” screen. If the meter turns off, press “ “
button or remove and reinsert the un-used strip to turn on the meter.
30 31

TESTING YOUR BLOOD GLUCOSE
HIGH AND LOW MESSAGE
Step 5
The test result (in mmol/L) will
appear after the meter counts
down from ve to one (5-to-1).
The result is equivalent to your
plasma glucose concentration.
Step 6
After nishing the test, remove the test strip
6.2
mmol/L
6.2
mmol/L
Mendor SMART Blood Glucose Meter displays test results between 1.1 -
33.3 mmol/L (20 - 600 mg/dL). Please refer to the instructions below, if you
receive a High or Low message.
High Message
The “High” message appears when the blood glucose level is above 33.3 mmol/L (600 mg/dL) and
may indicate hyperglycemia (high blood glucose).
If the “Hi” message is displayed again on retesting,
please contact your healthcare professional
immediately.
33.3 mmol/L
Low Message
The “Low” message appears when the blood
glucose Level is below than 1.1 mmol/L (20 mg/dL)
and indicates hypoglycemia (low blood glucose).
If the “Low” message is displayed again on retesting,
please contact your healthcare professional
immediately.
1.1 mmol/L
NOTE! If the HIGH/LOW messages persist after measuring several times and
your feelings do not match with the results contact your healthcare professional.
NOTE! Follow the instructions given by your physician when interpreting the re-
sults. Do not alter your treatment on the basis of meter readings before consulting
your healthcare professional.
If an error message appears see section “Error Messages”.
32 33

VIEWING TEST RESULTS IN MENDOR SMART BLOOD GLUCOSE METER’S
MEMORY
Mendor SMART Blood Glucose Meter stores the last 500 glucose test results
with time and date. If the memory is full, the oldest test result will be replaced by
new test results. Mendor SMART Blood Glucose Meter also calculates averages
from last 1/7/14/30/90 days starting from the current time and date shown on the
meter. The following gives you instructions to view the test results.
Step 1: Viewing the measurement result history
Entering the History menu, you can check your measured
test results on the screen as shown on the right.
You can move in the menu by pressing the “ “ and
“ “ buttons.
Test results are provided with measurement date,
20.5
6.3
2.1
mmol/L
mmol/L
mmol/L
check mark and colored letters. You can check
your average data by pressing “ ” button.
Step 2: Viewing the measurement result averages
Press “ ” button when you have entered the History
menu (screen looks like Step 1), now you can check your
1/7/14/30/90 day average results.
You can see 90 day average result by pressing
“ ” button.
6.3
6.3
mmol/L
mmol/L
MESSAGES
Step 1
On the Message menu,
you can see messages regarding the monitoring of your blood
glucose levels sent from Mendor
Balance server. By pressing “ ”
button, you can see the
messages.
6.3
mmol/L
6.3
mmol/L
Exiting from History
Press back button to exit from history to main menu or to turn off the meter by
pressing “ ” button for 3 seconds.
34 35

CHARGING MENDOR SMART BLOOD GLUCOSE METER
CHARGING MENDOR SMART BLOOD GLUCOSE METER
Step 1
Connect the end of the micro USB cable to the meter charging port. Then plug the
other end of the cable to the USB port on your computer or other powered USB
socket. The meter charging port is located on the bottom of the meter. Once the
micro USB cable is plugged in, the meter displays USB connection status as below.
Once the meter is connected, it is going to start charging and the charging icon will
be displayed on the screen.
Step 2
Mendor SMART Blood Glucose Meter displays the battery status with 6 image
Battery status
0 - 10 %
11- 20 %
21 - 40 %
Without
charging
(Status bar)
With charging
(Whole Display)
Battery status
41 - 80 %
81 - 99 %
100 %
Without
charging
(Status bar)
With charging
Plug into your
computer
Plug into the meter’s
Charging port
(Whole Display)
When the meter is on, the battery icon is shown in the top right corner.
The icon shows the battery power status.
36 37
CHARGING MENDOR SMART BLOOD GLUCOSE METER
ERROR MESSAGES
When the meter starts charging, the battery icon and its status will be displayed
on the screen as shown on the previous page.
Caution:
• Only use provided Micro USB cable.
• Do not charge the meter in high humidity or in a wet area.
• Do not use the Micro USB cable if it is damaged, abnormally hot or discolored.
• Do not allow children to charge the meter.
• Do not insert Test strip while the meter is charging.
• Before charging the meter, check that the supply voltage is correct.
• When charging the meter, plug the equipment into a supply outlet which has an
earth connection.
• Do not place the equipment in liquid, nor put it where it could fall into liquid. If
the equipment becomes wet, unplug it before touching it.
• Do not leave the equipment unattended for long periods of time while it is
plugged in.
• While charging the meter, do not place anything on top of the equipment.
• DANGER – Misuse of electrical equipment can cause electrocution, burns, re
and other HAZARDS.
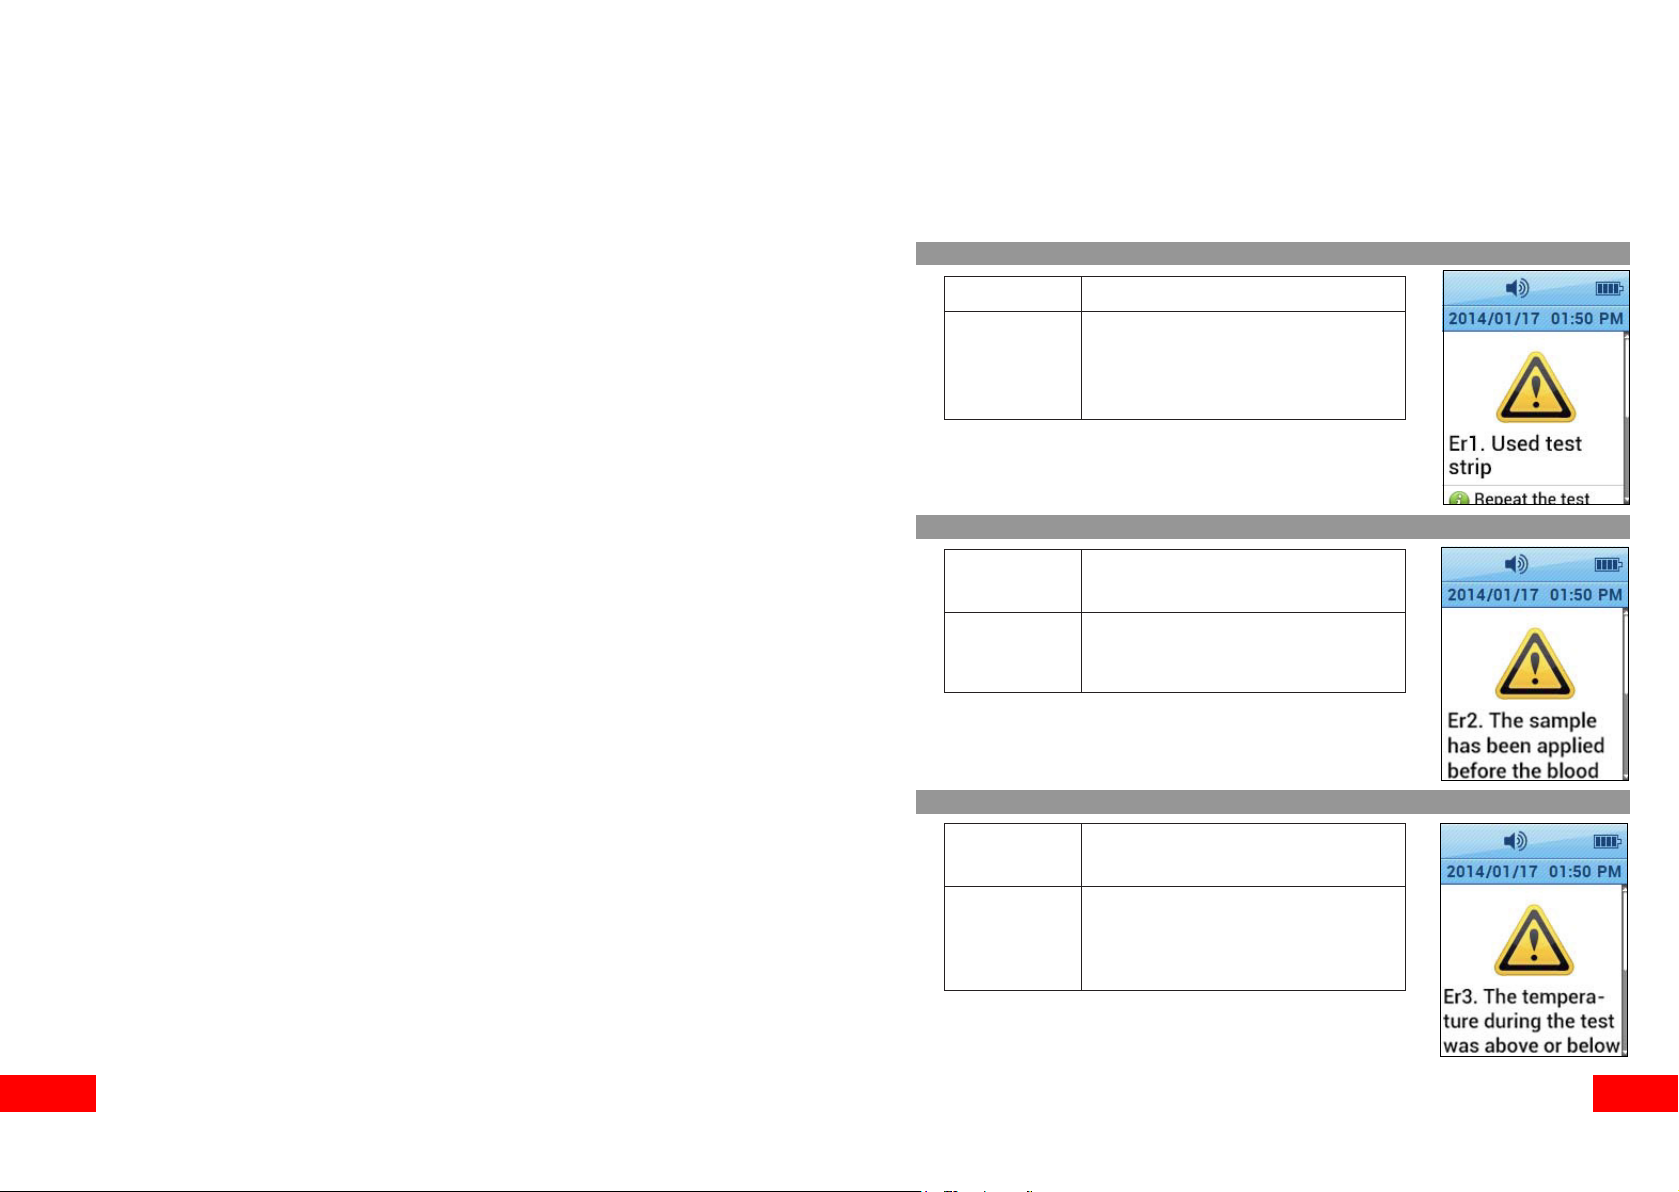
If error occurs while using the meter, the error screen is displayed and the meter provides a quick solution for resolving the problem.
Error 1
Cause
Solution
Used test strip
Repeat the test with a new test
strip.
Error 2
Cause
The sample has been applied
before the blood symbol appeared.
Solution
Repeat the test with a new test
strip and wait until the blood
symbol appears.
Error 3
Cause
Solution
The temperature during the test was
above or below the operating range.
Move to an area where the temperature is within the operating
range (5 - 50 °C / 41-122 °F) and
repeat the test after 30 minutes.
38 39

ERROR MESSAGES
CARING FOR YOUR SYSTEM
Error 4
Cause
Solution
Error 5
Cause
Solution
Error 6
The sample was not large enough
or it was too thick.
Repeat the test with a new
test strip.
Strip insertion error.
Please insert a Mendor test
strip properly.
Use a soft cloth or tissue to wipe the meter exterior. If necessary, the soft cloth
or tissue might be dipped in a small amount of 70% isopropyl alcohol. Do not
use organic solvents such as benzene, acetone, or household and industrial
cleaners that may cause irreparable damage to the meter. Store all the meter
components in the portable case to prevent loss.
Cause
Solution
Meter failure.
Contact the manufacturer of the
blood glucose meter.
NOTE! You can see quick solution by pressing “ ” button (scroll the display).
NOTE! If the error messages persist, please contact the manufacturer of the
blood glucose meter.
40 41

GENERAL TROUBLE SHOOTING
Problem Troubleshooting
The display is blank
even after inserting a
test strip.
The test does not start
even after applying the
Check whether the test strip is inserted with the
contact bars facing up. Check if the strip has been
inserted completely till the end.
Check if the conrmation window is lled adequately.
Repeat the test after inserting a new test strip.
blood sample on the
strip.
The test result does
not match your
expectation.
Repeat the test after inserting a new test strip.
Check the validity period of the test strip.
Perform a test with control solution to verify the
strips are OK.
Check the meter.
PERFORMANCE CHARACTERISTICS
The performance of Mendor SMART Blood Glucose Monitoring System has
been evaluated in laboratory and in clinical tests.
Accuracy:
The accuracy of Mendor SMART Blood Glucose Meter System
(Model:GM01CAB/GM01CAD) was assessed by comparing blood glucose
results obtained by patients with those obtained using a YSI Model 2300
Glucose Analyzer, a laboratory instrument. The following Results were
obtained by 100 diabetic patients at clinic centers.
System accuracy results for glucose concentration < 4.17 mmol/L (< 75 mg/dL)
Within ±0.28 mmol/L
(Within 5 mg/dL)
74/96 (77.1%)
Within ±0.56 mmol/L
(Within 10 mg/dL)
94/96 (97.9%)
Within ±0.83 mmol/L
(Within 15 mg/dL)
96/96 (100%)
System accuracy results for glucose concentration ≥ 4.17 mmol/L (≥ 75 mg/dL)
Within ± 5 %
249/504 (49.4%)
Within ± 10 %
401/504 (79.6%)
Within ± 20 %
493/504 (97.8%)
Within ± 20 %
504/504 (100%)
Results from repeatibility evaluation
Interval
1
2
3
4
5
Glucose concentration mmol/L
1.7 to 2.8
2.9 to 6.1
6.2 to 8.3
8.4 to 13.9
14.0 to 22.2
Pooled SD or CV
0.1 mmol/L
0.1 mmol/L
2.8 %
2.7 %
3.0 %
NOTE! If the problem is not resolved, please contact the manufacturer of the
blood glucose meter.
42 43

WARRANTY INFORMATION
MANUFACTURER INFORMATION
Manufacturer’s Warranty
Mendor warrants that the meter shall be free of defects in material and workmanship in normal use for a period of two (2) years. The meter must have been
subjected to normal use.
The warranty does not cover improper handling, tampering use or service of
the meter. All claim must be made within the warranty period. Mendor will, at
its discretion, repair or replace a defective meter or meter part that is covered
by this warranty. As a matter of warranty policy, Mendor will not reimburse the
consumer’s purchase price.
Obtaining Warranty Service
To obtain warranty service, you must return the defective meter or meter part
along with proof of purchase to the manufacturer.
i-SENS, Inc.
43, Banpo-daero 28-gil, Seocho-gu,
Seoul 06646, Korea
tel. 1-800-429-5001
www.i-sens.com
Manufacturer
i-SENS, Inc.
www.i-sens.com
43, Banpo-daero 28-gil, Seocho-gu, Seoul 06646,
Korea
44 45
Art. PM062011L04_A Rev. 10/14

FCC Part 15.19
This device complies with part 15 of the FCC Rules. Operation is subject to the following two conditions: (1) This device
may not cause harmful interference, and (2) this device must accept any interference received, including interference that
may cause undesired operation.
FCC Part 15.21
Any changes or modifications (including the antennas) to this device that are not expressly approved by the manufacturer
may void the user's authority to operate the equipment.
FCC Part 15.105 (B)
Note : This equipment has been tested and found to comply with the limits for a Class B digital device, pursuant to part 15
of the FCC Rules. These limits
are designed to provide reasonable protection against harmful interference in a residential installation This equipment
generates, uses and can radiate radio frequency energy and, if not installed and used in accordance with the instructions,
may cause harmful interference to radio communications,
However, there is no guarantee that interference will not occur in a particular installation. If this equipment does cause
harmful interference to radio or television reception, which can be determined by turning the equipment off and on, the user
is encouraged to try to correct the interference by one or more of the following measures:
- Reorient or relocate the receiving antenna.
- Increase the separation between the equipment and receiver.
- Connect the equipment into an outlet on a circuit different from that to which the receiver is connected.
- Consult the dealer or an experienced radio/TV technician for help.
Modifications not expressly approved by the manufacturer could void the user authority to the operated equipment under
FCC rules.
RF Exposure Statement (2.1093)
This equipment complies with FCC RF Radiation exposure limits set forth for an uncontrolled environment. This device and
its antenna must not be co-located or operating in conjunction with any other antenna or transmitter.
This equipment should be installed and operated with a minimum distance of 5mm between the radiator and your body.
 Loading...